


Document Name Nahimic 3 User guide Document Version 1.0 Document Creation Date 13 Dec 2017 Document Modification Date 18 Dec 2017 Document Author Maïté HOSTE [PM] Document Validation Product Name Nahimic 3 Product Version 1.0.0 Release Date December 2017 Release Author This document is the property of A Volute, Nahimic EU 17 rue de la Ladrie 59650 Villeneuve d’Ascq, France +33 3 20 91 78 69
13/12/2017 Nahimic 3 User Guide Page 1 of 22 Contents Introduction.................................................................................................................................................3 Designing the Nahimic 3 UI 3 System requirements 3 Installation and update.........................................................................................................................4 Navigation 5 Main window...........................................................................................................................................5 Audio 5 Microphone 5 Sound Tracker .........................................................................................................................................6 Settings 6 Main window...............................................................................................................................................7 Background process 7 Launch 7 Audio.............................................................................................................................................................8 1 – Device display and volume 8 2 – Mute....................................................................................................................................................8 3 Audio profiles 8 4 – On / Off button ................................................................................................................................8 5 Surround Sound...............................................................................................................................9 6 – Volume Stabilizer 9 7 – Voices..................................................................................................................................................9 8 Bass 9 9 – Treble..................................................................................................................................................9 10 Reset ...............................................................................................................................................10 11 – Try 10 Microphone................................................................................................................................................11 1 Device display and volume 11 2 – Mute..................................................................................................................................................11 3 Mic profiles 11 4 – On / Off button 11 5 Static Noise Suppression..............................................................................................................12
13/12/2017 Nahimic 3 User Guide Page 2 of 22 6 – Echo Cancellation...........................................................................................................................12 7 Lateral Sound Cancellation..........................................................................................................12 8 – Voice Stabilizer 12 9 Reset .................................................................................................................................................12 10 Try 12 Sound Tracker ...........................................................................................................................................13 1 ON / OFF button 13 2- Try 13 3 Sound Tracker ..................................................................................................................................14 4 Scale 14 5 Transparency....................................................................................................................................14 6 Color 14 7- Compatible games 14 Settings.......................................................................................................................................................15 1- Language 15 2 Version and website .......................................................................................................................15 3 Social media 15 4- Help us improve Nahimic 16 5 Support..............................................................................................................................................16 Default settings 17 FAQ ..............................................................................................................................................................18 Audio and microphone effects 18 Sound Tracker .......................................................................................................................................18 Device management............................................................................................................................19
Introduction
Welcome to the Nahimic 3 user guide for Windows® This document will introduce you to its main features.
Nahimic 3 is a software designed to offer the best audio experience, thanks to the following features.
Audio effects for playback devices including:
Surround Sound, Volume Stabilizer, Voices, Bass and Treble
X4 factory profiles (Music, Gaming, Movie, Communication)
Reset option
Test button for each profile
Global On/Off button
Microphone effects for capture devices including:
Static Noise Suppression, Echo Cancellation, Lateral Noise Cancellation and Voice Stabilizer
X2 factory profiles (Chat, Conference)
Reset option
Test button (loopback)
Global On/Off button
Sound Tracker including:
Drag and drop positioning
Transparency and scale sliders
Button to customize the color
Test button
On/Off button
Designing the Nahimic 3 UI
Nahimic 3 is a UWP application designed to follow Windows® 10 design guidelines as closely as possible in order to provide a consistent and up to date user experience.
System requirements
13/12/2017 Nahimic 3 User Guide Page 3 of 22
Nahimic 3 is optimized for Windows® 10 RS3 (32 and 64 bit)
Installation and update
Nahimic 3 is included in the drivers of your MSI device. If you need to install it or update it, please use the drivers supplied with your MSI device or download it from the Windows Store.
13/12/2017 Nahimic 3 User Guide Page 4 of 22
Navigation
Main window
Nahimic 3’s UI is composed of 4 tabs (Audio, Microphone, Sound Tracker and Settings).


Audio
From this tab, you can access all audio features
Microphone
From this tab, you can access all microphone features
13/12/2017 Nahimic 3 User Guide Page 5 of 22
Sound Tracker


From this tab, you can access all options to configure the Sound Tracker.
Settings
From this tab, you can access all settings and information of the software
13/12/2017 Nahimic 3 User Guide Page 6 of 22
Main window Background process
Nahimic 3 is automatically launched when your computer starts
At this point, Nahimic 3 runs in the background this is required to keep the effects and features enabled
If the Nahimic 3 main window is opened and you close it, Nahimic 3 will keep running in the background.
If you want to reopen Nahimic 3’s UI, just proceed as explained in the following points
Launch
Nahimic 3’s UI can be opened and displayed from Windows® search bar:

13/12/2017 Nahimic 3 User Guide Page 7 of 22
Audio
1 – Device display and volume
Displays the type of audio device currently being used as output, as well as its current volume.
2 – Mute
Mutes the current audio device.
3 – Audio profiles

Allows you to choose between 4 factory audio profiles to fit your multimedia experience (Music, Gaming, Movie or Communication) All profiles can be modified as you wish
4 – On / Off button
Allows you to turn all of Nahimic 3’s audio effects on and off in one click.
13/12/2017 Nahimic 3 User Guide Page 8 of 22
5 – Surround Sound
Surround Sound is an audio effect mainly dedicated to headphones acoustic experience. Here is what it does.
• Gaming and Movies
Virtualizes the multichannel audio stream from the game engine or the movie soundtrack and downmixes it in order to retrieve a multichannel listening experience over your stereo headphones or speakers.
• Music
Expands the stereo for a wider sound stage.
6 Volume Stabilizer
This compressor maintains a constant volume for all elements of the audio experience (dialogs, soundtrack, explosions, etc.) to make them all sound softer, balanced or louder The Quiet On / Off option allows to enter a night mode by removing some basses. This way, you won’t disturb people around you if you’re using speakers to play your media.
7 – Voices
Boosts (or removes) the speech in movies, video games and incoming communication from 12 to +12 dB.
8 – Bass
Increases (or decreases) the energy in low frequencies from 12 to +12 dB
9 – Treble
Increases (or decreases) the energy in high frequencies from 12 to +12 dB.
13/12/2017 Nahimic 3 User Guide Page 9 of 22
10 – Reset
Restores the current profile to its default settings
11 – Try
Launches an audio sample that allows to test audio settings.
13/12/2017 Nahimic 3 User Guide Page 10 of 22
Microphone
1 – Device display and volume
Displays the type of recording device currently being used as input, as well as its current volume.
2 – Mute
Mutes the current mic device.
3 – Mic profiles

Allows you to choose between 2 factory mic profiles to fit your experience (Chat or Conference) All profiles can be modified as you wish.
4 On / Off button
13/12/2017 Nahimic 3 User Guide Page 11 of 22
Allows you to turn on and off all Nahimic 3’s microphone effects in one click.
5 – Static Noise Suppression
The Static Noise Suppression removes the static noises like the ones coming from your computer fans.
6 Echo Cancellation
Improves the voice quality by cancelling the echo
7 – Lateral Sound Cancellation
Only records the sound coming from the front of your microphone.
8 – Voice Stabilizer
Levels the volume of your voice in order to avoid any saturation and maintains a constant and clear communication.
9 – Reset
Restores the current profile to its default settings
10 – Try
Turns the microphone loopback On/Off.
13/12/2017 Nahimic 3 User Guide Page 12 of 22
Sound Tracker
The Sound Tracker is an FPS oriented feature that provides a visual indication localizing the sources of the sounds while in a game. These are represented by dynamic segments pointing the direction of the sounds: the more opaque they are, the stronger the sounds are. Thanks to this feature, players are able to pick up an approaching threat more definitively and easily, thereby being even more dynamic.

The Sound Tracker captures the 5.1 and 7.1 sound streams processed by your audio system, and is displayed in all applications and games using DirectX 9, 9c, 10 and 11. You can refer to the official games list that is supported by the Sound Tracker by clicking the link on the top right of the screen
1- ON / OFF button
You can disable the Sound Tracker by switching this option OFF.
2- Try
13/12/2017 Nahimic 3 User Guide Page 13 of 22
Launch a 7.1 audio sample allowing you to preview how the radar will react in your game.
3- Sound Tracker
You can place the Sound Tracker wherever you want on your screen with a drag and drop action, or with a simple click.
4 Scale
Adjust the scale of the Sound Tracker, making it look bigger or smaller.
5 Transparency
Adjust the transparency of the Sound Tracker, making it look more or less discrete.
6- Color
Click the colored circle to open the color edition window. You can apply the color you want to the dynamic segments.
7- Compatible games
Clicking this link opens the official Nahimic website, and leads to the list of compatible games able to display the Sound Tracker.
13/12/2017 Nahimic 3 User Guide Page 14 of 22
Settings
1- Language
The language of Nahimic 3’s UI is based on the OS language. However, you can manually change the language in the preferences window (English, Simplified Chinese, Traditional Chinese, French, German, Italian, Spanish, Japanese, Korean, Russian, Portuguese or Polish) Warning: only the languages already installed on your machine in your Region & language options will appear in the list.
2- Version and website

Access the current version of Nahimic 3 installed on your computer, and get to the official website.
3- Social media
13/12/2017 Nahimic 3 User Guide Page 15 of 22
Get to our social media pages to discover Nahimic’s universe
4- Help us improve Nahimic
When you enable analytics, you help us improve Nahimic by sharing your user’s experience. This let us know more about your habits with Nahimic and adapt better the user experience we offer.
5 Support
You can ask for help or just for a question on our dedicated support pages
13/12/2017 Nahimic 3 User Guide Page 16 of 22
Default settings
When first launched, Nahimic 3 is set by default to the Music audio profile and the Chat mic profile The Music profile guarantees a balanced listening experience with a simple configuration. This helps to avoid altering your listening habits. Its factory settings are:
Profile name Virtual Surround Volume Stabilizer Voices Bass Treble Music Disabled Disabled Enabled (+4 dB) Enabled (+6 dB) Enabled (+4 dB)
The Chat mic profile guarantees you a clear voice. Its factory settings are:
Profile name Static Noise Suppression Echo Cancellation Lateral Sound Cancellation Voice Stabilizer Chat Enabled Enabled Disabled Enabled
When closing and re opening the UI, the default settings are the last settings saved.
13/12/2017 Nahimic 3 User Guide Page 17 of 22
FAQ
Audio and microphone effects
How does Virtual Surround work?
The Virtual Surround effect is designed to reproduce a 3D audio experience from multichannel audio files to stereo devices. When playing a stereo audio file on a stereo device, our Virtual Surround will offer you a better sound spatialization and a better overall audio experience.
Some examples of use:
• Multichannel audio file on a stereo device: the Virtual Surround is fully adapted to this configuration. You will enjoy a multichannel audio experience in your stereo device (i. e. speakers or headphones).
• Stereo audio file on a stereo device: enhancement of the audio experience with better spatialization
• Multichannel audio file on a multichannel device: Virtual Surround won’t work on this configuration.
• Stereo audio file on a multichannel device: Virtual Surround won’t work on this configuration.
I turned Voices “On”, but when I talk in my microphone, I can’t hear a difference. Why?
Voices is an audio effect (in the Audio tab). It’s designed to clarify the voices on the audio files you’re listening to. It’s not designed to clarify your own voice. If you want to clarify your own voice, please go to the Microphone tab and use the Static Noise Suppression setting.
What is supposed to happen if I change the Music profile settings, then click on the Gaming profile, and then come back to the Music profile?
As the changes are saved, you should find the Music profile settings as you left them.
Sound Tracker
Why is my Sound Tracker page always disabled?
There are 2 main reasons why your Sound Tracker page may be disabled:
• You set Sound Tracker to OFF
• Your audio device is not compatible Sound Tracker can only work on compatible audio devices
13/12/2017 Nahimic 3 User Guide Page 18 of 22
Why are the segments not displayed in the Sound Tracker?
The Sound Tracker only displays its segments for 5.1 and 7.1 audio streams. If the segments are not displayed in the Tracker, this would mean that your current audio stream is lower than 5.1 (mono or stereo for instance).
Also, our Sound Tracker uses an overlay technology that may not be compatible with all games. That’s why, sometimes, the whole Sound Tracker may not appear in some games.
You can refer to the official games list that is supported by the Sound Tracker by clicking the link on top of the screen of the Sound Tracker tab.
Why does the Sound Tracker only display 5.1 and 7.1 audio streams?
The aim of the Sound Tracker is to let your “see” your threats all around you in your game (= up to 360°). Based on this assessment, it would be meaningless to display segments on the Tracker for mono or stereo streams as they would only indicate what is in front of you (for mono audio streams) or what is at your left and right (for stereo audio streams).
Device management
What is a default device?
It is the device (playback and/or recording) selected by default in the Windows® device manager on which you will hear or make sound.
What is Windows® device manager and how do I access it?
Windows® device manager is the control window which shows the complete list of playback and recording devices on your computer. This window also allows you to enable, disable or set your playback and recording devices as the default. Here is the process to access it:
1. On your Windows® taskbar, right click on the volume icon.
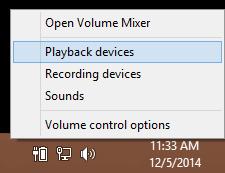
13/12/2017 Nahimic 3 User Guide Page 19 of 22
2. Click on Playback devices or Recording devices depending on what you are interested in. Playback devices are for audio devices, like speakers or headphones. Recording devices are capture devices, like microphones.
And there you have it you just accessed the Windows® device manager.
In the Windows® device manager, select the tab you are interested in (Playback or Recording). Then, right click on the device you want to set as the default, and click on “Set as Default Device”.
First, make sure your device is properly plugged into your computer.
If it still doesn’t appear, it may have been disabled and hidden in the Windows® device manager. To make it appear again in your device list, just right click on the Windows® device manager window (in the Playback or Recording tab, depending on the device you are interested in) and then select “Show Disabled Device”.


How do I set a device as the default?
My device doesn’t appear in the Windows® device manager. How do I make it appear?
13/12/2017 Nahimic 3 User Guide Page 20 of 22
What is the Windows® device manager option “Show Disconnected Devices” for?
This option allows display of all the devices your hardware can support.
What will happen in Nahimic 3 if I change the default devices in Realtek’s UI?
Nahimic 3’s UI will adapt to the new default device.
13/12/2017 Nahimic 3 User Guide Page 21 of 22
