for violin, viola, re-embodied cello and electronics 2021
Danniel Ribeir
fate(un)strung

For violin, viola, re-embodied cello and electronics
2021
Contact: dannfribeiro@gmail.com; dannielribeiro@berkeley.edu; +1(510)989-5569.
(Version edited to fit tabloid-sized paper)
Instrumentation:
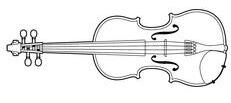
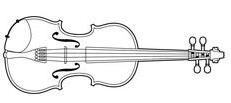
This piece is a fundamentally duo for violin and viola. The cello is presented without a performer and both instrumentalists in question are required to also play the cello. The cello should be positioned between both performers, secured horizontally (as a table-top instrument) and a cradle or stand is suggested.


Violinist
Violist
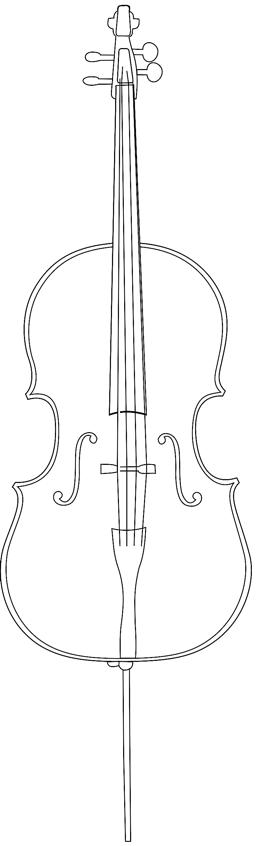
Cello (without a cellist performer)
Also required to play the cello and its preparation elements/objects. Also, to perform with superball mallets and a piece of bike tube
Duration: between 13’ - 14’
Also required to play the cello and its preparation elements/objects. Also, to perform with superball mallets and a high gauge steel wound guitar string.
Recording of Premiere: https://soundcloud.com/danniel-ferraz-ribeiro/fate-unstrung
Written for and premiered by members of ECO Ensemble and the Conservatoire National Supérieur de Musique et de Danse de Lyon as part of the CNMAT/CNSMDL collaborative concert (2021 and 2023)
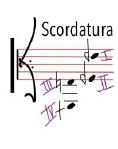
Scordatura:
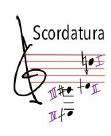
Violin
Viola
a) Contact composer for tuning sound files for violin and viola.
b) Cello is also supposed to be retuned depending on the materials and preparations used. Contact composer. Tentative Cello scordatura is as follows:
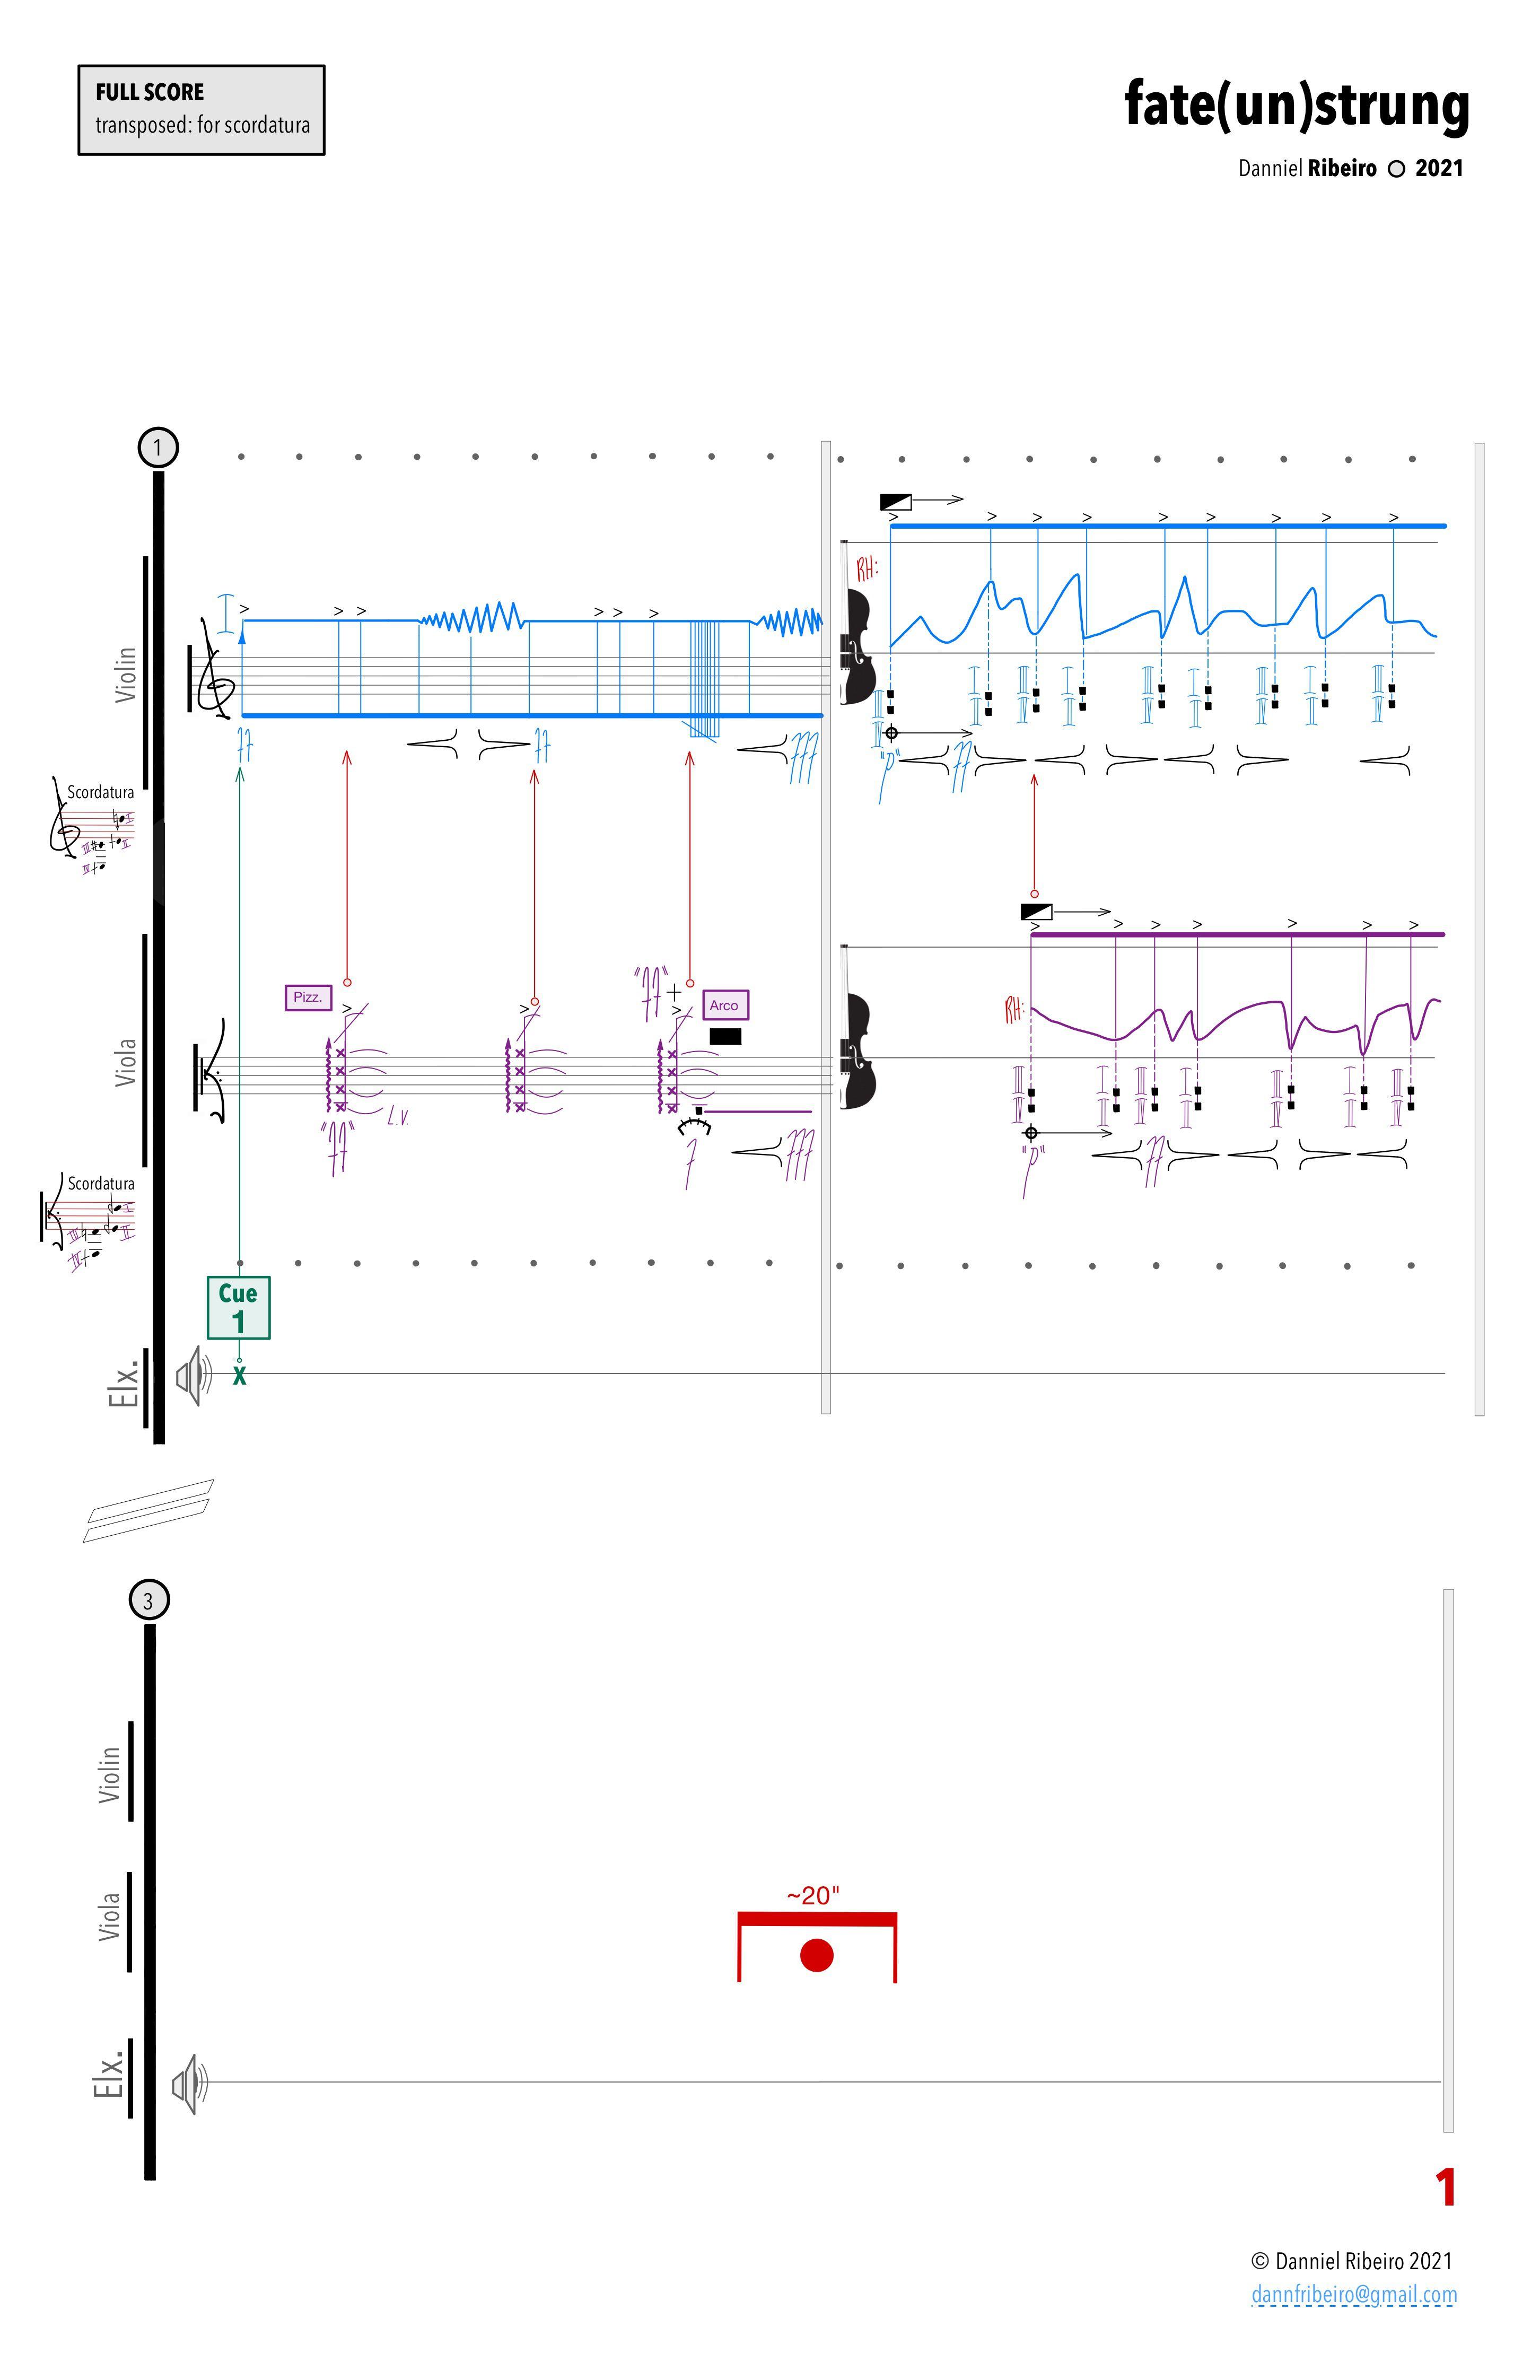
General indications:
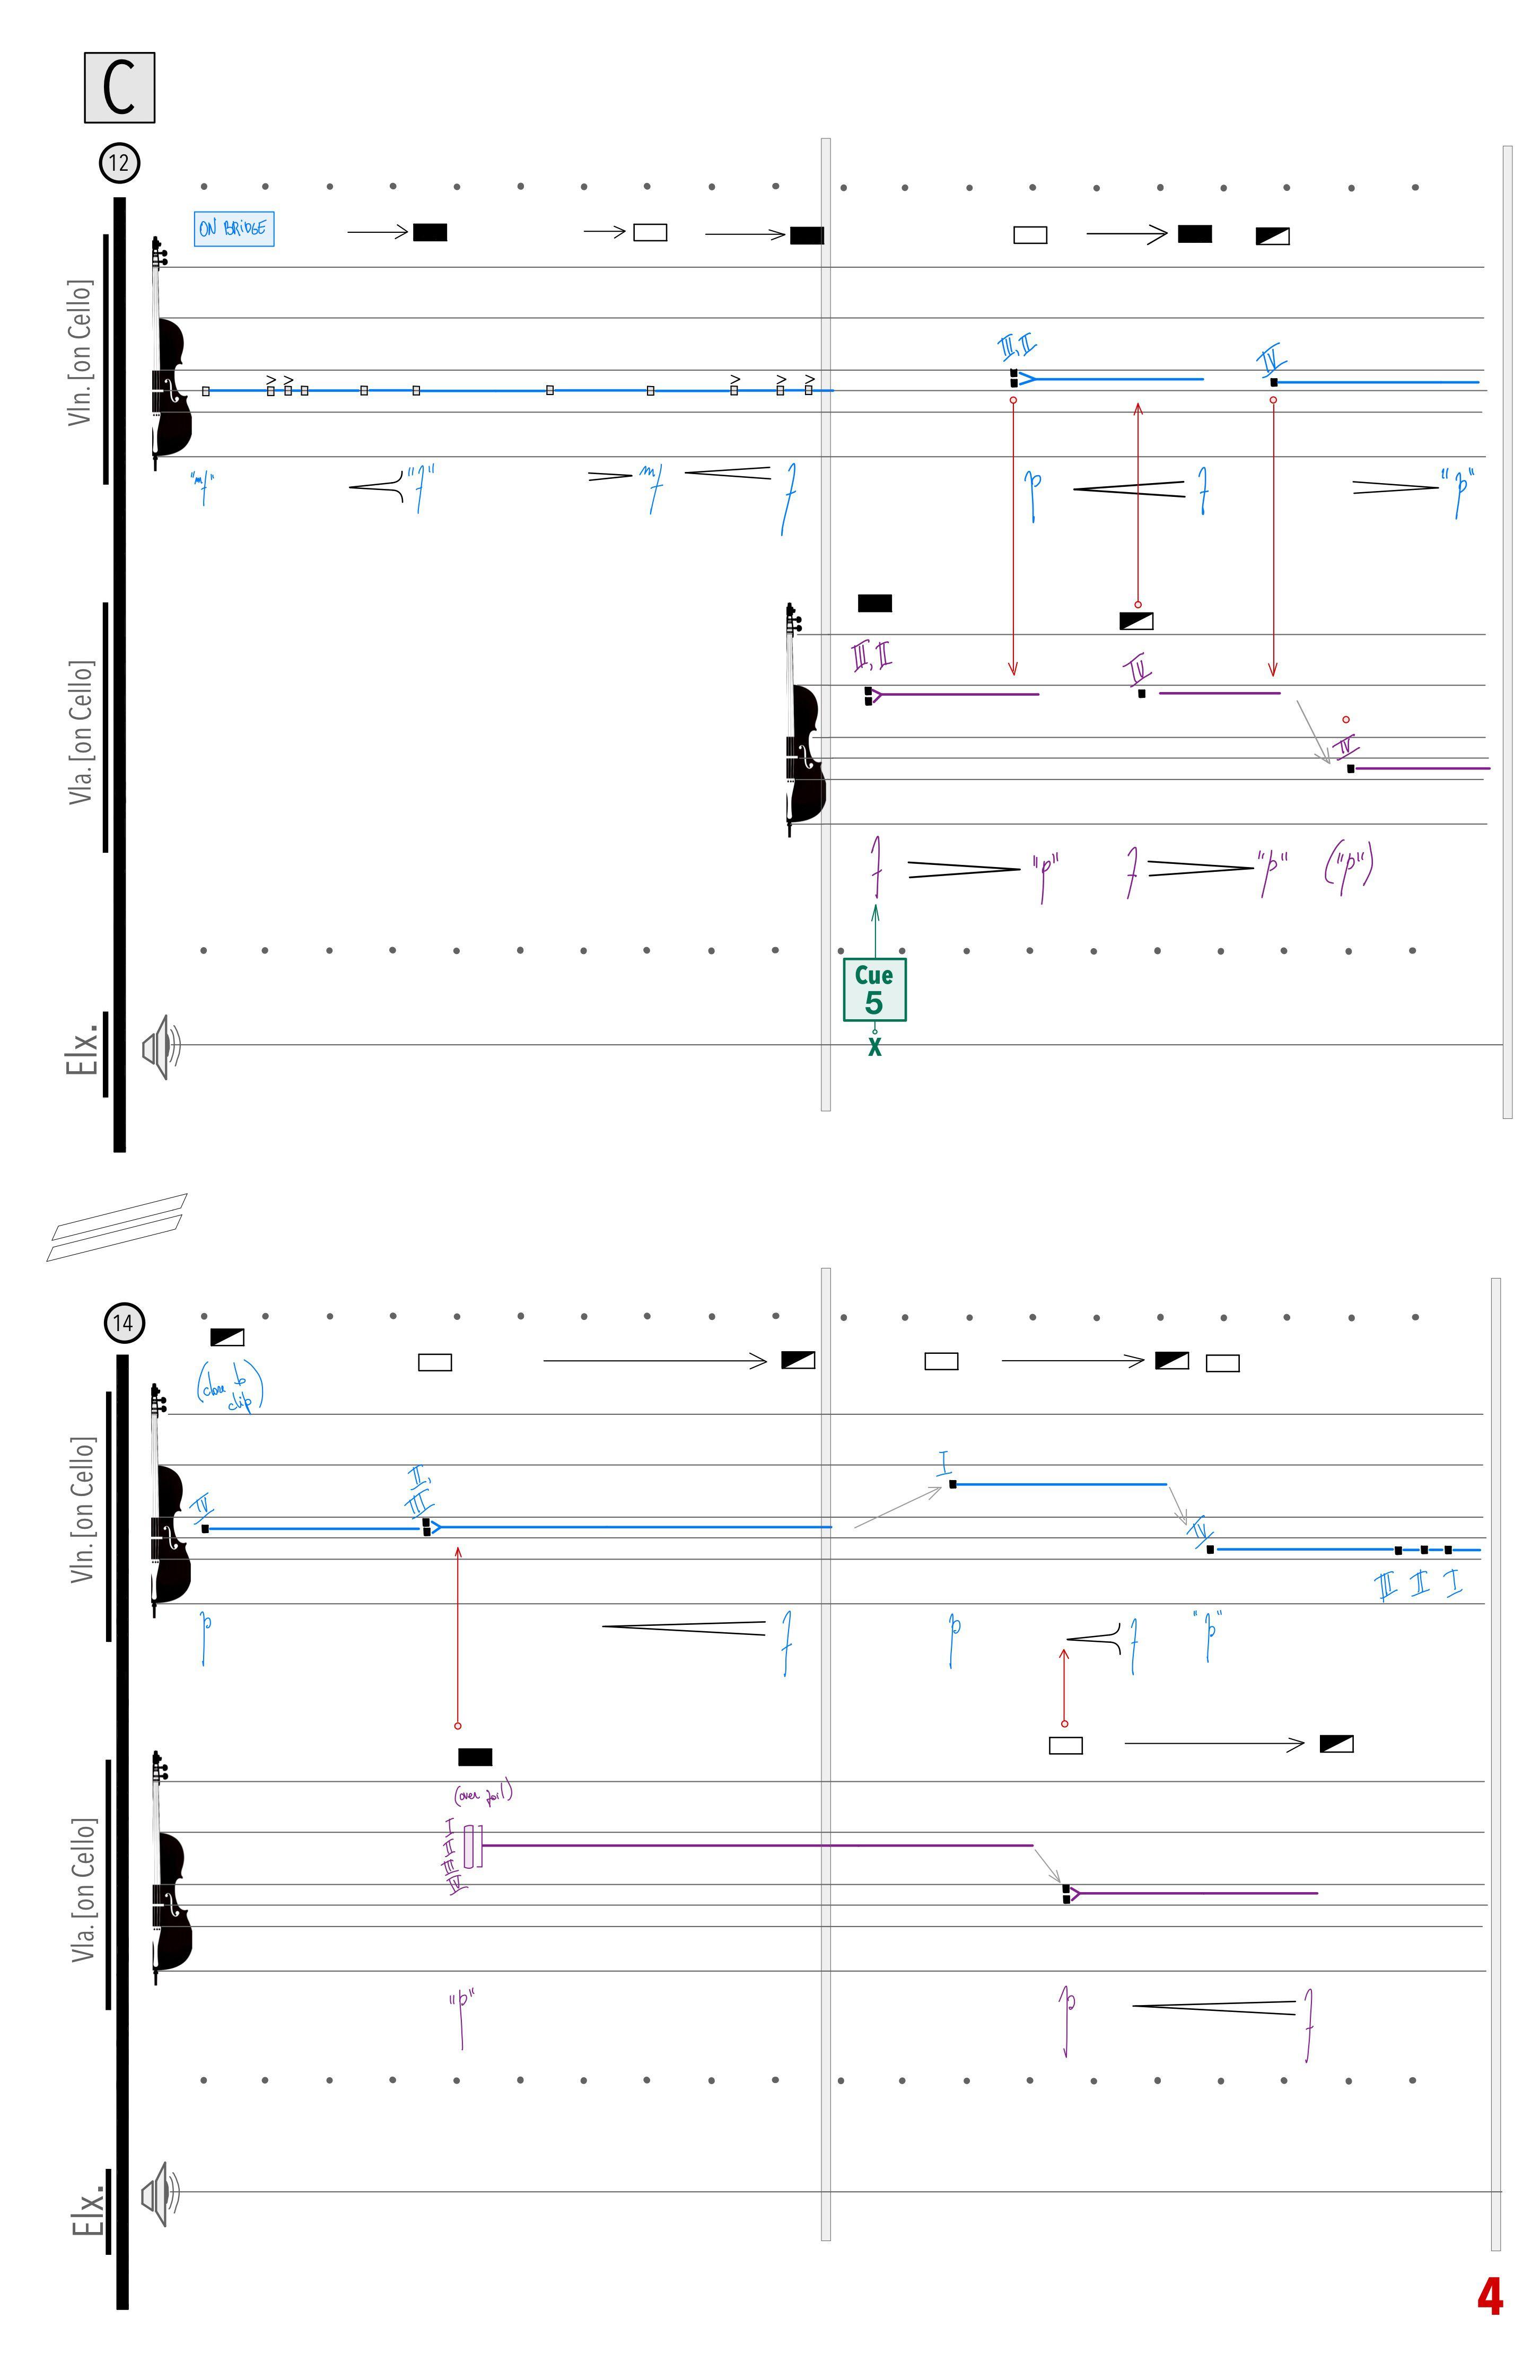
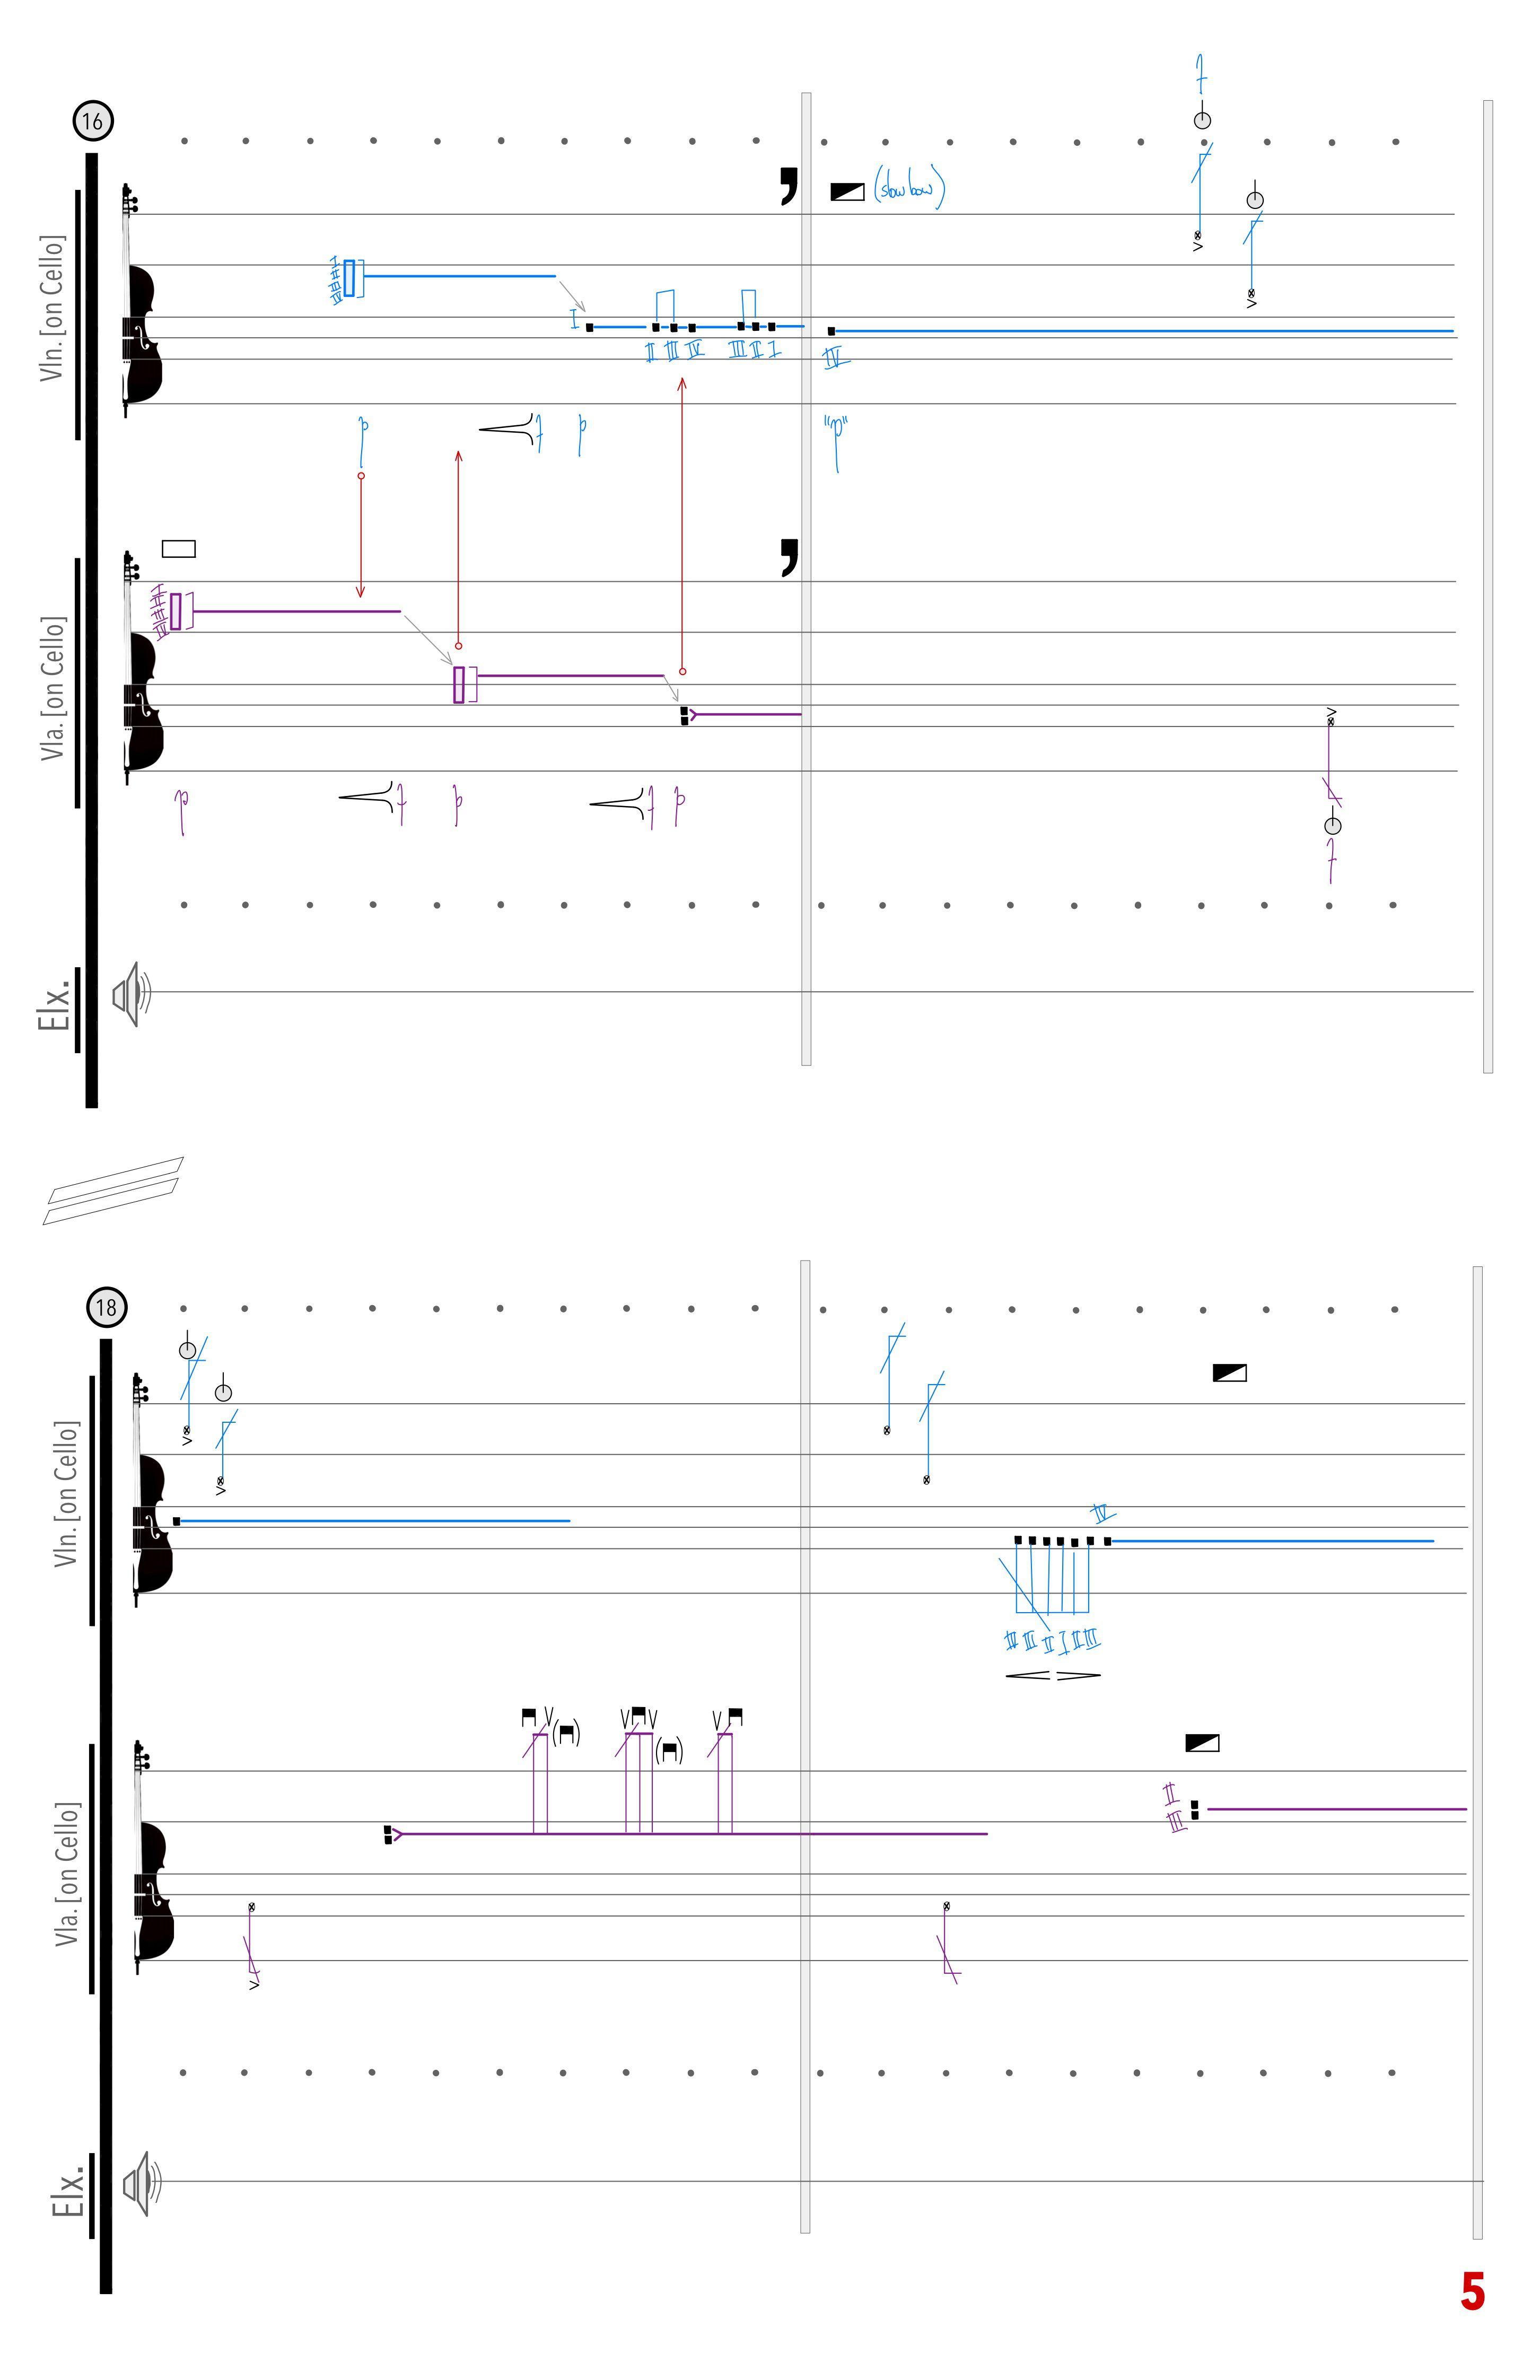
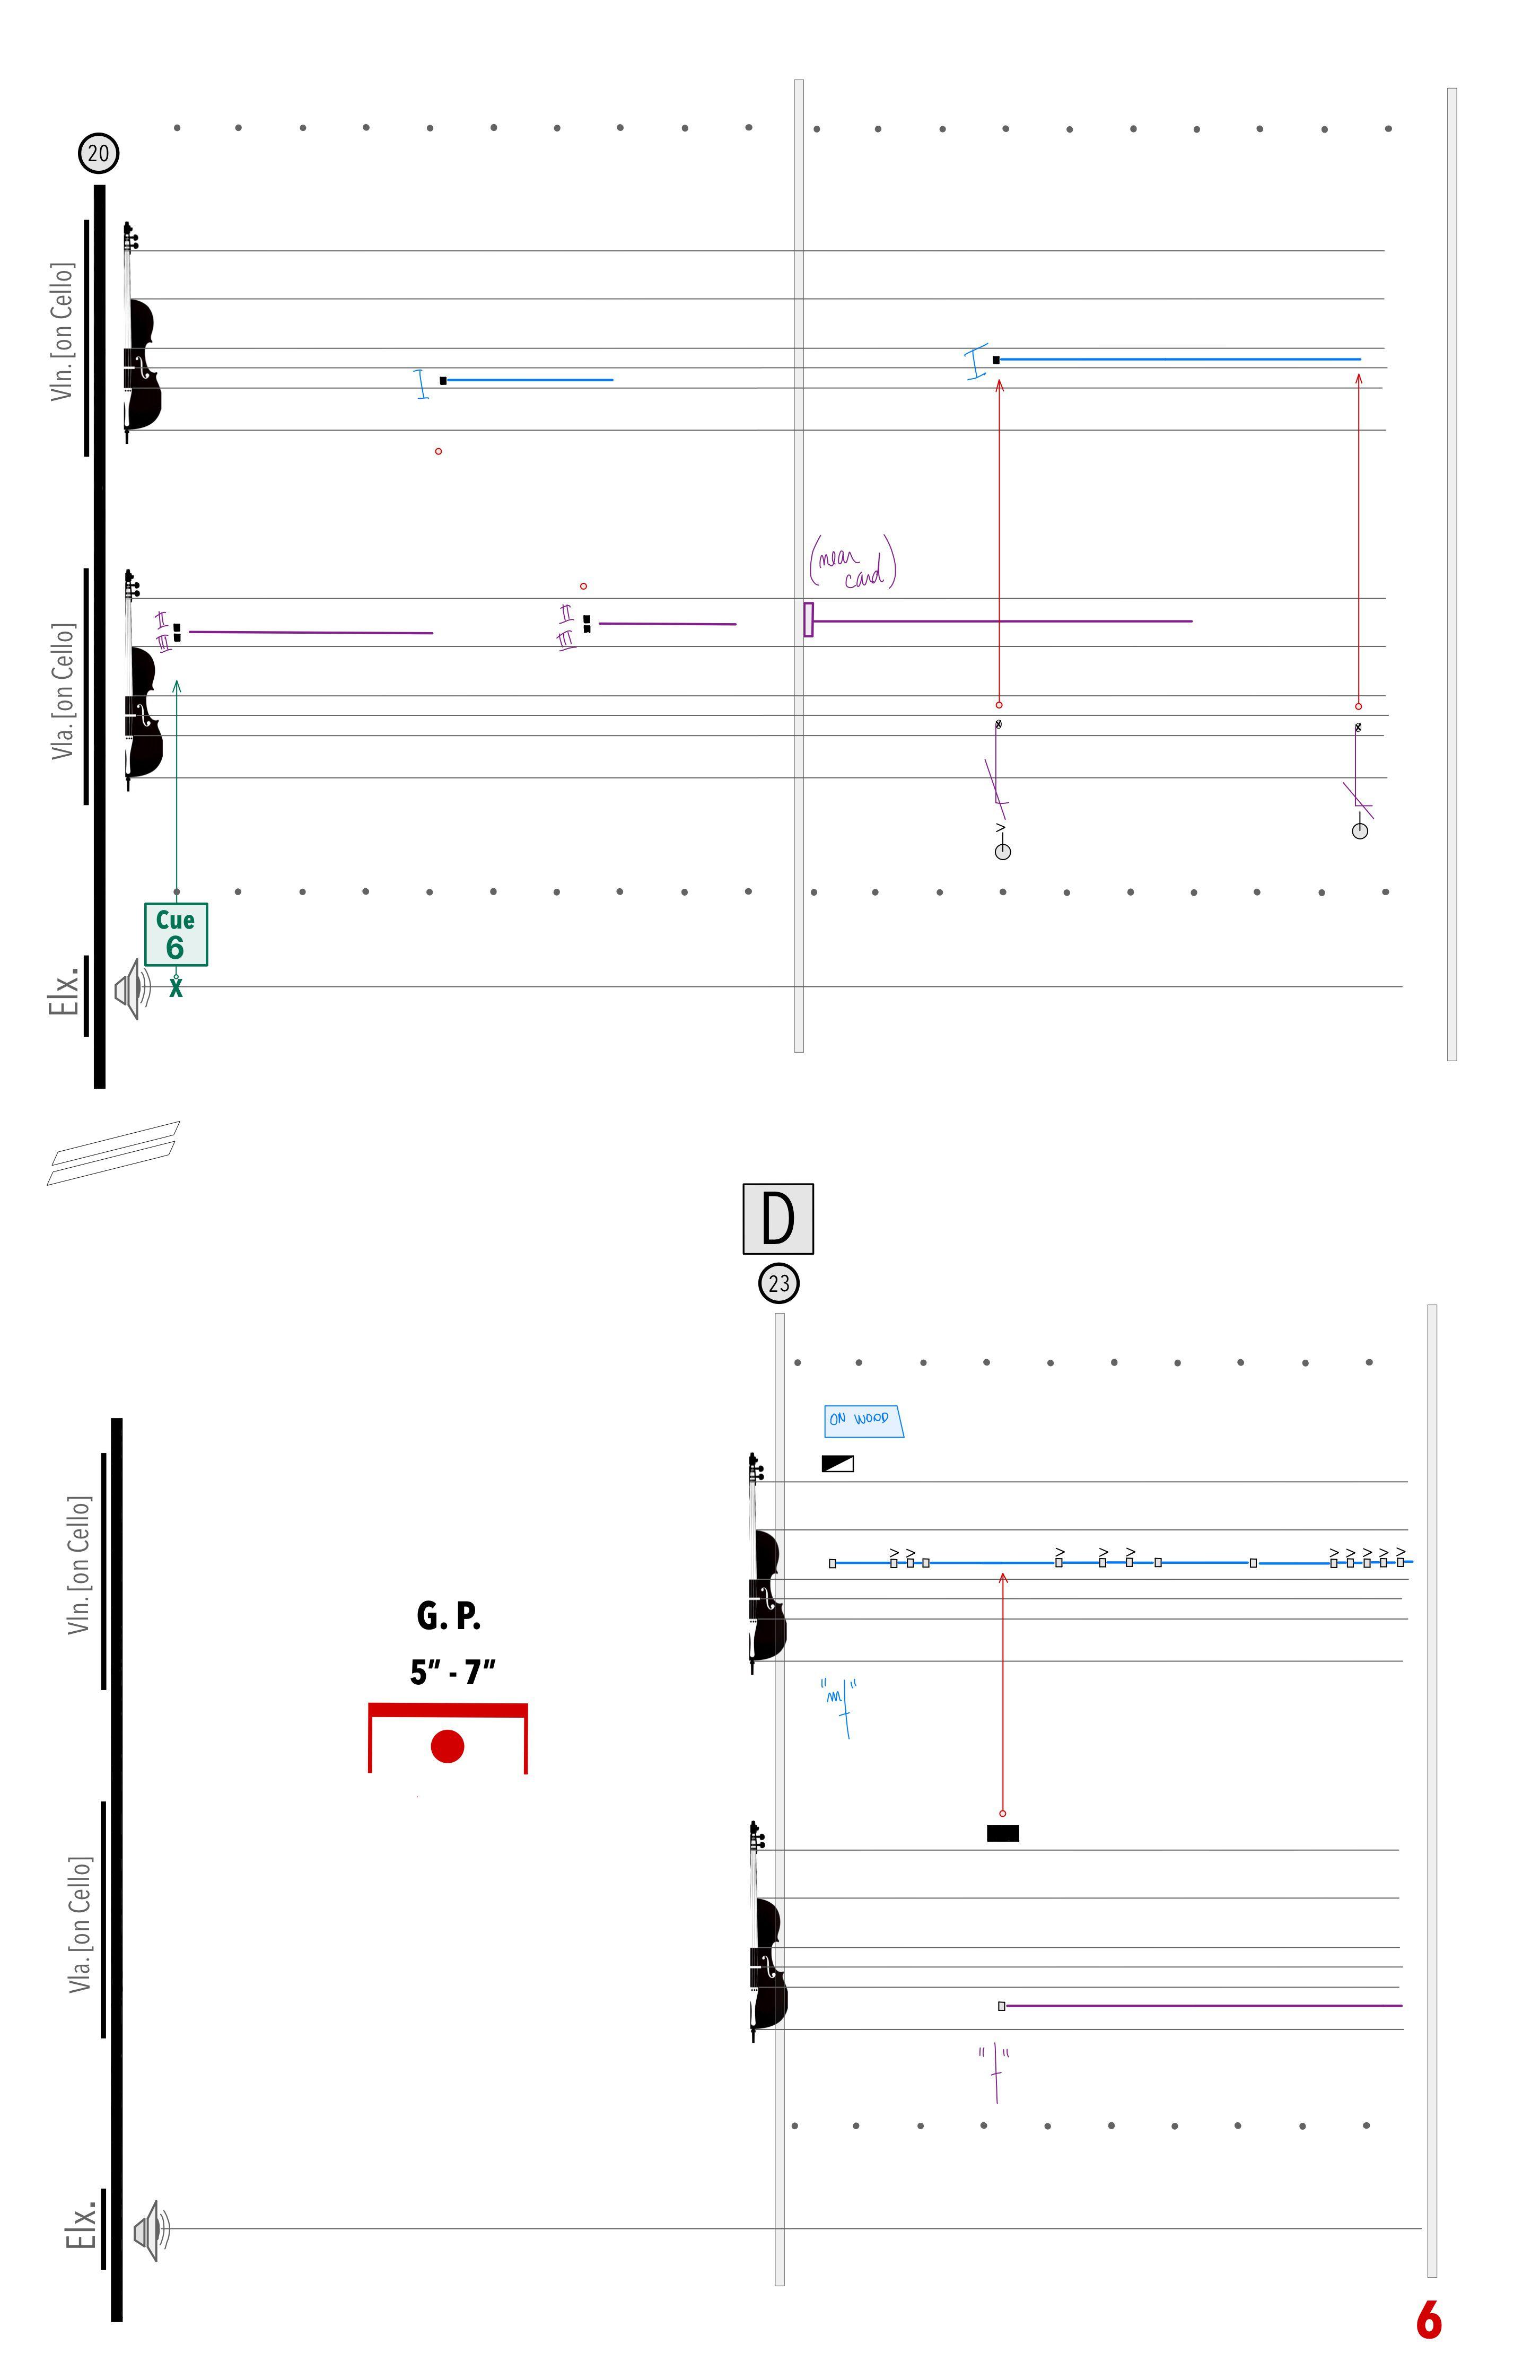
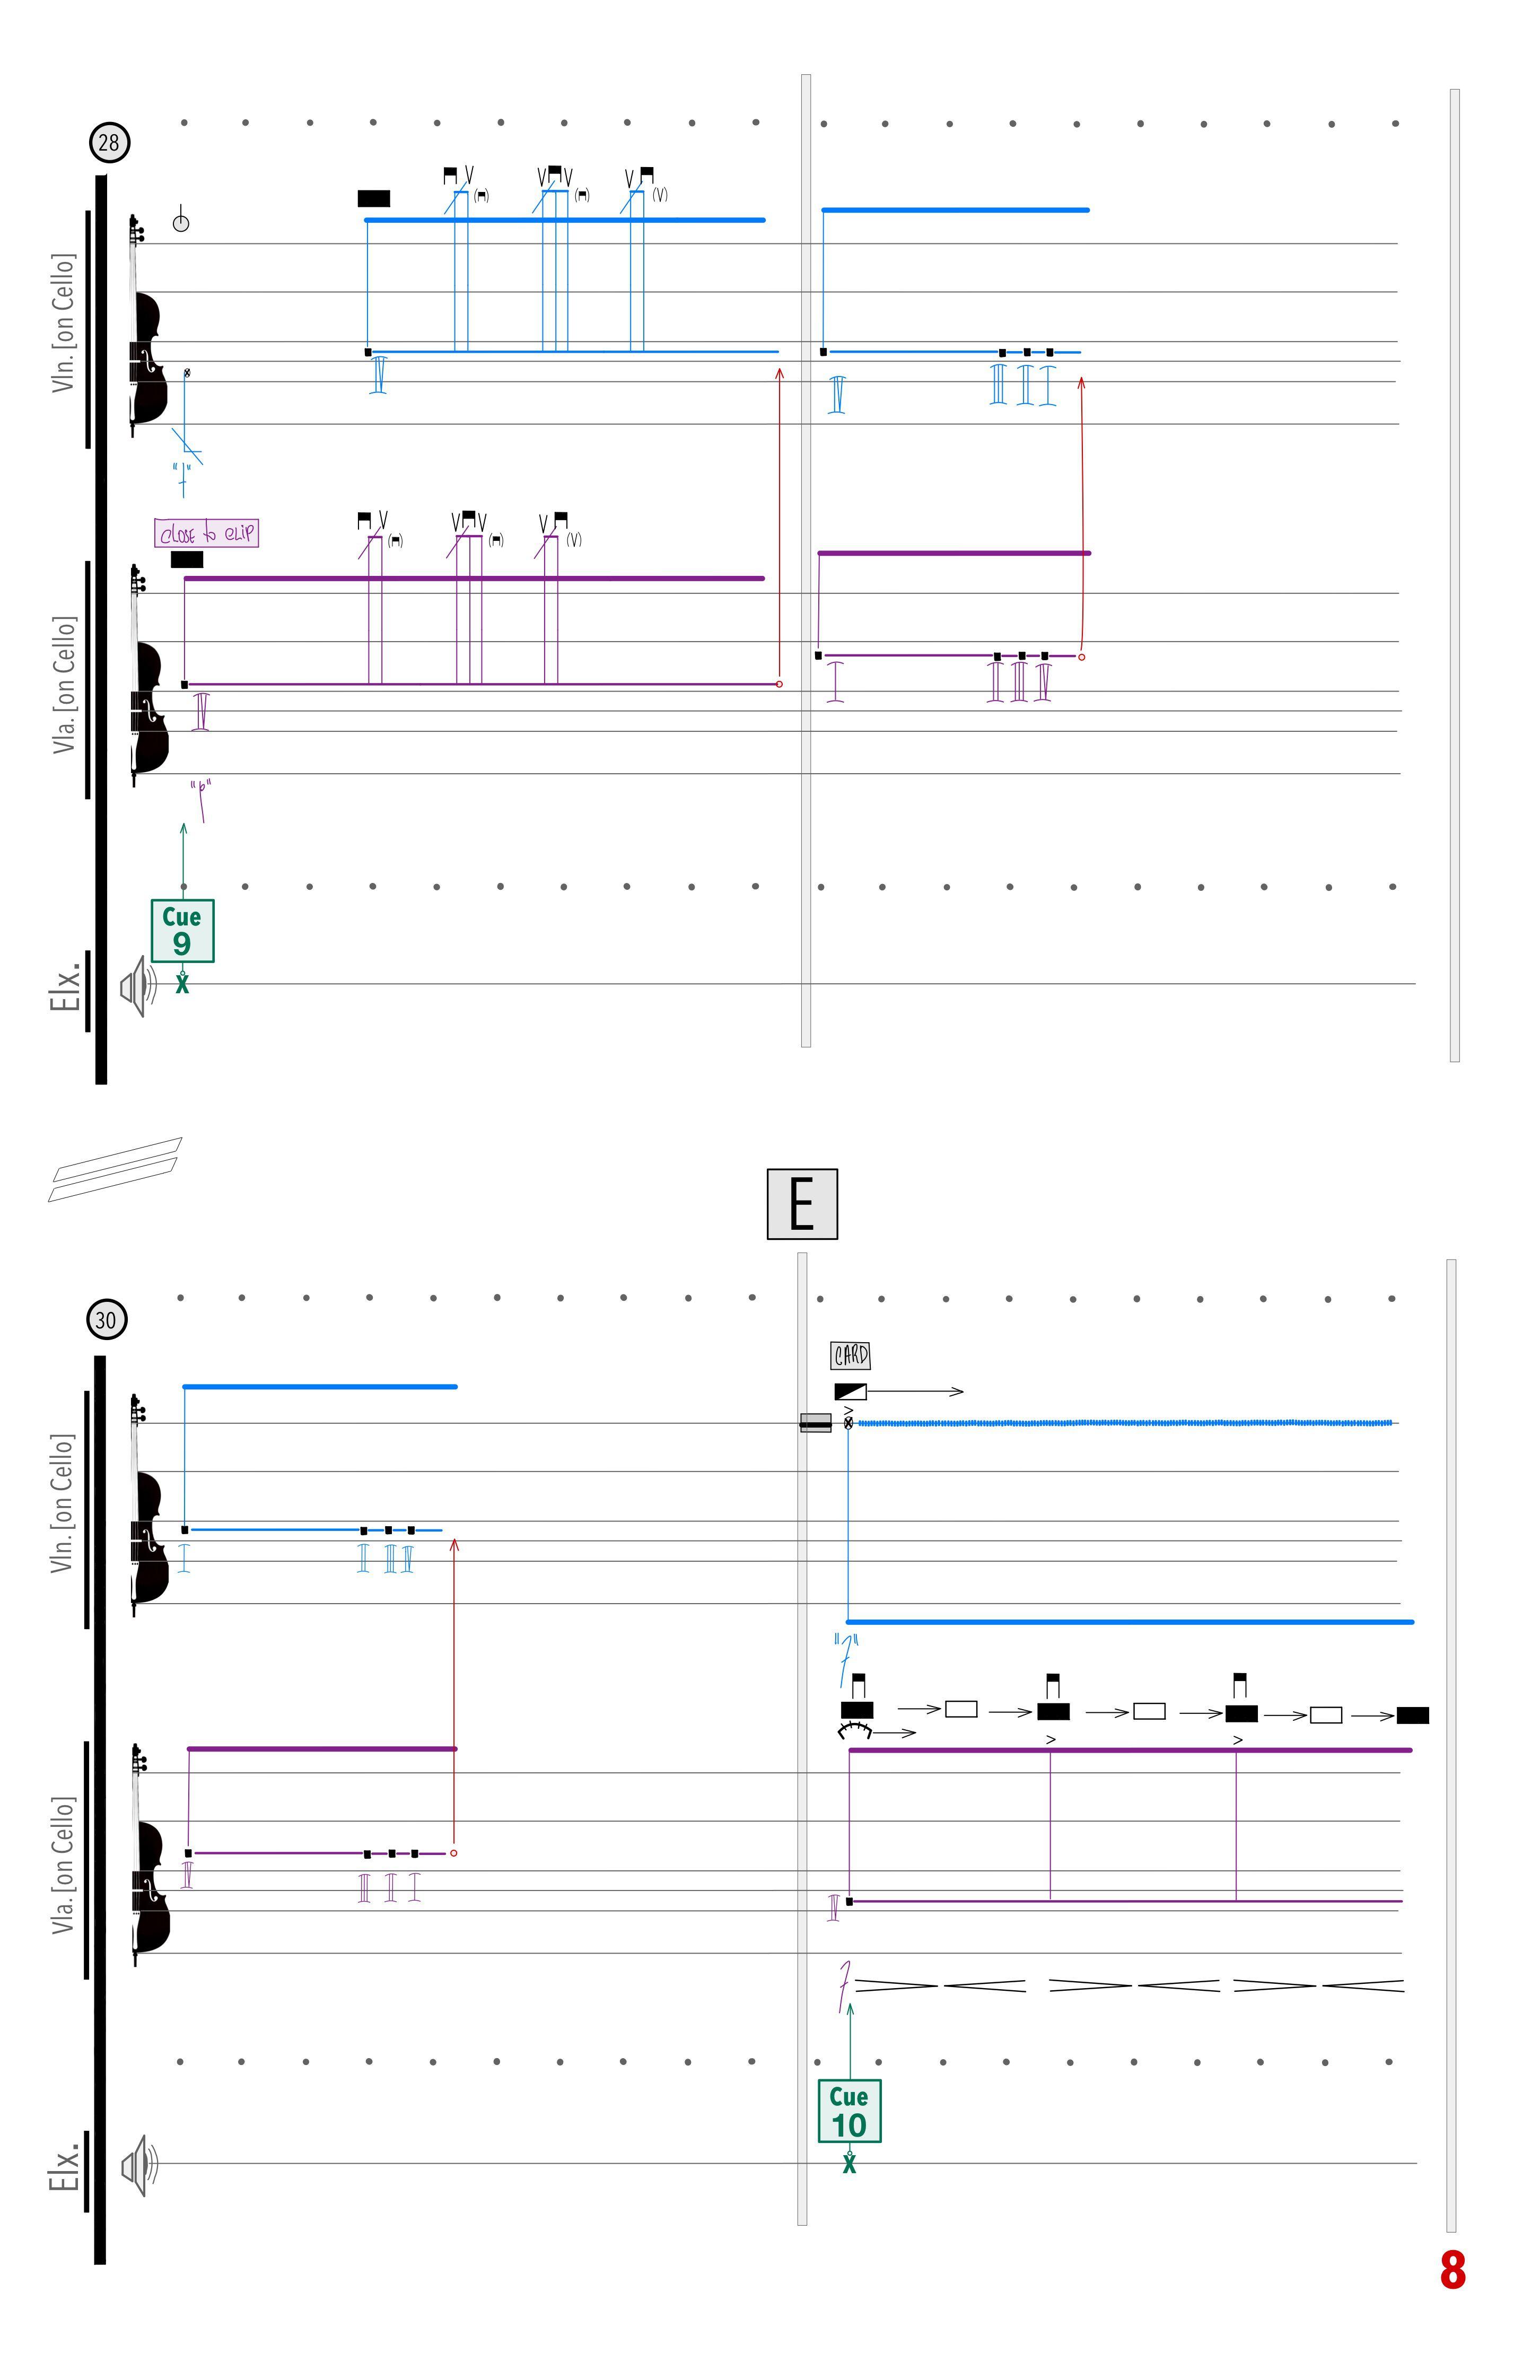
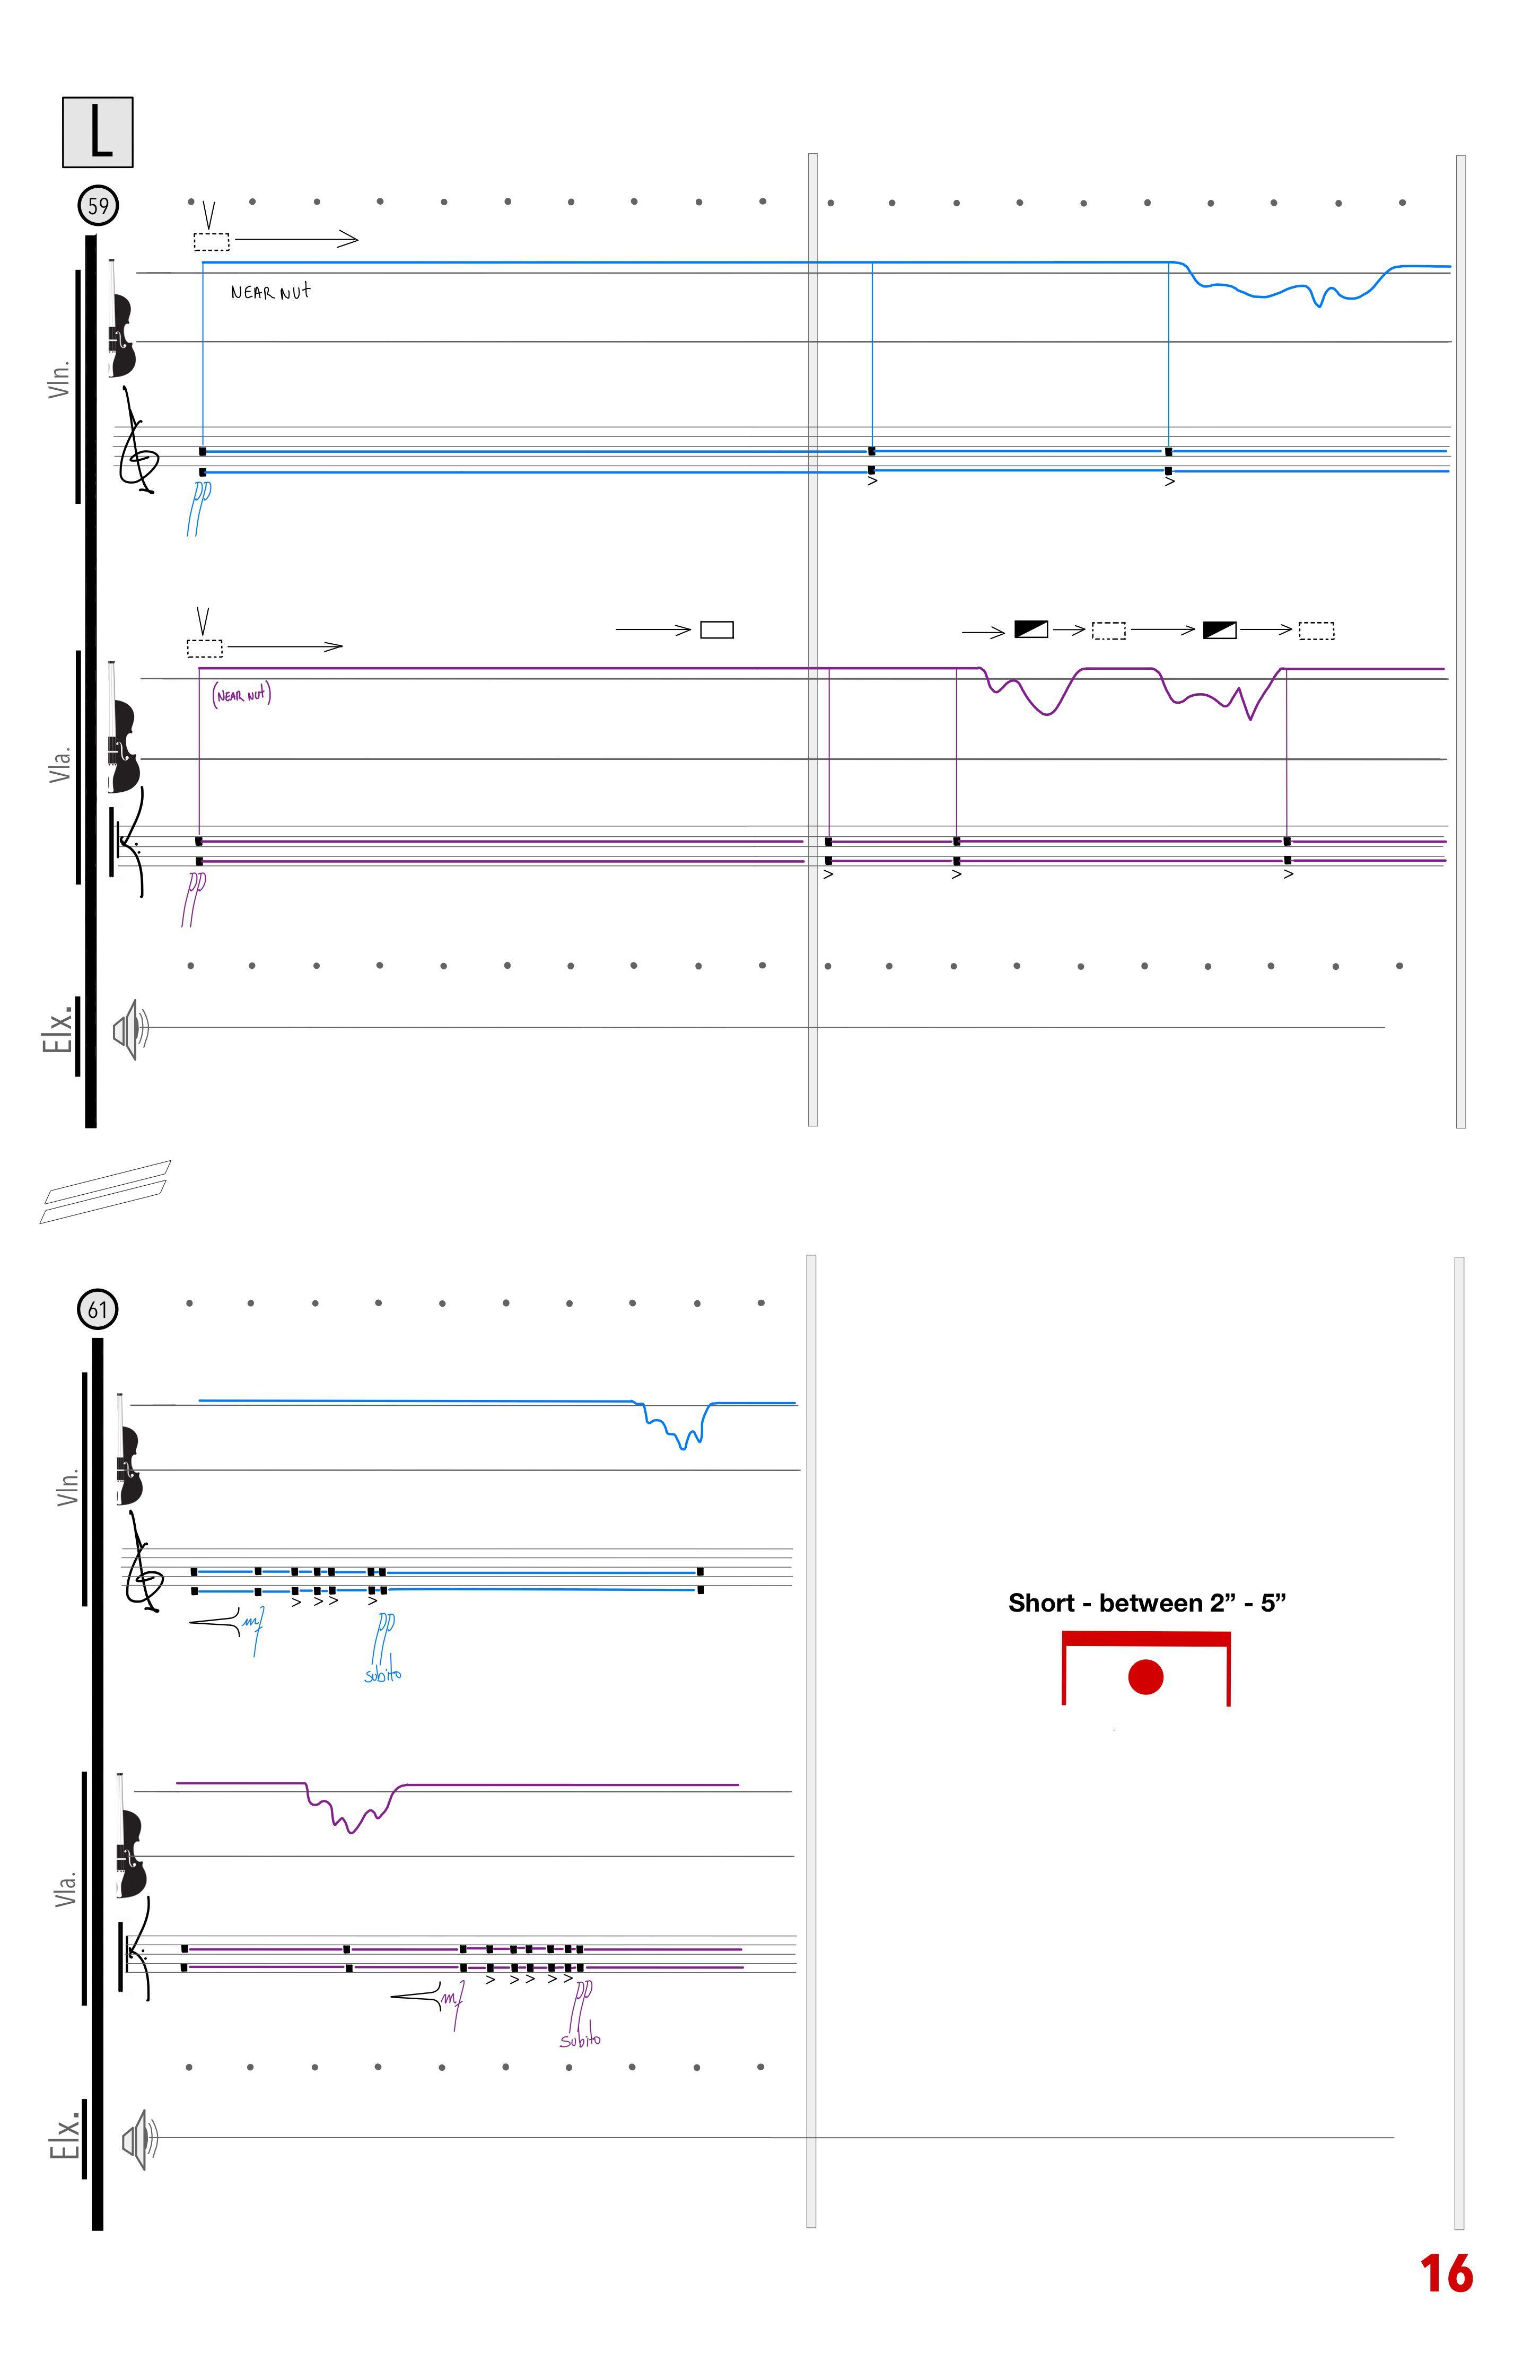
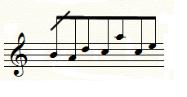
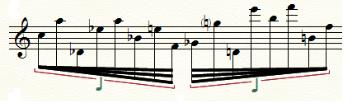
Feathered beams (measured accelerandi and ritardandi): tempo should be constant. Accelerate or decelerate within the assigned duration. Exaggerate gesture’s beginning and ending.
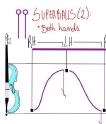
As fast as possible.
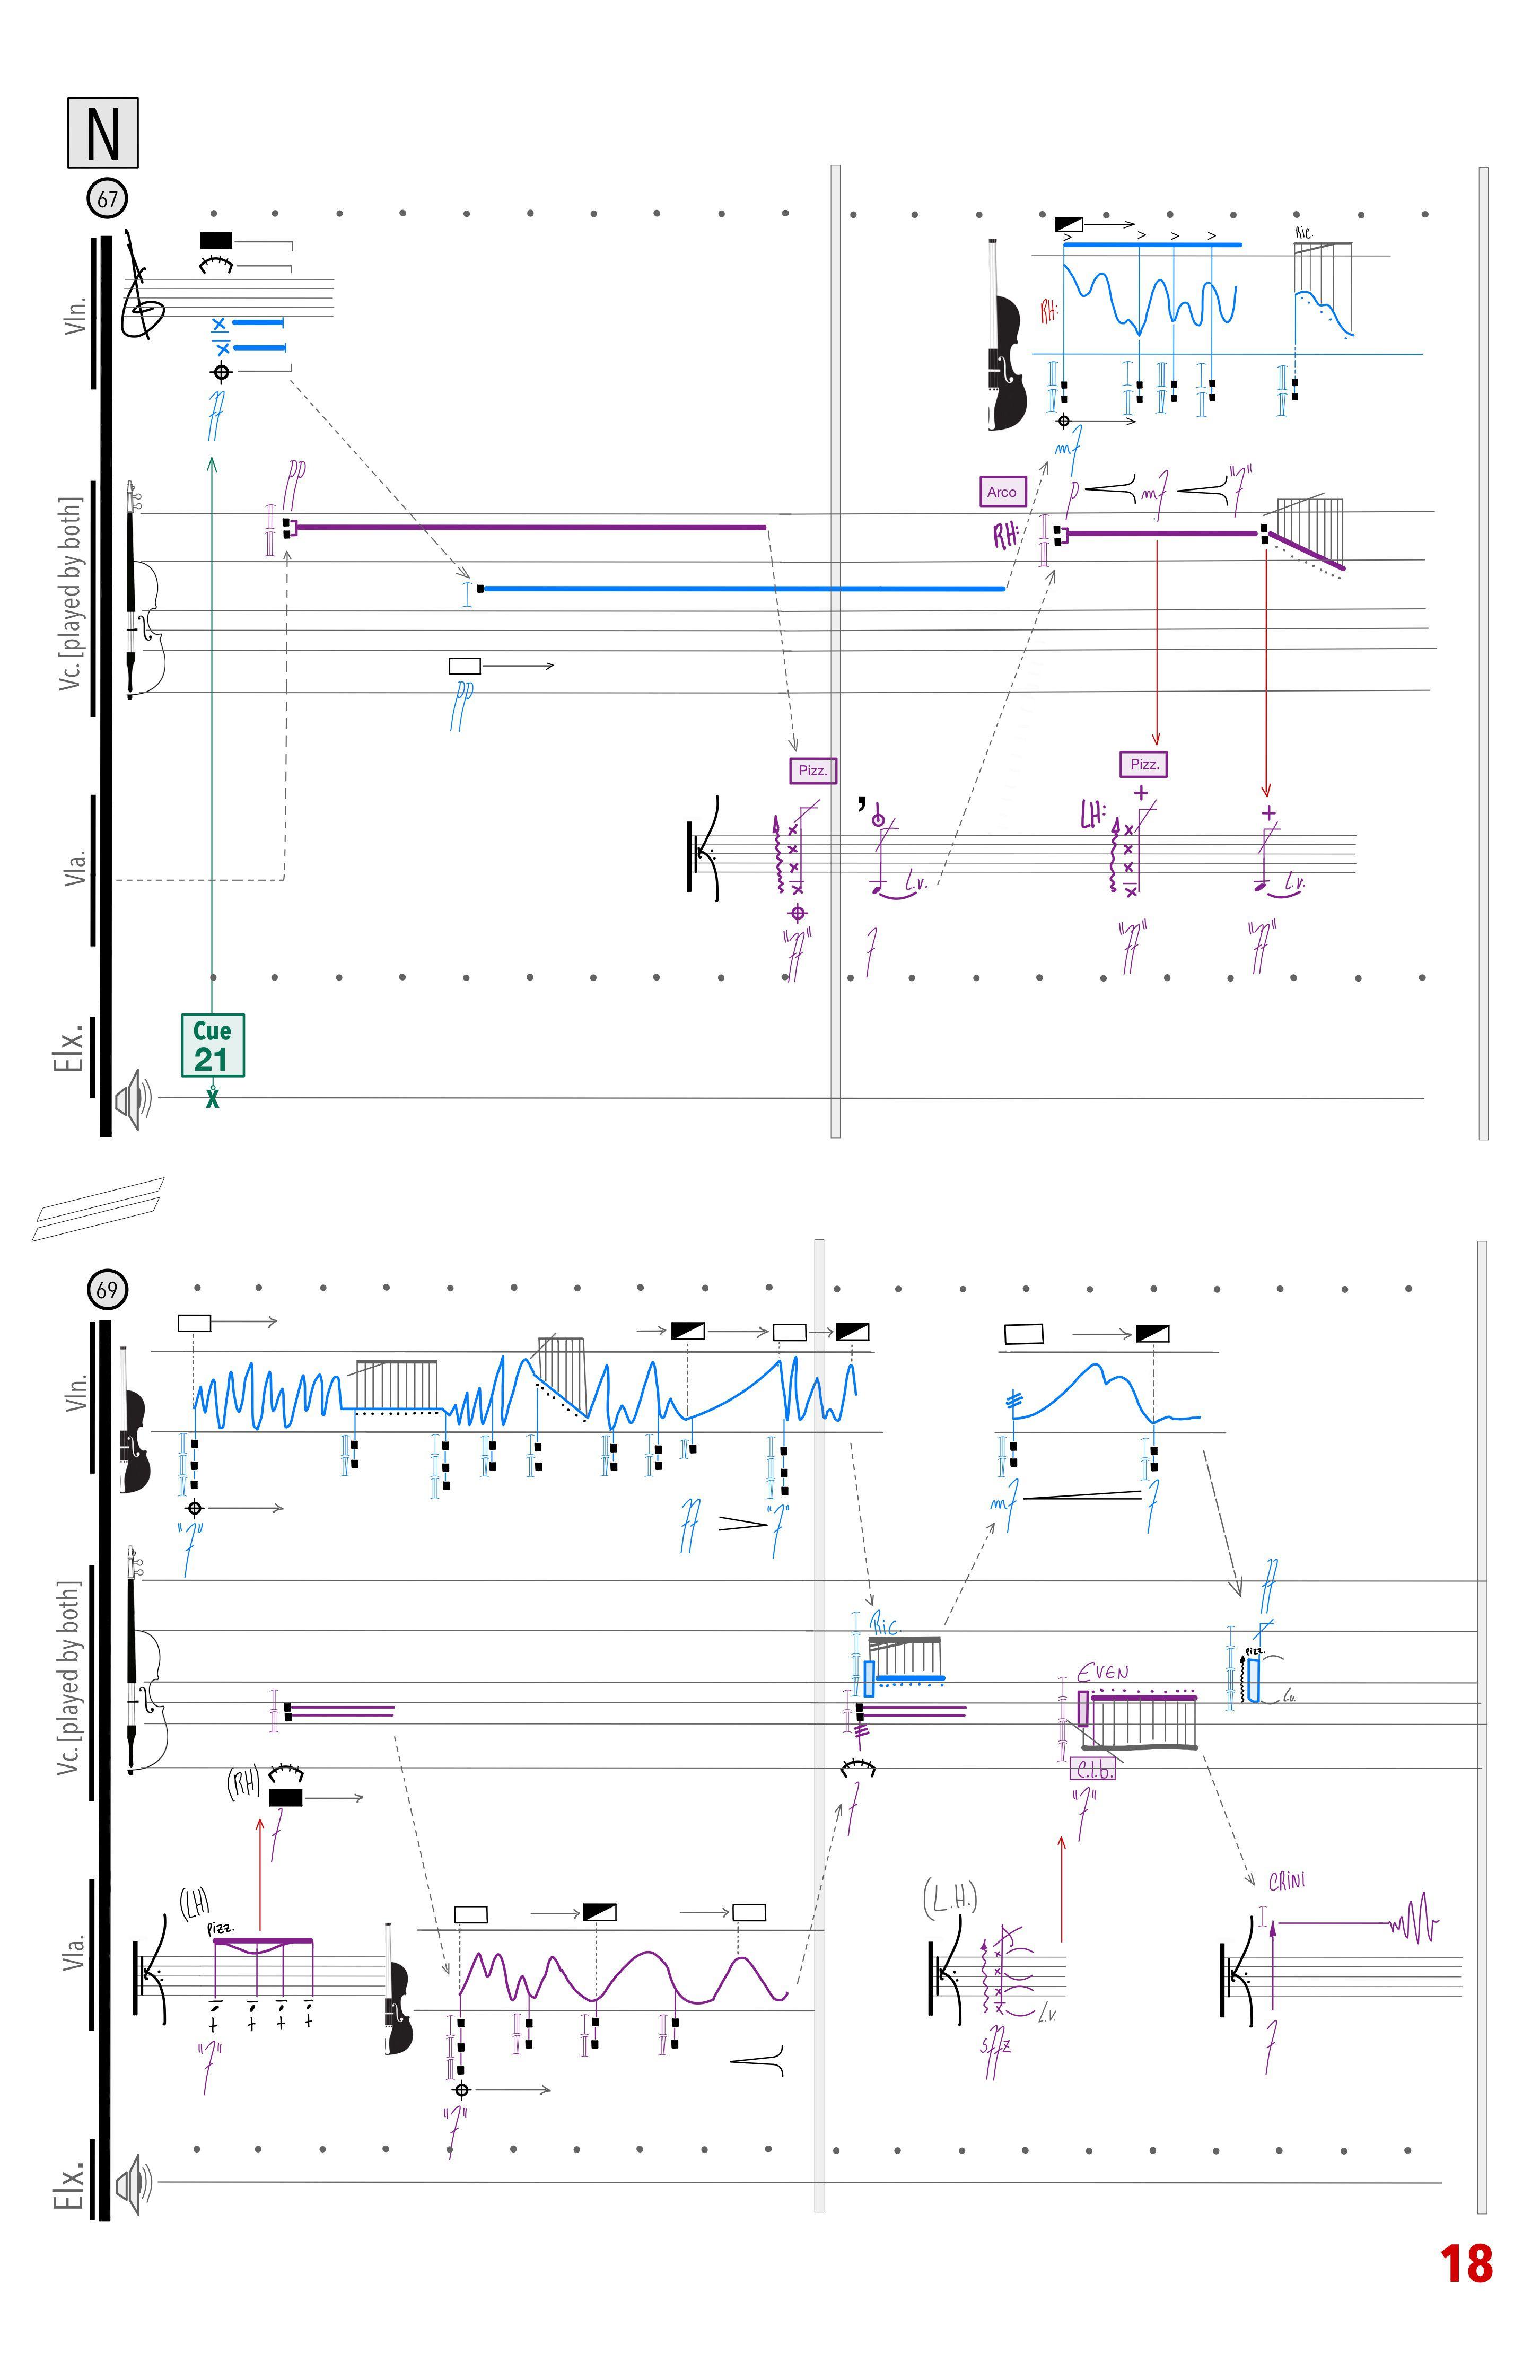
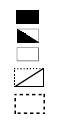
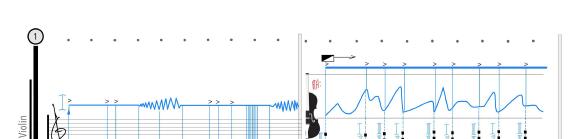
Pressure gradation: the boxes are used to symbolize five stages of pressure or saturation/density (from bottom to top): flautando (very light), half-flautando (light), normale (or ordinario, cancelling pressure alterations), exaggerated pressure (noisy and rich), fully overpressed (very noisy; no pitch definition; scratch tone).
Highest note or region possible.
General mute. Used to specify when muting/damping action is required for noise-oriented gestures or to obscure pitch definition. Also used to specify when to stop resonance after attacks.
Dynamics between quotation marks describe when the notated dynamics do not necessarily correspond to the sound result. It suggests the intensity (physical effort) of the performance action.

Additional technique:
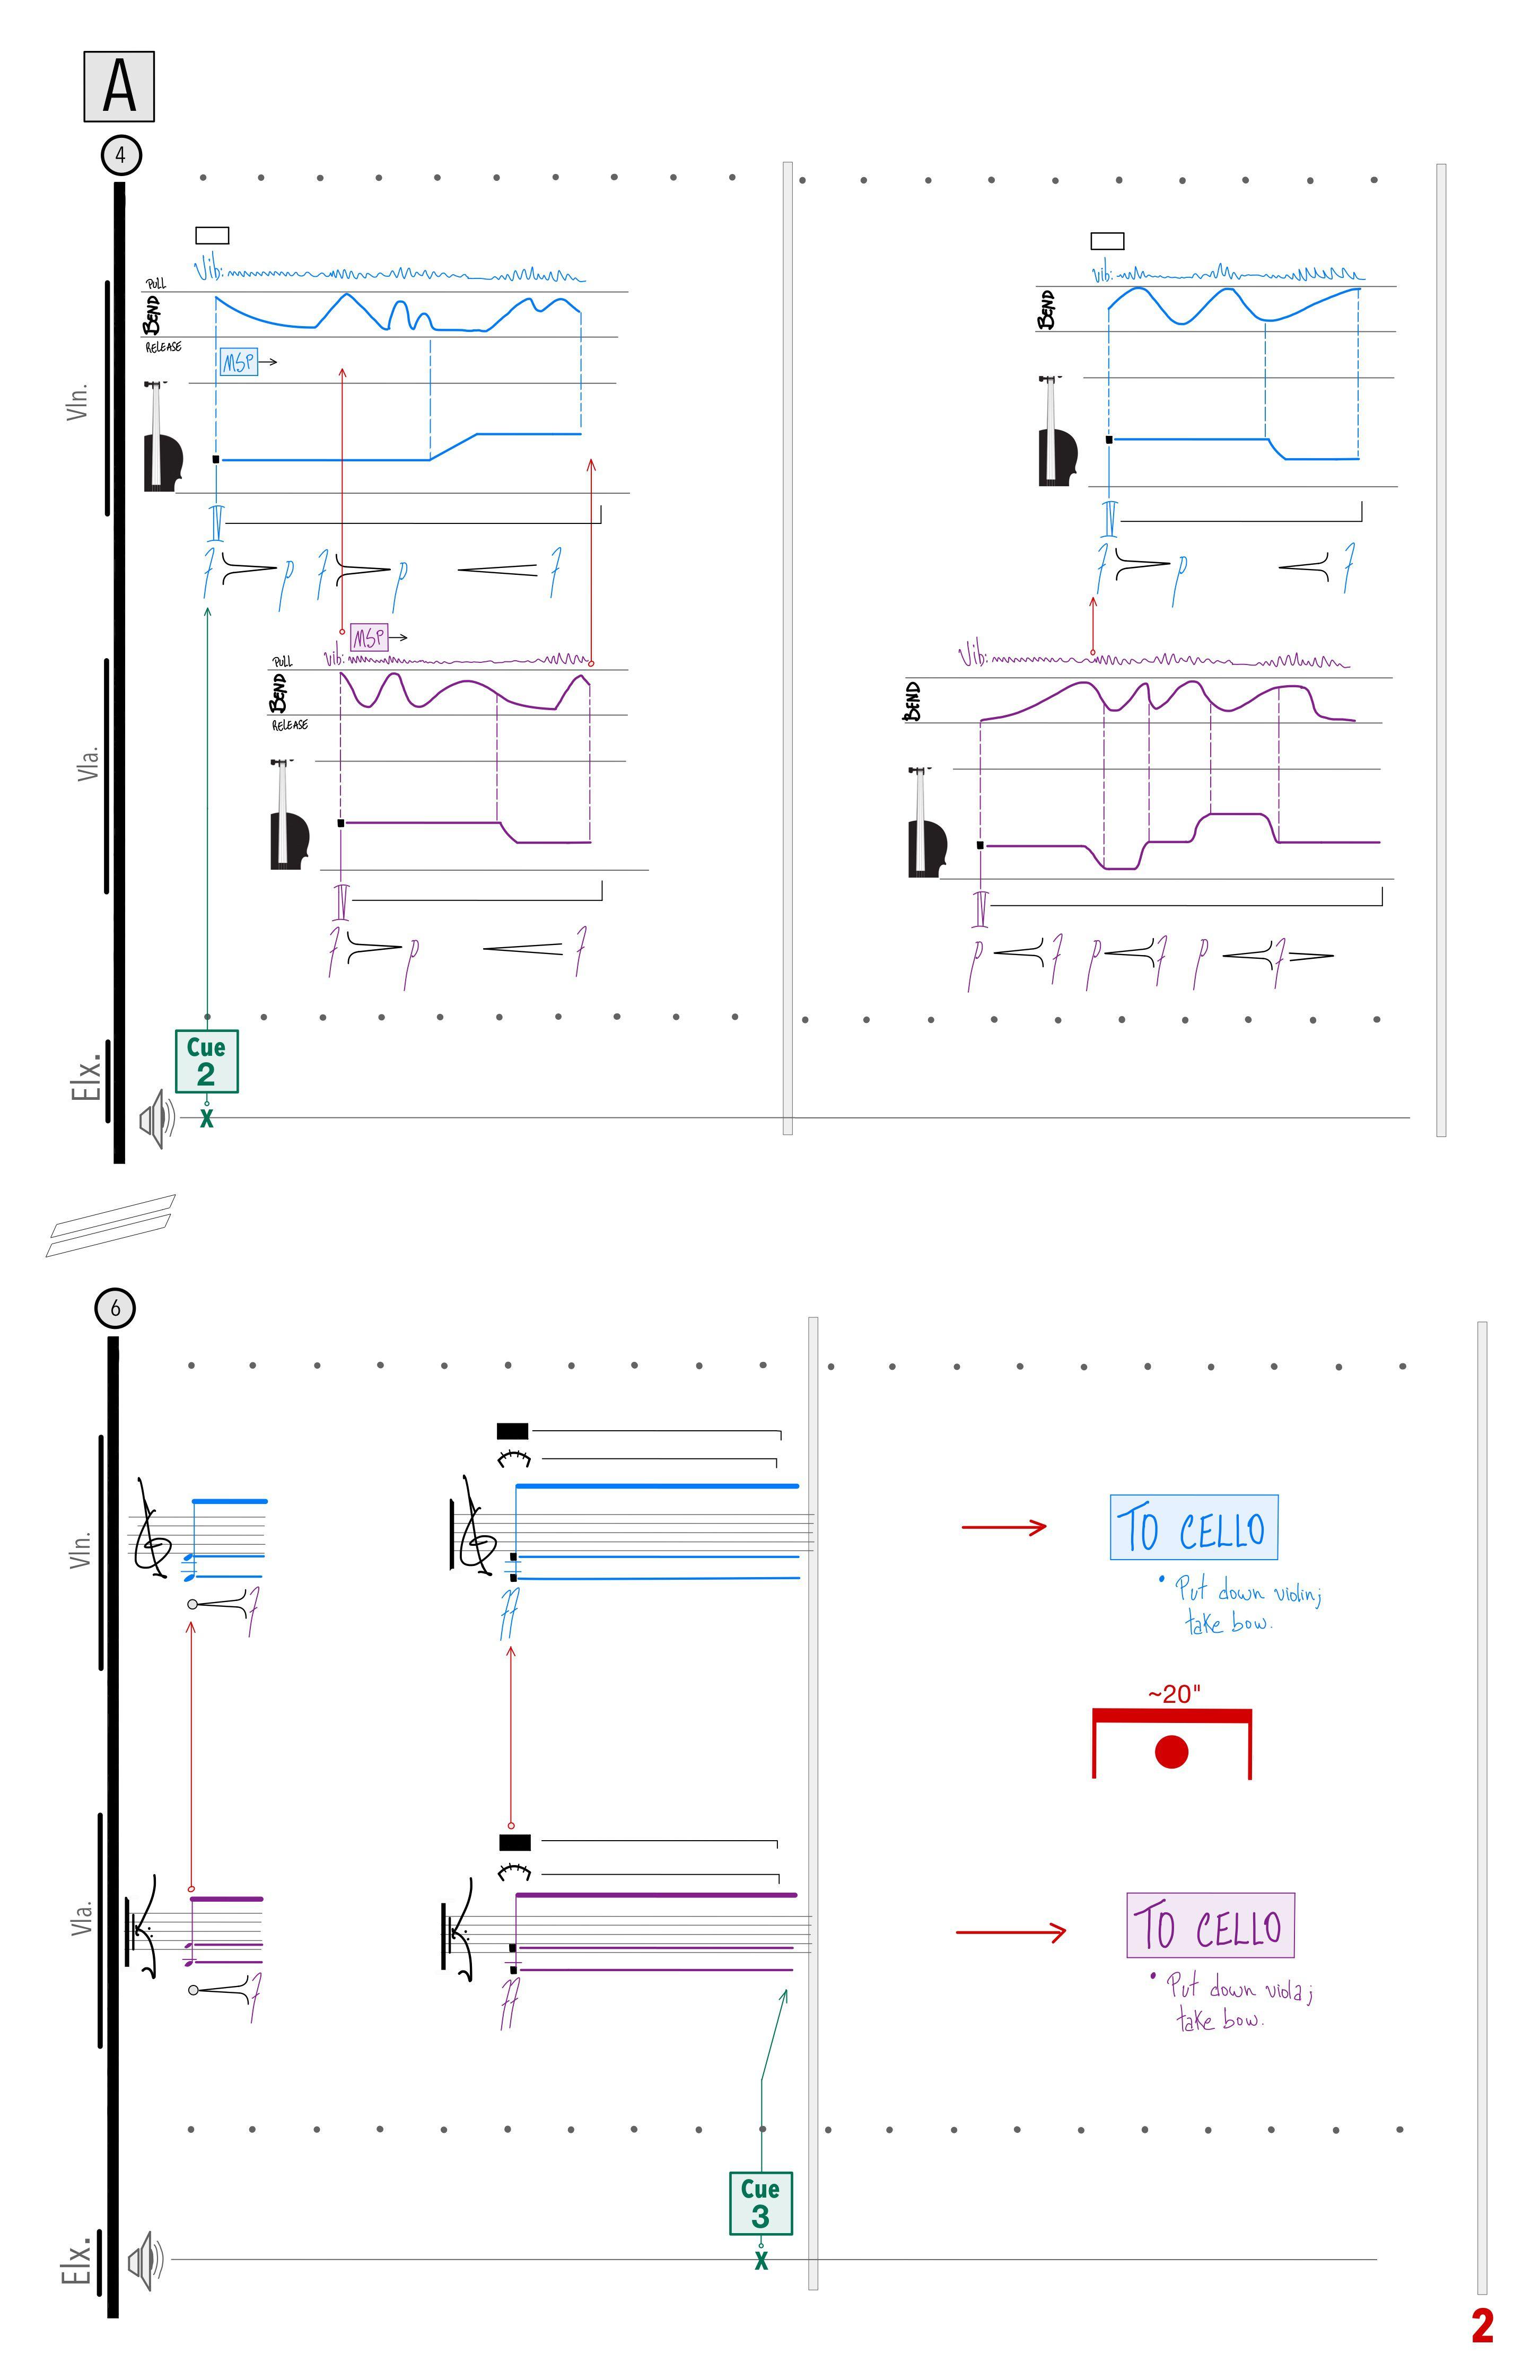
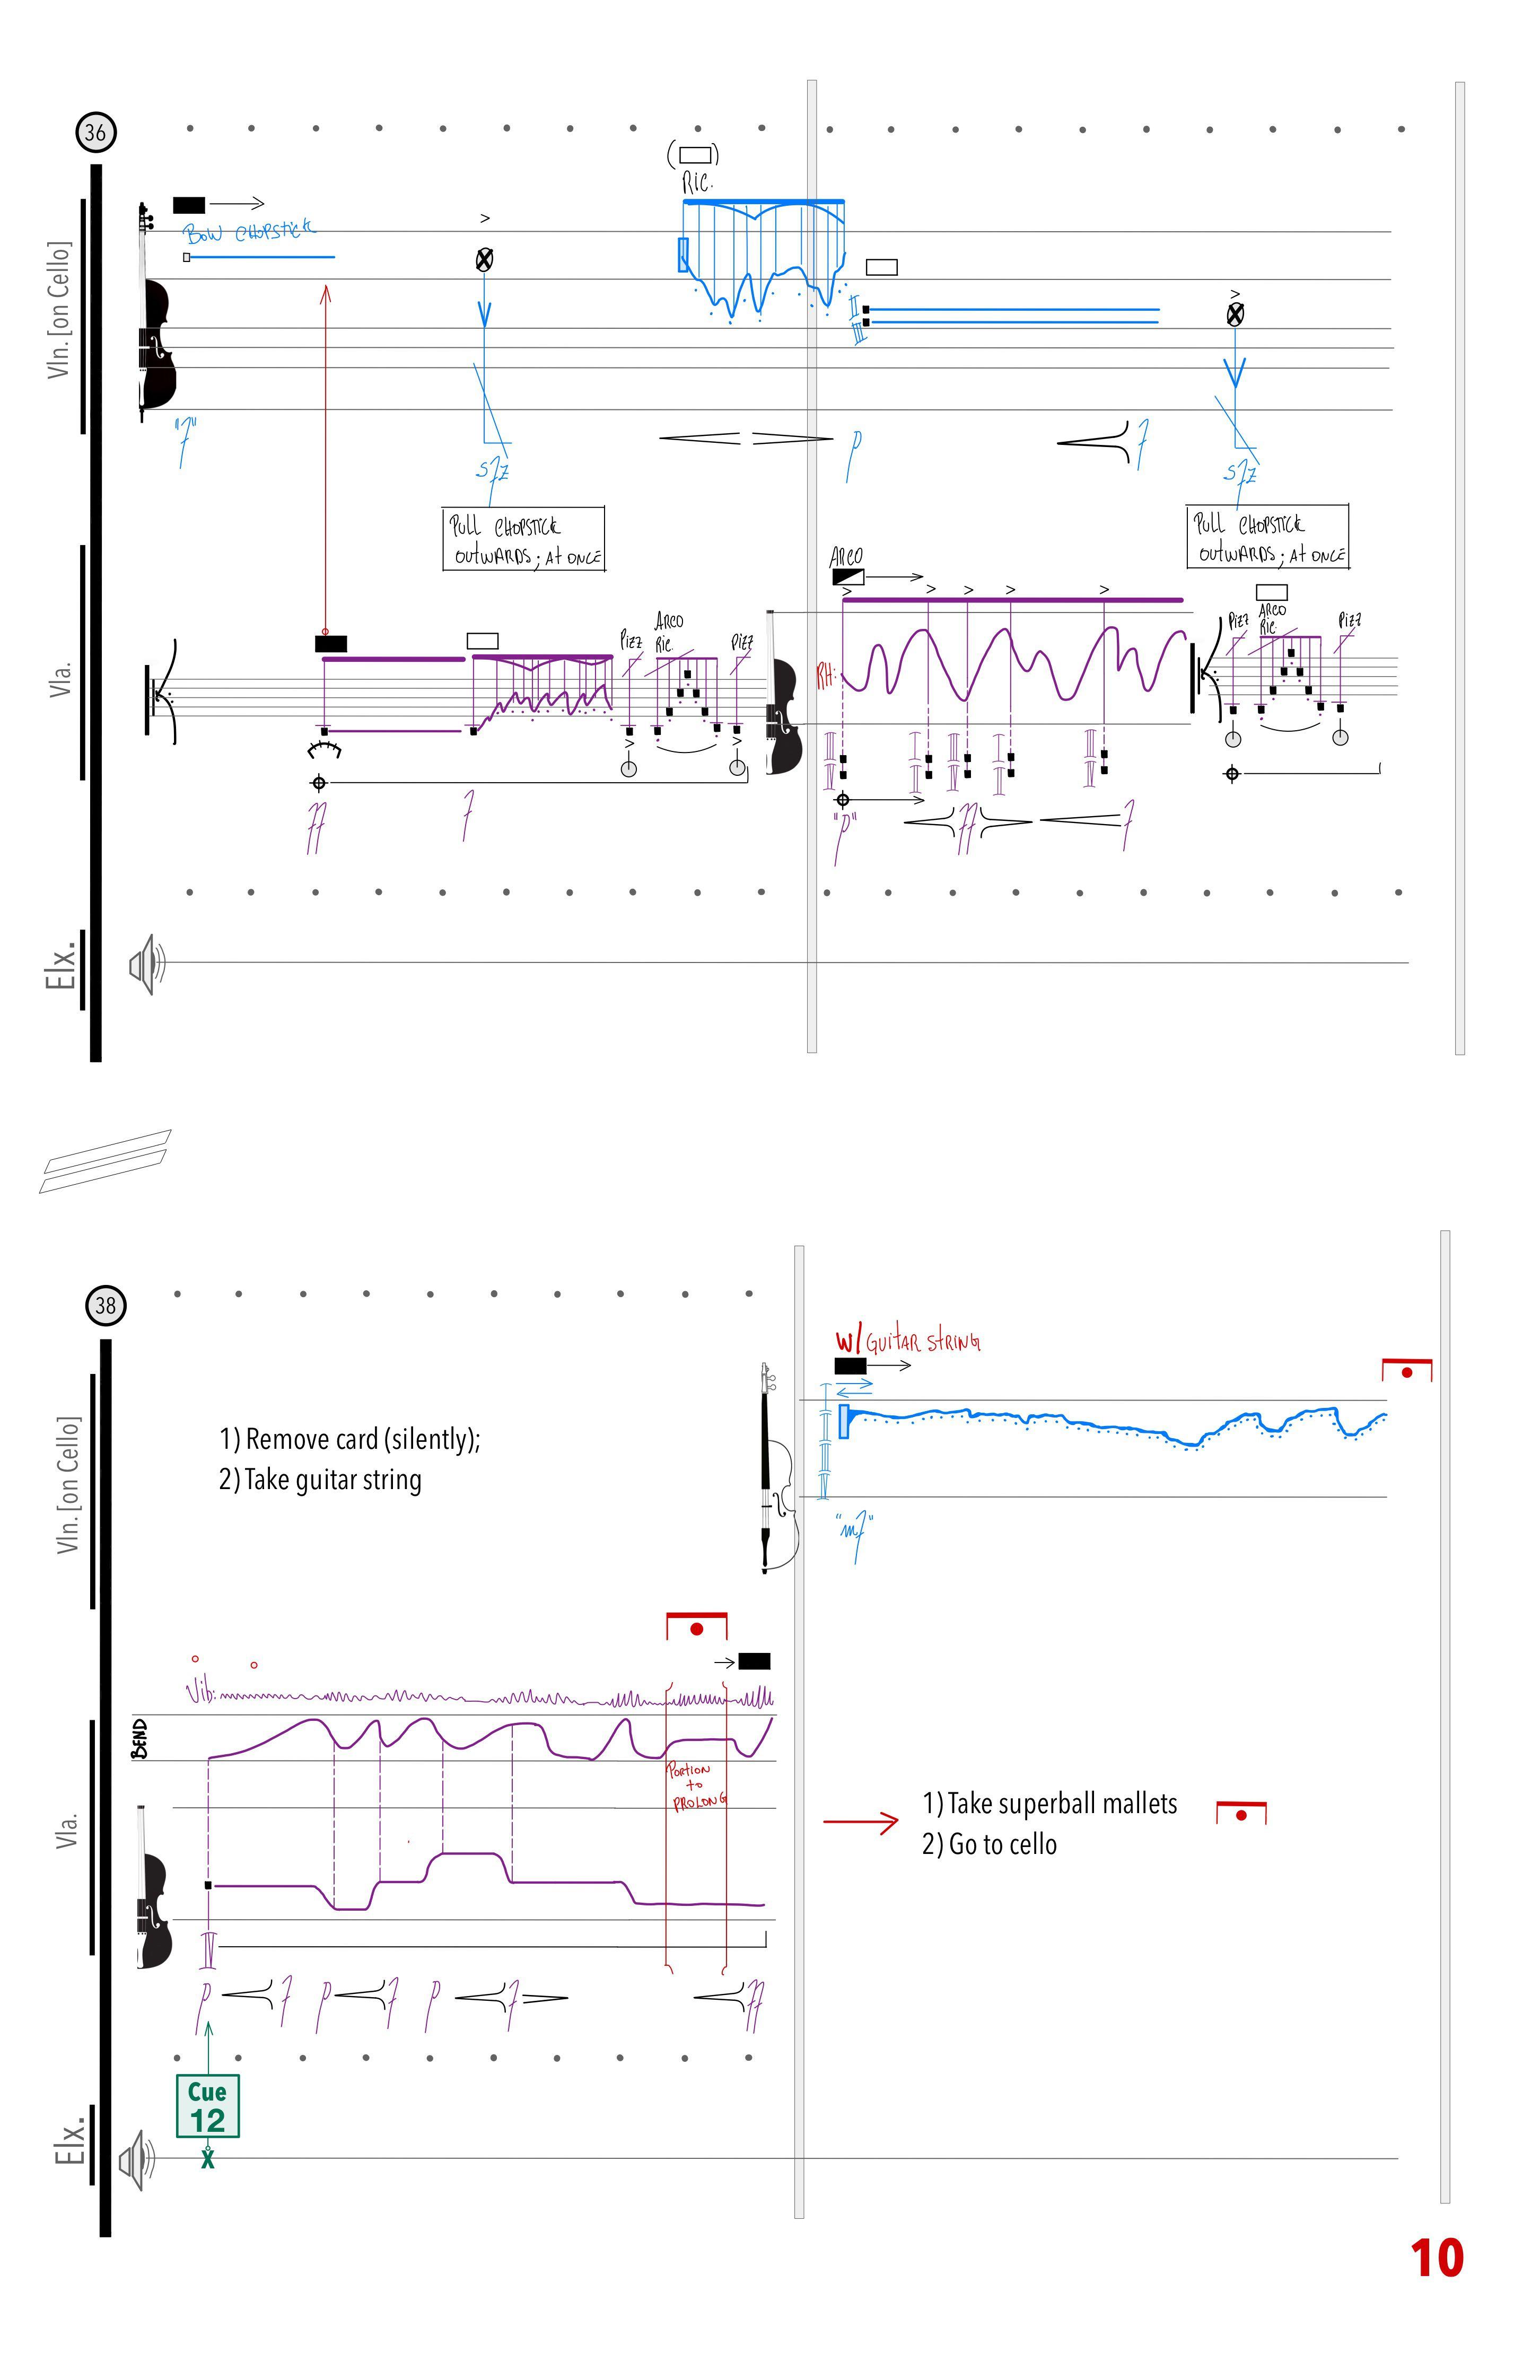
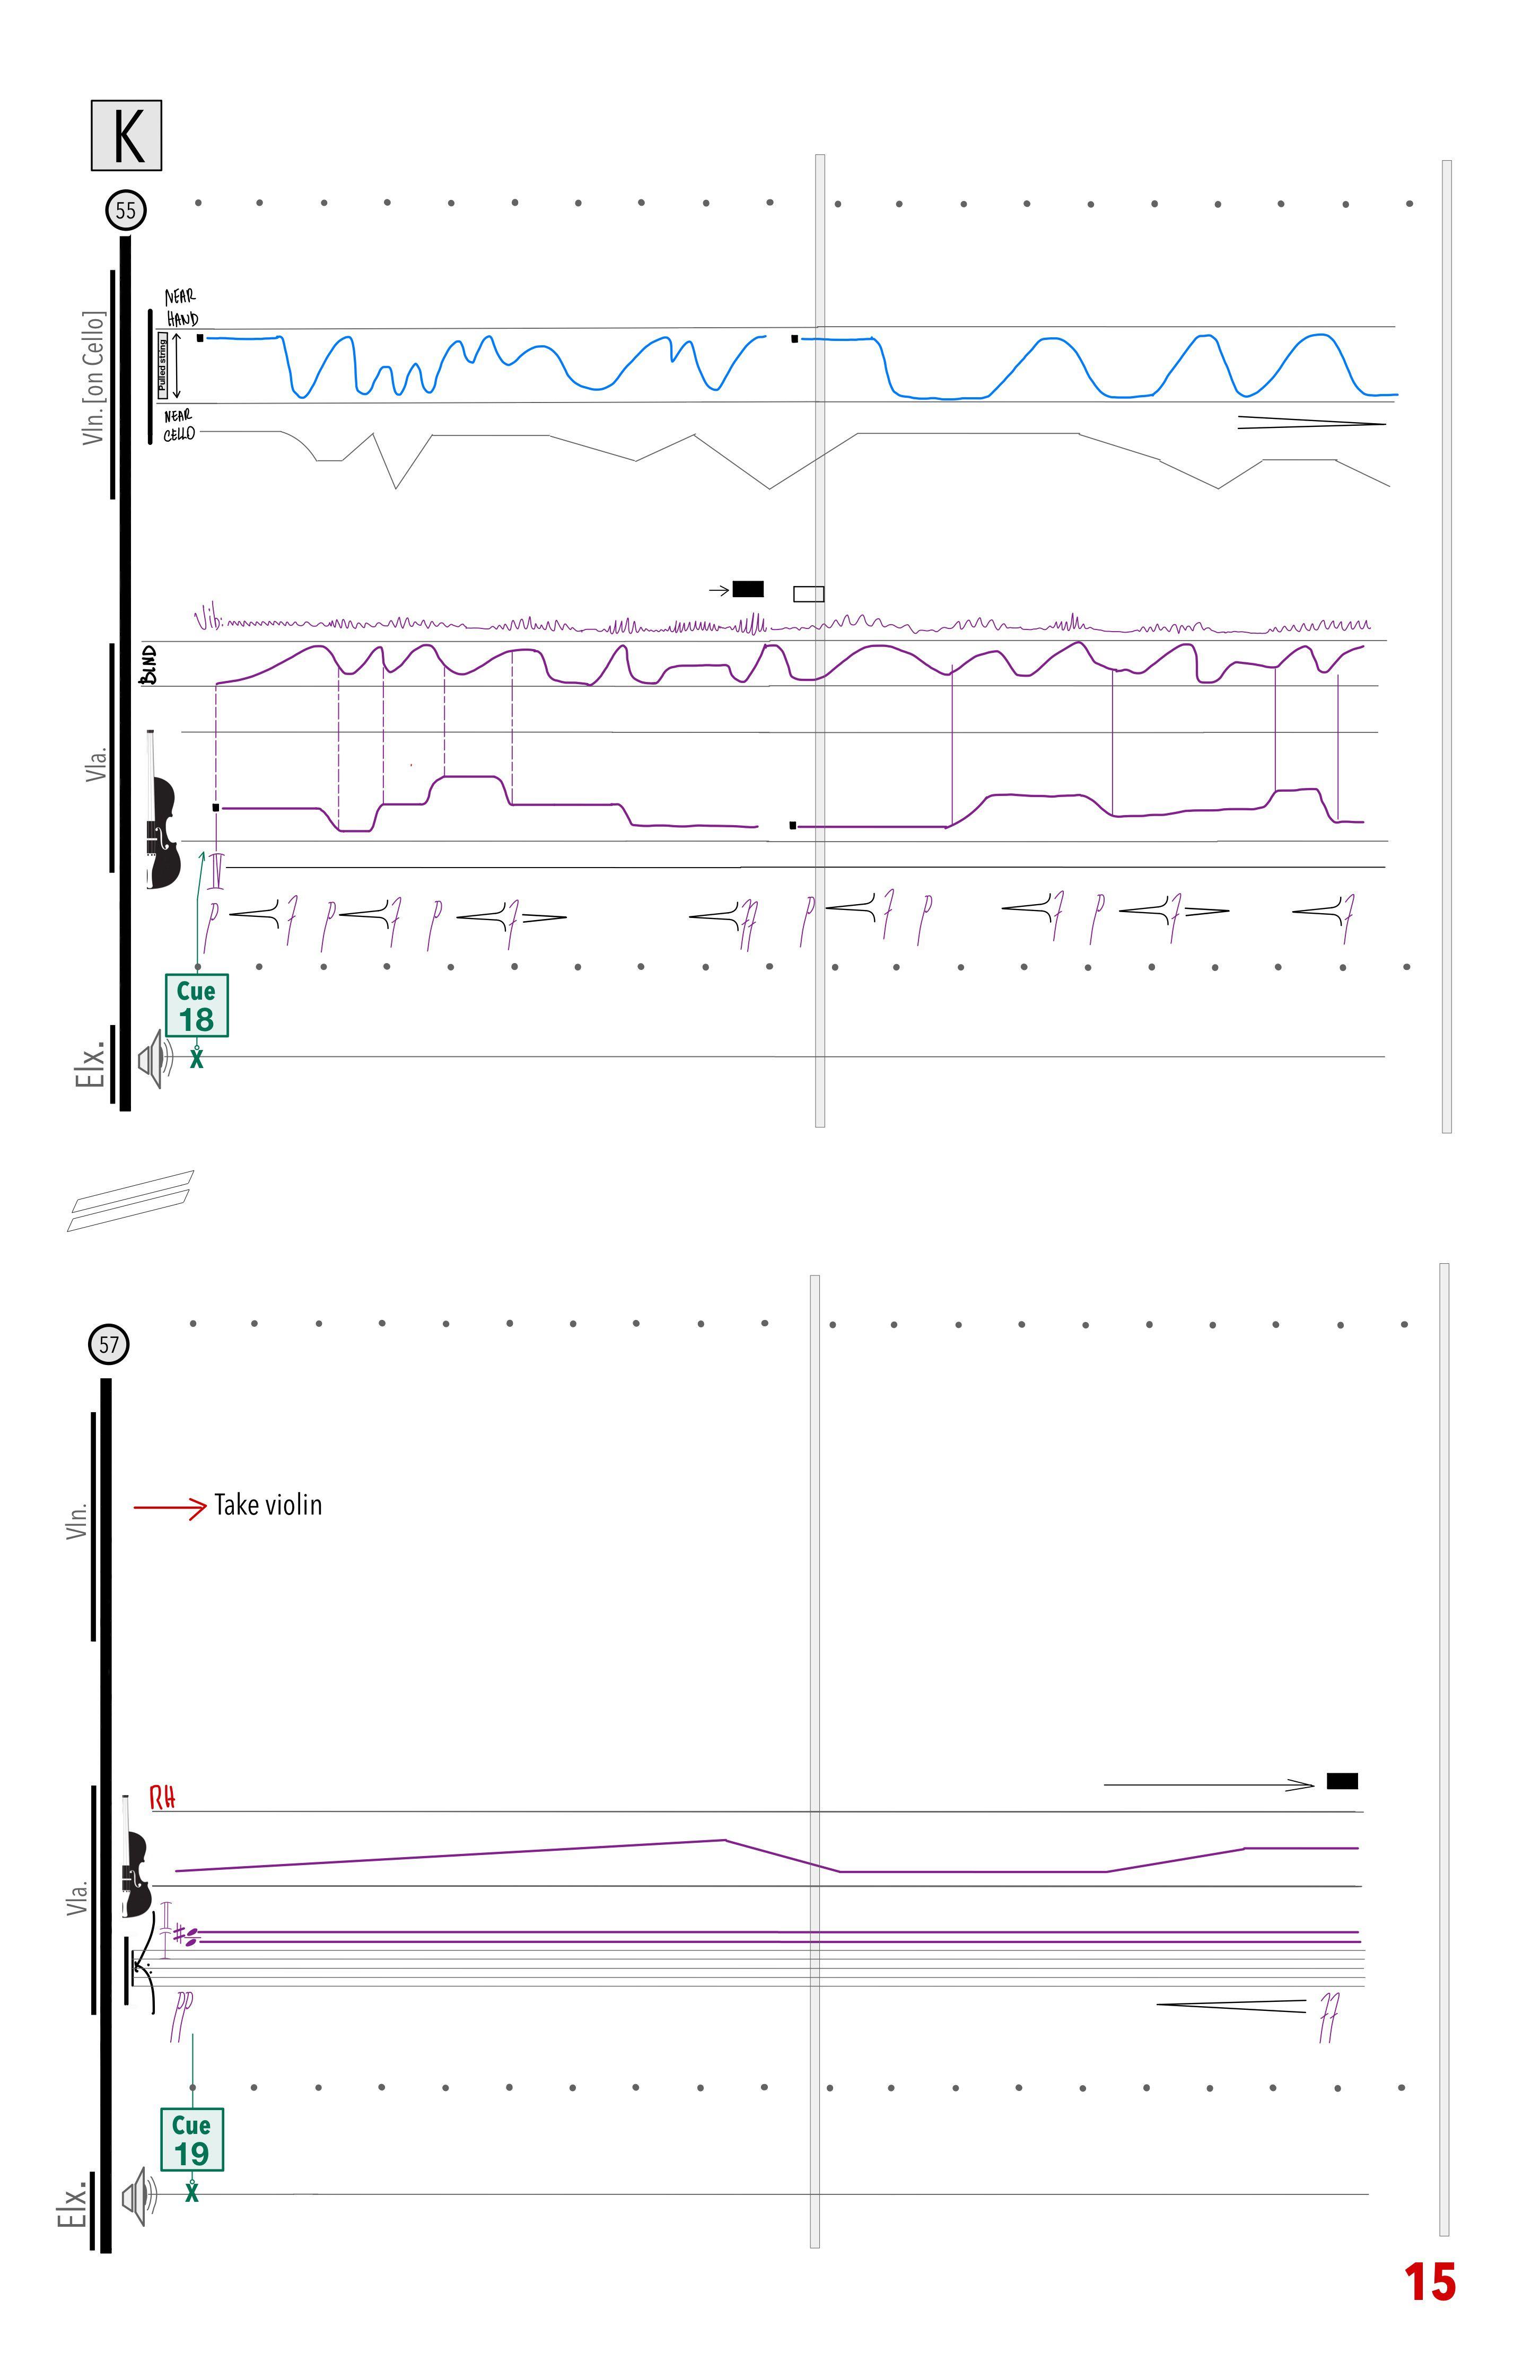
For Vln and Vla: The staff system above indicates “string bending”: the performer should apply a pulling action directly onto the string with the left hand according to the contact point determined by the notation (bottom staff). The upper staff in the diagram indicates the pulling tension gradation by left hand The character oscillation line following “Vibr.” indicates the speed of LH vibration. The sound result of the technique should be close to a wavering sound as in “weeping” or “moaning”. Changes in dynamics from pressure variation are expected.

Temporal Structure:
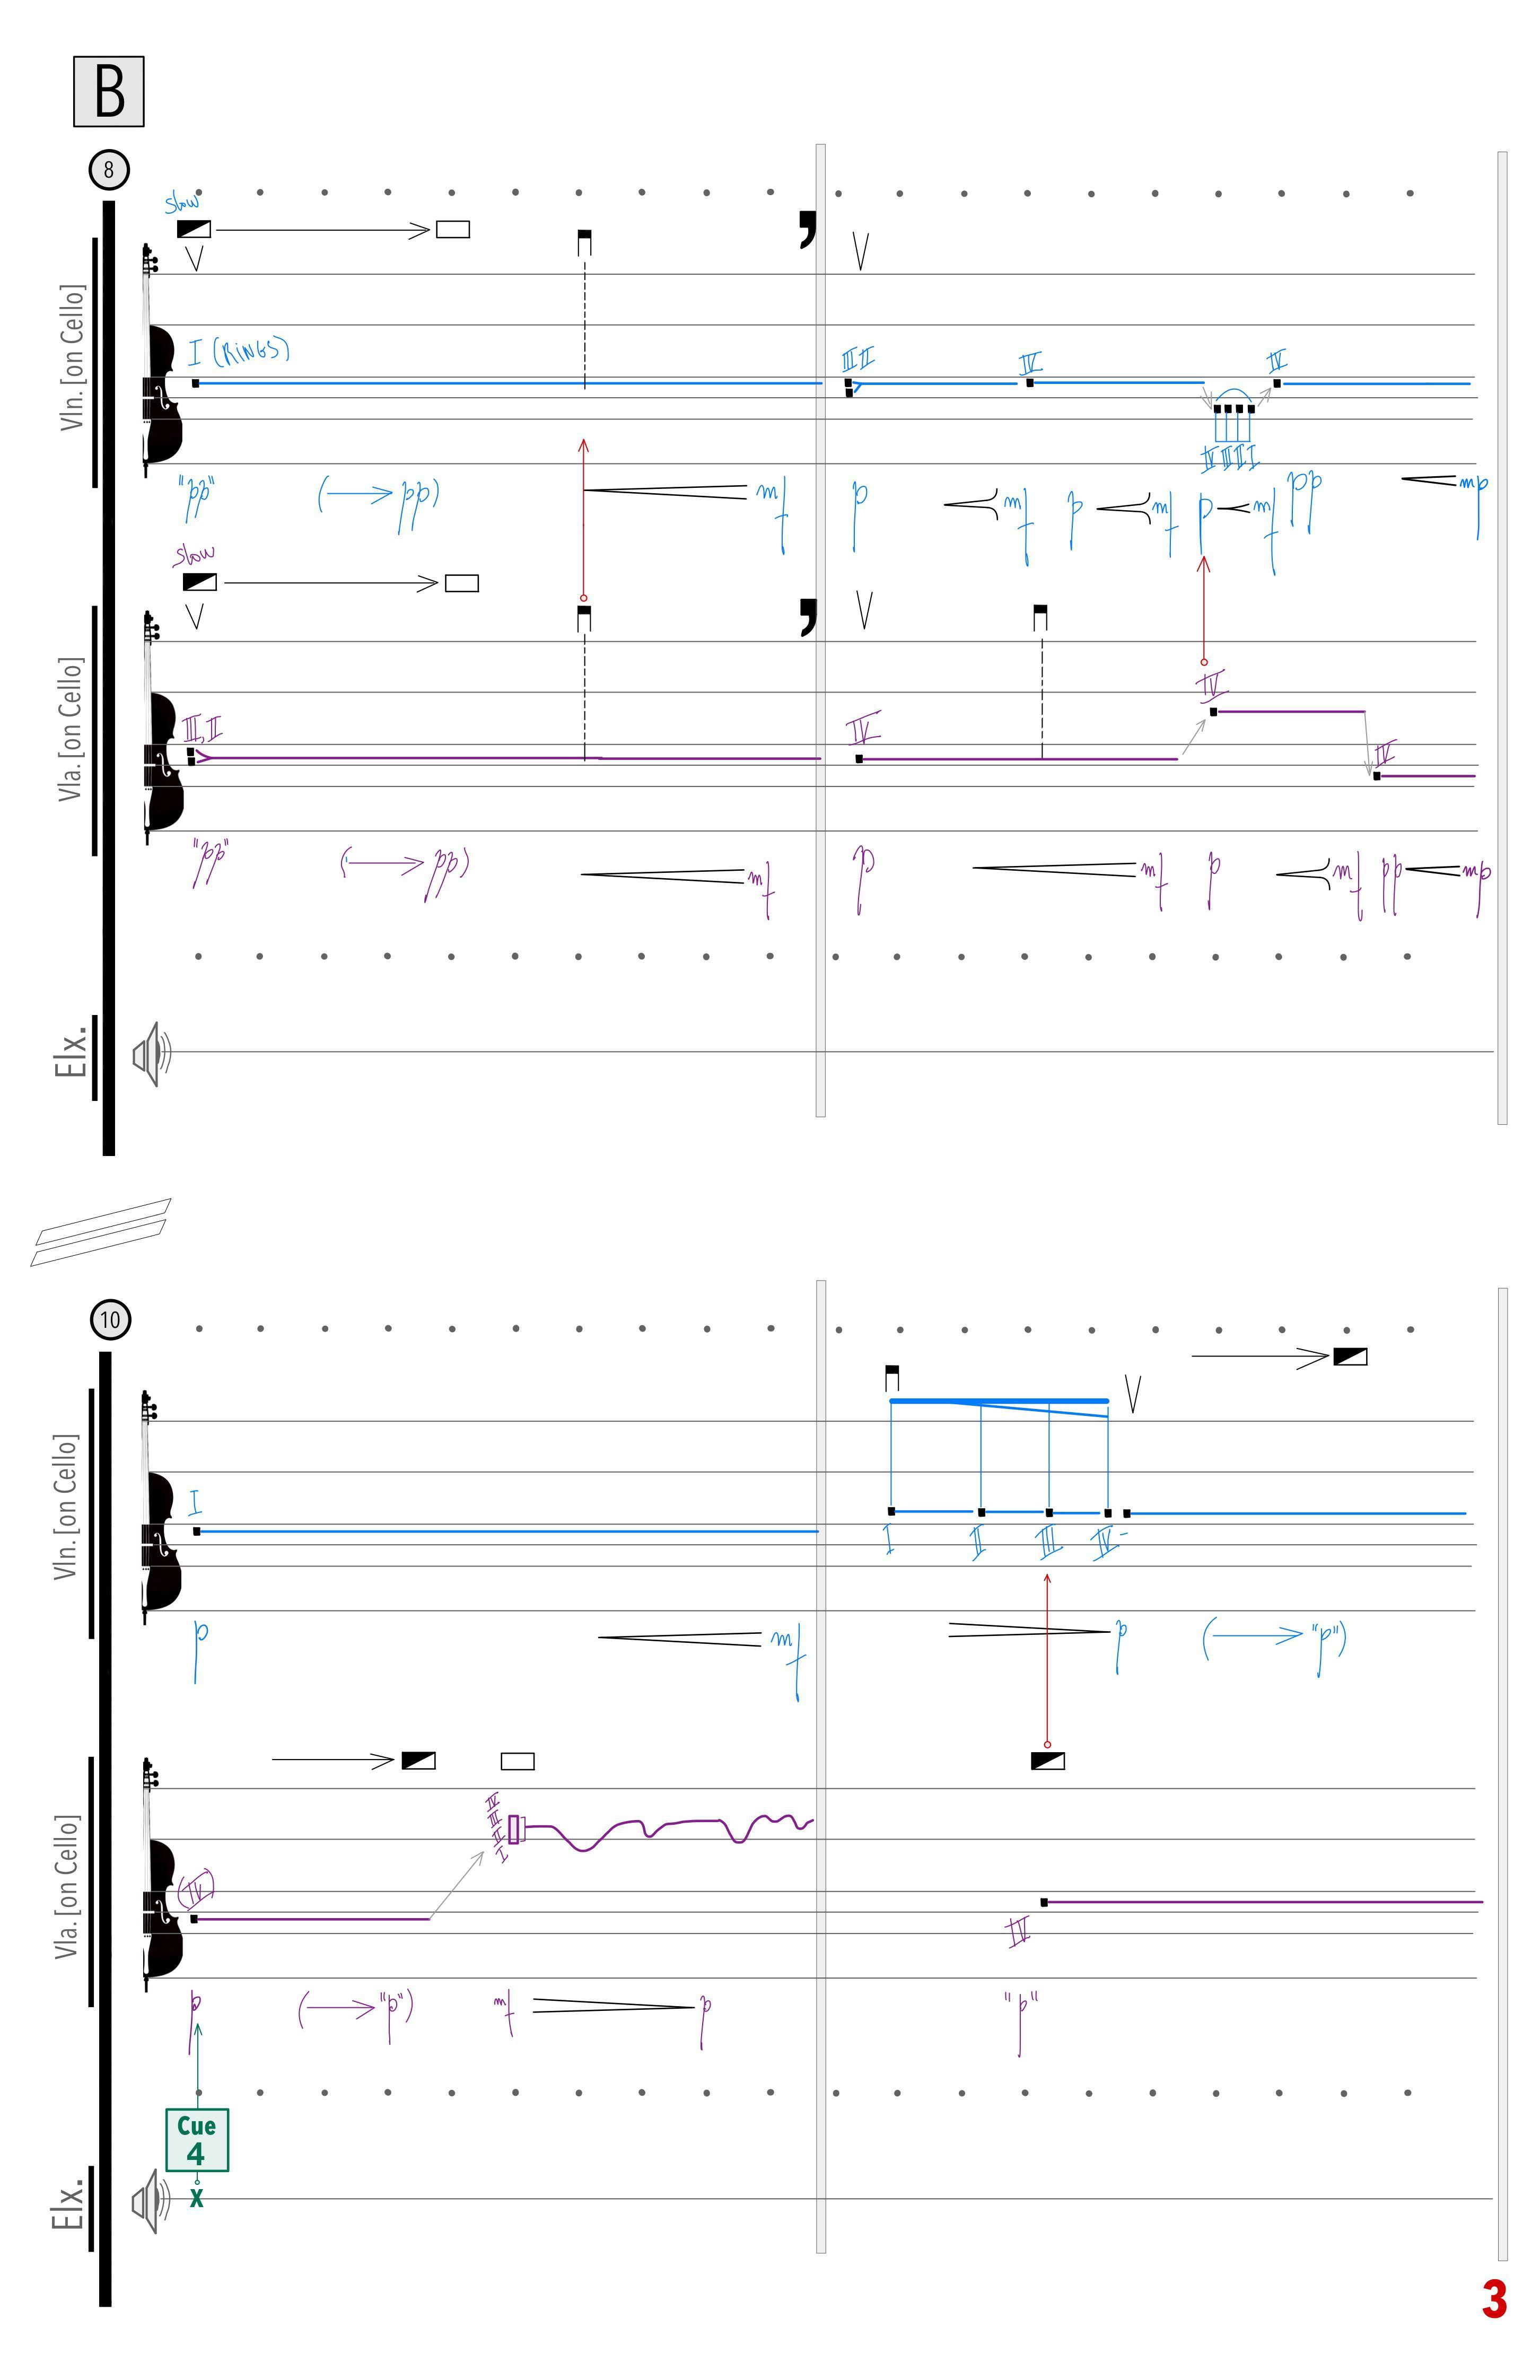
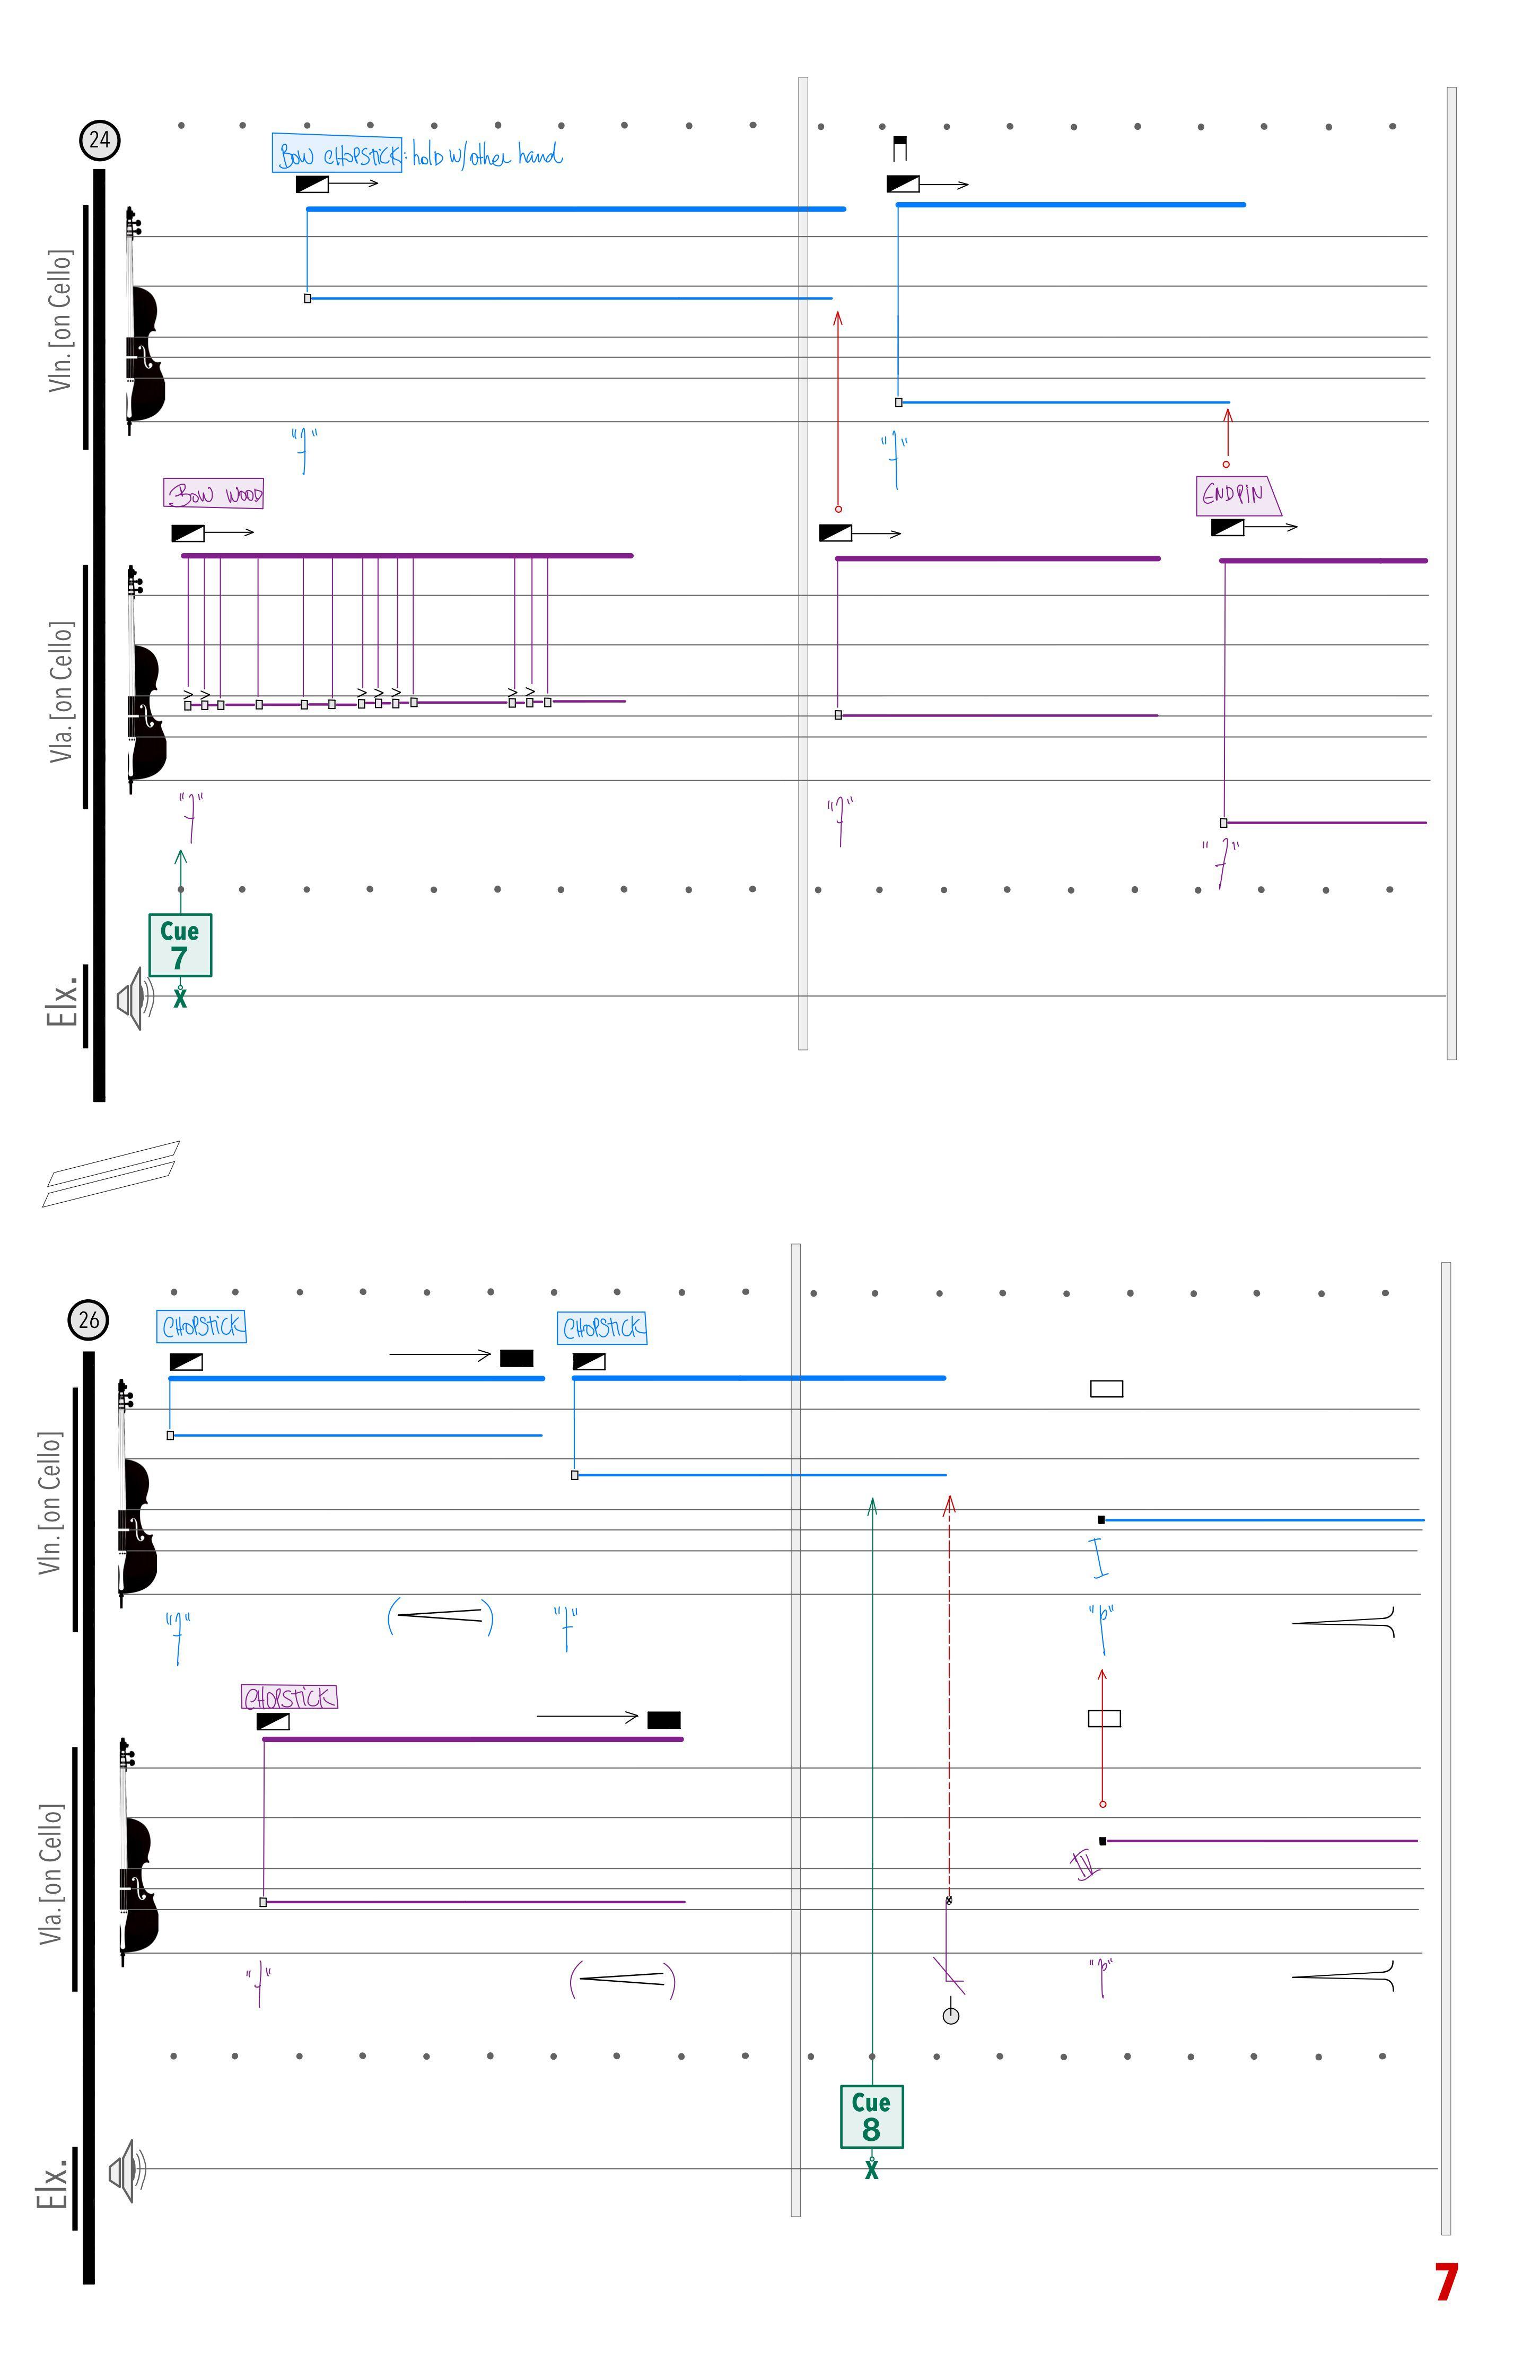
The piece is notated with a chronometric guide. The sequence of dots in the upper (and bottom) part of each system indicates the interval of one second. Therefore, the piece is organized in blocks/measures of 10 seconds. Systems with different durations are indicated in the score with fermatas. The instrumental gestures are notated roughly proportionate to the chronometric guide.
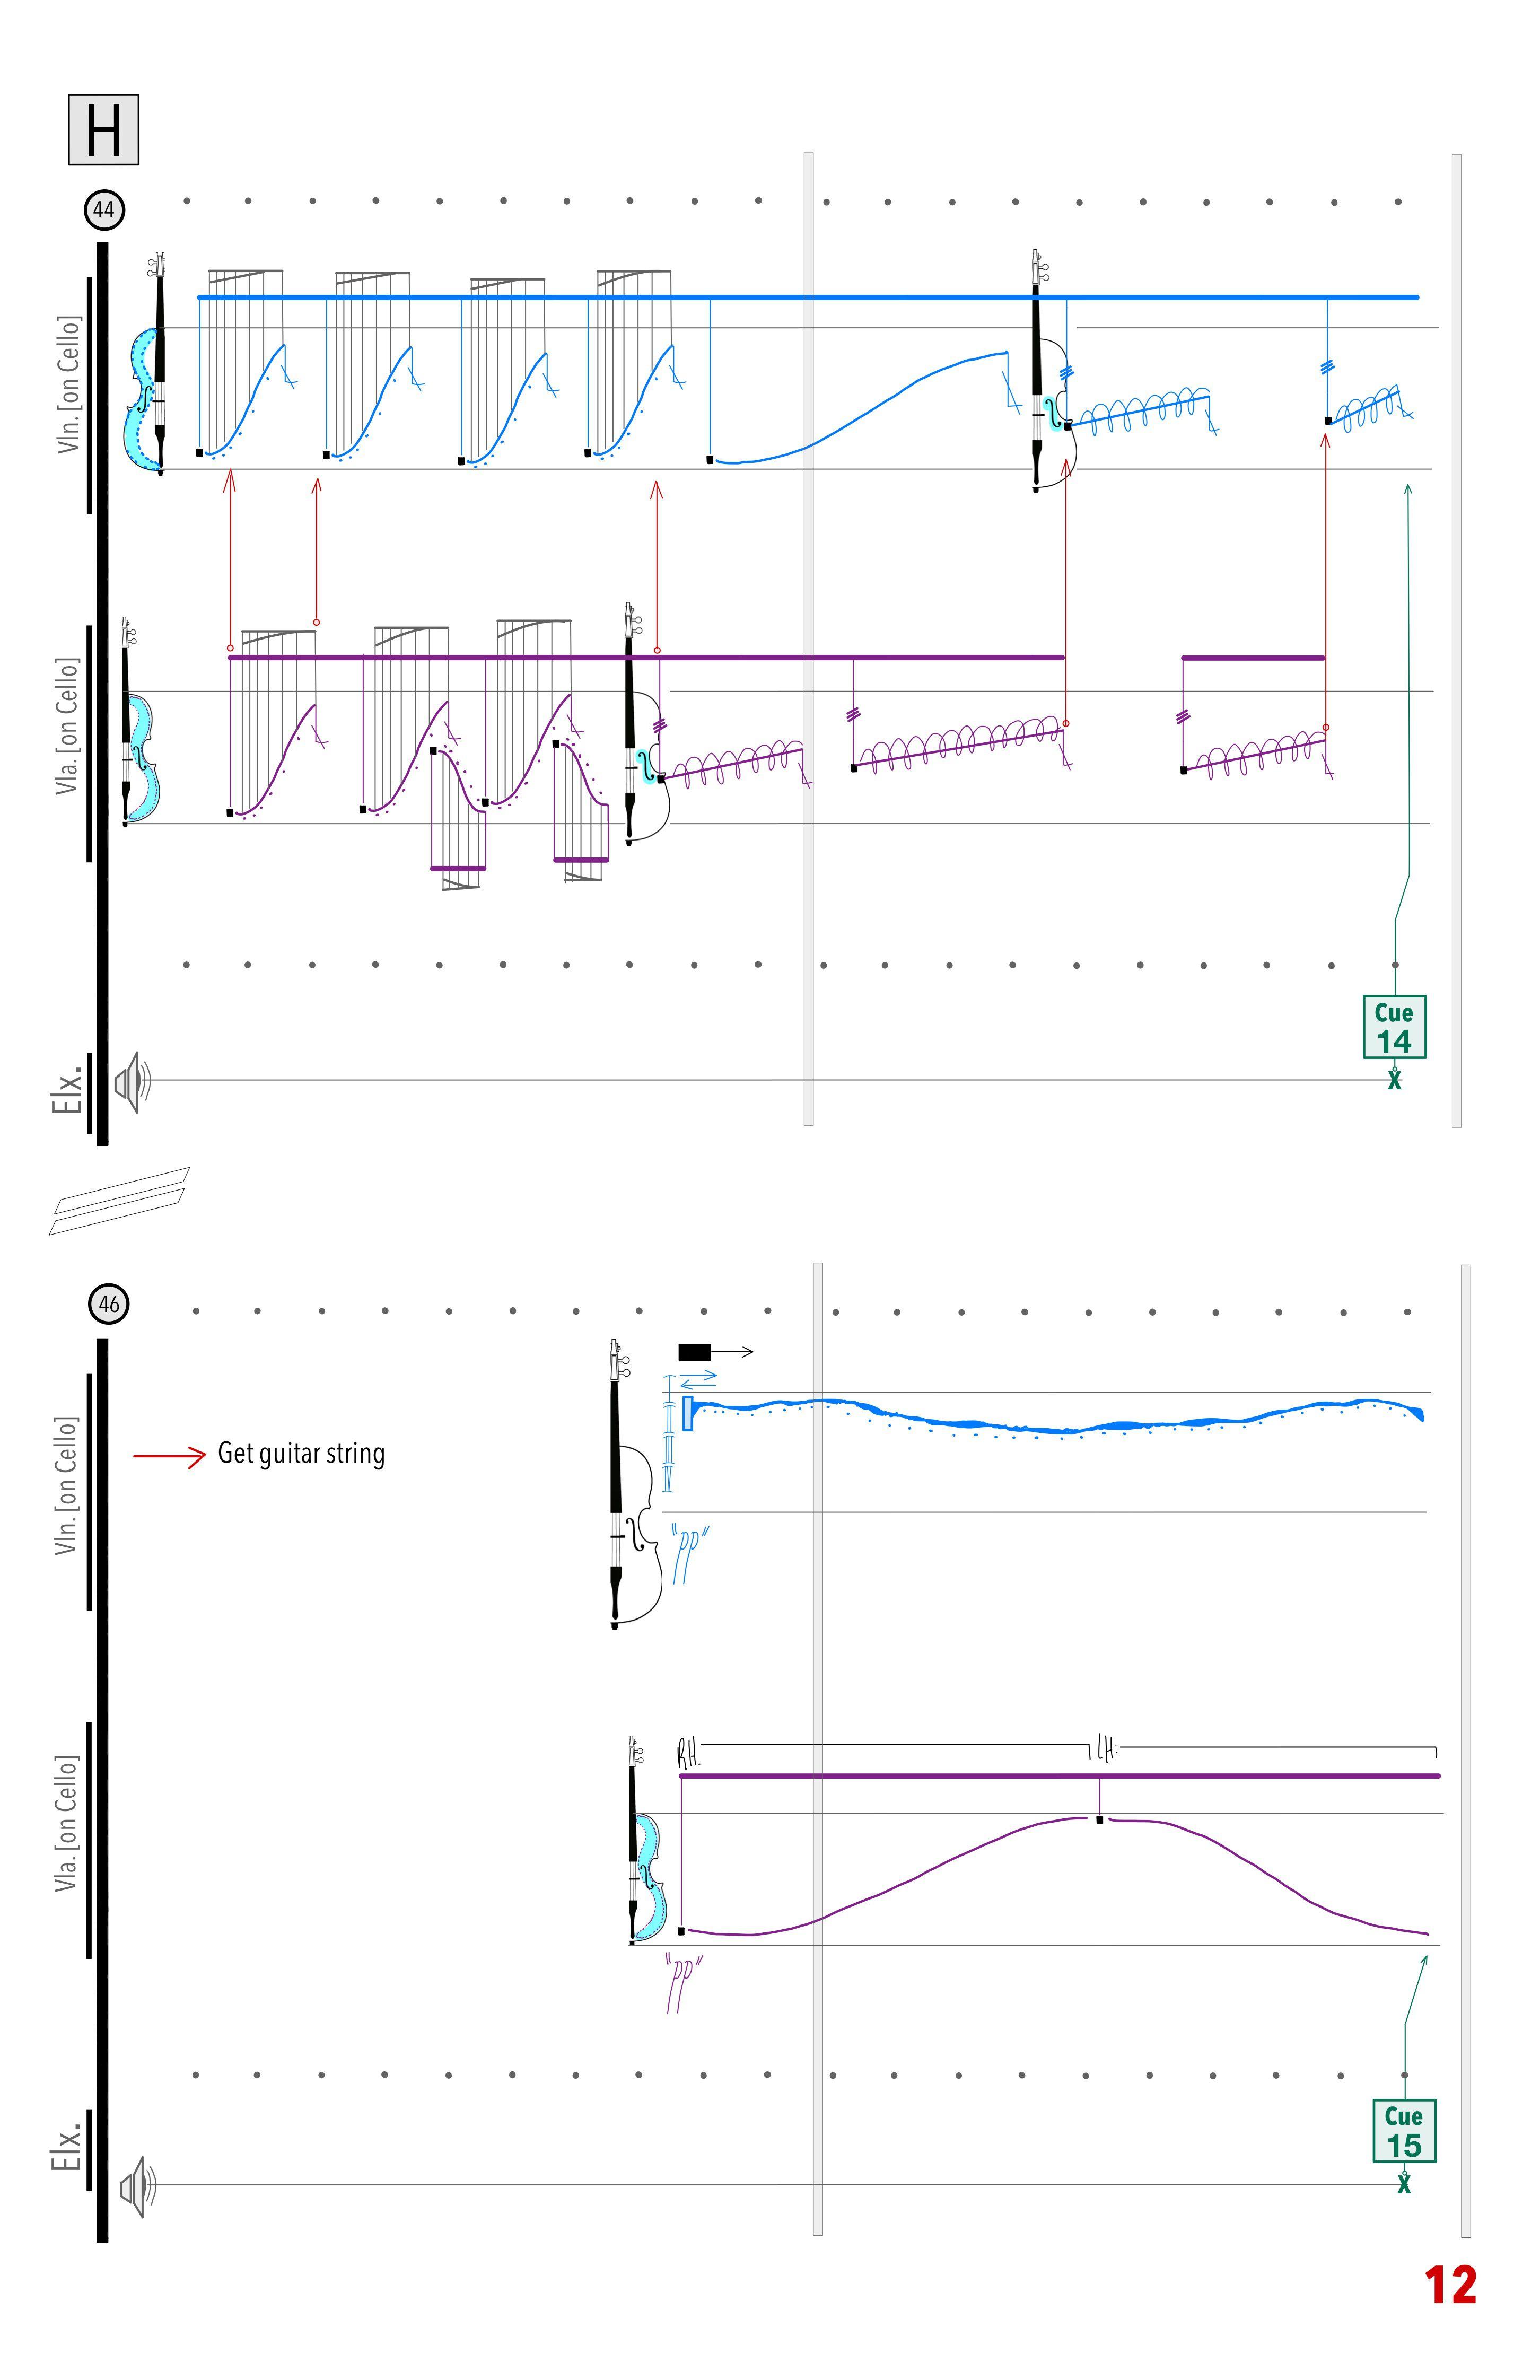
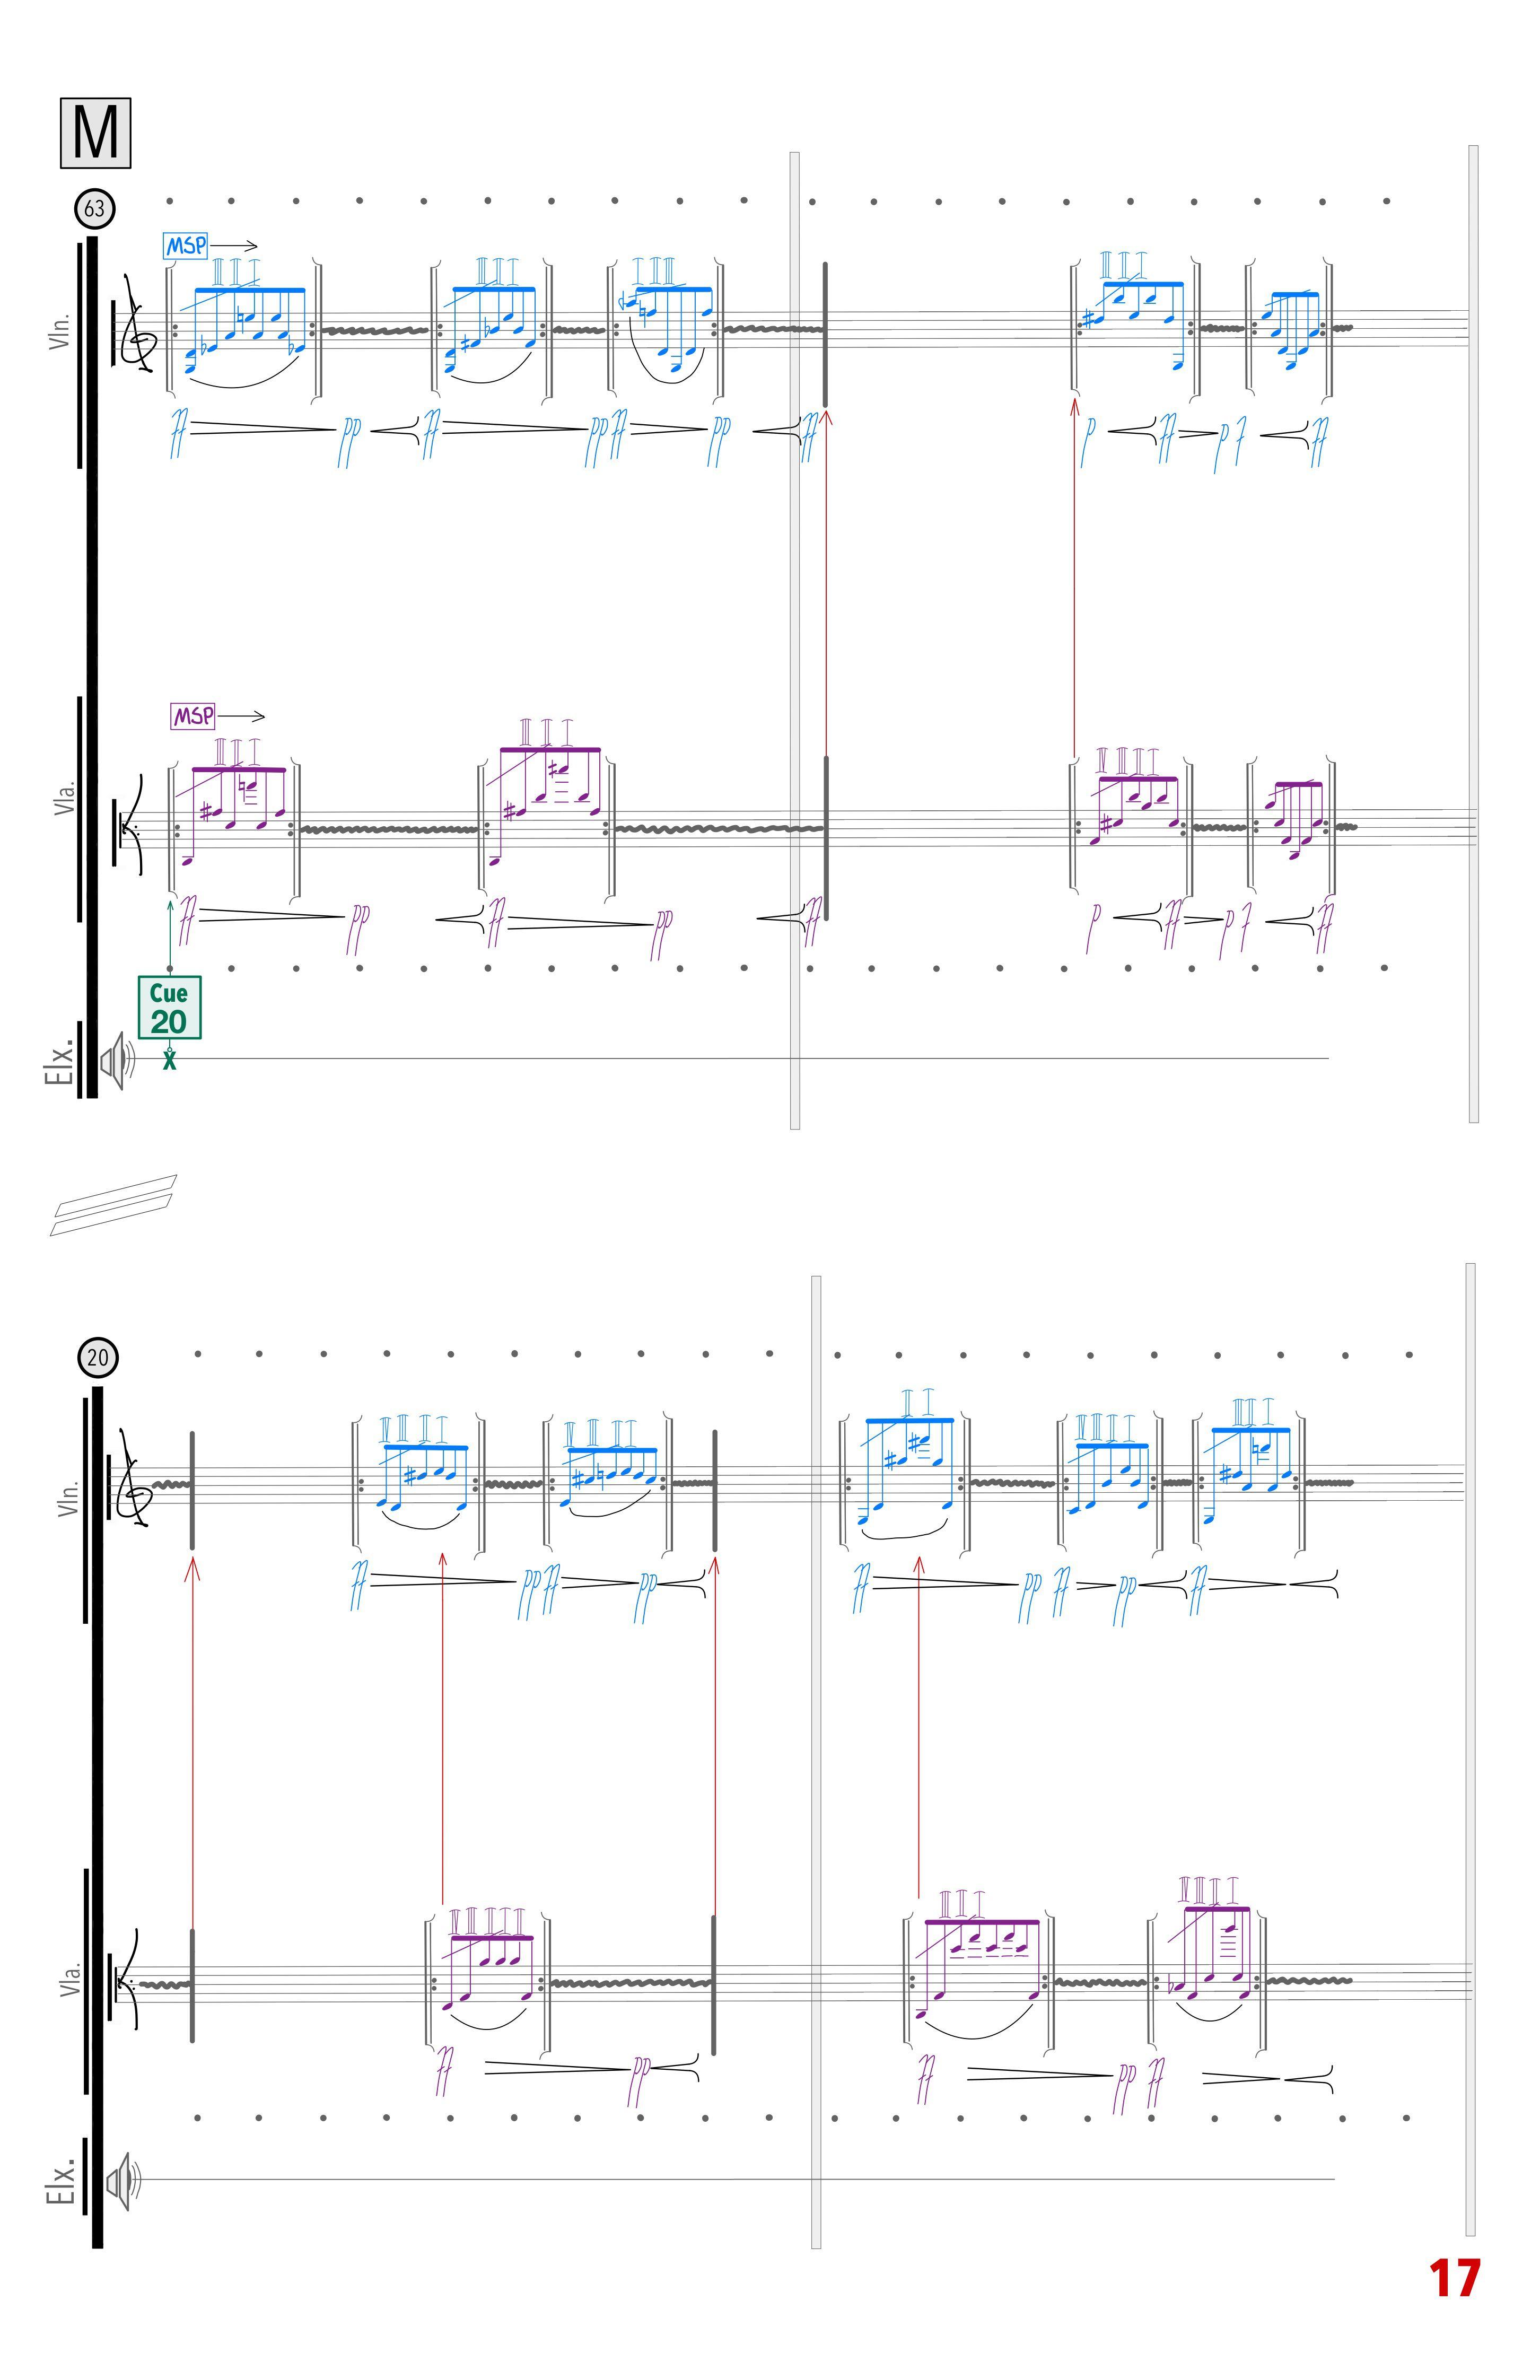
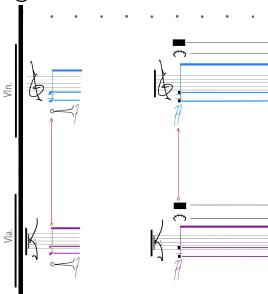
Color and simultaneities:
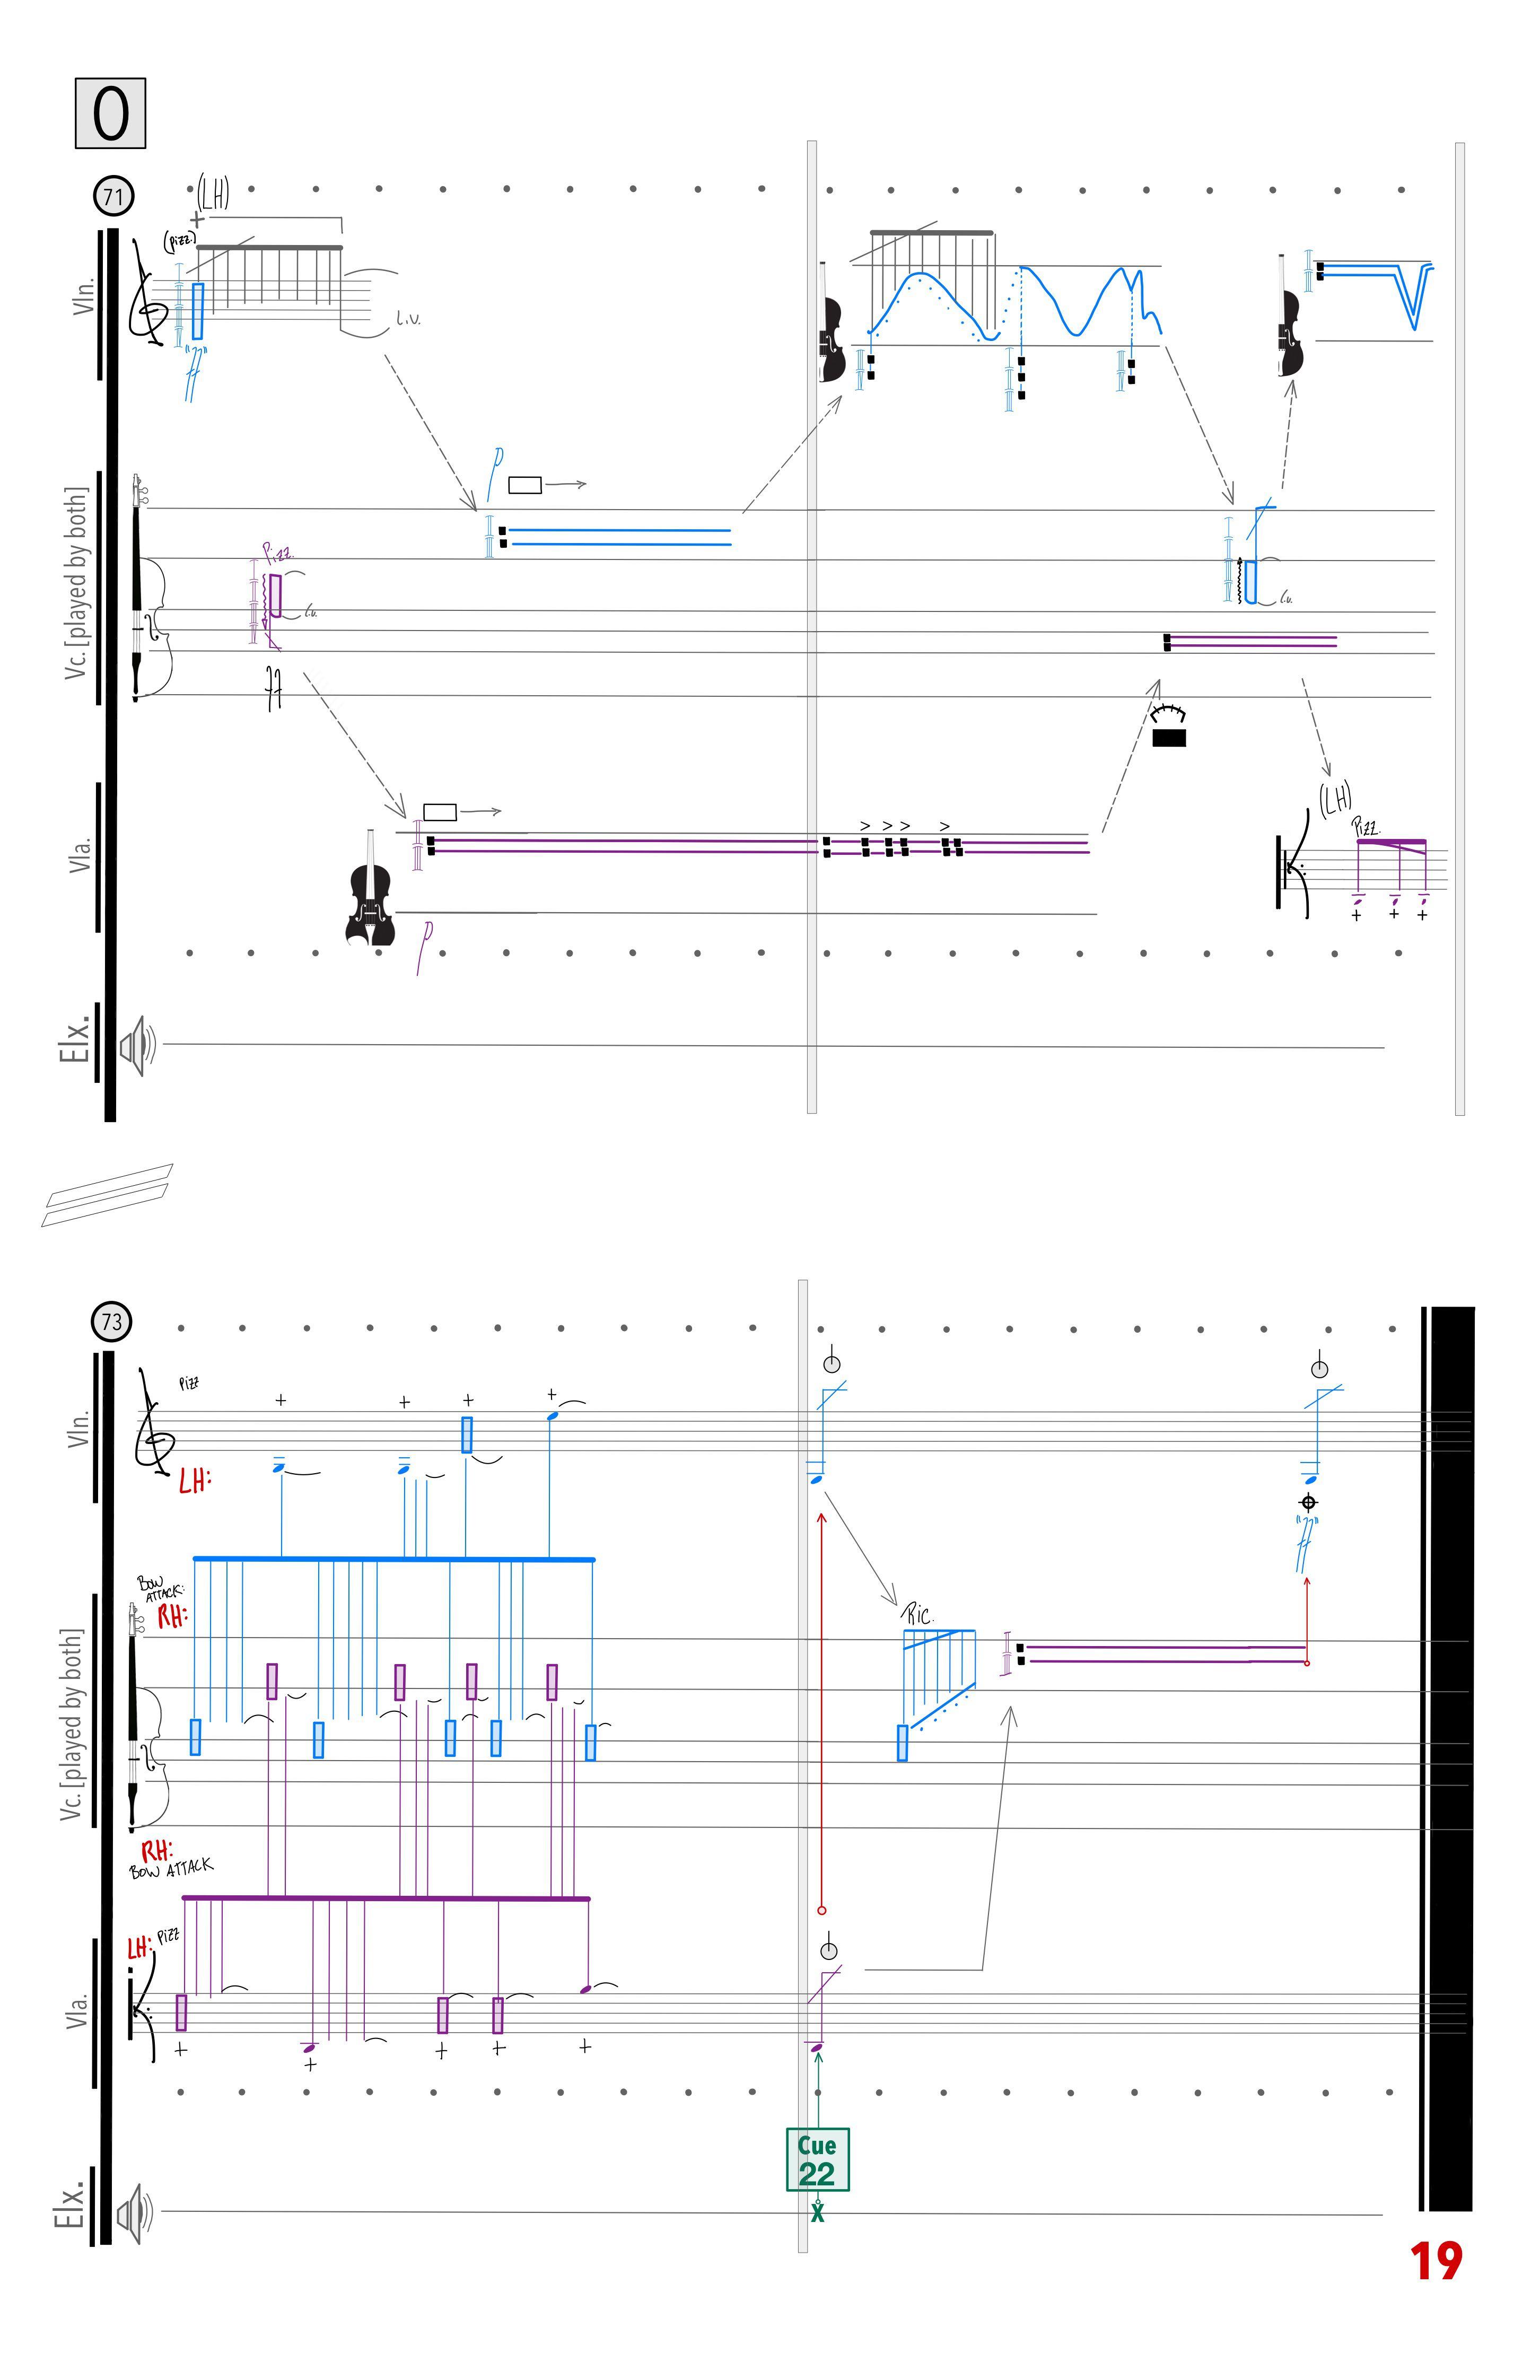
The present score was prepared to identify lines for the violinist in sky blue and lines for the violist in purple. This color-coded system is particularly design to support moments in which both instrumentalists are playing the Cello together. Additionally, red arrows are used to specify cues and simultaneous gestures between both instrumentalists (while playing the Cello or their respective instruments).
Cello Preparation:
The Cello is required to be prepared with a series of objects that total:
4 binder clips. -
4 key rings or paper clips.
1 sturdy plastic card. - A piece of aluminum foil. -
3 robust wooden chopsticks (or other similar objects that could provide a snapping gesture when “plucked”). -
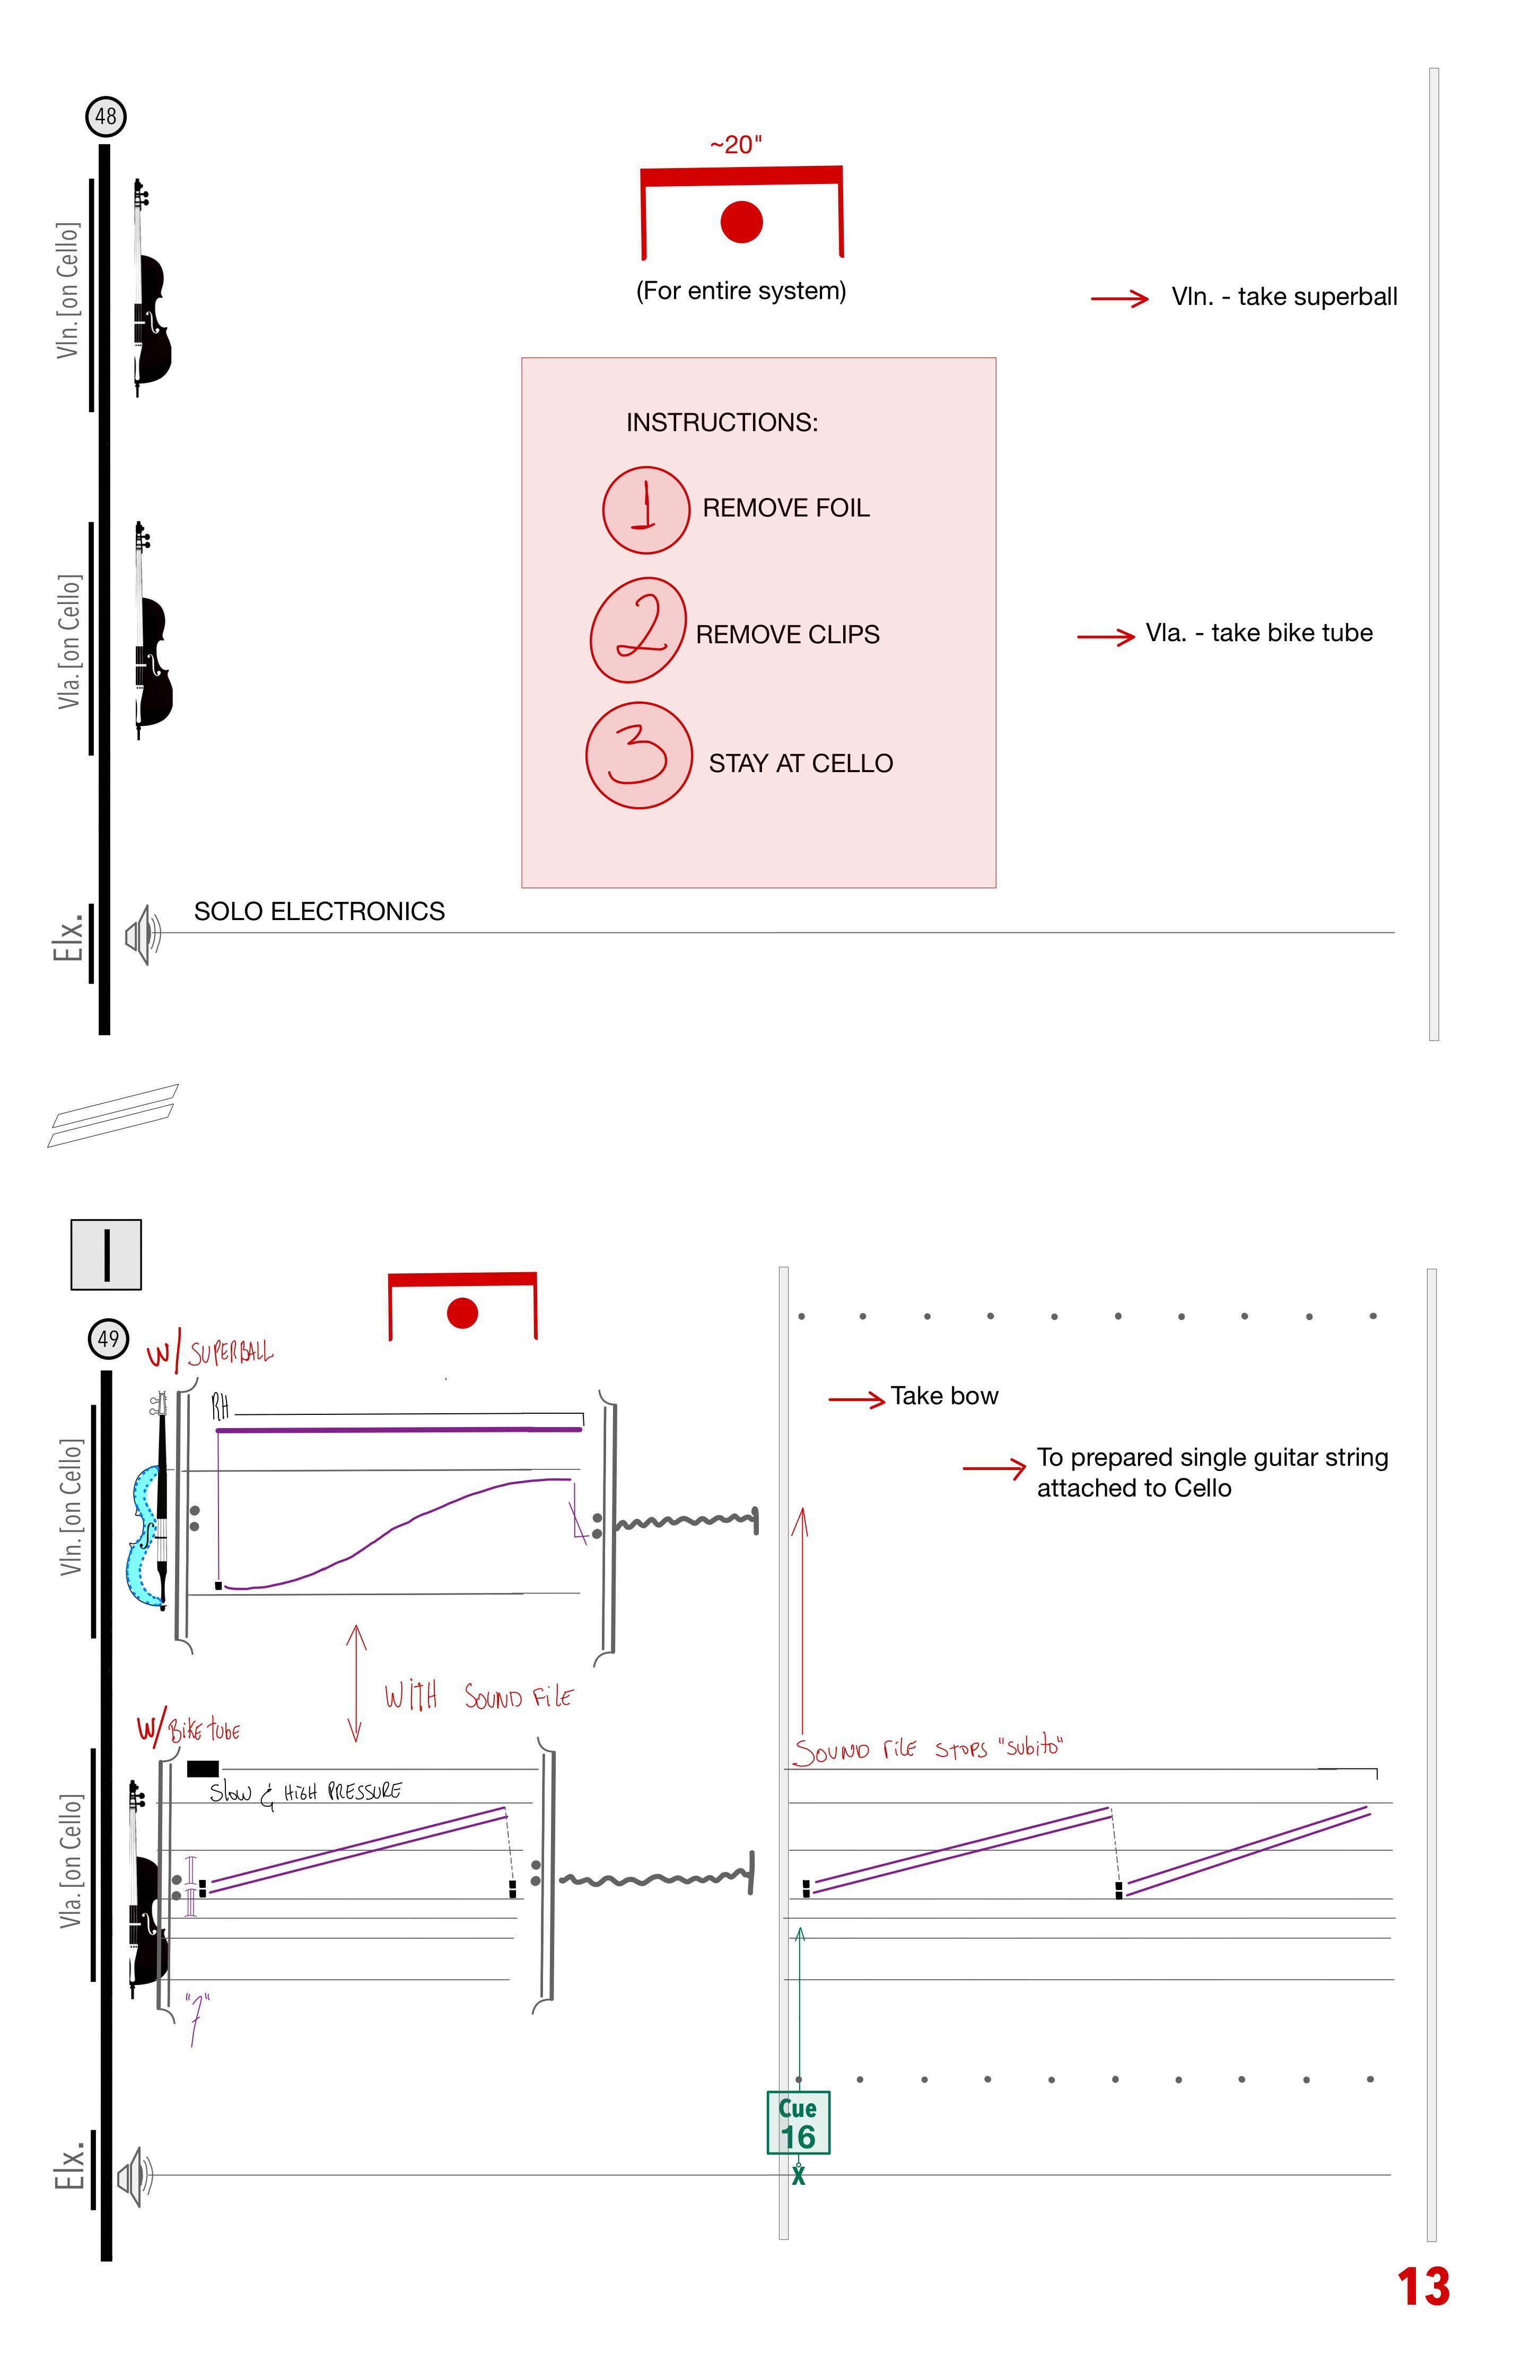
1 steel wound robust guitar string (preferably with a ball end) that hangs by being looped around either one of the strings of the cello or the tailpiece.
The picture above identifies an approximate placement of all binder and paper clips, the foil, and one chopstick. The other 2 chopsticks should be placed (tightly positioned through the strings) along the fingerboard and the plastic card close to the nut (also through the strings). The precise positioning of each element should consider the size of the Cello, its resonance, the bows used, and the instrument’s state of conservation. Please contact the composer for further documentation and instructions.
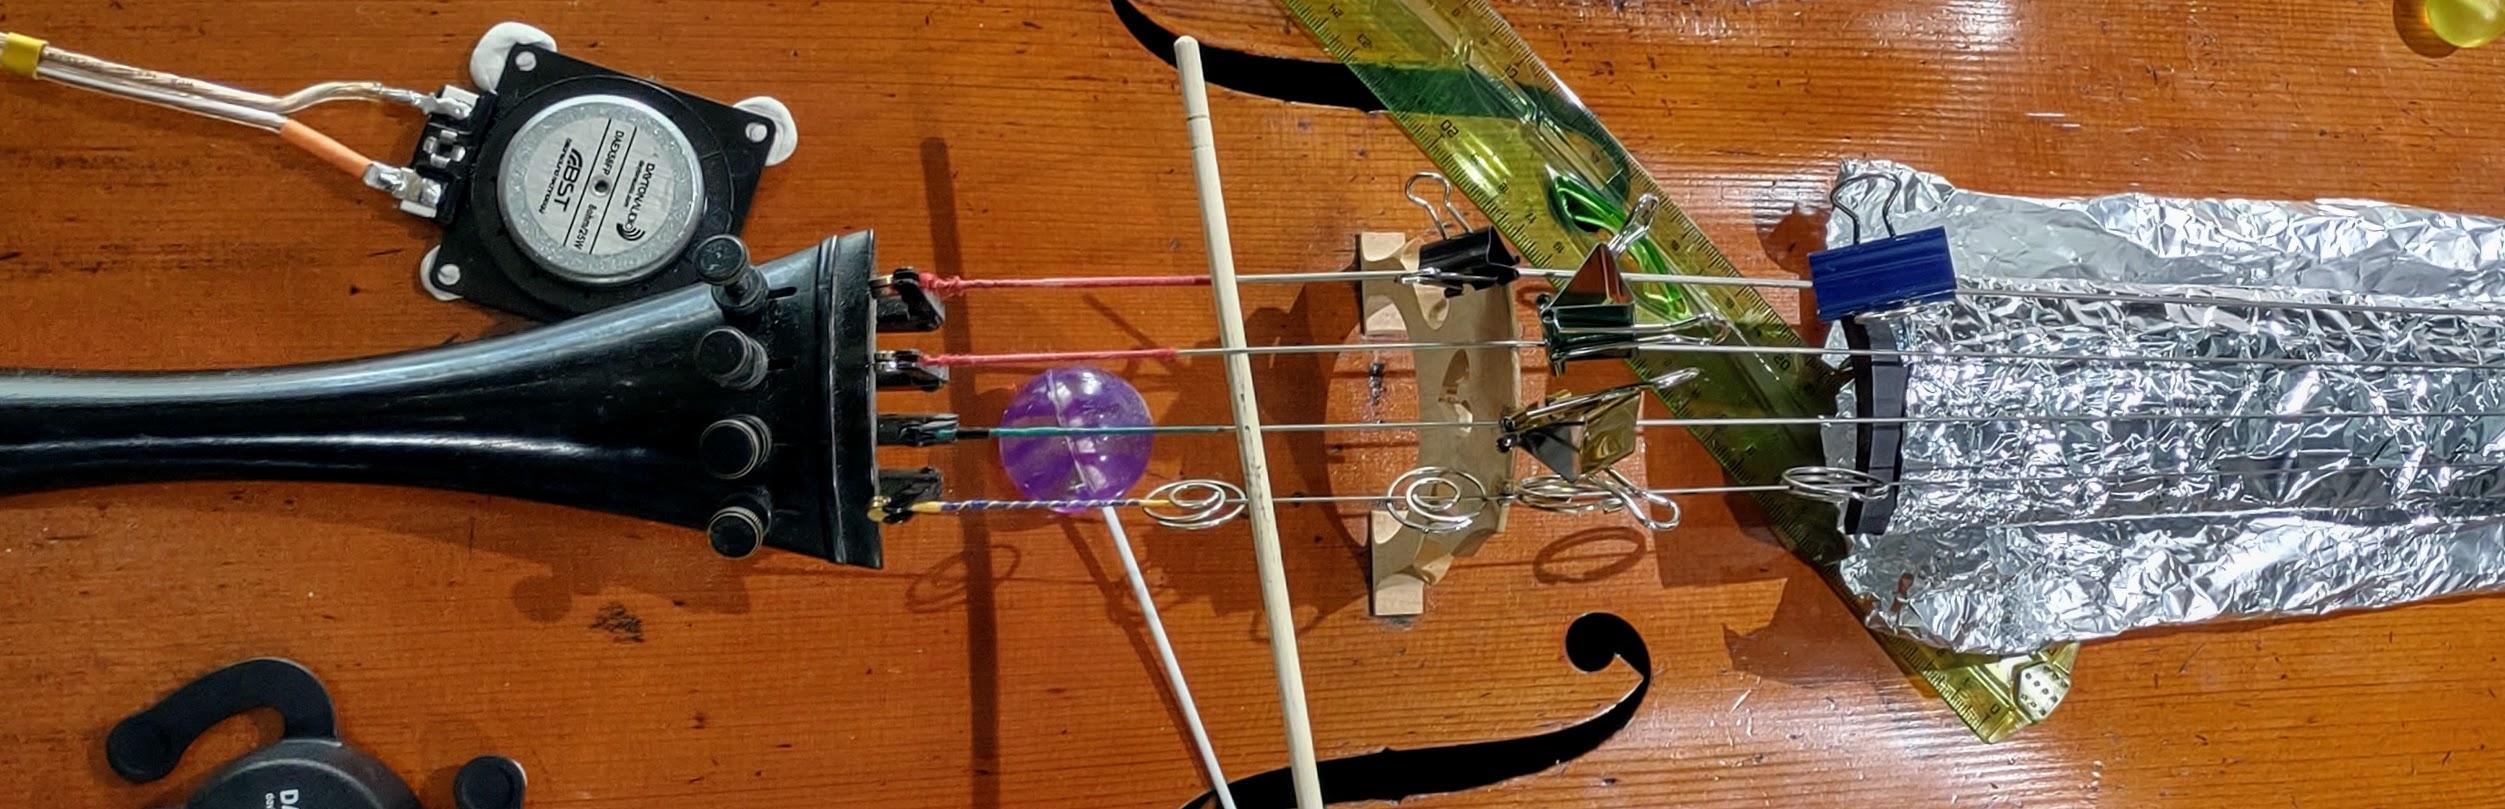
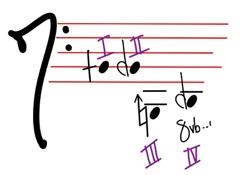
The diagram above identifies and divides the Cello into regions. In other, from the top line down, the lines define as their limit being 1) the nut, 2) where the upper bout meets the fingerboard, 3) the edge of the fingerboard, 4) the bridge, 5) the fine tuners, and 6) the start of the tailpiece.
Techniques on Cello:
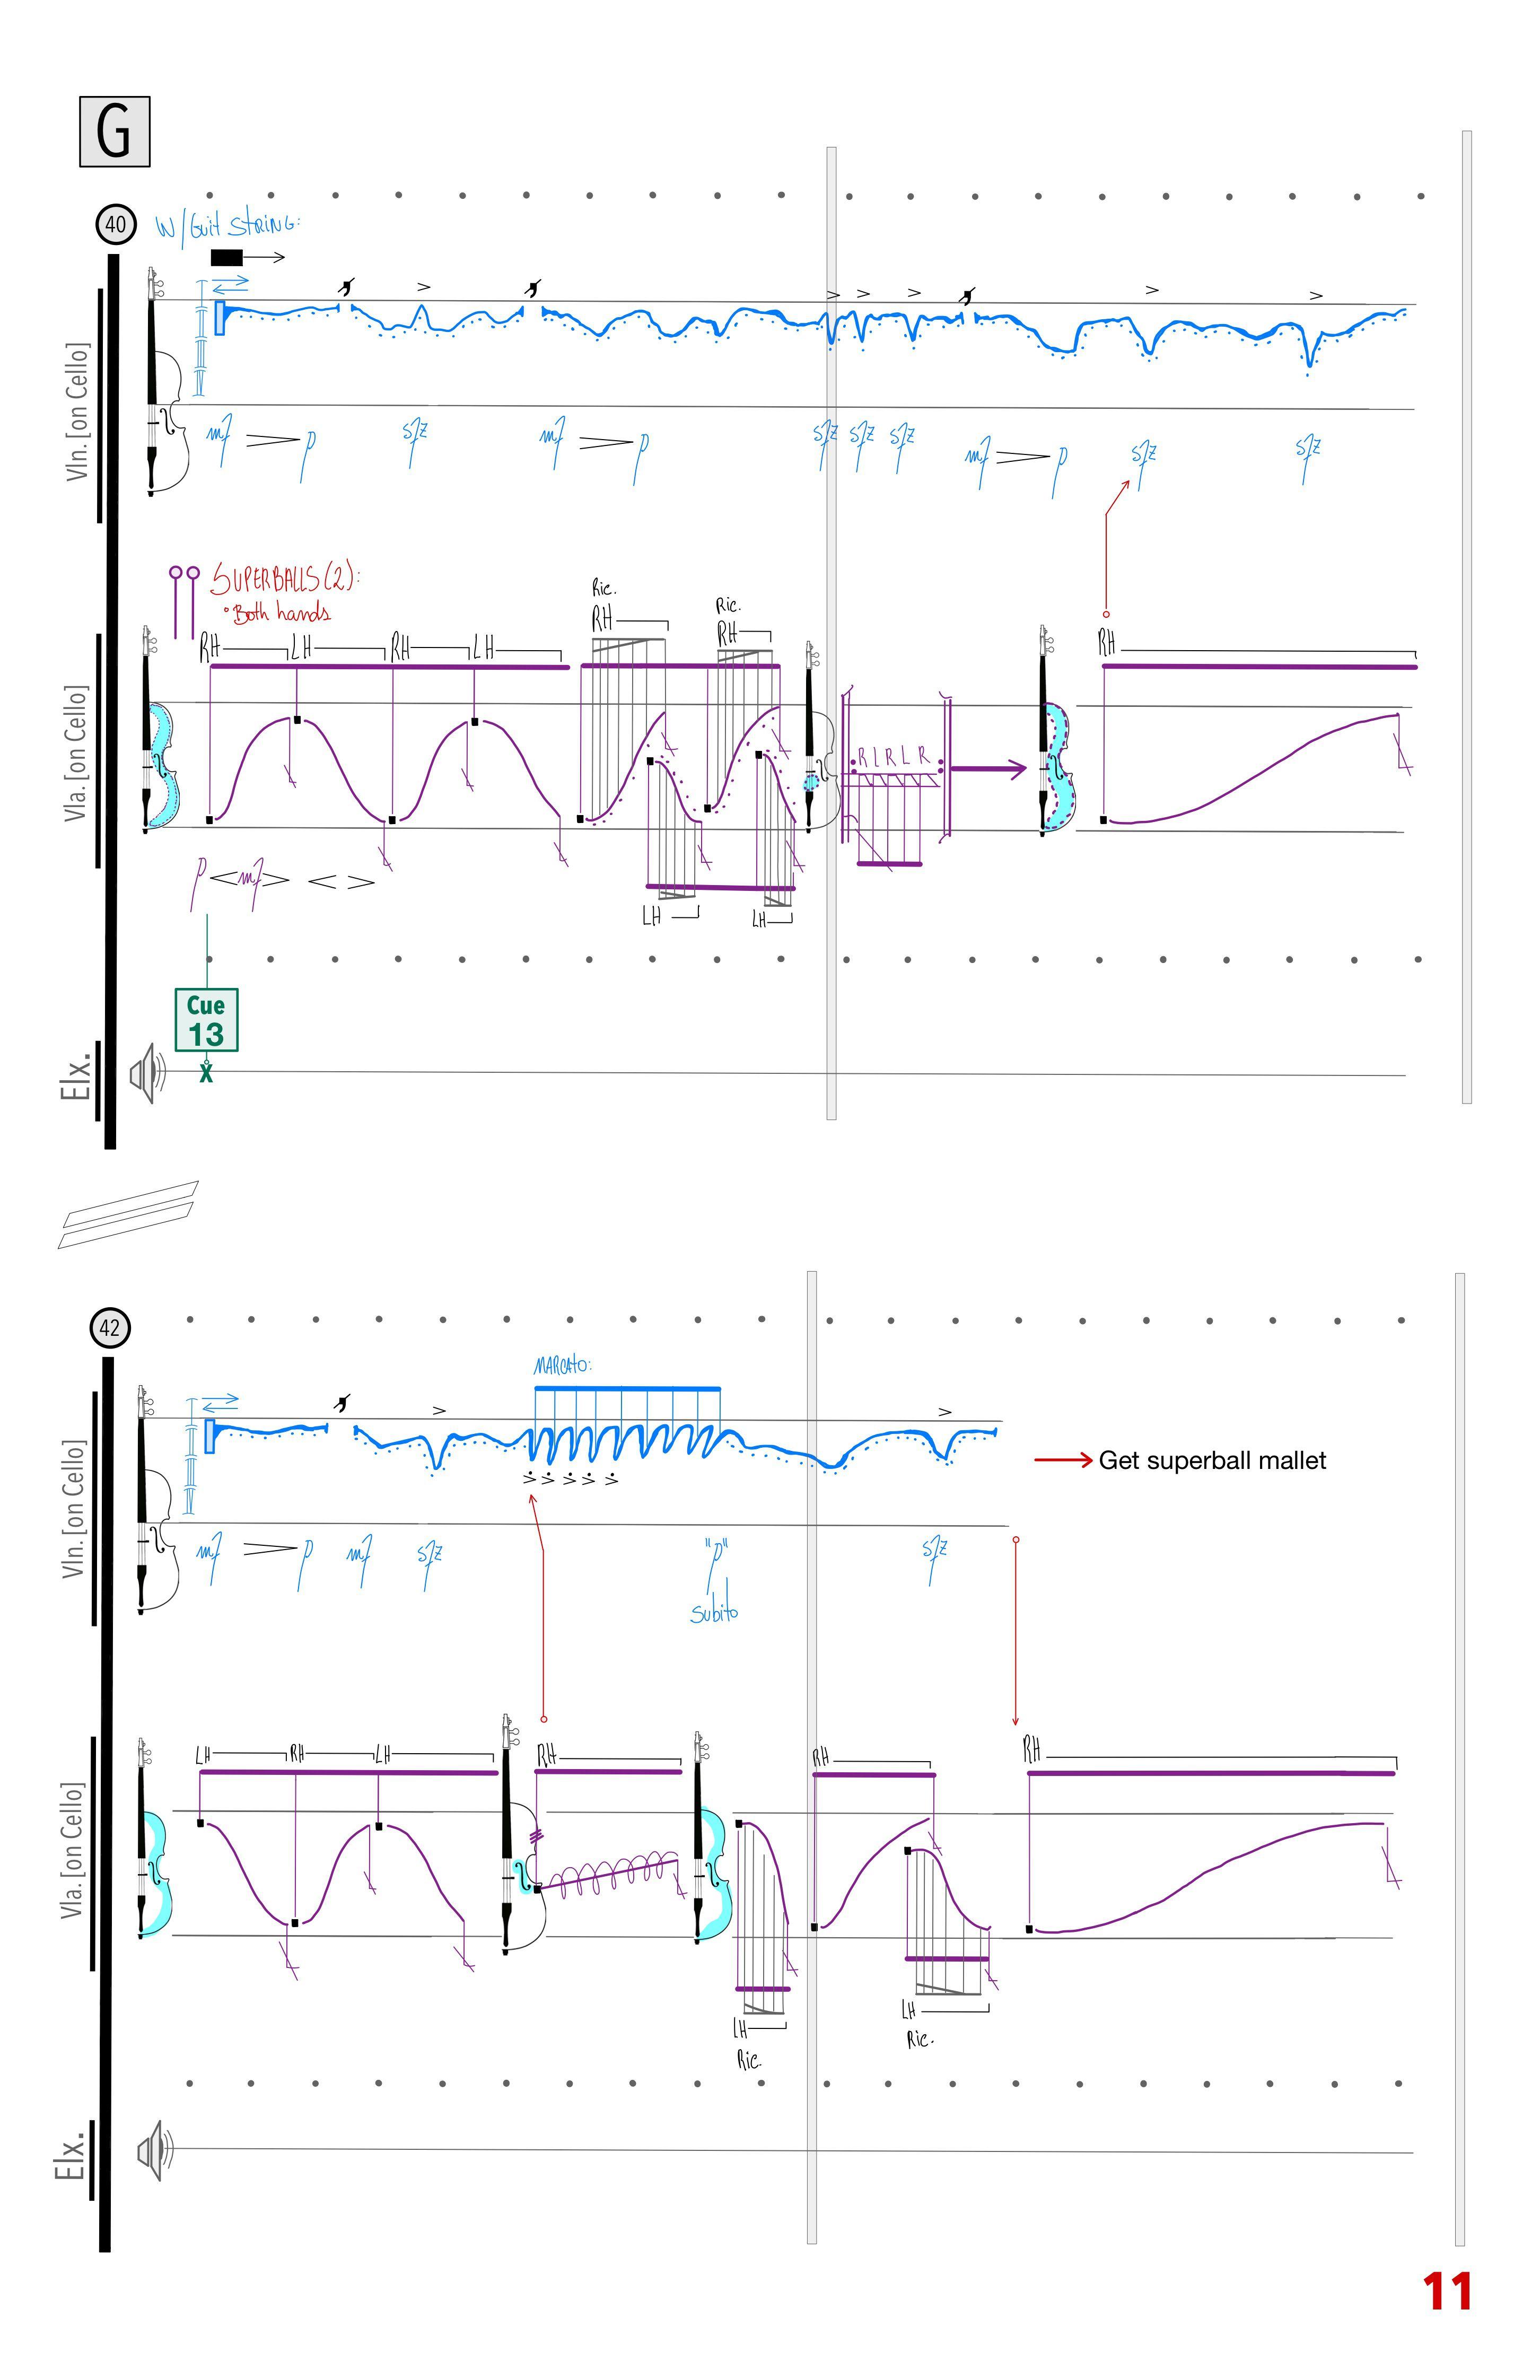
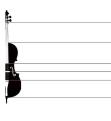
For Vln and Vla on Cello: The staff system above indicates with which hand and where on the cello the rubbing motion should be applied when using the superball mallets. The highlighted area on the cello diagram/clef indicates the path of the superball on the body of the cello.

For Vln and Vla on Cello: The example above identifies the gesture of plucking the chopstick, which it then snaps against the fingerboard
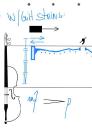
For Vln on Cello: The staff system above indicates the contact point of the loose guitar string against the Cello strings. The friction is achieved by moving the guitar string from side-to-side against the Cello’s strings. The contact point lines are specifying the trajectory of the guitar string lengthwise (up and down the Cello’s strings).
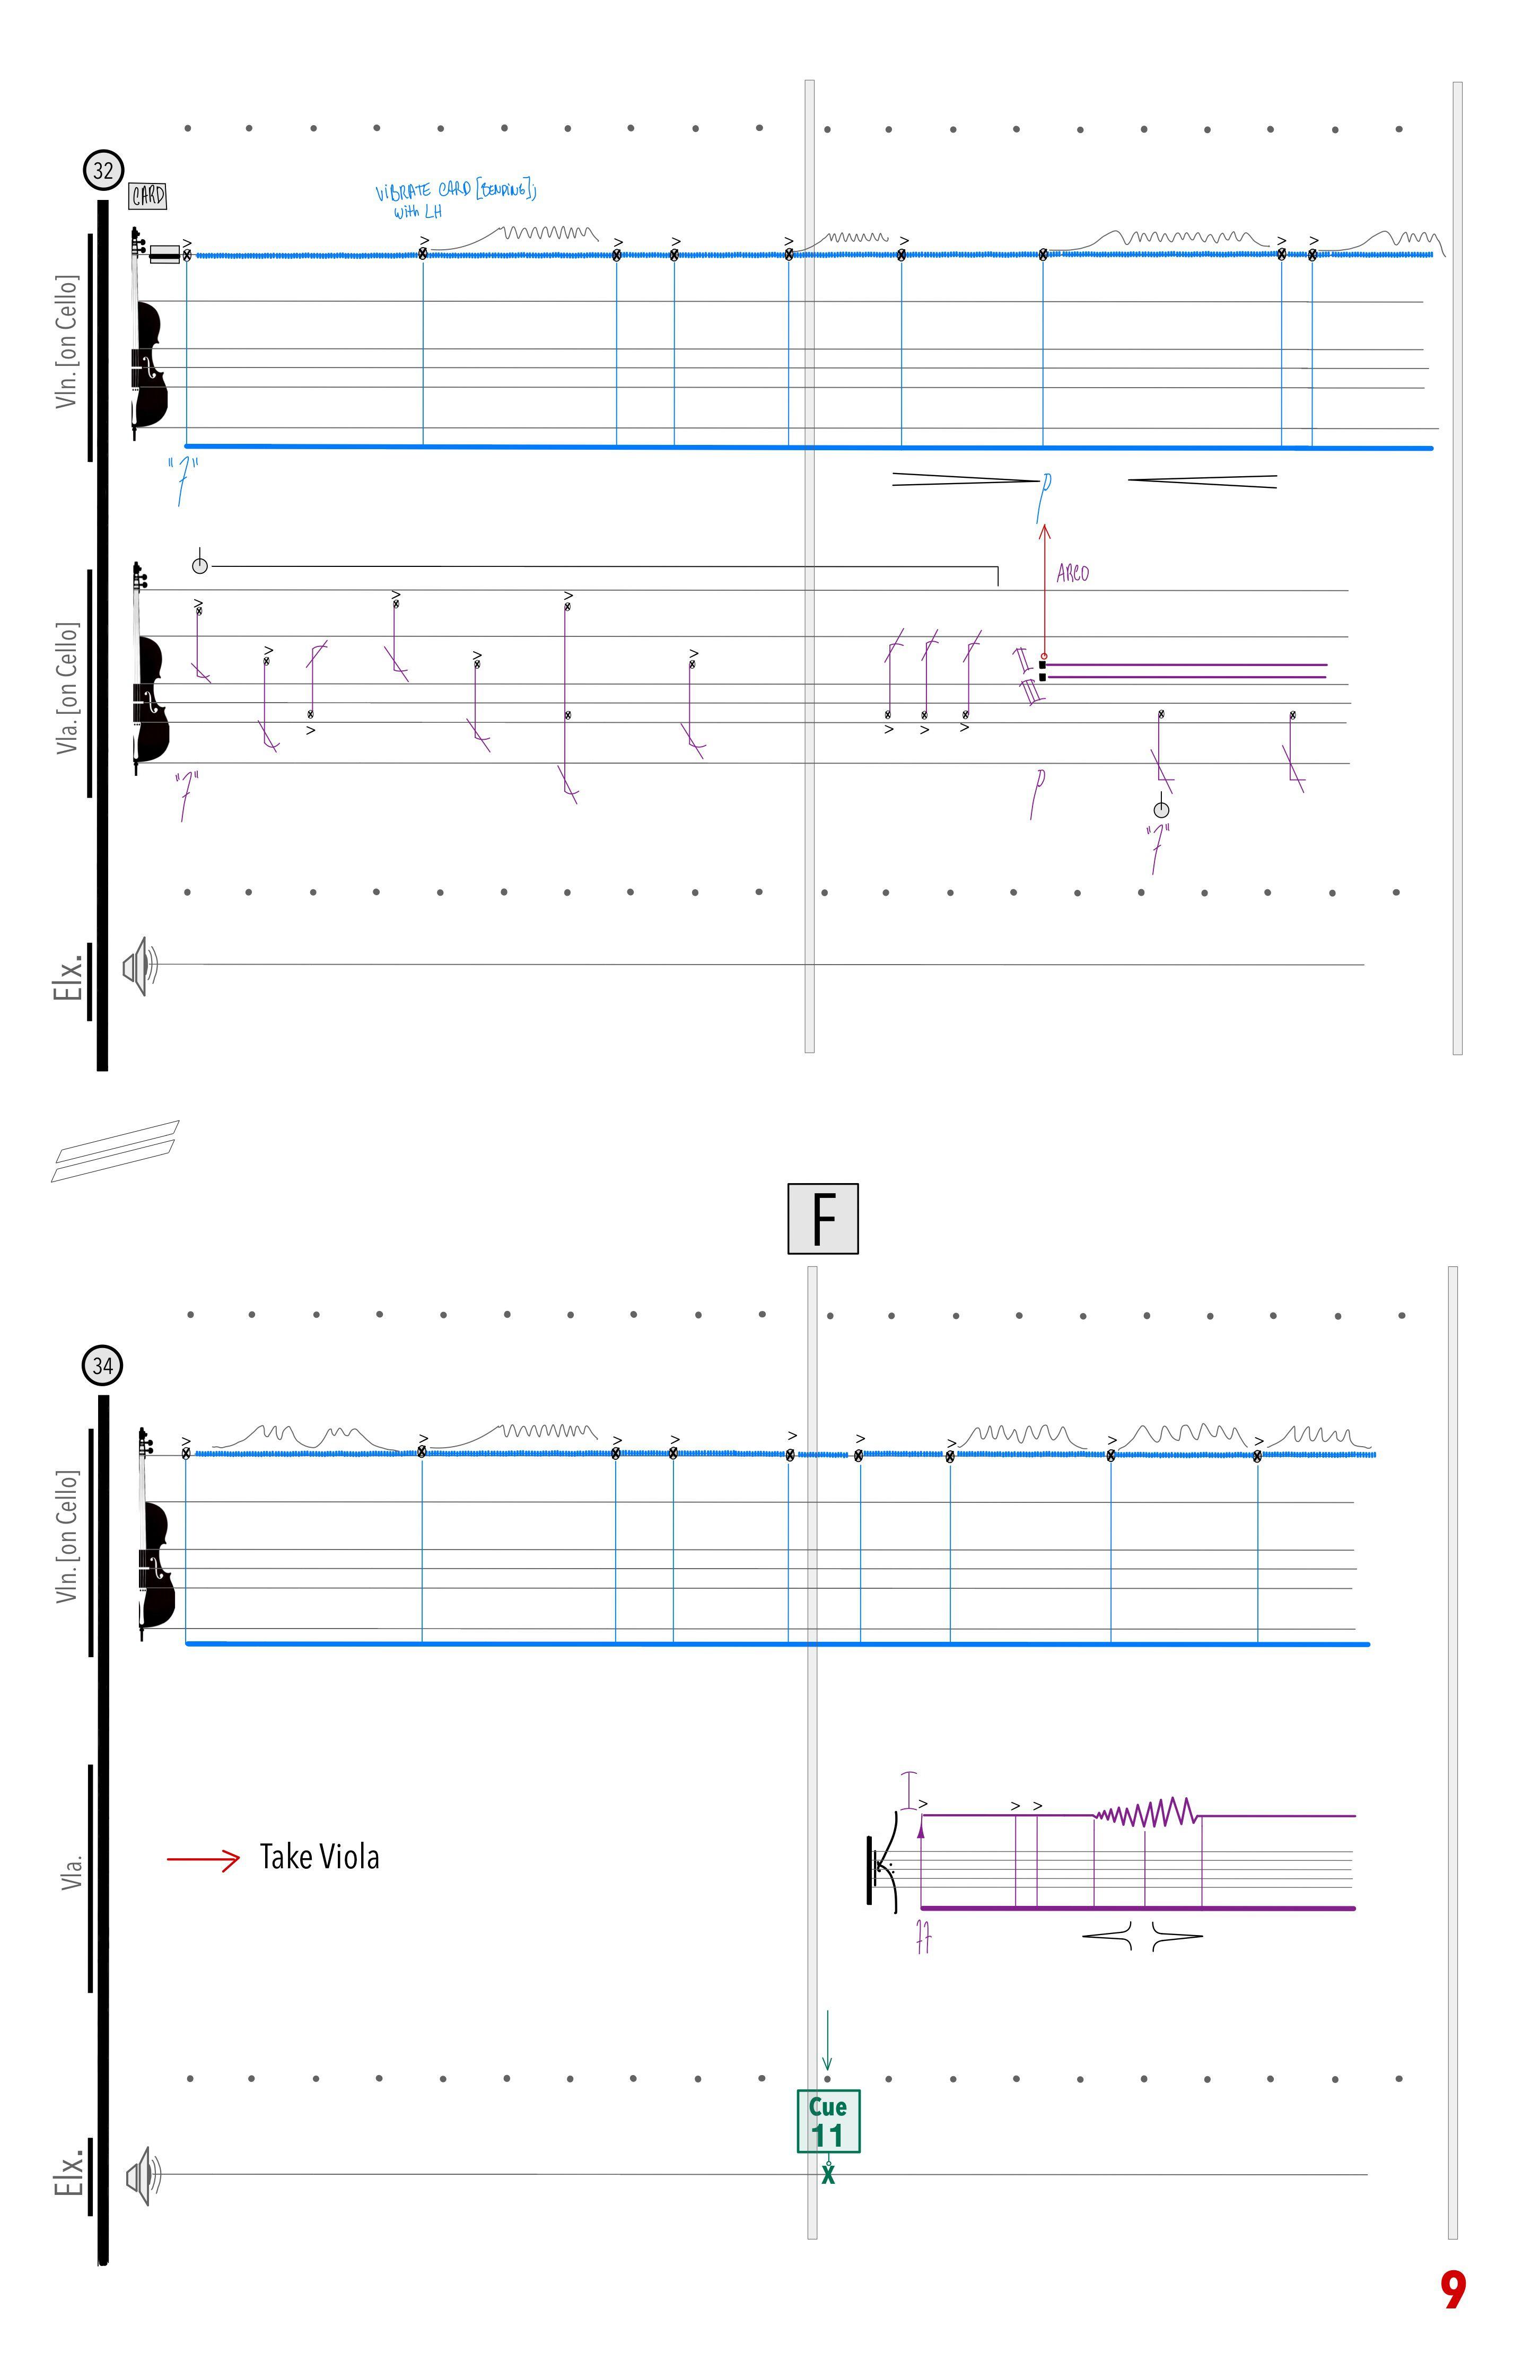
For Vln on Cello: The figure above identifies the gesture of vibrating the plastic card while bowing it (when it’s tightly places through the strings). The vibration should be done by simply bending slightly the card with the opposite hand, as if to mimic a type of “vibrato.”
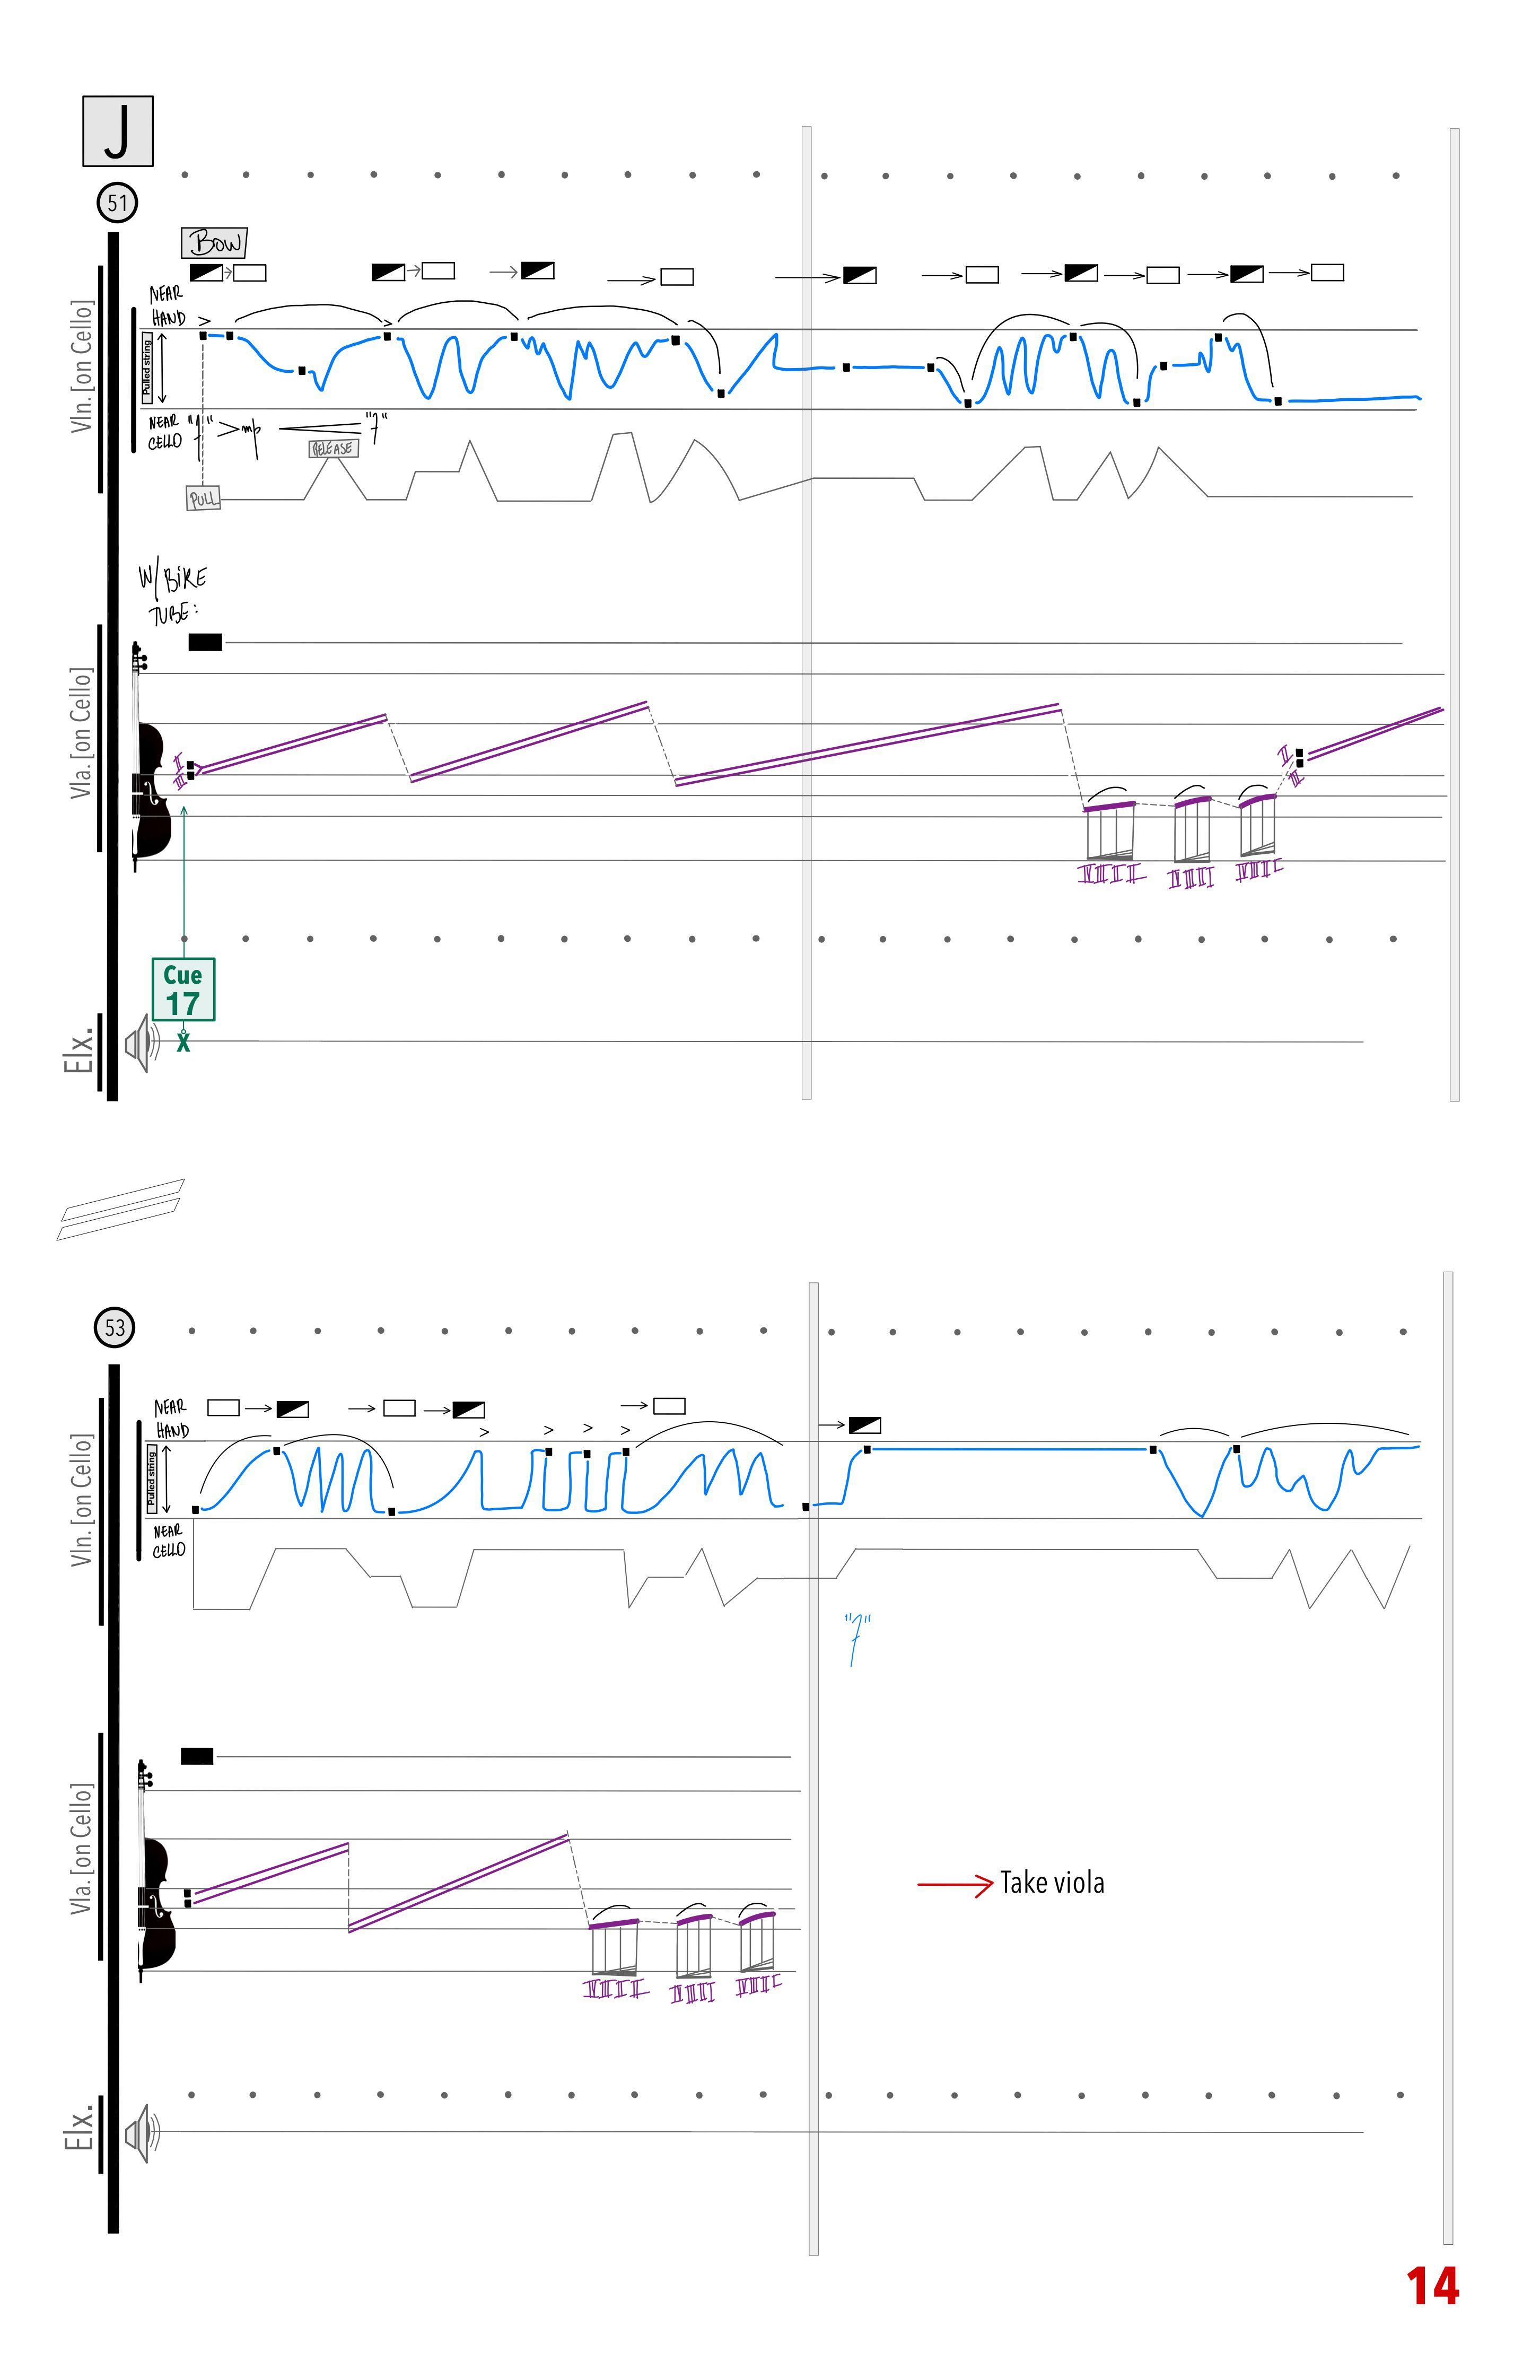
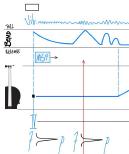
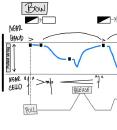
For Vln on Cello: The staff system above indicates a technique the violinist will perform on the cello. The attached guitar string (part of the cello’s preparation) should be stretched out upwards by the left hand of the performer and bowed by the right hand. The central space where it reads “pulled string” is the bow’s contact point along the stretched-out guitar string. The bottom grey line where it reads “pull” indicates the tension applied by the left hand in pulling the string attached to the cello. Pressure boxes are also included to specify bow pressure.
Electronics notation:
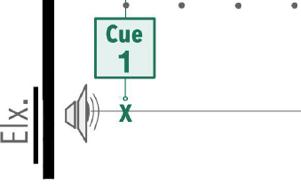
The numbered cues in the score are specifying when the performer/technical assistant controlling a Max/MSP patch should trigger events during performance.
The Max patch and its sound result, as well as the tech rider (necessary microphones and transducers) are to-be-determined.
Abbreviation of bow positions (when not using supplementary staff) and other techniques:
- MST – Molto sul tasto. Further up the fingerboard.
- ST – Sul tasto.
- ORD – Ordinario.
- SP - Sul ponticello.
- MSP - Molto sul ponticello (Almost “on the bridge”, rich in harmonics/noise).
c.l.b – Col legno battuto (Strike strings with wood).
c.l.t. – Col legno tratto (Bow strings with wood).
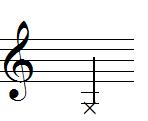
Play behind the bridge.
Indicates a “pitchless” sound on the referred string. If the ‘x’ notehead is in parenthesis, it indicates a fingered note that has been altered towards a “pitchless” result by extreme bow pressure.
for violin, viola, re-embodied cello, and electronics
dannfribeiro@gmail.com
dannielribeiro@berkeley.edu
Stage setup reference - bird's-eye
MINIMUM REQUIREMENTS:
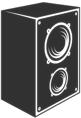
§ 2 sound exciters (a pair or same size and power; transducers). Required power relative to available amplifier and size of venue (baseline: +20W of power capacity).
§ 1 amplifier with speaker impedance matching the pair of exciters, stereo output.
§ 2 (one pair) or attenuator pads are recommended for exciter + amplifier connection.
§ 2 DPA microphones Supercardioid condensers with violin mounting clip (e.g., DPA 4099 CORE), with XLR adapter
§ 1 lavalier microphone to be positioned inside the “f hole” of the cello, with XLR adapter
§ 1 portable loudspeaker or powered studio monitor (+50W, e.g., Genelec 8020D or Yamaha HS5).
§ Audio interface or console with 3 available ins and 3 outs.
§ Laptop (preferably MacBook Pro) running Max/MSP 8 (see link below for patch and files)
o External required: sigmund
§ 2 trap tables
§ Cello station (see section below)


Max/MSP patch and files (most recent update: 11/2022): https://drive.google.com/drive/folders/1FMub5lJPx1l2_Q6X1b12B3yvF8Kkoqni?usp=sharing
NOTE 1: the house’s multichannel loudspeaker system will not be utilized. All diffused sounds will be on stage out of the 3 output points described above Cello station:
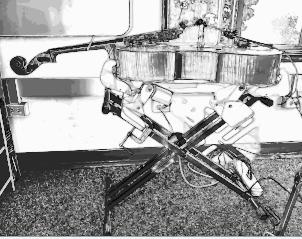
The cello is required to be set-up onto a structure that allows it to remain firmly positioned horizontally throughout the performance, allowing the musicians to confidently play it.
The reference image shows a 3D-printed cradle that was used at the premiere of the piece and is available (contact composer). Additionally, the cradle can be fastened (e.g., with a Cclamp) to a regular double braced X-style stand and the height can be adjusted.
If the cradle is not available, the cello should be positioned onto another structure that provides similar conditions firmly and safely attached without jeopardizing the instrument’s body resonance.
The monitor (Out 3) should be place under the X-style stand and preferably “hidden” from the audience.