


3.CAMERACOMPONENTS
RED® hasmadeeveryefforttoprovideclearandaccurateinformationin thisdocument,whichisprovidedsolelyfortheuser’sinformation.While thoughttobeaccurate,theinformationinthisdocumentisprovided strictly“asis”andREDwillnotbeheldresponsibleforissuesarising fromtypographicalerrorsoruser’sinterpretationofthelanguageused hereinthatisdifferentfromthatintendedbyRED.Allsafetyandgeneral informationissubjecttochangeasaresultofchangesinlocal,federal orotherapplicablelaws.
REDreservestherighttorevisethisdocumentandmakechangesfrom timetotimeinthecontenthereofwithoutobligationtonotifyanyperson ofsuchrevisionsorchanges.InnoeventshallRED,itsemployeesor authorizedagentsbeliabletoyouforanydamagesorlosses,director indirect,arisingfromtheuseofanytechnicaloroperationalinformation containedinthisdocument.
Thisdocumentwasgeneratedon10/22/2021.Toseeearlierversionsof thisdocument,submitaSupportticketat https://support.red.com Forcommentsorquestionsaboutcontentinthisdocument,senda detailedemailto OpsGuides@red.com.
COPYRIGHTNOTICE
COPYRIGHT©2021RED.COM,LLC
Alltrademarks,tradenames,logos,icons,images,writtenmaterial, code,andproductnamesusedinassociationwiththeaccompanying productarethecopyrights,trademarks,orotherintellectualproperty ownedandcontrolledexclusivelybyRED.COM,LLC.Fora comprehensivelist,see www.red.com/trademarks
Allothercompany,brand,andproductnamesaretrademarksor registeredtrademarksoftheirrespectiveholders.REDhasnoaffiliation to,isnotassociatedwithorsponsoredby,andhasnoexpressrightsin third-partytrademarks.AdobeandAdobePremiereProareregistered trademarksofAdobeSystemsIncorporated.DaVinciandDaVinci ResolveareregisteredtrademarksofBlackmagicDesignintheU.S.and othercountries.LeicaisaregisteredtrademarkofLeica MicrosystemsCanonisaregisteredtrademarkofCanon,U.S.A.Apple, iOS,Macintosh,FinalCutPro,andQuickTimeareregisteredtrademarks ofAppleInc.intheU.S.andothercountries.Windexisaregistered trademarkofS.C.Johnson&Son,Inc.Windowsisaregistered trademarkofMicrosoftCorporation.Avidisaregisteredtrademarkof AvidTechnology,Inc.FileZillaisaregisteredtrademarkofitsrespective owners.Nuke™isatrademarkofTheFoundryVisionmongersLtd. SCRATCHisaregisteredtrademark®ofASSIMILATE,2006.SCRATCH SCAFFOLDS,SCRATCHEXTENSIONS,andSCRATCHDigital IntermediateProcessSolutionarealltrademarksandregistered trademarksofASSIMILATE,2006,Allrightsreserved.Autodesk,the Autodesklogo,Flameareregisteredtrademarksortrademarksof Autodesk,Inc.,and/oritssubsidiariesand/oraffiliatesintheUSAand/or othercountries.
INDUSTRIALCANADAEMISSIONCOMPLIANCESTATEMENTS
ThisdevicecomplieswithIndustryCanadalicense-exemptRSS standardsRSS139andRSS210.Operationissubjecttothefollowing twoconditions:(1)thisdevicemaynotcauseinterference,and(2)this devicemustacceptanyinterference,includinginterferencethatmay causeundesiredoperationofthedevice. ThisClassBdigitalapparatuscomplieswithCanadianICES-003.
TocomplywithFCCandIndustryCanadaRFexposurelimitsforgeneral population/uncontrolledexposure,theantenna(s)usedforthis transmittermustbeinstalledtoprovideaseparationdistanceof70mm fromallpersonsandoperatinginconjunctionwithanyotherantennaor transmitter,exceptinaccordancewithFCCmulti-transmitterproduct procedures.
Otherusermanualstatementsmayapply.
LeprésentappareilestconformeauxCNRd’IndustrieCanada applicablesauxappareilsradioexemptsdelicence.L’exploitationest autoriséeauxdeuxconditionssuivantes:(1)l’appareilnedoitpas produiredebrouillage,et(2)l’utilisateurdel’appareildoitacceptertout brouillageradioélectriquesubi,mêmesilebrouillageestsusceptible d’encompromettrelefonctionnement.
CetappareilnumériquedelaclasseBestconformeàlanormeNMB003duCanada.
Pourseconformerauxlimitesd’expositionauxRFdelaFCCet d’industriesCandapourlapopulationgénérale/expositionnon controlee,l’antenne(s)utiliséepourcetransmetteurdoitêtreinstallé pourfournirunedistancedeseparationd’aumoins70mmdetoutesles personnesetfonctionnantconjointementavecuneautreantenneou émetteur,saufenconformitéaveclesproceéduresdeproduitsmultiémetteurFCC.
Autresd’eclarationsmanueldel’utilisateurpeuvents’appliquer.
FEDERALCOMMUNICATIONSCOMMISSION(FCC)STATEMENTS
Thisequipmenthasbeentestedandfoundto complywiththelimitsforaClassAdigital device,pursuanttopart15oftheFCCRules. Theselimitsaredesignedtoprovidereasonable protectionagainstharmfulinterferencewhenthe equipmentisoperatedinacommercial environment.Thisequipmentgenerates,uses, andcanradiateradiofrequencyenergyand,ifnotinstalledandusedin accordancewiththeinstructionmanual,maycauseharmfulinterference toradiocommunications.Operationofthisequipmentinaresidential areaislikelytocauseharmfulinterferenceinwhichcasetheuserwillbe requiredtocorrecttheinterferenceathisownexpense.
TomaintaincompliancewithFCCregulations,shieldedcablesmustbe usedwiththisequipment.Operationwithnon-approvedequipmentor unshieldedcablesislikelytoresultininterferencetoradioandTV reception.Theuseriscautionedthatchangesandmodificationsmade totheequipmentwithouttheapprovalofmanufacturercouldvoidthe usersauthoritytooperatethisequipment.
ThisdevicecomplieswithPart15oftheFCCRules.
Operationissubjecttothefollowingtwoconditions(1)thisdevicemay notcauseharmfulinterference,and(2)thisdevicemustacceptany interferencereceived,includinginterferencethatmaycauseundesired operation.

CAUTION: ExposuretoRadioFrequencyRadiation.
Thedeviceshallbeusedinsuchamannerthatthepotentialforhuman contactisminimized.
ThisequipmentcomplieswithFCCradiationexposurelimitssetforthfor anuncontrolledenvironment.Thisequipmentshouldbeinstalledand operatedwithaminimumdistanceof20cmbetweentheradiatorand yourbody.
CAUTION: RegulationsoftheFCCandFAAprohibitairborne operationofradio-frequencywirelessdevicesbecausetheir signalscouldinterferewithcriticalaircraftinstruments.
CAUTION: Ifthedeviceischangedormodifiedwithout permissionfromRED,theusermayvoidhisorherauthority tooperatetheequipment.
AUSTRALIAANDNEWZEALANDSTATEMENTS
REDdeclaresthattheradioequipmentdescribedinthisdocument complieswiththefollowinginternationalstandards:
IEC62368-1–ProductSafety
ETSIEN300328–Technicalrequirementforradioequipment
REDdeclaresdigitaldevicesdescribedinthisdocumentcomplywith thefollowingAustralianandNewZealandstandards:
AS/NZSCISPR22–ElectromagneticInterference
AS/NZS61000.3.2–PowerLineHarmonics
AS/NZS61000.3.3–PowerLineFlicker
SINGAPORESTATEMENTS
ComplieswithIMDSStandardsN3434-20.
THAILANDSTATEMENTS
Thistelecommunicationequipmentconformsto NTC/NBTCtechnicalrequirements.
JAPANSTATEMENTS
Thisequipmentcontainsspecifiedradioequipmentthathasbeen certifiedtotheTechnicalRegulationConformityCertificationunderthe RadioLaw.


REDdeclaresthattheradioequipment describedinthisdocumentcomplieswiththe EMCDirective(2014/30/EU)andtheLow VoltageDirective(2014/35/EU)issuedbythe CommissionoftheEuropeanCommunity.
Compliancewiththisdirectiveimplies conformitytothefollowingEuropeanNorms(inbracketsarethe equivalentinternationalstandards).
EN62368-1(IEC62368-1)–ProductSafety
ETSIEN300328Technicalrequirementforradioequipment
ETSIEN301489GeneralEMCrequirementsforradioequipment
EN55032(CISPR32)ElectromagneticCompatibility
EN55035(CISPR35)ImmunityRequirements
EN61000-3-2(IEC61000-3-2)HarmonicCurrentEmissions
EN61000-3-3(IEC61000-3-3)Voltagechanges,voltagefluctuations andflicker
EU2015/863RoHSDirective
TheWasteElectricalandElectronicEquipment (WEEE)markappliesonlytocountrieswithin theEuropeanUnion(EU)andNorway.This symbolontheproductandaccompanying documentsmeansthatusedelectricaland electronicproductsshouldnotbemixedwith generalhouseholdwaste.Forpropertreatment, recoveryandrecycling,takethisproductto designatedcollectionpointswhereitwillbe acceptedfreeofcharge.Alternatively,insome countriesyoumaybeabletoreturnyour productstoyourlocalretaileruponpurchaseofanequivalentnew product.
Disposingofthisproductcorrectlywillhelpsavevaluableresourcesand preventanypotentialnegativeeffectsonhumanhealthandthe environment,whichcouldotherwisearisefrominappropriatewaste handling.Contactyourlocalauthorityforfurtherdetailsofyournearest designatedcollectionpoint.Penaltiesmaybeapplicableforincorrect disposalofthiswaste,inaccordancewithyounationallegislation. ForbusinessusersintheEuropeanUnion,ifyouwishtodiscard electricalandelectronicequipment,contactyourdealerorsupplierfor furtherinformation.
REDDigitalCinema 94Icon LakeForest,CA92610 USA
DONOTusethecameraoraccessoriesnearwater.Avoidexposing yourcameratomoisture.Theunitisnotwaterproof,socontactwith watercouldcausepermanentdamagetotheunitaswellaselectric shockandseriousinjurytotheuser.DONOTusethecamerainthe rainorunderotherconditionswithhighmoisturewithoutappropriate protection,andimmediatelyremovepowersourceifcameraor accessoriesareexposedtomoisture.

WARNING: Toreducetheriskoffireorelectricshock,donot exposethecameratorainormoisture.
DONOTexposethecameratolaserbeams,aslaserbeamsmay damagethesensor.
DONOTexposeyourcameratoexcessivevibrationorimpact (shock).Becarefulnottodropyourcamera.Internalmechanisms maybedamagedbysevereshock.Mechanicalalignmentofoptical elementsmaybeaffectedbyexcessivevibration.
ELECTROMAGNETICINTERFERENCE:Theuseofdevicesusing radioorothercommunicationwavesmayresultinthemalfunctionor interferencewiththeunitand/orwithaudioandvideosignals. Cleanonlyusingadrycloth.Whencleaningyourcamera,remember thatitisnotwaterproofandmoisturecandamageelectronic circuitry.DONOTrinseorimmerseanyelementofthecamera,lens orotheraccessory,keepthemdryatalltimes.DONOTusesoaps, detergents,ammonia,alkalinecleaners,andabrasivecleaning compoundsorsolvents.Thesesubstancesmaydamagelens coatingsandelectroniccircuitry.
Maintainsufficientventilation—DONOTblockanyventilation openingsorobstructcoolingfanairflow.

CAUTION: Propercameraventilationrequiresaminimum 0.5"(1.25cm)clearancebetweenthecameraventilation openingsandexternalsurfaces.Verifythatobjectsthatcan blockthefanintakeandexhaustportsdonotimpedeairflow. Failuretopermitadequateairflowmayresultinoverheatingof thecamera,degradedoperation,andinextremesituations, damagetothecamera.
WARNING: Mediacardscanbecomeveryhotduring prolongedrecordingsessions.Whenejectingthemediacard, letitcoolbeforetouchingitwithbarefingers.
DONOToperateorstorenearanyheatsourcessuchasradiators, heatregisters,stoves,oranyotherapparatusesthatproduceheat. Storeinaprotected,levelandventilatedplace.Avoidexposureto temperatureextremes,damp,severevibration,strongmagnetic fields,directsunlightorlocalheatsourcesduringstorage.Remove anybatteriesfromthecamerabeforestorage.Recommended storageandusagetemperaturesforyourcamera,lensesandother accessoriesare:
Operatingrange:32°Fto104°F(0°Cto40°C)
Storagerange:–4°Fto122°F(–20°Cto50°C)
Ifthereareanyperformanceissueswithyourcameraoraccessories whenoperatingwithinthistemperaturerange,submitasupport ticketto https://support.red.com
DONOTbypassthethirdprongofthegrounding-typeplugonthe powercordoftheincludedpowerAdaptor.Agrounding-typeplug hastwobladesandathird“grounding”prong.Thethirdprongis providedforyoursafety.Youmustconnecttheplugtoanoutlet withaprotectiveearthconnection.Ifthegrounding-typeplugdoes notfitintoyouroutlet,donotattempttomodifytheplugoroutlet, consultaqualifiedelectrician.
Protectallpowercordsfrombeingpinched,walkedon,ordriven overbyavehicle.Replaceanypowercordssuspectedofsustaining damageduetocrushingorotherformsphysicaldamage.
CAUTION: Installthiscamerainapropersupportsystemthat canhandletheentireweightofthecameraandthe accessories.Securethecamerabyusingthe¼-20and/orthe 3/8-16mountingpointslocatedonthebottomofthecamera. Alwaysverifythatthescrewsaretightenedproperly.When thecameraisnotproperlyattached,orisplacedonan unstablesurface,thecameracanfallandcauseinjuryorbe damaged.

CAUTION: Productsmarkedwiththissymbolareclass2 devices.Thesedoubleinsulateddevicesarenotprovided withagroundingtypeplug.
CAUTION: Thepowercordplugfortheincludedpower adaptorisusedasthepowerdisconnect.Todisconnectall powerfromthepoweradaptor,unplugthepowercordplug fromthewalloutlet.Duringuse,thepowercordplugshould remaineasilyaccessibleatalltimes.
Lithium-ionbatteriesmaybesubjecttospecialhandling requirementspursuanttofederalandlocallaws.Refertospecific shippinginstructionsincludedwithyourbatteryregardingproper transportofyourbattery.Donothandleyourbatteryifitisdamaged orleaking.Disposalofbatteriesmustbeinaccordancewithlocal environmentalregulations.Forexample,Californialawrequiresthat allrechargeablebatteriesmustberecycledbyanauthorizedrecycle center.Storingbatteriesfullychargedorinhightemperature conditionsmaypermanentlyreducethelifeofthebattery.Available batterycapacitymayalsobetemporarilylessenedafterstoragein lowtemperatureconditions.
WARNING: DONOTexposethebatterytoexcessiveheat.
CAUTION: ReferallserviceandrepairtoqualifiedRED servicepersonnel.Toreducetheriskofelectricshock,and damagetothecameraoraccessories,DONOTattemptto performanyservicingotherthananyproceduresthatare recommendedintheoperatinginstructions.
INDOORUSEONLY: Thisdeviceisdesignedprimarilyfor indooruse.
Elaparatonodebequedarexpuestoagoteoosalpicadureaspor líquidos.
WARNING: Failuretoread,understand,andfollowthese instructionsmayresultinoverheating,chemicalleakage, smokeemission,fire,orotherpotentiallyharmfulresults.
Readandadheretoallsafetyinstructionsprovidedbythe manufacturerofthebatteries.
Alwaysfollowproperbatteryhandlingandstoragepractices. Improperhandlingandfailuretoabidebyproperstorage instructionsmaycausepermanentdamagetobatteries,ordegrade batterychargeholdingcapacity.Improperhandlingpracticesor failuretocomplywithinstructionsmayalsoputyouatrisk.
Lithium-Ionbatteries,liketheREDVOLTMicro-V,self-dischargeover time.Whenstoringforlongperiodsoftime,storebatteries separatelyfromthecameraorchargerandremembertocharge batteriestoacapacitylevelof40%to60%.Ifbatterieswillbe storedforlongperiodsoftime,REDrecommendsthatyoucheck thechargelevelatleastonceeverysix(6)months,andrecharge batteriestoacapacitylevelof40%to60%.
Whennotinuse,removethebatteryfromthecameraorcharger andstorethebatteryinacool,dryplace.Avoidextremehot temperatures(suchasinsideahotcar),corrosivegas,anddirect sunlight.Theoptimalstoragetemperatureforbatteriesisbetween –4°Fto68°F(–20°Cto20°C).
WARNING: Batteriesstoredinadischargedstateforlong periodsoftimemayself-dischargeandlosetheabilitytohold acharge.
WARNING: Ifrechargingoperationfailstocompleteeven afteraspecifiedrechargingtimehaselapsed,immediately stopfurtherrecharging.
DONOTstorebatteriesinafullychargedstateforextendedperiods oftime.
DONOTstorebatteriesinafullydischargedstateforextended periodsoftime.
DONOTstorebatteriesinthecameraorinachargerforextended periodsoftime.
DONOTusebatteriesforpurposesotherthantheirintendeduse.
DONOTstorebatteriesinextremehotorcoldtemperatures.
DONOTstorebatteriesindirectsunlight.
DONOTdisassembleormodifythebattery.
DONOToverchargebatteries.Overchargingmayincreaseinternal temperaturebeyondtherecommendedlimitsandcausepermanent damagetothebattery.
DONOTconnectthepositive(+)andnegative(–)terminalstoa metalobjectsuchasawire.
DONOTtransportorstorethebatterytogetherwithmetalobjects suchasjewelry,hairpins,etc.astheymaygenerateheatifthey comeintocontactwiththebattery.
DONOTdiscardthebatteryintofireorheat.
DONOTstore,use,orrechargethebatterynearaheatsourcesuch asafireoraheater.
DONOTallowthebatterytogetwet.
DONOTpiercethebatterywithpointedorothersharpobjects.
DONOTstepon,throw,orstrikethebatterywithahammer.
DONOTuseabatterythatappearstobedeformedordamaged.
DONOTdirectlysolderthebattery.
DONOTputthebatteryintoamicrowaveovenorapressurized container.
DONOTuseorsubjectthebatterytointensesunlightorhot temperaturessuchasinacarinhotweather.
DONOTuseitinalocationwherestaticelectricitymaybepresent. DONOTexceedtherechargingtemperaturerangeof32˚Fto104˚F (0˚Cto40˚C).
Storethebatteryinalocationwherechildrencannotreachit. Ifthebatteryleaksorgivesoffabadodor,discontinueuse immediately.
Ifthebatterygivesoffanodor,generatesheat,becomesdiscolored ordeformed,orinanywayappearsabnormalduringuse,recharging orstorage,immediatelyremoveitfromtheequipmentorbattery chargeranddiscontinueuse.
Ifelectrolytebeginsleakingfromthebatteryandcomesintocontact withyourskinorclothing,immediatelywashitawaywithrunning water.Failuretodothismayresultinskininflammation.
Ifthebatteryleaksandtheelectrolytereachestheeyes,donotrub them.Instead,rinsetheeyeswithcleanrunningwaterand immediatelyseekmedicalattention.Failuretodothismayresultin eyeinjury.
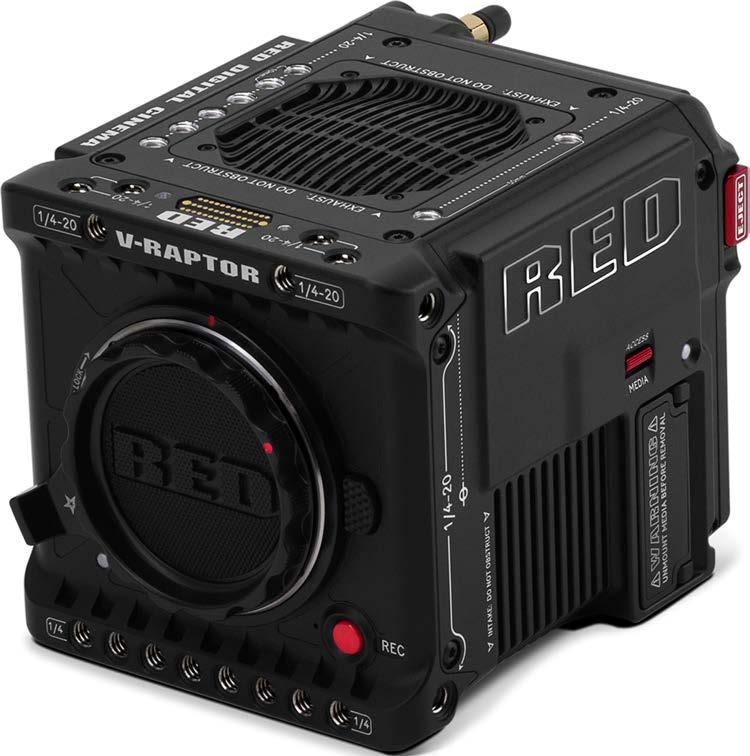
Figure:V-RAPTOR8KVVcamera
V-RAPTOR8KVVisthelatestbreakthroughproductinRED'slonglineofinnovativeimagecapturetechnology.The newestentrantintotheREDlineupisacompact,all-in-one,andhighlypowerfulcinemacamera.ItfeaturesRED’s cinemagradeimagequality,colorscience,andsensortechnologyinaportableformfactorcinematographerscantake anywhereandadapttoanyshootingscenario.
ThenewsensorinV-RAPTOR8KVVisan8KVVplus6KS35dualformatCMOSsensor.Thissensorbreaksnew technicalgroundbyretainingwidedynamicrangeanddeliveringunmatchedREDimagery,withoutcompromising creativeortechnicalfeatures.V-RAPTOR8KVVincludesabuilt-inlockingRF-stylemountallowinguserstheflexibility tousethefullfeaturesofRF-stylelensesandseverallensadaptors,suchasCanonEF,PL,andLeicaMmount.
TheV-RAPTOR8KVVrecordsusingtheR3DformatonaCFexpressTypeBmediacard.TheREDV-RAPTOR8KVV ispoweredbytheREDVOLTMICRO-Vbatteryorbyapowercable.YoucancontroltheV-RAPTOR8KVVfeaturesby usingtheside LCD,orbyusingREDControloverWi-Fiorthroughawiredconnection.
Refertothe QuickReference sectiontogetfamiliarwiththisguideandthecamera.
AllvideosandframesarerecordedtotheR3D® fileformat.TheR3DfileformatwasdevelopedbyREDtoprovidean efficientandmanageableRAWvideodataformatthatpromotesadvancedpostproductioneditingcapabilities.Inthe R3Dfileformat,thedigitalimagereceivedfromthesensorisformattedasapixel-defectcorrected(butinallother aspectsunprocessed)16-bitperpixelRAWdataframe.EachRAWframe,orsequenceofRAWframesinaclip,is compressedusingproprietaryREDCODE® RAWcompression,thenstoredtomedia.
RAWdataisrecordedindependentlyofanyRGBdomaincolorprocessingsuchasISO,WhiteBalance,orotherRGB colorspacesettings.Instead,colorparametersaresavedasreferencemetadata;thatis,colorisnotburnedintothe recordedRAWdata.ThisinnovativerecordingtechniquepromotesflexibilityinRGBcolorprocessing.Itallowsyouto defercolorcorrectiontopostproduction,ortoadjusttheimagecolorinthefield,withoutchangingtherecordedRAW dataimagequalityordynamicrange.
REDCODEisacompressioncodecthatreducesR3DRAWfilesdowntoamanageablesize,allowingthemediato recordlonger.TheabilitytocompressRAWdataisoneofthesignificanttechnologicaladvancesthatREDhasbrought tothemotionpictureindustry.
ThiscamerausesRED'sImageProcessingPipeline2(IPP2).InIPP2,theadvancedREDcolorspace (REDWideGamutRGB)allowsthecameratouseeverycolorthatthesensorcangenerateuptotheclippingthreshold. ThenthecameraencodestheimageusingLog3G10,agammacurvethatretainsextremehighlightandshadowdetail. Usingtheadvancedcolorspaceandgammacurve,REDIPP2allowsyoutogradeandmakecoloradjustmentsinpost production,insteadofin-camera.IPP2alsoallowsthecameratousea CDL forgrading.Formoreinformationabout IPP2,refertothe REDIPP2 supportpage.
Highresolutionvideo,suchasthedigitalfootagecapturedbythecamera,hassurpassedthedetailnecessaryto produceprofessionalfull-sizedprints.Becauseoftheabilitytorecordathighframeratesandresolution,thiscamerais ideallysuitedtocapturevideoandstillimages,simultaneously.
Manynon-lineareditingsystems(NLEs)canopenandeditREDfootage.EachNLEversionmayhavespecific compatibilityrequirements,suchascamerafirmwareversionorcameratype.Beforeshooting,makesureyoucheckall ofthecompatibilityrequirements.
Youcanopenand/oreditR3Dfilesbyusingoneofthefollowingproducts:
REDCINE-XPRO:RED'sproprietaryapplication.Download REDCINE-XPROforWindows or REDCINE-XPROfor Mac from www.red.com/downloads
AdobePremierePro
AvidMediaComposer
DaVinciResolve
FinalCutProX:Requiresyoutodownloadthe REDAppleWorkflowInstaller from www.red.com/downloads.
AdobePhotoShop:Canopen.R3Dfiles,however,youmustdownloadthe REDAdobePhotoShopInstallerfor Windows or REDAdobePhotoShopInstallerforMac from www.red.com/downloads
FoundryNuke
AssimilateScratch
AutoDeskFlame
ColorFrontTranskoder (betaforlatestsupport)
NOTE: Third-partyapplicationsmayhavelimitedcompatibilitywithR3Dfiles.Third-partydevelopersmustusethemost recent R3DSDK tooffercompatibilitywiththelatestREDfirmware.
REDCINE-XPROisaprofessionalone-lightcoloringtoolset,equippedwithanintegratedtimeline,andwitha collectionofposteffectssoftware.REDCINE-XPROprovidestheidealenvironmenttoreviewrecordedfootage,edit metadata,organizeprojects,andprepareyourR3Dfiles.YoucanuseREDCINE-XPROoranyofthecompatiblethirdpartyNLEstoeditR3Dfiles.
RED.com:Visitthe officialREDwebsite forthelatestinformationaboutREDproducts. REDDownloads:Goto REDDownloads todownloadthelatestfirmware,operationguides,andpostproduction software.
RED101Articles:REDoffers in-depthtechnicalarticles aboutREDcameras,postproduction,anddigital cinematography.
REDTECHVideos:REDoffers videos aboutunderstandingandusingREDcameras. REDSupport:Visitthe REDSUPPORTsite forsupportarticlesortofileasupportticket.
CongratulationsnewREDV-RAPTOR8KVVcameraowner.Thisquickreferencetopichelpsyougetfamiliarwiththis guideandthe CameraBody.Itincludeslinkstotopicsaboutconfiguringthecameratofityourrecordingrequirements, andforlearningthebasicoperationofthecamera.
Preparethecamerahardwareforrecordingby:
Attachingaccessories(referto OutriggerHandle, V-RAPTORWingGrip, DSMC3RED®Touch7.0"LCD)
Installingcompatible LensesandAdaptors
InsertingMedia
Connectingapowersource(referto Power or V-RAPTOR8KVVPowerAdaptor)
TurningOntheCamera
Configurethecamerasettingstoprepareforrecording.
Configuringthecamerasystemsettings(refertothe SystemSettingsMenu)
UpgradingtheFirmware
Calibratingthecamerausingthe Calibrate feature
Formattingthemedia(referto SecureFormat)
Specifyingthedesiredrecordingresolution(referto Format)
Configuringthe RecordingFrameRate and ProjectTimeBase
Settingtheexposure(referto Shutter)
Configuringthemonitoringtoolsandreviewingthemonitoredimage(refertothe MonitoringMenu)
Reviewingthecamerastatus(referto SystemStatus)
Startrecordingyourproject.
RecordbypressingtheRECbuttononthe CameraBody or OutriggerHandle
Recordbyusinganexternaltrigger(referto ExtensionPort)
RecordbyusingUSB-C(referto USB-CConfiguration)
RecordbyusingWi-Fi(referto HowTo)
Performpost-productionusinganyofthestandardapplications.
Adobe® Premiere® Pro
Avid® MediaComposer®
DaVinciResolve®
FinalCutProX®
Thecameracomponentsincludethecamerabody,battery,lensesandadaptors,mediareader,outriggerhandle,wing grip,cameraLCD,andtheREDcontrolapp.
Thissectiondescribesthe Front, Back, Left, Right, Top,and Bottom ofthecamera,andidentifiesthecontrols,buttons, CameraBodyLEDs,andthelensmountonthebody.
Thissectiondescribesthecontrolsandfeaturesofthecamera. FRONT
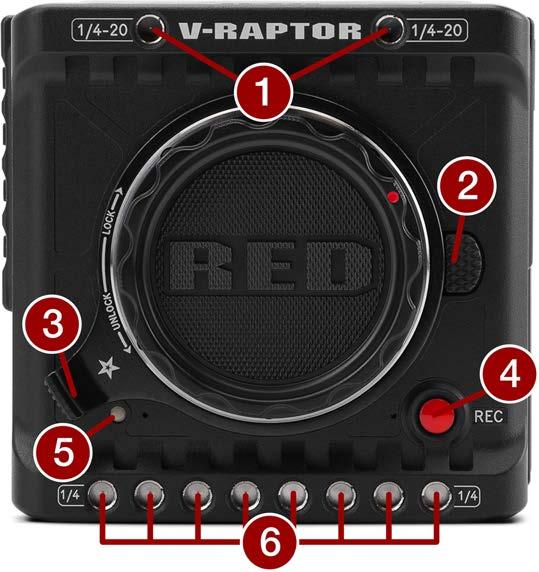
Figure:CameraBodyFrontControlsandFeatures
6 MountingholesEightlower¼"-20mountingholes
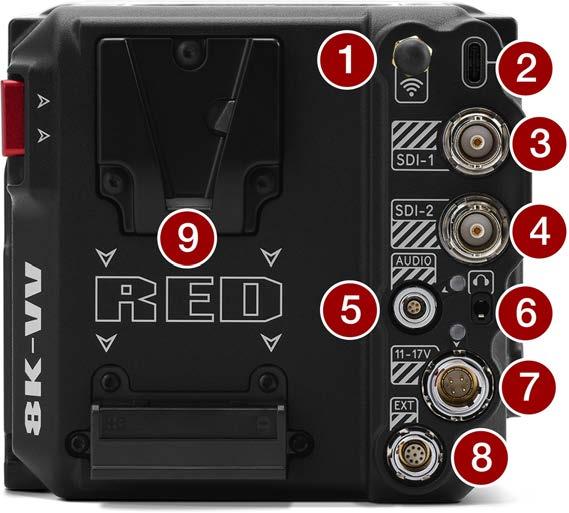
Figure:CameraBodyRearControlsandFeatures
# ITEM DETAILS
1 Antenna
MaleRPSMAWi-FiantennamountedtoafemaleRPSMAconnector.Supports2.4 GHzand5GHz
2 USB-Cport USB-Cconnection
3 12G-SDIport1
Full-size12G-SDIBNCportforSDImonitorconnection1,2
4 12G-SDIport2 Full-size12G-SDIBNCportforSDImonitorconnection1,2
5 Audioport/LED 5-pin00BODUfor2channelaudio(Line,Mic,and+48V)
6 Headphoneport3.5mmstereoheadphonejack
7 DC-INport 6-pin1BODUforDC-IN(11to17Volts)(referto 6-PinDC-IN)
8 9-Pin ExtensionPort 9-pin0BODUserialportforstart/stop,Genlock,TCandRS-232
9 MicroV-Lockport14.4VMicroV-Lockbatterymount(referto REDVOLTMicro-VBattery)
1.Usecertified12G-SDIcables.
2. WARNING:AlwaysconnecttheDCpowercable(orbatteries)beforeconnectingtheBNCSDIcable.AlwaysremovetheBNCSDIcablebefore removingtheDCpowercable(orbatteries).
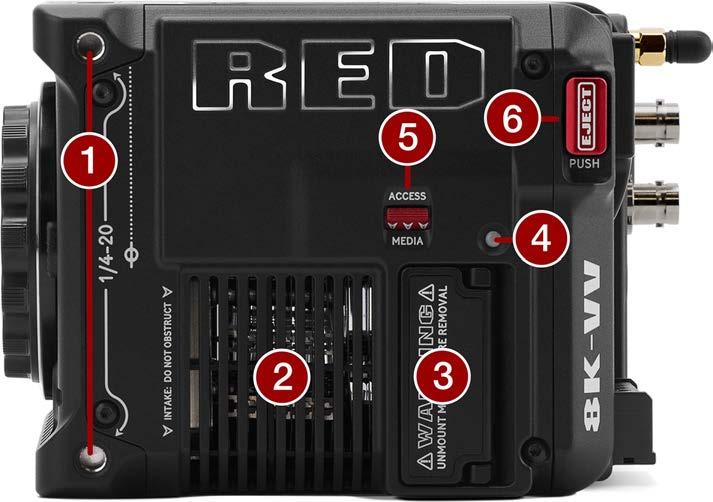
Figure:CameraBodyLeftControlsandFeatures
# ITEM DETAILS
1 Mountingholes Twoside¼-20mountingholes
2 Intake Coolingfanairintake
3 Mediacompartment CoveredCFexpressTypeBcompartment
4 CFexpressLED CFexpressstatusindicator(referto CameraBodyLEDs)
5 Accessmedia LatchfortheCFexpressTypeBmediacompartmentdoor
6 EJECTbutton EjectbuttonforMicroV-Lockbattery
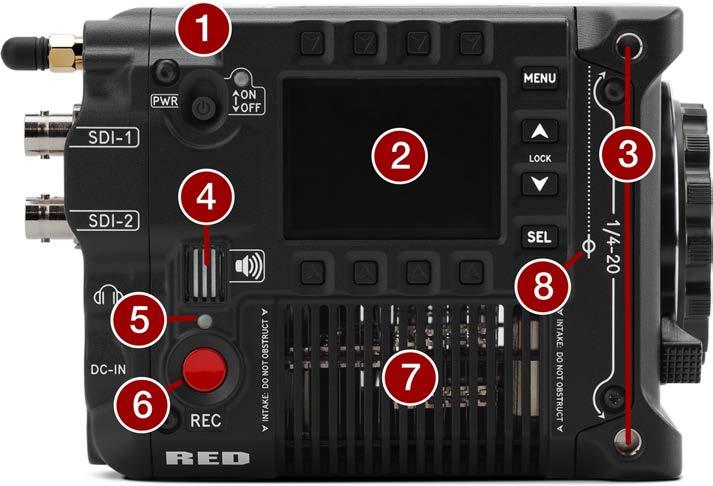
Figure:CameraBodyRightControlsandFeatures
# ITEM DETAILS
1 Powerswitch andLED Slideuptoturnonthecameraandslidedowntoturnoffthecamera.LEDdisplaysthecamera readystatus(referto CameraBodyLEDs)
2 MenuLCDGUImenuscreenandbuttons
3 MountingholesTwoside¼"-20mountingholes
4 SpeakerBeepspeakerforaudiblefeedback
5 RecordLEDDisplaysthecamerarecordingstatus(referto CameraBodyLEDs)
6 RECbuttonPressandreleasethe REC buttontotogglebetweenrecordstartandstop
7 AirintakeAirintakeforthermalmanagement
8 FocusplaneFocusplaneindicatorsymbol
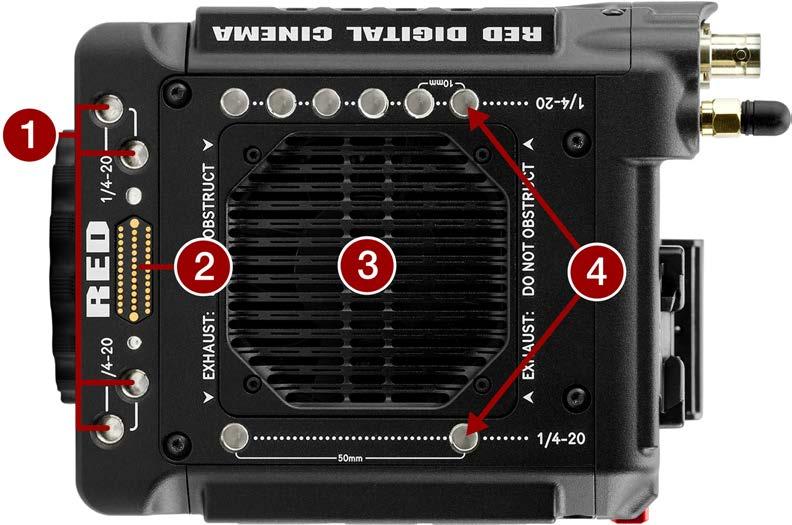
Figure:CameraBodyTopControlsandFeatures
# ITEM DETAILS
1 MountingholesFourtopfront¼"-20mountingholes
2 AccessoryportConnectionportforaccessories(referto OutriggerHandle,and DSMC3RED®Touch7.0"LCD)
3 ExhaustAirexhaustforthermalmanagement
4 MountingholesEighttopside¼"-20mountingholes
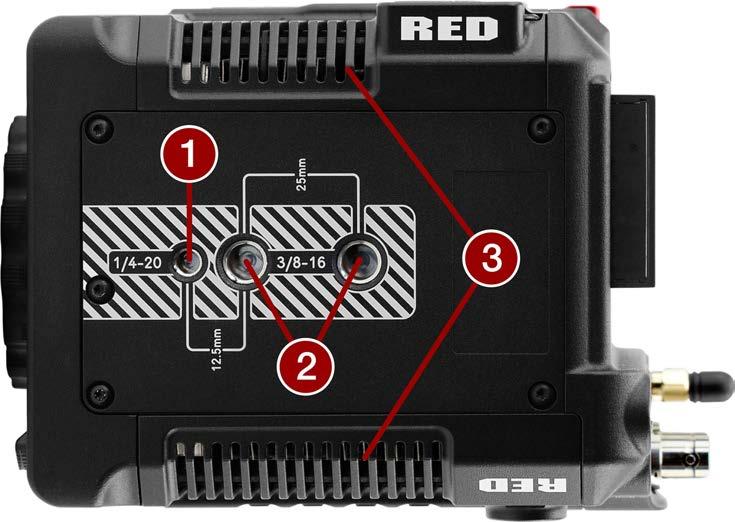
Figure:CameraBodyBottomFeatures
# ITEM DETAILS
1 Mountingpoint One(1)¼"-20mountinghole
2 Mountingpoints Two(2) ⅜"-16mountingholes
3 Airintakes Airintakesforthermalmanagement
FRONTLED

Figure:V-RAPTOR8KVVLED,Front
# ITEM
COLOR
1 TallyindicatorLED Red
DETAILS
Whenenabled,thisLEDisONwhenthecamerais recording.ForinformationaboutenablingthisLED,referto Indicators
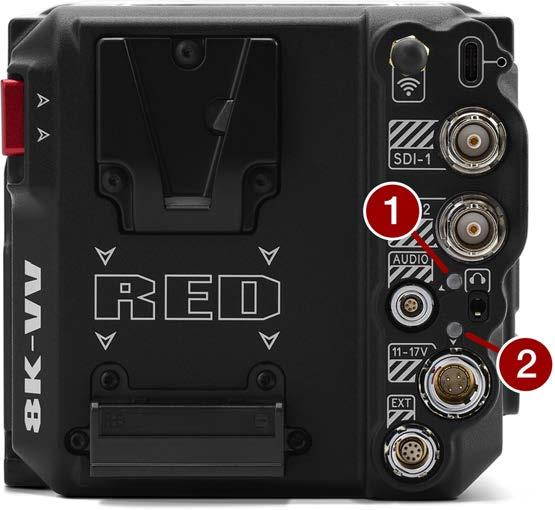
Figure:V-RAPTOR8KVV,DC/BatteryLEDs
# ITEMCOLOR
DETAILS
1 Phantom power Blue Indicatesthatthe+48VPhantomPowerisenabled
2 DC-INGreen DC-INispresentand/orthebatteryisfullycharged FlashingamberCommunicatingwith,andevaluating,thebattery Amber Chargingconnectedbattery Red Errorchargingthebattery
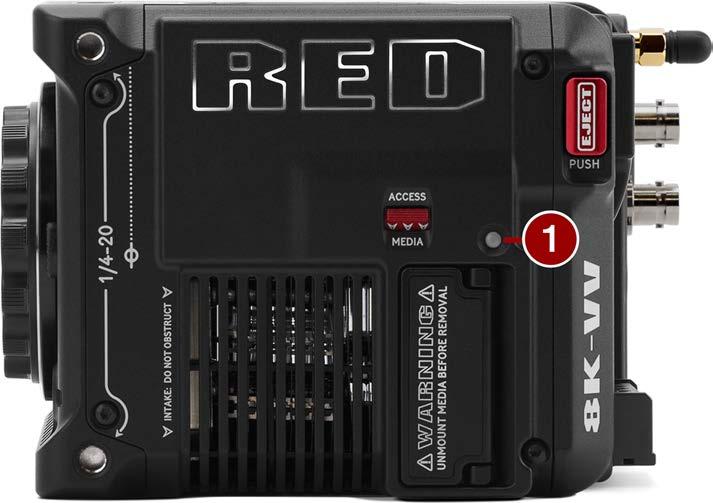
Figure:V-RAPTOR8KVVLED,LeftSide
# ITEM
COLOR/FLASHING
1 CFexpressmediaLEDOff
Green
Amber
Amberflashingslow
Redflashingslow
Redflashingfast
Red
DETAILS
Nomediamounted
Preview;mediamountedwith>10%of mediaspaceavailable
Recordingfinalizingorplaybackmode
Formattingmedia
Mediamountedwith>5%and<=10%of mediaspaceavailable
Mediamountedwith<=5%ofmediaspace available
Recordingwith>10%ofmediaspace available
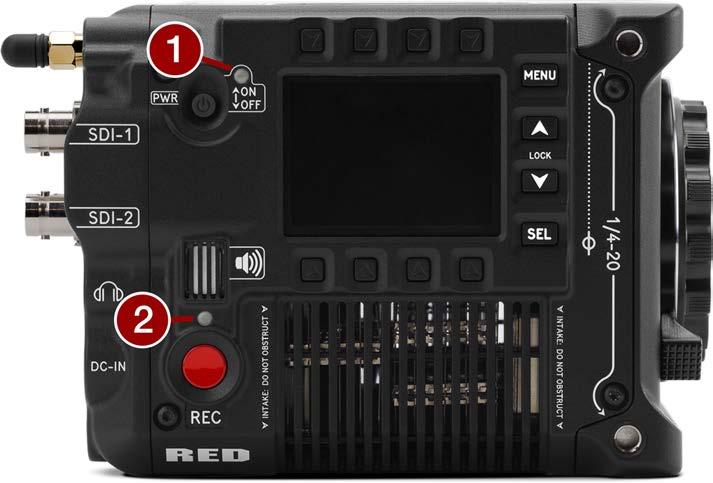
Figure:V-RAPTOR8KVVLEDs,RightSide
# ITEM
1 Powerstatus(ON) Off CameraOFF
Amber Camerabooting
Green CameraON
Amberflashing CameraON;5to10minofbatterytimeavailable
Redflashing CameraON;<5minofbatterytimeavailable
Red Camerashuttingdown
2 Recordstatus(REC) Off Nomediapresent
Green Readytorecord
Red Recording
Amber Finalizing
Redflashingslow Mediamountedwith>5%and<=10%ofmedia spaceavailable
Redflashingfast Mediamountedwith<=5%ofmediaspace available
Powerandrecord
Bothflashinggreen Firmwareupdateinprogress
Bothflashingred Firmwareupdateerror(referto Upgradingthe Firmware)
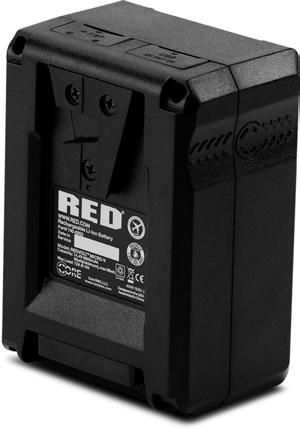
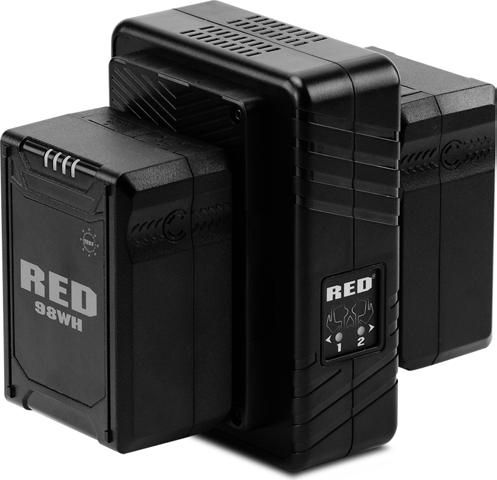
ThecamerausestheREDVOLTMicro-V14.7Vbattery.ThisbatteryincludesanLEDchargelevelindicator,aP-Tap port,andaUSBpowerport.
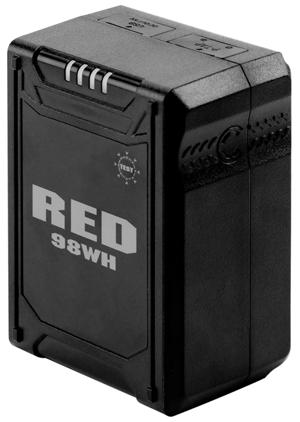
Type
Capacity
Batteryoutput
RechargeableLithium-IonBattery
6600mAh/98Wh
14.8VDC
P-Tapoutput 12VDC
USBoutput
Maximumload
Operatingtemperature
Chargingtemperature
Storagetemperature
5VDC(3Amps)
12Ampsat14VDC
50°F~113°F(10°C~45°C)
32°F~104°F(0°C~40°C)
68°F~122°F(20°C~50°C)
Charger REDCompactDualV-Lockcharger
Weight
Dimensions
Approximately1.2lb(544.3g)
Height:3.93in.(99.8mm)
Width:2.82in.(71.6mm)
Depth:1.94in.(49.3mm)
Thecamerachargesthebatterywhenthecameraisoffandapowercableisconnected.Youcanalsousetheoptional REDCompactDualV-Lockcharger.
TheoptionalREDCompactDualV-LockchargerallowsyoutochargetwoREDVOLTMicro-Vbatteries.
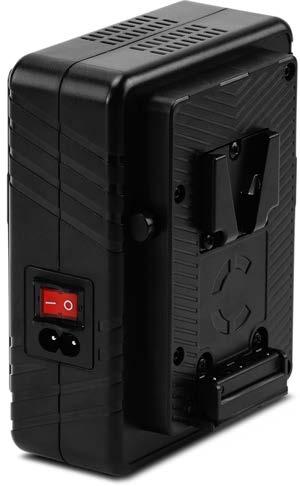
Input
Chargecurrent
100V-240VAC50Hzto60Hz
Onebattery3Amps,twobatteries1.5Amps
Chargingtemperature 32°F~104°F(0°C~40°C)
Storagetemperature 68°F~122°F(20°C~50°C)
Batterycompatibility REDVOLTMicro-V14.7VDC
Weight Approximately1lb(453.5g)
Dimensions
Height:4.5in.(114.3mm)
Width:5.5in.(139.7mm)
Depth:3in.(76.2mm)
Compatiblebatteriesarethosethatprovideenoughcurrent(14.4Vwith8Aorgreater)topowertheREDV-RAPTOR, andthatalsofitthedimensionsontheV-RAPTOR’sintegratedMicroV-Lockplate.
REDchosetheMicroV-LockplatefortheV-RAPTORtokeepitsform-factorcompact.Asaresult,notallV-Lock batteriesarecompatiblewiththecamera.
NOTE:
V-Lockbatterieswithawidthgreaterthan2.95in.(75mm)arenotcompatiblewiththecamera’sMicroV-Lockplate andwillrequireadapterplates.
ThecameracanchargeabatterythatsupportsSMBuscommunicationdirectly.Tochargethebattery,thecamera mustbepoweredoffwhileconnectedtoDC-INpower.
Thissectionliststhecompatiblelensesandadaptorsforthecamera.Italsoprovidesthestepsfor AttachingLenses and RemovingLenses Formoreinformationonaspecificlensoradaptor,refertotheoriginalmanufacturer’sinstructions.
WARNING: Whenthecameraisnotinuse,protectlensesandthecamerasensorbyattachingthelenscapsand cameramountcap.
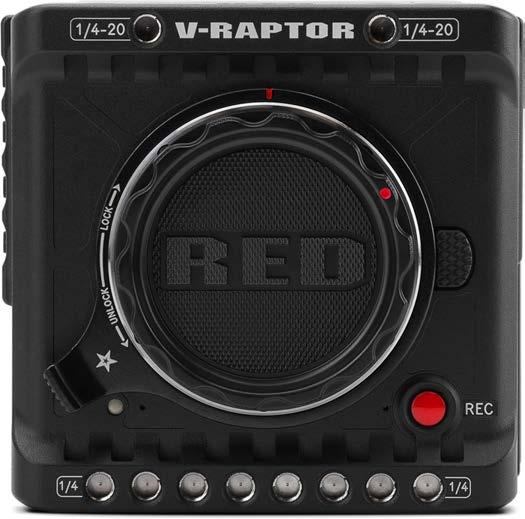
Figure:Camerawithmountcapinstalled.
IncompatiblelensesdonotregisteronthecameraUIandtheywillnotshowanyUIlensinformationormenucontrols. Thecameracancontrolcompatiblelenseselectronically,includingthefollowingfeatures: Iris-TheUImenuisenabledandthecameracancontrolthelensIris Autofocus-TheUImenuisenabledforlensesthatsupportautofocus ImageStabilization-TheUIindicatesthatimagestabilizationispresent ControlRing-TheUImenuisenabledandthecameracanusethecontrolring Formoreinformation,refertothe Lens menu.
ThelatestRED-testedandapprovedlensesarelistedontheV-RAPTOR8KVVsectionof REDSupport LENSWEIGHTANDLENSSUPPORT
Usealenssupportsystemwhenmountingheavyorlonglensestoyourcamera.
Whenmountingaheavyorlonglens,ensurethatthefullweightofthelensisneverdirectlyonthecameraorlens mount.Mountthelenstothesupportsystemfirst,andthencarefullymountthelenstothecamera.
REDtestedthefollowingadaptorsanddeterminedthattheyarecompatiblewiththecamera:
CanonMountAdaptorEF-EOSR
CanonDrop-InFilterMountAdaptorEF-EOSRwithVariableNDFilter/ClearFilter/CircularPolarizer
RefertotheV-RAPTOR8KVVsectionof REDSupport formoreinformation.
1.Unlockthelockingringbyrotatingittothefullycounterclockwiseposition.
2.Pressandholdthelensreleasebuttononthecamera.Whileholdingthelensreleasebutton,turnthecameralens mountcapcounter-clockwiseuntilitstops,andremoveitfromthecamera.Ifthelenslockingringrotateswhile removingthecap,makesurethatyouholdthelockingringtabinplacewhilerotatingthecap.
3.Removetherearlenscapfromthemountendofthelens.
4.Alignthereddotonthelensmountwiththereddotonthecameralensmount,andinsertthelensmountofthelens inthecameralensmountopening.
5.Turnthelensclockwiseuntilitclicksinplace.Ifthelenslockingringrotateswhileattachingthelens,makesurethat youholdthelockingringtabinplacewhilerotatingthelensoradaptor.
6.Gentlytightenthelockingring.DONOTOVER-TIGHTENTHELOCKINGRING.
7.Storethecameralensmountcapandtherearlenscaptogetherinadustfreelocation.
1.Loosenthelockingringgently.
2.Pressandholdthelensreleasebuttononthecamera.Whileholdingthelensreleasebutton,turnthelenscounterclockwiseuntilitstops,andremoveitfromthecamera.Ifthelenslockingringrotateswhileremovingthelens,make surethatyouholdthelockingringtabinplacewhilerotatingthelensoradaptor.
3.Alignthereddotonthecameralensmountcapwiththereddotonthecameralensmount,andattachthecapto thecamera.
4.Gentlytightenthelockingring.DONOTOVER-TIGHTENTHELOCKINGRING.
5.Attachtherearlenscaptothelens.
6.Storethelenswiththefrontandrearcapsattached.

TheREDCFexpressTypeBMediaprovidesthecamerawitha660gigabyterecordingoption.
ITEM
DETAILS
Type CFexpressTypeBMedia
Capacity
660,138,909,696bytes
Operatingtemperature14°Fto158°F(-10°Cto70°C)
Operatinghumidity 5%to95%,non-condensing
Storagetemperature -4°Fto185°F(-20°Cto85°C)
Shockresistance(operating)50g
Vibrationresistance(operating)15gat10Hzto2000Hz
Weight Approximately0.25oz(7.1g)
Dimensions
Height:1.52in.(38.5mm)
Width:1.17in.(29.6mm)
Depth:0.15in.(3.8mm)
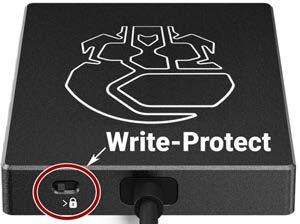
TheREDCFexpressTypeBCardReaderprovidesafastUSB-Cconnectionwiththecapabilityofwrite-protect. SettheWrite-ProtectswitchtotheLockpositiontopreventconnecteddevicesfromaddinganyunwanteddatatoyour CFexpressTypeBcard.

MediareadCFexpressTypeB
InterfaceUSB-C3.2cabletoCFexpressTypeB
PowerUSBbuspower
CableUSB-C3.2cabletypeAtoCadapter
WeightApproximately4.2oz(120g)
DimensionsHeight:3.74in.(95mm)
Width:2.56in.(65mm)
Depth:0.47in.(12mm)
TheOutriggerHandleoffersalowprofile,360°adjustableergonomicpistolgripandintegratedRecordStart/Stop button.MountedtotheTopHandlePortonyourcamera,theOutriggerHandleprovidescomfort,stability,and additional1/4-20mountingpointsforyourperipheralcameracomponents.Thebuilt-inRecordbuttonputsStart/Stop functionalityrightatyourfingertips.Youarealwaysreadytocapturetheperfectshot.

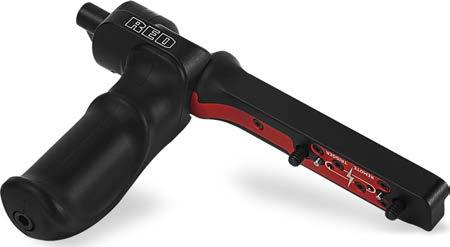
TheOutriggerHandleisidealforshooterswhouseonehandonthehandleforgripandrecordbuttonaccess,andthe otherforlensadjustmentsorsupport.
TheV-RAPTORWingGripofferscomfortandutilityforcarryingorshootingwithyourV-RAPTOR8KVV.
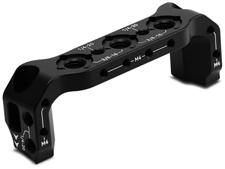
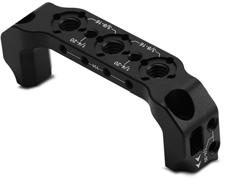
Featuringanergonomicmachinedgripwithtactical1/4"-20,3/8"-16,andM4mountingpoints.Itislightweight and offersaseamlesslow-profile hand-heldoption.
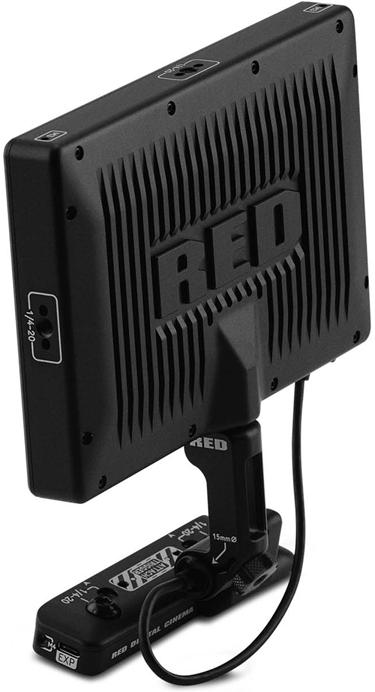
TheoptionalDSMC3RED® Touch7.0"LCDoffersanHDviewingexperienceforrecordingandviewingfootageonthe V-RAPTOR8KVVcamerasystem.A1920x1200resolutiondisplaypanelwithpeakbrightnessof1300nitsandhigh pixeldensity(at322ppi),notonlyprovidestheoptimalexperiencewhenviewingfootage,butalsofeatures100%DCIP3colorgamutcoveragefortremendouscoloraccuracy.
ThismonitoralsofeaturesfullcontroloverthecamerathroughthenewresponsivemenusystempoweredbySmallHD PageOS.ThefeaturesincludeWaveform,Vectorscope,Histogram,FalseColor,ColorPicker,PixelZoom,andmore.
Thelightweightdisplaymountstoaremovableintegratedtiltarmwiththecapabilitytorotate180degreesforversatile mountingoptions.Italsoboaststhelatestgenerationpogopinstoprovidepowerandvideotothemonitor,andthe abilitytoconnectthroughasingle-lockingUSB-C-styleDSMC3RMIcableforvideoandpower.NoadditionalSDIor powercablesareneeded.Referto REDMonitorInterfaceCable formoreinformation.
NOTE: TheUSB-C-styleDSMC3RMIcableisnotastandardUSB-Ccable.TheDSMC3REDTouch7.0"LCDisnot compatiblewithDSMC®,DSMC2®,REDRANGER® orKOMODO® camerasystems.
Formoreinformation,refertothe DSMC3RED® Touch7.0"LCDUserGuide
SPECIFICATIONS
ITEM

DETAILS
Material Aluminumalloy
Resolution 1920x1200
Pixeldensity 322ppi
Refreshrate 60Hz
Responsetime 25ms
Contrast 1250:1
Brightness 1300cd/m2
Colordepth 10bit
Colors
100%DCI-P3
Viewingangle ±160°allaxes
Displayorientation Landscape,180°rotation
Touch pCapMulti-Touch
Cameraconnection
PowerandcommunicationthroughtheRMIcable
Mounting 15mmrail
HoodMounting 4xM3mountingpoints
Buttons 4buttonsfunction1,2,3&4
Powerconsumption 15.5Watts
Operatingtemperature 32°Fto104°F(0°Cto38°C)
Storagetemperature –0°Fto120°F(–18°Cto49°C)
Operatinghumidity
Storagehumidity
Firmwarerequirement
Monitordimensions
Armdimensions
0%to85%,non-condensing
0%to85%,non-condensing
CompatiblewithV-RAPTORfirmwareversion1.1orlater
Weightapproximately1.25lb(568.0g)
Height:4.67in.(118.70mm)
Width:7.09in.(180.10mm)
Depth:1.13in.(28.80mm)
Weightapproximately0.07lb(30.1g)
Height:1.18in.(30.00mm)
Width:2.40in.(61.00mm)
Depth:0.70in.(17.50mm)
REDMonitorInterface(RMI)dimensionsWeightapproximately0.28lbs(126g)
Height:1.67in.(42.50mm)
Width:4.25in.(108.00mm)
Depth:1.51in.(38.23mm)
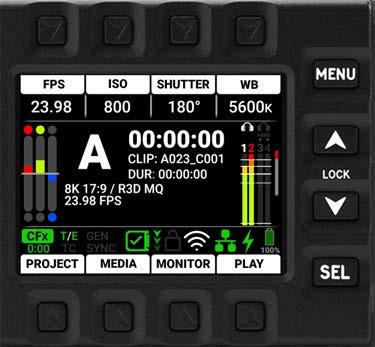
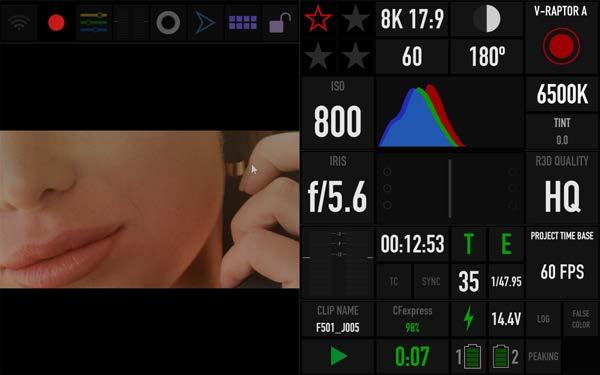
Thissectiondescribesthegraphicaluserinterface(GUI)forthebuilt-in camerasideLCD.Durablecontrolsenableconvenientaccesstomenus, camerafeatures,andcriticalcamerainformation.
PresstheupanddownarrowstogethertolockorunlocktheLCD.WhentheLCDislocked,theLockicondisplays brieflywheneveryoupushanLCDbutton.
SelectitemsontheLCDscreenbypressingtheadjacentbuttons:
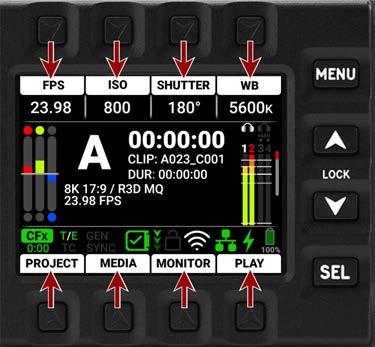
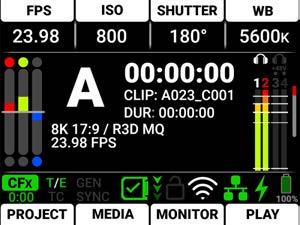
Inthisexample,pressingthebuttonaboveFPSopenstheRecordingFrameRateselectionlist:
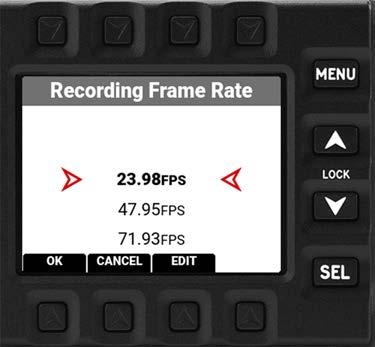
Presstheupanddownarrowstonavigatethelist.Pressthebuttonbelow OKorpresstheSELbuttontoacceptthechoiceandreturntotheHome Page.PressthebuttonbelowCANCELorpresstheMENUbuttontoreturn totheHomePagewithoutmakingachange.PressthebuttonunderEDIT toopenamanualeditingscreen.
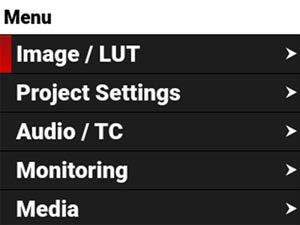
PresstheMENUbuttonfromtheHomePagetoopentheMenus:
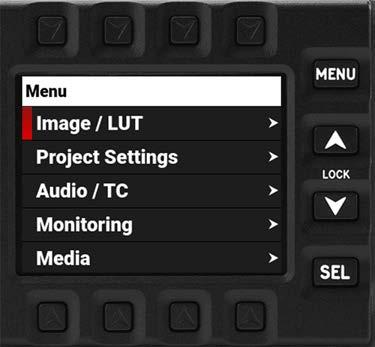
Presstheupanddownarrowstonavigateupanddowninthemenulist.PressSELtoselectamenuandopenthe submenus:
PressSELtoselectasubmenuandopenalistofmenuitems:
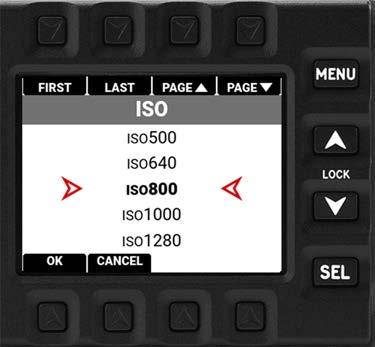
PressthebuttonsaboveFIRST,LAST,PAGE▲ ,orPAGE▼ orpresstheupordownarrowtonavigatethelist.Press SEL,orthebuttonunderOK,toselecttheitem.PressMENU,orthebuttonunderCANCEL,toreturntothemenu withoutmakingaselection.
Formoreinformationaboutmenus,referto Menus
TheLCDcontainstheHomePage,HistogramPage,ToolsPage,SDIPage,AudioChannels1and2Page,Audio Channels3and4Page,HeadphonesPage,andUserPages1,2,and3.
Presstheuparrowordownarrowtonavigatethroughthepages.SelectthepagesyouwanttheLCD todisplayby usingtheSideLCDmenu(referto SideLCDControlPanels).
TheHomePagecontainstheRecordingQuickSettings,ExposureMeter,RecordingStatus,VUMeter,StatusBar,and QuickMenus(referto HomePage).
TheHistogramPagecontainstheAutofocusQuickSettings,ExposureMeter,Histogram,andLensQuickSettings(refer to HistogramPage).
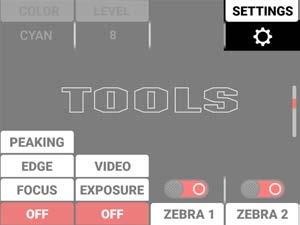
TheToolsPagecontainsthePeakingTools,ExposureTools,ZebraTools,andQuickMonitorMenu(referto Tools Page).

TheSDIPagecontainstheswitchesyouusetoenableordisabletheSDIfeatures,andtheLooksettingsforSDIPort1 andSDIPort2(referto SDIPage).
TheAudioChannels1/2Pagecontainsthesettingsfortheinternalmicrophonechannels1and2(referto Audio Channels1and2Page).
TheAudioChannels3/4Pagecontainsthesettingsfortheexternalaudioportchannels3and4(referto Audio Channels3/4Page).
TheHeadphonePagecontainsthesettingsfortheheadphoneportaudiooutput(referto HeadphonePage).
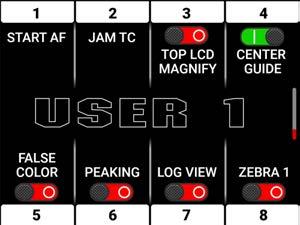
TheUserPages(1-3)allowyoutoassigneightquickbuttonstoeachpage(referto UserPages).
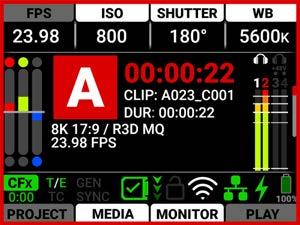
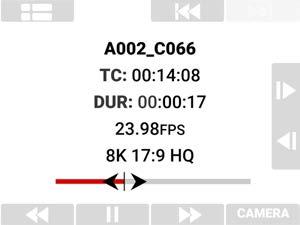
ThissectiondescribestheHomePageoftheLCDGUI.Thispagecontainsthe QuickSettings,ExposureMeter,RecordingInformation,VUMeter,StatusBar,and QuickMenus.Thisisthefirstpagethatdisplayswhenyoupowerupthecamera.

TheRecordingQuickSettingssectionoftheLCDhomepagedisplaystheRecordingQuickSettingsbuttons.Youcan usethesebuttonstoquicklyaccessthemostoftenusedcamerarecordingmenusettings.Thesesettingsinclude RecordingFrameRate, ISO, Shutter,and WhiteBalance

Pressthetopbuttonstoopenthemenuitemlists. PressUpandDowntonavigatethelist.
PressthebuttonunderOKorSELtoselecttheitemandreturntotheHomePage. PressthebuttonunderCANCELorpressMENUtoreturntotheHomePage withoutmakinganychanges.
PressandholdthebuttonaboveSHUTTERtotoggletheshutterbetweendegreesandfractions(referto Shutter for moreinformation).
PressandholdWhiteBalance(WB)totogglebetweenColorTemperatureandColorTemperaturePresets(referto WhiteBalance formoreinformation).
TheExposuresectionoftheLCDhomepagedisplaystheRGBexposurelevelsforthecamera.
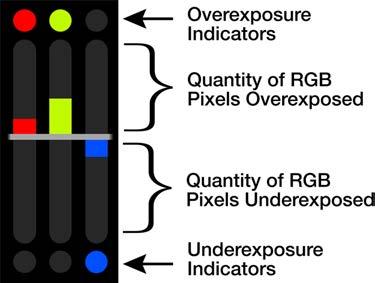


RGBExposureMeterdisplaysthequantityofoverorunderexposedpixelsineachoftheseparatered,green,andblue channels.
ThetopandbottomRGBlightsilluminatewhenasmallamountofpixelsonthesensorareoverexposedor underexposed.Thisindicatesthatasmallnumberofpixelsintheimagearetoobrightandwillnotcontainanydetail,or aretoodarkandwillappearasnoise.
ThebarsshowthequantityofoverexposedandunderexposedRGBpixelsonthesensor.Adjustthesettingsinthe camerasuchasIris,orshutterspeedtocompensate,orchangethescene'slightingforthebestbalancedimage.

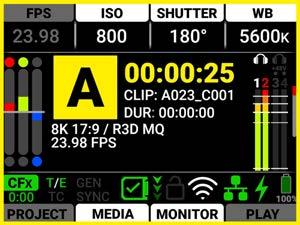
TheCameraDesignationandRecordindicatorontheLCDhomepagedisplaysthecameraletterassignedtothe camera(referto Slate and CameraID).Thecolorofthisareaindicateswhenthecamerarecordingisready(black),when thecameraisrecording(red),andwhentherecordingisstoppedandthecameraisaddingthepre-recording(yellow).
Recording: AddingPre-Recording:
TheTimecode/Edgecodesectiondisplaysthetimecodeoredgecode(referto TimecodeDisplayMode).
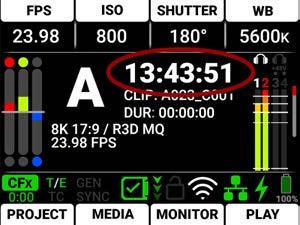
Timecode: Edgecode: Thistextturnsredwhenthecameraisrecording.
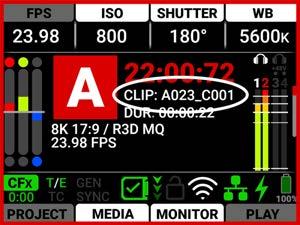
TheClipareadisplaystheclipnamedesignatedintheProjectSettingsmenu(referto Slate).
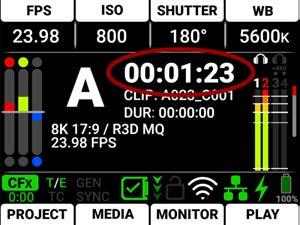
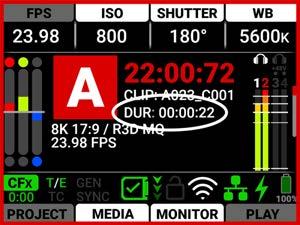
TheDurationareadisplaysthereal-timedurationofthecurrentclip.
TheSensorFormatareadisplaysthesensorformatselectedintheProjectSettings(referto Format).
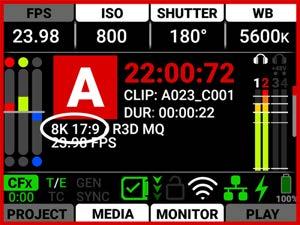
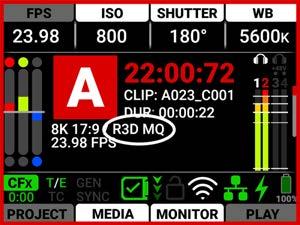
TheQualityareadisplaystheR3Dcompressionlevel(referto R3DQuality).
TheProjectTimeBaseareadisplaystheplaybackratefortherecordedfootageselectedintheProjectSettings(referto ProjectTimeBase).

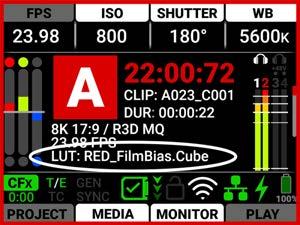
The3DLUTareadisplaystheLUTfileselectedintheImage/LUTmenu(referto 3DLUT).
The StatusBar containsstatusiconsforvariouscamerasettingsandinputs.
TheQuickMenussectionoftheLCDhomepagedisplaystheQuickMenubuttons.Youcanusethesebuttonsto quicklyaccessthemostoftenusedcameramenus.Thesesettingsinclude ProjectSettingsMenu, MediaMenu, MonitoringMenu,and Playback
PressthebottombuttonstoopentheQuick Menus.
PressUp,Down,andSELtonavigatethemenus.
PressMENUtoreturntotheHomescreen.
TheLCDHistogrampageisthesecondpageontheLCD.PressthedownbuttontonavigatefromtheHomepageto theHistogrampage.
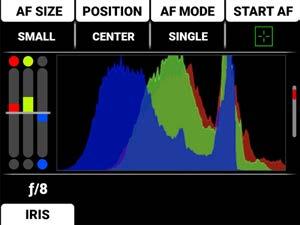
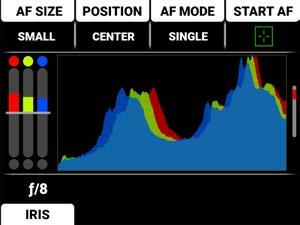
TheHistogramPagecontainstheAutofocusQuickSettings,ExposureMeter,Histogram,andLensQuickSettings.

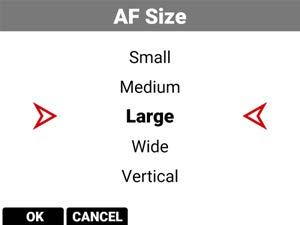
TheAutofocusquicksettingsallowyoutoaccesstheAutofocussettingsquickly. PressthebuttonaboveAFSIZEtoselecttheautofocussize
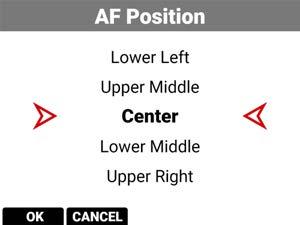
PressthebuttonabovePOSITIONtoselecttheautofocuslocationonthescreen
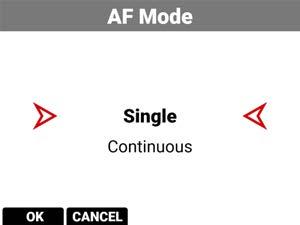
PressthebuttonaboveAF MODEtoselecttheautofocusmode
PressthebuttonaboveSTART AFtoenableautofocus
Referto Autofocus-BETAMenu formoreinformationabouttheAutofocusmenu.
TheExposuremeterdisplaystheRGBexposurelevelsforthecamera.
RGBExposureMeterdisplaysthequantityofoverorunderexposedpixelsineachoftheseparatered,green,andblue channels.
ThetopandbottomRGBlightsilluminatewhenasmallamountofpixelsonthesensorareoverexposedor underexposed.Thisindicatesthatasmallnumberofpixelsintheimagearetoobrightandwillnotcontainanydetail,or aretoodarkandwillappearasnoise.
ThebarsshowthequantityofoverexposedandunderexposedRGBpixelsonthesensor.Adjustthesettingsinthe camerasuchasIris,orshutterspeedtocompensate,orchangethescene'slightingforthebestbalancedimage.
TheHistogramareadisplaysahistogramdistributionoftheRGBexposureoftheLog3G10signalafterISOandWhite Balanceadjustments.
Thehistogramdisplaysthedarkestimageelementsatthefarleft,themidtonesinthemiddle,andthelightestimage elementsatthefarright.Thisgivesyouafastwaytodetermineyouroverallimageexposurelevels.
OverexposedExample
UnderexposedExample
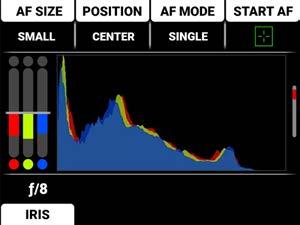

TheLensquicksettingsallowyoutoaccesstheIrissettingsquickly. PressthebuttonunderIRIStoopentheIrismenulistandselectthelensf-stop.
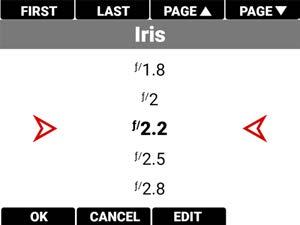
Referto Lens formoreinformationabouttheIrissettings.
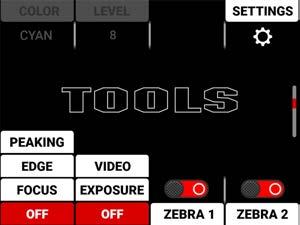
TheLCDToolspageisthethirdpageontheLCD.PressthedownbuttontwicetonavigatefromtheHomepagetothe Toolspage.
TheToolsPagecontainsthePeakingModes,FalseColorModes,ZebraToolSwitches,andQuickMonitorMenu.
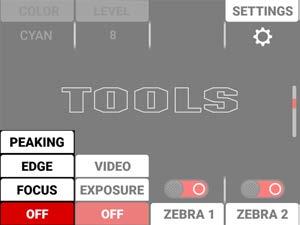
ThePeakingtoolsaremodesthatprovidedifferentwaystoindicateimagefocus.ThePeakingmodesyoucanselect include:
Peaking Selectacoloredoverlaytoindicateobjectsinfocus
Edge
Showoutlinesoffocusedobjects
Focus Useenhancedcontrastandedgesforfocusing PressthebuttonbelowthePeakingtoolscolumntocyclethroughthechoices.WhenyouselectthePeakingtool Peakingmode,thesettingsforColorandLevelareenabled:
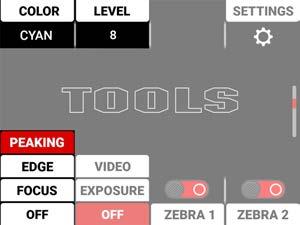
Formoreinformationreferto Peaking
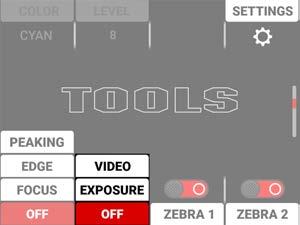
PressthebuttonbelowtheFalseColortoolscolumntocyclethroughthechoices.
FalseColorModesinclude:
FalseColorVideoMode AccesssceneexposureinvaryinglightwithoutrelyingontheLCDimagebrightness. FalseColorExposureMode Usefalsecolorstodetermineanoptimalbalancebetweenoverexposureand underexposure.
NOTE: FalseColormodesdisplayonvideorecordedthroughSDItoanexternalrecorderwhentheToolsareenabledin theMonitormenu.WhenrecordingthroughSDI,useFalseColormodesonlytohelpdeterminesceneexposure settings,andthendisablethemodebeforerecording.
FALSECOLORVIDEOMODE
NOTE: Forbestresults,VideoModeshouldbeviewedatoraboveISO800.
VideoModedisplaysacoloroverlaythatindicatesthevideoleveloftheRGBmonitorpath(calibratedtotheSMPTE testsignal).
ThecolorsusedarebasedontheRGBlevelsofthevideooutsignal(thatis,the“cooked”look,andnotRAWdata).The camera'sRGBsettingscanchangetheappearanceoftheVideoModecolors.
Formoreinformation,referto FalseColor
FALSECOLOREXPOSUREMODE
WhenthismonitoringFalseColormodeisactivated,mostofthetonalrangewillappearinmonochrome.
TheExposureModeisabletoindicateexactlywheremiddlegrayisfalling,andindicatewhichhighlightsorshadows areproblematicinthelogarithmicrepresentationoftheimage.ExposuremodeisjudgingtheexposureafterISOand WhiteBalanceadjustmentsaremade,andbeforeanysortofLUTortransformisappliedtotheLog3G10image.
Formoreinformation,referto FalseColor
UseZebra1todisplayonesetofdiagonalstripestoindicatehighlightexposurelevels.UseZebra2todisplayasecond setofdiagonalstripestoindicatemid-toneandshadowlevels.Formoreinformation,referto ZebraModes
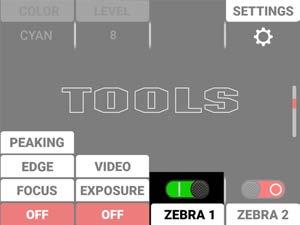
PressthebuttonbelowtheZEBRA1switchtoenableordisabletheZebra1tool. Formoreinformation,referto Zebra1
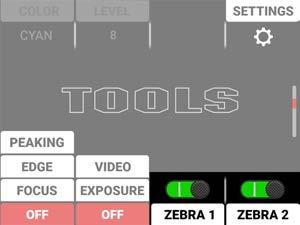
PressthebuttonbelowtheZEBRA2switchtoenableordisabletheZebra2tool. Formoreinformation,referto Zebra2.
PressthebuttonaboveSETTINGStoopentheQuickMonitoringMenu.
Formoreinformation,referto MonitoringMenu
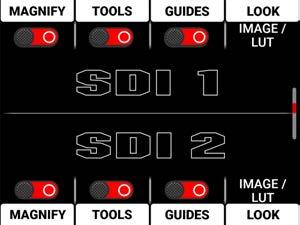
TheSDIPagecontainstheswitchesyouusetoenableordisabletheSDIfeatures,andtheLooksettingsforSDIPort1 andSDIPort2.
TheSDI1andSDI2sectionscontaintheswitchesyoucanusetoenableanddisableimagemagnification,focusand exposuretools,andframeandcenterguides.Formoreinformation,refertothe MonitoringMenu section.
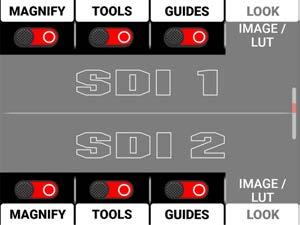
Pressthebuttonnexttotheswitchtotogglefromdisabledtoenabled. SelectLOOKtoopentheLookoptionsfortheSDI1andSDI2ports.
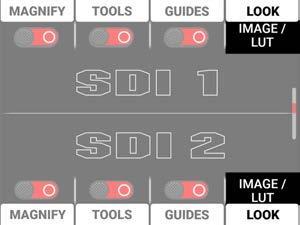

YoucanselecttheImage/LUTlookdefinedintheImage/LUTmenu,oryoucanselecttheRWG (REDWideGamutRGB)/Log3G10ImageProcessingPipeline(IPP2)look.
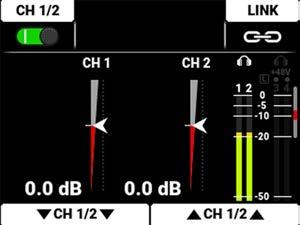
PressthedownbuttontonavigatefromtheHomepagetotheAudioChannels1and2page. TheAudioChannels1and2pagecontainstheswitchtoenabletheinternalmicrophonechannels(1and2),abuttonto enableanddisablethelinkbetweenthechannel1and2levels,theaudiolevelindicators,theheadphonemonitoring indicator,the48voltphantompowerindicator,theaudioVUmetersforchannels1,2,3,and4,adjusterstoreducethe audiochannel1and2levels,andadjusterstoincreasetheaudiochannel1and2levels.

TheAudioChannels1and2topbarallowsyoutoenabletheinternalmicrophones(channels1and2).
PressthebuttonaboveCH1/2toenableordisabletheinternalmicrophones
PressthebuttonaboveLINKtolinktheaudioleveladjustmentsforchannels1and2
Refertothe Audio/TCMenu sectionformoreinformationabouttheaudiofeatures.
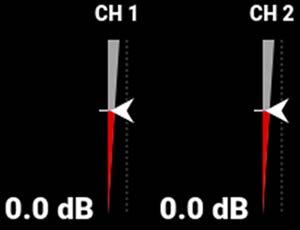
Theaudiolevelindicatorsmoveupanddowntoindicatethechangesintheaudioleveladjustments.Thelevel measuredindecibelsisdisplayedbelowthelevelindicators.Youcanadjustchannels1and2individually,oryoucan linkthechannelsandadjustthemtogether.

TheVUmeterdisplaystheheadphoneindicators,thelimiterindicator,the48Vphantompowerindicator,theaudio channelnumbers,andtheaudiosignallevels.
TheAudioChannels1and2bottombarallowsyoutoadjusttheinternalmicrophones(channels1and2).Youcan adjustthechannelsindividuallyoryoucanlinkthemandadjustthemtogether.
PressthebuttonsbelowCH1▼ toreducetheexternalaudiolevels(channel1)
PressthebuttonsbelowCH1▲ toincreasetheexternalaudiolevels(channel1)
PressthebuttonsbelowCH2▼ toreducetheexternalaudiolevels(channel2)
PressthebuttonsbelowCH2▲ toincreasetheexternalaudiolevels(channel2)
Refertothe Audio/TCMenu sectionformoreinformationabouttheaudiofeatures.
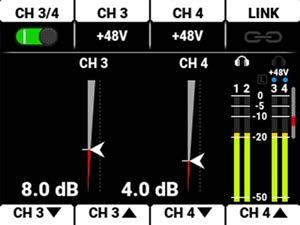
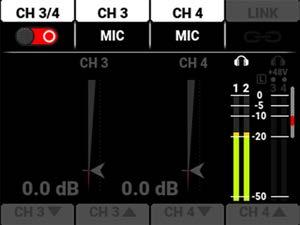
PressthedownbuttontonavigatefromtheHomepagetotheAudioChannels3and4page.
TheAudioChannels3and4pagecontainsaswitchtoenabletheexternalaudioinputchannels(3and4),abuttonto enableanddisablethelinkbetweenthechannel3and4levels,theaudiolevelindicators,theheadphonemonitoring indicator,the48voltphantompowerindicator,theaudioVUmetersforchannels1,2,3,and4,adjusterstoreducethe audiochannel3and4levels,andadjusterstoincreasetheaudiochannel3and4levels.


TheAudioChannels3and4topbarallowsyoutoenabletheexternalaudioinputs(channels3and4).
PressthebuttonaboveCH3/4toenableordisabletheexternalaudio
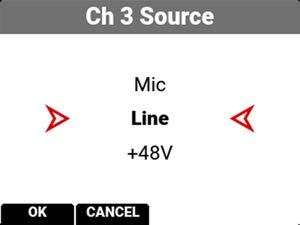
PressthebuttonaboveCH3orCH4toopenalistofexternalaudiooptionsforthosechannels(Mic,Line,+48V)
PressthebuttonaboveLINKtolinktheaudioleveladjustmentsforchannels3and4
Refertothe Audio/TCMenu sectionformoreinformationabouttheaudiofeatures.
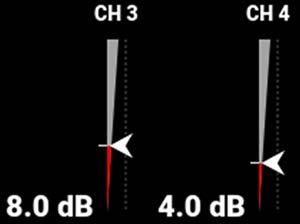
Theaudiolevelindicatorsmoveupanddowntoindicatethechangesintheaudioleveladjustments.Thelevel measuredindecibelsisdisplayedbelowthelevelindicators.Youcanadjustchannels3and4individually,oryoucan linkthechannelsandadjustthemtogether.
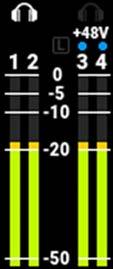
TheVUmeterdisplaystheheadphoneindicators,thelimiterindicator,the+48Vphantompowerindicator,theaudio channelnumbers,andtheaudiosignallevels.
TheAudioChannels3and4bottombarallowsyoutoadjusttheexternalaudio(channels3and4).Youcanadjustthe channelsindividuallyoryoucanlinkthemandadjustthemtogether.
PressthebuttonsbelowCH3▼ toreducetheexternalaudiolevels(channel3)
PressthebuttonsbelowCH3▲ toincreasetheexternalaudiolevels(channel3)
PressthebuttonsbelowCH4▼ toreducetheexternalaudiolevels(channel4)
PressthebuttonsbelowCH4▲ toincreasetheexternalaudiolevels(channel4)
Refertothe Audio/TCMenu sectionformoreinformationabouttheaudiofeatures.
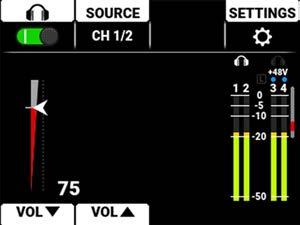
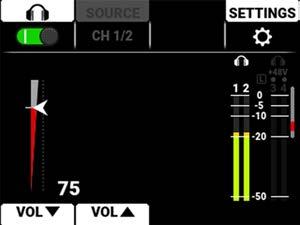
PressthedownbuttontonavigatefromtheHomepagetotheHeadphonepage. TheHeadphonepagecontainstheswitchtoenabletheheadphonejack,asourcelisttoselectthesourcetomonitor (CH1/2orCH3/4),theheadphonelevelindicator,theheadphonemonitoringindicator,thelimiterindicator,the+48volt phantompowerindicator,theaudioVUmetersforchannels1,2,3,and4,anadjustertoreducetheheadphonelevels, andanadjustertoincreasetheheadphonelevels.

TheHeadphonetopbarallowsyoutoenable/disabletheheadphoneportoutput,toselectthesourceoftheheadphone output(internalchannels1and2orexternalchannels3and4),andtoquicklyaccesstheAudio/TCmenu.
Pressthebuttonabovetheheadphoneicontoenableordisabletheheadphoneaudio PressthebuttonaboveSOURCEtoopenthelistofchannelstomonitor(Ch1/2orCh3/4)

PressthebuttonaboveSETTINGStoopentheAudio/TCmenu

Refertothe Audio/TCMenu sectionformoreinformationabouttheaudiofeatures.

Theaudiolevelindicatormovesupanddowntoindicatethechangesintheheadphoneleveladjustments.Thelevel measuredindecibelsisdisplayedbelowthelevelindicator.
TheVUmeterdisplaystheheadphoneindicators,thelimiterindicator,the+48Vphantompowerindicator,theaudio channelnumbers,andtheaudiosignallevels.
Theheadphonebottombarallowsyoutoadjusttheheadphonevolume.
PressthebuttonbelowVOL▼ toreducetheheadphonevolume
PressthebuttonbelowVOL▲ toincreasetheheadphonevolume
Refertothe Audio/TCMenu sectionformoreinformationabouttheheadphonefeatures.
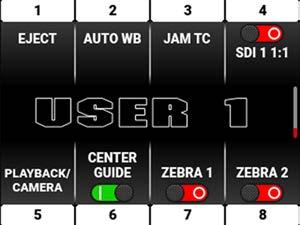
TheUser(1,2,3)pagesarethelastpagesontheLCD.PresstheupbuttontonavigatefromtheHomepagetotheUser pages.
TheUserPagescontainthesettingsyouassignedtothepagesintheUserSettingsmenu.Fromthispageyoucan pressbuttonsnextto1-8toquicklyselectacamerasettingorfeature. Refertothe UserSettingsMenu sectionformoreinformation.
WhenyoupressthebuttonbelowPLAYontheHomePage,theLCDdisplaysthePlaybackscreen.
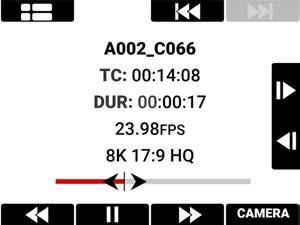
ToclosethePlaybackscreen,pressthebuttonbelowCAMERA.
ThePlaybackscreendisplaysthefollowing: ClipInformation PlaybackScreenButtons
TheClipInformationdisplaysthename,Timecode,duration,projecttimebase,format,andtimelineoftheclip.
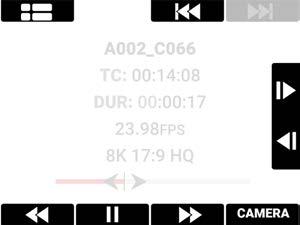
WiththePlaybackscreenbuttonsyoucanviewtheCliplist,movetothestartoftheclip,fastreverse,play/pause,fast forward,andmoveforwardandreversebyasingleframe.

PressthebuttonovertheClipListtoopentheClipLoadlist.
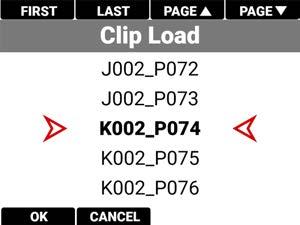
NavigatetothedesiredclipandpressthebuttonunderOKtoopentheclipinthePlaybackscreen.

PressthebuttonabovetheStartorEndbuttontonavigatetothestartorendoftheclip.

PresstheUParrowtomoveforwardbyasingleframeandpresstheDOWNarrowtoreversebyasingleframe.

PressthebuttonbelowRewindtoquicklynavigatebackwardsthroughtheclip.


PressthebuttonbelowPlay/Pausetotogglebetweenplayingtheclipandpausingtheclip.

PressthebuttonbelowFastForwardtoquicklynavigateforwardthroughtheclip.

PressthebuttonbelowCAMERAtoreturntothecamerainterface.
TheREDControlappprovidesremoteandtetheredaccesstothecamerafromadevice.Accessisavailablethrough Wi-Fi,USB-C,andEthernet.
TheREDControlappisfreethroughtheGooglePlaystoreandtheAppleAppstore.
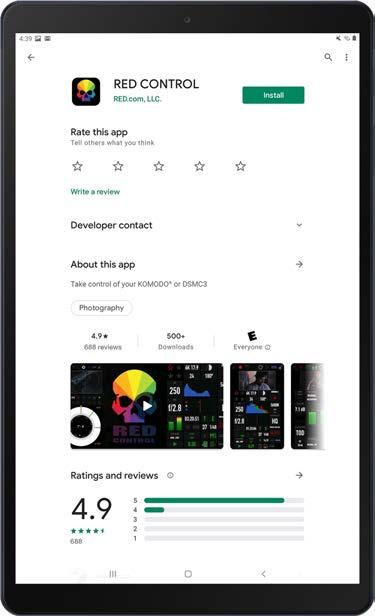

TheREDControlappallowsyoutocontrolallofthecamerafeatureswhileviewingtheimage.
FormoreinformationaboutconnectingthecameratoREDControl,refertotheHowTosection(USB-CConfiguration).
TheLCDscreendisplaysthecamerastatusbar.
TheStatusBarcontainsthefollowingbuttonandicons:

CFexpressStatusIcon


Temperature/ExposureIcon
TimecodeIcon

GenlockIcon

SYNCIcon

CameraStatusIcon
FTPSActivityIcon


Wi-FiIcon
NetworkIcon


LCDLockIcon
BatteryIcon
DC-InIcon
ThisicondisplaysthestatusoftheCFexpressmedia card,anditdisplaystherecordingtimeremainingforthe currentcamerasettings.
Thestatusdisplayedincludes:


Good Missing Incompatible
TEMPERATURE/EXPOSUREICON
Thisicondisplaysthetemperature(T)andexposure(E) calibrationindicators.
•WhenTisyelloworred,itindicatesthatthecamera requiressensorre-calibration.
•WhenEisyelloworred,itindicatesthatthecamera requiressensorre-calibration.
Referto CalibratingtheSensor

ThisiconindicatesthestateoftheTimecodegenerator connection.
GrayindicatesthatnoTimecodegeneratorsignalis detected.
GreenindicatesthattheTimecodesourceis connectedandjammed.

RedindicatesthattheTimecodesourceis connectedandnotjammed.

WhiteindicatesthattheTimecodesourceisjammed andnotconnected.

YellowindicatesthattheTimecodesourceiscrossjammed(atadifferent ProjectTimeBase).

ThisiconindicatesthattheTimecodeandGenlocksignals aresynchronizedtothecamera'sframespersecond(FPS) settings.
Grayindicatesthatnosynchronizationis detected.

Greenindicatesthatthecamerais synchronizedwiththeTimecodeandGenlocksignals.

Yellowindicatesthatthecamerais synchronizedwiththeasinglecameraoraGenlocksignal.

ThisiconindicatesthestateoftheGenlock connection.
GrayindicatesthatnoGenlocksignalis detected.

Greenindicatesthatthecamerais receivingandislockedtoaGenlocksignal.

Redindicatesthatthecameraisreceiving andisnotlockedtoaGenlocksignal.
Thisiconindicatesthestateofthecamera hardware.Thedifferenticonsandtheir correspondingstatusinclude:


ThisiconindicatesthestateofFTPSdatatransfer.
GrayindicatesthattheFTPSisnottransferring data.
Greenindicatesthatthecameraistransferring FTPSdata.

ThisiconindicatesthestateofWi-Ficonnection.
GrayandemptyindicatesthatnoWi-Fisignalis detected.
WhitebarsindicatethatWi-Fisignalisdetected (Infrastructure).

WhiteantennaindicatesthatWi-Fisignalis broadcasting(Ad-hoc).
Thisiconindicatesthestateofthenetwork connection.
Grayindicatesthatthecameraisnotconnected toanetwork.

Greenindicatesthatthecameraisconnectedto anetwork.
ThisiconindicatesthestateoftheLCDLock.Thestates include:

GrayandopenindicatesthatthecameraLCDis unlocked.

WhiteandclosedindicatesthatthecameraLCDis locked.

Thisiconindicatesthestateofthebatteryconnection andchargelevel.
Grayindicatesthatnobatteryisconnected.
Whiteindicatesthatthebatteryisconnectedand greenshowstherelativelevelofchargeremaining.

Yellowindicates10minutesofpowerremaining.

Redindicateslessthen5minutesofpower remaining.

Grayquestionmarkindicatesnocommunication withthebatteryandnopower.

Whitequestionmarkindicatesnocommunication withthebatteryandpower.

Grayexclamationpointindicateserror communicatingwiththebatteryandnopower.
ThisiconindicatesthestateofDCpowerconnection.
GrayindicatesthatnoDCpowerisconnected.
GreenindicatesthatthecameraisreceivingDCpower.
Thissectiondescribesthemenusandsub-menusforthecamera.Toaccessthemenus,navigatetoamenuitemfrom the LCD
Image/LUTMenu ISO,Shutter,WhiteBalance,OutputColorSpace,OutputToneMap,HighlightRoll-Off, 3DLUT,CDL,ExposureAdjust
ProjectSettingsMenu Format,RecordingFrameRate,ProjectTimeBase,R3DQuality,Pre-Record,Slate
Audio/TCMenu AudioSource,InternalAudio,ExternalAudio,Headphone,TimecodeSource,Jam TimecodetoTOD,TimecodeDisplayMode
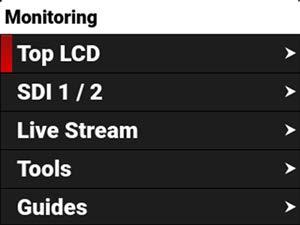
MonitoringMenu TopLCD,SDI1/2,LiveStream,Tools,Guides
MediaMenu Eject,MediaInfo,SecureFormat
UserSettingsMenu Presets,SideLCD,User1,User2,User3
Autofocus-BETAMenu Enable,Mode,Size,Position,StartAF
CommunicationMenu Camera,USB-C,Wi-Fi,FTPS,Serial
SystemSettingsMenu Date/Time,Lens,Power,Indicators,StatusSettings, SystemStatus
LanguageMenu English,Chinese,French,German,Japanese,Spanish
MaintenanceMenu Calibrate,Calibration,SaveLog,ResetDefaults,FactoryReset,Upgrade
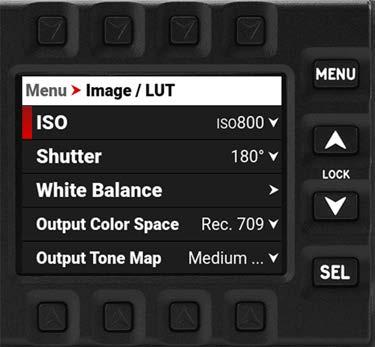
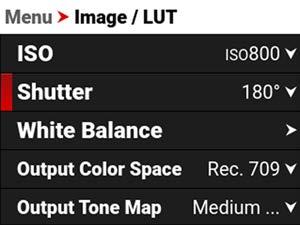
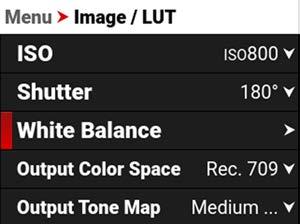
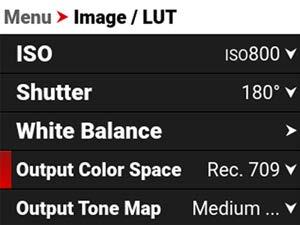
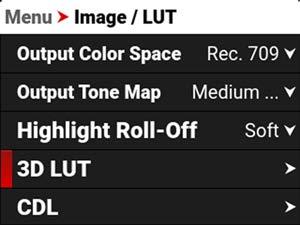
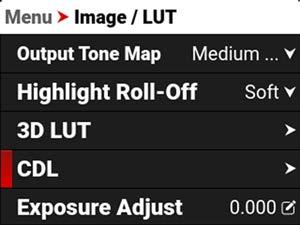
TheImage/LUTmenucontainsthesettingsyouusetoconfigureyourimage. FromthecameraLCDmenu,navigatetoImage/LUTandpressSEL:
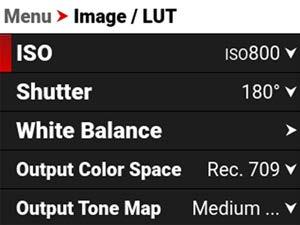
UsetheImage/LUTmenutoconfigurethecamera'simageandlookuptable(LUT)settings:
ITEM
ISO
Shutter
WhiteBalance
OutputColorSpace
OutputToneMap
HighlightRoll-Off
3DLUT
CDL
ExposureAdjust
DETAILS
Adjuststheimage’sbrightnessinthemonitoringpath
Adjuststheamountoflightexposedtothesensor
Adjuststhecolorstocompensateforthelightsourcetemperature
Adjustson-setworkingcolorspace
Adjuststheimagecontrast
Adjustsimagehighlightcompression
Managethecamera'slookuptables(LUTs)
OpenstheColorDecisionList(CDL)menu
Manuallyfine-tunesthemidtoneexposurelevel
UsetheISOsettingtoadjusttheimage’sbrightnessinthemonitoringpath.
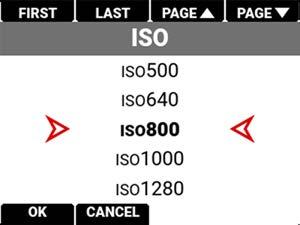
TheISOrangeisISO250toISO12,800.ThedefaultISOisISO800.
HigherISOvaluescreatebrighterimagesinthemonitorpath,andlowerISOvaluescreatedarkerimagesinthemonitor path.
Whenyourecord,theISOsettingsarestoredasmetadataandyoucanadjustthemnon-destructivelyinpostprocessingwithREDCINE-XPROorothereditingtoolsthatsupportR3Dfiles.
REDrecommendssettingtheISOtothedefaultof800,thenadjustingtheapertureandlightingtomatch.Youcan adjusttheISOlaterforfine-tuning.
UseShuttertoselecttheexposuretime(shutterspeed/shutterangle).Youcanchangetheshuttersettingswhile recording.
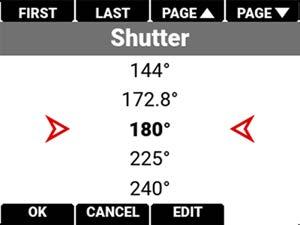
Youcanswitchbetweenangleandtimebyusingthe StatusSettings orbypressingandholdingthebuttonabove SHUTTERontheHomePage(referto HomePage).
Decreasingshutterspeedincreasestheamountoftimethatlighthitsthesensor,whichincreasesexposureandmotion blurofmovingobjects.Increasingshutterspeeddecreasestheamountoftimethatlighthitsthesensor,which decreasesexposureandmotionblurofmovingobjects.
Entertheexposurevalueasashutterangle(xx°).Theshutteranglerangeis0°to360°.Thedefaultshutterangleis 180°.ClickEdittoenteranexactshutterangleorshutterspeed.
Thetablebelowlistscommonshutterangleandshutterspeedequivalents.Thecalculationsinthetableusearecording framerateof23.98fps.
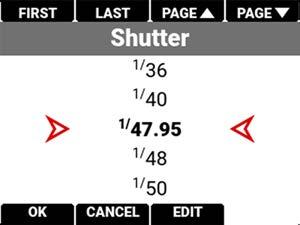
Entertheexposurevalueasashutterspeed(1/xxsec).
Theslowestshutterspeedis1/(recordingframerate).Forexample,iftherecordingframerateis23.98fps,theslowest availableshutterspeedis1/23.98sec.Thefastestshutterspeedis1/8000sec.Thedefaultshutterspeedis1/47.95 sec.
ShutterAngle=(ShutterSpeedxFrameRatex360)
Example:(1/47.95x23.98x360)=180
CONVERTSHUTTERANGLETOSHUTTERSPEED
ShutterSpeed=1/(FrameRatex360/Angle)
Example:1/(23.98x360/180)=1/47.95
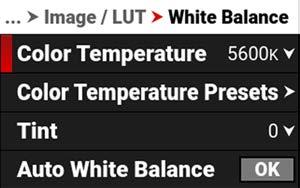
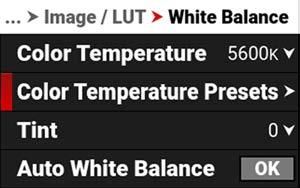
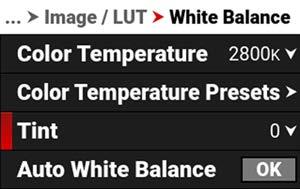
UsetheWhiteBalancemenutoadjustthe ColorTemperature andthe Tint
WhenshootinginR3Dformat,thecamerastoreswhitebalanceasmetadata,whichyoucanadjustnon-destructivelyin postproductionafterfilming.
UsetheWhiteBalancemenutoconfigurethecolortemperatureandtintsettingsforyourimage:
ColorTemperature Imagecolortemperaturecorrection
ColorTemperaturePresets Selectapresetcolortemperature
Tint
Adjustmagenta-greencolorcomponent
AutoWhiteBalance Thecameraautomaticallysetsthecolortemperatureandtint
UseColorTemperaturetoadjusttheimage'scolortemperatureinKelvinunits(K)orbyselectingpresets.
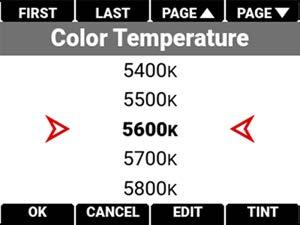
Whentheimage'slightsourcecolortemperatureiswarm,youcancompensatebysettingthecameratoawarmercolor temperature.Whentheimage'slightsourcecolortemperatureiscool,youcancompensatebysettingthecameratoa coolertemperature.
Thecolortemperaturerangeis1,700Kto10,000K.Thedefaultcolortemperatureis5600K.
WhentheWhiteBalanceListMode(referto StatusSettings)issettoPresets,theColorTemperaturemenulistusesthe PresettemperaturesinsteadoftheKelvintemperatures.
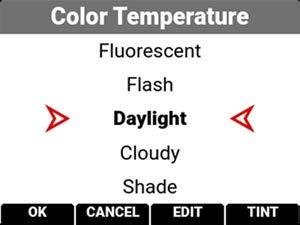
UseColorTemperaturePresetstoselectapre-configuredcolortemperature.
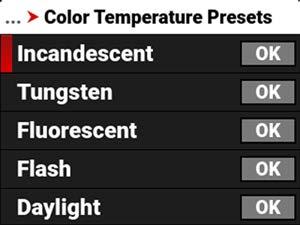
Thecolortemperaturepresetsyoucanselectinclude:
Flash 5500K
UseTinttoadjusttheimage'scolortint.
Colortemperaturecalculationsassumeapurelightsourcethatmaynotbetrueinthespecificscenethecamerais imaging.Tocompensateforanyresidualcolorcast,theTintsettingadjuststheRGBcolorbalancewithacompensating magenta-greencolorcomponent.
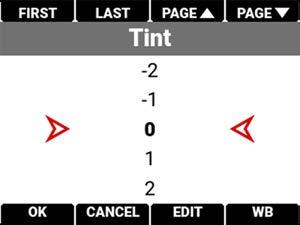
Tintrangeis–100to100.ThedefaultTintsettingis0.
UseAutoWhiteBalancetousethecamera'sautomaticwhitebalanceadjustment.
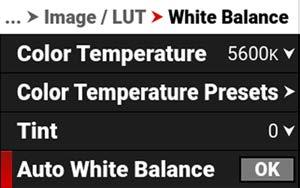
WhenshootinginR3Dformat,thecamerastoreswhitebalanceasmetadata,whichyoucanadjustnon-destructivelyin postproductionafterfilming.
TouseAutoWhiteBalance:
1.Placean18%graychartinthecenteroftheimageunderthecorrectexposure.
2.Fromthe WhiteBalance menu,navigatedownto AutoWhiteBalance andpressSELtoenable.
3.Thecameraautomaticallysetsthecolortemperatureandtintsettings.
NOTE: Placethechartinthesamelocationasyoursubject,andilluminateitwiththesamelighting.
UseOutputColorSpacetoselectthedesiredColorSpacetousewhendisplayingthecameraoutput.
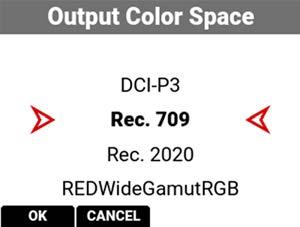
TheOutputColorSpaceselectionsinclude:
DCI-P3-DigitalCinemaInitiativestheaterprojectorstandardcolorspace
Rec.709-StandardColorSpaceforHDTV(default)
Rec.2020-StandardColorSpaceforUHDandHDR
REDWideGamutRGB-ColorspaceencompassingallofthecolorsthattheREDcameracangeneratewithout clipping
UseOutputToneMaptoadjusttheimagecontrastwhendisplayingthecameraoutput.
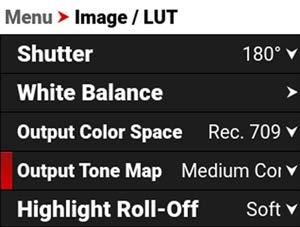

WhenshootinginR3Dformat,thecamerastoresthisasmetadata,whichyoucanadjustnon-destructivelyinpost productionafterfilming.
TheOutputToneMapselectionsinclude:
LowContrast-Lowcontrastisappliedtotheimage
MediumContrast-Mediumcontrastisappliedtotheimage(default)
HighContrast-Highcontrastisappliedtotheimage
None-Nocontrastisappliedtotheimage
UseHighlightRoll-Offtoselectthedesiredhighlightcompressiontousewhendisplayingthecameraoutput.
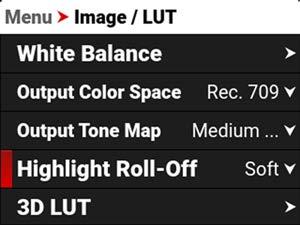
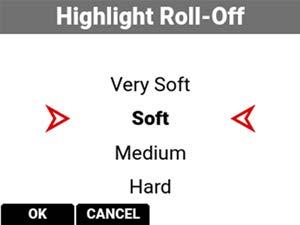
WhenshootinginR3Dformat,thecamerastoresthisasmetadata,whichyoucanadjustnon-destructivelyinpost productionafterfilming.
TheHighlightRoll-Offselectionsinclude:
VerySoft-Thelightestcompressionisappliedtotheimagehighlights
Soft-Softcompressionisappliedtotheimagehighlights(default)
Medium-Mediumcompressionisappliedtotheimagehighlights
Hard-Thehighestcompressionisappliedtotheimagehighlights
None-Nothingisappliedtotheimagehighlights
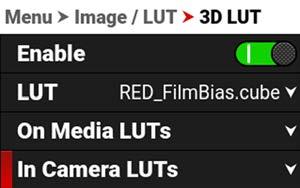
Usethe3DLUTmenutoapplyandmanagethecamera'sLook-UpTables(LUTs).
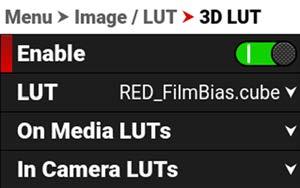
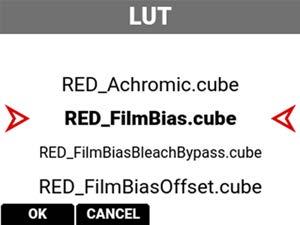
Whenyouarerecording,thisLUTwillbesavedalongwitheachcliponwhichitisactivatedduringrecording.TheLUT isnon-destructive,anditisreversible.
Toapplya3DLUT,followtheinstructionsbelow:
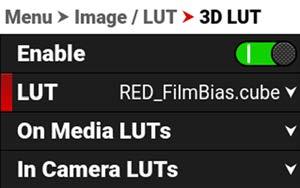
1.Goto MENU > IMAGE/LUT > 3DLUT > LUT
2.SelectaLUTfromtheLUTlist.
Toimport3DLUTsfrommedia,goto MENU > IMAGE/LUT > 3DLUT > OnMediaLUTs.


3DLUTscanbeimportedfrommediatothecamera.Whenimporting3DLUTsfrommediatothecamera,the3DLUTs mustbesavedontherootpathofyourmedia,inafoldertitled"luts."
FromOnMediaLUTsyoucan:
Importtheselected3DLUTfromthemediatothecamera
Importall3DLUTsfromthemediatothecamera
Toexportanddelete3DLUTsstoredinthecamera,goto MENU > IMAGE/LUT > 3DLUT > InCameraLUTs

Youcanexport3DLUTsstoredonthecamera,tomedia,touseonothercameras.Whenyouexport3DLUTsfromthe cameratomedia,the3DLUTsaresavedtoafolderonthemediacalled"luts."
NOTE: WhenaLUTisactiveduringrecord,itwillautomaticallybesavedalongwiththerecordedclip.
FromInCameraLUTsyoucan:
Deleteaselected3DLUTfromthecamera
Exportaselected3DLUTfromthecameratothemedia
Exportall3DLUTsfromthecameratothemedia
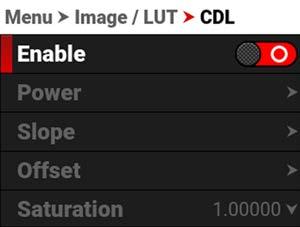
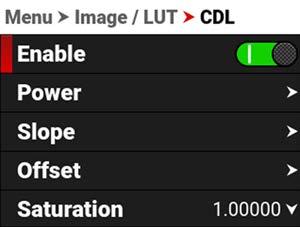
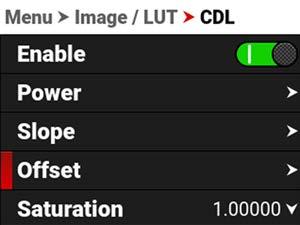
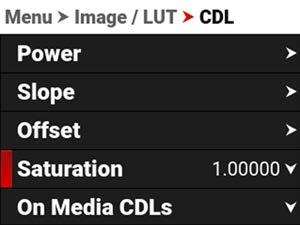
TheColorDecisionList(CDL)allowsyoudefinethelookofthecamera'scolorsinyourproject.
UsetheCDLmenuto:
EnabletheCDLs
Configure CDLPower
Configure CDLSlope
Configure CDLOffset
Configure CDLSaturation
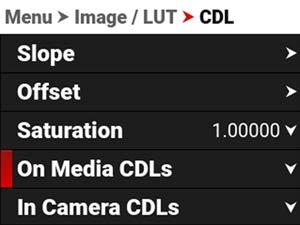
UsetheCDLsmenutoimportandexportCDLs.
CDLscanbestoredonthecameraortransferredtomediatobesharedwithothercameras.WhenexportingCDLsfrom cameratomedia,theCDLsaresavedtoafolderonthemediacalled“cdls”.WhenimportingCDLsfrommediatothe camera,theCDLsmustbestoredonthemediainafoldercalled“cdls.”
NOTE: WhenyourecordwithaCDL,thecameraautomaticallysavestheCDLtogetherwiththeclip.
ToexportselectedCDLsfromthecameratothemedia,refertothe InCameraCDLs section.
ToimportselectedCDLsfromthemediatothecamera,refertothe OnMediaCDL section.
AColorDecisionList(CDL)isametadatafileformatdevelopedbytheAmericanSocietyofCinematographers(ASC)to exchangestandardcolorcorrectioninformationbetweenpostproductiontools.Thisnon-destructivecoloradjustment layersimplifiestheversioningoflooksbyupdatingsimplemetadatawithouttheneedtore-transfertheimagedata.
CDLsareverycommoninVFXworkflowsbecausetheVFXartistneedsboththeungradedshotandtheintendedlook. Theungradedshotallowstheartisttocompintrulylinearlight,andtheintendedlookisneededtoconfirmthatthe individualplatesstillholdtogetherafterthegradeisapplied.
ThethreeCDLtonecurveparametersareSlope,OffsetandPower.Thesealgorithmsallowthecameratomodifythe recordedimage.
Slopemultipliestheincomingdata
Offsetissumoftheincomingdata
Powerisapowerfunctiontotheincomingdata
ThesethreerelatetoGain,Lift,andGammainthefollowingways:
Slope=Gain
GainAdjustshighlights.
Offset=Lift
LiftIncreasesthevalueofdarkcolors.
Power=Gamma
Gammaadjustsmidtones.
Thesethreerelatetoeachotherinthefollowingways:
Slope=inputxslope
Offset=(inputxslope)+offset
Power=((inputxslope)+offset)^power
TheformulaforASCCDLcolorcorrectionis: where
isthecolorgradedpixelcodevalue istheinputpixelcodevalue(0=black,1=white) isslope(anynumber0orgreater,nominalvalueis1.0) isoffset(anynumber,nominalvalueis0) ispower(anynumbergreaterthan0,nominalvalueis1.0)
Theformulaisappliedtothethreecolorvaluesforeachpixelusingthecorrespondingslope,offset,andpower numbersforeachcolorchannel.
Afourthparameter“Saturation”isachievedbyconvertingthe out datainaLumaandChromacomponent.TheChroma Signalisthenmultipliedbythe“Saturation”parameter.
WithSlopeandOffsetyoucanproducebothaFilmGrade“Exposure”and“Contrast”andaVideoGrade“Lift”and “Gain”.
ExposureisachievedbyOffset
ContrastisachievedbyacombinationofOffsetandSlope
GainisachievedbySlope
LiftisachievedbyacombinationofOffsetandSlope
GammaisachievedbyPower
CDLPOWER
TheCDLPowersettingscontrolthepoweroftheRed,Green,Blue,colordata.
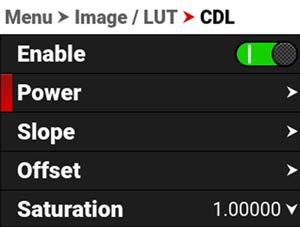
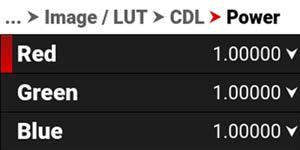
UsetheCDLPowermenutoadjustthepoweroftheRed,Green,andBlueCDLdata.

TheCDLPowersettingsrangefrom0.00000to4.00000.ThedefaultCDLPowersettingforeachcoloris1.00000.
CDLSLOPE
TheCDLSlopesettingsmultiplytheincomingRGBdata.
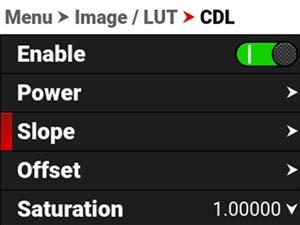
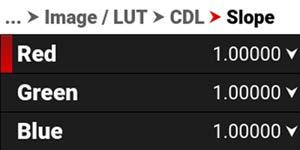
UsetheCDLSlopemenutosettheslopeofthered,green,andbluesignals.
SLOPESETTINGS

TheCDLSlopesettingsrangefrom0.00000to2.00000.ThedefaultCDLSlopesettingforeachcoloris1.00000.
TheCDLOffsetsettingscontroltheoffsetoftheRGBcolordata.
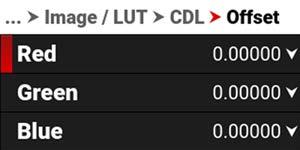
UsetheCDLOffsetmenutoadjusttheoffsetofthe CDLSlope fortheRed,Green,andBlueCDLdata.
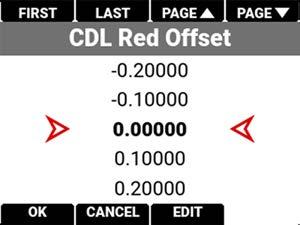
TheseCDLOffsetsettingsrangefrom-1.00000to1.00000.ThedefaultCDLOffsetsettingforeachcoloris0.00000.
TheCDLSaturationsettingscontroltheintensityofthecolordata.
UsetheCDLSaturationmenutoadjusttheintensityoftheimagecolor.

TheCDLSaturationsettingsrangefrom0.00000to4.00000.ThedefaultCDLSaturationsettingis1.00000.
UseOnMediaCDLstocopyCDLsstoredonthemediaandstorethemonthecamera.
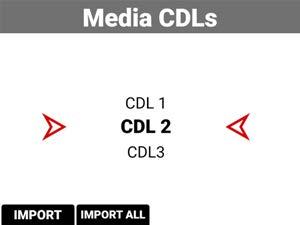
CDLscanbeimportedfrommediatothecamera.WhenimportingCDLsfrommediatothecamera,theCDLsaresaved toafolderonthecameracalled"cdls."
FromMediaCDLsyoucanimporttheselectedCDLfromthemediatothecameraorimportalloftheCDLsfromthe mediatothecamera.
UseInCameraCDLstocopyCDLsstoredonthecameraandstorethemonthemedia.Youcanalsoselectwhich storedCDLsyouwantthecameratouse.
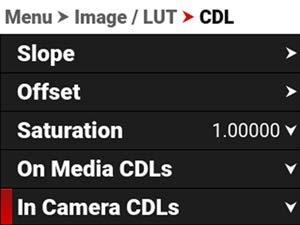
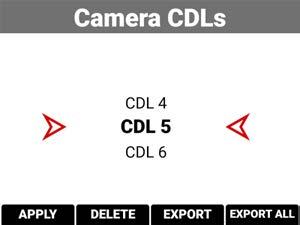
CDLscanbeexportedfromthecameratothemedia.WhenexportingCDLsfromcameratothemedia,theCDLsare savedtoafolderonthemediacalled"cdls."
FromCameraCDLsyoucanapplytheselectedCDLtothecamera,deletetheselectedCDLfromthecamera,export theselectedCDLfromthecameratothemedia,orexportalloftheCDLsfromthecameratothemedia.
UseExposureAdjusttomanuallyfine-tunethemidtoneexposurelevel.

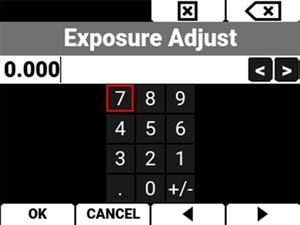
TheExposureAdjustrangeis–8.000to8.000.Thedefaultis0.000.
ExposureAdjustallowsyoutoadjustthemidtoneexposurelevelswhilepreservingthehighlightsandshadows,even whenchangedsubstantially.TheExposureAdjustsettingisexpressedintermsofrelativeexposurevalue(EV),where eachunitrepresentsa1-stopchangeinmidtoneexposurelevel.
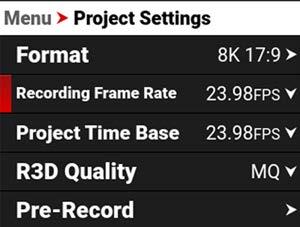
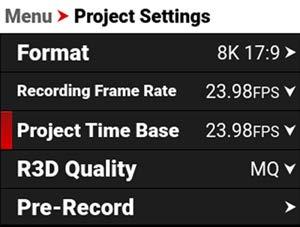
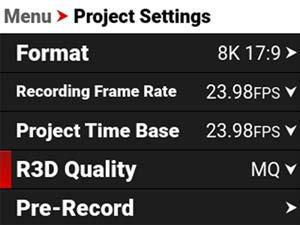
TheProjectSettingsmenucontainsthecamera'smainrecordingconfigurationsettings. FromthecameraLCDmenu,navigatetoProjectSettingsandpressSEL:

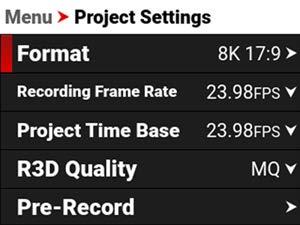
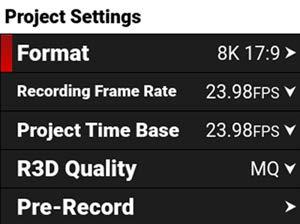
UsetheProjectSettingsmenutoconfiguretherecordingsettings:
ITEM DETAILS
Format Sizeoftheareacapturedbythesensor
RecordingFrameRate Framesrecordedpersecond
ProjectTimeBase Imageplaybackrate
R3DQuality Compressionleveloftherecordedimagefile
Pre-Record Enableandconfigureapre-recordclip
Slate CameraIDandcameraposition
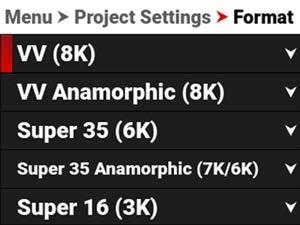
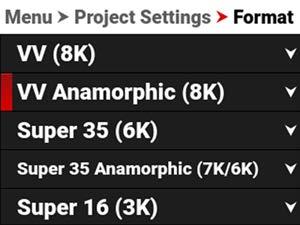
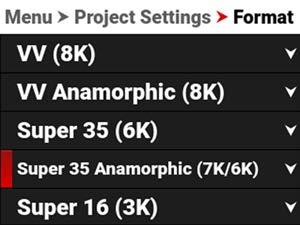
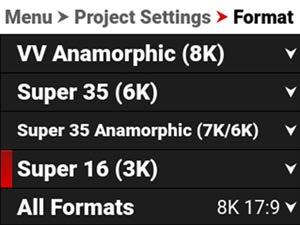
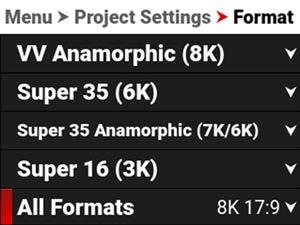
UsetheFormatsettingtodesignatehowmuchofthesensorthecamerashouldusetocaptureimages.

UsetheFormatmenutoconfigurethecamera'ssensorcaptureareasettings:
VV(8K)
VVAnamorphic(8K)
Super35(6K)
Super35Anamorphic(7K/6K)
Super16(3K)
AllFormats
SelectfromVV(8K)sensorcaptureareas
SelectfromVVanamorphic(8K)sensorcaptureareas
SelectfromSuper35(6K)sensorcaptureareas
SelectfromSuper35anamorphic(7K/6K)sensorcaptureareas
SelectfromSuper16(3K)sensorcaptureareas
Selectfromallsensorcaptureareas
Theavailableaspectratiosaredeterminedbytheselectedresolution.Thedefaultformatsettingis8K17:9. Whenyoulowertheresolutiononthecamera,onlyaportionofthesensorisused.Thecameradoesnotdownscale fromthe8K17:9formatwhenrecordingRAW.
VV(8K)
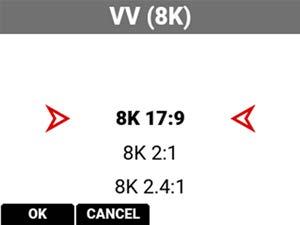
UsetheVV(8K)formatsettingtodesignatehowmuchofthesensorthecamerashouldusetocaptureimages. Theavailableaspectratiosaredeterminedbytheselectedresolution.
ThistablecontainsthedimensionsofthesensorareainPixelsandinMillimetersusedbyeachVV(8K)format.These dimensionsarecloseapproximations. Thedefaultformatis8K17:9.
8K16:9
8K1:1
UsetheVVAnamorphic(8K)formatsettingtodesignatehowmuchofthesensorthecamerashouldusetocapture anamorphicimageswiththeappropriatede-squeezeratio.
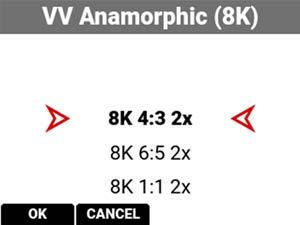
Theavailableaspectratiosaredeterminedbytheselectedresolution. Whenyoulowertheresolutiononthecamera,onlyaportionofthesensorisused.Thecameradoesnotdownscale fromtheformatwhenrecordingRAW.
ThistablecontainsthedimensionsofthesensorareainPixelsandinMillimetersusedbyeachVVAnamorphic(8K) format.Thesedimensionsarecloseapproximations. Thedefaultformatis8K4:32x.
8K4:32x 5760432028.8021.6036.00
8K6:52x 5184432025.9221.6033.74
8K1:12x 4320432021.6021.6030.55
8K3:21.8x 6480432032.4021.6038.94
8K4:31.8x 5758432028.8021.6036.00
8K3:21.6x 6480432032.4021.6038.94
8K16:91.5x 7680432038.4021.6044.06
8K17:91.3x 8192432040.9621.6046.31
8K16:91.3x 7680432038.4021.6044.06
8K17:91.25x 8192432040.9621.6046.31
UsetheSuper35(6K)formatsettingtodesignatehowmuchofthesensorthecamerashouldusetocaptureimages.
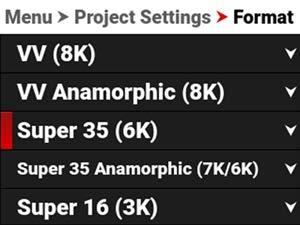

Theavailableaspectratiosaredeterminedbytheselectedresolution. Whenyoulowertheresolutiononthecamera,onlyaportionofthesensorisused.Thecameradoesnotdownscale fromthe6K17:9formatwhenrecordingRAW.
ThistablecontainsthedimensionsofthesensorareainPixelsandinMillimetersusedbyeachSuper35(6K)format. Thesedimensionsarecloseapproximations. Thedefaultformatis6K17:9.
6K2.4:1
UsetheSuper35AnamorphicFormatsettingtodesignatehowmuchofthesensorthecamerashouldusetocapture images.
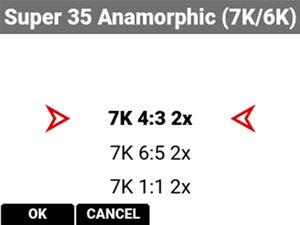
Theavailableaspectratiosaredeterminedbytheselectedresolution. Whenyoulowertheresolutiononthecamera,onlyaportionofthesensorisused.Thecameradoesnotdownscale fromtheformatwhenrecordingRAW.
ThistablecontainsthedimensionsofthesensorareainPixelsandinMillimetersusedbyeachSuper35Anamorphic (7K/6K)format.Thesedimensionsarecloseapproximations. Thedefaultsettingis7K4:32x.
FORMAT FILM EQUIVALENT
7K4:32x Super35mm4-Perf5040378025.2018.9031.50
7K6:52x Super35mm4-Perf4536378022.6818.9029.52
7K1:12x Super35mm4-Perf3780378018.9018.9026.73
7K3:21.8x Super35mm4-Perf5670378028.3518.9028.14
7K4:31.8x Super35mm4-Perf5040378025.2018.9031.50
7K3:21.6x Super35mm4-Perf5670378028.3518.9028.14
6K16:91.5x Super35mm3-Perf5760324028.8016.2033.04
6K17:91.3x Super35mm3-Perf6144324030.7216.2034.73
6K16:91.3x Super35mm3-Perf5760324028.8016.2033.04
6K17:91.25x Super35mm3-Perf6144324030.7216.2034.73
UsetheSuper16(3K)formatsettingtodesignatehowmuchofthesensorthecamerashouldusetocaptureimages.
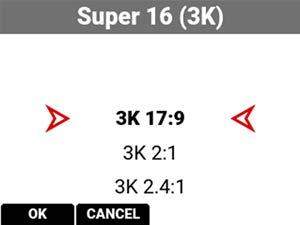
Theavailableaspectratiosaredeterminedbytheselectedresolution. Whenyoulowertheresolutiononthecamera,onlyaportionofthesensorisused.Thecameradoesnotdownscale fromtheformatwhenrecordingRAW.
ThistablecontainsthedimensionsofthesensorareainPixelsandinMillimetersusedbyeachSuper16(3K)format. Thesedimensionsarecloseapproximations. Thedefaultformatis3K17:9.
3K2.4:1
UsetheAllFormatssettingtoselectfromallofthepossibleformatstodesignatehowmuchofthesensorthecamera shouldusetocaptureimages.
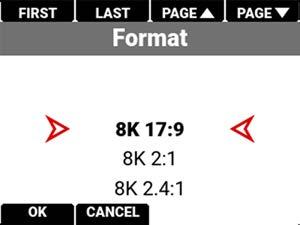
Theavailableaspectratiosaredeterminedbytheselectedresolution. Whenyoulowertheresolutiononthecamera,onlyaportionofthesensorisused.Thecameradoesnotdownscale fromthe8K17:9formatwhenrecordingRAW.
ThistablecontainsthedimensionsofthesensorareainPixelsandinMillimetersusedbyallofthecameraformats. Thesedimensionsarecloseapproximations.Thedefaultsettingis8K17:9.
FORMATDIMENSION(PIXELS)
8K17:9 8192432040.9621.646.31
8K2:1 8192409640.9620.4845.79
8K2.4:1 8192345640.9617.2844.46
8K16:9 7680432038.4021.644.06
8K1:1 4320432021.621.630.55
8K4:32x 5760432028.8021.6036.00
8K6:52x 5184432025.9221.6033.74
8K1:12x 4320432021.6021.6030.55
8K3:21.8x 6480432032.4021.6038.94
8K4:31.8x 5758432028.8021.6036.00
8K3:21.6x 6480432032.4021.6038.94
8K16:91.5x 7680432038.4021.6044.06
8K17:91.3x 8192432040.9621.6046.31
8K16:91.3x 7680432038.4021.6044.06
8K17:91.25x 8192432040.9621.6046.31
7K17:9 7168378035.8418.9040.52
7K2:1 7168358435.8417.9240.07
7K2.4:1 7168300235.8415.0138.86
7K16:9 6720378033.6018.9038.55
7K1:1 3780378018.9018.9026.73
7K4:32x 5040378025.2018.9031.50
7K6:52x 4536378022.6818.9029.52
7K1:12x 3780378018.9018.9026.73
7K3:21.8x 5670378028.3518.9028.14
7K4:31.8x 5040378025.2018.9031.50
7K3:21.6x 5670378028.3518.9028.14
6K17:9 6144324030.7216.2034.73
6K2:1 6144307230.7215.3634.35
6K2.4:1 6144259230.7212.8733.31
6K16:9 5760324028.8016.2033.04
6K1:1 3240324016.2016.2022.91
6K16:91.5x 5760324028.8016.2033.04
6K17:91.3x 6144324030.7216.2034.73
6K16:91.3x 5760324028.8016.2033.04
6K17:91.25x 6144324030.7216.2034.73
5K17:9 5120270025.6013.5028.94
5K2:1 5120256025.6012.8028.62
5K2.4:1 5120216025.6010.8027.78
5K16:9 4800270024.0013.5027.54
5K1:1 2700270013.5013.5019.09
4K17:9 4096216020.4810.8023.15
4K2:1 4096204820.4810.2422.90
4K2.4:1 4096172820.488.6422.23
4K16:9 3840216019.2010.8022.03
4K1:1 2160216010.8010.8015.27
3K17:9 3072162015.368.1017.36
3K2:1 3072153615.367.6817.17
3K2.4:1 3072129615.366.4816.67
3K16:9 2880162014.408.1016.52
3K1:1 162016208.108.1011.46
2K17:9 2048108010.245.4011.58
2K2:1 2048102410.245.1211.45
2K2.4:1 204886410.244.3211.11
2K16:9 192010809.605.4011.01
2K1:1 108010805.405.407.64
UseRecordingFrameRatetoselecttherecordingframerate(alsoreferredtoasthecaptureframerate).
Therecordingframerateisthenumberofframespersecond(FPS)thatarerecorded.Therecordingframerateis differentfromtheprojecttimebase,whichistherateatwhichthefootagewillbeplayedback.
Themaximumframerateforeachformatisdeterminedby ProjectTimeBase and Format.
WhenyouselectaProjectTimeBase,thecameraautomaticallyselectsamatchingRecordingFrameRateandanR3D Quality(whenpossible).YoumustchangetheRecordingFrameRateandR3DQualityaftertheProjectTimeBaseto selectadifferentsetting.
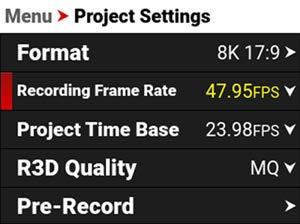
ARecordingFrameRatehighlightedin yellow willresultinplaybackoccurringata differentframeratethantheoriginalrecording,andwillrecordvarispeedaudio.
Thistableliststhecamera'smaximumrecordingframerates.TheseratesarebasedonaProjectTimeBasesettingof 24framespersecond(24 FPS
6K2.4:1 200
6K16:9 160
6K1:1 160
5K17:9 192
5K2:1 202
5K2.4:1 240
5K16:9 192
5K1:1 192
4K17:9 240
4K2:1 253
4K2.4:1 300 4K16:9 240 4K1:1 240
3K17:9 320
3K2:1 337
3K2.4:1 400
3K16:9 320 3K1:1 320
2K17:9 480
2K2:1 505
2K2.4:1 600
2K16:9 480 2K1:1 480
UsetheProjectTimeBasesettingtochoosetheplaybackratefortherecordedfootage.
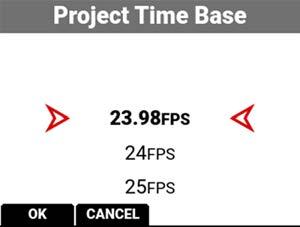
Thefollowingprojecttimebasesareavailable:
•23.98FPS(Default)•25.00FPS•30.00FPS•59.94FPS
•24.00FPS •29.97FPS•50.00FPS•60.00FPS WhenyouselecttheProjectTimeBase,itchangestheRecordingFrameRatetothesamesetting(whenpossible). WhenyouchangetheFormat,theRecordingFrameRateandProjectTimeBasedonotautomaticallyupdate.Youmust selecttheProjectTimeBaseafteryouchangetheFormatsetting.
UseR3DQualitytoselecttheR3Ddataratethecamerausestorecordtheimagefiles.
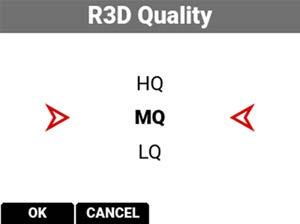
TheR3DQualityselectionsinclude: HQ-Highdatarateandlessrecordingtime MQ-Mediumdatarate(default)andlongerrecordingtime LQ-Lowestdatarateandlongestrecordingtime
Forhighcomplexityscenes,VFX,andstillsfrommotionworkflows,REDrecommendstheHQsetting.Forcinema(nonVFX)andhigh-endTV,REDrecommendstheMQsetting.ForTV,onlinecontent,documentaryandinterviews,RED recommendstheLQsetting.
UsethePre-RecordmenutoenableordisablePre-Record,andtoadjustthelengthofthePre-Recordedclip.
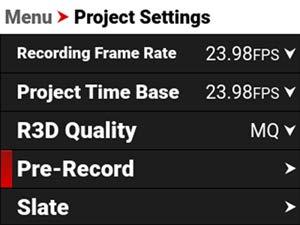
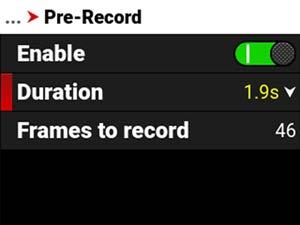
Pre-Recordallowsyoutocontinuallycaptureimagestoasmallamountofmemorywhilewaitingtobeginrecording. Thisallowsyoutocaptureunexpectedeventssuchas,awhalebreachingthewater,oraanathletescoringagoal. Whenyoufinishrecording,thepre-recordedclipisaddedtothebeginningoftherecording.
YoucansetthePre-Recordcliptorecordfromhalfasecondupto30seconds,dependingontheformat,filetype, resolution,andquality.Thedefaultsettingis2secondsatthedefaultProjectTimeBaseof23.98FPS. Formoreinformation,referto Pre-RecordingContent
UsetheSlatemenutoassignacameraIDandcamerapositionthecameraaddswhenrecordingclips.
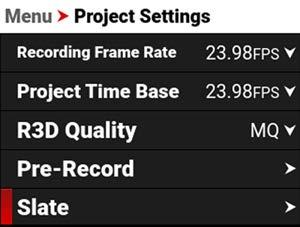
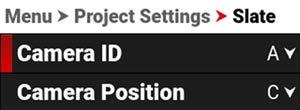
Thesettingsyoucanassigntoaclipinclude:
CameraID(alsopopulatesintheMediamenuwhenformattingmedia)
CameraPosition(alsopopulatesintheMediamenuwhenformattingmedia)
UseCameraIDtoassignacameraIDwhenthecamerarecordsclips.
NOTE: YoucanalsochangetheCameraIDbyusingSecureFormat(referto SecureFormat).
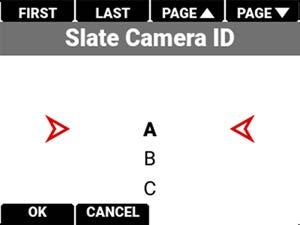
ThecameraIDsyoucanassignwhenrecordingaclipincludethelettersA-Z.
UseCameraPositiontoassignacamerapositionletterwhenthecamerarecordsclips.
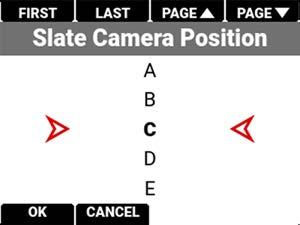
ThecamerapositionsyoucanassignwhenrecordingaclipincludethelettersA-Z.
TheAudio/TCmenucontainsthesettingsyouusetoconfigureyourcameraaudioandTimecode. FromthecameraLCDmenu,navigatetoAudio/TCandpressSEL:
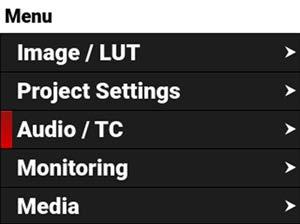
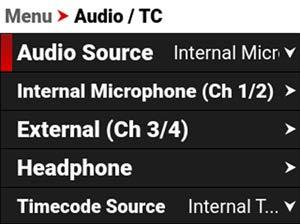
UsetheAudio/TCmenutoconfiguretheaudioandTimecodesettingsforthecamera:
ITEM
DETAILS
AudioSource Audioinputsource
InternalMicrophone(Ch1/2)
External(Ch3/4)
Headphone
LeftandRightinternalmicrophonelevels
LeftandRightexternalaudiolevels
Headphonevolumelevel
TimecodeSource Timecodesource
JamTimecodetoTOD ButtontoJamTimecodetoTimeofDay(TOD)
TimecodeDisplayMode Timecodetodisplay
Thecameraisequippedwithtwointegratedmicrophonessuitableforscratch-trackaudio(Ch1and2),anditis equippedwitha5-pinXLRaudioconnectorthataccepts2-channelaudio,Line,Mic,and+48VPhantomPowerfor externalaudio(Ch3and4).
Youcanlinkthegainforthetwointernalandexternalchannelstogether.Thisallowsyoutoadjustthetwointernal(or external)channelstogetherasone.
Youcanrecordaudiofromtheinternalmicrophones,fromtheexternalaudioconnector(2-channelrecording),orfrom internalandexternalsourcescombinedas24-bit48kHzuncompressedaudiotracks.
Youcanadjusttheexternalaudiobyusingtheappropriatecameragain-settings(-52.5dBto36.0dB).Thedefault cameragainsettingis0dB.
Thecamera'saudiodataissynchronizedwithvideoandtimecode,anditisembeddedintheR3Dfile.Youcanexport theaudiodataasseparateaudiofilesbyusingREDCINE-XPRO,ifneeded.Thecameraalsoembedstheaudiointhe SDIoutput.
Youcanmonitortheaudioduringrecordingandplaybackbyusingtheequipped3.5mmstereoheadphoneport.
Thiscamerahastheabilitytorecordaudiowhenthecamera'sRecordingFrameRateissettoahigherspeedthanthe ProjectTimeBasesetting(Varispeedmode).
NOTE: ThecamerarecordstheaudioasaseparateWAVfileandstoresitintheclip'sRDCfolderonthemediadrive.
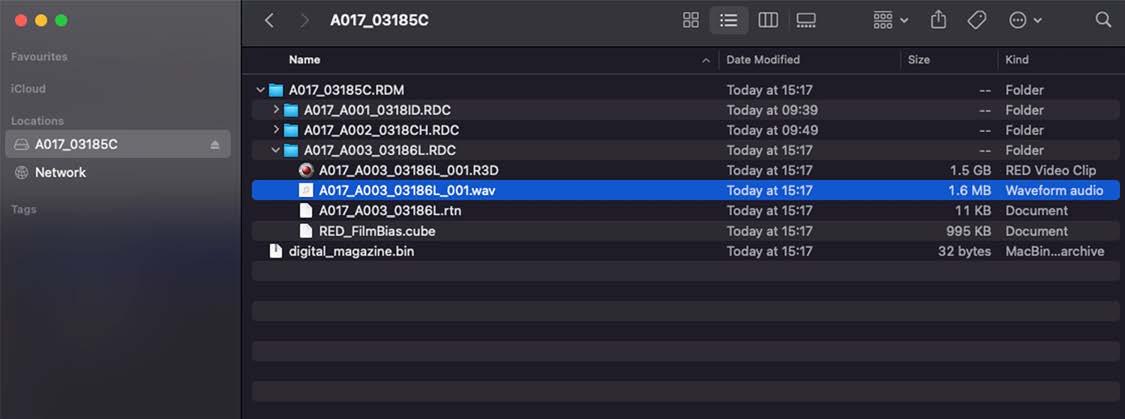
Timecodeprovidesamechanismtoreferenceframesfromthecamera'srecordedclipstoexternaldevicessuchas, othercamerasoraudiorecorders.Somedevicescanalsogatheradditionaldatasuchas,lensmetadata,orcamera orientation,whichTimecodecanlateruseformergingthedatabacktogetherinpost-processing.
ThecameraprovidestwoseparateTimecodeformats:
TimeOfDay(TOD) -ThecamerarecordsthetimeofdayastheTimecodeforeachclip
Edgecode -ThecamerarecordselapsedtimeastheTimecodeforeachclip.Thetimeisresetto01:00:00whena newmediacardisinsertedinthecamera.AlloftheclipsonthemediawillhaveacontinuousTimecodetrack. However,eachnewmediacardwilldefaulttoaTimecodetrackstartingat01:00:00.YoucanchangetheEdgecode tobeginatanydesiredtimebyusingtheMediaFormatmenu(referto Edgecode).
Thecamerasynchronizes(jams)theTODTimecodetoanexternalTimecodegenerator(whenoneisconnectedtothe camera)oritjamstheTimecodetoitsinternalreal-timeclock.
ThecamerastoresTODandEdgeTimecodeintheR3Dfile.Youcanselectwhichoneyouwanttodisplayonthe LCD.
UsetheAudioSourcesettingstoselecttheaudioinputsource.
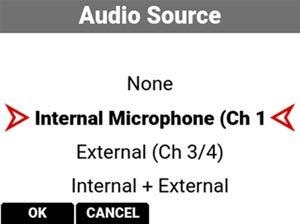
Theaudioinputsourcesinclude: None
InternalMicrophone(Ch1/2)-enablesthe InternalMicrophone(Ch1/2) menu(default) External(Ch3/4)-enablesthe External(Ch3/4) menu Internal+External-enablesallaudiosources
NOTE: Theheadphonescanonlymonitortheinternalmicrophonechannels(Ch1and2)ortheexternalaudiochannels (Ch3and4).
UsetheInternalMicrophone(Ch1/2)settingstosettheleftandrightinternalaudiolevels(channels1and2).Thismenu isonlyenabledwhentheAudioSourceissettoInternalMicrophoneorInternal+External.
NOTE: WhentheRecordingFrameRateandProjectTimeCodesettingsaredifferent,varispeedaudioisrecorded(refer to Audio/TCMenu).

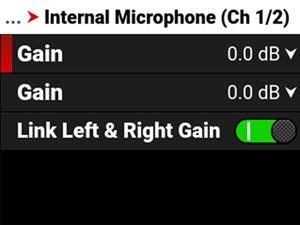
TheInternalMicrophoneisrepresentedasChannels1and2ontheHomePageandontheAudioChannels1/2Page VUMeters(referto LCD formoreinformation).Theleftchannelischannel1andtherightchannelischannel2.
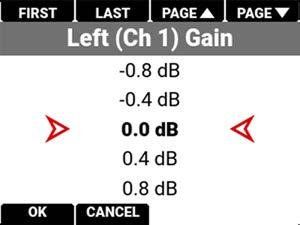
Youcanadjusttheinternalaudiolevelsforleftandrightfrom-52.5dBto36.0dB.
Thedefaultsettingis0dB.
WhenyouenableLinkLeft&RightGain,thechannelsarelinkedtogetherandadjustedasone.
UsetheExternalaudiosettingstosettheleftandrightexternalaudiolevels.Thismenuisonlyenabledwhenthe Audio Source issettoExternal(Ch3/4)orInternal+External.
NOTE: WhentheRecordingFrameRateandProjectTimeCodesettingsaredifferent,varispeedaudioisrecorded(refer to Audio/TCMenu).
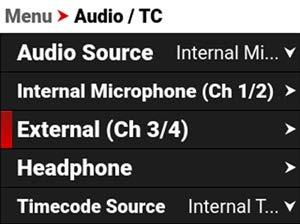
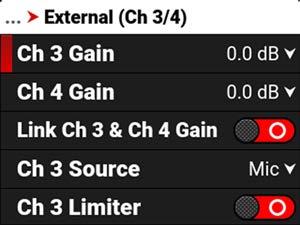
TheExternalaudioisrepresentedasChannels3and4ontheHomePageandontheAudioChannels3/4PageVU Meters(referto LCD formoreinformation).Theleftchannelischannel3andtherightchannelischannel4.
Youcanadjusttheexternalaudiogainlevelsforchannels3and4from-8.0dBto34.0dB.
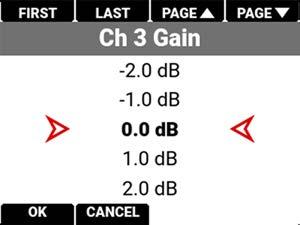
Thedefaultsettingis0dB.
WhenyouenableLinkChannel3andChannel4Gain,thechannelsarelinkedtogetherandadjustedasone.
UseSourcetoselectthetypeofinputconnectedtoexternalaudiochannel3and4ports.
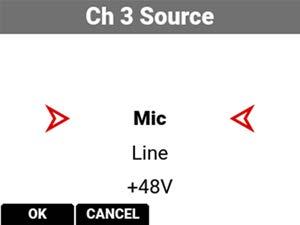
Youcanselectmicrophone,line,or+48Vphantompower. Thedefaultsettingismicrophone(Mic).
Whenenabled,usethelimitertoplacealimitpastwhichtheaudiolevelforchannels3and4cannotexceed.
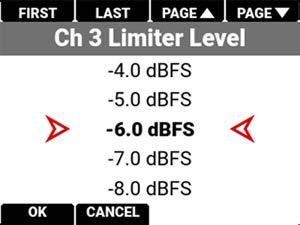
Youcanselectfrom-2.0to-12.0DecibelFullScale(dBFS)asthelimit. Thedefaultlimitis-6.0dBFS.
UsetheHeadphonesettingstoenabletheheadphonejackandtoadjusttheheadphonevolume.
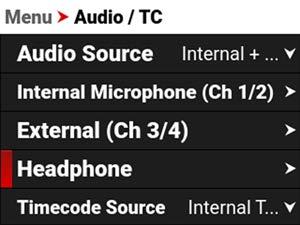
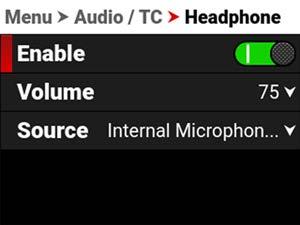
YoucanenableanddisabletheheadphoneaudiojackbypressingSELtotoggleEnabletotheright(green/enabled) andtotheleft(red/disabled).


Youcanadjusttheheadphonevolumefrom0to100.

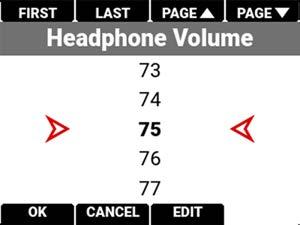
WhentheAudioSourceissettoInternal+External,youcanuseSourcetoselecttheaudiosourceyouwanttomonitor withtheheadphones.
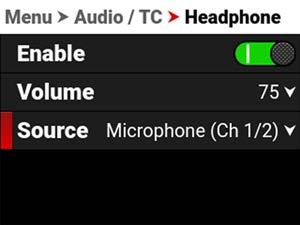

Youcanselecttheinternalmicrophonechannels1and2,oryoucanselecttheexternalchannels3and4. Thedefaultsettingistheinternalmicrophonechannels1and2.
UseTimecodesourcetoconfiguretheTimecodesourcethecameraappliestotherecordings.
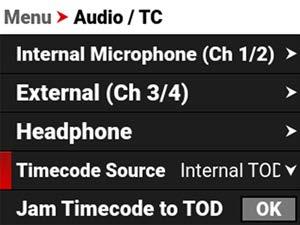
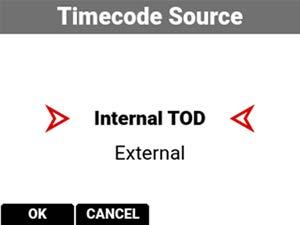
YoucansettheTimecodesourceasInternalTimeofDay(TOD)orExternal. WhenyousetthecameraTimecodesourcetoExternal,youcanconnectanexternalTimecodegeneratortothe ExtensionPort(referto CameraBody and ExtensionPort formoreinformation).
UseTimecodeDisplayModetoconfiguretheTimecodedisplaytypethatthecameraappliestotherecordings.
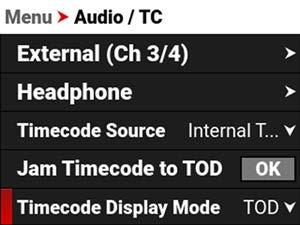
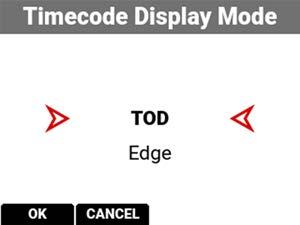
YoucansettheTimecodeDisplayModeasTimeofDay(TOD)orEdge.
TimeofDay(TOD)displaymodedisplaystheTimecodeasthetimeofdaythattheframewasrecorded.
EdgedisplaymodedisplaystheTimecodeasthesequentialrecordingtimethathaselapsedstartingwiththefirst frame.
TheMonitoringmenucontainsthesettingsyouusetoconfigureyourcameramonitoringoptions. FromtheLCDmenu,navigatetoMonitoringandpressSEL:
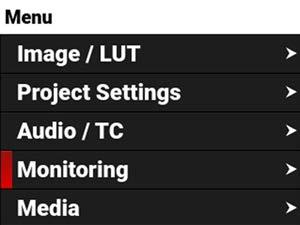
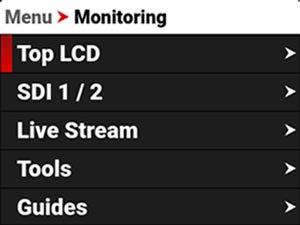
UsetheMonitoringmenutoconfigurethemonitoringsettings:
ITEM
DETAILS
TopLCD MonitoringtoolsforthetopLCD
SDI1/2
SDIportresolution,frequency,look,guides,tools,overlay,andoverlaymode
LiveStream EnableordisableWi-Filivestreaming
Tools
Variousmonitoringtoolsincluding FalseColor, Peaking,and ZebraModes Guides Frameguidesandacenterguide
TheTopLCDmenuprovidesaccesstothetopLCD features.ThismenuisonlyvisiblewhentheoptionalDSMC3RED Touch7.0"LCDisattachedtothecamera(referto DSMC3RED®Touch7.0"LCD).
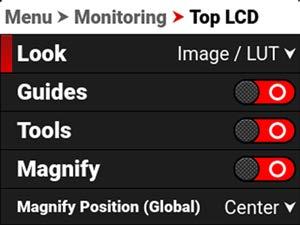
TheSDIportsettingsyoucanconfigureinclude:
Look SetthelookoftheplaybackbetweenRWG/Log3G10orImage/LUT Guides Enableordisablethemonitorguides Tools Enableordisablethemonitortools
Magnify Magnifythemonitorimage
MagnifyPosition Selectthepositionoftheoriginalimagetomagnify Flip/Mirror FlipandmirrorthetopLCDdisplay
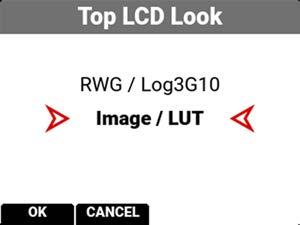
YoucanselectthelookoftheimagepreviewsignalsenttotheSDI port.
Theselectionsinclude:
•REDWideGamutRGB/Log3G10 •Image/LUT(default)
UseGuidestoenableordisabletheviewingofguides.PressSELtotogglebetweenenabledanddisabled(default).


UseToolstoenableordisabletheviewingoftools.PressSELtotogglebetweenenabledanddisabled(default).


UseMagnifytoenableordisablemonitormagnification.PressSELtotogglebetweenenabledanddisabled(default).


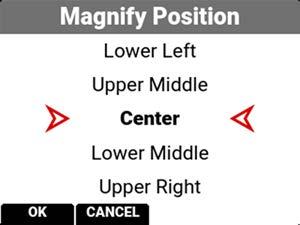
UseMagnifyPositiontogloballyselecttheareaoftheimageyouwanttomagnify. Theselectionsinclude:
UseFlip/MirrortoenableordisabletheflippedmirroredorientationoftheTopLCD.PressSELtotogglebetween enabledanddisabled(default).

UseSDI1/2toconfigurethesettingsonSDIports1and2.
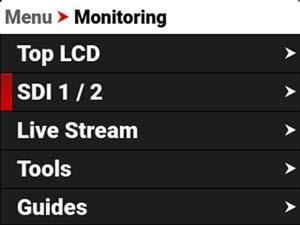
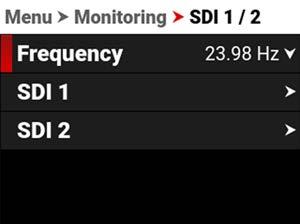

TheSDIportsettingsyoucanconfigureinclude:
ITEM
DETAILS
Frequency SelecttheSDIportfrequency
Resolution SelecttheSDIportresolution
DisplayPreset Selectthegammaforthecamerapreviewandmonitoroutput
Look SetthelookoftheplaybackbetweenRWG/Log3G10orImage/LUT
Guides Enableordisablethemonitorguides
Tools Enableordisablethemonitortools
Overlay Enableordisablethemonitoroverlay
OverlayMode Selecttheoverlaytype
WARNING: Undercertaincircumstances,itispossibleforanSDIconnectortoincurdamagewhenconnectedtoan accessoryandpoweredwithoutusingshieldedcables.REDrecommendsonlyusinghighquality,shieldedBNCcables thatareratedfor12G-SDIsignalsandonlyusingshieldedpowercablesforpoweringSDIaccessories.
MakesurepowerisconnectedtotheSDIaccessoryatalltimesbeforeyouconnecttheBNCtothecamera.
UngroundedpowerfromSDIaccessoriescandamagethecamera’sSDIport.Toavoidthispossibledamage,attachthe powersourcetotheaccessorybeforeattachingittotheBNCcable.WhenusingREDApprovedThirdPartybattery plates,unplugtheBNCcablepriortohotswapping.
Whenpossible,avoidusingP-Tap(alsoknownasD-Tap)cablestopoweraccessories.ToavoiddamagewhenusingPTap/D-Tap,it’simperativethattheconnect/disconnectsequence(below)isfollowedprecisely.
WhenattachingSDIaccessories:
1. ConnectapowersourcetotheSDIaccessory;powerontheSDIaccessory.
2. Ensureapowersourceisconnectedtothecamera.ThisensuresbotharegroundedpriortoconnectingtheBNC. Thecamera'spowerstatedoesnothaveanimpactonSDIattachmentsequence.
3. ConnecttheBNCcabletotheaccessory,thentothecamera.
WhendetachinganaccessorymountedtoanSDIoutput,ensurethatyouremovetheBNCconnectiontothecamera beforeremovingpowertotheSDIdevice:
1. ShutdowntheSDIaccessory.
2. DisconnecttheBNCcablefromthecamera.
3. DisconnectthepowersourcefromtheSDIaccessory.
Whenyouneedtoswapoutabatteryonanaccessorymountedtothecamera’sSDIport,youmust:
1. ShutdowntheSDIaccessory.
2. DisconnecttheBNCcablefromthecamera.
3. ReplacethebatteryontheSDIaccessory.
4. ConnecttheBNCcabletothecamera.
5. PowerontheSDIaccessory.
Formoreinformation,referto PreventingDamagetoSDIOutputs

UseFrequencytoselectoneofthefollowingSDIportfrequency settings:
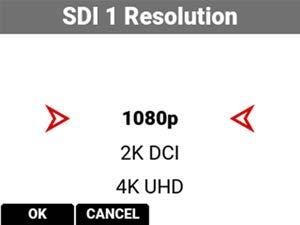
UseresolutiontoselectoneofthefollowingSDIportresolutionsettings:
•1080p
•2KDCI
•4KUHD
•4KDCI
TheresolutionselectedherecontrolstheSDIoutputresolutionofthepreview page.
Whenmonitoringin1080por4KUHDwhilecapturingina17:9format,theentire17:9imagewillbedown-scaledtothe 16:9aspectratioof1080por4KUHD.Smallblackbarswillonlyappearonthetopandbottomoftheframeinthe monitorpathandnotontherecordedimage.

UseDisplayPresettoselectgammaofthedisplayedpreviewimagefortheSDI ports:
SDR- StandardDynamicRange (default)
HDR- HighDynamicRange
HLG- HybridLog-Gamma
WhenshootinginR3Dformat,thecamerastoresthisasmetadata,whichyoucan adjustnon-destructivelyinpostproductionafterfilming.
TheDisplayPresetallowsyoutoselectthegammaforthecamerapreviewandmonitoroutput. Eachmonitorisdesignedtodisplayusingaspecificgamma.MostmonitorsuseSDR.However,somesupportHDR andHLGgammasignals.Selectthedisplaypresetthatworksbestwithyourmonitor.
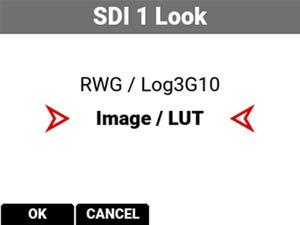
YoucanselectthelookoftheimagepreviewsignalsenttotheSDI port.
Theselectionsinclude:
•REDWideGamutRGB/Log3G10 •Image/LUT(default)
UseGuidestoenableordisabletheviewingofguides.YoucanenableanddisableguidesbypressingSELtotoggle Guidestotheright(green/enabled)andtotheleft(red/disabled).
UseToolstoenableordisabletheviewingoftools.YoucanenableanddisabletoolsbypressingSELtotoggleTools totheright(green/enabled)andtotheleft(red/disabled).
UseOverlaytoenableordisabletheviewingoftheoverlay.YoucanenableanddisabletheoverlaybypressingSELto toggleOverlaytotheright(green/enabled)andtotheleft(red/disabled).


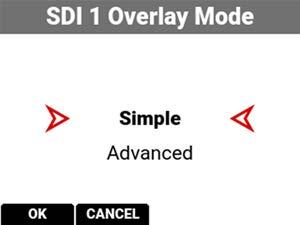
UseOverlayModetoselectoneofthefollowingSDIportoverlay modes:
•Simple-minimalimageinformationisdisplayed
•Advanced-manyimageandcameradetailsaredisplayed

SimplemodedisplaystheclipnameandthecurrentTimecode.Whenthecameraisrecording,theTimecodeturnsred, andareddotappearsinthetoprightcorner.

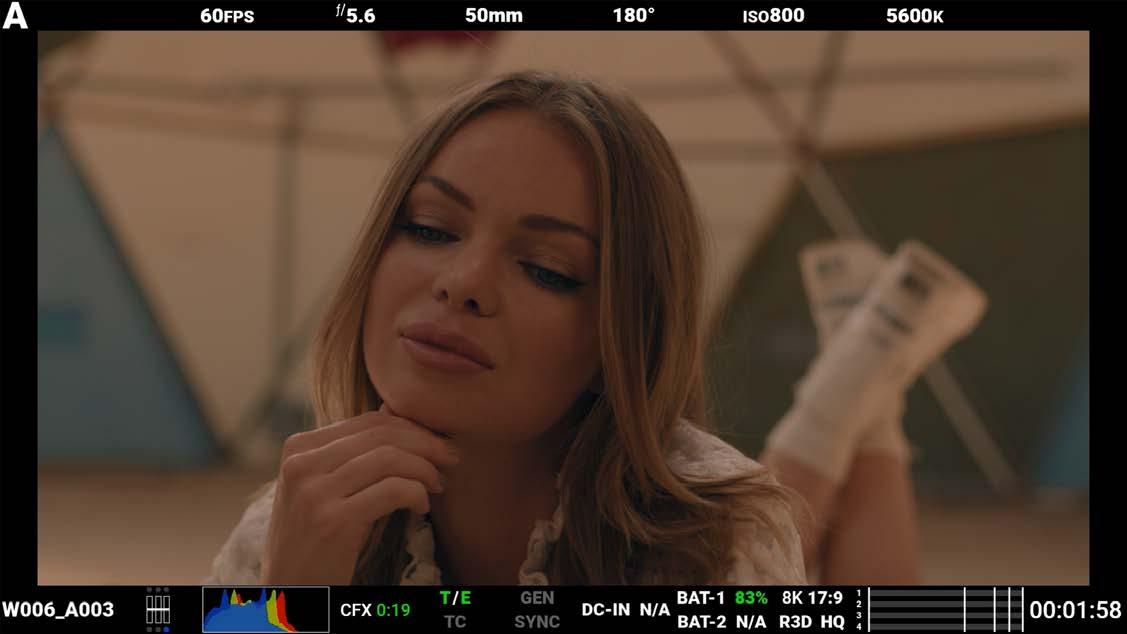
Advancedmodedisplaysthefollowing:
•CameraNumber
•RecordingFrameRate
•f-Stop
•FocusLength
•ShutterAngle
•ISO
•WhiteBalance
•ClipName
•ExposureMeter
•Histogram
•CFexpressTimeRemaining
•Temp/ExpCalibration
•Timecode,Genlock,Synch
•DC-In,Battery
•Format,FileType,Rate
•VUMeter
•Timecode
Whenthecameraisrecording,theTimecodeturnsred,andareddotappearsinthetoprightcorner.
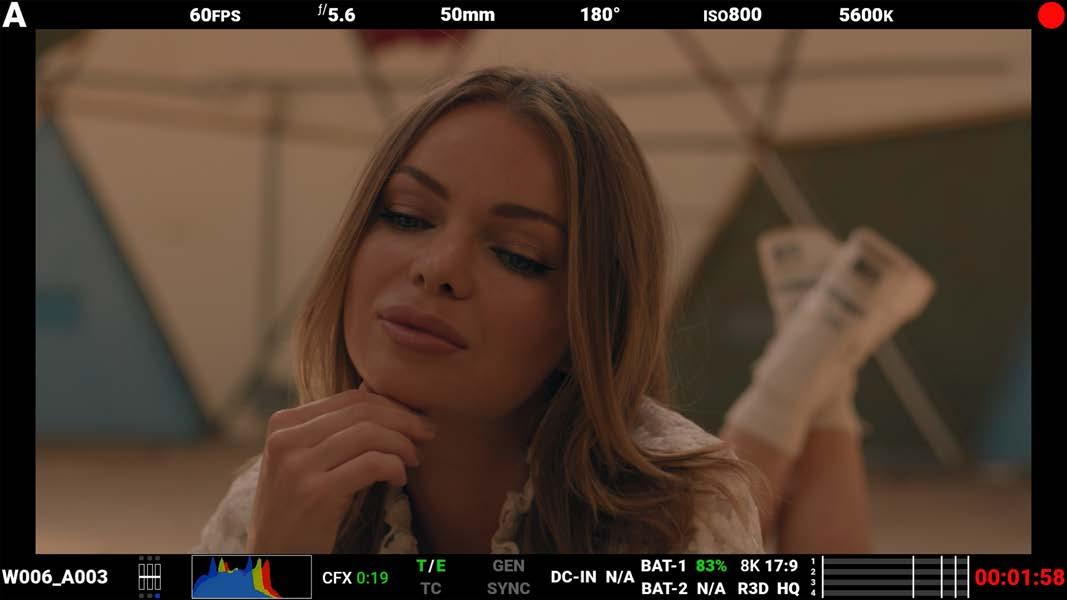
TheSerialDigitalInterface(SDI)portsallowthecameratodeliver12Gbpsofimagebandwidthwithgreaterresolution, framerates,andcolorfidelity.TheseportsallowyoutouseasingleBNCcablesolutionidealfor4Kp60format.
WARNING: Undercertaincircumstances,itispossibleforanSDIconnectortoincurdamagewhenconnectedtoan accessoryandpoweredwithoutusingshieldedcables.REDrecommendsonlyusinghighquality,shieldedBNCcables thatareratedfor12G-SDIsignalsandonlyusingshieldedpowercablesforpoweringSDIaccessories.
MakesurepowerisconnectedtotheSDIaccessoryatalltimesbeforeyouconnecttheBNCtothecamera. UngroundedpowerfromSDIaccessoriescandamagethecamera’sSDIport.Toavoidthispossibledamage,attachthe powersourcetotheaccessorybeforeattachingittotheBNCcable.WhenusingREDApprovedThirdPartybattery plates,unplugtheBNCcablepriortohotswapping.
Whenpossible,avoidusingP-Tap(alsoknownasD-Tap)cablestopoweraccessories.ToavoiddamagewhenusingPTap/D-Tap,it’simperativethattheconnect/disconnectsequence(below)isfollowedprecisely.
WhenattachingSDIaccessories:
1. ConnectapowersourcetotheSDIaccessory;powerontheSDIaccessory.
2. Ensureapowersourceisconnectedtothecamera.ThisensuresbotharegroundedpriortoconnectingtheBNC. Thecamera'spowerstatedoesnothaveanimpactonSDIattachmentsequence.
3. ConnecttheBNCcabletotheaccessory,thentothecamera.
WhendetachinganaccessorymountedtoanSDIoutput,ensurethatyouremovetheBNCconnectiontothecamera beforeremovingpowertotheSDIdevice:
1. ShutdowntheSDIaccessory.
2. DisconnecttheBNCcablefromthecamera.
3. DisconnectthepowersourcefromtheSDIaccessory.
Whenyouneedtoswapoutabatteryonanaccessorymountedtothecamera’sSDIport,youmust:
1. ShutdowntheSDIaccessory.
2. DisconnecttheBNCcablefromthecamera.
3. ReplacethebatteryontheSDIaccessory.
4. ConnecttheBNCcabletothecamera.
5. PowerontheSDIaccessory.
Formoreinformation,referto PreventingDamagetoSDIOutputs.
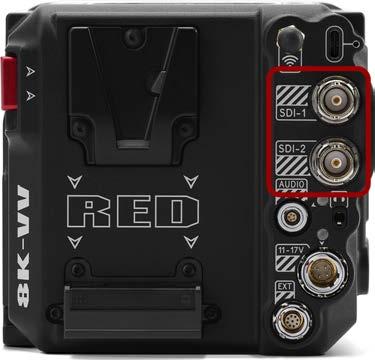
Formoreinformation,referto: 12G-SDI(SDI-1&SDI-2)
TheSDIstandard:SMPTE(SocietyofMotionPictureandTelevision Engineers)standardSMPTEST-2082
Standard-dynamic-range(SDR)videodescribesimagesorvideousingaconventionalgammacurvesignal.
High-dynamic-range(HDR)videoimagesarerecordedusingtheSMPTE-2084PQcurve.Thistechnologycapturesand outputsagreaterrangeofluminancethanimagesrecordedusingstandard-dynamic-range(SDR)methods.
Hybridlog-gamma(HLG)deliversHDRresolutionwithouttheneedformetadata.ThisallowsHLGtodisplaywellon SDRandHDRmonitors.
NHKandtheBBCdevelopedHLGinajointefforttocreateamorecompatiblesignalforawidevarietyoftelevision sets.
Hybridlog-gammaisanopen-sourcestandardHDR(high-dynamic-range)videoformat.Videodynamicrangeisthe measurementbetweenthebrightnessbetweenblackandwhite(luminosity).
ManymonitorsofferHDR.However,unlikeresolutionparameters(1080p,4K,etc.),HDRisrelatedtoluminosity. Luminositycanvarybetweenhowanimageiscapturedonacameraandhowtheimageisbroadcasttoamonitor. HLGsendsacombination(hybrid)ofthenormalGammacurveforlightcodingandalogarithmiccurvetodeliverthe HDRaspectsofthesignal.
UseLiveStreamtoenableordisablelivestreamingoverWi-Fi.Thisisoneofthemethodsyoucanusetoconnectto the REDControlApp
NOTE: Whenlivestreaming,select5GHzastheWi-Fiband(referto Ad-Hoc).
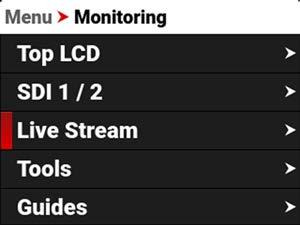
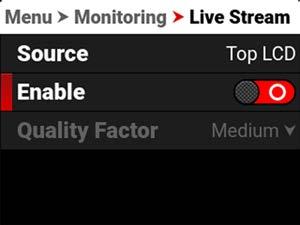
SourcedisplaysthesourceoftheLiveStreamimage.Livestreamdisplaystheguides,looks,andtoolsenabledforthat source.
UseEnabletoenableordisabletheLiveStreamfeature.
UseQualityFactor,whenLiveStreamingisenabled,tocontrolthevideoqualitythecamera'soutputstreams.Lower qualitycanstreamoveralongerdistance.
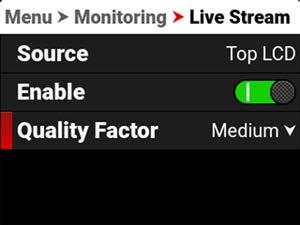
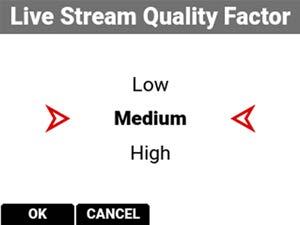
TheToolsmenuprovidesaccesstothemonitoringtoolsyouusetomonitorimageexposureandfocus.
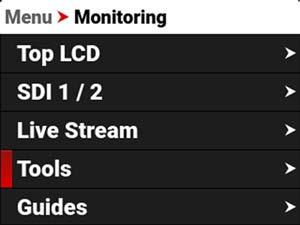

Themonitoringtoolsthatyoucanuseinclude:
ITEM
FalseColor
Peaking
LogView
Zebra1
Zebra2
FALSECOLOR
Enableandconfigurethe FalseColorExposureMode andthe FalseColor VideoMode
Enableandconfigurefocusindicatingmodes
EnableorDisableLogView
EnableandconfigureZebra1settings
EnableandconfigureZebra2settings
UseFalseColortoconfiguretheFalseColortoolsettings.

TheFalseColortoolsettingsyoucanconfigureinclude:
ITEM DETAILS
Enable EnableordisabletheFalseColortoolmodes
FalseColorMode SelecttheFalseColortoolmode
ENABLE
UseEnabletoenableordisabletheFalseColortool.
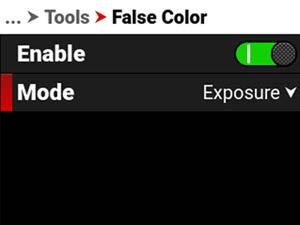
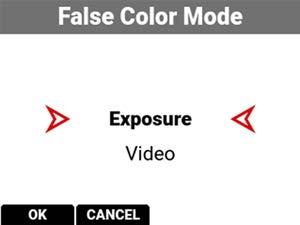
FalseColorModesinclude:
ITEM DETAILS
FalseColorExposureMode Usefalsecolorstodetermineanoptimalbalancebetweenoverexposureand underexposure.
FalseColorVideoMode AccesssceneexposureinvaryinglightwithoutrelyingontheLCDimagebrightness.
NOTE: FalseColormodesdisplayonvideorecordedthroughSDItoanexternalrecorderwhentheToolsareenabledin theMonitormenu.WhenrecordingthroughSDI,useFalseColormodesonlytohelpdeterminesceneexposure settings,andthendisablethemodebeforerecording.
Whenthismonitoring FalseColor modeisactivated,mostofthetonalrangewillappearinmonochrome.
TheExposureModeisabletoindicateexactlywheremiddlegrayisfalling,andindicatewhichhighlightsorshadows areproblematicinthelogarithmicrepresentationoftheimage.ExposuremodeisjudgingtheexposureafterISOand WhiteBalanceadjustmentsaremade,andbeforeanysortofLUTortransformisappliedtotheLog3G10image.
WhentheFalseColorModeoverlaysthecolorredwithinthesubjectofinterest,oranywhereexceptbrightlightsand directreflections,thentheimageislikelyoverexposed.WhentheFalseColorModedoesnotoverlaythecolorredon theimage,thentheexposureislikelyokayfortheselectedISO.
WhentheFalseColorModeoverlaysthecolorpurpleonkeyimagedetailthatisnotlocatedintheshadows,thenthe sceneislikelyunderexposed.WhentheFalseColorModedoesnotoverlaythecolorpurpleontheimage,thenthe exposureislikelyokayfortheselectedISO.
Formoreinformation,referto Exposure intheHowTosection.
NOTE: Forbestresults,VideoModeshouldbeviewedatoraboveISO800.
VideoModedisplaysacoloroverlaythatindicatesthevideoleveloftheRGBmonitorpath(calibratedtotheSMPTE testsignal).
ThecolorsusedarebasedontheRGBlevelsofthevideooutsignal(thatis,the“cooked”look,andnotRAWdata).The camera'sRGBsettingscanchangetheappearanceoftheVideoModecolors.
TheVideoModecolorsrepresentthefollowingIREvalues(atallothervalues,thedesaturatedimagerepresentsthe luminancevalueoftheISOadjustedimage):
Purple:IRE0–4
Blue:IRE5
Teal:IRE10–12
Green:IRE41–48
Pink:IRE61–70
Straw:IRE92–93
Formoreinformation,referto Exposure intheHowTosection.
Yellow:IRE94–95
Orange:IRE96–98
Red:IRE99–100
Greeniswhereyouwillwant18%gray,PinkistypicallythebrightnessofCaucasianskintones,Straw,Yellow,and Orangearestronghighlightsandincreasinglyclosertowhite,TealisdeepshadowsandBlueisonthevergeof becominguntexturedblack.Ingeneral,PinkandGreenaremosthelpfulwhencalibratingbasedonaknownreference, whereastheothercolorsindicatetheextremesofatonalrange.
ApotentialdisadvantageofFalseColorVideomodeisthatallthefalsecolorscandistractfromtheunderlyingpreview. Manyprefertousethismodeonlyduringinitialset-up,andthentheyuse FalseColorExposureMode underawider rangeofscenarios.
In FalseColorExposureMode,usethepurpleandredindicatorstoadjustyourlightingorlensaperture.Usethis strategytoachieveanoptimalbalancebetweenclippingfromoverexposureandimagenoisefromunderexposure.With mostscenes,youcanoftenhaveasurprisingrangeofexposurelatitudebeforeexcessiveredorpurpleindicatorsbegin toappear.
Ifnecessary,useFalseColorVideomodeor ZebraModes tofine-tunehowthescenewillappearoverSDI,oruseitto adjustyoursuggestedlookwhensendingfootageforpost-production.
TheZebraandVideomodesarealsoanobjectivewaytoassessthesceneexposureundervaryingambientlight withoutrelyingontheLCDimagetoevaluatebrightness.
ThePeakingtoolsdisplaycontrast,outlines,orcolorstoassistwithfocusing.
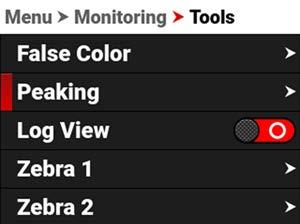
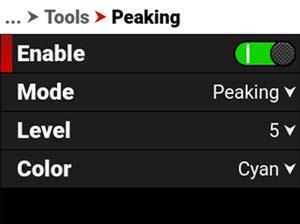
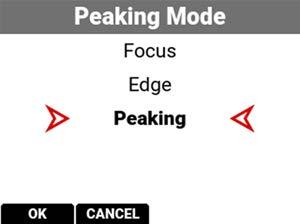
ThePeakingmodesyoucanuseinclude:
ITEM DETAILS
Focus Useenhancedcontrastandedgesforfocusing
Edge Showoutlinesoffocusedobjects
Peaking Selectacoloredoverlaytoindicateobjectsinfocus
FocusPeakingmodeemphasizescontrastandedgesintheimagewithoutchangingthebrightnessortheimage content.Thismodemakesiteasiertojudgefocus.Adjustthezoomandfocustoeasilyseewhichobjectsarecoming intofocus.
WhenyouenableEdgePeakingmode,thedisplayshowstheedgesoroutlinesofobjectsthatareinfocus.
ThePeakingPeakingmodedisplaysacoloroverlayontopofin-focusedges.SelectaLevelof1to10(weaktostrong) fortheintensityofthecoloroverlay.TheRGBsettingscanchangetheappearanceoftheselectedcoloroverlay. ThePeakingPeakingmodeindicatorisappliedaftertheimageisscaledtoamonitor,makingtheindicatorsappear differentlyonvariousmonitors.
FormoreinformationaboutPeaking,referto Focus intheHowTosection.
UseLogViewtodisplaycameraimagesinREDWideGamutRGBandLog3G10fortheISO,ExposureAdjust,Color Temperature,andTintsettings.Thisallowsyoutoquicklyseeungradedfootagethatremainsunaffectedbycreative decisionssuchasthechoiceof3DLUTorCDL.
LogViewispassedthroughtheSDIportwhenrecordingtoanexternalrecorder.YoucanviewtheLogimagein playbackontheLCDandonthemonitor.However,LogViewisnotrecordedtothefileonthemediacard.

PressSELtotoggletheLogViewswitchbetweenEnabledandDisabled:


UseZebra1todisplayonesetofdiagonalstripestoindicatehighlightexposurelevels.Formoreinformation,referto ZebraModes. Zebra1isdisabledbydefault.

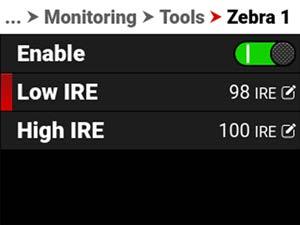
TheZebra1modeincludes:
ITEM
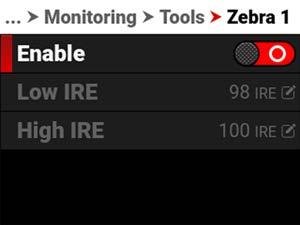
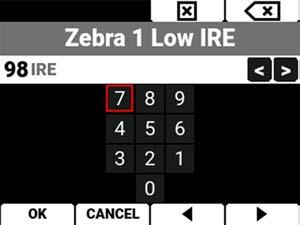
DETAILS
Enable Enablesredzebrastripestoindicatehighlightexposure
LowIRE
HighIRE
ENABLE
Setsthelowerthresholdfortheindicator
Setsthehigherthresholdfortheindicator
TheEnabletoggleswitchallowsyoutoenableordisabletheZebra1stripes.
LOWIRE
ProvidesakeypadthatallowsyoutosetthelowthresholdfortheZebrastripe.Thedefaultsettingis98IRE.
HIGHIRE
ProvidesakeypadthatallowsyoutosetthehighthresholdfortheZebrastripe.Thedefaultsettingis100IRE.
NORMALVIEW


UseZebra2todisplayasecondsetofdiagonalstripestoindicatemid-toneandshadowlevels.Formoreinformation, referto ZebraModes. Zebra2isdisabledbydefault.
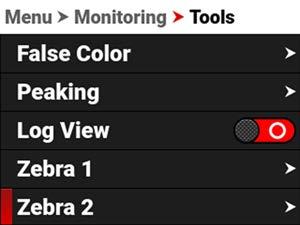
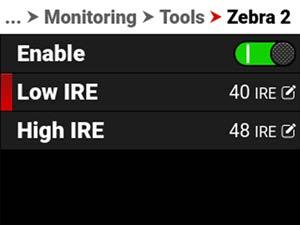
TheZebra2modeincludes:
ITEM
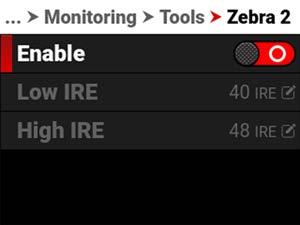
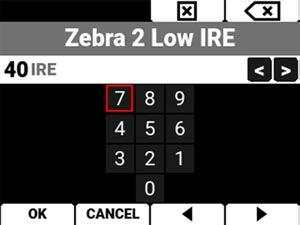
DETAILS
Enable Enablesgreenzebrastripestoindicatemid-toneandshadowexposure
LowIRE
HighIRE
ENABLE
Setsthelowerthresholdfortheindicator
Setsthehigherthresholdfortheindicator
TheEnabletoggleswitchallowsyoutoenableordisabletheZebra2stripes.
LOWIRE
ProvidesakeypadthatallowsyoutosetthelowthresholdfortheZebrastripe.Thedefaultsettingis40IRE.
HIGHIRE
ProvidesakeypadthatallowsyoutosetthehighthresholdfortheZebrastripe.Thedefaultsettingis48IRE.

UseGuidestoenableandconfigurethecamera'smonitoringguides.
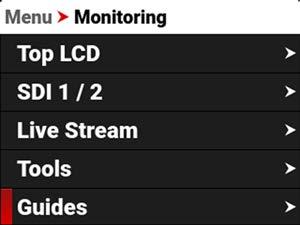
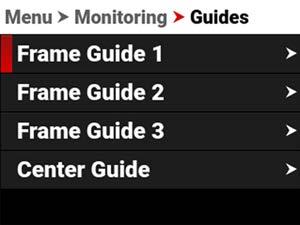
ThemonitoringGuidesthatyoucanuseinclude: ITEM DETAILS
FrameGuides Guidesyoucanconfiguretoaidinframingashot CenterGuide Acentercrosshairordotyoucanusetocenteryourshot
UseFrameGuidestoframethesceneusingvariousshapesandsizes.Youcanconfigureupto3FrameGuidesto displayonyourmonitor.
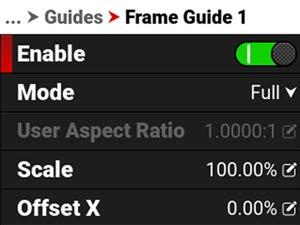
ConfiguretheFrameGuidesusingthefollowing:
Enable EnablestheFrameGuide
Mode Selectaspectratios,User,andAbsolutemodes
UserAspectRatio EnabledbyselectingUsermode
Scale PercentageoftheimagetheFrameGuideoccupies
OffsetX,Y Percentageofhorizontalandverticaloffset
AbsoluteX,Y,W,H Absolutemode-settheexactnumberofsizeandoffsetpixels
LineStyle SelecttheFrameGuidelinetype-solid,dashedorbracket
LineColor SelecttheFrameGuidelinecolor
LineOpacity SelecttheFrameGuidelineopacity
ShadeOutside EnablesshadingoutsideoftheFrameGuide
ShadeColor Selecttheshadingcolor
ShadeOpacity Selecttheshadingopacity
UseModetoselecttheFrameGuidemodeyouwanttousetoconfiguretheframeguide.
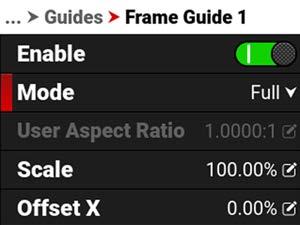
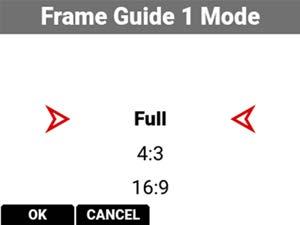
ThemodesyoucanselectincludeaspectratiosfromFullto2.4:1,User,andAbsolute.TheUserandAbsolutemodes enablesettingsthatarespecifictothosemodes.
ThisitemisenabledwhentheUsermodeisselected.
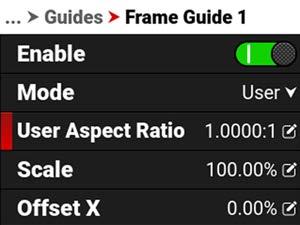
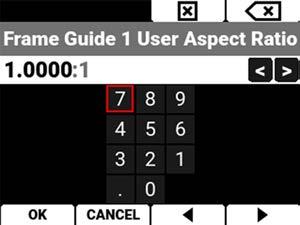
Usethekeypadtoenteryourdesiredaspectratio.
UsescaletoconfigurethepercentageoftheimageareathattheFrameGuidewillframe.
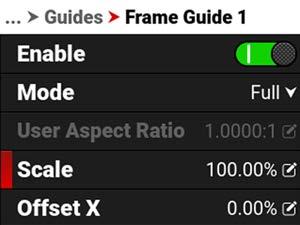

UsethekeypadtoenterthepercentageoftheimagetheFrameGuidecontains.
UseoffsettoconfiguretheXandYoffsetoftheFrameGuide.
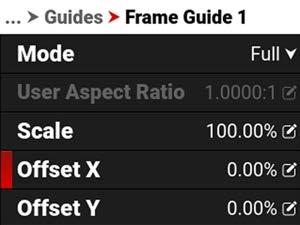
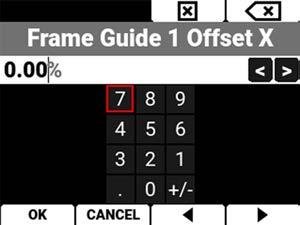
UsethekeypadtoenterthepercentageofoffsetfromcenteryouwanttoapplytotheFrameGuide.
UsetheAbsolutesettingstoconfiguretheabsolutedimensionsandpositionoftheFrameGuide.
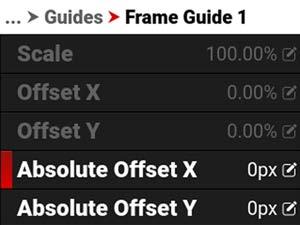
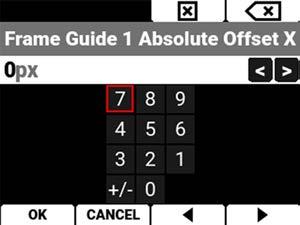
UsethekeypadtoenterthenumberofpixelsforX/YoffsetandforthewidthandheightoftheFrameGuide.The AbsoluteitemsareonlyenabledwhenyouselectAbsolute Mode.
UseLineStyletoselectthetypeoflinetheFrameGuideuses.
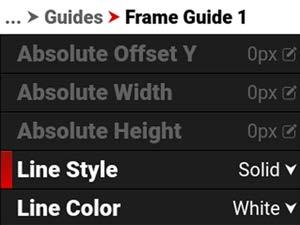

SelectSolid(default),Dashed,orBracketfortheFrameGuidelinestyle.
UseLineColortoselectthecoloroftheFrameGuideline.
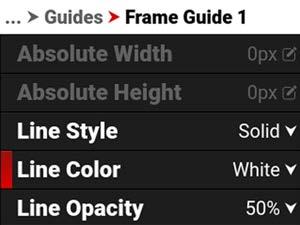
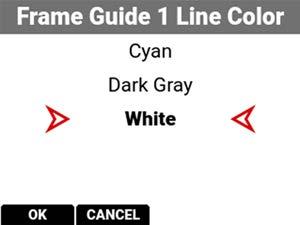
UseLineColortoselectoneofthefollowingcolorsfortheFrameGuide: Black Green Cyan Red Yellow DarkGray Blue Magenta White(default)
UseLineOpacitytoselecthowtransparenttheFrameGuidelineappears.
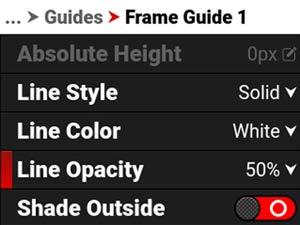
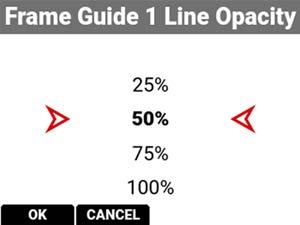
UseLineOpacitytoselectthepercentageofopacityfortheFrameGuide:
25%
50%(default)
75%
100%
UseShadeColortoselectthecolorofshadingtouseoutsideoftheFrameguide.
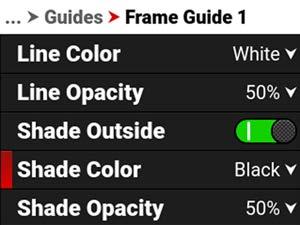
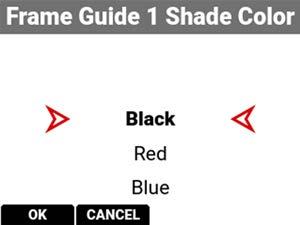
UseShadeColortoselectoneofthefollowingcolorsfortheoutsideshading:
Black(default) Green Cyan
Red Yellow DarkGray
Blue Magenta White
UseShadeOpacitytoselecttheopacityoftheshadingoutsideoftheFrameguide.
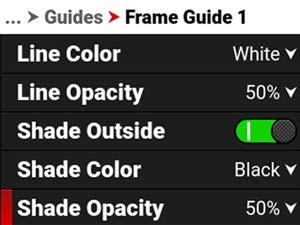

UseShadeOpacitytoselectthepercentageofopacityfortheshadingoutsideoftheFrameGuide:
25%
50%(default)
75%
100%
UseCenterGuidetoenableandconfiguretheCenterGuide.
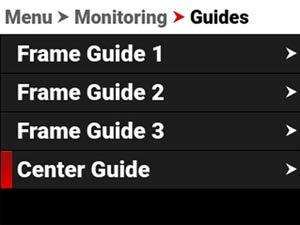
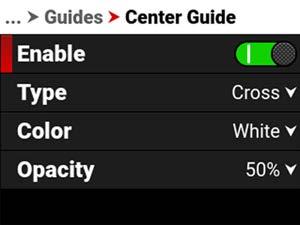
ConfiguretheCenterGuidebyusingthefollowing:
Enable EnablestheCenterGuide
Type SelectCenterGuidetype-dotorcross
Color SelectacolorfortheCenterGuide
Opacity Percentageofopacityoftheguidecolor
TYPE
UseTypetoselectthetypeofCenterGuidetodisplay.
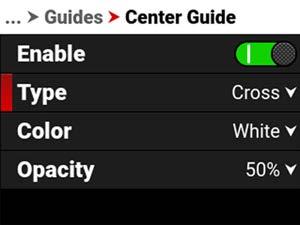
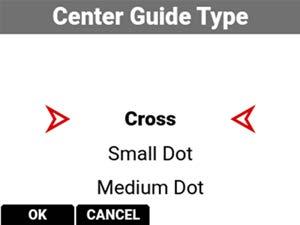
UseTypetoselectacenterdotorcross(default)fortheCenterGuide.
UseColortoselectthecolorusedbytheCenterGuide.
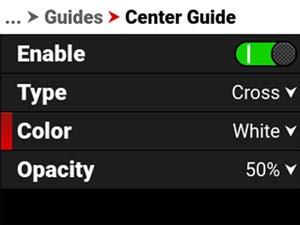
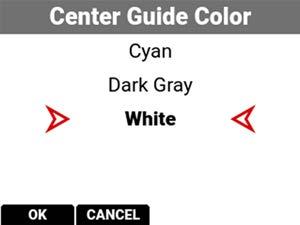
UseColortoselectoneofthefollowingcolorsfortheCenterGuide: Black Green Cyan Red Yellow DarkGray Blue Magenta White(default)
UseOpacitytoselecthowtransparenttheCenterGuideappears.
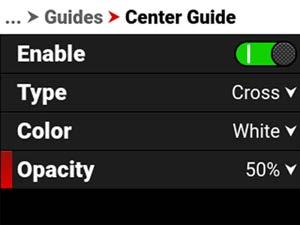
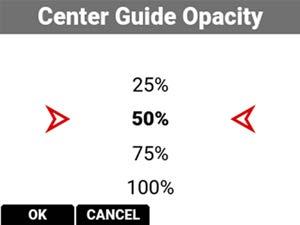
UseOpacitytoselectthepercentageofopacityfortheCenterGuide:
25%
50%(default)
75%
100%
TheMediamenucontainsthesettingsyouusetoconfigureyourmedia. FromthecameraLCDmenu,navigatetoMediaandpressSEL:
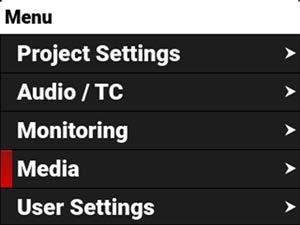
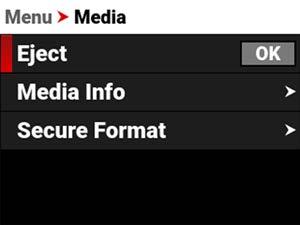
UsetheMediamenutoconfigurethecamera'sstoragemediasettingsandtoviewthemediainformation:
ITEM DETAILS
Eject EjecttheCFexpressmediacard
MediaInfo ViewtheCFexpressmediacardinformation
SecureFormat PerformsasecureformatoftheCFexpressmediacard
UseEjecttosafelyejecttheCFexpressmediacard.
WARNING: Themediacangetextremelyhot.Usecautionwhenremovingmedia.
WARNING: DonotattachalabeltotheCFexpressmediacard.Theheatgeneratedbythemediacanweakenthe label'sadhesive,causingthelabeltodetachinsideofthecamera.Labelscanalsodiminishheatdissipationandcause excessiveweartotheinternalcomponents.RemovingalabelfromaCFexpressmediacardcanpossiblydeformthe cardbody.
AccessEjectfromthe LCD Mediamenu:
UseMediaInfotodisplaytheCFexpressmediacardinformation.
AccessMediaInfofromthe LCD Mediamenu:
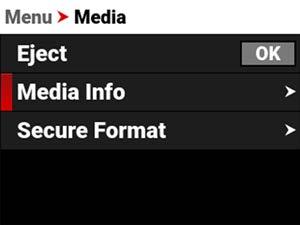
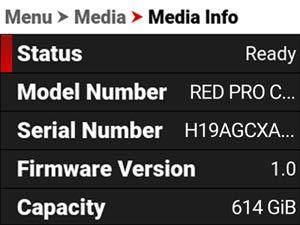
MediaInfodisplaysthefollowing: ITEM DETAILS
Status
ModelNumber
SerialNumber
FirmwareVersion
Capacity
Available
TimeRemaining
DisplaystheCFexpressmediacardstatus
DisplaystheCFexpressmediacardmodelnumber
DisplaystheCFexpressmediacardserialnumber
DisplaystheCFexpressmediacardfirmwareversion
DisplaystheCFexpressmediacardtotalcapacity
DisplaystheCFexpressmediacard'sremainingstorage
DisplaystherecordingtimeremainingontheCFexpressmediacard
UseSecureFormattoformattheCFexpressmediacarddowntothefilesystemlevel. Asecureformatallowsyoutorebuildthecardfilesystem.
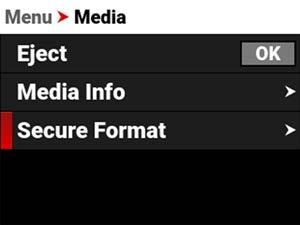
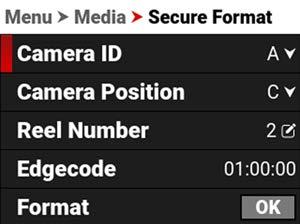
UsetheSecureFormatmenutoupdatethefollowinginformation:
CameraID SelectthecameraID(defaultisA)
CameraPosition Selectthecameraposition(defaultisC)
ReelNumber Selectthereelnumber(defaultis1)
Edgecode Enterthetimenumber(defaultis01:00:00)
Format StartstheSecureformattingprocess
UseCameraIDtoassignacameraIDlettertothemedia.
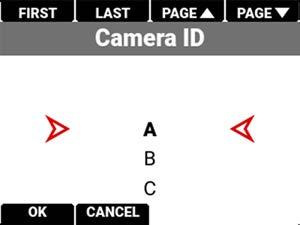
TheCameraIDlettersyoucanassignrangefromA-Z.Formoreinformation,referto SecureFormat
UseCameraPositiontoselectthecamerapositionlabelfortheCFexpressmediacard.
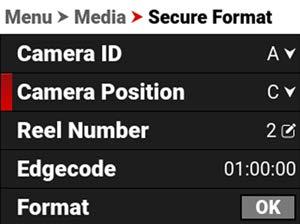

TheCameraPositionlettersyoucanassignrangefromA-Z.Formoreinformation,referto SecureFormat
UseReelNumbertoassignareelnumbertothemedia.

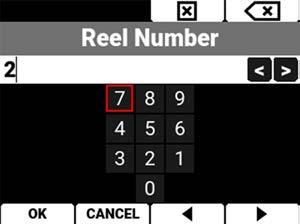
Usethekeypadtoenterauniquereelnumbertothemedia.
NOTE: ItisbestpracticetokeepyourreelnumberstonolongerthansevencharactersinlengthtoconformwithallEDL formats.
Formoreinformation,referto SecureFormat
UseEdgecodetoassignanedgecodetothemedia.
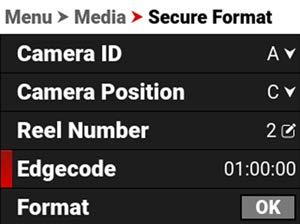
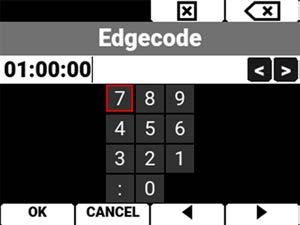
Usethekeypadtoenterauniqueedgecodenumbertothemedia.
EdgeCodeisaSMPTETimecodetrackthatbydefaultstartsat01:00:00onthefirstframeofeachCFexpressmedia card.Itisasequentialcodethatiscontinuousfromframetoframeandalsobetweenclips.EdgeCodeisequivalentto RUNRECORDasusedonbroadcastcameras.
Formoreinformation,referto SecureFormat.
UseFormattoexecuteasecureformatofthemedia.
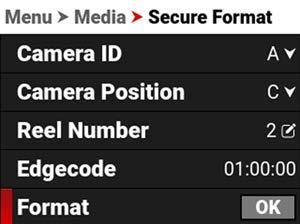
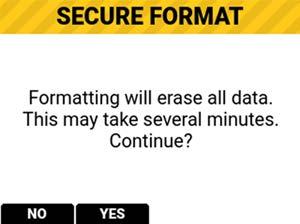


Formoreinformation,referto SecureFormat
TheUserSettingsmenucontainstheusersettingsyouusetopersonalizeyourcamerasetup. FromthecameraLCDmenu,navigatetoUserSettingsandpressSEL:
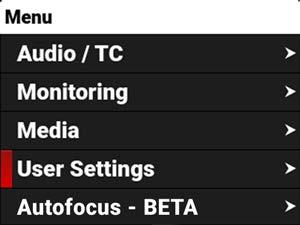
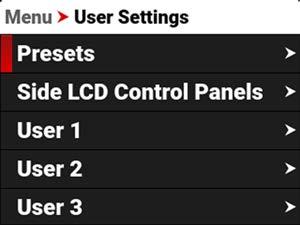
UsetheUserSettingsmenutobuildandselectpre-configuredsettingsforthecamera:
ITEM DETAILS
Presets
SideLCDControl Panels
User1,2,3
Createcamerasettingpresets
EnableordisablethecameraLCDpages
Configure8usersettingson3userpages
ThePresetsmenucontainsthesettingsyouusetoquicklysetupyourcamera.
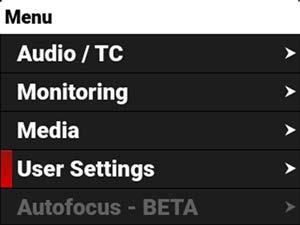
UsethePresetsmenutobuildandselectpre-configuredsettingsforthecamera: ITEM DETAILS
CreatePreset
Createcamerasettingpresets
OnMediaPresets Managepresetsstoredonthemedia
InCameraPresets Managepresetsstoredinthecamera
CREATEPRESET
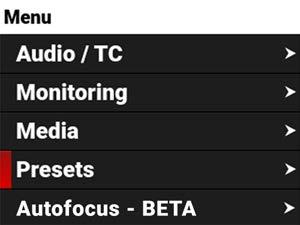
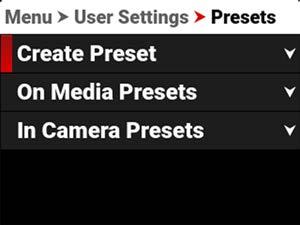
UseCreatePresettoselectthecurrentcamerasettingsyouwanttousetocreateapresetlistofsettings. Youcanselectsettingsindividually:

YoucanalsousetheALLENABLEDSETTINGScheckmarkbuttontoselectallofthecurrentcamerasettingsasa preset:
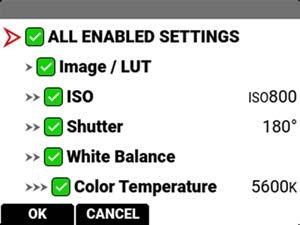
PressthebuttonunderOKtocreatethepreset.ThePresetNamescreenopens.
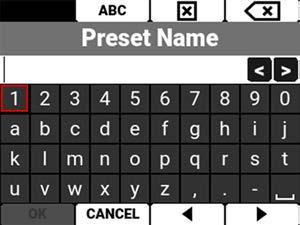
UsethePresetNamescreentonamethepreset.Whenthenamealreadyexistsinthecamera,thenameishighlighted inredandtheOKoptionisgrayedout:

Whenthenameisavailable,pressthebuttonunderOKandtheconfirmationscreendisplays:


Youcanimportpresetsfromthemediatothecamera.Whenimportingpresets fromthemediatothecamera,thepresetsaresavedtoafolderonthecamera called"presets."
FromMediaPresets,youcanimporttheselectedpresetfromthemediatothe cameraorimportallofthepresetsfromthemediatothecamera.
Youcanexportpresetsfromthecameratothemedia.Whenexportingpresets fromthecameratothemedia,thepresetsaresavedtoafolderonthemedia called"presets."
FromCameraPresets,youcanapplytheselectedpresettothecamera,deletethe selectedpresetfromthecamera,exporttheselectedpresetfromthecamerato themedia,orexportallofthepresetsfromthecameratothemedia.
TheSideLCDControlPanelsmenucontainsthesettingsyouusetoquicklysetupyourcamera.
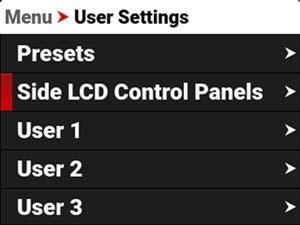
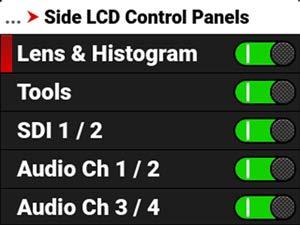
UsetheSideLCDControlPanelsmenutoenable/disabletheLCDpages. Thepagesyoucansetinclude: HistogramPage
ToolsPage SDIPages
AudioPages
HeadphonePage
UserPages
Refertothe LCD sectionformoreinformationabouttheLCDpages.
TheUsermenuscontainthesettingsyousavedtoquicklyconfigureyourcamera. FromthecameraLCDmenu,selectUser1,2,or3:
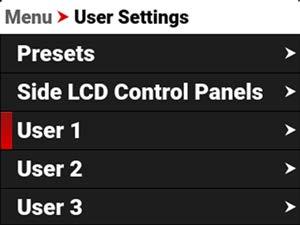
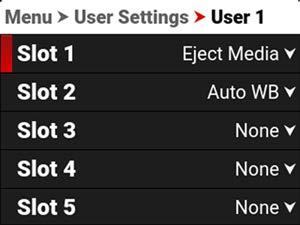
UseSlots1-8toassignquickusersettingsforthecamera.
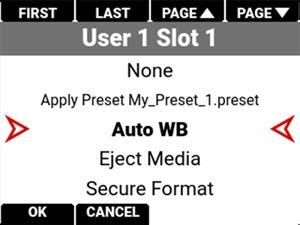
Theusersettingsinclude:
ITEM DETAILS
None NothingisassignedtotheUserSlot
ApplyPreset Applythepresetstoredonthecamera
AutoWB CameraautomaticallyadjuststheWhiteBalance
EjectMedia Unmountthemediainpreparationforremoval
SecureFormat Formatthemedia
JamTC toTOD JamTimecodetotimeofday
StartAF Startautofocus
SaveLog Savethelogfiletothemedia
SDI1MagnifyToggleSDIport1togglethemagnificationfeatureonandoff
SDI2MagnifyToggleSDIport2togglethemagnificationfeatureonandoff TopLCDMagnifyToggleTopLCDtogglethemagnificationfeatureonandoff
Pre-RecordToggleTogglethePre-Recordfeatureonandoff
Pre-RecordStopStopthePre-Recordfeature
Playback/CameraToggleTogglebetweencameraoutputandclipplayback
RecordToggle Togglerecordonandoff
FalseColorToggleToggletheFalseColortoolsonandoff
PeakingToggle TogglethePeakingtoolsonandoff
LogViewToggleToggleLogviewonandoff
Zebra1Toggle ToggleZebra1onandoff
Zebra2Toggle ToggleZebra2onandoff
SDI1GuidesToggleToggletheGuidesonandoffonSDI1output
SDI1ToolsToggleToggletheToolsonandoffontheSDI1output
SDI1OverlayToggleTogglebetweenthesimpleandadvancedOverlayontheSDI1output
SDI2GuidesToggleToggletheGuidesonandoffontheSDI2output
SDI2ToolsToggleToggletheToolsonandoffontheSDI2output
SDI2OverlayToggleTogglebetweenthesimpleandadvancedOverlayontheSDI2output
TopLCDGuidesToggleToggletheGuidesonandoffontheTopLCD
TopLCDToolsToggleToggletheToolsonandoffontheTopLCD
FrameGuide1ToggleToggleFrameGuide1onandoff
FrameGuide2ToggleToggleFrameGuide2onandoff
FrameGuide3ToggleToggleFrameGuide3onandoff
CenterGuideToggleToggletheCenterGuideonandoff
IrisOpen Opentheiris
IrisClose Closetheiris
SensorFlipToggleTogglesensorflipandnormalsensor
UseAutofocustoenableandconfigurethecamera'sAutofocusfeature.Thelensmustsupportautofocusforthis featuretowork.
FromthecameraLCDmenu,navigatetoAutofocus-BETAandpressSEL:
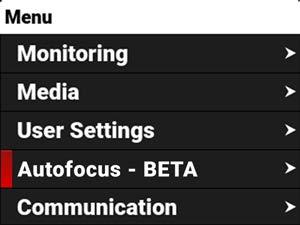
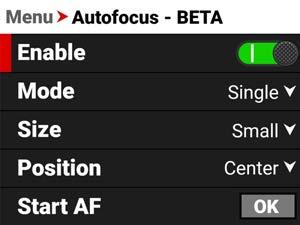
UsetheAutofocusmenutoperformcameraautofocustasks:
ITEM
Enable
Enable/Disabletheautofocusfeature
Mode Selecttheautofocusmode
Size
Position
StartAF
Selectthesizeoftheautofocusarea
Selectthepositionoftheautofocusarea
StarttheAutofocusfeature
UseEnabletoenableordisabletheautofocusfeature.Thelensmustsupportautofocusforthecameratousethis feature.
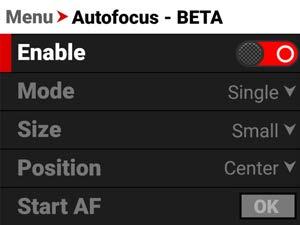
UseModetoselecttheautofocusmodeforthecamera.Thelensmustsupportautofocusforthecameratousethis feature.
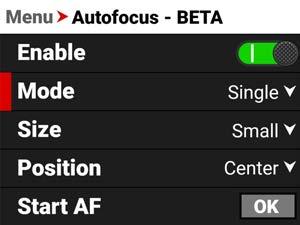
Usesinglemodetoautofocusandthenstopatthatfocusposition.
UseContinuousmodetocontinuouslykeepamovingsubjectinfocus.
UseSizetochoosewhatsizeareayouwantthecameratousefortheautofocusfeature.Thelensmustsupport autofocusforthecameratousethisfeature.
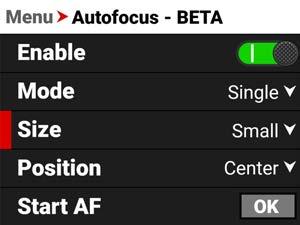
TheSizeselectionsfortheautofocusareaareSmall(default),Medium,Large,Wide,andVertical.
UsePositiontospecifythepositionoftheautofocusareaonthesensor.Thelensmustsupportautofocusforthe cameratousethisfeature.
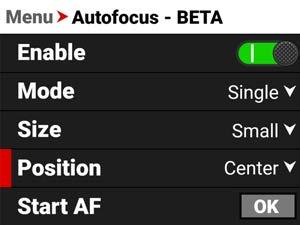
ThePositionselectionsinclude:
Left UpperMiddle UpperRight
UpperLeft Center(default) LowerRight
LowerLeft LowerMiddle Right
TheAutofocusPositionrectangledisplaysonthemonitor:
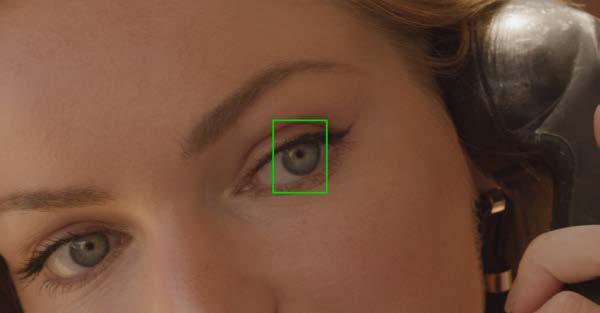
TheCommunicationmenucontainsthesettingsyouusetoconfigureyourcameratocommunicatewithotherdevices. FromthecameraLCDmenu,navigatetoCommunicationandpressSEL:
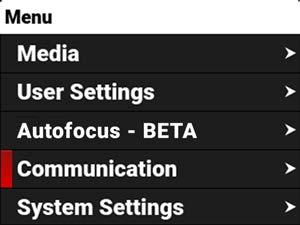
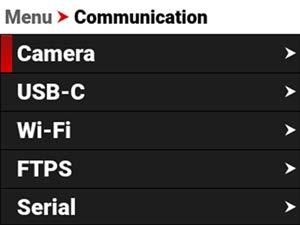
UsetheCommunicationmenutoconfigurethecamera'scommunicationsettings:
ITEM
DETAILS
Camera Settingforthecameraname
USB-C
SettingsforUSB-Ccommunication
Wi-Fi SettingsforWi-Ficommunication FTPS Filetransferprotocolsettings
Serial Settingsfortheserialconnection
CAMERA
UsetheCameramenutoviewandeditthecameraname.
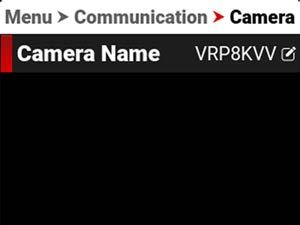
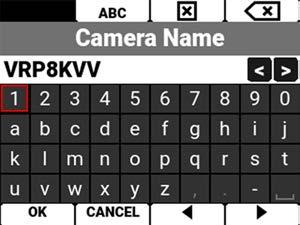
UseUSB-CtoconfiguretheconnectiontotheUSB-Cport.
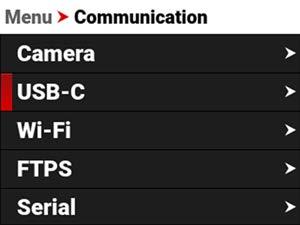
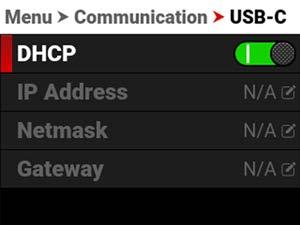
ThesettingsyoucanconfigurefortheserialconnectionthroughtheExtensionPortinclude:
DHCP EnablesDHCP
IPAddress VieworenterthenetworkIPaddress Netmask VieworenterthenetworkNetmask Gateway VieworenterthenetworkGateway
DHCP
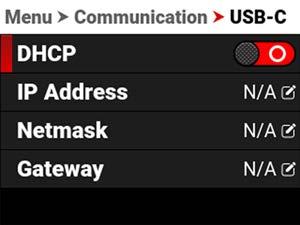
WhenconnectedtoanEthernetnetwork,thisallowsyoutoenableordisableDynamicHostConfigurationProtocol (DHCP).
WhenconnectedtoanEthernetnetworkandwithDHCPenabled,IPAddressdisplaysthenetworkIPaddress.
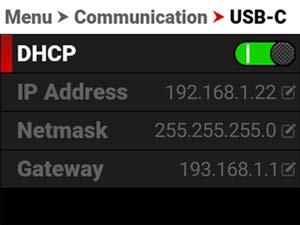
WhenDHCPisnotenabled,youcanselectIPAddressandmanuallyenterastaticIPaddress.

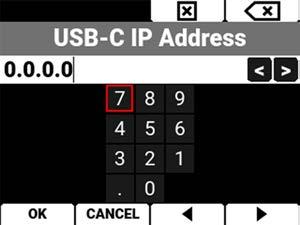
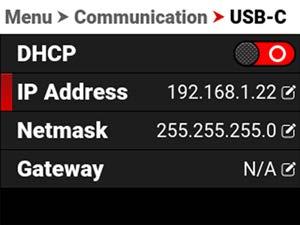
AfteryouenterthestaticIPaddressandselectOK,theNetmaskentryscreenopens.
WhenconnectedtoanEthernetnetworkandwithDHCPenabled,NetmaskdisplaysthenetworkNetmaskaddress.
WhenDHCPisnotenabled,youcanselectNetmaskandmanuallyenteraNetmaskaddress.Thisscreenopens automaticallyafteryouenterastaticIPaddress.
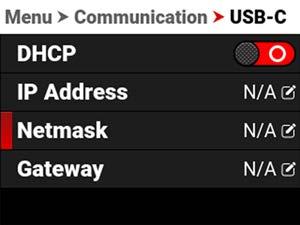

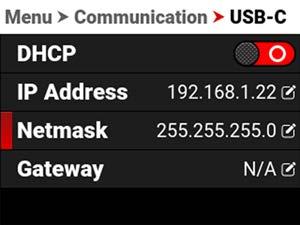
WhenconnectedtoanEthernetnetworkandwithDHCPenabled,GatewaydisplaysthenetworkGatewayaddress (routeraddress).
WhenDHCPisnotenabled,youcanselectGatewayandmanuallyenteraGatewayaddress.
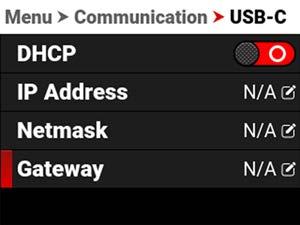
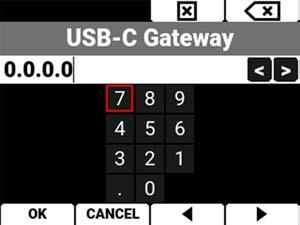
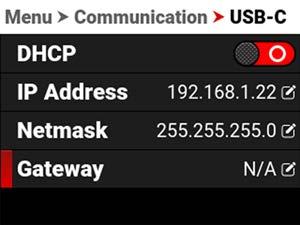
UseWi-FitoconfigurethecameratoworkwithaWi-Ficonnection.
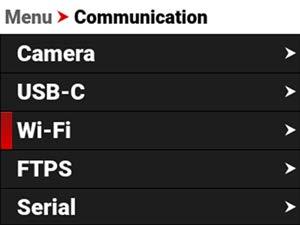
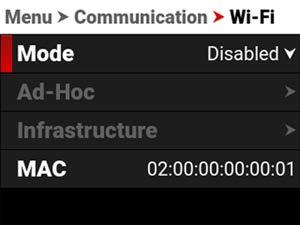
UsetheWi-Fimenutoconfigurethecamera'sWi-Fisettings:
ITEM
Mode DisableWi-FiorselectthecameraWi-Fisettings
Ad-Hoc ConfigurethecameraasaWi-Fihotspot
Infrastructure SettingsforconnectingtoanexistingWi-Finetwork
MAC DisplaysthecameradeviceMACaddress

FromModeyoucandisabletheWi-Finetwork,oryoucanenablethecamera's Ad-Hoc or Infrastructure Wi-Fisettings. ThedefaultsettingisDisabled.
UseAd-HoctoconfigurethecameraasaWi-Fihotspot.
NOTE: TheAd-Hocmenuisenabledwhenthe Wi-Fi Modeissetto Ad-Hoc


UsetheAd-HocmenutoconfiguretheWi-Fihotspotsettings:
SSID
EnterthenameoftheWi-Finetworkthecameragenerates
Passphrase EnterthepasswordfortheWi-Finetwork
Band SelecttheWi-Fifrequencyband
Channel SelecttheoptimalchannelfortheWi-Fiband
Encryption Displaystheencryptiontype
Status Displaystheconnectionstatus
IPAddress DisplaystheIPaddress
Netmask DisplaystheNetmask
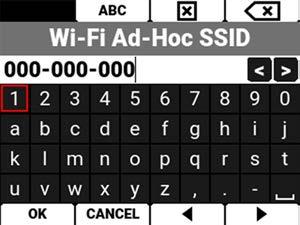
Usethekeypadtoenterthecamera'sWi-Finetworkname.
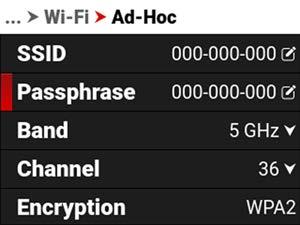
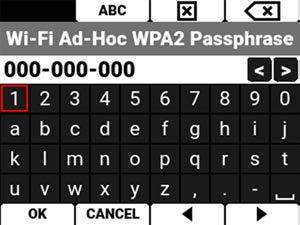
Usethekeypadtoenterthecamera'sWi-Fipassphrase.
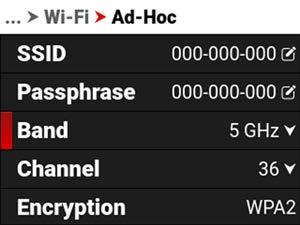
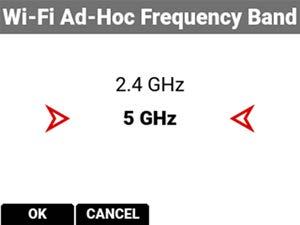
Selectthecamera'sWi-Finetworkfrequencyband.
Use5GHzforoptimalwirelessvideostreamingperformance(default)
Use2.4GHzforlongrangeremotecontrol(whennotutilizingwirelessvideostreaming)
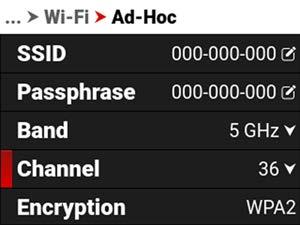

Selecttheoptimalchannelfortheselectedband,onewhichreceivestheleastinterferencefromthesurroundingWi-Fi signals.
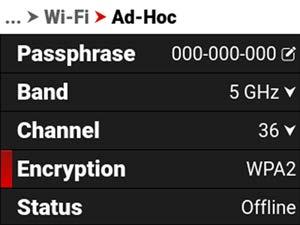
ThecamerausesWPA2securityencryption.
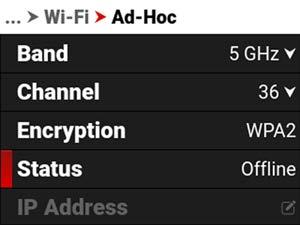
Displaysthecamera'sAd-HocWi-Ficonnectionstatus. TheAd-Hocstatuscaninclude: Offline Online

Whenonlineandbroadcastinganetwork,thecameradisplaysanIPaddress.
NETMASK
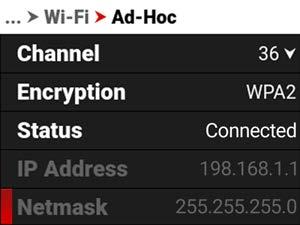
Whenonlineandbroadcastinganetwork,thecameradisplaystheNetmaskfortheIPaddress.
UseInfrastructuretoconfigurethecameratoconnecttoanexistingWi-Finetwork.
NOTE: TheInfrastructuremenuisenabledwhentheWi-FiModeissetto Infrastructure.Refertothe Wi-Fi sectionfor moreinformation.
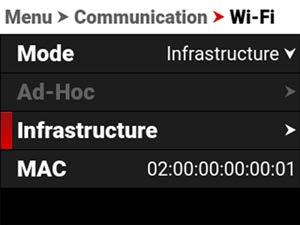
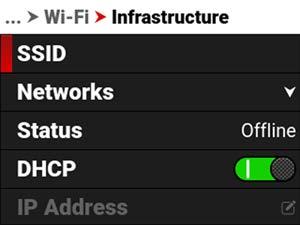
UsetheInfrastructuremenutoconfiguretheWi-FisettingstoconnecttoanexistingWi-Fiinfrastructure:
SSID DisplaysthenameoftheconnectedWi-Finetwork Networks Scanfor,select,orentertheWi-Finetwork
Status DisplaystheWi-Ficonnectionstatus
DHCP EnableordisableDHCP
IPAddress VieworentertheWi-FiIPaddress
Netmask VieworentertheWi-FiNetmask
Gateway VieworentertheWi-FiGateway(routeraddress)
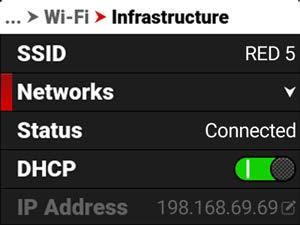
Whenanetworkisselected,theSSIDdisplaystheWi-Finetworkname(SSID).
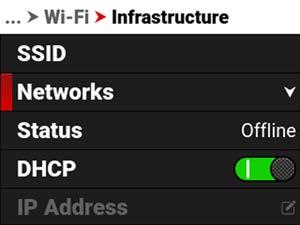
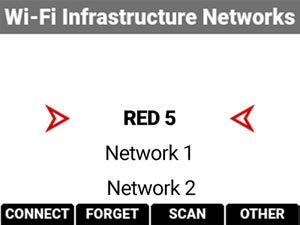
UseNetworkstoselectanexistingnetwork,scanforanavailablenetwork,ortoconfigureanewnetwork.
CONNECT:TheCONNECTbuttonconnectsthecameratotheselectednetwork.
FORGET:TheFORGETbuttonerasestheconnectioninformationfortheselectednetwork.
SCAN:TheSCANbuttonsearchesforavailablenetworks.
OTHER:TheOTHERbuttonopenstheOTHER NETWORKSscreenwhereyoucanmanuallyenteranSSIDanda Passphrase.
SelectanetworktoopentheCONNECTscreen.SelectPassphrasetoopenthePassphrasescreenandenterthe desirednetworkpassword:

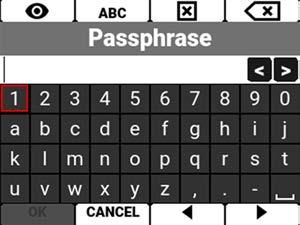

DisplaystheconnectionstatusofthecameratotheselectedWi-Finetwork.
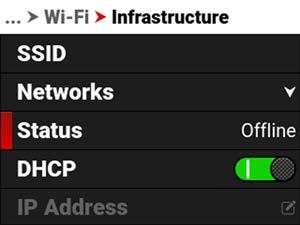
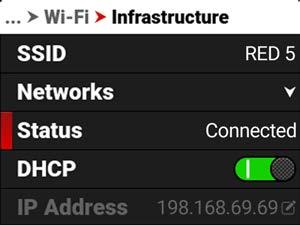
DHCPallowsyoutoenableordisableDynamicHostConfigurationProtocol(DHCP).
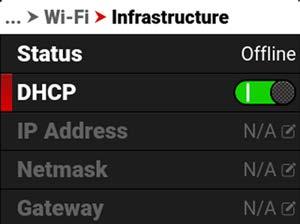
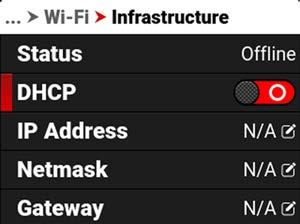
WhenconnectedtoaWi-FinetworkandwithDHCPenabled,IPAddressdisplaystheWi-FinetworkIPaddress.
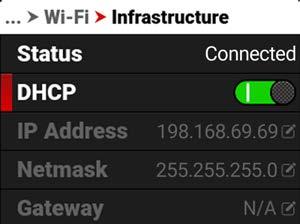
WhenDHCPisnotenabled,youcanmanuallyenterastaticIPaddress.
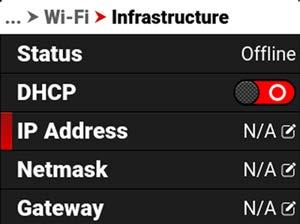
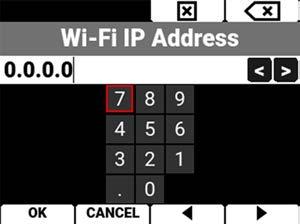
AfteryouenterthestaticIPaddress,theNetmaskentryscreenopens.
WhenconnectedtoaWi-FinetworkandwithDHCPenabled,NetmaskdisplaystheWi-FinetworkNetmaskaddress.
WhenDHCPisnotenabled,youcanmanuallyenteraNetmaskaddress.Thisscreenopensautomaticallyafteryou enterastaticIPaddress.


WhenconnectedtoaWi-FinetworkandwithDHCPenabled,GatewaydisplaystheWi-FinetworkGatewayaddress (routeraddress).
WhenDHCPisnotenabled,youcanmanuallyenteraGatewayaddress.
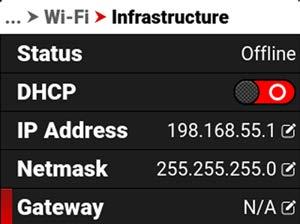
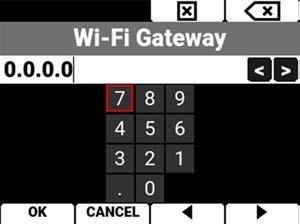
UseFTPStoconfigurethecameratoworkwithasecureFileTransferProtocol(FTPS)connection.
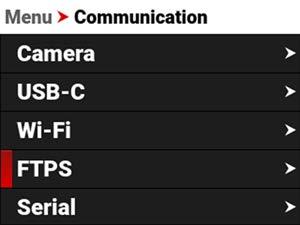
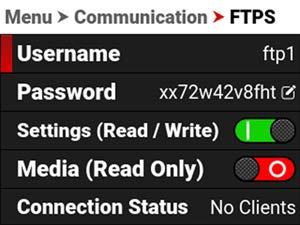
UsetheFTPSmenutoconfigurethecamera'sFTPSsettings:
Username Staticusernameftp1
Password User-editablepassword
Settings(R/W)EnableFTPaccesstothecamerasettings
Media(ReadOnly)Enableread-onlyaccesstothemedia ConnectionStatusDisplaystheFTPSactionsoccurring
UsePasswordtoenteranFTPSpassword.WhenyoupressSELonPassword,theFTPSPasswordeditingscreen appears.
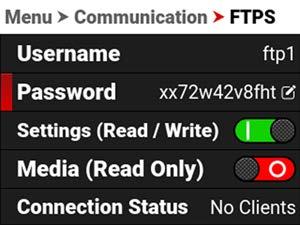
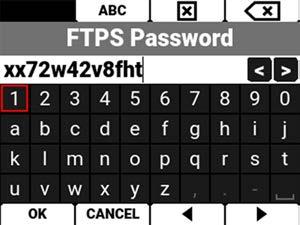
Thepasswordmustcontainaminimumof8characters.
UseSerialtoconfiguretheserialconnectiontothe ExtensionPort.
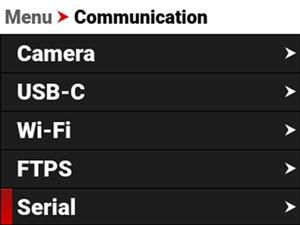
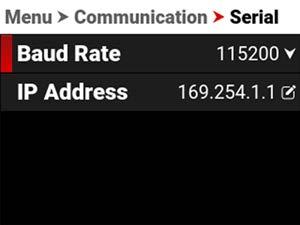
ThesettingsyoucanconfigurefortheserialconnectionthroughtheExtensionPortinclude:
ITEMDETAILS
BaudRate Selecttheserialportbaudrate
IPAddress EntertheIPaddressforthePPPprotocol
BAUDRATE
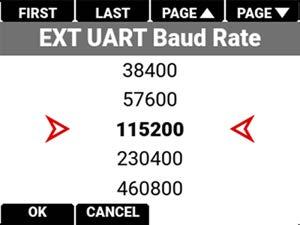
TheBaudratecontrolshowfastdataistransmittedovertheserialconnection.Thehigherthespeed,themorelikely thaterrorscanoccur.TheBaudratesyoucanchooseinclude:
BAUDRATES 9600115200*5760001500000
*Default
IPADDRESS
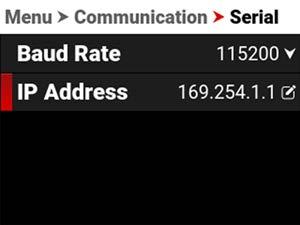
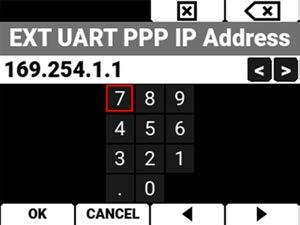
Usethekeypadtoentertheinternetprovider'sIPaddress.
TheSystemSettingsmenucontainsthecamerasystemconfigurationsettings. FromthecameraLCDmenu,navigatetoSystemSettingsandpressSEL:
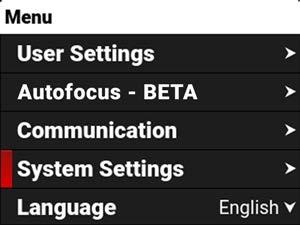
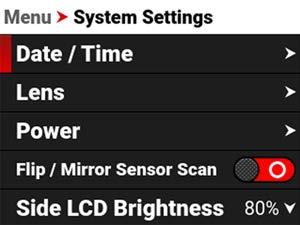
UsetheSystemSettingsmenutoconfigurethecamerasystemsettings:
ITEM DETAILS
Date/Time Dateandtimesettings
Lens ViewlensstatusinformationandaccesstheIrismenu
Power DCandBatterystatus
Flip/MirrorSensorScanEnableFlip/MirrorSensorScan
SideLCDBrightnessAdjustthesideLCDbrightness
Indicators Enableordisablethecamera'sfrontTallyLED
StatusSettings Shuttermode,Apertureincrements,andFocuslengthunitssettings
SystemStatus Informationaboutthecamera'stype,PIN,FW,andruntime
UsetheDate/Timemenutoresettheinternalclockofthecamera.ThetimeanddatearetimestampedonR3D® files whenrecordingtothemedia.Thecamerausesthe24-hourclockconvention(militarytime).Forexample,enter2:35PM as14:35:00.
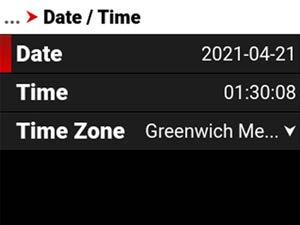
TheDate/Timemenuitemsinclude:
Date DateinYYYY-MM-DDformat
Time 24-hourformat
Timezone Globaltimezones
NavigatetoDateandpressSELtoenterthedateusingthekeypad:
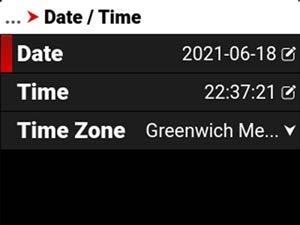
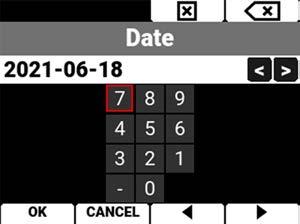
TIME
NavigatetoTimeandpressSELtoenterthetimein24hourmilitaryformatusingthekeypad:
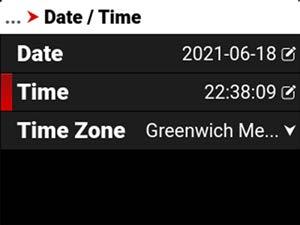
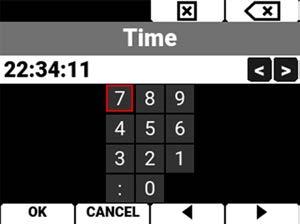
UseTimezonetoselectthelocaltimezoneforwherethecameraislocated.
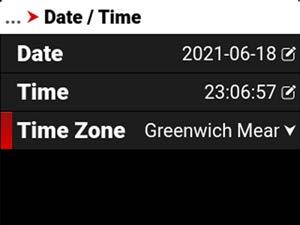

UseLenstoviewinformationabouttheattachedlens.
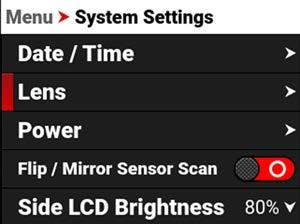
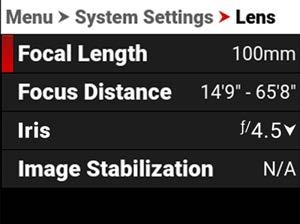
TheinformationyoucanviewfromLensincludes:
ITEM
DETAILS
FocalLengthDisplaysthelensfocallengthvalue
FocusDistanceDisplaysthelensfocaldistancevalue
Iris LensIrismenu
ImageStabilizationDisplaysthelensimagestabilizationstatus
UsetheIrismenutoselectthecameralensf-stop.PressthebuttonbelowEdittoopenthekeypadandenterthef-stop manually.

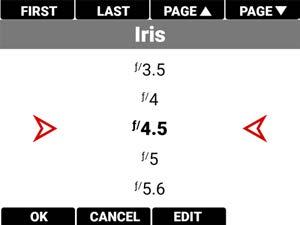
UsethePowermenutoviewthevariouscamerapowerstatusindicators:
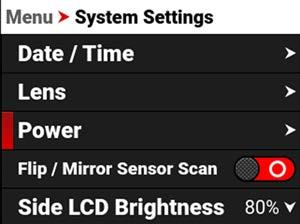
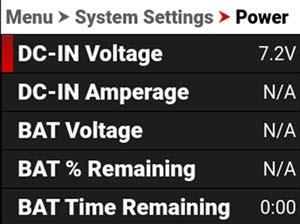
ThePowerindicatorsyoucanviewinclude:
ITEM DETAILS
DC-INVoltageWhenDCisconnected,thisdisplaystheDCVoltage DC-INAmperageWhenDCisconnected,thisdisplaystheDCAmps
BATVoltage Whenabatteryisconnectedintheleft#1slot,thisdisplaysthebattery Voltage
BAT%RemainingWhenacompatiblebatteryisconnectedintheleft#1slot,thisdisplaysthe %ofbatterychargeremaining
BATTimeRemainingWhenabatteryisconnectedintheleft#1slot,thisdisplaysthecamera operatingtimeremaining
BATAmperageWhenabatteryisconnectedintheleft#1slot,thisdisplaysthebattery Amps
PowerOut
Enablesordisablesthe5V/500mApowertothe ExtensionPort
UsetheIndicatorsmenutoenableordisablethetallylight(refertothe CameraBody sectionformoreinformationabout thecameraLEDs).
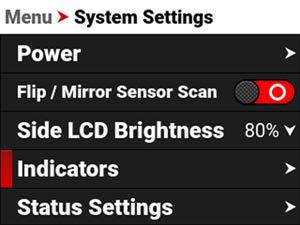


UsetheStatusSettingsmenutoselecttheshutterdisplaymode,apertureincrement,andfocusdistanceunits displayedinthecamera'smenus.
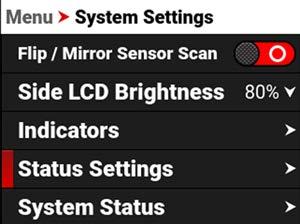
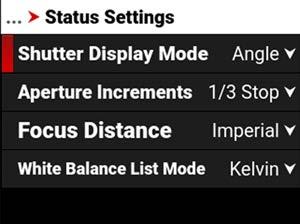
TheStatusSettingsthatyoucanconfigureinclude:
ShutterDisplayMode Selectatime-fractionorananglefortheshuttermenudisplayunit
ApertureIncrements Select1/4or1/3f-stopincrements
FocusDistance Selectthefocusdistanceunits(MetricorImperial)
WhiteBalanceListMode SelectKelvinorWhiteBalancePresets
UseShutterDisplaymodetoselectthewaythatthecameradisplaysthe Shutter settinginthemenu. WhenselectAngle,the Shutter menudisplaysthechoicesindegrees.WhenyouselectTime,theShuttermenudisplays thechoicesinfractionsofasecond.

UseApertureIncrementstoselectonefourthincrementsoronethirdincrementsforthecameraf-stopsettings.The defaultis1/3Stop.
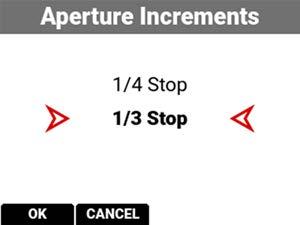
UseFocusDistancetoselectImperialorMetricunitsforthe Lens FocusDistancedisplay.ThedefaultisImperial.
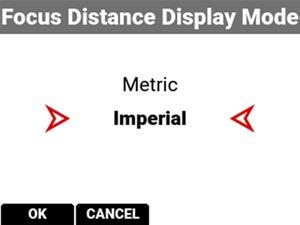
UseWhiteBalanceListModetoselectKelvinorPresetsfortheWhiteBalanceColorTemperaturemenu.Thedefaultis Kelvin.

UsetheSystemStatusmenutoviewcamerainformationandtoviewtemperaturereadings.
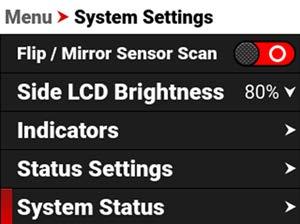
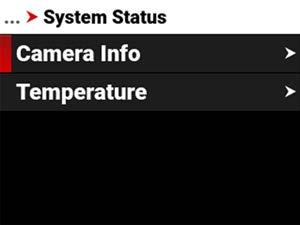
Thesystemstatusinformationyoucanviewincludes:
ITEM DETAILS
CameraInfo Camerainformation
Temperature Cameratemperatures
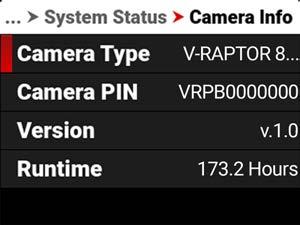
Thecamerainformationyoucanviewincludes:
ITEM DETAILS
CameraTypeDisplaysthecameradescription
CameraPINDisplaysthecamerapersonalidentificationnumber(PIN)
VersionDisplaysthefirmwareversionnumberinstalledonthecamera
RuntimeDisplaysthetotalnumberofhoursthatthecamerahasrun
TEMPERATURE
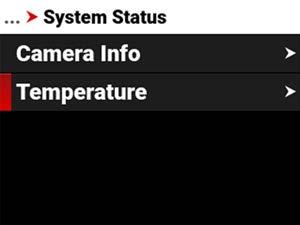
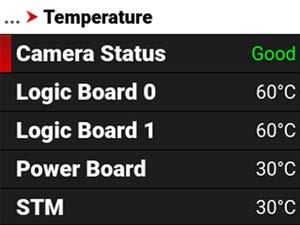
Thecameratemperaturesyoucanviewinclude:
ITEM DETAILS
CameraStatus
LogicBoard0
LogicBoard1
PowerBoard
STM
Sensor
DisplaysGood(green)orOverheating(yellow)
DisplaystheCelsiustemperatureofLogicBoard0
DisplaystheCelsiustemperatureofLogicBoard1
DisplaystheCelsiustemperatureofthepowerICboard
DisplaystheCelsiustemperatureofthepowerSTMIC
DisplaystheCelsiustemperatureofthesensor
CalibrationTemperatureTemperatureatwhichthesensorwascalibrated
TheLanguagemenucontainsthelanguagesyoucanselectfortheuserinterface(UI). FromthecameraLCDmenu,navigatetoLanguageandpressSEL:
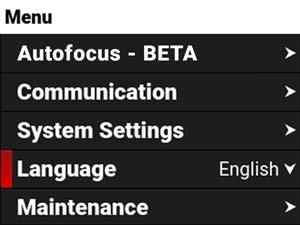

Thelanguagesyoucanselectinclude: English SimplifiedChinese French German Japanese Spanish
TheMaintenancemenucontainsthesettingsyouusetoperformvariousmaintenancetasksonyourcamera.
FromthecameraLCDmenu,navigatetoMaintenanceandpressSEL:
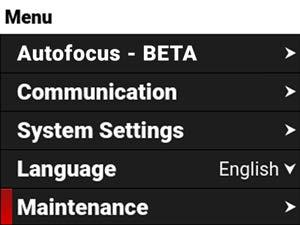
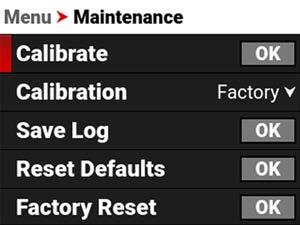
UsetheMaintenancemenutoperformthefollowingcameramaintenancetasks:
ITEMDETAILS
Calibrate PerformstheselectedCalibration
Calibration Listofcalibrationoptions
SaveLog Savesthecameralogfilestothemedia
ResetDefaults Resetsthecamerasettingstotheirdefaultsettings
FactoryReset Restoresthecameratothefactorysettings
Upgrade Updatesthefirmware
UseCalibratetostartthecameracalibrationprocessandcreateyourUsercalibrationprofile. Onlycalibratethecameraafterithasreacheditsoperationaltemperature.Thisoccursusuallywithintenminutesafter youturnonthecamerainthefilmingenvironment.Donotcalibrateimmediatelyafterpoweringon.
NOTE: Makesurethatthemountcapisinstalledonthecamerabeforeyoucalibratethecamera.
PressthebuttonbelowOKtobegincalibratingthecamera.
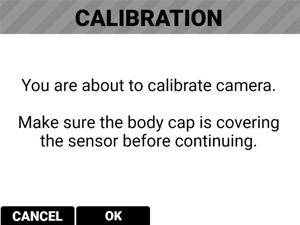
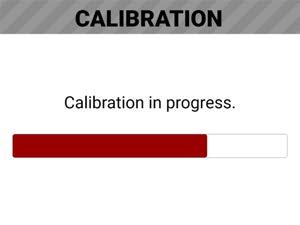
Whenthecameraisfinishedcalibrating,theLCDdisplaystheCalibrationstatusmessage: or:
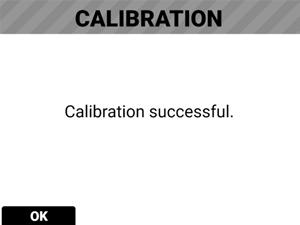
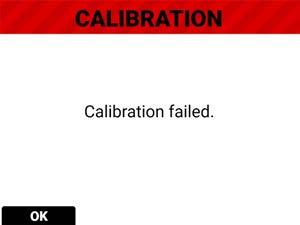
UseCalibrationtoselecttheactivecameraCalibration.
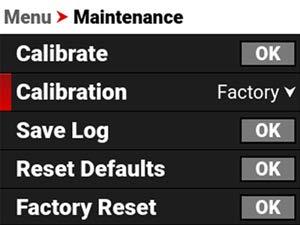
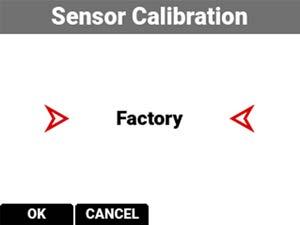
YoushouldalwaysselectUsercalibration.Thefirsttimeyoucalibratethecamera,theonlychoiceisFactory.Afteryou performacalibration,theUsercalibrationprofileisaddedtothelistandthecameramakesitthedefaultcalibration.
Everytimeyoucalibratethecamera,theUserprofileisupdated.TheonlytimetheUserprofileisremoved,iswhenyou performaFactoryReset.
IfUsercalibrationisnotavailable,thecameradefaultstoFactorycalibration.Calibratethecameratogenerateanew Usercalibrationprofile.
UseSaveLogtosavethecameralogtothemedia.
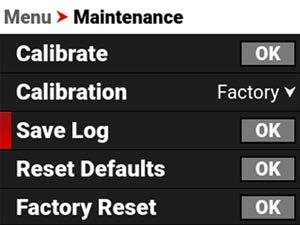
Whenthemediaisfull,ormissing,thecamerawilldisplayanerrormessage.Whenthereisnoerror,thesuccess messageisdisplayed.
Error: Success:


UseResetDefaultstoresetthecameratothefactorydefaultmenusettings.
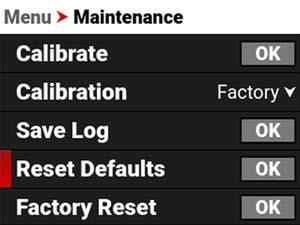
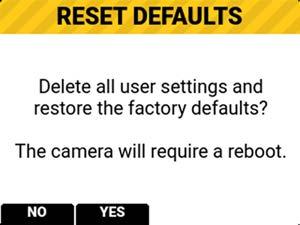
NOTE: Resettingthecamerawilldeleteallofyourmenusettings.
NOTE: Thecameraturnsoff,andthenbackontocompletetheresetprocess.
PressthebuttonunderYestoresetthecameramenustothedefaultssettings.
UseFactoryResettoresetthecameratothefactorysettings.
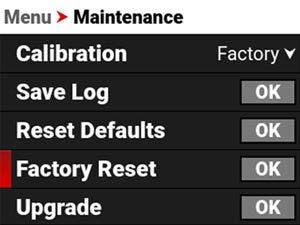

NOTE: Resettingthecamerawilldeleteallofyoursettingsandremoveallimportedfiles.Thecameraturnsoff,andthen backontocompletetheresetprocess.
PressthebuttonunderYestoresetthecameratothefactorysettings.
UseUpgradetoperformacamerafirmwareupdate.
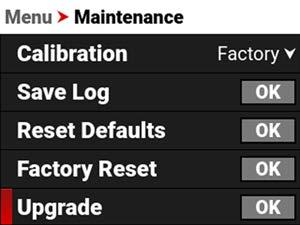

Formoreinformationaboutupgradingthefirmware,referto UpgradingtheFirmware.
Thissectiondescribeshowyoucanusethecamerafeatures.
Thecameraoffersawireless(802.11g)connectionthatprovidescommunicationsupportforthird-partyapplications.As withallwirelessdevices,thecommunicationrangevarieswiththeenvironmentandanyradiofrequency(RF) interferencethatmaybepresent.Youcanselectawirelessfrequencyof2.4GHzor5GHz.Foroptimalperformance, donotobstructtheantennawithanyaccessory,mountingplate,ormountingrail.
Thecamerauses Ad-Hoc modetosetupthecameraasaWi-Fihotspot.
Thecamerauses Infrastructure modetoconnecttoexistingWi-Fiinfrastructure.
ThiscamerausestheWPA2Wi-Fiprotocol.
1.NavigatetotheWi-Fimenu MENU > COMMUNICATION > Wi-Fi.
2.FromtheModeoption,selectInfrastructure.

3.FromtheInfrastructuremenu,selectNetworks.
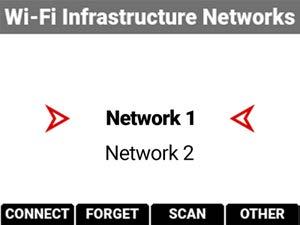
4.SelectthenetworknamefromtheNetworkslistmenu:
orpressthebuttonunderSCANtoscanforavailablenetworksandupdatetheNetworkslist:
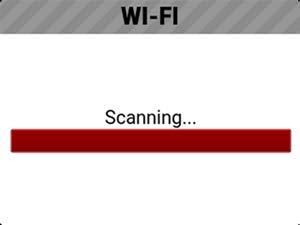
5.PressthebuttonunderCONNECT.TheCONNECTscreendisplays:
6.PressSEL.ThePassphraseentryscreendisplays:
7.Enterthepassphrasefortheselectednetwork.Thepassphrasemustuseaminimumof8characters.

8.PressthebuttonbelowOKonthecompletedPassphraseentryscreen.ThecompletedCONNECTscreendisplays.
9.PressthebuttonunderCONNECT.Thecameraconnectstotheselectednetwork:
TheFileTransferProtocolSecure(FTPS)offersafastandsecuresystemfortransferringdatatoandfromthecamera. FTPSisavailablewhenthecameraisenabledandconnectedtoanetworkoverWi-FiorthroughtheUSB-Cporttoan Ethernetadaptor.
ThesettingsforusingFTPSonthecamerainclude:
Protocol:FTPorFTPS
Host:[IPADDRESSOFTHECAMERA]
Port:21
Encryption:TLS/SSLExplicitencryption
Username:[USERNAMEINFTPSMENUSETTINGS]
Password:[PASSWORDINFTPSMENUSETTINGS]
LogonType:Normal
NOTE:
Filetransferspeedsmayvarydependingonthestrengthofthesignal(whenusingWi-Fi)andtheamountofnetwork traffic.Forthefastestandmostreliabledatatransfer,werecommendusingahard-wiredconnection.
StepsmaydifferdependingonwhichFTPsoftwareyouwishtouse,consultyoursoftware’suserguideforadditional assistance.
WhensettingupFTP,makesureyouuseFTPorFTPSandnotSFTPasthesearedifferentprotocols. Forsecurityreasons,theFTPShostnameandpasswordareonlydisplayedonthecameraFTPSmenu.
1. Connectyourcameratothenetworkwiththedesiredconnectionmethod(Ad-Hoc,InfrastructureorUSB-C)and verifytheconnection.Asuccessfulconnectionisconfirmedwhenthecameradisplays"Connected"intheWi-Fi Status:
2. NavigatetoMenu>Communication>FTPS.Takenoteoftheusernameandpassword.Youcanalsoenteranew password.
3. EnabletheuserpermissionsbytogglingSettingsorMediatotheonoroffposition.Themediafolderwilldisplayas anemptyfolderontheFTPAppwhenMediaAccessisdisabled(off).
4. Thecameraisnowset-uponFTPS.
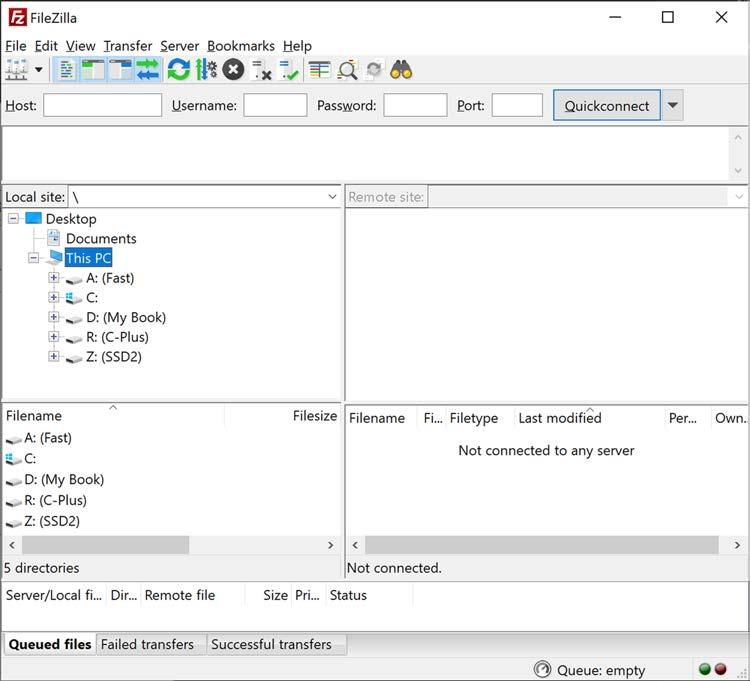
1. InFileZilla,enterthefollowingsettings:
Host:ftp://Camera'sIPAddress-Example:ftp://192.168.1.93
Username:UsernamedisplayedinFTPSmenu
Password:PassworddisplayedinFTPSmenu
Port:leaveblank
2. ClickonQuickconnect .Dependingonthepermissionsyouwillnowhaveaccesstothedesiredfolders.

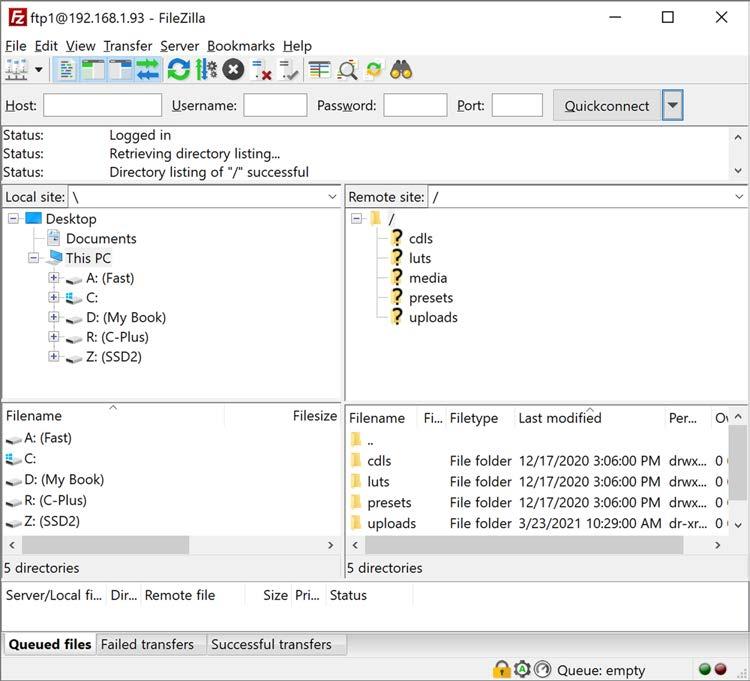
ThecameraFTPSmenuConnectionStatusdisplaysConnected:
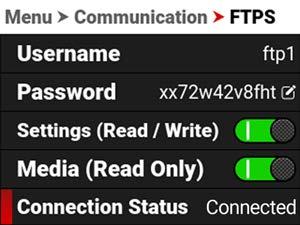
Whenuploadingfilestothecamera,makesurethatyouusethe‘upload’folder&thenthedesiredsub-directoryofluts, cdls,presets,orupgrade.Mediacannotbeuploadedtothecamera.
ThedatarateoftheFTPStransferwithencryptionmaxesoutatroughlyGigabitEthernetspeeds. Estimateddownloadtimeforafull256GBisapproximately47minuteswhenusingawiredconnection.
TheRED V-RAPTOR8KVVoffersaUSB-CconnectionthatprovidescommunicationsupportforAndroiddevices,Apple devices,andEthernetdevices.
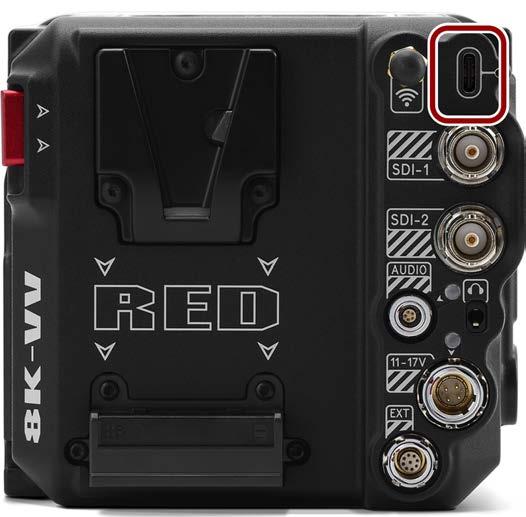
Thissectionincludesinstructionsfor:
USB-CAndroidConfiguration
USB-CAppleConfiguration
USB-CEthernetConfiguration
TheREDV-RAPTOR8KVVoffersaUSB-CconnectionthatprovidescommunicationsupportforAndroiddevices.
1.FromtheGooglePlaystore,downloadthe REDControlApp totheAndroiddevice.


2.ConnecttheAndroiddevicetothecamerawithaUSB-Ccable.
3.NavigatetotheCommunication>USB-C>IPAddress.
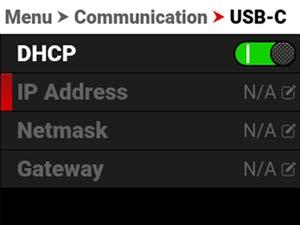
4.OpentheAndroiddevicesettingsbytappingtheSettingsicon(gear).

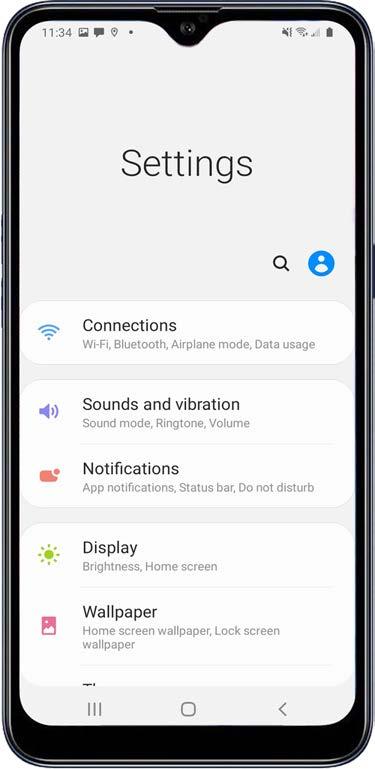
5.SelectConnections.

6.SelectMobileHotspotandTethering.
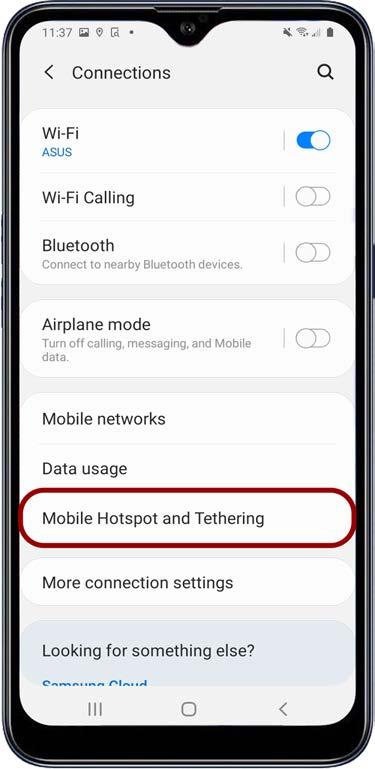
NOTE: MobileHotspotandTetheringisonlyavailableonAndroiddeviceswithcellularcapability.
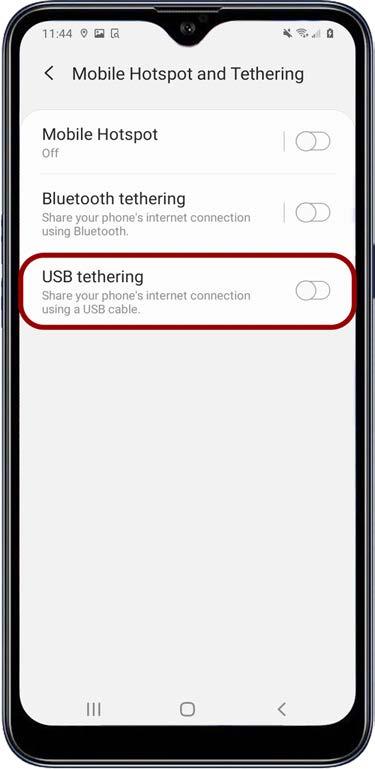
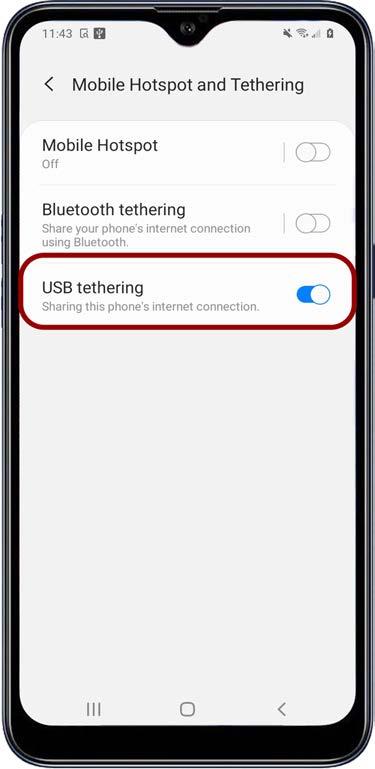
ThecameradisplaystheAndroiddevice'sIPaddressintheUSB-CIPAddressscreen:
8.FromtheAndroiddevice,taptheREDControlicontoopentheREDControlapp.

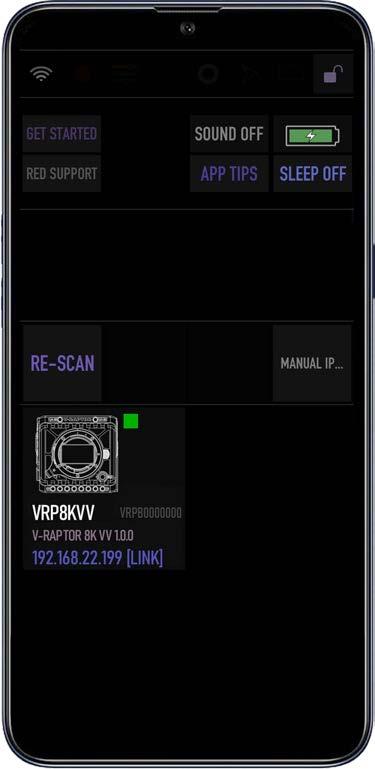
TheREDControlappdisplaysthecameraconnectionicon.
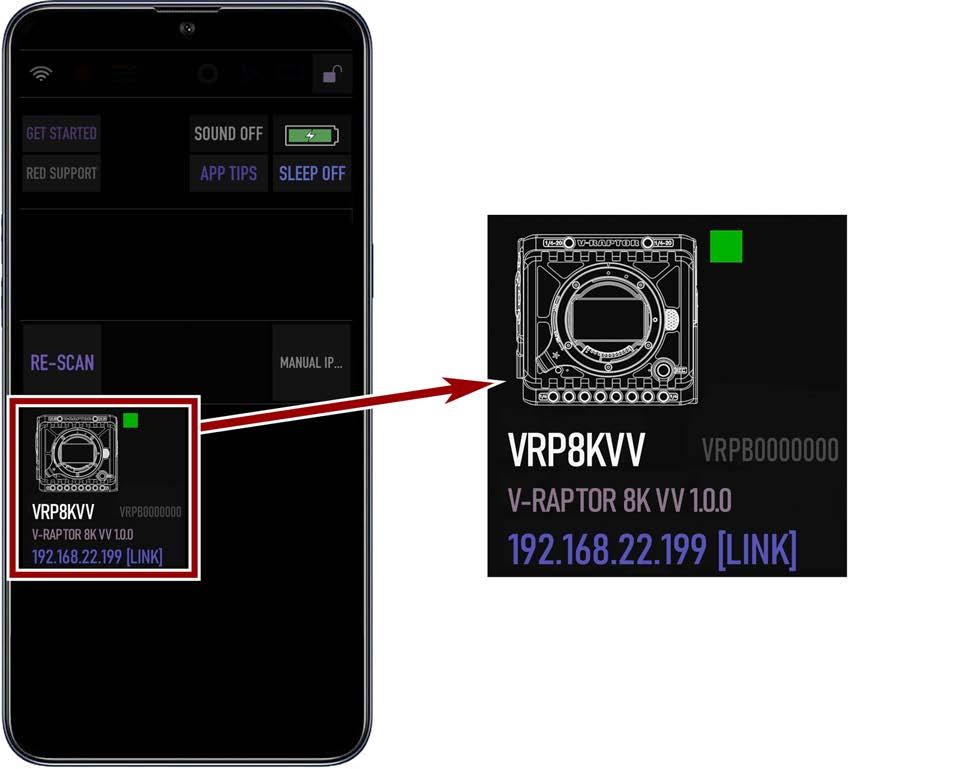
9.TaptheicontoopentheREDControlapptoolsforthetetheredcamera.
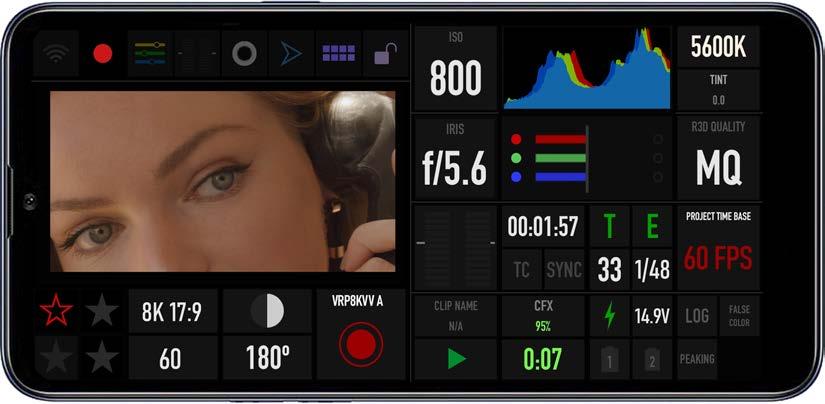
Fromhereyoucanusethe REDControlApp tomonitorandcontrolthecamera.
TheV-RAPTOR8KVVoffersaUSB-CconnectionthatprovidescommunicationsupportforAppledevices.
1.FromtheApplestore,downloadthe REDControlApp totheAppledevice.
Note: Scrolltothebottomoftheuseragreementtoaccepttheagreement.

2.ConnecttheAppledevicetothecamerawithaUSB-Ccable.Ifthe"TrustThisComputer?"messagedisplays,skip tostep7.
3.NavigatetoCommunication>USB-C>IPAddress.
4.OpentheAppledevicesettingsbytappingtheSettingsicon.
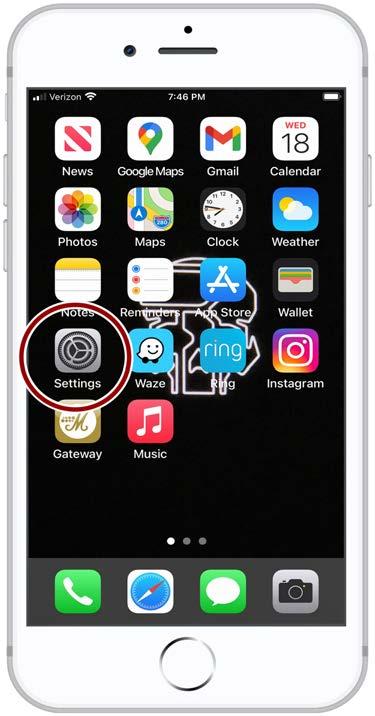


6.Allowotherstojoin.


7.TheAppledevicepromptsyoutoacknowledgethatyoutrustthecomputer(camera).

ThecameradisplaystheAppledevice'sIPaddressintheUSB-Cmenu:
8.FromtheAppledevice,taptheREDControlicontoopentheREDControlapp.

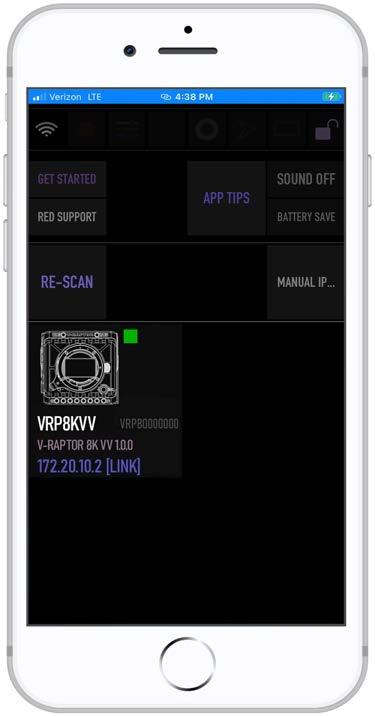
TheREDControlappdisplaysthecameraconnectionicon.ThewordLINKisvisibleaftertheIPaddress.
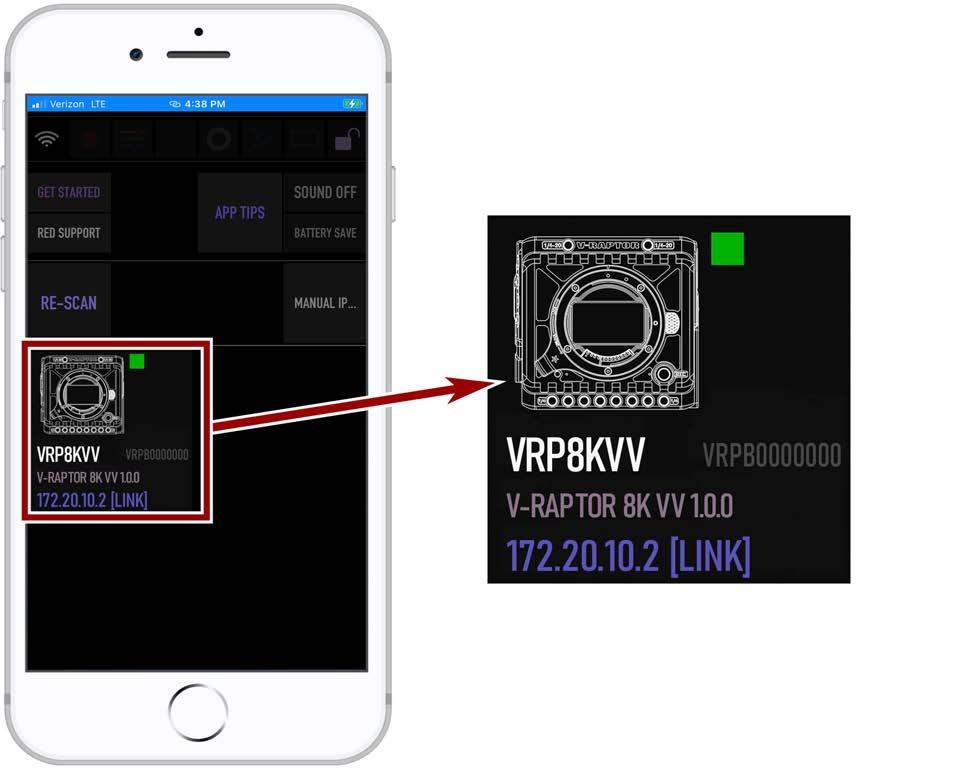
9.TaptheicontoopentheREDControlapptoolsfortheconnectedcamera. Fromhereyoucanusethe REDControlApp tomonitorandcontrolthecamera.
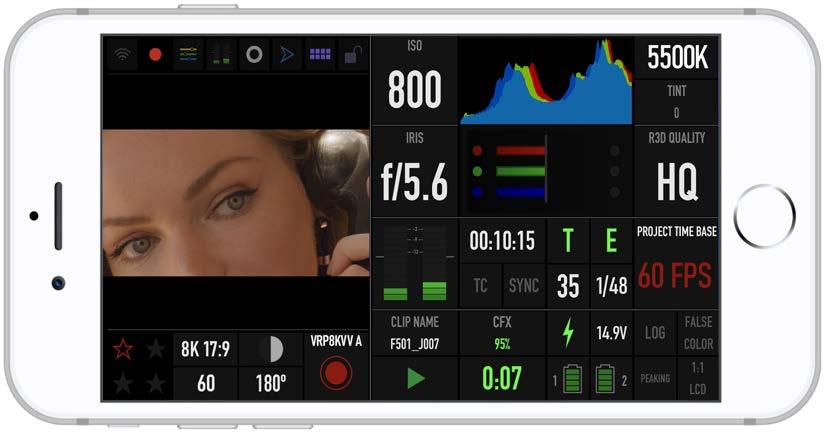
TheREDV-RAPTORoffersaUSB-CconnectionthatprovidescommunicationsupportforEthernetnetworks.
YoumustuseaUSB-CtoEthernetadaptertoconnectthecameratoanEthernetnetwork.
1.ConnectthecameratotheEthernetnetworkusingtheUSB-CtoEthernetadapter.
2.FromaWi-Fi-enableddevice,selecttheWi-Ficonnectiontowhichthecameraisconnected.
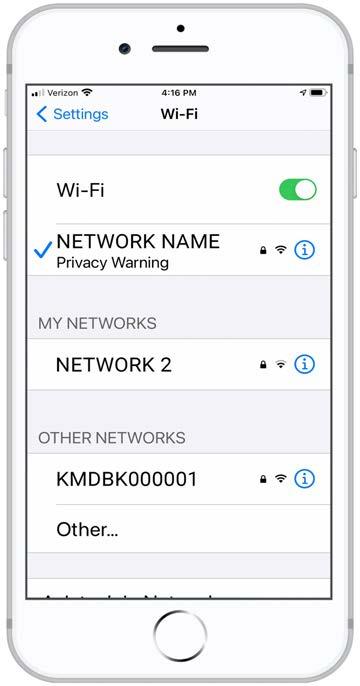
3.OpenREDControlonthe Wi-Fi-enableddevice.
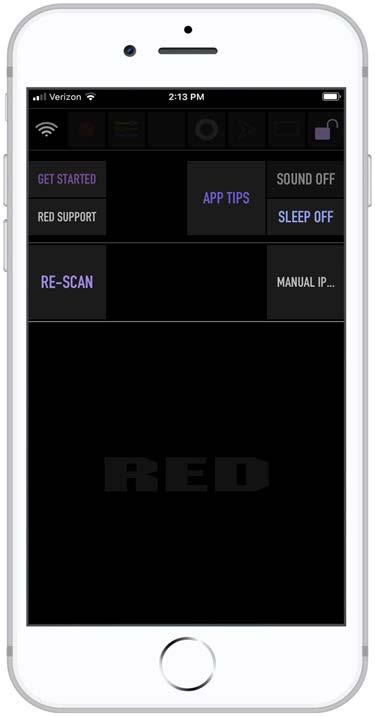
4.TapRE-SCAN. Thecameraicondisplays.
Thecameraicondisplaysthecamera'sEthernetIPaddress:
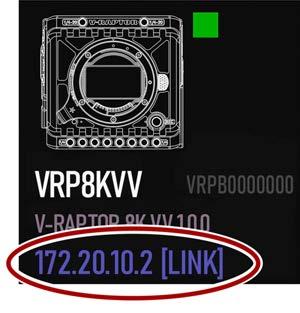
5.TapthecameraicontoopentheREDControlapptoolsforthenetworkedcamera.
6.OpenabrowserfromacomputerconnectedtotheEthernetnetwork.
7.Inthebrowseraddressfield,enterthecameraIPaddressdisplayedontheREDControlcameraicon.TheRED Controltoolsaredisplayedinthebrowser.
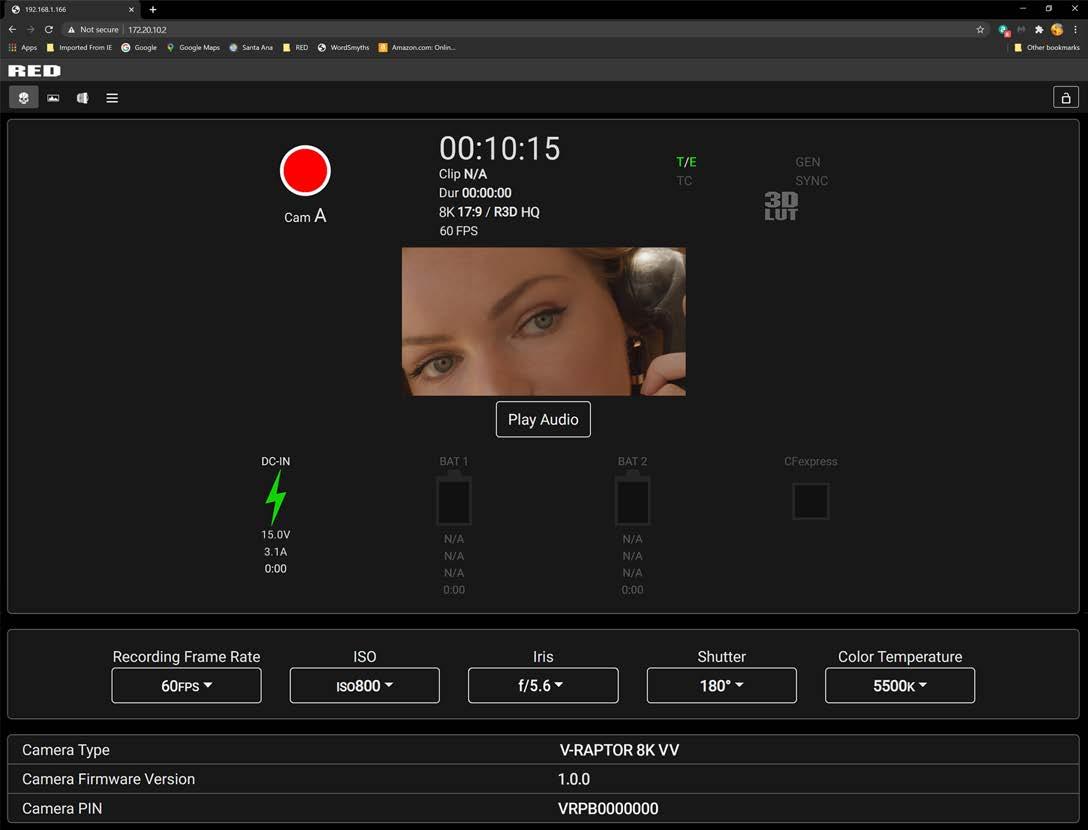
InsertacompatibleV-Lockbattery(referto REDVOLTMicro-VBattery)inthebatteryslot.Slidethebatteryuntilitclicks.
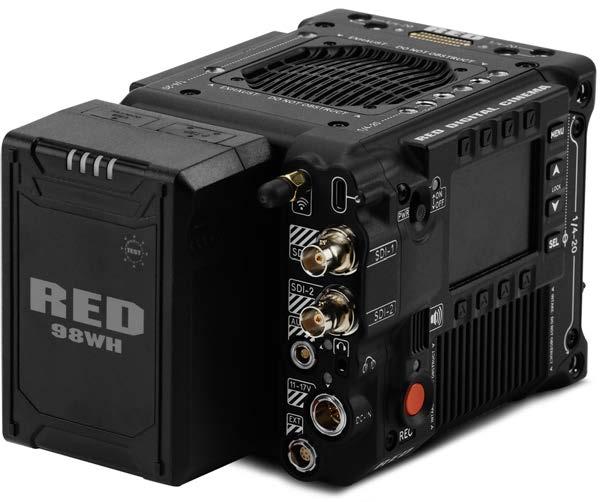
Thecameracanchargethebatterywhileitisattachedtothecamera,thecameraisoff,andtheDCpoweradaptoris connected.TheDCPowerLEDblinksamberuntilcommunicationisestablishedwiththebattery.TheLEDissolid amberwhencommunicationisestablishedandthebatteryischarging.TheLEDisgreenwhencommunicationisnot established(incompatiblebattery)andthebatteryisnotcharging.
NOTE: Incompatiblebatterieswillnotchargeonthecamera.
1.Whileholdingtheattachedbattery,pressthe EjectButton. 2.Liftthebatteryout.
YoucanpowertheV-RAPTOR8KVVcamerawiththeRED V-RAPTOR8KVVPowerAdaptor,anExternalDCPower Source,orwiththerear-mounted REDVOLTMicro-VBattery Forinformationaboutcharging,storing,ormaintainingthebatteries,refertothemanufacturer'sinstructions.
TheV-RAPTOR8KVV150WattACpoweradaptorconnectstothecamera'sporttoprovideDCpowerforoperating thecameraandforrechargingtheattached REDVOLTMicro-VBattery
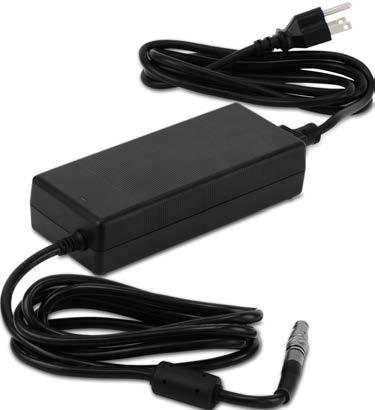
Thecamerachargesthebatterieswhenthecameraisoffandthepoweradaptorisconnected.
ThecamerasupportstheAutoBootonPowerfeature.Thismeansthatifallpowersourcesareremoved,andthePower SwitchissettoON,thenwhenapowersourceisattached,thecameraturnson.
Thecameradrawsvariouslevelsofpowerdependingontheconfigurationandoperatingconditions.Thepower consumptionguidelinesare:
60Wattsofpowerinthecamera'sbasicrecordingconfigurationatroomtemperature,8K,and24framespersecond 75Wattsmaximumwhenthecameraisrecordinginahighambienttemperature,8K,and120framespersecond
Whenmultiplepowersourcesareconnectedtothecamera,powerconsumptionisprioritizedinthissequence:
1.AnypowersupplyconnectedtotheDCINport.
2.Attachedbattery.
WARNING: AlwaysattachthepowerorbatterybeforeattachingtheSDIBNCcable.AlwaysremovetheSDIBNCcable beforeremovingthepowerorbatteries.
1.Attachapowersource(REDVOLTMicro-VBattery or V-RAPTOR8KVVPowerAdaptor)tothecamera.
2.Slidethe PowerSwitch uptothe ON position.
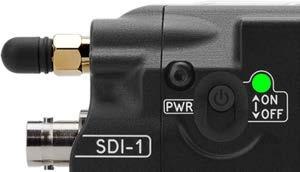
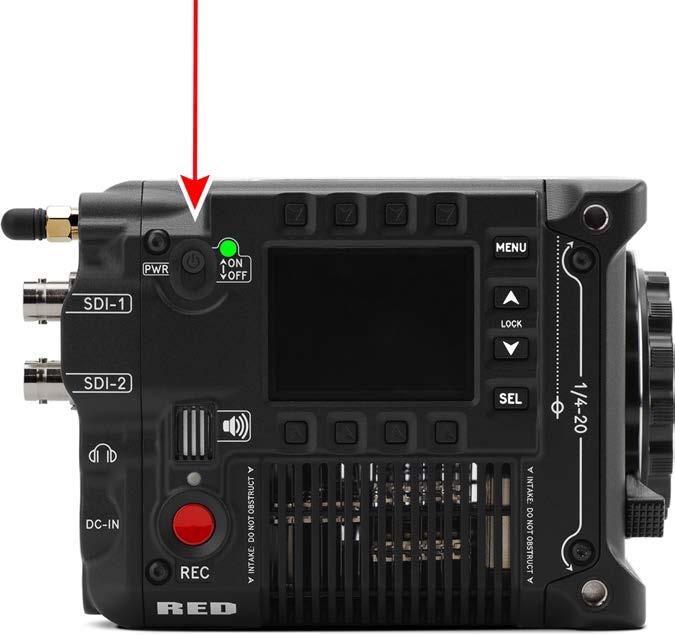
NOTE: Thecamerastopsrecordingandturnsoffautomaticallywhenthesupplyvoltagedropsto11.5V.
NOTE: Donotturnoffthecamerawhilethecameraisrecordingorformattingmedia.
Slidethe PowerSwitch downtothe OFF position.
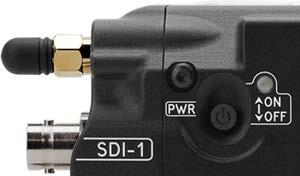
Thissectionexplainshowtouse,record,format,andoffloadmediaforthecamera.
WARNING: DonotattachalabeltotheCFexpressmediacard.Theheatgeneratedbythemediacanweakenthe label'sadhesive,causingthelabeltodetachinsideofthecamera.Labelscanalsodiminishheatdissipationandcause excessiveweartotheinternalcomponents.RemovingalabelfromaCFexpressmediacardcanpossiblydeformthe cardbody.
ThecamerasupportsexFATasthefilesystemforthemediacardtoaccommodatelargerfilesanddatarates.exFATis supportedbothonmacOSandMSWindows.
IMPORTANT: Toensuredataintegrity,mediamustalwaysbeejectedpriortoremovalfromthecamera.Thisensures thatpowerisremovedfromthemediaandanyopendatafilesareclosed.Failuretoproperlyejectmediamayresultin lostdataorcorruptedfiles.
Toejectmediafromthecamera,usethe LCD andselect Menu > Media
WithEjecthighlighted,pressSEL toeject(unmount)themedia:
TheSuccessmessagedisplays:

Themediaisnowejectedandallmediarelateditemsaregrayedoutinthemenu.
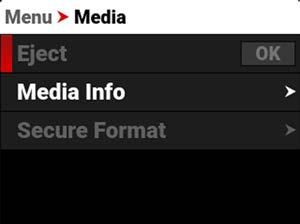
WARNING: Themediacangetextremelyhot.Usecautionwhenremovingmedia.
RemovingaCFexpressmediacardwithoutejectingfirstdoesnotdamagethemedia,however,itdoesincreasetherisk offilecorruption.Itisgoodpracticetoejectthemediabeforeremovingordisconnecting.Ejectingthemediaprovides thefollowingbenefits:
Protectstheintegrityofyourrecordeddata
Mountsclipsinstantlytoyourworkstationinpostproduction
NOTE: Ifyouremovemediawithoutejectingfirst,youreceiveawarningnotification:“Mediaremovedwithoutfirst ejecting.Dataintegrityrisk.”AlwaysejectmediabeforephysicallyremovingtheCFexpressmediacardtoprotectyour mediaandfootage.
ThecameracontainsacoveredcompartmentontheleftsidewhereyouinserttheCFexpressmediacard.
WARNING: DonotattachalabeltotheCFexpressmediacard.Theheatgeneratedbythemediacanweakenthe label'sadhesive,causingthelabeltodetachinsideofthecamera.Labelscanalsodiminishheatdissipationandcause excessiveweartotheinternalcomponents.RemovingalabelfromaCFexpressmediacardcanpossiblydeformthe cardbody.
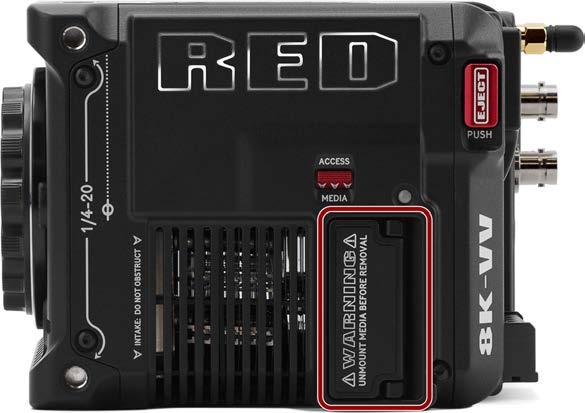
1.Pressthemediadooraccesslatchdown,andopenthemediadoor.
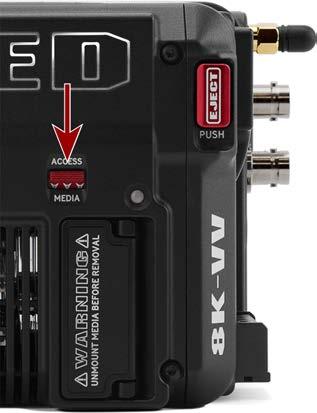

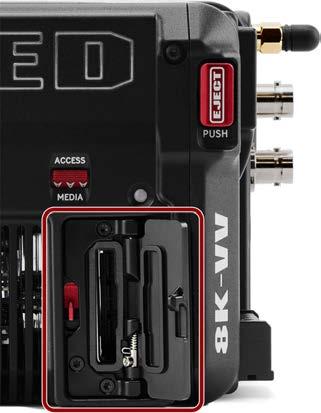
2.InserttheCFexpressmediacardintheslotwiththetopofthecardfacingtowardthefrontofthecamera.Insertthe carduntilthelockclicks.
3.Closethemediadoorandmakesurethatthedoorlatchclicks.
4.Ifneeded,formattheCFexpressmediacard.Referto SecureFormat formoreinformation.
NOTE: DonotremovetheCFexpresscardwhilethecameraisrecordingorformattingmedia.Referto Media Management formoreinformation.
WARNING: Themediacangetextremelyhot.Usecautionwhenremovingmedia.
1.Ifthecameraison,goto Menu > Media andselect Eject.
2.Pressthemediadooraccesslatchdownandopenthemediadoor.
3.PresstheCFexpressmediacarduntilthelockreleaseclicks.Thecardwillspringoutslightly.
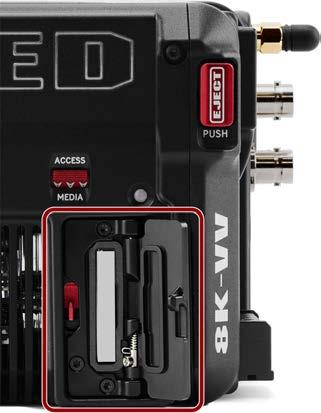
4.LettheCFexpressmediacardcoolbeforegentlypullingthecardoutoftheslot.
WARNING: Themediacangetextremelyhot.Usecautionwhenremovingmedia. 5.Closethemediadoorandmakesurethatthedoorlatchclicks.
AsecureformatisalowlevelformatthatrebuildstheCFexpresscardfilesystem.Asecureformaterasesalldataon thecard.
Performasecureformatwhenthecameraisreportingmedia-relatederrors.
CAUTION: Ensurealldataisbackedupbeforeformattingacard. Dataerasedduringformattingcannot be recovered.
WARNING: Themediacangetextremelyhot.Usecautionwhenremovingmedia.
Toperformasecureformat,followtheinstructionsbelow:
1.Goto Menu > Media > SecureFormat:
2.FromtheSecureFormatmenu,selectthedesired CameraID, CameraPosition,ReelNumber and Edgecode NavigatedowntotheFormatbuttonandpressSELtostarttheSecureFormatprocess:
Theconfirmationmessagedisplays:
3.PressthebuttonbelowYEStobeginformatting.
REDrecommendsthatyouonlyuseacomputertoformatyourCFexpressmediacardwhenyoucannotmountthe mediatothecamera.Refertothe Troubleshooting sectionformoreinformation.
Usethe MediaInfo menutodisplaytheCFexpressmediacardinformation.
Mediainformationincludesthefollowing:
Status DisplaystheCFexpressmediacardstatus
ModelNumberDisplaystheCFexpressmediacardmodelnumber
SerialNumberDisplaystheCFexpressmediacardserialnumber
FirmwareVersionDisplaystheCFexpressmediacardfirmwareversion
PercentageRemainingDisplaystheCFexpressmediacard'sremainingstorage*
TimeRemainingDisplaystherecordingtimeremainingontheCFexpressmediacard*
*withthecurrentprojectsettings
TheV-RAPTOR8KVVcameraformatstheCFexpressmediacardusingexFAT.BothMac® andWindows®-based computerssupportCFexpressmediacardswiththisformat.Refertothedocumentationforyouroperatingsystemto determinewhetherthereareanylimitationstoitsfileformatsupport.
Whenyourecordaclip,thecameracreatesauniquenamefortheclipfolderthatusestheformatdescribedinthetable below:
CameraID
ReelID
Theletterassignedtothecamera(referto CameraID)
Thereelnumberassignedtothemedia(referto ReelNumber)
ClipNumberThecamerapositionletterfollowedbythreedigitsstartingwith001
TwoCharactersTworandomalphanumericcharactersgeneratedbythecameratopreventany possibilityofduplicates 6M .RDC Clipfolderextension .RDC Forexample,asequenceofclipfolderswithinamediafolderoncamera"A"position"C"maylooklikethis:
A001_C001_12046M.RDC
A001_C002_1204CE.RDC
A001_C003_1204R5.RDC
Thefollowingmetadataisrecordedforeachframeofeachclip:
AudioData
LTCUserBits(332-bitwordreg-dumpfromISP)
Clip MediaSerialNumber
Configuration,CameraName,Network,Model, ModelID,SerialNumber
ProductionName
Copyright REDCODE®
DateandGMT Reel
Filename Scene
FirmwareVersion
StereoSetup
FrameGuides Take
JamsyncSetting Timecode
LensandShutterSpeed/AngleParameters Unit
LensName,Brand,ID,NearFocus,FarFocus Location
ThissectiondescribesbestpracticestoensurethatyourCFexpresscardscontinuetoprovidereliablestorageandfast datarates.FollowingthesebestpracticesmaypreventyourCFexpresscardfrombecomingfragmented,whichcan leadtodataintegrityerrors.
TheonlyfilesthatshouldbesavedfromyourcomputertoyourCFexpresscardarePresetfiles,FirmwareUpgrade files,andLUTs.DONOTsaveotherfiles,folders,orapplicationstoyourmedia.
DO NOTbackupyourharddrivetotheCFexpresscard.IfusingaMac,thesystemmayaskifyouwanttobackup yourfilestotheCFexpresscardusingTimeMachine;DO NOTusetheCFexpresscardasabackupdisk.
DONOTdeleteclipsoffofyourCFexpresscardusingacomputer.DeleteclipsonlybyformattingyourCFexpress cardin-camera.FormoreinformationaboutformattingyourCFexpresscard,referto SecureFormat
DONOTformatyourCFexpresscardusingacomputer,unlesstheCFexpresscardcannotmounttothecamera.For moreinformation,referto SecureFormat.
WhenejectingtheCFexpresscardfromacomputer,ensurethattheiconhascompletelydisappearedfromthe Finderwindow(Mac)orfromWindowsExplorer(Windows)beforeremovingtheCFexpresscard.Sometimes,the pop-upsayingthattheCFexpresscardhasejecteddisplaystooearly.
Whenthereaderhasawrite-protectswitch(suchasthe REDCFexpressTypeBMedia),itisrecommendedthatyou setthecardreadertowrite-protectwhenuploadingclipstopreventconnecteddevicesfromaddinganyunwanted datatoyourCFexpressTypeBcard.
NOTE: YoucanusetheREDCFexpressTypeBcardreaderwithWrite-ProtecttopreventtheMacOSfromindexing yourCFexpressTypeBcard(refertoREDCFexpressTypeBReader).
MostnewerversionsoftheMacOSautomaticallyindexallexternaldriveswhenyouconnectthem.Thisincludeswhen youconnectCFexpresscards.
Indexingmakestheconnectionprocesstakelonger.WhiletheCFexpresscardconnectstotheMac,DO NOTremove thecard.IndexingwriteshiddenfilestotheCFexpresscard.WhenyouinsertanindexedCFexpresscardinthecamera, itcantakethecameraawhiletorecognizethehiddenfilesandconnecttotheCFexpresscard.Whilewaitingforthe CFexpresscardtoconnect,DO NOTremovetheCFexpresscardorturnoffthecamera.Afterthecamerasuccessfully connectstotheCFexpresscard,performasecureformattoremovethehiddenfiles.Formoreinformation,referto SecureFormat.
TheDSMC3RED® Touch7.0"LCDmonitorincludesacustomREDMonitorInterface(RMI)cablethatprovides communicationbetweentheRMIandthemonitor.
WherethiscableattachestotheRMIandthemonitor,therearespeciallockingfeaturesthatkeepthecablefrom accidentallydetaching.
Tounlockthecablelocks,rotatetheRMIcablelockandslidethemonitorcablelockasshownintheimage:
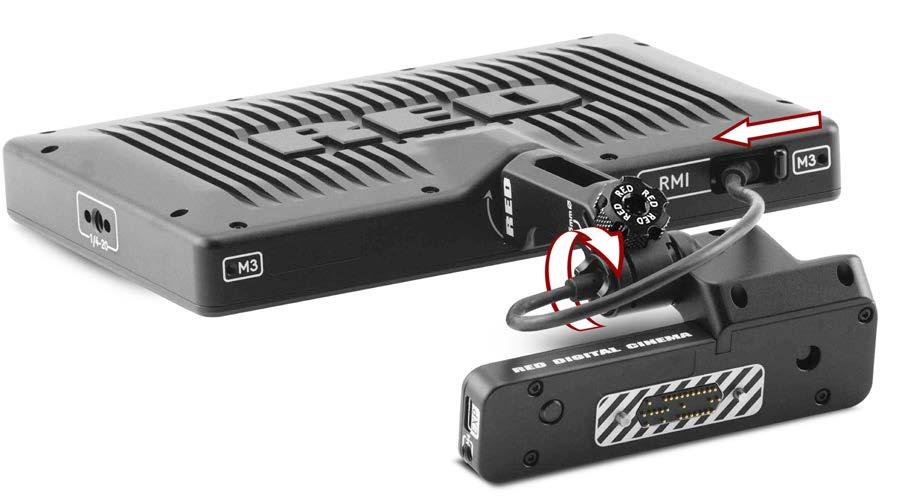
NOTE: TheUSB-C-styleDSMC3RMIcableisacustom-pinnedcable,whichisnotcompatiblewithstandardUSB-C cableports.
Thecameraprovidesseveralmethodsformonitoringtheimage.Thesemonitoringmethodsinclude:
DSMC3RED® Touch7.0"LCD
SDIoutputtoamonitor
REDControloverWi-FitoiOSorAndroiddevices
REDControloverUSB-CtoiOSorAndroiddevices
USB-CtoEthernetadaptertoacomputer
LiveStream
TheoptionalDSMC3REDTouch7.0"LCDprovidesa1920x1200resolutionliveimagefromthecamerasensor.By usingtheMonitoringmenuyoucanusedisplayguides,exposuretools,focustools,andamagnifiedimageonthis monitor(referto TopLCD).
SDIports1and2providea12GSDIsignaltoallowviewingofthecameraimageona4KSDImonitor. UsetheSDI1and2menustoselectthesettingsforSDIoutput,Tools,andGuides(referto SDI1/2).
WARNING: Undercertaincircumstances,itispossibleforanSDIconnectortoincurdamagewhenconnectedtoan accessoryandpoweredwithoutusingshieldedcables.REDrecommendsonlyusinghighquality,shieldedBNCcables thatareratedfor12G-SDIsignalsandonlyusingshieldedpowercablesforpoweringSDIaccessories.
MakesurepowerisconnectedtotheSDIaccessoryatalltimesbeforeyouconnecttheBNCtothecamera.
UngroundedpowerfromSDIaccessoriescandamagethecamera’sSDIport.Toavoidthispossibledamage,attachthe powersourcetotheaccessorybeforeattachingittotheBNCcable.WhenusingREDApprovedThirdPartybattery plates,unplugtheBNCcablepriortohotswapping.
Whenpossible,avoidusingP-Tap(alsoknownasD-Tap)cablestopoweraccessories.ToavoiddamagewhenusingPTap/D-Tap,it’simperativethattheconnect/disconnectsequence(below)isfollowedprecisely.
WhenattachingSDIaccessories:
1. ConnectapowersourcetotheSDIaccessory;powerontheSDIaccessory.
2. Ensureapowersourceisconnectedtothecamera.ThisensuresbotharegroundedpriortoconnectingtheBNC. Thecamera'spowerstatedoesnothaveanimpactonSDIattachmentsequence.
3. ConnecttheBNCcabletotheaccessory,thentothecamera.
WhendetachinganaccessorymountedtoanSDIoutput,ensurethatyouremovetheBNCconnectiontothecamera beforeremovingpowertotheSDIdevice:
1. ShutdowntheSDIaccessory.
2. DisconnecttheBNCcablefromthecamera.
3. DisconnectthepowersourcefromtheSDIaccessory.
Whenyouneedtoswapoutabatteryonanaccessorymountedtothecamera’sSDIport,youmust:
1. ShutdowntheSDIaccessory.
2. DisconnecttheBNCcablefromthecamera.
3. ReplacethebatteryontheSDIaccessory.
4. ConnecttheBNCcabletothecamera.
5. PowerontheSDIaccessory.
Formoreinformation,referto PreventingDamagetoSDIOutputs
Figure:SDImonitorwithSDIAdvancedOverlayModeenabled
SDIportspecifications:
Integrated12G-SDIwith6G-SDI,3G-SDI,and1.5G-SDImodes
12G-SDI:Upto4096×21604:2:2for60p
6G-SDI:Upto4096×21604:2:2for30p
3G-SDI:Upto2048×10804:2:2for60p
1.5G-SDI:Upto2048×10804:2:2for30pand24p
SMPTETimecode
HANCmetadata
Uptofour(4)channelsof24-bit48kHzaudio(referto AudioSource)
Youcanenableordisabletheimagemagnification,thefocusandexposuretools,andtheguidesdisplayedonimages senttotheSDImonitorbyusingtheSDI1and2menus(referto SDI1/2).
FromthesideLCD,navigatetotheSDItools(referto SDIPage).
YoucanenableordisablethefollowingmonitoringtoolsonSDI,(referto SDI1/2): Magnify SDItools
SDIguides
YoucanalsoselecttheImage/LUTlookdefinedintheImage/LUTmenu,oryoucanselecttheRWG (REDWideGamutRGB)/Log3G10ImageProcessingPipeline(IPP2)look.
REDControlallowsyoutouseWi-FitoconnecttothecameraandsendmonitorimagestoiOSandAndroiddevices.
NOTE: Youmustenablelivestreamingunder MENU > MONITORING > LIVESTREAM toenabletheimagefeed.

USB-C
UseaUSB-Ccabletoconnecttothecameraandsendmonitorimagesinreal-timetoUSB-Cdevices.
Figure:USB-CconnectedtoanAndroidphonewithREDControl
WiththeuseofanEthernettoUSB-Cadapter,youcanalsoconnectEthernetdevices.
Figure:USB-CconnectedtoanEthernetwebbrowser
Youcanadd:9090totheendoftheURLinyourbrowsertobringupanimage-onlyfeedforremoteviewing.
NOTE: Youmustenablelivestreamingunder MENU > MONITORING > LIVESTREAM toenabletheimagefeed.
Thecameraoffersmultipletoolstodeterminethecurrentimageexposurelevels,anditprovidesthetoolstoadjustthe exposuretothedesiredlevels.
WhenusingtheR3Dfileformat,youcancorrectcolortemperatureandISOsettingsatanytime.Theapertureand exposuretimehowever,aretwooftheparametersthatyoucannotcorrectedlaterinR3Dfiles.
Whilethecorrectexposureisalwaysanartisticdecision,therearebestpracticesforcapturingthemostdynamicrange whilealsoallowingpostproductiontopreservetheintendedimageinformation.
Thegoalistoreduceclippinginthebrightanddarkpartsoftheimageasmuchaspossible.Otherwisethesensor informationislostintheoverexposedandunderexposedareas.
Theprimarytoolfordeterminingtheexposurelevelsisthehistogram.Itshowstheexactluminancelevelsofthered, green,andbluepixelsafteryouapplytheISOandWhiteBalancesettings.Monitorshavetheirowncolorgamutsand brightnesslevelswhichmakesthemonitorlessthanoptimalfordeterminingthecamera'sexposurelevels.
Thiscameraincludesahistogram,andasimpleRGBrawpixelexposuremeter,whichallowsyoutodetermineproper exposureregardlessofthesetISOorcameralook(formoreinformationreferto HistogramPage).
Thehistogramprovidesinformationabouthowthebrightnessisdistributedintheimage.Thisallowsyoutoseehow closeasceneistoclippinginthelightanddarkareas,whichmakesiteasytochooseaperture,exposure,andNDfilter solutionsaccordingly.
Whilethehistogramprovidesinformationaboutthebrightnessdistributionandclippingoftheimage,itdoesnotshow youtheareasintheimagethatarenear,orthathavereached,clipping.Forthis,thecameraprovidesimageoverlays thatprovidefalsecolorstoindicatepreciseexposurelevels.
TheFalseColorExposuremodeoverlayprovidesinformationwheretheimageisclosetoclippingoralreadyclippingin thehighlights(red)andlow-lights(green)(referto FalseColorExposureMode).
ExampleofmonitoredimageinExposureMode:
TheFalseColorVideomodeprovidesmoregradualinformationaboutthebrightnessindifferentpartsoftheimage.This ishelpfulwhenyouwanttoexposeskincolorattherightlevel,whileignoringthefactthatbackgroundsmightbe overexposedorunderexposed(referto FalseColorVideoMode).
ExampleofmonitoredimageinVideoMode:

Focus,like Exposure and RecordingFrameRate isapropertythatcannotbefixedeasilyinpost-production.Tomake surethecameraisfocusedcorrectlywhenyoubeginrecording,itisimportanttoemployfocustoolsthatdonotrelyon thevisibilityonthemonitor.
Thecamerainterfaceincludesthefocustoolsyoucanusetoreachthedesiredimagefocus(referto Peaking).
TheFocusPeakingmodeappliesasharpeningfiltertotheimagethatemphasizesedgesofthesubjectinfocus.
ExampleofmonitoredimageinFocusPeakingmode:

TheEdgePeakingmodehidestheimageandonlyshowtheedges.Thisprovidesthebestvisualrepresentationofthe subjectthatiscurrentlyinfocus.
ExampleofmonitoredimageinEdgePeakingmode:

ThePeakingPeakingmodeemphasizestheedges,anditalsohighlightsthembyusingaselectablecolor. ExampleofmonitoredimageinPeakingPeakingmode:

Timecodeprovidesamechanismtoreferenceframetimingfromthecamera'srecordedclipstootherdeviceslike camerasandaudiorecorders.Somedevicescanalsogatherotherdatalikelensmetadataorcameraorientationthatis referencedbyTimecodetomergethedatabacktogetherinpost-processing.
V-RAPTOR8KVVprovidestwoseparateTimecodeconcepts:TimeofDay(TOD)andEdgecode.BothTODand EdgecodearestoredintheR3Dfile.TheusercanselectwhichTimecodedisplaysonthe LCD bysettingthepreference in TimecodeDisplayMode
TODTimecodereflectsthetimeanddatethecamerarecordedeachframe.V-RAPTOR8KVVsynchronizestheTOD TimecodetoanexternalTimecodegenerator(whenoneisconnectedtothe ExtensionPort)orsynchronizestothe internalreal-timeclockofthecamera.
TosetupTODTimecodeonthecamera,performthefollowing:
1.OpentheAudio/Timecodemenu: Menu > Audio/TC:
2.SelectTimecodeSource.TheTimecodeSourcemenuopens:
3.SelectInternalTODtousethecamera'sinternalrealtimeclock,orselectExternaltouseanexternalTimecode generatorconnectedtothe.PressthebuttonunderOKtoconfirmtheselection.
4.WhenyouselectInternalTOD,youcannavigateto JAMTimecodetoTOD andpressSELtosynchronizethe Timecodetothecamera'sinternalclock.
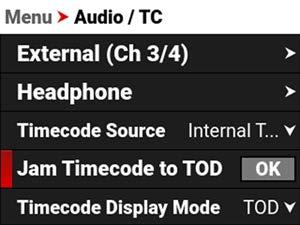
ThecameradisplaystheTimecodeonthe LCD Homepage:
NOTE: Thetimecodeisresetwhenthecameraisturnedoff.
Edgecodeonlyadvanceswhilethecameraisrecordingframes.Eachframeissequential.Whenthemediaisreplaced, thenewmediastartsthetimerover.YoucansettheEdgecodetimermanuallybyusingSecureFormat(referto Secure Format formoreinformation).
TosetupEdgecodeTimecodeonthecamera,performthefollowing:
1.OpentheAudio/Timecodemenu: Menu > Audio/TC:
2.NavigatedowntoTimecodeDisplayMode:
3.PressSELtoselectTimecodeDisplayMode.TheTimecodeDisplayModemenuopens:
4.SelectEdgeandpressthebuttonunderOKtouseEdgecode.ThecameradisplaystheEdgecodeonthe LCD Home page:
NOTE: Eachnewmediacardwilldefaulttoanedgecodetrackstartingat01:00:00.Youcanchangetheedgecodeto beginatanydesiredtimebyusingtheMediaFormatmenu(referto Edgecode).
UseZebramodestoenableandadjusttheupperandlowervaluesfortwo(2)independentzebraindicators.UseZebra 1forhighlightexposure,anduseZebra2formid-tonesorshadows.Zebrasaredisabledbydefault.
Formoreinformation,refertothe ExposurewithREDCameras:FalseColorandZebraTools article,availableat www.red.com/red-101/exposure-false-color-zebra-tools
1.Goto Menu > Monitoring > Tools andselect Zebra1
2.SetaLowIREof98.
3.SetaHighIREof100.
AreasoftheimageexposedwithintheIRErangeareindicatedbyreddiagonallinesat–45°.
ThedefaultsettingsareLowIRE=98andHighIRE=100.
1.Goto Menu > Monitoring > Tools andselect Zebra2
2.SetaLowIREof41.
3.SetaHighIREof48.
AreasoftheimageexposedwithintheIRErangeareindicatedbygreendiagonallinesat45°.
ThedefaultsettingsareLowIRE=41andHighIRE=48.
ZebraisaspecialtymodethatiscapableofshowinguptotwocustomizedoverlayswitharbitraryIREranges.Unlike theothertwomodes,Zebraindicatorsappearasdiagonalstripes,theyarefullyconfigurable,andtheyhavethe advantageofpreservingafull-colorbaseimage.
Withtraditionalvideocameras,manyusedasinglezebratoindicatehighlightdetail.Itwouldoftenbesetat70%(70 IRE),inpartbecausethisiswhereawhitepieceofpaperwouldbegintohaveminimaltexturewhenrenderedusinga typicalcontrastcurve.Skintonesorskieswouldbeexposedtoappearjustdarkerorbrighterthantheselines.If enabled,asecondzebrawouldtypicallyindicateeithermid-tonesorshadows.Fordeepshadows,youcansetthe secondindicatortobelow10%intensityor10IRE,andsetthefirstindicatortohighlightsabove85IRE.
However,aswithotherIRE-basedmodes,ZebramodeisonlyapplicableforthecurrentISOsettings(suchaswithSDI output),notfortherawimagedata.Ifanythingischangedinpost-production,theindicatorswon'tberepresentativeof thefinaloutputtones.Inthosesituations,Zebramodeismoreofapreviewandoutputbrightnesstoolthananexposure tool.
ThissectionexplainshowtousethePre-Recordfeature. Tostartpre-recording,pressthe Record button. TheLCDchangesfromtheReadyappearancetothePre-Recordappearance:
Pressthe Record buttonagaintostartrecording. Whenyoustartrecording,theappearanceoftheLCDchangesfromthePre-RecordappearancetotheRecord appearance:
ThecameraaddsthePre-Recordcliptothebeginningofyourrecording. ForinformationaboutenablingandconfiguringPre-Record,referto Pre-Record.
Sensorcalibrationisaprocessduringwhichthecameraoptimizesimagequalitybyensuringthatpixelsensitivity remainsconsistentthroughoutthesensor.
Calibrationisrequired:
Whenshootinginanenvironmentwherethetemperatureissignificantlydifferent(+/-30°F...)fromthecurrent calibration.TheTintheT/EStatusBarindicatorwillturnyellow(referto StatusBar formoreinformation) Afteranextremechangeinexposuretime(+/–1/2sec).TheEintheT/EStatusBarindicatorwillturnyellow(referto StatusBar formoreinformation)
Aftereachfirmwareupgrade
Youcanreceivethebestperformancefromyourcamerabyinstallingthelatestfirmware.Makeahabitoffrequently visitingREDDownloadsatwww.red.com/downloadstocheckfornewversionsofcamerafirmware,updatedoperation guides,andpostproductionsoftware.
Toviewthefirmwareversionthatiscurrentlyinstalledonyourcamera,open Menu > SystemSettings > System Status > CameraInfo:
Versiondisplaysthecurrentlyinstalledcamerafirmware.Ahighernumberreflectsanewerrelease.
Installthemostrecentfirmware.Unlessotherwisespecifiedinthereleasenotes,youdonotneedtoupgradetoany firmwareinbetweenyourcurrentversionandthemostrecentversionavailableonline.
NOTE: Youmustcalibratethesensorafterupgradingthecamera.Formoreinformation,referto CalibratingtheSensor.
1.DownloadthemostrecentfirmwareforyourcamerafromREDDownloadsatwww.red.com/downloads.
2.Unzipthefirmwarezipfile.
3.Intheunzippedfolder,navigatetothe upgrade folder.
4.Copythe upgrade folderanditscontentstotherootleveloftheCFexpressmediacarddirectory.
5.UnmounttheCFexpressmediacardfromyourcomputerandremovethemediacardfromthemediareader.
6.InserttheCFexpressmediacardinthecamera.
7.FromthecameraUI,navigateto Menu > Maintenance
8.FromtheMaintenancemenu,navigatedowntoUpgradeandpressSEL.
TheFirmwareUpgradeconfirmationscreendisplays:
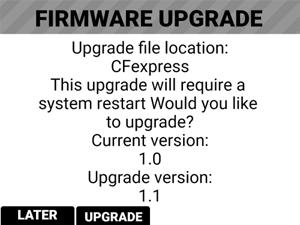
9.Pressthebuttonunder UPGRADE toconfirm.TheFirmwareUpgradeprogressscreendisplays:
Duringtheupgrade,thefansrunathighspeedandthefollowingoccurs:
Thecameradisplaysthe SHUTTING DOWN screenandreboots
Thecamerarestartsanddisplaysthe UPGRADING screen
Thecameradisplaysthe INITIALIZING screen
Thecameradisplaysthe FIRMWARE UPGRADE progressscreen:
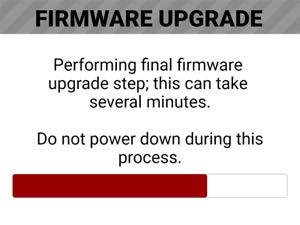
TheFirmwareUpgradesuccessmessagescreendisplayswitha RESTART button:

10.Pressthebuttonunder RESTART.Thecameradisplaysthe SHUTTING DOWN screenandrebootsagain.
11.ThecamerarestartsdisplayingtheV-RAPTOR8KVVstartscreen,the INITIALIZING screen,andthentheSoftware LicenseAgreement(SLA)displays:

12.Pressthebuttonunder Agree.IfyoudonotagreetotheSLA,thecameracannotbeused.TheSLAcontinuesto displayuntilitisaccepted.
13.Recalibratethecamerabeforerecording.Refertothe Calibration sectionand CalibratingtheSensor formore information.
AllREDproductsaredesignedforruggeddurability,butprecisioninstrumentsdemandpropercare.Followthe instructionsinthissectiontoclean,maintain,andstoreyourdevices.
WARNING: DONOTrinseorimmersethecameraorotheraccessoriesinwater.Keepdryatalltimes.
WARNING: DONOTusesoaps,detergents,ammonia,acetone,alkalinecleaners,abrasivecleaningcompounds,or solvents.Thesesubstancesmaydamagelenscoatingsandelectroniccircuitry.
WARNING: DONOTuseanexcessofcleaningsolution.
WARNING: DONOTreuseswabsorwipes.
WARNING: DONOTattempttocleanthesensororopticalcavityforanyreason.Ifthesensorbecomesdirty,submita Supportticketat https://support.red.com.
WARNING: DONOTattempttomodify,dismantle,oropenthecamera,lens,orotheraccessoryasdoingsomay exposeyoutoelectricshockandseriousinjury.Therearenouser-serviceablepartsinside.Alterationorrepairsmadeto thecameraoraccessories,exceptbyaREDauthorizedservicefacility,voidsallwarranties.
WARNING: Usecautionwithcompressedairandgasdusters,sincethehighpressure,oilyresidue,coldair, particulates,andmoisturemaycausedamage.Youmayuseafiltered,non-residuegasdustertocleannon-critical areas,suchasaroundthefansandotherrecessesontheexteriorofthecamera.Damagetothecameraorother componentsofthecamerasystemcausedbyusingcompressedairorgasdustersisnotcoveredunderwarranty.
WARNING: DONOTusecompressedairandgasdustersonthesensororonanyoptics.
WARNING: DONOTusecompressedairandgasdustersonoraroundtheintegratedmicrophonesonthefrontofthe camera.
Useafiltered,non-residuegasdustertocleannon-criticalareas,suchasaroundthefansandotherrecessesonthe exteriorofthecamera.
Cleanwithadrylint-freecloth.Whencleaningyourcameraandaccessories,rememberthatthedevicesarenot waterproofandmoisturecandamageelectroniccircuitry.
WARNING: DONOTstorethecameraoraccessoriesinanyplacewithextremetemperatures,directsunlight,high humidity,severevibration,orstrongmagneticfields.
ThissectionexplainshowtocleanthesideLCDscreen.
UseonlythefollowingproductstocleanthesideLCDscreen:
Ionizedrubberairbulb
Lensswabs
Dryopticalwipes
DelkinDevicesSensorSolution®
NOTE: Beforecleaningthescreenwithswabsorwipesandacleaningsolution,ALWAYSuseanionizedrubberairbulb toremoveanysolidparticles.Cleaningthescreenwithoutremovingsolidparticlesincreasestheriskofscratchingthe screen.
DONOTuseanyoftheitemslistedbelowtocleanthebuilt-inLCDscreen.Theseproductshavenotbeentestedon REDproductsandmaycausedamageorstreaking.
•Windex •Solvents •Gasdusters •Compressedair •Rubbingalcohol •Isopropylalcohol •Third-partycleaningkits •PancroProfessionalLensCleaner(orequivalent) •Pre-packagedlenscleanercontaininganyadditives,suchasdetergent,anti-staticcompounds,orfragrance.
WARNING: DamagetotheLCDscreenorothercomponentsofthecamerasystemcausedbyusingprohibitedcleaners isnotcoveredunderwarranty.
Ifyourdevicehascomeincontactwithwateroryoususpectcamerawaterdamage,submitaSupportticketat https://support.red.com immediately.
WARNING: DONOTattempttopoweranydevicethatmayhavewaterdamage.
WARNING: DONOTplacethedeviceinacontainerofrice,silicagel,ordesiccantpacketsinanattempttodrythe device.
Thissectiondescribesgeneraltroubleshootingtips: Checkthecurrentfirmwareonthecamera.IfnewerfirmwareisavailablefromRED,downloadandinstallthat firmware. Checkthe KnownIssuesList toseeiftheissuehasalreadybeenidentifiedbyRED. Turnthecameraoffandon. Tryusingfreshmedia. Trydifferentcablesandmakesurethatthecablesareproperlyattached. Removeallaccessoriesandthenre-attachthemone-by-one.Thisprocessmayhelpyouidentifywhethertheissue isspecifictoaparticularaccessory. Resetthecameratoitsdefaultsettings.
Ifyouareunabletoresolveanissue,submita Supportticket.Includethefollowingwiththerequest: ALogfile.Formoreinformation,goto SaveLog Alistofdevices,lens,andthird-partyaccessoriesthatwereattachedwhentheissueoccurred. Thecamerapowersourceusedwhentheissueoccurred(includebatterytypes,powerdevices,andpowercables). Adescriptionoftheissuethatoccurred.
Thefollowingisatableofthecamera'sstatusicons.


TheCFexpressmediacardisgoodandrecordingtimeremaining
TheCFexpressmediacardismissing
TheCFexpressmediacardisincompatible
Thesensortemperature(T)andexposure(E)calibrationaregood
Thesensortemperature(T)requirescalibration
Thesensorexposure(E)requirescalibration
GrayindicatesthatnoTimecodegeneratorsignalisdetected
GreenindicatesthattheTimecodesourceisconnectedandjammed
RedindicatesthattheTimecodesourceisconnectedandnotjammed
WhiteindicatesthattheTimecodesourceisjammedandnotconnected
YellowindicatesthattheTimecodesourceiscross-jammed(atadifferent ProjectTimeBase)
GrayindicatesthatnoGenlocksignalisdetected
GreenindicatesthatthecameraisreceivingandislockedtoaGenlocksignal
RedindicatesthatthecameraisreceivingandisnotlockedtoaGenlocksignal
Grayindicatesthatnosynchronizationisdetected
Greenindicatesthatthecamera'ssensorissynchronizedwithTimecodeandthatthecamera'soutput issynchronizedwithaGenlocksignal
Yellowindicatesthatthecamera'ssensoris NOT synchronizedwithTimecodeandthatthecamera's outputissynchronizedwithasinglecameraoraGenlocksignal
Cameratemperatureisgood
Cameraoverheatingwarning
Cameraoverheating
Camerashuttingdown
GrayindicatesnoFTPSdataistransferring
GreenarrowsindicateFTPSdataistransferring
GrayandopenindicatesthatthecameraLCDisunlocked
WhiteandclosedindicatesthatthecameraLCDislocked
GrayandemptyindicatesthatnoWi-Fisignalisdetected
WhitebarsindicatethestrengthoftheWi-Fisignaldetected(Infrastructure)
WhiteantennaindicatesthatWi-Fisignalisbroadcasting(Ad-hoc)
Grayindicatesthatthecameraisnotconnectedtoanetwork
Greenindicatesthatthecameraisconnectedtoanetwork
GrayindicatesthatnoDCpowerisconnected
GreenindicatesthatthecameraisreceivingDCpower
Grayindicatesthatnobatteryisconnected
Whiteindicatesthatthebatteryisconnectedandgreenshowstherelativelevelofchargeremaining
Yellowindicates10minutesofpowerremaining
Redindicateslessthen5minutesofpowerremaining
Grayquestionmarkindicatesnocommunicationwiththebatteryandnopower
Whitequestionmarkindicatesnocommunicationwiththebatteryandpower
Grayexclamationpointindicateserrorcommunicatingwiththebatteryandnopower
NOTE: Dimensionsareshowninmm.

Figure:CameraFrontView
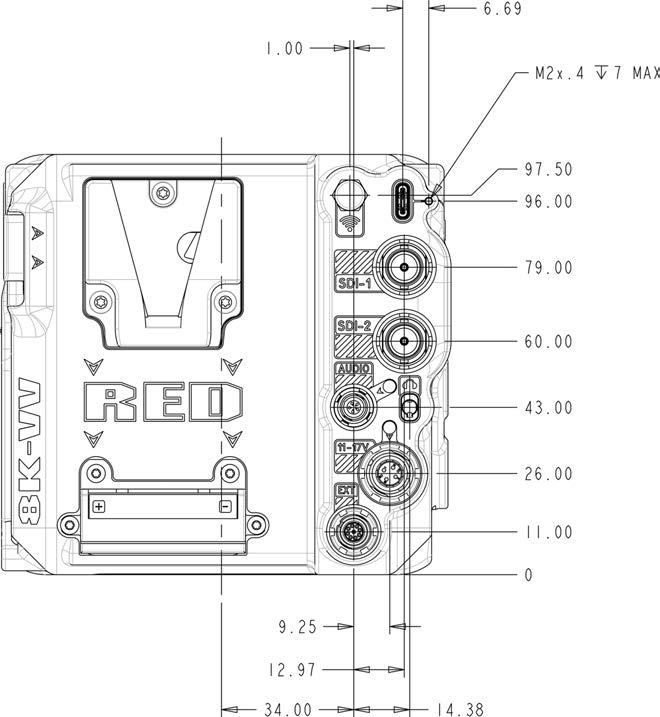
Figure:CameraBackView
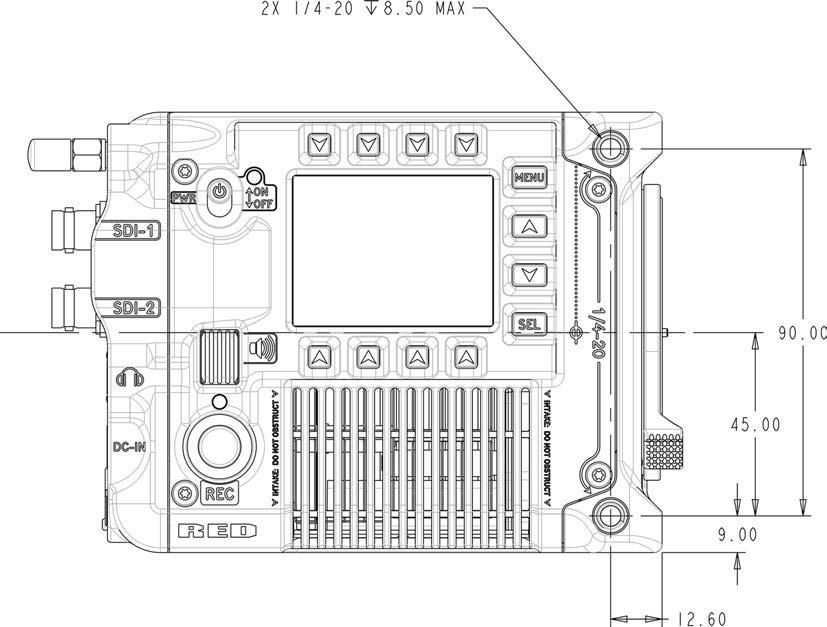
Figure:CameraSideView(Right)
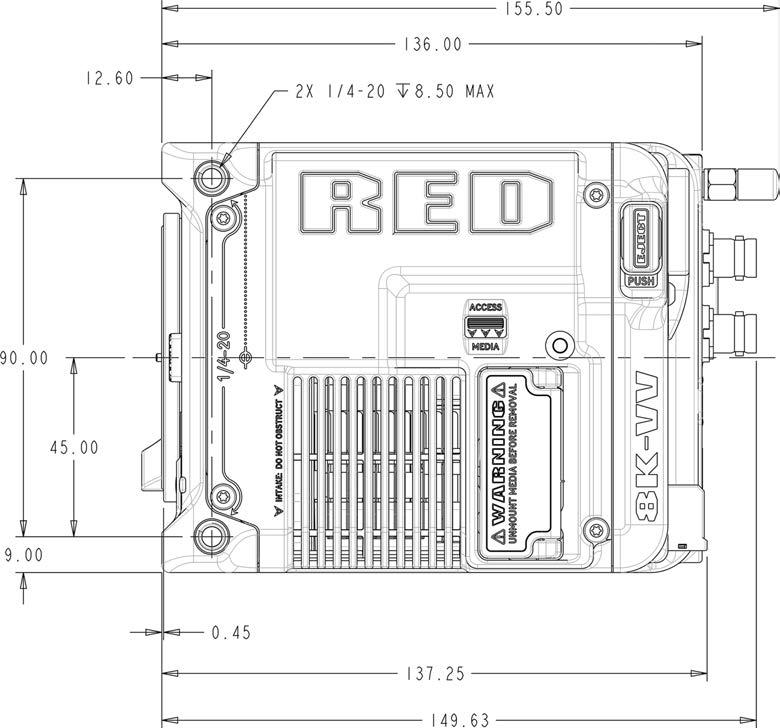
Figure:CameraSideView(Left)

Figure:CameraTopView
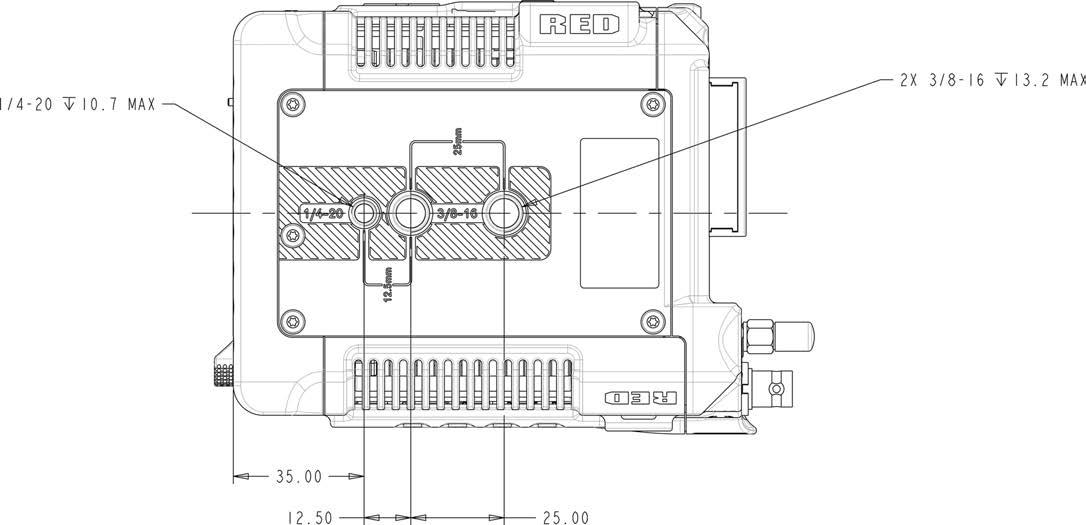
Figure:CameraBottomView
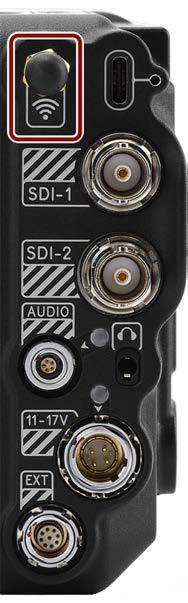
ThefemaleRPSMAconnectorprovidesanattachmentforthemaleRPSMAWi-Fiantenna.

Figure:FrontfaceofthefemaleRPSMAport(lookingatthebackofthecamera).
NOTE: MatingconnectorisaWi-FiantennawithastandardmaleRPSMAconnector.
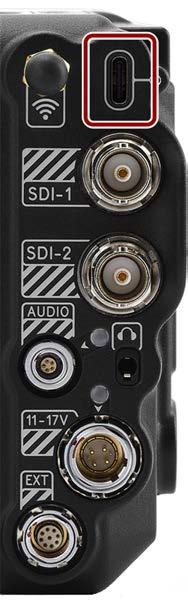
TheUSB-Cpoweroutconnectorsupplies5Voltsofpower.Themaximumsustainedcurrent drawis0.5Amps.TheUSB-Cportisusedprimarilyfordataconnections.

Figure:FrontfaceoftheUSB-Cport(lookingatthebackofthecamera).
NOTE: MatingconnectorisastandardUSB-Cmaleconnector.
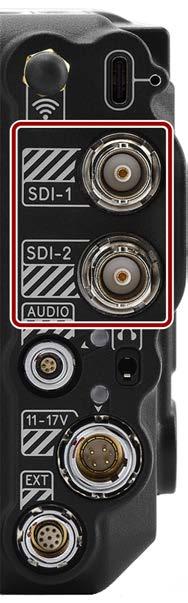
The12G-SDImale75ohmBNCportsdeliver12,6,3,or1.5Gbpsofimagebandwidthidealfor the4Kp60format.Otherfeaturesinclude:
UptoFour(4)channelsofembeddedaudio TimeofDayandEdgeTimecode
RecordTallyflag
Clipnameinformation(asSMPTERP-188VITC2HANCmetadata)

Figure:Frontfaceofthe12G-SDImaleBNCconnector(lookingatthebackofthecamera).
PINSIGNAL DESCRIPTION
Center12/6/3/1.5G-SDI Signal
DIRECTION
Upto4096x2160:444for30p,422for60p-LogvieworLUTview (SMPTEST2082) Out
ShellGround Commonground(cameraground)
NOTE: Matingconnectorisstandard75FemaleBNCconnectorratedfor12G-SDI.
N/A
WARNING: Undercertaincircumstances,itispossibleforanSDIconnectortoincurdamagewhenconnectedtoan accessoryandpoweredwithoutusingshieldedcables.REDrecommendsonlyusinghighquality,shieldedBNCcables thatareratedfor12G-SDIsignalsandonlyusingshieldedpowercablesforpoweringSDIaccessories.
MakesurepowerisconnectedtotheSDIaccessoryatalltimesbeforeyouconnecttheBNCtothecamera.
UngroundedpowerfromSDIaccessoriescandamagethecamera’sSDIport.Toavoidthispossibledamage,attachthe powersourcetotheaccessorybeforeattachingittotheBNCcable.WhenusingREDApprovedThirdPartybattery plates,unplugtheBNCcablepriortohotswapping.
Whenpossible,avoidusingP-Tap(alsoknownasD-Tap)cablestopoweraccessories.ToavoiddamagewhenusingPTap/D-Tap,it’simperativethattheconnect/disconnectsequence(below)isfollowedprecisely.
WhenattachingSDIaccessories:
1. ConnectapowersourcetotheSDIaccessory;powerontheSDIaccessory.
2. Ensureapowersourceisconnectedtothecamera.ThisensuresbotharegroundedpriortoconnectingtheBNC. Thecamera'spowerstatedoesnothaveanimpactonSDIattachmentsequence.
3. ConnecttheBNCcabletotheaccessory,thentothecamera.
WhendetachinganaccessorymountedtoanSDIoutput,ensurethatyouremovetheBNCconnectiontothecamera beforeremovingpowertotheSDIdevice:
1. ShutdowntheSDIaccessory.
2. DisconnecttheBNCcablefromthecamera.
3. DisconnectthepowersourcefromtheSDIaccessory.
Whenyouneedtoswapoutabatteryonanaccessorymountedtothecamera’sSDIport,youmust:
1. ShutdowntheSDIaccessory.
2. DisconnecttheBNCcablefromthecamera.
3. ReplacethebatteryontheSDIaccessory.
4. ConnecttheBNCcabletothecamera.
5. PowerontheSDIaccessory.
Formoreinformation,referto PreventingDamagetoSDIOutputs
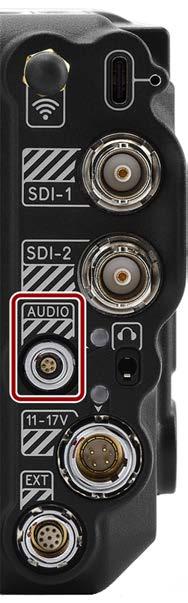
Thefemale5-pin00Baudioconnectoraccepts2-channelaudio,Line,Mic,and+48VPhantom Power.
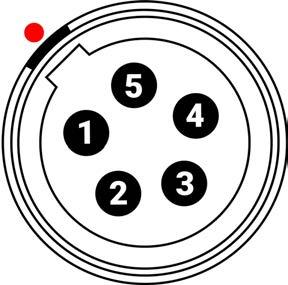
Figure:Frontfaceofthefemale5-pin00Baudioconnector(lookingatthebackofthecamera).
PIN SIGNAL
DESCRIPTION
1 Ground Groundtocamera
2 Ch3+
3 Ch3-
4 Ch4+
5 Ch4-
Channel3signal(positive)
Channel3negative
Channel4signal(positive)
Channel4negative
NOTE: MatingconnectorsareFGG.00.305.CLAD35Z(5-pin00circularpush-pullconnector,straightplug)and FHG.00.305.CLAD35Z(5-pin00circularpush-pullconnector,right-angleplug).
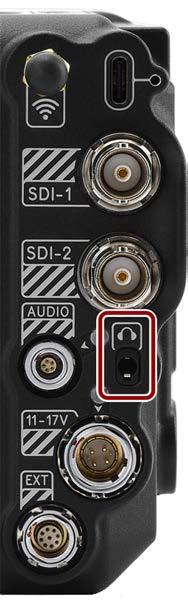
Thefemalestereo3.5mmheadphonejackprovidesanattachmentforstereoheadphones.
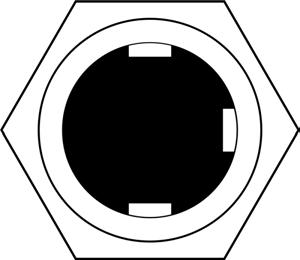
Figure:Frontfaceofthefemale3.5mmheadphonejack(lookingatthebackofthecamera).
NOTE: Matingconnectorisa3.5mmstereoheadphoneplug.

Themale6-Pin1BDC-INconnectoracceptsDCinputpowerfrom11VDCto17VDC.Abuilt-in powerconditionerprotectsagainstreverse-polarityconnections,electrostaticdischarge(ESD), undervoltage,overvoltage,andovercurrent.
WARNING: Bothpairsof+VBATTandGROUNDpinsmustbewired.Usingathird-partypower cablethatwiresonlyone(1)pairof+VBATTandGROUNDpinsmaydamagethepowersupply orthecamera.Damagetothepowersupplyorothercomponentsofthecamerasystemcaused byusinganinappropriatepowercableisnotcoveredunderwarranty.
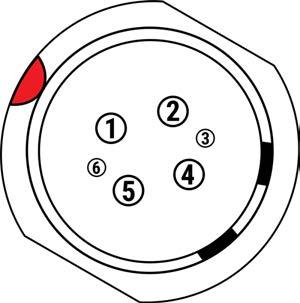
Figure:Frontfaceofthemale6-pin1BDCpowerinputconnector(lookingatthebackofthe camera).
PIN
1 +VBATT Powerinput,+11.5to+17VDC
2
6 SDA-BATT BatterySMBusSDAsignal(3.3V)
NOTE: MatingconnectorisFGJ.1B.306.CWLD72Z.
790-0638:DSMCACPowerAdaptorPack
790-0164:XLRPowerCable(10')
790-0291:DSMCBatteryBeltClip
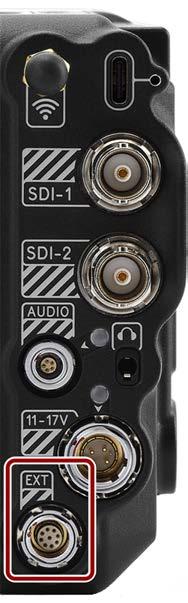
Thefemale9-contact0BODUExtensionportsupportsserial(RS-232RXandTX),aGeneral PurposeInput(GPI)trigger(active-lowswitchclosure),GeneralPurposeOutput(GPO), Timecode,andGenlock.Theconnectoralsooffersauxiliary5Voltpowerout,withamaximum sustainedcurrentdrawof500mA.
TooperatetheGPIcontactclosurestyletrigger,shortPin6(GPI)toPin9(ground).
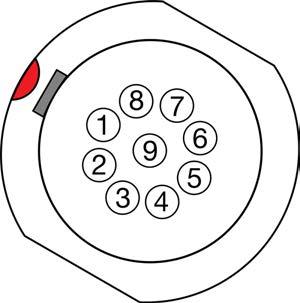
Figure:Frontfaceofthefemale9-contactExtensionport(lookingatthebackofthecamera).
NOTE: Therequiredmatingconnectoris9-Pin0LStraightPlugConnector(ODU,part#SX0L0XP09MCC0-0001).
2.Thesignalpathincludesaresistorpullingthesignalhigh,whichisdesignedtoworkwithaclosureswitchconnectedtoGND.
790-0685:RED9-PinEXTtoFlyingLead1.3’ 790-0674:REDEXTtoTimecode3'
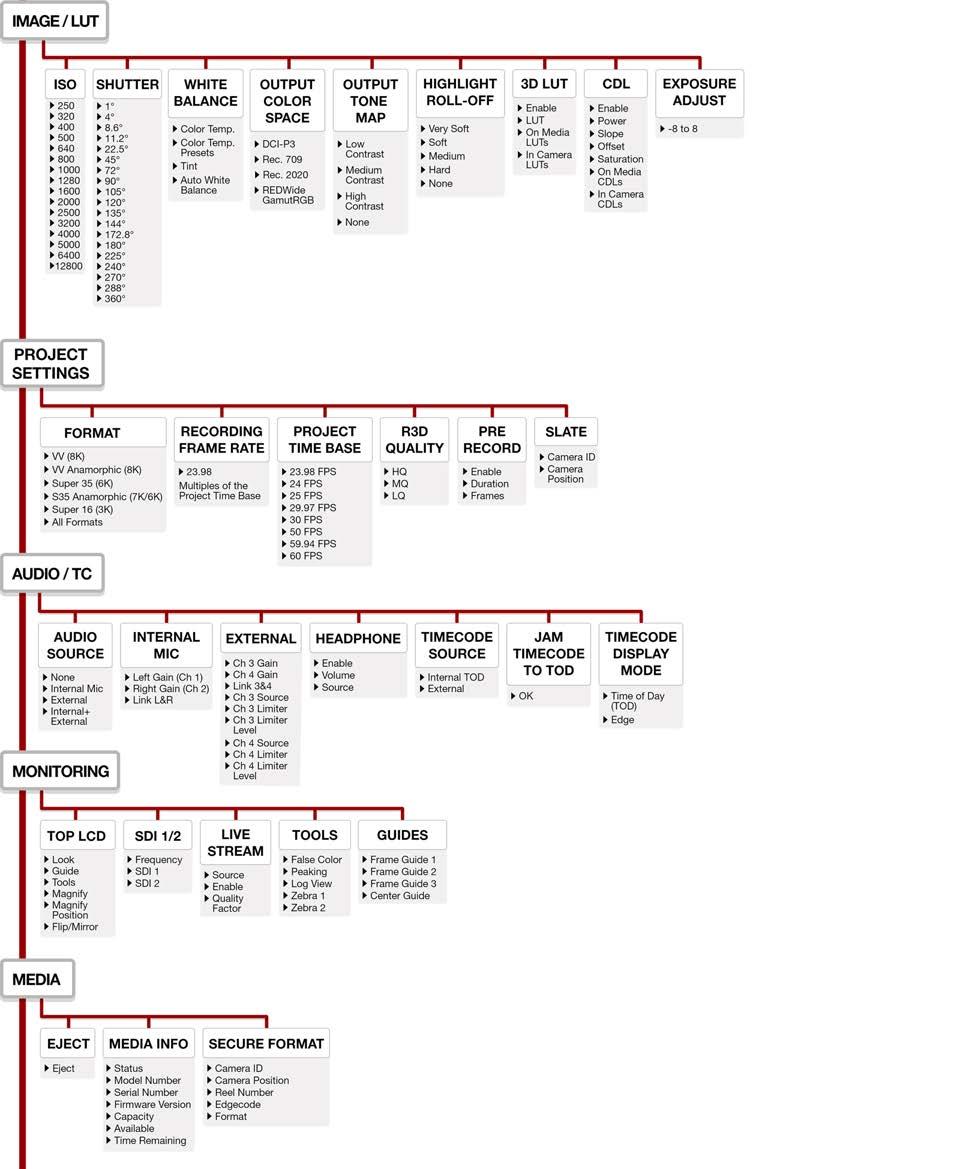
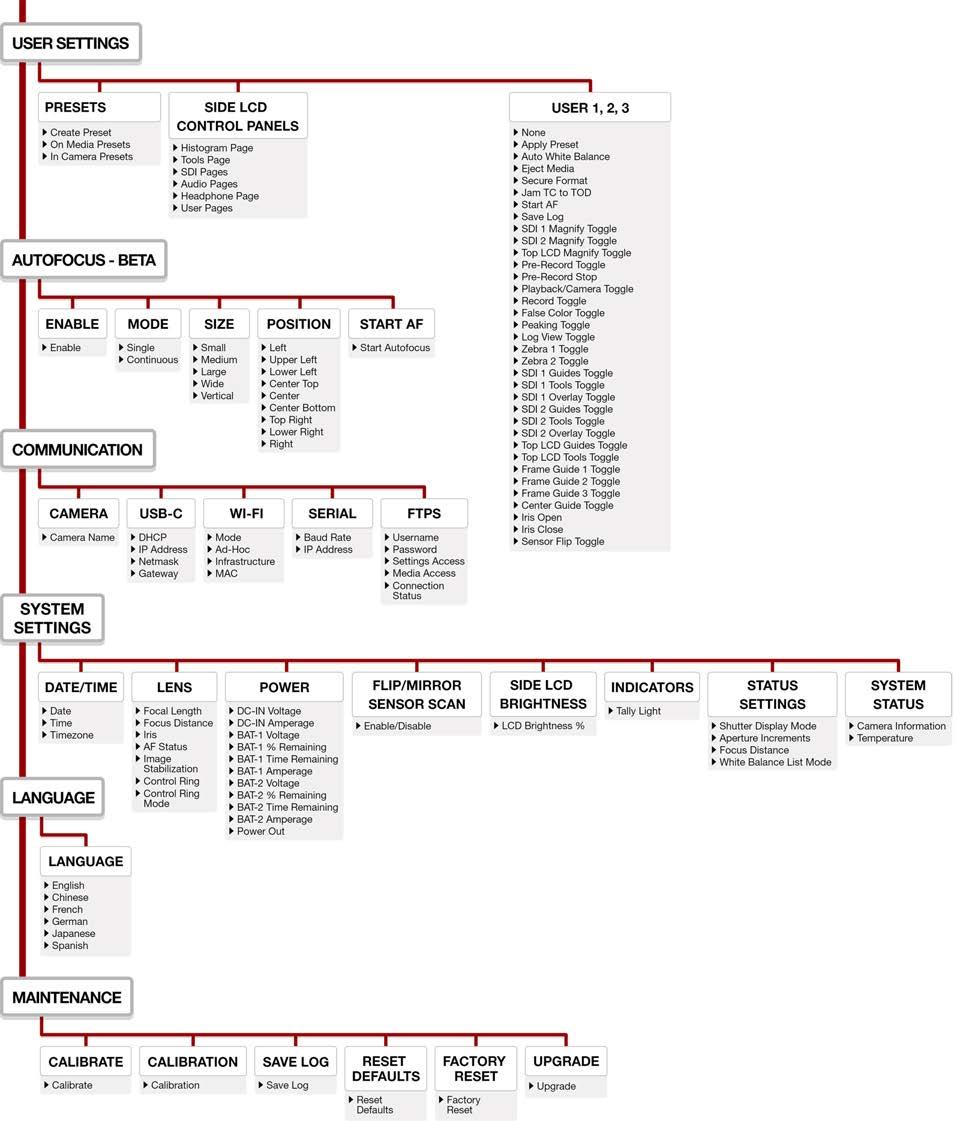
Technicalspecificationsreflectbothcurrentandprojectedinformation.Everythingissubjecttochange.
ITEM DETAILS
SensorType V-RAPTOR8KVV35.4Megapixel,CMOS
EffectivePixels 8192x4320
SensorSize 40.96mmx21.60mm(Diagonal:46.31mm)
DynamicRange 17+stops
MountType RFmountwithelectroniccommunication SupportsCanonEFwithelectroniccommunicationbyusingcompatibleCanonRFmountadapters AcceptsCanonRFmount-basedlensadaptorsfordiverselenschoices1
MaxDataRates Upto800MB/susingREDProCFexpressorotherqualifiedCFexpressmediacards1
REDCODE® RAW MaximumFrameRates
VV
Super35
Super16
PlaybackFrameRates (ProjectTimeBase)
BestAvailable REDCODE® Settings
REDCODERAW AcquisitionFormats
120fpsat8K17:9(8192x4320),150fpsat8K2.4:1(8192x3456) 140fpsat7K17:9(7168x3780),175fpsat7K2.4:1(7168x3024) 160fpsat6K17:9(6144x3240),200fpsat6K2.4:1(6144x2592) 192fpsat5K17:9(5120x2700),240fpsat5K2.4:1(5120x2160) 240fpsat4K17:9(4096x2160),300fpsat4K2.4:1(4096x1728) 320fpsat3K17:9(3072x1620),400fpsat3K2.4:1(3072x1296) 480fpsat2K17:9(2048x1080),600fpsat2K2.4:1(2048x864)
23.98,24,25,29.97,30,50,59.94,and60fps,atallresolutions
REDCODEHQ,MQ,andLQat8K17:9(8192×4320)upto60fps REDCODELQat8K17:9(8192×4320)upto120fps REDCODEHQ,MQ,andLQat6K17:9(6144×3240)upto96fps REDCODEMQ,andLQat6K17:9(6144×3240)upto160fps REDCODEHQ,MQ,andLQat4K17:9(4096×2160)upto240fps REDCODEHQ,MQ,andLQat2K17:9(2048×1080)upto480fps
8K17:9(8192x4320),2:1,2.4:1,16:9,1:1andAnamorphic2x,1.8x,1.6x,1.5x,1.3x,1.25x 7K17:9(7168x3780),2:1,2.4:1,16:9,1:1andAnamorphic2x,1.8x,1.6x 6K17:9(6144x3240),2:1,2.4:1,16:9,1:1andAnamorphic1.5x,1.3x,1.25x
5K17:9(5120x2700),2:1,2.4:1,16:9,1:1
4K17:9(4096x2160),2:1,2.4:1,16:9,1:1
3K17:9(3072x1620),2:1,2.4:1,16:9,1:1
2K17:9(2048x1080),2:1,2.4:1,16:9,1:1
Construction AluminumAlloy
Weight 4.03lbwithoutthebodycapandtheCFexpressTypeBmediacard
BatteryType IntegratedV-Lockbatteryinterfaceoptimizedforthe REDVOLTMicro-VBattery andother MicroV-Lockbatteries1
DCPower +11to+17voltsDCusingtheintegrated 6-PinDC-IN port
OperatingTemperature0˚Cto40˚C(32˚Fto104˚F)
StorageTemperature–20˚Cto50˚C(–4˚Fto122˚F)
ITEM DETAILS
RelativeHumidity 0%to85%non-condensing
ColorManagementImageProcessingPipeline2(IPP2)
Supports33×33×333DLUTs
SupportsimportofCDLs
Audio
RemoteControl
MonitorOutputs
MonitorOptions
SOFTWARE
REDControlApp
Integrateddualchanneldigitalmonomicrophones,uncompressed,24-bit48kHz
Integrateddualchannelmic/line/+48Vinputthroughthe5-pinAudioPort,uncompressed, 24-bit48kHz
Wi-FiforcameracontrolthroughinterchangeablemaleRPSMAantennatofemaleRPSMA connection.Genlock,TimecodeIn,GPIOandCtrl(RS-232)usingtheintegrated9-pinEXTPort.Wired controlusingtheUSB-CportorGigabitEthernet(compatibleUSB-CtoEthernetadapter1 required) allowingremotecameracontrol,liveMJPEGpreviewvideofeed,andremotemediaoffload
Integrated12G-SDIwith6G-SDI,3G-SDI,and1.5G-SDImodes
12G-SDI:Upto4096×21604:2:2for60p
6G-SDI:Upto4096×21604:2:2for30p,25p,and24p
3G-SDI:Upto2048×10804:2:2for60p
1.5G-SDI:Upto2048×10804:2:2for30p,25p,and24p SMPTETimecode,HANCmetadata,and24-bit48kHzaudio
DSMC3RED® Touch7"LCD(topLCD)
Wireless1080plivepreviewvideofeedthrough2.4GHzor5GHzWi-Fiforframing Integrated2.4"LCDforcameracontrol(nopreviewvideo)
AccessfullcameracontrolsandlivepreviewfromiOSorAndroiddevices
AvailablefromtheAppleAppStoreandGooglePlayStore.REDControlworkswirelesslyorwired throughtheUSB-Cport
1.Formoreinformationonaccessories,referto RED.com/third-party-accessories