


4.MENUS
RED® hasmadeeveryefforttoprovideclearandaccurateinformationin thisdocument,whichisprovidedsolelyfortheuser’sinformation.While thoughttobeaccurate,theinformationinthisdocumentisprovided strictly“asis”andREDwillnotbeheldresponsibleforissuesarising fromtypographicalerrorsoruser’sinterpretationofthelanguageused hereinthatisdifferentfromthatintendedbyRED.Allinformationis subjecttochangeasaresultofchangesinlocal,federalorother applicablelaws.
REDreservestherighttorevisethisdocumentandmakechangesfrom timetotimeinthecontenthereofwithoutobligationtonotifyanyperson ofsuchrevisionsorchanges.InnoeventshallRED,itsemployeesor authorizedagentsbeliabletoyouforanydamagesorlosses,director indirect,arisingfromtheuseofanytechnicaloroperationalinformation containedinthisdocument.
Thisdocumentwasgeneratedon6/27/2023.Toseeearlierversionsof thisdocument,submitaSupportticketat https://support.red.com Forcommentsorquestionsaboutcontentinthisdocument,senda detailedemailto OpsGuides@red.com
COPYRIGHT©2023RED.COM,LLC
Alltrademarks,tradenames,logos,icons,images,writtenmaterial, code,andproductnamesusedinassociationwiththeaccompanying productsarethecopyrights,trademarks,orotherintellectualproperty ownedandcontrolledexclusivelybyRED.COM,LLC.Fora comprehensivelist,see www.red.com/trademarks.
Allothercompany,brand,andproductnamesaretrademarksor registeredtrademarksoftheirrespectiveholders.REDhasnoaffiliation to,isnotassociatedwithorsponsoredby,andhasnoexpressrightsin third-partytrademarks.AdobeandAdobePremiereProareregistered trademarksofAdobeSystemsIncorporated.DaVinciandDaVinci ResolveareregisteredtrademarksofBlackmagicDesignintheU.S.and othercountries.LeicaisaregisteredtrademarkofLeicaMicrosystems. CanonisaregisteredtrademarkofCanon,U.S.A.Apple,iOS, Macintosh,FinalCutPro,andQuickTimeareregisteredtrademarksof AppleInc.intheU.S.andothercountries.Windexisaregistered trademarkofS.C.Johnson&Son,Inc.Windowsisaregistered trademarkofMicrosoftCorporation.Avidisaregisteredtrademarkof AvidTechnology,Inc.FileZillaisaregisteredtrademarkofitsrespective owners.Nuke™isatrademarkofTheFoundryVisionmongersLtd. SCRATCHisaregisteredtrademark®ofASSIMILATE,2006.SCRATCH SCAFFOLDS,SCRATCHEXTENSIONS,andSCRATCHDigital IntermediateProcessSolutionarealltrademarksandregistered trademarksofASSIMILATE,2006,Allrightsreserved.Autodesk,the Autodesklogo,Flameareregisteredtrademarksortrademarksof Autodesk,Inc.,and/oritssubsidiariesand/oraffiliatesintheUSAand/or othercountries.
ThisdevicecomplieswithIndustryCanadalicense-exemptRSS standardsRSS139andRSS210.Operationissubjecttothefollowing twoconditions:(1)thisdevicemaynotcauseinterference,and(2)this devicemustacceptanyinterference,includinginterferencethatmay causeundesiredoperationofthedevice.
ThisClassBdigitalapparatuscomplieswithCanadianICES-003. TocomplywithFCCandIndustryCanadaRFexposurelimitsforgeneral population/uncontrolledexposure,theantenna(s)usedforthis transmittermustbeinstalledtoprovideaseparationdistanceof70mm fromallpersonsandoperatinginconjunctionwithanyotherantennaor
transmitter,exceptinaccordancewithFCCmulti-transmitterproduct procedures.
Otherusermanualstatementsmayapply.
LeprésentappareilestconformeauxCNRd’IndustrieCanada applicablesauxappareilsradioexemptsdelicence.L’exploitationest autoriséeauxdeuxconditionssuivantes:(1)l’appareilnedoitpas produiredebrouillage,et(2)l’utilisateurdel’appareildoitacceptertout brouillageradioélectriquesubi,mêmesilebrouillageestsusceptible d’encompromettrelefonctionnement.
CetappareilnumériquedelaclasseBestconformeàlanormeNMB003duCanada.
Pourseconformerauxlimitesd’expositionauxRFdelaFCCet d’industriesCandapourlapopulationgénérale/expositionnon controlee,l’antenne(s)utiliséepourcetransmetteurdoitêtreinstallé pourfournirunedistancedeseparationd’aumoins70mmdetoutesles personnesetfonctionnantconjointementavecuneautreantenneou émetteur,saufenconformitéaveclesproceéduresdeproduitsmultiémetteurFCC.
Autresd’eclarationsmanueldel’utilisateurpeuvents’appliquer.
Thisequipmenthasbeentestedandfoundto complywiththelimitsforaClassAdigitaldevice, pursuanttopart15oftheFCCRules.These limitsaredesignedtoprovidereasonable protectionagainstharmfulinterferencewhenthe equipmentisoperatedinacommercial environment.Thisequipmentgenerates,uses,andcanradiateradio frequencyenergyand,ifnotinstalledandusedinaccordancewiththe instructionmanual,maycauseharmfulinterferencetoradio communications.Operationofthisequipmentinaresidentialareais likelytocauseharmfulinterferenceinwhichcasetheuserwillbe requiredtocorrecttheinterferenceathisownexpense.
TomaintaincompliancewithFCCregulations,shieldedcablesmustbe usedwiththisequipment.Operationwithnon-approvedequipmentor unshieldedcablesislikelytoresultininterferencetoradioandTV reception.Theuseriscautionedthatchangesandmodificationsmade totheequipmentwithouttheapprovalofmanufacturercouldvoidthe user'sauthoritytooperatethisequipment.
ThisdevicecomplieswithPart15oftheFCCRules.
Operationissubjecttothefollowingtwoconditions(1)thisdevicemay notcauseharmfulinterference,and(2)thisdevicemustacceptany interferencereceived,includinginterferencethatmaycauseundesired operation.

CAUTION: ExposuretoRadioFrequencyRadiation.
Thedeviceshallbeusedinsuchamannerthatthepotentialforhuman contactisminimized.
ThisequipmentcomplieswithFCCradiationexposurelimitssetforthfor anuncontrolledenvironment.Thisequipmentshouldbeinstalledand operatedwithaminimumdistanceof20cmbetweentheradiatorand yourbody.


CAUTION: RegulationsoftheFCCandFAAprohibitairborne operationofradio-frequencywirelessdevicesbecausetheir signalscouldinterferewithcriticalaircraftinstruments.
CAUTION: Ifthedeviceischangedormodifiedwithout permissionfromRED,theusermayvoidhisorherauthority tooperatetheequipment.
AUSTRALIAANDNEWZEALANDSTATEMENTS REDdeclaresthattheradioequipmentdescribedinthisdocument complieswiththefollowinginternationalstandards:
IEC62368-1–ProductSafety
ETSIEN300328–Technicalrequirementforradioequipment REDdeclaresdigitaldevicesdescribedinthisdocumentcomplywith thefollowingAustralianandNewZealandstandards:
AS/NZSCISPR32–ElectromagneticInterference AS/NZS61000.3.2–PowerLineHarmonics AS/NZS61000.3.3–PowerLineFlicker

1.EquipmentName/ModelName:Komodo-X/Komodo-X
2.RegistrationNo.:R-R-DV5-2023KX001,R-R-R3d-2022LSR001
3.ApplicantName:㈜ 디브이인사이드
4.ManufactureDate:2023
5.Manufacturer/CountryofOrigin:REDDigitalCinema,LLC/USA
Thisequipmentcontainsspecifiedradioequipmentthathasbeen certifiedtotheTechnicalRegulationConformityCertificationunderthe RadioLaw.


REDdeclaresthattheradioequipmentdescribed inthisdocumentcomplieswiththeEMCDirective (2014/30/EU)andtheLowVoltageDirective (2014/35/EU)issuedbytheCommissionofthe EuropeanCommunity.
Compliancewiththisdirectiveimpliesconformitytothefollowing EuropeanNorms(inbracketsaretheequivalentinternationalstandards).
EN62368-1(IEC62368-1)–ProductSafety
ETSIEN300328Technicalrequirementforradioequipment
ETSIEN301489GeneralEMCrequirementsforradioequipment
EN55032(CISPR32)ElectromagneticCompatibility
EN55035(CISPR35)ImmunityRequirements
EN61000-3-2(IEC61000-3-2)HarmonicCurrentEmissions
EN61000-3-3(IEC61000-3-3)Voltagechanges,voltagefluctuations andflicker
EU2015/863RoHSDirective
TheWasteElectricalandElectronicEquipment (WEEE)markappliesonlytocountrieswithinthe EuropeanUnion(EU)andNorway.Thissymbol, ontheproductandaccompanyingdocuments, meansthatusedelectricalandelectronic productsshouldnotbemixedwithgeneral householdwaste.Forpropertreatment,recovery andrecycling,takethisproducttodesignated collectionpointswhereitwillbeacceptedfreeof charge.Alternatively,insomecountriesyoumay beabletoreturnyourproductstoyourlocalretaileruponpurchaseof anequivalentnewproduct.
Disposingofthisproductcorrectlywillhelpsavevaluableresourcesand preventanypotentialnegativeeffectsonhumanhealthandthe environment,whichcouldotherwisearisefrominappropriatewaste handling.Contactyourlocalauthorityforfurtherdetailsofyournearest designatedcollectionpoint.Penaltiesmaybeapplicableforincorrect disposalofthiswaste,inaccordancewithyournationallegislation. ForbusinessusersintheEuropeanUnion,ifyouwishtodiscard electricalandelectronicequipment,contactyourdealerorsupplierfor furtherinformation.
REDDigitalCinema
94Icon
FoothillRanch,CA92610
USA
Thisequipmentisintendedtobeusedbyinstructedpersonnelandis notintendedtobeusedbychildren.
DONOTusethecameraoraccessoriesnearwater.Avoidexposing yourcameratomoisture.Theunitisnotwaterproof,socontactwith watercouldcausepermanentdamagetotheunitaswellaselectric shockandseriousinjurytotheuser.DONOTusethecamerainthe rainorunderotherconditionswithhighmoisturewithoutappropriate protection,andimmediatelyremovepowersourceifcameraor accessoriesareexposedtomoisture.

WARNING: Toreducetheriskoffireorelectricshock,donot exposethecameratorainormoisture.
DONOTpointthecameradirectlyintoextremelightsourcessuchas thesunorlasers.Permanentdamagetoopticalpathorsensormay occur,whichisnotcoveredbymanufacturer’swarranty.
DONOTexposeyourcameratoexcessivevibrationorimpact (shock).Becarefulnottodropyourcamera.Internalmechanisms maybedamagedbysevereshock.Mechanicalalignmentofoptical elementsmaybeaffectedbyexcessivevibration.
ELECTROMAGNETICINTERFERENCE:Theuseofdevicesusing radioorothercommunicationwavesmayresultinthemalfunctionor interferencewiththeunitand/orwithaudioandvideosignals. Cleanonlyusingadrycloth.Whencleaningyourcamera,remember thatitisnotwaterproofandmoisturecandamageelectroniccircuitry. DONOTrinseorimmerseanyelementofthecamera,lensorother accessory,keepthemdryatalltimes.DONOTusesoaps, detergents,ammonia,alkalinecleaners,andabrasivecleaning compoundsorsolvents.Thesesubstancesmaydamagelens coatingsandelectroniccircuitry.
Maintainsufficientventilation—DONOTblockanyventilation openingsorobstructcoolingfanairflow.


CAUTION: Propercameraventilationrequiresaminimum 0.5"(1.25cm)clearancebetweenthecameraventilation openingsandexternalsurfaces.Verifythatobjectsthatcan blockthefanintakeandexhaustportsdonotimpedeairflow. Failuretopermitadequateairflowmayresultinoverheatingof thecamera,degradedoperation,andinextremesituations, damagetothecamera.
WARNING: Mediacardscanbecomeveryhotduring prolongedrecordingsessions.Whenejectingthemediacard, letitcoolbeforetouchingitwithbarefingers.
DONOToperateorstorenearanyheatsourcessuchasradiators, heatregisters,stoves,oranyotherapparatusesthatproduceheat. Storeinaprotected,levelandventilatedplace.Avoidexposureto temperatureextremes,damp,severevibration,strongmagneticfields, directsunlightorlocalheatsourcesduringstorage.Removeany batteriesfromthecamerabeforestorage.Recommendedstorage andusagetemperaturesforyourcamera,lensesandother accessoriesare:
Operatingrange:32°Fto104°F(0°Cto40°C)
Storagerange:–4°Fto122°F(–20°Cto50°C) Ifthereareanyperformanceissueswithyourcameraoraccessories whenoperatingwithinthistemperaturerange,submitasupportticket to https://support.red.com
DONOTbypassthethirdprongofthegrounding-typeplugonthe powercordoftheincludedpoweradaptor.Agrounding-typeplug hastwobladesandathird“grounding”prong.Thethirdprongis providedforyoursafety.Youmustconnecttheplugtoanoutletwith aprotectiveearthconnection.Ifthegrounding-typeplugdoesnotfit intoyouroutlet,donotattempttomodifytheplugoroutlet,consulta qualifiedelectrician.
Protectallpowercordsfrombeingpinched,walkedon,ordrivenover byavehicle.Replaceanypowercordssuspectedofsustaining damageduetocrushingorotherformsphysicaldamage.

CAUTION: Installthiscamerainapropersupportsystemthat canhandletheentireweightofthecameraandthe accessories.Securethecamerabyusingthe¼-20and/orthe 3/8-16mountingpointslocatedonthebottomofthecamera. Alwaysverifythatthescrewsaretightenedproperly.When thecameraisnotproperlyattached,orisplacedonan unstablesurface,thecameracanfallandcauseinjuryorbe damaged.


CAUTION: ProductsmarkedwiththissymbolareClass2 devices.Thesedoubleinsulateddevicesarenotprovided withagroundingtypeplug.
CAUTION: Thepowercordplugfortheincludedpower adaptorisusedasthepowerdisconnect.Todisconnectall powerfromthepoweradaptor,unplugthepowercordplug fromthewalloutlet.Duringuse,thepowercordplugshould remaineasilyaccessibleatalltimes.
Lithium-ionbatteriesmaybesubjecttospecialhandlingrequirements pursuanttofederalandlocallaws.Refertospecificshipping instructionsincludedwithyourbatteryregardingpropertransportof yourbattery.Donothandleyourbatteryifitisdamagedorleaking. Disposalofbatteriesmustbeinaccordancewithlocalenvironmental regulations.Forexample,Californialawrequiresthatallrechargeable batteriesmustberecycledbyanauthorizedrecyclecenter.Storing batteriesfullychargedorinhightemperatureconditionsmay permanentlyreducethelifeofthebattery.Availablebatterycapacity mayalsobetemporarilylessenedafterstorageinlowtemperature conditions.


WARNING: DONOTexposethebatterytoexcessiveheat.
CAUTION: ReferallserviceandrepairtoqualifiedRED servicepersonnel.Toreducetheriskofelectricshock,and damagetothecameraoraccessories,DONOTattemptto performanyservicingotherthananyproceduresthatare recommendedintheoperatinginstructions.
INDOORUSEONLY: Thisdeviceisdesignedprimarilyfor indooruse.
Elaparatonodebequedarexpuestoagoteoosalpicadureaspor líquidos.


WARNING: Failuretoread,understand,andfollowthese instructionsmayresultinoverheating,chemicalleakage, smokeemission,fire,orotherpotentiallyharmfulresults.
WARNING: Onlyreplacethebatterywithabatteryofthe sametype,orwithabatterythatisequivalent.
Readandadheretoallsafetyinstructionsprovidedbythe manufacturerofthebatteries.
Alwaysfollowproperbatteryhandlingandstoragepractices. Improperhandlingandfailuretoabidebyproperstorageinstructions maycausepermanentdamagetobatteries,ordegradebattery chargeholdingcapacity.Improperhandlingpracticesorfailureto complywithinstructionsmayalsoputyouatrisk.
Lithium-Ionbatteries,liketheREDVOLTMicro-V,self-dischargeover time.Whenstoringforlongperiodsoftime,storebatteriesseparately fromthecameraorchargerandremembertochargebatteriestoa capacitylevelof40%to60%.Ifbatterieswillbestoredforlong periodsoftime,REDrecommendsthatyoucheckthechargelevelat leastonceeverysix(6)months,andrechargebatteriestoacapacity levelof40%to60%.
Whennotinuse,removethebatteryfromthecameraorchargerand storethebatteryinacool,dryplace.Avoidextremehottemperatures (suchasinsideahotcar),corrosivegas,anddirectsunlight.The optimalstoragetemperatureforbatteriesisbetween –4°Fto68°F(–20°Cto20°C).


WARNING: Batteriesstoredinadischargedstateforlong periodsoftimemayself-dischargeandlosetheabilitytohold acharge.
WARNING: Ifrechargingoperationfailstocompleteeven afteraspecifiedrechargingtimehaselapsed,immediately stopfurtherrecharging.
DONOTstorebatteriesinafullychargedstateforextendedperiods oftime.
DONOTstorebatteriesinafullydischargedstateforextended periodsoftime.
DONOTstorebatteriesinthecameraorinachargerforextended periodsoftime.
DONOTusebatteriesforpurposesotherthantheirintendeduse.
DONOTstorebatteriesinextremehotorcoldtemperatures.
DONOTstorebatteriesindirectsunlight.
DONOTdisassembleormodifythebattery.
DONOToverchargebatteries.Overchargingmayincreaseinternal temperaturebeyondtherecommendedlimitsandcausepermanent damagetothebattery.
DONOTconnectthepositive(+)andnegative(–)terminalstoametal objectsuchasawire.
DONOTtransportorstorethebatterytogetherwithmetalobjects suchasjewelry,hairpins,etc.astheymaygenerateheatiftheycome intocontactwiththebattery.
DONOTdiscardthebatteryintofireorheat.
DONOTstore,use,orrechargethebatterynearaheatsourcesuch asafireoraheater.
DONOTallowthebatterytogetwet.
DONOTpiercethebatterywithpointedorothersharpobjects.
DONOTstepon,throw,orstrikethebatterywithahammer.
DONOTuseabatterythatappearstobedeformedordamaged.
DONOTdirectlysolderthebattery.
DONOTputthebatteryintoamicrowaveovenorapressurized container.
DONOTuseorsubjectthebatterytointensesunlightorhot temperaturessuchasinacarinhotweather.
DONOTuseitinalocationwherestaticelectricitymaybepresent.
DONOTexceedtherechargingtemperaturerangeof32˚Fto104˚F (0˚Cto40˚C).
Storethebatteryinalocationwherechildrencannotreachit. Ifthebatteryleaksorgivesoffabadodor,discontinueuse immediately.
Ifthebatterygivesoffanodor,generatesheat,becomesdiscolored ordeformed,orinanywayappearsabnormalduringuse,recharging orstorage,immediatelyremoveitfromtheequipmentorbattery chargeranddiscontinueuse.
Ifelectrolytebeginsleakingfromthebatteryandcomesintocontact withyourskinorclothing,immediatelywashitawaywithrunning water.Failuretodothismayresultinskininflammation.
Ifthebatteryleaksandtheelectrolytereachestheeyes,donotrub them.Instead,rinsetheeyeswithcleanrunningwaterand immediatelyseekmedicalattention.Failuretodothismayresultin eyeinjury.

Figure:REDKOMODO-X™camera
KOMODO-XisthenextevolutionintheKOMODOfamily,multiplyingtheframerates,dynamicrange,andusabilityof theoriginalKOMODOtobreaknewgrounds.
KOMODO-Xfeaturesthesamesized6KS35GlobalShuttersensorastheKOMODO,butwithagroundupredesign andkeyarchitectureimprovements.
Improveddetailandcolorinshadows,pairedwithdoubletheframeratesat6K80Pand4K120PmakesKOMODO-X anevenmorepowerfultoolforcreatives.
Withkeyimprovementsforprofessionalworkflows,theKOMODO-XnowsharesmanyfeatureswiththeDSMC3line whilestillmaintainingtheimpressivelysmallKOMODOformfactor.AnintegratedmicroV-Lockallowsfordirect attachmentofprofessionalmicroV-Lockbatterieswithouttheneedforadaptersandisalsocompatiblewiththe upcomingREDPROI/OModuletoprovideauxiliarypowerandcompatibilitywithfullsizedV-LockandGoldMount batteries.
AreinforcedRFlensmountwithlockingmechanismmaintainstheflexibilityoftoollessswitchingbetweenmultiplelens mounttypes,whileprovidingthestabilityandrigidityprofessionalsneed.KOMODO-Xisalsofullycompatiblewith/iPL lensesusingtheREDRFtoPLAdapter.
12GSDI,fullsizedDC-IN,USBType-C,andaphantompoweredlockingaudioconnectorfurtherenablesKOMODO-X toseamlesslyintegrateintoanyprofessionalworkflow.KOMODO-Xiscompatiblewith DSMC3™RED®5-PintoSingle 3.5mmAdapter tosupportexistingKOMODOmicrophones,orthe DSMC3™RED®5-PintoDualXLRAdapter for generalpurposeXLRmicrophones.
Anintegrated2.9”LCDallowsforsimplifiedcontrolandimagepreviewincompactsetups.Formoreprecisemonitoring, KOMODO-XsupportstheDSMC37”TouchLCDwhichprovidesadaylightviewable,high-resolution,cameratop monitorandcontrolsolutionwithoutthemessofcables.
KOMODO-XisapowerfulplatformforanyIPbasedworkflow,fromVirtualProductiontoLiveBroadcast.With integratedUSBType-Cconnectionandbuilt-inWi-Fi,remotelycontrolthecamerausingREDControlorREDControl Pro,aswellasIPmediaoffloadingusingFTPSorin-cameraCloudUploadingfunctionality.Inaddition,KOMODO-X supportsframe-accuratePTPsynchronizationortri-levelgenlocksensorsyncwiththeabilitytooffsetontheflyto supportmulti-cameraLEDvolumeproductions.
KOMODO-XalsosupportsREDConnect,alicensedfeaturethatallowsforlivebroadcastingof6Kimagesdirectlyfrom thecameraoverIP,expandingRED’scinematicimageryintoboundlessnewuses.
Refertothe QuickReference sectiontogetfamiliarwiththisguideandthecamera.
AllvideosandframesarerecordedtotheR3D® fileformat.TheR3DfileformatwasdevelopedbyREDtoprovidean efficientandmanageableRAWvideodataformatthatpromotesadvancedpost-productioneditingcapabilities.Inthe R3Dfileformat,thedigitalimagereceivedfromthesensorisformattedasapixel-defectcorrected(butinallother aspectsunprocessed)16-bitperpixelRAWdataframe.EachRAWframe,orsequenceofRAWframesinaclip,is compressedusingproprietaryREDCODE® RAWcompression,thenstoredtomedia.
RAWdataisrecordedindependentlyofanyRGBdomaincolorprocessingsuchasISO,WhiteBalance,orotherRGB colorspacesettings.Instead,colorparametersaresavedasreferencemetadata;thatis,colorisnotburnedintothe recordedRAWdata.ThisinnovativerecordingtechniquepromotesflexibilityinRGBcolorprocessing.Itallowsyouto defercolorcorrectiontopost-production,ortoadjusttheimagecolorinthefield,withoutchangingtherecordedRAW dataimagequalityordynamicrange.
REDCODEisacompressioncodecthatreducesR3DRAWfilesdowntoamanageablesize,allowingthemediato recordlonger.TheabilitytocompressRAWdataisoneofthesignificanttechnologicaladvancesthatREDhasbrought tothemotionpictureindustry.
Thiscameraemploysglobalshuttertechnology.Thistechnologyexposesallofthesensor'spixelsineachframe simultaneously,unlikearollingshutterthatexposeslinesofpixels(eachwithadelay)causingimageartifactsonfastmovingobjects.Globalshuttertechnologynotonlyimprovesthevisualappearanceofthiscamera'simages,italso eliminatestrackingandmatte-paintingdistortionsduringpostproduction.
ThiscamerausesRED'sImageProcessingPipeline2(IPP2).InIPP2,theadvancedREDcolorspace (REDWideGamutRGB)allowsthecameratouseeverycolorthatthesensorcangenerateuptotheclippingthreshold. ThenthecameraencodestheimageusingLog3G10,agammacurvethatretainsextremehighlightandshadowdetail. Usingtheadvancedcolorspaceandgammacurve,REDIPP2allowsyoutogradeandmakecoloradjustmentsinpostproduction,insteadofin-camera.IPP2alsoallowsthecameratousea CDL forgrading.Formoreinformationabout IPP2,refertothe REDIPP2 supportpage.
Highresolutionvideo,suchasthedigitalfootagecapturedbythecamera,hassurpassedthedetailnecessaryto produceprofessionalfull-sizedprints.BecausethecameraisabletorecordRAWvideoathighframeratesand resolution,thiscameraisideallysuitedtocapturevideoandstillimagessimultaneouslywhilestillpreservingthefull flexibilitythatRAWstillphotographershavecometoexpect.
Manynon-lineareditingsystems(NLEs)canopenandeditREDfootage,allowingfullRAWcontrolandflexibilitywithout anyneedtore-transcode.EachNLEversionmayhavespecificcompatibilityrequirements,suchascamerafirmware versionorcameratype.Beforeshooting,makesureyoucheckallofthecompatibilityrequirements.
Youcanopenand/oreditR3Dfilesbyusingoneofthefollowingproducts:
REDCINE-XPRO:RED'sproprietaryapplication.Download REDCINE-XPROforWindows or REDCINE-XPROfor Mac from www.red.com/downloads
AdobePremierePro
AvidMediaComposer
DaVinciResolve
FinalCutProX:Requiresyoutodownloadthe REDAppleWorkflowInstaller from www.red.com/downloads.
FoundryNuke
AssimilateScratch
AutoDeskFlame
ColorFrontTranskoder (betaforlatestsupport)
PomfortSilverstack
NOTE: Third-partyapplicationsmayhavelimitedcompatibilitywithR3Dfiles.Third-partydevelopersmustusethemost recent R3DSDK tooffercompatibilitywiththelatestREDfirmware.
REDCINE-XPROisaprofessionalone-lightcoloringtoolset,equippedwithanintegratedtimeline,andwitha collectionofposteffectssoftware.REDCINE-XPROprovidestheidealenvironmenttoreviewrecordedfootage,edit metadata,organizeprojects,andprepareyourR3Dfiles.YoucanuseREDCINE-XPROoranyofthecompatiblethirdpartyNLEstoeditR3Dfiles.
RED.com:Visitthe officialREDwebsite forthelatestinformationaboutREDproducts. REDDownloads:Goto REDDownloads todownloadthelatestfirmware,operationguides,andpost-production software.
RED101Articles:REDoffers in-depthtechnicalarticles aboutREDcameras,post-production,anddigital cinematography.
REDTECHVideos:REDoffers videos aboutunderstandingandusingREDcameras.
REDSupport:Visitthe REDSUPPORTsite forsupportarticlesortofileasupportticket.
CongratulationsnewREDKOMODO-X™6KS35cameraowner.Thisquickreferencetopichelpsyougetfamiliarwith thisguideandthe CameraBody.Itincludeslinkstotopicsaboutconfiguringthecameratofityourrecording requirements,andforlearningthebasicoperationofthecamera.
Preparethecamerahardwareforrecordingby:
Attachingaccessories(referto Accessories)
Installing LensesandAdapters
InsertingtheMedia
Connectingapowersource(referto Power or Accessories)
TurningOntheCamera
Configurethecamerasettingstoprepareforrecordingby:
Configuringthecamerasystemsettings(refertothe SystemSettingsMenu)
UpgradingtheFirmware and UpgradingtheDSMC3™RED®Touch7.0"LCDFirmware
Calibratingthecamerausingthe Calibrate feature
Formattingthemedia(referto SecureFormat)
Specifyingthedesiredrecordingresolution(referto Format)
Configuringthe RecordingFrameRate and ProjectTimeBase
Settingtheexposure(referto Shutter)
Configuringthemonitoringtoolsandreviewingthemonitoredimage(refertothe MonitoringMenu)
Reviewingthecamerastatus(referto SystemStatus)
Startrecordingyourproject.
RecordbypressingtheRECbuttononthe CameraBody, OutriggerHandle,or RED®CompactTopHandleand Extensions
RecordbyusingtheTopLCD(referto DSMC3™RED®Touch7.0"LCD)
Recordbyusinganexternaltrigger(referto ExtensionPort)
Start,stop,andcontrolthecamerabyusingUSB-C(referto USB-CConfiguration)
Start,stop,andcontrolthecamerabyusingWi-Fi(referto HowTo)
Performpost-productionusinganyofthestandardapplications.
Adobe® Premiere® Pro
Avid® MediaComposer®
DaVinciResolve®
FinalCutProX®
NOTE: Third-partyapplicationsmayhavelimitedcompatibilitywithR3Dfiles.Third-partydevelopersmustusethemost recent R3DSDK (8.3orlater)tooffercompatibilitywiththelatestREDfirmware.
Thissectiondescribesthe Front, Top, Left, Right, Back,and Bottom ofthecamera,andidentifiesthecontrols,buttons, CameraBodyLEDs,andthelensmountonthebody.
Thissectiondescribesthecontrolsandfeaturesofthecamera.

5


Figure:CameraBodyLeftControlsandFeatures


Figure:CameraBodyRearControlsandFeatures
# ITEM DESCRIPTION
1 MicroV-Lockbattery mount 14.4VMicroV-Lockmount(referto REDVOLT®MICRO-VBattery and REDVOLT® NANO-VBattery)
2 WirelessantennaWi-FiantennamountedtoafemaleRP-SMAconnector.Supportsdualband2.4GHzor 5GHz
3 USBType-Cport USBType-CPort forUSB-Cconnection
4 12G-SDI port Full-size12G-SDIBNCportforSDImonitorconnection1,2
5 Headphoneport3.5mmstereoheadphoneoutput
6 AudioportandLED5-Pin00BODUfor2channelaudio(Line,Mic,and+48V)
7 9-pin ExtensionPort 9-pin0BODUport(referto ExtensionPort)
8 6-pinDC-IN portand LED 6-pin1BODUforDC-IN(11-17Volts)andpowerstatusLED(referto 6-pinDC-IN)
1.Usecertified12G-SDIcables.
2. WARNING:Alwaysconnecttheaccessories'DCpowercable(orbatteries)beforeconnectingtheBNCSDIcable.AlwaysremovetheBNCSDI cablebeforeremovingtheaccessories'DCpowercable(orbatteries).Formoreinformation,referto PreventingDamagetoSDIOutputs

Figure:CameraBodyBottomControlsandFeatures
#ITEM DESCRIPTION
1MountingPointsOne(1)1/4"-20mountingholeandone(1)3/8"-16mountinghole
2RegistrationPointsIndentedalignmentpoints
3ServicePort ForREDserviceonly-DONOTREMOVE
FRONTLED

Figure:CameraLED,Front
# ITEM
COLOR
DESCRIPTION
1 TallyIndicatorLED Red Whenenabled,thisLEDisONwhenthecamerais recording.ForinformationaboutenablingthisLED,referto Indicators.

Figure:CameraLED,LeftSide
# ITEM
COLOR/FLASHING
1 CFexpressMediaLEDOff
Green
Amber
Amberflashingslow
Redflashingslow
Redflashingfast
Red
DESCRIPTION
Nomediamounted
Preview;mediamountedwith>10%of mediaspaceavailable
Recordingfinalizingorplaybackmode
Formattingmedia
Mediamountedwith>5%and<=10%of mediaspaceavailable
Mediamountedwith<=5%ofmediaspace available
Recording

Figure:CameraLED,RightSide
# ITEM
COLOR/FLASHINGDESCRIPTION
1 PowerStatus(ON) Off CameraOFF
Amber Camerabooting
Green CameraON
Amberflashing Cameraon;5to10minofbatterytimeavailable
Redflashing Cameraon;<5minofbatterytimeavailable
Red Camerashuttingdown
2 RecordStatus(REC) Off Nomediapresent
Green Readytorecord
Red Recording
Amber Finalizing
Redflashingslow Mediamountedwith>5%and<=10%ofmedia spaceavailable
Redflashingfast Mediamountedwith<=5%ofmediaspace available
3 Power(firmwareupdate)Flashinggreen Firmwareupdateinprogress Flashingred Firmwareupdateerror(referto Upgradingthe Firmware)

Figure:CameraLEDs,Rear
# ITEMCOLOR DESCRIPTION
1 Phantom power Blue Indicatesthatthe+48VPhantomPowerisenabled
2 DC-INGreen
DC-INispresentand/orthebatteryisfullycharged FlashingAmberCommunicatingwith,andevaluatingthebattery Amber Chargingconnectedbatteries Red Errorchargingthebatteries
Thissectionliststhecompatiblelensesandadaptersforthecamera.Italsoprovidesthestepsfor AttachingLenses and RemovingLenses Formoreinformationonaspecificlensoradapter,refertotheoriginalmanufacturer’sinstructions.
WARNING: Whenthecameraisnotinuse,protectlensesandthecamerasensorbyattachingthelenscapsand cameramountcap.

Figure:Camerawithmountcapinstalled.
IncompatiblelensesmaynotregisteronthecameraUIorshowanyUIlensinformationormenucontrols.Thecamera cancontrolcompatiblelenseselectronically,includingthefollowingfeatures: Iris-TheUImenuisenabledandthecameracancontrolthelensIris Autofocus-TheUImenuisenabledforlensesthatsupportautofocus ImageStabilization-TheUIindicatesthatimagestabilizationispresent ControlRing-TheUImenuisenabledandthecameracanusethecontrolring Formoreinformation,refertothe Lens menu.
ThelatestRED-testedandapprovedlensesarelistedontheKOMODO-Xsectionof REDSupport.
Usealenssupportsystemwhenmountingheavyorlonglensestoyourcamera.
Whenmountingaheavyorlonglens,ensurethatthefullweightofthelensisneverdirectlyonthecameraorlens mount.Mountthelenstothesupportsystemfirst,andthencarefullymountthelenstothecamera.
REDtestedthefollowingadaptersanddeterminedthattheyarecompatiblewiththecamera:
KOMODO-X™RFtoPLAdapter(referto KOMODO-X™RFtoPLAdapterPack)
CanonMountAdapterEF-EOSR
CanonDrop-InFilterMountAdapterEF-EOSRwithVariableNDFilter/ClearFilter/CircularPolarizer
1.Unlockthelockingringbyrotatingittothefullycounterclockwiseposition.
2.Pressandholdthelensreleasebuttononthecamera.Whileholdingthelensreleasebutton,turnthecameralens mountcapcounter-clockwiseuntilitstops,andremoveitfromthecamera.Ifthelenslockingringrotateswhile removingthecap,makesurethatyouholdthelockingringtabinplacewhilerotatingthecap.
3.Removetherearlenscapfromthemountendofthelens.
4.Alignthereddotonthelensmountwiththereddotonthecameralensmount,andinsertthelensmountofthelens inthecameralensmountopening.
5.Turnthelensclockwiseuntilitclicksinplace.Ifthelenslockingringrotateswhileattachingthelens,makesurethat youholdthelockingringtabinplacewhilerotatingthelensoradapter.
6.Gentlytightenthelockingring.DONOTOVER-TIGHTENTHELOCKINGRING.
7.Storethecameralensmountcapandtherearlenscaptogetherinadustfreelocation.
1.Loosenthelockingringgently.
2.Pressandholdthelensreleasebuttononthecamera.Whileholdingthelensreleasebutton,turnthelenscounterclockwiseuntilitstops,andremoveitfromthecamera.Ifthelenslockingringrotateswhileremovingthelens,make surethatyouholdthelockingringtabinplacewhilerotatingthelensoradapter.
3.Alignthereddotonthecameralensmountcapwiththereddotonthecameralensmount,andattachthecaptothe camera.
4.Gentlytightenthelockingring.DONOTOVER-TIGHTENTHELOCKINGRING.
5.Attachtherearlenscaptothelens.
6.Storethelenswiththefrontandrearcapsattached.
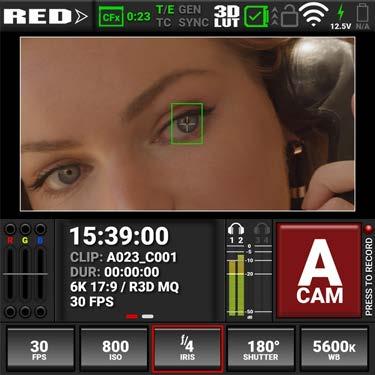
Thissectiondescribesthestructureandlayoutofthegraphicaluserinterface (GUI)fortheOnboardLCDtouchscreen.AdvancedGUImenucontrols enableconvenientaccesstomenus,camerafeatures,andcriticalcamera information.
NOTE: After1hourofinactivity,thetouchscreenwillgotosleep.Tapthe touchscreenortouchanybuttontowakethetouchscreen.Thetouchscreen willnotsleepwhilethecameraisrecording.
TheOnboardLCDTouchscreenhomepagecontainsthefollowingfeatures:
The StatusBar containsthebuttonfordisplayingtheHomescreenandMenuscreen.Italsocontainsstatusiconsfor variouscamerasettingsandinputs. WhenyoutaptheHome/Menutogglebutton(REDlogo),thecameratogglesthedisplaybetweenthemenupageand thehomepage:


WhenyoutaptheStatusbariconsthe StatusPage displays:

TheExposuresectionoftheOnboardLCDhomepagedisplaystheRGBexposurelevelsforthecamera.
Exposure Meter


RGBExposuredisplaysthepixelexposurequantityoftheseparateRGBchannelsandindicateswhenachannelis underexposedoroverexposed.ThismetermeasurestherawimagedataregardlessoftheISOandLUTsettings. ThetopandbottomRGBlightsilluminatewhenasmallnumberofpixelsonthesensorareoverexposedor underexposed.Thisindicatesthatasmallbrightordarkareaisintheimage.
ThelevelbarsshowthelevelsofoverexposedandunderexposedRGBpixelsonthesensor.Adjustthesettingsonthe cameratocompensate.
TaptheExposuresectiontotogglebetweenthisdisplayandthe MonitoringTools pagedisplay.
MEDIA/HISTOGRAM

TheMediasectionofthe Onboard LCDhomepagedisplaystheTimecodeor Edgecode,clipID,clipduration,resolution/format,andframerateforthecamera. TaptheMediasectiontotogglebetweenthisdisplayandtheHistogramdisplay.


TheHistogramsectionoftheOnboardLCDhomepagedisplaystheimagecolor histogram.TapthisareatotogglebetweenthisdisplayandtheMediadisplay.For moreinformation,referto Histogram
TheAudiosectionoftheOnboardLCDhomepagedisplaystheaudiolevelsforthecamera.Tapthe Audiosectiontotogglebetweenthisdisplayandthe AudioTools display.
TheAudioVUmetersdisplaytheaudiolevelsindecibel(dB)fortheselectedchannels.Refertothe Audio/TCMenusectionformoreinformationabouttheaudiochannels.
Inthisexample,channel2displaystheVUmeterclippingatmaximumdB.


TheCameraDesignationandRecordbuttonontheOnboardLCDtouchscreenhomepagedisplaysthecameraletter assignedtothecamera(referto Slate and CameraID).Youcantapthisareatostartpre-recording,andtostartand stoprecording.
Pre-recording:

Recording:


TheQuickSettingssectionoftheOnboardLCDhomepagedisplaystheQuickSettingsbuttonsforchangingthemost oftenusedcamerasettings.Thesesettingsinclude RecordingFrameRate, ISO,IRIS(referto Lens), Shutter,and White Balance.

TaponaQuickSettingbuttontochangethesettings. Swipethesettingleftorrighttomakeaselection.
TapEdittomanuallyenteravalue.
TapListtomanagewhichvaluesdisplayinthistool.
TapontheQuickSettingbuttontoclosetheselectionscreen.
TapandholdtheShutterbuttontoquicklytogglebetweenTimeandAnglesettings. TapandholdtheWhiteBalance(WB)buttontoquicklyswitchbetweenKelvinand Presets.
PressingtheMenubuttonnexttotheOnboardLCDtouchscreenopensthemainmenupage.Youcanselectthe desiredmenuitemsbyusingtheUp,Down,andSelect(SEL)buttons.PressingtheMenubuttonalsonavigates backwards(BACK)fromsubmenusinthemenutree.
PressingtheUparrowandtheDownarrowsimultaneouslylocks/unlocksthetouchscreenandthemenubuttons.The LockiconintheStatusbardisplaysthelockstatus.TheRECbuttonisnotlockedanditfunctionsnormally.
PressingthePlaybackbuttonstartsandstopsplayback(referto Playback formoreinformation). HomeScreen MenuScreen


ThetopoftheOnboardLCDscreendisplaysthecamerastatusbar.
TheStatusBarcontainsthefollowingbuttonandicons:

Home/MenuButton

MediaStatusIcon


Temperature/ExposureIcon
TimecodeIcon

GenlockIcon

SYNCIcon


StatusBar
3DLUTIcon
NetworkActivityIcon

LCDLockIcon

Wi-FiIcon

DC-InIcon
BatteryIcon

ThisbuttontogglestheOnboardLCDdisplaybetweentheHomescreenandtheMenuscreen.Thearrowonthebutton changesdirectionwhentoggled.
HomeScreen: MenuScreen:


ThisicondisplaysthestatusoftheCFexpressType Bmediacard,anditdisplaystherecordingtime remainingforthecurrentcamerasettings. Thestatusdisplayedincludes: Good Missing Incompatible
Thisicondisplaysthetemperature(T)andexposure(E) calibrationindicators.
•WhenTisyelloworred,itindicatesthatthecamera requiressensorre-calibrationatthecurrentambient temperature.
•WhenEisyelloworred,itindicatesthatthecamera requiressensorre-calibrationatthecurrentshutter speed.
Referto CalibratingtheSensor

ThisiconindicatesthestateoftheTimecode generatorconnection.

GrayindicatesthatnoTimecodegenerator signalisdetected.

GreenindicatesthattheTimecodesourceis connectedandjammed.

RedindicatesthattheselectedTimecode Sourceisnotpresent,ornotjammedinthelast12 hours.

WhiteindicatesthattheselectedTimecode sourceisnotcurrentlyconnectedbutwasjammed duringthecurrentcameraboot.

YellowindicatesthattheselectedTimecode sourcehasnotbeenjammedincurrentcameraboot buthasbeenwithinthelast12hours,orthat timecodesourceiscross-jammed(atadifferent ProjectTimeBase).

ThisiconindicatesthestateoftheGenlockconnection.

GrayindicatesthatnoGenlocksignalisdetected.

Greenindicatesthatthecameraisreceivinga Genlocksignal.

Redindicatesthatthecameraisreceivingandis notlockedtoaGenlocksignal.

ThisiconindicatesthattheTimecodeandGenlock signalsaresynchronizedtothecamera'sframesper second(FPS)settings.

Grayindicatesthatnosynchronizationis detected.

Greenindicatesthatthecamerais synchronizedwiththeTimecodeandGenlock signals.

Yellowindicatesthatthecamerais synchronizedusingGenlockbutnotTimecode.

Thisiconindicatestheactivationstatusof3DLUTs.

Grayindicatesthatno3DLUTsareinuse.

Whiteindicatesthatthecameraisusinga3D LUT.

Thisiconindicatesthestateofthecamerahardware. Thedifferenticonsandtheircorrespondingstatus include:

Good:Cameraoperatingasexpected.

AttentionRequired:Camera'scalibration requiresattentionorcameraisnearingoverheated state.

Overheating:Camerahasreachedtemperature thresholdandshutdownisimminent.

ShuttingDown:Cameraisshuttingdowndueto overheating.
ThisiconindicatesthestateofFTPSorClouddata transfer.
Grayindicatesthatnonetworkdatatransferis occurring.
Greenindicatesthatthecameraistransferring FTPSorClouddata.

ThisiconindicatesthestateoftheOnboardLCD Lock.Thestatesinclude:

Grayandopenindicatesthatthecamera OnboardLCDisunlocked.

Whiteandclosedindicatesthatthecamera OnboardLCDislocked.

ThisiconindicatesthestateofDCpowerconnection.

GrayindicatesthatnoDCpowerisconnected.

GreenindicatesthatthecameraisreceivingDC powerandthevoltagenumberisdisplayed.

ThisiconindicatesthestateofWi-Ficonnection.

GrayandemptyindicatesthatnoWi-Fisignalis detected.

WhitebarsindicatethatWi-Fisignalisdetected (Infrastructure).

WhiteantennaindicatesthatWi-Fisignalis broadcasting(Ad-hoc).

Thisiconindicatesthestateofthebatteryconnection andchargelevel.Whenthevoltageislow,itdisplaysthe voltageinred.

Grayindicatesthatnobatteryisconnected.

Whiteindicatesthatthebatteryisconnectedand greenshowstherelativelevelofchargeremaining.


Yellowindicates10minutesofpowerremaining.
Redindicateslessthen5minutesofpowerremaining.

Grayquestionmarkindicatesnocommunicationwith thebatteryandnopower.

Whitequestionmarkindicatesnocommunicationwith thebatteryandpower.

Grayexclamationpointindicateserrorcommunicating withthebatteryandnopower.
TheStatuspagecontainscamerastatusinformationandshortcutstotheassociatedcameramenus:

Thecamerastatusandmenushortcutsinclude:
ITEM
DETAILS
Media Displaysthemediastatusandalinktothe MediaMenu
Power Displaysthepowerstatusandalinktothe Power settingsmenu
SystemStatusDisplaysthecameratemperaturestatusandalinktothe SystemStatus menu
ProjectSettingsDisplaystheprojectstatusandalinktothe ProjectSettingsMenu
Lens Displaysthelensstatusandalinktothe Lens settingsmenu Wi-Fi Displaysthecommunicationstatusandalinktothe Wi-Fi settingsmenu
Maintenance DisplaystheTemperatureandExposurecalibration,theexternalconnectionstatus,andalink tothe MaintenanceMenu

OpentheMonitoringtoolsbytappingontheExposuresectionoftheOnboardLCDhomepage.
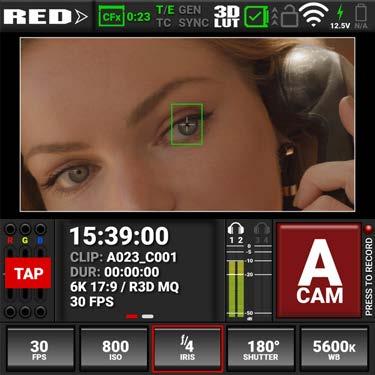

ReturntotheOnboardLCDhomepagebytappingthearrowbutton

TheMonitoringtoolsprovideaneasywaytotogglemanyofthemonitoringfeaturesonandoff. Whenthefeaturesareselected,thebuttonsindicatetheselection.
TheOnboardLCDswitchesallowyoutovieworhidetheenabledLCDmonitorGuidesandToolsontheOnboardLCD screen.

Whentheswitchesareselected,thegraybarturnsgreenontheleftsideoftheswitch.
TheOnboardLCDGuidesswitchdisplaystheMonitoring Guides (frameguidesandcenterguide)ontheOnboardLCD. TheOnboardLCDToolsswitchdisplaystheMonitoring Tools (falsecolor,peaking,zebra)ontheOnboardLCDandon LiveStream.
TheSDIswitchesallowyoutovieworhidetheenabledSDImonitorGuidesandToolsontheOnboardLCDscreen.

Whentheswitchesareselected,thegraybarturnsgreenontheleftsideoftheswitch. TheSDIGuidesswitchdisplaystheMonitoring Guides (frameguidesandcenterguide)ontheSDIoutput. TheSDIToolsswitchdisplaystheMonitoring Tools (falsecolor,peaking,zebra)ontheSDIoutput.
TheMagnifysectionallowsyoutoenableordisablemagnificationonthecamera'sLCDs(OnboardLCDandTopLCD) andtheSDImonitoroutput.Whentheswitchesareselected,thegraybarturnsgreenontheleftsideoftheswitch.

TheFocussectionallowsyoutoenableordisableoneofthefocustools.Thefocustoolbuttonyouselectwillturnred.

ForinformationaboutusingtheFocustools,referto Tools.
TheExposuresectionallowsyoutoenableordisableoneoftheexposuretools.TheExposuretoolbuttonyouselect willturnred.

ForinformationaboutusingtheExposuretools,referto Tools TOOLS
TheToolssectionallowsyoutoopentheMonitorToolsmenu.


ForinformationabouttheMonitorToolsmenu,referto Tools.
TheZebrasectionallowsyoutoenableordisabletheZebra1andZebra2modes.Whenthemodesareselected,the graybarturnsgreenontheleftsideoftheswitch.

ForinformationaboutusingthetwoZebramodes,referto Zebra1 and Zebra2
NOTE: TheHistogramfeatureisdisabledonMonochromecameras.

TapthehistogramareatotogglebetweentheHistogramdisplayandtheMediadisplay.


TheHistogramareaoftheLCDhomepagedisplaysanRGBexposuredistributionhistogramofthefinalimageasit appearsonscreen.ThehistogramtakesintoaccountexposureelementssuchasISO,LUTs,andwhitebalance. Thehistogramdisplaysthedarkestimageelementsatthefarleft,themidtonesinthemiddle,andthelightestimage elementsatthefarright.Thisprovidesaquickvisualtoolyoucanusetodetermineyouroverallimageexposurelevels.
OverexposedExample


UnderexposedExample

OpentheAudiotoolsbytappingontheAudiosectionoftheLCDhomepage.


ReturntotheLCDhomepagebytappingthearrow . TheAudiotoolsprovideaneasywaytocontrolmanyoftheaudiofeatures. Whenthefeaturesareselected,thebuttonsindicatetheselection.
Theheadphonesectionallowsyoutoenable/disabletheheadphoneoutput,toselectinputfromInternalMicrophone,or External,andtoadjusttheheadphonevolumewithaslider.

TheAudioSourcesectionallowsyoutoselecttheaudiosourcethecamerawillrecordtotheclip.Youcanselect InternalMicrophone,External,both,ornone.Usethesliderstoadjustthegainforeachchannel.YoucanusetheLink buttontolinkchannels1and2,ortolinkchannels3and4.Thisallowsyoutoadjustbothoftheinternalorexternal channelstogether.

TheAudioVUMetersectiondisplaystheaudioinputreceivedbythecamerafromthefourchannels.

Astheinputincreases,thelevelindicatorchangesfromgreentoyellowtoorangetored.Whentheaudioinputclips, thechannelnumberatthetopoftheVUmeterturnsred:

WhenyoupressonthePlaybackbutton,theOnboardLCDTouchscreendisplaysthePlaybackscreen.

ToclosethePlaybackscreen,pressthePlaybackbutton.
NOTE: Whenyouopenplayback,itdisablesmanyofthemenusettings.

ThePlaybackscreendisplaystheclipimagealongwiththefollowing:
ClipSlider
RGBExposure
Histogram
AudioVUMeters
ClipInformation
PlaybackScreenButtons

Useyourfingertomoveforwardandbackwardthroughtheframesbyswipingtheimagetotheleftandtheright.The ClipSlidershowswhereinthetimelinethedisplayedframeislocatedintheclip.

RGBExposuredisplaystheexposurelevelsoftheseparateRGBchannelsandindicateswhenachannelis underexposedoroverexposed.ThismetermeasurestherawimagedataregardlessoftheISOandLUTsettings.

Thehistogramdisplaysthedarkestimageelementsatthefarleft,themidtonesinthemiddle,andthelightestimage elementsatthefarright.Thisgivesyouaquickwaytoviewyouroverallimageexposurelevels.
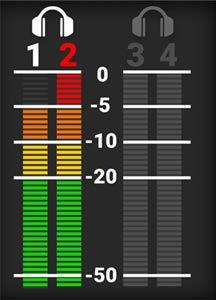
TheAudioVUmetersdisplaytheaudiolevelsintheplayedclip.

TheClipInformationdisplaysthename,duration,timebase,andformatoftheclip.

WiththePlaybackscreenbuttonsyoucanviewtheCliplist,moveoneclipback,moveoneframeback,play/pause, moveoneframeforward,andmoveoneclipforward.
TheClipListbuttondisplaysthelistofclipsrecordedonthemediacard. Eachclipdisplaysthefirstframeoftheclip,theclipinformation,andtheclipfileformat.

Swipeupanddowntoscrollthroughthelistofclips.Tapthedownarrowtoopentheclipinformationscreen.


WhenyoutaptheLoadbutton,thecameraloadsthecliptothePlaybackscreen.
Thissectiondescribesthemenusandsub-menusforthecamera.Toaccessthemenus,navigatetoamenuitemfrom the OnboardLCDTouchscreen
Image/LUTMenu ISO,Shutter,WhiteBalance,OutputColorSpace,OutputToneMap,HighlightRoll-Off, DisplayPreset,3DLUT,CDL,ExposureAdjust
ProjectSettingsMenu Format,RecordingFrameRate,ProjectTimeBase,FileFormat,R3DQuality, ProResResolution,ProResCodec,ProResColorProfile,Pre-Record,RecordingMode, Timelapse,FrameLimit,Slate
Audio/TCMenu AudioSource,InternalMic,ExternalAudio,Headphone,TimecodeSource, Auto-JamToggle,JamTimecodetoTOD,ManualTimecode,TimecodeDisplayMode
MonitoringMenu OnboardLCD,TopLCD,SDI,LiveStream,Tools,Guides
MediaMenu Eject,MediaInfo,SecureFormat
UserSettingsMenu CreatePresetsandassignUserButtonfunctions
AutofocusMenu EnableAF,Mode,Size,Position,AFToggle
CommunicationMenu Camera,Connections(USB-C,Wi-Fi,Serial),Clients&Services(FTPS,PTP),Cloud Upload(Frame.io,AWSS3)
SystemSettingsMenu Date/Time,Licenses,Lens,Power,Sensor,Indicators,GPO,StatusSettings,System Status
LanguageMenu English,Chinese,French,German,Japanese,Spanish
MaintenanceMenu Calibrate,Calibration,SaveLog,ResetDefaults,FactoryReset,UpgradeFW
TheImage/LUTmenucontainsthesettingsyouusetoconfigureyourimage. FromtheOnboardLCDtouchscreenmenu,tapImage/LUT:

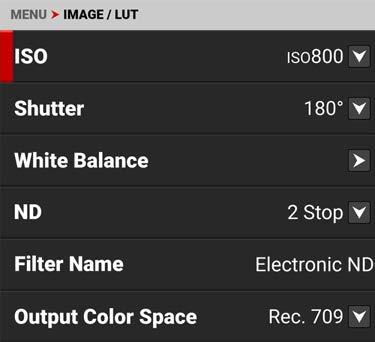
UsetheImage/LUTmenutoconfigurethecamera'simageandlookuptable(LUT)settings:
ITEM
ISO
Shutter
WhiteBalance
ND
FilterName
OutputColorSpace
OutputToneMap
HighlightRoll-Off
DisplayPreset
3DLUT
CDL
ExposureAdjust
DETAILS
Adjuststheimage’sbrightnessinthemonitoringpath
Adjuststheamountoftimethesensorisexposedtolight
Adjuststhecolorstocompensateforthelightsourcetemperature
Whenattached,youcanadjusttheNDvaluefortheRFtoPLAdapterw/ ElectronicND
Whenattached,thisdisplaysthenameofthePLfilter.
Adjustson-setworkingcolorspace
Adjuststheimagecontrast
Adjustsimagehighlightcompression
SelectthedisplayedpreviewimagegammafortheSDIport
Managethecamera'slookuptables(LUTs).
OpenstheColorDecisionList(CDL)menu
Manuallyfine-tunesthemidtoneexposurelevel
UsetheISOsettingtoadjusttheimage’sexposureinthemonitoringpath.


TheISOrangeisISO250toISO12,800.ThedefaultISOisISO800forcolorandISO2000forMonochrome. HigherISOvaluescreatebrighterimagesinthemonitorpath,andlowerISOvaluescreatedarkerimagesinthemonitor path.
Whenyourecord,theISOsettingsarestoredasmetadataandyoucanadjustthemnon-destructivelyinpostprocessingwithREDCINE-XPROorothereditingtoolsthatsupportR3Dfiles. REDrecommendssettingtheISOtothedefaultof800,thenadjustingtheapertureandlightingtomatch.Youcan adjusttheISOlaterforfine-tuning.
NOTE: WhenyousettheFileFormattoProRes,theISOisbaked-intheimage.
UseShuttertoselecttheexposuretime(shutterspeed/shutterangle).Thecameraallowsyoutochangetheshutter settingswhilerecording.
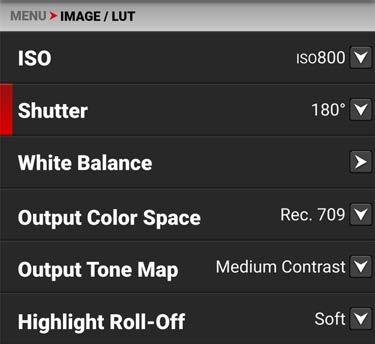

YoucanswitchbetweenAngleandTimesettingsbyholdingdowntheOnboardLCDShutterquicksettingbuttonon themainmenu,orbychangingtheShutterDisplaymodeinthe StatusSettings menu.
YoucantapEdittochangetheShutter menuvaluesmanually.

YoucantapListtochoosewhichvaluesyou wanttodisplayonthemenulist.

Entertheexposurevalueasashutterangle(xx°).Theshutteranglerangeis1°to360°.Thedefaultshutterangleis 180°.ClickEdittoenteranexactshutterangleorshutterspeed.
Thetablebelowlistscommonshutterangleandshutterspeedequivalents.Thecalculationsinthetableusearecording framerateof23.98fps.
SHUTTERSPEED
Entertheexposurevalueasashutterspeed(1/xxsec).
Theslowestshutterspeedis1/(recordingframerate).Forexample,iftherecordingframerateis23.98fps,theslowest availableshutterspeedis1/23.98sec.Theslowestavailableshutterspeedinthecamerais1/5.99secwhenthe recordingframerateissetto5.99fps.Thefastestshutterspeedis1/8000sec.Thedefaultshutterspeedis1/47.95 sec.
CONVERTSHUTTERSPEEDTOSHUTTERANGLE
ShutterAngle=(ShutterSpeedxFrameRatex360)
Example:(1/47.95x23.98x360)=180
CONVERTSHUTTERANGLETOSHUTTERSPEED
ShutterSpeed=1/(FrameRatex360/Angle)
Example:1/(23.98x360/180)=1/47.95
UsetheWhiteBalancemenutoadjustthe ColorTemperature, ColorTemperaturePresets, Tint andexecutethe Auto WhiteBalance
NOTE: ColortemperatureisdisabledonMonochromecameras.


YoucanswitchbetweenKelvinandPresetsbyholdingdowntheOnboardLCDWBquicksettingbuttononthemain menu,orbychangingtheWhiteBalanceListmodeinthe StatusSettings menu. WhenshootinginR3Dformat,thecamerastoreswhitebalanceasmetadata,whichyoucanadjustnon-destructivelyin post-productionafterfilming.
UsetheWhiteBalancemenutoconfigurethecolortemperatureandtintsettingsforyourimage:
ColorTemperature
ColorTemperaturePresets
Imagecolortemperaturecorrection
Tapabuttontoselectapresetcolortemperature Tint Adjustmagenta-greencolorcomponent
AutoWhiteBalance
Thecameraautomaticallysetsthecolortemperatureandtint
NOTE: WhenyousettheFileFormattoProRes,WhiteBalanceisbaked-intheimage.
UseColorTemperaturetoadjusttheimage'scolortemperatureinKelvinunits(K)orbyselectingpresets.
NOTE: ColortemperatureisdisabledonMonochromecameras.


Whentheimage'slightsourcecolortemperatureiswarm,youcancompensatebysettingthecameratoawarmercolor temperature.Whentheimage'slightsourcecolortemperatureiscool,youcancompensatebysettingthecameratoa coolertemperature.
Thecolortemperaturerangeis1,700Kto10,000K.Thedefaultcolortemperatureis5600K.
WhentheWhiteBalanceListMode(referto StatusSettings)issettoPresets,theColorTemperaturemenulistusesthe presettemperaturesinsteadoftheKelvintemperatures.

UseColorTemperaturePresetstoselectapre-configuredcolortemperature.
NOTE: ColortemperatureisdisabledonMonochromecameras.


Thecolortemperaturepresetsyoucanselectinclude:
Incandescent2800K Daylight5600K
Tungsten3200K Cloudy7500K
Fluorescent4500K Shade9000K
Flash 5500K
UseTinttoadjusttheimage'scolortint.
NOTE: TintisdisabledonMonochromecameras. Colortemperaturecalculationsassumeapurelightsourcethatmaynotbetrueinthespecificscenethecamerais imaging.Tocompensateforanyresidualcolorcast,theTintsettingadjuststheRGBcolorbalancewithacompensating magenta-greencolorcomponent.


Tintrangeis–100to100.ThedefaultTintsettingis0.
UseEdittoopenthekeypadscreenwhereyoucanenteraspecificTintvalue.

UseAutoWhiteBalancetousethecamera'sautomaticwhitebalanceadjustment.

WhenshootinginR3Dformat,thecamerastoreswhitebalanceasmetadata,whichyoucanadjustnon-destructivelyin post-productionafterfilming.
TouseAutoWhiteBalance:
1.Placean18%graychartinthecenteroftheimageunderthecorrectexposure.
2.Fromthe WhiteBalance menutapOKnextto AutoWhiteBalance
3.Thecameraautomaticallysetsthecolortemperatureandtintsettings.
NOTE: Placethechartinthesamelocationasyoursubject,andilluminateitwiththesamelighting.Makesurethatyou centerthechart,andthatitfillsatleast25%ofthesensorarea.
WhentheRFtoPLAdapterw/ElectronicNDisattached,andtheElectronicNDfilterisinserted,youcanusethismenu toselectthedensityoftheNDfilter.


TheNDfilterrangeis2-7stopsor0.6to2.1density.FromtheStatusSettingsmenu,youcanusetheNDDisplayMode submenutoselectStopsorDensityunits,andyoucanusetheNDIncrementssubmenutoselectthesizeofthe ND incrementsdisplayedonthecamera(referto StatusSettings formoreinformation).
UseOutputColorSpacetoselectthedesiredcolorspaceassociatedwiththeclip.WhenthecamerafileformatisR3D, itsavesthiscolorspaceasmetadata,whichyoucanadjustinpost-processing.WhenthecamerausestheProResfile format,andtheProResColorProfileisImage/LUT,thecamerabakesthecolorspaceintheresultingimage.


TheOutputColorSpaceselectionsinclude:
DCI-P3-DigitalCinemaInitiativestheaterprojectorstandardcolorspace
Rec.709-StandardColorSpaceforHDTV(default)
Rec.2020-StandardColorSpaceforUHDandHDR
REDWideGamutRGB-ColorspaceencompassingallofthecolorstheREDcameracangeneratewithoutclipping.
UseOutputToneMaptoadjusttheimagecontrastwhendisplayingthecameraoutput.


WhenshootinginR3Dformat,thecamerastoresthisasmetadata,whichyoucanadjustnon-destructivelyinpostproductionafterfilming.
TheOutputToneMapselectionsinclude:
LowContrast-Lowcontrastisappliedtotheimage
MediumContrast-Mediumcontrastisappliedtotheimage(default)
HighContrast-Highcontrastisappliedtotheimage.
UseHighlightRoll-Offtoselectthedesiredhighlightcompressiontousewhendisplayingthecameraoutput.


WhenshootinginR3Dformat,thecamerastoresthisasmetadata,whichyoucanadjustnon-destructivelyinpostproductionafterfilming.
TheHighlightRoll-Offselectionsinclude:
VerySoft-Thelightestcompressionisappliedtotheimagehighlights Soft-Softcompressionisappliedtotheimagehighlights(default) Medium-Mediumcompressionisappliedtotheimagehighlights Hard-Thehighestcompressionisappliedtotheimagehighlights.
UseDisplayPresettoselectthegammaofthedisplayedpreviewimagefortheSDIport:


WhenshootinginR3Dformat,thecamerastoresthisasmetadata,whichyoucanadjustnon-destructivelyinpostproductionafterfilming.
TheDisplayPresetallowsyoutoselectthegammaforthecamerapreviewandmonitoroutput. Eachmonitorisdesignedtodisplayusingaspecificgamma.MostmonitorsuseSDR.However,somesupportHDRand HLGgammasignals.Selectthedisplaypresetthatworksbestwithyourmonitor.
Theselectionsare:
SDR-StandardDynamicRange(default)
HDR-HighDynamicRange
HLG-HybridLog-Gamma
Standard-dynamic-range(SDR)videodescribesimagesorvideousingaconventionalgammacurvesignal.
High-dynamic-range(HDR)videoimagesarerecordedusingtheSMPTE-2084PQcurve.Thistechnologycapturesand outputsagreaterrangeofluminancethanimagesrecordedusingstandard-dynamic-range(SDR)methods.
Hybridlog-gamma(HLG)deliversHDRresolutionwithouttheneedformetadata.ThisallowsHLGtodisplaywellon SDRandHDRmonitors.
Usethe3DLUTmenutoapplyandmanagethecamera'sLook-UpTables(LUTs).


WhenyouarerecordingintheProResformat,youcanchoosetoirreversiblyencode(bake)the3DLUTintothe recordedfile.Formoreinformation,refertothe ProResColorProfile section. WhenyouarerecordingintheR3Dformat,thisLUTwillbesavedalongwitheachcliponwhichitisactivatedduring recording.TheoutputfilenameformatfortheLUTisclip_LUTName.cube.
TheLUTisnon-destructive,anditisreversible,whenrecordingintheR3Dformat. Toapplya3DLUT,followtheinstructionsbelow:
1.Goto MENU > IMAGE/LUT > 3DLUT > LUT.
2.SelectaLUTfromthe LUT list.
Toimport3DLUTsfrommedia,goto MENU > IMAGE/LUT > 3DLUT > OnMediaLUTs.


3DLUTscanbeimportedfrommediatothecamera.Whenimporting3DLUTsfrommediatothecamera,the3DLUTs mustbesavedontherootpathofyourmedia,inafoldertitled"luts."Thecameraonlysupports33x33x33LUTs.
FromOnMediaLUTs,youcan:
Importtheselected3DLUTfromthemediatothecamera Importall3DLUTsfromthemediatothecamera. WhenyoucopyLUTsfromacomputertothemedia,makesurethatthecardreaderisnotsettoreadonly.
Toexportanddelete3DLUTsstoredinthecamera,goto


Youcanexport3DLUTsstoredonthecamera,tomedia,touseonothercameras.Whenyouexport3DLUTsfromthe cameratomedia,the3DLUTsaresavedtoafolderonthemediacalled“luts.”
NOTE: WhenaLUTisactiveduringrecord,thecamerawillautomaticallysavetheLUTalongwiththerecordedclip.
FromInCameraLUTsyoucan:
Deleteaselected3DLUTfromthecamera
Exportaselected3DLUTfromthecameratothemedia Exportall3DLUTsfromthecameratothemedia.
TheColorDecisionList(CDL)allowsyoutodefinethelookofthecamera'scolorsinyourproject.
NOTE: TheCDLmenuisdisabledonMonochromecameras.


UsetheCDLmenuto: EnabletheCDLs
Configure CDLPower
Configure CDLSlope
Configure CDLOffset
Configure CDLSaturation
UsetheCDLsmenutoimportandexportCDLs.
CDLscanbestoredonthecameraortransferredtomediatobesharedwithothercameras.WhenexportingCDLsfrom cameratomedia,theCDLsaresavedtoafolderonthemediacalled“cdls”.WhenimportingCDLsfrommediatothe camera,theCDLsmustbestoredonthemediainafoldercalled“cdls.”
WhenyourecordwithaCDLinProResformat,theCDLisbaked-inwiththeProResfile.WhenyourecordwithaCDLin R3Dformat,thecameraautomaticallysavestheCDLfilealongwiththeR3Dfiles.
ToexportselectedCDLsfromthecameratothemedia,refertothe InCameraCDLs section. ToimportselectedCDLsfromthemediatothecamera,refertothe OnMediaCDL section.
AColorDecisionList(CDL)isametadatafileformatdevelopedbytheAmericanSocietyofCinematographers(ASC)to exchangestandardcolorcorrectioninformationbetweenpostproductiontools.Thisnon-destructivecoloradjustment layersimplifiestheversioningoflooksbyupdatingsimplemetadatawithouttheneedtore-transfertheimagedata.
CDLsareverycommoninVFXworkflowsbecausetheVFXartistneedsboththeungradedshotandtheintendedlook. Theungradedshotallowstheartisttocompintrulylinearlight,andtheintendedlookisneededtoconfirmthatthe individualplatesstillholdtogetherafterthegradeisapplied.
ThethreeCDLtonecurveparametersareSlope,OffsetandPower.Thesealgorithmsallowthecameratomodifythe recordedimage.
Slopemultipliestheincomingdata
Offsetissumoftheincomingdata
Powerisapowerfunctiontotheincomingdata
ThesethreerelatetoGain,Lift,andGammainthefollowingways:
Slope=Gain
GainAdjustshighlights.
Offset=Lift
LiftIncreasesthevalueofdarkcolors.
Power=Gamma
Gammaadjustsmidtones.
Thesethreerelatetoeachotherinthefollowingways:
Slope=inputxslope
Offset=(inputxslope)+offset
Power=((inputxslope)+offset)^power
TheformulaforASCCDLcolorcorrectionis:
where
isthecolorgradedpixelcodevalue
istheinputpixelcodevalue(0=black,1=white) isslope(anynumber0orgreater,nominalvalueis1.0) isoffset(anynumber,nominalvalueis0) ispower(anynumbergreaterthan0,nominalvalueis1.0)
Theformulaisappliedtothethreecolorvaluesforeachpixelusingthecorrespondingslope,offset,andpower numbersforeachcolorchannel.
Afourthparameter“Saturation”isachievedbyconvertingthe out datainaLumaandChromacomponent.TheChroma Signalisthenmultipliedbythe“Saturation”parameter.
WithSlopeandOffsetyoucanproducebothaFilmGrade“Exposure”and“Contrast”andaVideoGrade“Lift”and “Gain.”
ExposureisachievedbyOffset
ContrastisachievedbyacombinationofOffsetandSlope
GainisachievedbySlope
LiftisachievedbyacombinationofOffsetandSlope
GammaisachievedbyPower
TheCDLPowersettingscontrolthepoweroftheRed,Green,andBlue,colordata.
NOTE: TheCDLoptionsaredisabledonMonochromecameras.


UsetheCDLPowermenutoadjustthepoweroftheRed,Green,andBlueCDLdata.


TheCDLPowersettingsrangefrom0.00000to4.00000.ThedefaultCDLPowersettingforeachcoloris1.00000.The EditbuttonopensthekeypadwhereyoucanenteraspecificCDLPowervalue.
TheCDLSlopesettingsmultiplytheincomingRGBdata.
NOTE: TheCDLoptionsaredisabledonMonochromecameras.


UsetheCDLSlopemenutosettheslopeoftheRed,Green,andBluesignals.


TheCDLSlopesettingsrangefrom0.00000to2.00000.ThedefaultCDLSlopesettingsare1.00000.TheEditbutton opensakeypadwhereyoucanenteraspecificCDLSlopevalue.
TheCDLOffsetsettingscontroltheoffsetoftheRGBcolordata.
NOTE: TheCDLoptionsaredisabledonMonochromecameras.
TheCameraLCDMenuforCDLOffset:


UsetheCDLOffsetmenutoadjust theoffsetofthe CDLSlope forthe Red,Green,andBlueCDLdata.
TheseCDLOffsetsettingsrangefrom-1.00000to1.00000.ThedefaultCDLOffsetsettingforeachis0.00000.TheEdit buttonopensthekeypad,whereyoucanenteraspecificCDLOffsetvalue.

TheCDLSaturationsettingscontroltheintensityofthecolordata.
NOTE: TheCDLoptionsaredisabledonMonochromecameras. UsetheCDLSaturationmenutoadjusttheintensityoftheimagecolor.


TheCDLSaturationsettingsrangefrom0.00000to4.00000.ThedefaultCDLSaturationsettingis1.00000.TheEdit buttonopensakeypadwhereyoucanenteraspecificCDLSaturationvalue.
UseOnMediaCDLstoimportCDLsfromthemediatothecamera.
NOTE: TheCDLoptionsaredisabledonMonochromecameras.


WhenimportingCDLsfrommedia tothecamera,theCDLsaresaved toafolderonthecameracalled “cdls”.
FromOnMediaCDLsyoucan importaselectedCDLfromthe mediatothecamera,oryoucan importalloftheCDLsfromthe mediatothecamera. WhenyoucopyCDLsfroma computertothemedia,makesure thatthecardreaderisnotsetto ReadOnly.
UseInCameraCDLstoexportCDLsfromthecameratothemedia.YoucanalsoselectwhichstoredCDLyouwantto applytothecamera.
NOTE: TheCDLoptionsaredisabledonMonochromecameras.


WhenexportingCDLsfromthecameratothemedia,theCDLsaresavedtoafolderonthemediacalled“cdls.”
FromInCameraCDLs,youcanapplytheselectedCDLtothecamera,deletetheselectedCDLfromthecamera,export theselectedCDLfromthecameratothemedia,orexportalloftheCDLsfromthecameratothemedia.
UseExposureAdjusttomanuallyfine-tunethemidtoneexposurelevel.


TheExposureAdjustrangeis–8.000to8.000.Thedefaultis0.000.
ExposureAdjustallowsyoutoadjustthemidtoneexposurelevelswhilepreservingthehighlightsandshadows,even whenchangedsubstantially.TheExposureAdjustsettingisexpressedintermsofrelativeexposurevalue(EV),where eachunitrepresentsa1-stopchangeinmidtoneexposurelevel.
TheProjectSettingsmenucontainsthecamera'smainrecordingconfigurationsettings. FromtheOnboardLCDtouchscreenmenu,tapProjectSettings:


UsetheProjectSettingsmenutoconfiguretherecordingsettings: ITEMS
DETAILS
Format Sizeoftheareacapturedbythesensor
RecordingFrameRate Framesrecordedpersecond
ProjectTimeBase
FileFormat
R3DQuality
ProResResolution
ProResCodec
ProResColorProfile
Pre-Record
RecordingMode
Timelapse
FrameLimit
Imageplaybackrate
R3DorProResfileformats
Compressionleveloftherecordedimagefile
ResolutionoftherecordedProResimagefile
ProRescodecselection
RWG/Log3G10orImage/LUTsettings
Enableandconfigureapre-recordclip
SelectMotionorTimelapsemode
IntervalTimeandFramesperInterval
Enable,Frames,andPlaybackDuration
Slate EntertheCameraID,CameraPosition,CameraOperator,Scene, Shot,Take,Production,Director,DoP,andUnit
UsetheFormatsettingtodesignatehowmuchofthesensorthecamerashouldusetocaptureimages.


UsetheFormatmenutoconfigurethecamera'ssensorcaptureareasettings:
Super35(6K)
SelectfromSuper35sensorcaptureareas
Super35Anamorphic(6K) SelectfromSuper35anamorphicsensorcaptureareas
AllFormats Selectfromallsensorcaptureareas
Dimensions(Pixel) Displaysthedimensionsoftheselectedformatinpixels
Dimensions(mm) Displaysthedimensionsoftheselectedformatinmillimeters
Theavailableaspectratiosaredeterminedbytheselectedresolution.Thedefaultformatsettingis6K17:9. WhenyoulowertheresolutionintheFormatmenu,onlyaportionofthesensorisused.Thecameradoesnot downscalefromthe6K17:9formatwhenrecordingRAW.
UsetheSuper35(6K)formatsettingtodesignatehowmuchofthesensorthecamerashouldusetocaptureimages.

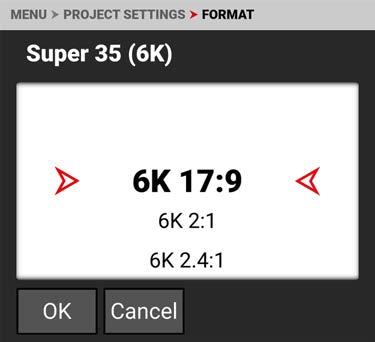
Theavailableaspectratiosaredeterminedbytheselectedresolution. Whenyoulowertheresolutiononthecamera,onlyaportionofthesensorisused.Thecameradoesnotdownscale fromthe6K17:9formatwhenrecordingRAW.
ThistablecontainsthedimensionsofthesensorareainPixelsandinMillimetersusedbyeachSuper35(6K)format. Thedefaultformatis6K17:9.
6K2.4:1
6K16:9
UsetheSuper35AnamorphicFormatsettingtodesignatehowmuchofthesensorthecamerashouldusetocapture images.


Theavailableaspectratiosaredeterminedbytheselectedresolution. Whenyoulowertheresolutiononthecamera,onlyaportionofthesensorisused.Thecameradoesnotdownscale fromthe6K17:9formatwhenrecordingRAW.
ThistablecontainstheeffectivedimensionsofthesensorareainPixelsandinMillimetersusedbyeachSuper35 Anamorphic(6K)format. Thedefaultsettingis6K4:32x.
FORMATDIMENSION(PIXELS)DIMENSIONDE-SQUEEZED (PIXELS) DIMENSIONS(MM)
6K4:32x 432032408640324019.0114.2623.76
6K6:52x 388832407776324017.1114.2622.27
6K1:12x 324032406480324014.2614.2620.17
6K3:21.8x 486032408748324021.3814.2625.70
6K4:31.8x 432032407776324019.0114.2623.76
6K3:21.6x 486032407776324021.3814.2625.70
6K16:91.5x 576032408640324025.3414.2629.08
6K17:91.3x 614432408192324027.0314.2630.56
6K17:91.25x 614432407680324027.0314.2630.56
UsetheAllFormatssettingtoselectfromallofthepossibleformatstodesignatehowmuchofthesensorthecamera shouldusetocaptureimages.


Theavailableaspectratiosare determinedbytheselected resolution.
Whenyoulowertheresolutionon thecamera,onlyaportionofthe sensorisused.Thecameradoes notdownscalefromthe6K17:9 formatwhenrecordingRAW.
ThistablecontainsthedimensionsofthesensorareainPixelsandinMillimetersusedbyallofthecameraformats.The defaultsettingis6K17:9.
6K17:9 6144324027.0314.2630.56
6K2:1 6144307227.0313.5230.22
6K2.4:1 6144259227.0311.4029.34
6K16:9 5760324025.3414.2629.08
6K1:1 3240324014.2614.2620.17
6K4:32x 4320324019.0114.2623.76
6K6:52x 3888324017.1114.2622.27
6K1:12x 3240324014.2614.2620.17
6K3:21.8x 4860324021.3814.2625.70
6K4:31.8x 4320324019.0114.2623.76
6K3:21.6x 4860324021.3814.2625.70
6K16:91.5x 5760324025.3414.2629.08
6K17:91.3x 6144324027.0314.2630.56
6K17:91.25x 6144324027.0314.2630.56
5K17:9 5120270022.5311.8825.47
5K16:9 4800270021.1211.8824.23
4K17:9 4096216018.029.5020.37
4K16:9 3840216016.909.5019.39
2K17:9 204810809.014.7510.19
UseRecordingFrameRatetoselecttherecordingframerate(alsoreferredtoasthecaptureframerate).


Therecordingframerateisthenumberofframespersecond(FPS)thatarerecorded.Therecordingframerateis differentfromtheprojecttimebase,whichistherateatwhichthefootagewillbeplayedback.Lowervaluesthanthe projecttimebasewillresultinunder-cranking(fastmotionplayback)andvalueslargerthantheprojecttimebasewill resultinover-cranking(slowmotionplayback).
Youcantap EDIT tochangetheRecordingFrameRatemenuvaluesmanually.


Youcantap LIST tochoosewhichvaluesyouwanttodisplayonthemenulist.


WhenyouselectaProjectTimeBase,thecameraautomaticallyselectsamatchingRecordingFrameRateandanR3D Quality(whenpossible).YoumustchangetheRecordingFrameRateandR3DQualityaftertheProjectTimeBaseto selectadifferentsetting.

ARecordingFrameRatehighlightedin yellowwillresultinplaybackoccurring atadifferentframeratethantheoriginalrecording,andwillrecordvarispeed audio.
Thistableliststhecamera'smaximumrecordingframerates.TheseratesarebasedonaProjectTimeBasesettingof 24framespersecond(24 FPS). FORMATFPS
6K17:9
4K17:9
UsetheProjectTimeBasesettingtochoosetheplaybackratefortherecordedfootage.


Thefollowingprojecttimebasesareavailable:
•23.98FPS(Default)•25.00FPS•30.00FPS•59.94FPS •24.00FPS •29.97FPS•50.00FPS•60.00FPS
WhenyouselecttheProjectTimeBase,itchangestheRecordingFrameRatetothesamesetting(whenpossible). WhenyouchangetheFormat,theRecordingFrameRateandProjectTimeBasedonotautomaticallyupdate.Youmust selecttheProjectTimeBaseafteryouchangetheFormatsetting.
NOTE: WhentheRecordingFrameRateissettoahigherspeedthantheProjectTimeBasesetting,audioisrecorded asvarispeedaudio(referto Audio/TCMenu).
UseFileFormattoselecttheformatthatthecamerausestorecordimagefiles.


Whenyouchangethefileformat,amessagewarnsyouthatthecameramustberebootedtocompletethechange:

R3DREDCODEFILEFORMAT
TheREDR3DfileformatrecordsimagesinacompressedRAWformat.IncomparisontoAppleProRes,REDCODE RAWdatadoesnotbakeinimagesettingslikeISO,saturation,orLUTs,allowingmoreflexibilityinpost-processing workflowswithoutreducingimagequalityordynamicrange.InsteadR3DfilesstoretheimagesettingsasMetadata. YoucanopenandprocessR3DfileswithREDCINE-XPROorwithnon-linearediting(NLE)softwarethatsupportsthe REDSDK.
R3Disthecamera'sdefaultfileformat.
APPLEPRORESFORMAT
ThissectionprovidesgeneralinformationaboutrecordingAppleProResfileswiththecamera,including: ThemaximumrecordingframerateinProResis120framespersecond(FPS).
QuickTimefileshavethesamemetadataastheREDCODERAWfiles.Themetadataisperclip,andnotperframe. Youcanselecta Format fromthe ProjectSettingsMenu andthecamerawillscaleittothetargetresolutionyou selectin ProResResolution
Recording4KProResfilesrequires4Kandaboveformatsin17:9.WheninProRes,formatsbelow4Kwill automaticallyberecordedas2KorHD.
FormoreinformationaboutAppleProRes,includingthedataratesforeachcodec,refertothe AppleProResWhite Paper
APPLEPRORESDESCRIPTION
ThetablebelowdescribeseachsupportedAppleProRescodec.
NAME CHROMASAMPLINGDATARATE
ProRes4444XQY'Cb Cr +α 4:4:4:41697Mbpsat4K17:9and24FPS
ProRes4444Y'Cb Cr +α 4:4:4:41131Mbpsat4K17:9and24FPS
ProRes422HQY'Cb Cr 4:2:2 754Mbpsat4K17:9and24FPS
ProRes422Y'Cb Cr 4:2:2 503Mbpsat4K17:9and24FPS
ProRes422LTY'Cb Cr 4:2:2 350Mbpsat4K17:9and24FPS
WhenyourecordusingR3D+ProResProxy,thisisthefilestructureoftherecordedfilesonthemedia: .RDMFolder .RDCFolder .mov .R3D
.rtn(REDThumbnailfile)
NOTE: Thecameracreatesmultiple.movfiles,similartohowthecameracreatesmultipleR3Dfiles.

WhenyourecordusingProResformat,thisisthefilestructureoftherecordedfilesonthemedia: .RDMFolder .RDCFolder .mov

UseR3DQualitytoselecttheR3Ddataratethecamerausestorecordtheimagefiles.


TheR3DQualityselectionsinclude:
HQ-Highdatarateandlessrecordingtime
MQ-Mediumdatarate(default)andlongerrecordingtime
LQ-Lowdatarateandlongrecordingtime
ELQ-Lowestdatarateandlongestrecordingtime
Forhighcomplexityscenes,VFX,andstillsfrommotionworkflows,REDrecommendstheHQsetting.Forcinema(nonVFX)andhigh-endTV,REDrecommendstheMQsetting.ForTV,onlinecontent,documentaryandinterviews,RED recommendstheLQsetting.ELQcompressionmodeprovidesnearly50%morerecordingtimethanLQ,andRED recommendsusingELQforsceneswherethecomplexityisloworthefinaldeliveryresolutionislowerthanthe acquisitionresolution(downsampling).
R3DQUALITYDATARATES FORMAT24PHQ24PMQ24PLQ24PELQ
6K17:9239MB/s168MB/s105MB/s65MB/s
WhenyouenableProResasthe FileFormat youcanselecttheProResresolution.


TheProResResolutionselectionsinclude:
HD(16:9)
2K(17:9)
UHD(16:9)
4K(17:9,default).
ThecamerawilldownscaletoachievetheselectedProResresolutionwhentheaspectratiosofyourformatandProRes resolutiondonotmatch.Itisrecommendedtoshoot4Kor2KProReswhentheformatis17:9,andtoshootUHDorHD whentheformatis16:9.
WhenyouenableProResasthe FileFormat youcanselecttheProResCodec.


TheProResCodecselectionsinclude:
ProRes4444XQ
ProRes4444
ProRes422HQ
ProRes422
ProRes422LT
NOTE: SomeProRescodecselectionsarenotavailableinallframerates.
WhenyouenableProResasthe FileFormat youcanselectthecolorprofile.


TheProResColorProfilesettingsinclude: RWG/Log3G10-REDWideGamutRGBcolorspaceandLog3G10gammacurve Image/LUT-AppliesallImage/LUTsettingsfor OutputColorSpace, DisplayPreset, 3DLUT,and CDL
NOTE: AllProResColorProfilesettingsbakeinboththeISOandtheWhiteBalancesettings.
UsethePre-RecordmenutoenableordisablePre-Record,andtoadjustthelengthofthePre-Recordedclip.


Pre-Recordallowsyoutocontinuallycaptureimagestoasmallamountofmemorywhilewaitingtobeginrecording. Thisallowsyoutocaptureunexpectedeventssuchas,awhalebreachingthewater,oranathletescoringagoal.When youfinishrecording,thepre-recordedclipisaddedtothebeginningoftherecording.
YoucansetthePre-Recordcliptorecordfromhalfasecondupto30seconds,dependingontheformat,filetype, resolution,andquality.Thedefaultsettingis2secondsatthedefaultProjectTimeBaseof23.98FPS.


Whentheselectedpre-recordtimeisnotpossibleintheselectedformat,theclosesttimeavailablewillbeshownin yellow.
Formoreinformation,referto Pre-RecordingContent.
SelectEnabletotogglePre-Recordonandoff.


SelectTimetochooseorenterthenumberofsecondstopre-record.


WhenyouselectaTimevaluelargerthanthecurrentsettingsallow,thecamerachangestheTimevaluetothe maximumvalueitcansupportandhighlightsthevaluein yellow.


PlaybackDurationdisplaysthedurationinsecondsthatthepre-recordclipwilllastinplayback.

FramestoRecorddisplaysthenumberofframesthepre-recordedclipwillcontainatthecurrentsettings.

UseRecordingModetoselectbetweennormalmotionrecordingortimelapserecording.


WhenyouselectTimelapse,theTimelapseoptionisenabledonthemenu.
UseTimelapsetoselectthetimelapsesettings.


FromTimelapseyoucanselecttheintervaltimebetweenthegroupofframesperinterval,andyoucanselectthe numberofframescapturedperinterval.
SelectIntervalTimetoentertheelapsedtimebetweenthegroupofframesperinterval.

Forexample:
60s=1minute
3600s=1hour
86400s=1day
SelectFramesPerIntervaltoenterthenumberofframestorecordperinterval.

Addingmoreframesperintervalallowsyoutohavemoreflexibilityinpost(forexample:imagestacking).
UseFrameLimittolimitthetotalnumberofframesrecordedperclip.FramelimitappliestobothMotionandTimelapse recordingmodes.


TheFrameLimitselectionsincludeEnable,Frames,andPlaybackDuration.
SelectEnabletotoggletheactivationoftheFrameLimitfeature.


Useframestoenterthemaximumnumberofframestheclipcanrecord.

PlaybackDurationdisplaysthecalculatedplaybackdurationoftheclipwiththeselectedFrameLimitandFPS. Forexample,using1440FramesasaFrameLimitat24FPSresultsinoneminuteofplaybackduration.
UsetheSlatemenutoassignacameraIDandcamerapositiontotheclip.


Theinformationyoucanaddtoaclipincludes:
CameraID Scene Production Unit
CameraPosition Shot Director
CameraOperator Take DoP
NOTE: WhenyousettheCameraIDandCameraPosition,theyarealsosetintheMedia>SecureFormatmenuitems.
UseCameraIDtoassignacameraIDwhenthecamerarecordsclips.
NOTE: YoucanalsochangetheCameraIDbyusingSecureFormat(referto SecureFormat).

ThecameraIDsyoucanassignwhenrecordingaclipincludethelettersA-Z.
UseCameraPositiontoassignacamerapositionletterwhenthecamerarecordsclips.

ThecamerapositionsyoucanassignwhenrecordingaclipincludethelettersA-Z.
UseCameraOperatortoenterthenameofthecameraoperator.

UseScenetoenterthescenename.

UseShottoenterthenumberoftheshot.

UseTaketoenterthenumberofthetake.

UseProductiontoenterthenameoftheproduction.

UseDirectortoenterthenameofthedirector.

UseDoPtoenterthenameofthedirectorofphotography.

UseUnittoenterthenameoftheproductionunit.

TheAudio/TCmenucontainsthesettingsyouusetoconfigureyourcameraaudioandTimecode. FromtheOnboardLCDtouchscreenmenu,selectAudio/TC:


UsetheAudio/TCmenutoconfiguretheaudioandTimecodesettingsforthecamera:
AudioSource Audioinputsource
InternalMicrophone(Ch1/2)
External(Ch3/4)
Headphone
TimecodeSource
AutoJam
JamTimecodetoTOD
ManualTimecode
TimecodeDisplayMode
Leftandrightinternalmicrophonelevels
Leftandrightexternalaudiolevels
Headphonevolumelevel
Timecodesource
Buttontoenableauto-jammingTimecodetotime-of-day(TOD)Timecode
ButtontojamTimecodetotime-of-day(TOD)
Buttontojamtothecamera'sinternalTimecodegeneratorandeditthe Timecodestartingnumber
Timecodetypetodisplay
Thecameraisequippedwithtwointegratedmicrophonessuitableforscratch-trackaudio(Ch1and2),anditis equippedwitha5-PinODUaudioconnectorthataccepts2-channelaudio,whichisconfigurableforLineorMiclevel inputs,andcanprovide+48VPhantompower(Ch3and4).
Youcanlinkthegainforthetwointernalchannelstogetherandyoucanlinkthetwoexternalchannelstogether.This allowsyoutoadjustthetwointernal(orexternal)channelstogetherasone.
Youcanrecordaudiofromtheinternalmicrophones,fromtheexternalaudioconnector(2-channelrecording),orfrom internalandexternalsourcescombinedasfour24-bit48kHzuncompressedaudiotracks.
Youcanadjusttheexternalaudiobyusingtheappropriatecameragain-settings.Thedefaultcameragainsettingis1 dB.
Thecamera'saudiodataissynchronizedwithvideoandtimecode,anditisembeddedintheR3Dfile.Youcanexport theaudiodataasseparateaudiofilesbyusingREDCINE-XPRO,ifneeded.Thecameraalsoembedstheaudiointhe SDIoutput.
Youcanmonitortheaudioduringrecordingandplaybackbyusingtheequipped3.5mmstereoheadphoneport.
WhenyouselectInternalMicrophone(Ch1/2)astheaudiosource,thecameraroutestheInternalMicrophonesignalsto SDIchannels1and2.WhenyouselectExternal(Ch3/4),thecameraroutestheExternalaudiosignaltoSDIchannels1 and2.WhenyouselectInternal+External,thecameraroutestheInternalMicrophonesignaltoSDIchannels1and2, andtheExternalAudiosignaltoSDIchannels3and4.
Thiscamerahastheabilitytorecordaudiowhenthecamera'sRecordingFrameRateissettoahigherspeedthanthe ProjectTimeBasesetting(Varispeedmode).
NOTE: ThecamerarecordstheaudioasaseparateWAVfileandstoresitintheclip'sRDCfolderonthemediadrive.

Timecodeprovidesamechanismtoreferenceframesfromthecamera'srecordedclipstoexternaldevices,suchas othercamerasoraudiorecorders.Somedevicescanalsogatheradditionaldatasuchas,lensmetadata,orcamera orientation,whichTimecodecanlateruseformergingthedatabacktogetherinpost-processing.
ThecameraprovidestwoseparateTimecodeformats:
TimeOfDay(TOD) -ThecamerarecordsthetimeofdayastheTimecodeforeachclip Edgecode -ThecamerarecordselapsedtimeastheTimecodeforeachclip.Thetimeisresetto01:00:00whena newmediacardisinsertedinthecamera.AlloftheclipsonthemediawillhaveacontinuousTimecodetrack. However,eachnewmediacardwilldefaulttoaTimecodetrackstartingat01:00:00.EdgecodeisequivalenttoRUN RECORDasusedonbroadcastcameras.YoucanchangetheEdgecodetobeginatanydesiredtimebyusingthe MediaFormatmenu(referto Edgecode).
Thecamerasynchronizes(jams)theTODTimecodetoanexternalTimecodegenerator(whenoneisconnectedtothe camera)oritjamstheTimecodetoitsinternalreal-timeclock.
WhenusingInternalTOD,ajambetweentherunningtimecodeandarealtimeclockisrequired.Thetimeatwhichthis jamoccurswillhaveaneffectontheoveralltimecodedriftovera24-hourperiodduetothenatureofnon-drop-frame (NDF)timecode.ByenablingAuto-Jam,thecameraautomaticallyjamsitstimecode,ensuringrepeatabledriftacross multiplecamerasanddays.
WhenAutoJamisdisabled,youcanmanuallypicktheinstantinwhichyouwanttojamtimecodetotherealtimeclock. ThecamerastoresTODandEdgeTimecodeintheR3Dfile.Youcanselectwhichoneyouwanttodisplayontheside LCD (referto TimecodeDisplayMode).
UsetheAudioSourcesettingstoselecttheaudioinputsource.


Theaudioinputsourcesinclude:
None
InternalMicrophone-enablesthe InternalMicrophone channels1and2(default)
External-enablesthe5-pin00BAudioInputportfor ExternalAudio channels3and4
InternalandExternal-enablestheInternalMicrophoneandthe5-pin00B AudioPort forallchannels1through4.
NOTE:Theheadphonescanonlymonitortwochannels.Youcaneithermonitorchannels1and2(internal microphone)oryoucanmonitorchannels3and4(externalport).Referto AudioTools formoreinformation.
UsetheInternalMicrophonesettingstosettheleftandrightinternalmicrophonelevels.Thismenuisonlyenabledwhen the AudioSource issettoInternalMicrophoneorInternalandExternal.


TheInternalMicrophoneisrepresentedasChannels1and2ontheUIVUMeters(referto Playback formore information).Theleftchannelischannel1(Ch1)andtherightchannelischannel2(Ch2).

Youcanadjusttheinternalaudiolevelsforleftandrightfrom-52.5dBto36.0dB. Thedefaultsettingis0dB.
WhenyouenableLinkLeft&RightGain,theadjustmentsyoumaketoeitherchannelofgainwilladjustbothchannelsto thesamesetting.
UsetheExternalAudiosettingstosettheleftandrightexternalaudiolevels.Thismenuisonlyenabledwhenthe Audio Source issettoExternalorsettoInternalandExternal.
NOTE: WhentheRecordingFrameRateissettoahigherspeedthantheProjectTimeBasesetting,audioisrecorded asvarispeedaudio.


TheExternalMicrophoneisrepresentedasChannels3and4ontheUIVUMeters(referto Playback formore information).

YoucanadjusttheexternalaudiolevelsforCh3andCh4from-8.0dBto 34.0dB.
Thedefaultsettingis1.0dB. WhenyouenableLinkCh3&Ch4Gain,theadjustmentsyoumaketoeither channelofgainwilladjustbothchannelstothesamesetting.
UseSourcetoselectthetypeofinputconnectedtoexternalaudiochannel3and4ports.

Youcanselectmicrophone,line,or+48Vphantompower. Thedefaultsettingismicrophone(Mic).
Whenenabled,usethelimitertoplacealimitpastwhichtheaudiolevelforchannels3and4cannotexceed.

Youcanselectfrom-2.0to-12.0DecibelFullScale(dBFS)asthelimit. Thedefaultlimitis-6.0dBFS.
UsetheHeadphonesettingstoenabletheheadphonejackandtoadjusttheheadphonevolume.


YoucanenableanddisabletheheadphoneaudiojackbytappingtheEnabletoggletotheright(green)andtotheleft (red).


Youcanadjusttheheadphonevolumefrom0to100.Thedefaultis75.

UseTimecodesourcetoconfiguretheTimecodesourcethecameraappliestotherecordings.


YoucanselectthefollowingTimecodesources:
InternalTimeofDay(TOD)
InternalManual
External
PrecisionTimeProtocol(PTP)
UseInternalTimeofDay(TOD)toJAMtothecamera'sinternalTimecodegenerator.WhenusingInternalTOD,ajam betweentherunningtimecodeandarealtimeclockisrequired.Thetimeatwhichthisjamoccurswillhaveaneffecton theoveralltimecodedriftovera24-hourperiodduetothenatureofnon-drop-frame(NDF)timecode.
ByenablingAuto-Jam,thecameraautomaticallyjamsitstimecode,ensuringrepeatabledriftacrossmultiplecameras anddays.WhenAutoJamisdisabled,youcanmanuallypicktheinstantinwhichyouwanttojamtimecodetothereal timeclock.
UseInternalManualtoJAMtothecamera'sinternalTimecodegeneratorandedittheTimecodestartingnumber. SelectManualTimecodeOKtoopentheJAMandeditingoptions:

SelectJAMtojamtotheinternalTimecodeorselectManualTimecodetoopentheeditingscreen:


EnterthedesiredTimecodenumberandselectOK.SelectJAMtojamtotheeditedTimecodenumber.
UseExternaltoconnectanexternalTimecodegeneratortothe9-contact0BExtensionport(referto CameraBody and ExtensionPort formoreinformation).
PrecisionTimeProtocol(SMPTE2059-1)isanetwork-basedsynchronizationmethodwhichwhenconfiguredusinga USB-CtoEthernetadapteroffersalevelofprecisionthatsupportsframe-accuratecamerasynchronizationoverIP.PTP intheKOMODO-Xcamerabodyonlyoffersframe-levelprecisionandthereforecannotbeusedforsensorscan synchronization.PTPTimecodecanbesentoverUSB-CthroughanEthernetadapter.
UseTimecodeDisplayModetoconfiguretheTimecodedisplaytypethatthecameraappliestotherecordings.


YoucansettheTimecodeDisplayModeasTimeofDay(TOD)orEdge.
TimeofDay(TOD)displaymodedisplaystheTimecodeasthetimeofdaythattheframewasrecorded.
EdgedisplaymodedisplaystheTimecodeasthesequentialrecordingtimethathaselapsedstartingwiththefirst frame.
TheMonitoringmenucontainsthesettingsyouusetoconfigureyourcameramonitoringoptions. Fromthe OnboardLCDTouchscreen menu,selectMonitoring:


UsetheMonitoringmenutoconfigurethemonitoringsettings:
ITEMS DETAILS
OnboardLCD OnboardLCDTouchscreen settings
TopLCD
DSMC3™RED®Touch7.0"LCD settings
SDI SDIportresolution,frequency,look,guides,tools,overlay,andoverlaymode
LiveStream EnableordisableWi-Filivestreaming
Tools Variousmonitoringtoolsincluding FalseColor, Peaking,and ZebraModes Guides Frameguidesandacenterguide
UseOnboardLCDtoconfigurethe OnboardLCDTouchscreen settings.


TheLCDsettingsyoucanconfigureinclude:
Brightness AdjusttheOnboardLCDtouchscreenbrightness Look SelecttheImage/LUT,RWG,Log3G10,oraCustomDisplayimagepreview
CustomDisplay ConfiguretheCustomDisplaysettingswhenenabled
Guides Enableordisablethecameraguides
Tools Enableordisablethecameratools
MagnifyLCDs
EnableordisableLCDsmagnification
MagnifyPosition(Global) Selectthemagnificationareaposition
PrismFinderMode Enableordisabletheprismfindermode(horizontallyfliptheLCD)

Youcanadjustthecamera'stopLCDbrightnessfrom10%to100%.Thedefaultis80%


YoucanselectthelookoftheimagepreviewsignalsenttotheTop LCD.
Theselectionsinclude:
•Image/LUT(default)
•REDWideGamutRGB/Log3G10
•CustomDisplay(enablestheCustomDisplaymenu)
UseCustomDisplay(enabledfromtheLookmenu)toselecttheOnboard LCD'sImage/LUTsettings.
Referto Image/LUTMenu formoreinformationaboutthespecificlook settingsandmenus.
Usethetoggletoenable(default)ordisablethecameraguides.


Usethetoggletoenable(default)ordisablethecameratools.


Usethetoggletoenableordisable(default)OnboardLCDandTopLCDmagnification.


UseMagnifyPosition(Global)toselectthepositionofthemagnifiedareafor allLCDmagnification.
Usethetoggletoenableordisable(default)theLCDflipview.


UseTopLCDtoconfigurethe DSMC3™RED®Touch7.0"LCD settings.


TheLCDsettingsyoucanconfigureinclude:
Resolution AdjusttheRED®Touch7.0"LCDresolution Look SelecttheImage/LUT,RWG,Log3G10,oraCustomDisplayimagepreview
CustomDisplay ConfiguretheCustomDisplaysettingswhenenabled Guides Enableordisablethecameraguides Tools Enableordisablethecameratools
MagnifyLCDs
EnableordisableLCDmagnification
MagnifyPosition(Global) SelecttheLCDmagnificationareaposition PrismFinderMode Enableordisabletheprismfindermode(horizontallyfliptheLCD)

YoucanselecttheresolutionoftheTopLCD. Theselectionsinclude: Auto(default) 1080p 2KDCI


YoucanselectthelookoftheimagepreviewsignalsenttotheTopLCD. Theselectionsinclude:
•Image/LUT(default)
•REDWideGamutRGB/Log3G10
•CustomDisplay(enablestheCustomDisplaymenu)
UseCustomDisplaytoconfiguretheTopLCDindependentlyofthe camera'sImage/LUTsettingsorothermonitoroutputconfigurations. Referto Image/LUTMenu formoreinformationabouttheImage/LUT settingsandmenus.
Usethetoggletoenable(default)ordisablethecameraguides.


Usethetoggletoenable(default)ordisablethecameratools.


Usethetoggletoenableordisable(default)LCDmagnification.


UseMagnifyPosition(Global)toselectthepositionofthemagnifiedareaforallLCDmagnification.

UseMagnifyPositiontogloballyselecttheareaoftheimageyouwanttomagnify.
Theselectionsinclude:
•Left
•UpperMiddle
•UpperRight
•UpperLeft•Center(default)•LowerRight
•LowerLeft•LowerMiddle
PRISMFINDERMODE
•Right
Usethetoggletoenableordisable(default)theLCDflipview.


UseSDItoconfiguretheSDIportsettings.


TheSDIportsettingsyoucanconfigureinclude:
Frequency SelecttheSDIportfrequency
Resolution SelecttheSDIportresolution
Look
CustomDisplay
Guides
Tools
Magnify
MagnifyPosition(Global)
Overlay
OverlayMode
OverlayOpacity
SelecttheImage/LUT,RWG,Log3G10,oraCustomDisplayimagepreview
ConfiguretheCustomDisplaysettingswhenenabled
Enableordisablethemonitorguides
Enableordisablethemonitortools
Enableordisablemonitormagnification
Selectthemagnificationareaposition
Enableordisablethemonitoroverlay
Selecttheoverlaytype
Selecttheopacityoftheoverlay
Flip/Mirror Flipandmirrortheimageoutputtothemonitor
WARNING: Undercertaincircumstances,itispossibleforanSDIconnectortoincurdamagewhenconnectedtoan accessoryandpoweredwithoutusingshieldedcables.REDrecommendsonlyusinghighquality,shieldedBNCcables thatareratedfor12G-SDIsignalsandonlyusingshieldedpowercablesforpoweringSDIaccessories.
MakesurepowerisconnectedtotheSDIaccessoryatalltimesbeforeyouconnecttheBNCtothecamera. UngroundedpowerfromSDIaccessoriescandamagethecamera’sSDIport.Toavoidthispossibledamage,attachthe powersourcetotheaccessorybeforeattachingittotheBNCcable.WhenusingREDApprovedThirdPartybattery plates,unplugtheBNCcablepriortohotswapping.
Whenpossible,avoidusingP-Tap(alsoknownasD-Tap)cablestopoweraccessories.ToavoiddamagewhenusingPTap/D-Tap,it’simperativethattheconnect/disconnectsequence(below)isfollowedprecisely.
WhenattachingSDIaccessories:
1.ConnectapowersourcetotheSDIaccessory;powerontheSDIaccessory.
2.Ensureapowersourceisconnectedtothecamera.ThisensuresbotharegroundedpriortoconnectingtheBNC. Thecamera'spowerstatedoesnothaveanimpactonSDIattachmentsequence.
3.ConnecttheBNCcabletotheaccessory,thentothecamera.
WhendetachinganaccessorymountedtoanSDIoutput,ensurethatyouremovetheBNCconnectiontothecamera beforeremovingpowertotheSDIdevice:
1.ShutdowntheSDIaccessory.
2.DisconnecttheBNCcablefromthecamera.
3.DisconnectthepowersourcefromtheSDIaccessory.
Whenyouneedtoswapoutabatteryonanaccessorymountedtothecamera’sSDIport,youmust:
1.ShutdowntheSDIaccessory.
2.DisconnecttheBNCcablefromthecamera.
3.ReplacethebatteryontheSDIaccessory.
4.ConnecttheBNCcabletothecamera.
5.PowerontheSDIaccessory.
Formoreinformation,referto PreventingDamagetoSDIOutputs

UseFrequencytoselectoneofthefollowingSDIportfrequencysettings:

UseresolutiontoselectoneofthefollowingSDIportresolutionsettings: 1080p(default)
2KDCI
4KUHD
4KDCI
TheresolutionselectedherecontrolstheSDIoutputresolutionofthe previewpage.
Whenmonitoringin1080por4KUHDwhilecapturingina17:9format,theentire17:9imagewillbedown-scaledtothe 16:9aspectratioof1080por4KUHD.Smallblackbarswillonlyappearonthetopandbottomoftheframeinthe monitorpathandnotontherecordedimage.


YoucanselectthelookoftheimagepreviewsignalsenttotheSDIport. Theselectionsinclude: Image/LUT(default) REDWideGamutRGB/Log3G10 CustomDisplay(enablestheCustomDisplaymenu)
UseCustomDisplay(enabledfromtheLookmenu)toselecttheSDI's isolatedlooksettings.
Referto Image/LUTMenu formoreinformationaboutthespecificlook settingsandmenus.
UseGuidestoenableordisable(default)theviewingofguides.Taptheswitchtotogglebetweenenabledanddisabled.


UseToolstoenableordisable(default)theviewingoftools.Taptheswitchtotogglebetweenenabledanddisabled.


UseMagnifytoenableordisable(default)monitormagnification.Taptheswitchtotogglebetweenenabledand disabled.


UseMagnifyPosition(Global)toselectthepositionofthemagnifiedareaforallmagnification.

UseMagnifyPositiontogloballyselecttheareaoftheimageyouwanttomagnify.
Theselectionsinclude:
•Left •UpperMiddle
•UpperRight
•UpperLeft•Center(default)•LowerRight
•LowerLeft•LowerMiddle
•Right
UseOverlaytoenable(default)ordisabletheviewingoftheoverlay.Taptheswitchtotogglebetweenenabledand disabled.


UseOverlayModetoselectoneofthefollowingSDIportoverlaymodes: Simple-Minimalimageinformationisdisplayed(referto SimpleMode)
Basic-Simpleplustimesensitivemediaandbatteryinformation(referto BasicMode)
Standard-Industrystandardimageandcameradetailsaredisplayed (referto StandardMode)
Advanced-Standardplusexposureandaudiometers(referto Advanced Mode)
Technical-Advancedpluslensfocusdistanceandmonitorlookstatus (referto TechnicalMode)

SimplemodedisplaystheclipnameandthecurrentTimecode.Whenthecameraisrecording,theTimecodeturnsred, andareddotappearsinthetoprightcorner.


Basicmodedisplaysthefollowing:
ClipName
CFexpressTimeRemaining(atthecurrentsettings)
Timecode
Batterypercentageremaining(atthecurrentsettings)
DC-IN
Whenthecameraisrecording,theTimecodeturnsred,andareddotappearsinthetoprightcorner.


Standardmodedisplaysthefollowing:
TOP BOTTOM
•CameraID
•RecordingFrameRate
•f-Stop
•FocusLength
•ShutterAngle
•ISO
•WhiteBalance
•ClipName
•CFexpressTimeRemaining
•Format,FileType,Rate
•Battery
•DC-IN
•Timecode
LensitemssuchasFocalLengthandf-Stopwilladaptivelydisplaydependingonwhetherthelensdataisavailable. Whenthecameraisrecording,theTimecodeturnsred,andareddotappearsinthetoprightcorner.


Advancedmodedisplaysthefollowing:
TOP BOTTOM
•CameraNumber
•RecordingFrameRate
•f-Stop
•FocusLength
•ShutterAngle
•ISO
•WhiteBalance
•ClipName
•ExposureMeter
•Histogram
•CFexpressTimeRemaining
•Temperature/Exposure Calibration
•Timecode,Genlock,Synch
•DC-In,Battery
•Format,FileType,Rate
•VUMeter
•Timecode
Whenthecameraisrecording,theTimecodeturnsred,andareddotappearsinthetoprightcorner.


Technicalmodedisplaysthefollowing:
TOP BOTTOM
•CameraID
•RecordingFrameRate
•f-Stop
•FocusLength
•ShutterAngle
•ISO
•WhiteBalance
•SDILook
•ExposureMeter
•Histogram
•ClipName
•CFexpressTimeRemaining
•Temperature/Exposure Calibration
•Timecode,Genlock,Synch
•CameraName
•DC-In,Battery
•Format,FileType,Rate
•Timecode
•VUMeter
Whenthecameraisrecording,theTimecodeturnsred,andareddotappearsinthetoprightcorner.


UseOverlayOpacitytoselectthepercentageofopacityyouwanttheoverlaytodisplayontheSDIoutput. Theopacityvaluesthecameracandisplayarebetween100%and0%.
UseFlip/MirrortoenableordisabletheflippedmirroredorientationoftheSDIoutput.PressSELtotogglebetween enabledanddisabled(default).


TheSerialDigitalInterface(SDI)portallowsthecameratodeliver12Gbpsofimagebandwidthwithgreaterresolution, framerates,andcolorfidelity.ThissingleBNCcablesolutionmakesitidealforthe4Kp60format.Theoutputsignalbit depthis10-bit4:2:2.
WARNING: Undercertaincircumstances,itispossibleforanSDIconnectortoincurdamagewhenconnectedtoan accessoryandpoweredwithoutusingshieldedcables.REDrecommendsonlyusinghighquality,shieldedBNCcables thatareratedfor12G-SDIsignalsandonlyusingshieldedpowercablesforpoweringSDIaccessories. MakesurepowerisconnectedtotheSDIaccessoryatalltimesbeforeyouconnecttheBNCtothecamera. UngroundedpowerfromSDIaccessoriescandamagethecamera’sSDIport.Toavoidthispossibledamage,attachthe powersourcetotheaccessorybeforeattachingittotheBNCcable.WhenusingREDApprovedThirdPartybattery plates,unplugtheBNCcablepriortohotswapping.
Whenpossible,avoidusingP-Tap(alsoknownasD-Tap)cablestopoweraccessories.ToavoiddamagewhenusingPTap/D-Tap,it’simperativethattheconnect/disconnectsequence(below)isfollowedprecisely.
WhenattachingSDIaccessories:
1.ConnectapowersourcetotheSDIaccessory;powerontheSDIaccessory.
2.Ensureapowersourceisconnectedtothecamera.ThisensuresbotharegroundedpriortoconnectingtheBNC. Thecamera'spowerstatedoesnothaveanimpactonSDIattachmentsequence.
3.ConnecttheBNCcabletotheaccessory,thentothecamera.
WhendetachinganaccessorymountedtoanSDIoutput,ensurethatyouremovetheBNCconnectiontothecamera beforeremovingpowertotheSDIdevice:
1.ShutdowntheSDIaccessory.
2.DisconnecttheBNCcablefromthecamera.
3.DisconnectthepowersourcefromtheSDIaccessory.
Whenyouneedtoswapoutabatteryonanaccessorymountedtothecamera’sSDIport,youmust:
1.ShutdowntheSDIaccessory.
2.DisconnecttheBNCcablefromthecamera.
3.ReplacethebatteryontheSDIaccessory.
4.ConnecttheBNCcabletothecamera.
5.PowerontheSDIaccessory.
Formoreinformation,referto PreventingDamagetoSDIOutputs

FormoreinformationabouttheSDIstandard,refertotheSMPTE(SocietyofMotionPicture andTelevisionEngineers)standardSMPTEST-2082.
UseLiveStreamtoenableordisablelivestreamingoverWi-Fi.TheLiveStreamimageiscontrolledbytheLCD monitoringtools(theGuidesarenotdisplayed).Referto MonitoringTools formoreinformation.
NOTE: Whenlivestreaming,select5GHzastheWi-Fiband(referto Ad-Hoc).

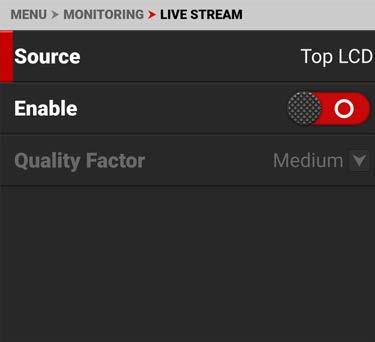
SourcedisplaysthesourceoftheLiveStreamimage.Livestreamdisplaysthelooks,tools,andmagnificationenabled forthatsource.

UseEnabletoenableordisable(default)theLiveStreamfeature.


UseQualityFactor,whenLiveStreamingisenabled,tocontrolthevideoqualitythecamera'soutputstream.Lower qualitycanstreamoveralongerdistance.


TheToolsmenuprovidesaccesstothemonitoringtoolsyouusetomonitorimageexposureandfocus.


Themonitoringtoolsthatyoucanuseinclude:
False Color Enableandconfigurethe FalseColorExposureMode, FalseColorVideoMode,andthe FalseColorVideo Mode
Peaking Enableandconfigurefocusindicatingmodes LogView Enableordisable(default)LogView
Zebra1 EnableandconfigureZebra1settings
Zebra2 EnableandconfigureZebra2settings
UseFalseColortoconfiguretheFalseColortoolsettings.


TheFalseColortoolsettingsyoucanconfigureinclude:
Enable EnableordisabletheFalseColortoolmodes FalseColorMode SelecttheFalseColortoolmode
FalseColorGioScope Mode Identify16+incrementswithinthedynamicrangeoftheRAWsensorimage.
UseEnabletoenableordisabletheFalseColortool.


FalseColorModesinclude:
FalseColorExposureMode Usefalsecolorstodetermineanoptimalbalancebetweenoverexposureand underexposure.
FalseColorVideoMode AccesssceneexposureinvaryinglightwithoutrelyingontheLCDimagebrightness.
FalseColorGioScope Mode Identify16+incrementswithinthedynamicrangeoftheRAWsensorimage.
NOTE: FalseColormodesdisplayonvideorecordedthroughSDItoanexternalrecorderwhentheToolsareenabledin theMonitormenu.WhenrecordingthroughSDI,useFalseColormodesonlytohelpdeterminesceneexposure settings,andthendisablethemodebeforerecording.
Whenthismonitoring FalseColor modeisactivated,mostofthetonalrangewillappearinmonochrome.
TheExposureModeisabletoindicateexactlywheremiddlegrayisfalling,andindicatewhichhighlightsorshadows areproblematicinthelogarithmicrepresentationoftheimage.ExposuremodeisjudgingtheexposureafterISOand WhiteBalanceadjustmentsaremade,andbeforeanysortofLUTortransformisappliedtotheLog3G10image.
WhentheFalseColorModeoverlaysthecolorredwithinthesubjectofinterest,oranywhereexceptbrightlightsand directreflections,thentheimageislikelyoverexposed.WhentheFalseColorModedoesnotoverlaythecolorredon theimage,thentheexposureislikelyokayfortheselectedISO.
WhentheFalseColorModeoverlaysthecolorpurpleonkeyimagedetailthatisnotlocatedintheshadows,thenthe sceneislikelyunderexposed.WhentheFalseColorModedoesnotoverlaythecolorpurpleontheimage,thenthe exposureislikelyokayfortheselectedISO.
Formoreinformation,referto Exposure intheHowTosection.
NOTE: Forbestresults,VideoModeshouldbeviewedatoraboveISO800. VideoModedisplaysacoloroverlaythatindicatesthevideoleveloftheRGBmonitorpath(calibratedtotheSMPTE testsignal).
ThecolorsusedarebasedontheRGBlevelsofthevideooutsignal(thatis,the“cooked”look,andnotRAWdata).The camera'sRGBsettingscanchangetheappearanceoftheVideoModecolors.
TheVideoModecolorsrepresentthefollowingIREvalues(atallothervalues,thedesaturatedimagerepresentsthe luminancevalueoftheISOadjustedimage):
Purple:IRE0–4
Blue:IRE5
Teal:IRE10–12
Green:IRE41–48
Pink:IRE61–70
Straw:IRE92–93
Formoreinformation,referto Exposure intheHowTosection.
Yellow:IRE94–95
Orange:IRE96–98
Red:IRE99–100
Greeniswhereyouwillwant18%gray,PinkistypicallythebrightnessofCaucasianskintones,Straw,Yellow,and Orangearestronghighlightsandincreasinglyclosertowhite,TealisdeepshadowsandBlueisonthevergeof becominguntexturedblack.Ingeneral,PinkandGreenaremosthelpfulwhencalibratingbasedonaknownreference, whereastheothercolorsindicatetheextremesofatonalrange.
ApotentialdisadvantageofFalseColorVideomodeisthatallthefalsecolorscandistractfromtheunderlyingpreview. Manyprefertousethismodeonlyduringinitialset-up,andthentheyuse FalseColorExposureMode underawider rangeofscenarios.
In FalseColorExposureMode,usethepurpleandredindicatorstoadjustyourlightingorlensaperture.Usethis strategytoachieveanoptimalbalancebetweenclippingfromoverexposureandimagenoisefromunderexposure.With mostscenes,youcanoftenhaveasurprisingrangeofexposurelatitudebeforeexcessiveredorpurpleindicatorsbegin toappear.
Ifnecessary,useFalseColorVideomodeor ZebraModes tofine-tunehowthescenewillappearoverSDI,oruseitto adjustyoursuggestedlookwhensendingfootageforpost-production.
TheZebraandVideomodesarealsoanobjectivewaytoassessthesceneexposureundervaryingambientlight withoutrelyingontheLCDimagetoevaluatebrightness.
GioScopemodedisplaysacoloroverlayontopofadesaturatedRAWsensorimage,identifying16incrementswithin thedynamicrangeofthesensor.TheRGBsettings(colortemperature,ISO,LUT,etc.)arenotusedbythismode.
Eachnumber(1to16)indicatesadifferentincrementofdynamicrange.Number16representsthetopincrement,andis brokenupinto1/8thsub-incrementstoshowhighlightroll-off.Each1/8thincrementisrepresentedbyadifferentshade ofred,rangingfromlightred(lesslight)todarkred(mostlight,clipping).
ThePeakingtoolsdisplaycontrast,outlines,orcolorstoassistwithfocusing.


ThePeakingmodesyoucanuseinclude:
ITEMS
DETAILS
Focus Useenhancedcontrastandedgesforfocusing Edge Showoutlinesoffocusedobjects
Peaking Selectacoloredoverlaytoindicateobjectsinfocus
FocusPeakingmodeemphasizescontrastandedgesintheimagewithoutchangingthebrightnessortheimage content.Thismodemakesiteasiertojudgefocus.Adjustthezoomandfocustoeasilyseewhichobjectsarecoming intofocus.
WhenyouenableEdgePeakingmode,thedisplayshowstheedgesoroutlinesofobjectsthatareinfocus.
ThePeakingPeakingmodedisplaysacoloroverlayontopofin-focusedges.SelectaLevelof1to10(weaktostrong) fortheintensityofthecoloroverlay.TheRGBsettingscanchangetheappearanceoftheselectedcoloroverlay.
ThePeakingPeakingmodeindicatorisappliedaftertheimageisscaledtoamonitor,makingtheindicatorsappear differentlyonvariousmonitors.
FormoreinformationaboutPeaking,referto Focus intheHowTosection.
UseLogViewtodisplaycameraimagesinREDWideGamutRGBandLog3G10fortheISO,ExposureAdjust,Color Temperature,andTintsettings.Thisallowsyoutoquicklyseeungradedfootagethatremainsunaffectedbycreative decisionssuchasthechoiceof3DLUTorCDL.
LogViewispassedthroughtheSDIportwhenrecordingtoanexternalrecorder.YoucanviewtheLogimagein playbackontheLCDandonthemonitor.However,LogViewisnotrecordedtothefilerecordedonthemediacard.
NOTE: LogViewisonlyenabledonR3DfilesandnotonProResfiles.


UseZebra1todisplayonesetofdiagonalstripestoindicatehighlightexposurelevels.Formoreinformation,referto ZebraModes. Zebra1isdisabledbydefault.


TheZebra1modeincludes:
Enable Enablesredzebrastripestoindicatehighlightexposure
LowIRE
HighIRE
Setsthelowerthresholdfortheindicator
Setsthehigherthresholdfortheindicator
TheEnabletoggleswitchallowsyoutoenableordisabletheZebra1stripes.
ProvidesakeypadthatallowsyoutosetthelowthresholdfortheZebrastripe.Thedefaultsettingis98IRE.
ProvidesakeypadthatallowsyoutosetthehighthresholdfortheZebrastripe.Thedefaultsettingis100IRE.
NORMALVIEW

ZEBRA1VIEW

UseZebra2todisplayasecondsetofdiagonalstripestoindicatemid-toneandshadowlevels.Formoreinformation, referto ZebraModes. Zebra2isdisabledbydefault.


TheZebra2modeincludes:
Enable Enablesgreenzebrastripestoindicatemid-toneandshadowexposure
LowIRE Setsthelowerthresholdfortheindicator
HighIRE Setsthehigherthresholdfortheindicator
TheEnabletoggleswitchallowsyoutoenableordisabletheZebra2stripes.
ProvidesakeypadthatallowsyoutosetthelowthresholdfortheZebrastripe.Thedefaultsettingis40IRE.
ProvidesakeypadthatallowsyoutosetthehighthresholdfortheZebrastripe.Thedefaultsettingis48IRE.


UseGuidestoenableandconfigurethecamera'smonitoringguides.


ThemonitoringGuidesthatyoucanuseinclude:
ITEMS DETAILS
FrameGuides Guidesyoucanconfiguretoaidinframingashot CenterGuide Acentercrosshairordotyoucanusetocenteryourshot
UseFrameGuidestoframethesceneusingvariousshapesandsizes.Youcanconfigureupto3FrameGuidesto displayonyourmonitor.


ConfiguretheFrameGuidesusingthefollowing: ITEMS
Enable EnablestheFrameGuide
Mode Selectaspectratios,User,andAbsolutemodes
UserAspectRatio EnabledbyselectingUsermode
Scale PercentageoftheimagetheFrameGuideoccupies
OffsetX,Y Percentageofhorizontalandverticaloffset
AbsoluteX,Y,W,H Absolutemode-settheexactnumberofsizeandoffsetpixels
LineStyle
LineColor
LineOpacity
SelecttheFrameGuidelinetype-solid,dashedorbracket
SelecttheFrameGuidelinecolor
SelecttheFrameGuidelineopacitypercentage
ShadeOutside EnablesshadingoutsideoftheFrameGuide
ShadeColor Selecttheshadingcolor
ShadeOpacity
MODE
Selecttheshadingopacity
UseModetoselecttheFrameGuidemodeyouwanttousetoconfiguretheframeguide.


ThemodesyoucanselectincludeaspectratiosfromFullto2.4:1,User,andAbsolute.TheUserandAbsolutemodes enablesettingsthatarespecifictothosemodes.
USERASPECTRATIO
ThisitemisenabledwhentheUsermodeisselected.


Usethekeypadtoenteryourdesiredaspectratio.
UsescaletoconfigurethepercentageoftheimageareathattheFrameGuidewillframe.


UsethekeypadtoenterthepercentageoftheimagetheFrameGuidecontains.
UseoffsettoconfiguretheXandYoffsetoftheFrameGuide.


UsethekeypadtoenterthepercentageofoffsetfromcenteryouwanttoapplytotheFrameGuide.
UsetheAbsolutesettingstoconfiguretheabsolutedimensionsandpositionoftheFrameGuide.


UsethekeypadtoenterthenumberofpixelsforX/YoffsetandforthewidthandheightoftheFrameGuide.The AbsoluteitemsareonlyenabledwhenyouselectAbsolute Mode
UseLineStyletoselectthetypeoflinetheFrameGuideuses.


SelectSolid(default),Dashed,orBracketfortheFrameGuidelinestyle.
UseLineColortoselectthecoloroftheFrameGuideline.


UseLineColortoselectoneofthefollowingcolorsfortheFrameGuideline: Black Green Cyan Red Yellow DarkGray Blue Magenta White(default)
UseLineOpacitytoselecthowtransparenttheFrameGuidelineappears.


UseLineOpacitytoselectthepercentageofopacityfortheFrameGuideline:
25%
50%(default)
75%
100%
UseShadeColortoselectthecolorofshadingtouseoutsideoftheFrameguide.


UseShadeColortoselectoneofthefollowingcolorsfortheoutsideshading:
Black(default) Green Cyan
Red Yellow DarkGray
Blue Magenta White
UseShadeOpacitytoselecttheopacityoftheshadingoutsideoftheFrameguide.


UseShadeOpacitytoselectthepercentageofopacityfortheshadingoutsideoftheFrameGuide: 25%(default)
UseCenterGuidetoenableandconfiguretheCenterGuide.


ConfiguretheCenterGuidebyusingthefollowing:
Enable EnablestheCenterGuide
Type SelectCenterGuidetype-dotorcross
Color SelectacolorfortheCenterGuide
Opacity Percentageofopacityoftheguidecolor
TYPE
UseTypetoselectthetypeofCenterGuidetodisplay.


UseTypetoselectacenterdotorcross(default)fortheCenterGuide.
UseColortoselectthecolorusedbytheCenterGuide.


UseColortoselectoneofthefollowingcolorsfortheCenterGuide: Black Green Cyan Red Yellow DarkGray Blue Magenta White(default)
UseOpacitytoselecthowtransparenttheCenterGuideappears.


UseOpacitytoselectthepercentageofopacityfortheCenterGuide: 25%
50%(default) 75% 100%
TheMediamenucontainsthesettingsyouusetoconfigureyourmedia. FromtheOnboardLCDtouchscreenmenu,tapMedia:


UsetheMediamenutoconfigurethecamera'sstoragemediasettingsandtoviewthemediainformation:
ITEMS DETAILS
Eject Ejectthemediacard
MediaInfo Viewthemediacardinformation
SecureFormat Performsasecureformatofthemediacard
UseEjecttosafelyunmountthemediacardelectronicallyfromthecamerabeforeremovingitphysically.
WARNING: Themediacangetextremelyhot.Usecautionwhenremovingmedia.
WARNING: Donotattachalabeltothemediacard.Theheatgeneratedbythemediacanweakenthelabel'sadhesive, causingthelabeltodetachinsideofthecamera.Labelscanalsodiminishheatdissipationandcauseexcessivewearto theinternalcomponents.Removingalabelfromamediacardcanpossiblydeformthecardbody.
AccessEjectfromthe OnboardLCDTouchscreen Mediamenu:

UseMediaInfotodisplaythemediacardinformation.
AccessMediaInfofromthe OnboardLCDTouchscreen Mediamenu:

MediaInfodisplaysthefollowing:
Status
ModelNumber
SerialNumber
FirmwareVersion
Capacity
Available
TimeRemaining

Displaysthemediacardstatus
Displaysthemediacardmodelnumber
Displaysthemediacardserialnumber
Displaysthemediacardfirmwareversion
Displaysthemediacardtotalcapacity
Displaysthemediacard'sremainingstorage
Displaystherecordingtimeremainingonthemediacard
UseSecureFormattoformatthemediacarddowntothefilesystemlevel. Asecureformatallowsyoutorebuildthecardfilesystem.
WARNING: SecureFormatpermanentlydeletesallinformationfromthemediacard.Datacannotberecoveredaftera SecureFormat.


UsetheSecureFormatmenutoupdatethefollowinginformation:
CameraID SelectthecameraID(defaultisA)
CameraPosition Selectthecameraposition(defaultisC)
ReelNumber Selectthereelnumber(defaultis1)
Edgecode Enterthetimenumber(defaultis01:00:00)
Format StartstheSecureformattingprocess
Formoreinformation,referto SecureFormat
UseCameraIDtoassignacameraIDlettertothemedia.


TheCameraIDlettersyoucanassignrangefromA-Z.Formoreinformation,referto SecureFormat
CAMERAPOSITION
UseCameraPositiontoselectthecamerapositionlabelforthemediacard.
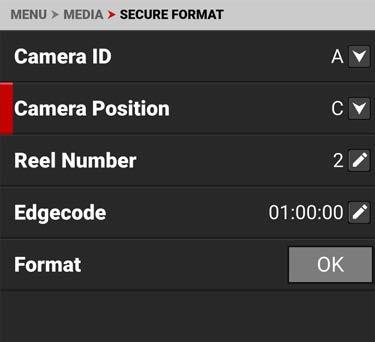

TheCameraPositionlettersyoucanassignrangefromA-Z.Formoreinformation,referto SecureFormat
UseReelNumbertoassignareelnumbertothemedia.


Usethekeypadtoenterauniquereelnumbertothemedia.
NOTE: Itisbestpracticetokeepyourreelnumberstonolongerthansevencharactersinlengthtoconformwithalledit decisionlist(EDL)formats.
Formoreinformation,referto SecureFormat.
UseEdgecodetoassignanedgecodetothemedia.


Usethekeypadtoenterauniqueedgecodenumbertothemedia.
EdgecodeisaSMPTETimecodetrack,whichbydefaultstartsat01:00:00onthefirstframeofeachmediacard.Itisa sequentialcodethatiscontinuousfromframetoframeandalsobetweenclips.EdgecodeisequivalenttoRUN RECORDasusedonbroadcastcameras.
Formoreinformation,referto SecureFormat
UseFormattoexecuteasecureformatofthemedia.
WARNING: Formattingpermanentlydeletesallinformationfromthemediacard.Datacannotberecoveredaftera format.


TheUserSettingsmenucontainsthesettingsyouusetocreatepresetsandassignUserbuttonfunctions. FromtheOnboardLCDtouchscreenmenu,selectUserSettings:


UsetheUserSettingsmenutoconfigurepresetsandUserbuttons:
Presets Configureandmanagepresets
UserButtons Assignfunctionstotheuserbuttons
UsePresetstobuildandselectpre-configuredsettingsforthecamera.

ThePresetsmenucontainsthefollowing:

CreatePreset Createcamerasettingpresets
OnMediaPresets Managepresetsstoredonthemedia
InCameraPresets Managepresetsstoredinthecamera


UseCreatePresettoselectthecurrentcamerasettingsyouwanttousetocreateapresetlistofsettings. Youcanselectsettingsindividually:

Youcanalsousethemenucheckmarkbuttontoselectallofamenussettingsasapreset:

ClickOKtocreatethepreset.TheCreatePresetscreenopens.EnteryourPresetnameandtapOK.ThePresetis savedtothecamera.

EnteryourPresetnameandtapOK.ThePresetissavedtothecamera(referto InCameraPresets).


Youcanimportpresetsfromthemediatothecamera.Whenimporting presetsfromthemediatothecamera,thepresetsaresavedtoafolderon thecameracalled“presets”.
FromOnMediaPresets,youcanimporttheselectedpresetfromthemedia tothecameraorimportallofthepresetsfromthemediatothecamera.

Youcanexportpresetsfromthecameratothemedia.Whenexporting presetsfromthecameratothemedia,thepresetsaresavedtoafolderon themediacalled“presets”.
FromInCameraPresets,youcanapplytheselectedpresettothecamera, deletetheselectedpresetfromthecamera,exporttheselectedpresetfrom thecameratothemedia,orexportallofthepresetsfromthecameratothe media.
UseUserButtonstoassignfunctionstothefrontandsideuserbuttons.


TheUserButtonsmenucontainsthefollowing:
FrontButton
FrontButtonHalf Press
SideButton
FrontButtonHalf Press
Assignfunctionstothefrontuserbutton
Assignfunctionstothefrontbuttonhalfpress
Assignfunctionstothesideuserbutton
Assignfunctionstothesideuserbuttonhalfpress


UseFrontButtontoselectthe functionyouwantassignedtothe frontcamerabutton.
ThedefaultsettingisRecord Toggle.
Referto UserButtonAssignable Functions fortheoptions.
UseFrontButtonHalfPressto selectthefunctionyouwant assignedtothefrontcamera buttonforahalfpress.
ThedefaultsettingisNone.
Referto UserButtonAssignable Functions fortheoptions.
UseSideButtontoselectthe functionyouwantassignedtothe sidecamerabutton.
ThedefaultsettingisRecord Toggle.
Referto UserButtonAssignable Functions fortheoptions.


ITEM DETAILS
None NothingisassignedtotheUserSlot
ApplyPreset Applythepresetsstoredonthecamera
AutoWB CameraautomaticallyadjuststheWhiteBalance
EjectMedia Unmountthemediainpreparationforremoval
SecureFormat Formatthemedia
EjectUSB-CDrive EjectdeviceconnectedtoUSB-Cport
JamTC toTOD JamTimecodetotimeofday
AFToggle Toggletheselectedautofocusmode
AFHold Activatesautofocuswhilepressed
SaveLog Savethelogfiletothemedia
UseSideButtonHalfPressto selectthefunctionyouwant assignedtothesidecamerabutton forahalfpress.
ThedefaultsettingisNone. Referto UserButtonAssignable Functions fortheoptions.
LCDsMagnifyToggleTogglethemagnificationfeatureonandoffforallLCDs
SDIMagnifyToggleToggletheSDIportmagnificationfeatureonandoff
Pre-RecordToggle TogglethePre-Recordfeatureonandoff
Pre-RecordStop StopthePre-Recordfeature
Playback/CameraToggleTogglebetweencameraoutputandclipplayback
RecordToggle(default)Togglerecordonandoff
FalseColorToggle ToggletheFalseColortoolsonandoff
PeakingToggle TogglethePeakingtoolsonandoff
LogViewToggle ToggleLogviewonandoff
Zebra1Toggle ToggleZebra1onandoff
Zebra2Toggle ToggleZebra2onandoff
LCDGuidesToggleToggletheGuidesonandoffontheOnboardLCD
ITEM
LCDToolsToggle ToggletheToolsonandoffontheOnboardLCD
SDIGuidesToggle ToggletheGuidesonandoffonSDIoutput
SDIToolsToggle ToggletheToolsonandoffontheSDIoutput
SDIOverlayToggleTogglebetweenthesimpleandadvancedOverlayontheSDIoutput
TopLCDGuidesToggleToggletheGuidesonandoffonthe DSMC3™RED®Touch7.0"LCD
TopLCDToolsToggleToggletheToolsonandoffonthe DSMC3™RED®Touch7.0"LCD
FrameGuide1ToggleToggleFrameGuide1onandoff
FrameGuide2ToggleToggleFrameGuide2onandoff
FrameGuide3ToggleToggleFrameGuide3onandoff
CenterGuideToggleToggletheCenterGuideonandoff
IrisOpen Opentheiris
IrisClose Closetheiris
NDIncrement IncreasetheNDsettingbyoneincrement
NDDecrement DecreasetheNDsettingbyoneincrement
ShutterDecrement Decreasetheshuttersettingbyoneincrement
ShutterIncrement Increasetheshuttersettingbyoneincrement
SyncShiftIncrement(1)Increasethesyncshiftsettingbyoneincrement
SyncShiftDecrement(1)Decreasethesyncshiftsettingbyoneincrement
SyncShiftIncrement(100)Increasethesyncshiftsettingby100increments
SyncShiftDecrement(100)Decreasethesyncshiftsettingby100increments
SyncShiftIncrement(1000)Increasethesyncshiftsettingby1000increments
SyncShiftDecrement(1000)Decreasethesyncshiftsettingby1000increments
UseAutofocustoenableandconfigurethecamera'sAutofocusfeature.Thelensmustsupportautofocusforthis featuretowork.


UsetheAutofocusmenutoperformcameraautofocustasks: ITEM
Enable Enable/DisabletheAutofocusfeature
Mode SelecttheAutofocusmode
Size SelectthesizeoftheAutofocusarea
Position SelectthepositionoftheAutofocusarea
AFToggle ToggletheselectedAutofocusmodeoffandon
UseEnabletoenableordisablethe AutofocusMenu feature.Thelensmustsupportautofocusforthecameratouse thisfeature.

UseModetoselecttheautofocusmodeforthecamera.Thelensmustsupportautofocusforthecameratousethis feature.


Usesinglemodetoautofocusand thenstopatthatfocusposition.
UseContinuousmodetocontinue tochangefocustokeepamoving subjectinfocus.
UseSizetochoosewhatsizeareayouwantthecameratousefortheautofocusfeature.Thelensmustsupport autofocusforthecameratousethisfeature.


TheSizeselectionsforthe autofocusareaareSmall(default), Medium,Large,Wide,andVertical.
UsePositiontospecifythepositionoftheautofocusareaonthesensor.Thelensmustsupportautofocusforthe cameratousethisfeature.


ThePositionselectionsinclude:
Left UpperMiddle UpperRight
UpperLeft Center(default) LowerRight
LowerLeft LowerMiddle Right
TheAutofocusPositionrectangledisplaysonthescreen:

YoucanmovethepositionmanuallyontheLCDscreen.ThemenuwillchangetodisplayCustom.

AFTogglewillhavedifferentbehaviorsdependingontheAutofocusMode.

SingleMode:AFToggleactivatesasingleautofocuscommandtofocuson thesubjectintheAutofocusbox,andthenitstops.EachactivationofAF Togglerepeatsthisprocess.
ContinuousMode:Continuousmodecontinuouslyfocusesthecameraon thesubjectintheAutofocusbox.AFToggleallowsyoutostopandstartthis feature.Thiscontrolishelpfulwhenyouaremovingthecamera,suchas whenpanningfromonesubjecttoanother.TapAFToggletodisable Continuousautofocusduringthepan,toensurethecameradoesnotattempt tofocusduringthepanningaction,andthentapAFToggleagainoncethe AFBoxisoverthesubjectonwhichyouwantfocus.
TheCommunicationmenucontainsthesettingsyouusetoconfigureyourcameratocommunicatewithotherdevices. FromthecameraLCDmenu,navigateto,andtap,Communication:


UsetheCommunicationmenutoconfigurethecamera'scommunicationsettings:
ITEM
Camera Settingforthecameraname
Connections
Clients&Services
CloudUpload
SettingsforUSB-C,Wi-Fi,andSerialcommunication
SettingsforFTPSandPTPcommunication
SettingsforFrame.ioandAWSS3communication
UsetheCameramenutoviewandeditthecameraname.SelectCameraNametoopentheCameraNameeditor.


UsetheConnectionsmenutoselecttheconnectionyouwanttoconfigure.


UsetheConnectionsmenutoconfigurethecamera'sconnectionsettings:
USB-C SelectthecameraUSB-Cconnectionsettings Wi-Fi ConfigurethecameraWi-Ficonnectionsettings
Serial Configurethecameraserialconnectionsettings
USB-C
UseUSB-CtoconfiguretheconnectiontotheUSB-Cport.


ThesettingsyoucanconfigurefortheUSB-Cportinclude:
ITEM DETAILS
IPAssignmentDisplaystheIPaddressassignmentmethod
ConfigureIP IPAddressmodesandconfigurationsettings
IPAddress VieworenterthenetworkIPaddress
Netmask VieworenterthenetworkNetmask
Gateway VieworenterthenetworkGateway
AdvancedSettings ChangetheMTUsize


WhenconnectedtoanEthernetnetwork,thisallowsyoutoautomaticallydetectanIPaddressortomanuallyenteran IPaddress,Netmaskaddress,andGateway(router)address.
WhenconnectedtoanEthernetnetworkandAutomaticIPAssignmentisenabled,IPAddressdisplaysthenetworkIP address.

WhenManualIPAssignmentisenabled,youcanselectIPAddressandmanuallyenterastaticIPaddress.


WhenconnectedtoanEthernetnetworkandAutomaticIPAssignmentisenabled,Netmaskdisplaysthenetwork Netmaskaddress.

WhenManualIPAssignmentisenabled,255.255.255.0isautomaticallypopulatedastheNetmaskaddress.

WhenconnectedtoanEthernetnetworkandAutomaticIPAssignmentisenabled,Gatewaydisplaysthenetwork Gatewayaddress(routeraddress).

WhenManualIPAssignmentisenabled,youcanselectGatewayandmanuallyenteraGateway(router)address.


TheUSB-CAdvancedSettingsmenuallowsyoutochangetheMTUsize.


TheAutosettingMTUsizeis1500bytes.YoucansettheMTUtoasizelargerthanthestandard1500bytes.This worksbestonfastEthernetconnectionslikeGigabitLAN.TheselargeMTUsareknownasJumboframes(aslargeas 9000bytes)andtheycanincreasedatatransmissionefficiencyandreduceoverhead.However,Jumboframeerror correctionisslowerasaresultofre-sendinglargerpackets.
WI-FI
UseWi-FitoconfigurethecameratoworkwithaWi-Ficonnection.


UsetheWi-Fimenutoconfigurethecamera'sWi-Fisettings:
Mode DisableWi-FiorselectthecameraWi-Fisettings Ad-Hoc ConfigurethecameraasaWi-Fihotspot
Infrastructure SettingsforconnectingtoanexistingWi-Finetwork MAC DisplaysthecameradeviceMACaddress


FromModeyoucandisabletheWi-Finetwork,oryoucanenablethecamera's Ad-Hoc or Infrastructure Wi-Fisettings. ThedefaultsettingisDisabled.
AD-HOC
UseAd-HoctoconfigurethecameraasaWi-Fihotspot.
NOTE: TheAd-Hocmenuisenabledwhenthe Wi-Fi Modeissetto Ad-Hoc.


UsetheAd-HocmenutoconfiguretheWi-Fihotspotsettings:
ITEM DETAILS
SSID EnterthenameoftheWi-Finetworkthecameragenerates
Passphrase EnterthepasswordfortheWi-Finetwork
Band SelecttheWi-Fifrequencyband
Channel SelecttheoptimalchannelfortheWi-Fiband Encryption Displaystheencryptiontype
Status Displaystheconnectionstatus
IPAddress DisplaystheIPaddress
Netmask DisplaystheNetmask
SSID


Usethekeypadtoenterthecamera'sWi-Finetworkname.


Usethekeypadtoenterthecamera'sWi-Fipassphrase.ThecameracreatesaQRcodeversionofthepassphrase.


Selectthecamera'sWi-Finetworkfrequencyband.
Use5GHzforoptimalwirelessvideostreamingperformance(default)
Use2.4GHzforextendedrangeremotecontrol(whennotutilizingwirelessvideostreaming)


Selecttheoptimalchannelfortheselectedband,onewhichreceivestheleastinterferencefromthesurroundingWi-Fi signals.
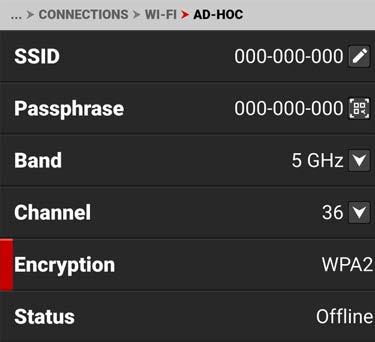
ThecamerausesWPA2securityencryption.
STATUS

Statusdisplaysthecamera'sAd-HocWi-Ficonnectionstatus. TheAd-HocstatusincludesOfflineandOnline.
IPADDRESS
Whenonlineandbroadcastinganetwork,thecameradisplaysanIPaddress.
NETMASK
Whenonlineandbroadcastinganetwork,thecameradisplaystheNetmaskfortheIPaddress.
UseInfrastructuretoconfigurethecameratoconnecttoanexistingWi-Finetwork.
NOTE: TheInfrastructuremenuisenabledwhentheWi-FiModeissetto Infrastructure.Refertothe Wi-Fi sectionfor moreinformation.


UsetheInfrastructuremenutoconfiguretheWi-FisettingstoconnecttoanexistingWi-Fiinfrastructure:
SSID DisplaysthenameoftheconnectedWi-Finetwork
Networks Scanfor,select,orentertheWi-Finetwork
Status DisplaystheWi-Ficonnectionstatus
IPAssignmentDisplaystheIPassignmentmethod
ConfigureIP SelecttheIPAssignmentmodeandmanuallyenterIP,Netmask,andGatewayaddresses
IPAddress VieworentertheWi-FinetworkIPaddress
Netmask VieworentertheWi-FinetworkNetmask
Gateway VieworentertheWi-FinetworkGateway
SSID


Whenanetworkisselected,theSSIDdisplaystheWi-Finetworkname(SSID).


UseNetworkstoselectanexistingnetwork,scanforanavailablenetwork,ortoconfigureanewnetwork.
CONNECT:TheCONNECTbuttonconnectsthecameratotheselectednetwork.
FORGET:TheFORGETbuttonerasestheconnectioninformationfortheselectednetwork.
SCAN:TheSCANbuttonsearchesforavailablenetworks.
OTHER:TheOTHERbuttonopenstheOTHER NETWORKSscreenwhereyoucanmanuallyenteranSSIDanda Passphrase.
TapSSIDtoopentheSSIDeditingscreenandenterthedesirednetworkSSID:


TapPassphrasetoopenthePassphraseeditingscreenandenterthedesiredpassphraseforthenetwork:

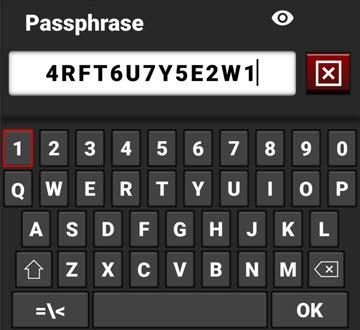
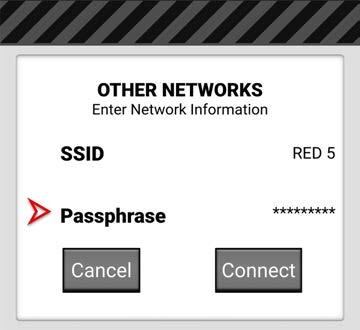
TapConnecttoconnecttothenewnetwork:

DisplaystheconnectionstatusofthecameratotheselectedWi-Finetwork.


IPAssignmentdisplaystheIPassignmentmode.InAutomaticmode,thecameraautomaticallydiscoversthe InfrastructureIPAddress.InManualmode,youcanmanuallyenterthenetworkaddressesinthecamera.

TapOKtoOpentheInfrastructureConfigureIPscreen.

YouusetheConfigureIPscreentoselecttheIPAssignmentmode,andtomanuallyentertheIP,Netmask,and GatewayaddressesinManualmode.
IPAssignmentallowsyoutoselecttheInfrastructureIPAssignmentmode.


TheAutomaticmodedetectstheavailableInfrastructureIPaddress.TheManualmodeallowsyoutomanuallyenterthe desiredInfrastructurenetworkaddresses.
WhenconnectedtoaWi-FinetworkandAutomaticIPAssignmentisenabled,IPAddressdisplaystheWi-FinetworkIP address.

WhenManualIPAssignmentisenabled,youcanmanuallyenterastaticIPaddress.


WhenconnectedtoanEthernetnetworkandAutomaticIPAssignmentisenabled,Netmaskdisplaysthenetwork Netmaskaddress.

WhenManualIPAssignmentisenabled,255.255.255.0isautomaticallypopulatedastheNetmaskaddress.

WhenconnectedtoaWi-FinetworkandAutomaticIPAssignmentisenabled,GatewaydisplaystheWi-Finetwork Gatewayaddress(routeraddress).
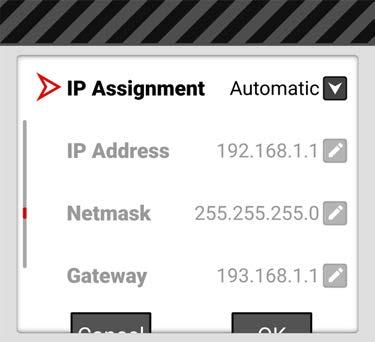
WhenManualIPAssignmentisenabled,youcanmanuallyenteraGatewayaddress.


UseSerialtoconfiguretheserialconnectiontothe ExtensionPort


ThesettingsyoucanconfigurefortheserialconnectionthroughtheExtensionPortinclude:
ITEMSDETAILS
Serial Selecttheserialportbaudrate
Serial EntertheIPaddressforthePPPprotocol
BAUDRATE


TheBaudratecontrolshowfastdataistransmittedovertheserialconnection.Thehigherthespeed,themorelikely thaterrorscanoccur.TheBaudratesyoucanchooseinclude:
BAUDRATES


Usethekeypadtoentertheinternetprovider'sIPaddress.
UsetheClients&Servicesmenutoconfiguretheclientandservicecommunicationsforthecamera.


UsetheClients&Servicesmenutoconfigurethecamera'sclientandservicesettings:
ITEMDETAILS
FTPS ConfigurethecameraFTPScommunicationsettings
PTP ConfigurethecameraPTPcommunicationssettings
FTPS
UseFTPStoconfigurethecameratoworkwithasecureFileTransferProtocol(FTPS)connection.


UsetheFTPSmenutoconfigurethecamera'sFTPSsettings:
Username Staticusernameftp1
Password User-editablepasswordandQRcode
SettingsAccessEnableFTPaccesstothecamerasettings
MediaAccessEnableread-onlyaccesstothemedia
DataEncryptionEncryptsthedatastream
ConnectionStatusDisplaystheFTPSactionsoccurring
PASSWORD
UsePasswordtoenteranFTPSpassword.WhenyouselectPassword,theFTPSPasswordQRcodescreenappears.


SelectEDITtoopentheFTPSPasswordeditingscreen.Thepasswordmustcontainaminimumof8characters.The screendisplayspasswordsshorterthan8charactersinaredfont.
UsePTPtoviewtheprecisiontimeprotocolstatusandconfiguretheprecisiontimeprotocolIPdomain. EnablePTPin Audio/TC > TimecodeSource (referto TimecodeSource).


ThesettingsyoucanconfigureforPTPinclude:
ITEM DETAILS
PTPStateDisplaysthecurrentstatusoftheprecisiontimeprotocol
PTPDomainAllowsyoutoselecttheprecisiontimeprotocoldomain
PTPDOMAIN
UsePTPDomaintoselecttheprecisiontimeprotocoldomainforthecamera.Thecamerawillonlyreceiveprecision timeprotocolcommunicationsaddressedtotheselectedIPdomain.


UsetheCloudUploadmenutoconfiguretheclouduploadcommunicationsforthecamera.


UsetheCloudUploadmenutomanagethecamera'sclouduploadingfeatures:
Enable EnableordisabletheCloudUploadfeatures
Service SelectFrame.ioorAWSS3astheclouduploadservice
UploadFileTypes EnableordisabletheuploadingofR3D,MOV,WAV,andCDL/LUTfiles
Status Displaysthestatusofthecloudconnection Frame.io ConfiguretheFrame.iosettingswhenthisserviceisselected S3 ConfiguretheAWSS3settingswhenthisserviceisselected
ClipsRemainingDisplaysthenumberofclipsremainingtoupload
TimeRemainingDisplaysthetimeremainingtoupload
UploadRemainingDisplaysthesizeoftheremainingupload
UploadSpeedDisplaysthespeedoftheupload
UseServicetoselectthetypeofclouduploadservicethecamerauses.


Thetypesofclouduploadservicesyoucanselectforthecamerainclude:
ITEMDETAILS
Frame.ioSelectstheFrame.iocloudcollaborationservice
S3 SelectstheAWSS3clouddatamanagementservice
UseUploadFileTypestoselectthefiletypesyouwantthecameratouploadtothecloud.


TheUploadFileTypesmenuonlyallowsyoutoenablethefiletypesavalableonthecamera.Whentheyarenotonthe cameratheyaregrayed-outonthemenu.
TheUploadFileTypesyoucanselectinclude:
ITEMDETAILS
R3D REDCODERAWvideofileformat
MOVProResvideofile
WAVStandardWaveformaudiodatafile
CDL/LUTIncameraCDLandLUTfiles
UseFrame.iotoconnectto,anddisconnectfrom,yourFrame.ioproject.


WhenyouselectConnect,thescreendisplaysatimesensitive6-digitcode.Usethiscodetosyncthecameratothe desiredprojectontheFrame.iowebsite.
UseS3toconfigurethecameraS3communications.


TheS3communicationssettingyoucanconfigureinclude:
ITEM
DETAILS
Bucket EntertheS3Bucketname
KeyPrefix EntertheS3KeyPrefix(optional)
Endpoint OverridethethedefaultS3Endpointaddress(optional)
VirtualAddressing EnableordisableVirtualAddressing
OnMediaAWSConfig SelecttheAWSconfigurationstoredonthemedia
InCameraAWSConfig ManagetheAWSconfigurationssavedtothecamera
UseBuckettoenterthenameoftheS3Bucketyouwanttousetouploadyourdatatothecloud.


Whenspecified,thecameraaddsaprefixtothekey(orpath)oftheuploadedobjectstocreateasubfolderinthe bucket(optional).


ENDPOINT
UseEndpointtooverridethedefaultS3endpointaddress(optional).


VirtualAddressingistypicallyenabled.However,youmustdisableitwheninterfacingwithsomeS3-compatiblestorage. ContactyourS3administratorformoreinformation.
ONMEDIAAWSCONFIG
UseOnMediaAWSConfigtoselectanAWSconfigurationstoredonthemediacardintheawsfolder(/aws).


INCAMERAAWSCONFIG
UseInCameraAWSConfigtoexportordeleteAWSconfigurationsstoredonthecamera.


AWSConfigurationandCredentialsfilescontainimportantinformationforconnectingtotheAWSbucket,suchas region,andaccessID/key.AWSCLItoolsgeneratethesefileswhenyouenter"awsconfigure".Youcanalsocreate AWSConfigurationandCredentialsfilesmanually.
ExamplesoftheAWSconfigurationandcredentialsfiles: config: [default] region=us-west-2 credentials: [default]
aws_access_key_id=AKIAIOSFODNN7EXAMPLE
aws_secret_access_key=wJalrXUtnFEMI/K7MDENG/bPxRfiCYEXAMPLEKEY
TheSystemSettingsmenucontainsthecamerasystemconfigurationsettings.
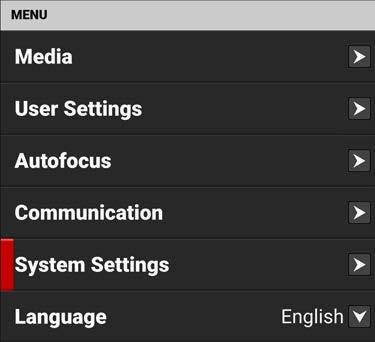

UsetheSystemSettingsmenutoconfigurethecamerasystemsettings:
Date/Time Dateandtimesettings
Licenses Managecameralicenses
Lens Viewlensstatusinformationandaccessthelensadjustments
Power DCandbatterystatus
Sensor Adjustsensortiming
Indicators EnableordisabletherecordsoundsandthefrontTallyLED
GPOFunction SelectSyncOutfunction
StatusSettings Shuttermode,apertureincrements,andfocuslengthunitssettings
SystemStatus Informationaboutthecamera'stype,PIN,FW,andruntime
UsetheDate/Timemenutoresettheinternalclockofthecamera.ThetimeanddatearetimestampedonR3D® files whenrecordingtothemedia.Thecamerausesthe24-hourclockconvention(militarytime).Forexample,enter2:35 p.m.as14:35:00.


TheDate/Timemenuitemsinclude:
Date DateinYYYY-MM-DDformat
Time 24-hourformat
TimeZone Globaltimezones
UseDatetoenterthedateusingthetouchscreenkeypad:


TIME
UseTimetoenterthetimein24-hourmilitaryformatusingthetouchscreenkeypad:


UseTimeZonetoselectthelocaltimezoneforwherethecameraislocated.


UsetheLicensesmenutomanageyourREDcameralicenses.


Youcanmanagethelicensesstoredonthemediacard,andyoucanmanagethelicensesstoredinthecamera.


UseLenstoviewinformationabouttheattachedlens.


TheinformationyoucanviewfromLensincludes:
FocalLength Displaysthelensfocallengthvalue
FocusDistance Displaysthelensfocaldistancevalue
Iris LensIrismenu
ImageStabilizationDisplaysthelensimagestabilizationstatus
RFIrisCompensationEnablesRFIrisCompensation
ControlRing Enablesthelenscontrolring
ControlRingMode ControlRingModesettings
/iData ViewthePLmountlens/iDatainformation
UsetheIrismenutoselectthecameralensf-stop.TapEdittoopenthekeypadandenterthef-stopmanually.


UseRFIrisCompensationtocompensateforirispositionshiftingthatcanoccurwithcertainRFzoomlensesasyou changethefocallength.Thiscompensationkeepstheirisreasonablymaintainedwhenthefocallengthischangedafter yousettheiris.Whenenabled,asmallirisflutteringmaybevisibleduringzooming.YoucandisableRFIris Compensationtostoptheirisfluttering.
UseControlRingModetoselectthecamerasettingyouwanttheControlRingtoadjust.


ThemodesyoucanselectincludeAperture(Iris,default), Shutter, ISO, WhiteBalance,LCDMagnify,SDIMagnify,LCDs +SDIMagnify,FalseColorCycle,PeakingCycle,andToolsCycle.
/iDATA
Use/iDatatoviewthePLmountlens/iDatainformation.


YoucanviewthelensBrand,Serialnumber,andOwnername.
UsethePowermenutoviewthevariouscamerapowerstatusindicators:


ThePowerindicatorsyoucanviewinclude:
DC-INVoltage WhenDCisconnected,thisdisplaystheDCVoltage
DC-INAmperage WhenDCisconnected,thisdisplaystheDCAmps
BATVoltage
Whenabatteryisconnectedintheleft#1slot,thisdisplaysthebatteryVoltage
BAT%RemainingWhenacompatiblebatteryisconnectedintheleft#1slot,thisdisplaysthe%ofbattery chargeremaining
BATTimeRemainingWhenabatteryisconnectedintheleft#1slot,thisdisplaysthecameraoperatingtime remaining
BATAmperage
Whenabatteryisconnectedintheleft#1slot,thisdisplaysthebatteryAmps LowVoltageWarning Setthebatterylowvoltagewarningthreshold
PowerOut
Enablesordisablesthe5V/500mApoweroutofthe ExtensionPort
UseLowVoltageWarningtosetthedesiredvoltageleveltotriggerthelowvoltagewarning.Thewarningdisplayson theLCDandacrossOverlayModesthatcontainbatterystatus(refertothe StatusBar sectionformoreinformation aboutthestatusicons).


UseSensortoshiftthesyncsignal.


TheSensormenuincludes:
SyncShift Enterthedesiredamountofsyncshift
SyncShiftTimeDisplaystheSyncShifttimeinmicroseconds(μs)
SyncShiftTimeUnitDisplaystheunitsofmicroseconds(μs)usedfortheSyncShiftsetting
UseSyncShifttoopenthekeypadandenterthenumberofSyncShiftTimeUnitsyouwanttooffsetthesensorfrom theexternalsyncsignal.UsethissettingtoresolvesynchronizationissuesonsetsuchaswhenworkingwithLED Volumes.


Inthisexample,theSyncShiftis2x0.013481microseconds ≃0.026microseconds.
UsetheIndicatorsmenutoenableordisablesoundandthetallylight(refertothe CameraBody sectionformore informationaboutthecameraLEDs),andtoselecttherecordstartindicatorandrecordstopindicatorsounds.


UseEnableSoundtoallowtheselectedsoundstoplay.


RecStartSoundallowsyoutoselectthesoundtoplaywhenyoubeginarecording.


Thesoundsyoucanselectinclude:
None
Beep
DoubleBeep
BeepAscending
BeepDescending
Money
Shutter
RecStopSoundallowsyoutoselectthesoundtoplaywhenyouendarecording.


Thesoundsyoucanselectinclude:
None
Beep
DoubleBeep
BeepAscending
BeepDescending Money
Shutter
UseTallyLighttoenableordisablethefrontrecordingtallyLED.


Formoreinformation,refertothe CameraBody LEDsection.
UsetheGPOFunctionmenutoselecttheGPOfunctionoftheExtensionport.


YoucanselectthefollowingGPOfunctionsfortheExtensionport: RecordingIndicatorOut SyncOut
TheRecordingIndicatorOutfunctionsendsasignaloutoftheExtensionportGPOpinwhenthecameraisrecording.
TheSyncOutfunctionsendsaSyncsignaloutoftheExtensionportGPOpin. Formoreinformation,referto ExtensionPort.
UsetheStatusSettingsmenutoselecttheshutterdisplaymode,apertureincrement,andfocusdistanceunits displayedinthecamera'smenus.


TheStatusSettingsthatyoucanconfigureinclude:
ShutterDisplayMode Selectatime-fractionorananglefortheshuttermenudisplayunit
ApertureIncrements Select1/4or1/3f-stopincrements
FocusDistance Selectthefocusdistanceunits(MetricorImperial)
WhiteBalanceListMode SelectKelvinorWhiteBalancePresets
NDDisplayMode Whenattached,selectNDfilterStopsorDensitydisplaymodes
NDIncrements Whenattached,selecttheNDincrementsize
UseShutterDisplaymodetoselectthewaythatthecameradisplaysthe Shutter settinginthemenu. WhenselectAngle,the Shutter menudisplaysthechoicesindegrees.WhenyouselectTime,theShuttermenudisplays thechoicesinfractionsofasecond.


UseApertureIncrementstoselectonefourthincrementsoronethirdincrementsforthecameraf-stopsettings.The defaultis1/3Stop.

UseFocusDistancetoselectImperialorMetricunitsforthe Lens FocusDistancedisplay.ThedefaultisImperial.

UseWhiteBalanceListModetoselectKelvinorPresetsfortheWhiteBalanceColorTemperaturemenu.Thedefaultis Kelvin.

UseNDDisplayModetoselectStopsorDensitydisplaymodeswhendisplayingNDsettings.

UseNDIncrementstosettheincrementsizeforincreasingordecreasingtheNDstop.

UsetheSystemStatusmenutoviewcamerainformationandtoviewtemperaturereadings.


Thesystemstatusinformationyoucanviewincludes:
ITEMS DETAILS
CameraInfo Camerainformation
Temperature Cameratemperatures


Thecamerainformationyoucanviewincludes:
ITEMS DETAILS
CameraTypeDisplaysthecameradescription
CameraPINDisplaysthecamerapersonalidentificationnumber(PIN)
VersionDisplaysthefirmwareversionnumberinstalledonthecamera
RuntimeDisplaysthetotalnumberofhoursthatthecamerahasrun


Thecameratemperaturesyoucanviewinclude:
ITEMS DETAILS
CameraStatusDisplaysGood(green)orOverheating(yellow)
LogicBoard0DisplaystheCelsiustemperatureofLogicBoard0
LogicBoard1DisplaystheCelsiustemperatureofLogicBoard1
PowerBoardDisplaystheCelsiustemperatureofthepowerICboard
STM DisplaystheCelsiustemperatureofthepowerSTMIC
Sensor DisplaystheCelsiustemperatureofthesensor
TheLanguagemenucontainsthelanguagesyoucanselectfortheuserinterface(UI).
FromtheOnboardLCDtouchscreenmenu,tapLanguage:


Thelanguagesyoucanselect include:
•English
•SimplifiedChinese
•French
•German
•Japanese
•Spanish
TheMaintenancemenucontainsthesettingsyouusetoperformvariousmaintenancetasksonyourcamera.
FromtheOnboardLCDtouchscreenmenu,tapMaintenance:


UsetheMaintenancemenutoperformthefollowingcameramaintenancetasks:
ITEM
Calibrate
Calibration
SaveLog
ResetDefaults
FactoryReset
DETAILS
Performscalibration
Listofcalibrationoptions
Savesthecameralogfilestothemedia
Resetsthecamerasettingstotheirdefaultsettings
Restoresthecameratothefactorysettings
Upgrade Updatesthefirmware
UseCalibratetostartthecameracalibrationprocessandcreateyourUsercalibrationprofile. Onlycalibratethecameraafterithasreacheditsoperationaltemperature.Thisoccursusuallywithintenminutesafter youturnonthecamerainthefilmingenvironment.Donotcalibrateimmediatelyafterpoweringon.

NOTE: Makesurethatthemountcapisinstalledonthecamerabeforeyoucalibratethecamera. TapOKonthetouchscreentobegincalibratingthecamera.


Whenthecameraisfinishedcalibrating,thetouchscreendisplaystheCalibrationstatusmessage:


UseCalibrationtoselecttheactivecameraCalibration.


YoushouldalwaysselectUsercalibration.Thefirsttimeyoucalibratethecamera,theonlychoiceisFactory.Afteryou performacalibration,theUsercalibrationprofileisaddedtothelistandthecameramakesitthedefaultcalibration. Everytimeyoucalibratethecamera,theUserprofileisupdated.TheonlytimetheUserprofileisremoved,iswhenyou performaFactoryReset.
IfUsercalibrationisnotavailable,thecameradefaultstoFactorycalibration.Calibratethecameratogeneratethenew Usercalibrationprofile.
UseSaveLogtosavethecameralogtothemedia.

Whenthemediaisfull,ormissing,thecamerawilldisplayanerrormessage.Whenthereisnoerror,thesuccess messageisdisplayed.
Error: Success:


UseResetDefaultstoresetthecameratothefactorydefaultsettings.


NOTE: Resettingthecamerawilldeleteallofyourmenusettings.
NOTE: Thecameraturnsoff,andthenbackontocompletetheresetprocess.
TapYesonthetouchscreentoresetthecameramenustothedefaultsettings.
UseFactoryResettoresetthecameratothefactorysettings.


NOTE: Resettingthecamerawilldeleteallofyoursettingsandremoveallimportedfiles.Thecameraturnsoff,andthen backontocompletetheresetprocess.
TapYesonthetouchscreentoresetthecameratothefactorysettings.
UseUpgradetoperformacamerafirmwareupdate.


Formoreinformationaboutupgradingthefirmware,referto UpgradingtheFirmware
Thissectiondescribeshowyoucanusethecamerafeatures.
Thecameraoffersawireless(802.11g)connectionthatprovidescommunicationsupportforthird-partyapplications.As withallwirelessdevices,thecommunicationrangevarieswiththeenvironmentandanyradiofrequency(RF) interferencethatmaybepresent.Youcanselectawirelessfrequencyof2.4GHzor5GHz.Foroptimalperformance, donotobstructtheantennawithanyaccessory,mountingplate,ormountingrail.
Thecamerauses Ad-Hoc modetosetupthecameraasaWi-Fihotspot.
Thecamerauses Infrastructure modetoconnecttoexistingWi-Fiinfrastructure. CONNECTINGWIRELESSLYTOANEXISTINGWI-FINETWORK
ThiscamerausestheWPA2Wi-Fiprotocol.
1.NavigatetotheWi-Fimenu MENU > COMMUNICATION > Wi-Fi.

2.FromtheModeoption,selectInfrastructure.


5.TapCONNECT.TheCONNECTscreendisplays:

6.TapPassphrase.ThePassphraseentryscreendisplays:

7.Enterthepassphrasefortheselectednetwork.Thepassphrasemustuseaminimumof8characters.

8.TapOKonthecompletedPassphraseentryscreen.ThecompletedCONNECTscreendisplays.

9.TaptheConnectbutton.Thecameraconnectstotheselectednetwork:

TheFileTransferProtocolSecure(FTPS)offersafastandsecuresystemfortransferringdatatoandfromthecamera. FTPSissupportedbyfirmwareversions1.5andhigher.FTPSisavailablewhenthecameraisenabledandconnected toanetworkoverWiFiorthroughtheUSB-CporttoanEthernetadaptor. ThesettingsforusingFTPSonthecamerainclude:
Protocol:FTPorFTPS
Host:[IPaddressofthecamera]
Port:21
Encryption:TLS/SSLExplicitencryption
Username:[UsernameinFTPSmenusettings]
Password:[PasswordinFTPSmenusettings]
LogonType:Normal
NOTE:
Filetransferspeedsmayvarydependingonthestrengthofthesignal(whenusingWiFi)andtheamountofnetwork traffic.Forthefastestandmostreliabledatatransfer,werecommendusingahard-wiredconnection. StepsmaydifferdependingonwhichFTPsoftwareyouwishtouse,consultyoursoftware’suserguideforadditional assistance.
WhensettingupFTP,makesureyouuseFTPorFTPSandnotSFTPasthesearedifferentprotocols. Forsecurityreasons,theFTPShostnameandpasswordareonlydisplayedonthecameraFTPSmenu. Disablingencryptioncanincreasetransmissionspeeds.
1.Connectyourcameratothenetworkwiththedesiredconnectionmethod(Ad-Hoc,InfrastructureorUSB-C)and verifytheconnection.AsuccessfulconnectionisconfirmedwhenthecameradisplaysanIPaddressintheWiFior USB-Csettingsmenus.

2.NavigatetoMenu>Communication>Clients&Services>FTPS.Takenoteoftheusernameandpassword.Youcan alsoenteranewpasswordQRcode.

3.EnablethepermissionsyouwantuserstohaveaccesstobytogglingSettingsAccessorMediaAccesstotheonor offposition.ThemediafolderwilldisplayasanemptyfolderontheFTPAppwhenMediaAccessisdisabled(off).
4.Thecameraisnowset-uponFTPS.

1.InFileZilla,enterthefollowingsettings:
Host:ftp://Camera'sIPAddress -Example: ftp://192.168.1.93
Username:Usernamedisplayedinthecamera'sFTPSmenu
Password:Passworddisplayedinthecamera'sFTPSmenu
Port:leaveblank
2.PressQuickconnect.Dependingonthepermissionsyouwillnowhaveaccesstothedesiredfolders.

ThecameraFTPSmenuConnectionStatusdisplaysConnected:

Whenuploadingfilestothecameramakesurethatyouusethe‘upload’folder&thenthedesiredsub-directoryofluts, cdls,presetsorupgrade.Mediacannotbeuploadedtothecamera. ThedatarateoftheFTPStransferwithencryptionmaxesoutatroughlyGigabitEthernetspeeds. Estimateddownloadtimeforafull256GBisapproximately47minuteswhenusingawiredconnection.
KOMODO-XoffersaUSB-C3.0protocolconnectionthatprovidescommunicationsupportforAndroiddevices,Apple devices,Ethernetdevices,andR3DstreamingwiththeREDConnectLicense(with5Gb/sEthernetadapter). FormoreinformationaboutREDConnectreferto: REDConnect

Thissectionincludesinstructionsfor:
USB-CAndroidConfiguration
USB-CAppleConfiguration
USB-CEthernetConfiguration
TheKOMODO-XoffersaUSB-C3.0protocolconnectionthatprovidescommunicationsupportforAppledevices.
1.FromtheApplestore,downloadthe REDControlApps totheAppledevice.
Note: Scrolltothebottomoftheuseragreementtoaccepttheagreement.


2.ConnecttheAppledevicetothecamerawithaUSB-Ccable.Ifthe"TrustThisComputer?"messagedisplays,skipto step6.
3.OpentheAppledevicesettingsbytappingtheSettingsicon.


5.Allowotherstojoin.


6.TheAppledevicepromptsyoutoacknowledgethatyoutrustthecomputer(camera).

7.FromtheAppledevice,taptheREDControlicontoopentheREDControlapp.


TheREDControlappdisplaysthecameraconnectionicon.ThewordLINKisvisibleaftertheIPaddress.

8.TaptheicontoopentheREDControlapptoolsfortheconnectedcamera.

TheKOMODO-XoffersaUSB-C3.0protocolconnectionthatprovidescommunicationsupportforAndroiddevices.
1.FromtheGooglePlaystore,downloadthe REDControlApp totheAndroiddevice.


2.ConnecttheAndroiddevicetothecamerawithaUSB-Ccable.
3.OpentheAndroiddevicesettingsbytappingtheSettingsicon(gear).


4.SelectConnections.

5.SelectMobileHotspotandTethering.

NOTE: MobileHotspotandTetheringisonlyavailableonAndroiddeviceswithcellularcapability.


7.FromtheAndroiddevice,taptheREDControlicontoopentheREDControlapp.


TheREDControlappdisplaysthecameraconnectionicon.

8.TaptheicontoopentheREDControlapptoolsforthetetheredcamera. Fromhereyoucanusethe REDControlApp tomonitorandcontrolthecamera.

TheKOMODO-XoffersaUSB-C3.0protocolconnectionthatprovidescommunicationsupportforEthernetnetworks.
YoumustuseaUSB-CtoEthernetadaptertoconnectthecameratoanEthernetnetwork.
1.ConnectthecameratotheEthernetnetworkusingtheUSB-CtoEthernetadapter.
2.FromaWi-Fi-enableddevice,selecttheWi-Ficonnectiontowhichthecameraisconnected.

3.OpenREDControlonthe Wi-Fi-enableddevice.

4.TapRE-SCAN. Thecameraicondisplays.

Thecameraicondisplaysthecamera'sEthernetIPaddress:

5.TapthecameraicontoopentheREDControlapptoolsforthenetworkedcamera.

6.OpenabrowserfromacomputerconnectedtotheEthernetnetwork.
7.Inthebrowseraddressfield,enterthecameraIPaddressdisplayedontheREDControlcameraiconorthecamera Communicationmenus(Ad-Hoc,Infrastructure).TheREDControltoolsaredisplayedinthebrowser.

ThecameraacceptspowerthroughaDC-INportandthroughanattachedbattery.Thecameracannotacceptpower throughUSB,orBNCports.Formoreinformation,referto 6-pinDC-IN, KOMODO-X™PowerAdaptorREDVOLT® NANO-VBattery,and REDVOLT®MICRO-VBattery.
AttachacompatibleV-Lockbattery(referto REDVOLT®NANO-VBattery and REDVOLT®MICRO-VBattery)intheVLockbatterymount.Slidethebatterydownuntilthelockingmechanismclicks.
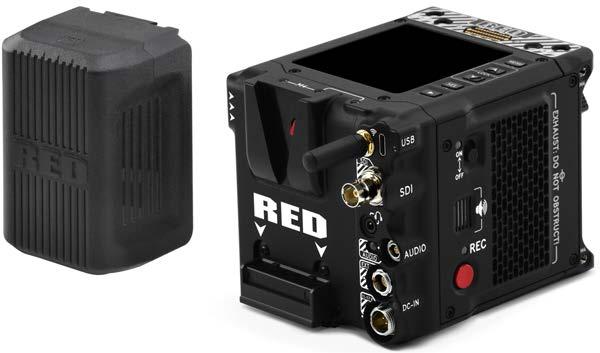
V-Lockbatterieswithawidthgreaterthan2.95in.(75 mm)arenotcompatiblewiththecamera’sMicroVLockplateandwillrequireabatteryadapter.
Thecameracanchargetheinstalledbatterywhenthe cameraisoffandtheDCpowerAdaptoris connected.Thecamerachargesthebatteriesonly whenthecameraisoffandthepowerAdaptoris connected.WhilethebatteryischargingtheDC PowerLEDblinksamberuntilcommunicationis established.TheLEDissolidamberwhen communicationisestablishedandthebatteryis charging.TheLEDisgreenwhencommunicationis notestablished(incompatiblebattery)andthebattery isnotcharging.
NOTE: Anincompatiblebatterywillnotchargeonthecamera.
Removethebatterywhenthechargeisloworwhenyouarestoringthecamera.
1.Turnoffthecamera.
2.Whileholdingtheattachedbattery,pressthebattery EjectButton 3.Slideandliftthebatteryup.
Youcanpowerthecamerawiththe KOMODO-X™PowerAdaptor,anExternalDCPowerSource,orwitharearmounted REDVOLT®MICRO-VBattery or REDVOLT®NANO-VBattery Forinformationaboutcharging,storing,ormaintainingthebatteries,refertothemanufacturer'sinstructions.
ThecamerasupportstheAutoBootonPowerfeature.Thismeansthatifallpowersourcesareremoved,andthePower SwitchissettoON,thenwhenapowersourceisattached,thecameraturnson.
Thecameradrawsvariouslevelsofpowerdependingontheconfigurationandoperatingconditions.Whenthereareno auxiliary(AUX)powerdrawsonthecamera,thepowerconsumptionguidelinesare: 28Wattsofpowerinthecamera'sbasicrecordingconfigurationatroomtemperature,6K,and24framespersecond 45WattsofpowerwhenusingDSMC3REDTouch7",atroomtemperature,6K,and80framespersecond
Whenmultiplepowersourcesareconnectedtothecamera,powerconsumptionisprioritizedinthissequence:
1.AnypowersupplyconnectedtotheDCINport.
2.AttachedV-Lockbattery.
WARNING: AlwaysattachthepowerorbatterybeforeattachingtheSDIBNCcable.AlwaysremovetheSDIBNCcable beforeremovingthepowerorbattery.
1.Attachapowersource(REDVOLT®MICRO-VBattery or DC-Input)tothecamera.
2.Slidethe PowerSwitch uptothe ON position.


NOTE: Donotturnoffthecamerawhilethecameraisrecording,orformattingmedia. Slidethe PowerSwitch downtothe OFF position.

Thissectionexplainshowtouse,record,format,andoffloadmediaforthecamera.
WARNING: Donotattachalabeltothemediacard.Theheatgeneratedbythemediacanweakenthelabel'sadhesive, causingthelabeltodetachinsideofthecamera.Labelscanalsodiminishheatdissipationandcauseexcessivewearto theinternalcomponents.Removingalabelfromamediacardcanpossiblydeformthecardbody.
ThecamerasupportsexFATasthefilesystemforthemediacardtoaccommodatelargerfilesanddatarates.exFATis supportedbothonmacOSandMSWindows.
Formatyourmediainthecamerawheneverpossible(referto MediaBestPractices).
IMPORTANT: Toensuredataintegrity,mediamustalwaysbeejected(unmounted)priortoremovalfromthecamera. Thisensuresthatpowerisremovedfromthemediaandanyopendatafilesareclosed.Failuretoproperlyeject (unmount)mediamayresultinlostdataorcorruptedfiles.
Toeject(unmount)mediafromthecamera,usethe OnboardLCDTouchscreen andselect Menu > Media.

TaptheEjectOKbutton:

TheSuccessmessagedisplays:

Themediaisnowejected(unmounted)andallmediarelateditemsaregrayedoutinthemenu.

WARNING: Themediacangetextremelyhot.Usecautionwhenremoving media.
Removingamediacardwithoutejecting(unmounting)firstdoesnotdamage themedia,however,itdoesincreasetheriskoffilecorruption.Itisgood practicetoejectthemediabeforeremovingordisconnecting.Ejectingthe mediaprovidesthefollowingbenefits: -Protectstheintegrityofyourrecordeddata -Mountsclipsinstantlytoyourworkstationinpost-production.
ThecameracontainsacoveredcompartmentontherightsidewhereyouinserttheCFexpressmediacard.
WARNING: DonotattachalabeltotheCFexpressmediacard.Theheatgeneratedbythemediacanweakenthe label'sadhesive,causingthelabeltodetachinsideofthecamera.Labelscanalsodiminishheatdissipationandcause excessiveweartotheinternalcomponents.RemovingalabelfromaCFexpressmediacardcanpossiblydeformthe cardbody.

1.Pressthemediadoorlatchdown,andthemediadooropens.


2.InserttheCFexpressmediacardintheslotwiththetopofthecardfacingtowardthefrontofthecamera.Insertthe carduntilitisfirmlyseated.
3.Closethemediadoorandmakesurethatthedoorlatchclicks.
4.Ifneeded,formattheCFexpressmediacard.Referto SecureFormat formoreinformation.
NOTE: DonotremovetheCFexpresscardwhilethecameraisrecordingorformattingmedia.Referto Media Management formoreinformation.
WARNING: Themediacangetextremelyhot.Usecautionwhenremovingmedia.
1.Ifthecameraison,goto Menu > Media andselect Eject
2.Pressthemediadoorlatchdown,andthemediadooropens.

3.PresstheCFexpressmediacarduntilyouhearaclick,andthenreleasethecardanditwillslideout.


4.LettheCFexpressmediacardcoolbeforegentlypullingthecardoutoftheslot.
WARNING: Themediacangetextremelyhot.Usecautionwhenremovingmedia. 5.Closethemediadoorandmakesurethatthedoorlatchclicks.
Asecureformatisalow-levelformatthatrebuildsthemediacardfilesystem.Asecureformaterasesalldataonthe card.
Performasecureformatwhenthecameraisreportingmedia-relatederrors.
CAUTION: Ensurealldataisbackedupbeforeformattingacard. Dataerasedduringformattingcannot be recovered.
WARNING: Themediacangetextremelyhot.Usecautionwhenremovingmedia.
Toperformasecureformat,followtheinstructionsbelow:
1.Goto MENU > MEDIA > SECUREFORMAT:

2.FromtheSecureFormatmenu,selectthedesired CameraID, CameraPosition, ReelNumber and Edgecode.Tapthe FormatbuttontostarttheSecureFormatprocess:

Theconfirmationmessagedisplays:

3.TapYestobeginformatting.


REDrecommendsthatyouonlyformatyourmediacardfromacomputerwhenyoucannotmountthemediatothe camera(referto MediaBestPractices formoreinformation).
Usethe MediaInfo menutodisplaythemediacardinformation.
Mediainformationincludesthefollowing:
Status
ModelNumber
SerialNumber
FirmwareVersion
PercentageRemaining
TimeRemaining
*withthecurrentprojectsettings
Displaysthemediacardstatus
Displaysthemediacardmodelnumber
Displaysthemediacardserialnumber
Displaysthemediacardfirmwareversion
Displaysthemediacard'sremainingstorage*
Displaystherecordingtimeremainingonthemediacard*
ThecameraformatsthemediacardusingtheexFATfilesystem.BothMac® andWindows®-basedcomputerssupport mediacardswiththissystem.Refertothedocumentationforyouroperatingsystemtodeterminewhetherthereareany limitationstoitsfilesystemsupport.
Whenyourecordaclip,thecameracreatesauniquenamefortheclipfolderthatusestheformatdescribedinthetable below: ITEM
CameraID
Theletterassignedtothecamera(referto CameraID) A ReelID
Thereelnumberassignedtothemedia(referto ReelNumber)
CameraPositionThecamerapositionletter(A-Z)followedbythreedigitsstartingwith001(refer to CameraPosition)
Month Monththattheclipisrecorded(referto Date/Time) 12 Day Daythattheclipisrecorded(referto Date/Time) 04
TwoCharactersTworandomalphanumericcharactersgeneratedbythecameratopreventany possibilityofduplicates
.RDC Clipfolderextension .RDC
Forexample,asequenceofclipfolderswithinamediafolderonCameraAmaylooklikethis:
A001_C001_12046M.RDC
A001_C002_1204CE.RDC
A001_C003_1204R5.RDC
Thefollowingmetadataisrecordedforeachframeofeachclip:
AudioData
LensName,Brand,ID,NearFocus,FarFocus
BroadcastWaveFile(BWF) Location
Clip LTCUserBits(332-bitwordreg-dumpfromISP)
Configuration,CameraName,Network,Model, ModelID,SerialNumber
MediaSerialNumber ProductionName
Copyright REDCODE®
DateandGMT Reel
Filename Scene
FirmwareVersion StereoSetup
FrameGuides Take
JamsyncSetting Timecode
LensandShutterSpeed/AngleParameters Unit
Thissectiondescribesbestpracticestoensurethatyourmediacardscontinuetoprovidereliablestorageandfastdata rates.Followingthesebestpracticesmaypreventyourmediacardfrombecomingfragmented,whichcanleadtodata integrityerrors.
TheonlyfilesthatshouldbesavedfromyourcomputertoyourmediacardarePresetfiles,FirmwareUpgradefiles, andLUTs.DONOTsaveotherfiles,folders,orapplicationstoyourmedia.
DO NOTbackupyourharddrivetothemediacard.WhenusingaMac,thesystemmayaskifyouwanttobackup yourfilestothemediacardusingTimeMachine;DO NOTusethemediacardasabackupdisk.
DONOTdeleteclipsoffofyourmediacardusingacomputer.Deleteclipsonlybyformattingyourmediacardincamera.Formoreinformationaboutformattingyourmediacard,referto SecureFormat
DONOTformatyourmediacardusingacomputer,unlessthemediacardcannotmounttothecamera.Formore information,referto SecureFormat
Whenejectingthemediacardfromacomputer,ensurethattheiconhascompletelydisappearedfromtheFinder window(Mac)orfromWindowsExplorer(Windows)beforeremovingthemediacard.Sometimes,thepop-upsaying thatthemediacardhasejecteddisplaystooearly.
Whenthereaderhasawrite-protectswitch(suchasthe CFexpressTypeBMedia reader),itisrecommendedthat yousetthecardreadertowrite-protectwhenuploadingclipstopreventconnecteddevicesfromaddingany unwanteddatatoyourmediacard.
NOTE: YoucanusetheREDmediareaderwithWrite-ProtecttopreventtheMacOSfromindexingyourmediacard. MostnewerversionsoftheMacOSautomaticallyindexallexternaldriveswhenyouconnectthem.Thisincludeswhen youconnectmediacards.
Indexingmakestheconnectionprocesstakelonger.WhilethemediacardconnectstotheMac,DO NOTremovethe card.Indexingwriteshiddenfilestothemediacard.Whenyouinsertanindexedmediacardinthecamera,itcantake thecameraawhiletorecognizethehiddenfilesandconnecttothemediacard.Whilewaitingforthemediacardto connect,DO NOTremovethecardorturnoffthecamera.Afterthecamerasuccessfullyconnectstothemediacard, performasecureformattoremovethehiddenfiles.Formoreinformation,referto SecureFormat
TheDSMC3™RED® Touch7.0"LCDmonitorincludesacustomREDMonitorInterface(RMI)cablethatprovides communicationbetweentheRMIandthemonitor.
WherethiscableattachestotheRMIandthemonitor,therearespeciallockingfeaturesthatkeepthecablefrom accidentallydetaching.
NOTE: TheRMIcableisattachedtothemonitoratanangle,asshownintheimage.
Tounlockthecablelocks,rotatetheRMIcablelockandslidethemonitorcablelock,asshownintheimage:

NOTE: TheUSB-C-styleDSMC3™RMIcableisacustom-Pinnedcable,whichisnotcompatiblewithstandardUSB-C cableports(includingtherearcameraUSB-Cport).TheEXPportsontheRMIareforfutureuseandarenotcurrently supported.
OptionalREDMonitorInterface(RMI)cables:
10"DSMC3™RMICable
18"DSMC3™RMICable
39"DSMC3™RMICable
Thecameraprovidesseveralmethodsformonitoringtheimage.Thesemonitoringmethodsinclude: OnboardLCDtouchscreen
DSMC3™RED®Touch7.0"LCD
SDIoutputtoamonitor
REDControloverWi-FitoiOSorAndroiddevices
USB-CtoEthernetadaptertoacomputer
1080M-JPEGLiveStream
TheOnboardLCDtouchscreenprovidesaliveimagefromthecamerasensor.ByusingtheMonitoringToolsmenu,you candisplayguides,exposuretools,focustools,andamagnifiedimage. TapontheExposuremetertoopentheMonitoringtools.

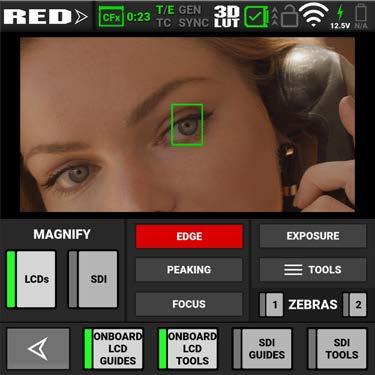
InthisexampletheLCDmagnificationandLCDguidesareenabled.TheAutofocusrectangleisalsodisplayed.
TheSDIportprovidesa12GSDIsignal,whichallowsyoutoviewthecameraimageona4KSDImonitoratupto60 fps.
UsetheMonitormenutoselectthesettingsforSDIoutput,Tools,andGuides(referto MonitoringMenu
WARNING: Undercertaincircumstances,itispossibleforanSDIconnectortoincurdamagewhenconnectedtoan accessoryandpoweredwithoutusingshieldedcables.REDrecommendsonlyusinghighquality,shieldedBNCcables thatareratedfor12G-SDIsignalsandonlyusingshieldedpowercablesforpoweringSDIaccessories.
MakesurepowerisconnectedtotheSDIaccessoryatalltimesbeforeyouconnecttheBNCtothecamera. UngroundedpowerfromSDIaccessoriescandamagethecamera’sSDIport.Toavoidthispossibledamage,attachthe powersourcetotheaccessorybeforeattachingittotheBNCcable.WhenusingREDApprovedThirdPartybattery plates,unplugtheBNCcablepriortohotswapping.
Whenpossible,avoidusingP-Tap(alsoknownasD-Tap)cablestopoweraccessories.ToavoiddamagewhenusingPTap/D-Tap,it’simperativethattheconnect/disconnectsequence(below)isfollowedprecisely.
WhenattachingSDIaccessories:
1.ConnectapowersourcetotheSDIaccessory;powerontheSDIaccessory.
2.Ensureapowersourceisconnectedtothecamera.ThisensuresbotharegroundedpriortoconnectingtheBNC. Thecamera'spowerstatedoesnothaveanimpactonSDIattachmentsequence.
3.ConnecttheBNCcabletotheaccessory,thentothecamera.
WhendetachinganaccessorymountedtoanSDIoutput,ensurethatyouremovetheBNCconnectiontothecamera beforeremovingpowertotheSDIdevice:
1.ShutdowntheSDIaccessory.
2.DisconnecttheBNCcablefromthecamera.
3.DisconnectthepowersourcefromtheSDIaccessory.
Whenyouneedtoswapoutabatteryonanaccessorymountedtothecamera’sSDIport,youmust:
1.ShutdowntheSDIaccessory.
2.DisconnecttheBNCcablefromthecamera.
3.ReplacethebatteryontheSDIaccessory.
4.ConnecttheBNCcabletothecamera.
5.PowerontheSDIaccessory.
Formoreinformation,referto PreventingDamagetoSDIOutputs

Figure:SDImonitorwithSDIAdvancedModeenabled
SDIportspecifications:
Integrated12G-SDIwith6G-SDI,3G-SDI,and1.5G-SDImodes
12G-SDI:Upto4096×216010-bit4:2:2for60p
6G-SDI:Upto4096×216010-bit4:2:2for30p
3G-SDI:Upto2048×108010-bit4:2:2for60p
1.5G-SDI:Upto2048×108010-bit4:2:2for30pand24p
SMPTETimecode
HANCMetadata
24-bit48kHzAudio
Youcanenableordisabletheimagemagnification,thefocusandexposuretools,andtheguidesdisplayedonimages senttotheSDImonitorbyusingtheMonitoringtools(referto MonitoringTools).
TapontheExposuremetertoopentheMonitoringtools.


YoucanenablethefollowingmonitoringtoolsonSDI: Magnify
SDIGuides(referto Guides)
SDITools(referto Tools)
REDControlallowsyoutouseWi-FitoconnecttothecameraandsendmonitorimagestoiOSandAndroiddevices.
NOTE: Youmustenablelivestreamingunder MENU > MONITORING > LIVESTREAM toenabletheimagefeed.

WiththeuseofanEthernettoUSB-Cadapter,youcanalsoconnectEthernetdevices.

Figure:USB-CAdaptorconnectedtoanEthernetwebbrowser
Youcanadd:9090totheendoftheURLinyourbrowsertobringupanimage-onlyfeedforremoteviewing.
NOTE: Youmustenablelivestreamingunder MENU > MONITORING > LIVESTREAM toenabletheimagefeed.
Thecameraoffersmultipletoolstodeterminethecurrentimageexposurelevelsandprovidesthetoolstoadjustthe exposuretothedesiredlevels.
WhenusingtheR3Dfileformat,youcancorrectcolortemperatureandISOsettingsatanytime.Theapertureand exposuretimehowever,aretwooftheparametersthatyoucannotcorrectedlaterinR3Dfiles.
NOTE: ProResfileformatburnsinISOandWhiteBalance,anddoesnotallowyoutoadjustthesesettingspostrecordinglikeyoucanwiththeR3Dformat.
Whilethecorrectexposureisalwaysanartisticdecision,therearebestpracticesforcapturingthemostdynamicrange whilealsoallowingpostproductiontopreservetheintendedimageinformation.
Thegoalistoreduceclippinginthebrightanddarkpartsoftheimageasmuchaspossible.Otherwisethesensor informationislostintheoverexposedandunderexposedareas.
Theprimarytoolfordeterminingtheexposurelevelsisthehistogram.Itshowstheexactluminancelevelsofthered, green,andbluepixelsafteryouapplytheISOandWhiteBalancesettings.Monitorshavetheirowncolorgamutsand brightnesslevelswhichmakesthemonitorlessthanoptimalfordeterminingthecamera'sexposurelevels.
Thiscameraincludesafull Histogram andasimpleRGBrawpixelexposuremeter,whichallowsyoutodetermine properexposureregardlessofthesetISOorcameralook(formoreinformationreferto OnboardLCDTouchscreen).
Thefullhistogramprovidesinformationabouthowthebrightnessisdistributedintheimage.Thisallowsyoutoseehow closeasceneistoclippinginthelightanddarkareas,whichmakesiteasytochooseaperture,exposure,andND filterssolutionsaccordingly.
Exampleofoverexposure withhistogramandexposuremeter:

Exampleofabalancedexposure withhistogramandexposuremeter:

Exampleofunderexposure withhistogramandexposuremeter:

Whilethehistogramprovidesinformationaboutthebrightnessdistributionandclippingoftheimage,itdoesnotshow youtheareasintheimagethatarenear,orthathavereached,clipping.Forthis,thecameraprovidesimageoverlays thatprovidefalsecolorstoindicatepreciseexposurelevels.
TheFalseColorExposuremodeoverlayprovidesinformationwheretheimageisclosetoclippingoralreadyclippingin thehighlights(red),midtones(green),andshadows(purple).Formoreinformation,referto FalseColorExposureMode.
ExampleofExposureMode:

TheFalseColorVideomodeprovidesmoregradualinformationaboutthebrightnessindifferentpartsoftheimage.This ishelpfulwhenyouwanttoexposeskincolorattherightlevel,whileignoringthefactthatbackgroundsmightbe overexposedorunderexposed(referto FalseColorVideoMode).
ExampleofVideoMode:

GioScopemodedisplaysacoloroverlayontopofadesaturatedRAWsensorimage,identifying16incrementswithin thedynamicrangeofthesensor.TheRGBsettings(colortemperature,ISO,LUT,etc.)arenotusedbythismode. Eachnumber(1to16)indicatesadifferentincrementofdynamicrange.Number16representsthetopincrement,andis brokenupinto1/8thsub-incrementstoshowhighlightroll-off.Each1/8thincrementisrepresentedbyadifferentshade ofred,rangingfromlightred(lesslight)todarkred(mostlight,clipping).
Focus,like Exposure and RecordingFrameRate isapropertythatcannotbefixedeasilyinpost-production.Tomake surethecameraisfocusedcorrectlywhenyoubeginrecording,itisimportanttorelyonfocustoolsthatdonotrelyon thevisibilityontheLCDTouchscreenoramonitor.
Thecamerainterfaceincludesthefocustoolsyoucanusetoreachthedesiredimagefocus(referto Peaking).
TheFocusPeakingmodeappliesasharpeningfiltertotheimagethatemphasizesedgesofthesubjectinfocus.
ExampleofFocusPeaking:

TheEdgePeakingmodehidestheimageandonlyshowstheedges.Thisprovidesthebestvisualrepresentationofthe subjectthatiscurrentlyinfocus.
ExampleofEdgePeakingmode:

ThePeakingPeakingmodeemphasizestheedges,anditalsohighlightsthembyusingaselectablecolor.
ExampleofPeakingPeakingmode:

Timecodeprovidesamechanismtoreferenceframesfromthecamera'srecordedclipstootherdeviceslikecameras andaudiorecorders.Somedevicescanalsogatherotherdatalikelensmetadataorcameraorientationthatis referencedbyTimecodetomergethedatabacktogetherinpost-processing.
KOMODOprovidestwoseparateTimecodeconcepts:TimeofDay(TOD)andEdgecode.BothTODandEdgecodeare storedintheR3Dfile.TheusercanselectwhichTimecodedisplaysonthe OnboardLCDTouchscreen bysettingthe preferencein TimecodeDisplayMode.
TODTimecodereflectsthetimeanddatethecamerarecordedeachframe.KOMODOsynchronizestheTODTimecode toanexternalTimecodegenerator(whenoneisconnectedtothe ExtensionPort)orsynchronizestotheinternalrealtimeclockofthecamera.
TosetupTODTimecodeonthecamera,performthefollowing:
1.OpentheAudio/Timecodemenu: MENU > AUDIO/TC:

2.SelectTimecodeSource.TheTimecodeSourcemenuopens:

3.SelectInternalTODtousethecamera'sinternalrealtimeclock,selectInternalManualtospecifyastartingtimefor theinternalclock,orselectExternaltouseanexternalTimecodegeneratorconnectedtothe ExtensionPort

4.WhenyouselectInternalTOD,youcanusethe AutoJam switchtoenablethecameratoautomaticallysynchronize theTimecodetothecamera'sinternalclock. ThecameradisplaystheTimecodeonthe OnboardLCDTouchscreen

NOTE: Thetimecodeisresetwhenthecameraisturnedoff,unlessanexternalpowersourceremainsconnectedand powered.
Edgecodeonlyadvanceswhilethecameraisrecordingframes.Eachframeissequential.Whenthemediaisreplaced, thenewmediastartsthetimerover.YoucansettheEdgecodetimermanuallybyusingthe SecureFormat menu.
TosetupEdgecodeTimecodeonthecamera,performthefollowing: 1.OpentheAudio/Timecodemenu: MENU > AUDIO/TC:

2.SwipethetouchscreenuptoscrolldowntoTimecodeDisplayMode:

3.SelectTimecodeDisplayMode.TheTimecodeDisplayModemenuopens:

4.SelectEdgeandtapOKtouseEdgecode.ThecameradisplaystheEdgecodeonthe OnboardLCDTouchscreen

UseZebramodetoenableandadjusttheupperandlowervaluesfortwo(2)independentzebraindicators.UseZebra1 forhighlightexposure,anduseZebra2formid-tonesorshadows.Zebrasaredisabledbydefault.
Formoreinformation,refertothe ExposurewithREDCameras:FalseColorandZebraTools article,availableat www.red.com/red-101/exposure-false-color-zebra-tools
1.Goto MENU > MONITORING > TOOLS andselect ZEBRA1
2.SetaLowIREof98.
3.SetaHighIREof100.
AreasoftheimageexposedwithintheIRErangeareindicatedbyreddiagonallinesat–45°.
ThedefaultsettingsareLowIRE=98andHighIRE=100.
1.Goto MENU > MONITORING > TOOLS andselect ZEBRA2.
2.SetaLowIREof41.
3.SetaHighIREof48.
AreasoftheimageexposedwithintheIRErangeareindicatedbygreendiagonallinesat45°.
ThedefaultsettingsareLowIRE=41andHighIRE=48.
ZebraisaspecialtymodethatiscapableofshowinguptotwocustomizedoverlayswitharbitraryIREranges.Unlike theothertwomodes,Zebraindicatorsappearasdiagonalstripes,theyarefullyconfigurable,andtheyhavethe advantageofpreservingafull-colorbaseimage.
Withtraditionalvideocameras,manyusedasinglezebratoindicatehighlightdetail.Itwouldoftenbesetat70%(70 IRE),inpartbecausethisiswhereawhitepieceofpaperwouldbegintohaveminimaltexturewhenrenderedusinga typicalcontrastcurve.Skintonesorskieswouldbeexposedtoappearjustdarkerorbrighterthantheselines.If enabled,asecondzebrawouldtypicallyindicateeithermid-tonesorshadows.Fordeepshadows,youcansetthe secondindicatortobelow10%intensityor10IRE,andsetthefirstindicatortohighlightsabove85IRE.
However,aswithotherIRE-basedmodes,ZebramodeisonlyapplicableforthecurrentISOsettings(suchaswithSDI output),notfortherawimagedata.Ifanythingischangedinpost-production,theindicatorswon'tberepresentativeof thefinaloutputtones.Inthosesituations,Zebramodeismoreofapreviewandoutputbrightnesstoolthananexposure tool.
ThissectionexplainshowtousethePre-Recordfeature.
Tostartpre-recording,pressthe Record button. TheLCDchangesfromtheReadyappearancetothePre-Recordappearance:


Pressthe Record buttonagaintostartrecording. Whenyoustartrecording,theappearanceoftheLCDchangesfromthePre-RecordappearancetotheRecord appearance:


ThecameraaddsthePre-Recordcliptothebeginningofyourrecording. YoucantouchandholdtherecordbuttonontheOnboardLCDtostopPre-Record.Youcanalsoassignphysical buttonsonthecameratoPre-RecordStoptostopanderasethecurrentPre-Recordsegment,orPre-RecordToggleto completelydisableorenablethePre-Recordfunction.
ForinformationaboutenablingandconfiguringPre-Record,referto Pre-Record
Sensorcalibrationisaprocessduringwhichthecameraoptimizesimagequalitybyensuringthatpixelsensitivity remainsconsistentthroughoutthesensor.
Calibrationisrecommended:
Whenshootinginanenvironmentwherethetemperatureissignificantlydifferent(+/-30°F...)fromthecurrent calibration.TheTintheT/EStatusBarindicatorwillturnyellow(referto StatusBar formoreinformation)
Afteranextremechangeinexposuretime(+/–1/2sec).TheEintheT/EStatusBarindicatorwillturnyellow(referto StatusBar formoreinformation)
Aftereachfirmwareupgrade
Whenyouhaveanyimagequalityconcerns
Youcanreceivethebestperformancefromyourcamerabyinstallingthelatestfirmware.Makeahabitoffrequently visitingREDDownloadsatwww.red.com/downloadstocheckfornewversionsofcamerafirmware,updatedoperation guides,andpost-productionsoftware.
Toviewthefirmwareversionthatiscurrentlyinstalledonyourcamera,open Menu > SystemSettings > System Status > CameraInfo:

Versiondisplaysthecurrentlyinstalledcamerafirmware.Ahighernumber reflectsanewerrelease.
Installthemostrecentfirmware.Unlessotherwisespecifiedinthereleasenotes,youdonotneedtoupgradetoany firmwareinbetweenyourcurrentversionandthemostrecentversionavailableonline.
Youcanupgradethefirmwarebyusinganupgradefoldercopiedtoamediacard,oryoucanupgradeoveranEthernet connection.
NOTE: Youmustcalibratethesensorafterupgradingthecamera.Formoreinformation,referto CalibratingtheSensor
1.DownloadthemostrecentfirmwareforyourcamerafromREDDownloadsatwww.red.com/downloads.
2.Unzipthefirmwarezipfile.
3.Intheunzippedfolder,navigatetothe upgrade folder.
4.Copythe upgrade folderanditscontentstotherootleveloftheCFexpressmediacarddirectory.
5.UnmounttheCFexpressmediacardfromyourcomputerandremovethemediacardfromthemediareader.
6.InserttheCFexpressmediacardinthecamera.Thecameradetectstheupgradefolderandpromptsyoutoupgrade thefirmware.
7.FromthecameraUI,navigateto Menu > Maintenance

8.FromtheMaintenancemenu,navigatedowntoUpgradeandtapOK.


9.Tap Upgrade toconfirm.TheFirmwareUpgradeprogressscreendisplays:

Duringtheupgrade,thefansrunathighspeedandthefollowingoccurs:
Thecameradisplaysthe SHUTTING DOWN screenandreboots
Thecamerarestartsanddisplaysthe UPGRADING screen
Thecameradisplaysthe INITIALIZING screen
Thecameradisplaysthe FIRMWARE UPGRADE progressscreen:

TheFirmwareUpgradesuccessmessagescreendisplayswitha RESTART button:

10.Tap Restart.Thecameradisplaysthe SHUTTING DOWN screenandrebootsagain.
11.ThecamerarestartsdisplayingtheStartscreen,the INITIALIZING screen,andthentheSoftwareLicense Agreement(SLA)displays:

12.Tap Agree.IfyoudonotagreetotheSLA,thecameracannotbeused.TheSLAcontinuestodisplayuntilitis accepted.
13.Recalibratethecamerabeforerecording.Refertothe Calibration sectionand CalibratingtheSensor formore information.
YoucanreceivethebestperformancefromyourDSMC3™RED® Touch7.0"LCDmonitorbyinstallingthelatest firmware.MakeahabitoffrequentlyvisitingREDDownloadsatwww.red.com/downloadstocheckfornewversionsof DSMC3™RED® Touch7.0"LCDfirmware,updatedoperationguides,andpost-productionsoftware.
Whenanewerfirmwareisdetectedonthecamera,theDSMC3™RED® Touch7.0"LCDwillpromptyouoneachboot toupdatethemonitor.Followtheon-screenpromptstoupdatethemonitor.
WhenanewermonitorfirmwareisavailabledirectlyfromSmallHD,therearetwowaysyoucanupgradetheDSMC3™ RED® Touch7.0"LCDfirmware.
1.DownloadtheDSMC3™RED® Touch7.0"LCDupgrade.binfiledirectlyfrom downloads.smallhd.com,totheroot directoryofa2,4,8,or16GBSDcard.
2.InserttheSDcardinthemonitor.
3.FromtheDSMC3™RED® Touch7.0"LCDSettingsPanel,initiatetheupdate.
UPGRADETHROUGHTHECAMERA
1.DownloadtheDSMC3™RED® Touch7.0"LCDupgrade.binfiledirectlyfromdownloads.smallhd.com.
2.Createafoldernamed“smallhd”ontherootofthecamera’sCFexpressmediacard.
3.Copythefirmwarefiletothe"smallhd"folder.
4.InserttheCFexpresscardinthecamera,andinitiatetheupdatethroughtheSettingsPaneloftheDSMC3™RED® Touch7.0"LCD.
NOTE: Thismethodrequiresthatthemonitorbeonatleastfirmwareversion5.0.0towork.IfthemonitorisonOS4, usethe DirectlyfromtheDSMC3™RED® Touch7.0"LCD firmwareupgrademethod.
AllREDproductsaredesignedforruggeddurability,butprecisioninstrumentsdemandpropercare.Followthe instructionsinthissectiontoclean,maintain,andstoreyourdevices.
WARNING: DONOTrinseorimmersethecameraorotheraccessoriesinwater.Keepdryatalltimes.
WARNING: DONOTusesoaps,detergents,ammonia,acetone,alkalinecleaners,abrasivecleaningcompounds,or solvents.Thesesubstancesmaydamagelenscoatingsandelectroniccircuitry.
WARNING: DONOTuseanexcessofcleaningsolution.
WARNING: DONOTreuseswabsorwipes.
WARNING: DONOTattempttocleanthesensororopticalcavityforanyreason.Ifthesensorbecomesdirty,submita Supportticketat https://support.red.com.
WARNING: DONOTattempttomodify,dismantle,oropenthecamera,lens,orotheraccessoryasdoingsomay exposeyoutoelectricshockandseriousinjury.Therearenouser-serviceablepartsinside.Alterationorrepairsmadeto thecameraoraccessories,exceptbyaREDauthorizedservicefacility,voidsallwarranties.
WARNING: Usecautionwithcompressedairandgasdusters,sincethehighpressure,oilyresidue,coldair, particulates,andmoisturemaycausedamage.Youmayuseafiltered,non-residuegasdustertocleannon-critical areas,suchasaroundthefansandotherrecessesontheexteriorofthecamera.Damagetothecameraorother componentsofthecamerasystemcausedbyusingcompressedairorgasdustersisnotcoveredunderwarranty.
WARNING: DONOTusecompressedairandgasdustersonthesensororonanyoptics.
WARNING: DONOTusecompressedairandgasdustersonoraroundtheintegratedmicrophonesonthefrontofthe camera.
Useafiltered,non-residuegasdustertocleannon-criticalareas,suchasaroundthefansandotherrecessesonthe exteriorofthecamera.
Cleanwithadrylint-freecloth.Whencleaningyourcameraandaccessories,rememberthatthedevicesarenot waterproofandmoisturecandamageelectroniccircuitry.
WARNING: DONOTstorethecameraoraccessoriesinanyplacewithextremetemperatures,directsunlight,high humidity,severevibration,orstrongmagneticfields.
ThissectionexplainshowtocleantheOnboardLCDscreen.
UseonlythefollowingproductstocleantheOnboardLCDscreen:
Ionizedrubberairbulb
DelkinDevicesSensorSolution®
Lensswabs
Dryopticalwipes
NOTE: Beforecleaningthescreenwithswabsorwipesandacleaningsolution,ALWAYSuseanionizedrubberairbulb toremoveanysolidparticles.Cleaningthescreenwithoutremovingsolidparticlesincreasestheriskofscratchingthe screen.
DONOTuseanyoftheitemslistedbelowtocleantheOnboardLCDscreen.Theseproductshavenotbeentestedon REDproductsandmaycausedamageorstreaking.
•Windex •Solvents •Gasdusters •Compressedair •Rubbingalcohol •Isopropylalcohol •Third-partycleaningkits •PancroProfessionalLensCleaner(orequivalent) •Pre-packagedlenscleanercontaininganyadditives,suchasdetergent,anti-staticcompounds,orfragrance.
WARNING: DamagetotheOnboardLCDscreenorothercomponentsofthecamerasystemcausedbyusing prohibitedcleanersisnotcoveredunderwarranty.
Ifyourdevicehascomeincontactwithwateroryoususpectwaterdamage,submitaSupportticketat https://support.red.com immediately.
WARNING: DONOTattempttopoweranydevicethatmayhavewaterdamage.
WARNING: DONOTplacethedeviceinacontainerofrice,silicagel,ordesiccantpacketsinanattempttodrythe device.
Thissectiondescribesgeneraltroubleshootingtips:
1.ConfirmtheFirmwareversioncurrentlyinstalledonyourcamera.Eachfirmwarereleasecontainsbugfixesandother improvements.Youmaybeexperiencingabugresolvedinalaterrelease.
Youcanfindthisunder Menu>SystemSettings>SystemStatus>CameraInfo
Toconfirmanddownloadthelatestfirmwareversion,visit red.com/downloads
Ifyourcurrentfirmwareisout-of-date,pleaseupgradetothelatestreleasebuildfoundon red.com/downloads
2.Rebootthecamerabypoweringitoffandbackon.
3.TestthecamerabyinstallinganalternateorrecentlyformattedCFexpresscard.
4.Ensurethatallofthecablesandconnectionsarefullyseatedandlockedinplace(ifapplicable).
5.Removeallattachedaccessories,REDandthird-party.Ensureallcontactsareclean,undamaged,andfreeofdebris beforeremounting.TrybootingthecamerausingtheACpoweradaptorwithoutanyaccessoriesattachedto determinewhethertheissuepersistsbeforereattachinganyaccessories.
6.Tryrebootingthecameraagainafterreattachingtheaccessories.Ifthecamerabootswithoutaccessoriesandthe symptomreoccursafterreattaching,tryaddingtheaccessoriesoneatatimetoisolatetherootcause.Thishelps narrowdownrootcausestospecificaccessoriesandhelpstoensurethatabadconnectionisnotthesourceofthe issues.
7.PerformaResetDefaults.Thiswillrestoreallcamerasettingsbacktofactorydefaultsettingsandreducethe possibilitythatappliedsettingscausedtheissue.
Youcanfindthisunder Menu>Maintenance>ResetDefaults
8.Asalastresort,performaHardRestore.Thiswillrestoreallcamerasettingsbacktofactorydefaultsettingsbut goesastepfurthertoclearcamerainternalmemory.
a.Removeallattachedaccessories,REDandthird-party,leavingonlyanACpoweradaptorattached.
b.Turnthecameraoff.
c.PressandholdtheRECbuttonandatthesametimeswitchthepowerON.
d.ContinuetoholdtheRECbuttonuntilthecamerafinishesbootingandthelicenseagreementdisplays. Thiscompletesthehardrestore.
Ifyourcameracontinuestomisbehaveafteryouhaveperformedthesetroubleshootingsteps,submitarequestfor TechnicalSupport.Includethefollowingwiththerequest: Adetaileddescriptionoftheissueandeventsthatleduptoitsoccurrence,includingstepstoreplicate. Adescriptionoftherateofoccurrenceconfirmingwhetherthesymptomisrare,intermittent,orcontinuous. AfreshlysavedcameraLogFile.TheLogFilecanbesavedthrough Menu>Maintenance>SaveLog.Referto Save Log formoreinformation.
Pleaseconfirmthefirmwareversioncurrentlyinstalled.Youcanfindthefirmwareversionnumberunder Menu>SystemSettings>SystemStatus>CameraInfo. Ashortvideodetailingtheissuethatisoccurring,showingyourcamerasetupandallattachedaccessories. Adetailedlistofaccessories(REDandthird-party),lens,andmodulesattachedatthetimetheissueoccurred. Adescriptionofhowthecameraandattachedaccessorieswerepoweredwhentheissuefirstoccurred.
Thefollowingisatableofthecamera'sstatusicons.


TheCFexpressTypeBmediacardisgood( andrecordingtimeremaining)
Themediacardismissing
Themediacardisincompatible

Thesensortemperature(T)andexposure(E)calibrationaregood
Thesensortemperature(T)requirescalibration
Thesensorexposure(E)requirescalibration
GrayindicatesthatnoTimecodegeneratorsignalisdetected
GreenindicatesthattheTimecodesourceisconnectedandjammed
RedindicatesthattheTimecodesourceisconnectedandnotjammed
WhiteindicatesthattheTimecodesourceisjammedandnotconnected
YellowindicatesthattheTimecodesourceiscross-jammed(atadifferent ProjectTimeBase)
GrayindicatesthatnoGenlocksignalisdetected
GreenindicatesthatthecameraisreceivingandislockedtoaGenlocksignal
RedindicatesthatthecameraisreceivingandisnotlockedtoaGenlocksignal
Grayindicatesthatnosynchronizationisdetected
Greenindicatesthatthecamera'ssensorissynchronizedwithTimecodeandthatthecamera'soutput issynchronizedwithaGenlocksignal
Yellowindicatesthatthecamera'ssensoris NOT synchronizedwithTimecodeandthatthecamera's outputissynchronizedwithasinglecameraoraGenlocksignal
Grayindicatesthatno3DLUTsareinuse
Whiteindicatesthatthecameraisusinga3DLUT
Cameratemperatureisgood
Cameraoverheatingwarning
Cameraoverheating


Camerashuttingdown
GrayindicatesnoFTPSdataistransferring
GreenarrowsindicateFTPSdataistransferring
GrayandopenindicatesthatthecameraLCDisunlocked
WhiteandclosedindicatesthatthecameraLCDislocked
GrayandemptyindicatesthatnoWi-Fisignalisdetected
WhitebarsindicatethestrengthoftheWi-Fisignaldetected(Infrastructure)
WhiteantennaindicatesthatWi-Fisignalisbroadcasting(Ad-hoc)
GrayindicatesthatnoDCpowerisconnected
GreenindicatesthatthecameraisreceivingDCpower
Grayindicatesthatnobatteryisconnected
Whiteindicatesthatthebatteryisconnectedandgreenshowstherelativelevelofchargeremaining
Yellowindicates10minutesofpowerremaining
Redindicateslessthan5minutesofpowerremaining
Grayquestionmarkindicatesnocommunicationwiththebatteryandnopower
Whitequestionmarkindicatesnocommunicationwiththebatteryandpower
Grayexclamationpointindicateserrorcommunicatingwiththebatteryandnopower
NOTE: Dimensionsareshowninmm. FRONTVIEW

Figure:CameraFrontView


Figure:CameraSideView(Right)


Figure:CameraTopView

Figure:CameraBottomView

ThefemaleRPSMAconnectorprovidesanattachmentforthemaleRPSMAWi-Fiantenna.

Figure:FrontfaceofthefemaleRPSMAport(lookingatthebackofthecamera).
NOTE: MatingconnectorisaWi-FiantennawithastandardmaleRPSMAconnector.

TheUSBType-Cportisusedprimarilyfordataconnections.TheUSBType-Cportprovides5 voltsat0.5amps.

Figure:FrontfaceoftheUSB-Cport(lookingatthebackofthecamera).
NOTE: MatingconnectorisastandardUSB-Cmaleconnector.

The12G-SDImale75-ohmBNCportdeliver12,6,3,or1.5Gbpsofimagebandwidthidealfor the4Kp60format.Otherfeaturesinclude:
UptoFour(4)channelsofembeddedaudio
TimeofDayandEdgeTimecode
RecordTallyflag
Clipnameinformation(asSMPTERP-188VITC2HANCmetadata)

Figure:Frontfaceofthe12G-SDImaleBNCconnector(lookingatthebackofthecamera).
PINSIGNAL
Center12/6/3/1.5G-SDI Signal
ShellGround
Upto4096x2160:422for60p-LogvieworLUTview(SMPTEST 2082)
Commonground(cameraground) N/A
NOTE: Matingconnectorisstandard75-ohmfemaleBNCconnectorratedfor12G-SDI.
WARNING: Undercertaincircumstances,itispossibleforanSDIconnectortoincurdamagewhenconnectedtoan accessoryandpoweredwithoutusingshieldedcables.REDrecommendsonlyusinghighquality,shieldedBNCcables thatareratedfor12G-SDIsignalsandonlyusingshieldedpowercablesforpoweringSDIaccessories.
MakesurepowerisconnectedtotheSDIaccessoryatalltimesbeforeyouconnecttheBNCtothecamera. UngroundedpowerfromSDIaccessoriescandamagethecamera’sSDIport.Toavoidthispossibledamage,attachthe powersourcetotheaccessorybeforeattachingittotheBNCcable.WhenusingREDApprovedThirdPartybattery plates,unplugtheBNCcablepriortohotswapping.
Whenpossible,avoidusingP-Tap(alsoknownasD-Tap)cablestopoweraccessories.ToavoiddamagewhenusingPTap/D-Tap,it’simperativethattheconnect/disconnectsequence(below)isfollowedprecisely.
WhenattachingSDIaccessories:
1.ConnectapowersourcetotheSDIaccessory;powerontheSDIaccessory.
2.Ensureapowersourceisconnectedtothecamera.ThisensuresbotharegroundedpriortoconnectingtheBNC. Thecamera'spowerstatedoesnothaveanimpactonSDIattachmentsequence.
3.ConnecttheBNCcabletotheaccessory,thentothecamera.
WhendetachinganaccessorymountedtoanSDIoutput,ensurethatyouremovetheBNCconnectiontothecamera beforeremovingpowertotheSDIdevice:
1.ShutdowntheSDIaccessory.
2.DisconnecttheBNCcablefromthecamera.
3.DisconnectthepowersourcefromtheSDIaccessory.
Whenyouneedtoswapoutabatteryonanaccessorymountedtothecamera’sSDIport,youmust:
1.ShutdowntheSDIaccessory.
2.DisconnecttheBNCcablefromthecamera.
3.ReplacethebatteryontheSDIaccessory.
4.ConnecttheBNCcabletothecamera.
5.PowerontheSDIaccessory.
Formoreinformation,referto PreventingDamagetoSDIOutputs

Thefemalestereo3.5mmheadphoneportprovidesanattachmentforstereoheadphones.

NOTE: Onlyuseheadphoneswitha3-conductorjack.Ifyoutrytouseaheadsetwithamic and4-conductorjack,itwillproduceunpredictableresults.
Figure:Frontfaceofthefemale3.5mmheadphoneport(lookingatthebackofthecamera).
NOTE: Matingconnectorisa3.5mmstereoheadphoneplug.

ThefemaleLEMO5-Pin00Baudioconnectoraccepts2-channelaudio,Line,Mic,and+48V PhantomPower.

Figure:Frontfaceofthefemale5-Pin00Baudioconnector(lookingatthebackofthecamera).
PIN SIGNAL
DESCRIPTION
1 Ground Groundtocamera
2 Ch3+
3 Ch3-
4 Ch4+
Channel3signal(positive)
Channel3negative
Channel4signal(positive)
5 Ch4- Channel4negative
NOTE: MatingconnectorsareFGG.00.305.CLAD35Z(5-Pin00circularpush-pullconnector,straightplug)and FHG.00.305.CLAD35Z(5-Pin00circularpush-pullconnector,right-angleplug).
Accessories:
DSMC3™RED®5-PintoSingle3.5mmAdapter
DSMC3™RED®5-PintoDualXLRAdapter

Thefemale9-contact0BODUExtensionportsupportsserial(RS-232RXandTX),aGeneral PurposeInput(GPI)trigger(active-lowswitchclosure),GeneralPurposeOutput(GPO), Timecode,andGenlock.Theconnectoralsooffersauxiliary5-Voltpowerout,withamaximum sustainedcurrentdrawof500mA.
TooperatetheGPIcontactclosurestyletrigger,shortPin6(GPI)toPin9(ground).

Figure:Frontfaceofthefemale9-contactExtensionport(lookingatthebackofthecamera).
NOTE: Therequiredmatingconnectoris9-Pin0LStraightPlugConnector(ODU,part# SX0L0X-P09MCC0-0001).
5VoltAUX(500mAMax)enabledusingthe Power menu
GeneralPurposeOut:RecordingIndicatorOut,SensorSyncOutusing3.3volt logiclevel
SerialRS-232transmit(refertothe Serial menu)
SerialRS-232receive(refertothe Serial menu)
GeneralPurposeIn,3.3-Voltlogiclevel2
1.Notcurrentlysupported.
2.Thesignalpathincludesaresistorpullingthesignalhigh,whichisdesignedtoworkwithaclosureswitchconnectedtoGND. COMPATIBLECABLES
790-0685:RED9-PinEXTtoFlyingLead1.3’
790-0674:REDEXTtoTimecode3'

Themale6-Pin1BDC-INconnectoracceptsDCinputpowerfrom11VDCto17VDC.A built-inpowerconditionerprotectsagainstreverse-polarityconnections,electrostatic discharge(ESD),undervoltage,overvoltage,andovercurrent.
WARNING: Bothpairsof+VBATTandGROUNDpinsmustbewired.Usingathird-party powercablethatwiresonlyone(1)pairof+VBATTandGROUNDpinsmaydamagethepower supplyorthecamera.Damagetothepowersupplyorothercomponentsofthecamera systemcausedbyusinganinappropriatepowercableisnotcoveredunderwarranty.

Figure:Frontfaceofthemale6-Pin1BDCpowerinputconnector(lookingatthebackofthe camera).
6-PIN1BDCINPUTCONNECTOR
MatingconnectorisFGJ.1B.306.CWLD72Z.


Technicalspecificationsreflectbothcurrentandprojectedinformation.Everythingissubjecttochange.
SPECIFICATION DESCRIPTION
SensorType KOMODO-X™19.9MPSuper35mmGlobalShutterCMOS
EffectivePixels 6144x3240
SensorSize 27.03mmx14.26mm(Diagonal:30.56mm)
DynamicRange 16.5+stops
MountType IntegratedlockingRFmountwithelectroniccommunication Supports/iPLlenseswithREDRFtoPLAdapters SupportsCanonEFadapterwithcommunicationandotheradaptersbasedontheRFmount
MaxDataRates Upto560MB/susingREDbrandedorotherqualifiedCFexpressmediacards1
REDCODE® RAW MaximumFrameRates
PlaybackFrameRates (ProjectTimeBase)
BestAvailableREDCODE® Settings
REDCODE® RAWAcquisition Formats
80fpsat6K17:9(6144x3240)
96fpsat5K17:9(5120x2700)
120fpsat4K17:9(4096x2160)
240fpsat2K17:9(2048x1080)
23.98,24,25,29.97,30,50,59.94,60fps,allresolutions
REDCODEHQ,MQ,LQ,andELQat6K17:9(6144x3240)upto80fps
REDCODEHQ,MQ,LQ,andELQat4K17:9(4096x2160)upto120fps REDCODEHQ,MQ,LQ,andELQat2K17:9(2048x1080)upto240fps
6K17:9(6144x3240),2:1,2.4:1,16:9.1:1,andAnamorphic2x,1.8x,1.6x,1.5x,1.3x,1.25x 5K17:9(5120x2700)and16:9
4K17:9(4096x2160)and16:9 2K17:9(2048x1080)
Apple® ProRes Dedicatedrecordingin4K(4096x2160)ProRes4444XQupto60fps,ProRes4444upto80fps, andProRes422HQ,ProRes422,andProRes422LTupto120fps
Construction AluminumAlloy
Dimensions LxWxH=5.1inx4inx3.8in(129.37mmx101.26mmx95.26mm)largestfixeddimensions
Weight 2.62lb(withoutbodycapandCFexpresscard)
MediaType CFexpressTypeB
BatteryType IntegratedV-LockbatteryinterfaceoptimizedforMicroV-LockBatteries1
DCPower 11v-17vthrougha 6-pinDC-IN
OperatingTemperature0°Cto40°C(32°Fto104°F)
StorageTemperature –20°Cto50°C(–4°Fto122°F)
RelativeHumidity 0%to85%non-condensing
ColorManagement ImageProcessingPipeline2(IPP2) Supports33×33×333DLUTs SupportsimportandadjustmentofCDLs
SPECIFICATION DESCRIPTION
Audio Integrateddualchanneldigitalmonomicrophones,uncompressed,24-bit48kHz
Integrateddualchannel(mic/line/+48V)inputthrougha5-Pin00BAudioPort,uncompressed,24bit48kHz
3.5mmstereoheadphoneport
Autofocus PhaseDetectandContrast
MonitorOptions
AdditionalI/O
ProprietaryTopAccessoryPortforMonitoringandControl Integrated2.9"1440x1440touchscreenLCDwithpreviewandcameracontrol
Integrated12G-SDIwith6G-SDI,3G-SDIand1.5G-SDImodes
12G-SDI:Upto4096x21604:2:2for60p
6G-SDI:Upto4096x21604:2:2for30p
3G-SDI:Upto2048x10804:2:2for60p
1.5G-SDI:Upto2048x10804:2:2for30p,24p
SMPTETimecode,HANCMetadata,24-bit48kHzAudio
Tri-LevelGenlockInputthroughthe9-PinEXTport LTCTimecodeInputthroughthe9-PinEXTport RS232CTRL(usingRCP2)throughthe9-PinEXTport
IPConnected Wi-Fi(2.4GHz/5GHz)forcameracontrol,videopreview,andmediaoffloading EthernetoverUSBType-Cforcameracontrol,videopreview,andmediaoffloading MJPEG1080plivestreamaccessiblethroughWi-FiandUSB-C PTPforframelevelsynchronization
SOFTWARE
REDControlApp
REDControlProApp
R3DlivebroadcastingavailablewithREDConnectlicenseand5GbpsEthernetadapter
AccessfullcameracontrolsandlivepreviewfromiOSorAndroiddevices ProApp:OperateoneormultiplecamerasoveranIPconnectiontosynchronizesettings,manage mediafileslocallyoruploaddirectlytoFrameIO,developcustomlookswithadvancedCDLand LUTcontrols,andmore
Idealforcontrolofmulti-cameraarrays,multi-camshoots,andliveevents,allfromonecentral location
StandardappavailablefromtheAppleAppStoreandGooglePlayStore REDControlProavailableviaAppleAppstoreonlyandrequiresadditionalpurchase REDControlworkswirelesslyorwiredoverUSB-C
1.Formoreinformationonapprovedmountadaptors,lenses,batteries,accessoriesandmediacards,referto REDThird-PartyAccessories
Thefollowingisalistofcameraaccessories.Someareoptional,dependingonthepackageyoupurchase:
REDVOLT®NANO-VBattery
REDVOLT®MICRO-VBattery
RED®CompactDualV-LockCharger CFexpressTypeBMedia
KOMODO-X™RFtoPLAdapterPack
KOMODO-X™RFtoPLwithElectronicNDAdapterPack
DSMC3™RED®Touch7.0"LCD
DSMC3™RED®Touch7.0"LCDHood
KOMODO-X™PowerAdaptor OutriggerHandle
KOMODO®WingGrip RED®CompactTopHandleandExtensions
DSMC3™RED®5-PintoSingle3.5mmAdapter
DSMC3™RED®5-PintoDualXLRAdapter
RED®ProI/OModule
REDControlApps

TheREDVOLTNANO-Vbatteryisasmall,lightweightpowersolutionfortheKOMODO-X.Weighinginatonly0.63lb (288g),itisidealforgimbals,drones,andothersetupswhereformfactorandweightmatter.Thebattery'sdimensions (66mmx88mmx44mm)ensurethecameraretainscompletelyflatsurfacesonthetopandsides,allowingusersto attachvariouscombinationsofcagesandplates,withoutissue.


Featuringa49Whcapacityandwithamaximumoutputcurrentof6amps,thebatterycanpowertheKOMODO-Xand DSMC3™RED®Touch7.0”LCDforshortdurationswhenyouwanttoshootinaslightaconfigurationaspossible.
ITEM
Type
Capacity
Batteryoutput
Maximumload
Operatingtemperature
Chargingtemperature
Storagetemperature
DETAILS
RechargeableLithium-IonBattery
3300mAh/49Wh
12to16.8VDC
6Ampsat14VDC
50°F~113°F(10°C~45°C)
32°F~104°F(0°C~40°C)
68°F~122°F(20°C~50°C)
Charger REDCompactDualV-Lockcharger
Weight Approximately0.63lb(288g)
Dimensions
Height:3.46in.(88mm)
Width:2.60in.(66mm)
Depth:1.30in.(44mm)
REDVOLTNANO-VwasdesignedinpartnershipwithCoreSWXandiscompatiblewithmostcameras/modulesthat acceptV-Lockbatteries.Forissuesortroubleshooting,pleasevisithttps://coreswx.supportsystem.com.
TheREDVOLTMICRO-V14.7VoltV-LockbatteryincludesanLEDchargelevelindicator,aP-tapport,andaUSB powerport.

Type

RechargeableLithium-IonBattery
Capacity 6600mAh/98Wh
Batteryoutput 14.8VDC
P-tapoutput 12VDC
USBoutput 5VDC(3Amps)
Maximumload 12Ampsat14VDC
Operatingtemperature
Chargingtemperature
50°F~113°F(10°C~45°C)
32°F~104°F(0°C~40°C)
Storagetemperature 68°F~122°F(20°C~50°C)
Charger REDCompactDualV-Lockcharger
Weight Approximately1.2lb(544.3g)
Dimensions
Height:3.93in.(99.8mm)
Width:2.82in.(71.6mm)
Depth:1.94in.(49.3mm)
Compatiblebatteriesarethosethatprovideenoughcurrent(14.4Vwith6Aorgreater)topowertheREDKOMODO-X, andthatalsofitthedimensionsontheKOMODO-X'sintegratedMicroV-Lockplate. REDchosetheMicroV-LockfortheKOMODO-Xtokeepitsform-factorcompact.Asaresult,notallV-Lockbatteries arecompatiblewiththecamera.
NOTE:
V-Lockbatterieswithawidthgreaterthan2.95in.(75mm)arenotcompatiblewiththecamera’sMicroV-Lockplate andwillrequirethebatteryadapter.
ThecameracanchargeabatterythatsupportsSMBuscommunicationdirectly.Tochargethebattery,thecamera mustbepoweredoffwhileconnectedtoDC-INpower.YoucanalsousetheoptionalREDCompactDualV-Lock charger.
TheoptionalREDCompactDualV-LockchargerallowsyoutochargetwoREDVOLTbatteries.

ITEM
Input

DETAILS
100V-240VAC50Hzto60Hz
Chargecurrent Onebattery3Amps,twobatteries1.5Amps
Chargingtemperature 32°F~104°F(0°C~40°C)
Storagetemperature 68°F~122°F(20°C~50°C)
Batterycompatibility REDVOLTMICRO-V14.7VDC
Weight Approximately1lb(453.5g)
Dimensions
Height:4.5in.(114.3mm)
Width:5.5in.(139.7mm)
Depth:3in.(76.2mm)


TheREDCFexpressTypeBMediaprovidesthecamerawith660gigabyte,1,1.3,2,and4terabyterecordingoptions. The2TBand660GBcardsusethesamehardwareasdothe1.3TBand4TB.Thedifferencescomefromthesoftware andfirmware,whichconfigurethemediadifferentlytoprioritizedifferentfeaturesets.The1TB,2TBand4TBprioritize capacitywhilestillprovidingexcellentdurabilityundernormaluse.The660GBand1.3TBareinanoverprovisioned configurationofthesamemediatoprioritizeextendedwritecyclesandimprovedthermalperformanceforconstant writingandre-writingofdata.Theunderlyinghardwareisidentical.
Type CFexpressTypeBMedia
Capacity-660GBHighEndurance660,138,909,696bytes
Capacity-1TBHighCapacity1,099,511,627,776bytes
Capacity-1.3TBHighEndurance1,331,512,536,141bytes
Capacity-2TBHighCapacity2,048,480,824,832bytes
Capacity-4TBHighCapacity4,096,961,649,664bytes
Operatingtemperature 14°Fto158°F(-10°Cto70°C)
Operatinghumidity 5%to95%,non-condensing
Storagetemperature -4°Fto185°F(-20°Cto85°C)
Shockresistance(operating) 50g
Vibrationresistance(operating)15gat10Hzto2000Hz
Weight Approximately0.25oz(7.1g)
Dimensions
Height:1.52in.(38.5mm)
Width:1.17in.(29.6mm)
Depth:0.15in.(3.8mm)
TheREDCFexpressTypeBCardReaderprovidesafastUSB-Cconnectionwiththecapabilityofwrite-protect. SettheWrite-ProtectswitchtotheLockpositiontopreventconnecteddevicesfromaddinganyunwanteddatatoyour CFexpressTypeBcard.

MediareadCFexpressTypeB
InterfaceUSB-C3.2cabletoCFexpressTypeB
PowerUSBbuspower
CableUSB-C3.2cabletypeAtoCadapter
WeightApproximately4.2oz(120g)
DimensionsHeight:3.74in.(95mm)
Width:2.56in.(65mm)
Depth:0.47in.(12mm)

TheRED® KOMODO-XRFtoPLAdapterPackprovidesarobustPLmountsolutionfortheREDKOMODO-X. SupportingCooke/ilenscommunication,powerandrecordtriggering,theRFtoPLAdapterexpandsthefunctionality ofthecamera'snativeRFlensmountforprofessionalapplications.Constructedofatitaniumcore,theshimmableRFto PLAdapterisresistanttoenvironmentaltemperaturechanges,providingconsistentandprecisebackfocus.

TheREDKOMODO-XRFtoPLAdapterPackincludesboththeKOMODO-XSideRibsandAdapterSupportBrackets toprovideadditionalrigidityandanative-likemountexperience.
NOTE: KOMODO-XRFtoPLadapterisnotcompatiblewithElectronicFilters.

TheRED® KOMODO-XRFtoPLwithElectronicNDAdapterPackincludestwofilters;AclearfilterforwhennoNDis neededandanElectronicNDFilterwitha2-7stoprange.Itfeaturesprecisecontrolof¼,1/3orfullstopincrements whichallowschoosingtheexactexposurewithoutcompromisingtheintendedaperture.
EachclearandelectronicNDfiltersthicknessaremeasuredandpairedtogethertoensurenobackfocusshiftswhen switchingbetweenfilters.NDcanbecontrolledviatheintegratedbuttonsontheElectronicNDFilter,onboardLCD, DSMC3™RED® Touch7.0”LCD,REDControl,REDControlPro,webinterface,oranyotherRCP2compatibleremote control,allowingforeasyaccesstoexposurenomatterhowthecameraisconfigured.
SupportingCooke/ilenscommunicationandrecordtriggering,theRFtoPLAdapterw/ElectronicNDexpandsthe functionalityofthecamera'snativeRFlensmountforprofessionalapplications.Constructedofatitaniumcore,the shimmableRFtoPLAdapterisresistanttoenvironmentaltemperaturechanges,providingconsistentandpreciseback focus.
TheREDKOMODORFtoPLAdapterw/ElectronicNDFilterAdapterPackincludesboththeKOMODO® SideRibsand AdapterSupportBracketstoprovideadditionalrigidityandanative-likemountexperience.
COMPATIBILITY:OnlycompatiblewithKOMODOandKOMODO-X.


TheoptionalDSMC3™REDTouch7.0"LCDoffersanHDviewingexperienceforrecordingandviewingfootageonthe V-RAPTOR™XLcamera.A1920x1200resolutiondisplaypanelwithpeakbrightnessof1300nitsandhighpixel density(at322ppi),notonlyprovidestheoptimalexperiencewhenviewingfootage,butalsofeatures100%DCI-P3 colorgamutcoveragefortremendouscoloraccuracy.
ThismonitoralsofeaturesfullcontroloverthecamerathroughthenewresponsivemenusystempoweredbySmallHD PageOS.ThefeaturesincludeWaveform,Vectorscope,Histogram,FalseColor,ColorPicker,PixelZoom,andmore. Thelightweightdisplaymountstoaremovableintegratedtiltarmwiththecapabilitytorotate180degreesforversatile mountingoptions.
Italsoboaststhelatestgenerationpogopinstoprovidepowerandvideotothemonitor,andtheabilitytoconnect throughasingle-lockingUSB-C-styleDSMC3™RMIcableforvideoandpower.NoadditionalSDIorpowercablesare needed.
Referto REDMonitorInterfaceCable formoreinformation.
NOTE: TheUSB-C-styleDSMC3™RMIcableisnotastandardUSB-Ccable.TheDSMC3™REDTouch7.0"LCDis notcompatiblewithDSMC®,DSMC2®,REDRANGER® orKOMODO® camerasystems.
Formoreinformation,refertothe DSMC3™RED® Touch7.0"LCDUserGuide
SPECIFICATIONS
ITEM DETAILS
Material Aluminumalloy
Resolution 1920x1200
Pixeldensity 322ppi
Refreshrate 60Hz
Responsetime 25ms
Contrast 1250:1
Brightness 1300cd/m2
Colordepth 10-bit(8-bitpanel)
Colors 100%DCI-P3
Viewingangle ±160°allaxes
Displayorientation
Landscape,180°rotation
Touch pCapMulti-Touch
Cameraconnection
PowerandcommunicationthroughtheRMIcable
Mounting 15mmrail
HoodMounting 4xM3mountingpoints
Buttons 4buttonsfunction1,2,3&4
EXPPorts
Forfutureuse,notcurrentlysupported
Powerconsumption 15.5Watts
Operatingtemperature
32°Fto104°F(0°Cto38°C)
Storagetemperature –0°Fto120°F(–18°Cto49°C)
Operatinghumidity
0%to85%,non-condensing
Storagehumidity 0%to85%,non-condensing
Firmwarerequirement
Monitordimensions
Armdimensions
CompatiblewithV-RAPTORfirmwareversion1.1orlater
Weightapproximately1.25lb(568.0g)
Height:4.67in.(118.70mm)
Width:7.09in.(180.10mm)
Depth:1.13in.(28.80mm)
Weightapproximately0.07lb(30.1g)
Height:1.18in.(30.00mm)
Width:2.40in.(61.00mm)
Depth:0.70in.(17.50mm)
REDMonitorInterface(RMI)dimensionsWeightapproximately0.28lb(126g)
Height:1.67in.(42.50mm)
Width:4.25in.(108.00mm)
Depth:1.51in.(38.23mm)

TheDSMC3™RED®Touch7.0”LCDHoodattacheseasilyanddirectlytothe DSMC3™RED®Touch7.0”LCDandcanblockoutthesuntomakeviewingthe LCDeasierinbrightconditions.
COMPATIBILITY:TheDSMC3™RED®Touch7.0”LCDHoodisonlycompatiblewith theDSMC3™RED®Touch7.0”LCD.

TheKOMODO-X150-WattACpoweradaptorconnectstothecamera'sporttoprovideDC powerforoperatingthecameraandforrechargingtheattached REDVOLT®MICRO-V Battery.
Thecamerachargesthebatterywhenthecameraisoffandthepoweradaptorisconnected.
TheOutriggerHandleoffersalowprofile,360°adjustableergonomicpistolgripandintegratedRecordStart/Stop button.MountedtotheTopHandlePortonyourcamera,theOutriggerHandleprovidescomfort,stability,and additional1/4-20mountingpointsforyourperipheralcameracomponents.Thebuilt-inRecordbuttonputsStart/Stop functionalityrightatyourfingertips.Youarealwaysreadytocapturetheperfectshot.

TheOutriggerHandleisidealforshooterswhouseonehandonthehandleforgripandrecordbuttonaccess,andthe otherforlensadjustmentsorsupport.
TheKOMODOWingGripofferscomfortandutilityforcarryingorshootingwithyourKOMODO.


Featuringanergonomicmachinedgripwithtactical1/4-20mountingpoints.Itislightweight andoffersaseamlesslowprofile hand-heldoption.
TheKOMODOWingGripisasimplehandleandthatprovidesextramountingoptionsforyourcamera.
TheRED® CompactTopHandleeasilymountstothetopoftheKOMODO-XorV-RAPTORcamerabodieswhile offeringacombinationofcomfortandutilityforcarryingorshootingwithyourcamera.


Thistop-mountedmachinedhandlefeaturesergonomicBocotewoodinlayswithcameratriggercontrol.
Thehandleincludes: Handletrigger Rear3”piece Front1”piece 15mmmonitormount Forissuesortroubleshooting,contactsupport@cs.inc.
COMPATIBILITY: TheREDCompactTopHandleisnotcompatiblewithDSMC®,DSMC2®orREDRANGER®camera systems.
ToinstalltheREDTouchLCDtotheTopHandle:
1.AlignaTopHandleExtensionwithfrontoftheTopHandle.
2.TightenthehexbolttotheTopHandle.
3.Alignthe15mmMonitorMountextensionboltwiththeside3/8-16mountholeoftheTopHandleextension.
4.TightentheMonitorMountbolttotheTopHandleextension.
5.Alignthe15mmholeontheMonitorrailtothe15mmMonitorMount.
6.Slipthe15mmMonitorrailcollaroverthe15mmMonitormountpostandtightentheknurledknobontheMonitor railtothedesiredmonitorposition.

TheDSMC3™RED®5-PintoSingle3.5mmAdapterisa11.3”(28.9 cm)cabledesignedtobreakoutthe5-PinAudioporttoasingle3.5 mmTRSinputallowingfor3.5mmaudiodevicestobeconnected.
NOTES:
Lengthmeasuredfromendtoendincludingconnectors. Forreplacementoradditionalcomponents,suchasscrews,contact support@cs.inc.
COMPATIBILITY:TheDSMC3™RED5-PintoSingle3.5mmAdapterisnotcompatiblewithDSMC®,DSMC2®,RED RANGER®orKOMODO®camerasystems.

TheDSMC3™RED® 5-PintoDualXLRAdapterisacompact solutionforbreakingoutthe5-PinAudioporttodual3-PinXLR ports.ThisadapterprovidestwoindustrystandardXLRports providing48-voltphantompower,andmicandlineinputthatiseasily mountedtoyourcamera.
TheDualXLRadapter'smodulardesignprovidesseveralmounting optionsforthecamera.
TheDualXLRadapterincludesthefollowing: DualXLRadapter L-shapedmountingbracketwith2x3/16screwsand4x Anti-Rotatepins Areplacement¼-20mountingscrew 18”Rightangle-to-straight5-Pincable
ToattachtheL-shapedmountingbracket:
1.Determinethemountingpositiononoroffofthecamera.Youmay needtore-positionorremovetheanti-rotatepinsonthebracketdependingontheorientationandpositionyouwant tomountthebracket.Youcanalsomountthebrackettothecamerabyusingthereplacement¼-20screw.
2.Screwoneofthe3/16screwsintheDualXLRadapterensuringtheanti-rotatepinslineupwiththedesiredposition oftheDualXLRadapter.Thenattachtheothersideofthebrackettothepositionofyourchoice,confirmingthatthe anti-rotatepinsalignwithholesonthecamera.
NOTE: Makesurethatyouonlypullontheknurledsleeveofthe90°angleconnectoronthe18”Rightangle-to-straight 5-PincablewhenremovingitfromtheDualXLRadapter.
TheRED® ProI/OModuleoffersavarietyofinput/outputconnections,anditalsoincludesanindustrystandardV-Lock orGoldmounttopoweryourKOMODO-X™withhighercapacitybatteries.Thismodulemountsdirectlytothe KOMODO-X’srearMicroV-Lockplateand9-PinEXTPort,anditoffersconnectionsforthefollowing:
DCPowerInput(DC-IN)
Genlock(BNC)
CTRL(4-Pin)
Timecode(5-pin)
1x3-Pin24-volt(regulated)FischerR/Sport(3Amax)
2x2-Pin12-volt(unregulated)AUXports(3Acombinedmax)
Themodulealsoincludesanoperator-sidescreenwhichdisplayskeypowervoltageandbatterypercentageinformation (withcompatiblebatteries)alongwithapowerswitchtocutpowertothemodulewhenyouwanttoleaveabatteryon themoduleforlongdurations.
NOTE: TheREDProV-LockI/OModuleisonlycompatiblewithKOMODO-X™.Itisrecommendedtouse12ABatteries suchatheREDVOLT® MICRO-VorREDVOLT® XL-VwhenusingallAUXoutputssimultaneously.Whenusedwith REDVOLT® NANO-VtheAUXpoweroutputswillbedisabled.


TheRED® ProI/OModuleconnectstothecamerathroughtheKOMODO-X ExtensionPort
24VRS 3-pinFischer
Timecode 5-pin
CTRL 4-pin00BODU
Genlock BNC
Modulecable 9-pin0BODU
DC-IN 6-pin1Bsocket
24-volt(regulated)FischerR/Sport(3Amax)
ConnectionforexternalTimecodedevice
CTRL(RS-232Control) portforexternalRS-232 connection
ConnectionforexternalGenlockdevice
Attachestothe ExtensionPort
ConnectionforexternalDCpower
TheREDControlappsprovidesremoteandtetheredaccesstothecamerafromadevice.Accessisavailablethrough Wi-Fi,USB-C,andEthernet.
TheREDControlappisfreethroughtheGooglePlaystoreandtheAppleAppstore.


TheREDControlappallowsyoutocontrolalloftheKOMODOfeatureswhileviewingtheimage.

FormoreinformationaboutconnectingthecameratoREDControl,refertotheHowTosection(KOMODOLink Adaptor).
REDControlProfessionalallowsyoutocontrolmultipleREDDSMC3camerasfromanAppleiPadoranAppleMac. REDControlProisalicensedapplicationavailablefromthe AppleAppStore

REDConnectisalicenseenabledfeaturesavailableoneitherKOMODO-X,V-RAPTOR,orV-RAPTORXL,which streamsfullresolutionliveR3DvideooveranIPnetworkbysimplyconnectingthecameracontrolunit(CCU)withan EthernetcableforKOMODO-XorwiththeREDConnectModuleforV-RAPTORandV-RAPTORXL.Thisnewfeature opensupanextraordinaryrangeofcreativeapplicationsfromlivebroadcasttovirtualproductionandtrue8KVR(VRAPTOR,V-RAPTORXL).
REDConnectLicensesareavailablewithoptionsforoneyearorperpetual.
Formoreinformation,referto https://www.red.com/red-connect.