This Mother’s Day, celebrate the women in your life who help make you – well, you. From the one who raised you and still answers every burning question you have to your new mum bestie who is always down to talk about the latest romantasies. With Cricut, you can show your love and admiration with personalised “me time” must-haves, matching accessories & more.
PROJECT INSPIRATION
Whether you’re letting your mum know you’ll always be by her side or giving your partner a break from the daily demands, we’ve got all the projects you need to make Mother’s Day a bit more personal.
For your mum.
This Mother’s Day, show Mum how much you love her with personalised accessories and decor. With Cricut™, you can make her feel special – for less.
Beau-tea-ful Saucer Plate →
Mother’s Day Flower Garden →
Made With Love Cookbook Holder →
Line Floral Watercolour Tote →
Mother-Daughter Line Art Bag →
Pamper Box Printable Labels →
Dog Mama Mug →
Mother-Daughter Line Art Bag
This project uses Smart Iron-On™ to create a personalised bag.
What you need
Materials to Cut
Smart Iron-On, White
Everything Else
Cricut Explore™ 4
Standard Grip Machine Mat*
Cricut™ Heat Press
Cricut EasyPress™ Mat
Weeder tool (or tweezers)
Crossbody Bags
Optional: Thin Cotton Pressing Cloth (if material is delicate)
Preparation
Cut
To personalise the project, select Customise
When you’re ready to cut, select Make, then follow prompts to cut design from iron-on
Remember to Mirror your design on the Preview screen
Assemble
Remove Iron-On from machine mat, then place protective cover back on machine mat (if using Smart Iron-On, skip this step)
Use Weeder tool to gently lift and peel away unwanted material from liner, leaving only desired design
Position design where you want it on your crossbody bag, clear carrier sheet (shiny side) face up
Place Cricut heat press over entire design for 30 seconds, applying consistent, firm pressure
Flip material so your design is face down on your mat, then press again for a few more seconds
Let design cool, then carefully peel liner to reveal your finished project
*Smart Iron-On does not require a machine mat
For your bestie.
From late-night talks to book club shenanigans, you know your bestie like the back of your hand. With Cricut, you can celebrate her new mum status with matching outfits, custom stickers & so much more.
Mama Cosmetic Bag →
Postpartum Care Box →
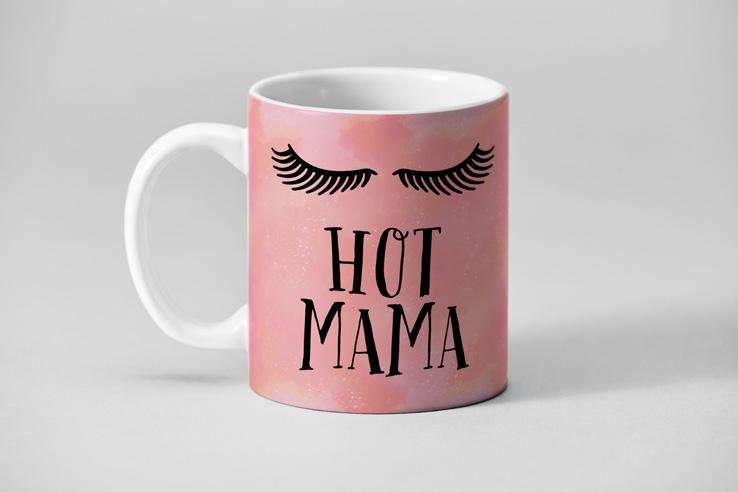
Hot Mama Mug →
Bath Salt Jar →
Best Mom Ever Mug →
Tulip Card →
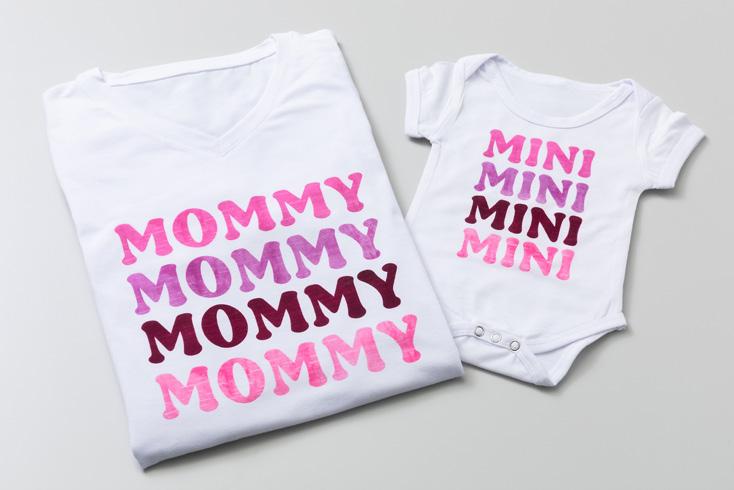
Mommy and Mini Shirt Set →
Bath Salt Jar
This project uses Adhesive Foil to create a custom jar.
What you need
Materials to Cut
Adhesive Foil Matte, Bronze
Everything Else
Cricut Explore™ 4
Standard Grip Machine Mat
Strong Grip Transfer Tape
Weeder tool (or Tweezers)
Scraper tool (or Credit Card)
Ceramic Jar
Masking Tape
Preparation
Cut
To personalise the project, select Customise
When you’re ready to cut, select Make, then follow prompts to cut design from adhesive foil
Assemble
Remove adhesive foil from machine mat, then place protective cover back on machine mat
Use Weeder tool to lift and peel away unwanted material from liner
Trim the design into three different sections, the top two lines, the middle circle and the bottom two lines
Cut a piece of Transfer Tape the size of each section of your decal, then use Scraper tool to firmly press Transfer Tape over decal
Slowly peel the white liner at an angle, making sure decal adheres to Transfer Tape
Place decal in desired position, then use Scraper tool to firmly press decal to jar
Slowly peel back transfer tape at a 45-degree angle –if pieces of decal remain on tape, use Scraper tool to firmly press again
Push any bubbles in the vinyl out toward the cut edges with Scraper or fingernail
Repeat for each section
For your partner.
Give the gift of relaxation with custom wine glasses, eye masks & more. With Cricut™, you can transform her Mother’s Day into a spa day.
Mother’s Day Breakfast In Bed Tray → Mum’s Day Afternoon Tea Menu →
Luxury Boxed Mother’s Day Gift →
Mother’s Day Care Package →
Room Service Tag and Eye Mask for Mum’s Day → Bath Salt Gift Tag →
Mom’s Time Out Wine Glass →
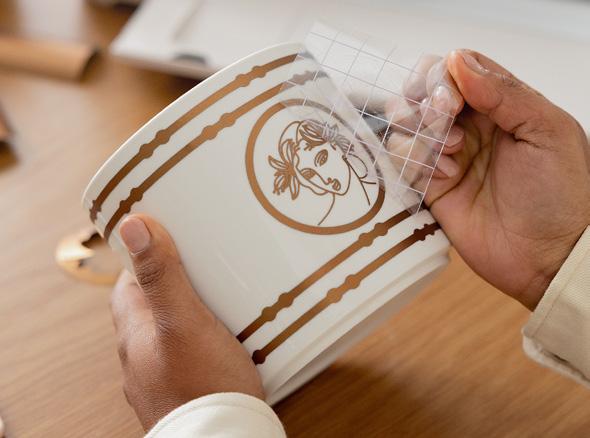
Luxury Boxed Mother’s Day Gift
This project uses Adhesive Foil to create a custom gift box.
What you need
Materials to Cut
Adhesive Foil Matte, Gold
Adhesive Foil Matte, Pink
Adhesive Foil Matte, Bronze
Adhesive Foil Matte, Teal
Everything Else
Cricut Maker™ 4
Standard Grip Machine Mat
Transfer Tape
Weeder tool (or Tweezers)
Scraper tool (or Credit Card)
Glass Box
Preparation
Cut
To personalise the project, select Customise, then edit text boxes to your liking
When you’re ready to cut, select Make, then follow prompts to cut design from each colour of adhesive foil
Assemble
Remove each colour of adhesive foil from machine mat, then place protective cover back on machine mat
Use Weeder tool to lift and peel away unwanted material from liner
Cut a piece of Transfer Tape the size of your decal, then use Scraper tool to firmly press Transfer Tape over decal
Slowly peel the white liner at an angle, making sure decal adheres to Transfer Tape
Place decal in desired position, then use Scraper tool to firmly press decal to glass box
Slowly peel back transfer tape at a 45-degree angle –if pieces of decal remain on tape, use Scraper tool to firmly press again
Push any bubbles in the vinyl out toward the cut edges with Scraper or fingernail