


Iowa State University | Ames, IA
Bachelor of Industrial Design | 2023
AutoCAD Draftsperson Level 1 | Cleary Building Corp.
September 2023 - Present
> Translating architectural and engineering concepts into detailed and accurate 2D digital building plans.
> Working closely with salesmen and engineers to navigate design challenges and ensure client satisfaction on every job.
> Contributing design observations to optimize building functionality and aesthetic appeal.
Student Help | Electronic Theatre Controls, Inc.
May 2022 - August 2022, December 2022
> Operated PEM fastener insertion machine for part assemblies.
> Learned to read and comprehend technical orthographic drawings.
> Masked and prepared products for painting.
> Lifted and maneuvered heavy loads on a daily basis.
Landscaper | Cassel Prairie Landscape
February 2015 - August 2021
> Assisted in the restoration and maintenance of natural prairie back into its original habitat.
> Controlled invasive species through use of herbicide treatment, precision cutting, area mowing, and controlled burns.
> Advised during the timeline of several projects including a stone and mortar building, stone fences, wooden fences, wooded trails, trail waterbars, aesthetic privacy screens, building upkeep, and granite stone driveways.
Restaurant Research & Marketing | Ichiban Japanese Restaurant Spring Semester 2022
> Worked as a small group of industrial designers to find opportunity gaps for local businesses.
> Conducted interviews and surveys throughout student body at Iowa State University to find existing data.
> Analyzed found data and designed new marketing strategies to increase restaurant exposure.
Collaborative Design Studio | Vermeer Corporation Spring Semester 2023
> Worked with a team of student designers to collaborate with Vermeer’s research & development branch on a given design prompt.
> Learned to research, ideate, and present as part of a design group.
> Produced research, ideations, renders, and physical models to be presented to Vermeer.
> Deans & Honors List (2019-2023)
> Milwaukee Valve Company Scholarship (2019)
> Bob Wollersheim Memorial Scholarship (2019)
> Life Scout (2019)
> AutoCAD
> Solidworks
> Rhino
> Keyshot
> Photoshop
> Illustrator
> Indesign
> Design Thinking
> User Research
> Design Analysis
> Problem Solving
> Critical Thinking
> Collaboration


Many young adults bring aesthetic lighting into their living spaces, but very few do the same when it comes to fire safety devices. Life Light is a lighting fixture designed to provide both lighting and fire safety measures to small housing units.


In this student living apartment, the smoke alarm is placed above the stairs and around the corner from the kitchen. There is a fire extinguisher, but it is located at the bottom of the stairs. If an unmanaged fired were to break out, by the time the smoke alarm goes off there could a fire large enough to block the stairway. This could prevent any inhabitants from reaching the fire extinguisher or exiting the apartment through the door if they were upstairs. Note: Home refers
PROBLEM:
Most young adults aren’t testing their smoke alarms the recommended number of times per year, according to most major insurance companies.


7 out of 8 young adults interviewed that were living in 2 bedroom apartments answered that they had added lighting to their apartment
Only 1 PERSON said they had added a smoke alarm to their apartment.
PROBLEM:
Smoke detectors installed in housing units may meet all mandatory codes, but the doesn’t always mean their placement is ideal.
PROBLEM:
While many young adults are adding extra lighting to their apartments, most aren’t doing the same with proper smoke detecting devices.
Design a lighting device that also operates as a smoke alarm to help promote fire safety for young adults.


FUNCTIONAL: The final product has to function as both a light and a smoke alarm. It must fit the function of both into a single design. The design cannot sacrifice any part of one for the other.
SIMPLE: The final design must be simple to operate. The interface needs to be user friendly It also must be simple to manufacture and package.
PRACTICAL: The lamp has to do its job in the most sensible way possible. It existence in a space needs to be understandable. The design needs to be feasible and realistic.
UNIQUE: The lamp should be unique in shape and aesthetically pleasing. The design needs to appeal to the intended audience, which is young adults and college students.


The appearance model was used for user testing. I placed all the necessary smoke detector components in the upper housing to best show proper functionality. The upper housing was made using 3-d printing, and the clear acrylic bottom half was made using a wooden core and vacuum former. I gave this model to several college students, who identified pain points and gave aesthetic suggestions.


For most of it’s life, the Life Light’s primary use is as a source of lighting. Electricity powering the light is also used to power the smoke alarm when the light is on and to charge the lithium ion battery. The smoke alarm functions silently in the background, out of sight.
The ion chamber(1) continuously samples the air to be tested by the electrochemical sensor(2). Convection brings air up through the vents past the chamber in a more efficient manner than most commonly used smoke detectors.
The ion chamber(1) continuously samples the air to be tested by the electrochemical sensor(2). The sensor is reading the level of carbon monoxide in the air. When levels of CO get too high, the sensor tells the siren(3) to sound.
When the siren is triggered, the light will automatically be powered on using power from the lithium ion battery. The light is a secondary alert, letting you know that the smoke alarm has been triggered.

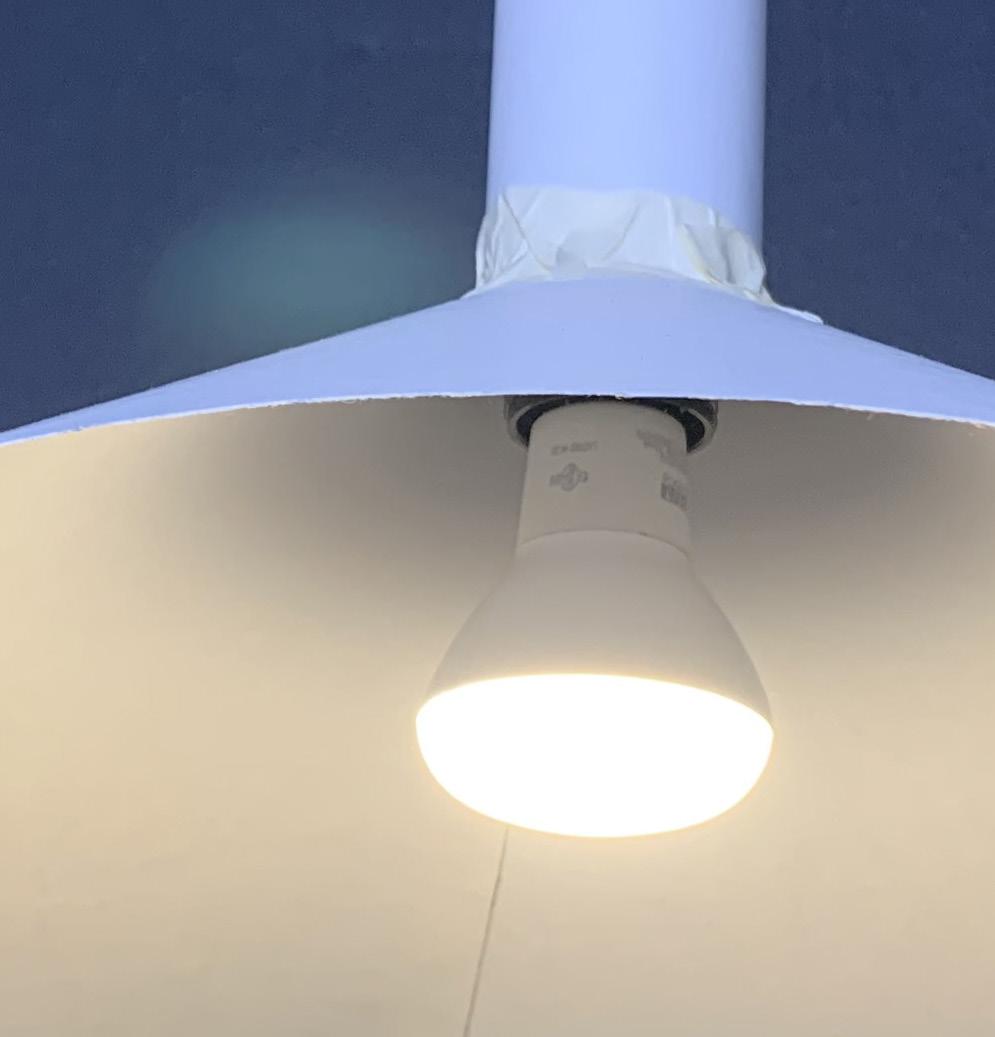
By placing holes above and below the light bulb, the design allows air to move through the lamp and past the sensors, which are placed directly above lampshade. A byproduct of the light bulb is heat. The environment that exists within the lamp causes the process of convection to occur, where the hot air inside the lampshade rises up through the vents and is replaced by cooler air from below. This process makes the sensor more efficient when the light is on because the air movement means it can sample more air than it would if the air was stagnant.


Life Light was designed with user interface in mind. The light would also feature access to a simple app to be installed on your phone. If the Life Light’s smoke alarm were to go off, a message would also be sent to your phone, notifying you of the alert. This app would also send notifications for when the alarm should be tested, helping to give you a better sense of safety.


A take on improving and modernizing the design of a standard Roku TV remote. The process from understanding a tool’s design to producing a better designed alternative. Learning to rapidly model and better use models to detect user pain points.
The objective of this project was to form a greater understanding of tool design through the research and ideation required to improve upon an existing design. We were tasked with choosing a tool that we were familiar with and distinguishing pain points about it that we thought we could improve upon. We started by recreating the tools through blue foam models and then tried to improve upon the design through user testing and ideation.
I chose the remote for a Roku TV because I thought the design had several pain points that I could improve upon. I wanted to create a remote that looked and felt more modern and elite, a step up from the standard remote.


Function:
Create a device that functions as a way to remotely operate a television?
Identity:
Create a device which can be identified as a television remote?
Aesthetics:
Create a device which is simple and satisfying to use?
Operation:
Create a remote with buttons and a layout that is easily understood by the user.


Ideation began with sketching body side and top profiles, and then trying as many combinations as possible. After finding several that I felt worked well together, on structured the controls configurations. After receiving user feedback, I worked my way down to ideating a smaller selection of bodies and layouts.
Modeling in blue foam served as a fast way to test multiple remote designs. Rough bodies could be produced in a short amount of time, allowing for a larger variety of designs to be tested. Receiving user feedback narrowed down shape and size and emphasized how important button placement was. I was able to quickly adjust each blue foam model until user criteria was satisfied with the latest design and button layout. After several models, I was able to produce a final appearance model.


Simplicity is a staple of the ROKU ELITE’s design, but that doesn’t mean luxury or function has been sacrificed. The controls layout is made with todays entertainment services in mind, giving you the basic controls needed to navigate your TV. The shortcut buttons allow for rapid navigation to the most popular streaming services.

The ROKU ELITE remote would eliminate the need for and waste of single use batteries, replacing it with a rechargeable lithium ion battery. This rechargeable battery can be removed and charged or charge wirelessly.

The design of a seat that can be broken down into smaller pieces and packed down flat for storage. This project focused on maintaining a budget and following a specific set of design criteria.

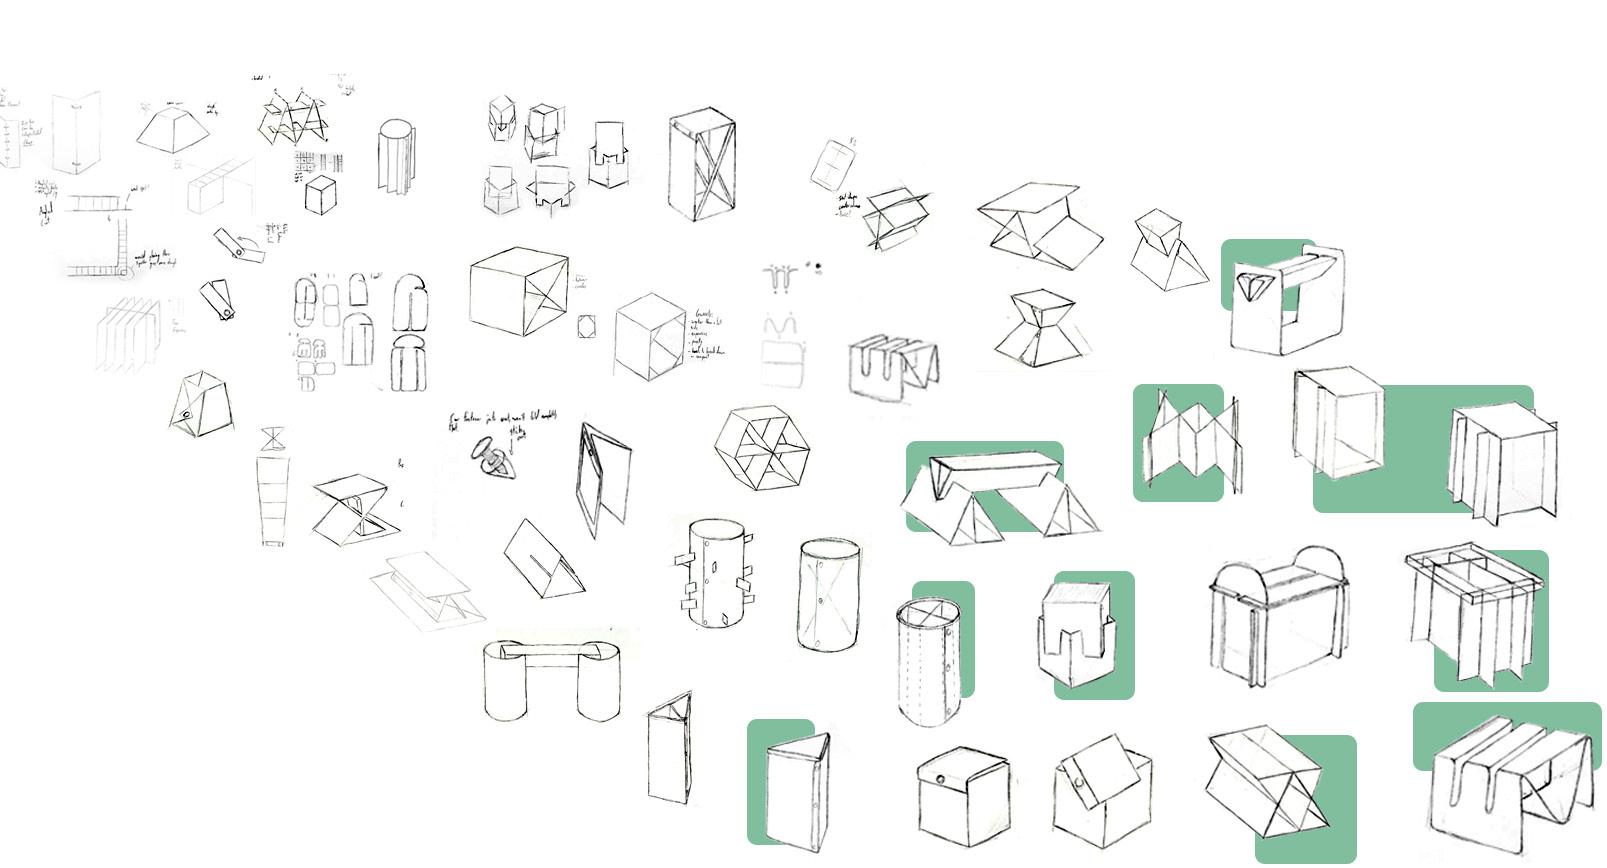
The goal of this project was to design a seat or stool that was capable of being taken apart and folded flat. We would start with sketches that were then tested as scaled down bristol paper models. We would then move on to cardboard models and have our final model be made of coroplast. Our designs would be judged based on the design criteria given to us and if the seat could hold out weight.
I took a lot of my inspiration from I-beams because of their pronounced strength and rigidity. I was given $2.00 for my budget, so I needed to make every bend or cut worth its weight during this project. I decided fasteners were too expensive for my small budget and that a series of methodically placed bends and cut grooves would have to hold the stool together. Overall, I wanted to design a simple stool that was creative, aesthetically pleasing, and most importantly, functioned as a seat that could be deconstructed and packed flat.


Function: Pack Flat
The main design function was to have each seat pack down flat. This meant all parts had to be able to come apart to allow for a flat storage design.
Budget: $2.00
Everyone was randomly given a budget of either 2.00 4.00 or 6.00 dollars. This budget was used to restrict the amount of cut, bends, or fasteners used by each individual. All cuts cost $0.20, all bends cost $0.15, and fastener costs were calculated by bulk purchasing amounts.
Material: Coroplast
The final product had to be cut from a single piece of 4’x4’x4mm coroplast. Fasteners such as velcro, glue and button snaps were allowed but penalized through cost.
Size: 16”x16”
Each person’s stool had to be a minimum of 16” tall by 16” wide. This helped keep projects comparable to one another.
Budget was the number one factor in directing the outcome of every ideation created. Each sketch had to be broken down and analyzed by the number of cuts, folds, and fasteners that would potentially need to be used. Understanding the materials to be used was also crucial to know how they would react in different shapes or forms. I found that simpler shaped known for their rigidness would give me the best results, and tested several cylindrical and triangular shapes.


Layout Dimensions: 4’x4’
Shown above is the cutting layout of the stool. Positioning pieces to decrease cuts was crucial to stay on budget. Most of the corners on the stool had to be rounded so that I could make it around without lifting my knife, which also allowed me to achieve fewer cuts and maintain my budget.


The design of my flat pack seat succeeded in holding weight of my professor, as well as qualifying as a flat packing seat. While there was a bit of flexing, the design was able to distribute the weight over the edge and down the spine in a way that prevented the seat from collapsing.


A project based on showing rendering skills highlighting a personal project designed over two weeks. Limitless Orange is a frosted glass cube filled with acrylic orange colored spheres that aren’t secured and fully rearrangeable to create lighting with personality.
This project was meant to have us show learned knowledge in SolidWorks and Keyshot, with the model being whatever each student chose to create. I came up with the idea to make a lamp that allowed for more creativity than the common house lamp. The design includes a frosted glass cube in which 15 textured opaque orange spheres made from acrylic move freely. To change the way light is thrown through the cube, one simply has to pick up the cube and tilt it one way or another. I wanted the design to feel as if it had an unlimited amount of ways that the light could be cast.


Other projects from design classes or personal exploration and progression. The projects were often shorter in duration and not as detailed.


Thank you very much for your time. Stay on the lookout for new big things!