


Silent War 2.0
Welcome to SILENT WAR/IJN 2.0
Silent War 2.0 is a major update to the original Silent War published by Compass Games, LLC in 2005 as their very first release. With hundreds of detailed playthroughs and after action reports posted by enthusiastic players on ConsimWorld, BoardGameGeek, and other online sites, as well as direct feedback from players of Silent War, IJN, Steel Wolves, and Steel Wolves Fleet Boats, we have been able to incorporate a wide variety of updates, improvements, tweaks, and a number of carefully selected changes, without altering the essential play of the game.
Nonetheless, this is a completely new edition, replete with subtle enhancements aimed at rebalancing the game, providing additional clarity and, most importantly, an improved experience.
The major changes include: a completely revised map, incorporating portions of the eastern Indian Ocean; revised art throughout to aid identifying Silent War 1.0 components from 2.0; a rebalance for War Period 3 and 4 to more accurately reflect the diminishment of Japanese naval forces, including a complete revision of the Engagement Table; revised TDC counters; tweaked ship and submarine data, including adding an "early" Gato class set of ten submarines that can be refitted; new rules, including Weather and Attack Posture; and lastly, tweaks to existing scenarios as well as two new ones.
Two full years of evaluation, re-work & development, art, and additional development and testing went into this production and a great deal of thanks goes to our many contributing players. We hope you enjoy Silent War 2.0 as much as many did with the first edition. Thank you for purchasing this new game edition.


CONTENTS
[1.0]
[2.0]
[1.1]
[2.2]
Surface Ships

[19.0] EVENTS
[19.1] Transit Events
[19.2] Combat Events
[20.0] SPECIAL MISSION ZONES (SMZs)
[21.0] BASES
[21.1] Forward Bases
[21.2] Submarine Tenders

[22.0] CONGREGATING RISK
[23.0] SPOTTED EFFECTS
[24.0] WOLFPACKS
[24.1] Wolfpack Formation
[24.2] Wolfpacks and Movement
[24.3] Wolfpack Types
[24.4] Wolfpacks and Transit Events
[24.5] Wolfpacks and Combat
[24.6] Wolfpacks and SPOTTED results.
[24.7] Wolfpacks Experience
[25.0] SUPER SKIPPERS
[26.0] TWO PLAYER VARIANT
[27.0] QUICK RESOLUTION (Removed)
[28.0] ADDED RULES
[28.1] Loners
[28.2] Crash Dive!
[28.3] Japanese Hospital Ships

[28.4] Targeting An Escort
[28.5] Early Advancement into War Period 4
[29.0] SILENT WAR 1.0/1.2 ORIGINAL ENGAGEMENT TABLE
INTRODUCTION
Silent War 2.0 is a solitaire simulation of the United States’ submarine war against Imperial Japan during the Second World War. 2.0 is a major update to Silent War 1.0 published in 2005 as well as IJN, published in 2010. Silent War 2.0 contains a number of scenarios that allow players to recreate various stages of the submarine war or the entire U.S. submarine campaign.
In these scenarios, each player takes on the role of Commander Submarines, U.S. Pacific Fleet (ComSubPac), deploying available submarines from either Pearl Harbor or Australia in order to attack the Japanese Navy. Additionally, in the patrol game, using single submarines players can recreate some of the war’s most famous patrols. Lastly, some campaigns, as well as add-in rules, allow the player to use or incorporate Allied (primarily British & Dutch) forces into the game.

[1.1] How to Read these Rules
To help you quickly familiarize yourself with the game, a detailed sequence of play has been created. The rules follow this sequence: Set up the game, and follow the sequence of play to get an overview of game events, then, begin the game, referencing the rules as you go. It is suggested new players first play a patrol scenario before proceeding to play a campaign game. Players may find it very helpful to read through the Comprehensive Example of Play found at the rear of the scenario book. This provides a solid overview of a typical turn and will allow players to see past the rules and into the process.
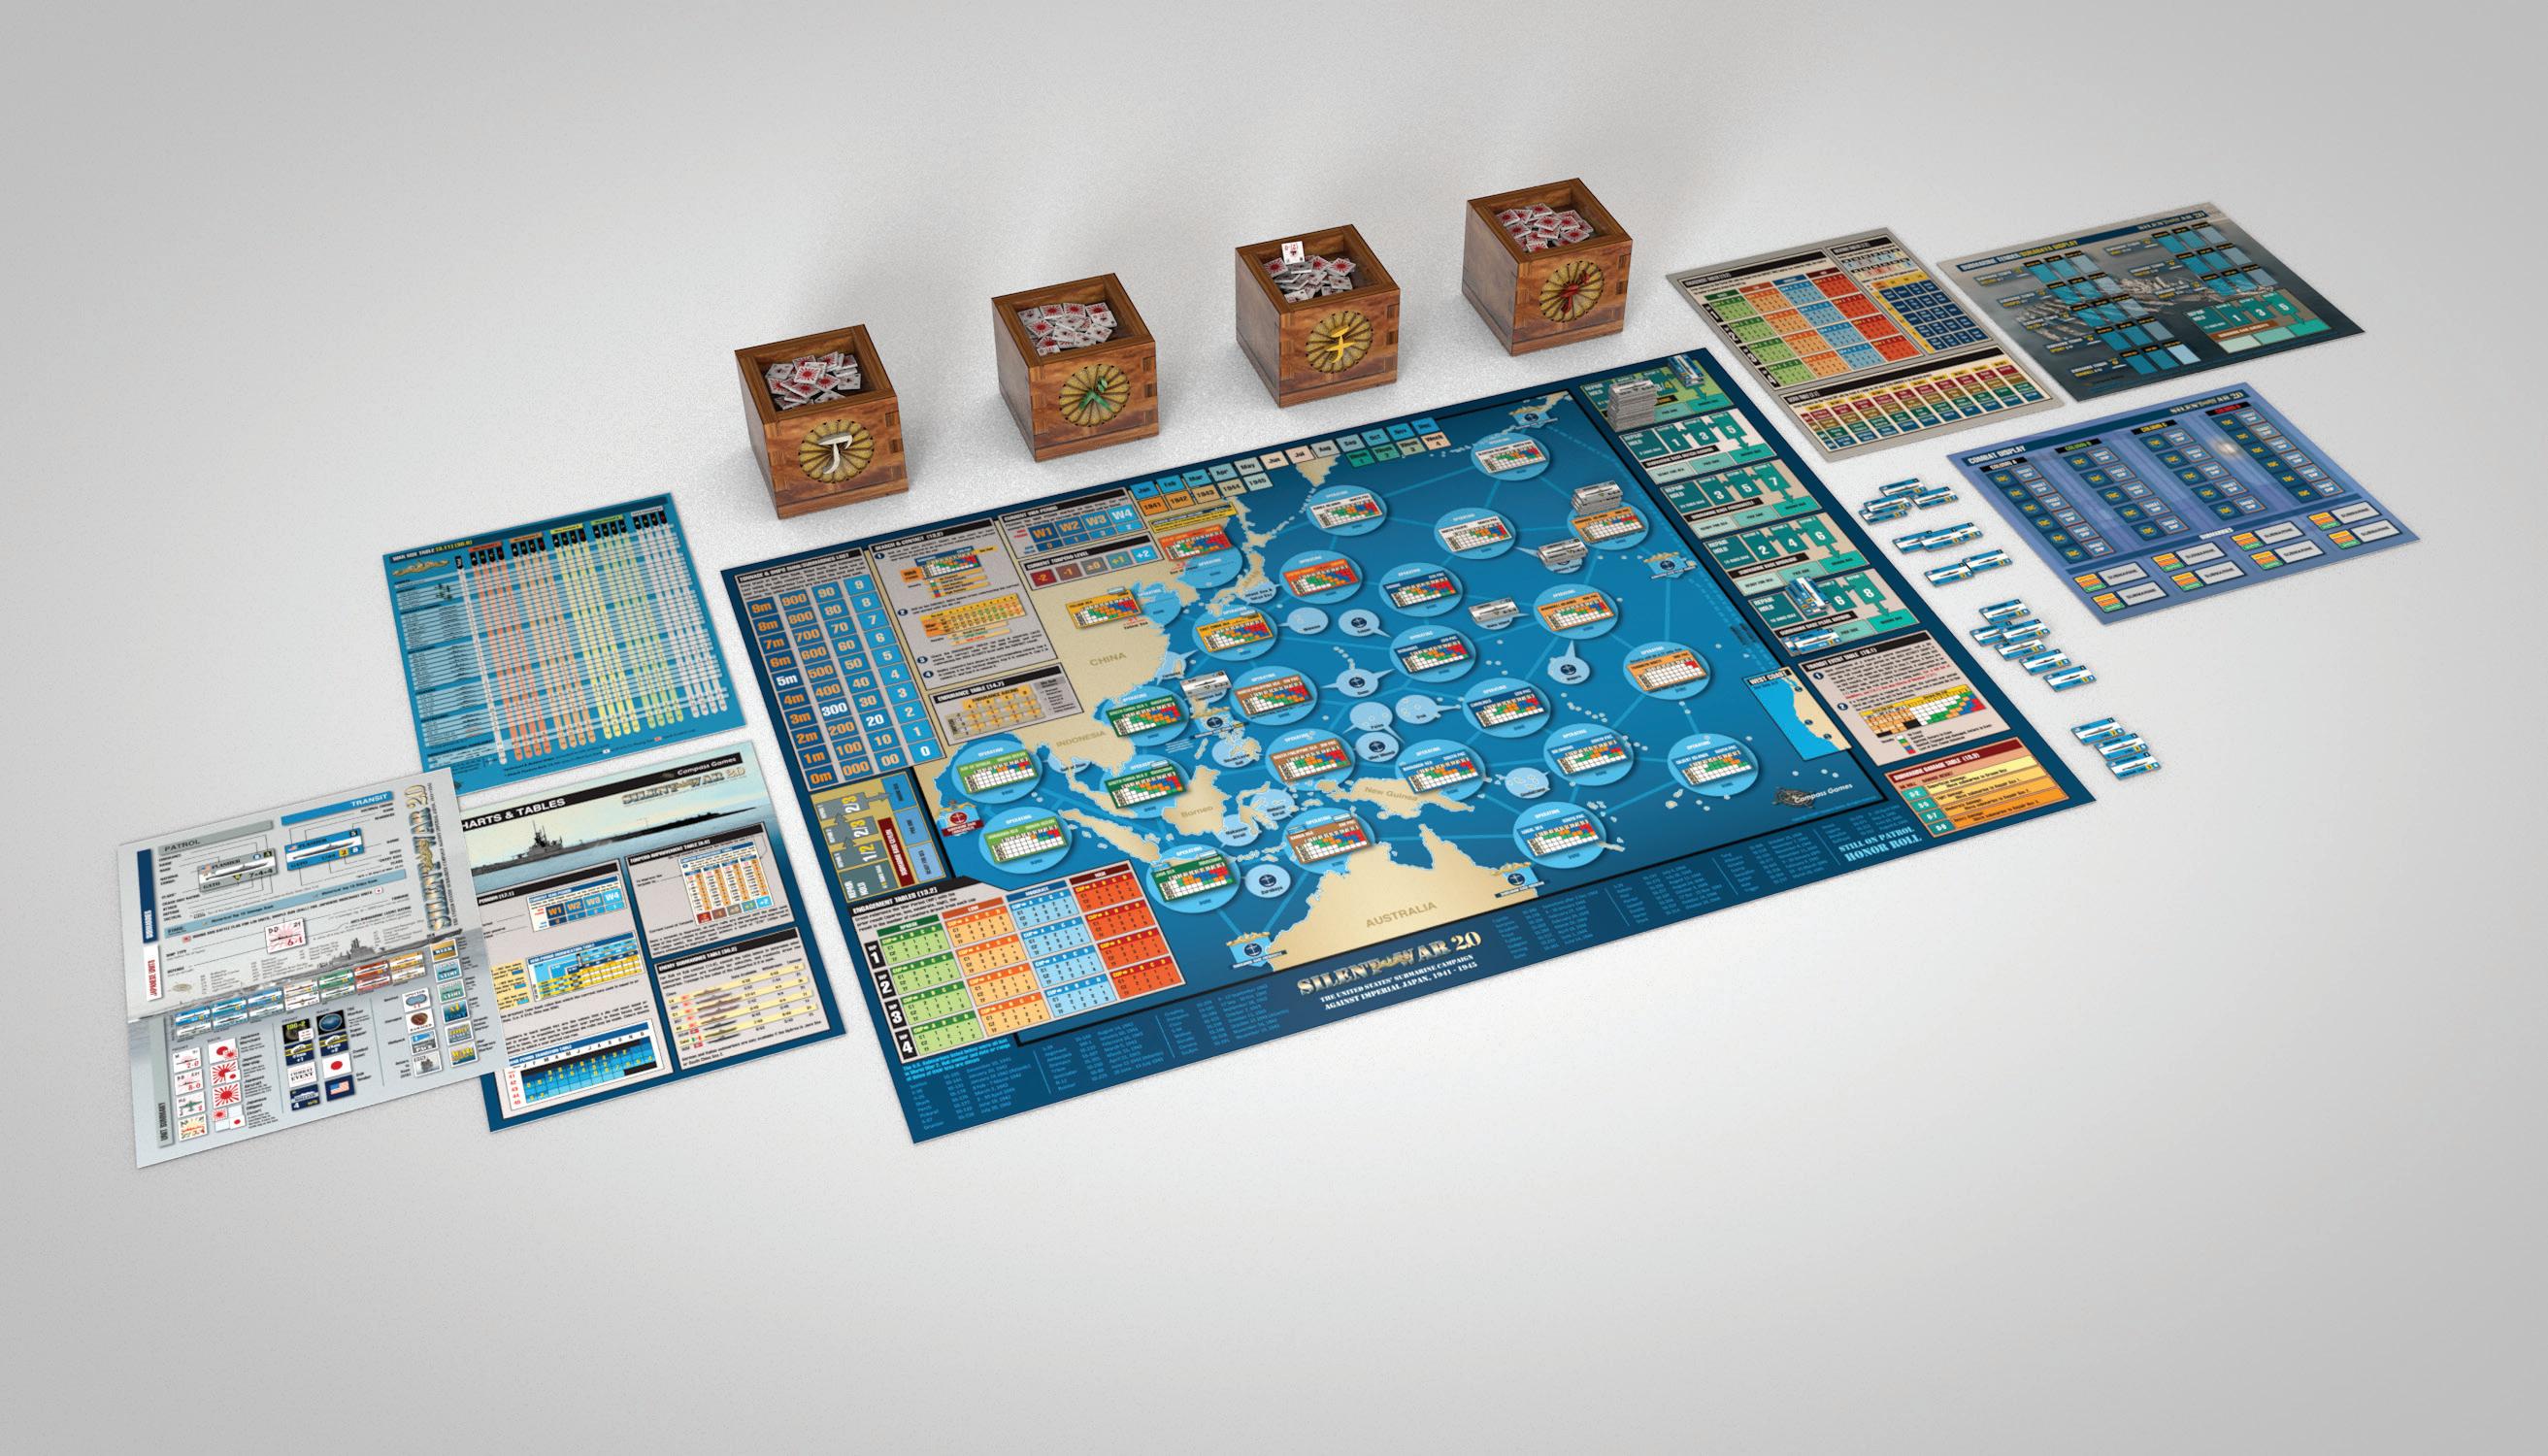
[2.0] GAME COMPONENTS
Silent War 2.0 has the following components:
• 1x 22" x 32" Game Map
• 1x Combat Display
• 1x Submarine Tender/Surabaya Base Display
• 2x double sided Charts & Tables Cards (1 & 2)
• 1x Counter/Map Explanation card
• 1x War Mix/Sequence of Play Card
• Eight Counter Sheets (6 SW 2.0 & 2 IJN 2.0)
• 2x Rules Books (SW 2.0 & IJN 2.0)

• 1x Scenario Book
• 1x Ten-Sided Die
• 1x Box Set (lid & bottom)
Note: Players must supply four opaque cups.
[2.1]
The Game Map
The map portrays the Pacific Theater of Operations containing graphic representations of submarine transit routes and areas where American and Allied submarines conducted operations and special missions. There are several displays and charts necessary for play also on the map, some of which are also printed on separate charts and tables cards.
There are three types of play “Areas” on the map connected by Transit Routes.
Submarine Base: Represented by a hexagon and a port (anchor) symbol.

Operations Area (OpArea): Large circular area containing an Activity Chart. An Operations Area is divided into an Operating section (top) for the submarines conducting combat in that Area and a Done section (bottom) for submarines which have completed their combat or movement in that Area. Each OpArea belongs to a geographic group, noted in text on the top of each Activity Chart (examples: Empire, Indochina, North Pac(ific), South Pac(ific)).
Special Mission Zone (SMZ): Small circular area without an Activity Chart that points to one or more OpAreas. If a submarine tender is in the zone it is a forward submarine base. If no tender is present, these zones can only be entered by a submarine when directed by a War Event [20.0].

Transit Routes: All Areas are linked by transit routes, a series of lines that delineate movement for submarines. Only submarines move on the map.
OpArea Restrictions: Some OpAreas are marked as Narrow or Shallow and have the following restrictions: Narrow: +1 to contact rolls [13.1] Shallow: no crash dive and -1 to the submarine defense value Both: As above and +1 to Transit Event die rolls [19.1] until radar is available.

[2.2] Game Charts, Tables & Tracks
There are a number of charts and tables in Silent War, some printed on the map and others on separate cards. Several are duplicated for convenience.
Map Charts and Tables include: Individual Area Activity Charts, Search and Contact Table, Transit Event Table, Submarine Damage Table, Endurance Table, Engagement Tables, Tonnage and Ships Sunk Tracks, Date Tracks, Current Torpedo Value Track, and Submarine Bases (Manilla/Subic, Dutch Harbor, Freemantle, Brisbane, Pearl Harbor and Trincomalee).
Charts and Tables Cards 1 & 2 include: War Progress Tables (3), Torpedo Improvement Table, Enemy Submarines Chart, Search & Contact Table, Transit Event Table, Endurance Table, Combat Tables (Attack - Damage/Counterattack Tables), Attack Posture, Congregating Risk Table, Engagement Tables, Weather Tables, and the Ultra Table. The original Silent War 1.0/1.2 Engagement table is also included.
[2.3] Playing Pieces
There are several different types of pieces in the game:
A. SUBMARINES
Every U.S. and many Allied submarines that participated in the Pacific War are represented by their own playing piece. There are two sides to every submarine: Transit, the light blue side, and Patrol, the gray side. Dutch, British and other submarines follow the same approach although the base colors are different. (see the Counter Explanation card for a detailed diagram of the values)

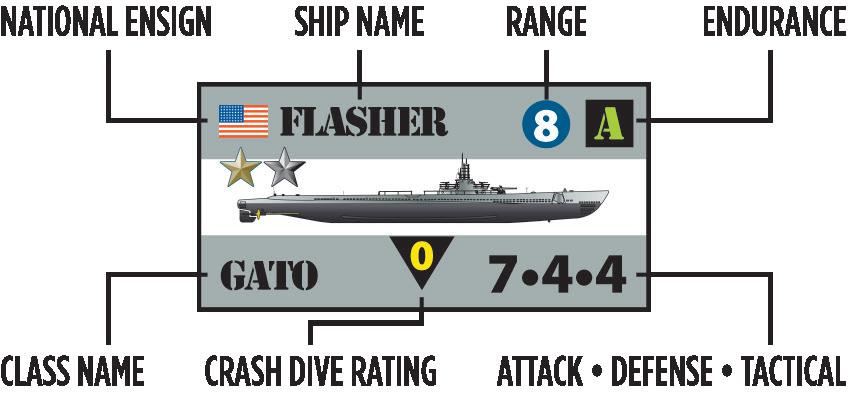
Transit Side:
The Transit side has the name (top left) and class name (bottom left) of the submarine plus the following information and ratings:
Patrol Side:
The Patrol side has the name (top left) and class name (bottom left) of the submarine plus the following ratings:
• Entry Date: Two numbers separated by a slash (/), the first being the month and the second the year in which the submarine arrives in the game (W/S means at “War Start”, 12/41).
• Speed: The number in the large box at the bottom (2 in the above image). This is the number of OpAreas that a submarine may move in a single turn (each turn is one week).
• Range: The number in the circle which is the maximum number of OpAreas that a submarine may be from any friendly Base or Submarine Tender at any time.
• Readiness: The value in the box in the upper right (5 in the above image) which the player must roll to “ready” the particular submarine for sea.

Note: Class Name "Early Gato":
The Gato class first deployed in April 1942 and, along with its derivatives the Balao and Tench classes, became the standard type of American submarine during World War II. During the war they underwent numerous changes, including bridge/conning tower rearrangements, and various deck armaments. A number of the early boats had the preceding T class “streamlined bridge” and lacked some of the improved tactical equipment of the later boats. Ten Gato submarine playing pieces are marked EARLY GATO and will enter early war scenarios. See [30.4] in the scenario book for complete details on upgrading these Early Gato submarines.
• Combat Ratings: Three digits separated by dots on the lower right of the playing piece.
Attack: The fighting value of the submarine, a mixture of the number of torpedo tubes the submarine has, whether or not the submarine has tubes both fore and aft, and its overall loadout of torpedoes.
Defense: An evaluation of the submarine’s ability to maneuver, speed of dive, diving depth, tonnage, and the “robustness” of the design and construction. Size matters.
Tactical: An estimation of the submarine’s ”handiness“ in combat, a mixture of the measurement of her general modernity, engineering responsiveness, and most importantly, her combat systems, scopes, TDC, radar, sonar, as well as the progress of experience in naval construction.
Design Note: The term "Tactical" is a handy misnomer to some extent. Given that the game assumes that each submarine has an independent commanding officer, the tactical rating may be best thought of as an "exposure" rating, that is, how much risk can the submarine take on given its capabilities. This is a derived value based on the prior mentioned attack and defense considerations with newer submarines generally being more capable and thus possessing higher tactical ratings. This allows them to see more potential targets but also exposes them more to potential enemy anti-submarine combatants.
• Endurance: The box with a letter (A, B, C or D) in the upper right corner that determines if the submarine can remain on patrol or if it must return to base (RTB). This rating factors in torpedo loadout and consumables such as food, water, and fuel supply.
• Range: The number in the circle which is the maximum number of OpAreas that a submarine may be from any friendly Base or Submarine Tender at any time.
• Crash Dive: The number in the downward facing triangle below the submarine which the player uses to determine if the submarine can crash dive during combat (some submarines took a long time to dive, others could do it moderately quickly). Note: Shallow Waters [see 2.1] prohibits crash diving.
Japanese surface ship units are represented by generic
Silent War 2.0
pieces that are used over and over again (or once by playing pieces used by the IJN 2.0 expansion). These pieces have a type designation, tonnage rating, defense rating, and an anti-submarine warfare (ASW) rating.
• ASW Rating: An evaluation of the ASW capabilities of the ship and crew. Values are either 0, Ø, 1, 2, 3, or 4. An ASW rating of zero (0) indicates that the unit has no ASW capability. An ASW rating of zed (Ø) has an ASW rating of 1/2 during surface gunnery combat only (see [19.21 #1] & [28.14]). The ASW value of a ship with a Damage marker is zero (0).
B2. SPECIFIC JAPANESE UNITS

Some specific named Japanese ships are provided. These are the carriers Kaga, Shokaku, Shinano, and Taiho, the battleship Yamato, hybrid BB/CV Ise, the repair ship Asahi, the armored cruiser Izumo, and two hospital ships, Asahi Maru and Kiku Maru. If sunk, these ships are permanently removed from play.
B3. DILIGENT ESCORTS
Ship Type: The general type of ship based on the United States Navy Ship Type Nomenclature in use during World War II. The following is a complete list of ship types used in the game:
BB Battleship
BV Battleship Carrier (the Ise class battleships that were converted to hybrid carriers)
CV Aircraft Carrier.
CA Heavy Cruiser
AC Armored Cruiser
CL Light Cruiser
DD Destroyer
DE Destroyer Escort
GB Gun Boat
AH Hospital Ship*
AO Naval Oil Tanker*
AGT Motor Torpedo Boat Tender*
AF Stores ship, often refrigerated*
AK Naval Cargo Ship*
AR Repair Ship*
AP Converted Passenger Ship*
AT Troop Transport*
AM Armed Merchant Vessel*
M Merchant, including freighter, transport, and other requisitioned non-combatants used by Japan.
AX A designation used by the IJN 2.0 expansion. An AX IJN 2.0 unit can replace any base game Japanese Naval Auxiliary ship with the designations AR, AT, and AM.
• Tonnage: The size of the ship in thousands of Tons Light (the weight of the ship without cargo or fuel).
• Defense Rating: An estimate of how difficult a target the ship is to hit with a torpedo, and the robustness of her construction - an indication of her ability to withstand damage. Inherent explosion dangers are factored into this rating. Aircraft have no defense rating as they cannot be attacked.
* Ships (AH, AO, AF, AGT, AK, AR, AP, AT and AM) are considered merchants (M) for rules purposes.
There are six Diligent Escort pieces in the game, three with the Red Ball on the back and three with the Rising Sun on the back. These represent particularly alert, aggressive, and tenacious destroyer captains who occasionally surprised a submarine skipper with their skill, daring and lethality (See also [14.13]).

B4. COMBAT EVENTS
Four Japanese "ship" units have the words “COMBAT EVENT” on their front and the red-ball on their back and are used in the War Mix [3.1]. When revealed a unique event has occurred. (See Combat Events [19.2])

B5. JAPANESE AIRCRAFT UNITS
Japanese Aircraft units (both land and ship based) are represented by generic pieces that are used over and over again. These pieces have a type designation and an anti-submarine (ASW) rating.

C. MARKERS
The "No TDC Solution" is new to Silent War 2.0 and represents situations where there is no possibility of any type of attack despite having the target in sight.

C1. TDC MARKERS
TDC markers represent Target Data Computer (TDC) solutions on a target, incorporating the vagaries of the target's position relative to the submarine, and general good or bad fortune inherent in World War II submarine combat. TDC markers have target modification values between -3 and +3 printed on them. Note: players should
be aware that the lower the value, the better, hence a -3 is the best result, +3 the least.
C2. SUPER SKIPPERS
These pieces represent the top U.S., British and Dutch submarine skippers of World War II which can be obtained during the game. Super Skippers have a combat bonus rating which is added into the submarine’s attack and defense calculations. British and Dutch skippers are used in certain scenarios and with optional Allied submarine rules (see [25.0])

C3. OTHER MARKERS
The playing pieces mix also has markers for the game turn, recording the number of ships and tonnage sunk, the number of submarines lost, the current Torpedo Status, the current War Period (Progress), Spotted, Damaged, Return to Base, and Wolfpacks.

[2.4] Scale
The map represents the Pacific Ocean from Hawaii to the Eastern Indian Ocean, and from Northern Australia to Alaska’s Aleutian Islands, encompassing approximately one-third of the earth's surface. Each game turn is one week.
[2.5] Conventions
When rolling the ten-sided die (d10), zero (0) is always zero (0) and not ten (10). The barred zero ("Ø") is zed, used on some ship counters to denote an ASW surface gunnery rating [2.3 B1 ASW Rating].
The following logical terms are used in the rules:
# number or value.
> greater than.
< less than.
= or > equal to or greater than.
= or < equal to or less than.
drm Die Roll Modifier (changes to the die roll + or -).
value/ Value or Rating modifications rating (changes to a set number indicated by adding/subtract value (#).
Fraction Rounding: Fractions are rounded up or down to the nearest integer. However, pay close attention; although a common convention was desired, Silent War uses both rounding-up, and rounding-down in order to keep as close to the statistical model as possible.
When fractions are rounded, round all fractions less than one half (<0.499) down, and all fractions equal to or greater than one half (> 0.5) up.
[3.0] SETTING UP THE GAME
Choose a scenario: Lay out the map and sort the submarines by the entry date noted on each piece from the beginning through the end of the scenario. The Entry Date “W/S” indicates that the submarine is available at “war start.”
Place the submarines for the beginning month of the scenario in their arrival locations, Transit side up. Place all the Wolfpack and Submarine Tender markers aside as these will not come into play until later in the game. Next, sort out the markers, TDC markers, Super Skippers and finally the Japanese ships marked with either the Japanese naval ensign or the Japanese national ensign. The Japanese ships will be distributed among four cups in a “War Mix.”
[3.1] The “War Mix”
The “War Mix” is the distribution of the Japanese ships into four, player supplied, opaque cups designated A, B, C, and D. The player should sort the Japanese ships by type and tonnage and then consult the “War Mix” Table.

[3.11] The “War Mix” Table is divided into the game's four War Periods, with an extra column for the East Wind Early 1932 campaign (there is also a separate War Mix table in the British Indian Ocean 1942 scenario itself).
Inside each War Period is a column for the four cups. Along the left side of the table are the Japanese ship categories. Choose the columns for the War Period noted in the scenario and sort the Japanese pieces into each cup as per the Table. If a ship category (such as M 7k tons or more) has different types of pieces, choose and distribute them randomly into the cups. Note that Japanese Auxiliary ships (Any ship with an leading "A" in it's type: e.g. AO, AF and AM etc.) are considered to be M’s on the War Mix Table.
[3.12] Counter Fronts vs. Backs
There are two types of Japanese flags in use in the game:
the Japanese Battle Flag, commonly known as the "Rising Sun," and the Japanese Merchant Ensign, often called the "Ball" or the "Red Ball." The background on the front of the playing piece is that unit's actual flag. if it is the Rising Sun, it is an Imperial Japanese Navy unit. If it is a Red Ball, it is a requisitioned merchant vessel pressed into the service for the war. However, the back of the playing piece may or may not display the actual

flag. The back flags are meant to apply some fog of war in that one can rarely be certain of what is seen through the periscope or on the radar screen.
For the purpose of distributing units into the four cups, the type of flag on the unit's front or back makes no difference: only the ship type is used to place the ship in the appropriate cup (i.e a CL with a naval ensign or a CL with a “red ball” flag are both distributed as a CL).

Historical Note: The Rising Sun flag was originally used by feudal warlords in Japan during the Edo period (1603–1868). On May 15, 1870 it was adopted as the war flag of the Imperial Japanese Army, and on October 7, 1889, it was adopted as the naval ensign of the Imperial Japanese Navy.
[3.13] Ten Japanese ship pieces have Entry Dates printed on them. These ships are not placed into the War Mix cups until their date of entry into the war. These ships are BB Yamato (5/42), BB Mushashi (2/43), BV Ise 36t (10/43), CV Taiho (3/44), CV Shinano (11/44), and the five Matsu class destroyer escorts (DE) (3/44) Additionally, remove BB36t in 3/43.
[3.14] If any of the italicized Japanese units are noted as sunk at the beginning of a scenario, their pieces are not placed in the War Mix. They are removed from the game and not replaced.
[3.15] It is strongly suggested that the War Mix be re-shuffled every two months, to avoid the player remembering what units are in which cup. Additionally, the War Mix must be re-shuffled as per the War Mix Table any time the War Period advances [17.0].
[3.2] Marker Set Up
Place the Tonnage, Ships Sunk, and Submarines Lost markers in the appropriate boxes on the Tonnage & Ships Sunk / Submarines Lost Track, and the Torpedo, Month, Week, Year, and War Progress markers in their respective boxes according to the scenario. The game is now ready to begin.

Silent War: Imperial Japanese Navy (IJN),
The IJN expansion set, originally released in 2010 is now included as part of Silent War 2.0. IJN allows players to recreate the Imperial Japanese Navy in its operational entirety with all of its capital ships, cruisers, destroyers, and select auxiliary ships with which Japan fought the war. IJN does not change basic game play, but rather allows players to replace generic ships with named ships on the combat display, removing those that are sunk, and placing any that are damaged on the Turn Record Track for repair. IJN playing pieces are placed near the game play area, sorted by type.
When a Japanese warship from the basic SW set of playing pieces is revealed, that is a target counter is flipped face up revealing a white playing piece with a Japanese warship on it (but not a Diligent Escort), the player immediately replaces the SW Set counter with a counter drawn from one of the IJN Set warship piles, selected randomly from the same type as the ship being replaced (BB, CV, CA, CL, DD, AX). When a Japanese auxiliary from the SW Set is revealed, that is a target counter is flipped face up revealing an auxiliary playing piece featuring a merchant type ship type of AR, AT or AM, on it, the player immediately replaces the SW Set counter with a randomly drawn counter from the IJN Set AX pile. When AX ships are gone, just use the AR, AT, or AM ships as normal.
Remember that at the end of combat return all SW Set ships to their A-B-C-D cups, and remember to return the IJN Set ships to their correct piles, being careful not to put them into the A-B-C-D cups (unless sunk, then remove them). IJN's rules are in a separate booklet included in this game.

[5.0] WAR EVENT PHASE
At the start of each turn, the player rolls a d10. If the die roll is 0, 1, 2, or 3, the player rolls again on the War Events Table found in the Scenario Book and follows the event’s instructions.
[5.1] Some events are one-time only events (such as the Fall of Manila). Once these have occurred, they cannot occur again. Treat any further rolls of those events as No Event.
[5.2] Some War Events direct the player to deploy a certain number of submarines to a Special Mission Zone for the turn. These submarines utilize Patrol Movement to enter the SMZ. If the player does not have enough submarines able to enter the zone via Patrol Movement (see [12.0]), non-RTB submarines that are Transit side up in or adjacent to an OpArea with the SMZ must be flipped to their Patrol side and moved into the SMZ. Note: this is the ONLY time a Transit side submarine may be flipped to Patrol side at the beginning of the turn If the player still does not have enough submarines to fulfill the conditions of the War Event, there is no penalty, but the player must move as many submarines as possible up to the number indicated.
[6.0] TORPEDO IMPROVEMENT PHASE COMMENTARY
The Mark XIV Torpedo, which the Americans went to war with, was the product of the Newport Torpedo Station, a U.S. Navy Bureau. In an appalling example of elitist arrogance, this Bureau obstinately refused to acknowledge the truth of the many complaints from experienced combat submariners that the Mark XIV was not working properly. Instead, they accused the

skippers of “improperly” setting the weapon. However, careful experiments in July of 1942 in Australia, and the intercession of Admiral King himself, finally moved the Newport Torpedo Station to act. Still, it was not until fully a year later that the Mk-XIV was operating the way it was intended, 21 months after the start of the war. Once working correctly, it proved to be devastating.
The Mk-XIV torpedo marker (also representing the Mk-X used by S-boats and the late war Mk-XVIII electric) begins the game on the Current Torpedo Level track according to scenario instructions. This value will change during the game based upon the number of ships sunk. During the Torpedo Improvement Phase in which the current number of ships sunk reaches or exceeds one or more of the listed numbers of ships sunk on the Torpedo Improvement table, the player rolls a d10 using the highest number for ships sunk that the current number of ships sunk exceeds.
If the die roll equals or exceeds the result listed for that number of ships sunk, the torpedo marker is immediately advanced indicating a fix to the torpedo problem. If the die roll is less than the result there is no change, and another roll may not be attempted until the next listed number of ships sunk is reached.
Example: In 1942 the player reaches 70 ships sunk. The player is now eligible to attempt torpedo improvement from –2 to –1 (left column). The die roll is ‘6’ indicating that no improvement is made (a ‘9’ is required). The player may not roll again until 75 ships, or more, have been sunk. If the player reaches 76 ships, the player will roll on the 75 line and a result of ‘8’ or ‘9’ will result in the improvement to –1. If, however, the player jumped from 70 to 81 ships, the player will roll on the 80 line needing 7, 8 or 9 to improve the torpedo. If the torpedo is improved, the player must wait until ships sunk is greater than the next ships sunk in the next improvement column (2nd column). The area in the chart referenced here is shown in red box.

COMMENTARY
Ultra was the name of the British cipher project that broke and read the German codes. Magic was a combined allied effort with a focus on the Japanese Navy Codes JN25 and JN339 (maru) but the output of their combined efforts came to be known as “ULTRAs” and hence we use that term here.
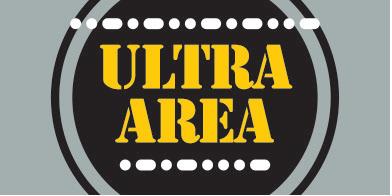
Throughout the war, Ultras provided the US submarine force with dramatically accurate information on Japanese convoy composition and movements. Early lack of success was not due to failing to be “at the right place at the right time,” but rather having defective torpedoes that failed to run at the correct depth and explode as designed.
In all ways, the Ultra War was a stunning success. In an odd way, it was also a tribute to the Japanese naval planners that they could schedule and run convoys on such tight schedules — an accomplishment that ultimately proved fatal.
PROCEDURE
At the start of each turn, the player should consult the ULTRA Table by rolling a die and finding the result under the current War Period. Place an ULTRA marker in each of the listed Areas. All die rolls on the Area Activity Charts in these Areas are increased by a +1 drm. All numbers from the Engagement Table (the number of ships placed in columns A, B, C, and D) are increased by one (1) except for those cups indicating “no draw."
[7.11] When the Sea of Japan OpArea contains an ULTRA marker, Transit Event Check die rolls are subject to a +1 drm instead of the normal +2 drm
[7.12] ULTRA Areas only last for one turn. New ULTRA Areas will be rolled at the beginning of each turn.
[7.13] There may never be more than three (3) ULTRA Areas in existence during any one turn. If two rolls are made due to a War Event, take the Areas in order they are received, top to bottom.
Example: In War Period 3, a War Event calls for rolling twice on the ULTRA table. The player rolls a ‘2’ followed by a ‘4’. ULTRA markers are placed on the Empire Pacific, Bismarck Sea, and the Kuriles. A marker is not placed in the Carolines

[7.14] Submarines are never required to respond to ULTRA information. The decision to Patrol Move and take advantage of the target-rich environment is up to the player and should be balanced by the risks associated with Patrol Movement (see [12.0]).
[7.2] Weather COMMENTARY
The "peaceful" ocean can at times become a raging tempest as cyclonic weather events take hold and generate some of the largest and most powerful tropical storms and typhoons at sea. In the region of the Pacific portrayed by the game, cyclones tend to arise in the area of the Caroline Islands, and move westward, either in a straight line towards China or swinging around to the north or northeastward in a parabolic arc. Such significant weather events affect search and combat. Weather events are represented by markers depicting either a tropical storm or a typhoon affecting all naval and air operations in the area they are in. There can be more than one tropical storm or typhoon markers on the map at the same time.
Note: Although the duration of most average cyclonic weather events is usually a week or less, these game weather events represent those longer duration, severe storms that are very large and cannot be avoided as submarines need to return to the surface to recharge batteries and replenish oxygen. While at depth, submarines are generally unaffected by storms, but when surfaced, due to their long and low profile, they can be tossed about quite violently.
There are three steps for determining status of weather: Step
A. Weather Event Strengthening
For each Typhoon-1 on the map roll a d10:
• If during the months of December to May the result is a 0, it becomes a Typhoon-2. Flip the Typhoon-1 marker to its Typhoon-2 side.
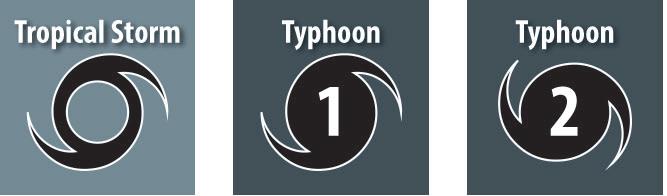
If during the months of June to November the result is a 0-1, it becomes a Typhoon-2. Flip the Typhoon-1 marker to its Typhoon-2 side.
Step B. Existing Typhoon Movement
For each Typhoon, roll a d10 on the Weather Event table's 2nd Week Movement Section and move the storm to the indicated OpArea. It is recommended to move western most storms first as much as possible.

• If it moves to an area that has a Tropical Storm in it, the Typhoon absorbs the Tropical Storm (remove the tropical storm, leave the Typhoon).
• If it moves to an area with a Typhoon in it that has not yet moved, follow this procedure to move that Typhoon first (the storms do not merge).
• If it moves to an area with a Typhoon-1 in it that has already moved, roll a d10: on a result of 0 – 1, they form a Typhoon-2. On a result of 2 – 5, they simply merge into a single Typhoon-1. On a result of 6 – 9 they dissipate; remove both immediately.
• If it moves to an area with a Typhoon-2 that has already moved they simply merge into a single Typhoon-2.
Step C. New Weather Event Formation & Location
Roll one d10. For the month the turn is in, on a die roll = or < than that month’s Weather Event Formation Number (X indicates that a weather event cannot occur), one weather event is generated.
Should a Weather Event occur, roll a d10 on the Weather Event Initial Location Column and place a Tropical Storm marker in the indicated Initial Location’s OpArea.
• If the OpArea already has a Tropical Storm in it, it becomes a Typhoon-1. Replace the tropical storm marker with a Typhoon-1 Marker.
• If it has a Typhoon (1 or 2) in it, the tropical storm is NOT placed (the event is ignored).
Step D. Immediate Weather Effects
• For any OpArea containing a Tropical Storm, roll a d10 for each Spotted submarine. On a roll of 0-7, remove the Spotted Marker. (See also [24.6]).
• For any OpArea containing a Typhoon, remove all Spotted markers and disband all Wolfpacks.
[7.21] Effects of Weather
Tropical Storm Markers represent heavy weather with considerable cloud build up, strong gusting winds, intermittent heavy rain squalls, rough seas, and reduced visibility. The following effects are in place in the OpArea and any connected SMZs:
• Transit Events [19.1] only occur in the OpArea on a d10 roll of 0 - 3.
• Any Japanese aircraft revealed during combat is returned to the appropriate cup on a die roll of 0-7. No other unit is revealed in its place.
• There is a -2 drm to all submarine rolls on the Area Activity Chart (AAC) [13.1].
• Subtract one (1) from a submarine’s attack value for (EACH attack).
• Any Surface Gunnery Attacks are allowed only on a die roll of 0-1.
• Upon storm formation, on a d10 roll of 0-7, remove Spotted markers.
• At the Conclude Turn Phase [16.0], a die is rolled for each submarine that is in or has transited through or from a Tropical Storm OpArea during any part of the turn. On a result of 0, the submarine receives a Damaged marker.
Typhoon Markers (1 & 2) represent significant and hazardous weather with solid sky cover, heavy seas, sustained high winds, continuous slashing rain, and near zero visibility. The following effects are in place in the OpArea and any connected SMZs:
• Transit Events cannot occur in the OpArea.
• Any Japanese aircraft revealed during combat is returned to the appropriate cup. No other unit is revealed in its place.
• All escort ASW factors are reduced by 1 to a minimum
• There is a -3 drm to all submarine rolls on the Area Activity Chart (AAC) [13.1].
• Subtract two (2) from a submarine’s attack value (EACH attack).
• Results of “damaged” against a Japanese unit is changed to sunk.
• Surface gunnery attacks are not allowed.
• Sub vs Sub [14.6] combat is not allowed.
• Upon storm formation remove any Spotted markers.
• No Wolfpacks may be formed, any formed Wolfpacks are disbanded.
• At the Conclude Turn Phase [16.0], a die is rolled for each submarine that is in the OpArea at the end of the turn, or that has transited through or from a Typhoon OpArea during the turn. On a result of 0-1, the submarine is damaged. On any result of “damaged” against a submarine, a second die is rolled. If the result is greater than the defense rating of the submarine, the submarine is lost. Super Skipper ratings modify this die roll by subtracting the skipper’s rating from both die rolls.
• For any submarine with an existing Damaged marker (that is not from the bullet above) that has transited through or from a Typhoon OpArea during the turn a die is rolled, if the result is greater than the defense rating of the submarine +1 (they have had time to prepare as best as possible), the submarine is lost. Super Skipper ratings modify this die roll by subtracting the Super Skipper’s rating from it.
[7.22] Conclude Turn [16.0] Weather Activities
Typhoon-2s are removed from the map in the Conclude Turn Phase [16.0]. Typhoon-1s and Tropical Storm Markers are removed from the map during December to May. From June through to November, Typhoon-1 and Tropical Storm markers are removed on a die roll of 0-7. A Tropical Storm not removed becomes a Typhoon-1. Replace the Tropical Storm Marker with a Typhoon-1
[8.0] SUBMARINE REINFORCEMENTS PHASE COMMENTARY
The United States quickly began a massive program of building submarines using both coastal and Great Lakes yards. New construction poured into the Pacific at an amazing rate. Not only did new submarines appear, but nearly every submarine through the Gato class received a major overhaul during the course of the war. Many overhauls repaired major battle damage that was beyond the capabilities of Pacific bases; in some cases replacing defective main diesel engines or rebuilding entire conning towers. Most overhauls do not alter a submarine's ratings, but they do represent a major logistics improvement to operations and therefore are factored into the game. That said, there are ten "Early Gato" submarines that, after entering overhaul, they return as normal Gatos (See note in 2.3 A).
Players consult the Master Submarine Reinforcements list. There are four categories of units listed:
1. Additions to War Mix: Japanese units with entry dates are added to the War Mix as per the War Mix Table.
2. Reinforcements: Newly received submarines are listed along with their base of arrival. Place them in the Broom Box of the proper Base display Transit side up. If a base of arrival is not yet active or has fallen, the submarines are received at Pearl Harbor (Exception: Brisbane subs are received at Fremantle if the latter is active).
3. Withdrawals: Submarines are withdrawn for overhaul to one of the yards on the West coast of the United States. These submarines are preceded by “Withdraw”, and must involuntary RTB [15.22] if at sea. They must RTB to Pearl Harbor regardless of its distance away. Once at Pearl Harbor or if at Pearl already, they are moved immediately to the “U.S. West Coast” Box on the map. Any Super Skipper stays with the boat, and any damaged/spotted markers are removed. If the submarine has been sunk, no other submarine takes its place. While in overhaul, a submarine cannot be removed from play via the War Event “Relegation to Training Duty." (See also Early Gatos [2.3 A Note])
4. Returns: After a number of months, the submarines in overhaul are returned to service. These are preceded by “Return” in the list. All returning submarines are placed in the Broom Box of Pearl Harbor Transit side up unless otherwise noted.

[9.0] READYING SUBMARINES FOR SEA PHASE COMMENTARY
Prior to deploying to sea, a submarine must be “readied”. This represents provisioning and fueling, as well as assembling and training the crew. The latter evolution (to use the Navy term for an activity) can be somewhat indeterminate in length of time it takes. The average Pacific submarine was able to perform a turn around between patrols in a week. Sometimes it took two. The older, “creakier” boats took a little more effort to ready for sea than their brand new war construction sisters
PROCEDURE
Move all submarines in the Pier Side Box of a Base (Shipside Box of a Tender) to the Ready for Sea Box. For each submarine starting in the Broom Box, roll a die. If the result is = or < the “Readiness” rating, the submarine is moved to the Ready for Sea Box of the Base display. If the roll is greater than the rating, the submarine is moved to the Pier Side Box on the Base display, where it will be automatically ready for sea in the following turn.
Submarines with a damaged marker may be repaired at a Base. There are four boxes within the Repair Box in each Base display, a “Hold”, “3”, “2”, and “1” box. In each of the “3”, “2”, and “1” boxes, a Repair Number is printed.
[11.0] PREP FOR OPERATIONS PHASE
All submarines at sea are moved from the “Done” section of their OpArea to the “Operating” section.


PROCEDURE
Roll a die for each submarine in a Repair Box, starting with the submarines in Repair Box 1 and advancing one box at a time to the Hold Box. If the result is = or < that box’s Repair number, advance the submarine to the next box. A submarine in box “1” advances into the Broom Box. (see also, Bases & Tenders in Typhoons [21.3]).
[10.1] The Base Max Repair Capacity is the total number of submarines that may be in boxes “1”, “2”, and “3” at any one time. A submarine with damage may not be advanced into the repair process unless there is room for it.


[10.2] If a damaged submarine enters a base that is already at its Max Repair Capacity, that submarine is placed in the Hold Box Transit side up. Which submarine(s) go in the Hold Box is up to the player. Note: consider repairing a more capable submarine with less damage first, shunting a more damaged submarine into the Hold Box even if it arrived earlier.
[10.21] When submarines are repaired and there is room for more to be repaired, submarines may be advanced from the Hold Box into the “3” box (regardless of the actual damage it suffered- it is assumed to have deteriorated from waiting in the holding basin), but must wait until the following turn to roll for repair. Note: Players should carefully plan for the return of damaged subs to avoid the holding basin penalty. For example, subs operating out of Pearl Harbor can “bounce” to Australia if needed.
[10.3] Submarines waiting in a Repair Box may not leave a Base. Check scenario rules in the case where a Base should be captured by the Japanese ("Fall of a Base" from the War Event [5.0] Table) with one or more submarines in a Repair or Hold Box.
Historical Note: The “Broom Box” is a nod to the flying of a broom aloft upon return from a successful patrol. It originated with the U.S.S. Wahoo (SS 238 - Dudley Walker “Mush” Morton) returning from its third patrol with a broom affixed to the periscope mast indicating a clean sweep of enemy ships during its patrol.
[12.0] PATROL MOVEMENT PHASE COMMENTARY
Normally when on patrol, submarines tended to remain in a single OpArea. However, tactical considerations may alter a player's approach to their operational deployments and thus a player may change their patrol area to an adjacent OpArea using Patrol Movement. To use Patrol Movement, a patrol side up submarine is simply moved to any adjacent OpArea, so long as that OpArea does not place the submarine further from a Base than its Range rating. A roll is made for a Transit Event (see [19.1]). If an RTB result is obtained, place an involuntary RTB marker [15.22] on it and place it in the "Done" section.
[12.1] If a Special Mission Zone has been activated by a War Event, a submarine may enter it using Patrol Movement for no additional movement cost. A roll is made for a Transit Event [19.1] (see [20.0] for more details).
Example: A Special Mission Event has occurred for a Guadalcanal Patrol. A submarine on patrol in the Coral Sea may Patrol Move to the Solomons (roll for transit event), and then enter the Guadalcanal Special Mission Zone for no additional cost, also rolling for a Transit Event using the Solomons Area Activity Chart.
[12.2] Submarines may not use Patrol Movement to enter or depart a submarine base.
USS Archerfish (SS-311) was a Balao-class submarine best known for sinking the Japanese aircraft carrier Shinano (69,151 tons) on 29 November 1944, the largest warship ever sunk by a submarine.
Silent War 2.0
• If there is no contact, proceed directly to the Endurance Phase [14.7] with a -1 drm to the Endurance roll.
Submarine combat is essentially sorting through the available contacts and determining quickly the best opportunities for sinking selected ships. Information is usually imperfect, time short, angles and opportunities limited. Within these bounds, a submarine commander must make his decisions such that the best opportunity to inflict damage is taken.
[13.1] Search or Bypass Search Determination
A submarine may choose to bypass the Search & Contact Procedure in order to not engage in combat. If the player chooses this option, remove any Spotted marker from the submarine and proceed directly to the Endurance Check [14.7] with a -2 drm to the Endurance roll. A submarine bypassing Search & Contact may also voluntarily RTB (see [15.21]).
PROCEDURE
To determine if the submarine makes contact with the enemy and, if so, how many ships the submarine contacts, the player follows these three steps:
A. Consult the Area Activity Chart in the OpArea in which the submarine is located. If the submarine is located in a Special Mission Zone that has been activated by a War Event, the player consults the Area Activity Chart of the OpArea from which the submarine entered the Special Mission Zone. If there are any colored (non white) boxes in the row for the current war period, the player owning the submarine rolls a die, adding the following
cumulative modifiers:
+1 drm if this is an ULTRA area (see [7.1]).

+1 drm if this is in a Narrow OpArea
+2 drm if rolling for a Barrier deployed Wolfpack.
-1 drm if the submarine is Spotted and it is War Period 1 or 2.
-2 drm if OpArea contains a Tropical Storm, -3 drm if the OpArea contains a Typhoon.
The color of the box result determines the Activity Level:


White - No Contact (see bullets below)
Green - Sparse: contact with a very small number of enemy ships
Orange - Low: contact with a small number of enemy ships

Blue - Moderate: contact with a moderate number of enemy ships
Red - High: contact with a large number of enemy ships
If neither of the below is the case, proceed to Step B:
• If the box is white, and the row has at least one colored box, the player rolls a second die. If the second roll results in a red box, a loner has been contacted. See [28.1].
• If the unmodified initial roll is a zero and the second roll is also a zero, the submarine has encountered an enemy submarine. Proceed to the Sub vs. Sub Combat segment [14.6]
B. Once enemy ships have been contacted, the player rolls on the Contact Table (left side of map), again first determining the War Period, and then rolling a die. The result is either: C1 - small convoy, C2 - large convoy; or TF - a naval task force.
C. The Player consults the Engagement Table, crossreferencing the Activity Level from the Area Activity Chart die roll with the Contact result from the Contact Table. The Engagement Table will direct the player to randomly select a number of pieces from each of the four prepared ‘War Mix’ cups, A, B, C, or D. Pieces are drawn from the cup (without examining them) and placed face down on the Combat Display in the column corresponding to their cup (they will be revealed in [14.13] after Attack Posture.)
[13.2] If the OpArea has an ULTRA marker (see [7.1]), the number of pieces per cup is increased by one unless the result for that cup was “no draw,”
[13.3] If directed by any game activity to use TF ONLY, only pull ships for column D and only place vessels with the Rising Sun flag on their backs. If a Red Ball flag is drawn, return it to the cup and draw another until all vessels placed have Rising Sun flags on their backs. Conduct combat normally. If the Engagement Table result would not place any ships in Column D, proceed directly to the Endurance Phase [14.7] with a -1 drm to the Endurance roll.
[14.0] COMBAT PHASE
The player now engages the Japanese convoy or task force in a series of attack rounds.
[14.1] First Attack Round PROCEDURE
[14.11] Submarine Placement Place the submarine in any one of the submarine boxes on the Combat Display (can include columns with no ships in them). No more than one submarine per each box. See also Wolfpacks and Combat [24.5].
[14.12] Attack Posture
DESIGN NOTE: Attack Posture is a rule that allows a player to set an "aggressiveness" level for the submarine conducting an attack, giving the player more influence over the outcome.
PROCEDURE
Each submarine is given one of three attack postures: Cautious, Standard, or Aggressive, applying the modifiers from the Attack Posture Table.
Attack Posture during Subsequent Rounds
During a subsequent re-attack combat round a player may keep the current level or voluntarily change the submarine’s attack posture by one posture level up or down. A submarine with a Super Skipper (see [25.0]) can change to any posture level in any subsequent reattack round.
Example: A submarine given a Cautious posture in the first attack round can only be given the same level (Cautious) or Standard in the next re-attack round (see [14.4]). A submarine given a Standard posture in the first attack round can be given any of the postures in the subsequent re-attack round. A submarine given an Aggressive posture in the first attack round can only be given an Aggressive or Standard posture in the subsequent re-attack round. Submarines with Super Skippers can change to any posture level.
[14.13] Revealing Japanese Ships
The player reveals a number of Japanese units on the Combat Display equal to the Tactical Rating of the submarine by turning them face up, one at a time. The ships the player chooses to reveal must be from either the column the submarine is in, or from an adjacent one on the Combat Display.
• If a “Combat Event” marker is revealed, the event is immediately resolved as per the Events instructions (see [19.2]). If any additional Combat Event markers are drawn during an attack round, they are returned to the cup.
• If a “Diligent Escort” is revealed in a column that does not already have one revealed (unless Combat Event 5, Deadly Division, has occurred), if able, attempt a Crash Dive [28.2]. If unsuccessful, the player rolls immediately (applying applicable modifiers from the Attack Posture Table [14.12]) on the Diligent Escort row of the Counterattack Table. Combat then proceeds normally with the Diligent Escort in its place, face up, in the proper column. If the submarine is damaged, the player may choose to withdraw from combat at this point, proceeding to the Endurance Phase [14.7].
• If a second Diligent Escort is revealed in the same column and Combat Event 5, Deadly Division, occurred any time prior during this attack, roll as per the bullet above applying the result. No withdraw is allowed. If Combat Event 5 is not active, the second Diligent Escort is ignored (remove, do not replace).

• If an aircraft is revealed, check Weather Effects [7.21].
Starting in 10/1943 until the End of War, submarines are equipped with Radar and may “unflip” any one Japanese unit unless it is a Combat Event, Diligent Escort, or an Aircraft. The choice to “unflip” the unit must be made immediately, before any other units are revealed. If a unit is “unflipped”, another unit must be revealed in its place. If no other units are available to be revealed, a unit may not be “unflipped." Note: if the submarine is still an Early Gato [2.3 A], it is still equipped with Radar during 1943 to the End of the War (see also [30.6] Realistic Radar Refit) in the scenario book.
[14.14] The player utilizes the Tactical Rating of the submarine to determine the number of “TDC” (Target Data Computer) pieces that are randomly selected from the pool of face down TDC markers. The player places TDC markers (without examining them), one per target, on any of the revealed OR face down Japanese ships in the same column containing the submarine or in an adjacent column. Once they are all placed, TDC markers may not be moved.
[14.15] The player reveals the TDC markers and selects targets for attack. A target must be a unit with a TDC marker on it. The player may select as many targets as he can allocate the submarine’s attack value to, with a minimum of one (1). The total of all attacks may not exceed the attack value of the attacking submarine. Once all revealed targets have been selected, any unrevealed Japanese unit that is being targeted is now turned face up. If a Japanese aircraft or Combat Event marker is revealed, remove the TDC marker from it. Attack points allocated to the aircraft or Combat Event marker may be reallocated to any other unit with a TDC marker on it.
• If a Combat Event is revealed, the event is immediately resolved as per the Combat Events
Silent War 2.0
[19.2]. Any additional Combat Event markers drawn during an attack round are returned to the cup.
• If a Diligent Escort is revealed, the player rolls immediately on the Diligent Escort row of the Counterattack Table (applying applicable modifiers from the Attack Posture Table [14.12]), applying the result. Combat then proceeds normally with the Diligent Escort in its place, face up, in its column. If the submarine is damaged, the player may NOT choose to withdraw from combat at this point.
• If a second Diligent Escort is revealed in the same column and Combat Event 5, Deadly Division, occurred any time prior during this attack, roll as per the bullet above applying the result. No withdraw is allowed.
• If an aircraft is revealed, check Weather Effects [7.21].
[14.16]
Resolving the Attack
Each attack is resolved separately. The following procedure (steps A through D) is used for each attack:
A. Total the following for the attacking submarine:
1. The portion of the submarine’s Attack Value allocated to this target.
2. The value of a Super Skipper marker on this submarine (if any). Each attack gets this bonus.
3. The current Mk-XIV torpedo value (Remember, adding a negative number is the same as subtracting it.)
4. If in a Tropical Storm, subtract one (1) from the submarine’s attack value [7.21].
5. If in a Typhoon, subtract two (2) from the submarine’s attack value [7.21].
B. Total the following for the target:
1. The target’s Defense Value.
2. The ASW value of all revealed Japanese vessels in the submarine’s column and adjacent columns (-1 from each ship's factor if in typhoon, see [7.21]), and the ASW value of all revealed aircraft regardless of column.
3. The TDC marker value, modified for Attack Posture [14.12] (Remember, adding a negative number is the same as subtracting it.)
4. If the target ship is not in the same column as the submarine, add one (1).
5. If the target ship has a Damage marker subtract one (1).
C. Subtract the target’s value from the attacker’s value (round down) to get a result and roll a die. Add +1 drm if part of a Wolfpack [24.53]. If the roll is = or < than the result (difference), the target has been hit.
D. If the target is hit, consult the Attack Results Table. Find the size of the target in tonnage in the left column and roll a die, adding the current value of the Mk-XIV torpedo (adding a negative number results in subtraction).
Attack Posture Cautious: +1 drm to the “to hit” die roll if the target ship is not the one with the unmodified TDC.
Attack Posture Aggressive: -1 drm from the “to hit” die roll.
If the modified result falls into the orange results, the target has been damaged. Place a Damage marker on the vessel. If the target already had a Damage marker, or is an OpArea containing a Typhoon, it is sunk. If the result falls into the red results, the target has been sunk. Advance the Ships Sunk marker by one and the Tonnage Sunk marker(s) by the tonnage size.
Note: The torpedo value counts for or against the player twice: First, in terms of hitting the target (running at the proper (or not) depth), and second, in terms of detonating correctly (in terms of the magnetic exploder that was so problematic or the defective contact exploders.)
[14.17] There will be times when it is not possible for a submarine to hit a target, through a combination of low attack factors, low torpedo rating, adverse TDC modifiers, and/or high escort values. In such cases follow these guidelines:
A. If no successful attack can be made in the first attack round, there is no Counterattack [14.2]. The player may withdraw [14.3] or conduct a Re-Attack round [14.4] normally.
B. If no successful attack can be made in a Re-Attack round, a counterattack round is conducted normally regardless of whether an attack is made in the first attack round.
Note: Unrevealed units with TDC markers are considered to have a defense of ‘1’ until revealed. If attacked, and it is determined that the target cannot be hit, the attack goes through with an automatic miss, followed by a counterattack.
[14.2] Counterattack Round
Counterattack normally occurs after an attacking submarine has conducted combat against surface ships, but under certain circumstances Counterattack may occur before the submarine has attacked surface ships. Note: Any units sunk in the attack round before are removed prior to Counterattack.
Note: If all revealed units only have a zero (0) ASW value, there is no Counterattack unless any revealed unit has a zed (Ø) and the submarine is conducting a surface gunnery attack [19.21-#1, 28.14].
To conduct Counterattack, use the following procedure:
A. Add the following for the Japanese:
1. The ASW value of all revealed Japanese forces (even those not attacked) in the column containing the submarine and in all adjacent columns, fractions rounded up. The ASW value of a ship in a typhoon is reduced by one and the value of a ship with a Damage marker is zero. The ASW value of an aircraft is added regardless of the column the aircraft is in. A ship with an ASW value of Ø has a value of 1/2 if the Counterattack is following Surface Gunnery Combat [19.21 #1]
2. The number of red boxes for the current war period in the Area Activity Chart of the OpArea where the combat is occurring.
3. The general ASW value from the War Period display for the current war period.
B. For the submarine, add:
1. The submarine’s Defense value.
2. The value of a Super Skipper marker assigned to this submarine (if any).
3. Subtract one if the sub is in Shallow waters.
4. -1 drm if Attack Posture is Cautious
5. +1 drm if Attack Posture is Aggressive
C. Subtract the submarine’s result from the Japanese result and locate the applicable row on the Counterattack Table. Roll a die and apply the following modifiers:
1. +1 drm for each damage marker a submarine has.
2. +1 drm if this Counterattack follows a Re-Attack.
3. +1 drm if the submarine has a Spotted marker. In some cases on the table, a second roll on the counterattack table is needed. Apply the results of the table immediately.
[14.3] Withdrawal
Once the Counterattack Round is over, the player may voluntarily withdraw the submarine from combat. If the player voluntarily withdraws, proceed to Super Skipper Determination (see [14.5] & [25.0]).
[14.4] Re-Attack Rounds
If the submarine has not been sunk, withdrawn, or forced to RTB (Return to Base), it can choose to engage the convoy or task force a second time. The TDC markers from the first round are removed and mixed back into the draw pool. Revealed Japanese units remain revealed.

PROCEDURE
Prior to Re-Attack combat, the player may re-position the submarine to an adjacent column. The player then repeats steps [14.11] through [14.16] followed by a counterattack [14.2], with the following exceptions:
A. Ships with the Rising Sun battle flag must be revealed first (if in columns eligible for revealing). Only when all Rising Sun flags have been revealed may a “red ball” flag be turned over.
B. If equipped with Radar (10/1943 to War End), the submarine may not “unflip” a Japanese unit that was revealed in the first attack round. In the Re-Attack round, one is subtracted from every TDC marker except for any –3 markers. This represents the submarine maneuvering for a better shot.
[14.41] The first Re-Attack is at the player’s option. A second Re-Attack may only occur if the player has a Super Skipper on the submarine and rolls equal to or less than the Super Skipper’s rating.
[14.42] Once a second Re-Attack is concluded, combat ends.
[14.5]
Super Skipper Determination
If the submarine has sunk three (3) or more ships totaling 16,000 or more tons during the Combat Phase, the submarine has a “Super Skipper.”
• If the submarine does not already have a Super Skipper, a Super Skipper marker is randomly drawn and assigned to that submarine with the +1 side of
Combat Example
[14.15]: USS Spearfish (6-3-4) has Whitaker (+1) as her super skipper and is in standard (posture) combat against two 2-0, one 1-0 cargo ship, and one revealed 7-1 destroyer. The first 2-0 cargo ship has a TDC value of –2 but is in an adjacent column, the second 2-0 cargo ship has a TDC value of +1. The third 1-0 cargo ship has a TDC value of 0. The player assigns 3 attack points to the first cargo ship (TDC -2) and 3 attack points to the third cargo ship (TDC 0). The player does not target the second cargo ship or the destroyer. Total attack points assigned: 6. [14.16]: Given a current Mark XIV torpedo value of minus (–1). The player calculates the following attacks:
Merchant Ship #1 is the 2-0 in the Adjacent Column:
a) 3 attack points + 1 super skipper point + torpedo value –1, for a total of (3+1+[-1]) = +3.
b) 2 defense points + 1 revealed escort + TDC –2, +1 for being in an adjacent column for a total of (2+1+[-2]+1) = +2
c) The player must roll equal to or less than 1 (3 - 2 = 1) to hit this target. (20% chance of hit)
Merchant Ship #3 is 1-0, Same Column:
a) 3 attack points + 1 super skipper point + torpedo value –1 for a total of (3+1+[-1]) = +3.
b) 1 defense point + 1 revealed escort + TDC 0 for a total of (1+1+0) = +2
c) The player must roll equal to or less than 1 (3 - 2 = 1) to hit this target (20% chance of hit).
[14.2]: As above in War Period 2 in the East China Sea with a general ASW level of 1. The player calculates the following counterattack:

a) 1 revealed ASW +3 red boxes in the Area Activity Chart +1 general ASW level = +5.
b) 3 submarine defense points +1 Super Skipper = +4.
c) The player consults the ‘1’ line of the Counterattack Table (5-4=1).
the marker.
• If the submarine already has a +1 Super Skipper, the Skipper is flipped to the +2 side.
• If the submarine already has a +2 Super Skipper there is no additional benefit.
See Super Skippers [25.0] for additional rules.
[14.6]
Sub vs. Sub Combat
If the Search & Contact Phase resulted in an encounter with an enemy submarine, conduct the following steps:
A. If a Wolfpack is involved, randomly select one of the player submarines to encounter the enemy submarine. The other submarines are not involved, though this does not affect belonging to the Wolfpack.
B. Make a die roll, -1 drm if the submarine is Spotted, -1 drm if the submarine is Damaged, and +1 drm if the submarine has radar (10/1943 to War End). If the result is 0-2 the enemy has spotted the player submarine first. If the result is 3-9 the player has detected the enemy first.
C. Consult the Enemy Submarine Table [30.3] in the scenario book to determine what enemy submarine pieces are available based on date and OpArea. The player randomly draws one of these from a cup. Place the submarine which detected the other first in the Submarine Box of any column on the Combat Display and the detected submarine in a Target Box of the same column. Draw and reveal a TDC marker for the target submarine.
E. Conduct one attack round using Standard Attack Posture. Total the following for the attacking submarine:
1. Its Attack Rating
2. Any Super Skipper value.
3. Subtract one (1) if in Shallow Waters [2.1].
4. Subtract one (1) if in a Tropical Storm
5. Subtract two (2) if in Typhoon.
6. The current Mk-XIV Torpedo value:
• Allied submarines use the current value of the Mk-XIV torpedo unless assigned another torpedo value by scenario rules (Dutch, British and French).
• Japanese torpedoes have a value of -2 (Note: they were notoriously poor against submarines)
• German, and Italian torpedoes have a value of +1. Total for the target Submarine
1. Its Defense Rating
2. The TDC marker value (Remember, adding a negative number is the same as subtracting it.)
3. Any Super Skipper value.
F. Subtract the target’s value from the attacker’s value (round down) to get a result and roll a d10. If the roll is = or < than the result (difference), the target has been hit. If the target submarine is hit, consult the 1-4 row of the Attack Results Table and roll a d10 adding the torpedo value from [14.6E] above, -1 drm if the attacking submarine is US or British. If the player submarine is sunk, advance the Subs Lost marker by one.
If an Axis submarine is sunk, advance the Ships Sunk marker by one and the Tonnage Sunk marker by the appropriate amount.
Sub vs. Sub Combat ends following a single combat round. There is no Counterattack or Re-Attack round.
Historical Note: 15 Japanese Submarines and 1 German U-Boat were lost to allied submarines in the Pacific (13 to U.S. and 2 to British). Only 1 U.S. Submarine was confirmed lost to a Japanese submarine, the Corvina (SS-226), to I-176 on 16 November 1943.
[14.7] Endurance Check COMMENTARY
There are four key elements to keeping a World War II warship at sea: Fuel, victuals, crew, and weapons carried or, in naval terms, loadout. During the Pacific War, given the small number of torpedoes carried (12 to 24), and the problems with the Mk-XIV torpedo, the most often encountered limitation was the torpedo loadout.

PROCEDURE
After the Combat Phase, all Patrol side submarines must roll a die to see if the submarine has expended its loadout of torpedoes or is running too low on fuel or other consumables. To do this, the player cross-indexes the submarine’s Endurance rating with the current value of the Mk-XIV torpedo on the Endurance Table, and rolls a d10, -2 drm if the submarine bypassed the Search & Contact Phase [13.1], but did not voluntarily RTB [15.21], -1 drm if the submarine encountered no enemy contacts, +1 drm if the submarine is Damaged (including from weather ([7.21]), and +1 drm if the submarine was given an Attack Posture of “Aggressive” (see [14.12]).
• If the result is > than the number indicated, the submarine involuntarily RTBs [15.22]. Place an involuntary RTB marker on it, and moved it to the "Done" section of the OpArea it is in.
• If the result is = or < than the number, place the submarine in the “Done” section of the OpArea.
[14.8]
Clean-Up
Return the Japanese units and Combat Event markers to the appropriate cups. If any of the ships that are italicized on the War Mix Table were sunk, they are removed from the game and not placed back into the cups. Remove TDCs from the combat display and return them to the draw pool.
[15.0]
TRANSIT MOVEMENT PHASE
Transit Movement is the only way a submarine may move to and from a Base. Submarines move along the light blue lines connecting OpAreas. Submarines performing Transit Movement are placed on their Transit side. There are two types of Transit Movement:
• Deployment
• Return to Base (RTB)
[15.1] Deployment Transit Movement
From a Base to an OpArea, OpArea to OpArea or Base to Base
During the Operations Segment a submarine starting in the Ready for Sea Box of a Base may (player's choice) move any number of OpAreas up to its speed. Note: departure from a permanent base to an adjacent OpArea is counted against its speed rating, while departure from a Special Mission Zone (SMZ) base to a connected OpArea is not since the SMZ is considered to be “in” the OpArea
Perform a Transit Event check [19.1] for the submarine using the OpArea with the lowest number on the line for the current War Period which contains a red box through which the submarine moved. Do not use the OpArea from which the submarine started. If the submarine survives undamaged, place it in the “Done” section of the ending OpArea. The submarine remains Transit side up if it intends to transit further next turn, or flips to its Patrol side if it intends to patrol next turn. Once in patrol status a submarine may never enter transit status again unless it is returning to a base (RTB).
[15.11] In the following turn(s), a non-RTB Transit side submarine repeats transit movement (and Transit Event roll). A submarine may never move farther from any active base than its range value.
[15.2]
Return to Base (RTB)
From an OpArea to a Base, either voluntarily or involuntarily as a result of Combat or Transit events
Submarines may voluntarily RTB or be forced to RTB from a Combat result, a transit event, or by the Endurance Table. Submarines marked with an RTB marker can never return to patrol status without returning to a Base first.
[15.21] Submarines may only choose to voluntarily RTB by having skipped the Search and Contact and Combat Phase [13.1]. Flip the submarine to its Transit side, place a voluntary RTB marker on it and leave it in the "Operating" section of the OpArea it is in. These submarines will Transit move in the same turn.
[15.22] A involuntary RTB from a Combat result, a transit event, or the Endurance Table forces the submarine to enter RTB immediately. A submarine entering involuntary RTB remains on, or is flipped to its Patrol side, has an involuntary RTB marker placed on it, and
is moved to the "Done" section of the OpArea it is in. These submarines flip to their Transit side during the Conclude Turn Phase and will move in the next turn’s Transit phase.
[15.23]
RTB Transit Movement
During the Transit Movement Phase, the submarine is moved via OpAreas to a destination Base as directly as possible within its range value. If undamaged, the submarine is placed in the Broom Box. If damaged, it must determine the level of damage before being placed in a Repair Box. (See Damaged Submarines 18.1). The following bullets apply to all RTB movement, voluntary and involuntary.

• If the submarine is moving from an OpArea to an adjacent Base (such as from the Hawaiian Islands to Pearl Harbor), no Transit Event roll is made.
• If the submarine cannot return to base in one move, it is moved to the closest OpArea it can reach and placed in the "Done" section of that OpArea. During the Transit Movement Phase of the following turn(s), the submarine repeats Transit Movement until it can be moved to the Broom or Repair box of the destination Base. Conduct applicable Transit Events. Perform a Transit Event check [19.1] for the sub using the OpArea with the lowest number of red boxes for the current war period in the OpAreas passed through.
[15.24]
RTB to Dutch Harbor
Note: Operations out of Dutch Harbor were extremely difficult on submarines and crew. Frigid temperatures resulted in extended repairs and increased wear on machinery. Turnarounds on submarine deployments sometimes exceeded a month. Any undamaged submarine which RTBs to Dutch Harbor must make a roll on the Damage Table. Any results of Repair 2 or Repair 3 are changed to Repair 1.
[15.25]
Cautious Transit
A submarine performing Transit movement may choose to move a single OpArea instead of at a higher speed in order to reduce vulnerability to patrolling ASW assets. If a submarine chooses to move one OpArea, subtract one from the Transit Event check [19.1].
[15.26]
Submarines Beyond Range of a Base
Submarines may not move beyond their range (in OpAreas) from any base. However, some events may precipitate a submarine being out of range of a base (such as fall of a base). A submarine that is discovered to be out of range of a base is damaged and must RTB to the nearest base at a speed one less than its printed speed (never less than one). Note: The crew is operating the boat using long range cruise methods such as single engine, slow speeds, and such
USS Swordfish (SS-193) a Sargo-class submarine was the first American submarine to sink a Japanese ship during World War II, the cargo ship Atsutasan Maru (original JANAC reported name, Awakisan Maru), 9,794 tons. The submarine was lost on (or about) 12 January, 1945 in the vicinity of Okinawa either by depth charges or a mine. Swordfish earned eight battle stars for its World War II service.
[16.1]
CONCLUDE TURN PHASE
Check Victory Conditions
Check victory conditions for victory or defeat. If either is achieved, play ends immediately.
[16.2] Check for possible Typhoon Damage (as per the last bullet of [7.21] under Typhoon).
[16.3]
Marker Removal
A. Spotted: Roll a die for every submarine at sea with a Spotted marker on it, subtracting the rating of the sub’s Super Skipper if it has one. On a die roll of 0 through 6, remove the Spotted marker. On a die roll of 7 through 9, the submarine remains spotted (See also Effects of Weather [7.21] on spotted). Only one roll is made for a spotted Wolfpack; the entire pack either remains spotted or has all the markers removed. Upon entry to a Base, Spotted markers are removed.
B. ULTRA: Remove ULTRA marker(s) from the map.
C. RTB: Submarines on their Patrol Side with a RTB marker in a Done section of an AAC are flipped to their Transit side, keeping the RTB Marker. They move in Transit Phase of the next turn.
D. Determine effect of weather on submarines [7.21].
E. Weather Markers: Remove as per [7.22].
[16.4] Advance the Week marker, and the Month/Year markers as needed.
[17.0] WAR PROGRESS PHASE COMMENTARY
Silent War assumes the inevitable defeat of Japan as a key underlying component to the game system. The game scenarios portray the Pacific War in four distinct periods: W1—Pearl Harbor to Midway, W2—Midway to the End of the Solomons Campaign, W3—Solomons Campaign to Leyte Gulf, W4—Leyte Gulf to Tokyo Bay. The periods however, will not follow the historical dates precisely. While some of this is arbitrary, it is felt that these time frames roughly parallel the change in Japanese naval and shipping movements upon which the Area Activity Charts and Search and Contact processes are based.
PROCEDURE
The War Period marker begins the game set on the War Period Track, according to the scenario instructions. At the beginning of months marked with numbers in their boxes on the War Period Transition Table, the player must determine if the War Period advances. Conduct the following steps:
A. Consult the “War Period Modification Table”. Ships & Tonnage Sunk totals can advance the progress of the war or retard it. Under the section for the next war period, cross-index the Ships Sunk and the Tonnage Sunk to determine the modification, rounding DOWN unless already at the lowest level. This will give the player a modifier for use in the next step.
B. Consult the “War Period Transition Table” and roll a die, adding the Step A modifier. If the result is = or > than the number in the box, the War Period advances.
C. If the War Period fails to advance, another attempt may not be made until the beginning of the following month
D. If the War Period advances, re-sort the War Mix [3.1] as per the War Mix table for that War Period.
[17.1] Automatic Advance
If the War Period has not advanced by the time all numbers for transition have been attempted (November, 1942 for example), the War Period advances automatically.
USS Salmon (SS-182) Damage Chart. In September 1944, Salmon was heavily damaged during a depth-charge attack. Despite her damage, she surfaced, engaged the enemy, and drove them off. This action earned the submarine a Presidential Unit Citation.

[18.0] DAMAGE
[18.1] Submarines
Submarines may be “damaged” by Transit Events, weather, or during combat. If damaged, a Damage marker is placed on the submarine. The actual level of damage is determined when the submarine reaches a base.
[18.11] Upon arriving at a Base, damaged submarines must roll one d10 on the Damage Table. The results of this die roll places the submarine in one of the Repair Boxes or into the Broom Box.
[18.12] Should a submarine receive a second Damage marker, a die is rolled:
• If the die result is > the Defense rating of the submarine, it is sunk. Advance the Submarines Sunk marker by one (1).
• If the sub is not sunk, place a second Damage marker on the sub. When the sub reaches base, determine its damage level (see 10.0 Repair Phase) by rolling twice on the Damage Table and adding the resulting Repair Box numbers. If the total damage of the sub would place it beyond Repair Box “3”, then the submarine is considered a “Constructive Total Loss.” It is removed from play but it does not count against the submarines sunk.
[18.13] Should a submarine receive a third Damage marker, it is sunk. Advance the Submarines Sunk marker by one (1).
[18.14] The player may 'Decommission' a submarine on the Repair Track or in the Holding Box at any time. The submarine is removed from the game but is not counted as “lost.” If the submarine has a Super Skipper, determine if he is assigned another submarine as per [25.3].
[18.2] Surface Ships
Surface ships can be damaged as a result of submarine attack. The ASW value of a ship with a Damage marker is zero (0), and a -1 drm is applied to the target value during the Combat Phase. If a damaged surface ship survives all combat (that is, it is not sunk), then the damage has no further effect. Remove the Damage marker; the ship made it to port (see also IJN [3.5]).
COMMENTARY
For good or bad, combat, whether between divisions, brigades, ships, or aircraft, is governed by that intangible element called fate. Submarine warfare is particularly susceptible to it. Napoleon, the master opportunist, was once asked if given the choice of choosing between a good general or a lucky general who would he take? he replied, “L’on fortuné, chaque temps!”— The lucky one, every time! Admirals Christie and Lockwood would no doubt have agreed wholeheartedly with him.
At various times throughout the game, events will be summoned by the game system. Players must immediately resolve these events as they have immediate consequences for the submarine(s). There are two types of events, Transit Events and Combat Events.
[19.1] Transit Events
Transit Events reflect instances where submarines were spotted and attacked before they were aware of the attacker’s presence, or the loss of a submarine due to “causes unknown”. These could include being torpedoed by an undetected Japanese submarine, attacked by an aircraft, striking a mine, or simply accidental loss such as a battery explosion, or a catastrophic mechanical failure. A Transit Event check occurs during Transit and Patrol Movement any time a submarine enters an OpArea or SMZ.
PROCEDURE
Every time a submarine completes Transit or Patrol Movement the player performs a Transit Event check. The Transit Event is based on the governing OpArea. The governing OpArea is determined in the following manner:
• For Patrol Movement, use the OpArea the submarine has moved into.
• For a Special Mission Zone, use the OpArea from which the submarine entered the Special Mission Zone.
• For Transit Movement, use the OpArea with the lowest number on the line for the current War Period which contains a RED box through which the submarine moved. Do not use the OpArea from which the submarine started.
If there are no RED results on the War Period line, no Transit Check is required (see also Effects of Weather [7.21]).
If a Transit Event check is required, roll a d10 for the submarine and apply the following cumulative modifiers:
• -1 drm if the submarine is Transit side up (i.e. not performing Patrol Movement).
• -1 drm if the submarine is conducting Cautious Transit [15.25].
• -1 drm if the submarine is a member of a wolfpack [24.4].
• +1 drm if the submarine is Spotted during War Periods 1 and 2 [23.0].
• +2 drm if the submarine is entering a Special Mission Zone (SMZ) [20.3], or if entering/leaving the Sea of
Japan [7.1] (exception [7.11]).
• +1 drm or more for Congregating Risk [22.1].
• +1 drm if in Narrow or Shallow OpArea until Radar Equipped.
• When the Sea of Japan OpArea contains an ULTRA marker, Transit Event Check die rolls are subject to a +1 drm instead of the normal +2 drm.
If the die roll = or > the number at which red results start, the player has encountered a Transit Event. The player now rolls again twice on the Transit Event Table to find the row and column and cross-references the result. The result is applied immediately.
[19.11] If a submarine receives an involuntary RTB result (regardless of whether it is already in RTB), the submarine is placed in the Done section (as per [15.22]) of the OpArea used to determine the Transit Event check. If more than one OpArea could have been used (lowest number on the Area Activity Chart which contains a red box is the same), the submarine is placed in whichever OpArea the player decides.
[19.2]
Combat Events
Each cup contains one chit marked “Combat Event.” When an Event chit is revealed, play is momentarily stopped and the Event is immediately resolved. The results of the Event supercede the rules in all cases.
PROCEDURE
Upon revealing an Event chit, roll a die and consult the Combat Event Table on the following two pages. Implement the effects listed.
• The Event is applicable to a single attack round (exception: Event 5, Deadly Division)
• Only one Event can occur per attack round.
COMBAT EVENT TABLE: Next 2 Pages
The Torpedo Data Computer (TDC) was an early electromechanical analog computer used for torpedo fire-control on American submarines during World War II. Although Britain, Germany, and Japan also developed automated torpedo fire control equipment they were not as advanced as the US Navy's TDC as it was able to automatically track the target rather than giving an instantaneous firing solution.

The use of the US Navy's TDC was an important factor in the successful commerce raiding program conducted by American submarines during the Pacific campaign of World War II.
The model shown above is a Mark II from the USS Bowfin (SS-287), a Balao class submarine of the United States Navy. Bowfin is a museum ship at Pearl Harbor, Hawaii.
Note: In the case of Events 2 (Torpedo Malfunction) and 5 (Cui Favet Fortuna?), a second die roll is needed to determine the exact procedure to follow.
Target Lumbers into Way
A Japanese ship suddenly crosses the path of one or more torpedoes. Conduct the Combat Phase normally, but prior to conducting the first attack round (14.1), choose any face down “red ball” flagged ship in this or an adjacent column, reveal it, and determine if it is sunk. To do this, roll a die and add the current torpedo value on the correct target size line of the Attack Results Table. Continue the attack round normally. If no eligible ships are on the display, ignore this Event. Note: A Diligent Escort revealed this way does not get to roll on the Counterattack table as if revealed in [14.13]
Surface Gunnery Combat
The submarine surfaces to engage in gun combat. (this event is ignored if the submarine is Spotted or the OpArea contains a Typhoon. If the OpArea contains a Tropical Storm, roll a d10. If the roll is 2 - 9, ignore the event). Conduct the Combat Phase normally but instead of the attack round perform the following steps:
A. Place a Spotted marker on the submarine.
B. Choose any revealed Japanese merchant/transport piece in this column and attack it using a die roll on the 26-35 line of the Attack Results Table (Argonaut, Nautilus, and Narwhal use the 18-25 line, Surcouf uses the 10-17 line, and Leviathan uses the 5-9 line). The value of the Mk-XIV torpedo is NOT applied to the result. If there is no revealed merchant/transport piece, or if there is a revealed IJN unit (aircraft, DE, DD, CL, AC, CA, BB, BV, Carrier or a Diligent Escort), this event is ignored. When finished, proceed to the Counterattack Round. Note: Ships with an ASW value of Ø have an ASW value of 1/2 during the Counterattack Round.
Torpedo Malfunction
Roll 1 (d10) die to determine the type of malfunction and effect on combat
0, 1, 2 - Circular Run: A torpedo runs in a circle back toward the submarine. Conduct the Attack Round normally, but additionally conduct an attack on your own submarine. To conduct this attack, the player adds one to the current Mk-XIV torpedo value and a specially drawn TDC marker (adding a negative number is the same as subtracting), and rolls a die. If the die roll is = or < the result, the submarine is sunk. If the submarine survives proceed to the Counterattack Round. Note: If able, a submarine may attempt a crash dive [28.2] to avoid its own torpedo. If crash diving is unsuccessful, the submarine must still attack itself.
3, 4 - Hot Run: A torpedo starts and arms in the tube, but is not released into the water. The torpedo is NOT fired, the current attack round is cancelled. Proceed to the Counterattack round. The submarine is still eligible for a subsequent combat next round.

5 - Premature Detonation: A torpedo detonates just outside the hull during firing. The submarine’s attack value is halved for the current attack round due to emergency repair party activities in the torpedo room. Roll a d10 die. If the die roll is zero (0), the submarine is sunk, if the roll is = or > the submarines printed defense value the submarine is damaged, other wise no effect. If the submarine has a Super Skipper, +1 drm to the die roll. If not sunk, conduct the Counterattack round adding one (1) to the ASW value (the detonation aids in localizing the submarine).
6 - Dead Torpedo: The torpedo has suffered a major malfunction without danger to the submarine. The submarine’s attack value is halved (round down) for the current attack round due to corrective activities in the torpedo room. Conduct Counterattack round as normal.
7, 8, 9 - Close call: Things got tense, but the crew pulled through. The current attack round is canceled including the counterattack. The submarine is still eligible for a subsequent combat next round.
Japanese Patrol Bomber Spots Submarine
The submarine is spotted and attacked by a Japanese Patrol Bomber. If able, attempt a Crash Dive [28.2]. If unsuccessful, roll a die immediately on the “Event Aircraft” line of the Counterattack Table and apply the results. Proceed to the Endurance check. If in Tropical Storm or Typhoon ignore this event.
Mechanical Troubles End Attack
The submarine encounters mechanical trouble. There is no Combat Phase for the submarine this turn. Roll a die:
• If an odd result, place a Damage marker and an RTB marker on the submarine and it involuntarily RTBs ([15.22]).
• If an even result, the chief engineer fixes the problem and the submarine may resume normal operations next turn. Place the submarine is the "Done" section of the OpArea. (It does not have to roll on the Endurance Table for this turn).
Cui Favet Fortuna? (Whom does Fortune Favor?)
One side or the other has fortune smile upon them. If this event occurs, roll a d10 die to determine the type of fortune affecting combat
0 - 4 Perfect Setup: The submarine approach was perfect. Proceed normally except that all TDC markers for this round have negative values. (i.e., treat all “+” as “-”.)
5 - 9 Deadly Division: The submarine has encountered a deadly Diligent Escort Division. All Diligent Escorts that are revealed after this event occurs in this and all subsequent rounds during this attack remain in play.

Tonnage Doubled
The skipper spots a fat target. At the end of the Combat Phase, double the tonnage of the largest merchant ship sunk. If this event is drawn again (or multiple times) in a subsequent round, double the tonnage of the next largest ship(s) as well.
Counterattack - Combat
The sequence of combat is altered for this round only. Once all targets are revealed normally, including unrevealed flags with TDCs that are being targeted, the escorts attack first. If not sunk or forced to RTB, the submarine attacks the surface ships. Conduct the initial attack round ([14.11] thru [14.15]) then skip to the Counterattack Round [14.2]. If the submarine is not sunk or forced to RTB, it may then attack normally as per [14.16]. Note: This event represents the submarine being discovered but the skipper not realizing it and getting a little surprise while intently focused upon a target ahead.
Counterattack
Escorts detect the submarine making its approach and hold it down. Resolve as per Combat Event #7 except the submarine cannot make an attack. If this event occurs to a Wolfpack, the other submarines in the Wolfpack that have not yet attacked and which have revealed escorts in the same or an adjacent column may not attack this round. If not, they may attack normally.
Combat - Combat
The submarine eludes all escorts and attacks the surface ships. There is no Counterattack, and the submarine gets an extra free attack before proceeding to [14.3]. There is no -1 modifier to the TDCs for this free attack unless this event is drawn during a re-attack round.
[20.0] SPECIAL MISSION ZONES (SMZs) COMMENTARY
Often, submarines were co-opted by higher levels of command for special missions. In these cases, they were not available for normal combat operations. Fortunately, special missions tended to be of short duration and the co-opted subs were quickly returned to regular duty.
Special Mission Zones (SMZs) are the circular areas on the map without Area Activity Charts in them. These areas are where submarines carried out special missions such as covering invasions, inserting supplies and guerillas, supporting major surface battles such as searching for downed airmen, or barring enemy ship movement through a particular geographic location. These SMZs see intensive activity by enemy surface forces thus increasing both the chance to contact and engage targets as well as increasing the danger of detection and ASW attack.
[20.1] SMZs may not be entered unless they have been activated on the War Event Table. Individual SMZs are activated by a die roll on the Table during the War Event Phase [5.0] and are activated for only a single turn. SMZs are linked by a light blue arrowhead to one or more OpAreas. SMZs may only be entered via a linked OpArea.

[20.2] When assigned to an active SMZ, allocated submarines are exempt from Congregating Risk (see 22.0) in that OpArea.
[20.3] Once in an OpArea a submarine may be repositioned to an active SMZ that is connected by a light blue arrowhead to that OpArea. Movement into an SMZ requires a Transit Event check (separate from any Transit Event Check from OpArea to OpArea movement just performed) with a +2 drm, using the Area Activity Chart of the OpArea from which the submarine entered the SMZ.
[20.4] When in a SMZ, the submarine conducts the mission given by the War Event. If it is a Search and Contact mission, use the Area Activity Chart belonging to the OpArea from which it entered into the SMZ. All die roll results on this Area Activity Chart are increased
by one Activity Level. Thus, Sparse becomes Low, Low becomes Moderate, Moderate becomes High. High remains High and No Contact remains No Contact. Other results may apply as directed by the War Events
Table.
[20.5] Submarines in a SMZ skip the Endurance check [14.7] unless otherwise noted. These submarines must conduct voluntary RTB movement [15.21] in the Transit Movement Phase of the current turn. They may not RTB to any newly created Submarine Base (Tender or Base) in that SMZ as the Base does not become active until the War Progress Phase of the turn.
[21.0] BASES
Bases are where submarines start and end missions (unless they are sunk during the mission). There are six major Bases in the game: PEARL HARBOR, FREMANTLE, BRISBANE, MANILA/SUBIC BAY, DUTCH HARBOR and TRINCOMALEE for the British. Major bases are represented by Base Displays on the Map. Of the major bases, only Pearl Harbor is continuously active throughout the war. The others become active and/or inactive due to a War Event as follows:
• Manila - Active at War Start. Inactive on War Event.
• Fremantle - Active on War Event.
• Brisbane - Active on War Event.
• Dutch Harbor - Active on War Event. Inactive on War Event.
• Subic Bay - Active on War Event.
• Trincomalee - Only Used for British Scenarios
[21.1]
Forward Bases
The remaining bases are Forward Bases that are represented on the map by Submarine Tenders in SMZs. These bases are:
• Surabaya - Active on War Event. Inactive on War Event.
• Midway - Active on War Event.
• Majuro - Active on War Event.
• Mios Woendi - Active on War Event.
• Saipan - Active on War Event.
• Guam - Active on War Event.
[21.11] Once active, a Forward Base SMZ may no longer be the target of a Special Mission unless inactivated by a War Event. Submarines moving to a Forward Base do not add +2 to their Transit Event check as per [20.3].
[21.2] Submarine Tenders
Support Capacity/Entry Date
Submarine Tenders are specialized ships that support submarines in forward areas, providing fuel, torpedoes, food, and other supplies. They lacked the capabilities of a full base but could conduct minor repairs and provided valuable service in extending the time a submarine could operate far from its home port.
[21.21] When a Forward Base is made active by the War Event Table, the player randomly selects a submarine tender and places it in the SMZ in the War Progress Phase of the turn unless otherwise noted. A tender may not be added to the draw pile until its deployment date, which is printed on both the counter and the submarine tender display.

[21.22] A submarine tender’s support capacity is listed on the Submarine Tender card and on the Tender counter. This is the maximum number of submarines that can be in the tender’s Broom, Shipside, and Ready for Sea Boxes at any one time. If the tender is at maximum capacity, no additional submarines may RTB to that tender.
[21.23] A damaged submarine may RTB to a Forward Base in an attempt to make minor repairs. Roll immediately on the Submarine Damage Table. If the result is ‘Superficial Damage’, move the submarine to the Broom Box of the appropriate tender. If any other result, move the damaged submarine to the ‘Done’ section of the applicable OpArea, and in subsequent turns it may only RTB to a major base.
[21.24] A submarine tender that is at a base which falls is removed from play but remains eligible to be used for a new base.
[21.3] Bases & Tenders in Typhoons
If a typhoon entered the OpArea containing a tender or an OpArea adjacent to a Major Base, that Tender or Base may not make any repair rolls [10.0] or form Wolfpacks [24.0] that turn..
in its Area Activity Chart for the current War Period, implement the following modifiers for all submarines:
• +1 drm to any Transit Event die roll if the sub is passing through, arriving, or departing. Note: the Congregating Risk die roll is used even if the OpArea where the Transit check is made (the OpArea with the lowest Red box) is not the box with the highest Congregating Risk.
• -1 drm when searching for ships on the Area Activity Chart.
[22.2] The above modifiers are cumulative for additional multiples of four (Example, -1 search penalty and +1 transit roll for five to eight submarines, -2/+2 for nine to twelve, -3/+3 for thirteen to sixteen, etc.).
Note that congregating risk is determined at the instant of checking for (1) Search & Contact, and (2) Transit Event Check. It does not matter how many submarines were in an OpArea earlier in the turn; only how many there are now at the moment the check is required.
[22.4] Wolfpacks & Congregating Risk
Every two (fractions rounded up) submarines in a Wolfpack [24.0] count as one submarine for purposes of Congregating Risk.
[23.0] SPOTTED EFFECTS
[22.0] CONGREGATING RISK COMMENTARY
One of the greatest risks for submarines not operating as a Wolfpack or assigned to special missions was congregating a great number of them in an operating area. First, the radio traffic often alerted the Japanese to increased activity, and second, the activities of one submarine might unexpectedly draw enough attention to reveal another. Just such an effort in 1943 caused a rapid rise in submarine losses prompting the shorebased commanders to stop “playing checkers” with the boats.
There is no limit on the number of submarines that may be in an OpArea. However, as their numbers increase, the liabilities of increased submarine activity take effect.
[22.1] For each multiple of four submarines beyond the first four in an OpArea with RED or BLUE boxes
A spotted submarine has greater difficulty locating the enemy (as the enemy is avoiding the area the reported submarine is in) as well as experiencing an increased risk of encountering Japanese escort forces. When spotted during War Periods 1 and 2, -1 drm from any rolls on the Area Activity Chart and +1 drm on any Transit Event rolls. Spotted also affects sub-vs-sub combat [14.6 B], prohibits targeting an escort [28.41 A] and prohibits surface gunnery [19.21 #1]).

Spotted submarines also have +1 drm in all war periods when rolling on the Counterattack table per [14.2]. [23.1] Additional Spotted markers have no effect. If a submarine that is already Spotted receives a Spotted result, no action is taken.

COMMENTARY
Despite the early successful use of operationally coordinated submarines by the Germans (called Wolfpacks, a term not universally adopted by U.S. submarine forces) the United States was loath at first to emulate this tactic for various reasons ranging from tactical ones to psychological ones. (The United States had, after all, been brandishing the sword of indignant rage at the Germans for their unrestricted submarine warfare and for the use of “Wolfpacks”.) However, by the spring of 1943, Jimmy Fife, commander of submarines in Brisbane, was willing to give it a try. It would take some time for the Americans to develop the skill necessary, but by mid-1944, American Wolfpacks were accomplishing what the Germans could only dream of.
PROCEDURE
A Wolfpack may only be formed with U.S. Submarines at a Major Base (not a Forward Base). All units that participate in a Wolfpack must start out from their Base at the same time and must arrive in the Wolfpack’s OpArea at the same time. All Wolfpack submarines are placed under a Wolfpack marker. Submarines may leave a Wolfpack at any time but once a submarine has left a Wolfpack, it may not re-join it at sea later. The minimum number of submarines a Wolfpack may have is three (3).
[24.1]
Wolfpack Formation
Starting in October 1943, Wolfpacks may be formed. The submarines chosen must all be in the Ready for Sea Box.
[24.11] Prior to the Wolfpack Experience marker reaching nine (9) (See Wolfpack Experience [24.7]), the following restrictions are in effect:
• A player may only deploy one wolfpack at a time.
• Wolfpacks may not exceed three (3) submarines.
[24.12] The turn after the Wolfpack Experience marker reaches nine (9), the following restrictions are in effect:
• A player may deploy up to three Wolfpacks at a time.
• Wolfpacks may not exceed four (4) submarines.
[24.13] The turn after the Wolfpack Experience marker reaches fifteen (15), the following restrictions are in effect:
• A player may deploy up to five Wolfpacks at a time.
• Wolfpacks may not exceed six (6) submarines.
[24.14] Disbanding
A Wolfpack which falls below three submarines ceases to exist at the end of the Combat Phase in which the pack fell below three. The other two (or one) submarines may continue to attack together for the current phase only. If the Wolfpack falls below three members due to a Transit Event or a member failing its Endurance check, the pack is disbanded immediately. A wolfpack is also disbanded when in an OpArea with a Typhoon [7.21].
COMMENTARY
A Wolfpack is more than the sum of its parts. Although a pair of submarines operating together has benefits, it is not sufficient to qualify as a wolfpack for rules purposes.
[24.2] Wolfpacks and Movement
Wolfpacks follow the rules of movement except that all members of a Wolfpack move together as if it were a single unit. Wolfpacks cannot transfer from Base to Base, but they may ‘bounce’ to a new base after spending at least one turn in ‘patrol’ mode.
[24.3] Wolfpack Types COMMENTARY
American Wolfpacks had the boats operate in close proximity to each other. While they covered less area, they were able to quickly deliver a coordinated attack. German Wolfpacks tended to operate in a barrier fashion, often stretching in a line hundreds of miles long. This allowed the Germans to have a higher probability of detecting a convoy, but often resulted in the farther boats being unable to catch it.
Wolfpacks may be deployed in an OpArea or SMZ in two ways: Group or Barrier. The player decides which type he is using prior to the Search and Contact Phase [13.0]. This can be changed in subsequent turns.
[24.31] Group Pack: If deployed in a Group, the pack makes a single die roll on the Area Activity Chart [13.1.A] with no (drm) modifier.
[24.32] Barrier Pack: If deployed in a Barrier, the pack makes a single die roll on the Area Activity Chart [13.1.A] with a +2 drm. If contact is made, one randomly chosen submarine from the Wolfpack is assumed to have made the contact. A separate die roll is then made for each additional submarine in the pack to determine if it is able to intercept as well. On a roll of 0-5 the submarine is able to intercept. On a roll of 6-9 the submarine is unable to intercept and is set aside (but is still in the Wolfpack). This could result in only one or two members of the pack being able to attack. Note: at the conclusion of the turn, all surviving Wolfpack submarines (including those that did not intercept) are placed in the “Done” section of the OpArea. Additionally, submarines that did not attack do not have to do an endurance check [14.7].
[24.4]
Wolfpacks and Transit Events
Each submarine of a Wolfpack must undergo Transit Events. Each member must roll separately for Transit Events as normal, however each Wolfpack member subtracts one (-1) from the Transit Event die roll. Should a Wolfpack member encounter a Transit Event, the remaining die rolls to resolve that Transit Event are normal, unmodified rolls.
[24.41] A member of a Wolfpack sustaining a RTB/ Damaged result must drop out of the Wolfpack and involuntarily RTB [15.22]. This may force a Wolfpack to disband.
[24.5]
Wolfpacks and Combat
Wolfpacks conduct combat with with all eligible members (see [24.32]) on the Combat Display. The player may freely assign submarines to the columns, but no more than two subs per column.
[24.51] If a Diligent Escort counter is drawn, its attack is made on a randomly chosen submarine prior to placing it in its proper column.
Combat Events [19.2] only apply to the submarine that reveals the event chit except for Event 5, Cui Favet Fortuna? Deadly Division: additional Diligent Escorts apply to all submarines.
[24.53] Combat is conducted normally except as noted below. Each submarine resolves its attack and counterattack individually (one at a time). The following sequence is used:
A. Assign subs to columns (max two per column).
B. Starting with the sub of your choice, reveal Japanese units per [14.13].
C. With the same sub, place TDC markers per [14.14].
D Make the attack with that sub, utilizing the current Revealed Escort level [24.54].
E. Resolve the counterattack on that sub.
F. Return to step (B) with submarine #2, and so on. Due to Wolfpack coordination, all attacks by Wolfpack submarines have a +1 drm to the attack results die roll.
[24.54] Revealed Escort Level
Each submarine will have its own Revealed Escort level, which applies to the attack and the counterattack.
• If a submarine has an escort in its column, the escort’s ASW factor is applied to that submarine.
• If a submarine has an escort in an adjacent column, and no submarine is in that column, the escort’s ASW factor is applied to that submarine.
The ASW level of an aircraft is applied to all submarines regardless of column.
Note: this can result in the ASW factor of an escort vessel being applied to up to four submarines.
[24.55]
Re-Attack
Wolfpacks may Re-Attack once but never twice (coordination breaks down too much). Each member of the Wolfpack must successfully roll for Re-Attack. Failure of this roll results in the submarine withdrawing [14.3] from the current combat phase, but the submarine is still a member of the Wolfpack. The other submarines in the pack which make their roll may then attack, even if only one or two are re-attacking.
To determine if a Wolfpack can conduct a Re-Attack, roll a die for each member submarine. If the die roll is less than or equal to the tactical rating of the submarine plus any Super Skipper value, it may participate in a Re-Attack. Damaged submarines add two have +2 drm to this die roll. Note: a submarine that withdraws is removed from the Combat Display which may change the Revealed Escort Level applied to any remaining submarines ([24.54]).
[24.6]
Wolfpacks and SPOTTED Results.
Any SPOTTED result obtained by a member of a Wolfpack results in all members of that Wolfpack being spotted. In the Conclude Turn Phase, one die roll is made for the entire pack. If the result is removal of the spotted marker, markers are removed from all submarines in the pack. Otherwise, the entire pack remains spotted.
[24.7]
Wolfpack Experience
When two or more subs in a Wolfpack sink an enemy ship in any one Combat Phase [14.0], the Wolfpack gains a Wolfpack Experience Point. The Wolfpack
Experience marker is increased by one on the tonnage track. A Wolfpack may only gain one experience point per patrol.
• When the Wolfpack Experience marker reaches nine (9), the player’s ability to deploy and assign submarines to Wolfpacks is improved.
• When the Wolfpack Experience marker reaches fifteen (15), the player’s ability to deploy and assign submarines to Wolfpacks reaches its maximum.
[25.0] SUPER SKIPPERS
COMMENTARY
In any military endeavor, there are gifted individuals who rise above their peers to achieve greatness. The Submarine War was no exception. Legendary skippers such as Morton, O’Kane, and Klakring forever established a tradition of excellence for those who would wear silver or gold dolphins in the U.S. Navy. SILENT WAR provides twenty-four named skippers, two of which are Allied skippers, who accomplished great feats of daring. However, behind every great skipper is a skilled, dedicated crew that allows the submarine to perform as a superb engine of war.
[25.1] Super Skipper Determination (see also ([14.5])
• If the submarine has sunk three (3) or more ships totaling 16,000 or more tons during the Combat Phase, the submarine has a “Super Skipper”.
• If the submarine does not already have a Super Skipper, a Super Skipper marker is randomly drawn and assigned to that submarine with the +1 side of the marker.
• If the submarine already has a +1 Super Skipper, the Skipper is flipped to the +2 side.

• If the submarine already has a +2 Super Skipper there is no additional benefit.
[25.2] The Super Skipper normally remains with one submarine and is lost if the submarine is lost.
[25.3] The only time a Super Skipper may be reassigned is if the submarine is withdrawn from service (removed per War Event result), declared a Constructive Total Loss [18.12] or Decommissioned [18.14]. In such an event, roll a die for the Super Skipper. If the result is 0 thru 4, the Skipper is removed from play (re-assigned to training command, a surface warship, or transferred to the War Department). If the result is 5 thru 9, he may be assigned at the +1 level to any submarine currently in a Repair Box, or any submarine next in line to be received as a reinforcement, or returning from an overhaul.
Example: In December 1943, S-42 with +2 Whitaker is withdrawn from active service. The player rolls a die and gets an 8. The player may reassign +1 Whitaker to any sub that is in a Repair Box, or to Redfin, Angler, Flasher, Robalo, Tang, Jack, or Tambor which will be received in January of 1944.
Although there was one Commander of Submarines Pacific, there was, in all reality, two fully functional commands operating submarines against the Japanese; Pacific Command at Pearl Harbor, and SouthWest Pacific Command at the two Australian Bases at Fremantle and Brisbane.
It is possible to play Silent War with two players playing simultaneously, each taking one of the commands. This is not a competitive game between players- it is a cooperative one. The distribution of submarines and the variance of the Area Activity Charts coupled with the distance between the commands and the operational areas make it very hard to artificially balance the game such that two players can “compete” for tonnage. All game rules are followed normally. Both players play each turn using the submarines at their disposal. Transfers of submarines are by player agreement when not specified in the rules.
A suggestion for cooperation might be: Anytime the number of submarines operating from Australia falls below thirty-six, the South West Pacific Commander may demand six of the newest class of submarines available to the Pearl Harbor Command. Players should otherwise balance the distribution of submarines (authorizing transfers as needed) and agree on operating areas. Players are not prohibited from both hunting in the same OpArea but Congregating Risk rules [22.0] apply.
[27.0]
QUICK RESOLUTION [Removed]
The quick resolution rules have been removed from the game. Results over time have demonstrated that they were not effective and they are not compatible with the changes in Silent War 2.0.
[28.0] ADDED RULES
Steel Wolves, Vol 1: The German Submarine Campaign against Britain and its Allies 1939-1943, was the follow-on title to Silent War, and introduced several new concepts to the Silent War system.
Silent War 1.2 formally incorporated three of these rules and in Silent War 2.0, they are now formally given Silent War rule numbering.
The new rules are:
• Loners
• Crash Dive
• Targeting an Escort
Additionally, a new procedure for transitioning from War Period 3 to War Period 4 was introduced and is now incorporated.
Note: As noted in Silent War 1.2, mine laying was not included; the Joint Army-Navy Assessment Committee (JANAC) responsible for determining Japanese losses only assigned six (6) Japanese merchant losses to United States Navy laid mines out of approximately 2,346 total losses for all categories, and hence mines are statistically inconsequential.
28.1 Loners COMMENTARY
Unlike the Atlantic campaign where there were a significant number of ships sailing outside of convoys (loners), the vast majority of Japanese shipping was organized into task force style convoys. However, loners did occur, especially lone warships. This rule introduces the concept of loners from Steel Wolves into Silent War apropos to the Japanese experience.
[28.11]
Determining Loner Contacts
When rolling for contacts on an Area Activity Chart (AAC) War Period row in which there are red boxes and the die roll result is a white box, there is a chance of encountering a loner. On a white box result, roll again. If the second die roll result is a red box on that AAC’s War Period line, a loner has been encountered.
[28.12] If the initial roll is a zero and the second roll is also a zero, there is a Sub vs. Sub contact [14.6].
[28.13]
Setting Up Loner Combat
Use the following procedure to set-up and conduct loner combat.
The Target
If a loner has been encountered, a single playing piece is drawn from one of the cups in accordance with the War Period the player is in:
• WP1: draw from cup A
• WP2: draw from cup B
• WP3: draw from cup C
• WP4: draw from cup D
Place this ship in the column that is associated with the cup from which the counter was drawn (this is for the purpose of remembering which cup the playing piece came from).
The Submarine
Roll one die, subtracting any Super Skipper value from the result and compare it to the submarine’s tactical rating. If the (modified) die roll is equal to or less than the submarine’s tactical rating, place the submarine in the same column as the target; otherwise place it in an adjacent column.
[28.14] Resolving Loner Combat
The player reveals the target unit.
• If the revealed unit is a Combat Event, roll a d10 as per [19.2], but only apply the event if the result is 1, 3 or 4, treating 0, 2, 5, 6, 7, 8, and 9 as “no-event.”
• If the revealed unit is an aircraft the aircraft receives a single counterattack round after which combat ends (may be negated by Effects of Weather [7.21]).
• If the unit is a surface ship (any type) proceed to the Combat Procedure below.
PROCEDURE
Resolve combat normally with the exception that the player may voluntarily invoke Combat Event #1 (Surface Gunnery Combat) unless the loner is a Japanese warship naval unit, the submarine is Spotted, the OpArea
contains a Typhoon, or the OpArea contains a Tropical Storm and d10 roll is not 0-1. Non-warship Auxiliaries (units whose type begins with an "A") may be attacked by surface gunnery.
Re-attack rounds may be used and a Super Skipper may get an additional re-attack as per [14.41]. The player has a -1 drm on the combat Endurance Check at the end of the combat.
[28.2] Crash Dive!
"X" indicates that the submarine cannot crash dive.
The Crash Dive Rating is a rating that gives a submarine a “second chance” against sudden attacks such as from patrol aircraft, diligent escorts, and malfunctioning (circular running) torpedoes. Submarines may not crash dive in shallow waters (see OpArea Restrictions [2.1]).

PROCEDURE
During combat resolution, if a Diligent Escort is drawn, or the Combat Events “#2 Torpedo Malfunction - Circular Running Torpedo” or “#3 Japanese Patrol Bomber Spots Submarine” is rolled, the submarine may attempt to evade using its Crash Dive Rating. Before resolving the Diligent Escort or the event, the player rolls one die, subtracting any Super Skipper rating from the result and comparing the final result to the Submarine’s Crash Dive Rating.
• If the result is = or < to the Crash Dive Rating, the crash dive is successful. Roll on the Diligent Escort
or Event Aircraft Table (as applicable), but change any result except "No Effect" to "Spotted." Circular running torpedoes (Combat Event 2 - 0, 1 or 2) automatically miss a submarine that has successfully crash dived, continue with combat as normal. If diving to avoid a Patrol Bomber, proceed to the Endurance Check (as directed by that Combat Event).
• If the submarine fails the roll, the occurrence (escort or event) is resolved normally, and combat continues normally.
[28.21] Crash Dive Ratings
All Crash Dive Ratings now appear on the Submarine Counters.
[28.3] Japanese Hospital Ships
COMMENTARY
While theoretically all sides tried to avoid attacks on Hospital Ships, there were a number of incidents, including the sinking of the Japanese Hospital Ship Ural Maru by the USS Flasher (SS-249). While such tragedies, intentional or not, occurred, they are still matters of grave concern and there are consequences.
There are two Japanese Hospital Ships in Silent War 2.0: the Asahi Maru and Kiku Maru, which are representative of their type. Should an American or Allied submarine sink one, the ship is counted towards ships sunk but no tonnage is scored. The submarine is marked as an involuntary RTB [15.22] . Additionally, if the Submarine has a super skipper, that skipper is immediately relieved of command and removed from the game. If sunk, the hospital ship is removed from the game.

USS Flying Fish (SS-229) was a Gato class submarine credited with having sunk 15 ships for a total of 58,306 tons tying her 10th place in ships sunk and in the top 30 for tonnage. On 28 August 1942 she sighted the masts of a Japanese battleship now known to have been Yamato guarded by two destroyers and air cover. Flying Fish launched four torpedoes and shortly thereafter heard two explosions, now believed to have been premature detonations. An intensive counterattack immediately followed and she was kept down at depth until clearing the area on the morning of the 29th. Flying Fish received 12 battle stars for its World War II service.

[28.4] Targeting An Escort COMMENTARY
Most successful attacks on escorts occurred when the escort was unaware of the submarine's presence until the torpedo hit (or until the torpedo track was sighted with little opportunity to react). In other words, active ASW was not occurring during the attack. The escort generally was steaming at slow speed with the convoy or task force, and perhaps changing station with eyes more interested in keeping out of the way of the bigger ships. This option allows a 10% or 20% improved chance of hitting one escort in line with historical occurrences. Nonetheless, the escort’s high defense value must still be overcome and the submarine will still need a good TDC solution.

A submarine can target one (1) DD or DE escort and that escort's ASW value is not counted as part of the defense of that unit. The ASW values of any other revealed escorts ARE counted. The option may be utilized if the player fires at an unrevealed target but which later turns out to be an escort, so long as only one escort in total has its ASW value ignored. If the escort is damaged or sunk, its ASW value is not used in the counterattack round.
Note: This rule applies only to the first attack round (but not the re-attack).
[28.41] Restrictions:
This option cannot be utilized if any of the following conditions exist:
A. The submarine is SPOTTED.
B. A Diligent Escort has been revealed.
C. An aircraft has been revealed.
D. Any one of the following Combat Events occurred:
1. Japanese Patrol Bomber Spots Submarine.
2. Counterattack (escorts spot submarine and hold it down).
3. Counterattack - combat (escorts attack before sub can).
E. A member of a Wolfpack has already attacked, alerting the escorts (only the first member of a pack can take advantage of this benefit).
[28.5] Early Advancement Into War Period 4
COMMENTARY
The American submarine campaign was the primary contributor to the degraded ability of the Japanese Imperial forces to resist Allied advances. By 1945 imports of bauxite (for aluminum) fell by 88%, iron ore was down by 95%, wood pulp dropped 90%, cotton and wool was down by 91%, oil dropped by 92%, soda and cement fell by 96%, lumber was down 98%, and rubber by an astonishing 99%. The impacts to Japans ability to conduct the war were dramatic:
• Aircraft engine testing fell from 8 hours and five flights per engine to 2 hours of ground testing on only 10% of all engines resulting in an increased failure rate of engines in flight and combat.
• By the end of 1944, 80% of each aircraft was made from substandard aluminum pilings, resulting in significantly reduced quality and strength.
• Lack of aviation fuel resulted in a significant decrease of pilot training.
• Japanese carrier pilots received inadequate training at sea in part because of the reluctance of carriers to leave port to conduct training in ever more dangerous U.S. submarine infested waters.
• Inability of tankers to bring fuel to naval units resulted in those units being stationed close to the fuel supply rather than at distant sites where they could be more effective in countering Allied moves.
• In 1944, the lack of steel forced significant cutbacks in all naval and merchant construction programs and greatly inhibited repairs on damaged units.
• Delivery of supplies to island garrisons fell from a 96% delivery rate in 1942 to 67% in 1944 and 51% by 1945
This is an adjustment to Silent War rule [17.0], which allows an early transition to War Period 4 in response to the player achieving greater results in earlier periods than occurred historically, enabling a more rapid Allied advance, and hastening the demise of the Japanese merchant marine. During the War Progress Phase, rather than use the numbers in the boxes on the War Period Transition Table for War Period 4 (June 44 thru Jan 45) use the following procedure:
PROCEDURE
When both the Ships Sunk marker reaches or exceeds 860, and the Tons Sunk marker reaches or exceeds 3,800 (3.8 million) tons, the current month becomes the new first month for the transition to War Period 4 on the War Period Transition Table. The current month is now considered to have the number ‘9’ in it (the same as the printed June of 1944 turn on the War Period Transition Table) and subsequent months on the table have the corresponding subsequent numbers in them. Once this occurs, rolling on the War Period Modification Table for War Period 4 is performed as it would normally be done.
Example: In March of 1944 the player achieves 860 ships sunk for 3,900t. The War Period 4 transition now advances into the current month with the War Period transition number for March being ‘9’, April is ‘8’, May is now ‘7’, and so on.
SILENT WAR 1.0/1.2 ORIGINAL ENGAGEMENT TABLE
During playtesting it was found that some players still preferred the simpler Engagement Table found in Silent War 1.0, 1.1 and 1.2. While a critical portion of Silent War 2.0's rebalance rely on the new Engagement Tables, players wishing to use the original table will find it below.

has been hit. +1 drm to the die roll for Wolfpack.
Attack Posture Cautious: +1 drm to the “to hit” die roll if the target ship is not the one with the unmodified TDC.
Attack Posture Aggressive: -1 drm from the “to hit” die roll.
JAPANESE COUNTERATTACK
A. Add the following for the Japanese:
1. The ASW value of all revealed Japanese forces (even those not attacked) in the column containing the submarine and in all adjacent columns, fractions rounded up. Remember, the ASW value of a ship with a Damage marker is zero. The ASW value of an aircraft is added regardless of the column the aircraft is in.
Typhoon: All escort ASW factors are reduced by 1 to a minimum of 0.
2. The number of red boxes for the current war period in the Area Activity Chart of the OpArea where the combat is occurring.
CONSOLIDATED ATTACK/COUNTERATTACK
PROCEDURE & MODIFIERS
SUBMARINE ATTACK (TO HIT)
A. Total the following for the attacking submarine:
1. The portion of the submarine’s Attack Value allocated to this target.
Tropical Storm: subtract one (1) from the submarine’s attack value for EACH attack.
Typhoon: -subtract two (2) from the submarine’s attack value for EACH attack.
2. The value of a Super Skipper marker assigned to this submarine (if any). Each attack gets this bonus.
3. The current Mk-XIV torpedo value (Remember, adding a negative number is the same as subtracting it.)
B. Total the following for the target:
1. The target’s Defense Value.
2. The ASW value of all revealed Japanese vessels in the submarine’s column and adjacent columns, and the ASW value of all revealed aircraft regardless of column.
3. The TDC marker value , modified for Attack Posture [14.12] (Remember, adding a negative number is the same as subtracting it.)
4. If the target ship is not in the same column as the submarine, add one (1).
5. If the target ship has a Damage marker subtract one (1).
C. Subtract the target’s value from the attacker’s value (round down) to get a result and roll a die. If the roll is equal to or less than the result (difference), the target
3. The general ASW value from the War Period display for the current war period.
B. For the submarine, add:
1. The submarine’s Defense value.
2. The value of a Super Skipper marker assigned to this submarine (if any).
3. Subtract (1) for Shallow OpArea.
C. Subtract the submarine’s result from the Japanese result and locate the applicable row on the Counterattack Table. Roll a d10 and apply the following modifiers:
+1 drm for each damage marker a submarine has.
+1 drm if this Counterattack follows a Re-Attack.
+1 drm if the submarine has a Spotted marker.
Attack Posture Cautious: -1 drm from a non Diligent Escort counterattack [14.2] die roll.
Roll one die for each Diligent Escort revealed. If the die roll is greater than the Diligent Escort’s ASW value, the Diligent Escort is treated as a normal DD subtracting one (1) from its ASW value. If the die roll is zero, +1 drm to the Diligent Escort’s counterattack die roll [14.13].
Attack Posture Aggressive: +1 drm to any non Diligent Escort counterattack [14.2] die roll.
Any Diligent Escort in the same column as the submarine has +2 drm to the Diligent Escort’s counterattack die roll. +1 drm for a Diligent Escort's counterattack [14.13] die roll that is in an adjacent column.
In some cases on the table, a second roll on the counterattack table is needed. Apply the results of the table immediately.
