TABLE OF CONTENTS

[1.0]
[2.0]
[3.0]
[4.0]
[5.0]
[6.0]
[7.0]
[8.0] Attrition............................................5
[9.0] Reinforcements................................5
[10.0]
[11.0]
[12.0]
[13.0]
[15.0]
[16.0]
[17.0]
[18.0]
[19.0]
[20.0]
[21.0]
[22.0]
[23.0]
[24.0]
[25.0]
[26.0]
[28.0] Withdrawal...................................22
[29.0] Retreat...........................................22
[30.0] Pursuit...........................................22
[31.0] Advance After Combat................23
[32.0] Combat Reinforcement...............25
[33.0] Flank Attacks..............................27
[34.0]
[1.0] INTRODUCTION
Mr. Lincoln’s War is a historical game that captures the epic struggle of the American Civil War. From their first major battle at Bull Run in 1861, through the campaigns of Vicksburg, Gettysburg, and Atlanta, until the final days at Appomattox in 1865, the armies of the Union and the Confederacy raged across America wreaking havoc and bloodshed on a scale never seen before or since witnessed in the New World.
Mr. Lincoln’s War is organized into two sub-games, “Army of the Tennessee,” which deals with the war in the western theater, and “Army of the Potomac,” which deals with the war in Virginia. Each has four short scenarios that recreate the maneuvers and battles of Shiloh, Gettysburg, Atlanta, and other monumental Civil War contests. Campaign games enabling the players to fight the war in the West or East are provided with each sub-game. They may be combined to play the Mr. Lincoln’s War grand campaign that simulates the entire Civil War, on both fronts.
The rules of the sub-games are identical, except for individual scenario rules, included to better recreate those campaigns.
There are minor differences in victory and production rules between the campaign scenarios of the two games, but they are resolved when the sub-games are joined to play Mr. Lincoln’s War
[2.0] COMPONENTS
The game contains the following components:
• Two 22” x 34” mapboards covering the eastern and western portion of the United States.
• Four countersheets
•This rules booklet.
• One scenario booklets.
• Fourteen player-aids and displays.
• Two six-sided dice
If any parts are damaged or missing please contact: Compass Games, LLC
PO Box 271 Cromwell, CT 06416
Phone: (860) 301-0477
E-mail: support@compassgames.com
Online game support is available. Visit us on the web: https://www.compassgames.com
You can also use the URL or QR code to reach Compass Games online: https://linktr.ee/compassgames

We also recommend you visit the official game discussion topic on Consimworld to share your play experiences with others. You can find the Mr. Lincoln’s War game topic by visiting: http://talk.consimworld.com.
[3.0] THE MAPBOARDS
“Army of the Potomac” and “Army of the Tennessee” each have mapboards portraying the major terrain features, state boundaries, railroads, towns, and cities in their portion of the United States in 1861.Ahexagonal grid is superimposed on the map to regulate the movement and positioning of the playing pieces and to delineate the various terrain features that affect play. Each hexagon represents an area about 12 miles wide.
There are also six Sea Zones (Northern Ports, Chesapeake, Atlantic, Caribbean, Overseas, and Gulf) on the maps. These areas are used for naval movement and operations along the coast.
There are three types of cities in the game: Major cities (such asAtlanta and Washington); Minor cities (such as Bowling Green and Gettysburg); and Valley cities (Harper’s Ferry, Winchester, New Market, and Staunton). The Valley cities are connected by a line representing the macadam Valley Road.
Fort symbols (pre-war masonry fortresses) and solid red lines (railroads) complete the types of man-made structures on the map. Other terrain features include mountains, forests, and swamps. Rivers (major and minor) are portrayed as blue lines running along hexsides.A “major river hex” is a hex with one or more major river hexsides. The Turn Record Track is also on the game map.
[4.0] HOME STATES
Each side has “home states” that it initially controlled in 1861. Confederate home states areArkansas, Louisiana, Texas, Mississippi,Alabama, Virginia, North and South Carolina, Georgia, Tennessee, and Florida.

Union home states are Illinois, Indiana, Missouri, Ohio, Pennsylvania, Delaware, and Maryland. Kentucky is a Union home state in all scenarios except the “War in the West” scenario and the Mr. Lincoln’s War grand campaign game, where it begins as a neutral state. “Friendly” areas and cities are those within a player’s home states.
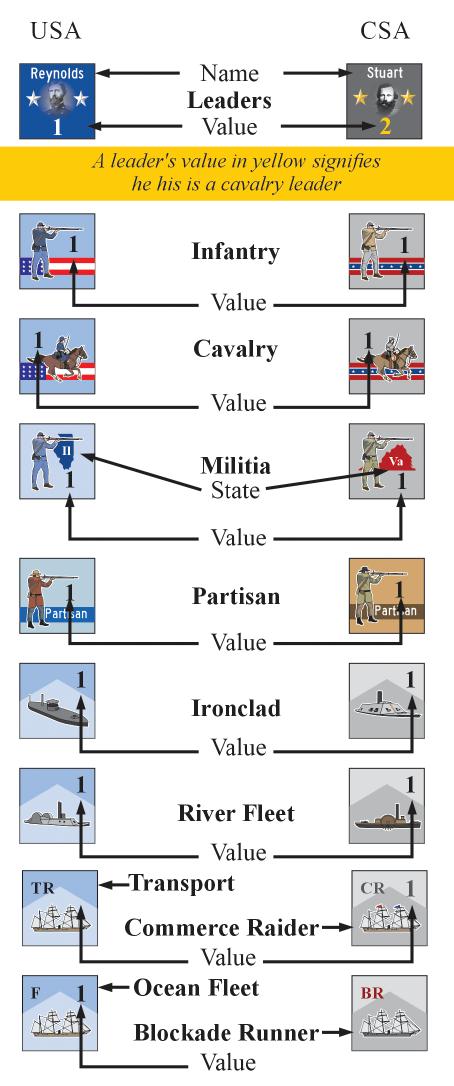
[5.0] THE PLAYING PIECES
[5.A] The die-cut playing pieces, hereafter referred to as units, represent the forces and leaders that fought in the American Civil War. The armies and navies are represented in abstract terms as infantry, cavalry, naval, and auxiliary units.
[5.B] Units are printed in several denominations of strength points (SPs). Each infantry, cavalry, and militia SP represents a brigade of approximately 2,500 men. Ocean fleets, River fleets, and naval Transports represent squadrons and flotillas of approximately five major warships or ten transport vessels, with their attendant forces of minor ships. Other naval units represent two to four vessels.
[5.C] Like money, SPs of the same type and nationality may be exchanged for larger or smaller units for ease of play. At any time, a player may replace similar type unit counters in the same hex with a larger denomination counter that represents the same number and type of SPs. Conversely, a single counter may be replaced by several smaller denomination counters. Combination or division are limited only by the number of unit counters available.
Example: A unit representing five Union infantry SPs may be replaced by one unit worth 2 SP and three units worth 1 SP each.
[5.D] Most of the important military commanders who participated in the Civil War are represented by individual counters showing the leader’s name and relative leadership value, which ranges from zero (poor) to three (excellent) and affects movement and combat. The zeropoint leaders identified by a letter rather than by name represent lower-ranking generals.
[5.E] There are two types of infantry units represented in the game: regular infantry, designated by a strength point (SP) number (only), and militia, designated by a SP number and the abbreviation and image of the militia’s home state. There are two types of cavalry: regular and partisan. Infantry, militia, cavalry, and partisans are “combat units.” There are seven types of naval units:
Ironclads, Union Mortar Boats, River fleets, Ocean fleets, naval Transports, Commerce Raiders, and Blockade Runners. Transports are marked “TR.” Blockade Runners (“BR”) and Commerce Raiders (“CR”) appear only in campaign games.
[5.F] All army units have a basic morale value ranging from 1 (poor) to 3 (superior) that affects their ability to engage in combat. (See the Unit Characteristics Chart for details.)
[6.0] THE PLAYER AIDS
[6.A] The Player Aid Card contains the charts and tables needed to play. These include the Unit Characteristics, Combat Loss, and Terrain Effects Charts, and the Attrition, Forced March, Combat Results, Political Points, Recruitment, the Optional Tactical Matrix, and various Naval Tables.
[6.B] Leader Displays, which are printed on the map edges, are meant to reduce the number of counters on the map and thus ease play. For each leader, there is a box on which all units accompanying that leader may be deployed. The leader counter remains on the map. All units in a leader’s box on the display are considered present in the leader’s hex. Units may be removed from the display and placed directly on the map under their leader’s counter at any time.
There is no limit to the number of units or strength points (SP) that may be stacked in a hex, but individual leaders are limited to moving 10 SPs of infantry or militia (see
11.0 Land Movement). If there are more than 10 SPs in a box on the Leader Display, those units that can’t accompany their leader when he moves; they remain behind and are placed on the map in the hex where their leader began the movement phase. Players may freely examine the opposing player’s stacks and Leader Display.
[6.C] Several major city boxes are also provided on the display, for the large stacks that often accumulate in those hexes.
[7.0] SEQUENCE OF PLAY
[7.A] The game is played in a series of turns, each representing 1 month (2 months during the winter). Each turn consists of two player segments: a Confederate player segment followed by a Union player segment. Each player’s segment is divided into four phases. The player whose segment is in progress is called the “active player”; the other is called the “inactive player.” Each player’s segment is executed as follows:
I. Attrition Phase, see 8.0.
II. Reinforcement and Replacement Phase, see 9.0.
III. Movement Phase (including Inactive Player Interception, Naval Movement and Naval Combat, Overrun Combat, and Forced Marches).
IV. Combat Phase. Combat occurs in the following order:
A. First Rounds of Interceptions. (Inactive player chooses order), see 14.0.
B. First Rounds of Active Player Combats. (Active player chooses order), see 23.0.
C. Morale Reduction of Units Engaged in Combat.
D. Withdrawals and Retreats from Combat. (Inactive player first, then active player), see 28.0 and 29.0.
E. Pursuit and Advance After Combat. (Possible loss of SP based on morale, Attacker may advance into a vacant hex), see 30.0 and 31.0.
F. Reinforcement of Continuing Combats. (Active player first, then inactive player), see 32.0.
G. Repeat A through F until all combats are concluded.
H. Roll for Leader Injury, see 40.D.
I. Siege Die Rolls, see 38.0
J. Rail Repair, Construction and Conversion, see 16.0.
K. Morale Recovery, see 27.0
V. After the Confederate player has completed phases 1-4, the Union player does the same. If the victory conditions or time limit of the scenario have not been met, advance the turn marker by one turn on the Turn Record Track and continue to the next turn.
[8.0] ATTRITION
In the Attrition Phase, the active player rolls 1 die to determine the attrition losses in every hex and zone occupied by 3 or more friendly land combat SPs. Modify the roll as it applies to a particular hex or zone as follows:
-1 if Confederate units
-1 the hex contains a friendly unburned and unbesieged city
-1 the units are in an offboard zone
-1 aboard naval units in a sea zone.
+1 if it is a winter turn.
+1 any SP in the hex or zone is unsupplied.
+# of Siege Status marker.
If the units are besieged, add the number on the Siege Status Marker (see 38.0 Siege).
All modifiers are cumulative. Treat results greater than 6 as 6. Results less than 1 mean no attrition loss.
[8.A] Calculate attrition separately for each hex by cross-referencing the modified die roll with the number of friendly SPs in the hex and locating the result on the Attrition Table. If the result is greater than zero, the active player eliminates that many SPs from the hex. If the result is in red and it is a winter turn, one of the eliminated SPs must be cavalry, if any are present; otherwise the loss may be fulfilled as the active player wishes.
[8.B] Naval, leader, siege, pontoon, rail, and partisan units are ignored for purposes of attrition. They are not counted toward the number of SPs in a hex, nor may they be lost to fulfill attrition loss requirements.
NOTE: Omit the attrition phase for both sides in the first turn of every scenario.
Attrition Example: During the Confederate player’s Attrition Phase of the November-December (winter) turn, the Confederate player rolls a 5 on the die to determine attrition effect on an unsupplied stack of 6 infantry SPs and 1 cavalry SP in Fredericksburg. The die roll of 5 is modified by -1 for Confederate units, +1 for winter, and +1 for unsupplied, a modified total of +1. Looking up 6 on the 6-10 column of the Attrition Table yields a result of “2”. The Confederate player must eliminate 2 SPs from the Fredericksburg hex; since it is winter, since cavalry is present, one eliminated SP must be cavalry.
[9.0] REINFORCEMENTS
[9.A] In the Reinforcement and Replacement Phase, the active player deploys any reinforcements scheduled to arrive that turn. Each scenario lists when and where reinforcements arrive.
[9.B] If the city/hex/zone where the reinforcements are scheduled to arrive is occupied, burned, or besieged by enemy units, the reinforcements arrive at the nearest (measured in movement points) friendly major city or off-board zone. If several are equidistant, the active player may choose. If no such locations are available, the reinforcements are delayed until the next turn.
[9.C] Players may voluntarily delay their own reinforcements until a later turn.
[10.0] REPLACEMENTS
Each scenario lists replacement points for each side and where those points are available. In the Reinforcement and Replacement Phase the active player may spend replacement points allocated by the scenario or through production in campaign games.
[10.A] Replacements are purchased from units that have been previously eliminated. Players keep such units in their Force Pool box on the map.
[10.B] Aplayer may spend replacement points to rebuild militia, partisan, infantry, and cavalry units. Each SP of militia or infantry costs 1 replacement point. Partisans cost 1 replacement point each and cavalry cost 2 replacement points per SP, but neither is available for placement on the map until the next friendly Reinforcement and Replacement Phase.
[10.C] Naval units that are eliminated may not be replaced in the scenarios. Units that are damaged, however, may be repaired. A damaged naval unit that begins the Reinforcement and Replacement Phase in a friendly, supplied, unburned, and unbesieged major city or off-boardzone (or the Northern Ports Sea Zone for Union units) may be repaired. Each replacement point spent repairs 2 points of damage. Naval units that repair more than 1 damage point can’t move in that player’s movement phase, place them under a repair marker. If attacked, however, they defend and retreat normally.
[10.D] Unused replacement points may be accumulated from turn to turn. Use the Production Track to keep track of accumulated replacements.
[10.E] Railroad, Siege and Pontoon Train units are replaced free of charge in the scenarios a few turns after being eliminated. Pontoon trains are available 2 turns later, Siege Trains 3 turns after later, and Rail Repair units 4 turns later.
[10.F] Replacements are placed on the map in the same manner as Reinforcements (see 9.A and 9.B).
Example: If a Pontoon Train was destroyed in the April turn, it would be replaced and available for placement in the owning player’s June Reinforcement and Replacement Phase.
[10.G] Replacement Points may also be used to construct Forts and Repair Fortresses. It costs 2 replacement points and requires two consecutive turns to build a fort or repair a ruined fortress. Hexes where repair/construction takes place must be supplied and occupied by friendly land combat units during both turns, or the repair/ construction is canceled and any replacement points spent are wasted. (See 37.0 Fortifications.)
[11.0] LAND MOVEMENT
Each infantry, cavalry, militia, partisan, siege train or pontoon train counter is a “unit.”A“stack” is any number of units (including a single unit), of any type, in the same hex or Leader Display box.
[11.A] In the Movement Phase, the active player may move as many or as few units as desired, in any order. Units may be moved in any direction or combinations of directions. Move each unit individually, except that units in the same hex at the start of the movement phases (a stack) may be moved together for convenience. The active player moves each unit or stack through a series of continuous hexes. Complete the movement of one unit/stack before moving another. Movement of a particular unit may be restricted by its type, its movement allowance, terrain features, and the presence of enemy units.
[11.B] The distance that a unit can move is limited by its movement allowance, expressed as a number of movement points (MPs).Aunit usually spends 1 MP for each hex it enters, but the cost to enter or move through a hex varies according to the terrain in a hex or along a hexside. These costs are summarized on the Terrain Effects Chart.All movement costs are cumulative.
[11.C] Once a unit has spent all of its MPs, it can’t move farther except by Forced March (12.0). If a unit has MPs remaining when its move is complete, those MPs are forfeited—they may not be saved or passed to another unit.
[11.D] The movement allowance of a unit is based on the unit’s type. Leaders can spend up to 20 MPs in a friendly movement phase. Cavalry and partisans can spend 12 MPs. Infantry and militia can spend 10 MPs but only under the following restrictions:
[11.D.1] Infantry (and militia) may move out of a hex only if accompanied by a leader who was in the same hex at the start of the movement phase (or if moving by rail or naval/ river transport). Leader movement is not automatic. (See 40.0 Leaders.)
[11.D.2] No more than 10 infantry SPs may accompany a single leader. If two leaders begin the movement phase in the same stack, they may each move 10 SPs, either together or separately. They can move up to 20 infantry SPs as one stack, if both leaders stay together. If three leaders begin the movement phase in a stack, up to 30 infantry SPs may accompany them. Since there is no stacking limit, the only limit to the number of infantry SPs that may move into a hex is the number of leaders accompanying them.
[11.D.3] Infantry SPs accompanying a leader can spend more than 10 MPs only by Forced March (See 12.0).
[11.D.4] As a leader is moving, any infantry units accompanying that leader may be detached (or “dropped off”) in any hex the leader enters. Infantry may not be “picked up” by a leader once that leader has spent a single MP. The active player can continue moving a leader that has dropped off all accompanying infantry up to the leader’s full 20 MP allowance.
[11.D.5] Militia units move like infantry, but are restricted to their home state. They may not cross state boundaries.
[11.E] Unlike infantry, cavalry can move without a leader. Cavalry may also move with a leader, but doesn’t count against the leader’s ability to move 10 infantry SPs.
EXCEPTION: Union cavalry units in 1861 and 1862 (only) do require the presence of a leader to move. Any number of cavalry SPs may accompany a leader for 12 MPs without forced marching. They don’t count against that leader’s ability to move 10 infantry SPs.
[11.F] Partisans have 12 MPs and don’t require a leader to move. They may not cross state boundaries. They may not end their movement stacked with any other combat unit.
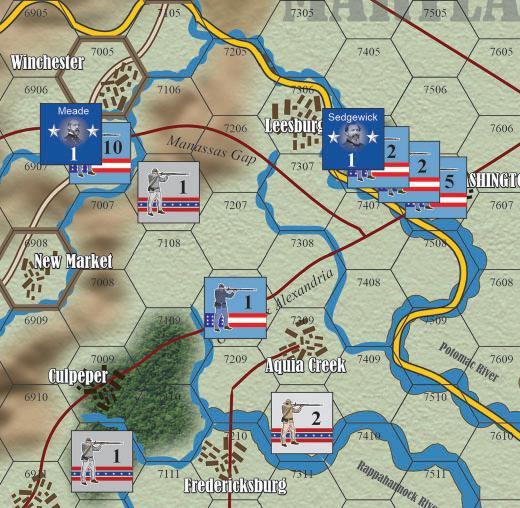
Union leader Sedgwick and 9 infantry SPs begin the Union player’s movement phase in Washington. The Union player wants to move Sedgwick to Culpeper (7009). The Terrain Effects Chart (TEC) on the Player Aid Card shows how many movement points (MPs) it will cost to make the move.
Since the railroad to Culpeper is not destroyed, Sedgwick can march straight to Culpeper, at a cost of 1 MP per hex. The railroad negates the effect of other terrain in a hex entered via an unbroken railroad hexside. Sedgwick spends 5 MPs to move the 5 hexes to Culpeper.
He cannot “pick up” the Union infantry unit in hex 7208. That unit is unable to move, as it did not start the movement phase with a leader.
The Union player wishes to move Meade and a stack of 10 infantry SPs (in 7006) to hex 6910, adjacent to Culpeper. Meade moves along the Valley Road 2 hexes to New Market. Each hex of the Valley Road costs ½ MP and allows units to ignore the cost of other terrain in the hex, when entered via a Valley Road hexside. Meade spends 1 MP to reach New Market (6908). It costs 6 MPs to enter hex 6909, 3 to cross the minor river and 3 for the mountain hex.
It costs 3 more MPs to enter the mountain hex 6910. Meade has spent 10 MPs (1 for the two Valley Road hexes to New Market, 6 to enter hex 6909, 3 more to cross the minor river, and 3 to enter hex 6910).
[11.G] Siege, Pontoon, and Rail units don’t require a leader to move. Siege trains have 3 MPs and Pontoon trains have 4 MPs. Rail units have unlimited movement along friendly, contiguous rail hexes (see 16.0 Rail Repair).
[11.H] Leaders can move independently or accompanied by other leaders, units, or both. Leaders pay all terrain costs when moving.
[11.I] During the movement phase, there is no land combat (EXCEPTION: 13.0 Overrun). Naval combat occurs, however, as it is a function of movement (See Naval Movement and Combat Rules).
In the movement phase, only the active player moves units; the inactive player can’t move units (EXCEPTION: 14.0 Interception).
[12.0] FORCED MARCHING
[12.A] In the movement phase, the active player may attempt to force march infantry, militia, partisan, and cavalry units.
[12.A.1] At any point in a stack’s movement, the active player may declare a forced march of up to 6 additional MPs (for a maximum of 16 MPs for infantry and 18 MPs for cavalry). Leaders may NOT increase their own movement beyond 20 MPs.
[12.A.2] Immediately after declaring how many MPs are requested, the active player rolls one die and modifies it as follows (also found on the Forced March Table):
+1 if Confederate units.
+1 if the stack is led by a 2, 3, or yellow 2-point leader.
-1 if the stack is led by a 0 leader.
-1 if the stack is unsupplied.
-3 if this is a winter turn.
[12.A.3] If the modified result is zero or less, the stack ceases movement immediately, even if it hasn’t used all of its MPs.
[12.A.4] If the modified result is greater than zero, the stack gets that many additional MPs, up to the number declared, but not more (even if the die-roll was higher than the declared amount).
[12.B] Infantry and militia (and Union cavalry in 1861 and 1862) must be accompanied by a leader to spend forced march MPs.
[12.C] Cavalry (except Union cavalry in 1861 and 1862) and partisans may force march either independently or with a leader. If they accompany a leader, they are subject
to his positive or negative influence on the forced march die roll.
[12.D] Leaders may affect the die roll of all units in a stack that wish to force march. If only one leader is used to influence the forced march die roll for the entire stack, the stack must move with that leader. There must still be at least one leader per 10 infantry SPs moving.
[12.E] When a player declares a forced march of more than 3 SPs and succeeds, roll a second die with no modifiers. If the result is 4 or more, the stack must leave 1 SP behind in every hex that it enters by spending forced march MPs. The stack must use its forced march MPs as far as possible, and may not enter the same hex more than once during its forced march movement.
[12.F] The active player may not attempt to force march any SP or leader more than once per movement phase.
Forced March Example: In the Confederate player’s November December (winter) turn, a zero-point leader is moving with a stack of 10 unsupplied infantry SPs. They have spent 9 of their 10 MPs and the player wants them to enter a mountain hex, which costs 3 MPs. The stack will need to force march an additional 2 MPs to do this. The player rolls a 6, modified by + 1 for Confederate units, -1 since the only leader present is a zero-point leader, -1 for unsupplied, and -3 for a winter turn, yielding a result of 2. The stack may spend 2 additional MPs, plus its 1 MP remaining, so it can enter the mountain hex (2+1= 3). Had the die roll been a 5, the stack would not have been able to enter the mountain hex, but the player could have spent 2 MPs to move in another direction, or could have ended movement for the stack. A roll of 3 (or lower) would have been modified to 0 (or a negative number), causing the stack to forfeit its last MP and end its movement.
[13.0] OVERRUN
[13.A] The active player can move units into a hex containing enemy units only if the moving force can overrun those units.
[13.A.1] A force can overrun an enemy stack if it outnumbers the enemy by 4:1 or more (if the hex is clear terrain), or by 5:1 or more in a forest or swamp hex, or a hex with an entrenchment marker.
[13.A.2] A stack worth at least 1 SP in a mountain or mountain pass hex, or inside a fort or fortress, can’t be overrun.
[13.A.3] Cities are ignored for overrun purposes. Treat cities as the other terrain in the hex.
[13.A.4] A stack may not cross an river hexside (major or minor) to overrun enemy units behind it.
[13.A.5] A stack may not overrun enemy units in a hex where it is making an amphibious landing from naval units.
[13.A.6] Units using rail movement or being transported by naval units can’t overrun while using those methods of transportation. They may detrain/disembark in a vacant hex and then, if they gain enough MPs by forced marching, overrun enemy units in another hex.
[13.B] All units in the overrunning force must begin the movement phase in supply and in the same stack.
[13.C] If the force being overrun has only 1 or 2 SPs, they are eliminated (captured in a campaign game); roll a die for each leader in their stack. A “6” eliminates the leader (he is captured in a campaign game).
[13.C.1] If the force being overrun has more than 2 SPs, it suffers a D3 combat result and must retreat (see 25.A.4, Combat Results). Any units lost are eliminated (captured in a campaign game.)
[13.C.2] The same units may be overrun again by the same or another stack of the active player’s units, if those units have enough MPs.
[13.D] The moving stack spends 1 additional MP to conduct an overrun, after spending the MP cost to enter the hex.
[13.D.1] If the overrunning force has a 6:1 or greater superiority in SPs over the units it is overrunning, it doesn’t pay the additional MP cost for the overrun, but still pays all terrain costs.
[13.D.2] A stack can overrun as many units as it can physically reach, including units it previously overran that turn, up to the limit of its movement allowance, including any MPs gained by forced marching.
[13.E] A stack with any cavalry SPs can’t be overrun unless the moving stack has at least an equal number of cavalry SPs.
[13.F] Partisans can’t be overrun unless the overrunning stack contains at least 1 cavalry SP.
Overrun Example: Refer to the illustration used in the movement example in 11.0. Meade can’t overrun the single Confederate SP that begins the movement phase adjacent to Meade’s stack (hex 7107) because that unit is in a mountain hex. Meade then moves to hex 6910. The Union player decides to force march four MP, rolling the die and obtaining a 4, no modifiers apply. Meade may spend 4 additional MPs. Since Meade is moving 4 or more MPs, the die is rolled again. The die result is greater than 3 (The Union player rolled a 4), Meade’s force will have to leave a straggler SP in each hex that it enters using forced march MPs.
Meade overruns the single Confederate SP in hex 7010. It costs 2 MPs to enter the forest hex, but Meade doesn’t have to pay the normal 1 MP penalty for an overrun since his force of 10 SPs outnumbers the enemy being overrun by at least six to one. The Confederate unit is eliminated (captured in the Campaign game) and Meade continues to move. He must leave at least 1 SP behind in hex 7010 as a straggler from forced marching. Meade has spent 2 of his MPs gained by force marching. Meade spends a third forced march MP to enter hex 7111 and a fourth to enter Fredericksburg (7210). One SP of stragglers is left behind in hex 7111. At the end of the move, Meade and 8 of the original 10 SPs are in Fredericksburg, and single SPs are in both hexes 7010 and 7111.
Even if Meade had 1 or 2 MPs remaining he could not overrun the Confederate unit in 7310 across the river from Fredericksburg as an overrun may not occur across a river hexside.
In order to overrun that Confederate unit, Meade would have to move to hex 7209 in the next friendly movement phase. At that point, Meade could overrun the Confederate unit at a cost of 2 MPs.
[14.0] INTERCEPTION
The inactive player may not normally move during the active player’s movement phase, but may do so by interception. Only the inactive player can use interception movement. The active player may not intercept the inactive player’s interception movement.
NOTE: There are no zones of control in this game, as there are in many other war games. As a result, the active player can move past inactive units freely, unless stopped by interception.
[14.A] During the active player’s movement phase, the inactive player may attempt to intercept the movement of the active player’s forces. Each inactive side leader valued at 1 or more leadership points may roll once (only) in the movement phase to intercept. Zero-point leaders, and unaccompanied infantry/militia, may not attempt interception (see 26.C.1).
[14.A.1] If at any point during the active player’s movement, a stack moves within 3 hexes of an inactive side unit that is capable of interception, the inactive player may announce an interception attempt. The active player temporarily halts movement.
[14.A.2] The inactive player designates which leader, and how many SPs stacked with him, will attempt to intercept, and rolls one die. If the modified result is 5 or 6, that leader and his units may intercept. Modify the roll as follows (all these modifiers are cumulative):
• Add the value of the leader attempting the interception.
• +1 if the intercepting stack contains cavalry.
• -1 if the interceptor would have to move more than 1 hex to intercept.
[14.A.3] If the interception fails, that inactive leader and the units designated to accompany him may not roll to intercept again that turn.
[14.A.4] If the Interception succeeds, the intercepting leader may move up to 2 hexes (not movement points) in any direction to intercept the target stack. The intercepting force must end adjacent to the enemy stack and must attack it in the active player’s combat phase. If the intercepting force is already adjacent to the enemy stack, it need not move at all, but may do so as long as it ends the move adjacent to the target stack.
[14.A.5] Interception or movement during interception may not cross an unbridged river hexside (major or minor) or enter a mountain hex. (Note that pontoons, unbroken railroads, unburned cities, and naval Transports or River fleets act as bridges).
[14.A.6] A stack may not be intercepted until it has moved at least 1 hex in the current Movement Phase, nor may it be intercepted after its movement is complete and the active player has begun moving another stack. (EXCEPTION: see 14.A.7)
[14.A.7] Units moving by rail may be intercepted as if moving by normal land movement. Units being transported by naval units may not be intercepted by
land units. Units disembarking from naval units may be intercepted as they land in a hex, where they suffer the same penalty as if they were intercepted while crossing a major river hexside. (See below).
[14.A.8] Units that are successfully intercepted cease moving unless they have sufficient strength and MPs to overrun the intercepting units, in which case they may do so immediately and continue moving.
[14.A.9] Units that have been successfully intercepted and can’t overrun their interceptors cease moving. No land units of either side may overrun or enter the hexes occupied by either the intercepted or intercepting stacks for the rest of that Movement Phase. Naval units may traverse but not unload land units in either hex.
[14.A.10] In the active player’s combat phase, the inactive player must attack each stack that has been intercepted. Any inactive-side land units in a hex occupied by intercepting units may participate in combat as part of the intercepting force. The inactive player resolves the first round of combat against each stack that has been intercepted. When those rounds are completed, the active player may resolve the first rounds of all combats that they have announced, as per the turn sequence.
• After first rounds have been completed, the inactive player may decline to continue combat with any intercepting forces. If an intercepting force does so, but doesn’t withdraw, the active player may elect to continue the combat, in which case the intercepted force becomes the attacker, with all terrain and other modifiers calculated as per the rules of combat (see 23.0 Combat).
• Other units may join in the combat for the second round (regardless of which player is the attacker) between intercepted and intercepting units during the reinforcement segment of combat (see 32.0 Combat Reinforcement).
[14.A.11] Intercepted units receive the benefit of terrain in their hex in rounds when the intercepting player is attacking.
• When an intercepting force attacks across a minor or bridged major river hexside, it pays a penalty for doing so (see 41.0 Minor Rivers and 42.0 Major Rivers).
• If a stack is intercepted immediately after crossing a minor river hexside, the intercepting units receive a bonus on the combat dice roll of 1 if the river is bridged, or 2 if unbridged.
• If a stack is intercepted immediately after crossing a bridged major river hexside, the intercepting units receive the same bonus as above. Treat the intercepted units as temporarily halved in strength for purposes of determining the combat odds (but don’t actually eliminate half of their SPs). The stack is no longer treated as halved if the intercepting units decline to continue attacking after the first round of combat.
[14.A.12] Special Interceptions. Stacks composed of cavalry or partisans don’t need a leader to attempt to intercept (except for Union cavalry in 1861-62, which require at least a 1-point leader for interception).
[14.A.13] Individual leader counters moving without accompanying units may be intercepted by enemy infantry with a leader, or by cavalry or partisans. An unaccompanied leader who is intercepted rolls 1 die. If the result is 5 or 6, he is eliminated (captured in a campaign game). If he is not captured, he must immediately move to the nearest friendly combat unit and may make no other move in that movement phase.
[14.A.14] Pinned Units. Although combat is not normally announced until the end of the movement phase (see 23.0 Combat), when a stack moves adjacent to an enemy stack during the Movement Phase, the active player may declare that it will attack that enemy stack. The enemy stack is then “pinned.”
• If the stack that is declared to be attacking a pinned stack is equal to or greater in SPs as the pinned stack, no leaders and units in the pinned stack can attempt interception.
• If the pinning stack has fewer SPs than the pinned stack, the leaders and units of the pinned stack may attempt to intercept other moving stacks, but must leave behind in the hex a number of SPs at least equal to those in the pinning stack. All leaders in such a pinned stack are free to leave the stack to intercept, even if this leaves the pinned stack leaderless.
• A pinning stack must attack the pinned stack in the first round of combat.
Interception Example:
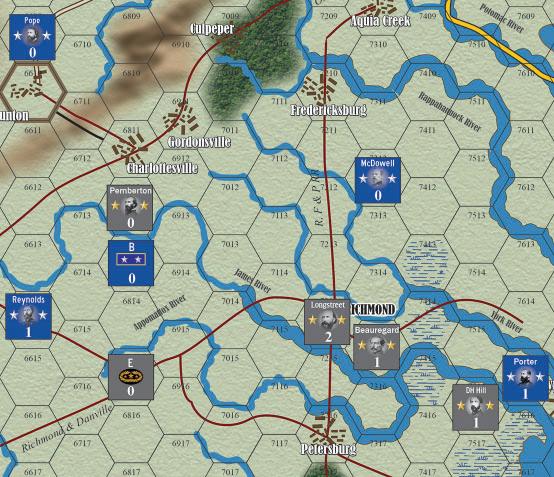
The Union player is trying to converge four stacks on Richmond. Union leader McDowell in hex 7312 moves to hex 7211 and then 7212, crossing a bridged minor river hexside. Confederate leader Longstreet in Richmond, who is within 3 hexes, attempts to intercept McDowell. He rolls a 3, modified by +2 for Longstreet’s leadership. Since the result is 5 or more, he succeeds and moves one hex to 7213. Since McDowell was intercepted immediately after crossing a bridged minor river, in the combat that will follow Longstreet will get a bonus of +1 on his combat dice and McDowell’s units will have their morale reduced by 1. Longstreet will also retain his leadership bonus of 2 over McDowell.
Union leader Porter in hex 7615 moves to hex 7415. Beauregard intercepts and D. H. Hill can’t effectively intercept him there, because Porter is by an unbridged major river and they would not be able to attack him across the river.
Union leader “B” in hex 6813 has 5 SPs. The Union player announces that “B” will attack Confederate leader Pemberton in 6812 to “pin” Pemberton. Since Pemberton has 10 SPs, he may still roll to intercept with 5 of his SPs, while 5 must remain in 6812 as they are now pinned.
Union leader Pope in 6609 moves toward Charlottesville (6811). Pemberton can’t intercept Pope in Staunton (6610) because Pemberton would have to enter a mountain hex, which is prohibited to intercepting units.
He waits until Pope is in 6711 and rolls to intercept. The interception is successful and Pemberton with 5 SPs moves to hex 6811 adjacent to Pope.
Union leader Reynolds (hex 6614) moves toward Richmond. He moves past Confederate leader “E” who is a zero-point leader and can’t intercept. Reynolds moves to 7215, to attack Richmond across the bridged major River hexside. Confederate leader D. H. Hill, who has not yet rolled to intercept, does so now. The Confederate player applies a -1 to the interception die roll since Hill must move more than one hex to reach Petersburg (7216) where he can attack Reynolds across a bridged major river. The Confederate player adds +1 to the interception because D.H. Hill is a 1-point leader. There are no other modifiers and die roll is a 5. Hill may move to Petersburg to intercept Reynolds, but he will be attacking across a bridged major river.
When all movement is completed, the Combat Phase begins. The Confederate player then resolves the first round of combat for each interception (Hill, Longstreet, and Pemberton), in any order desired. The Union player then resolves the attack of leader “B” against the pinned units Pemberton left behind in 6812.
In the second round of combat, the Confederate player may decline to continue attacking with some or all of the intercepting forces; if so, the Union player may declare that some or all of the intercepted stacks will attack. The Union player decides the order of these attacks. If neither side wishes to continue attacking, combat is completed.
[15.0] RAILROAD MOVEMENT
[15.A] Friendly railroads aid supply (see 20.0). All railroads also negate terrain cost during normal movement and doesn’t count against rail capacity (see Terrain Effects Chart).
[15.B] All railroads in Northern home states (4.0) and the railroad from Harper’s Ferry to Parkersburg in Virginia are friendly to the Union player.
[15.C] All railroads in Kentucky are friendly to both sides, until converted by the Union player (see 17.0 Rail Conversion). While friendly to both sides, both players may simultaneously (if necessary) treat Kentucky railroads as their own for all purposes.
[15.D] All railroads in all other states are friendly to the Confederate player, until converted by the Union player (see 17.0 Rail conversion).
[15.E] Each scenario designates how many SPs per turn each player may move by rail. Only land (not naval) units may move by rail. Each infantry, cavalry, or militia SP, and each pontoon or siege train unit moved by rail, counts as 1 point against the limit that may be moved by rail in a turn.
[15.E.1] Naval and partisan units can’t move by rail.
[15.E.2] Leaders and Union rail repair units don’t count against the rail movement limitation.
[15.E.3] Unused rail capacity may not be saved for use in subsequent turns. It is lost.
[15.F] To use rail movement, a unit must begin the movement phase on a friendly rail hex. A unit may move up to 30 hexes (not MPs) by rail and counts against rail capacity.
[15.F.1] Units using rail movement may not enter unfriendly, broken, or enemy-occupied rail hexes.
[15.F.2] Units using rail movement move only through rail hexes, via rail hexsides.
[15.G] Units that use rail movement can’t also use normal movement. Once they cease rail movement, however, they may attempt to force march, if accompanied by a leader.
[15.G.1] Leaders are not required for rail movement. Units that begin the movement phase on a friendly rail hex may use rail movement with or without a leader. Only units that move by rail with a leader, however, may force march after completing their rail movement. Leaders that move by rail may attempt to force march either on their own or with units. Unaccompanied leaders may move up to 60 hexes by rail, and may always force march themselves 6 MPs.
[15.G.2] Units may not combine rail movement, forced marching, and additional rail movement in the same turn. Once a unit stops moving by rail it can’t use rail movement again that turn.
[15.H] All Northern off-board zones (Delaware, Pennsylvania, Ohio, Indiana, Illinois, and Missouri) and Florida contain railroads that are linked to those on the hexagonal portion of the map.
[15.H.1] It costs 5 rail MPs to enter an off-board zone from a rail hex where the rail lines lead into the off-board zone. It also costs 5 rail MPs to move from one off-board zone to an adjacent one, and another 5 rail MPs to leave the zone and enter a rail hex where the rail line leads from the zone into a hex.
[15.H.2] Railroads in the off-board zones can’t be broken.
[15.H.3] Units that begin the movement phase in a friendly off-board zone may move by rail.
[16.0] RAIL REPAIR
[16.A] Any land combat unit (cavalry, partisan, militia or infantry) may destroy a rail hex by spending 2 additional MPs in the hex. Place a rail break marker in that hex.
[16.A.1] A river hexside (major or minor) is not bridged by rail if either adjacent rail hex is destroyed. (Unburned adjacent cities still count as bridges, even if the rails in the hex have been destroyed). No unit may enter a destroyed rail hex by rail movement or trace supplies by rail through the hex.
[16.A.2] Destroyed rail hexes nullify the effect of the railroad on normal movement. Units entering a broken rail hex pay the cost of other terrain in the hex (unless there is a city or mountain pass in the hex, in which case it still only costs 1 MP to enter the hex).
[16.A.3] If a city is burned, all rails in the hex are broken.
[16.B] The Confederate player may repair up to 2 destroyed Southern or Kentucky rail hexes per turn. If either Atlanta or Richmond are unsupplied, besieged, burned, or occupied by Union forces, the Confederate player may only repair 1 rail hex. When both are lost, no rail hexes may be repaired that turn. In the “Army of the Potomac” scenarios and campaign game, Atlanta is considered burned at the beginning of October 1864.
[16.C] The Union player has rail repair units. These units may: (a) Repair broken rail hexes; (b) Convert Southern rail hexes to Union-friendly rail hexes; and (c) Construct new rail hexes.
[16.C.1] Union rail repair units may move an unlimited number of friendly rail hexes in a turn. They may also be transported by naval Transport (not River unit) to any coastal hex containing a railroad. Otherwise, rail units only move along friendly, contiguous, unbroken rail hexes and may not enter non-rail hexes.
[16.C.2] Rail units can affect any rail hex within 20 contiguous rail hexes that is in supply at that moment. Each rail unit can repair or convert a total of 5 hexes per tum (units may repair 2 hexes and convert 3, for example). A hex to be repaired or converted must be connected to another friendly non-broken rail hex. As one hex is repaired/converted, the adjacent connected rail hexes immediately become eligible for repair or conversion. Thus, for example, two rail units could combine to repair/ convert a 10-hex-long stretch in one turn.
[16.C.3] Rail units that move by sea are limited to repairing/converting the hex in which they land that turn, even if it was already a friendly rail hex. On the next turn they may convert/repair normally.
[16.D] Neither player may repair a rail hex occupied by or adjacent to enemy units.
[16.D.1] In addition, the Union player may not repair a rail hex if there is a Confederate combat unit on or adjacent to a rail hex between the rail unit and the hex to be repaired.
[16.D.2] As long as the Confederate player can trace a path of unbroken rail hexes from any supplied friendly major city in the Confederacy to the rail hex to be repaired, with no Union unit on or adjacent to that path, the rail hex may be repaired.
[16.E] Rail repair, construction, and conversion take place after movement and combat (see 7.0 Sequence of Play).
[17.0] RAIL CONVERSION
[17.A] The Union player may use rail units to convert Confederate rail hexes to Union-friendly rail hexes. Each Union rail unit has 5 rail operation points. The points are used at a cost of 1 rail operations point to repair a rail hex or to convert a Confederate rail hex into a Union rail hex.
Rules of rail repair also apply to rail conversion, with the following addition:
[17.A.1]The Union player may only convert Southern rail hexes that are between a rail unit and one or more Union combat units. No Confederate combat unit can be on or adjacent to any rail hex between the rail unit and the hexes to be converted.
[17.A.2] Place rail progress markers to show the southernmost limit of the conversion.
[17.A.3] The Union player may convert Kentucky rail hexes to exclusive Union control and thus prevent Confederate rail movement in Kentucky.
[17.A.4] Note that a Union rail unit must still be within 20 contiguous rail hexes of the hex to be converted.
[17.B] The Confederate player may repair converted rail hexes in the same manner as broken rail hexes, thus bringing them back under Confederate control.
Rail Example:
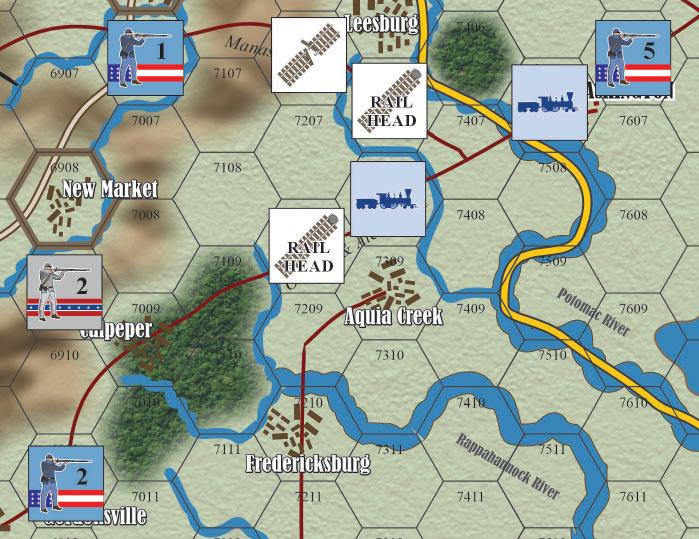
The Union player wants to move the 5 SP unit in hex 7606 by rail to Ohio. The unit can move 30 hexes by rail. It takes 2 rail hexes to reach Baltimore. From there, entering the Delaware off-board zone is equivalent to moving 5 hexes by rail, as is moving from one offboard zone to another, so movement from Delaware to Pennsylvania to Ohio off-board uses 10 more hexes, for a total of 17 so far. Entering a rail hex adjacent to and linked with the Ohio off-board zone (such as Cincinnati) costs 5 more hexes, leaving the unit able to move 8 more hexes by rail.
The Union player has two rail units, at Washington (7507) and in 7308. Each can conduct 5 rail operations. One of them repairs hex 7206, converts it to Union use, and then converts hexes 7006 and 7106 (toward Winchester) and hex 7109, near Culpeper. That unit has completed its maximum of 5 repair/conversion operations (one repair and four conversions).
The Union can’t convert hexes 7009 or 6910, even though they lie between a Union combat unit and a rail unit, because the Confederate SP in 6909 is adjacent to the rail line. If the Confederate unit weren’t there, the second rail unit could convert hexes 7009 (Culpeper), 6910, and 6911 (Gordonsville).
[18.0] RAIL CONSTRUCTION
[18.A] The Union player (only) may construct new rail hexes. Each rail unit may, instead of repairing or converting rail hexes, construct 1 rail hex per turn.
[18.B] A railroad may only be built adjacent to another friendly rail hex, within 20 unbroken, contiguous, friendly rail hexes. No Confederate combat unit can be on or adjacent to a rail hex between the rail unit and the new rail hex.
[18.C] To build a railroad across a major river hexside, a rail unit must spend a turn building a bridge before it can build a new rail hex on the other side of the river. This requirement is excused if there is a city in the major river hex (representing existing rail bridges and ferries).
[18.D] New rail hexes are shown by placement of a rail progress marker. A new railroad is linked to the rail hexes indicated by a railhead marker. Thus, a new rail hex could be built in a clear hex between two parallel rail lines, to link them together.
[19.0] RAIL UNITS IN COMBAT
[19.A] Rail units have no combat value. They are eliminated immediately if in a hex without friendly combat units that is entered by Confederate combat units.
[19.A.1]A rail unit is also eliminated if the combat units stacked in its hex are eliminated or overrun; or if they are forced to retreat by combat or are voluntarily withdrawn, other than into an adjacent, connected, friendly, unbroken rail hex.
[19.A.2] Rail units may not withdraw onto naval transports.
[19.A.3] Rail units in a besieged fortification are destroyed if the fortification surrenders or the defending combat units are eliminated.
[19.B] In scenarios, rail repair units are automatically replaced, free of charge, four turns after they are destroyed. In campaign games, the Union player may spend production points to rebuild eliminated rail units or construct new ones.
[20.0] SOURCES OF SUPPLY
[20.A] The active player determines the supply status of friendly units for purposes of attrition, movement, and combat. All units must determine their supply status at the moment of combat if they are attacking.
[20.B] Union supply sources are the offboard zones (including Missouri) on the northern and northeastern sides of the map, and major cities in the Northern home states (4.0).
[20.C] The Confederate player has several supply networks that serve as sources of supply. A supply network is:
• any two major cities in the Confederate home states; or
• one home state major city and one Shenandoah Valley city; or
• one of the four Confederate off-board zones (Texas, Arkansas, Louisiana, and Florida) and one home state major city.
The component cities and zones of a network must be connected by a contiguous line of unblocked hexes that contain railroads, the Valley Road, or major river hexsides, in any combination.
[20.C.1] Burned, besieged, or Union-occupied cities can’t form part of the network. Off-board zones must be free of Union land combat units to participate in the network.
[20.C.2] Rail hexes are blocked if broken, converted, or occupied by Union combat units.
[20.C.3] Major river hexsides are blocked if occupied by Union naval combat (not naval Transport) units, or if they border a hex occupied by Union land units that are either entrenched or in fortifications.
[20.C.4] Valley Road hexes are blocked if occupied by Union combat units.
[20.D] A network may be linked by one or more unblocked routes, or by a combination of routes, such as from a major city along a major river to a hex containing a railroad and from there by rail to another major city, offboard zone, or Valley city.
[20.D.1] The Confederate player may also use land combat SPs to connect a network. A land combat unit may trace a line of hexes up to 3 MPs to a major city hex, and another line of up to 3 MPs to a major river, Valley Road, or railroad that leads to the other half of the network.
[20.D.2] Confederate SPs may thus “bridge” a gap in a rail line or circumvent a Union block on a rail, major river or road.
[20.E] In “Army of the Potomac” scenarios, all railroads in Confederate states that lead off the western edge of the map are Confederate sources of supply until September 1864. After that, they no longer serve as supply sources, because of the fall of Atlanta.
[20.F] In “Army of the Tennessee” scenarios, railroads in the Confederate states that lead off the eastern edge of the board are Confederate sources of supply.
[21.0] UNIT SUPPLY
[21.A] For a unit to be supplied, it must be able to trace a path of hexes no more than 3 MPs in length to a supply source or a supplied hex.
[21.B] The supply path pays all movement costs for the intervening terrain, as if the unit were actually moving from its hex back to the supply source/supplied hex.
[21.B.1] There is no terrain penalty for tracing a supply path across an unbridged minor river hexside if the path of supply is traced through hexes containing contiguous river hexsides of the same river.
[21.B.1] The supply path can’t traverse unbridged major river hexside or coastal/sea areas (EXCEPTION: 55.0 Naval Supply).
[21.C] A supplied hex (as opposed to a supply source) is a hex occupied by at least one friendly combat unit that is within 3 MPs of another supplied hex or supply source.
[21.C.1] A supplied hex may also be a friendly rail or Valley Road hex that can trace a line of rail/road hexes to either another supplied hex or a source of supply.
[21.C.2] A unit in a hex adjacent to a friendly off-board zone that qualifies as a source of supply is a supplied hex. (Ignore the normal cost of 5 MPs to enter an offboard zone in this case.)
[21.C.3] Naval Transport and River fleets may act as limited sources of supply (see 55.0 Naval Supply).
[21.C.5] The path of supply may be traced into or through a hex in which a friendly unit is besieging an enemy unit in a fortification.
[22.0] UNSUPPLIED UNITS
[22.A] Unsupplied units:
1. Can’t overrun enemy forces;
2. Can’t build fortifications or entrenchments;
3. Add 1 to attrition die rolls and subtract 1 from forced march die rolls; and
4. Are halved in strength (fractions dropped) when attacking. Unsupplied stacks are never reduced below 1 SP. Unsupplied units defend at their full SP value.
[22.B] Zero-point and 1-point leaders can’t voluntarily move to an out of supply position unless:
1. They are currently unsupplied and are moving toward a source of supply or supplied hex; or
2. They are stacked with or adjacent to a friendly 2- or 3-point leader at the start of the movement phase.
[22.C] All 2- and 3-point leaders, and any leaders and units that begin a movement phase stacked with or adjacent to them, may move to an out of supply position that turn.
[22.D] Cavalry and partisans (unless led by a 0- or 1-point leader) may voluntarily move out of supply.
Supply Examples:
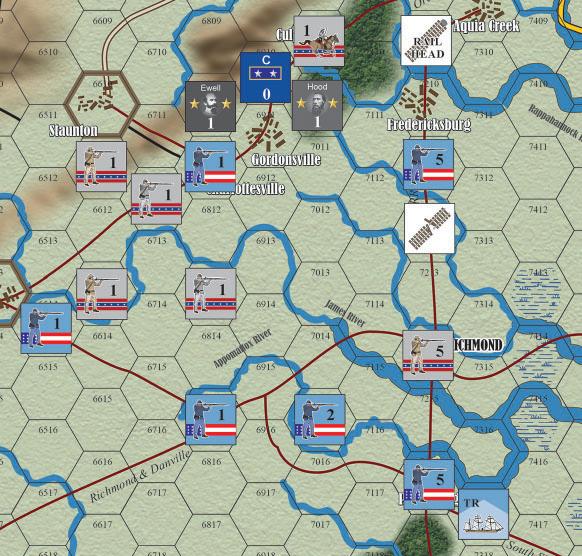
The Confederate player has a supply network consisting of of Richmond (a major city in a Confederate home state) and Staunton, a Valley city. They are connected by a combination of rail lines and combat units. The Richmond-Staunton line is traced as follows: The unit in hex 6611 is only 1 MP from Staunton. The unit in 6712 is 3 MPs (the maximum distance allowed for a supply path) away from the unit in mountain hex 6611. The unit in 6813 is 2 MPs away from hex 6712; since there is a friendly unit in that hex, there is no +1 MP cost to cross the minor river hexside. The unit in 6813 also 2 MPs from rail hex 7014, which leads directly to Richmond. Confederate units can be supplied out of either city in the network.
Ewell (in 6810) can use Staunton as a source of supply, since he is within 3 MPs of the city. Hood (in 7010), however, is not in supply. He is not within 3 MPs of Richmond, Staunton, or a supplied hex. Staunton is 6 MPs away, across the mountains. The rail hex to Richmond in 7212 is within 3 MPs, but the Union player has broken the rail line there. Ewell, who is in supply,
is in a mountain hex 4 MPs from Hood, so he can’t be used to extend the supply chain from Staunton. If there were a Confederate unit in Gordonsville (6911), that unit would have provided Hood with a supplied hex.
The Union player has two lines of communication. The friendly railroad hex north of Fredericksburg (7209) is a supplied hex, presuming of course that the Union player has built a railroad in hex 7308 (just north of Aquia Creek) to link it to the main railroad that leads into Washington. This can supply the 5 SP unit in hex 7211, but not Union leader “C” or the SP in Charlottesville, as they can’t trace a path of 3 (or fewer) MPs to either the supplied rail hex (7209) or the supplied unit (7211). Both would be supplied if there were a Union unit in hex 7111.
The naval transport in hex 7317 can be used to supply up to 10 SPs (see Naval Supply rules). The 5 SP unit in Petersburg (7216) adjacent to the transport is within the 3 MP limit, so it is supplied. The Union units in 6514 and 6815 are in supply as they can each trace a path of 3 MPs to each other and then a back to Petersburg.
[23.0] COMBAT
[23.A] Eligibility
[23.A.1] In the Combat Phase, the active player may attack any hex occupied by enemy SPs that is adjacent to a hex occupied by at least 1 SP of the active player’s forces (unless these two hexes are separated by an all-sea or unbridged major river hexside).
[23.A.2] At the start of the Combat phase, before resolving any combat, the active player must specify aloud each hex that will be attacked and which SPs will execute each attack. Place attack markers.
• Each attack must be initiated from a single hex, although SPs from adjacent hexes may attempt to reinforce a battle after at least one round of combat has been resolved. (See 32.0 Combat Reinforcement).
• The active player may initiate as many attacks as desired at the start of the Combat Phase, but may not initiate any additional new attacks once combat resolution has begun. The active player may only resolve attacks against the hexes specified at the start of the Combat Phase. For each specified attack, at least one round of combat must be resolved.
[23.A.3] If the active player has more than 1 SP in a hex, that force may attack more than one adjacent hex. Each combat is resolved separately. The first round of every combat in a Combat Phase is concluded, however, before the second round of any attack is begun, from that hex or any other. Each SP may participate in only one battle per combat round.
[23.A.4] Combat is never mandatory. Combat takes place only if the active player declares an attack, or the inactive player has used interception to attack. If neither player attacks, combat doesn’t take place.
[23.A.5] Leaders and supply affect combat but neither are required for combat to occur.
Combat Eligibilty Example: The Confederate player is the active player in the following example:
The Confederate 2 SP unit in hex 7316 can’t attack the Union 5 SP unit in 7416 because they are separated by an unbridged major river. The Virginia militia unit in Yorktown (7716) can’t attack the Union 1 SP unit in hex 7815 because they are separated by an all-sea hexside.
The Confederate player isn’t required to attack the Union 2 SP unit in hex 6915 as combat isn’t mandatory. If the Confederate player does choose to attack, either the cavalry in 6814 or the 5 SP infantry unit in 7014 could do so, but not both, as an attack can come from only one hex. After the first round of combat, however, the other unit could attempt to join the battle (see Combat Reinforcement, 32.0). If it were the Union player’s combat phase, only the unit in hex 6915 could attack, because of terrain restrictions on the other two Union units. The 2 SP unit could attack either of the adjacent Confederate units or the Union player could exchange it for two 1 SP units and use one to attack each hex. Each battle would be resolved separately.
[23.B] Sequence
Combat occurs in the following order:
A. Interception Attacks. First rounds of all interception attacks, with the inactive player determining the order in which they are resolved.
B. Active Player Attacks. First rounds of all attacks by the active player, with the active player designating their order.
C. Morale Reduction. Reduce by 1 the morale of all units involved in combat, in addition to any morale losses resulting from combat resolution (see 24.0 Combat Resolution).
D. Retreats. All units engaged in combat whose morale value is less than zero must retreat. The inactive player retreats first. Withdrawals. Players may choose to withdraw any units engaged in combat. The inactive player executes withdrawals first.
NOTE: if using the optional tactical matrix, only units that chose a withdrawal tactical chit and were successful, may withdraw. Cavalry and partisans may withdraw if engaged with a force inferior in cavalry SPs, even if using the optional tactical rules.
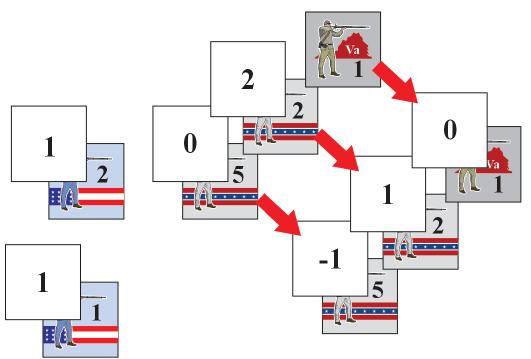
E. Puruit and Advance after Combat. When a force withdraws or retreats from combat, it will lose an additional SP to pursuit if the average morale of all engaged victorious units is greater than that of the units leaving the battle or the victorious units’ leader is of equal or greater value than the leader who led those
leaving the battle. At the end of any round of combat, after withdrawals, retreats, and pursuits have been conducted, any units no longer engaged with enemy units in adjacent hexes, may advance into the hex they were fighting the hex was vacated.
E. Reinforcement. Players who have friendly unengaged units adjacent to either of the hexes (friendly or enemy) engaged in a battle may attempt to involve them in the fight. Roll 1 die for each such stack that the player wishes to commit to the battle. The stack enters the battle on a roll of 5 or 6, modified by adding the leadership value of any one general (if any) in the reinforcing stack. Unsuccessful units may attempt to reinforce again on subsequent rounds. The active player rolls to reinforce first.
F. Continuation of Combat and Counterattacks. Neither player is required to continue attacking. If a player declines to continue to attack in a subsequent round but doesn’t withdraw, the other player may counterattack with those units already engaged in the battle.
A counterattack is resolved in the same manner as an initial attack. The counterattacking player announces which hex of enemy units that were previously committed to battle is the target of the counterattack. Units of both players adjacent to either the counterattacking hex or the hex being counterattacked can attempt to reinforce. Defending units receive any bonus for the terrain in the hex
designated as the target of the counterattack. The counterattacking player suffers any penalty for terrain in the hex designated as the counterattacking hex. Terrain occupied by reinforcing units is ignored. If neither player wishes to attack or counterattack with the units previously committed, no further combat occurs.
Players repeat steps A-F until there are no longer any units engaged in combat. Players then roll for leader injury and siege resolution, as per those rules. The active player executes any rail repair, construction, or conversion desired, then both players recover the morale of demoralized units.
[23.C] General Rules
[23.C.1] The player who is attacking (either the active player or the intercepting player) must specify the target hex and the hex from which it is being attacked. An attack may not be initiated from more than one hex. Players attacking in the first round (either from interception or active player choice) must resolve all of their first round combats. Units that are declared as attacking in any subsequent round must fight that round.
[23.C.2] The active player may initiate as many attacks as desired at the start of the combat phase, but can’t attack any other hexes (other than by counterattack, as noted above) once the combat resolution process has begun.
[23.C.3] A player who has attacked an enemy-occupied hex may continue executing one attack against that hex in each round of combat, until either of the two original hexes (the attacking hex and the target hex) is vacated, at which time the combat is terminated. The same hex may not be attacked more than once in a single round.
[23.C.4] Players must resolve one round of every combat before a second round of any combat may begin. The combat phase can consist of any number of combat rounds.
[24.0] COMBAT RESOLUTION
[24.A] At the start of a round of combat, both players announce how many SPs they are committing to the battle. The attacking player announces first. The other player must commit at least as many SPs if possible; if not, they must commit the entire force in the hex under attack.
1. Once units are committed, they remain committed until eliminated, retreated, or withdrawn from combat; or until the combat ceases.
2. If there are any uncommitted units in a hex, place an uncommitted marker over them. (See 35.0 Uncommitted Units.)
[24.B] In each round of combat the players resolve each battle separately according to the following procedure:
1. Both players total all of their SPs committed to the battle, taking into account the effects of supply and fortifications. Unsupplied units that are attacking are halved in strength, fractions dropped. Units defending in fortifications are doubled. The player with the greater total is the Larger Force; the other is the Smaller Force. If the totals are equal, the attacking side is the Larger Force.
2. Determine the combat odds ratio by dividing the strength of the Larger Force by that of the Smaller Force. If the result is 3 or greater, the ratio is 3:1; if 2 or greater but less than 3, the ratio is 2:1; if 1.5 or greater but less than 2, the ratio is 1.5:1; any other result is 1:1. Each ratio is printed on a separate line on the Combat Result Table (CRT).
Example:
1. The Confederate player has 15 SPs, in supply, attacking 6 Union SPs. The Confederate player has the Larger Force, and the odds are 15:6, reduced to 2:1.
2. As above, but the Union 6 SPs are in a fort, so they are doubled to 12. The Confederate player still has the Larger Force (with 15 SPs), but the odds are 15:12, reduced to 1:1.
3. As above, but the Confederate force is not in supply, so it is halved to 7 (fractions dropped). The Confederate player is still the attacker, but the Union 6 SPs in a fort (doubled to 12) are now the Larger Force. The odds are 12:7, reduced to 1.5:1.
4. As above, but since the Confederate attacking force counts as only 7 SPs, the Union player decides to commit only 4 SPs (doubled to 8 by the fort) and keep 2 SPs uncommitted. An uncommitted marker is placed in the fort, on top of the 2 uncommitted SPs to show this. The Union player still has the Larger Force (8 vs. 7) and the odds are 8:7, reduced to 1:1.
3. After determining the ratio, the Larger Force player rolls 2 dice and applies appropriate modifiers. The modified result is then located opposite the previously determined ratio on the CRT. Directly above this number, at the top of the CRT, is a result affecting
both the Larger and Smaller force. Apply the result to both forces before resolving any other battle.
4. The resolution dice roll may be modified by leadership, morale, and terrain, as follows:
Leadership: Each player may use one leader, if any are present in the engaged hexes, to influence each battle. This leader must occupy the same hex as friendly SPs committed to the battle. Increase the dice roll by the value of the Larger Force’s leader and decrease it by that of the Smaller Force’s. If a force doesn’t have a leader, its leadership value is zero.A player may choose a different leader for each round of combat, if more than one is present, including leaders who are reinforcing a battle.
Morale: Each force has a morale value equal to the average morale of all units committed to battle. Most units have a morale value of 3, but some (militia and partisans) have a morale value of 1. Some units may have a morale value ranging from 0 to 2 because of previous combat results or the morale reduction that follows each round of combat. Calculate the average by dividing the total current morale by the number of units involved, rounding up fractions greater than .5 and dropping fractions of .5 or less.
Morale may change during the course of a battle because of combat results, morale reduction, or reinforcement by units of a different morale level. Units attacking across a bridged major river hexside are reduced by 1 in morale, as are units that are intercepted after crossing a major or minor river hexside.
The combat dice roll is increased by the morale of the Larger Force and decreased by the morale of the Smaller Force.
Terrain: Terrain effects are summarized on the Terrain Effects Chart (TEC). Attacking units receive no benefit from the terrain in the hex they occupy. Units being attacked across a minor river or bridged major river are penalized by subtracting 2 from the dice roll if they are the Smaller Force, or adding 2 if the Larger Force. Units defending in forests or swamps subtract 1 if they are the Smaller Force, add 1 if the Larger Force. If defending in a mountain hex, the Smaller Force subtracts 2, if Lager Force add 2.
Cities don’t affect combat (except to provide bridges across major rivers). SPs being transported by naval
units and attacking coastal or major river hexes have the dice modified as if attacking across a bridged major river hexside. Units intercepted immediately after crossing a river hexside are also penalized. If the interceptor is the Larger Force, increase the dice by 1 if the river hexside was bridged, or by 2 if it was not. If the interceptor is the Smaller Force, reduce the dice by 1 if the hex was bridged, or by 2 if it was not.
Entrenchments: The combat dice roll is modified if the defender is entrenched; increase it by 1 if the Larger Force is defending, or decrease it by 1 if the Smaller Force is defending. A defending force that is entrenched also adds 1 to its morale.
Other: Naval units bombarding or defending certain hexes adjust the dice roll by 1 in their side’s favor: plus 1 for the Larger, minus 1 for the Smaller Force (see 51.0 Naval Combat).
Units defending in fortifications (Forts or Fortresses) also receive a bonus of 1 to the dice roll in their favor, as well as having their morale increased by 1.They can also ignore certain combat results (see 37.0 Fortification rules). Modify the roll by 1 in favor of a player with a siege train who is defending in an entrenchment or fortification, or attacking units in entrenchments or fortifications. (See 39.0 Siege Trains.) The dice roll may be modified further if the optional Tactical Matrix Combat Rules are used.
Cumulative: All modifiers (leadership, morale, terrain, entrenchments, and those listed as “other”) are cumulative. The combat dice roll, however, may never be modified by more than plus or minus 4. Treat a modified die roll of less than 2, or more than 12, as 2 or 12, respectively.
5. Determine the Larger Force and recalculate the combat ratio and modifiers for each round of combat.
[25.0] COMBAT RESULTS
[25.A.1] After determining the ratio and modifiers, the Larger Force player rolls two dice and refers to the Combat Results Table (CRT) to determine the battle’s outcome. CRT results can affect both opposing forces. Apply the result indicated under the column marked “L” to the larger force, and the result indicated under the “S” column to the smaller force.
To determine their losses, both players consult the Combat Loss Chart (CLC), cross-referencing the combat result
with the number of SPs in the Smaller Force (even when determining the loss inflicted on the Larger Force). Each player then eliminates SPs equal to the number indicated by the CLC.
[25.A.2] The CLC has three types of results: a number, (1), and 1+
Number: this is how many SPs the force loses. (1): the player rolls 1 die. If greater than the force’s current morale, it loses 1 SP; otherwise no SP is lost. 1+: the player rolls 1 die. If greater than the force’s current morale, it loses 2 SP; otherwise it loses 1 SP.
[25.A.3] Players remove their losses immediately. At least 50% of the losses must be SPs whose morale is at least equal to the average morale of the force as determined before combat. Siege, Pontoon, Rail and Leader units may not be eliminated to satisfy required losses on the CLC. Naval units may not be lost unless committed to the battle, and then only if their SPs were used in an assault on an entrenched or fortified enemy and their force suffered a result of D1. Non-combat Naval units (Transports and Blockade Runners) may never be eliminated to satisfy losses.
[25.A.4] When a force receives a D1, D2 or D3 result, in addition to losing SPs, its morale is reduced by the number following the “D”. Use the morale markers to record this.
Combat Results Example:
The Confederate player attacks with 8 SPs against 5 Union SPs. The odds are 8:5, reduced to 1.5:1. An 8 is rolled but modified by +1 resulting in a 9. The players read along the 1.5:1 line on the CRT until they reach the number 9, then look to the top of the column for the result: “L1/SD1”. Next they consult the Combat Loss Chart (CLC). Cross-indexing the SPs of the Smaller Force (5) with the result for the Larger Force (1), the outcome for the Confederates is 1 SP lost. Crossindexing the Smaller Force size (5) with the Smaller Force’s result (D1), the Union force also loses 1 SP, but the “D” portion of the result also reduces its morale by 1.
[26.0] COMBAT MORALE
[26.A] Land combat units have a basic morale of 1, 2, or 3, as specified by the Unit Characteristics Chart. Partisans and militia always have a morale of 1. All infantry have a morale of 2 in 1861. Union cavalry have a morale of 2 in 1861 and 1862 while Confederate cavalry always have
a morale of 3, as does all infantry in 1862-1865. Siege trains, Pontoon trains, and Rail units don’t have morale.
[26.B] A unit’s morale can be increased or decreased by several factors. Show adjustments in morale by placing a Morale marker on the unit to indicate its current morale. If a unit’s basic morale is unchanged, it has no marker.
[26.B.1] A Morale Marker is numbered 2, 1, 0, and -1 on its face. Place it on top the unit on the map or on the City or Leader holding box. Units in a hex or holding box may have different morale ratings.
1. lf different morale values need to be shown within a stack or holding box, place several markers accordingly. All units beneath a morale marker have the morale depicted by that marker.
2. When units in a stack or holding box have different morale values, calculate their average morale to determine the morale modifier for combat resolution, and to determine “(1)” and “1+” losses on the Combat Loss Chart. Drop fractions of 0.5 or lower and round up those higher than 0.5.
3. At least 50% of the SPs eliminated in combat must be have morale equal to or higher than the average morale used to determine the combat morale modifier.
Morale Examples:
1. The morale markers on the Union units show a morale of 1 for the 2 SP unit and a morale of 1 for the 1 SP unit. The Confederate player has a stack of units worth 5 SPs, 2 SPs, and 1 SP. The 1 SP unit is militia. The stack on the left shows a morale of 0 for the 5 SP unit and a morale of 2 for the 2 SP unit. The militia unit is unmarked, indicating that it has its original morale of 1.The stack’s average morale is 1. (5 x 0 = 0 plus 2 x 2 = 4 plus 1 x 1 = 1 for a total of 5 morale points divided by 8 SPs. 5 ÷ 8 = 0.6, rounded up to 1). If the stack took losses in combat, at least 50% of the units eliminated
would have to be of morale 1 or higher.
If the Confederate stack’s morale were to be reduced by 1, its morale markers would be changed to those of the stack on the right.
2. If a Union unit with morale 3 were intercepted while crossing a river, its morale would immediately drop to 2, shown by placing a morale “2” marker on it. If it then received a D2 combat result, its morale would be reduced by 2, to 0. After the end of that round of combat, its morale would be reduced by one for having been committed to combat. Its morale would now be -1 (3 – 1 – 2 – 1 = -1).
[26.C] A unit’s morale may be reduced by the following combat situations:
[26.C.1] A unit intercepted in the hex after crossing any river has its morale reduced by 1. (Note: the unit’s morale is not reduced if the intercepting unit is outnumbered by 4:1 or more during the first round of combat, see 34.0)
[26.C.2] Morale of a unit attacking across a bridged major river, or a land unit attacking in the hex into which it is trying to disembark from a naval unit, is reduced by 1.
[26.C.3] If a unit’s morale is reduced by of one of the above, apply the reduction before the first round of combat takes place.
[26.D] A unit may also have its morale reduced by a CRT result. D1, D2, and D3 results reduce the morale of all committed units by 1, 2, or 3 respectively.
[26.E] All units committed to battle have their morale reduced by 1 at the end of each round of combat. This reduction is carried out in the morale reduction portion of the combat phase, and is in addition to any reductions caused by combat situations or CRT results.
[26.F] A unit has its morale temporarily increased by 1 when defending in an entrenchment, fort, or fortress. The fortification or entrenchment marker acts as a +1 morale marker. As soon as the unit is no longer being attacked in the fortification or entrenchment, the bonus is lost. Should the unit attack from or leave the hex its morale reverts to that shown by its Morale Marker (if any) or its basic morale.
[26.G] If a unit’s morale falls below zero (including any positive adjustment for fortifications and entrenchments) it must retreat from combat. Units besieged in a fortification are eliminated (captured in a campaign game) if their morale falls below zero. (See 29.0 Retreat.)
[26.G.1] There are no markers to depict morale lower than -1. If a unit in an entrenchment or fortification with a morale of -1 (which means its morale would temporarily be 0) has its morale reduced, it loses the entrenchment/ fortification bonus and must either retreat or, if besieged, be eliminated (captured in a campaign game). If the units retreat, the morale marker is remains at -1.
[26.G.2] If a unit with morale of -1 is attacked, and isn’t in a fortification or entrenchment, it automatically suffers a D3 result and inflicts no losses on its attacker. It must retreat.
NOTE: If after morale reduction at the end of a round of combat, all units of both players committed to a battle have negative morale, then neither side is forced to retreat, although either or both sides (beginning with the active player) may elect to retreat. In this case, units under siege would not be eliminated (units under siege, of course, can’t retreat). (See 29.0 Retreat and 37.0 Fortifications.)
[27.0] MORALE RECOVERY
[27.A] At the end of each player’s Combat Phase, all units of both players are eligible for morale recovery.
[27.B] All units with a morale lower than their basic morale (i.e., all units with morale markers) recover as follows:
[27.B.1] All units in friendly, supplied major cities or in entrenchments or fortifications recover 1 point of morale.
[27.B.2] Next, all units stacked with a leader valued at 1 or more may recover additional morale points. Only one leader may be used to recover morale in a stack.
• All units stacked with a 1-point leader recover 1 point of morale.
• All units stacked with a 1+, 1*, 2, or yellow 2-point leader recover 2 points of morale.
• All units stacked with Lee (a 3-point leader) recover 3 points of morale.
[27.C] A unit may not recover more morale than it has lost. A unit’s morale may not be higher than its basic morale (except temporarily, when it is in a fortification or entrenchment, where its morale may be increased by 1 for combat purposes.)
[27.D] After all units have recovered morale, any units that still have a negative morale have their morale increased to zero.
[28.0] WITHDRAWAL
[28.A] At the end of each round of combat, after morale reduction, either player may withdraw from combat, terminating that combat.
[28.A.1] The inactive player announces which (if any) engaged units are withdrawing from combat. Besieged units can’t withdraw.
[28.A.2] Units that withdraw must leave their hex. They may move up to 4 hexes (not MPs) when they withdraw.
[28.A.3] Units that withdraw must move to a hex that is:
• Free of enemy units; and
• Not farther, in terms of MPs, from a friendly source of supply/supplied unit than the hex where it began the combat phase; and
• If possible, in the direction of the nearest friendly, unbesieged, unburned major city in its home territory.
[28.A.4] A unit may withdraw through a hex containing enemy units, but it may not end its withdrawal in that hex. If a force must pass through a hex containing enemy units, 1 additional SP is lost (captured in a campaign game) for each such hex entered.
[28.A.5] A unit may never withdraw across an all-sea or unbridged major river hexside.
[28.A.6] Units may withdraw onto friendly naval units, but only up to their transport capacity (2 SPs per River fleet, 4 per Transport). (See 47.0 Amphibious Movement.)
[28.A.7] A unit may never end its withdrawal in a hex containing:
• Enemy units; or
• Friendly units that are engaged in combat; or
• A fortification that is under siege.
NOTE: A unit may withdraw from a battle into a friendly fortification in the same hex. It may be attacked in the next round of combat by the same enemy units with which it was engaged, as well as any unit reinforcing the enemy (See 37.0 Fortification and 32.0 Combat Reinforcement.)
[28.A.8] If a unit has more than one hex available for withdrawal, the player may chose the withdrawal direction and hex. A stack doesn’t require a leader to withdraw from combat. Units withdrawing from a hex need not all withdraw to the same hex.
[28.A.9] When units withdraw, all pontoons, siege trains, and rail units may withdraw with them. Rail units are lost if they withdraw into hexes occupied by enemy units or if they withdraw other than into friendly, unbroken, contiguous rail hexes.
[28.A.10] After the inactive player has announced and conducted any withdrawals, the active player does the same.
[28.B] Tactical Matrix. If the Optional Tactical Matrix Rules are used, withdrawal is no longer automatic. Players must successfully choose a withdrawal option. See Optional Tactical Rules.
[28.C] Cavalry and Partisans may withdraw from combat before any round of combat, even the first, if the opposing committed units don’t contain an equal number of cavalry or partisans. (Infantry units accompanying the cavalry, however, may only withdraw normally, not before the first round of combat.) However, if cavalry or partisans intercepted opposing units, they must fight the first round of combat. These rules apply even if the Optional Tactical Matrix rules are used.
[28.D] Partial Withdrawal. A player need not withdraw all the troops committed to a battle. Some may withdraw while others remain engaged. If a player withdraws all engaged units from a battle, but friendly unengaged units remain in the hex from which the player withdrew, the opposing player may attack that hex with all engaged units that are adjacent to that hex, as well as any units that can reinforce the combat (see 32.0 Combat Reinforcement).
[29.0] RETREAT
[29.A] At the end of each round of combat, after morale reduction, any units whose morale has fallen below zero must retreat, unless all units of both players committed to the battle are reduced below zero. In that case, neither side must retreat, but either side may withdraw if desired. The inactive player retreats first, then the active player.
[29.B] Retreats are conducted according to the same rules as withdrawal with the following exceptions:
[29.B.1] Units that retreat must leave the hex even if it contains a friendly fortification. If the fortification is besieged, units in it may not retreat and are eliminated (captured in a campaign game).
[29.B.2] Units that retreat abandon all rail, siege, and pontoon units. These are eliminated.
[29.C] Partial Withdrawal (see 28.D) rule also applies.
[30.0] PURSUIT
[30.A] When a force withdraws or retreats from combat, it will lose an additional SP to pursuit, if BOTH of the following conditions apply:
[30.A.1] The average morale of all engaged victorious units is greater than that of the units leaving the battle; and [30.A.2] The victorious units’ leader is of equal or greater value than the leader who led those leaving the battle. Use the same leaders who were used to determine leadership value during the round of combat (1+, 2 and yellow-2 leaders are equal for this purpose).
[30.B] Pursuit doesn’t involve any physical movement of the victorious units, though they may be eligible to advance after combat.
[31.0] ADVANCE AFTER COMBAT
[31.A] At the end of any round of combat, after all withdrawals, retreats, and pursuits have been conducted, any units that were committed to a battle and are no longer engaged with enemy units in adjacent hexes, may advance into the hex they were fighting if all opposing units that occupied that hex have either been eliminated or have withdrawn/retreated from the hex. If a unit is still engaged with other enemy units, in other hexes (which is possible according to the Combat Reinforcement Rules), it may not advance until those other enemy units are eliminated, withdrawn, or retreated, or are no longer engaged with the victorious units. If neither the victorious units nor the units with which they are currently engaged in combat wish to attack, the victorious units may occupy the hex that was vacated.
[31.B] If the enemy units have withdrawn into a fortification hex, victorious units may advance into the hex. In subsequent turns they may assault or besiege the fortification (see 37.0 Fortifications and 38.0 Sieges).
[31.C] Unsupplied units and infantry units that are not accompanied by a leader may not advance after combat.
[31.D] Advance after combat is never mandatory; some, all, or none of the victorious units may advance. NOTE: Although units may withdraw or retreat up to 4 hexes, victorious units may advance only into the adjacent vacant hex and no farther.
[31.E] In a situation where the morale of both sides is simultaneously reduced below zero, if only one side chooses to withdraw, the other side may advance after combat.
Basic Combat Examples:
It is the Union half of the April 1863 turn. Confederate leader Jackson has intercepted Union leader Howard
after crossing the bridged major river at Fredericksburg (7210). The Union player launches three attacks: Sheridan vs the 5 SP unit in Culpeper (7009); Sherman vs the cavalry in Charlottesville (6811); and Warren vs A.P. Hill in 7011. All units are in supply.
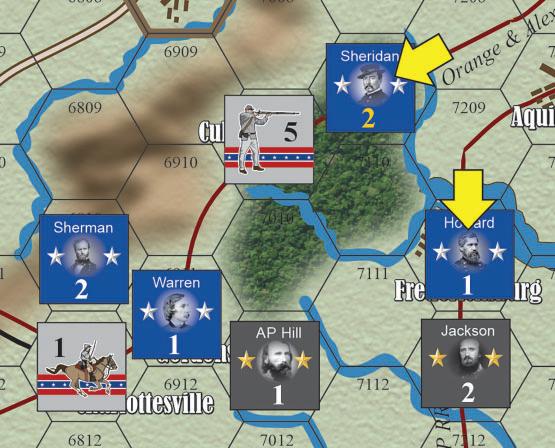
The initial rounds of each battle are resolved first, starting with the Confederate interception battle. Jackson vs. Howard, 1st round: Jackson has 5 SPs intercepting Howard with 7 SPs. Since Howard’s force was intercepted after crossing a bridged major river, its morale is reduced by 1 from its original level of 3 and its strength is halved (fractions dropped). The Union player places a “2” morale marker on Howard’s stack. Jackson commits all 5 SPs to the battle. Howard’s 7 SP are halved to 3, so he is outnumbered and must commit his entire force. The odds are 5:3, reduced to 1.5:1, with Jackson being the Larger Force.
The combat die roll will be modified by: +1 for the difference between Jacksons’ leadership rating (2) and Howard’s (1); +1 for the difference in morale of Jackson’s force (basic morale of 3) and Howard’s (reduced to 2); and +1 for Howard’s force being intercepted after crossing a river. Jackson rolls two dice, obtaining a 7 modified to 10. Cross-indexing the odds of 1.5:1 and the modified roll of 10 on the CRT yields “L1/SD2”. On the Combat Loss Chart (CLC), both results are cross-indexed with the number of SPs in the Smaller Force (3). The Larger Force gets a result of (1), so the Confederate player rolls one die, obtaining a 3. This is equal to or less than his force’s morale rating (3), so Jackson takes no losses. The Smaller Force result is 1, eliminating 1 SP from Howard’s force, while the
“D2” reduces its morale by 2, down to 0. The eliminated SP goes in the force pool where it is available for replacement.
Both sides now reduce their morale by 1 for engaging in a round of combat. Jackson’s force gets a “2” morale marker, while Howard’s force goes to -1, the lowest possible morale. Forces with morale less than zero must retreat (up to 4 hexes). The Union player retreats Howard 1 hex, to 7209. In the pursuit segment, Howard loses another SP as Jackson is a better leader with troops of higher morale. The eliminated SP is placed in the Union force pool (in the Campaign Game, it would be captured and placed in the Confederate Prisoner Box). Jackson may choose to advance into Fredericksburg as it is now vacant. After this battle’s first (and only) round, Jackson has 5 SPs with morale 2 and Howard has 5 SPs with a morale of -1. Both sides await morale recovery, which occurs at the end of the Combat Phase after all battles are complete. The first rounds of the active player’s attacks are now resolved. The Union (active) player decides to begin with Sheridan.
Sheridan vs. Confederate infantry, 1st round: Sheridan has 10 infantry and 5 cavalry SPs for a total of 15 SPs. (Sheridan could move a force larger than 10 infantry SPs because Union cavalry don’t require a leader to move after 1862, and even then they wouldn’t count against his 10 infantry SP limit). The Confederate player has 5 SPs. Sheridan decides to commit 5 infantry and 5 cavalry SPs to battle for a total of 10. The outnumbered Confederates must commit their entire force of 5 SPs. The odds are 10:5, reduced to 2:1 with Sheridan having the Larger Force.
The dice are modified as follows: + 2 for leadership as Sheridan is a yellow 2 (cavalry general) and counts as a 2-point leader as long as at least half of the units he is leading in a battle are cavalry. The Confederate unit is leaderless and is treated as having a zero-point leader, but it is in a wooded hex, which modifies the roll by -1. There is no morale modifier, as each force has its basic morale of 3. The net modifier for the battle is +1 (2 - 1 = 1). Sheridan rolls a 7, modified by +1 to 8. The result on the CRT at 2:1 is L1/SD1. Consulting the CLC for a Smaller Force of 5 SPs, the losses are 1 Union SP and 1 Confederate SP. The D1 result also reduced the Confederate force’s morale by 1. Both sides then reduce their morale by 1 for engaging in a round of combat.
The Confederate player elects not to withdraw, so a second round of battle will follow after all of the initial rounds have been resolved.
Warren vs. A.P. Hill, 1st round: Warren has 5 SPs of infantry and A.P. Hill has 2 Virginia militia SPs and 5 infantry SPs. Warren commits all 5 of his SPs, forcing Hill to commit at least 5 SPs. Hill decides to commit 3 infantry SPs and all 2 of his militia SPs, leaving 2 infantry SP uncommitted. The odds are 5:5, reduced to 1:1 with Warren as the Larger Force (when numbers are equal numbers, the attacking side is Larger Force).
The dice are modified as follows: Warren gets +1 because of morale. Union morale is the basic 3 for infantry, and Confederate morale is 2 (3 infantry x 3 = 9, plus 2 militia x 1 = 2; 9 + 2 = 11, divided by 5 SPs = 2.2, dropping fractions). There is no leadership modifier, as both sides have generals of equal value. There is no terrain modifier, as both sides are in clear terrain. The dice roll is a 2 (bad luck!), modified +1 to 3. Consulting the CRT, the result is LD2/S1. Losses, according to the CLC, are 1 Confederate SP and “1+” Union SPs. Warren rolls a 2, which is equal to or less than his current morale (3), so he loses only 1 SP. The Confederate loss must be an infantry SP, not a militia SP, as the majority of losses must be SPs with morale equal to or higher than that used in the combat. Warren’s force is reduced by 2 in morale because of the D2 result, then both sides are reduced 1 more for engaging in a round of combat. Warren’s troops have morale of 0, while Hill’s force needs two markers (a 2 for the 2 infantry SPs that fought and survived, and a 0 for the 2 committed militia SPs). Hill’s 2 uncommitted SPs need no marker as they retain their basic morale of 3. Neither side withdraws after the round.
Sherman vs. Confederate cavalry, 1st round: Sherman and 10 infantry SPs attack the single Confederate cavalry SP in Charlottesville. Since the Union player doesn’t have an equal number of cavalry SPs, the Confederate cavalry have the option to withdraw prior to combat. They use it and move to hex 6712, ending the battle.
Two of the four battles have ended after their first rounds. Second rounds are now resolved.
Sheridan vs. Confederate infantry, 2nd round: The Confederate player has 4 SPs remaining, at morale 1, against Sheridan’s 9 SPs with morale 2 as well as 5
uncommitted SPs with morale 3. Sheridan decides to continue his attack, using only those already engaged, not his uncommitted SPs. The odds are 9:4, reduced to 2:1. The net dice modifier is now +2 as Sheridan still has his + 2 leadership bonus, and now has a +1 morale bonus, against the -1 for forest terrain. Sheridan rolls a 10, with the +2 modifier resulting in a 12. The CRT result is L1/SD2. Sheridan loses 1 SP. The Confederate player gets a “1+” result on the CLC, loses 1 SP, and must roll for another loss. The roll is a 2, causing a second SP loss as Confederate morale is only 1. The D2 result (plus the automatic morale reduction for each round of combat) puts the Confederate morale below zero, forcing a retreat. The Confederate player loses another SP to pursuit, leaving just 1 SP surviving to retreat to the hex occupied by Jackson, who is now in Fredericksburg.
Sheridan advances into Culpeper with all 8 SPs that were committed to the battle, plus his 5 uncommitted SPs (see Uncommitted Units rules).
Warren vs. A.P. Hill, 2nd round: Warren did not withdraw but decides not to renew his attack for a second round. A.P. Hill has the option to counterattack and seizes it. He commits the 2 uncommitted SPs with his 4 surviving SPs for a total of 6 SPs to Warren’s 4 SPs. The odds are 6:4, reduced to 1.5:1, and A.P. Hill is now the Larger Force.
The dice are modified as follows: +2 for morale. The Union morale is 0 but the Confederate morale is an average of 2 (2 committed infantry x 1 = 2, 2 militia x 0 = 0, 4 + 0 + 6 = 6, divided by 6 SPs = 1. Leadership is equal and there are no terrain modifiers.
Hill rolls a 2 (more bad luck), modified to 3. The CRT result is LD1/S1. On the CLC 4 SP column (Warren has only 4 SPs) the results are 1 SP loss for each side. The Confederate player has to lose another infantry SP, not a militia SP, since the militia’s morale of 0 is less than the morale used by the stack in combat. The Confederate units go down by 1 in morale from the D1 result, and down 1 more for fighting another round. The militia’s morale goes below 0 and forces them to retreat, but the infantry are reduced to 0 or 1 and have the option to stay in the hex. Warren’s entire force is reduced to negative morale by the 1-point reduction for being engaged, so it must retreat. Warren and his force retreat to 6809, ending the battle. There is no pursuit as both forces have
equal leadership ratings. Hill advances into Warren’s hex.
Morale recovery: At the end of the combat phase, both players recover morale.
Jackson’s force recovers 1 point, returning its morale from 2 to 3 (as a 2-point leader Jackson can rally 2 points of morale recovery at a time, but his troops can’t improve their morale beyond their basic value of 3). The 1 SP that retreated to Jackson’s hex recovers 2 morale points (from -1 to 1) and gets a “1” morale marker.
Howard’s force recovers 1 point of morale, improving from -1 to 0.
Sheridan’s 8 committed SPs lost 1 morale point for each of the two rounds they fought, but they recover both points because Sheridan’s leadership rating is 2.
Warren’s SPs recover 1 morale point, from -1 to 0.
A.P. Hill’s forces in Gordonsville recover 1 point in morale. His infantry SPs go from 0 to 1 or from 1 to 2. The militia recover to 0.
If any units still had negative morale at the end of morale recovery, they would now be raised to morale 0.
NOTE: This example did not take into account Combat Reinforcement, Flank attacks or Leader Casualty rules, which will be covered in the next sections.
[32.0] COMBAT REINFORCEMENT
[32.A] At the end of each round of combat each player may attempt to commit additional SPs to any battle.
[32.A.1] SPs may be committed to reinforce a battle if:
• They are in a hex adjacent to one or both of the two hexes where the battle originated; or
• They are already in a battle hex as uncommitted troops.
[32.A.2] SPs that wish to reinforce a battle may not be engaged in combat with other enemy units. If a unit fought in the previous round of combat and its opponent hasn’t withdrawn, retreated, or been eliminated, it is still engaged in combat.
• A unit that has withdrawn from or advanced after combat in a previous round may attempt to reinforce another combat.
• A unit that retreated from combat may not attempt to reinforce another combat.
[32.A.3] A unit may not reinforce a battle on the opposite side of an unbridged major river hexside from the units engaged in the battle.
[32.B] The active player indicates which uncommitted SPs already in a hex with friendly engaged units are joining the battle, then the inactive player does the same (see 35.0 Uncommitted Units).
[32.C] To commit units in adjacent hexes to a battle, each player specifies aloud which stacks will try to reinforce which battles, before rolling for any of them.
[32.C.1] The active player announces reinforcement attempts first, then the inactive player does so.
[32.C.2] The active player rolls one die for each stack trying to reinforce the battle. Before each roll, the player may declare that the stack’s leader’s value will be added to the roll. Treat leaders valued at 1+ and yellow 2 as 2-point leaders. On a modified die roll of 5 or more, the reinforcement succeeds. On any other result, the stack remains in its hex and doesn’t reinforce the battle. After the active player has rolled for each reinforcement attempt, the inactive player does the same.
[32.C.3] A unit does not need a leader to reinforce a battle, but if a leader is used and the attempt is successful, that leader must be committed to the battle.
[32.C.4] No unit may attempt to reinforce more than one battle. Although units in a stack may split up into groups to reinforce different battles, each leader may modify the reinforcement die roll for only one such attempt. If there are multiple leaders in a stack, they may be parceled out to aid different reinforcement attempts.
[32.D] Units that successfully roll to reinforce a battle must be adjacent to the enemy hex being engaged when the next round of combat is resolved.
[32.D.1] If the reinforcing SPs are already in a hex with friendly engaged units, their deployment is not altered.
[32.D.2] If the reinforcing SPs are in a hex that isn’t adjacent to the enemy, move them into an adjacent hex occupied by a friendly unit that is already committed to the battle.
[32.D.3] If a reinforcing unit is adjacent to both the enemy and friendly engaged units, the player may either leave it where it is or move it into the hex with other friendly engaged units.
[32.E] Units that reinforce a battle must be committed to that battle.
[32.F] As a result of combat reinforcements after the
initial round of combat, SPs involved in a battle may occupy several different hexes. Such a battle is treated as a single combat situation for all combat resolution purposes.
[32.F.1] Only the units in the two original hexes receive any benefit or pay any penalties for terrain. If one or both hexes are vacated, but reinforcing units of either side are still adjacent to an enemy hex and engaged, the attacking player chooses the hex being attacked and the hex from which the attack is being initiated. Only these hexes count for purposes of determining terrain modifiers. The committed units of both players, however, remain committed to the battle if they occupy or are adjacent to either of these two hexes.
[32.F.2] If units engaged in a battle occupy more than one hex and have different morale values, take the average of all friendly units involved in the battle. Only units that are entrenched or in fortifications receive the morale bonus for those entrenchments/fortifications, not reinforcing units in other hexes. The player attacking the entrenchment still pays the penalty for doing so (-1 on the dice).
[32.F.3] Any one leader in any committed stack may be used to influence the combat die roll.
Reinforcement Example:
It is the Union player’s combat phase. In the initial round, Union unit A attacked Confederate unit 1. In the combat reinforcement segment, Union units B, C and D may attempt to reinforce the battle since each of them is adjacent to at least one of the two battle hexes. Units B and C, if successful, must move into the hex occupied by A so they will be adjacent to the enemy unit engaged in the battle. Unit D would remain where it is, as it is already adjacent to the enemy unit.
Confederate units 3 and 6 may also attempt to join the battle. Unit 3 is already adjacent to Union unit A, so if successful it remains where it is. Unit 6 is adjacent to both friendly unit (1) and enemy unit (A) engaged in the Battle, so if it succeeds in joining the fight, the Confederate player may either leave unit 6 where it is or move it into the hex occupied by unit 1.
Confederate units 4 and 5 and Union unit E can’t reinforce the battle betweenAand 1 since they aren’t adjacent to either of the two original battle hexes. Although they may be adjacent to units that have reinforced the battle, they still can’t roll to reinforce that battle.
Confederate unit 2 can’t roll to reinforce the battle as it is on the opposite side of an unbridged major river from the battle.
If, in the same example, there were also a second battle between Union unit C and Confederate unit 5, the reinforcing options would be different. Union unit D could only reinforce the battle between A and 1, as it isn’t adjacent to either C or 5. The same is true of Confederate unit 3. Union unit B and Confederate unit 6 could reinforce either battle or their stacks could be divided to reinforce each battle. Union unit E is adjacent to Confederate unit 5 and could now reinforce that battle. Confederate units 2 (across the river) and 4 (not adjacent to either battle) would still be unable to reinforce.
[33.0] FLANK ATTACKS
[33.A] During the second and subsequent rounds of combat, either player may attempt a flank attack. A flank attack is brought about by reinforcing an ongoing battle.
[33.A.1] Both of the following criteria must be met for a flank attack to occur:
•The flanking stack must enter the combat by the reinforcement procedure; and
•The flanking stack must be adjacent to the enemy hex but not adjacent to any friendly stack that is already engaged in that combat.
[33.A.2] Either player may launch a flank attack, regardless of whether that player is attacking or defending.
[33.B] A flank attack modifies the combat dice roll by 2 in favor of the player making the flank attack. Add 2 if the Larger Force is making the flank attack; subtract 2 if launched by the Smaller Force.
[33.C] The flank attack bonus is only received in the round of combat in which it first occurs. It doesn’t carry over into subsequent rounds of combat.
[33.D] A stack may be the object of more than one flank attack in a combat. If two flank attacks are launched in the same round of combat, however, the bonus is only applied once. If two flank attacks are launched in separate rounds of combat, however, the flank attacking side would receive the benefit in each round.
[33.E] If both players launch one or more flank attacks in the same combat round, neither receives the bonus, as they cancel each other.
Flank Examples:
Confederate unit 1 is attacking Union unit A. After the first round of combat, the Confederate player may attempt to reinforce with units 2, 3 and 4. Units 2 and 3 would enter the battle as flank attacks because neither is adjacent to a Confederate unit already engaged in combat (unit 1). Unit 4 could not enter as a flank attack because it is adjacent to Unit 1.
If units 2 or 3 were successful in reinforcing combat, the Confederate player would receive a flank attack bonus. If both were successful in the same round, the Confederate would still receive only one flank attack bonus.
If unit 4 reinforced the battle for the second round and unit 3 reinforced on the next round, it would not receive a flank attack bonus, because it is adjacent to unit 4 which would already be engaged in the battle.
If the Confederate player reinforced with unit 2 after the first round, and then with units 3 and 4 after the second round, the flank attack bonus would apply in both rounds.
In the second example, units 5 and B are engaged in combat. Units C and 6 can both reinforce and launch flank attacks. If they do so in the same round, neither player receives the bonus (they cancel each other out). If the Union player reinforced with C after the first round, and the Confederates reinforced with 6 after the second round, both players would receive the bonus in the round in which their units entered.
[34.0] AUTOMATIC VICTORY
[34.A] If at the start of any round of combat, after all reinforcements have entered the battle and any unsupplied attacking units have been halved, one force outnumbers the other by 4:1 or more (5:1 if the smaller force is entrenched or in a mountain hex), the result is an automatic victory.
[34.B] Instead of following the combat resolution procedure, the smaller force suffers an automatic D3 combat result and must retreat. The victor takes no losses, nor do either side’s units undergo morale reduction for having been in a round of combat.
[34.C] Naval units and units in fortifications are never subject to automatic victory. Treat odds of greater than 3:1 against fortifications as 3:1.
[35.0] UNCOMMITTED UNITS
[35.A] If a player chooses not to commit some SPs in a hex to battle, place an Uncommitted marker on the uncommitted units, with any committed units in the hex above it.
[35.B] Once a unit has been committed to battle, it can’t become uncommitted again unless it withdraws or retreats.
[35.C] In battle, uncommitted units are not counted for any purposes: determining combat odds, automatic victory, or morale. They can’t be assigned any losses and don’t suffer morale reduction.
[35.C.1] If the committed units in a hex are eliminated, voluntarily withdrawn, or forced to retreat from the hex, the uncommitted units may either withdraw with them or remain in the hex. If they remain in the hex, the opposing player may continue combat against the hex, in which case some or all of the uncommitted units would be forced to engage in combat.
[35.C.2] If the committed units remain in the hex, all or some of the uncommitted units may reinforce them or remain uncommitted. Since the uncommitted units are already in the hex, no die roll is needed to commit them; they reinforce automatically if the player wants them to join the battle.
Multiple Combat Example:
This example demonstrates all rules of land combat, including reinforcement, flank attacks, withdrawal, morale, and uncommitted units. The Union player attacks with Slocum against Stuart, Meade against Hill, and leader “C” against Longstreet, in that order.
Slocum vs. Stuart, 1st round: Slocum’s 10 SPs attack Stuart’s 5 cavalry SPs. Stuart elects to withdraw before combat as his force is all cavalry and Slocum doesn’t have an equal number of cavalry. Stuart withdraws to 7112. No battle occurs.
Meade vs. Hill, 1st round: Meade commits 8 of his 10 SPs against Hill who has 4 SPs. An Uncommitted marker is placed in Meade’s hex with 2 SPs beneath it. The odds are 8:4 (2:1) with no morale, leader, or
terrain modifiers. The dice roll is an 8, which gives a CRT result of L1/SD1. Meade and Hill each lose 1 SP according to the Combat Loss Chart (CLC) and Hill’s morale is reduced by 1. Both sides reduce morale by 1 for engaging in a round of combat, reducing Meade’s 7 committed SPs to 2 and Hill’s force to 1. Neither side withdraws.
Leader “C” vs. Longstreet, 1st round: Both sides have 5 SPs, so the odds are 1:1 but the Union has the Larger Force because they are attacking. The dice are modified by -2 because of Longstreet’s superior leadership value. The roll is a 5, which becomes a 3. The CRT result is LD2/S1. Longstreet loses 1 SP. The Larger Force result on the CLC is “1+” so Leader “C” loses 1 SP and rolls a 5 for a second SP loss. Union morale is reduced by 2 for the D2 result and 1 more for participating in a combat round, bringing it to 0. Longstreet’s 4 SPs are reduced to morale 2. Neither side withdraws or is forced to retreat.
Combat Reinforcements, 1st round: The active (Union) player goes first and announces that Slocum, Hooker, and Sedgwick will attempt to reinforce Meade. Meade will also commit his 2 uncommitted SPs. The Confederate player declares that Lee and Stuart will attempt to reinforce Hill.
The Union player rolls a die for each reinforcing stack, adding the leadership value of its general. Slocum and Hooker both roll 4 or better (modified to 5 or better), so they are successful. They are both already adjacent to the enemy engaged (Hill), so they don’t need to move to join the battle. Sedgwick fails his roll to reinforce and remains in his hex, unengaged. The Union player doesn’t have to roll for Meade’s uncommitted SPs which automatically enter the combat. Lee and Stuart are both successful and move into Hill’s hex.
The image below shows the situation at the start of the second round of combat. The Union player announces that “C” will not continue to attack Longstreet, while Meade (with Hooker and Slocum) will continue their combat against Hill’s hex, which now includes Lee and Stuart. The Confederate player decides to counterattack C with Longstreet. The Union player decides that Meade’s attack will be resolved before Longstreet’s counterattack.
1
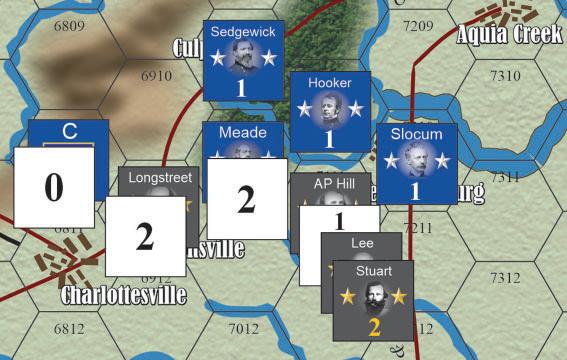
Meade vs. Hill, 2nd round: Meade has 9 SPs, Hooker 5 SPs, and Slocum 10 SPs for a total of 24. Their average morale is 3: all 15 of Hooker’s and Slocum’s SPs have full morale, as do Meade’s 2 newly committed SPs, while his other 7 SPs have a morale of 2. The mathematical average is just over 2.7, which is rounded up since it is greater than 2.5.
The Confederates have Hill’s 4 SPs (morale of 1), plus Stuart’s 5 cavalry and Lee’s 3 SPs, both with a morale of 3. Calculating their morale yields an average of 2 (4 x 1 = 4, plus 8 x 3 = 24, for a total of 28 divided by 12 SPs = 2.33, rounded down to 2). The odds are 24:12 (2:1) with a morale bonus of +1 for the Union. The Confederate player chooses Lee to command, to get a -2 modifier (Lee is a 3 while Meade or any other leader is a 1). There is no terrain modifier as Lee is in a clear hex and Meade isn’t attacking across a river hexside. Hooker is reinforcing across a hexside, but there is no modifier for that. not initiating the attack. The net modifier is -1. The Union player rolls a 7, modified to 6 for a CRT result of L1/S1. Lee’s force loses 2 SPs, according to the CLC. Since Confederate morale was 2, the first SP lost must be one with morale of 2 or higher. The second SP loss can come from Hill’s lower morale SPs. The automatic 1-point morale loss for engaging in combat leaves Lee with Hill and 3 SPs (morale 1), Stuart’s 5 cavalry SPs (morale 2), and Lee’s own 2 remaining SPs (morale 2) SPs.
The Union player must also lose 2 SPs. Meade decides to lose 1 of his newly committed SPs and 1 of his lower morale SPs. After the 1-point morale loss for the round of combat, Meade now has 6 SPs a morale of 1 and 1 SP at 2 morale. Hooker’s 5 SPs are morale 2 and Slocum’s 10 SPs have a morale of 2.
Leader “C” vs. Longstreet, 2nd round: Longstreet now attacks Leader “C.” The odds are 4:3, reduced to 1:1, with Longstreet’s as the Larger Force. Dice modifiers are +2 for leadership, +2 for morale, and -2 for terrain as the Union troops are in a mountain hex. The net modifier is +2. Longstreet rolls a 10, which becomes 12. The CRT result of L1/SD3, Leader “C” loses 1 SP and is reduced in morale to -1, the lowest possible. Longstreet’s CLC result is “(1)” so he rolls a die that comes up a 2. This is equal to his morale, so he incurs no SP loss. All units engaged in combat are now reduced by 1 in morale, so Longstreet drops to 2. Leader “C” can’t go any lower and remains at -1, which requires him to retreat. Since Longstreet has higher morale and better leadership, his pursuit eliminates another SP from Leader “C.” Leader “C’ retreats to 6809 with his remaining SPs, ending this engagement.
Combat Reinforcements, 2nd round: The Union player announces that Sedgwick will try to reinforce Meade. The Confederates will bring Longstreet in against Meade, now that Longstreet’s original opponents are no longer engaged with him. Sedgwick rolls successfully and enters the battle by moving with his 5 SPs into Meade’s hex. Longstreet is also successful and remains in his hex. Since he isn’t adjacent to any friendly unit engaged in the combat, he will be making a flank attack. Hooker, Slocum and Meade’s better morale units drop to 1 and Meade’s six other lower morale units drop to 0.

The previous image shows the situation just prior to rolling for reinforcements.
Meade vs. Lee (formerly Hill), 3rd round: The Union has 27 SPs with overall morale of 1. (Meade has 6 SP x 0 = 0; Meade’s other SP and the 15 SPs of Hooker and
Slocum are 16 x 1=16; plus Sedgwick’s 5 SPs x 3 = 15, for a total of 31 divided by 27 SPs = 1.1, rounded to 1.)
The Confederates have 14 SPs with overall morale of 1 (Lee’s 2 SPs and Stuart’s 5 cavalry SPs are 7 x 2 = 14; Hill has 3 SPs x 0 = 0; Longstreet brings 4 SPs x 1 = 4, for a total of 18 divided by 14 SPs = 1.3, rounded to 1).
The Confederates have a leader advantage of +2 (Lee’s 3 vs. Meade’s 1) and Longstreet’s flank attack for another +2, giving a total modifier of +4. The Union player decides not to attack, but the Confederate player does. The Union now gets a -1 terrain modifier for the woods in Meade’s hex, reducing the net modifier to +3. Since the Union is still the Larger Force, the modifier becomes -3 so it will favor the Confederate Smaller Force. The odds are 27:14, reduced to 1.5:1.
The Union player rolls a 7, modified to 4 for a result of LD1/S1. Both sides lose 2 SPs, of which 1 must be at morale 1 or higher. The Confederates eliminate 1 SP each from Hill and Longstreet. The Union removes 2 SPs from Meade, including his single SP with a morale value of 1. The D1 result lowers Meade’s remaining SPs to -1, Hooker’s and Slocum’s 15 SPs to 0 and Sedgewick’s 5 SPs to 2.
Both sides now reduce their morale for being engaged in combat. Hooker and Slocum go to -1 and Sedgwick to 1. Meade is already below zero and can’t go lower than -1. Lee and Stuart are reduced to 1, Longstreet to 0, and Hill to -1.
All units with negative morale must retreat, starting with those of the inactive player. Hill retreats, with no pursuit as the Confederates have a better leader in the hex. Hooker, Slocum and Meade all retreat, losing a single SP among them from pursuit since the South has a better general (Lee) and a higher morale (1) than the retreating units.
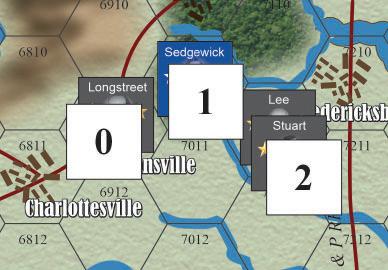
The above image shows the start of the fourth round of combat.
Sedgwick (formerly Meade) vs. Lee, 4th round: Sedgwick has 5 SPs, morale 1, in a forest hex. Lee and Stuart have 7 SPs with morale 1 and Longstreet has 3 SPs at 0 morale, giving the Confederates an average morale of .7, rounded to 1. Lee’s +2 in leadership is partially countered by a -1 for the woods occupied by Sedgwick. Lee attacks at 10:5 (2:1) with a +1 modifier. He rolls a 7 which becomes an 8 for a result of L1/ SD1. According to the CLC, both sides lose 1 SP (taken from Sedgwick and Lee), and Sedgwick is reduced to a 0 morale by the D1 result. The morale reduction segment brings Sedgwick and Longstreet to -1 so both must retreat. Lee and Stuart are reduced from 1 to 0. Longstreet must retreat first without pursuit. Sedgwick retreats and loses 1 more SP to Lee’s pursuit.
After four rounds of combat, Lee, Stuart, 1 infantry SP and 5 cavalry SPs remain in the hex. All other forces have retreated.
Morale recovery: All units can now recover morale. The units stacked with Lee, including Stuart’s cavalry, regain all 3 morale points. The units with Longstreet go from -1 to 1, recovering 2 morale points. The units with Hill and Union leaders Sedgwick, Meade, Slocum, and Hooker regain 1 morale point each, going from -1 to 0. The units with Union leader “C” don’t regain morale as Leader “C” is a zero-point leader. Since no unit ends a player turn with negative morale, the morale of units with Leader “C” is raised to 0.
[36.0] ENTRENCHMENTS
[36.A] During the movement phase, the active player may entrench supplied friendly forces at a cost of 3 MPs by placing an entrenchment marker in their hex. Units that are unable to move may still entrench if they are in supply and occupy a city hex. Only land units may entrench. When built in a hex between two Major Rivers, you must choose which river it is facing.
[36.B] Units in a hex with entrenchments receive a morale and combat modifier bonus when defending. Units don’t receive any bonus when attacking from a hex with entrenchments.
Entrenchment Example:
A 5 SP unit with a “0” morale marker and a 2 SP unit with a basic morale of 3 are in an entrenchment. The entrenchment counter acts as a “+1” temporary morale marker, so 5 SP unit has a modified morale of 1 and the 2 SP unit (with no morale marker) has a modified morale of 4.
[36.B.1] Units in entrenchments have their morale temporarily increased by 1. The entrenchment marker acts as a +1 morale marker.
[36.B.2] If a unit leaves the entrenchment or attacks from an entrenched hex, it loses its morale bonus.
[36.B.3] If a unit in an entrenchment has a morale of 0 that is reduced to -1 in the morale reduction segment of combat, the unit doesn’t have to retreat since its temporarily modified morale is 0. If a unit in an entrenchment has a morale of -1 that is reduced for being in combat, it must retreat.
[36.B.4] Only units in a hex with an entrenchment receive that entrenchment’s morale bonus. Units reinforcing a battle are not in the entrenchments and don’t receive the bonus.
[36.C] In the morale recovery segment of a player turn, entrenched units recover an additional point of morale.
[36.D] Units defending entrenchments also receive a combat modifier to the dice of 1 in their favor. This is in addition to the morale bonus.
[36.E] Units in entrenchments must leave the protection of the entrenchments to attack or to reinforce a combat in another hex. Place these units on top of the entrenchment marker. They receive no morale or combat bonuses while outside of the entrenchments.
[36.F] If a unit enters a hex occupied by a friendly unit and an entrenchment marker, it may enter the entrenchments and receive all of its benefits. Place it under the entrenchment marker. It need not spend any MPs to entrench.
[36.G] There may never be more than one entrenchment marker in a hex. When a hex with an entrenchment is vacated (by movement, combat withdrawal/retreat, or elimination), remove the entrenchment marker.
[36.H] Entrenchments have a limited combat effect against naval units. An entrenchment occupied by 5 or more SPs may fire upon enemy naval units that enter or remain in the hex (see 48.0 Battery Fire). Any combat unit in an entrenchment hex with a major river hexside blocks naval supply through that hexside (see 55.0 Naval Supply).
[37.0] FORTIFICATIONS
[37.A] Definition. There are two types of fortifications: forts (upgraded fieldworks strengthened and reinforced
with emplaced artillery) and fortresses (permanent, prewar coastal masonry forts with heavy naval artillery). Forts are depicted by fort counters; fortresses are printed on the map. Forts can be built during play on one river. Rotate the fort counter to show which river it is on, Fortresses can only be repaired, not built.
[37.B] Control.
[37.B.1] At the start of a scenario players control all fortifications in their home states and in which only their forces are deployed, unless otherwise specified.
[37.B.2] At any time, a player controls a fortification if at least 1 friendly SP (and no enemy SPs) occupies the fortification’s hex.
[37.C] Construction and Repair.
[37.C.1] Forts are constructed in the reinforcement and replacement segment of a turn.Afort costs 2 replacement points (or 2 production points in a campaign game) and takes 1 turns to build. Forts may be built in any friendly supplied city, railroad, or major river hex that is occupied by at least 1 friendly land combat SP. Forts may also be built in any friendly supplied hex containing a friendly leader and a friendly land combat SP.
37.C.2] On the first turn a fort is to be constructed, the player pays the 2-replacement point cost and places an inverted fort marker in the hex. If the hex is still in supply in the subsequent friendly replacement phase, flip the counter to show that a fort has been constructed. If the hex is no longer in supply, place an entrenchment marker in the hex instead. The player would have to spend 2 more replacement points and begin construction over again to build a fort.
[37.C.3] If enemy troops enter a hex with an incomplete fort, or if friendly units abandon the hex, remove the marker.
[37.C.4] Fortresses can’t be constructed, only repaired. Fortresses are repaired at a cost of 2 replacement (or production) points. The fortress must be occupied by friendly units and in supply. On the turn the repair cost is paid, flip the Destroyed marker in the hex. In the next friendly reinforcement phase, remove the marker.
[37.C.5] If enemy land combat units enter a fortress hex while it is undergoing repair, if the hex becomes unsupplied, or if friendly units abandon the hex, flip the marker back to the Destroyed side.
[37.C.6] A fortress under repair does not affect play.
[37.D] Capacity.
[37.D.1] A fortress can hold up to 2 land combat SPs.
[37.D.2] A fort in a city hex can hold up to 12 land combat SPs.
[37.D.3] A fort in any hex other than a city can only hold up to 4 land combat SPs.
[37.D.4] Any number of leader, naval, pontoon, siege, and rail units may shelter in a fort or fortress.
[37.D.5] Land combat SPs in excess of a fortification’s capacity may remain in the hex, but are placed on top of the fort marker to indicate that they aren’t in the fort. For a fortress, invert the SPs to show they are not in the fortress.
[37.E] Multiple Fortifications.
[37.E.1] A hex may contain a fortress, a fort, and an entrenchment. There may never be 2 forts or 2 entrenchments in a hex. Therefore, in the same hex there may be four levels:
•2 SPs in a fortress.
•4 or 12 SPs in a fort (depending on whether there is a city in the hex).
•Any number of SPs in an entrenchment.
•Any number of SPs “in the field” (i.e., above the entrenchment marker) in the same hex.
[37.E.2] During a friendly movement phase and the withdrawal segment of any round of combat, a player may freely move troops among all levels in the hex. Units in the field may move back into the entrenchments or one of the fortifications and vice versa.
[37.E.3] A hex with multiple levels of SPs, entrenchments, and fortifications must be dealt with one level at a time. To attack a fortification, an opposing player must first defeat all other forces in the hex. Thus:
•Before the units in the entrenchments may be attacked, the units in the field must be forced to leave the hex or enter the entrenchments.
•Before the units in the fort may be attacked, the units in the entrenchments must be forced to leave the hex or enter the fort.
•Before the units in the fortress may be attacked or besieged, the units in the fort must be eliminated.
•Only after all units in the field, entrenchments, and fort have left the hex may a fortress be attacked or besieged.
[37.F] Morale Bonus.
[37.F.1] Units in fortifications receive the same morale bonuses as units in entrenchments. They do not, however, receive both bonuses.
[37.F.2] Units in fortifications with a morale of zero that is reduced by 1 by combat or post-combat morale reduction get a -1 morale marker but may remain in the fortification, since the fortification bonus gives them a temporary morale of zero.
[37.F.3] Units in fortifications that have a morale of -1 (without the temporary bonus) and are reduced again in morale, or units that suffer a morale reduction that would reduce them to less than a -1 for any reason, must retreat. If the hex is besieged or being attacked, the units are eliminated (captured in a campaign game). (See 38.0 Sieges.)
[37.G] Combat Bonus.
[37.G.1] Land combat SPs in fortifications are doubled when attacked.
[37.G.2] When a fort is attacked, units in the fort ignore any Combat Results Table (CRT) result of 1 and suffer no loss of SPs nor morale reduction for that round of combat. Units attacking the fort suffer SP and morale reduction losses normally. Results of D1, D2, or D3 are treated normally.
[37.G.3] When a fortress is attacked, units in the fortress ignore any CRT result of 1 or D1 and neither lose any SPs nor suffer morale reduction. Results of D2 or D3, however, are treated normally
[37.G.4] Units in fortifications can’t be overrun and aren’t subject toAutomatic Victory.Any odds greater than 3:1 are treated as 3:1.
[37.H] Effect on Naval Units.
[37.H.1] Fortifications may fire upon enemy naval units that enter their hex with River hexside (See Naval Rules).
[37.H.2] Friendly naval units in a hex with a friendly fortification may shelter in the fortification and may not be attacked by enemy naval units unless the player who controls the fortification accepts combat. Friendly naval units sheltering in fortifications don’t impede the movement of enemy naval units into or out of the hex unless they leave the shelter of the fortification and initiate combat or interception in the hex (See Naval rules).
[37.I] Destruction of Fortifications.
[37.I.1] When a fortification is abandoned, the abandoning player may leave it intact or destroy it. If left intact, then the next unit (of either side) to enter it makes the fortification friendly to its side.
[37.I.2] If a fortification’s defenders are eliminated by combat or siege (see 38.0 Sieges) the fortification is destroyed.
[37.I.3] A fort that is destroyed is removed; place burn markers on destroyed fortresses.
[38.0] SIEGES
Enemy units in fortifications may be eliminated by two methods: assault or siege.
[38.A] Assault. Assault combat resolution is affected by the combat bonuses and morale rules in the Fortification rules (37.0). Assault combat resolution occurs during the normal rounds of combat, and is subject to reinforcement, flank attacks, and all other combat rules, with the following exceptions:
[38.A.1] To attack a fortification, there must be no other enemy land combat SPs in the field or entrenched in the hex. Instead of attacking from an adjacent hex, the attacker enters the fortification’s hex and declares an assault.
[38.A.2] The attacker pays no penalty for terrain in the hex (unless entering by amphibious assault, which incurs the same morale and dice roll modifications as if attacking across a bridged major river). The defender, however, receives all mountain, woods, and swamp terrain benefits as well as the fortification benefits.
[38.A.3] Units in fortifications may “come out” of the fortifications for the second or later rounds of combat to fight a field battle in the hex. Both sides remain in the hex and the player who is not attacking receives the terrain bonus (woods, mountains, swamp, but not rivers) for the hex.
[38.A.4] Units in a fortification or in a hex under siege who come out of the fortification to fight a field battle may not retreat or withdraw from the hex. They may withdraw into the fortification at the end of any round of combat, but if forced to retreat are eliminated (captured in a campaign game).
[38.B] Tactical Matrix. The optional tactical matrix rules don’t apply to attacks on fortifications and aren’t used if defending units remain in the fortification. They are used if the units come out and fight a field battle; however, those units may freely withdraw into the fortification and don’t need the tactical withdrawal chit to do so.
[38.C] Entering Fortified Hexes. An enemy fortification can be attacked only by friendly units in the same hex. Units can’t move into a hex with an enemy fortification if there are also enemy units in the field or entrenchments in the hex. To enter a hex with an enemy fortification, the active player must ask if the enemy units will remain
in the fortification or come out into the field. If any of them come out into the field, the active player’s forces can’t enter the hex and must end their movement. If all enemy units remain in the fortification or (during a round of combat) withdraw into the fortification, friendly units may immediately enter the hex.
[38.D] Siege Requirements. In addition to assaulting a fortification, a player may try to take a fortification by siege. As with an assault, the active player must first enter the hex with the fortification. There are three requirements for siege resolution:
[38.D.1] The besieging player must have at least as many SPs in the hex as the defender has in the fortification (the fortified units are not doubled for this purpose).
[38.D.2] The besieging units must be in supply and must have a morale of zero or higher.
[38.D.3] Only the active player may attempt to resolve a siege.
[38.E] Siege Resolution.
[38.E.1] If the requirements for a siege have been met, the active player places a siege status marker (numbered from 1 to 5) on the hex. If this is the first turn of a siege, place a 1 marker. On subsequent turns of a siege, increase the marker by 1, to a maximum of 5.
[38.E.2] The active player rolls 1 die. Subtract 1 for any friendly naval combat units in the hex; also subtract 1 for having a siege train in the hex. Add 1 if there are any enemy naval combat units in the hex; also add 1 if the enemy has a siege train in the fortification. If the modified die roll is equal to or less than the siege status marker, the fortification falls and all units in it, including leaders, siege trains, pontoons, and rail units, are eliminated (captured in a campaign game).
[38.F] Naval Units in Sieges. Naval units in a fortification when it falls may remain in the hex if there are no enemy naval combat units present. If there are enemy naval combat units present, the naval units that were in the fortification have three options:
• Scuttle (voluntarily eliminate the units); or
• Fight (immediately resolve naval combat according to naval combat rules); or
• Attempt to Flee, in which case they are subject to immediate naval interception and combat (See Naval Rules).
[38.G] Supply And Attrition Effects.
[38.G.1] Besieged units are unsupplied. They suffer
attrition as unsupplied units and add the siege status marker number to their attrition die roll.
[38.G.2] Units may not be built, repaired, replaced, or entered as reinforcements in cities under siege.
[38.H] Breaking a Siege.
[38.H.1] A siege is broken whenever the besieging force has fewer SPs than the besieged force, is reduced below zero in morale, or leaves the hex. The siege is also broken if, during siege resolution, the besieging force is unsupplied.
[38.H.2] If a siege is broken, remove the siege status marker. The besieging force may remain in the hex or withdraw from the hex per normal withdrawal rules.
[38.I] Reinforcing a Besieged Fortification. A besieged fortification may be reinforced in two ways: 1) by land units that defeat the besieger or, 2) by naval units bringing in reinforcements by sea or major rivers if the fortification is in a coastal hex or major river hexside.
[38.I.1] Land combat units may attack a besieger. The besieger receives all terrain bonuses for its hex. Follow normal Combat Resolution rules. The units in the besieged fortification may enter the combat as reinforcements without a die roll, but they will be unsupplied. If the besieger is eliminated, withdraws, or retreats from the hex, the victorious units may enter the hex. (Note that until the besieger leaves, units in the fortification can’t withdraw out of the hex and are eliminated if forced to retreat.)
[38.I.2] Friendly naval units may enter the besieged hex to reinforce the besieged units. If the besieging player has any naval combat units in the hex, however, these units must be eliminated or withdrawn during naval combat (which takes place during movement; see Naval rules) before the naval units and any land combat units aboard them may enter the fortification.
[38.J]
Evacuation.
[38.J.1] If there are naval combat units capable of transporting land combat units in a fortification, those naval units and any units they can carry may attempt to leave the besieged hex, but only during a friendly movement phase. If enemy naval units occupy the hex, these enemy naval units must be eliminated or withdrawn during naval combat (see Naval Combat rules).
[38.J.2] Units that successfully evacuate a fortification may destroy the fortification if they have left it vacant.
[38.K] Siege Works. A besieging player may construct entrenchments in the hex if the requirements for
entrenching are met. The besieger receives all benefits of the entrenchment if attacked.
[38.L] Gulf Coastal Fortress Siege Exception. Two Confederate fortresses are liable to special fortress surrender rules.
[38.L.1] Confederate Fortress Jackson and St. Philip surrenders at the end of any Confederate combat phase in which a Confederate force in the fortress is besieged and New Orleans is occupied by unbesieged Union land combat units.
[38.L.2] Fortress Morgan is subject to the same rule if Mobile is occupied by unbesieged Union land combat units.
[38.L.3] This rule also applies to any forts in those hexes.
[38.L.4] Union units in those fortresses ignore this rule.
[39.0] SIEGE TRAINS
[39.A] The Union player has one siege train unit, only in scenarios that specifically list it. It may be constructed at a cost of 3 production points and a delay of 3 turns.
[39.B] The siege train aids forces defending in, attacking, or besieging entrenchments or fortifications. The siege train has no effect in battles where none of the above are present.
[39.C] The siege train modifies the combat dice roll by 1 in favor of the Union player, whether defending or attacking/besieging an entrenchment or fortification. (It adds 1 to the combat dice if the Union is the Larger Force and subtracts 1 if the Smaller Force.)
[39.D] If the Union player has the siege train in the hex, subtract 1 from the siege resolution die if the Union force is besieging a fortification, or add 1 if the Union force is besieged in a fortification.
[39.E] The Union player receives the benefit of the siege train when defending or besieged (regardless of supply), and when attacking and in supply at the moment of combat.
[39.F] The siege train has no inherent combat value and isn’t counted for purposes of determining combat odds or attrition. It may not be eliminated to satisfy attrition or combat losses.
[39.G] The siege train doesn’t require a leader to move and has a movement allowance of 3 MP. It can’t force march. It may be moved by rail or naval transport as if it were a single SP.
[39.H] The siege train is eliminated if attacked alone in a hex without friendly land combat units, or if the friendly land combat units are forced to retreat or are eliminated. The siege train is never captured. If eliminated in a scenario, it is replaced free of charge in 3 turns.
[39.I] The siege train may fire on enemy naval units that enter or remain in its hex. The siege train counts as an additional fort in the hex but must be in a fortification or entrenchment to fire on enemy naval units (see Naval rules).
[40.0] LEADERS
[40.A] Cautious Leaders. Many leaders were overly cautious, poorly suited for command, or simply inept. The following rules reflect this.
[40.A.1] Zero- and 1-point leaders do not automatically move in the friendly movement phase.
• All 0-point leaders require a die roll of 4 or less to move forward. They subtract 1 from the forced march die when they are the only leader accompanying the forced marching units.
•All 1-point leaders require a die roll of 5 or less to move forward. They neither hinder nor help when forced marching.
[40.A.2] A leader’s ability to move forward is determined at the moment the player wishes to move that leader. The active player may either declare that one leader is the “commander” of the stack, or may declare that an individual leader is moving with a specified number of SPs. If the move is successful:
• If one leader is the commander of the stack, any units and leaders in the stack that the player wishes to move must move with that leader as a stack. Individual leaders and units may be dropped off as he moves, but they may not move independently. If he does not move, none of the units or leaders in the stack may move forward.
• If an individual leader is moving and a specified number of SPs are accompanying him, he must move before any other leader or unit in the hex. If he doesn’t move, neither he nor his designated units may move.
[40.A.3] A leader who can’t move is not necessarily immobilized. He may still move in the direction of the nearest friendly major city in his original home territory (e.g., a Union leader may move toward a Union major city in the Northern states). The leader and his units may not
overrun, attack, or reinforce any combat. They must end the movement phase in the same hex where they began the phase or a hex closer to a friendly major city in home territory. If intercepted, or if already involved in a siege, the leader and his units may fight normally.
[40.A.4] 0- and 1-point leaders who move by rail or aboard naval units don’t have to roll to move by these methods, nor do they need to roll to force march once they detrain or disembark.
[40.A.5] 0- and 1-point leaders may not voluntarily move out of supply. If they begin the movement phase out of supply, they must move toward supply. Once they have reestablished supply, they may move normally.
[40.B] Superior Leaders.
[40.B.1] All yellow 2 (a cavalry leader), 2, and 3-point leaders are “superior” leaders. They don’t have to roll to move, nor do any zero- or 1-point leaders who wish to move with them as a stack.
[40.B.2] In addition, superior leaders may freely move out of supply. Zero- and 1-point leaders that begin the movement phase stacked with or adjacent to them may also move out of supply that turn.
[40.B.3] Superior leaders add 1 to the die when trying to force march.
[40.C] Special Leader Bonuses.
[40.C.1] Confederate leader J.E. Johnston is a defensive general. He is a 1-point leader for purposes of movement and attacking, but acts as a 2-point leader for morale recovery and defending.
[40.C.2] Confederate leaders Stuart, Wheeler, Forrest, and Kirby Smith, and Union general Sheridan are cavalry leaders (with a yellow 2 on the counter). For all movement and morale recovery purposes they are 2-point leaders. For purposes of combat, they are 1-point leaders unless at least half of the friendly SPs engaged in the combat are cavalry. If they use the cavalry bonus and incur any losses, the first SP eliminated in combat must be a cavalry SP.
[40.C.3] Union leader Farragut is a naval leader (with a blue 2 on the counter). He does not affect land combat units and may not move them at all. He must always be stacked with a naval unit and his leadership value is only used when attacking fortifications with land and naval units. He may always move and adds 1 to the naval pursuit die.
[40.C.4] Union leader McClellan functions as a 1-point leader for all purposes except morale recovery, in which he acts as a 2-point leader.
[40.D] Leader Casualties.
[40.D.1] At the end of the combat phase and before morale recovery, each player must roll dice for each friendly leader that was in a hex that participated in combat. (Leaders in fortifications that were not attacked, or were aboard naval vessels, don’t need to roll.)
[40.D.2] For each leader, roll 2 dice; if the result is 12, the leader is injured. Any other result has no effect. If the leader is injured, roll a single die; if the result is 6, the leader’s injury is fatal and he is eliminated. If the result is between 1 and 5, the leader is removed from play for that many turns. For example, on a result of “1,” he would be available as a reinforcement in the friendly reinforcement phase of the turn after next.
[40.D.3] If a leader’s removal leaves a stack with insufficient leaders to move all of its units, the player may place an unnamed zero-point leader not in play in the stack. Leaders in the counter mix or on the reinforcement track are available for this use.
[40.E] Leader Capture.
[40.E.1] If a leader is in a hex where all combat units are eliminated by combat, overrun, or automatic victory, he may be captured. Roll 1 die. If the result is 6, the leader is captured. Add 1 to the die if the leader was a casualty.
[40.E.2] Leaders in fortifications that fall to assault or siege are eliminated (captured in a campaign game).
[40.E.3] If all the combat units with a leader are eliminated and the leader isn’t captured, place him with the nearest (in terms of MPs) hex that is occupied by friendly unbesieged land combat SPs. He may not influence their movement or combat for the rest of the player-tum in which he is displaced.
[40.E.4] If a leader is aboard a naval unit and that unit is captured, he is captured. If it is eliminated or scuttled, he rolls for injury and capture as normal. If not captured he is placed with the nearest friendly unit of any type that is not besieged. If this occurs while in a sea zone, he is placed in the nearest friendly unbesieged coastal city.
[40.F] Unidentified Leaders. The unidentified zero-point leaders (known only by the letter on the counter), and the “A” and Confederate “E” 1-point leaders, represent lowerranked officers who are easier to replace than the named leaders. Unidentified leaders are never eliminated, never roll for injury, and if captured are immediately returned to the original player’s force pool and may enter play in the next friendly reinforcement and replacement phase.
[41.0] MINOR RIVERS
Minor rivers are thin blue lines that follow along hexsides. They impede land movement by costing additional MPs to cross. Units that attack across or are intercepted immediately after crossing minor river hexsides pay a penalty in combat. Naval units may not move along minor rivers.
[41.A] Movement.
[41.A.1] Land units that move across an unbridged minor river hexside pay 3 MPs in addition to all other terrain costs.
[41.A.2] Unburned adjacent cities and unbroken railroad hexes on both sides of a minor river hexside act as bridges over that hexside. Units that cross a river to or from a city hex, or via an unbroken railroad, don’t pay additional MPs to cross the river.
[41.A.3] Apontoon bridge unit in a hex with one or more minor river hexsides may spend 1 additional MP to bridge one hexside. Point the pontoon bridge unit at the hexside that is being bridged.All other units of either side may treat that hexside as bridged.
[41.A.4] Aunit may not overrun enemy units in an adjacent hex by crossing an intervening minor river hexside, bridged or not.
[41.B] There is no terrain penalty for tracing a supply path across an unbridged minor river hexside if the path of supply is traced through hexes containing contiguous river hexsides of the same river.
[41.C] Combat.
[41.C.1]Aunit that is intercepted in a hex that it just entered by crossing a minor river hexside is reduced by 1 in morale. The intercepting player receives a bonus on the combat dice roll of 1 if the river is bridged or 2 if unbridged. River hexsides with burned cities or broken railroads are not bridged.
[41.C.2]Aunitthatattacksacrossaminorriverhexside (bridged or not) modifies the combat dice by 2 in the defender’s favor.
[41.C.3] Units that reinforce a battle do not pay this penalty.
[42.0] MAJOR RIVERS
Major rivers are thick blue lines along hexsides. They block land movement except where bridged. Supply lines may be traced and naval units may move along major rivers.
[42.A] Land Movement.
[42.A.1] Land units may not cross unbridged major river hexsides.
[42.B.2] Unburned adjacent cities and unbroken railroad hexes on both sides of a major river hexside act as bridges over that hexside. Unit may cross a major river hexside to or from a city hex, or via an unbroken railroad, at no penalty in movement.
[42.A.3] Pontoon trains must spend 2 additional MPs to bridge a major river hexside. Point the pontoon bridge unit at the hexside that is being bridged. Units of both sides then immediately treat the hexside as bridged.
[42.a.4] A unit may not overrun enemy units in an adjacent hex by crossing an intervening major river hexside, bridged or not.
[42.B] Supply.
[42.B.1] Units may not trace supply across unbridged major rivers.
[42.B.2] Although a major river may form part of the Confederate supply network, the river hexsides themselves are not a source of supply.
[42.B.3] Friendly River fleets and Naval Transports along major river hexsides may provide a limited amount of supply (see 55.0 Naval Supply).
[42.C] Combat.
[42.C.1]A unit that is intercepted in the hex that it just entered by crossing a bridged major river hexside is reduced by 1 in morale and its SPs are counted as halved (with fractions dropped, but never below 1 SP). In addition, the intercepting player receives a combat dice roll bonus of +1.
[42.C.2] Units may not attack or reinforce combat across unbridged major rivers.
[42.C.3] Units may attack across bridged major river hexsides. They are halved (with fractions dropped, but never below 1 SP), reduced by 1 in morale, and the dice are modified by 2 in favor of the defending player.
[42.D] Ferries. Friendly River fleets and naval Transports can act as ferries across major river hexsides, allowing a player to treat the hexside as bridged. Land units spend 1 additional MP to cross a major river hexside by naval ferrying. The naval units do not spend MPs to ferry. They can act as ferries both before and after, but not while, they move.
[43.0] PONTOON TRAINS
[43.A] Pontoon trains enable units to cross major and minor river hexsides at no additional MP cost. To show that a Pontoon train has bridged a river, the arrows on the Pontoon bridge marker should face the river hexside being bridged.
[43.B] Pontoon trains have a movement allowance of 4 MPs. They don’t require a leader to move. They may move by rail or be transported by naval Transport or River fleet as if they were a single SP. They may not force march.
[43.C] A pontoon train pays an additional 1 MP to bridge a minor river hexside and 2 MPs to bridge a major river hexside. These bridges may be used immediately upon set up.
[43.D] Pontoons have no effect on and are not counted when determining attrition or SPs for combat. They may not be eliminated to satisfy combat losses. Active players may voluntarily destroy their pontoons at any time. Pontoons may be captured or destroyed if alone in a hex and enemy units enter that hex by movement, overrun, or advance after combat. A stack with a pontoon train can withdraw from a hex with the pontoons, but if forced to retreat the pontoons are left behind.
[43.E] Pontoon units are replaced free of charge in the scenarios, available 2 turns after they were eliminated or captured. They cost production points in a campaign game.
[44.0] NAVAL UNITS
There are seven types of naval units:
•Union Ocean fleets (combat units).
•Union naval Transports (non-combat units).
•Confederate Commerce Raiders (limited combat units).
•Confederate Blockade Runners (noncombat units).
•Union and Confederate Ironclads (combat units).
•Union and Confederate River fleets (multipurpose units).
•Union Mortar Boats (optional rules only).
[44.A] See The Naval Section of the Terrain Effects Chart and the Unit Capabilities Chart for details. Noncombat units neither attack nor defend, they are targets or prizes.

[45.0] NAVAL MOVEMENT
Every naval unit has a movement allowance of 50 MP. All naval units have an arrow shaped image
to designate the River they are facing or occupying when along a major river. For movement purposes, naval units are divided into two categories:
Ocean units (Ocean fleets, Transports, Commerce Raiders, and Blockade Runners).
River units (Ironclads, River fleets, and Mortar Boats).
[45.A] Movement restrictions are as follows:
RIVERS
1. Naval units may not move along minor river hexsides.
2. Naval units follow along major river hexsides. River units pay 1 MP and Ocean units pay 2 MP by the major river hex, not by the hexsides.
3. If the major river hexside is adjacent to a swamp hex, River units pay an additional 1 MP and Ocean units pay an additional 2 MP.
4. All rivers flow from their source into the sea, moving away from the sea is moving upriver. Note: The Tennessee and the Cumberland flow into the Ohio, so this cost applies only when moving to a major river hexside away from the Ohio.
5. Any damaged naval unit (with 2 or more damage points) and any unit that is towing/being towed spends an additional 1 MP per major river hex.
6. Naval Units can choose which major river hexside it is located on within the hex.
No ocean units may move into or north of any Memphis hexside on the Mississippi river. River units may move normally
SEAHEXES
There are a limited number of all-sea hexes on the map. Ocean-type naval units may enter those for 1 MP. River-type units may only enter if towed. (See Towing rules below).
SEAZONES
1. There are six Sea Zones: Northern Ports, Chesapeake, Atlantic, Caribbean, Overseas, and Gulf. It costs a naval unit 15 MPs to go from an all-sea or coastal hex to an adjacent sea zone, or from a sea zone to an adjacent sea zone. A unit in a sea zone may enter an all-sea or coastal hex adjacent to the zone at the normal movement costs (1 or 2 MPs respectively.)
2. Some sea zones are adjacent to land off-board zones. It takes a naval unit 5 MPs to move into an offboard zone from an adjacent sea zone, all-sea hex, or coastal hex; and vice-versa.
3. Only ocean-type naval units may enter sea zones. River-type naval units may enter sea zones only if towed. River-type units may, however, enter land offboard zones that are adjacent to sea zones on their own.
4. No naval unit may enter a land off-board zone that is not adjacent to a sea zone.
[45.B] Coastal Hexes. All naval units spend 2 MPs to enter a coastal hex (a hex that is part sea and part land).
[45.C] Towing.
[45.C.1] Union river-type naval units may only enter all-sea hexes or sea zones if towed by Union oceantype units. Each ocean-type SP can tow 1 river-type SP. Confederate ocean-type units may not tow Confederate river-type units into sea zones or all-sea hexes.
[45.C.2] The unit that is towing and the unit to be towed must begin the movement phase stacked together. They move together, with both units paying the full MP cost for all hexes and zones entered.
[45.C.3] Whenever the towing unit reaches a coastal hex, major river hexside, or a land off-board zone, it may decouple from the unit it is towing. Both units may then complete the remainder of their normal moves. For example, a Union Transport could tow a Union ironclad to a coastal hex outside of Charleston and then return to the Atlantic sea zone, while the ironclad proceeded into the Charleston hex or along the coast, up to the remainder of their MPs.
[45.C.4] Units that have been so heavily damaged as to be dead in the water and thus incapable of independent movement (see 51.0 Naval Combat) may be towed by any friendly naval unit that is still capable of movement. Captured units may also be towed by victorious units. Any SP can tow any other SP in coastal hexes and along major river hexsides. Only Union ocean-type units can tow in a sea zone or all-sea hex.
[45.C.5] Units that are being towed can’t fight. If the towing unit is sunk, the towed unit is sunk. If the towing unit is dead in the water, neither unit can move independently.
[45.C.6] Units that are being towed, and are not dead in the water, may still carry troops and supplies (see Transport and Naval Supply rules).
[46.0] NAVAL INTERCEPTION
The inactive player’s naval units may attempt to intercept enemy naval units that move into their sea zone, or that
move into an adjacent hex or a connected major river hexside that the inactive player’s naval units could enter (river-type units can’t enter all-sea hexes or zones).
[46.A] The Naval Interception Table shows the die roll needed to intercept and modifiers to that die roll.
[46.A.1] Units normally intercept on a die roll of 4 or more. In the scenarios, the only die roll modifier is +2 if the inactive player is blockading (in the same hex as) the active player’s naval units and the active player’s naval units are trying to leave the hex. The other modifiers are used only in campaign games where the Confederate player has Blockade Runners and Commerce Raiders in play (See Campaign Game rules).
[46.A.2] To intercept, the inactive player announces how many eligible stacks or units will attempt interception, before rolling the die.
•In sea zones, each SP may roll to intercept.
•In all other hexes or hexsides, each stack may roll to intercept.
[46.A.3] Units that fail to intercept remain in the hex/ hexside/zone.
[46.A.4] Units that successfully intercept enter the same hex or hexside as the active player’s unit (or the same stack in the sea zone) and fight. All other movement ceases while the combat is resolved. Combat continues until one side is eliminated, captured, or successfully withdraws.
[46.A.5] If the intercepted units win the combat, they spend an additional 5 MPs for having fought. If they have any MPs remaining, they may continue moving.
[46.A.6] If the intercepting units win the combat, they may remain in the hex/hexside or withdraw to the nearest friendly unblockaded coastal city.
[46.A.7]Aunit may only successfully intercept once per turn. Units that failed in their interception attempt may attempt to intercept each time an enemy unit/stack moves into their sea zone, or an adjacent hex or connected hexside. Once it has successfully intercepted it may not roll again.Aunit may not roll more than once to intercept the same enemy unit/stack unless the target enters a different adjacent hex or connected hexside, or spends additional MPs in the sea zone.
[47.0]AMPHIBIOUSMOVEMENT
Union naval Transports, and Union and Confederate River fleets, can carry land units for amphibious operations. Each naval Transport unit can carry up to 4 land SPs,
including siege, rail, and pontoon units, each of which counts as 1 SP. Each River fleet SP can carry up to 2 land SPs, but may not carry rail or siege units. Either type of naval unit may carry any number of leaders.
[47.A] Embarkation/Debarkation
[47.A.1]To embark, land units must begin the movement phase with the naval unit in their hex (or on its hexside), or in the same off-board zone. Embarkation doesn’t cost MPs for either the land or naval unit.
[47.A.2] Naval units may disembark land units in a friendly coastal city or off-board zone for 1 additional MP. To disembark land units in a hex without a friendly city, the naval unit pays 3 additional MPs. Land units may not be unloaded in swamp hexes unless the hex also contains a fortification, entrenchment, or city.
•After land units disembark, the naval units may continue moving with their remaining MPs.
•Land units may move in the same phase after they disembark, but only by forced marching (12.0). They don’t pay MPs to enter the hex in which they landed.
[47.B] Amphibious Assault. Land units may be disembarked in hexes with enemy land units, but must then attack them. If any defending SPs (other than those that have withdrawn into a fortification) remain in the hex at the end of the combat phase, the disembarking units must withdraw or retreat back aboard the naval units. If the naval units are no longer in the hex, the retreating land units are eliminated (captured in a campaign game).
[47.C] Risk
[47.C.1] If a naval unit carrying land units is damaged (takes 2 or more hits from fire or combat) it must immediately:
•Unload the land units, if in a major river hexside or coastal hex; and
•Return to the nearest friendly coastal city, if in a sea zone.
[47.C.2] If a naval unit becomes dead in the water from fire or combat, the land units it is carrying must either unload, if possible, or the naval unit must be towed to the nearest friendly coastal city, if in a sea zone.
[47.C.3] If a naval unit is captured with land units aboard, the units are eliminated (captured in a campaign game).
[47.C.4] If a naval unit is sunk, all land units aboard are eliminated and leaders roll for injury. If neither injured nor killed, place leaders with the nearest friendly naval unit or in the nearest friendly coastal city.
[48.0] BATTERY FIRE
When a naval unit stack enters a hex with a major river hexside containing enemy fortifications or entrenchments, the enemy units may fire upon the naval units. Forts and entrenchments control river hexsides on the river it is facing. Forts and Entrenchments need to occupy one hex that is adjacent to a major river hexside to control it. They fire once per hex, not per major river hexside.
[48.A] As soon as the naval units enter the hex or major river hex, the inactive player’s batteries can fire.They receive 3 “shots” per fortress, 2 per fort, and 1 for an entrenchment. There must be at least 1 SP in a fortificationforitto fire; a hex with a fort and a fortress must have 2 SPs to fire both batteries. An entrenchment needs at least 5 SPs in it to fire.
[48.B] Each battery “shot” is a die roll on the Naval Combat Table.
[48.B.1] The battery player may allocate each shot to a separate target or may combine shots at the same target.
[48.B.2] All targets must be announced before rolling any dice.
[48.B.3] The active player may use ironclads to mask other naval SPs. The battery player must assign at least 1 shot to an ironclad for every shot at the unit it is masking.
[48.C] Resolve battery fire on the Naval Combat Table, applying the modifiers listed in the table. For each hit result, roll again on the Naval Damage Table to determine how many damage points were inflicted. If 2 or more points of damage are inflicted by a battery, from 1 or more shots, the naval unit is damaged and must withdraw from the hex or hexside to the hex or hexside they were in immediately before entering the battery hex.
[48.C.1]If the unit becomes dead in the water, it stops in the hex. The active player may scuttle (sink) the unit if there are other friendly naval units in the hex.
[48.C.2]Units that aren’t sunk, dead in the water, or damaged (2 or more damage points) by battery firemay withdraw from the hex or hexside, remain where they are, or continue moving.
[48.D] Batteries may fire at every stack that enters their hex or one of its major river hexsides that turn, including units that withdraw or retreat into or through the hex/ hexside.
[48.E] Batteries may also fire during the battery player’s turn. They may fire at any enemy naval units that begin the battery player’s movement phase in the hex/hexside, and at enemy naval units that enter the hex/hexside by interception, withdrawal, or retreat.
[48.F] If the Union siege train is in a fortification or entrenchment, it may also act as a battery. It can fire 2 shots.
[49.0] NAVALGUNFIRE
Naval combat units (except Commerce Raiders) may attack enemy batteries and provide support for land units that are attacking batteries or are being attacked.
[49.A] Naval combat units may destroy enemy entrenchments. If a stack of naval combat units enters a coastal hex (or a major river hexside of a hex) that contains an enemy entrenchment, and if it has at least as many naval combat SPs as there are enemy land combat SPs in the hex, the entrenchment marker is removed. No land combat units are destroyed. The naval units must spend 5 additional MPs to destroy an entrenchment in this fashion. The entrenchment and any other batteries may fire before they are destroyed.
[49.B] Naval combat units may not destroy fortifications by fire, nor may they return fire. They may only attack or bombard them in conjunction with land units. In the combat phase, land and naval units may combine to attack fortifications and entrenchments in coastal and major river hexes. The naval units in the hex or major river hexside may either bombard or act as additional SPs for the attack.
[49.B.1] When naval units bombard, they modify the combat dice roll by 1 in favor of the land/naval attack, regardless of how many naval combat SPs are bombarding. Bombarding units don’t suffer any combat results. Some naval units may bombard, while others participate in assaulting the fortification/entrenchment.
[49.B.2] Naval units in the hex with a major river hexside that are not bombarding may assault the fortification or entrenchment. They are treated as additional land combat SPs. The morale of the attacking force is based solely on that of the land units involved. No naval units are eliminated unless the combat result is a D1 or greater against the land and naval force, in which case 1 naval SP must be eliminated. This loss counts toward the total number of SPs to be lost and is taken regardless of a “(1)” or a “1+” result. If the land units participating in the joint land and naval attack are eliminated, withdrawn, or forced to retreat, the naval units may either withdraw or remain where they are, at the owning player’s option.
[49.C] Sieges. Naval units may bombard during siege resolution. They subtract 1 from the die roll in the same
manner as a siege train. Regardless of the number of naval units, the die is modified by only 1.
[49.D] Field Battles.
[49.D.1] Naval units may not assault or bombard hexes that don’t contain enemy fortifications or entrenchments.
[49.D.2] If naval combat units are in a hex (or a river hexside of a hex) with land units that is being attacked by enemy land units, they may offer fire support. Fire support modifies the combat dice by 1 in favor of the defending player, regardless of how many naval SPs are present.
[49.D.3] Units offering fire support may not be eliminated to satisfy combat losses and don’t have to withdraw or retreat from the hex or river hexside, but may do so if desired.
[50.0] FERRYING
Naval Transports and River fleets can ferry land units across major river hexsides.
[50.A] If a ferry-capable unit is in a major river hexside, friendly land units may treat it as a bridge for purposes of combat, withdrawal, retreat, and supply. They may move across it at a cost of 1 additional MP.
[50.B]Aunit may act as a ferry and then move, or move and then ferry troops. It may not move, ferry, and then move again in the same turn.
[50.C] Units may attack across a ferry as if across a bridged major river.
[50.D] Units that are intercepted immediately after crossing a river hexside by ferry are treated as if they were after crossing a bridged major river.
[50.E]ARiver fleet that acts as a ferry can also provide naval gunfire or engage in combat or assault in the same turn.
[51.0] NAVALCOMBAT
[51.A] Definition and Eligibility.
[51.A.1] Naval combat occurs whenever naval units intercept enemy naval units or enter a hex or major river hexside with enemy naval units.
[51.A.2] Naval units of the inactive player in (or on a hexside of) a hex with a fortification may shelter in the fortification and avoid combat. If there are no enemy naval units outside of the fortification, the active player can either remain in the hex/hexside (blocking) or continue moving. If there are any enemy naval units in the hex or major river hexside outside the fortification, combat must be fought.
[51.B] Sequence.
[51.B.1] First resolve any battery fire. Battery fire occurs only once, no matter how many rounds of combat are fought in the hex.
[51.B.2] Naval combat is fought in a series of rounds until one side or the other is eliminated or withdraws. The sequence is:
• Fight.
• Scuttle.
• Withdrawal/Pursuit.
• Fight again, and so on.
[51.C] Procedure.
[51.C.1] Both players remove their naval units from the hex or major river hexside and place them in a clear area off the board. The player with fewer naval combat SPs (or the inactive player if the points are equal) places their units in a line. If desired, units may also be placed behind this line, where they will be screened from enemy fire but unable themselves to fire.
[51.C.2] The opposing player then places his units in one or two lines, in a similar fashion.
[51.C.3] The first lines of each player are then placed opposite each other. SPs opposite each other will fire on each other. If one front line has more SPs than the other, the excess SPs may “double up” against the enemy’s firstline SPs.
[51.C.4] No SP may be fired on by more than 1 enemy SP unless every other friendly first-line SP is fired on by 1 enemy SP. No SP may be fired on by more than 2 SPs unless every other first-line SP is fired on by at least 2 SPs, etc.
[51.C.5] Strength points fire opposite each other using the Naval Combat Table. Roll 1 die for each naval SP. Modify the die as follows:
-1 if the target is an ironclad.
-1 If the firing unit has 2 or more damage points.
+1 If the target has 2 or more damage points.
+1 if the target is an ocean-type unit in a major river hexside.
[51.C.6] If the die roll results in a hit, roll again on the Naval Damage Table. The only modifier to this die is a (-1) if the target is an ironclad. The result (0,1, or 2) is the number of damage points the target takes. Place a numerical marker on the target ship counter to show how many damage points it has received.
[51.D] Damage. Each type of naval unit can take a specified number of damage points:
Ironclads: 4 damage points. Ocean units and River fleets: 3 damage points. Transport, Commerce Raider, and Blockade Runners: 2 damage points.
[51.D.1] A unit with 2 or more damage points is “damaged.” Damaged units pay an additional MP to enter a hex or major river hexside. If carrying troops, they must either unload them, or attempt to withdraw (see below) and then retreat to the nearest friendly coastal city. Damaged units are reduced by 1 when firing and enemy units add 1 when firing at a damaged unit.
[51.D.2] If a unit takes the maximum number of damage points it can sustain, it is “dead in the water.” Units dead in the water can’t fire. They can move only if towed. They must disembark any troops they carry unless they can withdraw and be towed to a friendly coastal city.
[51.D.3] If all of a player’s naval units (first and second lines included) are dead in the water, they are captured if the opposing player has any functioning naval combat units (not dead in the water). If neither player has any functioning naval combat units, the first player to move a functioning naval combat unit into the hex/major river hexside/zone captures the enemy ships. A Commerce Raider or Blockade Runner that is dead in the water immediately sinks and is eliminated.
[51.D.4] If a unit takes more damage points than it can sustain, it sinks. Any units it is carrying (except leaders) are eliminated. Leaders may roll for injury and, if not injured, may be placed with another friendly naval unit in the hex/major river hexside/sea zone or the nearest friendly coastal city.
[51.D.5] Fire and damage are simultaneous. No units are eliminated or treated as damaged/dead in the water/sunk until they have had a chance to fire in a given round. After all units in both first lines have fired, damage points are assessed, and eliminated units removed.
[51.E] Scuttle.
[51.E.1] After all damage points have been assessed and eliminated units removed, each player may voluntarily scuttle any friendly units. Scuttled units are eliminated.
[51.E.2] A player may not scuttle units that are dead in the water unless they have other, functioning naval units in either the first or second line.
[51.F] Capture.
[51.F.1] If all the units of a player’s fleet are dead in the water, they are captured by the opposing player, if there
are any enemy combat units present that are not dead in the water.
[51.F.2] Captured units may be scuttled or towed and may be repaired in friendly major cities (see 54.0 Naval Repair).
[51.G] Withdrawal. Units may not leave a hex/major river hexside/sea zone where combat is taking place except by withdrawal.
[51.G.1] After damage points have been assessed and before another round of combat begins, either player (inactive player first) may attempt to withdraw. A player may automatically withdraw units if:
•They are in a hex (or major river hexside of a hex) with a friendly fortification and the units wish to shelter in the fortification; or
•They are adjacent to an all-sea hex, major river hexside, or sea zone that they can legally enter (rivertype units may be towed as per towing rules) and the other player can’t or doesn’t wish to enter.
[51.G.2] If neither of the above applies, the opposing player may attempt to stop the withdrawal by rolling a pursuit die. If the result is 4 or more, the units do not withdraw and must fight another round of combat. (The Union leader Farragut adds 1 to a Union pursuit die roll).
[51.G.3] If the units successfully withdraw, they must move toward the nearest friendly unblockaded coastal city. Units may not withdraw forward; they may only go back in the direction from which they entered the hex or major river hexside, or in the direction opposite that from which the enemy entered. If in a sea zone, they must either withdraw to the coastal city or sea zone from which they entered or (if they began in the sea zone) remain in the sea zone but not fight another round.
[51.G.4] If units are blockaded in a hex with a city or fortification and the fortification or city is occupied solely by enemy land units, the naval units may not withdraw and must fight until eliminated, scuttled, or captured.
[51.H] Second Round Combat. Second and subsequent rounds of combat follow the same procedure as the initial round of combat. Units in the first line must remain there if opposed by an enemy unit. Additional units from the second line may be brought forward and added to the combat.
[51.I] Free Fire. If all of a player’s units are dead in the water or non-combat units, the opposing player can freely allocate combat units to fire at any naval unit regardless of their line.
[52.0] MULTIPLE NAVALCOMBATS
[52.A] Naval Combat is a function of movement and takes place during the Movement Phase. If active units win the combat (their opponents having been eliminated or withdrawn) they may continue moving, after paying an additional 5 MPs to leave the hex/hexside/sea zone. If a unit doesn’t have at least 5 MPs remaining, its move is over. This cost is assessed regardless of who initiated the naval combat.Anaval unit may therefore fight several different naval battles in the same turn.
[52.B]Aunit can be attacked more than once in a turn by the same enemy naval units from which it withdrew, if the enemy naval units enter the hex/hexside into which the units withdrew.
[53.0] LAND-SEASEQUENCE
[53.A] Naval combat is a function of movement and occurs in the active player’s movement phase.
[53.B]After all naval combats have been resolved, any naval units in a hex with enemy fortificationsor entrenchments may assault or bombard fortifications and entrenchments in conjunction with land units in the Combat Phase.
[54.0] NAVALREPAIR
[54.A] Naval unit damage points may be repaired in friendly, unburned, unbesieged major cities in the player’s home states. Union ships may also be repaired in the Northern Ports Sea Zone and the Delaware off-board zone. Confederate ships may also be repaired in the Florida and Texas off-board zones. Units may not be repaired in an off-board zone if enemy units are present in the zone.
[54.B] In the Reinforcement and Replacement phase, a player may spend replacement points to repair naval units. Each replacement point repairs 2 damage points. The damage points to be repaired need not be on the same unit: a replacement point can repair 1 damage point each on two different ships.
[54.B.1] Aunit that has 2 or more damage points repaired in the same turn may not move, act as a ferry/source of supply, engage in combat against land units, or conduct counterbattery fire in that turn. If attacked it may fight and withdraw normally.
[54.B.2]Aplayer may repair a captured naval unit. Once repair work begins, replace the unit with a friendly counter of the same type.
[54.C] Campaign Exception. In the campaign game, as soon as a unit is captured it is replaced with a friendly unit of the same type drawn from the captured counters or, if there is none, from the Force Pool. If there are none available, the captured unit is sunk.
The Confederate player can’t repair Union Transports or Ocean fleets; if captured they are immediately sunk.
[55.0] NAVAL SUPPLY
[55.A] Naval units and land units being transported by naval units are always in supply.
[55.B] Land units that disembark from naval units are supplied the turn they disembark.
[55.C] River fleets and Union naval Transports can provide a limited amount of supplies for land units.
[55.C.1] River fleets and Transports on major river hexsides that can trace an unblocked path along the major river, free of unblockaded enemy naval units, fortifications, or entrenchments, to a friendly source of supply can serve as a limited source of supply for land units.
[55.C.2] Each such River fleet can supply 5 land SPs. Each such transport can supply 10 land SPs. Land units trace supply routes to those naval units as per the normal supply rules.
[55.D] Union Transports in coastal hexes that have a fort, fortress, entrenchment, or city can act as a limited source of supply for land units. In addition, they can act as a source of supply for friendly River fleets or naval Transports on major rivers that can trace an unblocked path to the transport along major river hexsides.
[55.D.1] One such Transport SP can supply 10 land SPs. These may be:
•10 SPs in the same hex; or
•10 SPs in several hexes, including the SPs that form a chain of supplied units to the Transport SP; or
•1 Transport or 2 River fleet SPs that can trace a path along major river hexsides to the Transport SP, and can in turn supply 10 land SPs; or
•A combination of the above, not to exceed 10 land SPs.
NOTE: A stack of units is either supplied or unsupplied. If there are not enough supplies available from naval units to supply all the SPs in a stack, none of them are in supply. The stack may split apart during movement allowing some of the units to be in supply for forced marching or combat.
[55.D.2] Transports and River fleets acting as sources of supply in a coastal or major river hex can’t carry land units in the same turn, and vice versa. They may participate in combat, bombardment, etc.
[56.0] CITIES
There are three types of cities in the game: Major, Minor, and Valley. Major cities are used to determine supply and as entry points for replacements and reinforcements. Control of major cities often determines victory in the scenarios. Valley cities form part of the Confederate supply network.
[56.A] All unburned cities reduce attrition die rolls in the hex by 1 and negate the MP cost of terrain in the hex. They also act as bridges for major and minor rivers on their hexsides and as ports for coastal hexes.
[56.B] Players may burn cities in enemy territory if their units are the sole occupants of the city. Players may not burn cities in their own home states or in Kentucky.
[56.B.1] It costs 2 MPs to burn a minor or Valley city and 4 MPs for a major city. Place a rail break marker in a burned city, as all rails in the city are burned.
[56.B.2] Treat a burned city as if it no longer existed. It is no longer a bridge, doesn’t negate the cost of terrain in the hex, and can’t be used to reduce attrition or form part of a supply chain. Reinforcements and replacements may not be placed in a burned city.
[56.B.3] The rail break marker may be repaired as if it were a rail break in a clear hex.
[56.C] Campaign Note. Cities may be rebuilt in the campaign game (only) by spending production points. It costs 5 production points to rebuild a major or Valley city, and 3 points to rebuild a minor city. It takes 3 consecutive turns to rebuild any city. The city hex must be in supply and unoccupied by enemy units for all 3 turns or the points and time spent rebuilding it are lost. Once rebuilt, it is treated as if it had never been burned.
[57.0] OFF-BOARD ZONES
[57.A] Off-board zones cost 5 MPs to enter or exit from adjacent hexes, off-board zones, or sea zones. Units may enter or exit a zone from or into any adjacent hex or zone.
[57.B]Aplayer’s units in a zone take attrition as if all in one stack, but subtract 1 from the die roll.
[57.C] Treat all of a player’s units in the zone as one stack for purposes of interception.
[57.D] Units in a zone may only fight enemy units in the same zone. They may not attack or be attacked from adjacent zones or hexes. If a unit withdraws from or retreats from a battle in a zone, it must leave that zone. If the adjacent zone is occupied solely by friendly units or is unoccupied and in that player’s home territory, it may go to that zone. If not, the unit must leave the zone and enter a hex adjacent to the zone. It must enter the hex that is closest, in terms of MPs, to a friendly supplied hex or source of supply.
[57.E] Zones in home territory are sources of supply for the Union and form part of the supply network for the Confederacy, unless occupied solely by enemy units. If both players have units in the zone, then units in the zone may still be supplied, but units outside the zone can’t trace supplies to it until the enemy units leave.
[58.0] NORTHERN INVASION
When Confederate forces enter a hex completely within a Northern state or off-board zone, the Confederate player is invading the North.
[58.A] If a Northern invasion occurs, the Union player’s must, in his Movement Phase must be used to move units into the state/zone until there are at least as many US SPs as the Confederates have in the state/zone. If Maryland, Pennsylvania, or Delaware are invaded, the Union player must move double the number of Union SPs as there are Confederate SPs into the zone.
[58.B] Union forces are counted separately for each state and zone; thus if the Confederates had units in both the Pennsylvania zone and a hex in Pennsylvania, the Union player would need twice as many SPs as the Confederate player in both the zone and in a hex in Pennsylvania.
[58.C] Treat Washington, D.C. as part of Maryland for this purpose.
[58.D] Until the Union player fulfills the above conditions, no Union land combat forces may move any farther south in the Confederate States As soon as these conditions have been met, even in the midst of a movement phase, the Union player may resume normal movement, as long as the above requirements remain met.
[59.0] WASHINGTON GARRISON
[59.A] In all scenarios and campaign games as well as the Grand Campaign Game, the Union player must garrison Washington with at least 10 land SPs. If, at the end of the Union player’s turn, there are fewer than 10
land SPs in Washington, no Union leaders or SPs may move farther into the Confederate states in the following Union Movement Phase. If the Union player violates the Washington Garrison rule a second time, they forfeit the game.
[59.B] If Confederate units occupy Washington, the Union player may not move any units farther into the Confederacy until Washington is reoccupied by the Union. The presence of Confederate units in Washington temporarily relieves the Union player of the normal effects of the Washington Garrison rule, as one can’t garrison something they don’t control. The forfeiture rule only applies to a deliberate violation by the Union player.
[60.0] MILITIA
[60.A] Both players have 2 militia SPs for each state in their home territory, except Pennsylvania, Georgia, and Virginia have 4 SPs each, and Florida and Texas have no militia. Both players have 2 Kentucky militia SPs.
[60.B] Militia move and fight like regular infantry, except that they may not cross state borders nor attack enemy units in hexes that aren’t inside their borders.
[60.C] Militia have a morale of 1.
[60.D] Militia may only be replaced in a friendly major city of their home state.
[61.0] PARTISANS
[61.A] The Confederate player has 1 partisan for each state in the Confederacy. The Union player has 1 partisan for Western Virginia. Each player has 1 partisan each for Missouri and Kentucky.
[61.A.1] Each player is limited to 1 partisan per state. In addition, the Union player is restricted in deploying the West Virginia partisan: it may not move or fight east or south of the hex row occupied by Romney, Virginia.
[61.A.2] Partisans are placed on the board according to scenario rules or as replacements. They must be placed in their home states, in mountain, forest, or swamp hexes that are not occupied by enemy units. Texas partisans may set up in the Texas off board area. They are replaced as cavalry, but when they enter play are placed as above.
[61.A.3] Partisans defeated by overrun or automatic victory are not captured but eliminated and returned to the force pool.
[61.B] Partisans move, fight, and withdraw before and during combat as if they were cavalry, but like militia they are limited to fighting in their own state. They have a
[61.C] Partisans can’t be overrun except by stacks with at least 1 cavalry SP. Partisans can’t stack with other units or enter fortifications or entrenchments, nor may they entrench or be transported by rail or naval units.
[61.D] Partisans are always in supply, but may not supply other units except as a link in a chain to other supplied units.
[62.0] OPTIONAL RULES
[62.A] Limited Intelligence. Players may agree not to examine the other player’s stacks on the map or Leader Display boxes before combat. To conduct an overrun, the active player announces how many SPs are doing so. If that is sufficient for the overrun, the inactive player must say so.
[62.B] The Tactical Matrix. The tactical matrix is an important part of the system that should be used once players are familiar with the game. It allows players to directly influence the outcome of field battles by choosing tactical options. It also makes withdrawing from combat much harder and thus makes combat more decisive.
[62.B.1] The tactical matrix is on the Player Aid Card. Each player has a separate set of six tactical chits: Charge, Flank, Skirmish, Bombard, Refuse and Withdraw.
[62.B.2] In each round of combat (except when assaulting a fortification, when the tactical matrix is not used) each player secretly selects a tactical chit and places it face-down on their force’s leader. Both chits are then simultaneously revealed. The tactic chosen by the player controlling the larger force is then cross-referenced with the tactic chosen by other player. Results on the tactical matrix are:
• A number (positive, negative, or zero) that modifies the combat dice roll.
• If the result is parenthesized, the player(s) attempting to withdraw may do so immediately after resolution of the current round of combat.
• “NC” (no combat) means that no round of combat takes place; the battle between those units is ended.
[62.B.3] When using the tactical matrix, the rules for withdrawal are modified as follows:
• If the result on the tactical matrix was neither parenthesized nor “NC,” players may not withdraw, but may of course retreat if required to do so.
• A force may always withdraw into a friendly fortification or entrenchment in the hex. No withdrawal chit or parenthesized result is needed to do so.
• Forces of a player who chooses the withdrawal chit must, if able, leave the hex at the end of the current round of combat.
[62.B.4] After the tactical chits are revealed and the combat dice are rolled, return the chits to the players so that they can choose from a full set for the next round.
[62.B.5] Players choose a tactical chit for each round of combat, one round at a time.
[62.B.6] All other combat die roll modifications apply, but the die roll may not be modified by more than plus or minus 4.
[62.C] Mines. The Confederate player may place mines in coastal hexes or major river hexsides in the Confederate states where a fortification, entrenchment, or city is present, and the hex is not occupied by Union units.
[62.C.1] In scenarios, the Confederate player secretly rolls 1 die and receives that many mines. Additional mines may be purchased for 1 replacement point each.
[62.C.2] In campaign games, mines cost 1 production point each. Any mines purchased or received are secretly placed by writing down their hex. Only one mine may be placed in a hex.
[62.C.3] If Union naval units enter a mined hex or hexside, the Confederate player immediately informs the Union player and rolls 1 die. If the result is 5 or 6, the mine sinks the topmost naval unit in the stack, before any battery fire, counterbattery or combat occurs.
[62.C.4] A Confederate land or naval combat SP must be in the coastal or major river hex to fire the mine. If a Union land combat unit is ever in sole occupation of a mine hex, the mine is eliminated and the Union player is so informed.
[62.C.5] Once a mine explodes, it is eliminated.
[62.D] Mortar Boats. Only the Union player may construct mortar boats. Mortar boats are available only in campaign games and in the Shiloh and Vicksburg scenarios.
[62.D.1] Mortar Boat units move like River fleets but have no combat value against other naval units. They may not fire at enemy naval units and can take only 2 damage points.
[62.D.2] Mortar boat units can be used in counterbattery, naval gunfire support, and bombardment. They don’t have to be present in the hex to do so but may be in an adjacent connected major river hexside or coastal hex.
a. Mortar boats may not be used as SPs in a land-
a. Mortar boats may not be used as SPs in a land-sea assault and can’t be eliminated to satisfy losses in land-sea engagements.
[62.D.3] Mortar boat, Siege train and naval bombardment are cumulative when fired against the same target. If, in a campaign game, more than one mortar boat is used against the same target, only one mortar boat counts.
[62.D.4] Mortar boats may not carry troops, or act as ferries or sources of supply for land units.
[62.D.5] Mortar boats may be captured and used by the Confederate player, who uses the mortar boat counter (as there are no Confederate mortar counters).
[62.D.6] If eliminated, the mortar boat unit is replaced in 5 turns in the scenarios and is placed either at Cairo or, if Union naval units occupy New Orleans or the Gulf, with those units.
[62.D.7] In the campaign game, mortar boats cost 6 production points and require 5 turns to produce.
GAME CREDITS
Historical Research, Game Design And Development: Mark McLaughlin
Game Graphics: Bruce Yearian
Game Management and Production: Billy Thomas
Special Thanks to: Gerald Prokopowicz
GETTYSBURG ADDRESS
Four score and seven years ago our fathers brought forth on this continent, a new nation, conceived in Liberty, and dedicated to the proposition that all men are created equal.
Now we are engaged in a great civil war, testing whether that nation, or any nation so conceived and so dedicated, can long endure. We are met on a great battle-field of that war. We have come to dedicate a portion of that field, as a final resting place for those who here gave their lives that that nation might live. It is altogether fitting and proper that we should do this.
But, in a larger sense, we can not dedicate—we can not consecrate—we can not hallow—this ground. The brave men, living and dead, who struggled here, have consecrated it, far above our poor power to add or detract. The world will little note, nor long remember what we say here, but it can never forget what they did here. It is for us the living, rather, to be dedicated here to the unfinished work which they who fought here have thus far so nobly advanced. It is rather for us to be here dedicated to the great task remaining before us—that from these honored dead we take increased devotion to that cause for which they gave the last full measure of devotion—that we here highly resolve that these dead shall not have died in vain—that this nation, under God, shall have a new birth of freedom—and that government of the people, by the people, for the people, shall not perish from the earth.
The Bliss version of the speech
President Abraham Lincoln giving the Gettysburg Address on November 18, 1863.