Moxi Present
What is it?
A real estate company market analysis (CMA) tool that lets you seamlessly guide your clients through the home buying or selling journey.
• Time efficient with pre-loaded templates
• Connects to MLS for real-time data

• Includes buyer & seller presentations, buyer tours, and listing presentations
• Offers digital and print versions
• Allows for personalization
FEBRUARY 2023


Document is for internal use only. Created by the Coldwell Banker – The Property Exchange Marketing Team. All Rights Reserved. 2 THE PROPERTY EXCHANGE NOTES
Overview of Moxipresent dashboard
.01
Two Main Tabs: My Presentations (displays personal presentations & presentations assigned to you), Brokerage Presentations (displays presentations made by the brokerage), Team Presentations (only for teams, i.e. Graham Group, Bowers Team).
My library: Store and retrieve previous presentations.
.06
Gear Icon: Access settings and give feedback.
.07
Recently updated tab: A way to click and sort presentations by recently updated, date created, or title.
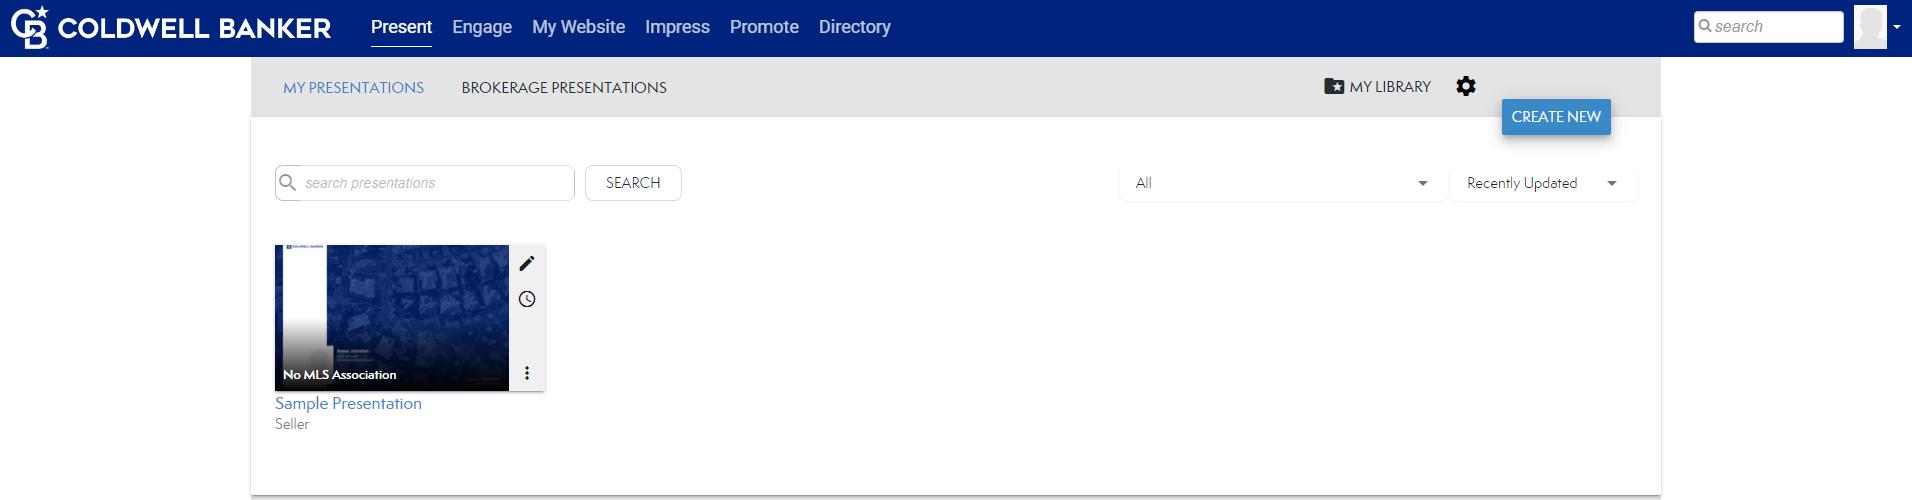
Press ‘all’ to display all presentations: Buyer/Seller Only, Archived, and Title/Subject Property search. Are as they sound.
Presentation Thumbnail Icons: Edit button (pencil icon, allows you to edit), Clock button (clock icon, see important dates related to the presentation), Click on thumbnail (access the presentation).
Help Button: Located on the bottom right of whatever page you’re on.
3 Document is for internal use only. Created by the Coldwell Banker – The Property Exchange Marketing Team. All Rights Reserved. THE PROPERTY EXCHANGE
.02 .03 .04 .05
.01 .02 .03 .04 .05 .06 .07
Getting started with MoxiPresent
Video: https://learning.realogy.com/mod/scorm/view.php?id=3287
Getting Started
When you log into MoxiPresent, you’ll land on the dashboard.
In the upper right corner is a bright blue button called CREATE NEW. Click this to start entering information for the set-up of a new presentation.
After you click Create New, you’ll be able to select what type of presentation you can make. Click Continue when done.


Types of Presentations
Seller – Assess a current or potential home’s market value with this traditional CMA
Property Review – Create a personalized review of a property, and compare to current listings and market trends
Buyer Tour – Guided your clients from listing to listing with a detailed buyer tour experience
Buyer – Find the perfect property for your buyer clients or create a CMA potential property
Non-Listing – Create interactive newsletters or marketing pieces using custom pages
Document is for internal use only. Created by the Coldwell Banker – The Property Exchange Marketing Team. All Rights Reserved. 4 THE PROPERTY EXCHANGE
Next, you’ll select the type of template you want to use. Click Continue when done.
Types of Templates
Brokerage Templates – Currently there is only a default template available. The brokerage can upload additional templates in the future.
Coldwell Banker Templates – These are from the corporate office, and offer a wider variety of options to choose from.
Finally, you’ll enter the info for who you are preparing the presentation for.


Ensure the drop-down for the Listing Source matches where the property is listed (for instance, the Cheyenne Board of Realtors would be the appropriate one for property 605 Harmony Lane).
The next screen will enter the official presentation, where you can either add a property by its MLS # or by hand. The property address you’re adding here is the one of your client.

5 Document is for internal use only. Created by the Coldwell Banker – The Property Exchange Marketing Team. All Rights Reserved. THE PROPERTY EXCHANGE
You can upload a picture directly from your computer by clicking the Browse button (handy if you don’t like the one that is auto-pulled from the MLS #, or if you’re entering this info manually).

If the listing already exists in the MLS, an MLS # will be the easiest way to put a listing into the Presentation. This will pull directly from the MLS and fill in the info on the “Subject Property” page.
NOTE: This will not pull Sold, Expired or commercial listings.
Listings Page Information
This is where Present accesses listings with addresses, prices, days on market, and status of the listings. It also provides in-depth info about the listings that show (it’s because Present is tied to your MLS. Without an MLS number you won’t get this kind of data on the Listings Page).

Listings will be filtered out and populated through the filters you put in place on this page. Filters include: # of beds and baths, price, SQ.FT. and more.


Document is for internal use only. Created by the Coldwell Banker – The Property Exchange Marketing Team. All Rights Reserved. 6 THE PROPERTY EXCHANGE
When you press continue, you will be brought to a “Search” page. This page will be the comps that you’re pulling for the original listing.

You can narrow down the amount of listings on this page by putting (3) sets of filters in place. Make sure to click Apply, or your settings won’t be saved.


1 2 3 1 2 3
Once you have your filters in place, choose the listings you would like to compare your listing with


To choose a listing press in the middle of the thumbnail. Selected listings will have a green circle with a check mark on them.
When you press continue, you will be brought to the “Listings” page, where your listing and all the listings you chose to compare will show up.
From here, you’ll see:
• The average, low and high price of the group
• The Bed/Bath, SQ.FT., Price and $/SQ.FT.
• Add a Custom Listing
• View listings on the Map
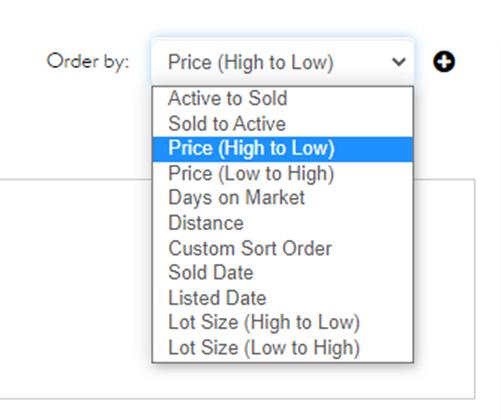
On this page you can reorder how the properties show up by going to the Order By: drop down menu.
When you press custom listing a similar page to Subject Property Page comes up. You have the option to add the property by hand or with an MLS number.

8 THE PROPER EXCHANGE
When you press “View Listings on Map,” it shows all of the listings on a map layout.

Stick the wrong listing in? Or too many? You can remove listings by pressing the red X in the top right corner of the listings.

You will be asked if you are sure you want to delete the listing. Press Remove to make it gone!


You are able to do quite a bit with each listing.
• Listing Details – In-depth details of the property, such as:
• Features
• Property Information
• Remarks
• Price
• Open House Times
• Agent Info
• Edit remarks – Add remarks for this listing.
• Copy to Custom Listing – Copy the listing and edit it.
• Replace with Custom Listing – What it sounds like.
9 Document is for internal use only. Created by the Coldwell Banker – The Property Exchange Marketing Team. All Rights Reserved. THE PROPERTY EXCHANGE
• +Add/Edit Adjustment – Add adjustments to the property (things like a new roof can increase the price of a listing).
When you are satisfied with the listings, press Continue. You will be brought to the Estimated Pricing Page.


You can put what you estimate the value of the house is along with an estimate range percentage for the house.
You can also switch over to the Estimated Net Proceeds tab. This is where you can add Mortgage Payoffs, Brokerage Fees, Settlement costs, Transfer/ Excise Tax, Other costs and custom costs


When you are done with the Estimate Page, press Continue. This will take you to the Presentation, where you can:
• Edit, delete, and add slides
• View and send your presentation
• Create a flyer
• Assign the presentation to another agent and/or add a co-presenter
– The Property Exchange Marketing Team. All Rights Reserved. 10 THE PROPER EXCHANGE
Overview of moxipresent Presentation
We interrupt your training to go over this section in detail. SNS.
Navigating Present
We’ll start with these. They’re the sections you see directly on your dashboard when you log into MoxiEngage:
Action Menu: For viewing, sending, and changing settings on the fly.
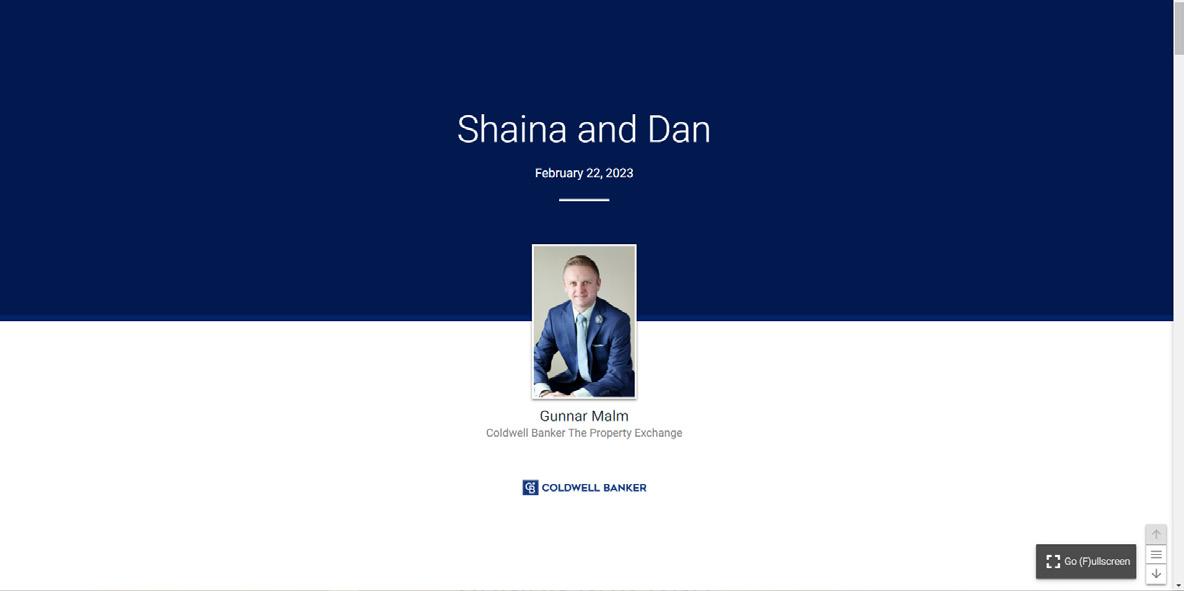
Cover Photo: The main photo for the presentation. Also displayed is the presentation name, address, and date created.
Selection Menu: Quick access to different areas & sections of the presentation. All presentations display a different section menu.
Viewing Options: View in web or print mode.
Business info: Displays agent/broker info.
11 Document is for internal use only. Created by the Coldwell Banker – The Property Exchange Marketing Team. All Rights Reserved. THE PROPERTY EXCHANGE
.05
.01 .02 .03 .04
.01 .02 .04 .05 .03
Customizing your presentation
Now back to your regularly scheduled training docs.
Adding to your presentation
Want to add a slide? You can! Choose one from the library or create your own custom (blank) one.
If you press “Add from Library,” you’ll see Report Pages (the pages provided in your presentation), CBx Pages, and Custom Pages

CBx Buyer Locator Data
What is it?
This tool predicts where buyers are coming from so you can potentially get more listings and close more deals.

• Two additional slides are added with the CBx buyer locator. This provides demographic and interactive info.
• Two additional pages are Buyer Profile Intelligence Page and Buyer Profile Map:
• Buyer Profile Intelligence Page — has tabs to choose from which shows a variety of data in the community. This is where you can see demographics of the homes and people in the selected zip code.
• Buyer Profile Map — This page shows many of the media choices your targeted buyers use. This is to show that you know where to market their home to get the right people viewing your listing.
Create New
Where you have the choice to build a page or upload PDF pages. Edit a slide: Press the pencil icon. Email the presentation (as PDF or link)


Share, Create Quick Flyer, View Quick Flyer, Assign to Agent, Add Co-Presenter, Help & Feedback, Delete


13 Document is for internal use only. Created by the Coldwell Banker – The Property Exchange Marketing Team. All Rights Reserved. THE PROPERTY EXCHANGE CBX Buyer locator pages
Building a custom page for your presentation

Clicking on the custom page will bring you to a pop-up that asks about what kind of layout you want this page to have.


After you click on your choice, click the Create button (this is where you’ll get to customize the actual page).
When you’re done, press the Save button in the top right (you’ll then be prompted to add a Name and description of the page)
Document is for internal use only. Created by the Coldwell Banker – The Property Exchange Marketing Team. All Rights Reserved. 14 THE PROPERTY EXCHANGE
Printing your moxipresent presentation
To print, ensure you are on your MoxiPresent dashboard (where you’ll see little thumbnails of all presentations you’ve made).

Click the three little dots in the bottom right corner of the thumbnail.
Hover over the View option. You’ll see two options: Web Presentation: This is the default viewing (since you’re on a computer and all).


Print Presentation: How you print the presentation in a lovely booklet.
You’ll also see quick settings for:
• Share
• Email
• Settings
• Duplicate
• Delete
• Archive
• Quick Flyer
• Assign
• Add Co-Presenter
15 Document is for internal use only. Created by the Coldwell Banker – The Property Exchange Marketing Team. All Rights Reserved. THE PROPERTY EXCHANGE
APPENDIX

Step-by-step How-to: Buyer Presentation
Step 1 – Press the blue Create New button in the top right corner.
Step 2 – Select type of presentation (buyer for this presentation).
Step 3 – Choose a template. Choices are available in the pull-down menu.
• My Templates
• Brokerage Templates
• If you click brokerage templates, you’ll have templates in this category to choose from.
Step 4 – Prepared For: Name of client you are making the presentation for.
Step 5 – A page will open called The Subject Property.
• You have the choice to put in the MLS # or Location/Zip code.
• Remarks Section: What you put here will appear on the 1st page of your presentation.
• On the right side of this page you have the choice to Upload a New Image.
• If you want to upload an image: Browse>This Computer>Find the file where the images are>click on the image >Upload.
• OPTIONAL SECTION: INTRIX Drive Time. Where you can put a location that is important to your client (their workplace, schools, amenities), and it will calculate how far this area is from the home.
Step 6 – Search: Where you will narrow your search with filters.
• Car Icon: Where you can place a preference for the commute time.
• Pen Icon: Where you can draw the radius of your clients preferred area.
• Click one of the colored (green, yellow, red) dots to see more info about each property.
• Sort Button: Sort properties by Date Listed, Beds, Baths, Date Sold, SQ.FT, Distance, Price.
• Choose at least 3 properties to show your client.
• To select, click the middle of the presentation thumbnail.
Step 7 – Where you will see your search criteria (Listings Page).
• Able to order the listings by clicking on Order By drop-down menu and selecting preference.
• Listings Summary is located to right of the screen. Where Bed/Bath, SQ.FT, Price and $/ SQ.FT. is displayed for each property.
• Can add Custom Listing or view listings on the map.
• Price drop-down: Enter the client’s budget (Min. price to Max price).
• Bed + Bath drop-down: Enter your client’s min. and max. bathrooms and bedrooms.
• Filter drop-down: Where Property Type, Property Info, and Features personalize the search.

Step 8 – Estimate Page.
• Click the Estimate tab for an estimate of closing costs and pricings.
• Click Create Range to enter parameters.
Step 9 – Click Continue and your presentation will generate.
Step-by-step How-to: seller Presentation
Step 1 – Press the blue Create New button in the top right corner.
Step 2 – Select the type of presentation (seller for this presentation).
Step 3 – Choose a template. Choices are available in the drop-down menu.
• My Templates
• Brokerage Templates
• If you click brokerage templates, you’ll have templates in this category to choose from.
Step 4 – Prepared For: Name of client you are making the presentation for.
Step 5 – Subject Property Page.
• Enter the address in the Location field and specify the Subject Property info. OR
• Enter the MLS number for data to be auto-filled (NOTE: This info will not auto update).
• If subject property info is not auto-filled: Fill in info manually (# of Beds, Bath, SQ.FT., etc.).
• Click Continue.
Step 6 – Search Page: Used for CMA purposes (this is where you add filters to see a better comparison to the property you’re selling).
• Draw a boundary on the map. Only the houses within the boundary will show up (see image).
• Set a price min and max of the properties to display.
• Set the property type.
• Click Apply on the filters.
• When you click Apply, the listings will filter out properties that don’t meet your criteria and only display properties that fit the filters you selected.

• Click the Sort button to sort by Date Sold, Price, Features and more.
Step 7 – Select the properties you want to focus on.
• To select properties, click the middle of the thumbnail. Once you select your properties, click continue.
• Scroll to the bottom of the page and click continue.
• The Listings page will appear. To see more info for each property, click the Listing Details button under the thumbnail image.
Step 8 – Estimate Page.
• Click the Estimate tab for an estimate of closing costs and pricings.
• Click Create Range to enter parameters.
Step 9 – Click continue to generate your presentation.
How-to: buyers tour Presentation
Step 1 – Press the blue Create New button in the top right corner.
Step 2 – Select type of presentation (Buyers Tour for this presentation).
Step 3 – Choose a template. Choices are available in the drop-down menu:
• My Templates
• Brokerage Templates
• If you click brokerage templates, you’ll have templates in this category to choose from.
– Prepared For: Name of client you are making the presentation for. (NOTE: You can turn on an option that says Notes and Ratings. Someone can place notes and ratings on the property tour.)
Step 4
Step 5 – Options Page.
• OPTIONAL: Fill in INTRIX Drive Time to place to starting point of your tour. Enter a location where your Clients are and press continue to figure out commute time.

Step 6 – Search Page.
• Add in your clients preferred location (Cheyenne, Laramie, Wheatland).
• Draw a boundary on the map. Only the houses within the boundary will show up. This is a quick way to set a filter.
• Set a price min and max of the properties around you.
• Set the property type.
• Click Apply on the filters you chose.
• When you click Apply, the listings will filter out the properties that don’t meet your criteria and only show ones that fit the filters.
• Click the Sort button and sort the properties by Date Sold, Price, Features and more.
Step 7 – Select the properties you would like to take your client on a tour.
• To select properties: click the middle of the thumbnail. Select the properties and click continue.
• Scroll to the bottom of the page and hit continue.
Step 8 – Listings Page: The order and map of the tour (NOTE: You are able to change the order of the tour by clicking on the Change Order button at the top of the screen).
• Click and drag properties to change the order.
• Press Save Changes to save the order of the tour.
• Press continue.
Step 9 – Your Buyers Tour Presentation will generate with the order of the tour, the map of the tour, and the properties.
Step 10 – Share your presentation.
• In the top right of the presentation screen, there will be a Send button. You can easily send your client a digital copy of your presentation so they have access to it during the tour. NOTE: You can continue to edit the presentation. When you mouse over a presentation, you’ll see a Pencil icon. Click this to edit. You can add more pages, like Home Renovation or an About You page.
Step-by-step
Step-by-step How-to: a Non-listing Presentation
Step 1 – Press the blue Create New button in the top right corner.
Step 2 – Select type of presentation (Non-Listing for this presentation).
Step 3 – Choose a template. Choices are available in the drop-down menu:
• My Templates
• Brokerage Templates
• If you click brokerage templates, you’ll have templates in this category to choose from.
Step 4 – Prepared For: Name of what you want this presentation for.
Step 5 – Add Pages.
• You will start with two pages: a Cover Page and Agent Profile Page.
• You can edit the cover page by clicking on the pencil icon
• To add pages, click the + Add Page button.
• Then decide if you’re adding a page from the library or creating a new page.
• Add From Library option brings up pages you have previously made
• Create New option will start a page from scratch
Step 6 – Create New Page.
• When you select Create New, a pop-up gives you 2 options: Build Page & Upload PDF page(s).
• Let’s say you click Build Page.
• The next screen will have you choose a layout of a page in your presentation.
• To make your selection, click on a layout you like. Click on one of the layouts (a green circle with a white check mark will appear in the top right corner of the layout to let you know it’s selected), then click the Create button at the bottom of the screen.
Step 7 – Design Your Presentation page.
• You will have the choice to add text, images, videos and more to the page.
• If you click Image, you can add images from the Image Library, Upload an Image, or go to the web to find one.
• Choose an image, then click the add button.
• Once you are done with your page, press the Save button in the top right of the page.
• Add a name and description, then click Save in the bottom of the pop-up.
• Click the save button in the top right of the page.
• To go back to the home page, press the X on the top left of the page.
Step 8
– Reorganize your presentation.
• Click and hold the page you want to move.
• Drag the page to your desired area.
Step 9 – Send your presentation.
• To send your presentation: click the Send button in the top right of the page.
• You can send both the presentation and PDF of the presentation by clicking on the check mark boxes at the top of the pop-up.
• This is where you will put in the email address(es) of your recipients.
random stuff i didn’t have a place for
INRIX Drive Time
Measures distance in minutes rather than miles. This helps your client find a location that works for them based on commute time and proximity to important features (school, work, daycares, etc.)

FAQs

Frequently asked questions
Q. If I’m creating a CMA, will it auto create a presentation?
A: Yes. It will look like the presentation on the next page!
Q. Why didn’t my CMA pull any comps?
A: You may need to fix the radius (manually change it) and sometimes you may need to finangle the filter options, too. We aren’t sure why.
Q. Is there an auto radius on comp searches?
A: Yes. It’s a specific mile range. But don’t rely on that to give you comps. Expand your search radius manually. Nearly 100% of the time.
Q. Where does archive go? How do I see archived things?
A: Click the drop-down for view. Then you’ll see Archive in there.
Q. If I want more flyers, etc., Can I make them without a CMA?
A: We recommend going into MoxiImpress. But if you have a presentation already made, you can print off a variety of flyers for the address & presentation.
Q. How long are my presentations stored for?
A: Unlimited time frame. You’ll need to delete them if you want to get rid of them.
.07
Q. Why are there no images for a listing?
A: We see this happen from time to time due to data glitches either on the MLS side or in how MoxiPresent processes the MLS data. If you come across a listing missing images, please submit a Support Request to MoxiWorks for a “resweep for images”. Please include this information in your request:
• the MLS the listing is part of
• the MLS Number of the listing
23 Document is for internal use only. Created by the Coldwell Banker – The Property Exchange Marketing Team. All Rights Reserved. THE PROPERTY EXCHANGE
WILL ADD MORE TO THIS AS WE GET THEM .01 .02 .03 .04 .05 .06


– The Property Exchange Marketing Team. All Rights Reserved. 24 THE PROPER EXCHANGE
2 1 3 4 9 8 7 6 5
A Presentation
resources

Addt’l Resources
General Moxipresent Help Center:
• https://support.moxiworks.com/hc/en-us/ categories/200391145-MoxiPresent
moxipresent FAQ
• https://support.moxiworks.com/hc/en-us/ articles/8152340359828-MoxiPresent-FAQ
Hot tips: working with multiple net proceeds sheets
• https://support.moxiworks.com/hc/en-us/ articles/360040844872-Hot-Tips-Working-withMultiple-Net-Proceeds-Sheets
Hot tips: how to change # of photos in comp presentation?
• https://support.moxiworks.com/hc/en-us/ articles/11994022452244-How-do-I-increasedecrease-the-number-of-photos-per-comparablein-a-presentation-
What is the difference between ‘my library’ & ‘the library’?
• https://support.moxiworks.com/hc/en-us/ articles/11989222755476-What-is-the-differencebetween-my-library-and-the-library-in-Present-
how is the estimated market value price calculated?
• https://support.moxiworks.com/hc/en-us/ articles/360055654652-How-is-the-EstimatedMarket-Value-price-calculated-
how do i add zillow reviews to a presentation?
• https://support.moxiworks.com/hc/en-us/ articles/360000097366-How-do-I-add-my-ZillowReviews-to-a-presentation-
how do i add zillow reviews to a presentation?
• https://support.moxiworks.com/hc/en-us/ articles/360000097366-How-do-I-add-my-ZillowReviews-to-a-presentation-
adding iFrame content to a custom presentation page
• https://support.moxiworks.com/hc/en-us/ articles/211194903-Adding-iFrame-Content-to-aCustom-Page
embedding a google map to your presentation
• https://support.moxiworks.com/hc/en-us/ articles/360038322791-Embedding-a-GoogleMap-to-Your-Presentation
uploading a pdf to a presentation in present
• https://support.moxiworks.com/hc/en-us/ articles/205700835-Uploading-a-PDF-to-aPresentation
selecting alternate branding for your presentation
• https://support.moxiworks.com/hc/en-us/ articles/211238363-Selecting-Alternate-Branding
PDF: Headers and Footers
• https://support.moxiworks.com/hc/en-us/ articles/360000908466-PDF-Headers-and-Footers
PDF: cover page designs
• https://support.moxiworks.com/hc/en-us/ articles/360000908766-PDF-Cover-Page-Designs
managing school searches
• https://support.moxiworks.com/hc/en-us/ articles/217446706-Search-Screen-Managingyour-School-Searches
limit listing images in the print version of your presentation
• https://support.moxiworks.com/hc/en-us/ articles/360037927432-Limit-Listing-Images-inthe-Print-Version-of-Your-Presentation
ADVANCED TOPIC FAQ
27 Document is for internal use only. Created by the Coldwell Banker – The Property Exchange Marketing Team. All Rights Reserved. THE PROPERTY EXCHANGE NOTES

THE PROPERTY EXCHANGE Questions? Reese Johnston Director of Marketing RJohnston@propertyex.com Miranda Bohnen Marketing Associate Miranda@propertyex.com 255 Storey Boulevard Cheyenne, WY 82009 307.632.6481 propertyex.com

