Figure 2 – Two-dimensional temperature distribution in the prefabricated panels considering a heat flow with direction perpendicular to the face
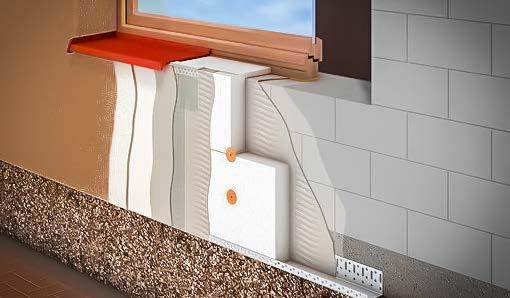
Figure 3 – General Composition of SAPPETI system
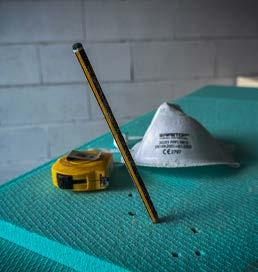
Figure 4 – EPI and Tools
Figure 5 – Safety when working at height (signaling)
Figure 6 – Safety when working at height
Figure 7 – Apply adhesive
Figure 8 – Spread adhesive
Figure 9 – Installation of Prefabricated Panel
Figure 10 – Interlacing of panels on corners
Figure 11 – Interlacing of panels on walls
Figure 12 – Interlacing of panels on windows or open holes
Figure 13 – Levelling with grinding smoother
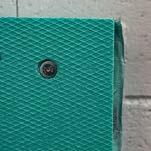
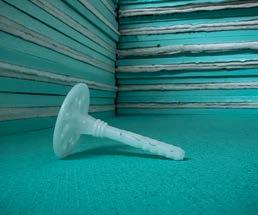
Figure 14 – PVC screw (anchor)
Figure 15 – Polyurethane Panel
TABLES INDEX
Table 1 – Layers and Materials of Prefabricated Panel to Spain
Table 2 – Layers and Materials of Prefabricated Panel to Greece
Table 3 – Types of substrates
Table 4 – Measures for preparation the substrates
INTRODUCTION
A construction of buildings plays a crucial role in our society, providing spaces for living, working, and enjoying daily life. However, amidst growing concerns about climate change, responsible use of natural resources, and the pursuit of energy efficiency, the way we design and construct buildings, is undergoing a fundamental transformation.
In this context, the need to prioritize external building insulation stands out as a matter of utmost importance. External insulation is not only a matter of comfort but also a cornerstone for sustainability, resource conservation, and energy efficiency in any building.
A prefabricated panel with silica aerogel is a building component that combines prefabricated panel technology with the remarkable thermal insulation capability of silica aerogel.
Silica aerogel is a highly porous solid material, primarily composed of silica (a common component of sand), known for its extreme thermal insulation efficiency. Its most notable feature is its incredible ability to reduce heat transfer, making it one of the most effective insulation materials available on the market.
Prefabricated panels with silica aerogel results by incorporating rolls or sheets of silica aerogel into a prefabricated panel system to facilitate installation in buildings and structures. These panels are primarily used to enhance the energy efficiency of buildings by reducing heat loss during the winter and heat gain during the summer. They can also be employed to insulate structures in industrial and aerospace
applications.
The benefits of prefabricated panels with silica aerogel include:
EXCELLENT THERMAL INSULATION:
Silica aerogel is renowned for its superior thermal insulation performance, making these panels ideal for maintaining stable indoor temperatures and reducing heating and cooling costs.
LIGHTWEIGHT: Despite its thermal effectiveness, silica aerogel is extremely lightweight, making the panels easier to manage and install.
REDUCED THICKNESS: Panels with silica aerogel can provide high-level insulation with thin profiles, saving space.
STRENGTH AND DURABILITY: The panels are robust and resistant to various weather conditions, ensuring a long service life.
ENERGY CONSUMPTION REDUCTION: By minimizing heat loss and the need for air conditioning, these panels contribute to reduced energy consumption and carbon emissions.
INDOOR COMFORT : They create more comfortable indoor environments with stable temperatures and reduced thermal variations.
In summary, CJR’s technology is a Silica Aerogel Prefabricated Panel for External Thermal Insulation ( SAPPETI ), it represents an advanced solution to enhance the energy efficiency of buildings and structures. It offers highquality thermal insulation in an easy-toinstall format and comes with significant advantages in terms of energy savings and comfort. Its application is based on ETICS .
WHAT IS ETICS?
ETICS stands for “External Thermal Insulation Composite System.” It is a building insulation method used to improve the energy efficiency of buildings by enhancing their thermal performance and reducing heat loss. ETICS involves applying an insulating material to the external surface of a building, followed by a reinforcing mesh and a protective rendering or cladding system.
The key components of an ETICS typically include:
INSULATING MATERIAL: This is a layer of thermal insulation, often made of materials like expanded polystyrene (EPS), extruded polystyrene (XPS), mineral wool, or polyurethane foam. It is attached directly to the exterior wall of the building. Our insulating material is a composite panel, its main material is silica aerogel blanket.
REINFORCING MESH: A mesh or fabric made of fiberglass or similar materials is embedded in a layer of adhesive or mortar over the insulating material. This mesh helps to distribute loads and provide strength to the system.
PROTECTIVE RENDERING OR CLADDING: A finishing layer is applied over the reinforcing mesh, usually in the form of a cement-based render, synthetic render, or cladding system. This layer not only protects the insulation but also provides an aesthetically pleasing exterior finish to the building.
ETICS offers multiple advantages, including:
IMPROVED ENERGY EFFICIENCY: It reduces heat loss from the building, resulting in energy savings and lower heating and cooling costs.
REDUCED ENVIRONMENTAL IMPACT: It contributes to lower carbon emissions and increased building sustainability.
INCREASED BUILDING LIFESPAN: The system can protect the building’s structure from external weathering and deterioration.
AESTHETIC FLEXIBILITY: A wide range of finishes and colors are available to suit the building’s design.
ETICS is commonly used in both, new construction, and the retrofitting of existing buildings. It is a versatile and effective method for upgrading building envelopes to meet modern energy efficiency standards and improve overall comfort and sustainability.
GENERAL COMPOSITION OF SAPPETI AND ITS SYSTEM
Until now, renovation of a building made use of mostly conventional technologies and commercial renewable products and enabled significant reduction of building energy consumption from existing levels, maximizing the perceived comfort of the individual users. The proposed project will go beyond current pratices in radically changing renovation. The technologies currently available for renovation are expensive and renovation processes are time consuming while disturbing the occupants, making it unattractive for deep retrofit to building owners.
This is an innovative modular/prefabricated technology to rapidly renovate a selection of domestic buildings to reduce energy consumption not only from the existing levels but also to meet the aspiration for near zero energy buildings and meet personal comfort level.
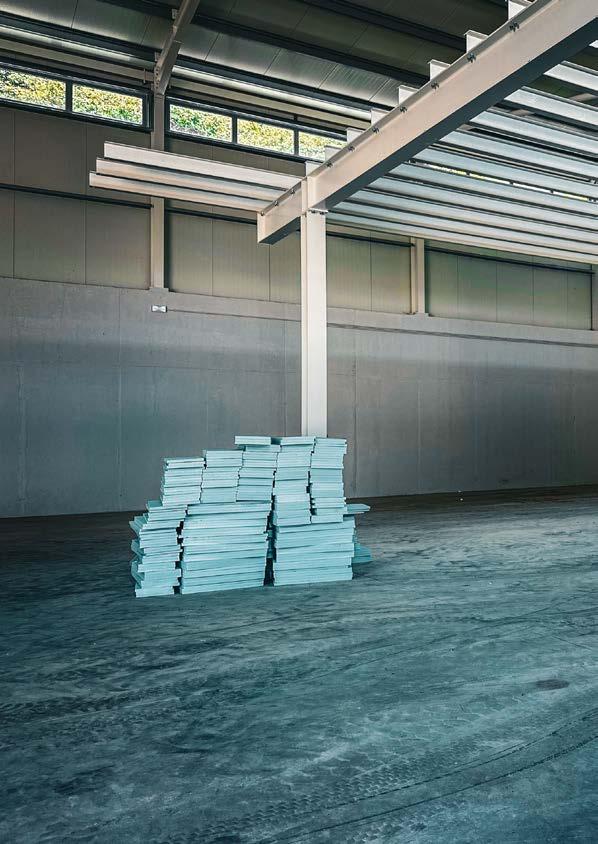
Figure 1 - Prefabricated Panel
XPS
Silica Aerogel
Prefabricated Panel
Polyurethane
Bolt and nuts
LAYERS AND MATERIALS
Table 1 - Layers and Materials of Prefabricated Panel to Spain
Table 2 - Layers and Materials of Prefabricated Panel to Greece
Based on the information provided by the customer, the prefabricated panels considered are building components consisting of homogeneous layers which have the following composition:
The rigid polyurethane foam (PU) layer is in contact with the facade.
The determination of the thermal resistance of the prefabricated panels were conducted based on the ISO 6946:2017 standard, by applying a two-dimensional numerical calculation model based on the ISO 10211:2017 standard. For this purpose, the Bisco software, from Physibel , was used.
The design value determined for the thermal resistance of the prefabricated panel was RSPAIN=2,08 m2·K/W and RGREECE=2,78 m2·K/W .
Figure 2 shows the two-dimensional temperature distribution in the prefabricated panels considering a heat flow with direction perpendicular to the face, obtained by numerical calculation, solved by the finite element method.
Figure 2 - Two-dimensional temperature distribution in the prefabricated panels considering a heat flow with direction perpendicular to the face
DETERMINING THERMAL CONDUCTIVITY OF BOTH SOLUTIONS:
— Thermal conductivity (Spain) = 0.029 W/m.K
— Thermal conductivity (Greece) = 0.025 W/m.K
U-VALUE IS ALSO IMPORTANT TO THIS STUDY:
— U-value (Spain) = 0.481 W/m².K
— U-value (Greece) = 0.360 W/m².K
SPAIN (60 mm) GREECE (70 mm)
GENERAL COMPOSITION OF SAPPETI SYSTEM
Substrate Start
SAPPETI
MANUFACTURING OF SAPPETI
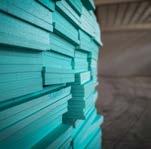
Silica aerogel is the most important material as it is the i nnovative insulation . However, it is not very easy to install it on walls alone, without a rigid layer. This one is made by the joining a silica aerogel blanket with two aluminium foils (both sides), to allow the gluing of this blanket to the rigid panels of XPS or PU .
To glue it, it’s recommended to use a polyurethane foam like ( PURLOGIC ):
INSTRUCTIONS:
Shake aerosol vigorously before use (for around 30 seconds). Screw the gun to the aerosol valve. First, protect any surfaces around the working area. Degrease and clean the surfaces to be treated. Regularly shake the aerosol during application. Any adhesive that has not hardened may be removed with a suitable product or some acetone. Hardened adhesive can only be removed mechanically.
For best results, keep the gun at around 1–2 cm from the surface to be bonded. Apply the adhesive in 30 mm thick lines , in vertical strips, on the contours and in a W shape, keeping at least 3 cm from the edge. Check that at least 40% of the surface is covered with adhesive when pressing the panel on to the surface. Lightweight panels can be applied immediately without waiting. With heavier materials, depending on weather conditions, wait 4 to 8 minutes before applying. Then place the panel or
part to be bonded on the surface, pressing heavily for 30 seconds to 1 minute . Check the position and adjust, if necessary, with an appropriate tool. In some cases, temporary additional mechanical fastening may be necessary.”
After the application of both sides’ panels, it is recommended to use bolts and insert nuts for wood (self-locking nuts), in every corner of the panels, to ensure that the three layers are bonded efficiently.
It should be noted that XPS and PU choice and thickness, must be adapted depending on the necessities of each building.
Figure 4 - EPI and Tools
SAFETY IN THE EXECUTION OF SAPPETI
Prefabricated panels that incorporate insulation with a silica aerogel blanket, XPS ( Extruded Polystyrene ) sheets, and polyurethane sheets can enhance energy efficiency. SAFETY is a top priority, considering that cutting these materials can release fine particles, and these three materials are bonded with polyurethane foam.
Those are the best practices and safety measures for the execution of prefabricated panels with these materials.
SILICA AEROGEL BLANKET
Silica aerogel blanket is a highly efficient insulator, but its handling requires special care:
— PERSONAL PROTECTIVE EQUIPMENT
( PPE ): Workers must wear PPE, including gloves, safety goggles, N95 or higher-rated masks, and long-sleeved clothing to prevent exposure to fine particles released during cutting.
— ADEQUATE VENTILATION: Cutting the silica aerogel blanket should be performed in well-ventilated areas to reduce the concentration of airborne particles. Proper Tools: Use appropriate tools designed to minimize dust generation during cutting.
XPS (EXTRUDED POLYSTYRENE)
XPS sheets are widely chosen for their effective insulation and non-flammable characteristics:
— FIRE PREVENTION: XPS is fire-resistant, but it is essential to uphold fire prevention measures specifically in the cutting area to ensure safety .
— VENTILATION: Cutting XPS should be done in well-ventilated areas to disperse any released particles and minimize exposure to potentially toxic fumes.
— PPE: Use long-sleeved clothing, gloves resistant to chemicals, safety goggles, and an appropriate mask.
POLYURETHANE
Polyurethane sheets are effective in terms of insulation, but safety during cutting is critical:
— VENTILATION: Cutting polyurethane should be carried out in well-ventilated areas to disperse any toxic fumes released.
— SKIN PROTECTION: Wear long-sleeved clothing and gloves resistant to chemicals to avoid direct contact with liquid polyurethane.
— PPE: In addition to gloves and clothing, use safety goggles and an appropriate mask to protect the eyes and respiratory system.
BONDING WITH POLYURETHANE FOAM
For bonding the materials, polyurethane foam is often used, requiring additional precautions:
PROPER STORAGE: Keep the polyurethane foam and its components in suitable locations away from heat sources.
— VENTILATION: Apply the polyurethane foam in well-ventilated areas to avoid exposure to fumes.
— PPE: Use protective clothing, gloves, and an appropriate mask during the application of polyurethane foam.
GENERAL CONSIDERATIONS
Regardless of the insulation material or bonding process, follow some general practices to ensure safety:
— TRAINING: Ensure that all workers involved receive proper training in safety and the handling of insulation materials and adhesives.
— WASTE MANAGEMENT: Dispose of insulation waste and adhesive packaging in accordance with local and national regulations.
— RISK ASSESSMENT: Conduct a risk assessment before commencing any insulation and bonding project, identifying, and mitigating potential hazards.
Safety in the execution of prefabricated panels incorporating a silica aerogel blanket , XPS sheets , polyurethane sheets , and polyurethane foam is crucial to protect workers’ health and ensure the quality of the construction project. The use of PPE , proper training, and adherence to safety practices will contribute to a safe and effective installation. Ensuring proper ventilation and using appropriate tools during cutting and bonding is essential to minimize exposure to fine particles and potentially toxic fumes.
SAFETY IN THE APPLICATION OF SAPPETI
SAPPETI is an effective technique for improving the energy efficiency of buildings, reducing heat losses, and increasing thermal comfort. However, to guarantee the performance and durability of the system, it is essential to adequately address the issue of safety during its application. In this chapter, we will discuss the main security considerations that must be considered when applying SAPPETI .
PREPARATION AND TRAINING
Before starting any work with SAPPETI, is crucial that the installation team is properly trained and certified to perform the work. Improper installation of the system can result in safety issues, unsatisfactory performance, and damage to the building. Professionals should be trained in the correct application techniques, as well as the necessary safety measures to protect themselves and the work environment.
WORK ENVIRONMENT ASSESSMENT
Before starting the application of SAPPETI, it is essential to conduct a thorough assessment of the work environment. This includes identifying potential hazards such as exposed electrical wires, gas or water pipes, and other structures that may pose a risk during installation. All hazards should be properly marked, and additional protective measures, when necessary, should be implemented.
PERSONAL PROTECTIVE EQUIPMENT (PPE)
The installation team must use appropriate Personal Protective Equipment (PPE) throughout the process. This includes eye, hand, ear, respiratory protection equipment, and protective clothing. Furthermore, it is essential to provide training on the proper use of PPE and ensure that all workers are aware of its importance. It is recommended that each worker signs a declaration of receipt of all PPE.
ADEQUATE VENTILATION
During the application of SAPPETI, chemicals and adhesives that emit harmful fumes may be used. Therefore, it is crucial to ensure adequate ventilation in the workplace to reduce exposure to these fumes. This can be achieved by using mechanical ventilation systems or keeping doors and windows open when necessary.
WORK AT HEIGHT
In many cases, the installation of SAPPETI requires working at heights, whether on scaffolding or elevated platforms . The installation team should be trained in working at heights and follow all relevant safety regulations. This includes the use of appropriate anchoring systems, such as safety belts, and the implementation of safety barriers around the work area.
Safety in the application of SAPPETI is crucial to ensure the integrity of the system, the safety of the workers, and the durability of the building. By following safety guidelines, properly training the team, and adopting safe work practices, it is possible to obtain the benefits of SAPPETI safely and effectively.
NEGLECTING SAFETY can result in accidents , system failures , and additional costs . Therefore, safety should be a priority throughout the SAPPETI application process.
Figure 6 - Safety when working at height
Figure 5 - Safety when working at height (signaling)
PREPARATION BEFORE START OF CONSTRUCTION WORK
Thickness and type of insulation boards, quantity, position towards reinforcement and (in case of need) layout of dowels, base coat, topcoat, and accessories, including solution of details always in accordance with specification of SAPPETI , determines the project and/or construction documentation.
Main technological operations at application of SAPPETI onto prepared substrate, can be divided in the following phases:
a) adhesion of insulation boards.
b) anchoring by dowels.
c) realisation of base coat.
d) realisation of topcoat.
At connecting SAPPETI with adjacent constructions and with details of permeating elements creation of cracks and in-leak of water to SAPPETI must be avoided. Sealing tapes, dilatation profiles or sealing formed by means of flexible bonding agents are designed for this purpose. Decreasing gradient of permeating elements in direction from the substrate to external surface of SAPPETI functions as a measure against water in-leak.
Roof flashing is bedded according to the building documentation before or during installation of SAPPETI according to the valid standard. Structurally and materially the flashing must consider eventual negative corrosion interaction of various materials.
With cementitious base coats or adhesives and other materials containing cement it is recommended to use a separation layer with zinc , titanium-zinc , and galvanised materials .
Newly installed plumbing components must be installed so that the drip edge is advanced at least 40 mm (when using a copper plate min. 50mm ) and in the desired slope in front of face topcoat of future SAPPETI .
When finishing the attic, it is appropriate to apply the following recommendations for the drip height depending on the construction:
— building height until 8 meters - drip mould height 50 mm
— building height from 8 to 20 metersdrip mould height 80 mm
— building height above 20 meters - drip mould height 100 mm
For elements on the substrate, as vent hole openings, bells, switches, switchgear boxes and other external wiring, external lighting, house numbers, plate names of streets, laundry racks, holder of flowers, among others, a new way of embedding should be prepared.
When fixing elements and flashings, there must be no damage to cables present in the ground or construction. It is recommended to mark and document cable routing areas.
SUBSTRATE
SAPPETI can be applied on external walls of buildings on the bases listed in the table:
CONCRETE AND MASONRY SUBSTRATES
New or existing exterior walls of buildings or sloping walls and ceilings that are not exposed to precipitation
SUBSTRATES
Bricks
Blocks of stones
Concrete (monolith and prefabricated elements)
Table 3 - Types of substrates
Concrete and masonry substrates can be provided with lime-cement, cement, polymercement, dispersion, silicone, silicate plasters with any facade paints depending on the SAPPETI fixing.
Average substrate cohesion is recommended at least 200kPa . The smallest individual allowable value is 80kPa . Local levelling or re-profiling of the substrate is performed with appropriate material to ensure consistency of at least 250kPa .
ENSURING THE SUITABILITY OF THE BASE
SAPPETI shall not be applied on unsuitable substrates - such as contaminated (with efflorescence, grease, dust, demoulding oils, and others), chalki ng, biotically contested, constantly moistened or showing increased steady humidity.
The mentioned conditions of the substrate can be redeveloped by appropriate methods before application of SAPPETI .
INDIVIDUAL TECHNICAL MEASURES ARE PRESENTED IN THE TABLE
SUBSTRATE INITIAL STATUS
Wet substrate (for example earth humidity)
Dusty substrate
Greasy substrate
Contamination by demoulding agents or other separating means
Spurs on dried substrate
Blisters and peeling places
Moss, lichen other biotic attack
Non-active cracks
Active cracks
Insufficient consistency
Insufficient flatness
Heterogenity, excessive absorbency
RECOMMENDED MEASURE
Upon analysis either maintenance of causes of the humidity and ensuring of drying or just ensuring of drying.
Sweeping or washing by power water.
Removal of greasiness withpresurized water with addition of suitable cleaning agents; washing by presurized water.
Removal of remnants of demoulding agents or other separing means by water vapour with use of cleaning agents; washing by presurized water.
Mechanical removal; sweeping, washing by presurized water.
Mechanical removal; sweeping, eventually local squaring off or re-profilation by a suitable material ensuring consistency of the substrate by at least 0.25 Mpa; always ensure drying of the used materials.
Mechanical removal after moisturising or chemical treatment of the substrate; eventually ensure drying.
Airtight can be left untreated. Open non-active cracks are sealed with a suitable material.
ETICS may not be applied until the causes for cracks are not removed.
Mechanical removal of loose layers with eventual precedent moisturising; ensure drying and eventual levelling of the substrate.
Local or full-area levelling by a suitable material ensuring consistency of the substrate.
Impregnation of the substrate by appropriate primer.
Table 4 - Measures for preparation the substrates
1) After cleaning by pressurized water, the substrate must sufficiently dry off before application of SAPPETI.
2) Before use of any chemical cleaning agent contact the SAPPETI producer to consult its usage.
3) Joints between panels shall be treated as open non-active cracks
4) Active cracks caused for example by movements of the object or inadequate dilation. Open non-active cracks are filled with adhesive material.
Shrinkage cracks in plaster (if not plaster is not loose on substrate) are not at fault. The original dilatation joints in the substrate must be maintained, if necessary, redeveloped.
5) Maximum permitted flatness tolerances depending on the SAPPETI fixing method:
— max. 10 mm/m - if it is bonded SAPPETI (partially or fully) with supplementary mechanical fixing.
— max. 20 mm/m - if it is mechanically fixed SAPPETI by dowels with supplementary adhesive.
Recommended methods and procedures for the initial assessment of the substrate suitability:
A visual survey for cracks, roughness and peeling places in the substrate, detection of the substrate and areas with similar damaged substrate, obvious damp spots and others.
To assess the consistency of the substrate with tapping - used to detect hollow places with low cohesion of the substrate. Assess the degree of degradation of the substrate with scratching or scratching through by hard pointed object - used to evaluate the consistency and strength of the substrate (e.g., coating adhesion by cross-cut test according to ISO 2409 , tape test)
Assess the substrate with rubbing by hands or dark fabric - used to verify dusting, efflorescence or chalking of final treatment. Assessing the moisture content by indirect methods “in situ” such as by electrical resistance.
Assessment of the expansion joints in the substrate.
Assessment of flatness with a meter lath
Screening test cohesion - for substrates with finishes smooth a glass mesh on the base – at least with 300 x 300 mm adhesive from the considered system. Only the reinforcement may be released when teared after 3 days. Decisive is always the result of measurable test of cohesion of the substrate.
There are the following test methods to determine the measurable properties of the substrate:
— EN 1542 to determine the cohesion of the substrate.
— EN ISO 12570 to determine the moisture content.
A record of the substrate examination issued after the substrate evaluation must be made.
All elements on the substrate, which make the SAPPETI installation impossible or could cause undesirable thermal bridges must be dismantled. The re-assembly must not impair the functionality of the system such as the creation of thermal bridges, leaking water into the system, among others. Any works increasing the substrate humidity must be done at least 72 hours before start of the SAPPETI installation.
Prior to mounting SAPPETI the roof should be completed as well as all building work, resulting in the increase of moisture within building insulation construction, at least 14 days before the start of bonding sheets of heat insulating material.
CONDITIONS FOR THE IMPLEMENTATION OF SAPPETI
Installation works must be conducted under a temperature range of 5-30 degrees (air and substrate).
FOUNDATION OF THE SYSTEM
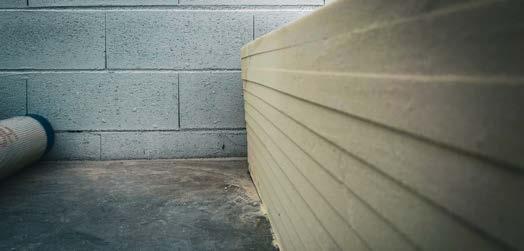
Founding a system using foundation lath Foundation lath or possibly finishing profiles must be installed before bonding the insulation boards.
Foundation lath must be straight and fitted horizontally.
Aluminium foundation lath shall be provided with drip cap with a mesh to ensure a firm connection of the foundation lath with the insulant.
Flange width must correspond to the thickness of the insulation boards.
Laths are connected by plastic couplings. Gap 2/3 mm must be left between the laths for dilatation.
Work cannot be performed in the rain or strong wind. When applied, material must be protected from the rain, frost, strong wind, and direct sunlight for at least 72 hours after application, paints, and colours for 24 hours .
Too fast drying of the individual layers of the system may result in unwanted visual defects.
Those conditions are necessary to ensure by appropriate technical measures and organization of work (for example: shielding of the sunlit areas).
Foundation lath is attached to the substrate by the dowels with spacing of approximately 300mm . Any unevenness is offset by spacers.
The method of anchoring of foundation to the substrate must take in account the possibility of electrochemical corrosion. The corners of the lath are dragged at least 250 mm over the edge.
The gap between the lath and the substrate is sealed with adhesive or other suitable material (after the bonding of insulation boards).
BONDING OF INSULATION BOARDS
PREPARATION BEFORE BONDING
If it is determined by construction documentation. It shall be provided immediately prior the bonding of boards to the continuing part of the structure, pervasive elements and flashing by sealing tape.
A method of preparing an adhesive material determines the appropriate technical data sheet and is listed on the original packaging.
APPLICATION OF THE ADHESIVE MATERIAL ON THE INSULANT
The adhesive is applied to the back of the insulation board (Figure 7 – Apply adhesive) either as a continuous band around the perimeter and at least three targets middle or fully with toothed smoother (Figure 8 – Spread adhesive). The height of the tooth depends on uneven surfaces, at least 6 mm .
SAPPETI fixed to the substrate purely with bonding (optionally with sup plementary anchoring) contact with the base shall be at least 40 % of the board surface. In the case of mechanically fixed SAPPETI with dowels supplementary bonding must be in contact with the base at least 40% of the board (unless specified in the construction documents otherwise). Mineral board with transverse orientation of fibers (lamellas) are always fully bonded.
To increase the final adhesion, it is recommended to apply in th e first place a thin layer of adhesive in the place of bonding and after that to apply the desired amount of material for bonding (directly after another) on the thermal insulation. The surface of SAPPETI with no surface treatment shall be thoroughly grind before bonding.
Panels are bonded with soft side to the substrate, so the solid layer labelled TOP is at position outwardly from the base after bonding.
Adhesive may not be applied to the lateral surfaces of boards nor may be squeezed into the joints between them.
Figure 7 – Apply adhesive
Figure 8 – Spread adhesive
BONDING BOARDS TO THE BASE
Insulation boards must fit tightly with the front flange of the f oundation lath or pavement (in case of rehabilitations) and it may not exceed or be recessed.
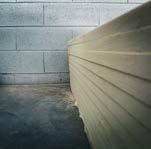
Insulating boards are bonded from the bottom up by pressing to the substrate with the longer side horizontally to the binding of horizontal bands, over the corner.
The emergence of cross joints and joints in the corners of the openings is not allowed ( Figure 12 – Interlacing of panels on windows or open holes). Insulation boards under the foundation lath are bonded from top to bottom. Unless construction documents say otherwise are the dimension stocks of insulation boards bonded on the lining, windowsills and lintels building openings. Insulation boards on the corner is suitable to bond with overlap (5-10 mm) and after hardening of adhesive materials (at least 1 day) to cut and grind.
We recommend no interlacing of the internal corners (Figure 10 – Interlacing of panels on corners). In cases where there is the inner
corner to change the thickness of the insulator or a significant disproportion of insulated surfaces (e.g., insulation of balconies and loggias), it is advisable to solve the detail by dilation.
Figure 9 - Installation of Prefabricated Panel
Figure 10 – Interlacing of panels on corners
Figure 11 – Interlacing of panels on walls
Figure 12 – Interlacing of panels on windows or open holes
The insulation boards are always bonded close. Any gaps above 2 mm are filled with dimension stock from the used insulating material. Joints up to 4 mm may be filled with PUR foam in case of EPS boards . It is always necessary to keep the flatness of the outer surface of the insulant.
It is recommended to bond the entire insulation board. You can also use leftovers if their width is at least 150 mm and place it individually in SAPPETI surface but never on corners, angles, at the end of SAPPETI and fillings for openings. The vertical dimension of the placed board cannot be provided by folding board residues above the other.
Joints between insulation boards must be at least 100 mm from modified inactive cracks and joints in the substrate, from changes in the thickness of the structure reflecting on the surface of the substrate and from the interface of the material on the substrate.
The original expansion joints in the substrate must be maintained.
The joints connection between insulation boards must be at least 100 mm from the corners of the building openings.
There is recommendation for openings to fit insulation boards with such an overlap to cover up the dimension stocks of the insulation bonded to the lining of the openings.
To use a method “floating - buttering” is advisable especially for the last row of boards when pitched roofs are being insulated. This will prevent the chimney
effect. The first step is to apply an adhesive material on the board with a toothed trowel (tooth least 10 mm depending on the substrate) in perpendicular direction to its longer side. In the second step, the adhesive material is applied to base in the horizontal direction. After that, the insulation board is fitted.
The protruding parts such as built-deposit box of blinds or ceiling fronts should be covered with boards with no contact of these boards. The excess of the insulating material can be removed from the back side of the insulation boards to the residual thickness of 30 mm . The cover with insulating material, however, should constitute at least one-third of the original thickness of the insulation board.
Thermal bridge reduction on the lining of building openings will be achieved by using boards with a low coefficient of thermal conductivity (λD) . These includes PUR , PIR , or phenolic boards. Their use and design of connection details on the insulator SAPPETI surface is recommended to consult with the manufacturer.
The panel’s surface is usually levelled with grinding smoother (Figure 13 - Levelling with grinding smoother ) fully and properly sweeped after hardening adhesive materials (at least after 1 day). Unless within 14 days provided with the basic layer must be regrinded.
Consistent grinding of bonded boards is required for boards made of extruded polystyrene with no surface treatment. If you cannot reliably ensure control of regrinding, it is recommended to use EPS type Perimeter .
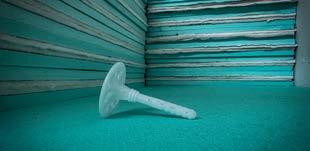
ANCHORING INSULATION BOARDS
SELECTION OF DOWELS
The construction documents determine the type , number , anchoring length , position with respect to reinforcement, placement of dowels around insulation boards and at the point of contact and/or on the entire surface of SAPPETI .
The procedure for calculating the amount of the dowels on the surface is given in Chapter Design SAPPETI Attaching to the Substrate .
Dowels with metal stud or screw must be used in SAPPETI for masonry and concrete substrates.
Figure 13 - Levelling with grinding smoother
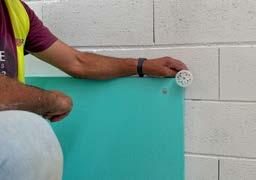
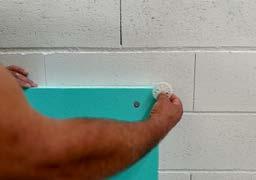
INSTALLATION OF DOWELS
The dowels are installed at earliest after 2 days of insulating boards bonding. Base coat that covers the dowels must be applied within 6 weeks , otherwise the dowels may be damaged by UV radiation .
The axis of the hole for the dowel must be perpendicular to the substrate. The dowel length, diameter, and minimum distance from the edges of the substrate, ceiling or expansion joints depends on the type of dowel.
Insulation boards must be always first pierced with the drill before drilling to substrate.
It’s recommended to equip dowels for anchoring SAPPETI with the suitable plate.
Drill diameter and depth of the borehole performed depends on the type of the
dowel.
Into the base with a cavity or into the base of highly porous materials is fundamentally drilling without hammering is necessary for substrate from porous materials and vertically perforated clay bricks.
The dowel plate must not interfere with the flatness of the base coat.
Poorly fitted (loosely doweled, projecting and others), deformed or in another way damaged dowels must be replaced with new in near position. Poorly fitted dowel is removed, the hole in the insulation is filled with used insulating material. The remaining hole is levelled with filling compound. If you cannot remove the dowel, it must be adjusted not to disturb the flatness of the base coat.
INSTALLATION OF ANCHORS
Anchors are installed at least 2 days after bonding of the insulation boards. Base coat must be applied latest 14 days after installation of the anchors. Otherwise, the anchors may be damaged by the UV radiation .
First the drill hole to substrate is drilled. It is performed with the drill with diameter 14/15 mm . The depth of the drill hole is 10 mm deeper than anchorage depth of the anchor. Drilling is always provided with the
hammering. The hole is cleaned, by using the drill, inserting it into the drill hole. Anchor is inserted to the drill hole using an application tool with a distance ring, which ensures the correct depth location of the anchor in the insulation. Anchor must be inserted at least 10 mm under the front surface of insulation boards.
Grouting of the drill hole can be done only with grouting material. Preparation of grouting material is described in relevant
technical datasheet.
Working temperature range is + 5 °C to +30 °C . Temperature of grouting material must be higher than 10°C . Grouting material is applied from the bottom of the drill hole. The biggest part is inserted in here. With continuous lifting of the application hose of appropriate length towards surface of insulation boards the whole drill hole is filled with grouting material.
Each packaging of grouting material is equipped with application hoses in length respecting the length of the anchor. Cured expanded grouting material exceeding from the surface of the insulation boards is removed with a knife. It can be done first 24 hours after installation of the anchors.
Application of the base coat can be done after curing of expanded grouting material (at first 24 hours after installation of anchors).
Following rules must be followed:
— Axis of the drill hole must be perpendicular to substrate.
— Depth of drill hole is related to the type and length of the anchor.
— Anchor must not disrupt the flatness of the base coat.
— Poorly fitted (loosely doweled, projecting, among other), deformed or in another way damaged dowels must be replaced with new in near position. Poorly fitted dowel is removed, the hole in the insulation is filled with used insulating material. The remaining hole is levelled with filling compound. If you cannot remove the dowel, it must be adjusted not to disturb the flatness of the base coat.
BASE COAT
IN GENERAL:
Levelling substance and glass mesh placed in the outer half of the layer is used for a base coat.
The type of levelling substance and glass mesh forming a base coat is determined by the construction documents as specified by the SAPPETI .
Preparing process of the levelling substance is determined by appropriate technical data sheet.
The minimum thickness of the base coat is 2.8 mm , the maximum thickness is 5 mm. Levelling up to the required thickness can be done by applying another layer on smoothed, not hardened layer applied initially.
The base coat must be reinforced throughout all its area.
Figure 14 - PVC screw (anchor)
Reinforcement of the base coat must be covered by a layer of levelling substance at least 1 mm thick (or 0.5 mm in areas of mutual overlap of individual strips of glass mesh).
Reinforcing mesh overlaps on the surface (the contact of two strips of glass mesh), on corners, on edges of dilatation fields, at the start of the tiles using a mounting lath. Linings and corners are reinforced with corner profiles.
Stronger reinforcement (such as diagonal stripes) must be designed in areas with expected stress concentrations.
Increase of the system resistance against mechanical damage (e.g., in the plinth area) is achieved by means of stronger reinforcing with reinforcing mesh VT1 or using armoured mesh R 330 (laid on the first layer with contact) and the reinforcing mesh VT1 in the second layer, or a double reinforcement base layer in the desired area.
REINFORCEMENT
There is mounted ending, corner and dilatation-profiles on the insulation boards to reinforce the base coat. Profiles and reinforcements are pressed into the applied layer of levelling substance to avoid air cavities under the profile.
Areas with an expected concentration of stress – lining corners - is reinforced by fiberglass mesh dimensions of at least 300x200 mm located diagonally in the corners.
The contact of two different SAPPETI
differing only in the type of thermal insulant, without the visible joint, must be reinforced with a reinforcing strip within a distance of at least 150 mm on each side of the contact.
To increase SAPPETI resistance to mechanical damage in the surface area of SAPPETI the selected reinforcement mesh is placed without overlaps prior application of the base coat.
CREATING A BASE COAT
Adjacent structures, plating, mounted and pervasive elements must be protected from contamination (e.g., with tapes or foils). Removal of residues of dried material is difficult.
The base coat is started to apply at first 2 days after bonding of the thermal insulation and after mounting the anchors. It is performed by applying levelling substance on dry and clean insulation boards.
The base coat is reinforced by pushing the reinforcing mesh into the levelling substance. Levelling material pervaded through the mesh loops is smoothen, after an addition of levelling substance, like mortar.
The reinforcing mesh is usually imposed from the top down, overlapping of the strips must be at least 100 mm wide. In the case of double reinforcement, the whole procedure is repeated before the previous layer dries. Mutual overlapping strips of each layer of the double mesh
reinforcement must not overlap. When it is dried the glass mesh is cut over the outside edge of the sheet /profile on the foundation lath, ending- and c orner- profile.
The base coat must contain a reinforcing mesh over the entire surface up to its edges.
The reinforcing mesh must be placed without folds in the outer half of the base coat, covered by at least 1 mm of levelling material (in the mesh overlap at least 0,5 mm ).
OTHER DESIGNING REQUIREMENTS
— The design of SAPPETI must consider static properties of insulated construction.
— Dilatation of SAPPETI must respect original dilatation segments of the building.
— Connection of SAPPETI to opening fillings must consider diffusion parameters of original joint.
— Construction details must be designed to ensure thermal engineering requirements according to valid standards, to prevent water penetration under the surface of SAPPETI , to eliminate corrosive action of materials in contact with SAPPETI
DEFINITION OF
MAINTENANCE MEASURES
PREVENTIVE PROTECTIVE COATING
Exposure to weather conditions causes the outer layer of SAPPETI to be stressed. Effective preventive measures for increased resistance of the outer layer to weather conditions are the application of protective coating after 15 to 20 years from system implementation. The SAPPETI coating effectively extends the morale life and eliminates mino r drawbacks in the original implementation.
CLEANING WITH PRESSURE WATER
Soiled SAPPETI finishes - plasters or coatings - because of contaminated envir onment, do not reduce the thermal insulation properties of the system. Its unacceptability is due to visual action. The negative visual effect is improved by cleanin g with hot pressure water or hot pressure water with the addition of surfactants (e.g., detergent).
REPAIR OF MECHANICAL DAMAGE
Intended use may result in intentional or unintentional mechanical damage to the SAPPETI . The purpose of the measure is to eliminate the damage incurred so as not to create conditions for a rapid deterioration of the system due to weather conditions and to achieve satisfactory appearance in the damaged site.
ALGAE
The occurrence of algae on the surface of SAPPETI is provoked due to the cooling of the outer layer below the dew point of the ambient air. This results in full surface condensation of water on the surface of the system, which, together with the substances contained in the air and rainwater, is the nutrient medium for the algae. Algae alone do not cause SAPPETI failures nor aesthetic problem.
Their dead cells, however, create suitable conditions for the growth of other organisms, Mosses, or fungi, which by their action can mechanically damage the surface layer of SAPPETI because they have their own root system.