WOODTURNING with RESIN
Techniques & Projects for Turning Works of Art
KEITH LACKNER
Foreword by David J. Marks

KEITH LACKNER
Foreword by David J. Marks
KEITH LACKNER

It isn’t often that someone can break new ground in the field of woodworking and woodturning and gain acceptance for their work.
Keith Lackner is one of those individuals whose drive and passion pushed him to the forefront of what can now be referred to as a new category of woodturning: “hybrid woodturning.” I see this term as a way to describe the combination of resin and wood. Keith wasn’t the first one to do this, but he is the first one to take it to such a high level.
In one of my Creative Woodturning Classes back in 2013, Keith displayed the enthusiasm that I knew would take his work far beyond the others.
Two years later, Keith returned to my school in Santa Rosa, CA, for a second class taught by guest instructor and world-renowned turner, Mike Mahoney. It was evident that Keith’s sense of form had greatly developed since his first visit.
His fine eye for form, combined with the refinement of his techniques, moved him up the ladder quickly. While Keith always adhered to good, clean craftsmanship—the hallmark of quality
woodturning—it was when he began experimenting with resin and playing with colors that his woodturning career started to take off.
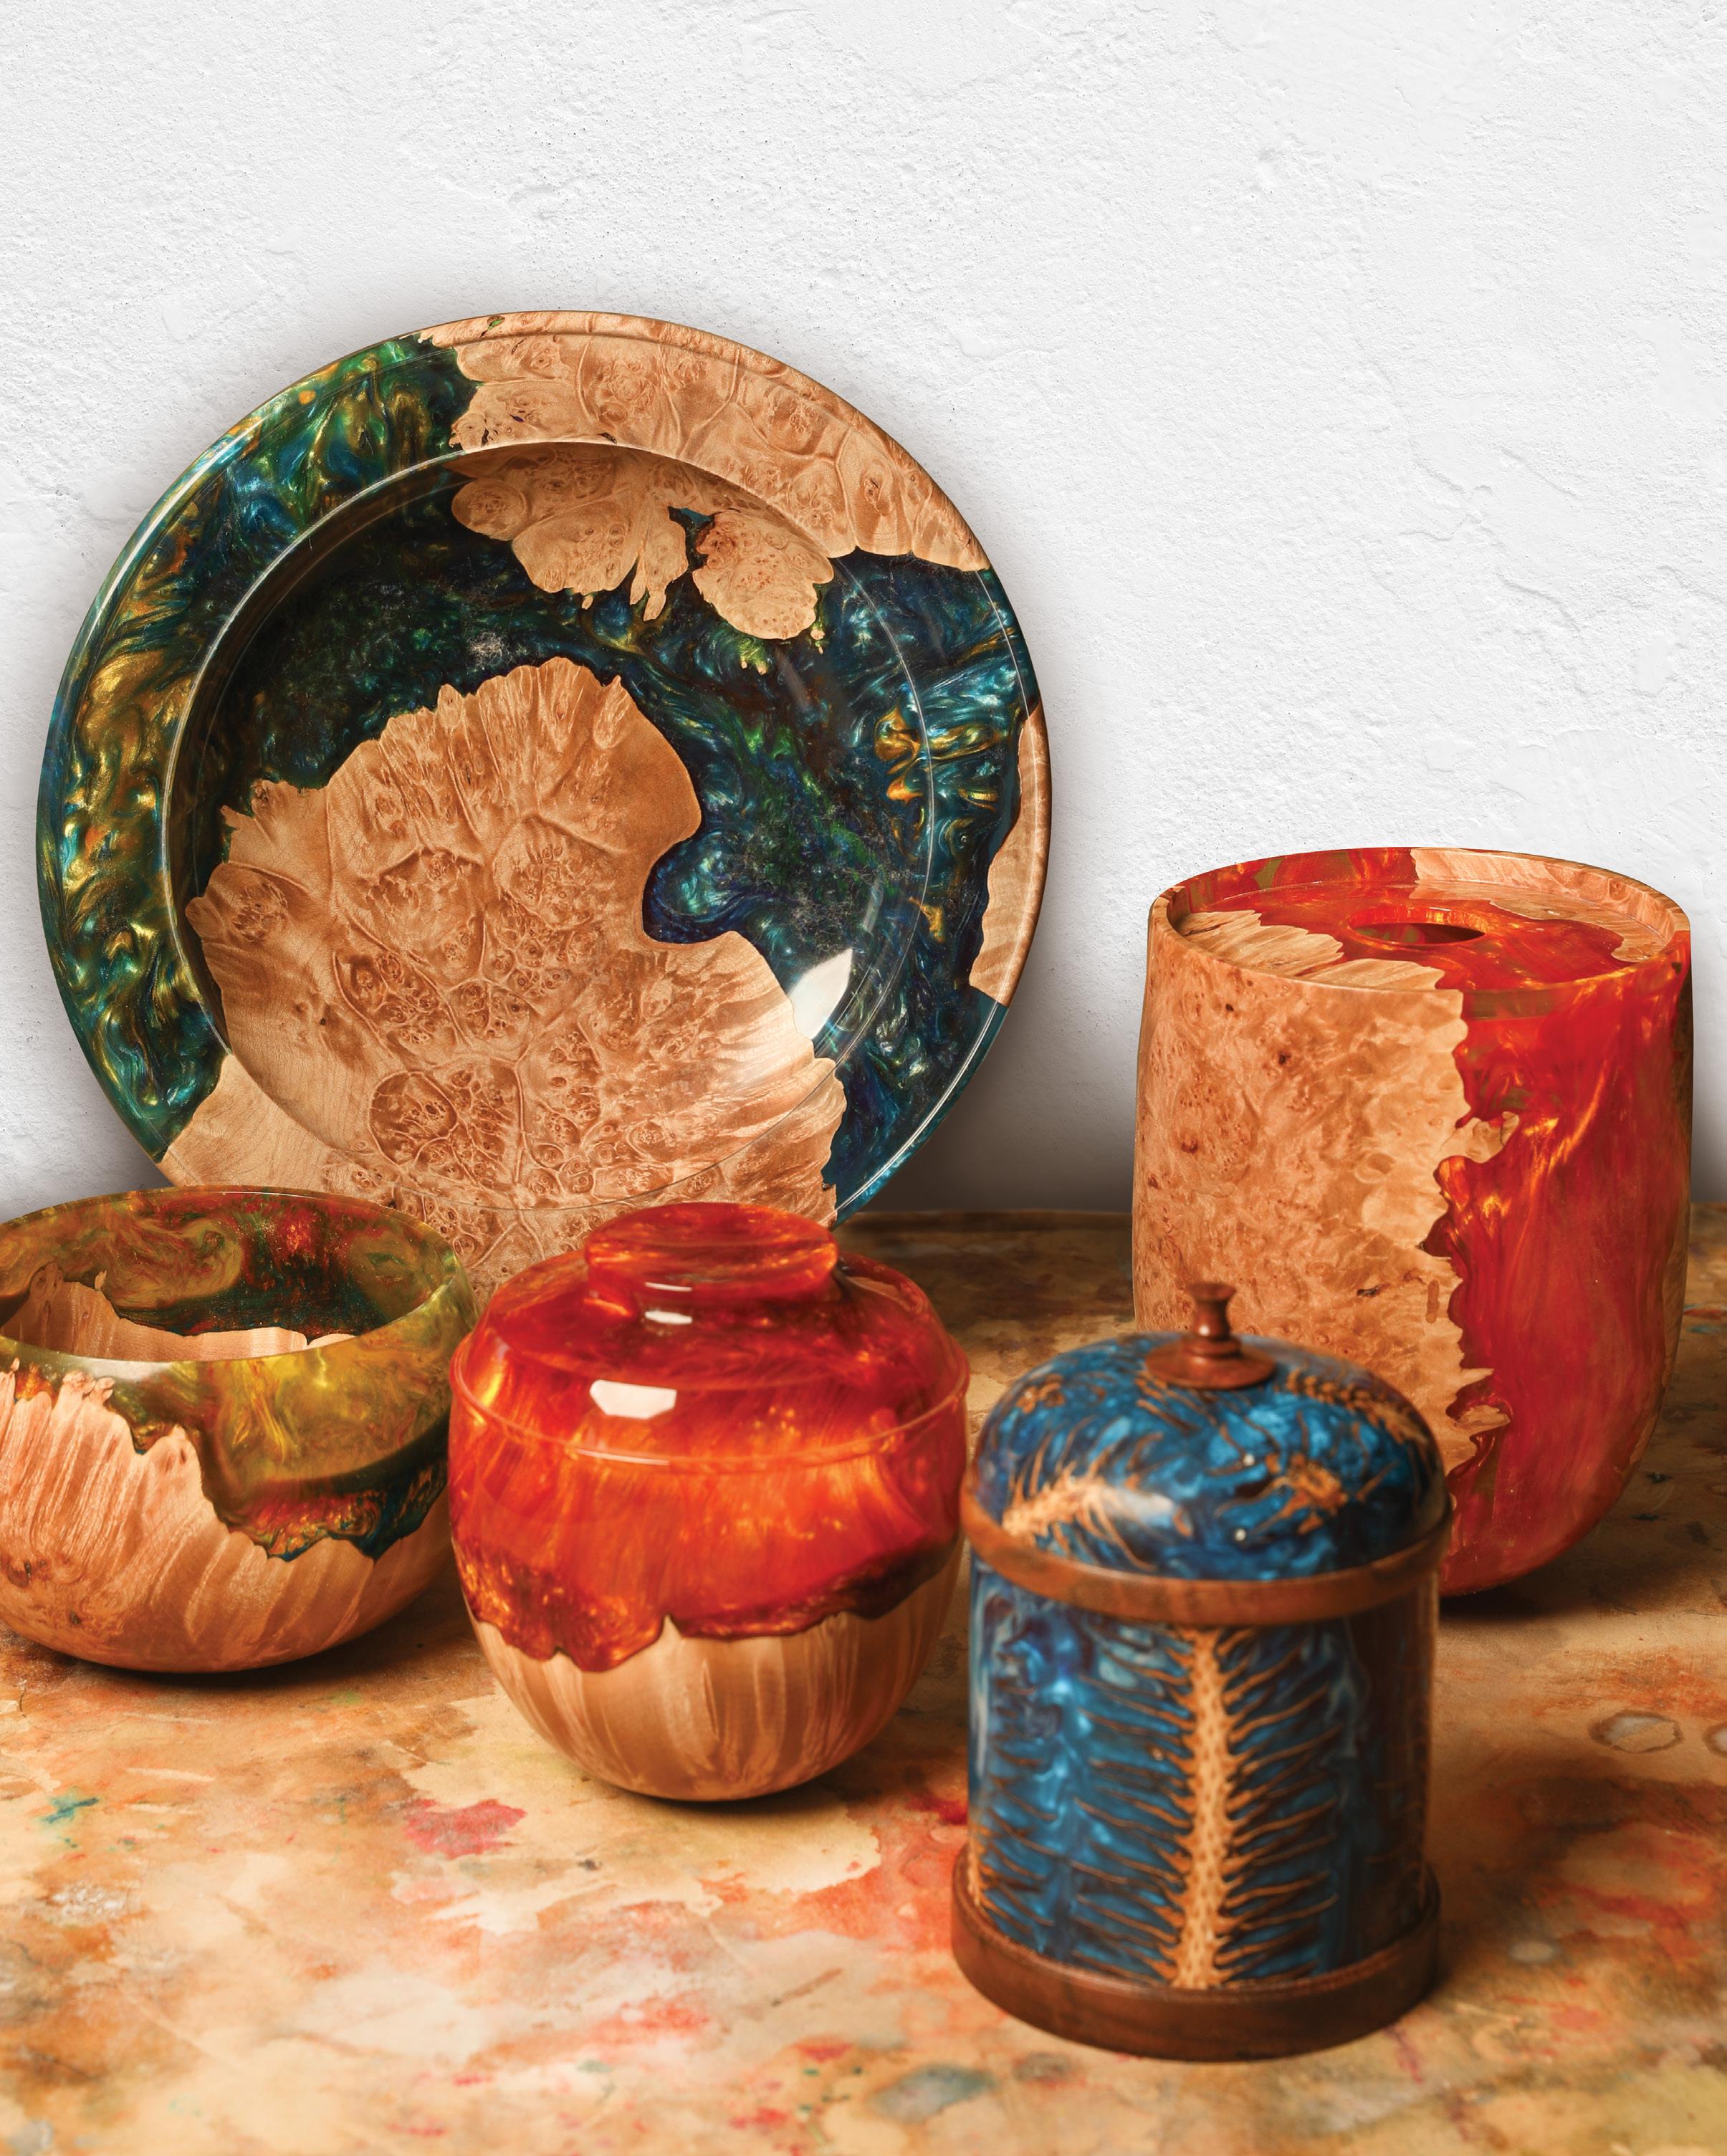
I have always admired traditional woodturning and the rich beauty of nearly flawless natural wood. Bowls, hollow vessels, and boxes still grab my eye when they are carefully proportioned and finely detailed. However, perfect wood isn’t always easy to come by, and if you like to turn highly figured woods and burls as Keith does, you are very likely to encounter defects such as bark inclusions and voids. Rather than view these flaws as problems, Keith started on his unique path by filling the voids with colored resin. He then somehow found a way to modify the curing equipment used for his smaller turnings to create larger-scale vessels and boxes with these resin techniques.
Today, almost a decade since his first class, Keith’s creative and artful use of layered colors is what truly distinguishes him from the crowd. The recognition he garners for the beautiful, well-crafted, and unique vessels he creates at the lathe is rightfully earned.
David J. Marks Designer/Craftsman DJMarks.com


My whole life I have been a creative person; whether drawing, throwing pottery, building and designing my own furniture, or woodturning, I’ve found ways to express my personality. I have always loved working with my hands and trying to create things. For the most part, I have gravitated toward working with wood; no two trees are the same, and I’ve always admired the beauty of the different tones and grain patterns of the seemingly endless species available. When I began working with resin, I noticed how perfectly the resin complemented highly figured woods with lots of imperfections and voids— wood that turners would usually pass on. At the time, no one was creating anything larger than a pen blank with these methods, but I could imagine the possibilities and wanted to push the boundaries to see what could be created.
I started out, like everybody else at the time, by taking woodworking shop classes in high school. In one of my classes I made a coffee table with birdseye maple as an accent. Being introduced to

the unique and colorful patterns of highly figured woods helped to merge my love for woodworking with my love for art.
After graduating from high school, I made the decision to build all my own furniture—I wanted something that nobody else had, that would astonish people when they saw it for the first time. I was researching furniture makers, trying to find pieces that would leave me speechless. One night, I was flipping through the television channels and
I created this larfe piece, Grasshopper, after being inspired by a creation made by my turning teacher, david J. Marks.
came across a show called WoodWorks with master craftsman David J. Marks. I remember being absolutely blown away by not only the design of the furniture but also the amazing wood he was using. I had no clue woods like that even existed. I became obsessed with watching WoodWorks every chance I could; I even built multiple pieces from the show. In a few episodes, David used the lathe to turn hollow forms—believe it or not, I had no interest in turning at that time.

A few years went by. One day, I made a trip to a local tool supply store. A local turning club was there allowing people to turn pens. I figured, why not? I’ll give it a try. In those 20 minutes, my life changed—I became fascinated with woodturning. In a few months, I got my first lathe. I found out quickly that woodturning was not as easy as it was in the store when I had somebody telling me how to do everything. Back then, woodturning was not the easiest thing to research, either. I pushed my lathe into the corner and went back to furniture building.
A few months went by and I saw an ad from David Marks selling olive wood. I thought it would be so cool to own a piece of wood from somebody I had followed and respected for years. I picked up the phone and called the number from the ad. I remember thinking that since David was a big TV star, it must be a corporation I was calling. A nice lady answered the phone; after I asked some
Turning mixed wood and resin pieces is pretty similar to turning just wood.
Teaching at conferences and clubs is one of my favorite things to do.

Mike Mahoney, seen here teaching me, was a huge influence in convincing me to become a turning teacher myself.


questions, she asked me to hold for David. I could not believe I was going to be talking to David J. Marks! He and I talked for what seemed like an hour, and at the end of the conversation, David invited me out to his school in Santa Rosa, California.
David’s school is where I learned the art of turning. David showed me around his private wood collection, and I asked what his source was; I needed to go see all the exotic woods, and more importantly, burls. David directed me to Global Wood Source, just south of San Francisco. I walked in and was met by the owner, Russ Jacobs. When I told him I was at David’s school, he gave me a full tour of his inventory. During this walk I noticed a pallet of highly figured walnut billets. Even though these billets had a lot of checks and splits, the grain was so insane I had to have them. I knew they were not safe to turn, but I figured with my woodworking experience I could veneer the pieces and use them as inlay in my furniture building. I had the billets shipped home to Illinois and put them up in my storage rack.

After having a taste of turning wood and resin, I knew it was something I wanted to keep doing.
When I came home from David’s school, I was obsessed with turning and did it day and night. It was getting close to Christmas, so I was making presents—lots of pens. One of the pen blanks I was turning was buckeye burl and resin. This was back in 2013 when these blanks were just released, and I remember thinking how unique they were. While putting the finishing touches on this pen at about 1:30 a.m., I thought how cool it would be if I could make a vase out of this material. Then, I remembered the walnut billets. They would be perfect—all the cracks, voids, and highly figured wood would blend in with the resin. Thus the idea for my first piece, Hell Fire, was born.
People often ask me how long it took me to make that first piece I always smile and tell them one year. It wasn’t just building a mold, pouring the resin, and boom—I had a blank. Absolutely nobody had cast anything of this size—15 times larger than a pen blank—so I had to invent every step of the way. Back then, the only blanks on the market were for pens or duck calls, and the only casting videos
on YouTube (maybe a grand total of three) focused on making those blanks. All I knew was that the wood had to be dry and I needed a pressure pot.
After more research, I found the resin I needed was from the Alumilite Corporation. The next obstacle was to make a pressure pot that could handle a 14" x 20" blank and 80 psi. I think it took my friend Kyle and myself about 2 to 3 months to design and build a pressure pot that could build up the pressure in the time before the resin would set. The pour took 1 full gallon blend; since it’s equal parts of resin and hardener, my very first cast was 2 total gallons.
While turning the large billet, I came across a crack running right down the center of the piece. I had nobody to turn to for advice, so I made the decision to recast the piece with black to replicate a black lightning bolt going right through the gold and red resin (see page 8). I showed this piece at AAW and got mixed reviews.
I really needed to understand why my resin split, so I decided to call Alumilite’s tech center. They were having a hard time understanding what I was talking about because I had used 15 times the amount they had ever heard of anyone using. They asked for me to send pictures, and about 35 minutes later, my phone rang. The owner of the company, Mike, told me they were blown away with what they saw and wanted to work with me. I agreed, as I knew I was on to something that no one had ever done before, and this was my chance to be the one who started it all.
And so, since 2013, I have continued to push the envelope with creating new techniques, and enjoy teaching clubs and people who want to cast large pieces so they do not struggle early on like I did. It is my hope that this book will answer your questions and put you confidently on the path to creating cool woodturned resin pieces!

This is where you’ll start your informational journey into understanding resin. This basis in the theory of the overall resin-working process serves as an introduction to the unique properties of urethane resin. After reading this section, you’ll have a firm grasp of what exactly resin is, what the different types are, and how to work with resin safely. You’ll also understand the three golden rules of working with urethane resin— Preparation, Product, and Pressure. Mastery of these three areas will eliminate the majority of common issues encountered by resin hobbyists. Covered here is the importance of properly drying the wood used in a resin-fusion project; the what, when, and why of stabilizing woods; common mistakes to avoid when mixing resin; guidelines and timing for applying pressure to blanks; and much more.

This section takes you into the nitty-gritty, step-by-step processes of working with resin. We’ll start with an overview of the tools you’ll need. The overall process begins when you prepare the wood you’re going to be joining with resin (unless you choose to make 100% resin pieces). Create the mold that will form your blank, then properly mix the resin and add it to the mold. After allowing the resin to set in the pressure pot, mount the blank on your lathe and turn it. Finally, we’ll go through the finishing process for both resin and resin-fusion pieces and cover some common troubleshooting issues. After absorbing this section, you’ll be ready to start turning projects.

You understand the process; now let’s make projects. Gather the General, Resin, and Turning Tool Kits (p. 139).
You’ll need these for each piece. Remember, you can create any of these projects with 100% resin blanks or wood that doesn’t require stabilizing—go to your level of interest.
We’ll start off with a few approachable all-resin pieces so you can get the feel for resin on the lathe. First up in the lineup are some straight-forward Kit handles to cut your teeth on (p. 60). Next up, a turning favorite—the Pen (p. 70). If you want to skip ahead to a resin-fusion blank, the first is the intriguing decorative Art (p. 76). The next step is the Bowl (p. 84), when you’ll bring your bowl-turning skills into play. Experience fusion faceplate-turning with the stunning river Platter (p. 92). The Pine cone Box (p. 104) is a playful, yet elegant piece that will show you just how effective stabilizing resin can be.
Finally, the most complex project is the hollow Form (p. 117): create thin walls that show off the translucent quality of resin.

Turning kits are a fantastic way to get the feel for turning with resin. With minimal tools and experience, you can make a practical and good-looking custom piece quickly. There are many kits available that include the necessary hardware to insert into a turned handle: beer taps, vegetable peelers, bottle openers, and so on. You can create four at a time by making a slab blank. We’ll cover the general process for handles; also
• Kit of choice
• Urethane resin, such as Alumilite Clear Slow, 1,060 g
• Red liquid urethane resin dye, such as Alumilite, enough to dye about 80% of the resin
• Gold mica powder, such as Pearl Ex, enough to dye about 10% of the resin
• Red liquid urethane resin dye and gold mica powder, enough to dye about 10% of the resin
• Urethane mold release spray, such as Stoner
• Mandrel and tap
• Four-jaw chuck and 60° live center
• 5-minute epoxy
UHMW MOLD:
• Bottom (1): 3/4" x 6 1/2" x 6 1/4"
• Sides (2): 3/4" x 6 1/4" x 3"
• End caps (2): 3/4" x 7 3/4" x 3"
• Self-tapping flathead screws (32)

The diameter of the base and the size of the hole are specific to the kit you use.
This project uses a 3/8" mandrel. step 2: The pictured stopper was tapped with a 3/8" tap.
step 8: When done, take away the tailstock and shape the butt of the piece.

You’re likely already familiar with the process of turning pens, so you can focus on the new material. Note that different kits require different blank sizes, drill bits, and bushing kits. Make sure to use the bushing sets made specifically for your kit. Here, I use a Premium Cigar Pen Kit with a 1" x 1" x 6" blank. Review the slab blank instructions on page 63 if you want to make a few of these; a 1"-high pour will yield six pen blanks. Otherwise, make a mold as described below that will yield a 1" x 1" x 6" blank.
• Cigar pen kit
• Urethane resin, such as Alumilite Clear Slow, about 132 g
• Blue liquid resin dye, such as Alumilite, enough to dye about 30% of the resin
• Blue mica powder, such as Pearl Ex, enough to dye about 60% of the resin
• Pink mica powder, such as Pearl Ex,
• Mandrel (kit specific)
• Pen press or quick clamp
• Cyanoacrylate medium-density glue
• Accelerator
UHWM MOLD:
• Bottom (1): 3/4" x 1" x 6"
• Sides (2): 3/4" x 6" x 2 1/2"
• End caps (2): 3/4" x 2 1/2" x 2 1/2"
• Self-tapping flathead screws (22)


In the ’90s, I found Jackson Pollock’s work. I loved the movement throughout the paintings; everywhere you looked, there were colors blending and flowing together. Today, that style is called a “dirty pour.” When I discovered resin casting, I wanted to try merging the techniques. With this type of piece, it’s all about the natural flowing pattern of the resin as it freezes in time. The resin itself creates the art—I just help it come out for everybody to see. This project is all about showcasing the resin.
• Burl, 6" x 6" x 3" (or what you can find)
• Urethane resin, such as Alumilite Clear Slow, about 2,000 g
• Gold mica powder, such as Pearl Ex, enough to dye about 3% of the resin
• Orange liquid resin dye, such as Alumilite, enough to dye about 3% of the resin
• Waste blank for jam chuck
MDF MOLD:
• Interior dimensions: 6" x 6" x 7" (or sized to fit the burl you have)


Fusing a funky burl with some swirly, colorful resin makes for a great bowl. The combination of translucent and opaque materials creates a piece that really draws the eye. The impervious nature of urethane resin and a durable finish allows you to actually use this bowl if desired—or place it in a spot where it can be admired
• Burl, 6" x 6" x 2" (or what you can find)
• Urethane resin, such as Alumilite Clear Slow, about 1,200 g
• Green liquid resin dye, such as Alumilite, enough to dye about 90% of the resin
• Orange liquid resin dye, such as Alumilite, enough to dye about 5% of the resin
• Gold mica powder, such as Pearl Ex, enough to dye about 5% of the resin
• Hot glue
• Waste block, 3" dia. x 4"
• Polyurethane wipe-on finish, such as Arm-R-Seal
MdF Mold:
• Interior dimensions: 6" x 6" x 4" (or sized to fit the burl you have)


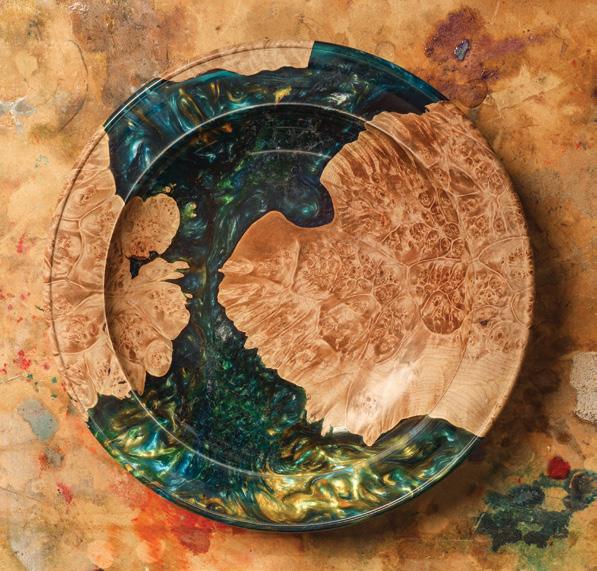
The river platter is my version of a river table. I like to use figured natural-edged burls for this project, as I find the more visual movement you have, the better your piece will turn out. This is a display piece meant to be the center of attention on the table at special events or perched on your mantelpiece.
• Large burl, roughly 3" x 4" x 12", cut with curves to fit in mold
• Green mica powder, such as Pearl Ex, enough to dye about 5% of the resin

THROWAWAY MOLD:
• Sides (1): Concrete tube form, 12" dia. x 4"
• Bottom (1): MDF, 12" dia. x 1/2"

This piece received its inspiration from nature. My girlfriend and I love to take long walks with our dog. One of the paths we take near our home is called Pine Cone Path due to all the pine trees. A large Northern spruce tree supplied me with all the cones I needed. When I picked up the cones, I remember seeing the sky start to darken as the sun set, and I wanted to match the different blue tones I saw in the sky that night.


Reverence is a design I came up with after being influenced by world-renowned turner and craftsman Ray Key. Ray spent his life creating art and teaching students all over the world. I always thought I would have the opportunity to meet him and shake his hand, but sadly, he passed away before I ever got the chance. The day I learned of his passing I put my spin on one of his more famous shapes as a sign of
• Urethane resin, such as Alumilite Clear Slow, about 2,000 g
• Yellow liquid resin dye, such as Alumilite, enough to dye about 75% of the resin
• Gold mica powder, such as Pearl Ex, enough to dye about 5% of the resin
• Orange liquid resin dye and gold mica powder, enough to dye about 10% of the resin
• Orange liquid resin dye, such as Alumilite, enough to dye about 5% of the resin
• Red liquid resin dye, such as Alumilite, enough to dye about 5% of the resin
• Waste block for reverse-turning
• 3/4" Forstner bit
• Drill bit extension (optional)
• Hollowing system, such as Carter Products Hollow Roller
• Hollowing gooseneck scraper
• Hemostat (I recommend a set with different curved ends)

• Bottom (1): 1/2" x 5 1/2" x 5 1/2"
• Sides (2): 1/2" x 5 1/2" x 7 1/2"
• End caps (2): 1/2" x 7 1/2" x 7 1/2"

You’ll find plentiful inspiration and information in the following pages. A gallery of thought-stimulating finished resin projects will give you ideas to try out in your own shop, now that you understand how to work with urethane resin. If you need to find any of the special tools, materials, or equipment shown in the book, look no further than the manufacturer section. And don’t miss the glossary if you want to brush up on resin-casting terms.
Keith’s passion is creating and pushing the envelope on new oneof-a-kind pieces. His love for exotic woods helped him become one of the founding artists in the current resin trend. As the foremost artist and instructor in woodturning with resin, he has taught people from all over the world the steps he has honed over the years. His expertise not only in casting but also in woodturning means he can teach students every step of the process, from casting to design to turning to finishing. Keith has showcased his wood and resin pieces in galleries all over the United States, and has numerous articles in Woodcraft Magazine and Woodturning. He is a sponsored woodturner for Carter Products and Powermatic, and has instructed at the Marc Adams School of Woodworking, as well as many other venues and conferences across the country.

You’ve probably seen the work of woodturners combining resin with wood to create a one-ofa-kind project. The end result is so amazing it’s natural to assume it’s complicated—not so.
From Keith Lackner, one of today’s leading resin turners, Woodturning with Resin is the goto guide for learning to work with this intriguing medium. Expert instruction, stunning photos,

and nine projects take you through the techniques for making molds; preparing the wood and resin; and turning the completed blank. Helpful finishing tips ensure your completed piece shines.
Stir things up with Woodturning with Resin and discover the unlimited potential of mixing resin into your next woodturning project.


“I most certainly appreciate the aesthetics of wood, but mixing in other media, such as resin, I can also appreciate. Keith Lackner’s work stands out in this medium.”
MIKE MAHONEY
, world-renowned woodturner & instructor
“Keith Lackner is one of the most talented and experienced resin casters I know. With his help, you too can become a skilled resin artist.”
TIM
YODER, host of Woodturning Workshop on PBS
“I was thrilled to hear about this book from master woodturner Keith Lackner. Turners can now learn more about this fantastic and beautiful branch of turning.”
EMILIANO
ACHAVAL, KEA Woodturning Studio
