
Product: DOWNLOAD SERVICE MANAUL EXCAVATOR
Model: 317B L EXCAVATOR 9WW
Configuration: 317B L & 317B LN Excavators 9WW00001-UP (MACHINE) POWERED BY 3046 Engine
Disassembly and Assembly
3046 Engine For Caterpillar Built Machines Media
Gear Group (Front) - Remove - Idler Gear Only
SMCS - 1206-011
Removal Procedure Table1
Required Tools Tool
A 9U-6148 IdlerShaftPuller 1
Start By:
A. Removethefronthousing RefertoDisassemblyandAssembly,"Housing(Front)Remove".
NOTICE
Keep all parts clean from contaminants.
Contaminants may cause rapid wear and shortened component life.
NOTICE
Care must be taken to ensure that fluids are contained during performance of inspection, maintenance, testing, adjusting and repair of the product. Be prepared to collect the fluid with suitable containers before opening any compartment or disassembling any component containing fluids.
Refer to Special Publication, NENG2500, "Caterpillar Tools and Shop Products Guide" for tools and supplies suitable to collect and contain fluids on Caterpillar products.
Dispose of all fluids according to local regulations and mandates.
Note: Beforeremoval,ensurethatthemarksonthetiminggearsareinalignment.Alig nthe fuelinjectiondrivegearwiththe"33"markwiththe"3"markontheidlergear Make an alignmentofthe"2"markonthecamshaftgearwiththe"22"markontheidlergear.Al ign the"1"markonthecrankshaftgearwiththe"11"markontheidlergear TheNo 1cyl inder isatthetopcenterpositionwhenthesemarksareinalignment


1. Removeidlergearbolt(1)andthewasherfromtheidlergearshaft
2. Removethrustplate(2).

Illustration3 g00559567

Illustration4 g00559569
4. UseTool(A)andremoveidlershaft(4)fromthecylinderblock.

Illustration5 g00559572
5. Ifnecessary,removefivebolts(5)thatholdfrontplate(6)tothecylinderblock.
6. Removefrontplate(6)andthegasket.
Note: Seethefollowinglistfortheremovaloftheothergearsinthefrontgeargroup.
• Inordertoremovethecamshaftgear,refertoDisassemblyandAssembly,"CamshaftRemoveandInstall".
• Inordertoremovethefuelinjectionpumpgear,refertoDisassemblyandAssembly," Fuel InjectionPumpHousingandGovernor-Remove".
• Inordertoremovethegeartotheengineoilpump,refertoDisassemblyandAssembl y, "EngineOilPump-Remove".
• Inordertoremovethecrankshaftfrontgear,refertoDisassemblyandAssembly, "CrankshaftGear-RemoveandInstall".
Product: EXCAVATOR
Model: 317B L EXCAVATOR 9WW
Configuration: 317B L & 317B LN Excavators 9WW00001-UP (MACHINE) POWERED BY 3046 Engine
Disassembly and Assembly
3046 Engine For Caterpillar Built Machines
Media Number -SENR6458-05
Publication Date -01/04/2004
Date Updated -22/04/2004
Gear Group (Front) - Install - Idler Gear Only
SMCS - 1206-012
Installation Procedure
NOTICE
Keep all parts clean from contaminants. Contaminants may cause rapid wear and shortened component life.

1. Installanewgasketandfrontplate(6)
Note: Ensurethatallmatingsurfacesarecleanandfreeofoldgasketmaterial.
2. Installfivebolts(5)thatholdfrontplate(6)tothecylinderblock Tightentheseboltst oa torqueof10to13N·m(7to10lbft).

Illustration2
g00559567
3. Installidlershaft(4)ontothecylinderblock.
Note: Ifnecessary,cooltheidlershaftto0°C(32°F)beforeinstallation.

Illustration3
g00559536
Note: Ensurethatthemarksonthetiminggearsareinalignment.Alignthefuelinjecti on drivegearwiththe"33"markwiththe"3"markontheidlergear.Makeanalignment ofthe "2"markonthecamshaftgearwiththe"22"markontheidlergear.Alignthe"1"mark on thecrankshaftgearwiththe"11"markontheidlergear TheNo 1cylinderisattheto p centerpositionwhenthesemarksareinalignment.
4. Installidlergear(3).
5. Installthrustplate(2)
6. Installthewasherandidlergearbolt(1)ontothrustplate(2).Tightenidlergearbolt( 1)toa torqueof34±5N·m(25±4lbft).
Note: Formoreinformation,refertotheSpecificationsModule,"GearGroup(Front)".
Note: Seethefollowinglistfortheinstallationoftheothergearsinthefrontgeargrou p.
• Inordertoinstallthecamshaftgear,refertoDisassemblyandAssembly,"CamshaftRemoveandInstall".
• Inordertoinstallthefuelinjectionpumpgear,refertoDisassemblyandAssembly,"Fu el InjectionPumpHousingandGovernor-Install".
• Inordertoinstallthegearfromtheengineoilpump,refertoDisassemblyandAssembl y, "EngineOilPump-Install".
• Inordertoinstallthecrankshaftfrontgear,refertoDisassemblyandAssembly,"Crank shaft FrontGear-RemoveandInstall".
End By: Installthefronthousing RefertoDisassemblyandAssembly,"Housing(Front)Install".
Product: EXCAVATOR
Model: 317B L EXCAVATOR 9WW
Configuration: 317B L & 317B LN Excavators 9WW00001-UP (MACHINE) POWERED BY 3046 Engine
Disassembly and Assembly
3046 Engine For Caterpillar Built Machines
Media Number -SENR6458-05 Publication Date -01/04/2004 Date Updated -22/04/2004
Housing (Front) - Remove
SMCS - 1162-011
Removal Procedure
Start By:
i01646584
A. Removethealternator RefertoDisassemblyandAssembly,"Alternator-Removeand Install".
B Removethevibrationdamperandthepulley RefertoDisassemblyandAssembly, "VibrationDamperandPulley-RemoveandInstall".
NOTICE
Keep all parts clean from contaminants.
Contaminants may cause rapid wear and shortened component life.
NOTICE
Care must be taken to ensure that fluids are contained during performance of inspection, maintenance, testing, adjusting and repair of the product. Be prepared to collect the fluid with suitable containers before opening any compartment or disassembling any component containing fluids.
Refer to Special Publication, NENG2500, "Caterpillar Tools and Shop Products Guide" for tools and supplies suitable to collect and contain fluids on Caterpillar products.
Dispose of all fluids according to local regulations and mandates.

Illustration1 g00560210
1. Removefourbolts(1)andthewashersfromfanpulley(2)
2. Removefanpulley(2).
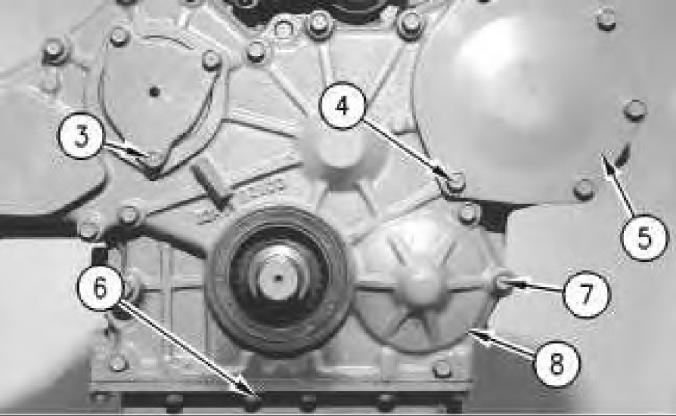
Illustration2 g00529390
3. Ifequipped,removebolts(3)andthewashersfromfronthousing(8)
4. Removefivebolts(4)andthewashersfromcover(5)forthefuelinjectionpumpge ar.
5. Removecover(5)fortheengineoilpump.
6. Removesixbolts(6)andthewashersthatsecuretheengineoilpantothefronthou sing.
7. Removebolts(7)thatsecurefronthousing(8)tothecylinderblock.
8. Removefronthousing(8).
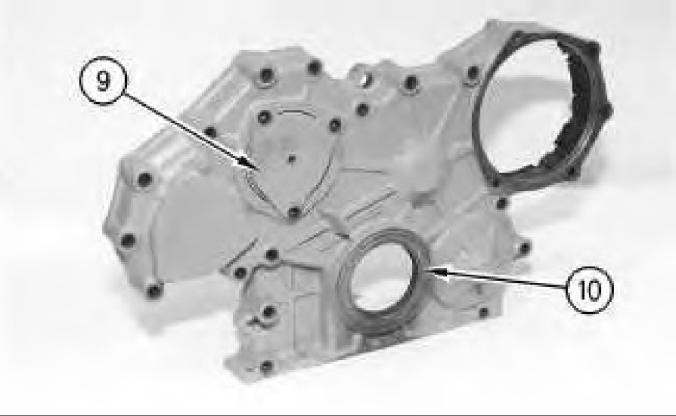
Illustration3
g00529391
9. Ifequipped,removecover(9)forthecamshaftgear.
10. Checktheconditionofcrankshaftfrontseal(10).Ifthecrankshaftfrontsealiswo rnor damaged,useanewpartforreplacement RefertoDisassemblyandAssembly,"C rankshaft FrontSeal-Remove"forremovalofthecrankshaftfrontseal.

Illustration4
g00529392
11. Removebearing(12),ifequipped Ifthebearingiswornordamaged,useanewp artfor replacement.
12. Cleanoldgasketmaterial(11)fromthecontactsurfaceoffronthousing(8)andt hetiming gearplate.
.
