SURVIVAL to SUSTAINABLE CARE
Brittany Loewen community guideline 2024
why do we need sustainable care?
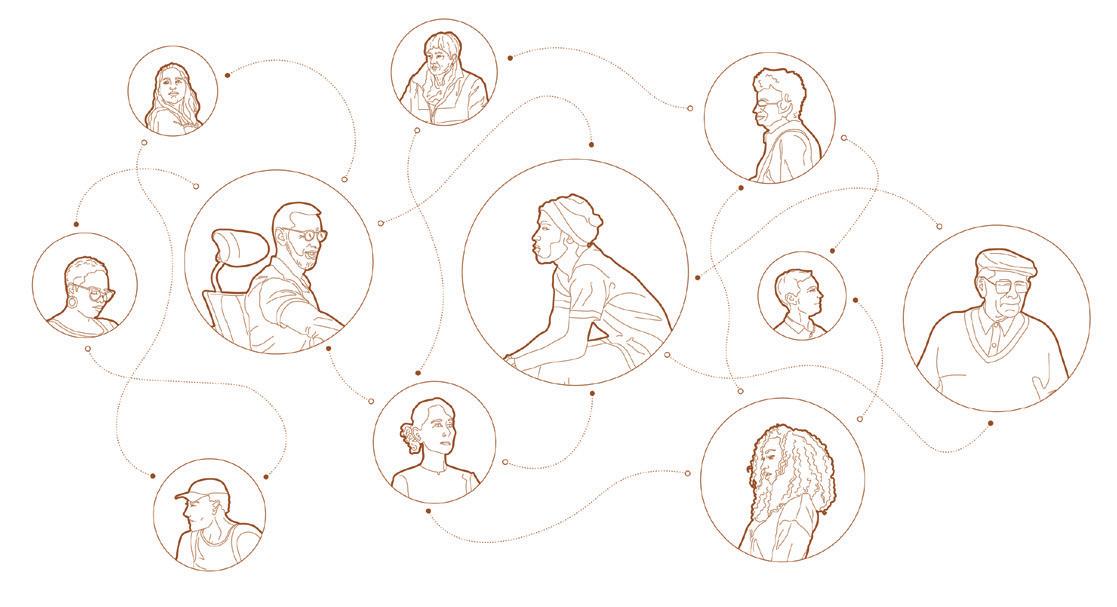

Within current societies in Canada, the lack of care for unhoused individuals is evidently revealed through both historic and contemporary systems and ideologies. Although housing is a human right, many municipalities struggle to provide adequate solutions to prevent unshelteredness and ensure survival. Considering the lack of adequate affordable housing across North America, there is a need to critically reflect on the current systems that address unshelteredness and reevaluate societal perspectives that currently prioritize personal gain over collective care. This guideline is thus informed by research regarding the challenges unhoused individuals often face, current regulated shelter systems, societal perspectives and stigmatization, and innovative building strategies to ensure social, economic, and environmental sustainability The application demonstrates the potentials of autonomous hybrid shelters to ensure houseless human dignity and address societal stigma within cities across North America through prioritizing vulnerable individuals within our communities who have been the most affected by this systemic lack of care.


COMMUNITY GUIDELINE 2024 SURVIVAL TO SUSTAINABLE CARE 2 1 SURVIVAL TO SUSTAINABLE CARE
Guideline completed by Brittany Loewen as part of the thesis entitled Survival to Sustainable Care: Mono-Material Timber
Autonomous Hybrid Shelters to Ensure Houseless Human Dignity and Address Societal Stigma
Thesis Advisor: Jean-Philippe Saucier
Step 1 | Need Assessment
In order to determine an appropriate response for each site and community it is essential to complete the following need assessment forms prior to beginning the design and construction phases. The site is required to be equipped with the necessary programs to ensure occupant well-being and comfort. Therefore, each element within the SITE PROGRAM CHECKLIST needs to be either existing within the selected site or included within the new proposed programming.
Additionally, in order to ensure autonomy for occupants, each individual is asked to complete the OCCUPANT NEEDS CHECKLIST prior to being assigned a shelter. This ensures that each shelter type meets the needs of each individual. Additionally, the program will allow for individualized plans for each occupant that provide the necessary steps and support for self-improvement. The checklist provides initial information regarding additional supports that may be needed, however, detailed plans for each individual will be developed by professional healthcare workers.
SITE PROGRAM CHECKLIST
Close access to free daily meals (i.e. food bank, soup kitchen, etc.)
On-site washrooms (including barrier free)
On-site showers (including barrier free)
Access to support workers and clinics (min. one on-site support worker)
On-site shared interior space (i.e. kitchen or gathering area)
On-site drinking fountains
Location
OCCUPANT NEEDS
CHECKLIST
Shelter Type
Support Needed
additional information (optional):
COMMUNITY GUIDELINE 2024 SURVIVAL TO SUSTAINABLE CARE 4 3 SURVIVAL TO SUSTAINABLE CARE
Other:
additional information (optional):
Single (only one occupant) single bed semi-rigid hammock
Pets Shelter
Additional
Double (two occupants) two single beds one double bed Accessible (one or two occupants) two single beds one double bed Semi-Detached (one occupant) single bed semi-rigid hammock
of neighbour
Ground Access ramp access required stair access Rooftop Yes dog cat other: No Substance Abuse drug alcohol other: Mental Health Physical Health
name
if applicable:
The following DEFINING A SITE CHECKLIST can be used to determine if a site is appropriate for the proposed intervention.
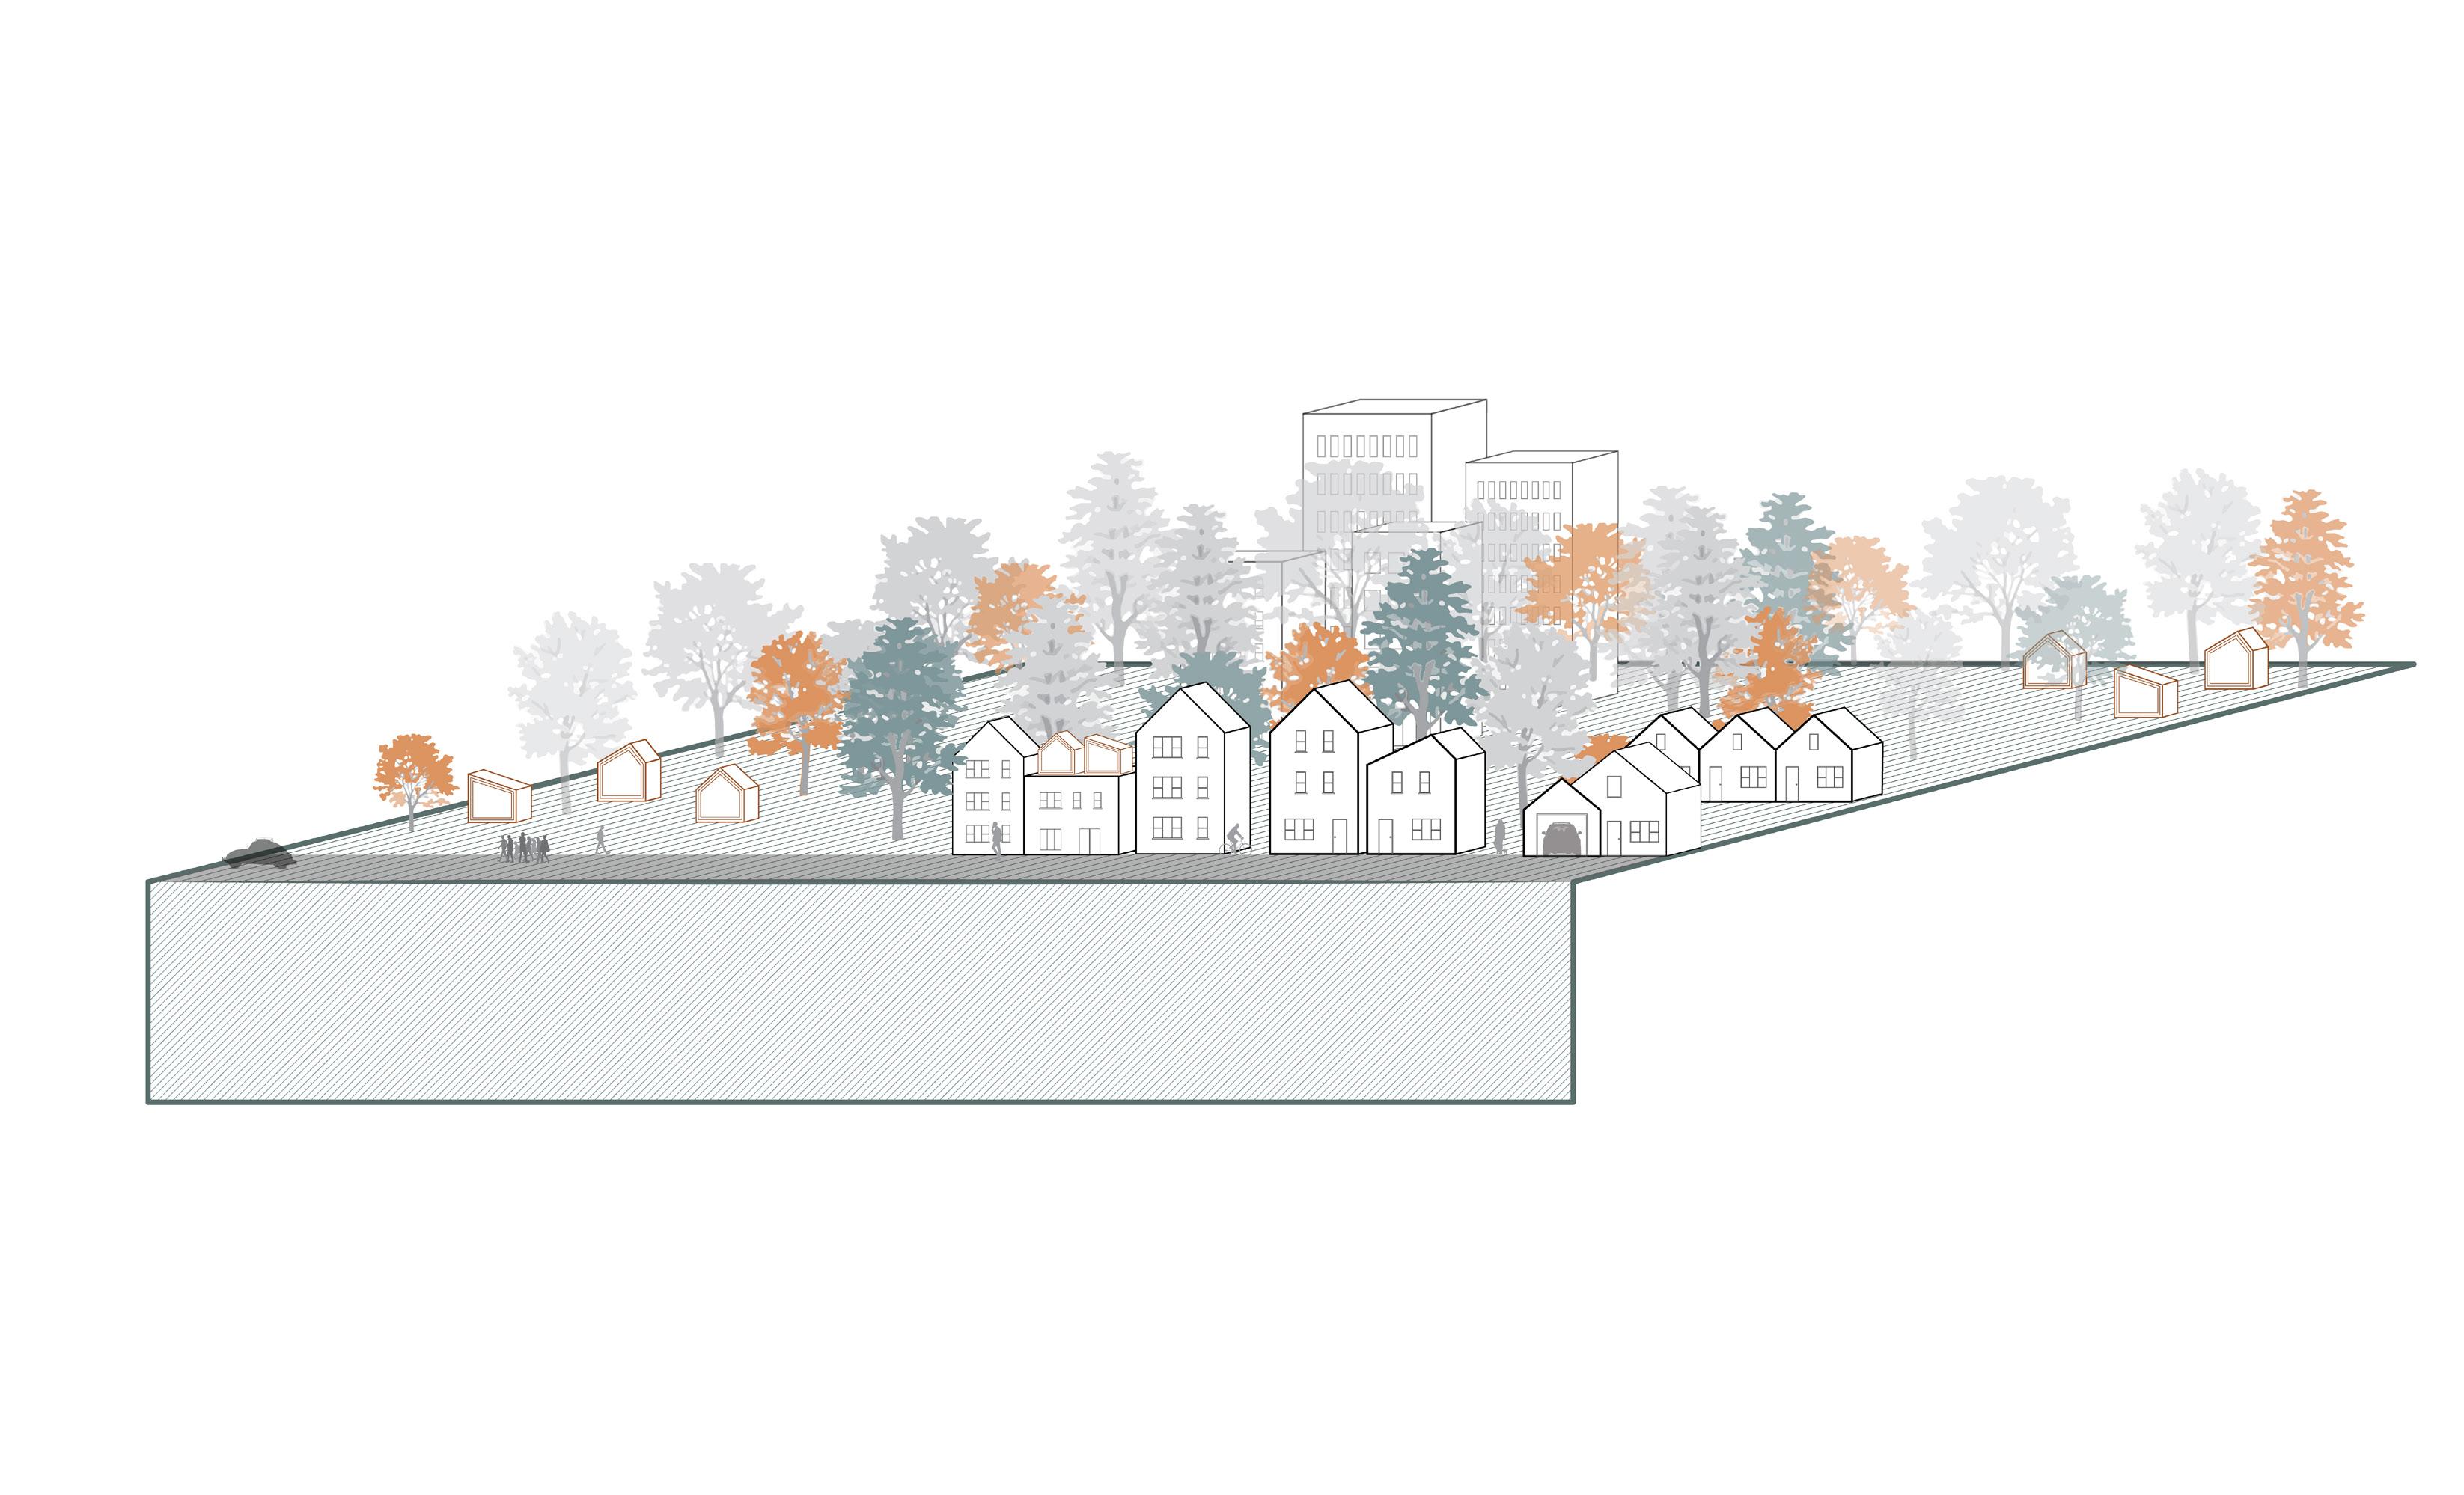
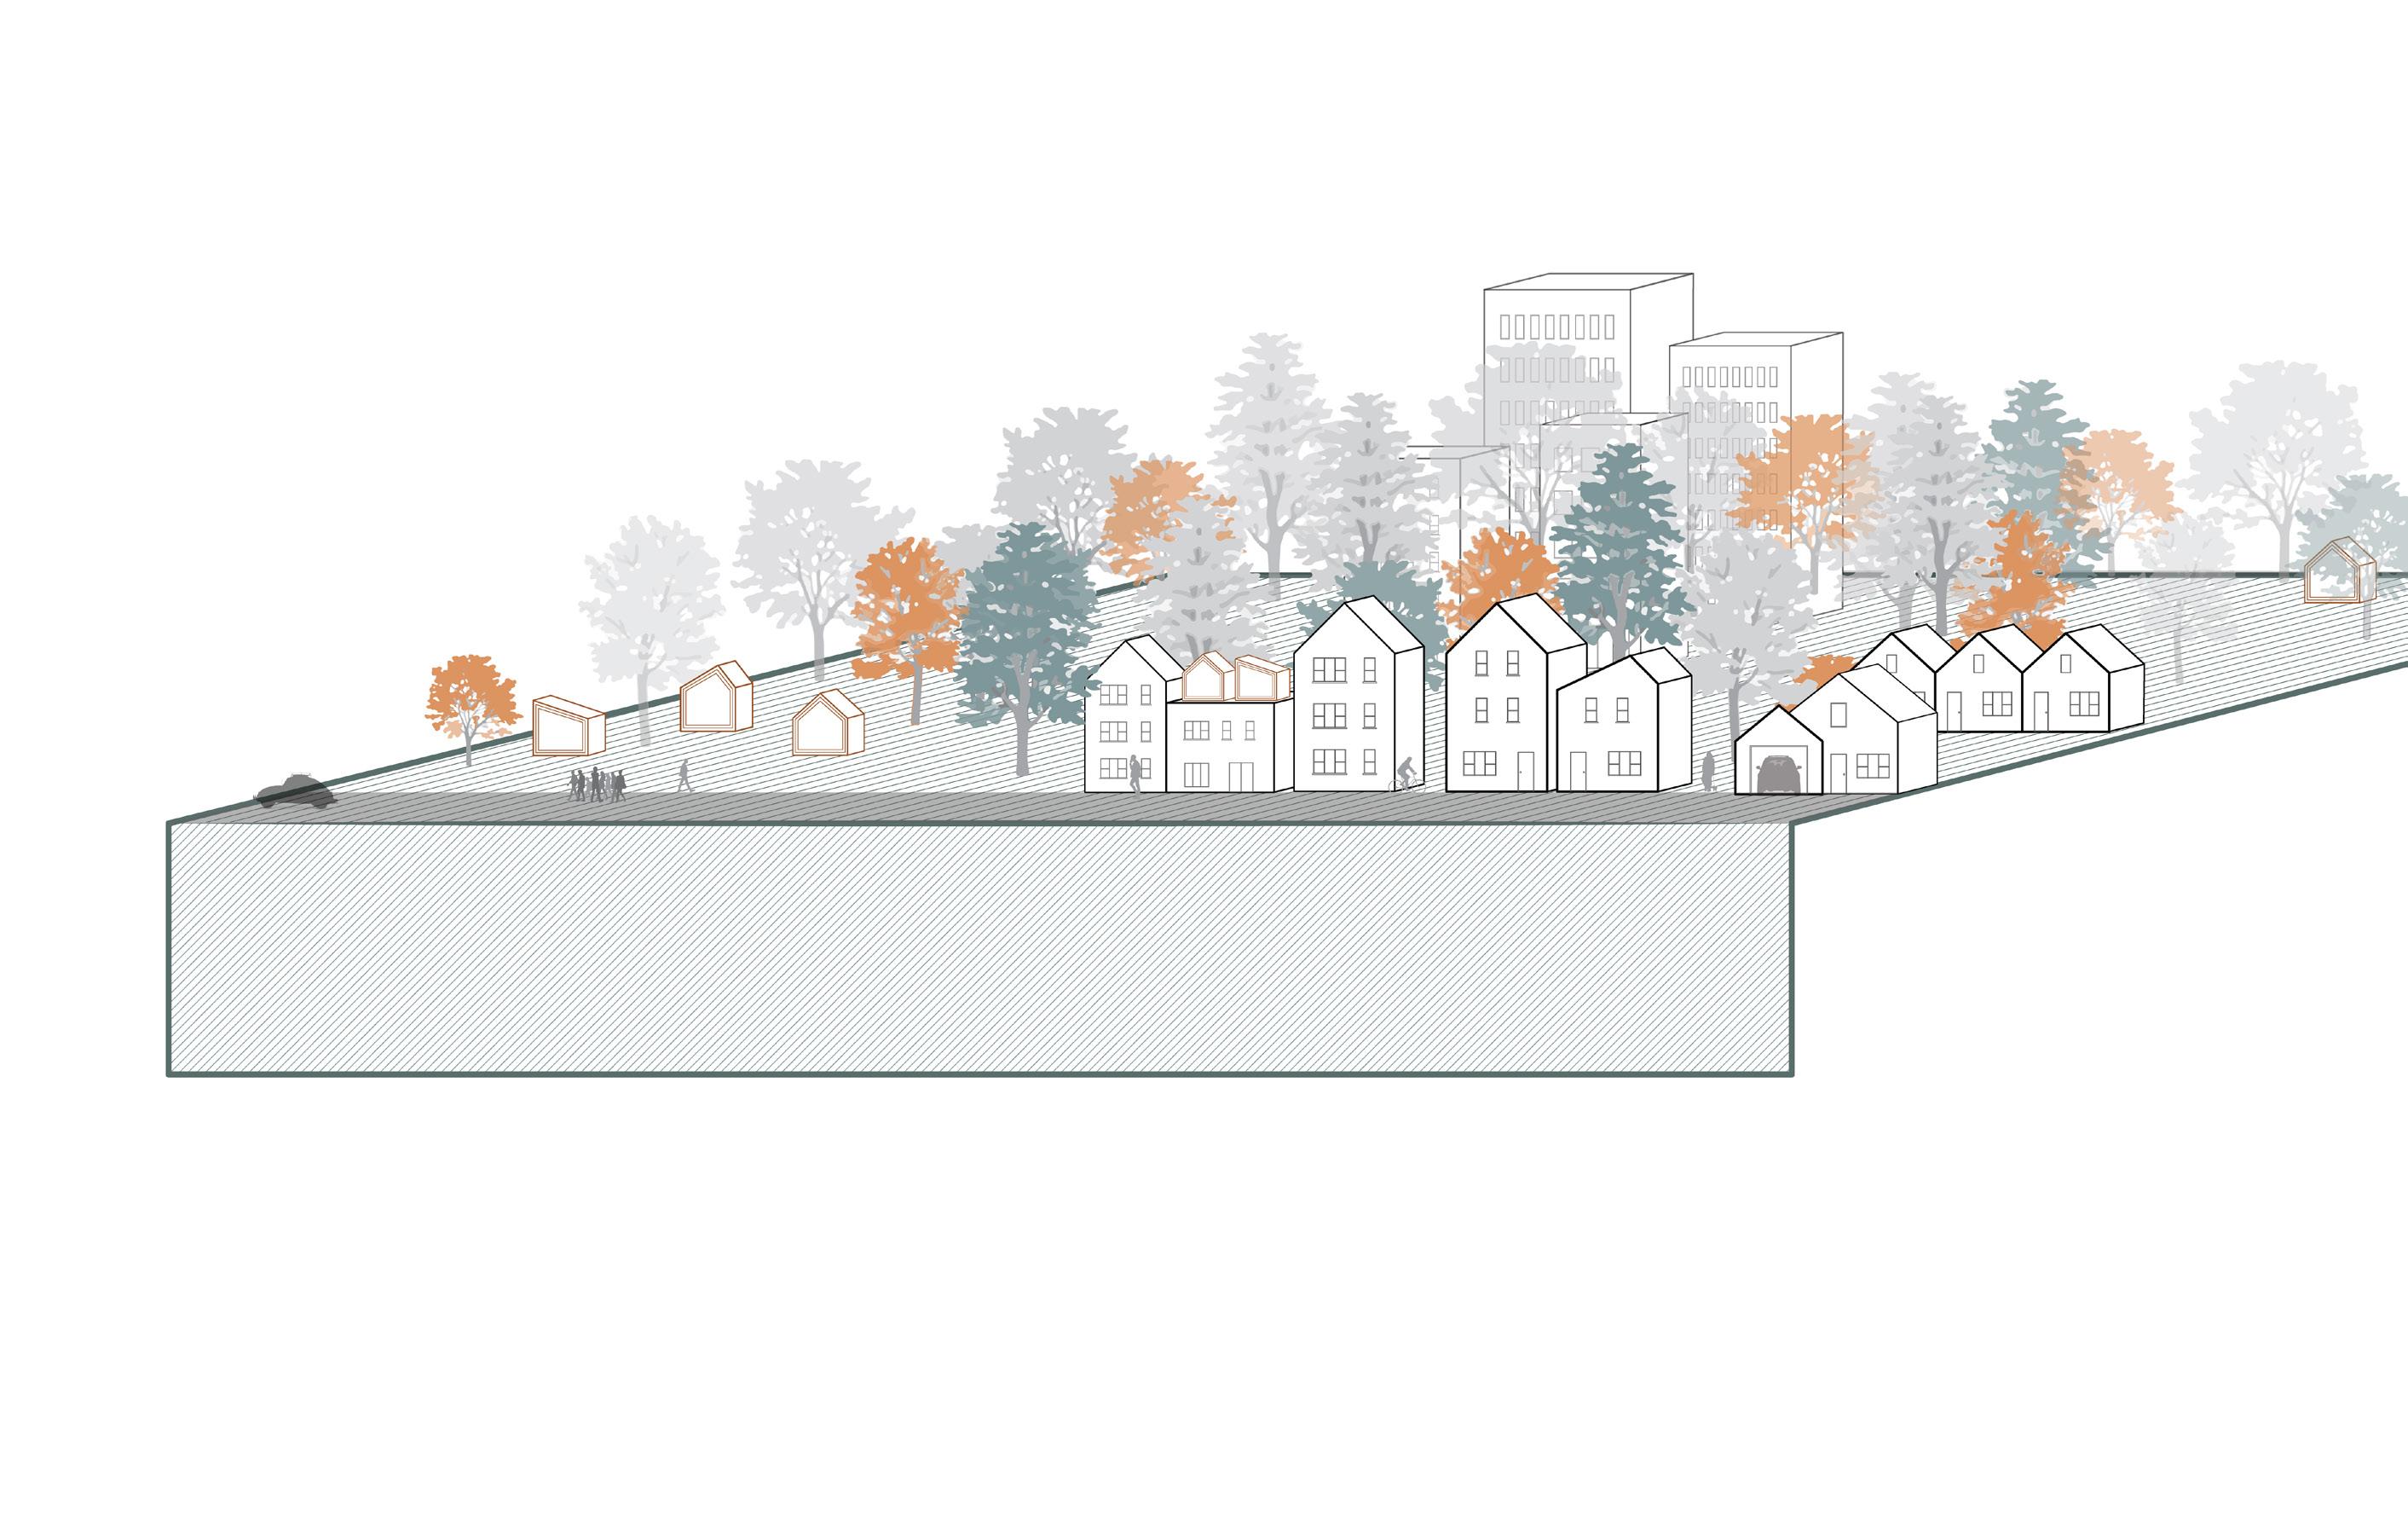
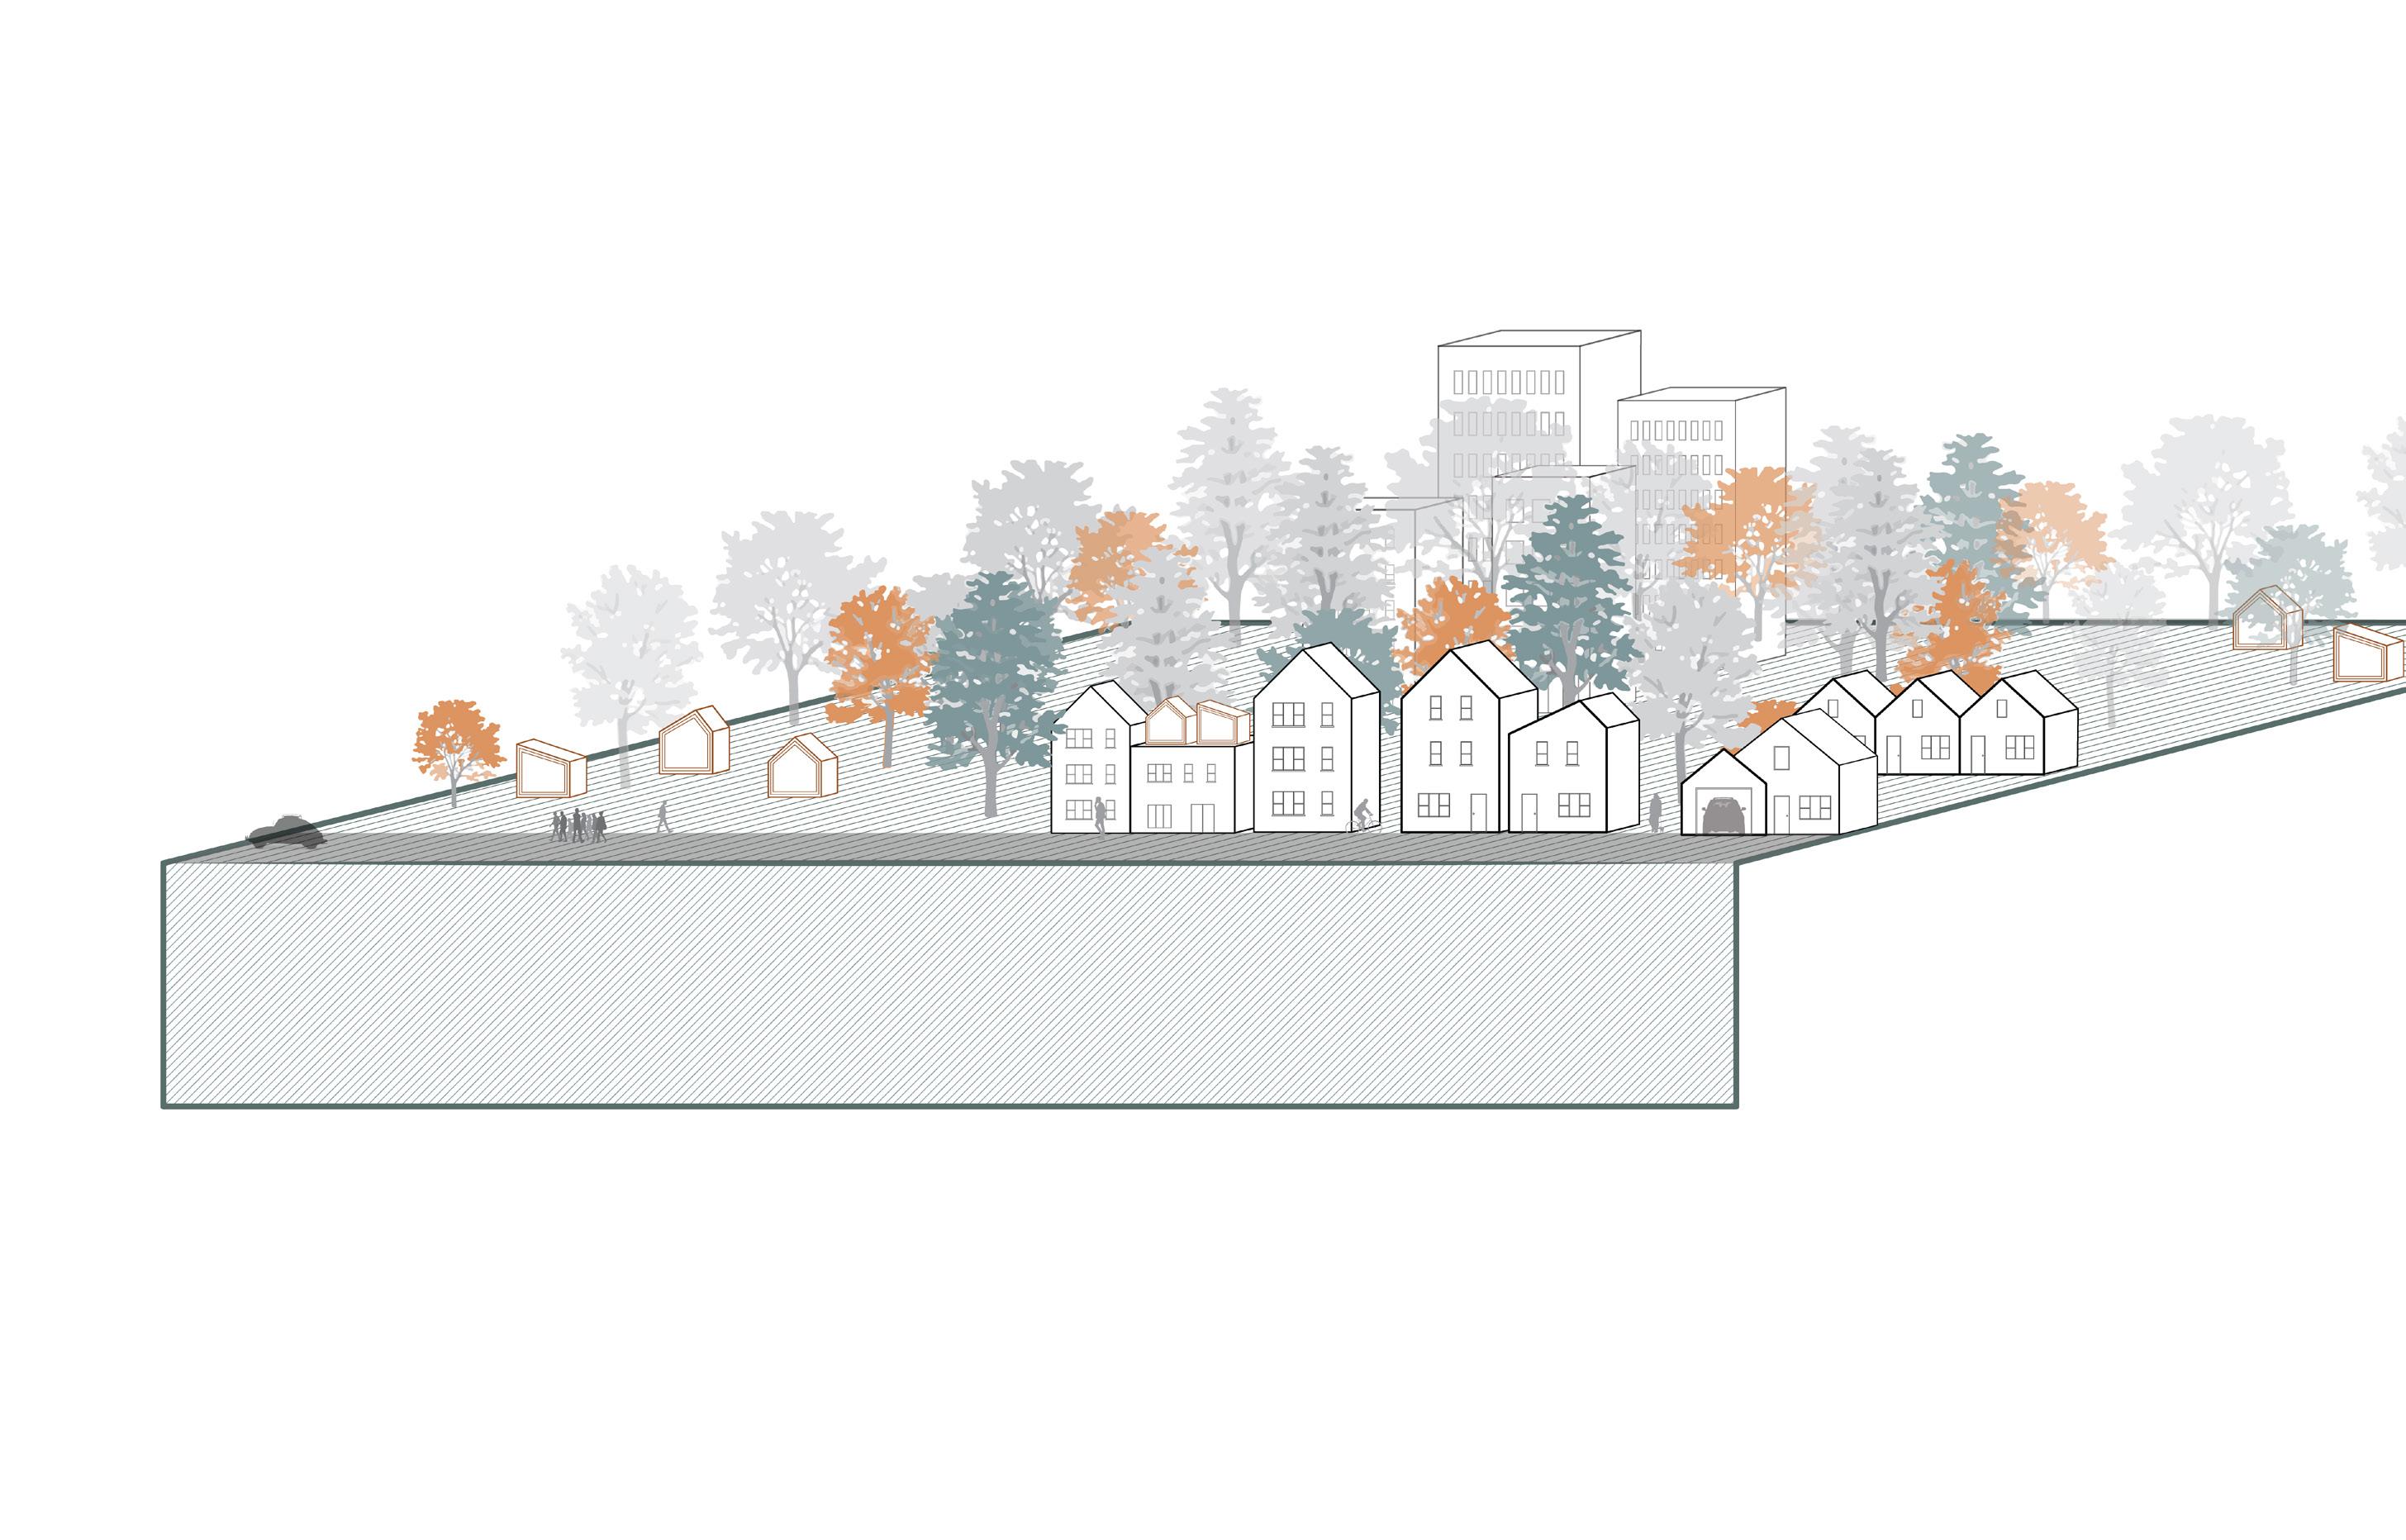
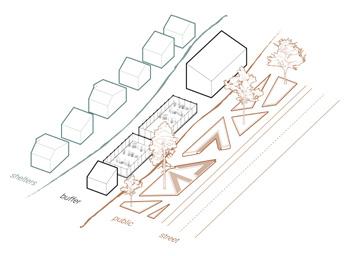
In order to avoid social isolation, increase awareness of houselessness, and provide safety for unhoused individuals, the siting strategy must provide a balance between high visibility and no visibility through locating the individual shelters “acupuncturally” within underutilized areas. Additionally, the site must be located in close proximity to essential services, have adequate solar access, and provide opportunities for public use and programs. Some shelters may also be located on top of 1 storey flat roofs, and therefore should be located between two slightly taller buildings to ensure safety and comfort for occupants.
sites for interventions
social workers, access to meals, etc.)
6 5 SURVIVAL TO SUSTAINABLE CARE Step 2 | Defining
Visibility Proximity
Solar Currently Opportunities for 1
Between
a Site
storey above grade (Rooftop only)
two slightly taller buildings (Rooftop only) Multiple
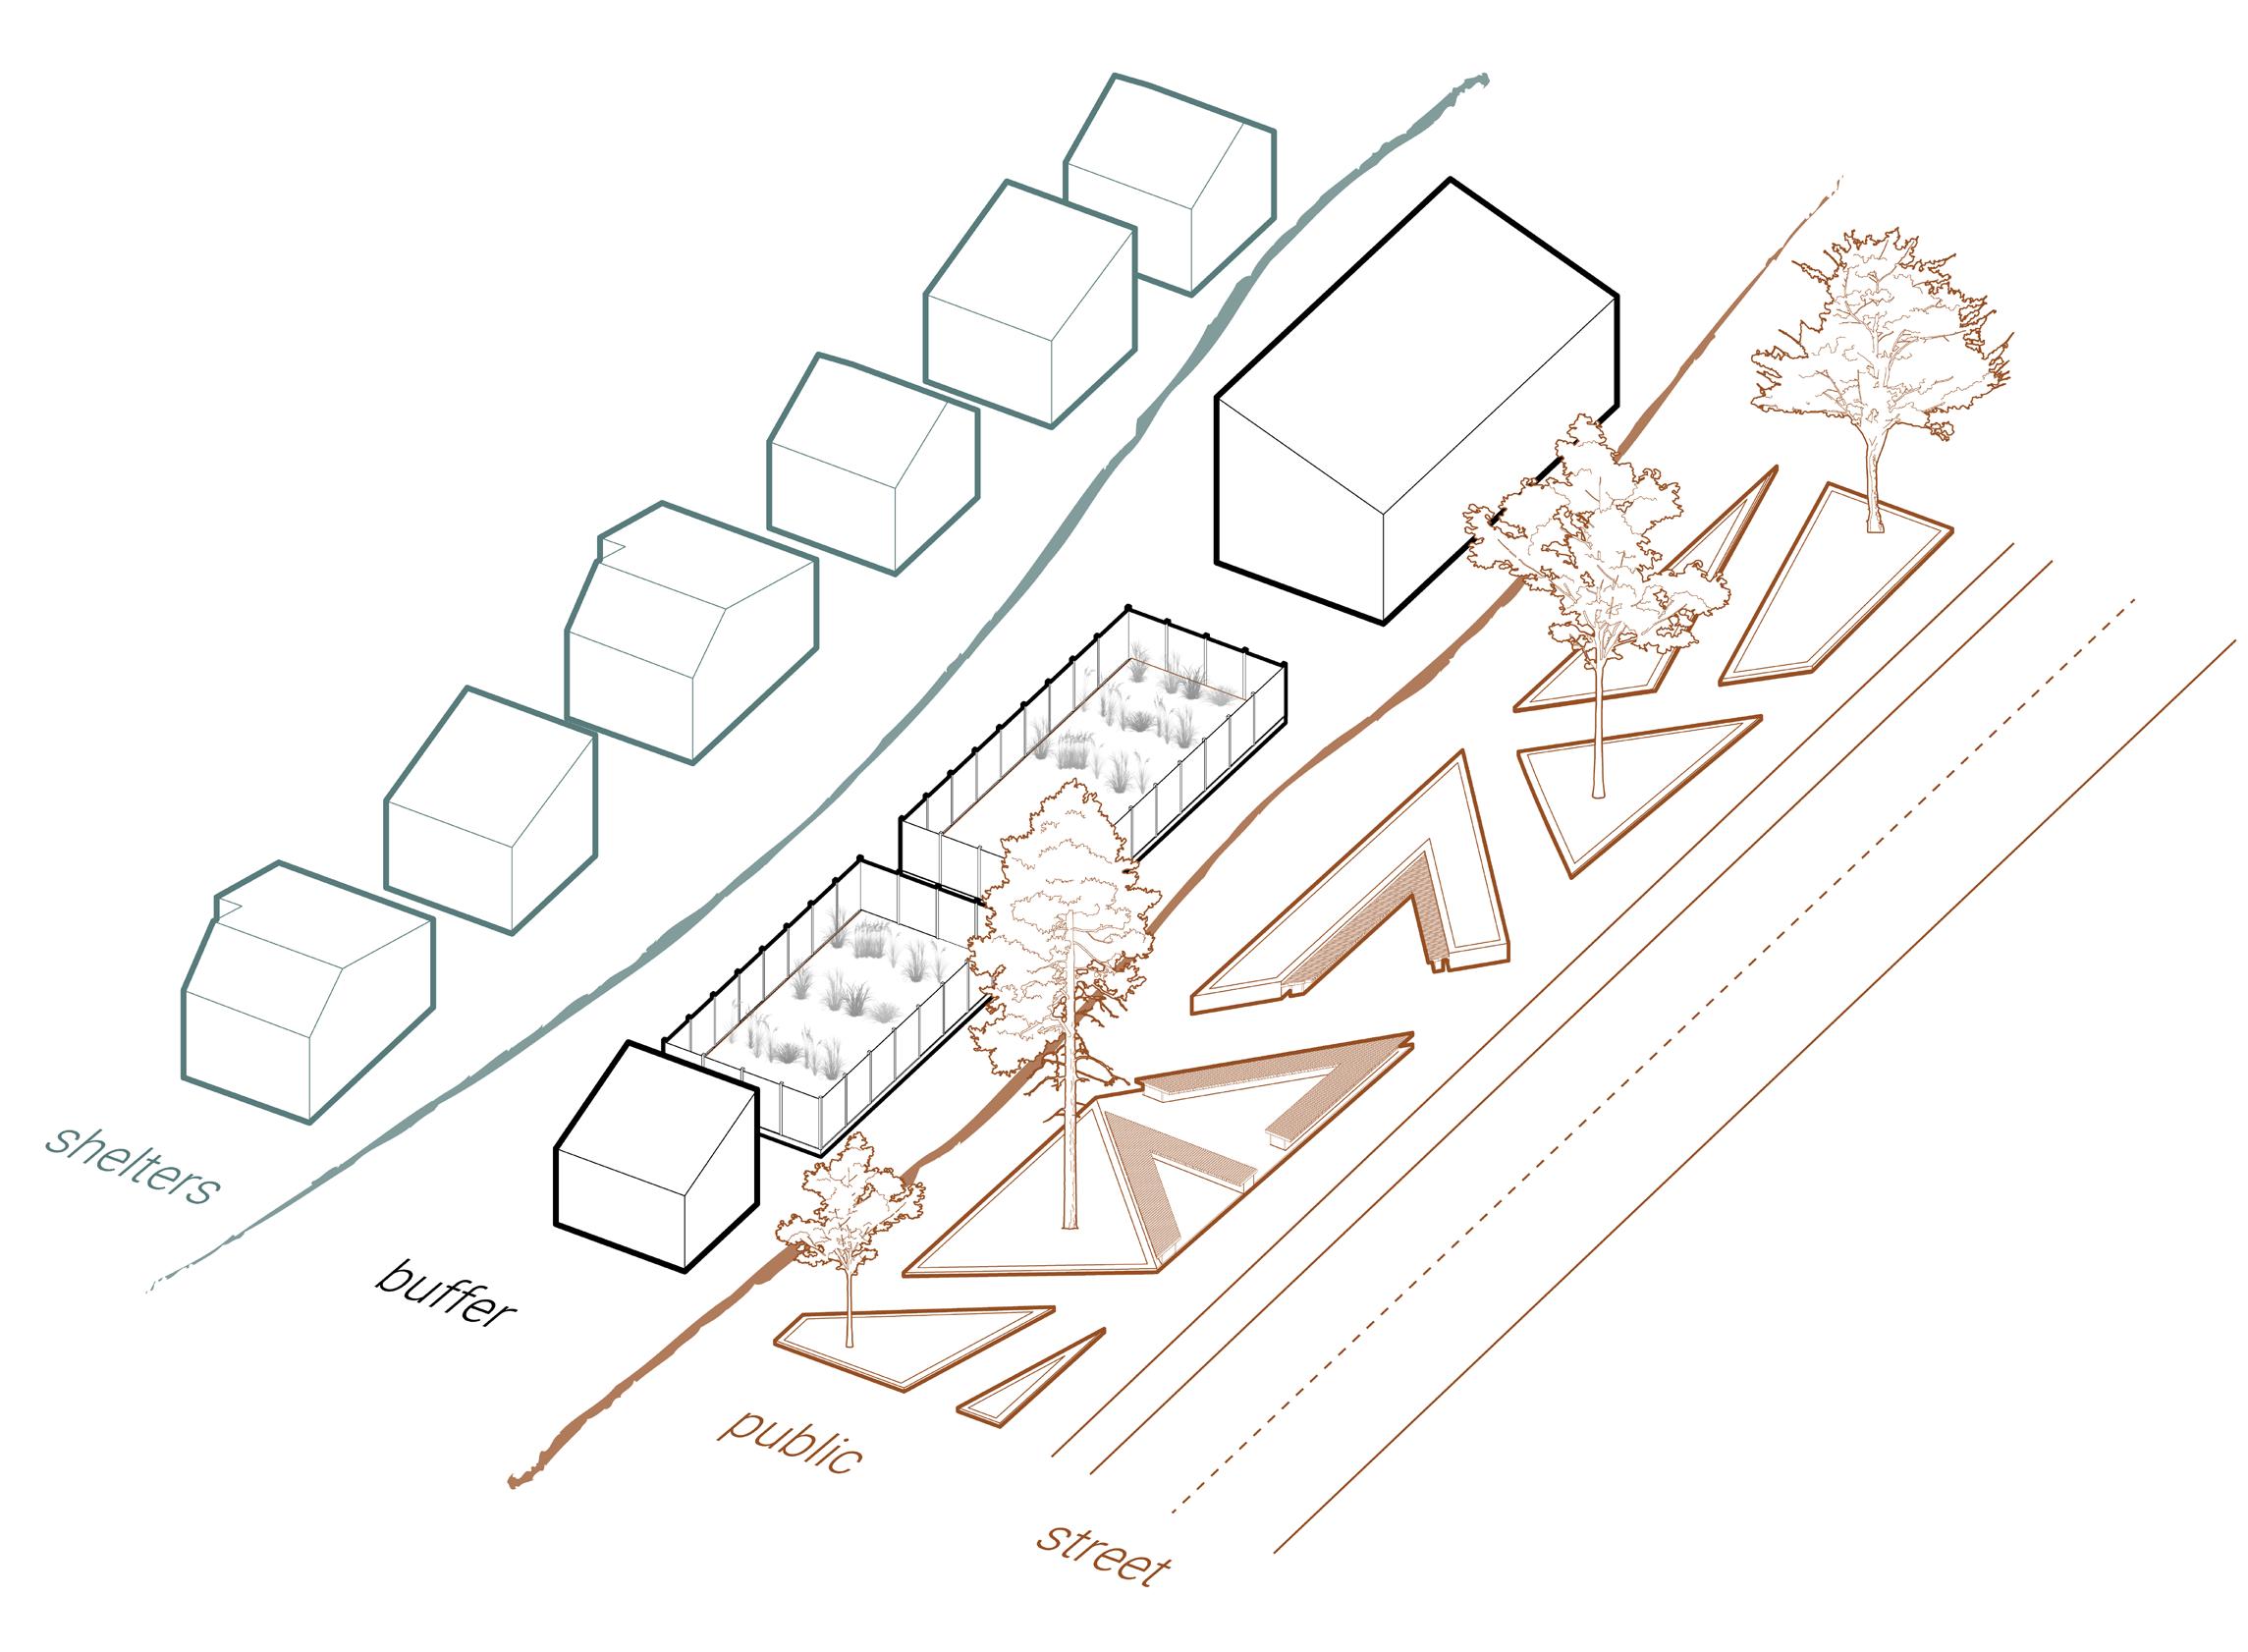
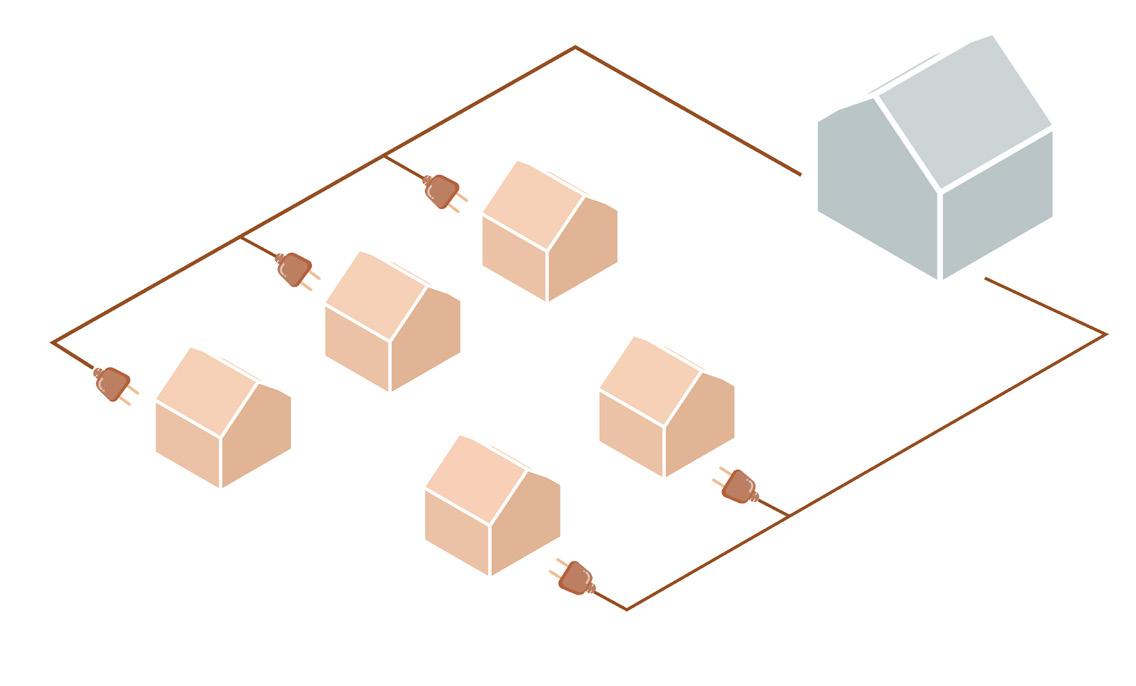
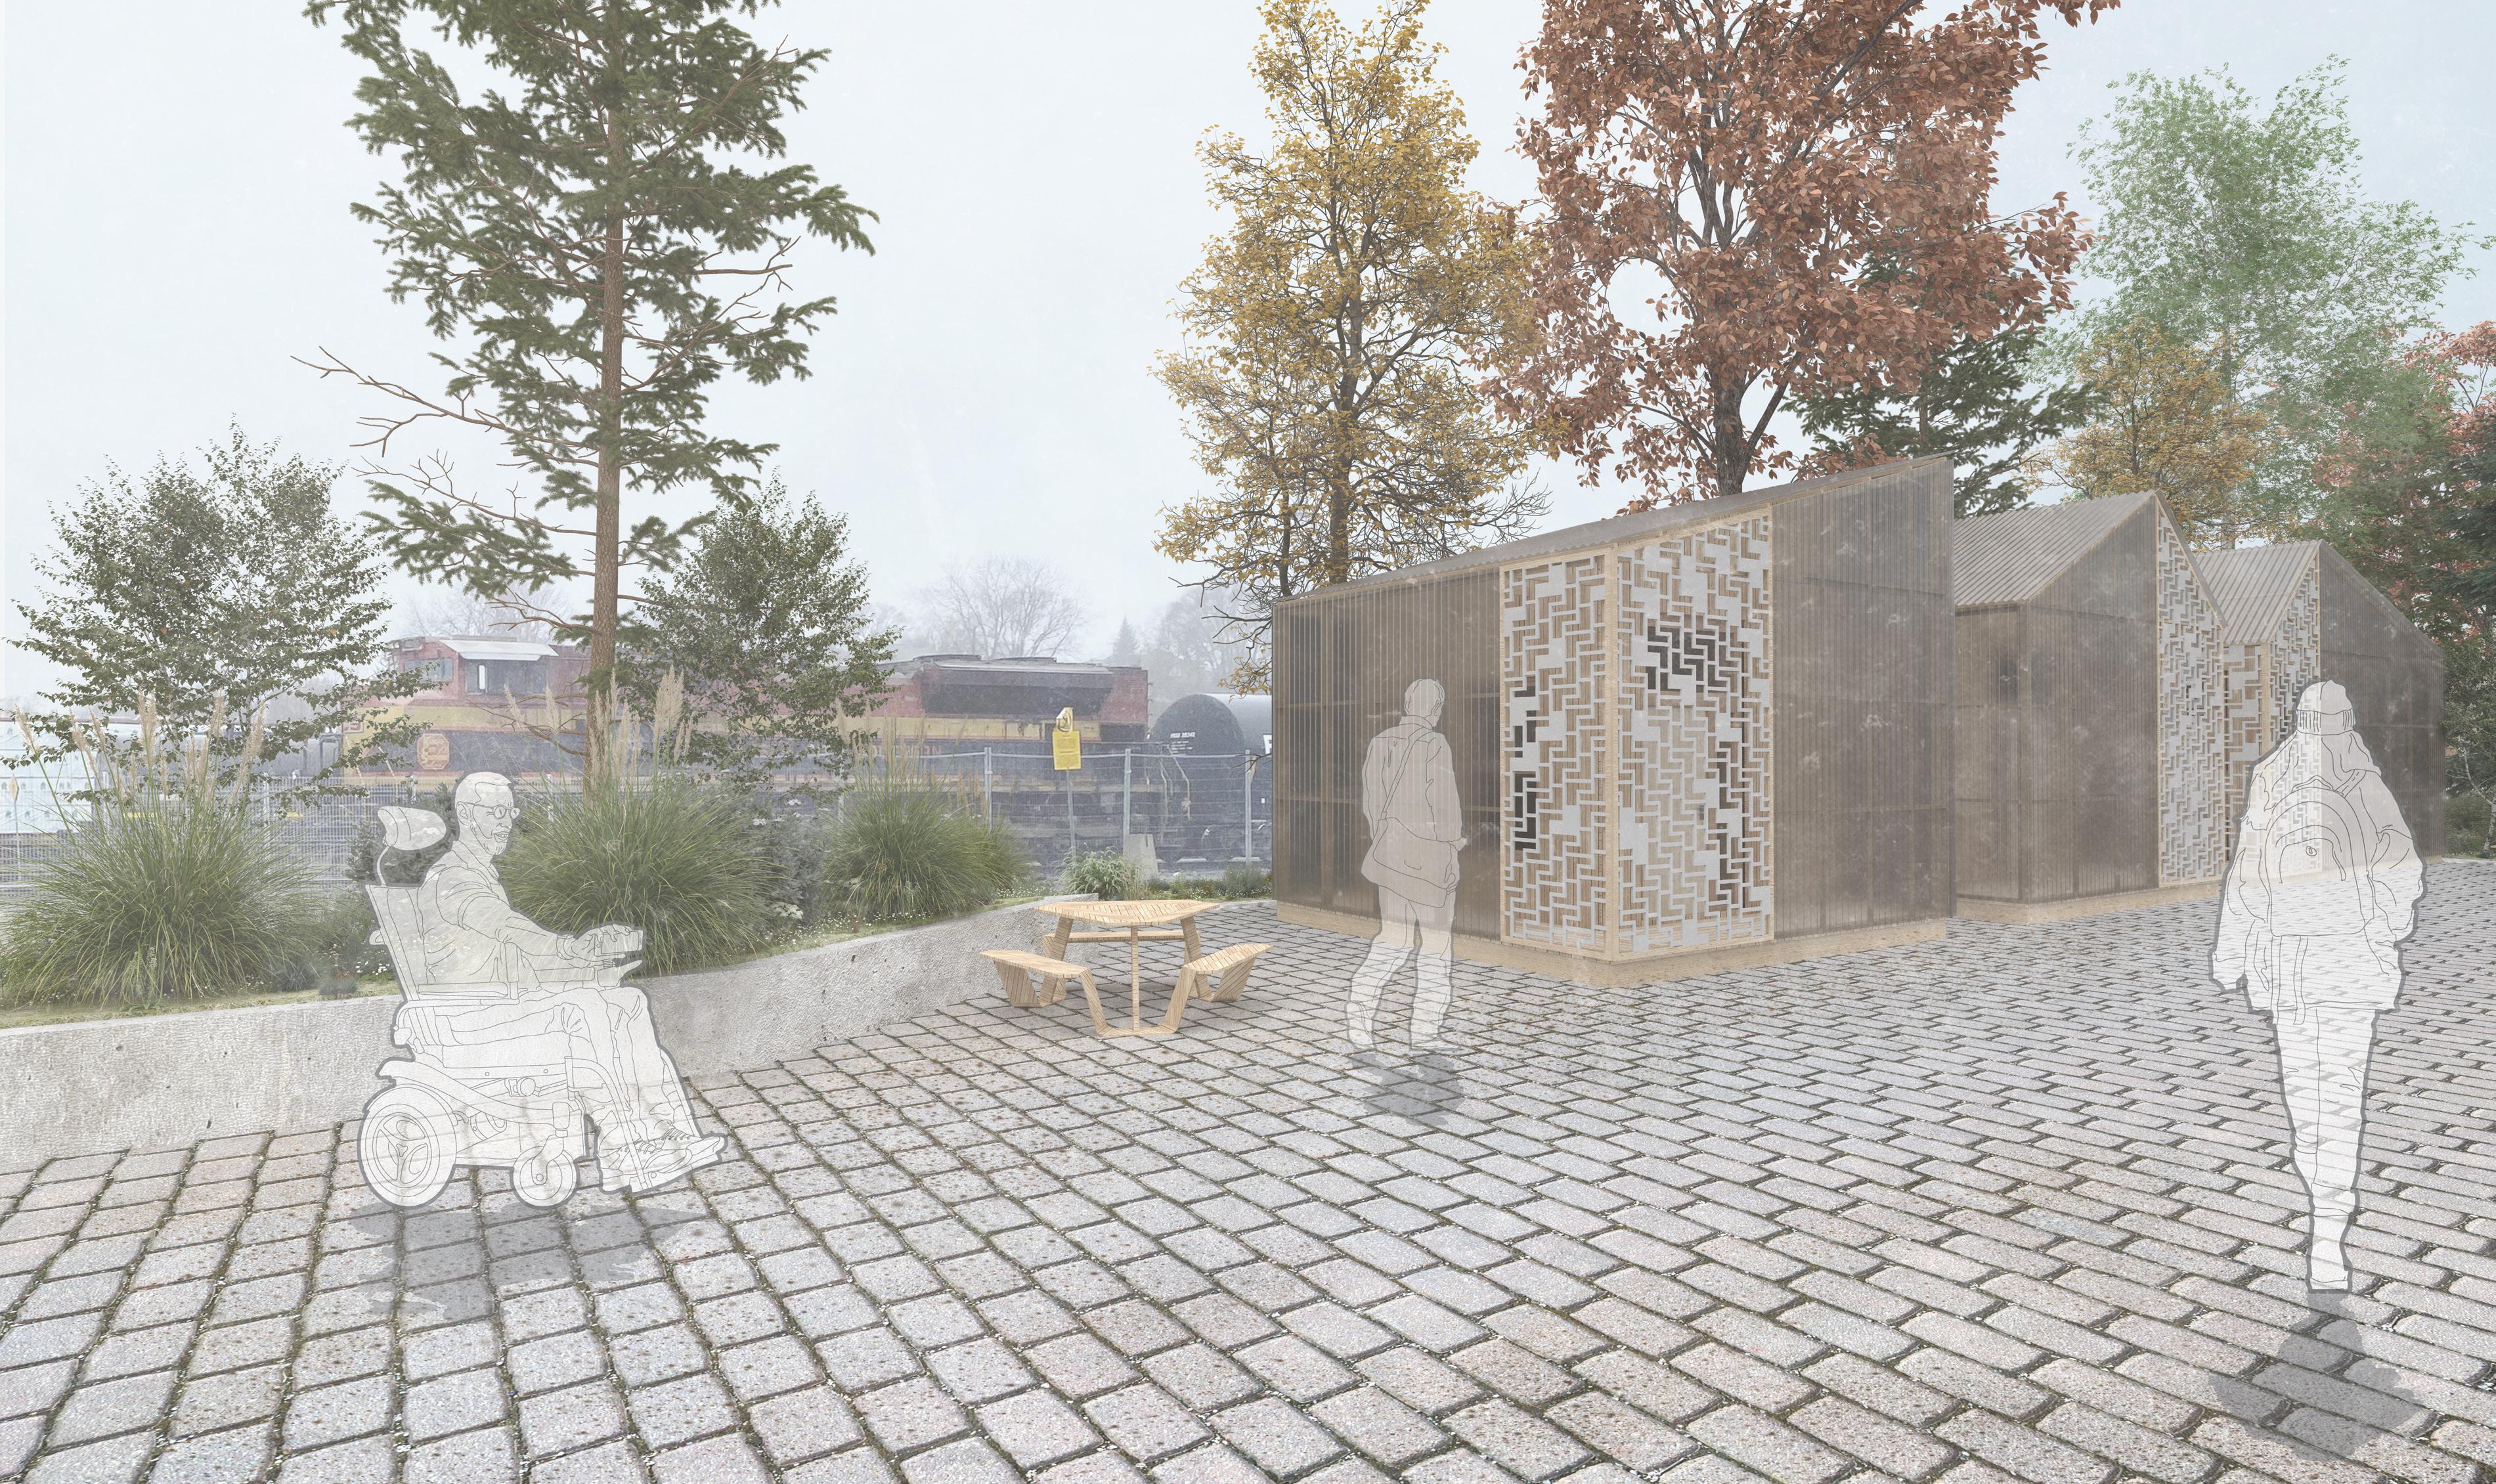
When considering both public and private use throughout the site, the site should be split into three zones as seen on page 8. The zone closest to the street encourages public access through providing additional public greenspace, pathways, and seating to the overall community. The middle zone acts as a buffer between the public greenspace and the shelters. This zone includes community gardens that can be used by the public and individuals residing in the shelters, ultimately creating opportunities for teaching and fostering positive interactions. This middle buffer zone also includes facilities that may be used by the public or individuals within the shelters (i.e. washrooms, showers, laundry, garbage disposal, etc.) The zone furthest from the street includes the shelters. To ensure safety and privacy for occupants within the shelters, public access to this zone should be limited. This can be accomplished through the use of screening elements and planter boxes that indicate a lack of open public access without the need to implement any locked gates.
public and semi-private w/r, shower, laundry, etc.
COMMUNITY GUIDELINE 2024 SURVIVAL TO SUSTAINABLE CARE 8 7 SURVIVAL TO SUSTAINABLE CARE Step 3 |
Site Design
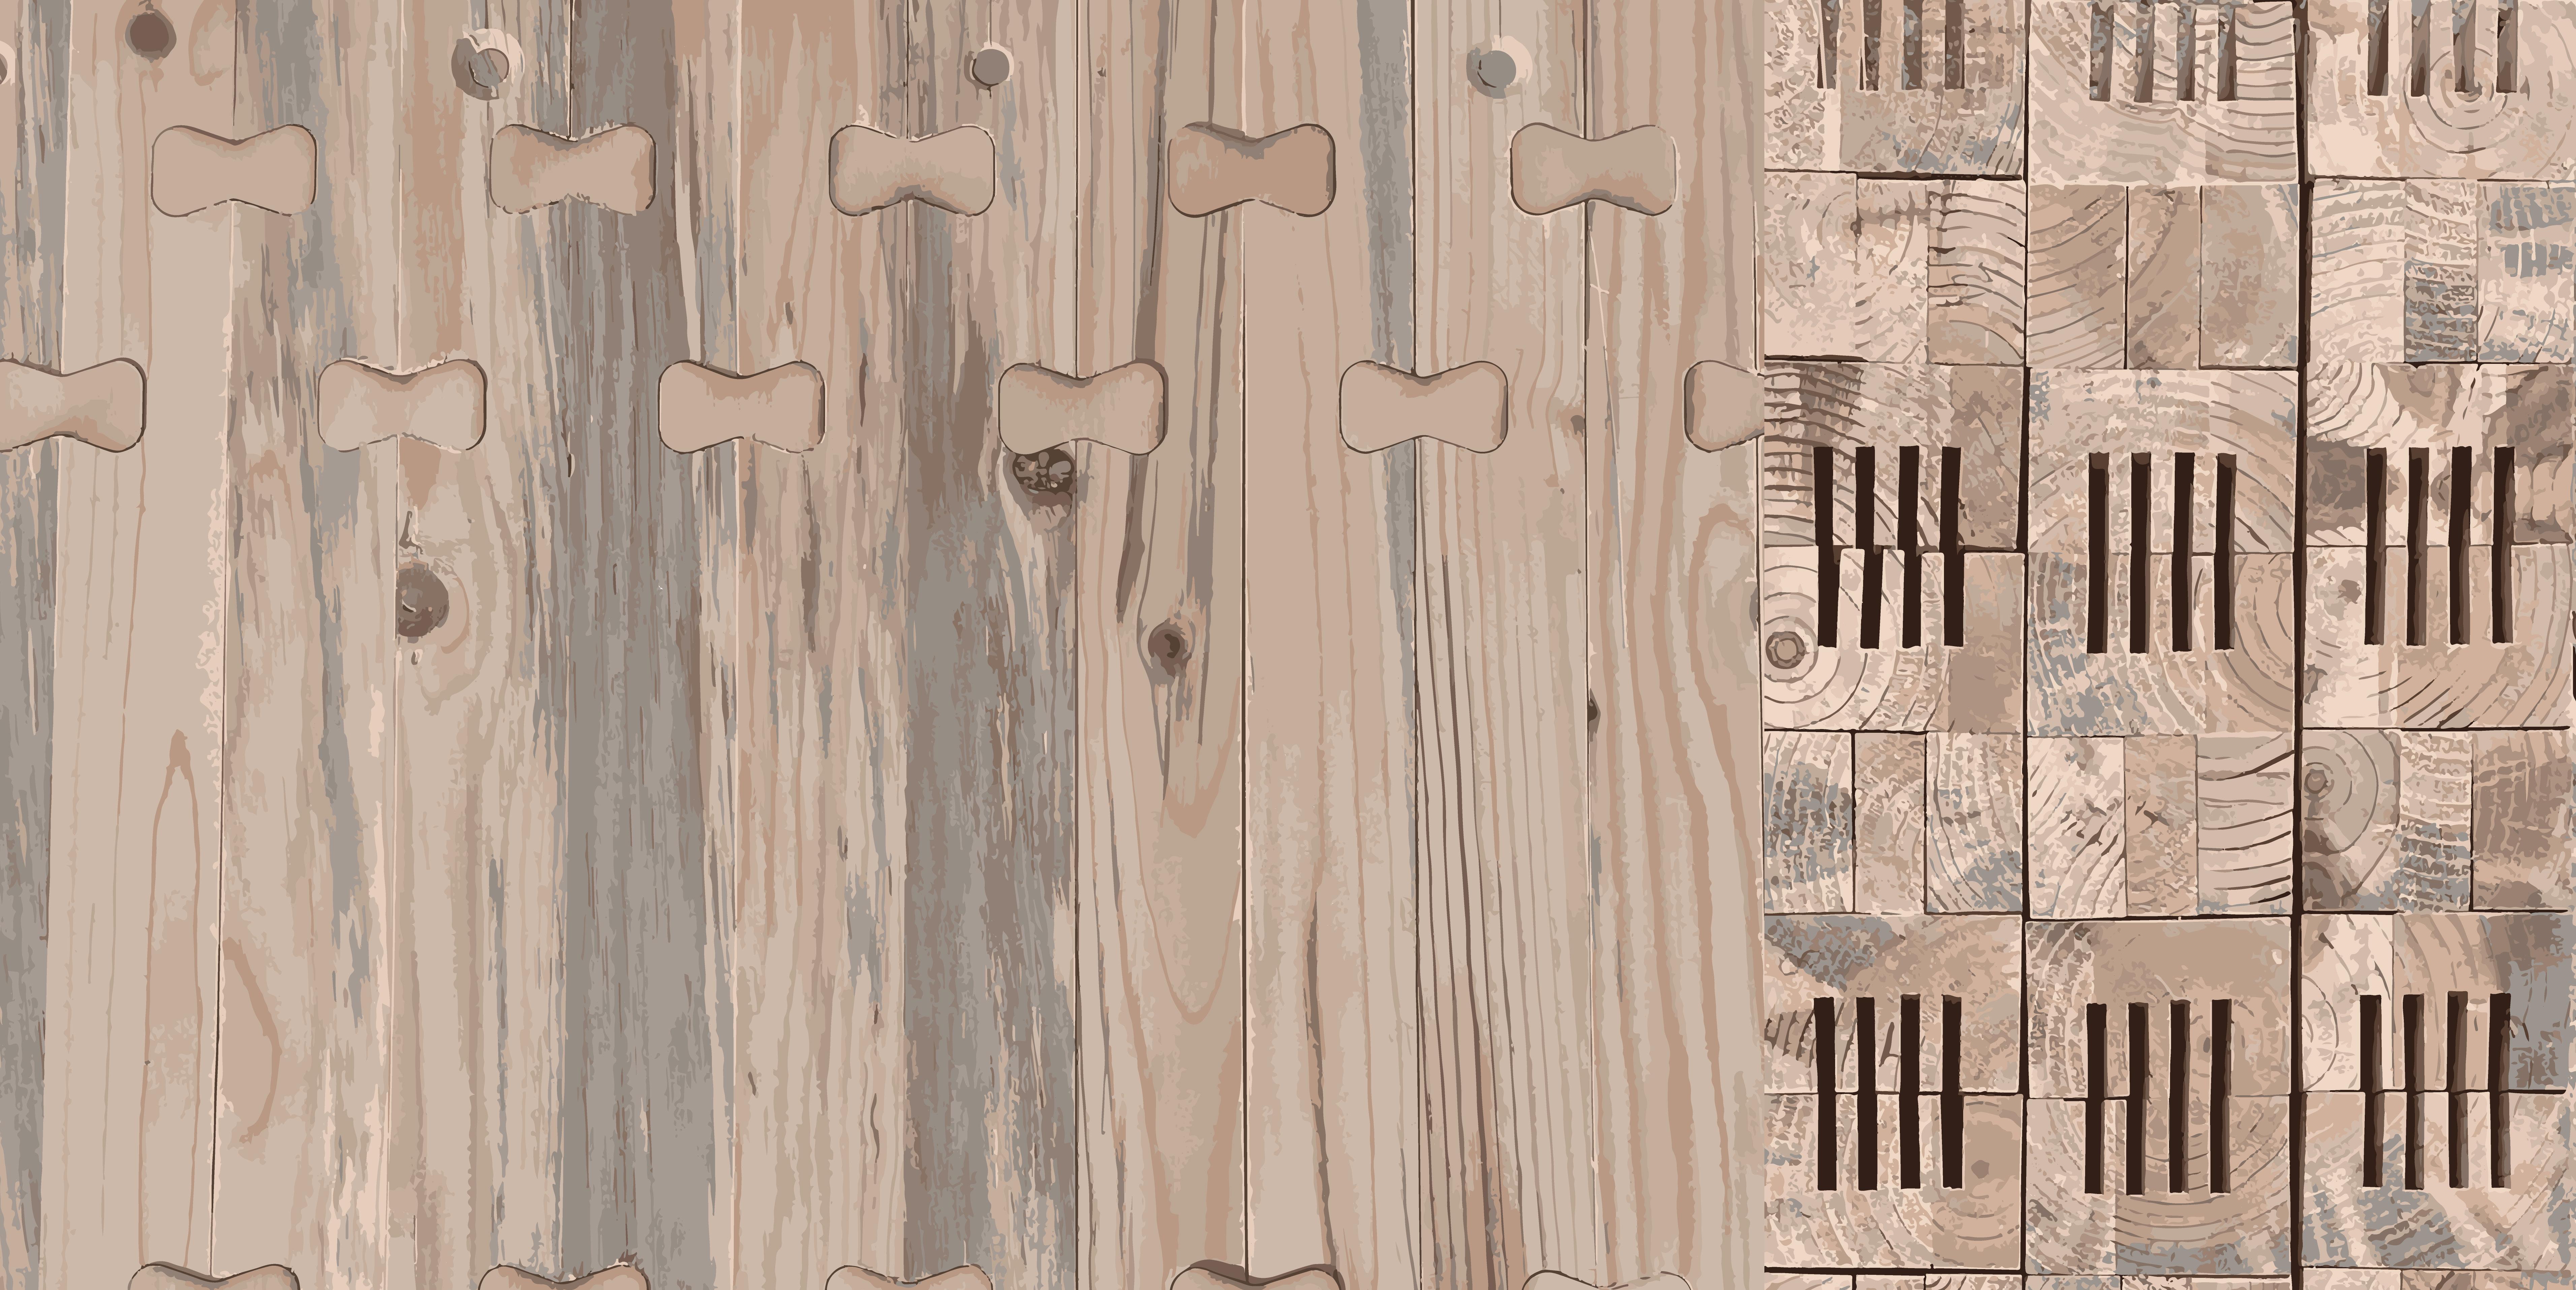
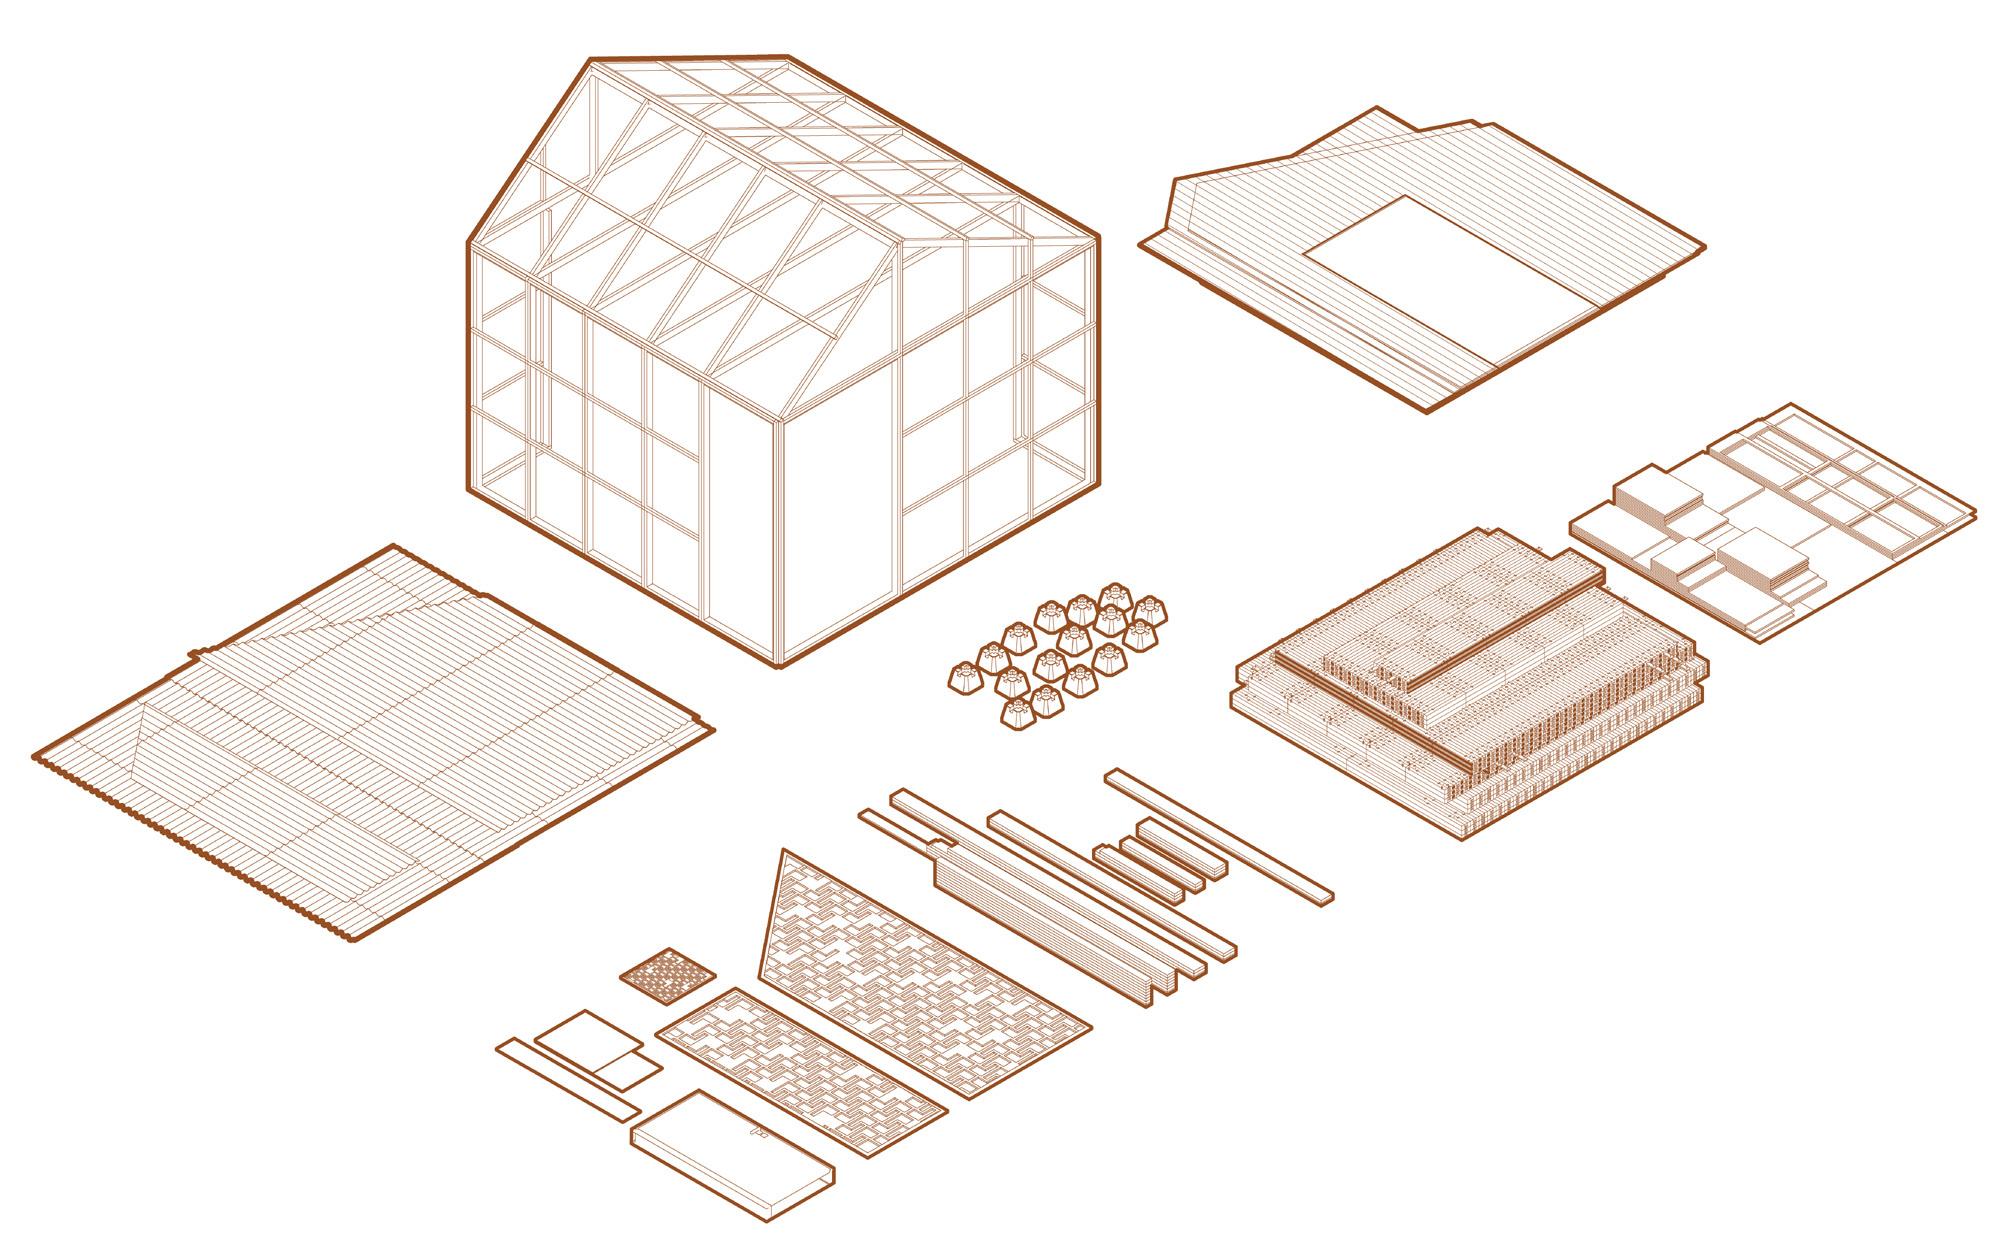
In order to ensure social, economic, and environmental sustainability, the materials used should be locally sourced when possible. This allows for ease of access to materials when a new shelter is needed or repairs on existing shelters are required. The materials needed for the construction of the shelters include precast concrete blocks, dimensional lumber, wood dowels, metal brackets and hangers, metal sheets for screening elements, plywood, wood v-joint siding, corrugated polycarbonate, glass, and doors.
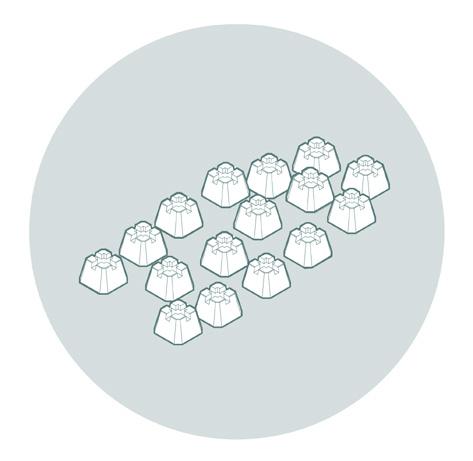
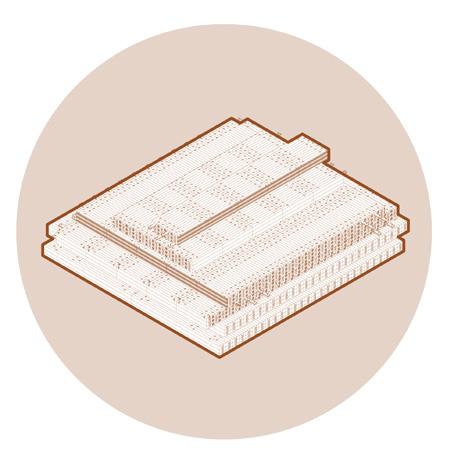
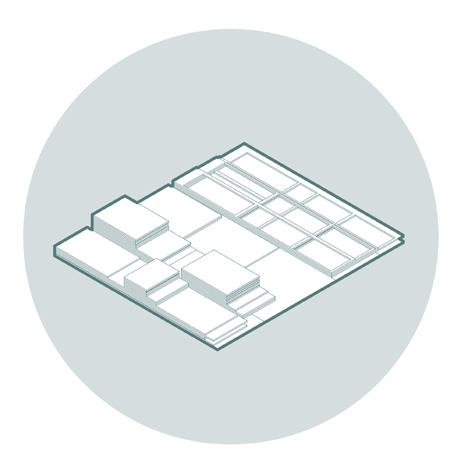
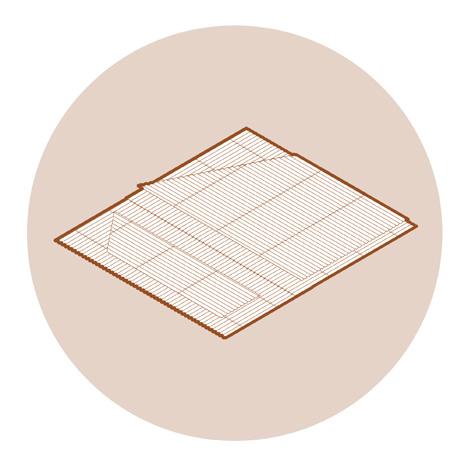

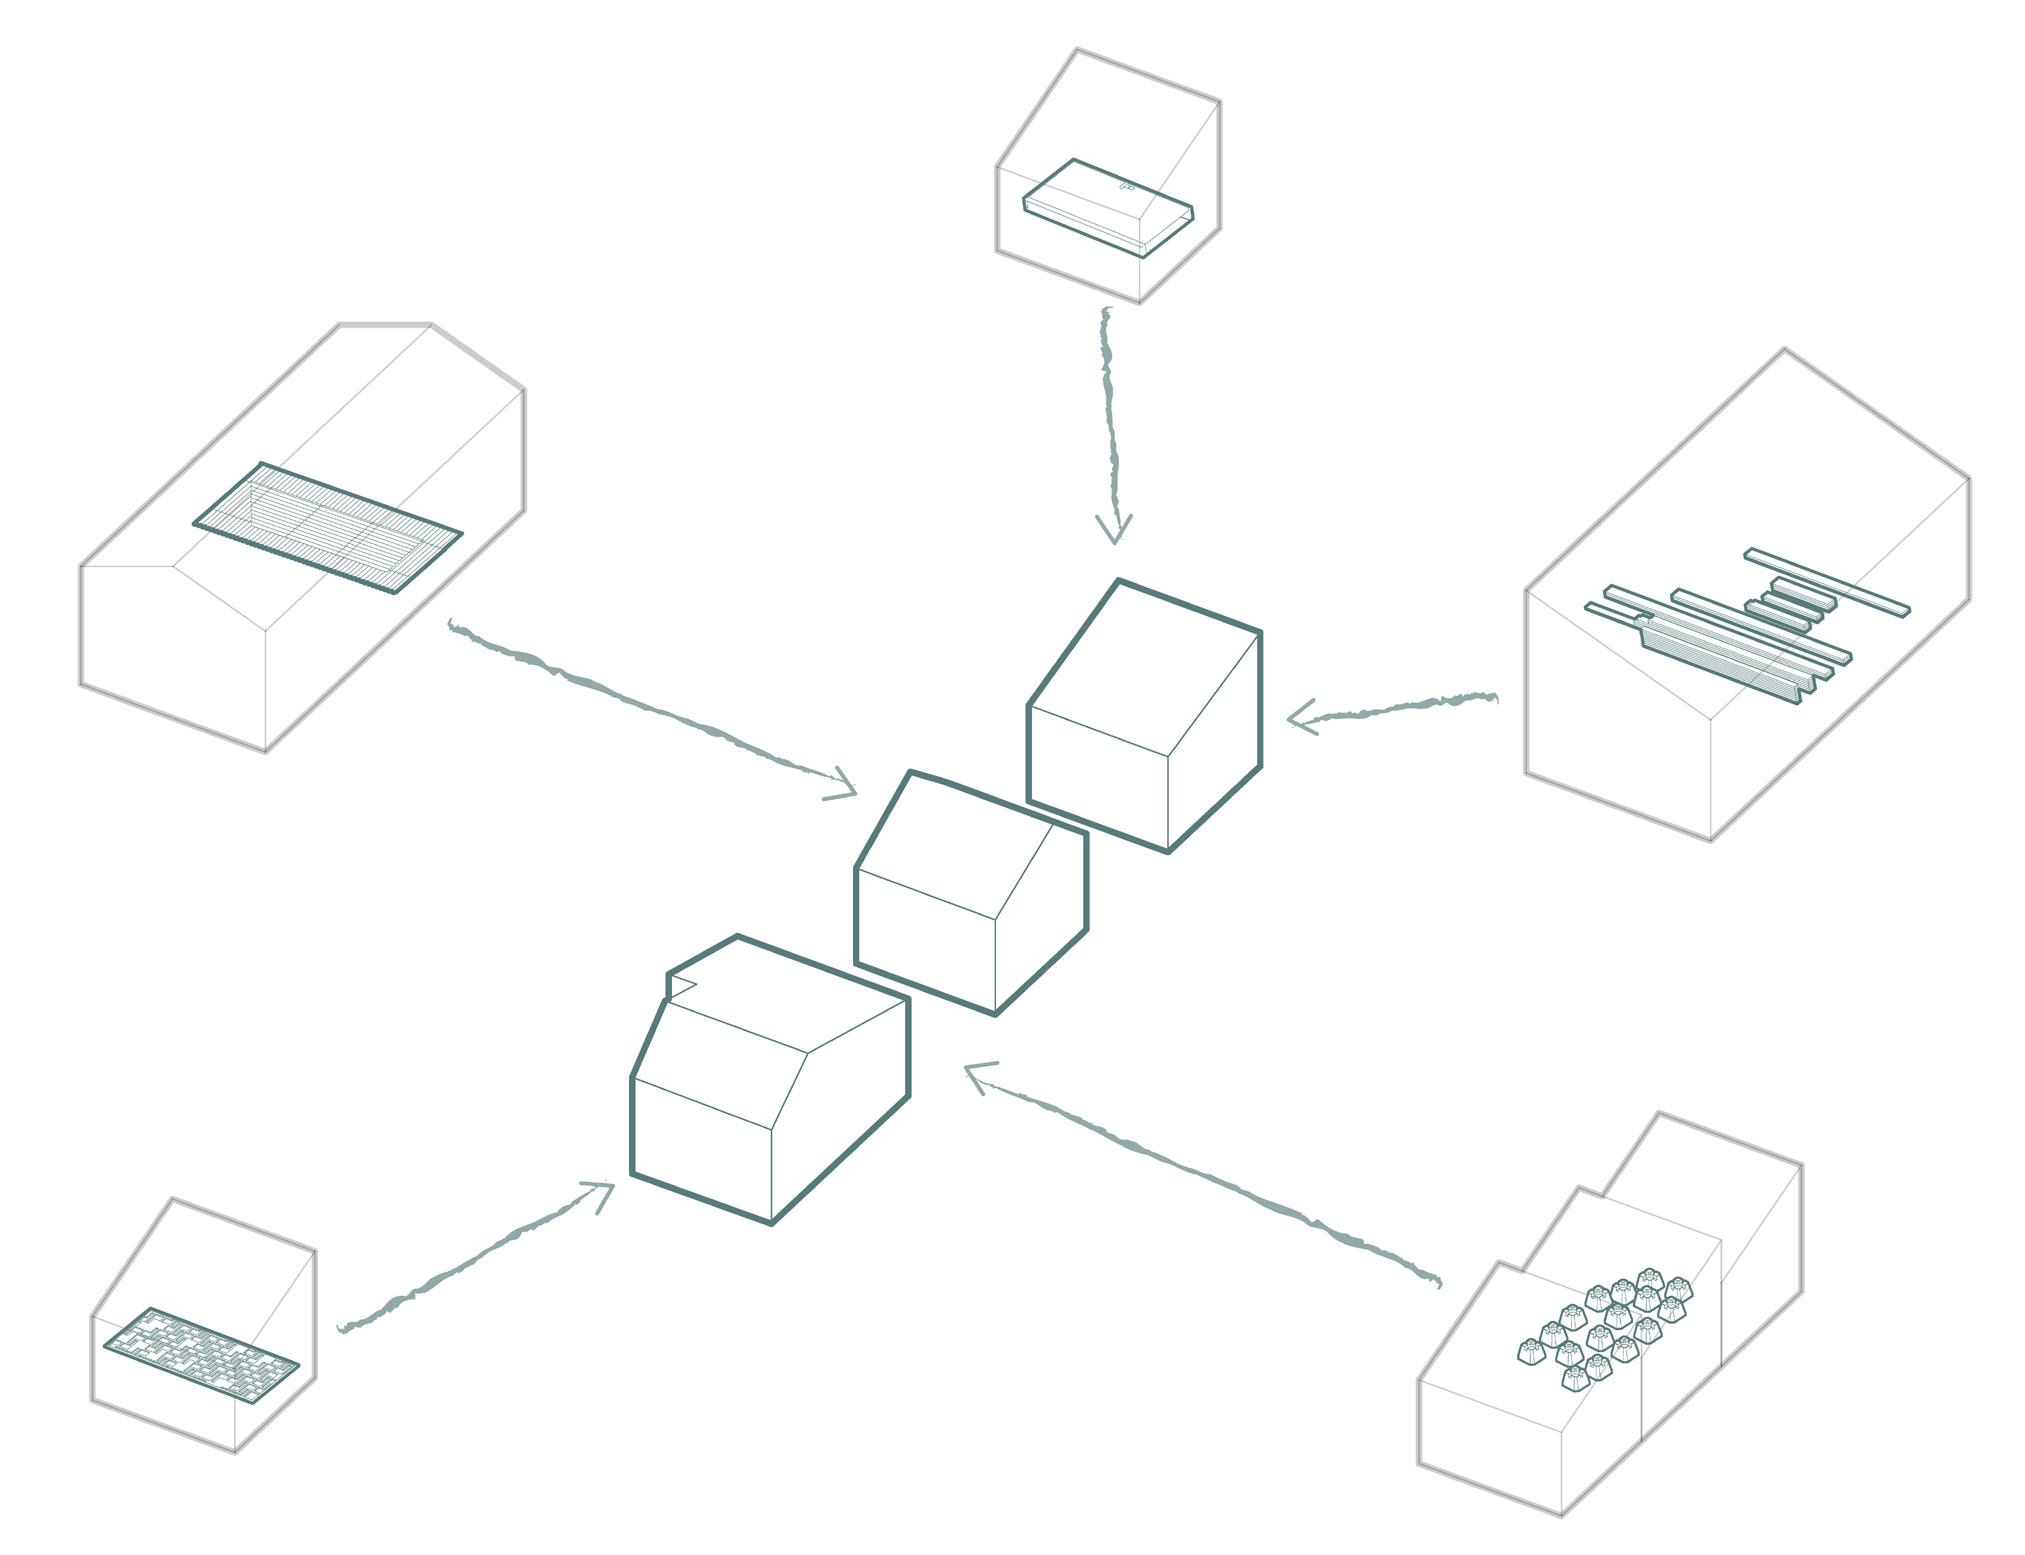
COMMUNITY GUIDELINE 2024 SURVIVAL TO SUSTAINABLE CARE 10 9 SURVIVAL TO SUSTAINABLE CARE Step 4 | Material Collection locallymaterialssourced
precast concreteblock s dimensionallumber dimensionallumberfor w a l l s metal sheetsforscreeni n g e l e stnem plywood woodv-jointsiding corrugatedpolycarbonat e g ass, anddoors
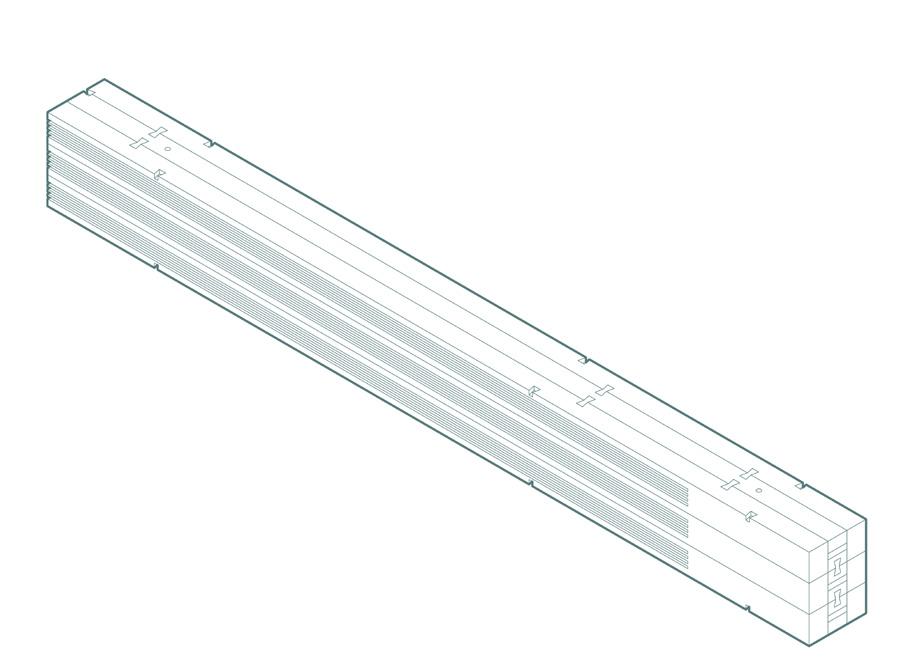
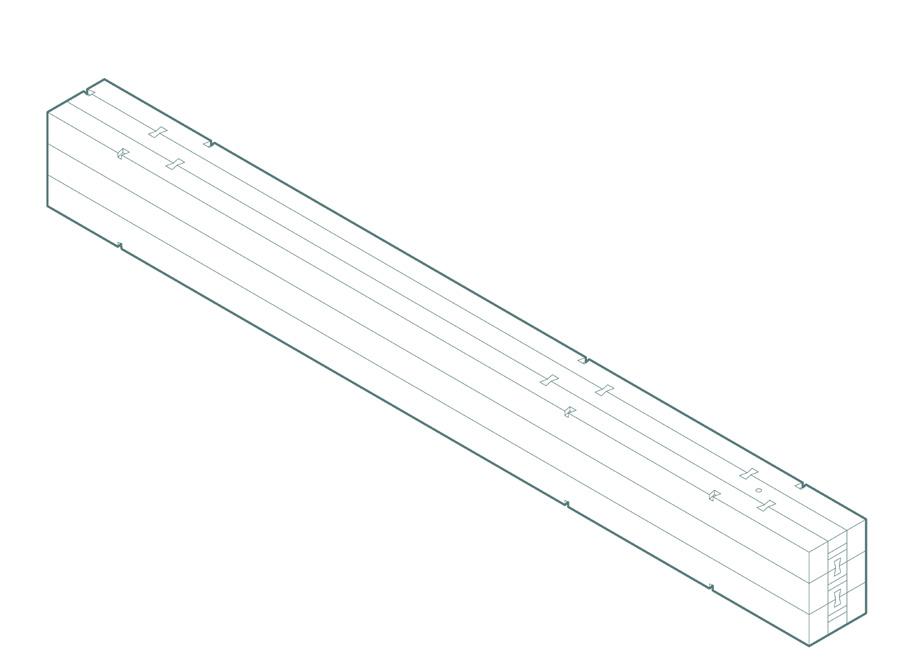
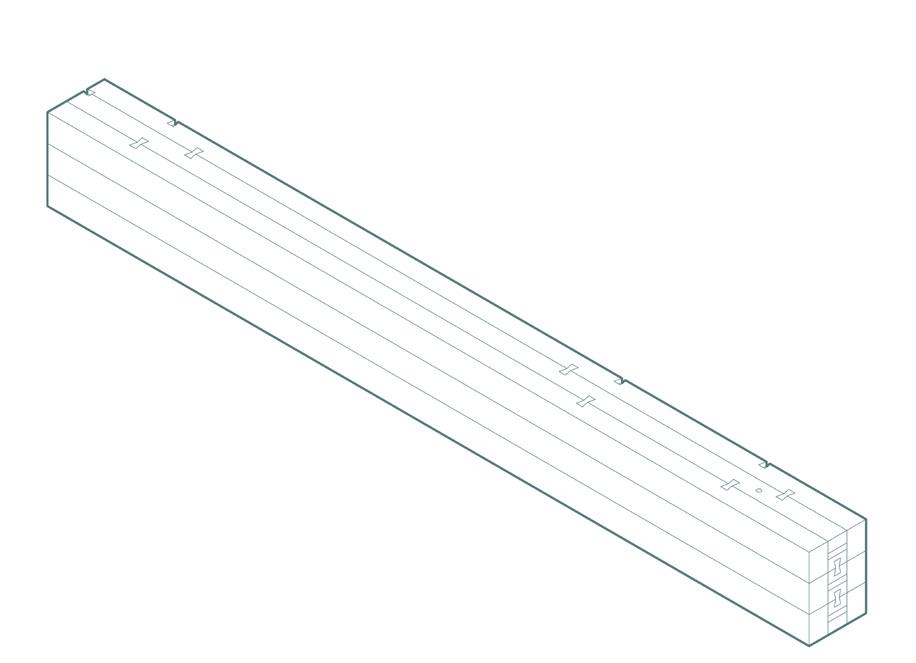
Following material collection, the first step in fabricating the shelters is CNC milling. This step requires an individual or individuals who have experience operating a CNC machine. As seen on page 12, 13 & 14, the steps required to be completed using CNC milling include cutting the 4x4s into 4 pieces, adding 5mm wide air spaces, and cutting dowel and bowtie connections into each wood member. Refer to Step 6 for CNC milling notes for each panel type.

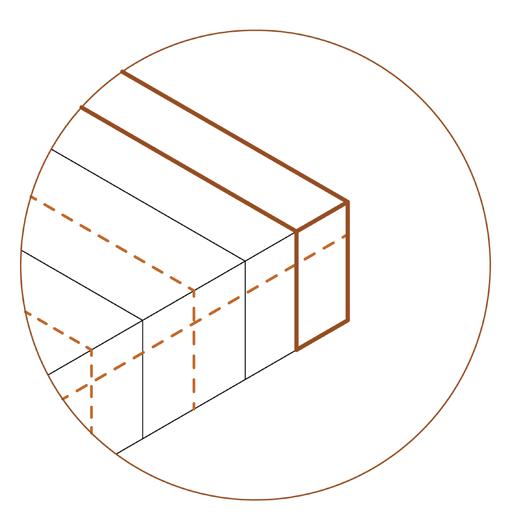


COMMUNITY GUIDELINE 2024 SURVIVAL TO SUSTAINABLE CARE 12 11 SURVIVAL TO SUSTAINABLE CARE Step 5 | CNC Milling Solid
Cut
cut4x4 e longateform addairspac e s cut4x4 addairspaces cutdowel & bowtieconnecti o n s
4 x 4
4 x 4 Reconfigured 4 x 4 Reconfigured 4 x 4 w/ Air Spaces
Cut 4x4s
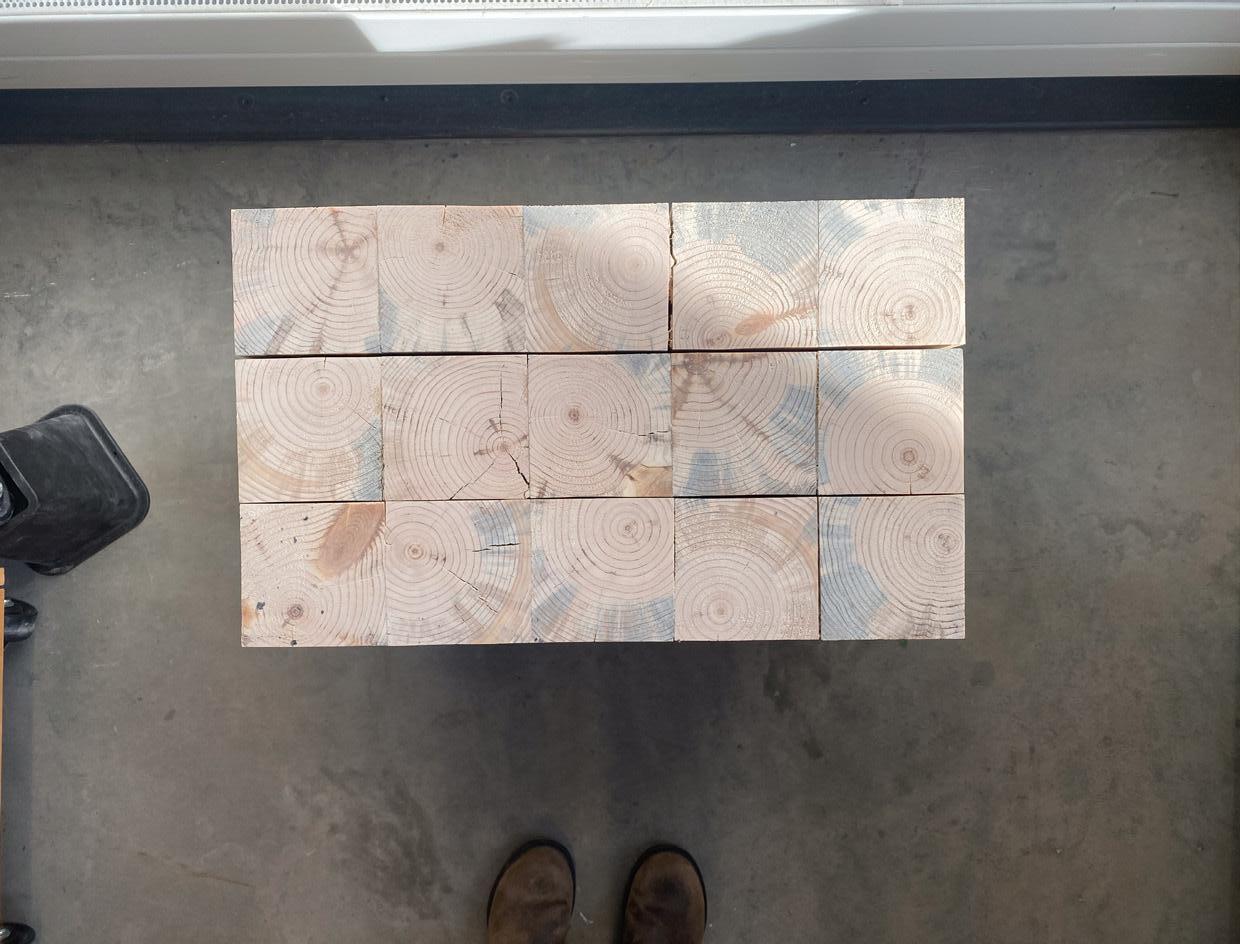
Add Air Spaces
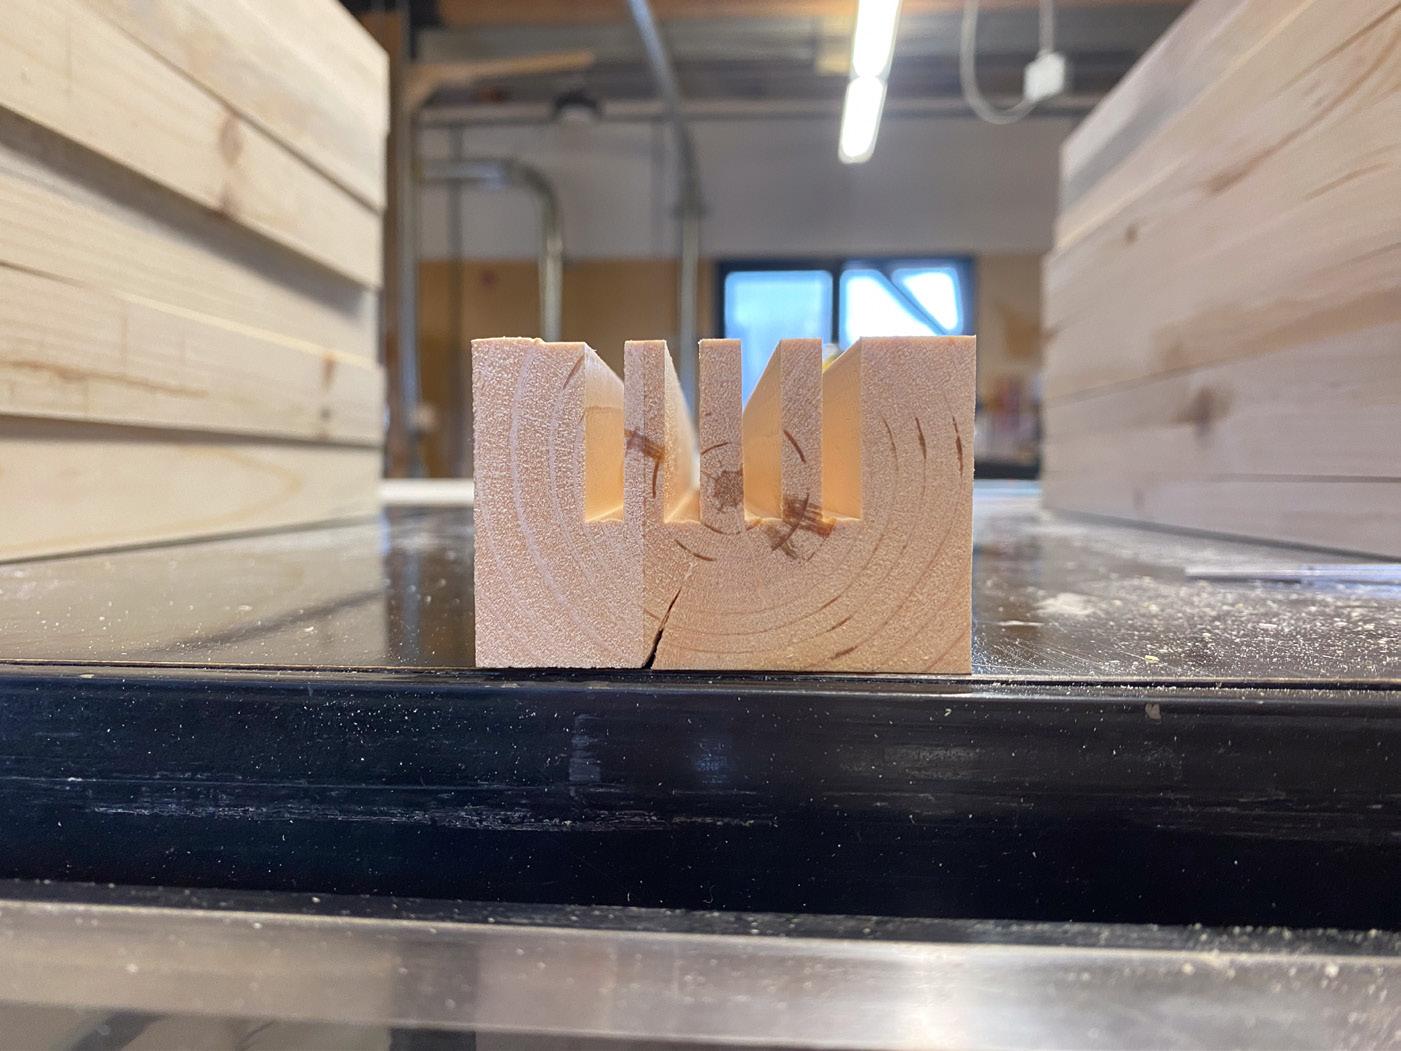
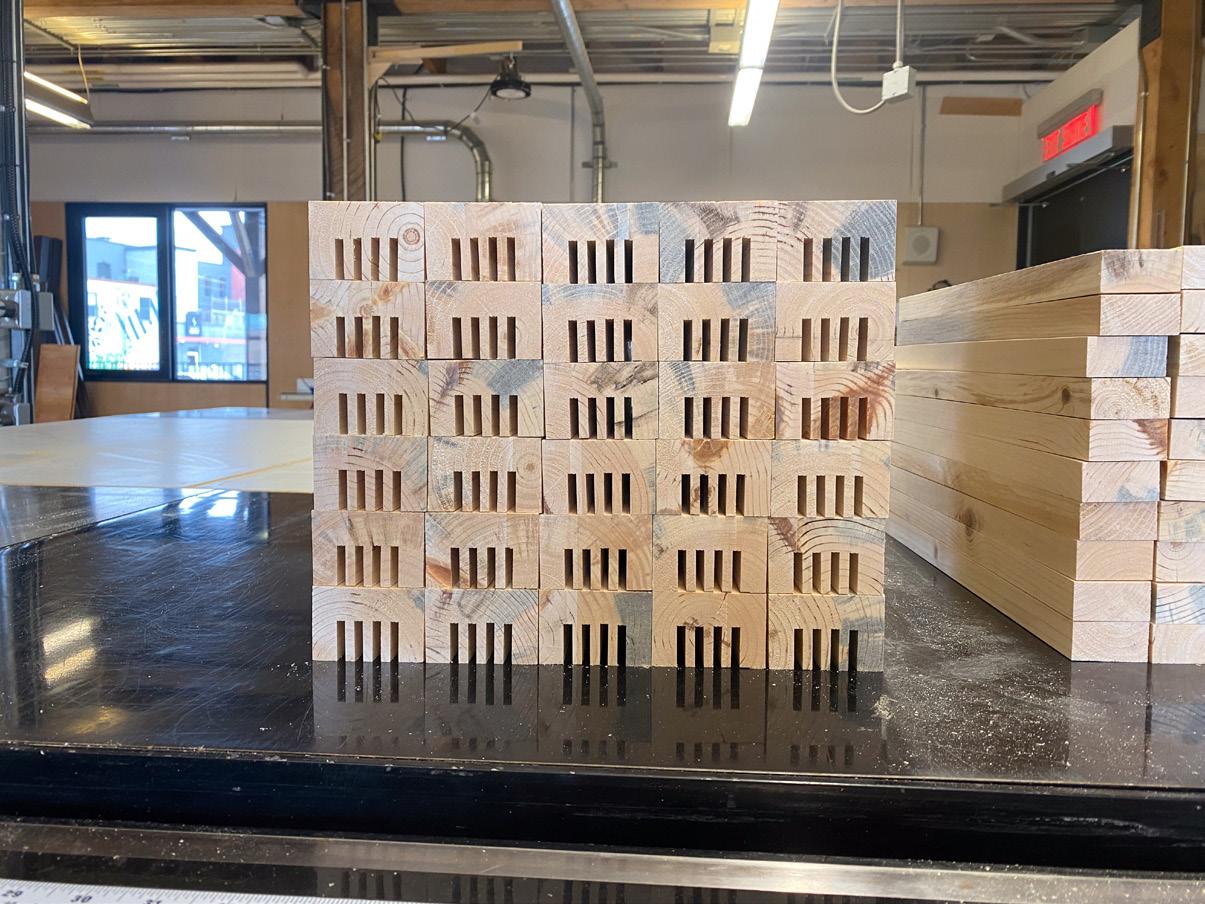
Cut Dowel & Bowtie Connections
COMMUNITY GUIDELINE 2024 SURVIVAL TO SUSTAINABLE CARE SURVIVAL TO SUSTAINABLE CARE
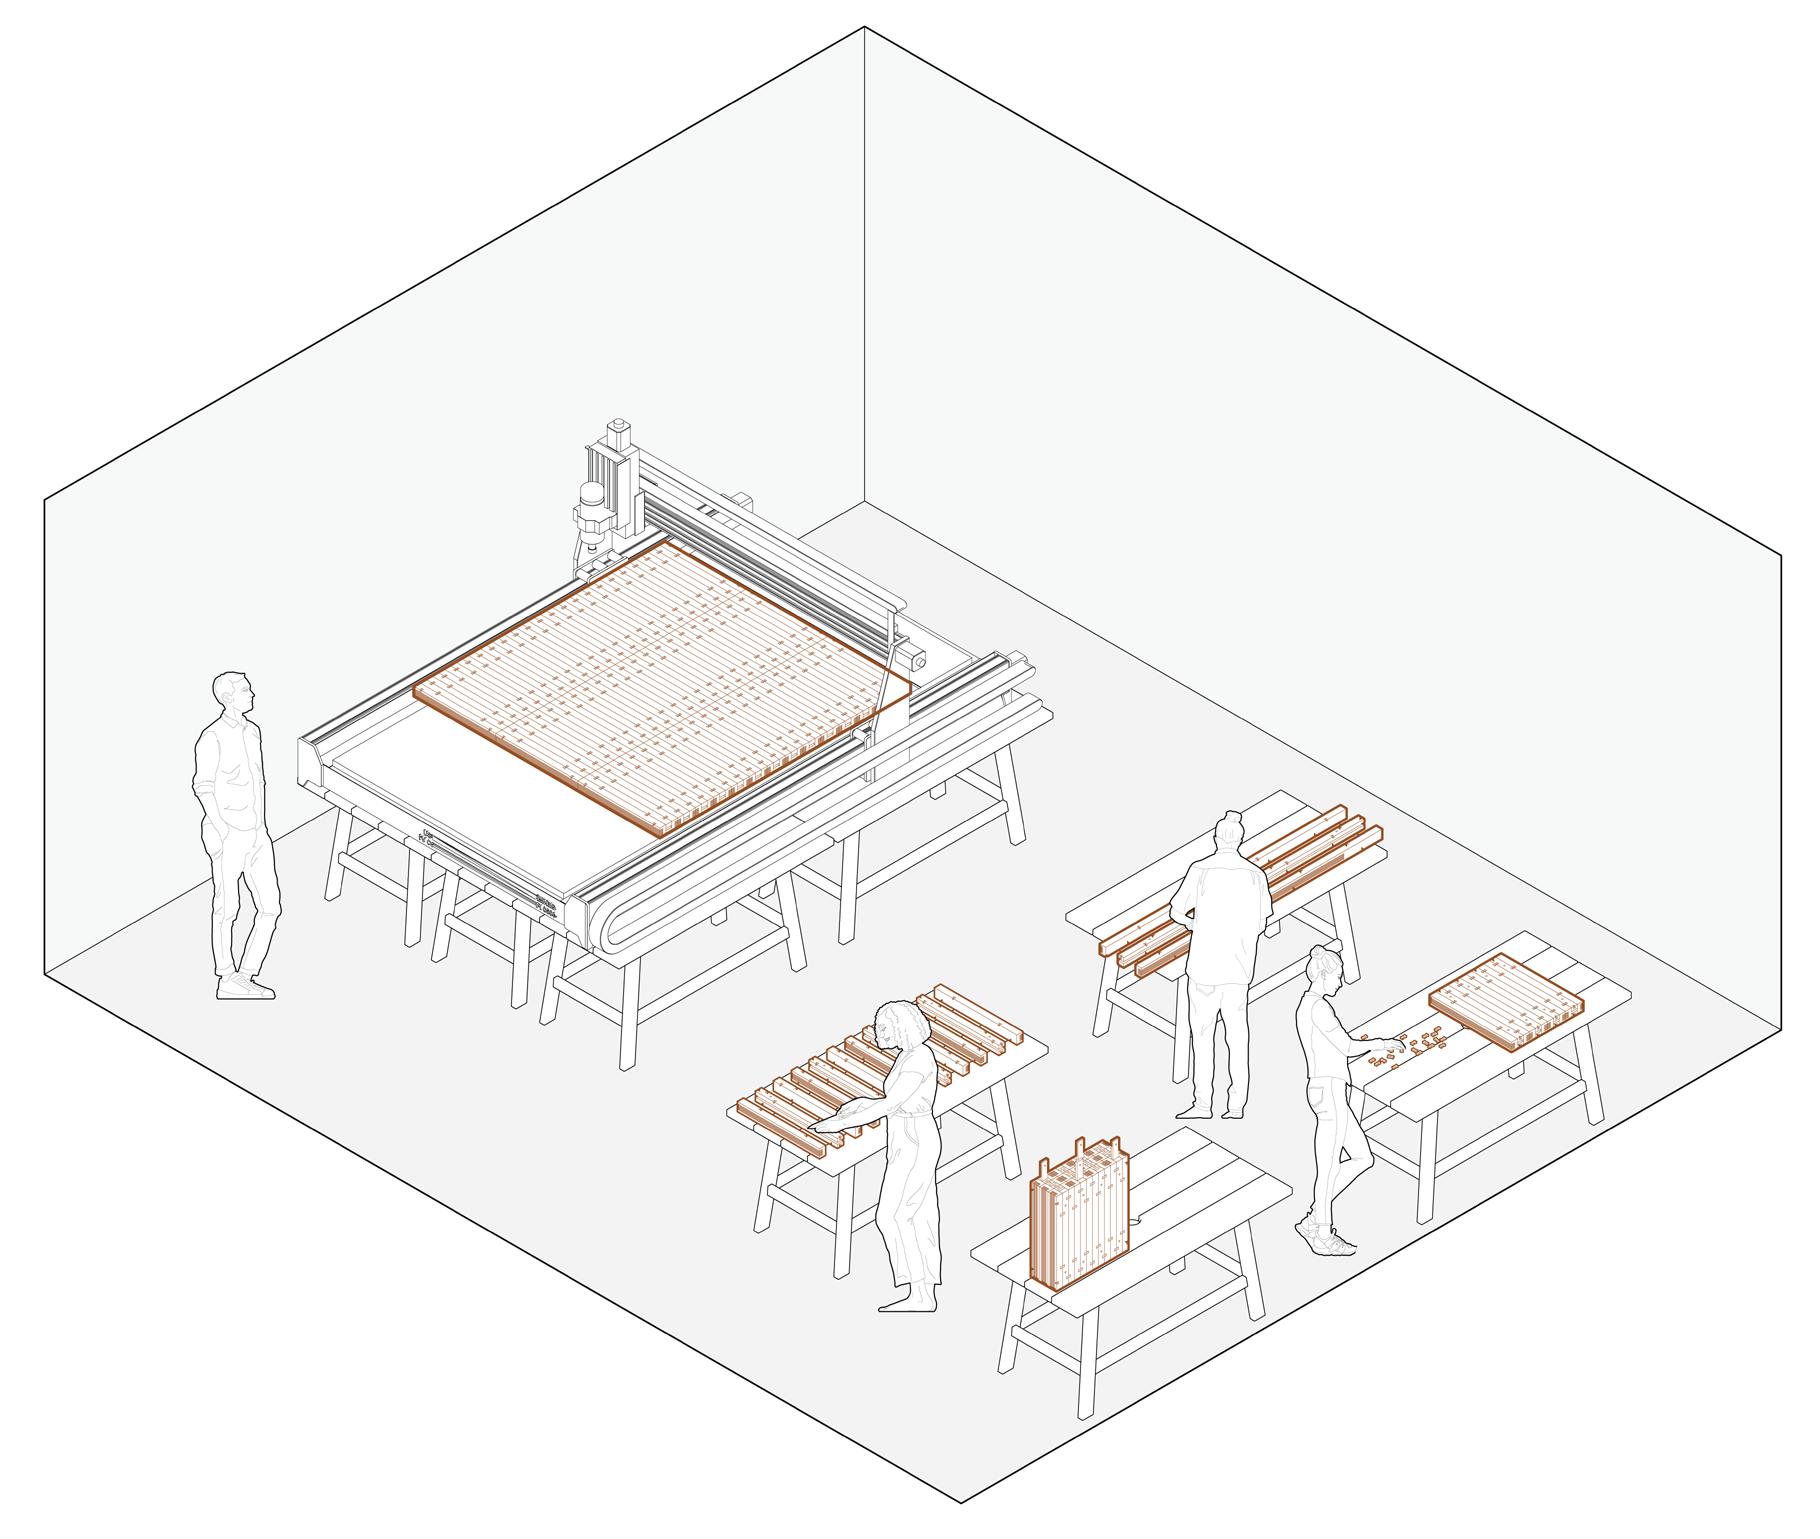
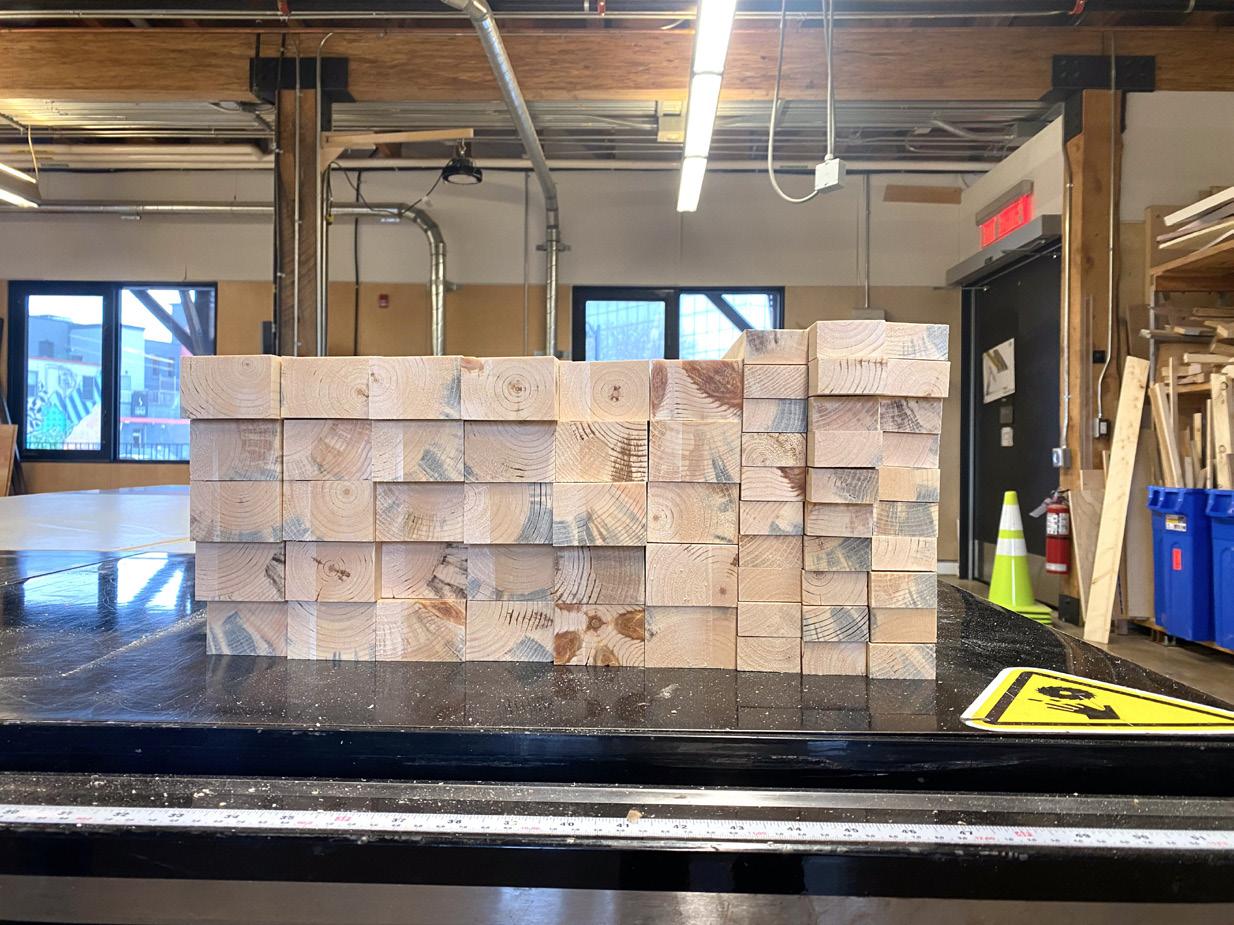
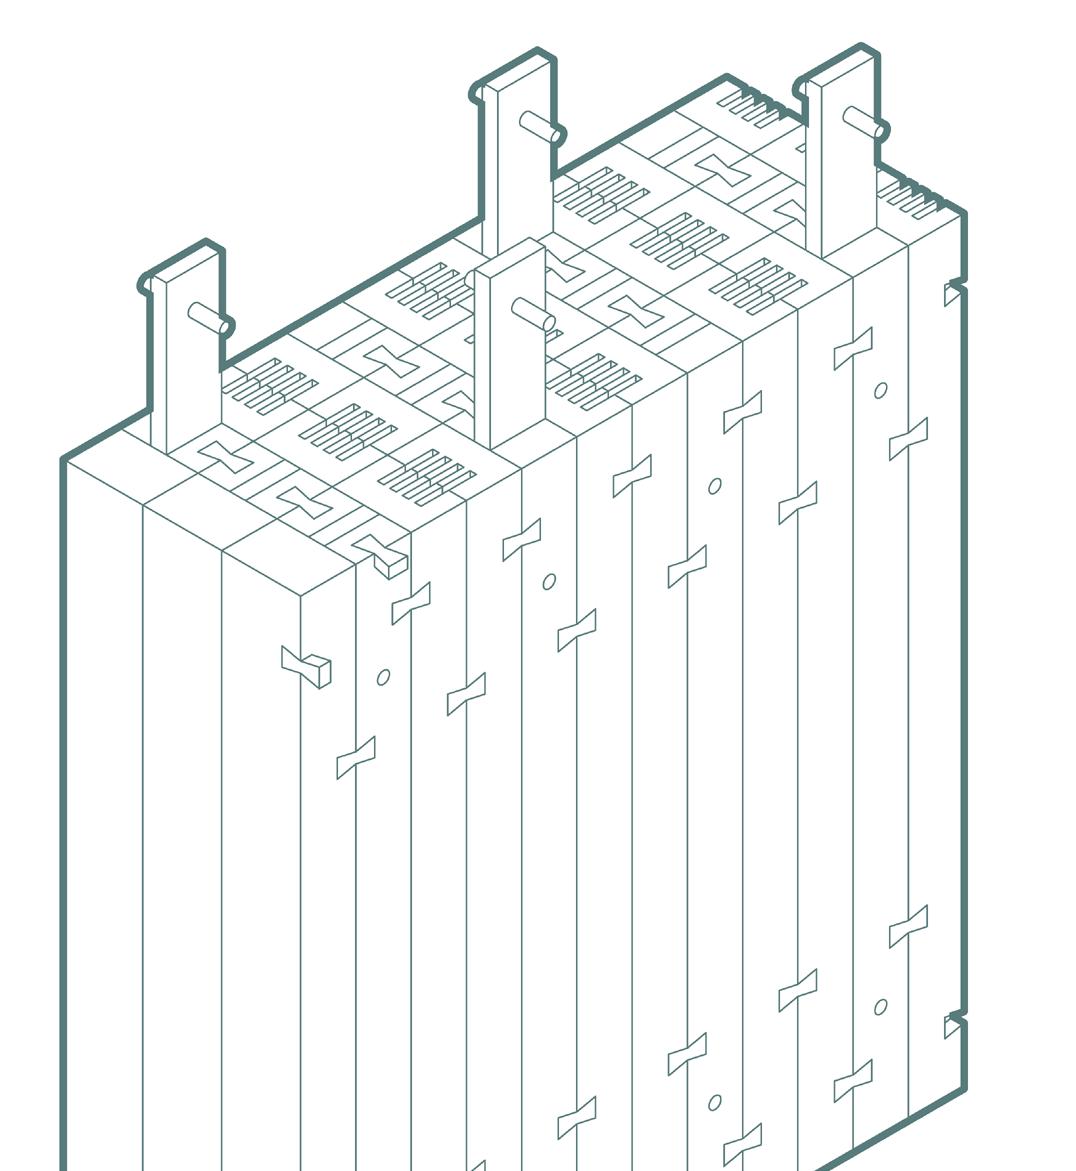
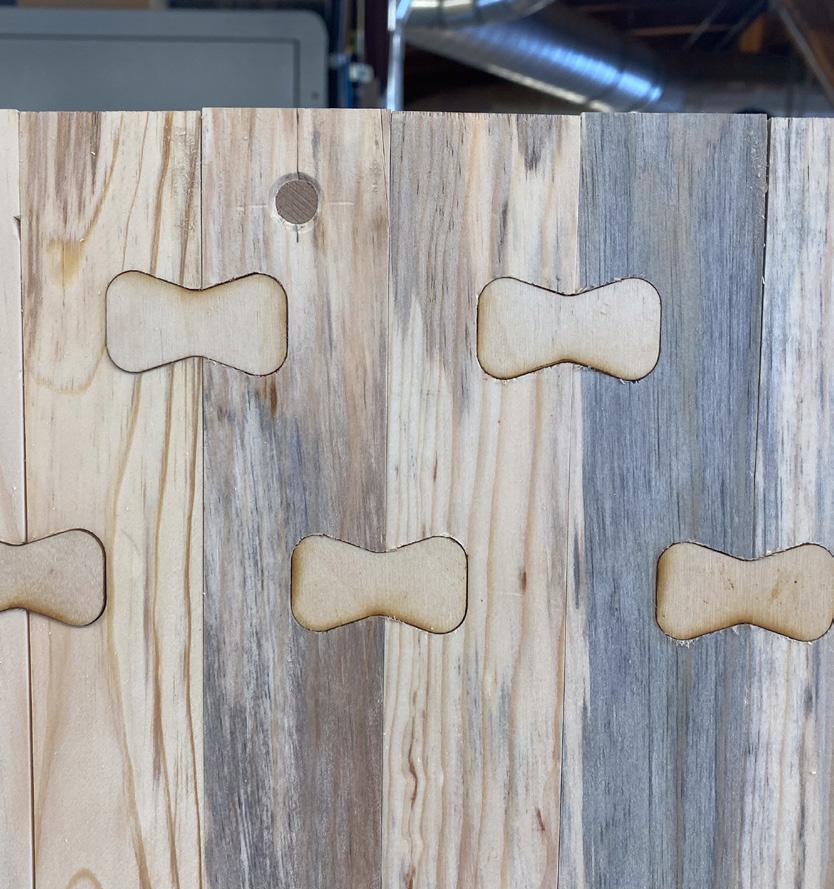
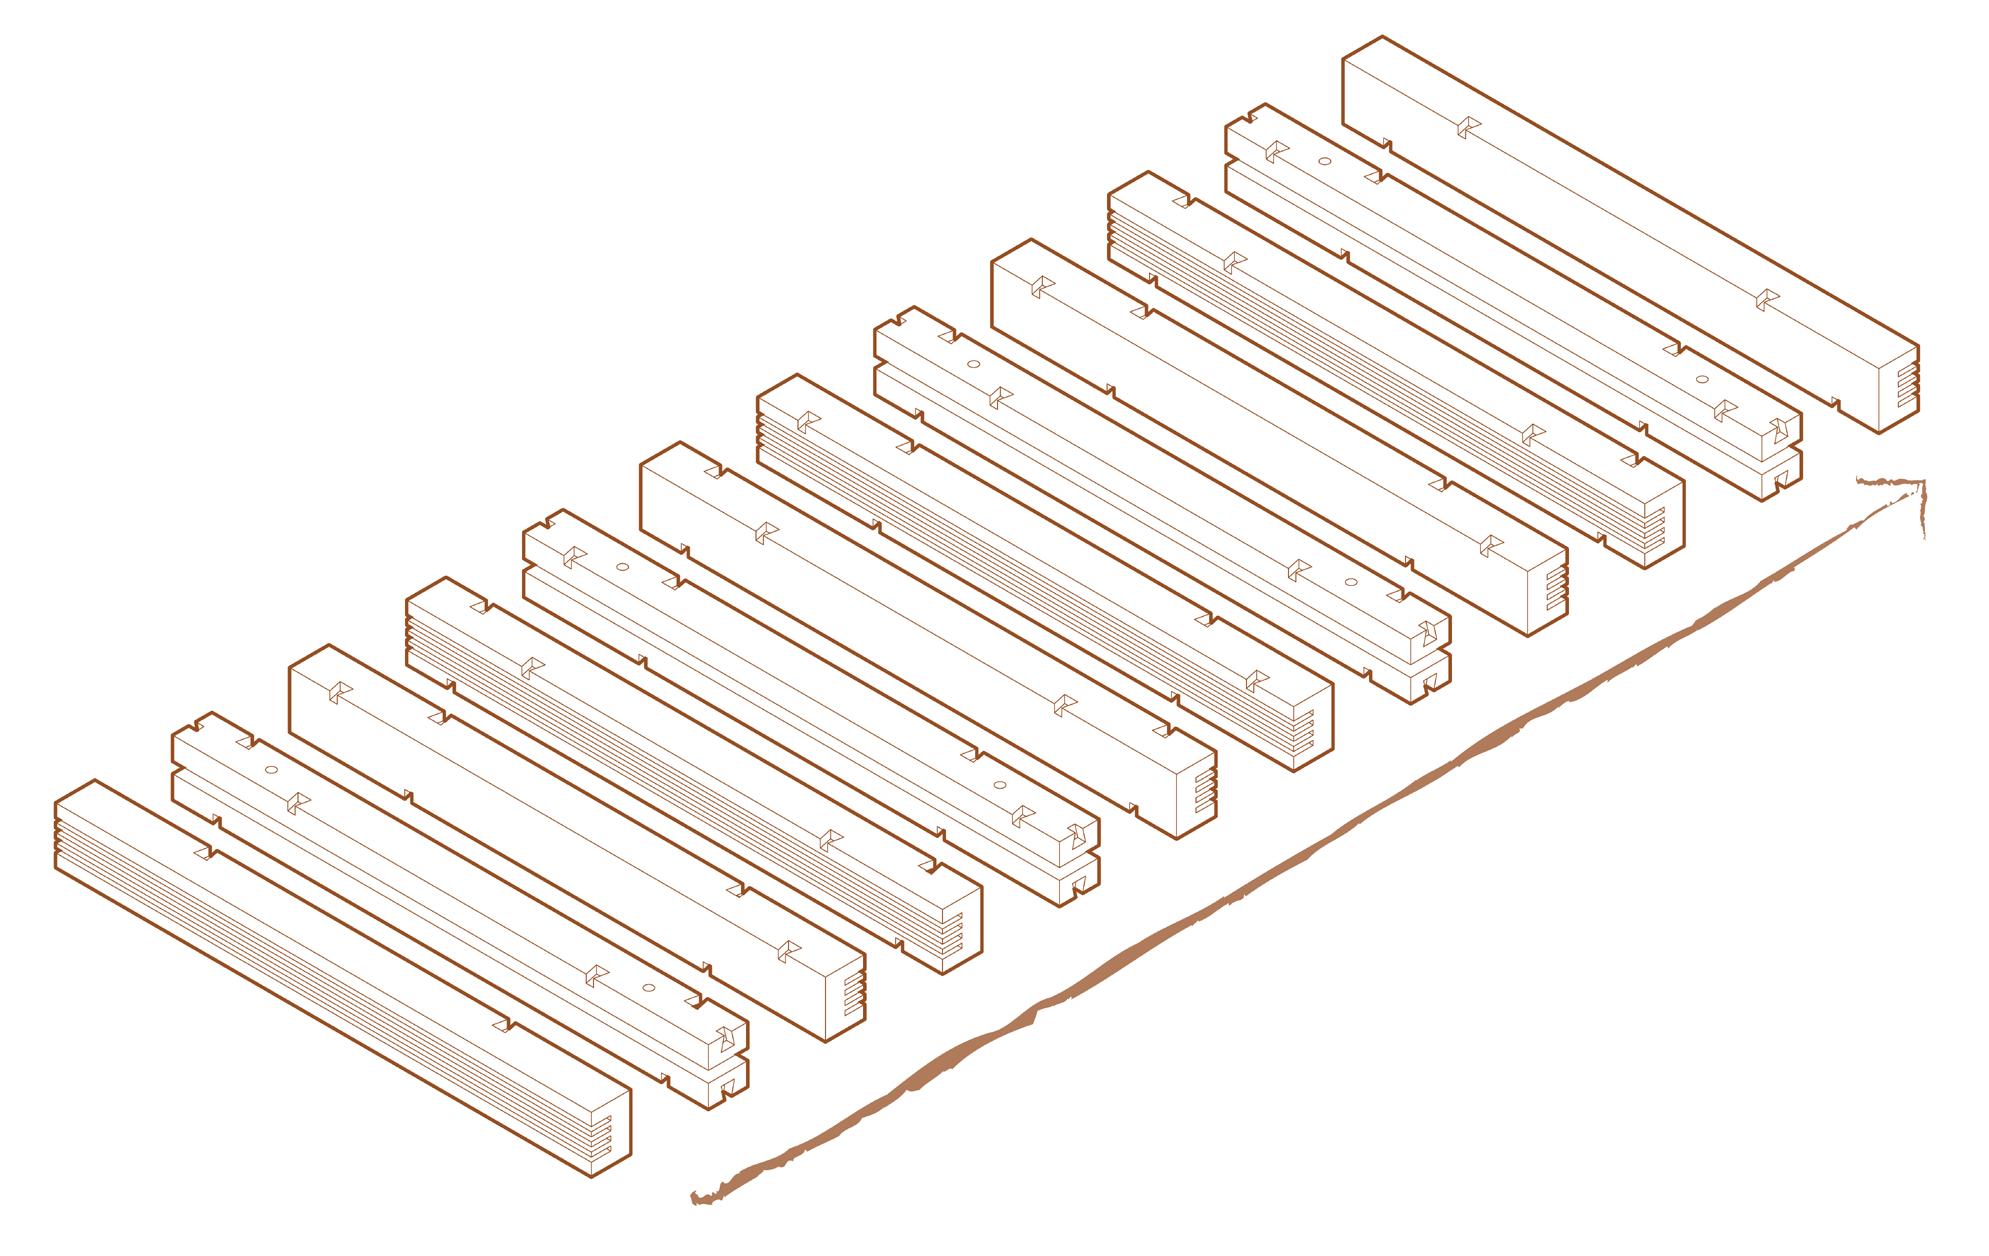
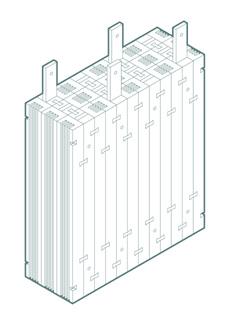
Panel Assembly
After the CNC milling is complete, each panel can be assembled off-site by members of the community. Specifically, involving high school students in the assembly of the shelters may result in a lasting reduction of stigmatization against unhoused individuals through creating positive hands-on experiences that emphasize why it is important to care for this vulnerable population.
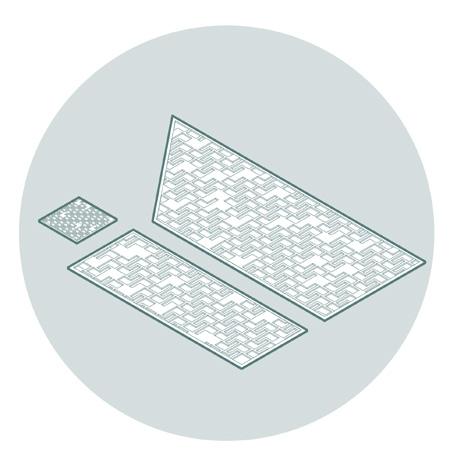
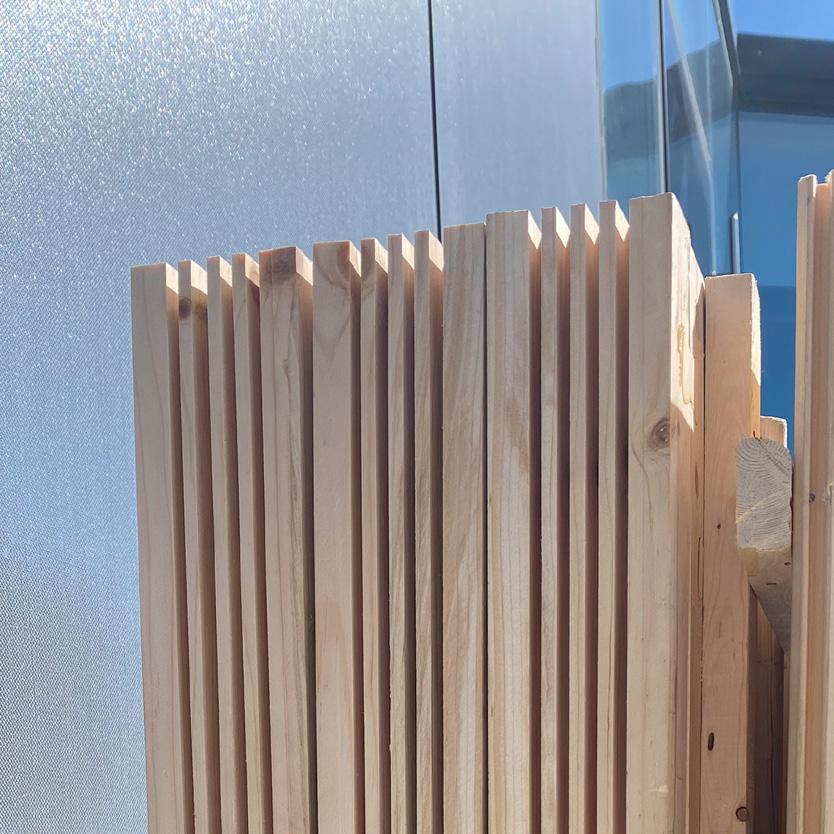
Three types of wall panels are required for the construction of the shelters (page 16). The three panels include the Typical Wall Panel (W1), the Inner Corner Wall Panel (W2), and the Outer Corner Wall Panel (W3). Each panel is approximately 533mm in length and 610mm in height once assembled (this will differ slightly based on the size of CNC milling bit used during Step 5). While the panel size could be altered during the CNC milling process, it is important to ensure the panels are able to be lifted and moved by community members and high school students, and therefore must remain relatively small and manageable.
Similar to the wall panels, there are three types of floor/roof panels utilized within the shelters (page 23). These include the Typical Floor/Roof Panel (F/R1), the Solid Floor/Roof Panel (F/R2), and the End Floor/Roof Panel (F/ R3). The size of each panel is approximately 1790mm in length and 190mm in height once assembled (this will differ slightly based on the size of CNC milling bit used during Step 5). The typical assembly method of the wall and floor panels is described on pages 19 to 22.
Wall Panel Types
Wall Panel (W1)
CNC notes:
• include air spaces in all A1 & A2 wood members (see diagram on page 15)
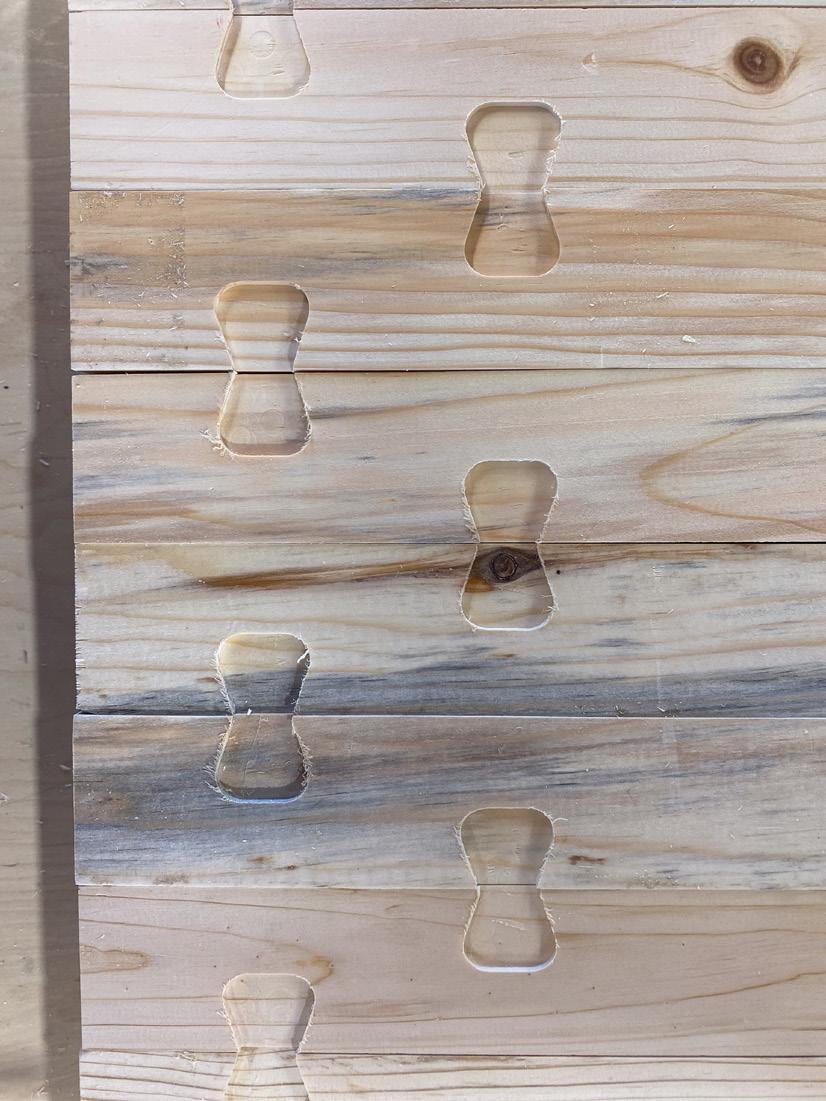
• bowtie connections included on the front, back, top, and bottom of the panels (typ.)
Inner Corner Wall Panel (W2)
CNC notes:
• include air spaces in all A1 & A2 wood members (see diagram on page 15)
• additional bowtie connection on top and bottom of panel for corner connection
Outer Corner Wall Panel (W3)
CNC notes:
• exclude air spaces in A1 & A2 wood members located at the corner end
• additional bowtie connection on top and bottom of panel for corner connection
COMMUNITY GUIDELINE 2024 16 15 SURVIVAL TO SUSTAINABLE CARE Step
|
6
Typical
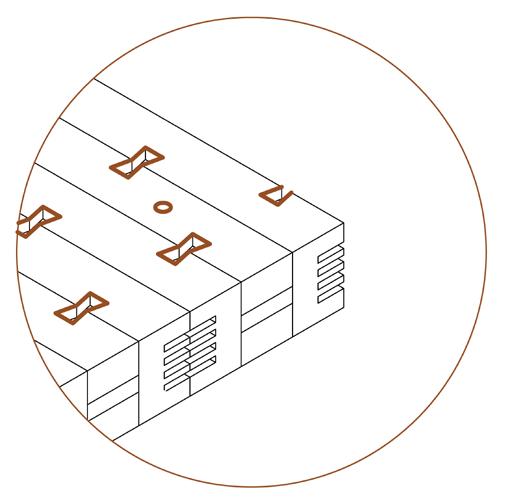
B1 A1 B2 C 3/8"
9mm
A2
dowel
deep bowties
Assembled Panel

Assembled Panel Details
COMMUNITY GUIDELINE 2024 SURVIVAL TO SUSTAINABLE CARE 18 17 SURVIVAL TO SUSTAINABLE CARE
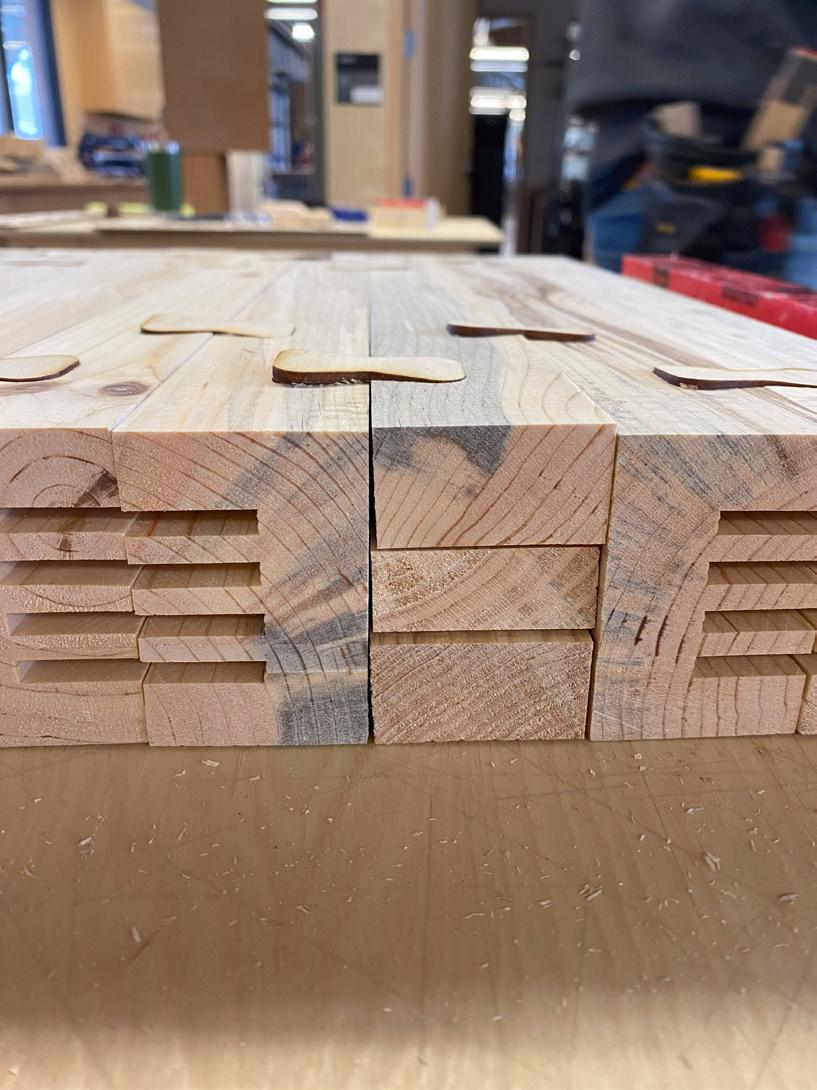
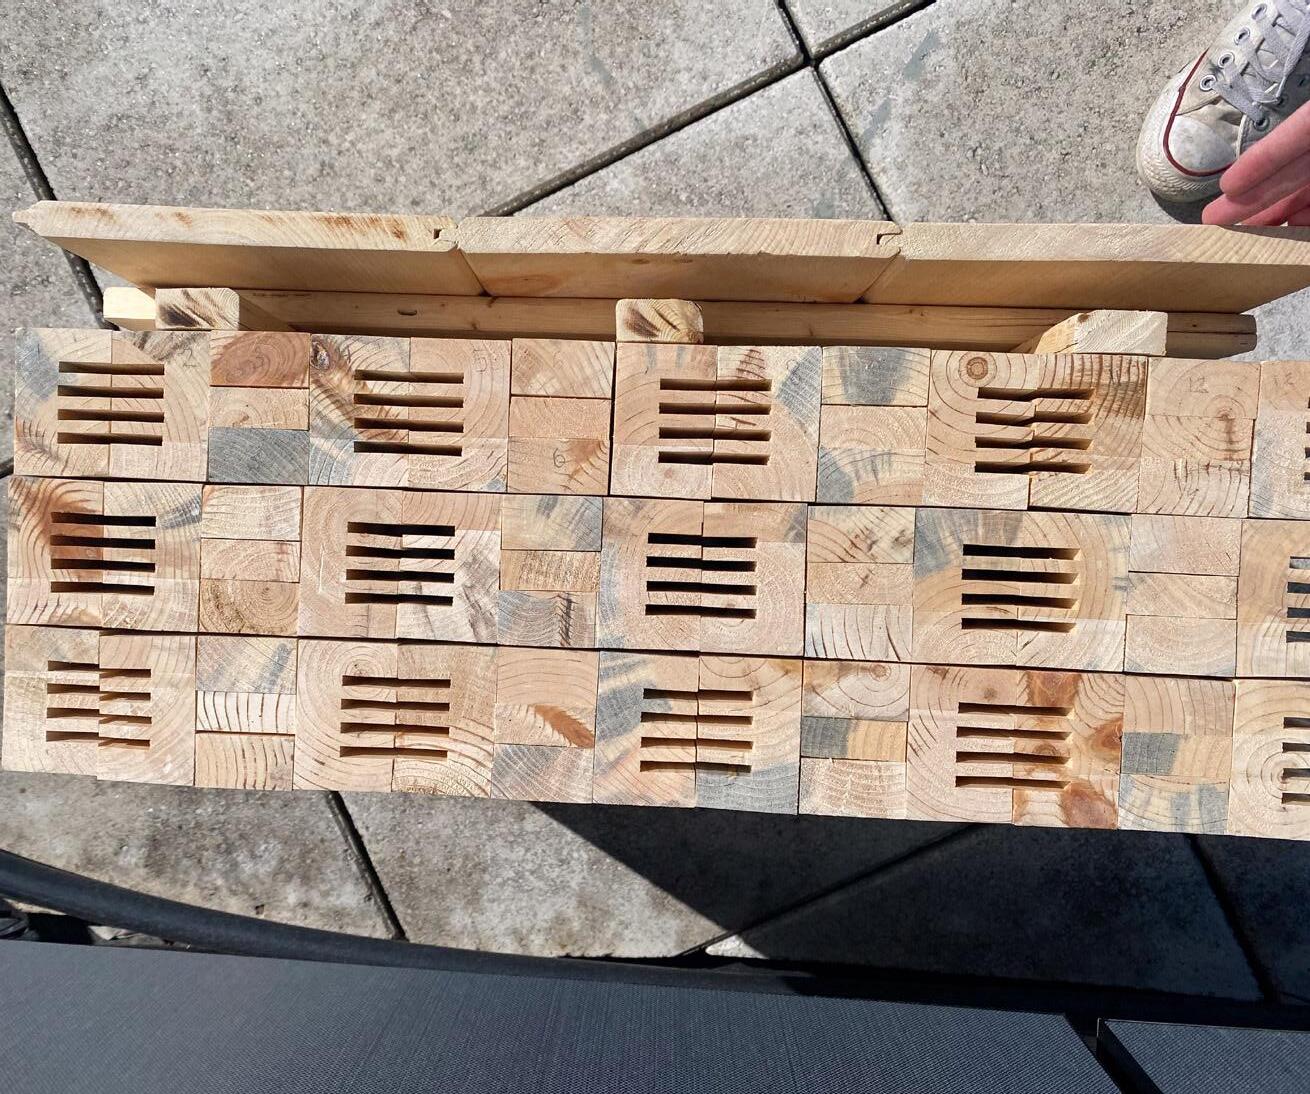
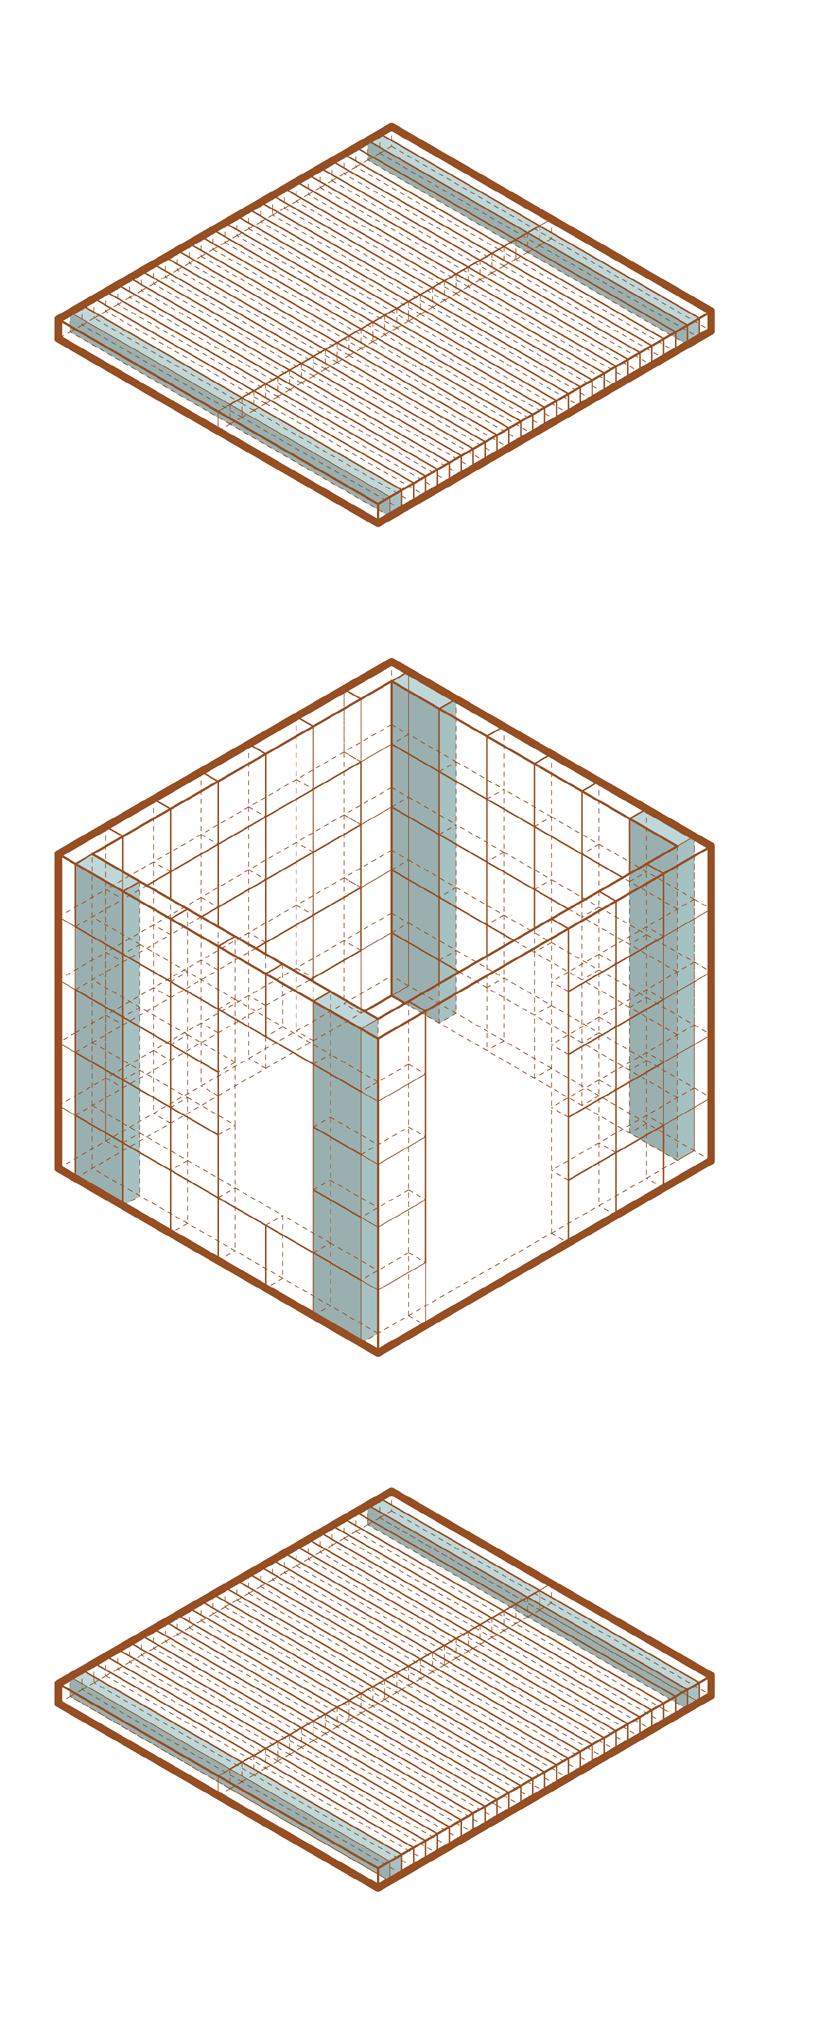
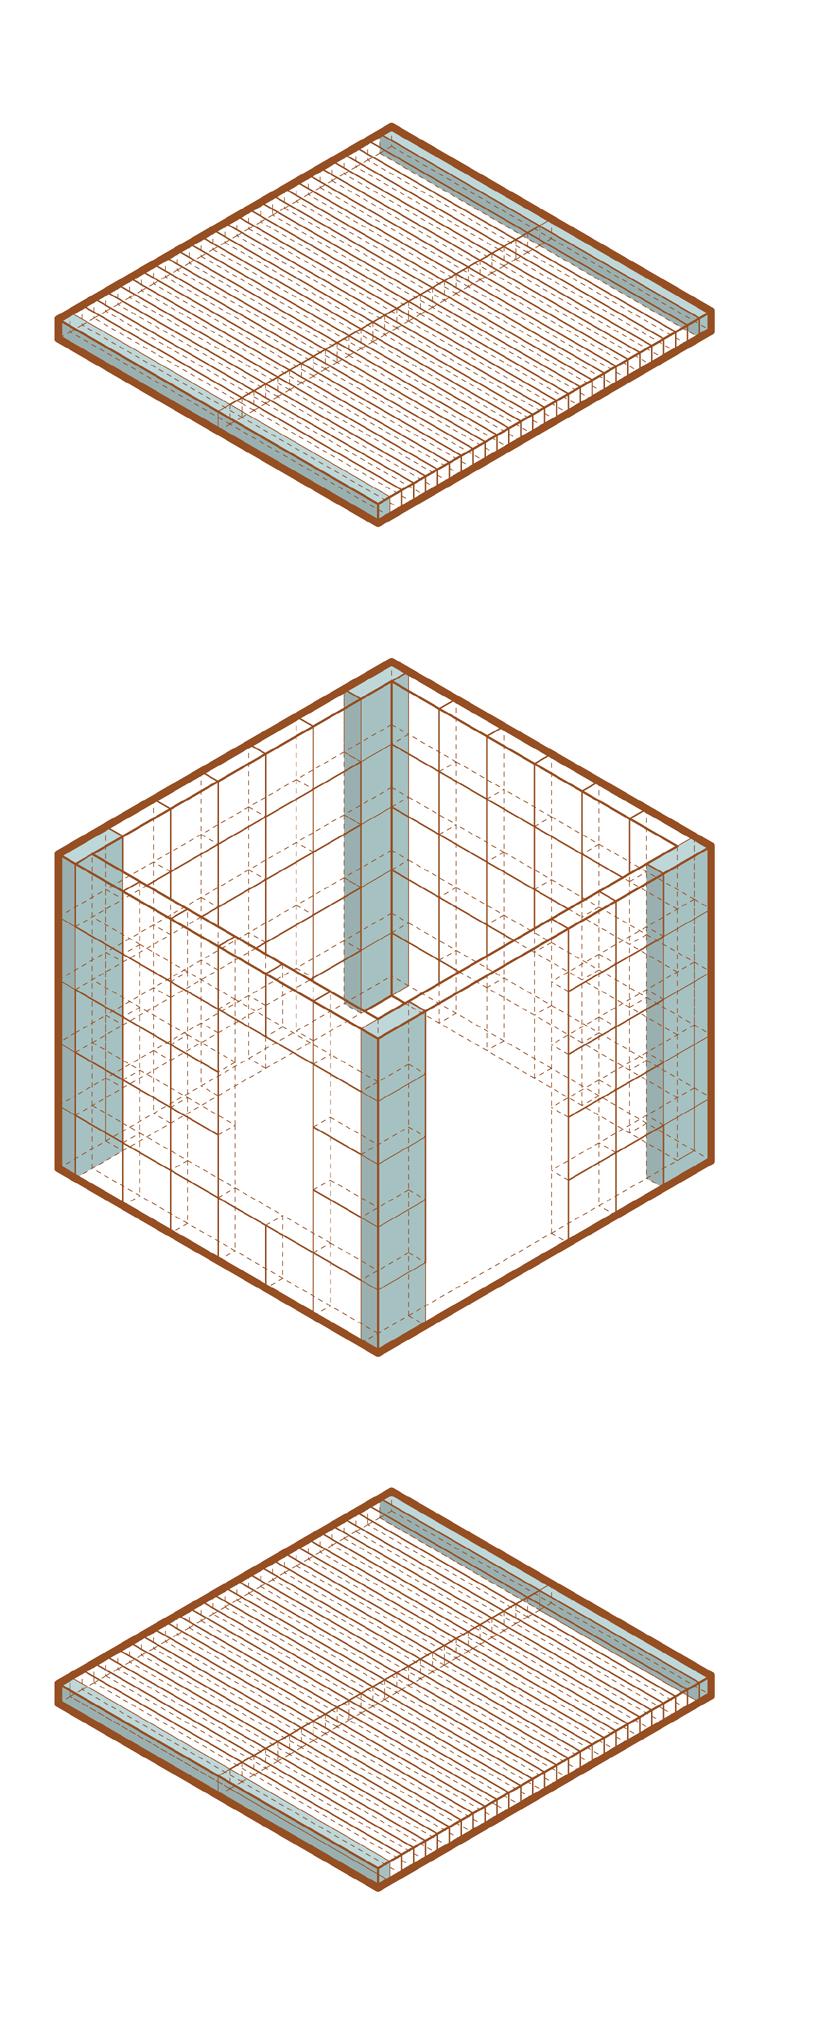
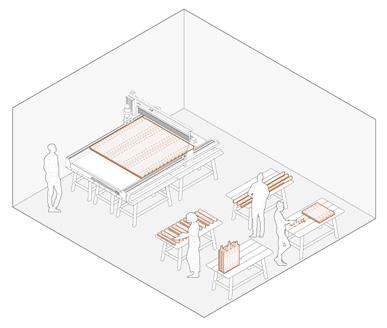
Typical Panel Assembly Steps
Step 1: Arrange one layer of monomaterial timbers on flat surface. Clamp together ensuring the wood members don’t move.
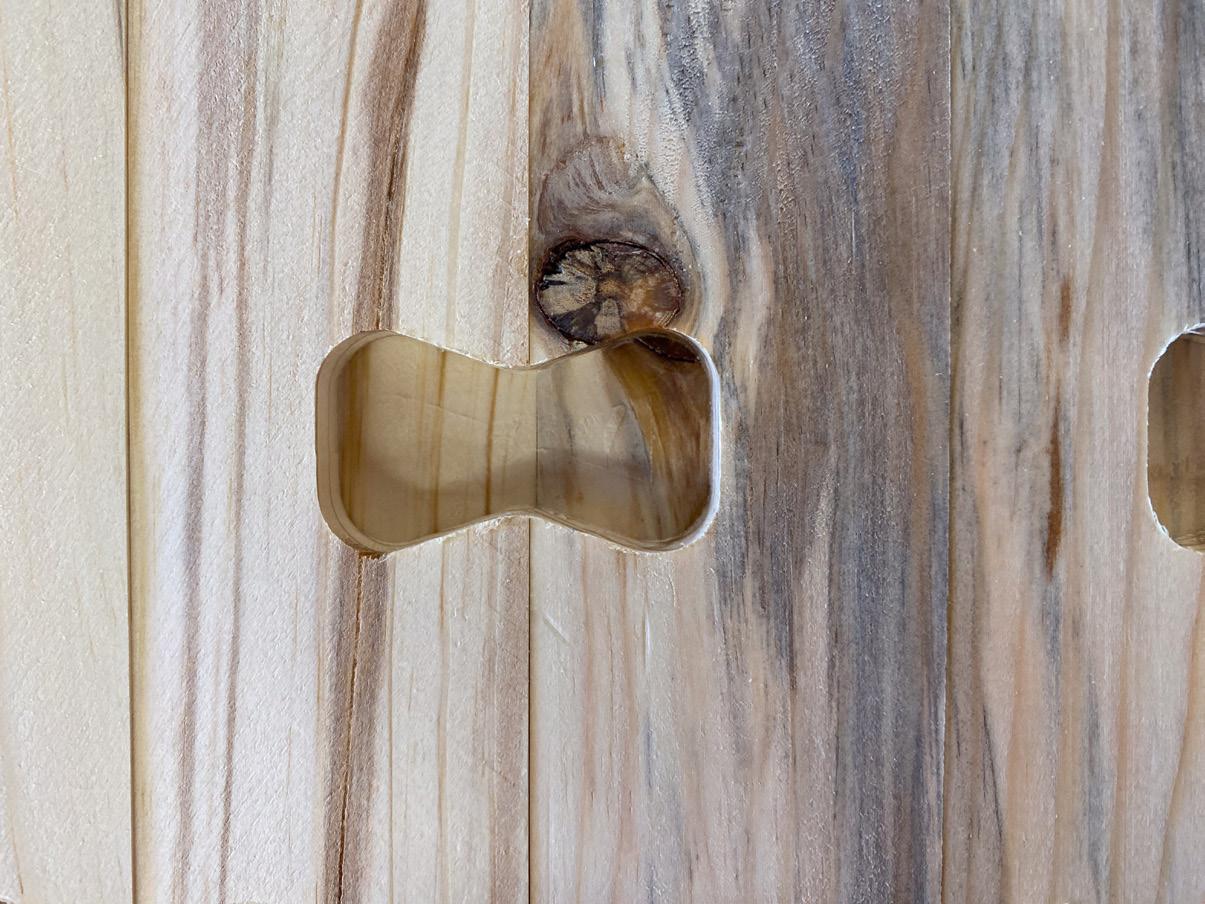
Step 2: Insert spacers/ mortise and tenon connection pieces.
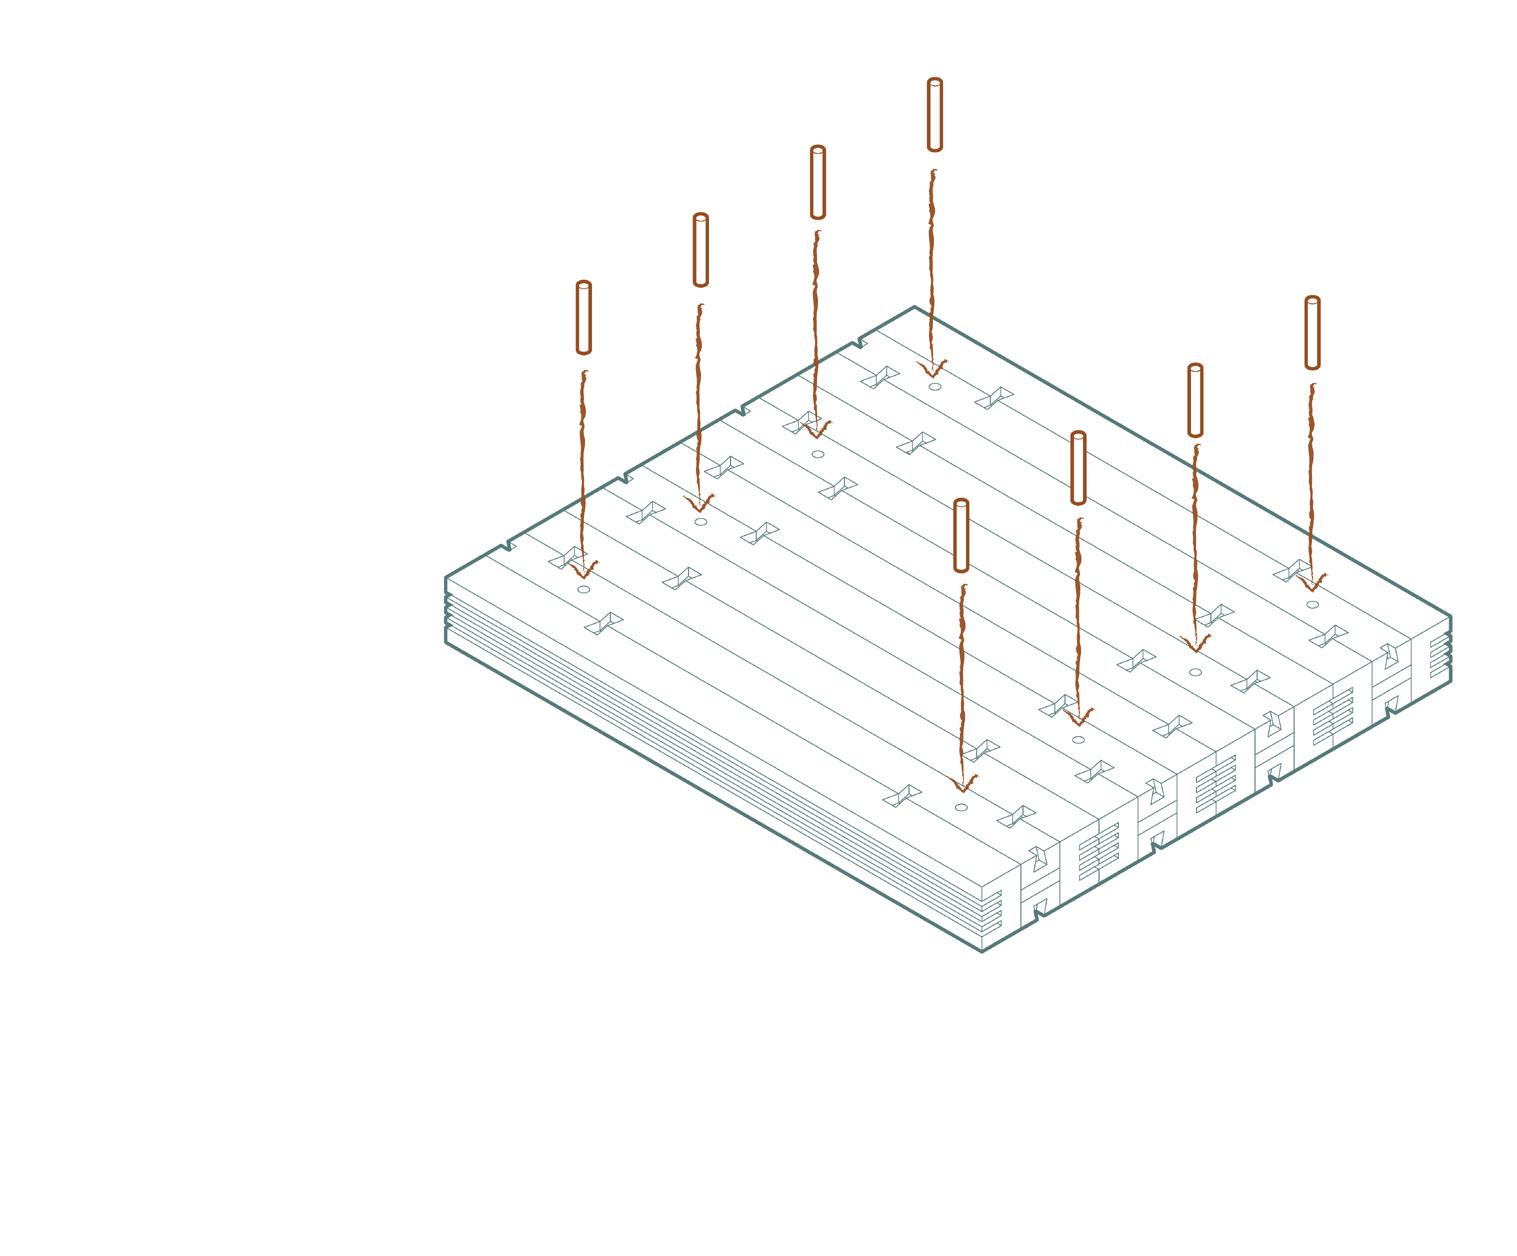
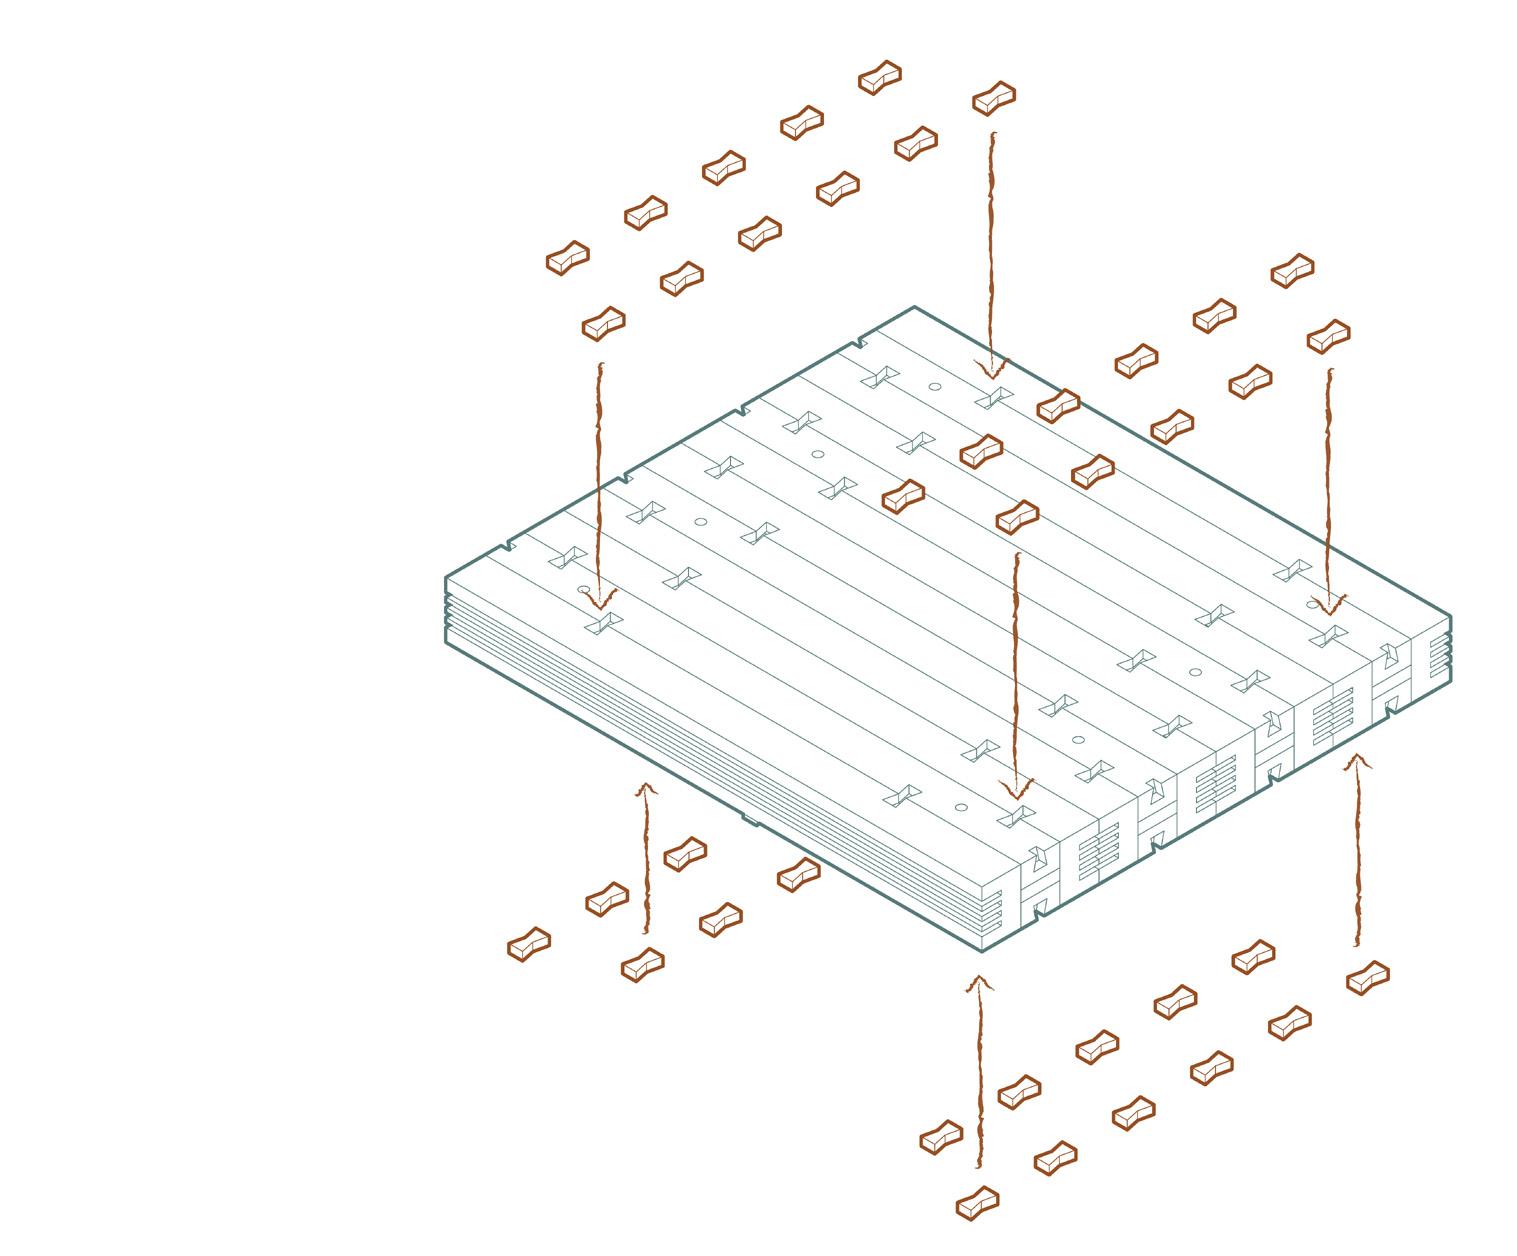
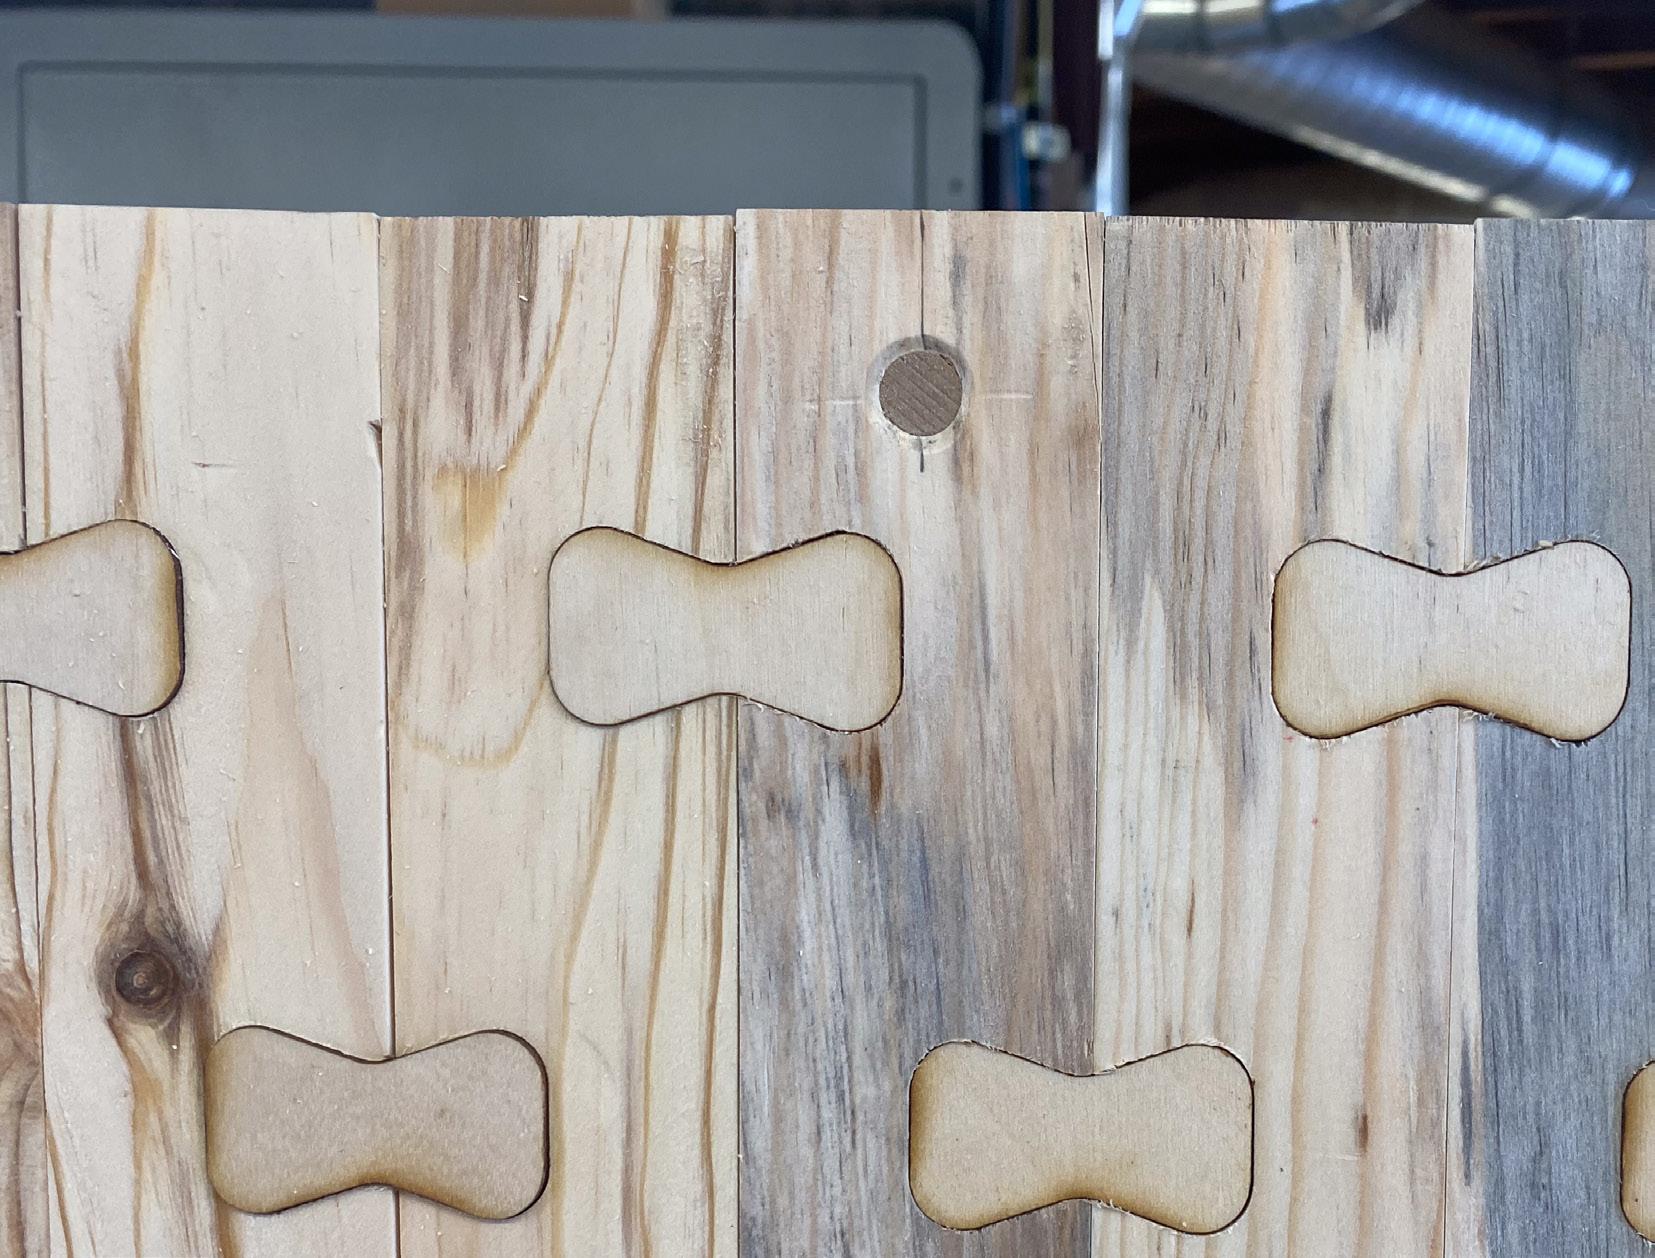
Step 3: Insert wood dowels into spacers ensuring they are friction fit.
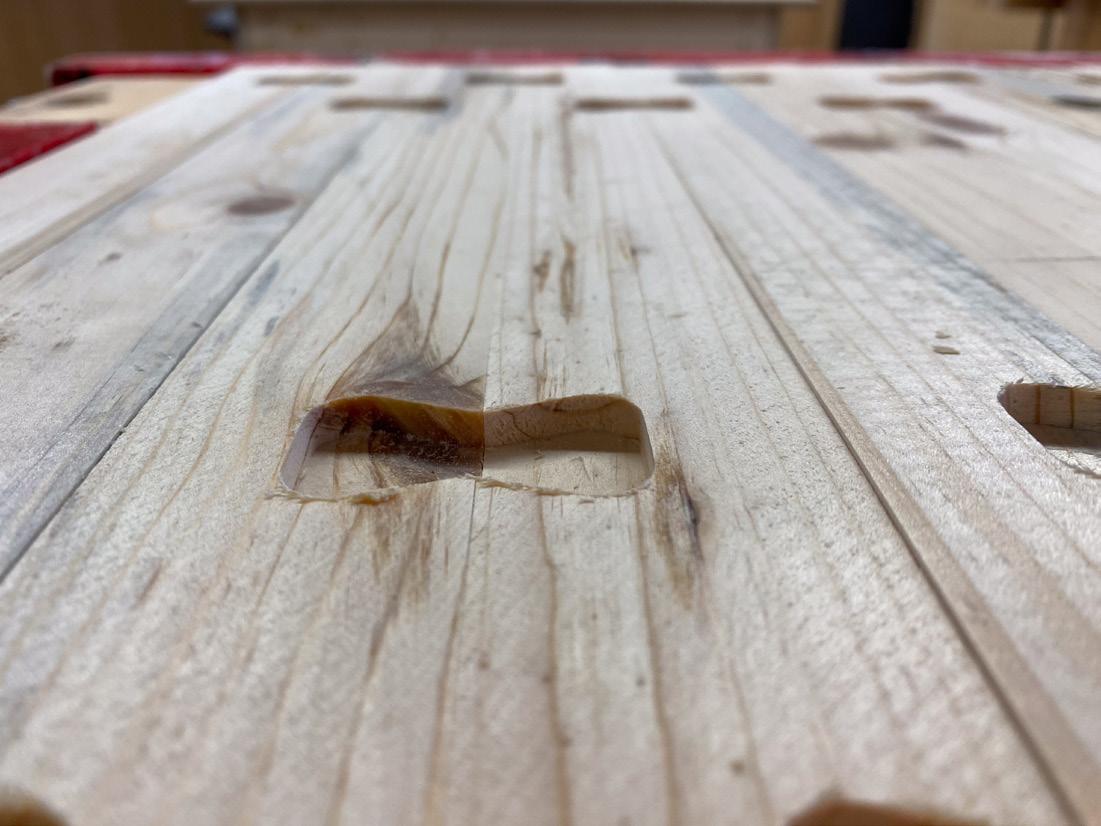
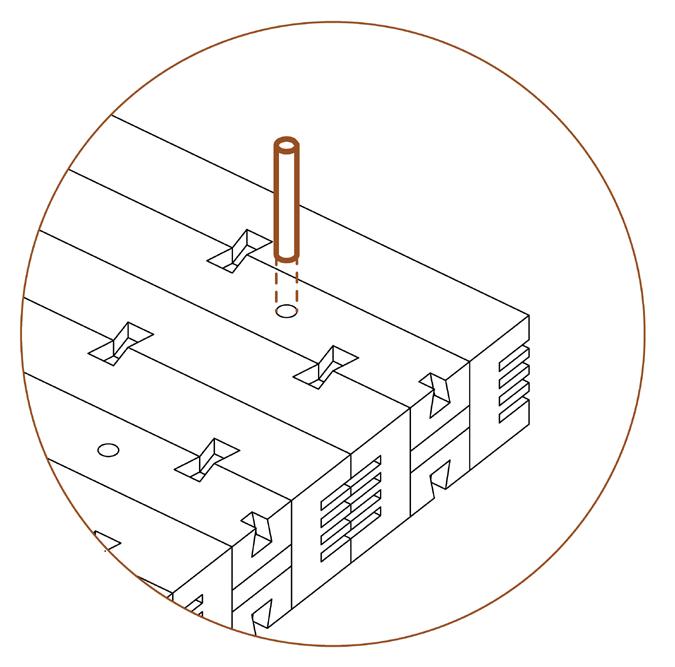
Step 4: Insert bowties to connect each wood piece together ensuring they are friction fit. This can be accomplished by using a hammer to carefully tap in each bowtie until it is flush with the wood panel. After one side is complete, flip the panel over and insert bowties into the other side of the panel.
COMMUNITY GUIDELINE 2024 SURVIVAL TO SUSTAINABLE CARE 20 19 SURVIVAL TO SUSTAINABLE CARE
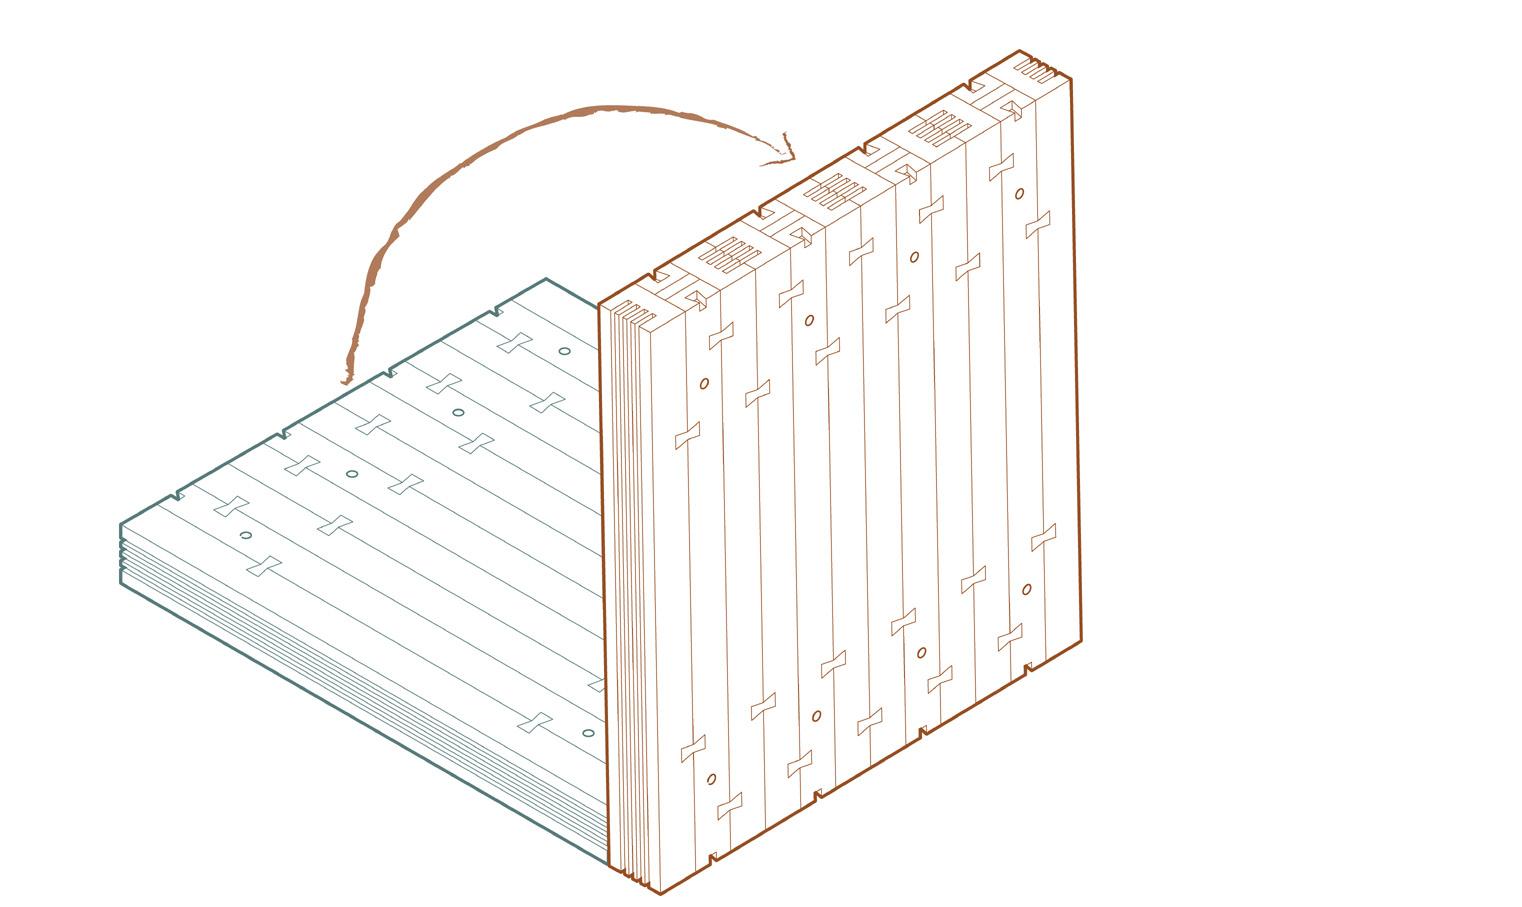
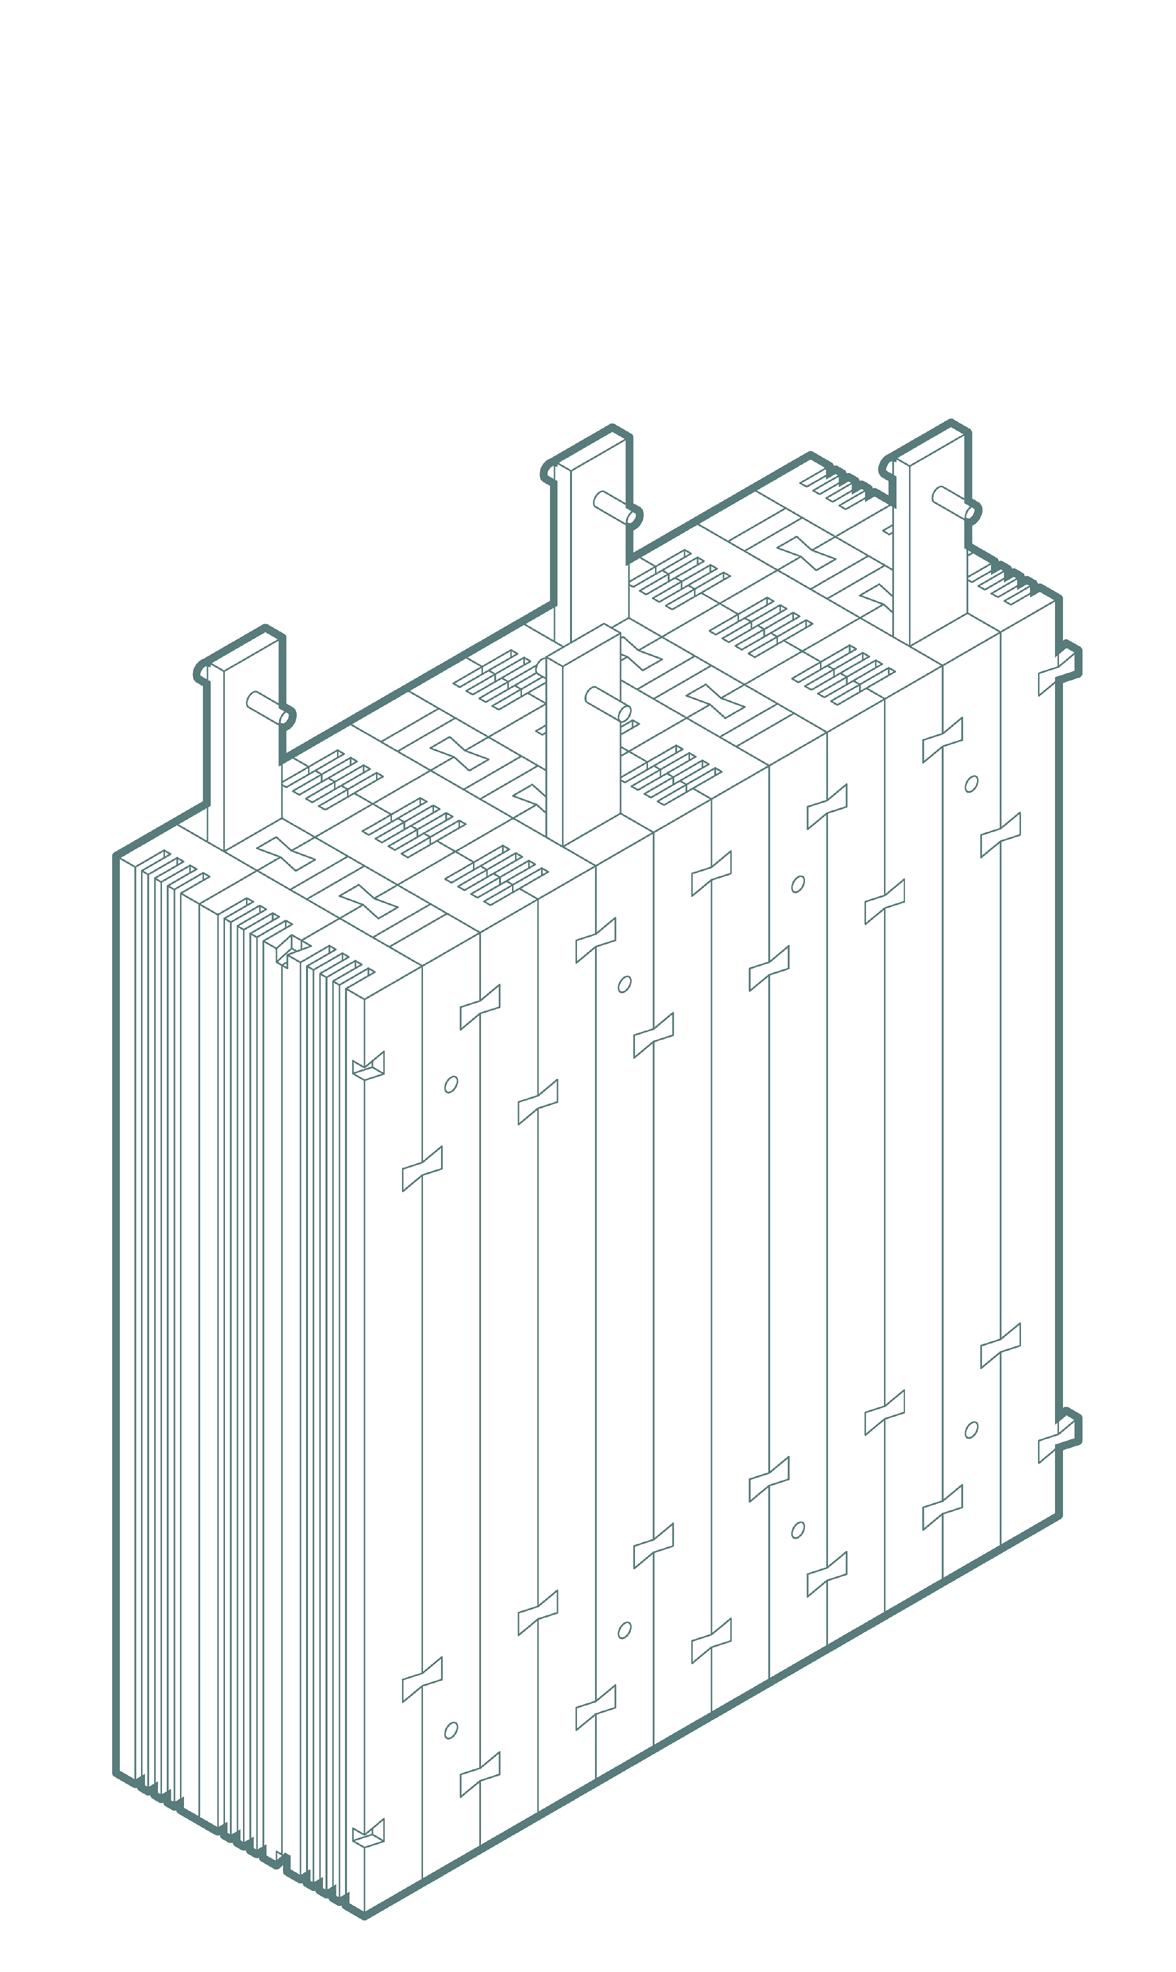
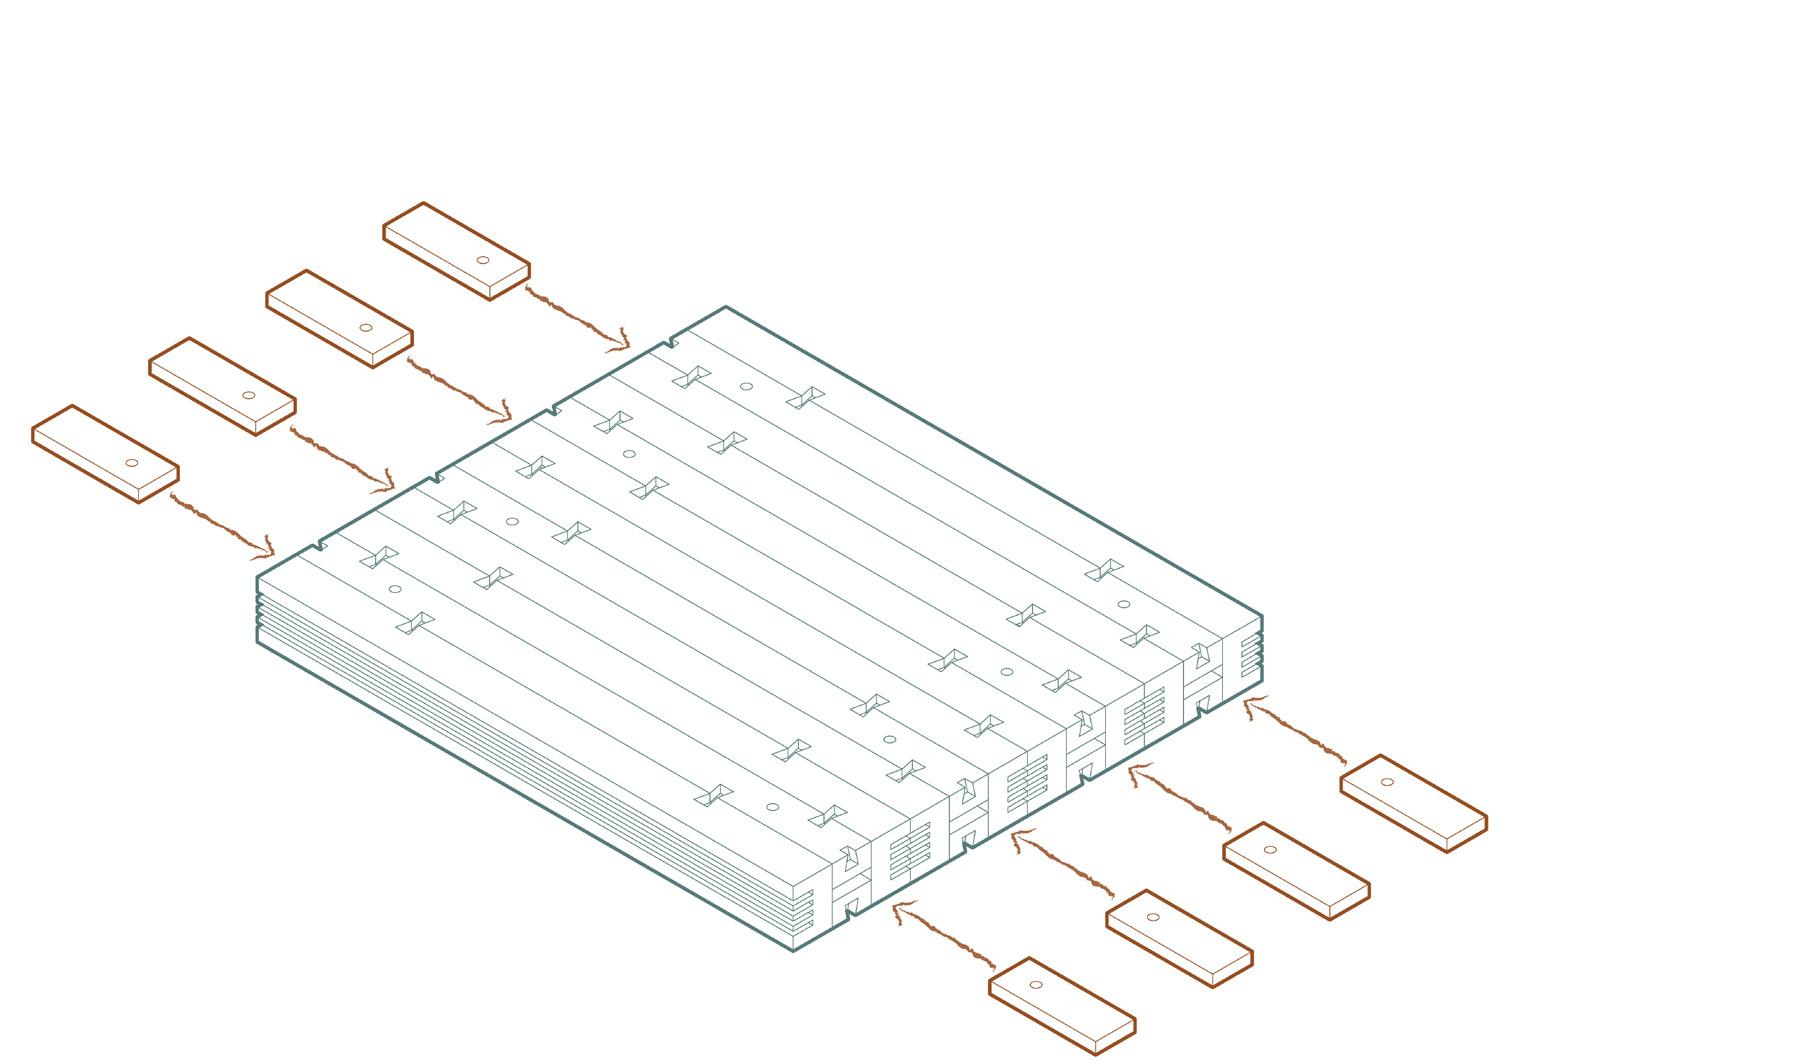
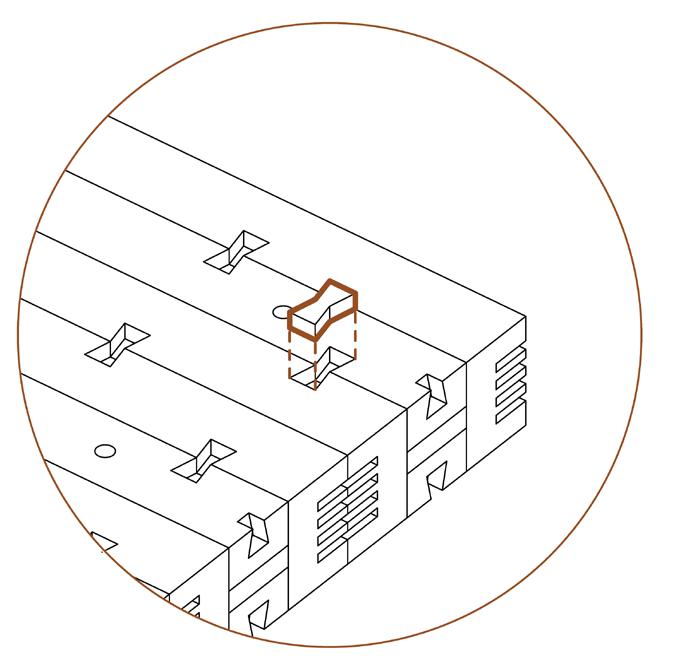
Step 5: Rotate each panel.
Step 6: Arrange each modular panel using three layers of wood panels previously constructed.
Step 6: Insert bowties to into the top and bottom of each panel to connect the three layers together ensuring they are friction fit.
COMMUNITY GUIDELINE 2024 SURVIVAL TO SUSTAINABLE CARE 22 21 SURVIVAL TO SUSTAINABLE CARE
Floor/ Roof Panel Types
Typical Floor/Roof Panel (F/R1)
CNC notes:
• include air spaces in all A1 & A2 wood members (see diagram on page 15)
• bowtie connections included on the front, back, top, and bottom of the panels (typ.)
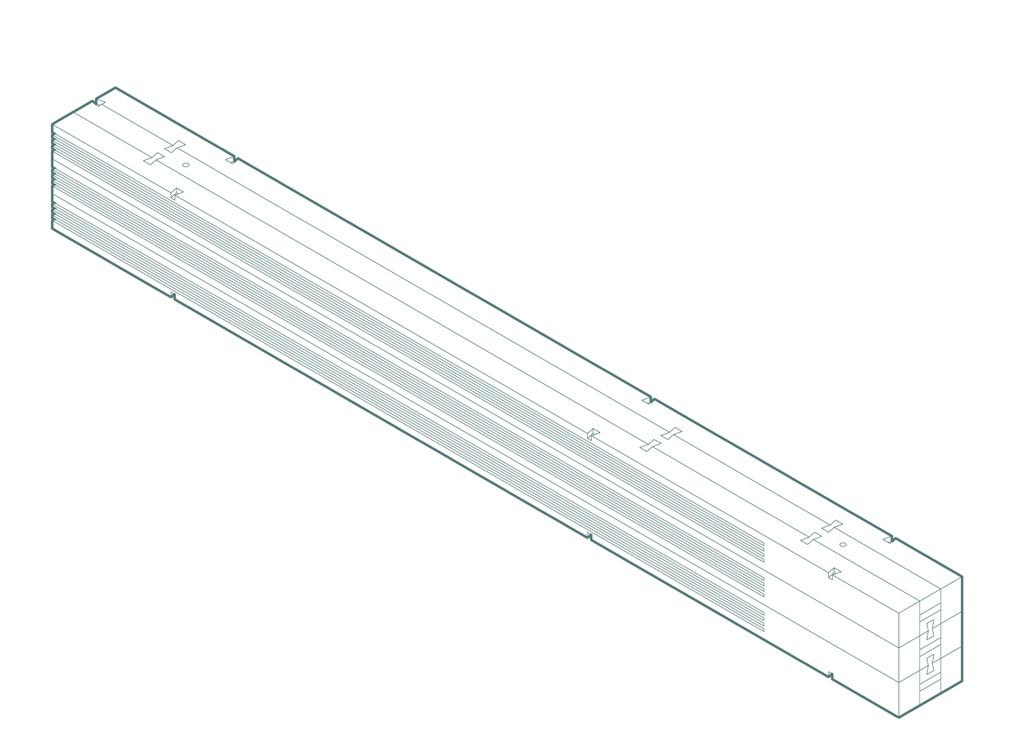
Solid Floor/Roof Panel (F/R2)
CNC notes:
• exclude air spaces in A1 & A2 wood members (see diagram on page 15)
• bowtie connections included on the front, back, top, and bottom of the panels (typ.)
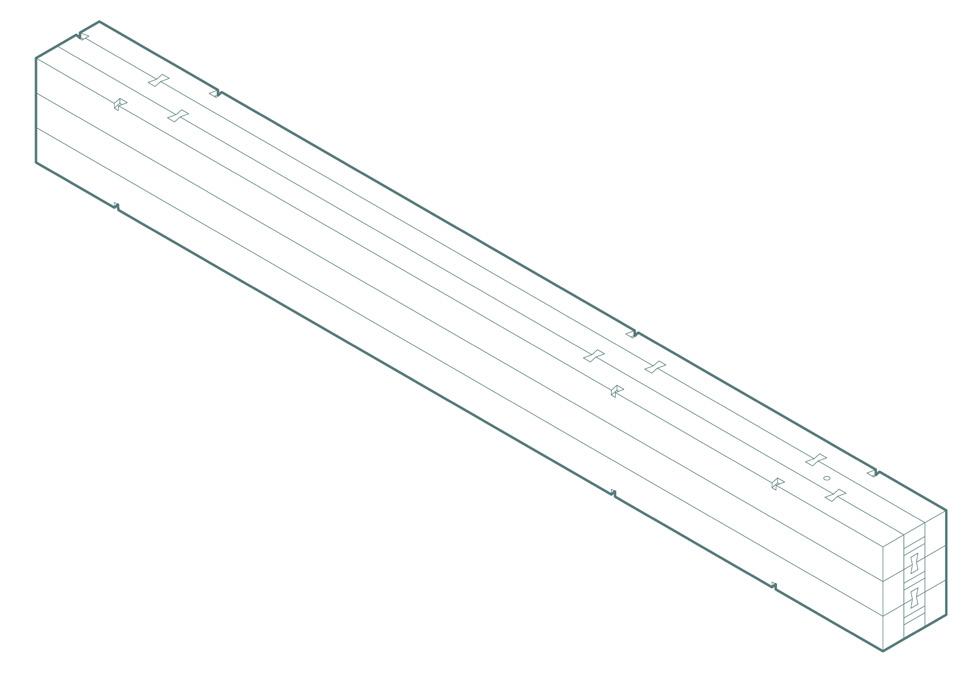
End Floor/Roof Panel (F/R3)
CNC notes:
• exclude air spaces in A1 & A2 wood members (see diagram on page 15)
• bowtie connections excluded from A1 & A2 wood members at end

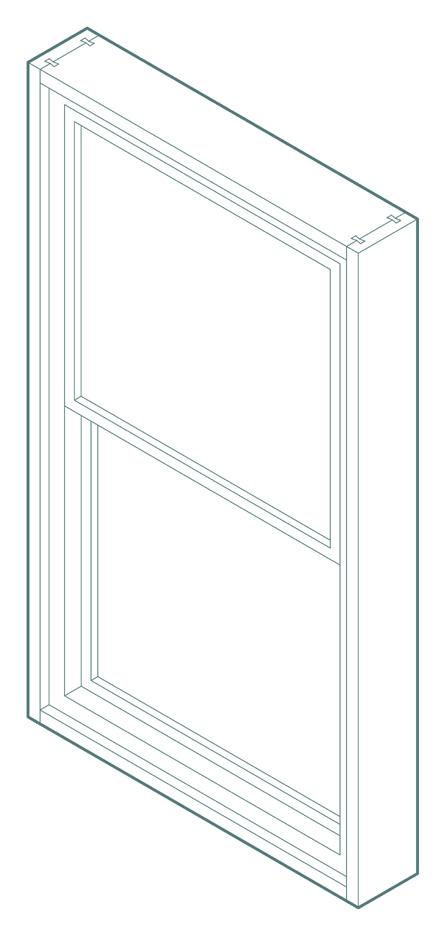
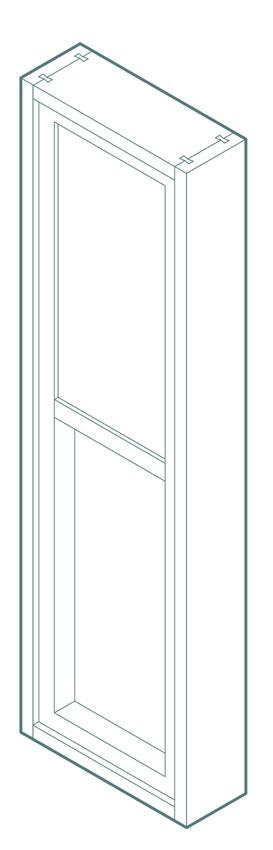
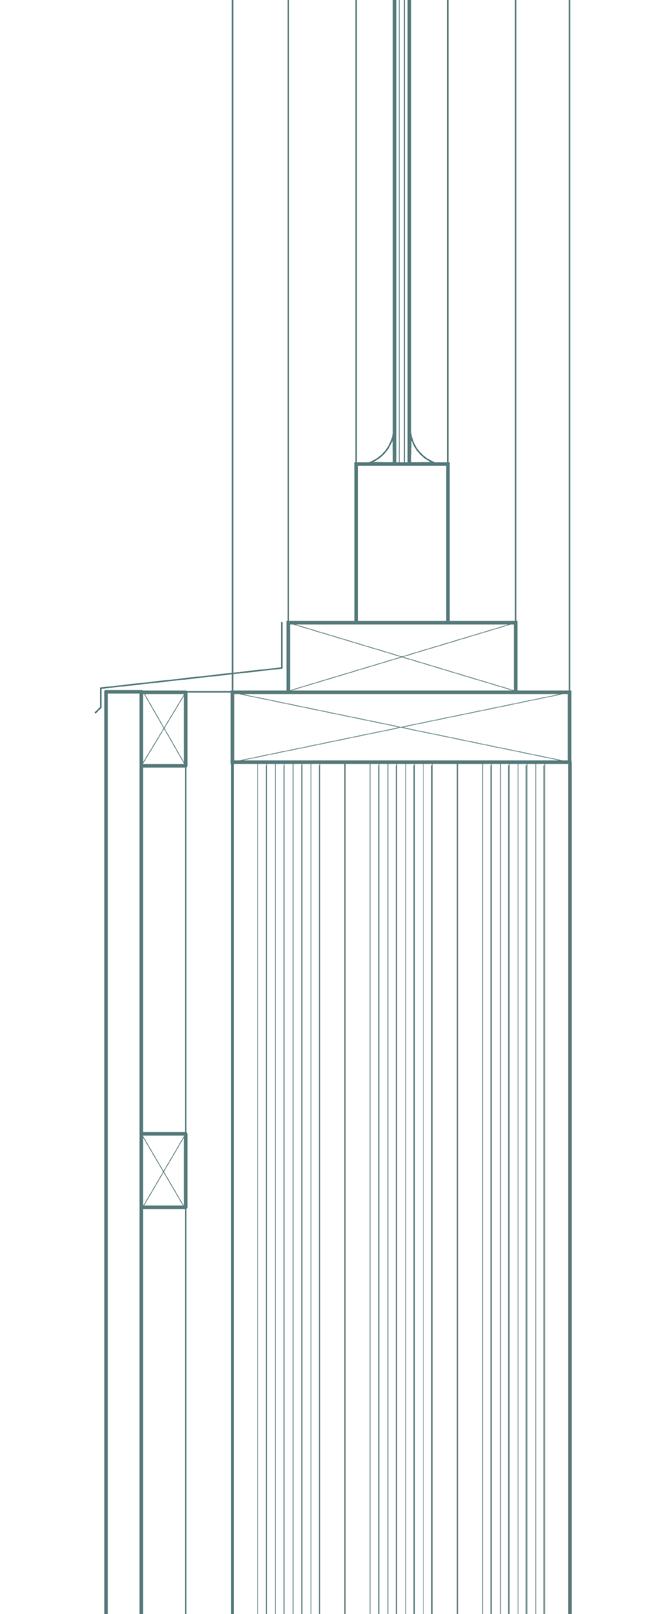
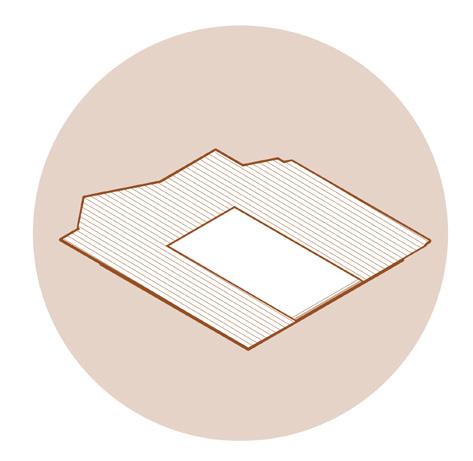
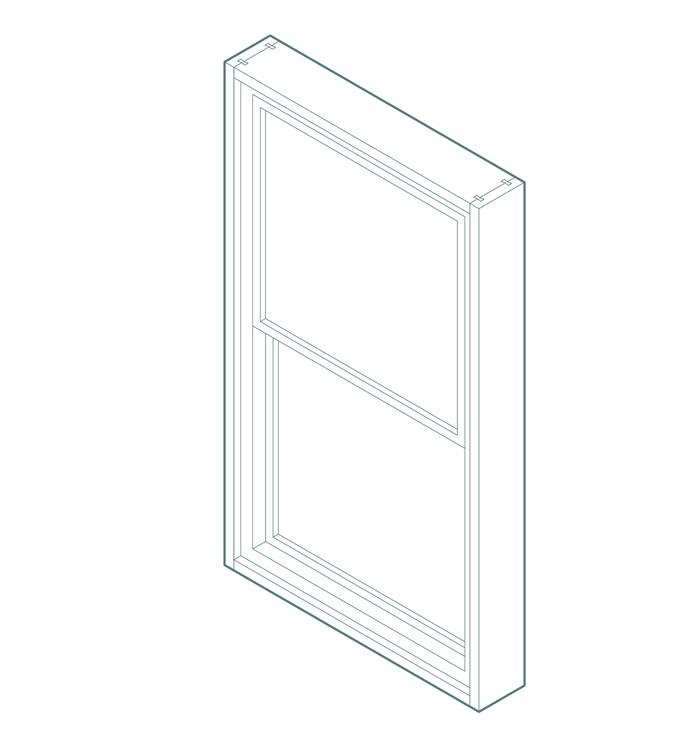
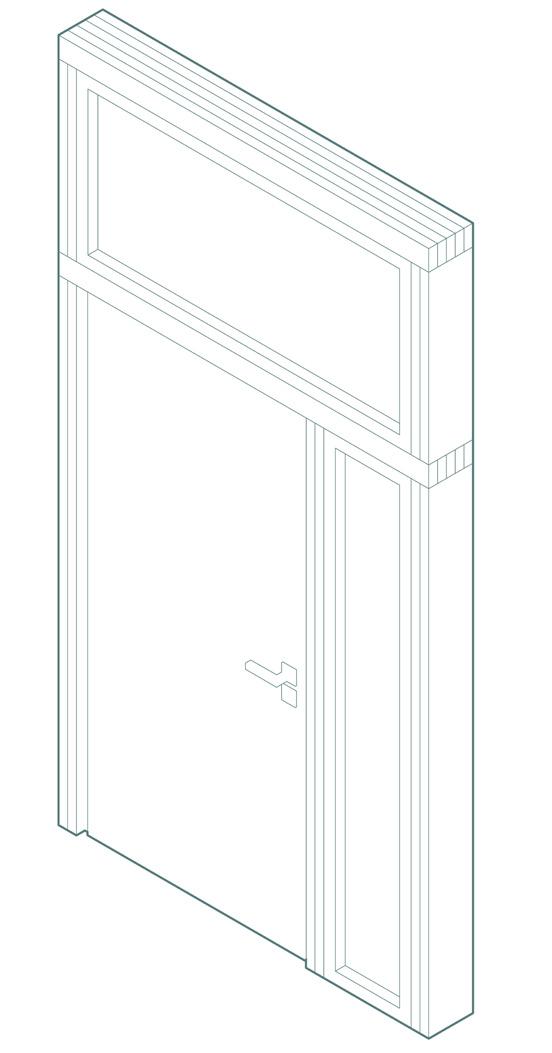
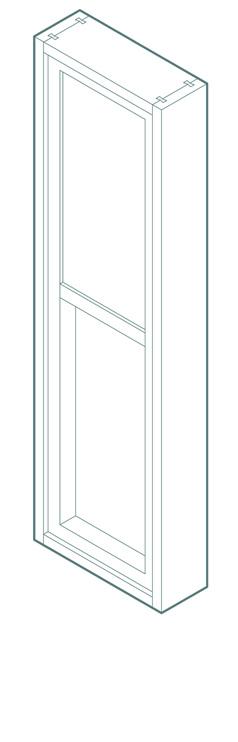
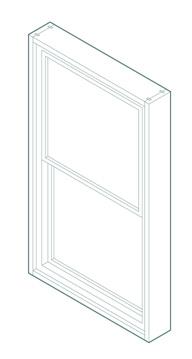
The three door & window panels include the large window panel (WL), the small window panel (WS), and the door panel (D1). These panels are assembled using simple traditional techniques and include wood, glass, and glazing putty. The glazing putty is made with whiting (finely ground chalk) and linseed oil, providing a more sustainable sealant for the glass panes in comparison to current construction methods.
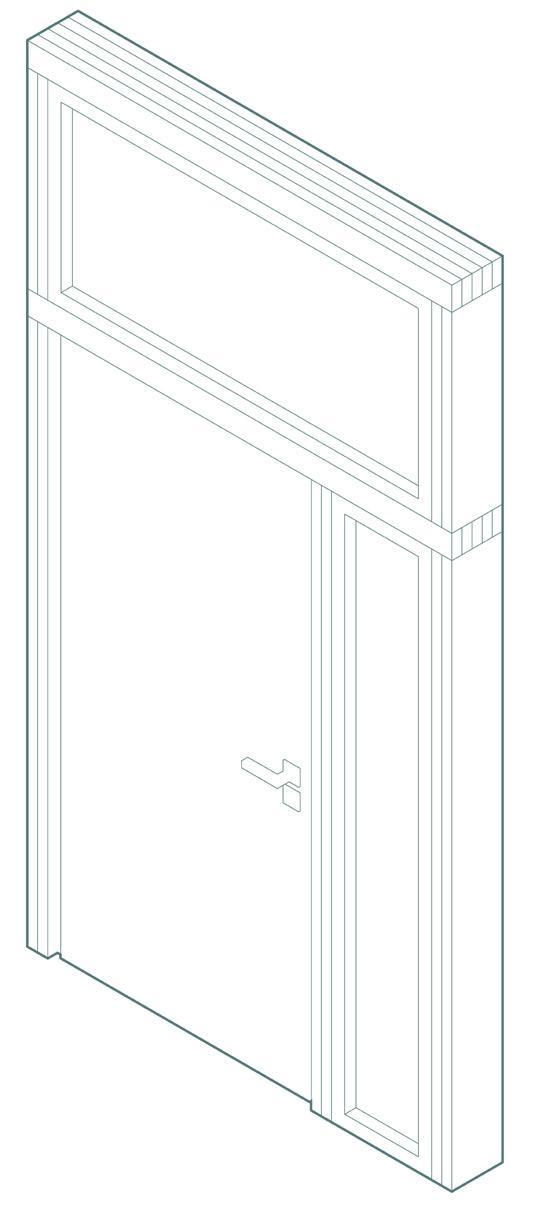
COMMUNITY GUIDELINE 2024 SURVIVAL TO SUSTAINABLE CARE 24 23 SURVIVAL TO SUSTAINABLE CARE 1790mm 190mm
2wallpanels 3 wall panels 1wallpanel 3 wall panels glazing putty 3wallpanel 5 wall panels
(WL) (Ws) (D1)
Window & Door Panel Types
windowdetail
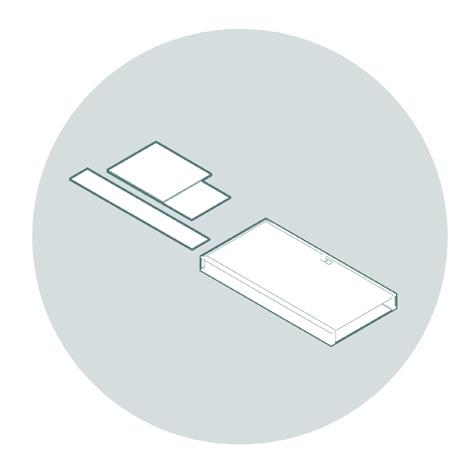
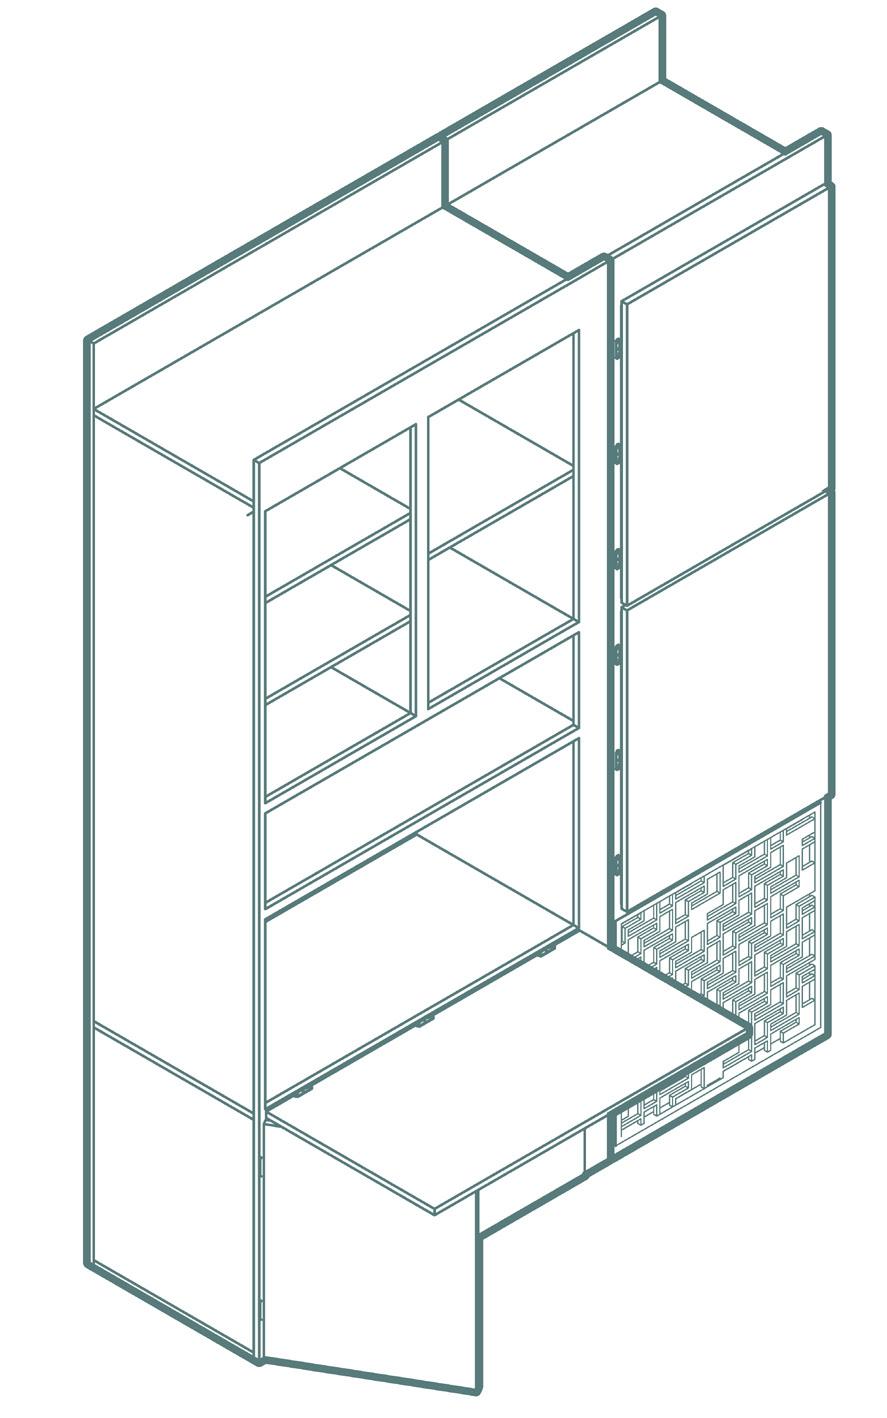
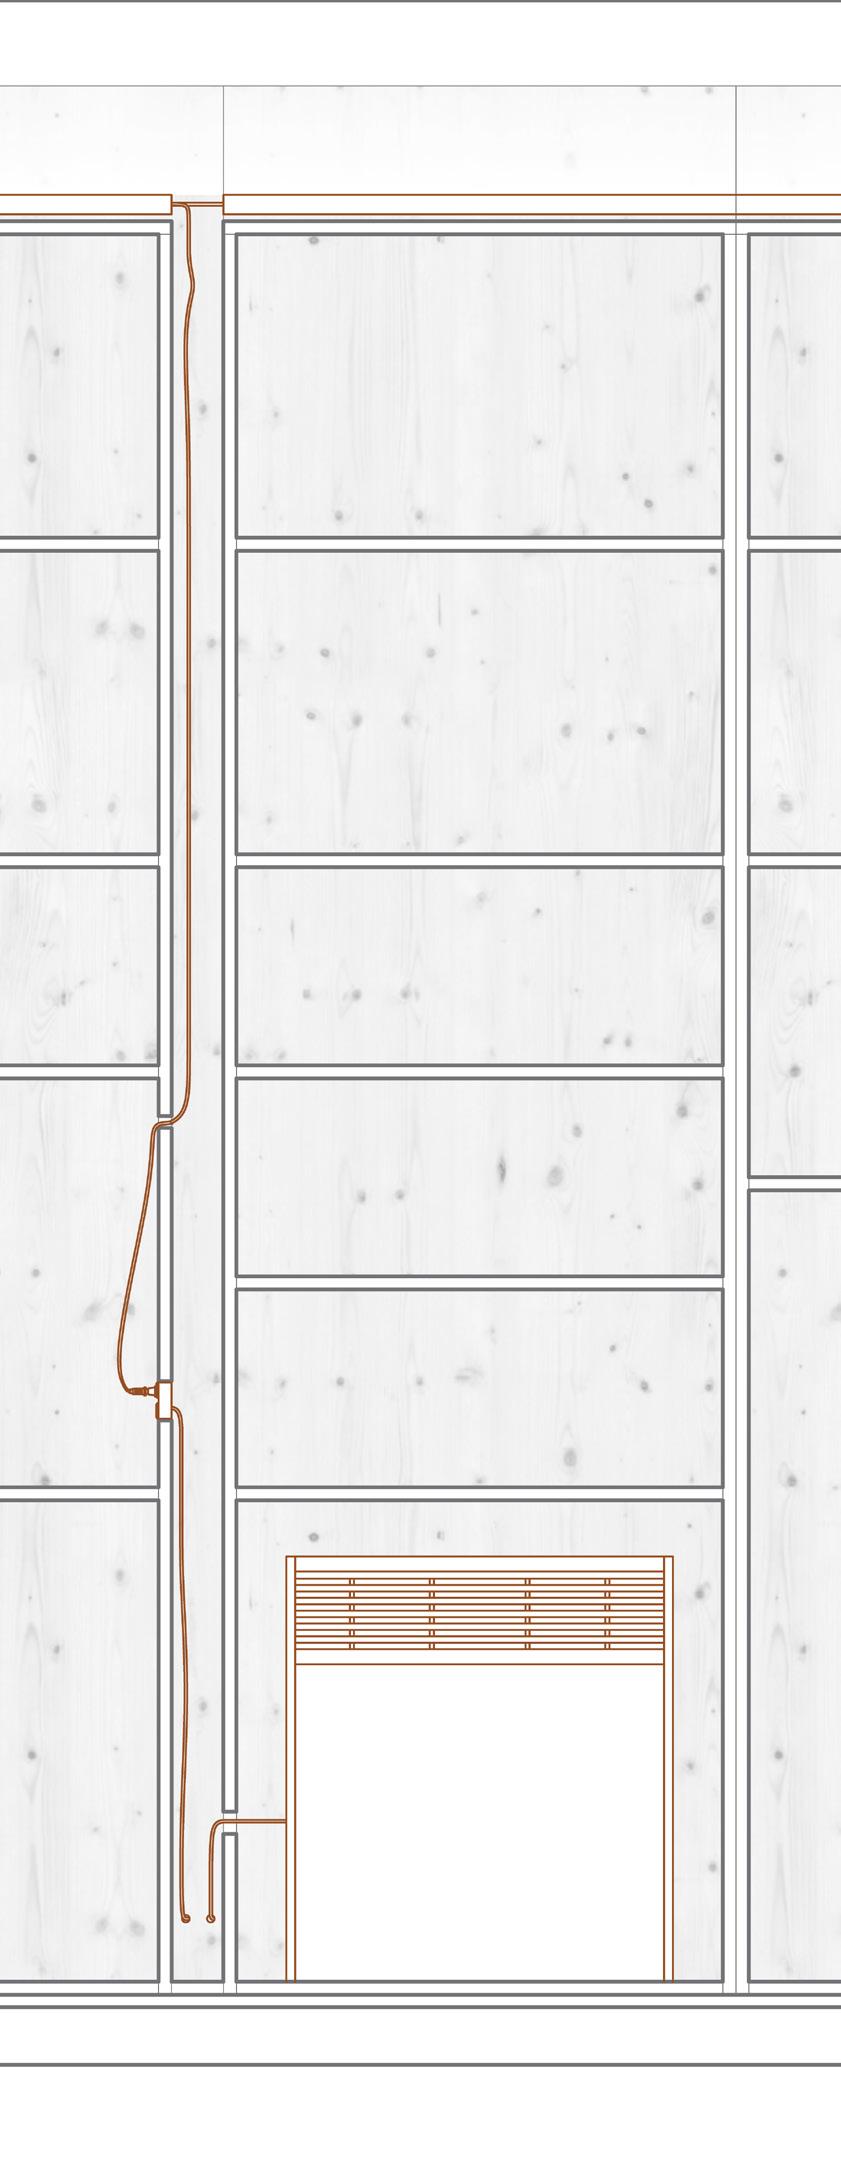
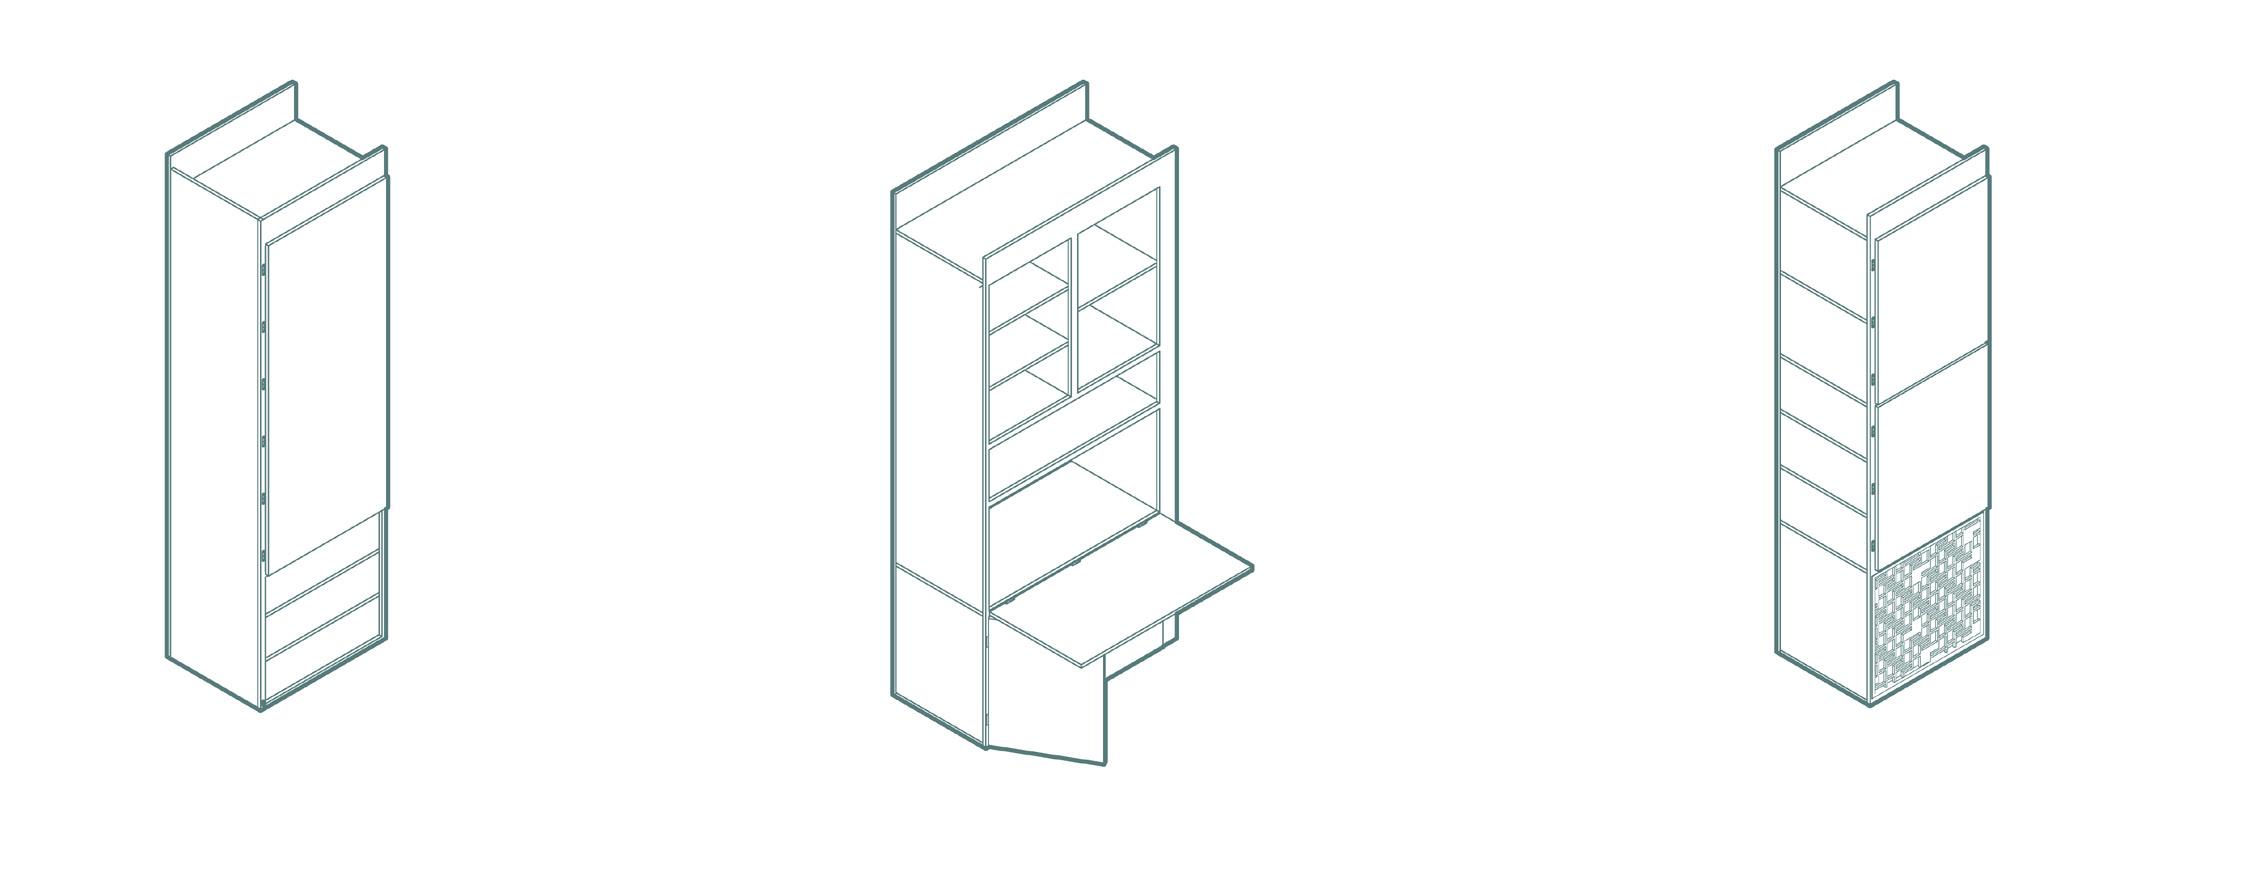
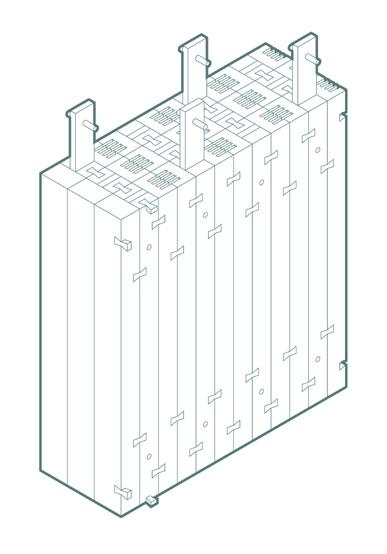
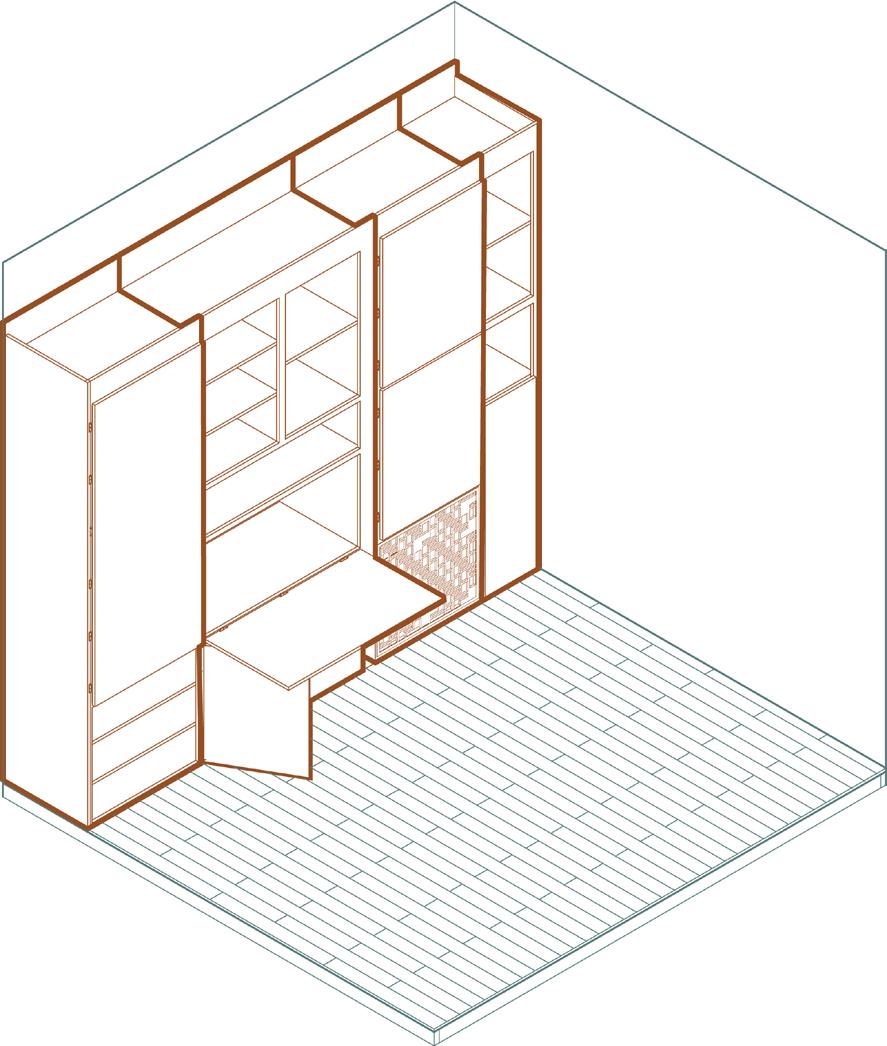
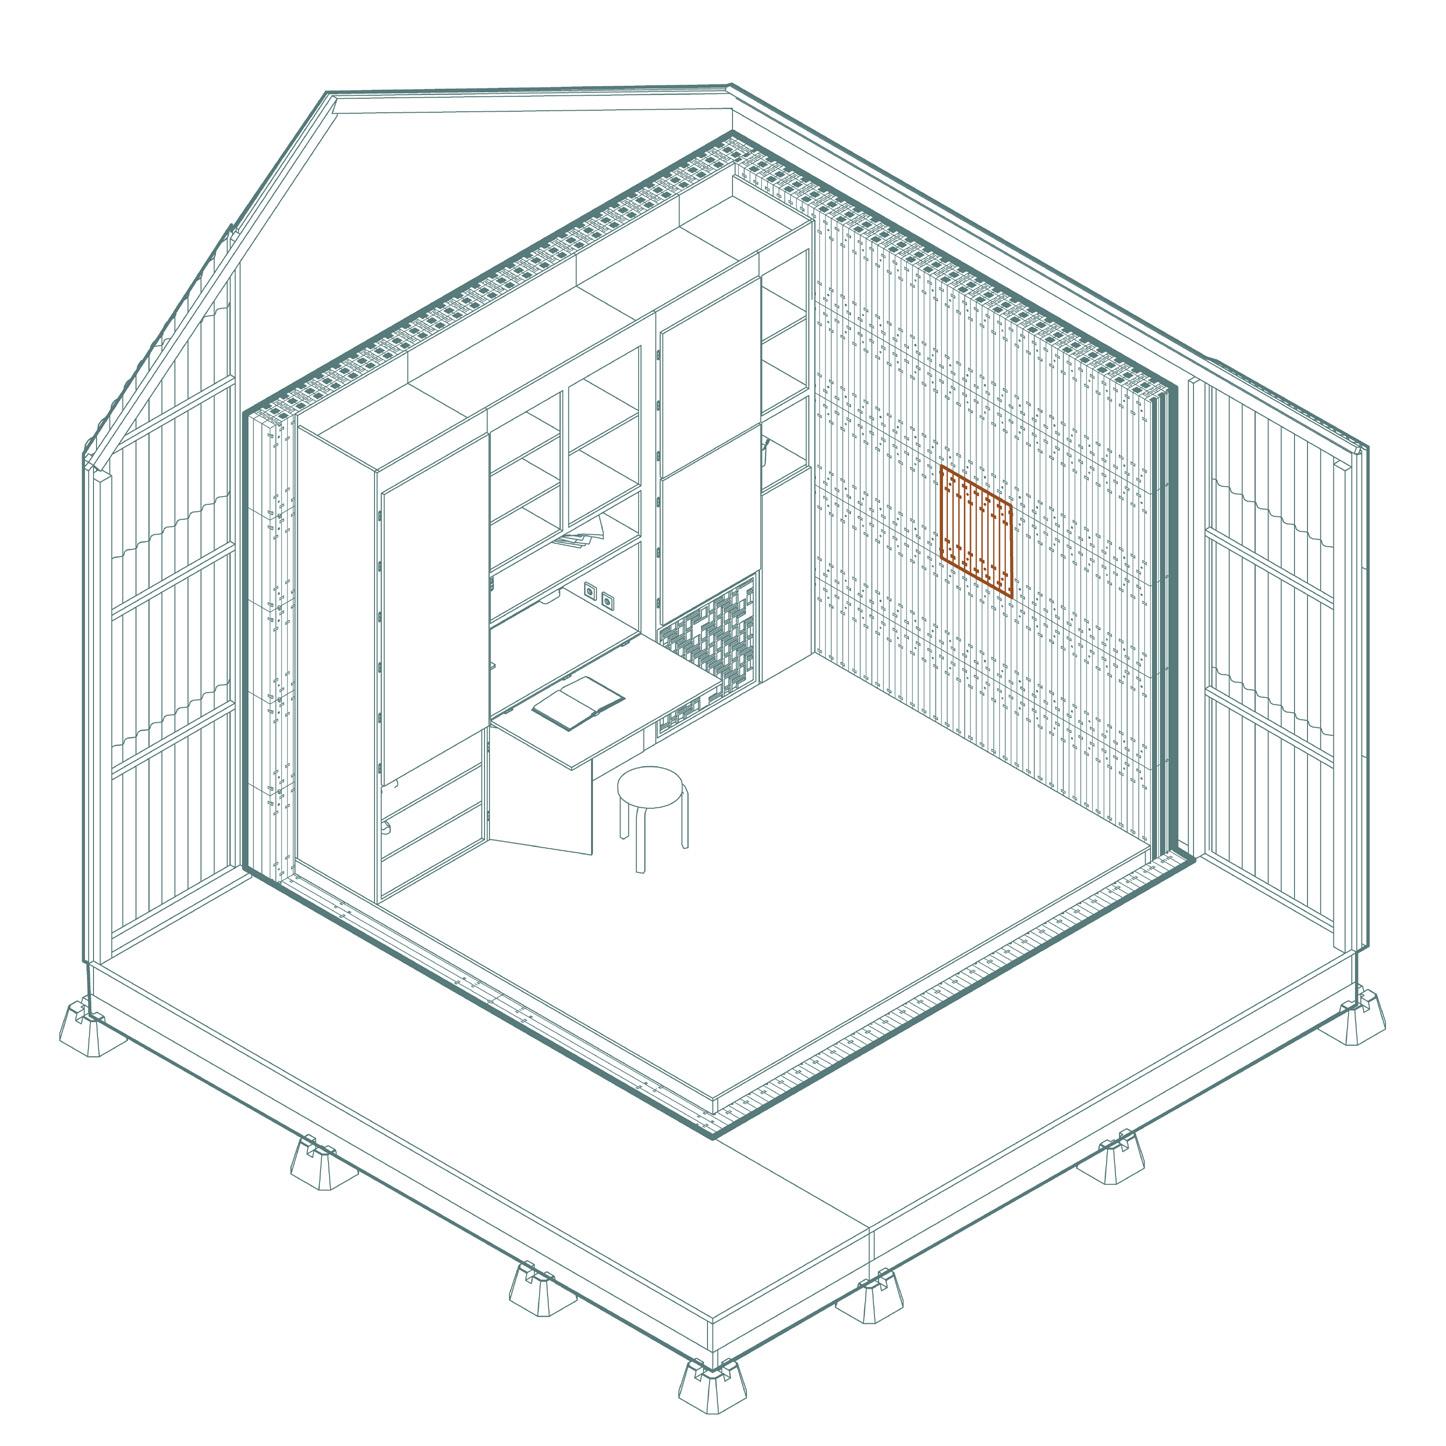
Step 7 describes the assembly of the storage wall modules. There are six module types that are constructed using plywood, screws, and typical cabinet hinges. These modules provide interior storage space, an adaptable desk, and also contain the heating and lighting systems. Each module is to be assembled off site along with the other prefabricated elements previously described. As shown on page 26, the electrical cords to provide a plug and LED cove lighting are to be included between module B and C (install on site). Additionally, the electric unit heater is to be included within module C and an exterior plug is to be provided in order to plug each shelter in on site (electricity is to be provided from the washroom facilities to each shelter). The types and sizes of storage wall modules are included on pages 27 and 28.
Washroom Facilities Shelters
Storage Module Systems Integration
LED COVE LIGHT
B C
COMMUNITY GUIDELINE 2024 SURVIVAL TO SUSTAINABLE CARE 26 25 SURVIVAL TO SUSTAINABLE CARE
Step 7 |
Storage Wall Assembly
PLUG
ELECTRIC UNIT HEATER
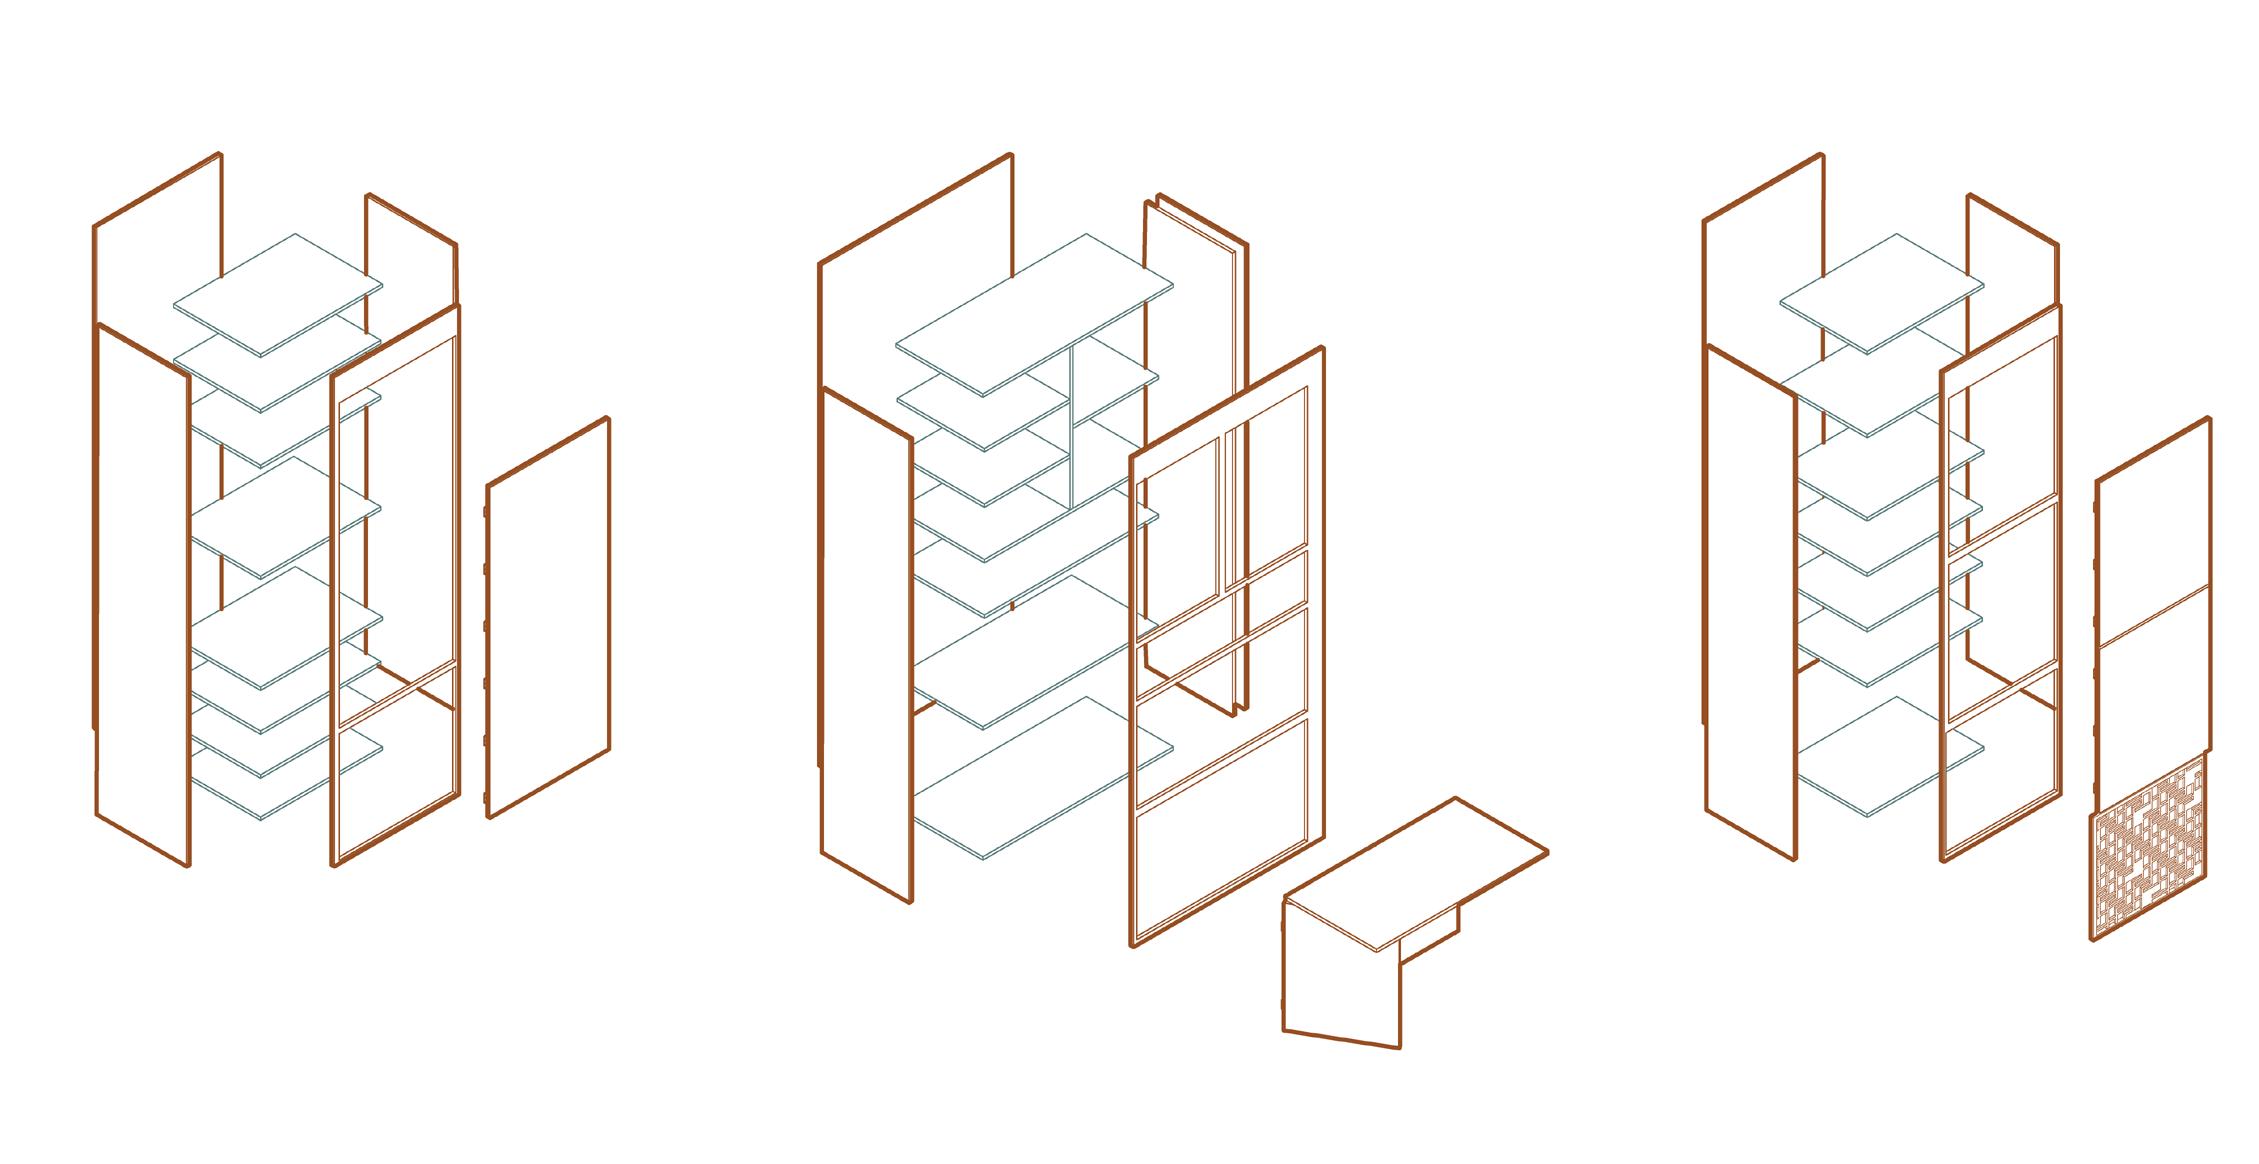
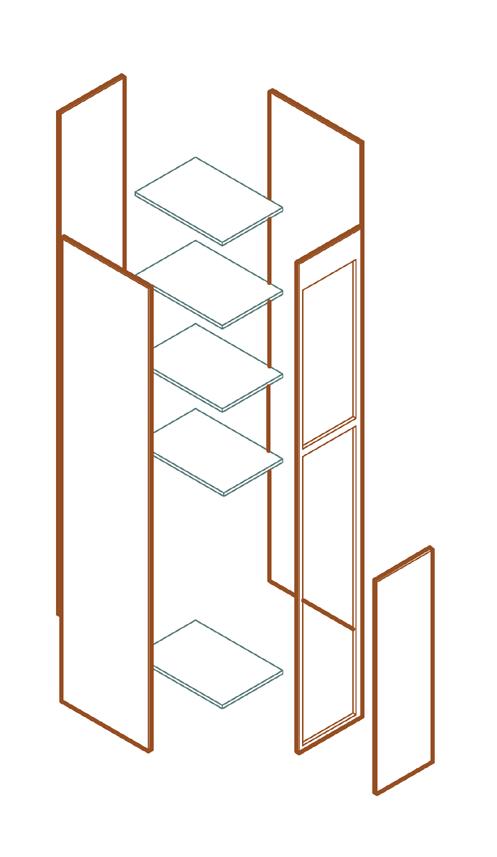
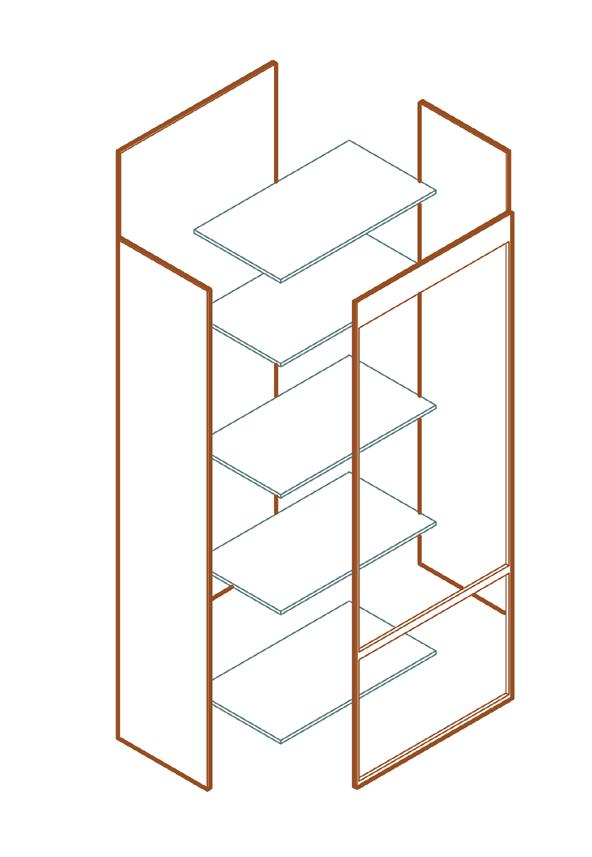
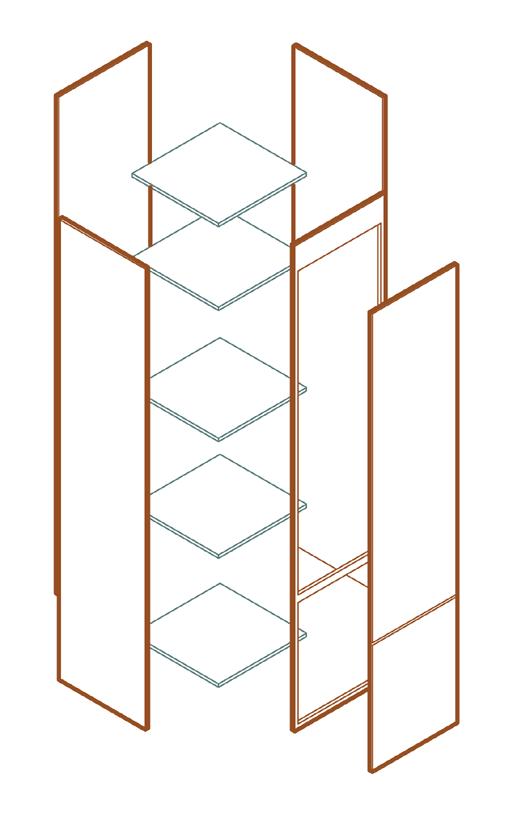
COMMUNITY GUIDELINE 2024 SURVIVAL TO SUSTAINABLE CARE 28 27 SURVIVAL TO SUSTAINABLE CARE A B C DISASSEMBLED
A 2942mm 845mm B C D E F D E F C * exclude metal screening and extend door Storage
Types 2942mm 1290mm 2942mm 790mm 2942mm 429mm 2942mm 1077mm 2942mm 620mm
ASSEMBLED
Module
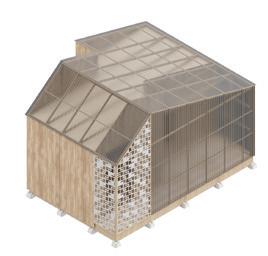
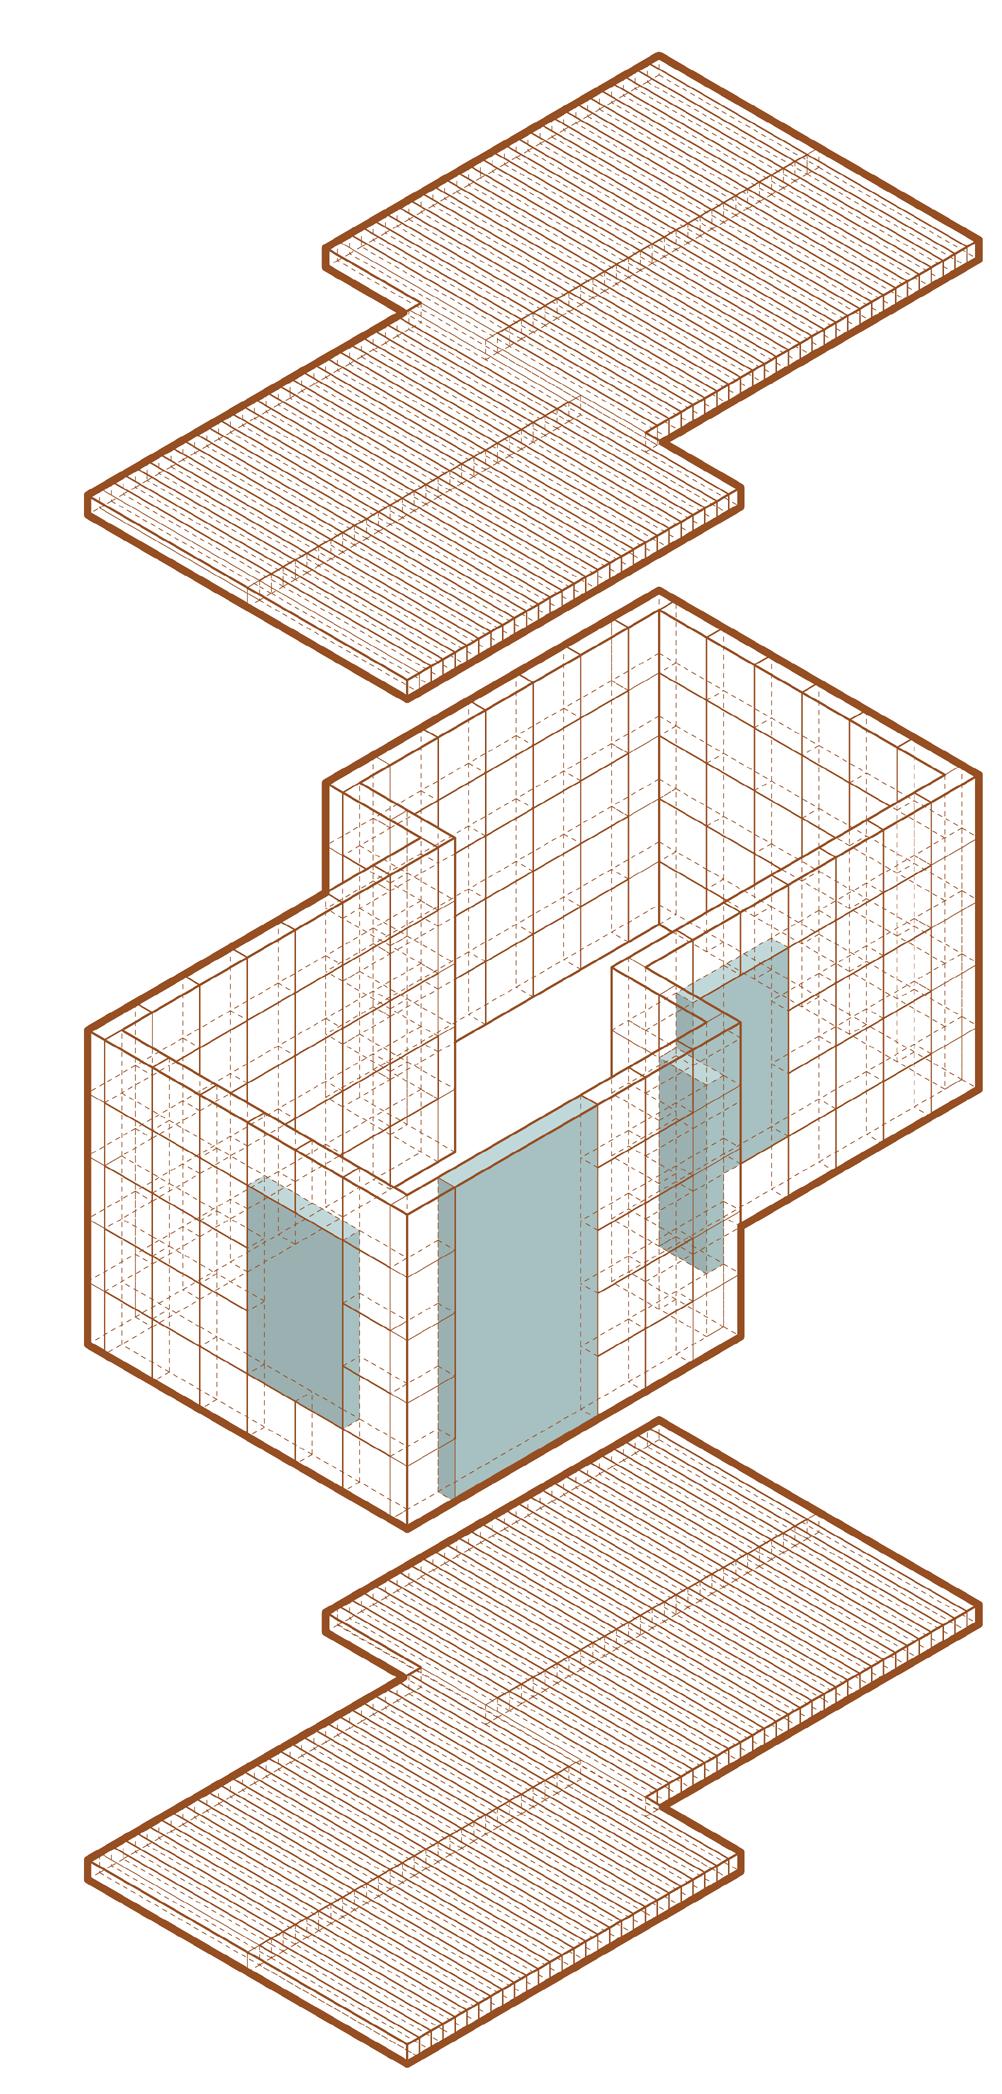
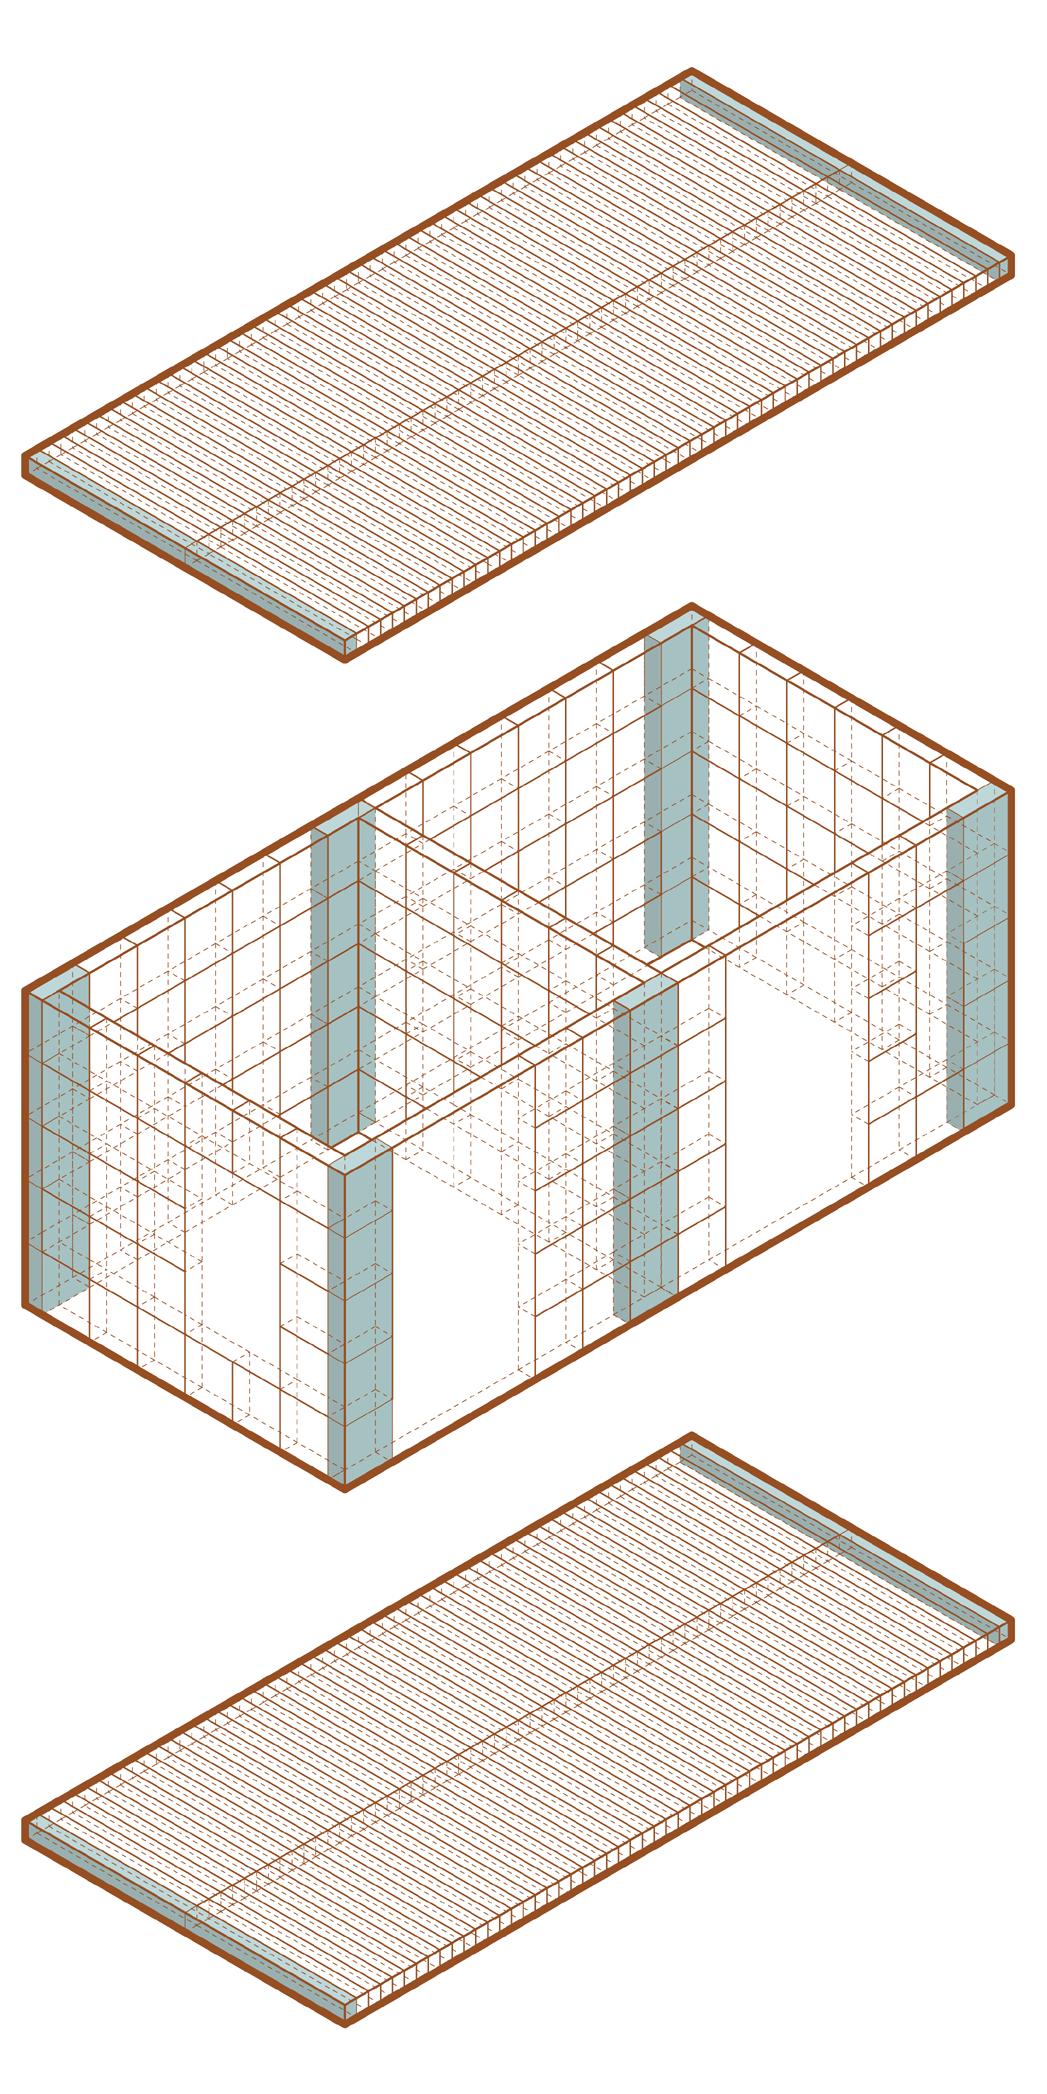
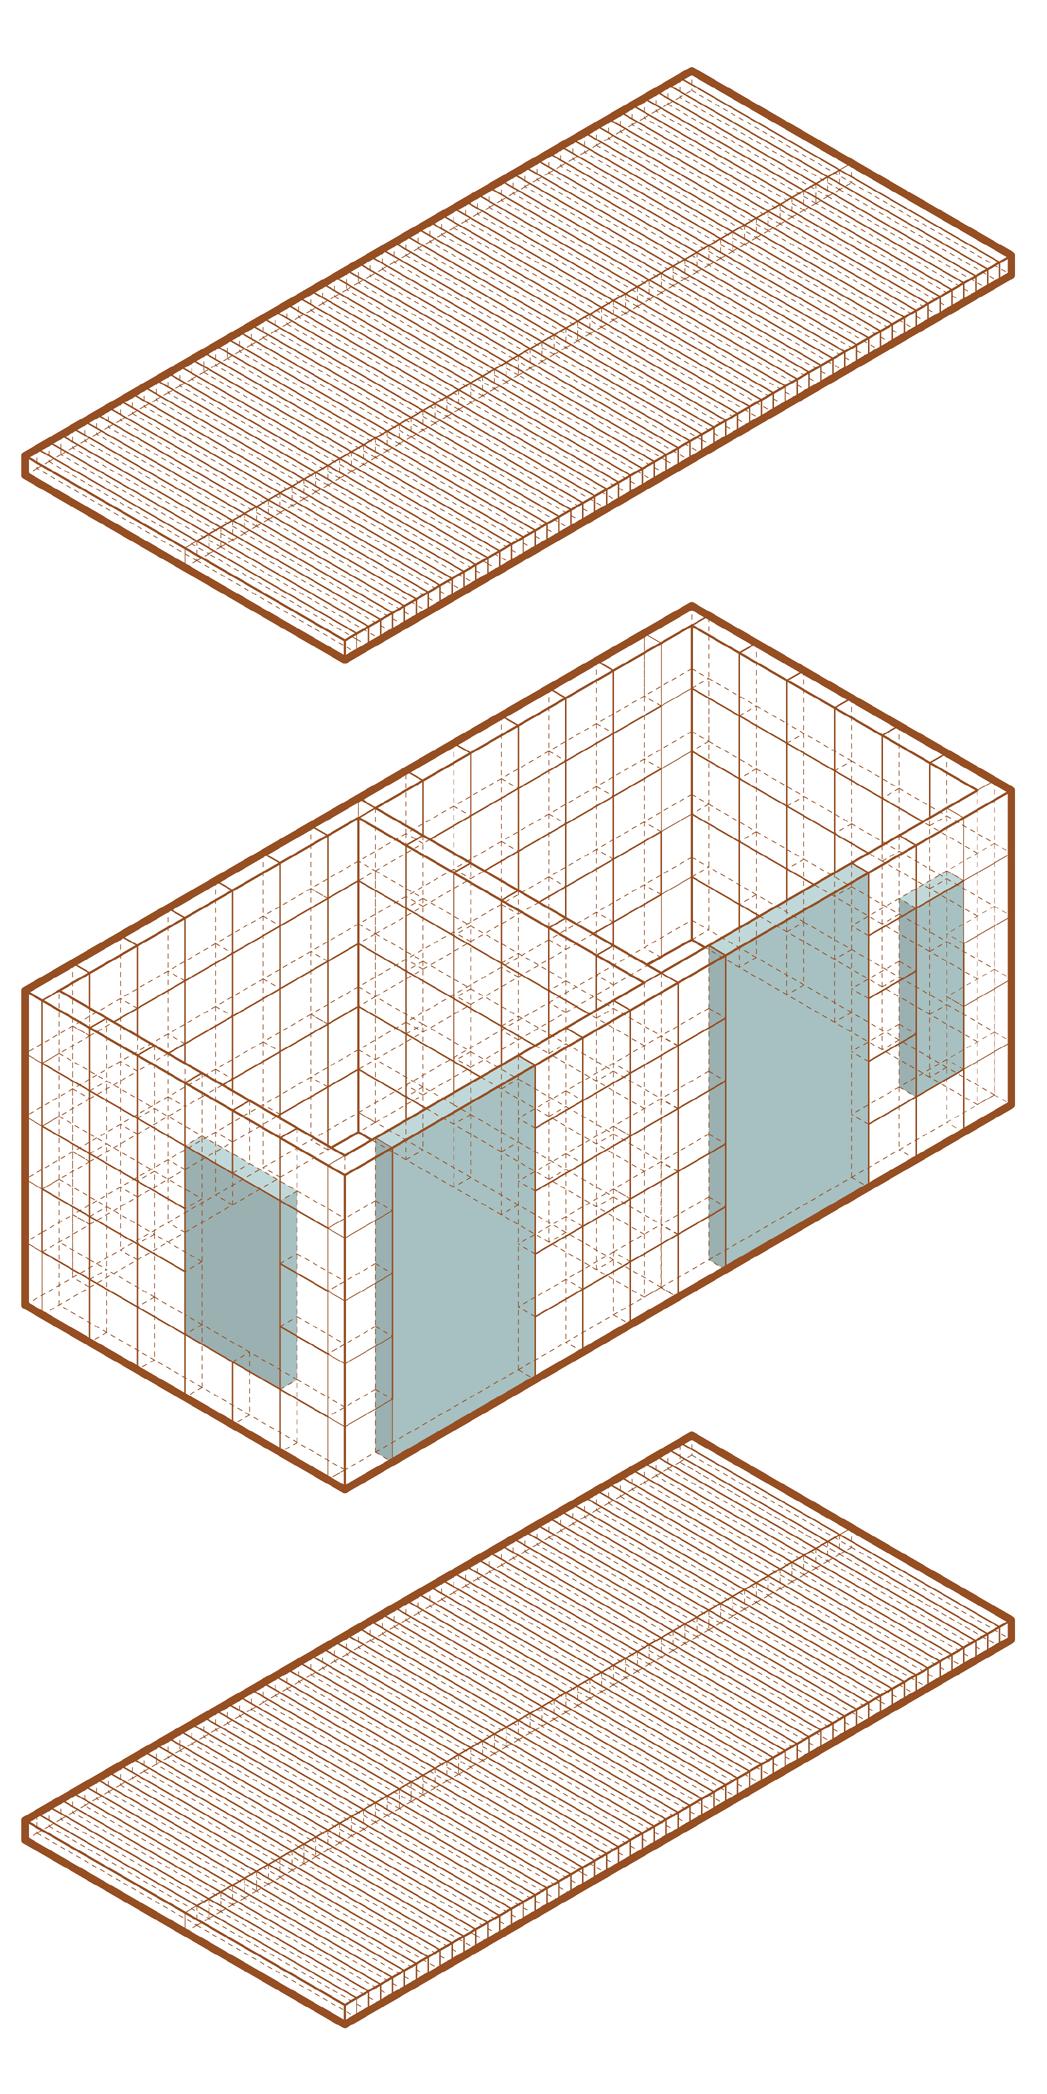
Step 8 | Shelter Assembly (On-Site)
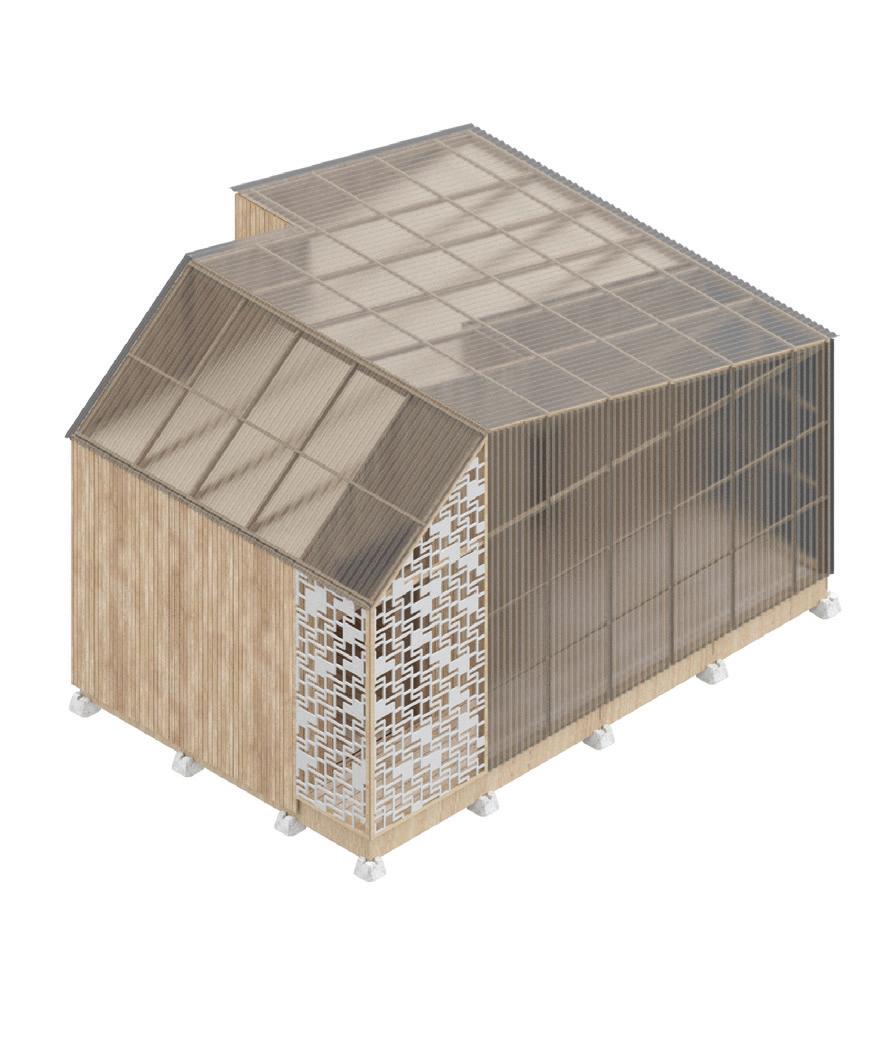
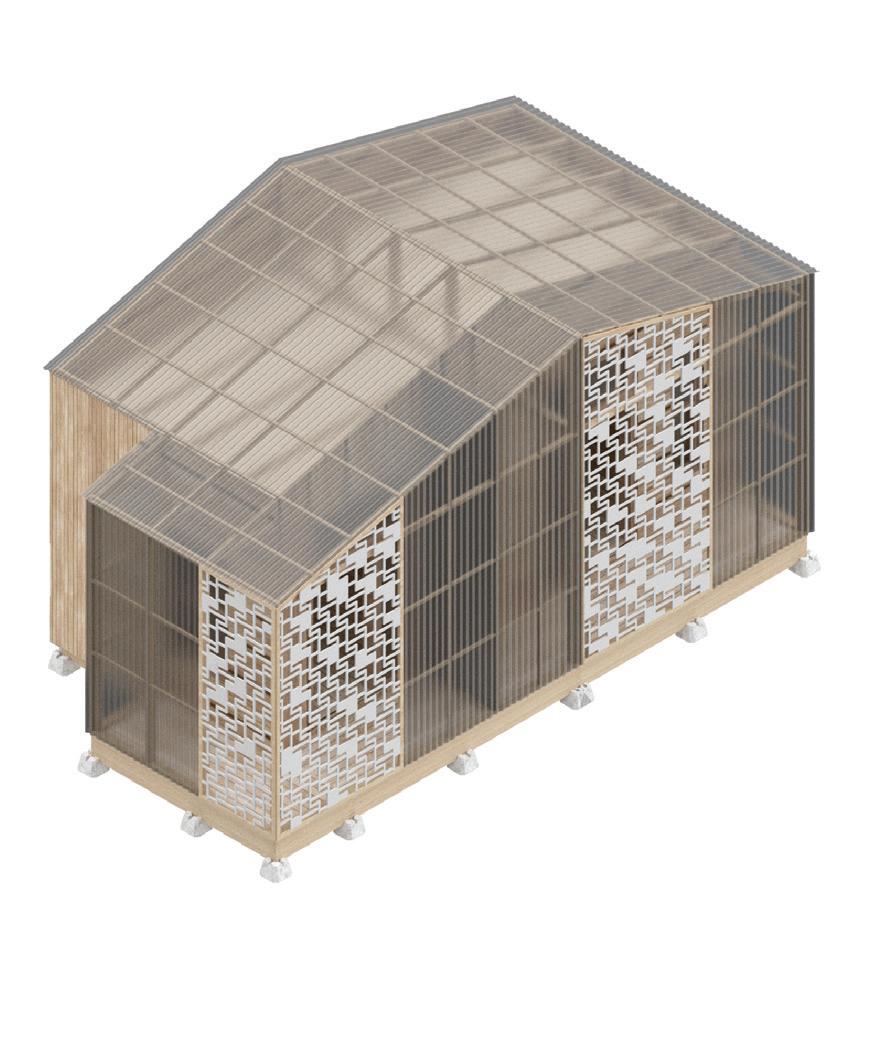
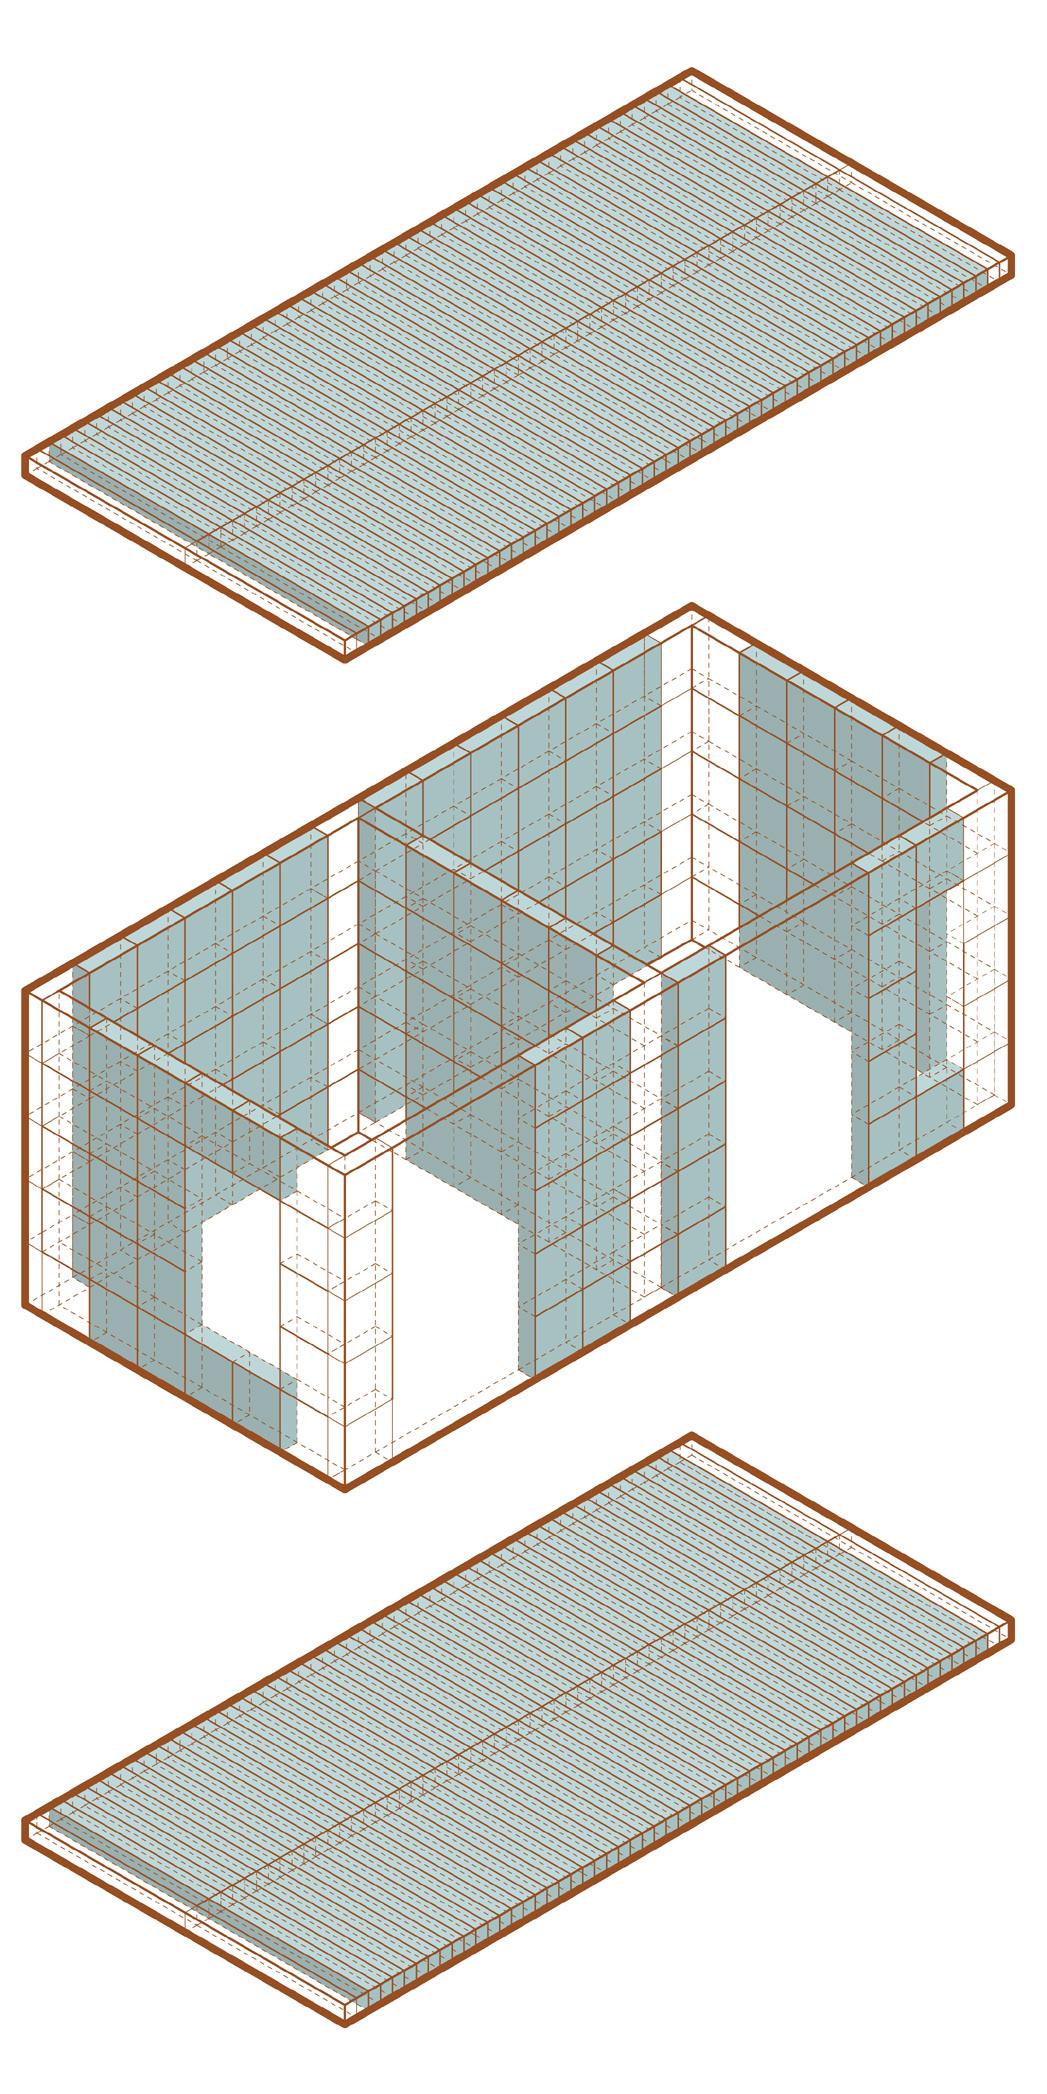
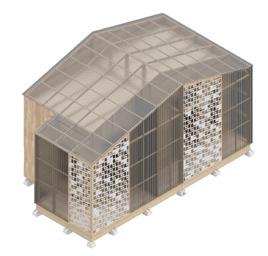
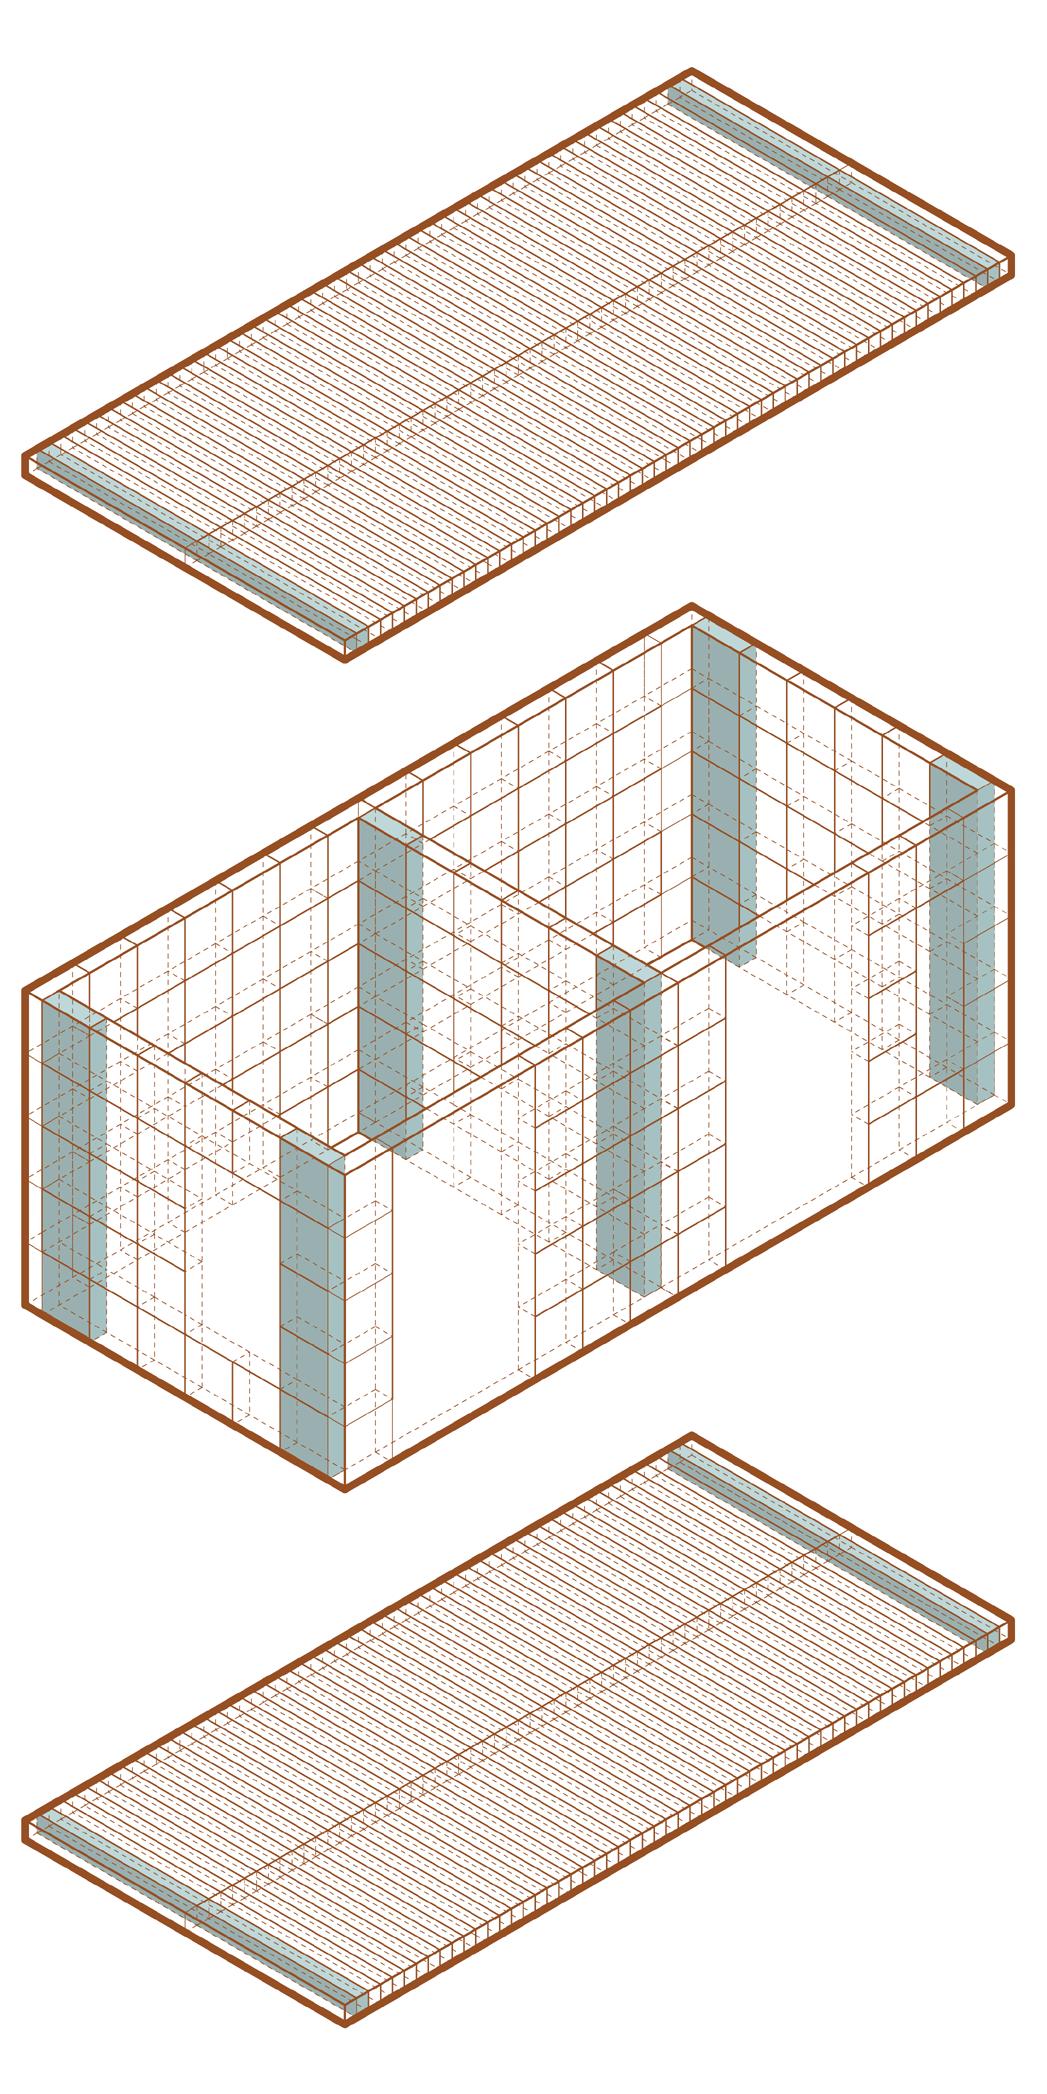
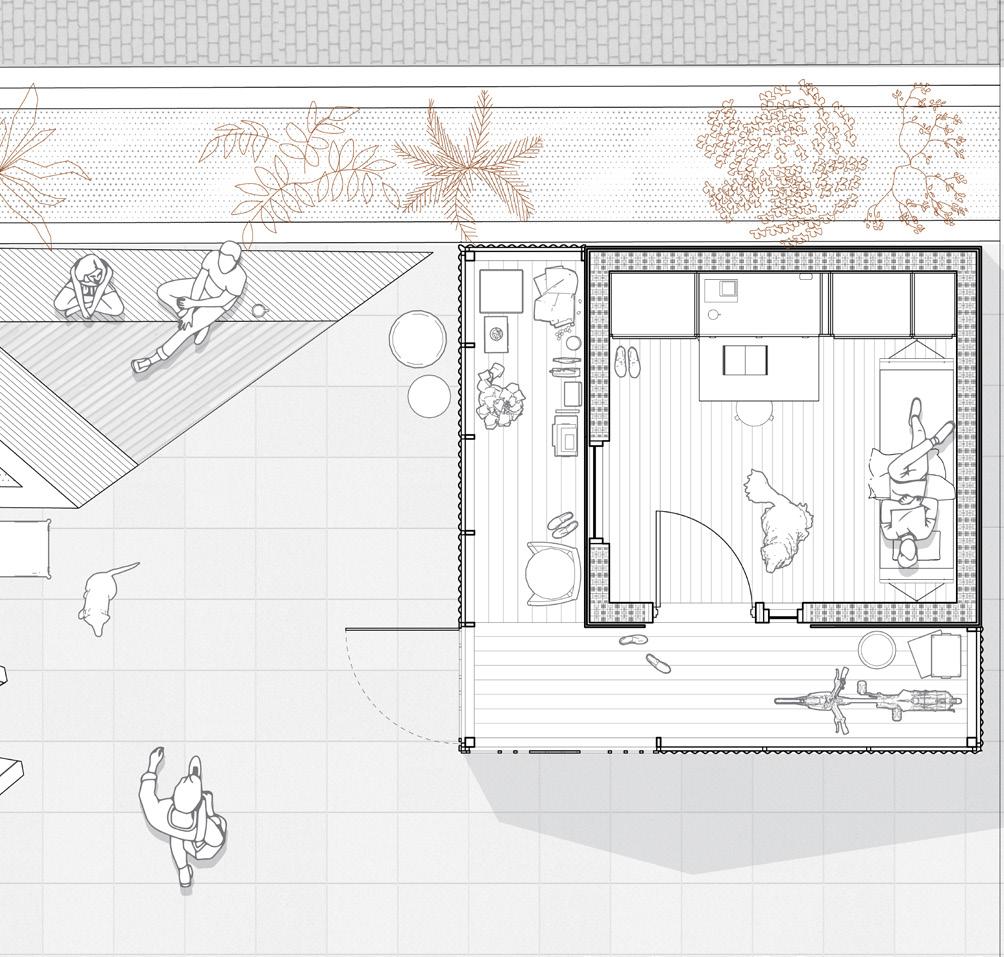
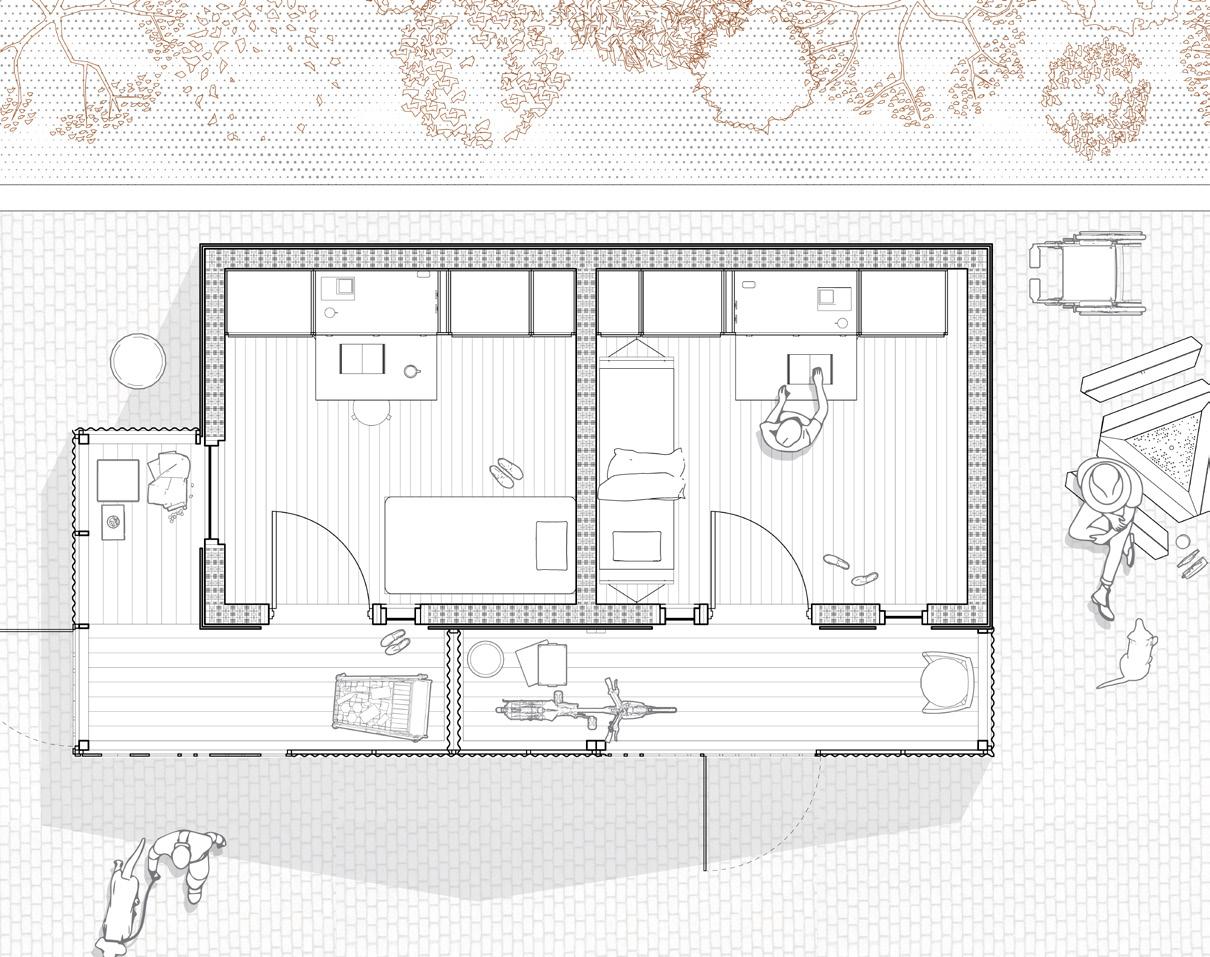
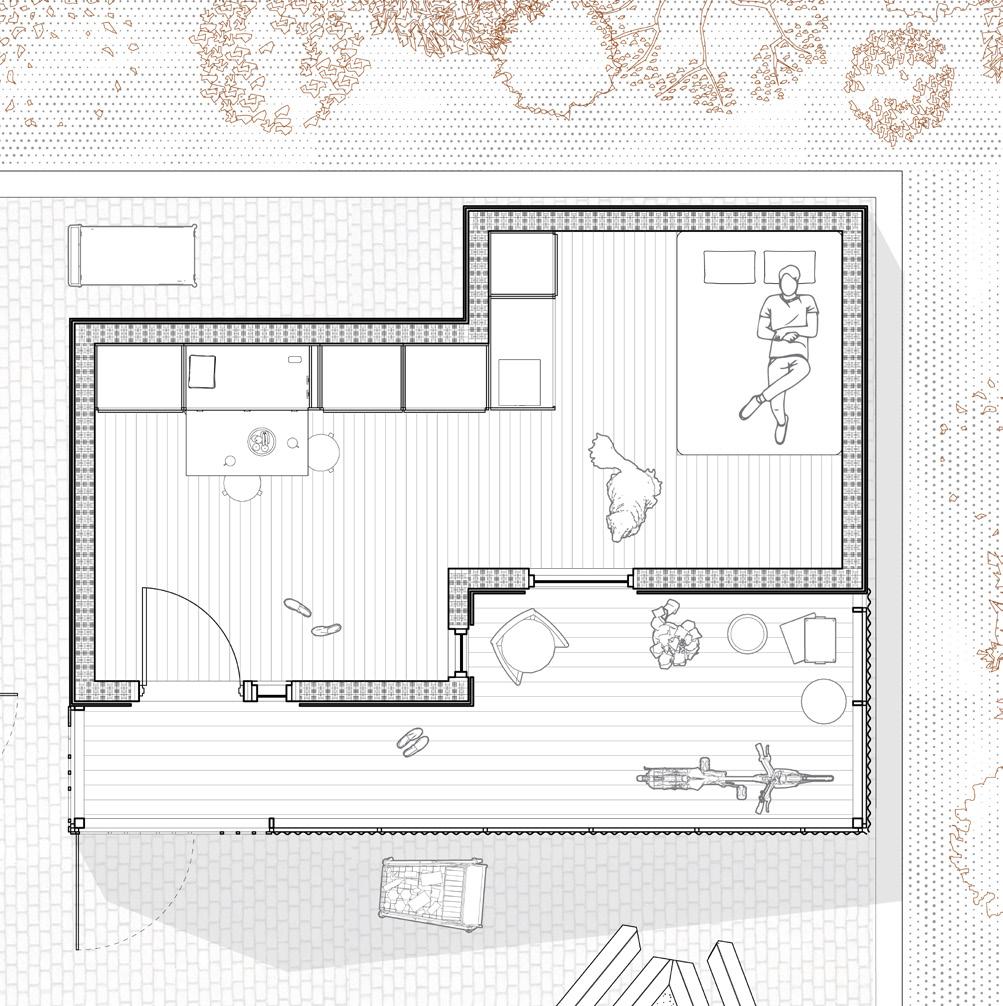
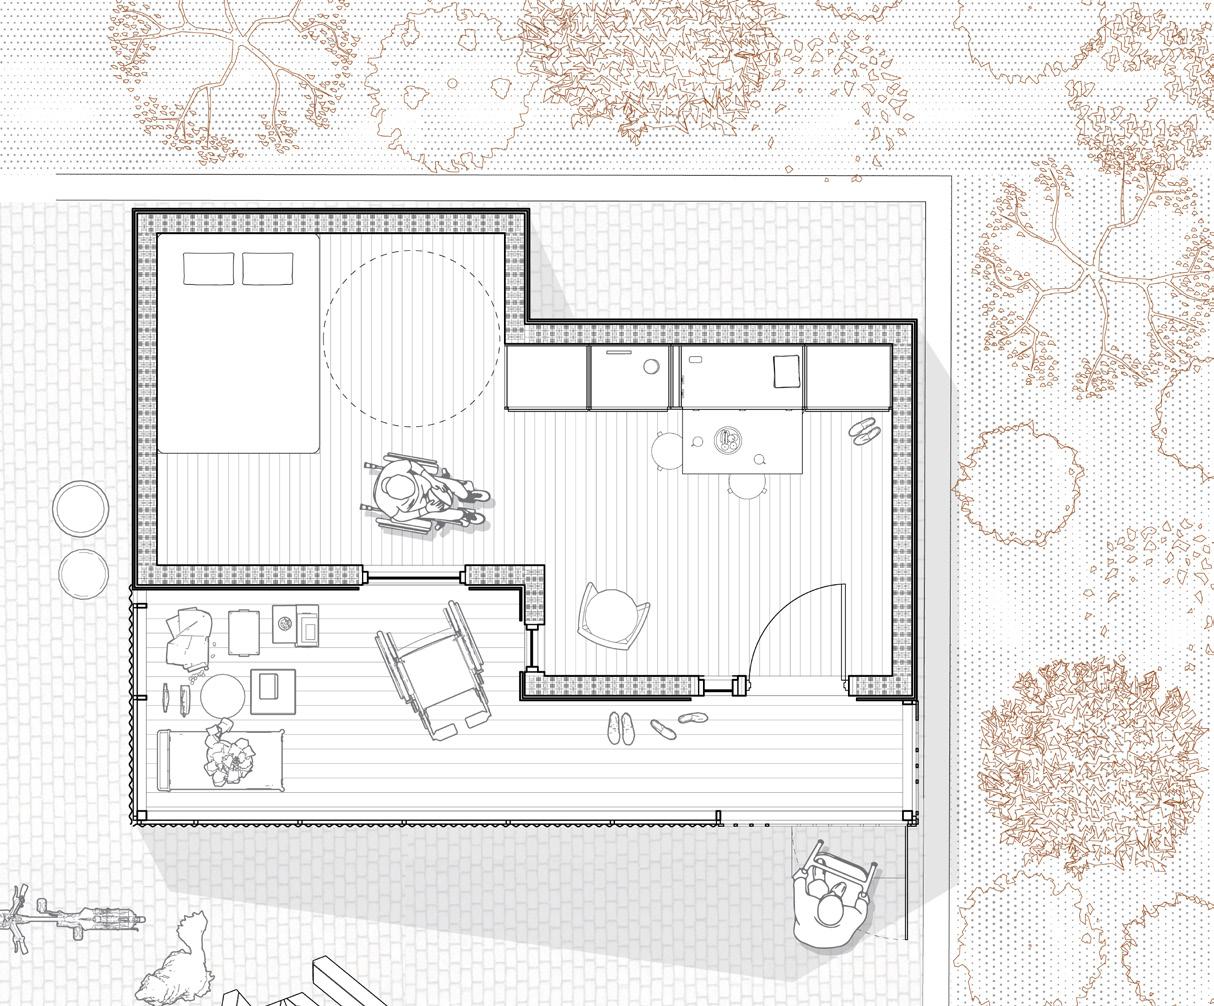
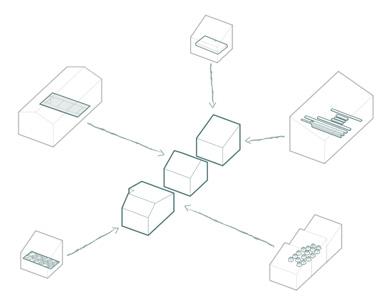
Step 8 describes the quantity of prefabricated panels required for each shelter type (page 31-42), the steps required for onsite construction (page 43-45), and the storage wall modules included within each shelter type (page 46). As seen on page 30, the types of shelters include single, double, accessible, and semi-detached. The single shelter is intended for a single occupant, the double shelter type is intended for two occupants, the accessible shelter can have one or two occupants, and the semi-detached shelter includes two single shelter modules within one exterior frame. The double and accessible shelter types are identical in construction, other than the storage wall modules that are included within the shelters which differ slightly (as seen on page 46).

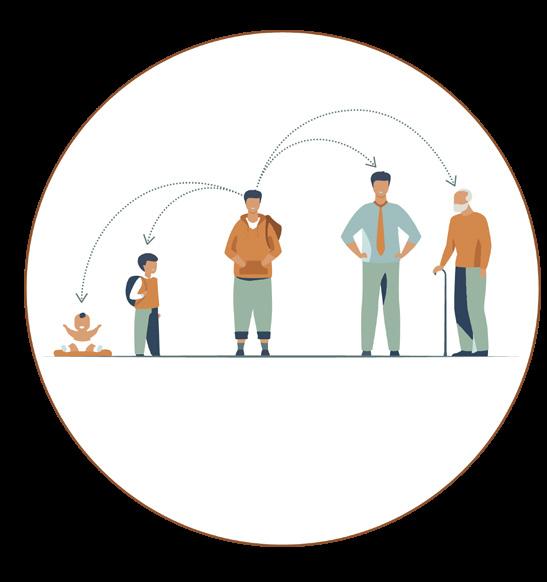
Similar to step 6, it is important to involve community members, specifically high school students in the on-site assembly of the shelters. This practice may help with the reduction of stigma through the act of building the shelters as well as social interaction with unhoused individuals on-site which may also lead to opportunities to share their change in perception with family members, friends, and future children. Additionally, through the act of on-site participation, during construction, students may also be able to collaborate with individuals who will be residing within them, further fostering the reduction of stigma.

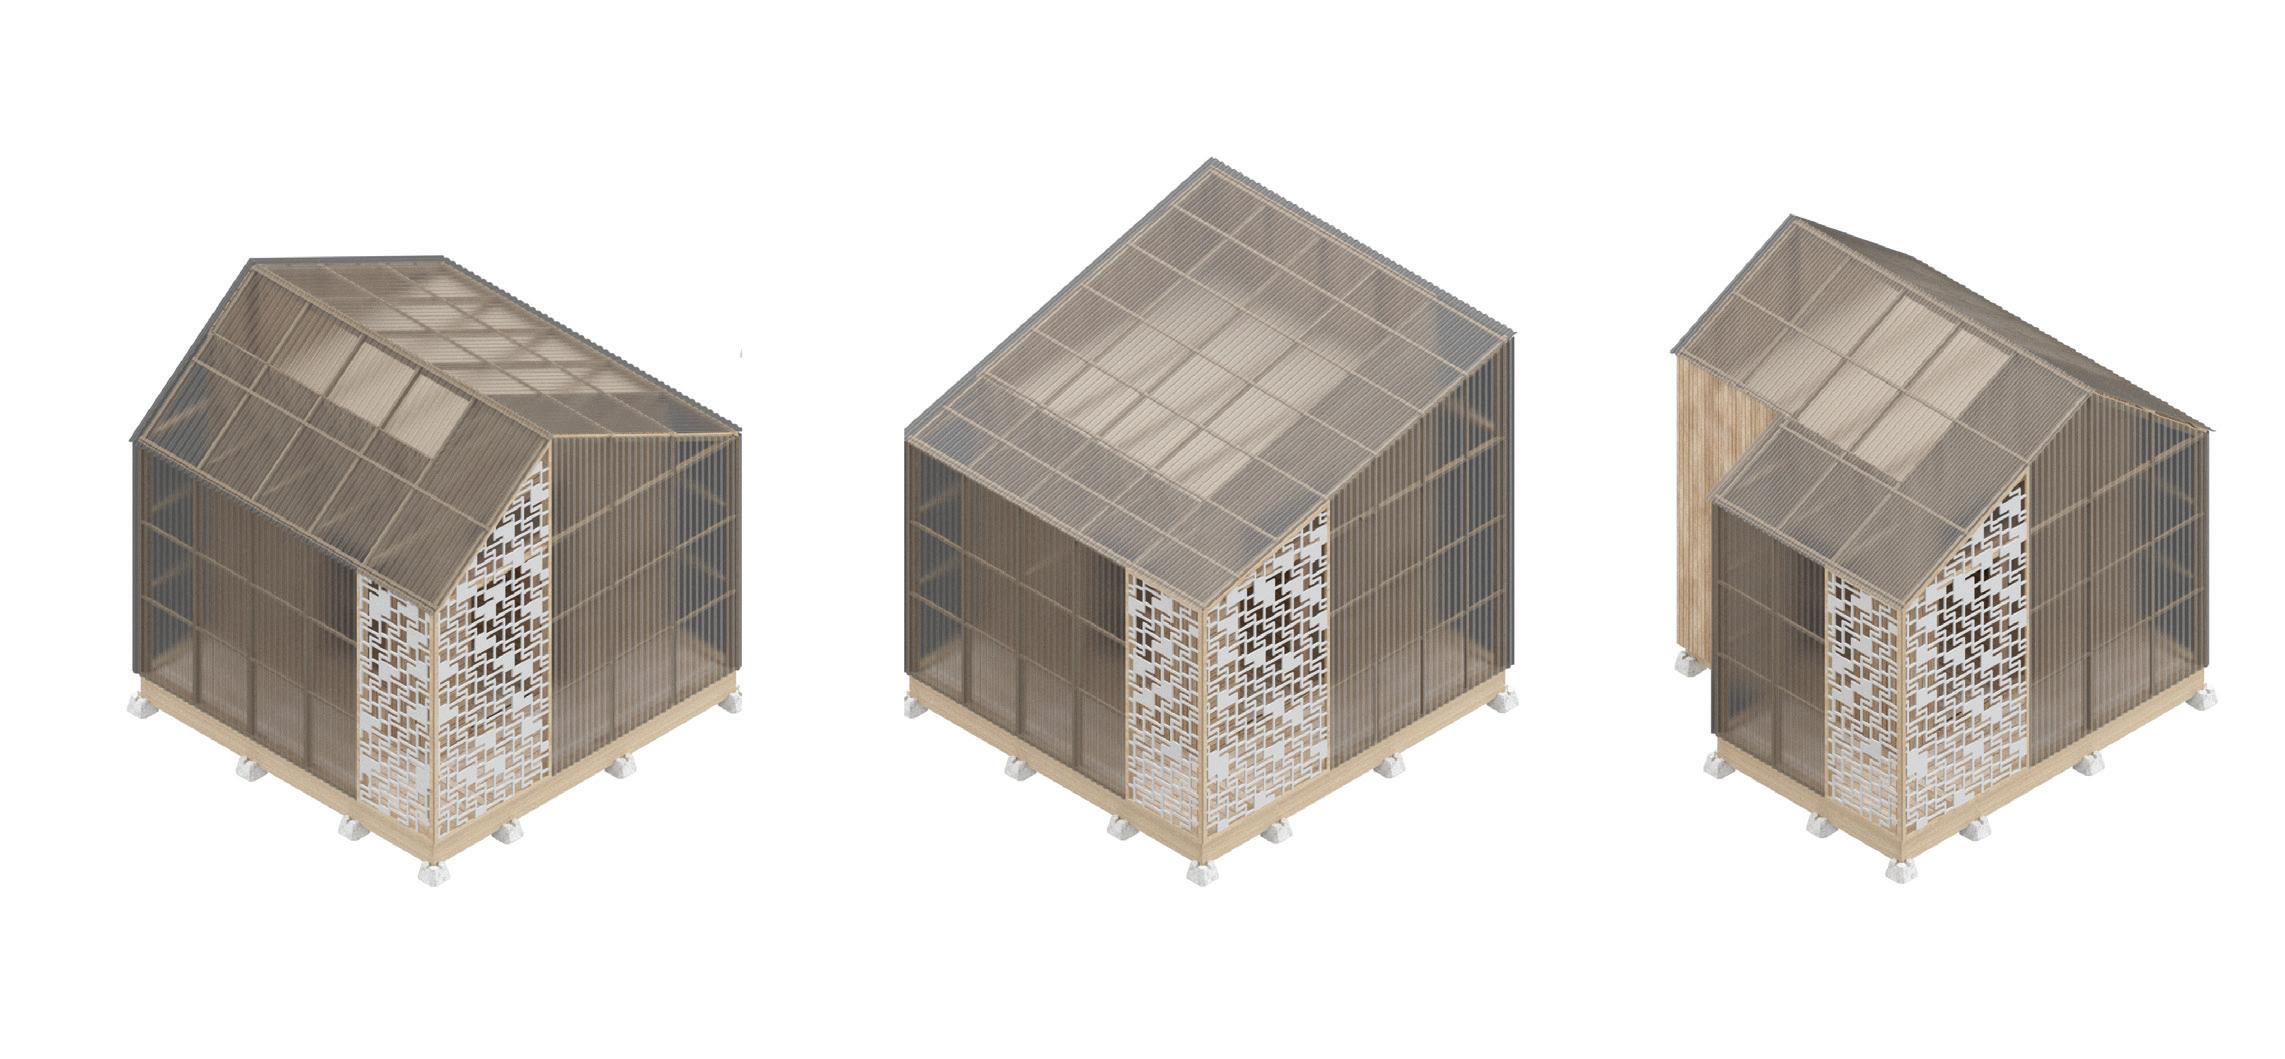
SINGLE
SEMI-DETACHED DOUBLE OR ACCESSIBLE
COMMUNITY GUIDELINE 2024 SURVIVAL TO SUSTAINABLE CARE 30 29 SURVIVAL TO SUSTAINABLE CARE
Construction&Mainten a n c e Social Interaction IntergenerationalEd ucat i o n
1 2 3
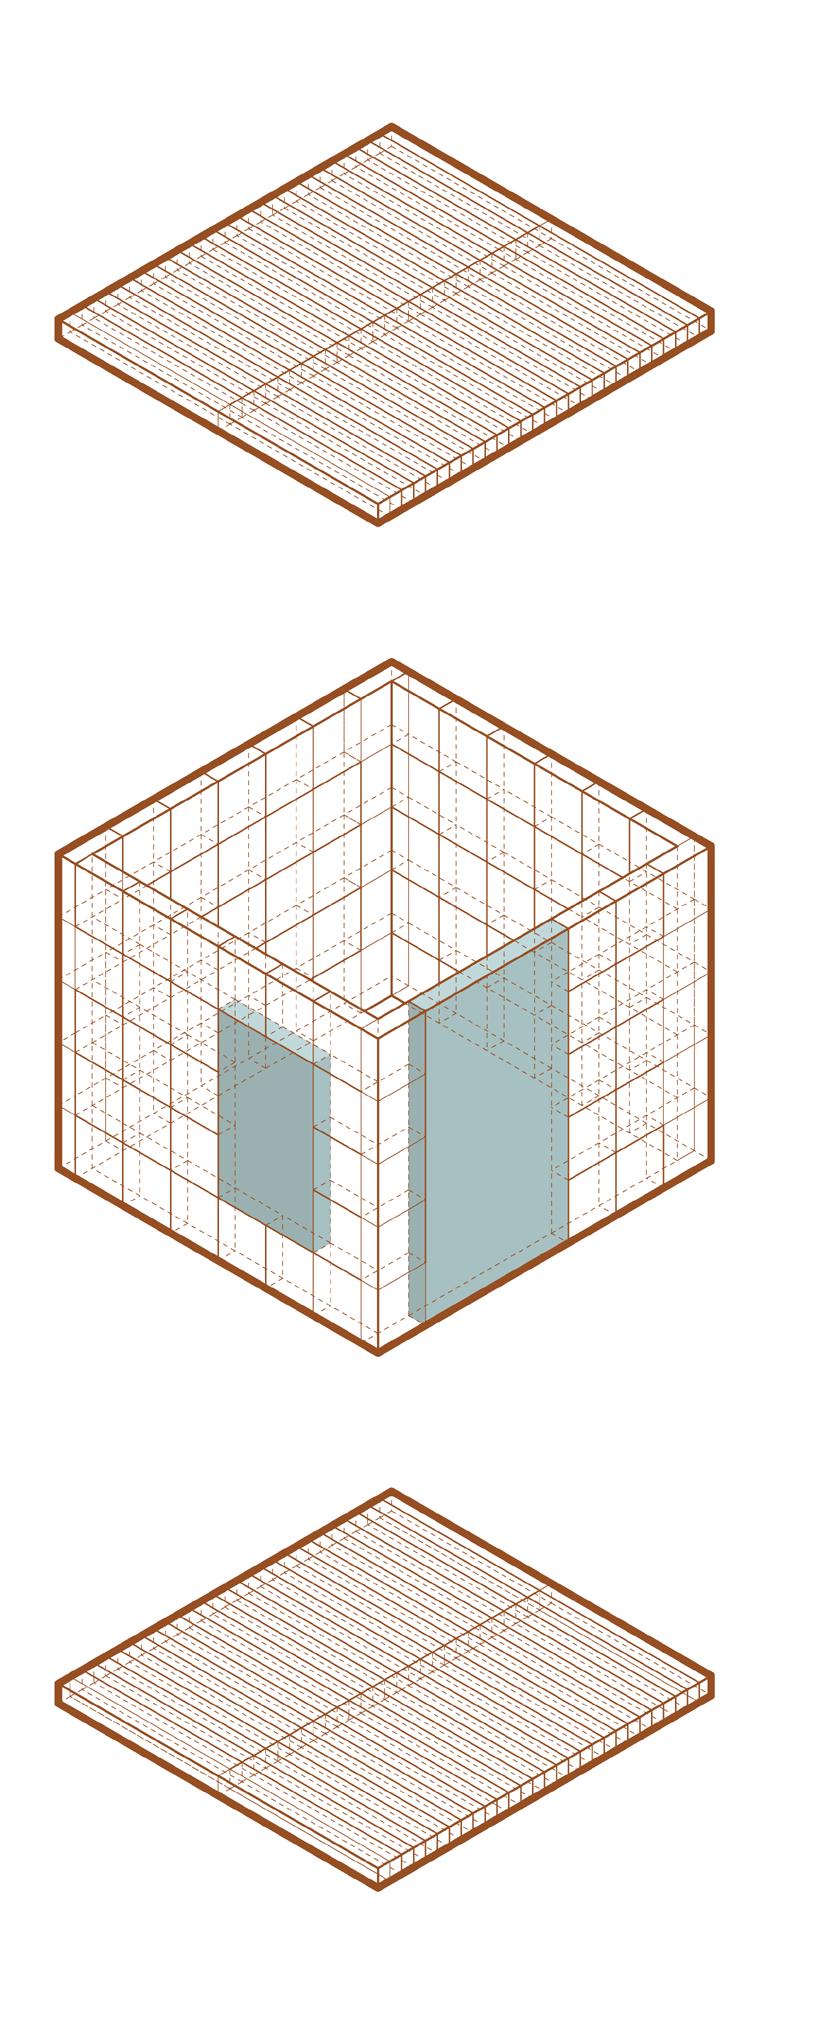
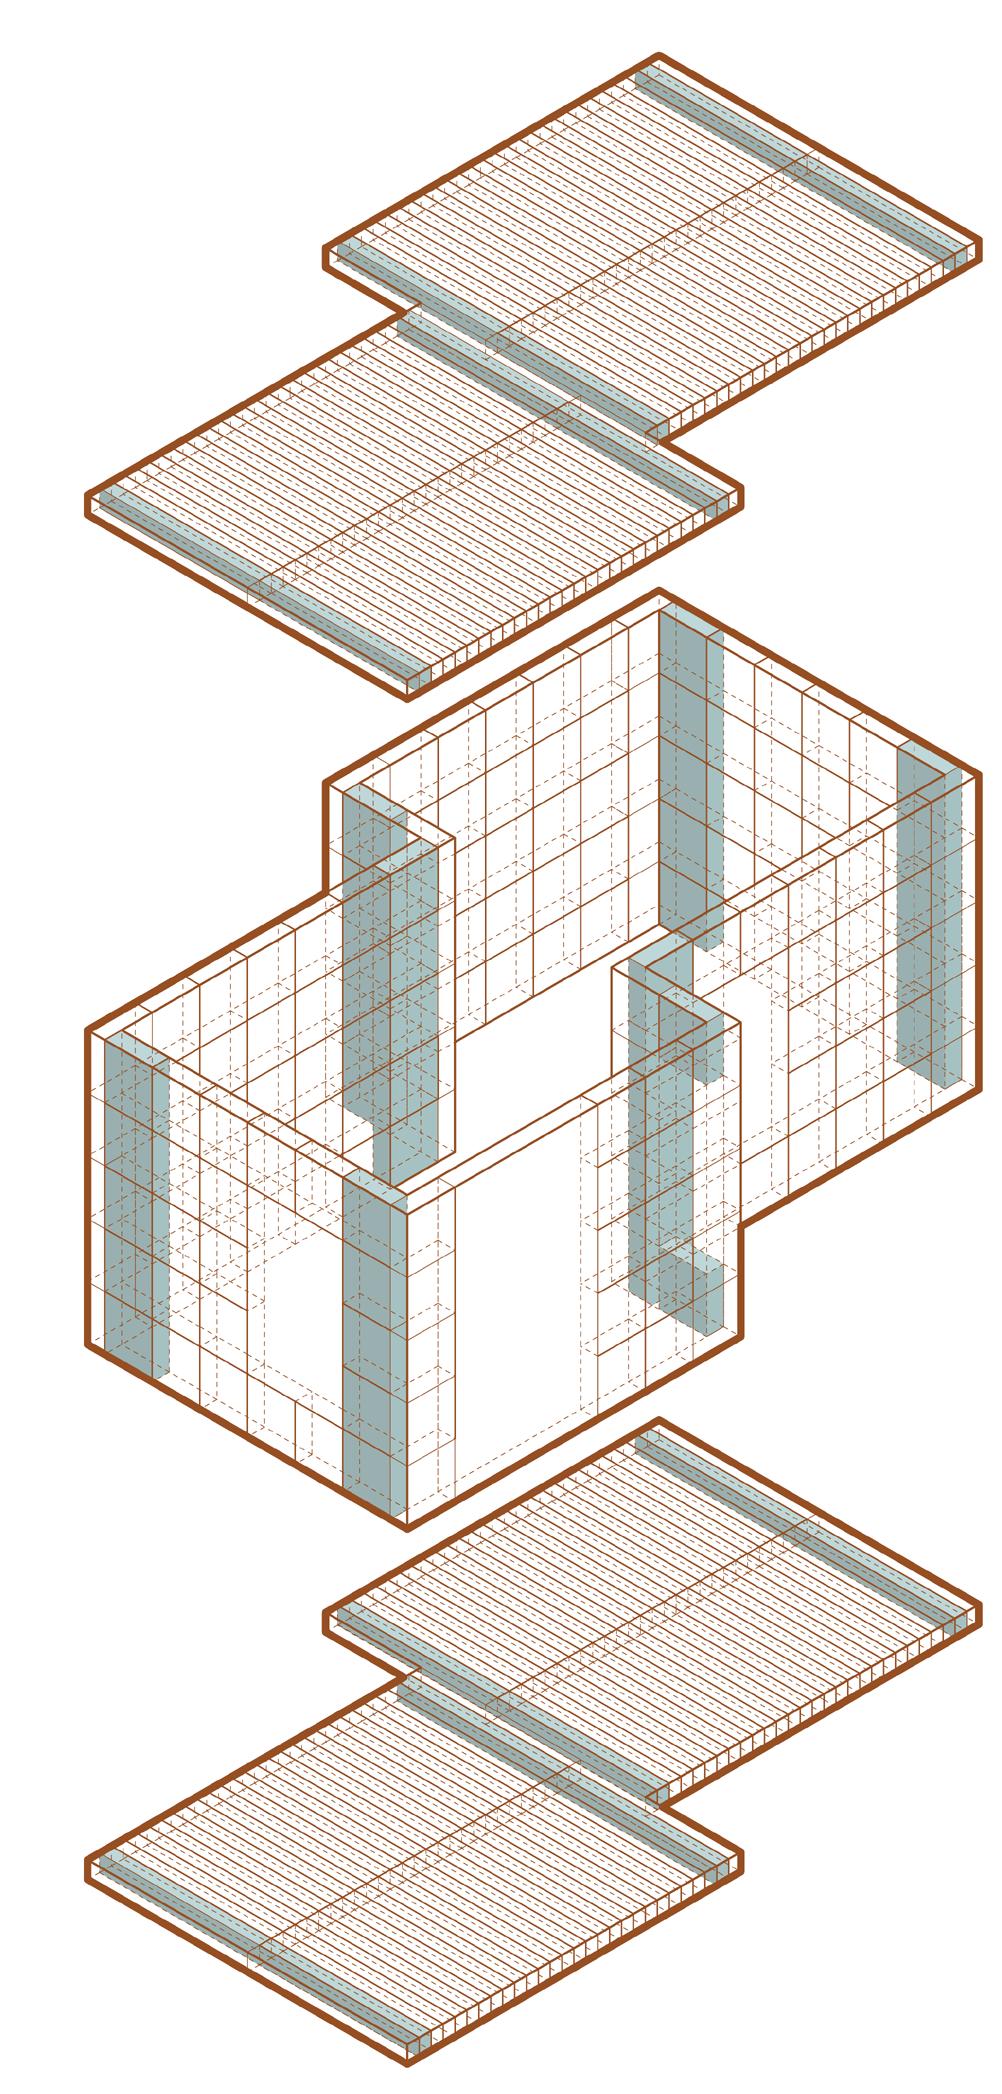
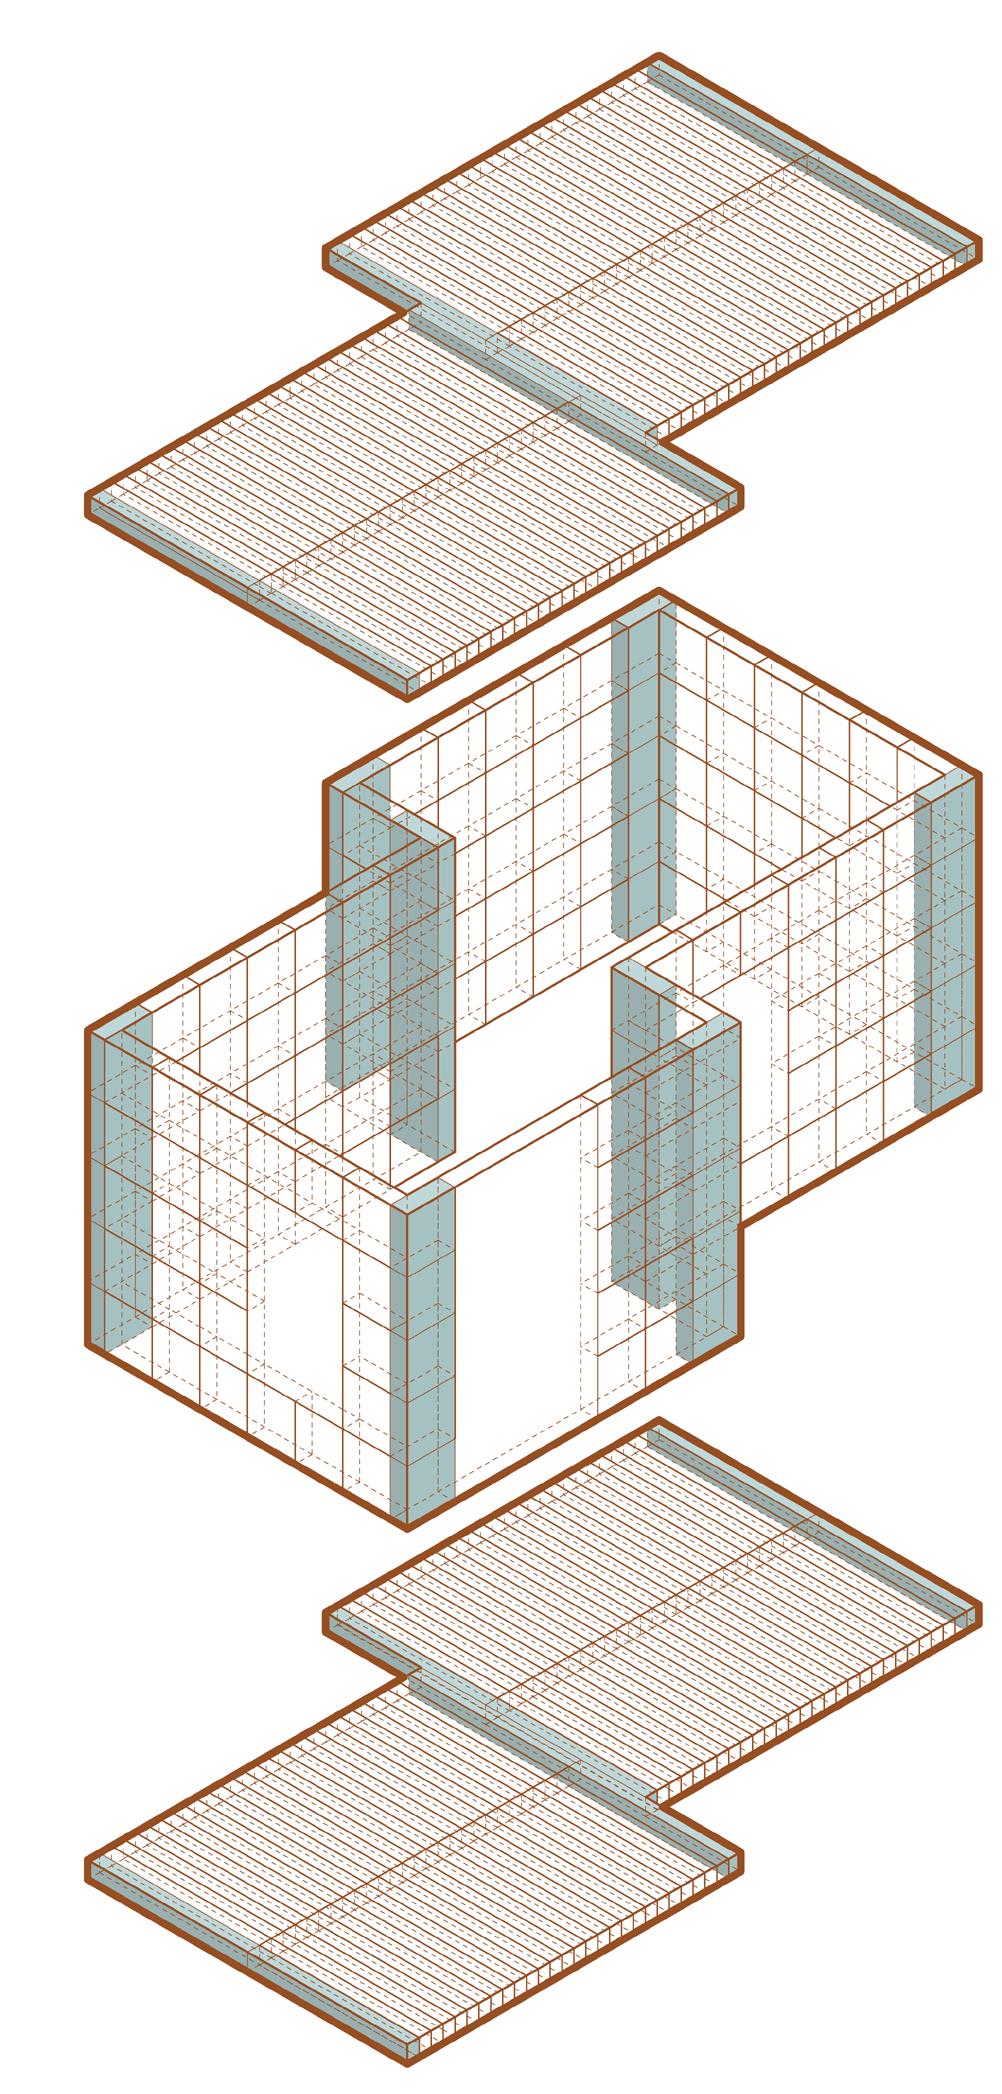
Single Shelter Quantities: (F/R1) & (W1)
Roof: (F/R1) x 24
Walls: (W1) x 69
Floor: (F/R1) x 24

Single Shelter Quantities: (F/R2) & (W2)
Roof: (F/R2) x 2
Walls: (W2) x 20
Floor: (F/R2) x 2
COMMUNITY GUIDELINE 2024 SURVIVAL TO SUSTAINABLE CARE 32 31 SURVIVAL TO SUSTAINABLE CARE
Single Shelter Quantities: (F/R3) & (W3)
Roof: (F/R3) x 2
Walls: (W3) x 20
Single Shelter Quantities: (WL) & (D1)
Floor: (F/R3) x 2
Windows: (WL) x 1
Doors: (D1) x 1
COMMUNITY GUIDELINE 2024 SURVIVAL TO SUSTAINABLE CARE 34 33 SURVIVAL TO SUSTAINABLE CARE
WL D1
Double/ Accessible Shelter Quantities: (F/R1) & (W1)
Roof: (F/R1) x 48
Walls: (W1) x 113
Floor: (F/R1) x 48
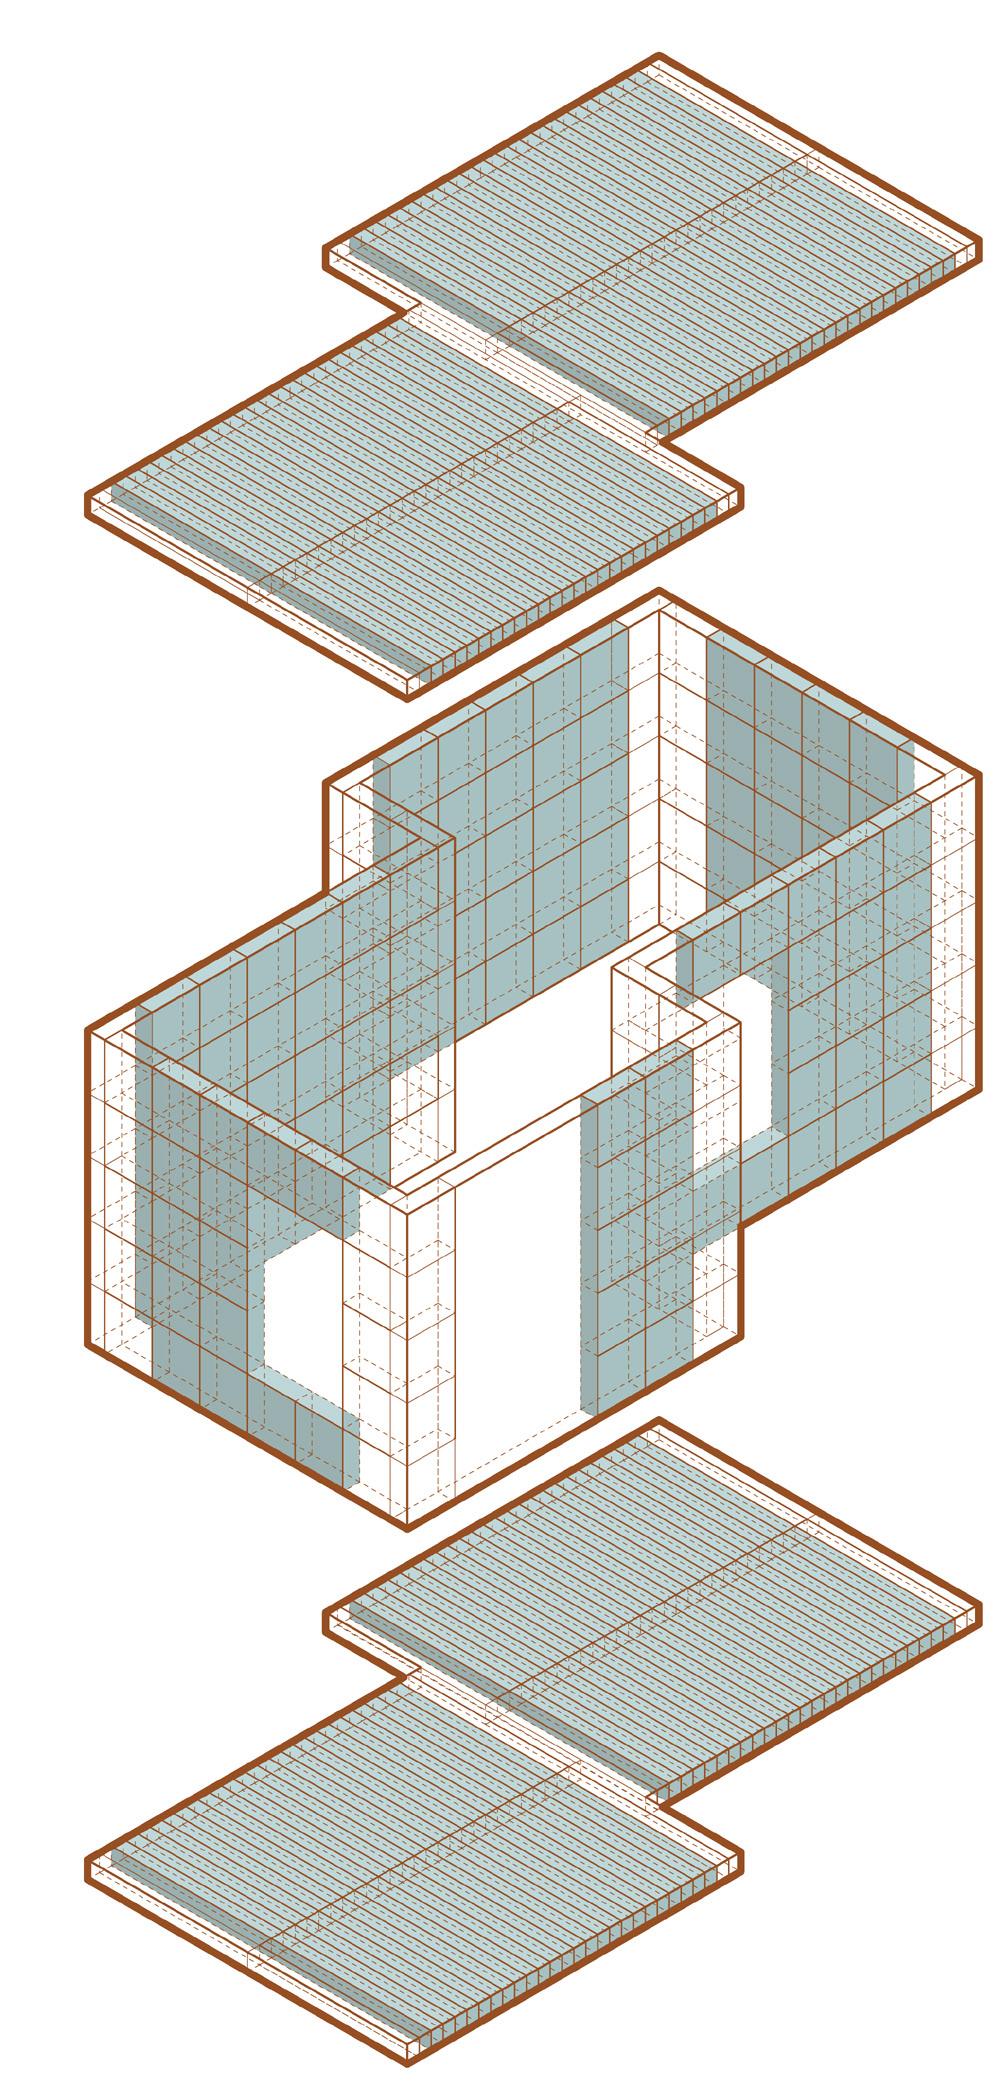
Double/ Accessible Shelter Quantities: (F/R2) & (W2)
Roof: (F/R2) x 4
Walls: (W2) x 37
Floor: (F/R2) x 4
COMMUNITY GUIDELINE 2024 SURVIVAL TO SUSTAINABLE CARE 36 35 SURVIVAL TO SUSTAINABLE CARE
Double/ Accessible Shelter Quantities: (F/R3) & (W3)
Roof: (F/R3) x 4
Walls: (W3) x 40
Floor: (F/R3) x 4
Double/ Accessible Shelter Quantities: (WL), (WS) & (D1)
Windows: (WL) x 2
Windows: (WS) x 1
Doors: (D1) x 1
COMMUNITY GUIDELINE 2024 SURVIVAL TO SUSTAINABLE CARE 38 37 SURVIVAL TO SUSTAINABLE CARE
WL WL WS D1
Semi-Detached Shelter Quantities: (F/R1) & (W1)
Roof: (F/R1) x 52
Walls: (W1) x 131
Floor: (F/R1) x 52
Semi-Detached Shelter Quantities: (F/R2) & (W2)
Roof: (F/R2) x 2
Walls: (W2) x 30
Floor: (F/R2) x 2
COMMUNITY GUIDELINE 2024 SURVIVAL TO SUSTAINABLE CARE 40 39 SURVIVAL TO SUSTAINABLE CARE
Semi-Detached Shelter Quantities: (F/R3) & (W3)
Roof: (F/R3) x 2
Walls: (W3) x 30
Floor: (F/R3) x 2
Semi-Detached Shelter Quantities: (WL), (WS) & (D1)
Windows: (WL) x 1
Windows: (WS) x 1
Doors: (D1) x 2
COMMUNITY GUIDELINE 2024 SURVIVAL TO SUSTAINABLE CARE 42 41 SURVIVAL TO SUSTAINABLE CARE
WL WS D1 D1
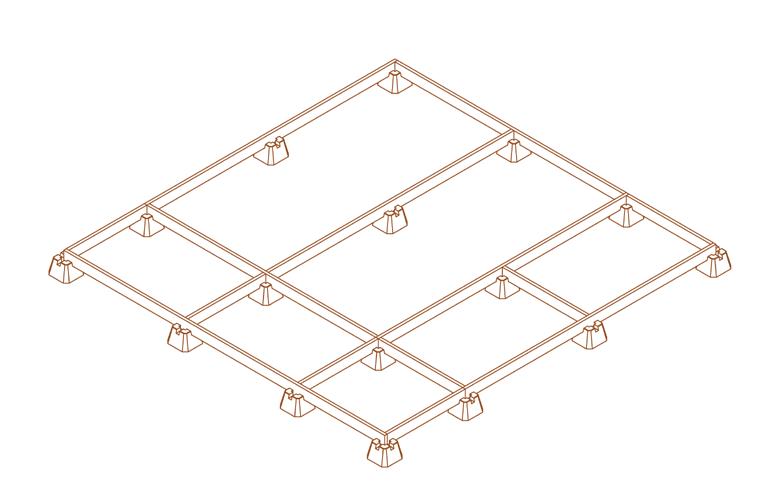
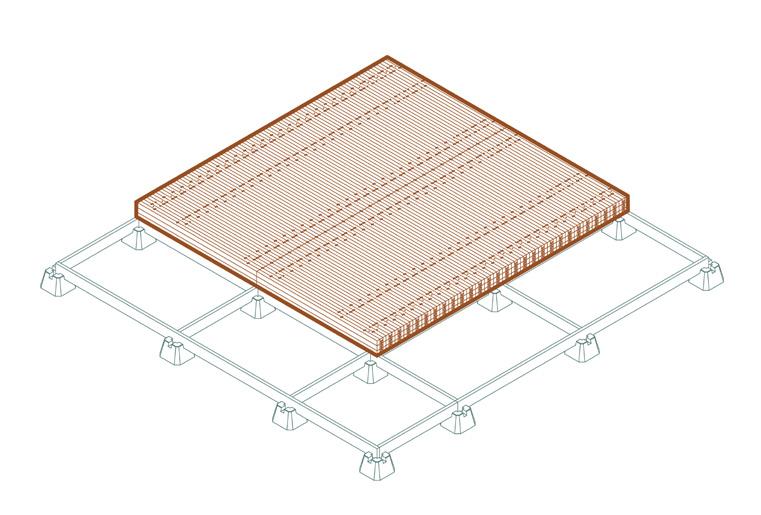
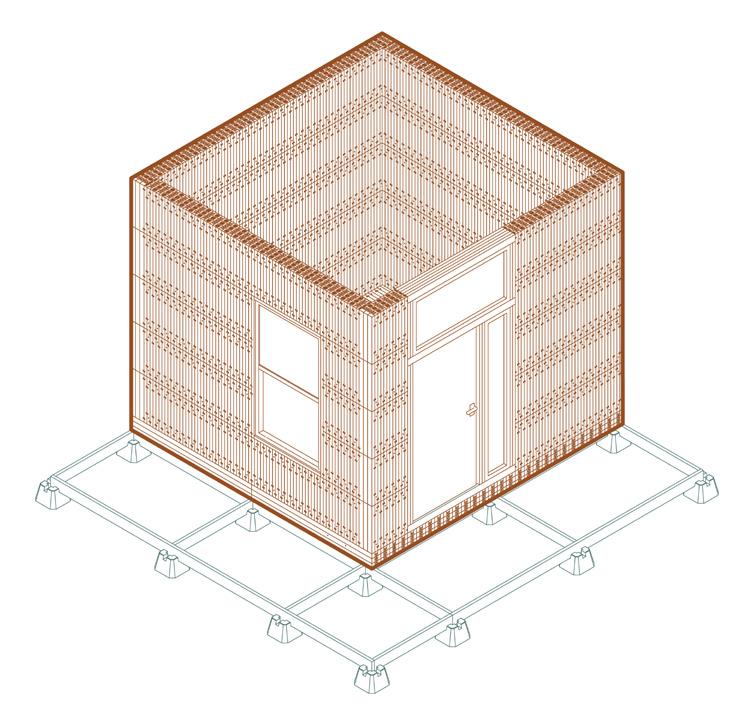
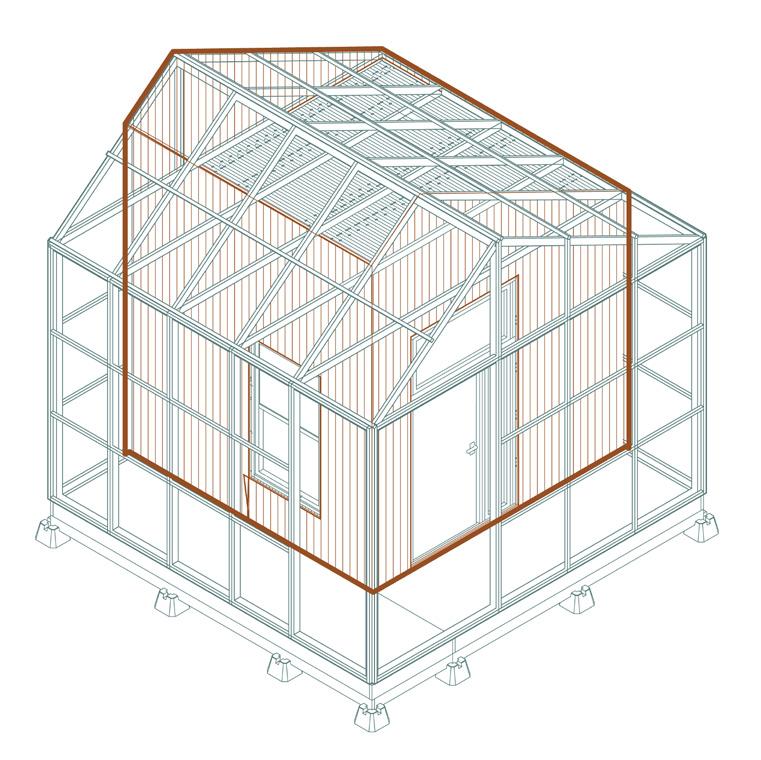
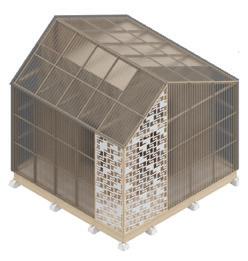
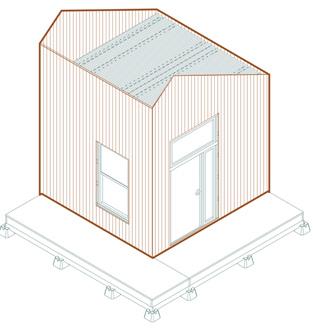
On-Site Assembly
1 | Foundation: Precast concrete blocks, wood beams
2 | Floor: Prefabricated floor panels
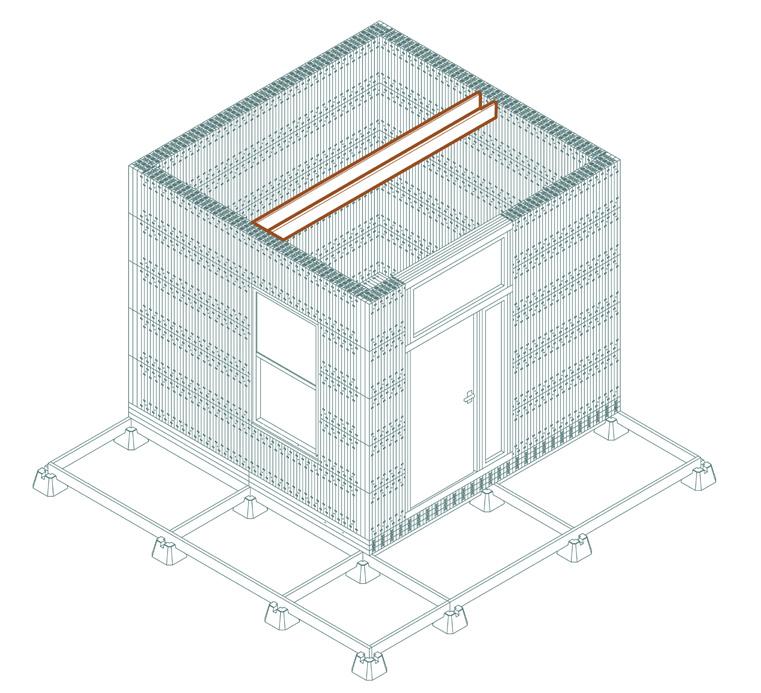
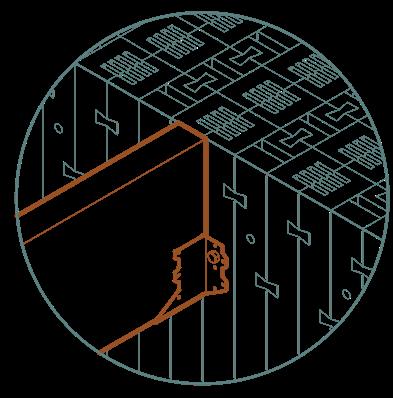
4 | Roof Beams: Wood beams with metal joist hanger
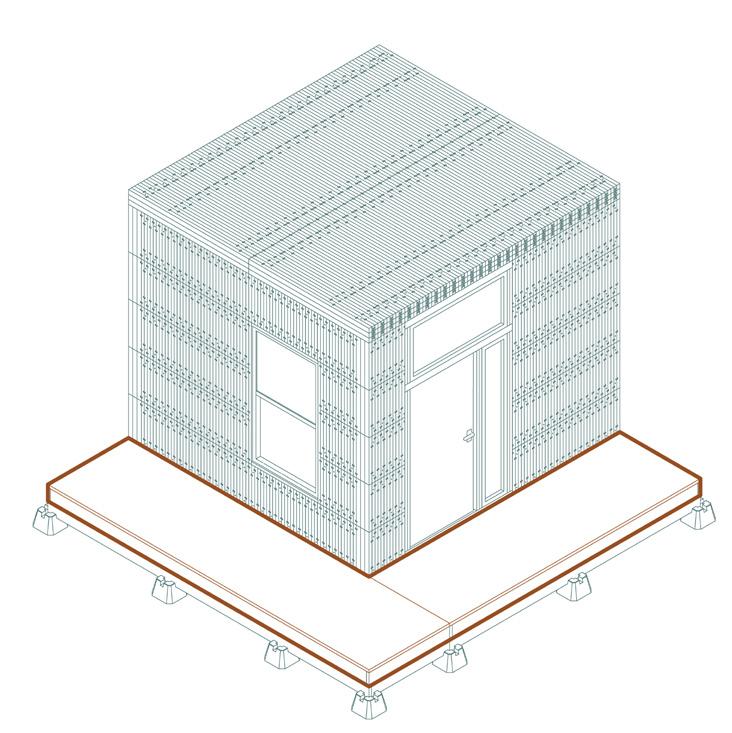
6 | Porch: Wood joists and decking
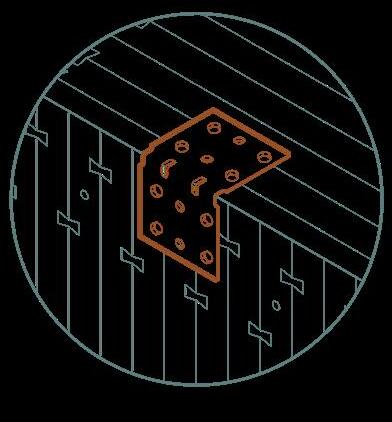
3 | Walls: Prefabricated wall, window and door panels with metal angle connection
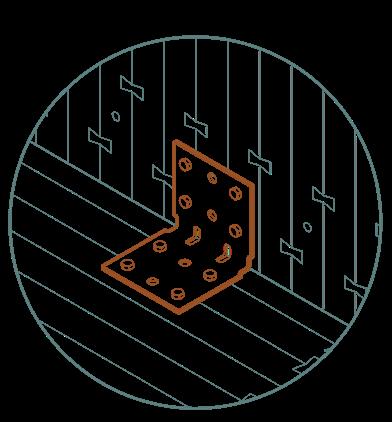
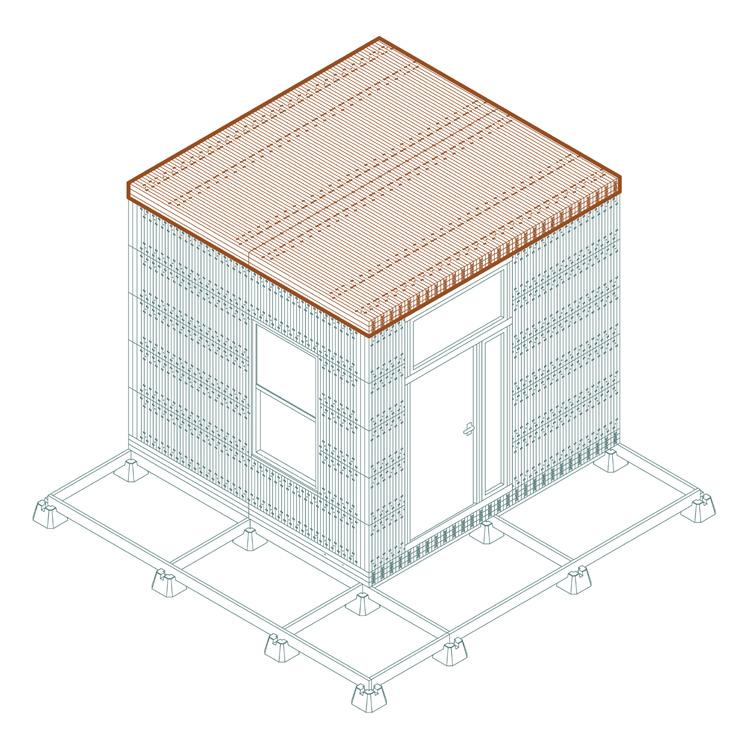
5 | Roof: Prefabricated roof panels with metal angle connection between roof and wall panels
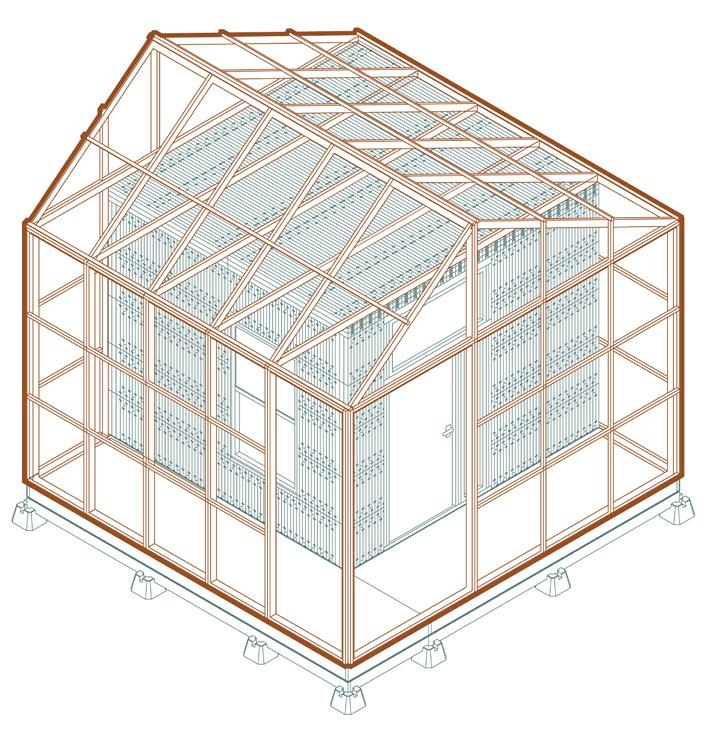
7 | Frame: Wood framing around deck and shelter module
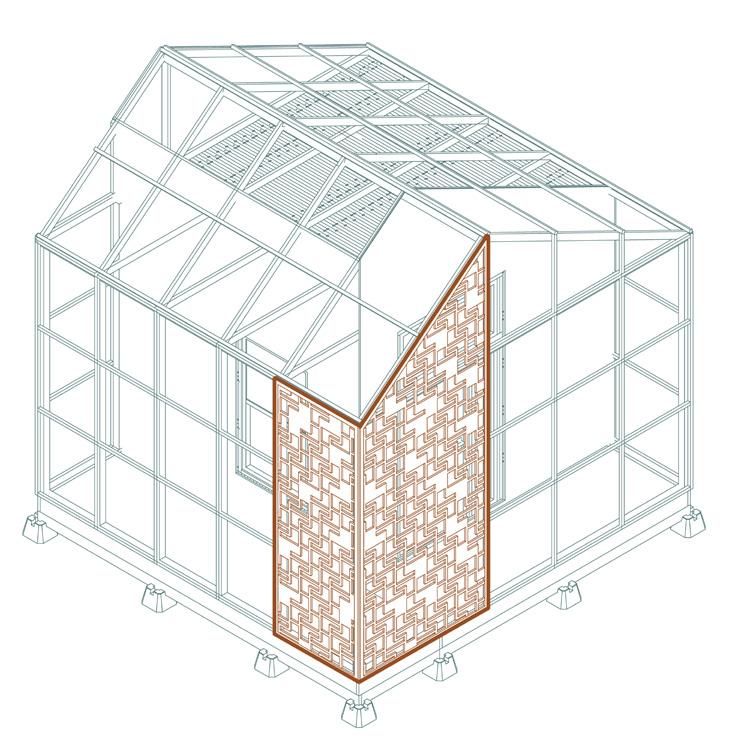
9 | Metal Screen: Metal screening for porch door
8 | Rainscreen: Two layers of wood strapping and vertical wood cladding
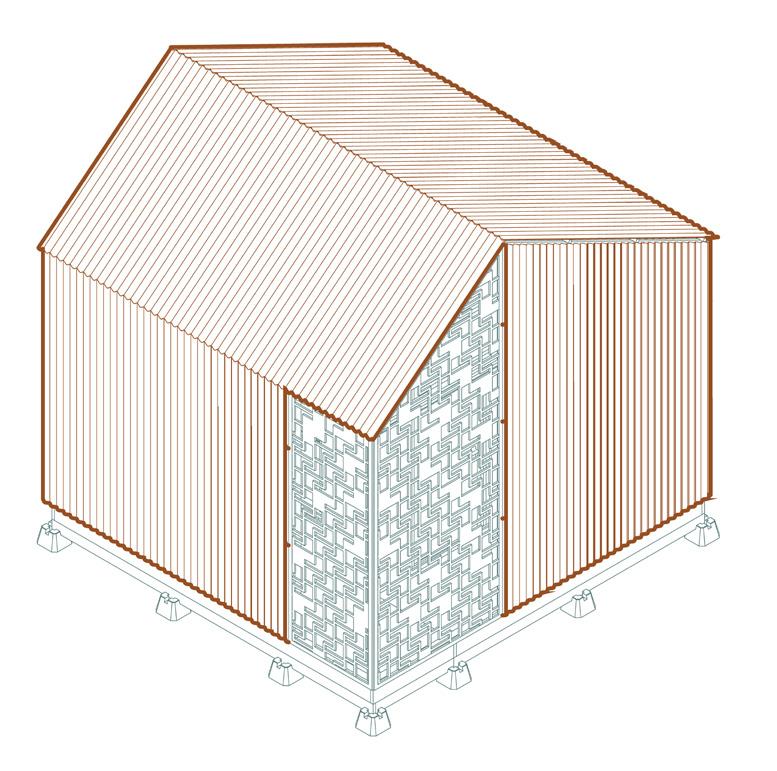
10 | Corrugated Polycarbonate: Two layers of lapped corrugated polycarbonate fastened to wood framing
COMMUNITY GUIDELINE 2024 SURVIVAL TO SUSTAINABLE CARE 44 43 SURVIVAL TO SUSTAINABLE CARE

11 | Raised Floor: 2”x4” floor joists and wood flooring
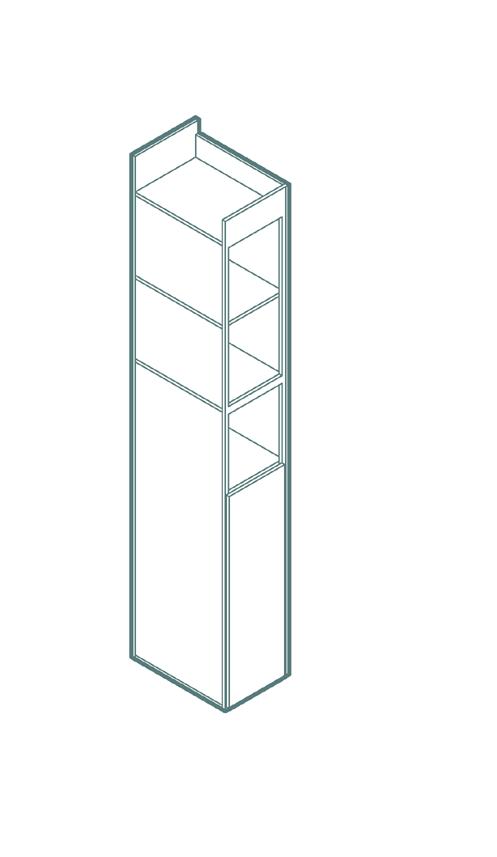
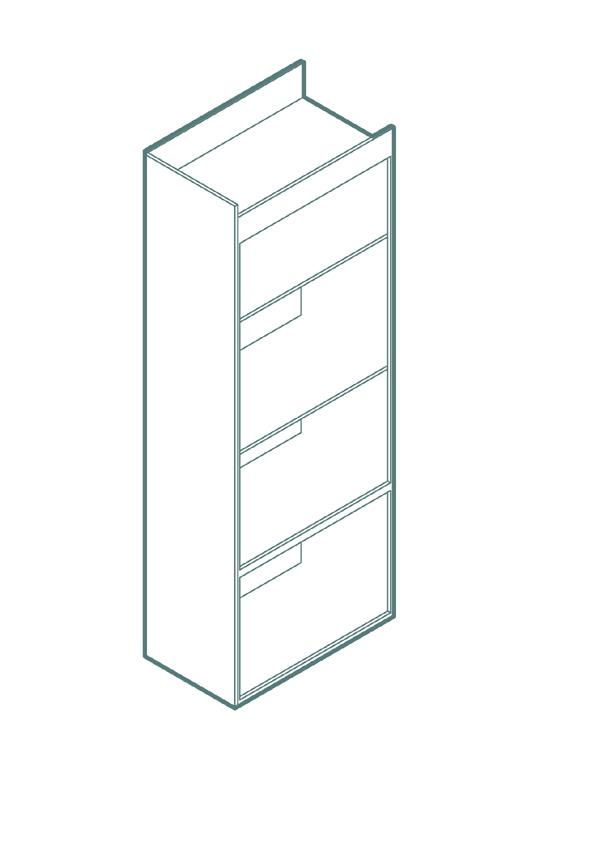
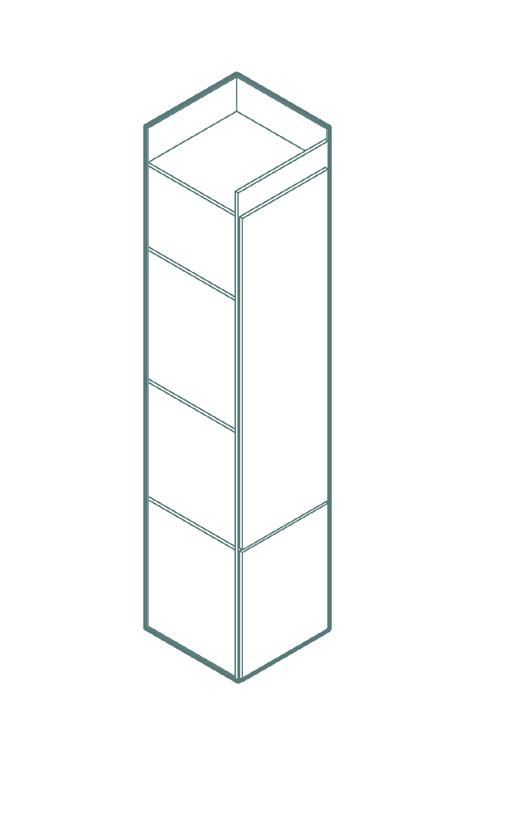
Storage Wall Modules for Each Shelter Type
SINGLE SEMI-DETACHED
12 | Storage Wall Modules: Prefabricated storage wall modules, plugs, lighting, and heater
DOUBLE ACCESSIBLE
COMMUNITY GUIDELINE 2024 46 45 SURVIVAL TO SUSTAINABLE CARE
A B D E F C A B D C A B D C A A B B C C C C * *
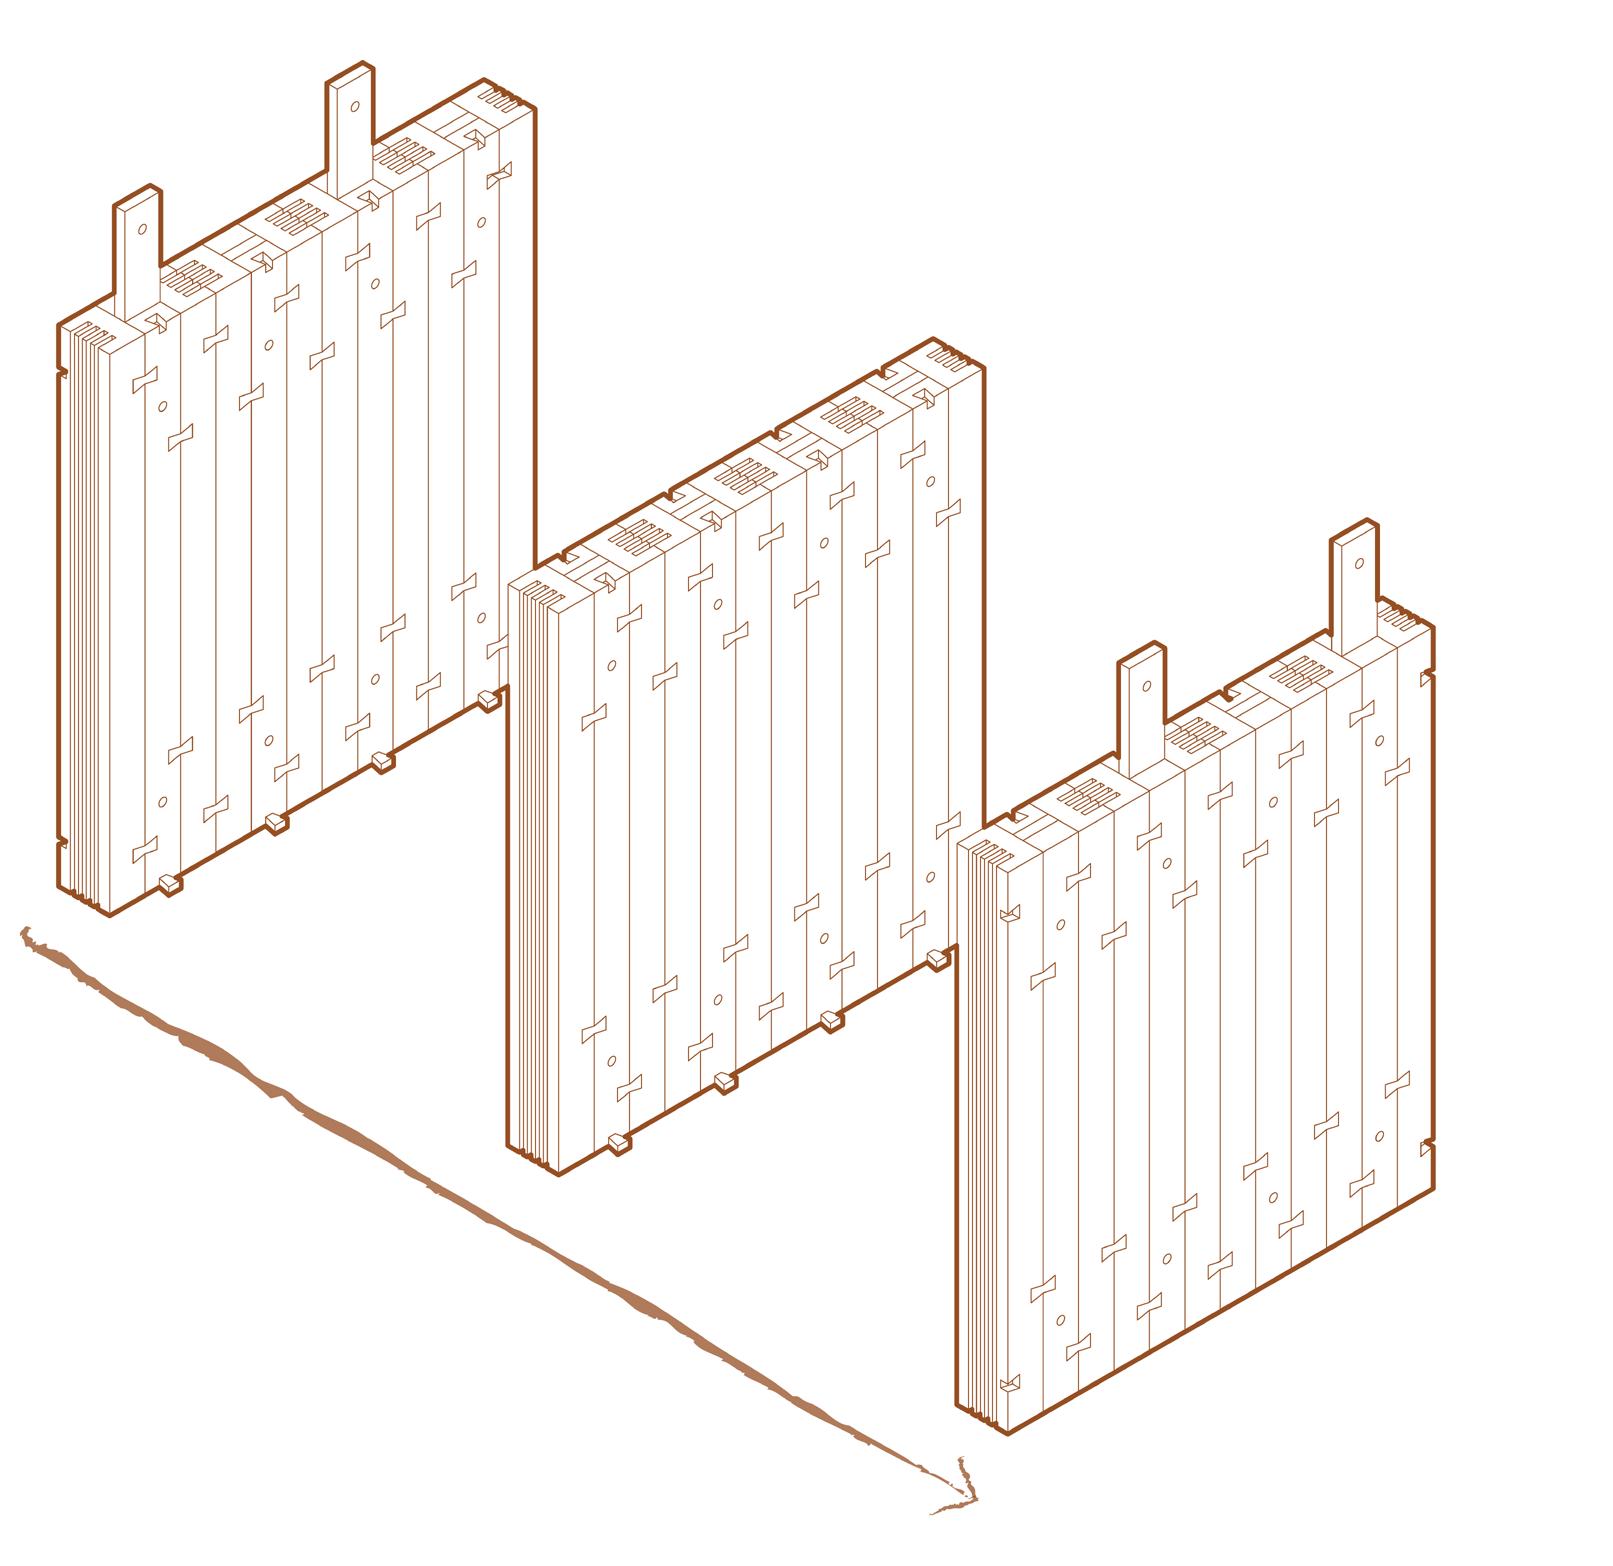
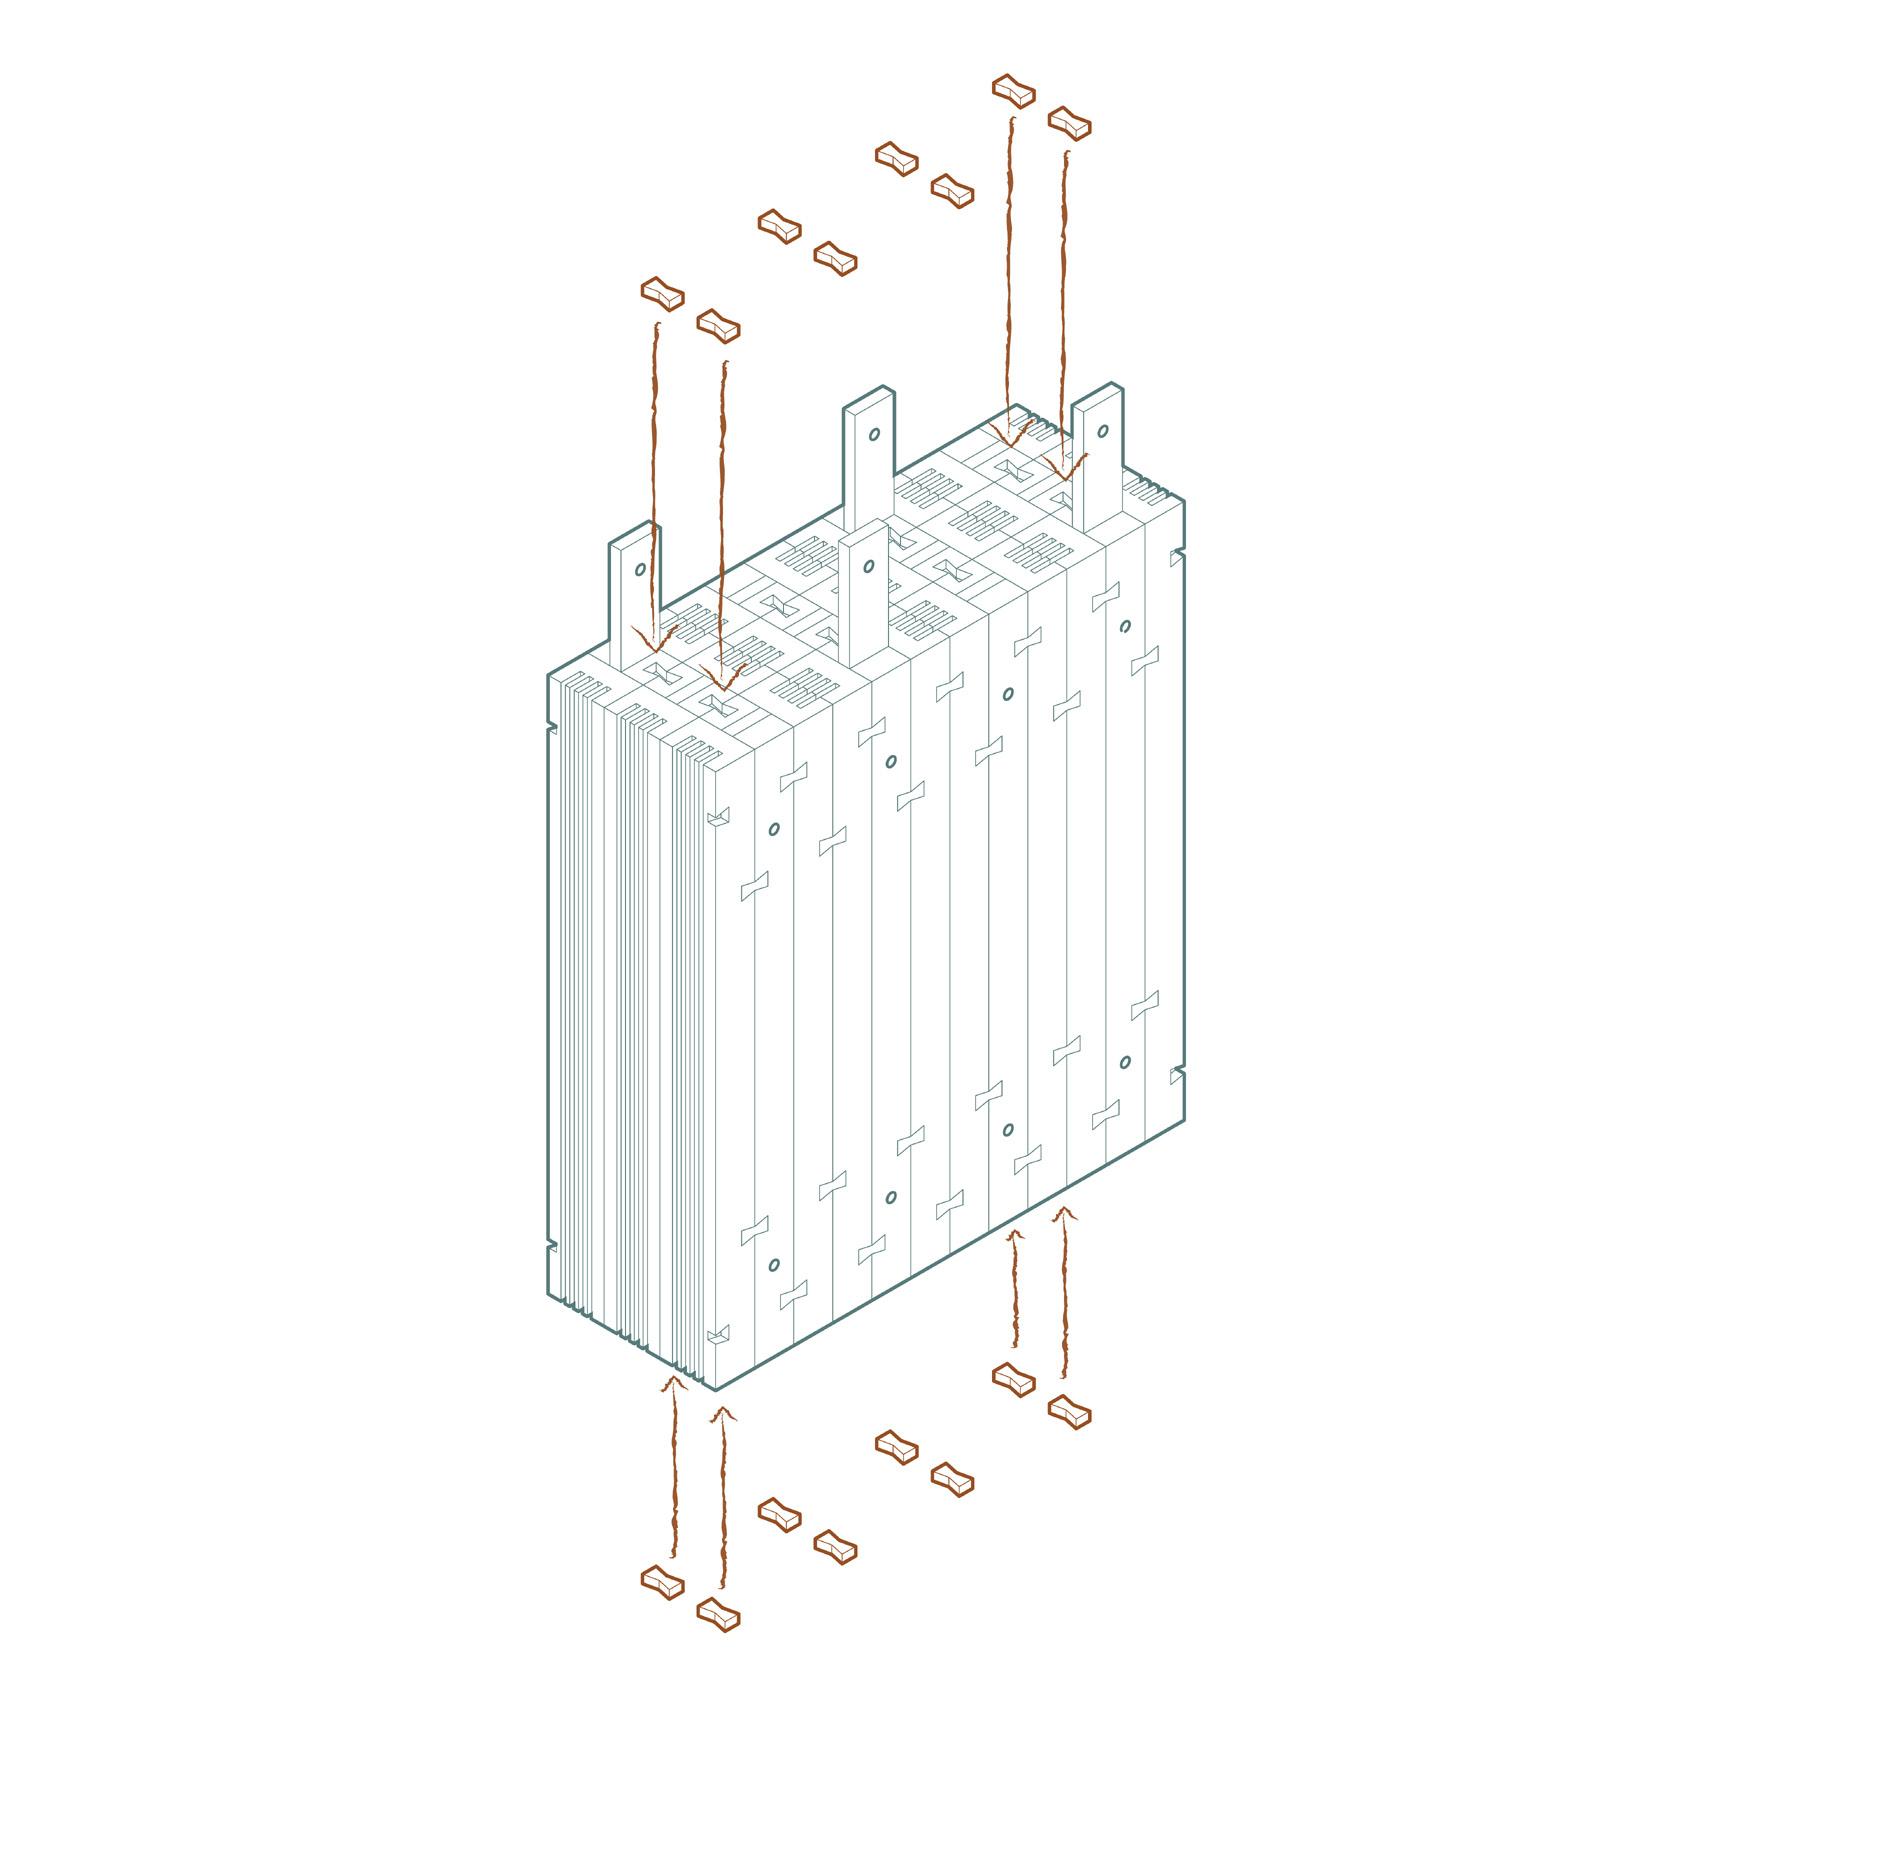
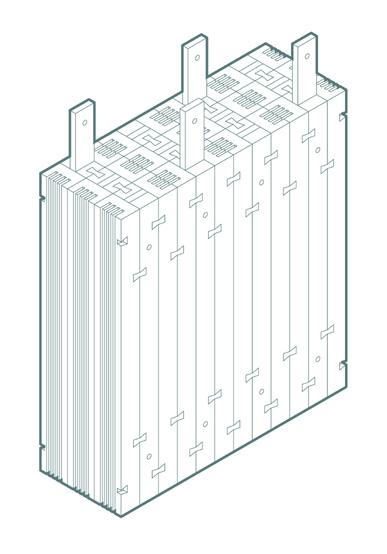
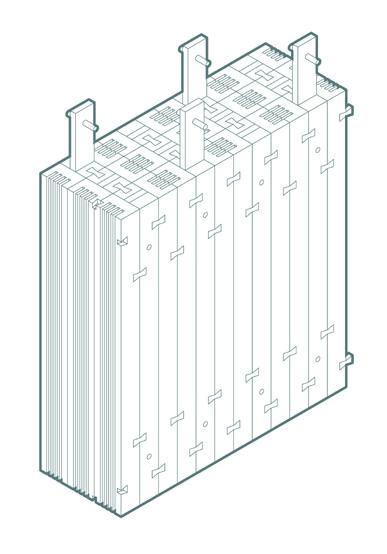
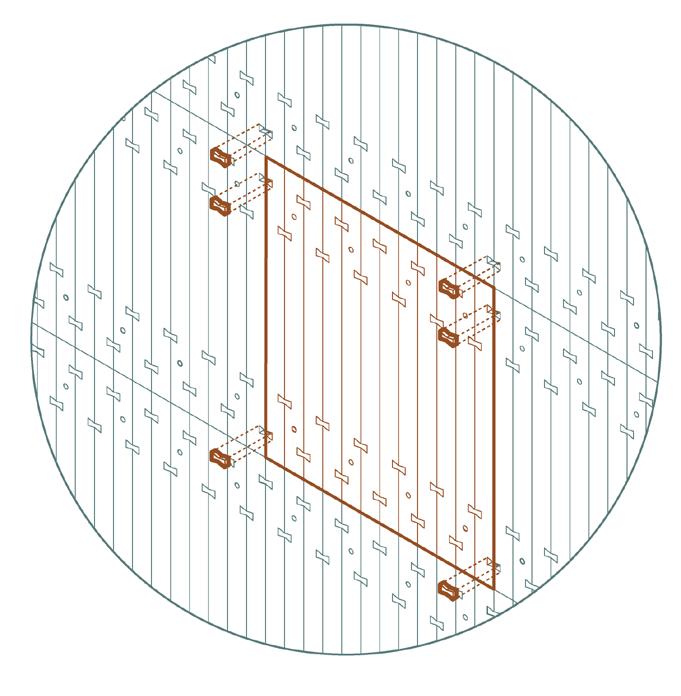
After the shelters are used for a prolonged period of time, it is normal for the wood elements to deteriorate, especially due to the lack of membranes used within the design. When this occurs, the panels can be removed and replaced with new ones. In order to replace a wall panel, the first step includes removing the necessary roof panels that sit above the panel to be replaced. The next step, as pictured on page 48, includes removing the bowties located between each prefabricated panel (including the damaged panel as well as those located directly above).
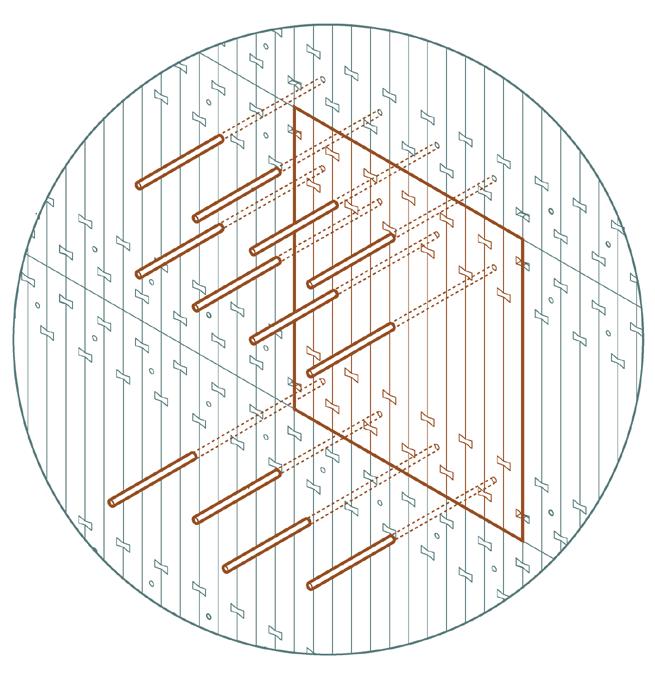
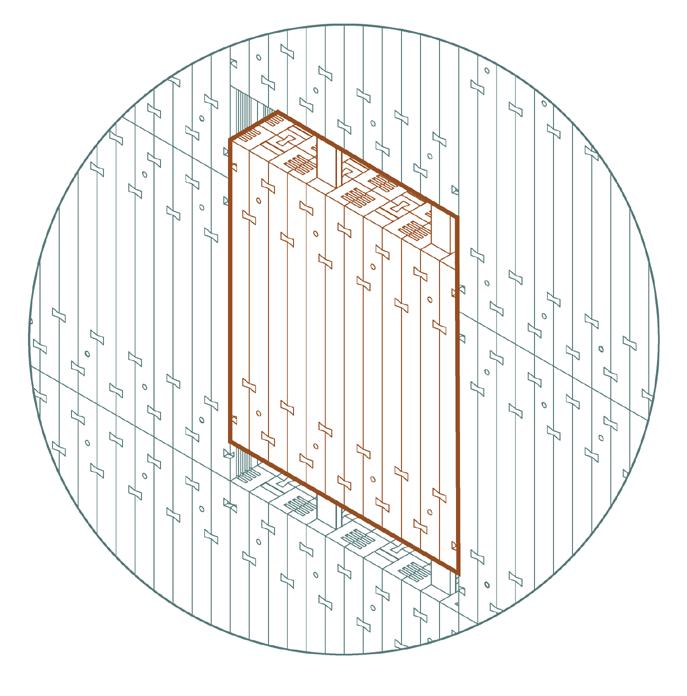
Following this, the dowels are removed from the spacers that connect the prefabricated panels vertically (including the damaged panel as well as those located directly above). After the bowties and dowels are removed, the panels above the damaged panel can then be carefully removed and kept for re-installation. The damaged panel can then be removed and set aside to be repurposed (see step 10 for potential repurposing options). After this, a new prefabricated panel, along with the panels that were previously set aside can be installed.
COMMUNITY GUIDELINE 2024 SURVIVAL TO SUSTAINABLE CARE 48 47 SURVIVAL TO SUSTAINABLE CARE Step 9
remove
aboveand replace d am a g e d plena
| Shelter Use
bowtie connections remove dowelconnections remove panels
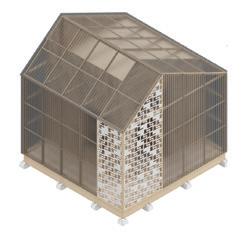
After the materials are used for the shelters, due to utilizing Designing for Deconstruction techniques, they can be disassembled and repurposed. If the materials are in good condition they can be utilized to construct future shelters. Alternatively, once the prefabricated panels are damaged or no longer sufficient in providing comfortable thermal conditions they can be repurposed to construct sheds or other structures that do not require the same thermal resistance values as a dwelling does. Additionally, the other materials such as corrugated polycarbonate, wood cladding, and metal screening elements can be used within the construction of these structures. The prefabricated mono-material timber panels could also be used to construct exterior tables and benches to be placed onsite for various purposes such as a place to eat lunch or repair a bicycle. Additionally, the wood elements, from the mono-material timber panels, exterior frame, and storage modules can be repurposed to make furniture or architectural models.
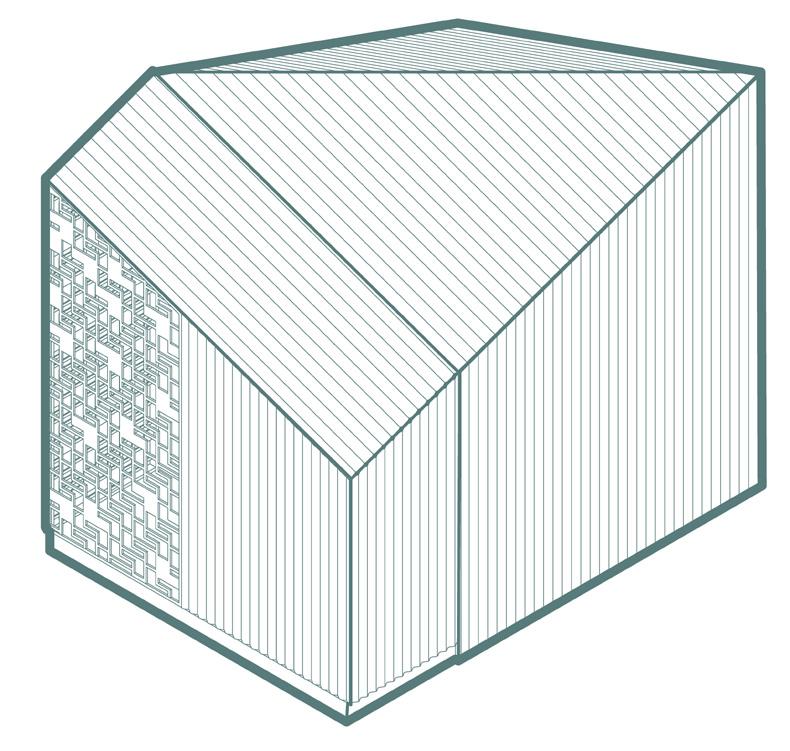
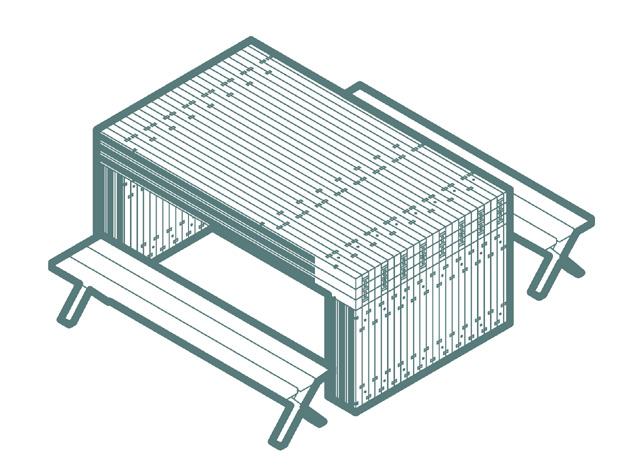
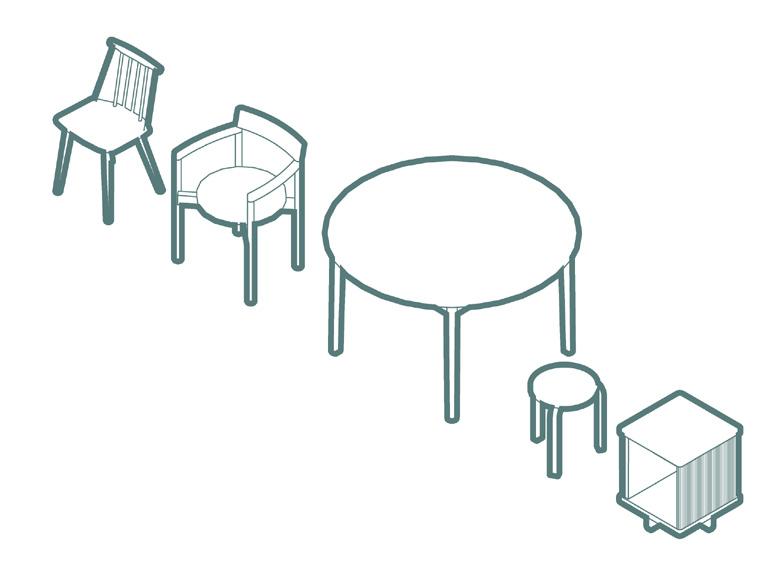
COMMUNITY GUIDELINE 2024 SURVIVAL TO SUSTAINABLE CARE 50 49 SURVIVAL TO SUSTAINABLE CARE Step 10 | End of Life Cycle furniture storageshed
tables&benches
Step 11 | Evaluation & Improved Shelter Design
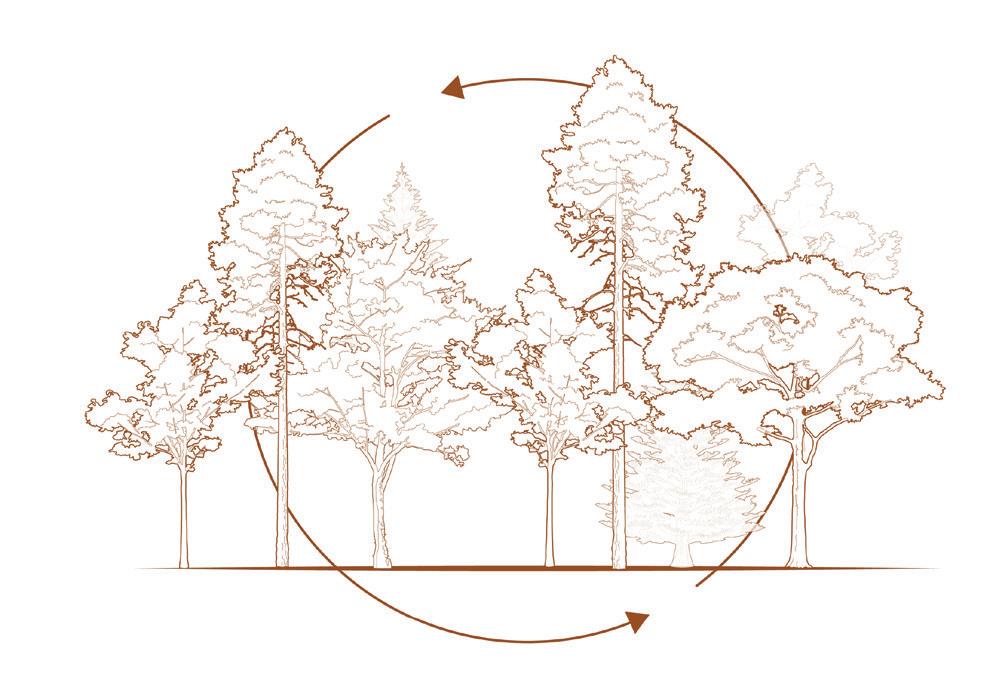
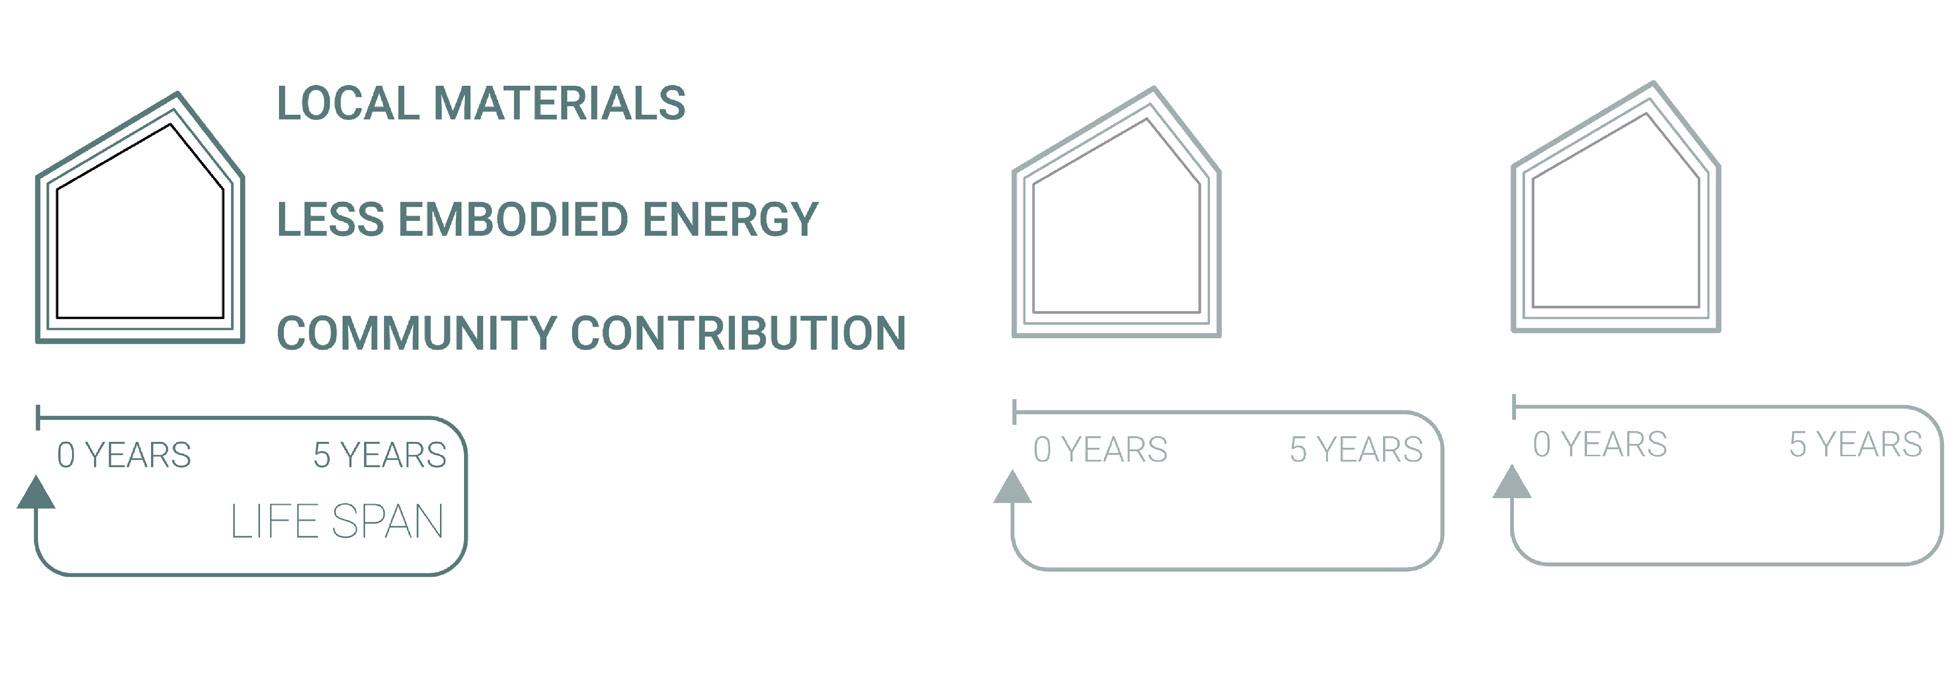
At the end of the shelter’s life cycle, it is crucial to evaluate the performance and improve the design for future shelter iterations. The following step (page 51 & 52) includes categories in which the project should be evaluated and space to include notes regarding each category.
Designing the shelters to have a short life cycle allows us to learn from these initial prototypes and utilize this modular system to improve the design of the shelters in future iterations. Additionally, this short life cycle allows for continuous youth and community involvement throughout time, which thus helps with the lasting reduction of stigma.
Site Selection & Design (Step 1 & 2)
Ease of Assembly (Steps 6, 7, & 8)
COMMUNITY GUIDELINE 2024 SURVIVAL TO SUSTAINABLE CARE 52 51 SURVIVAL TO SUSTAINABLE CARE
Need Assessment Form (Step 4)
Rainscreen Performance
Other Improvements to be Made
CNC Milling (Step 5)
Window & Door Performance
Access to Materials (Step 3)
Thermal Comfort (Prefab Wall Panels)
COMMUNITY GUIDELINE 2024 SURVIVAL TO SUSTAINABLE CARE 54 53 SURVIVAL TO SUSTAINABLE CARE