Manuale di istruzioni
Instruction manual

Italiano English
Italiano English
ATTENZIONE WARNING
Rodaggio
Break in period
Olio Idraulico
Hydraulic fluid
Montaggio pompante
Pump installation
Pompante RXC
RXC brake pump
Pompante RGR
RGR brake pump
Montaggio pinza
Caliper installation
Montaggio pinza
Caliper assembly
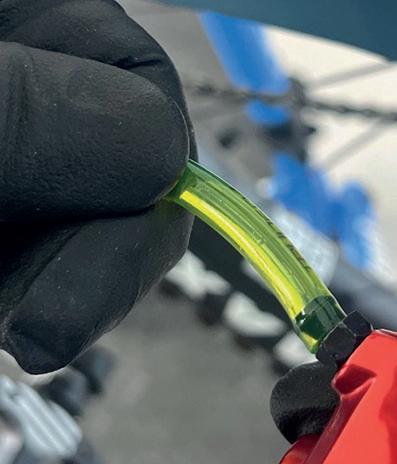
Tubi
Pipe fitting
Collegamento tubo-pompante
Pipe fitting on pump
Collegamento tubo-pinza
Pipe fitting on caliper
Montaggio pastiglie freno
Breake pads fitting
Rimuovere le pastiglie
Removing brake pads
Inserire le pastiglie
Fitting brake pads
Spurgo
Bleeding
Operazioni preliminari
Initial operations
Riempimento
Filling
Spurgo
Bleeding
Regolazioni
Setting
Corsa della leva - RXC
Lever Reach - RXC
Corsa della leva - RGR
Lever Reach - RGR
Corsa morta - RGR
- RGR

La manutenzione degli impianti frenanti deve essere eseguita da un tecnico qualificato. Raicam non è responsabile in caso di malfunzionamenti causati da utilizzo improprio. Maintenance operations must be carried out by a qualified technician. Raicam is not responsible for malfunctions caused by improper handling.
Per ottenere le migliori prestazioni dell’impianto frenante, è necessario rodare l’impianto correttamente. Raicam consiglia di effettuare almeno 30 cicli di frenata su asfalto, frenando fino al completo arresto della bicicletta.
To obtain the best performance from the braking system, it is necessary to run the system in correctly. Raicam recommends performing at least 30 test braking cycles on safe ground, braking until the bike comes to a complete stop.
Gli impianti frenanti Raicam sono progettati per lavorare esclusivamente con olio minerale Raicam.
Raicam brake systems are designed to operate with Raicam mineral oil only.
PUMP INSTALLATION
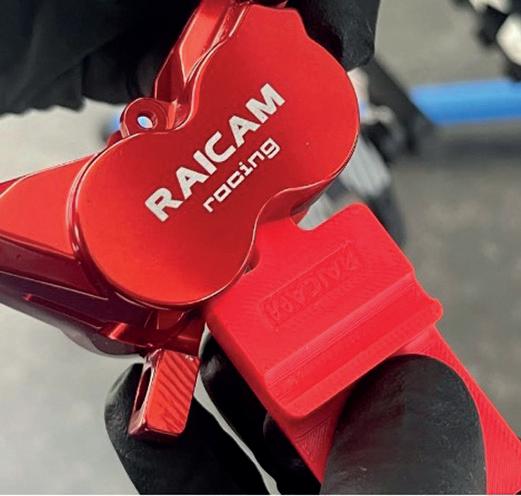
I pompanti Raicam RGR ed RXC sono speculari; possono essere utilizzati sia come freno anteriore che come freno posteriore.
Raicam RGR and RXC master cylinders are mirror-image; they can be used independently on the front or rear brake.
3. Pompante RXC
3.1
RXC brake pump
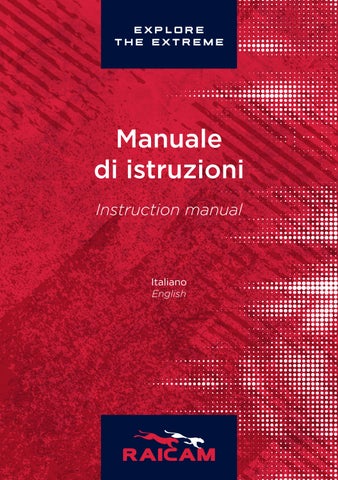
Montare il pompante sul manubrio nella posizione desiderata. Install the pump on the handlebar in the desired position.
Fissare il pompante con il collarino in dotazione, quindi stringere le viti a 3.5 - 4Nm con una chiave a brugola da 4mm.
Secure the pump with the clamp provided, tightening both screws to a torque of 3.5 - 4Nm with a 4mm hex key.
1 1
3.2
Pompante RGR
RGR brake pump
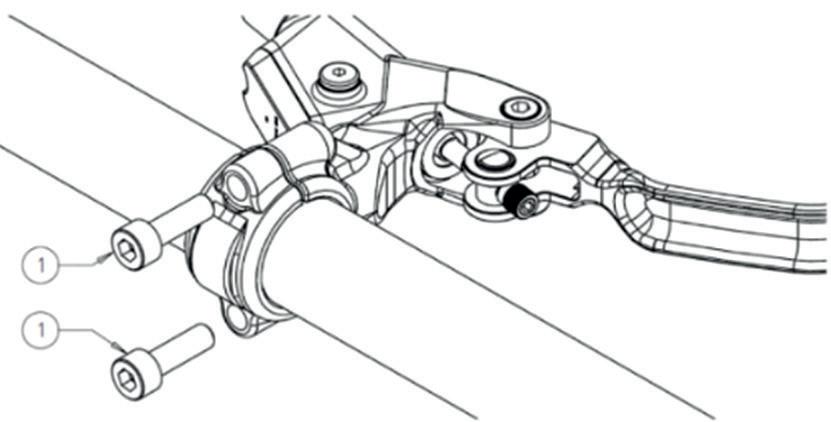
Montare il pompante sul manubrio nella posizione desiderata. Install the pump on the handlebar in the desired position.
Fissare il collarino del pompante e stringere la vite a 3.5 - 4 Nm con una chiave a brugola da 4mm.
2
Close the supplied clamp on the pump and then tighten the screw to a torque of 3.5 - 4 Nm with a 4 mm hex key. 2
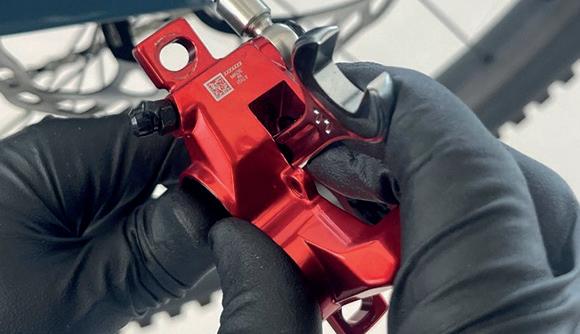
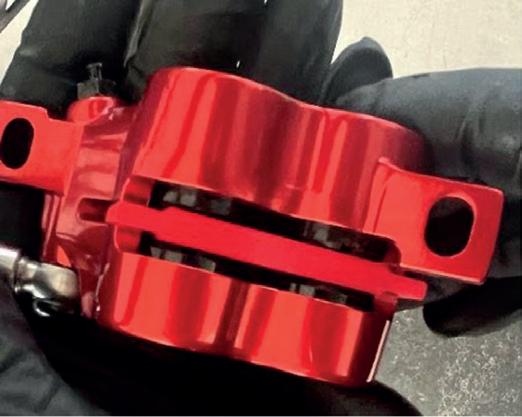
CALIPER INSTALLATION
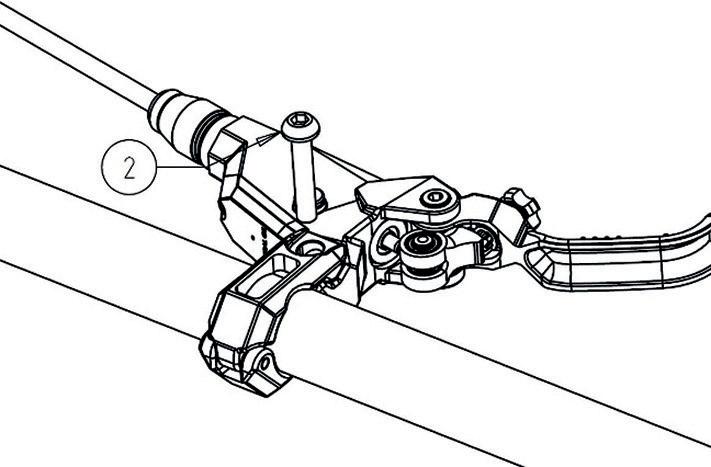
Per garantire il corretto montaggio della pinza freno al telaio, ed il corretto funzionamento con tutti i diametri di disco, potrebbe essere necessario utilizzare degli adattatori.
To ensure correct assembly of the brake caliper to the frame, adapters may be required to ensure proper functionality with all disc diameters.
4.1
Montaggio pinza
Caliper assembly
Installare la pinza freno sul telaio della bicicletta; se è necessario l’utilizzo di un adattatore, lo stesso deve essere posizionato tra il telaio e la pinza. Install the caliper on the bike frame, if an adapter is required it must be positioned between the bike frame and the caliper.
*NB: Non eccedere il diametro del disco minimo e massimo consentito dal telaio della bicicletta e/o dalla forcella. Do not exceed the minimum and maximum disc diameter allowed by the bicycle frame and/or fork.
Fissare la pinza con le rondelle e le viti . Serrare le viti ad una coppia di 6 - 8 Nm.
3 4 3 4
Secure the caliper with the provided washers and screws . Tighten the screws to a torque of 6 Nm.
5.
*NB: Assicurarsi che l’estremità del tubo sia tagliata perpendicolarmente al tubo stesso, e che il tubo non sia danneggiato internamente.
Check that the end of the pipe is cut perpendicular to the pipe and that the pipe is not crushed internally.
Questa procedura preparatoria è necessaria per installare i tubi freno su tutti i pompanti e le pinze freno Raicam. This initial procedure is required to install the hose on all Raicam calipers and pumps.
Inserire l’inserto nel tubo utilizzando gli strumenti per il trasporto/spurgo . Fit the insert into the pipe using the two tools required for transport/bleeding .

Bloccare i due strumenti ed utilizzare una mazzetta in plastica per inserire l’inserto nel tubo.
Clamp the two tools together and use a plastic hammer to fit the insert into the pipe. 5 6 5 6
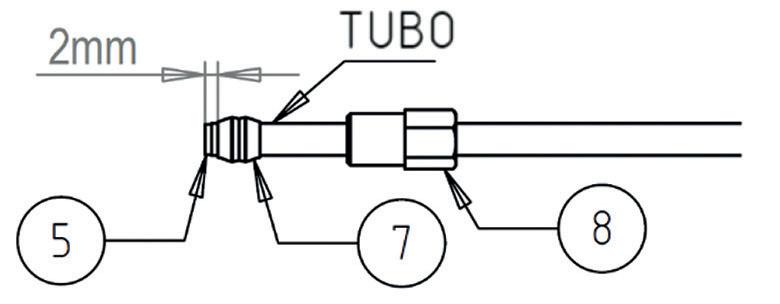
*NB: Fare attenzione a posizionare l’inserto a filo del tubo. Pay attention to set it flush with the pipe.
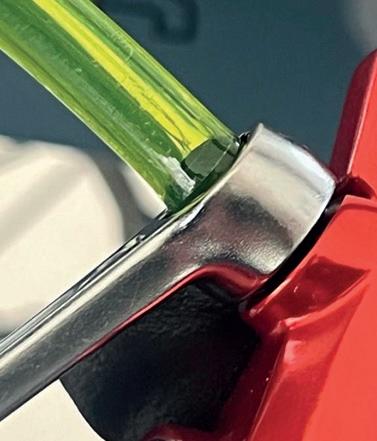
Far scorrere l’ogiva sul tubo fermandosi a circa 2mm dall’estremità. Assicurarsi che il dado possa scorrere liberamente sul tubo.
Slide the ogive onto the pipe, stopping about 2mm from the end of the pipe. Make sure to have the screw nut free to slide on the pipe. 7 8 7 8
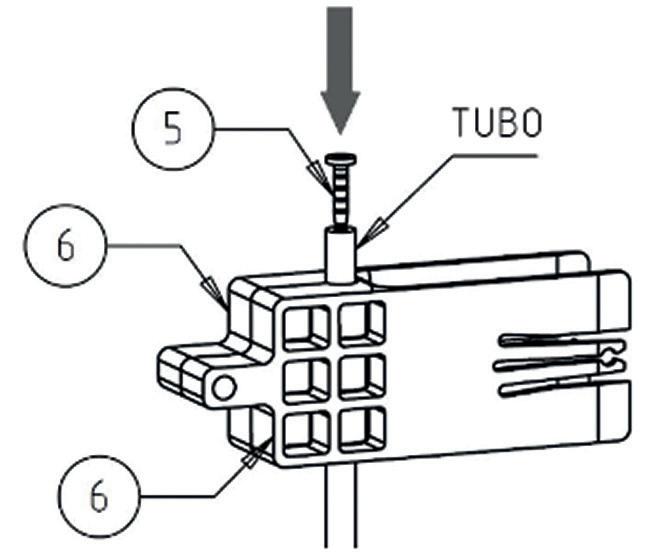
5.1
Collegamento tubo-pompante
Pipe fitting on pump
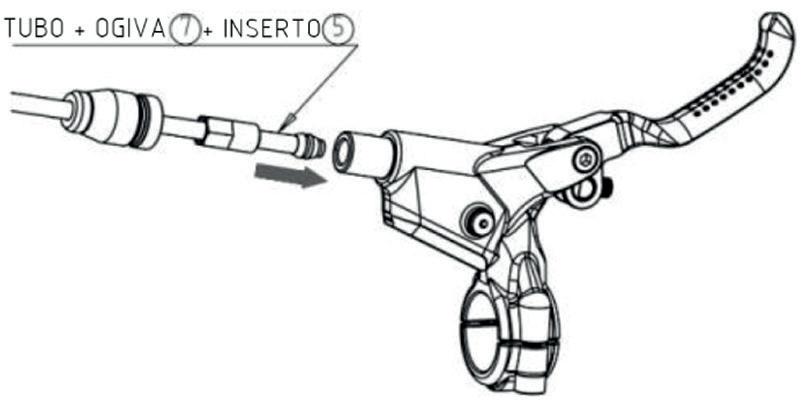
Inserire il tubo, con l’inserto e l’ogiva assemblati , all’interno del corpo del pompante freno.
Fit the pipe, with insert and ogive assembled , into the brake pump body. 5 7 5 7
Tubo + Ogiva + Inserto Pipe + Ogive + Insert 7 5 7 5
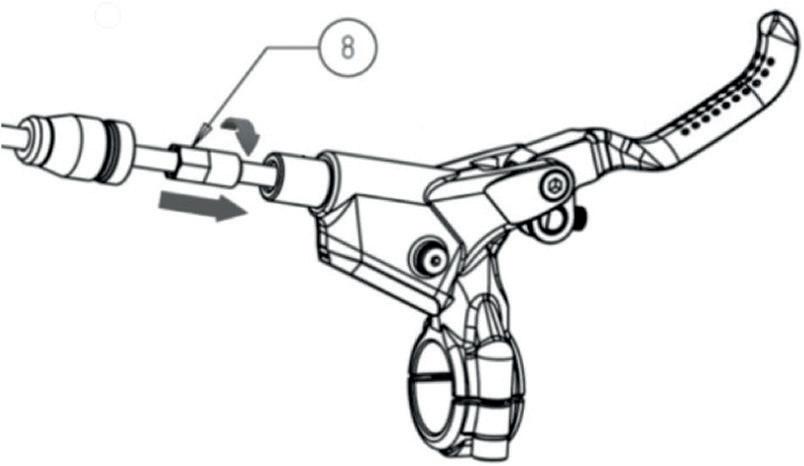
Quindi far scorrere il dado sul tubo ed alloggiarlo nel corpo del pompante freno.
Then slide the screw nut on the pipe to fit in in the brake pump body. 8 8
5.2
Stringere il dado (usando una chiave da 8mm) al corpo del pompante freno. Serrare il dado a 7Nm.
Screw the screw nut (using a 8mm spanner) to the brake pump body. Tighten to a torque of 7 Nm.
*NB: Fare attenzione a mantenere il tubo in contatto con il fondo della sede del corpo pompante freno.
Pay attention to keeping the pipe in contact with the bottom of the seat on the pump body. 8 8
*NB: Fare attenzione a mantenere il tubo parallelo al corpo pompante freno durante il serraggio del dado.
Pay attention to keeping the pipe parallel to the pump body when tightening the screw.
Collegamento tubo-pinza
Pipe fitting on caliper
Per collegare il tubo freno alle pinze Raicam, è necessario utilizzare il connettore e la vite forniti da Raicam.
To connect the brake hose to the Raicam calipers, the banjo connector and screw supplied by Raicam must be used.
Inserire i due o-ring all’interno delle rispettive sedi del connettore. Insert the two o-rings supplied into the corresponding seats on the banjo connector. 9 10 9 10 11 11
*NB: Fare attenzione a non pizzicare gli o-ring. Be careful not to pinch them.

Posizionare il connettore nell’apposita sede della pinza freno e stringere la vite a 4 Nm.
Place the banjo connector close to the brake caliper and tighten the screw to 4 Nm.
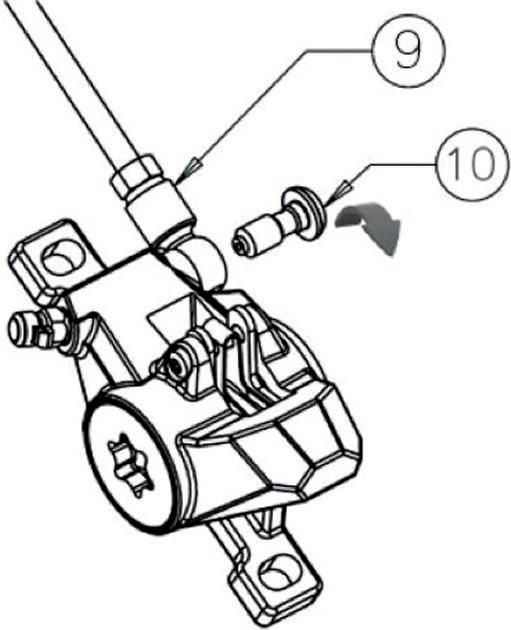
La procedura è la medesima per gli impianti RGR ed RXC. The procedure is the same for the RGR and RXC systems.
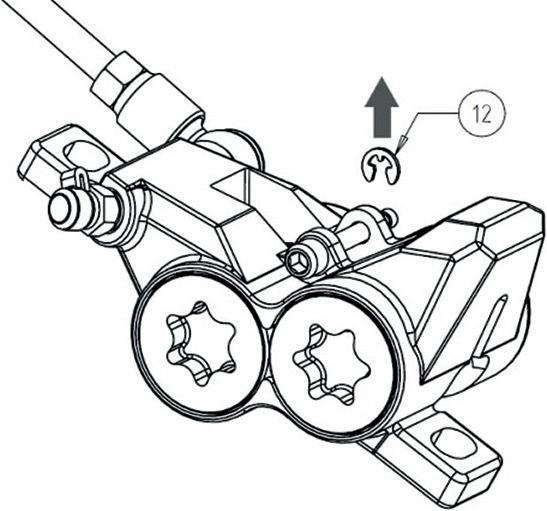
6.1
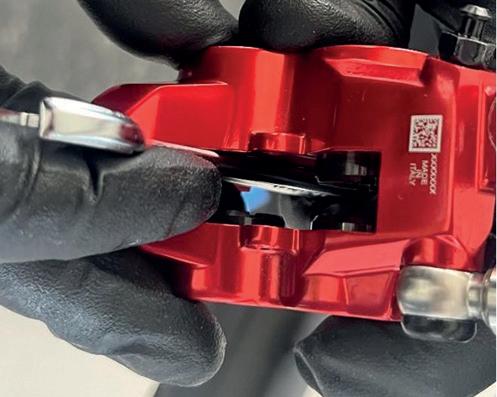
Rimuovere le pastiglie
Removing brake pads
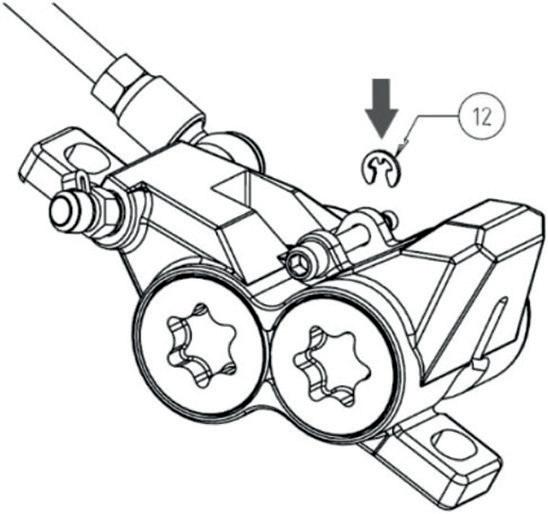
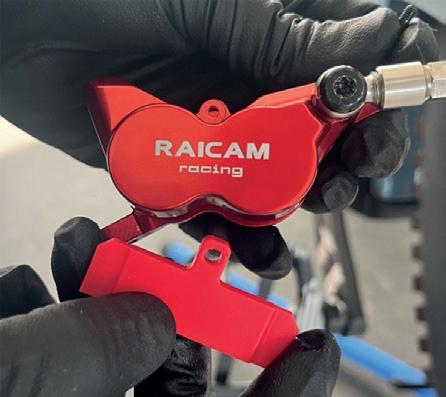
Rimuovere la coppiglia di sicurezza con delle pinze a becco lungo. Remove the safety clip using long-nose pliers. 12 12 1.
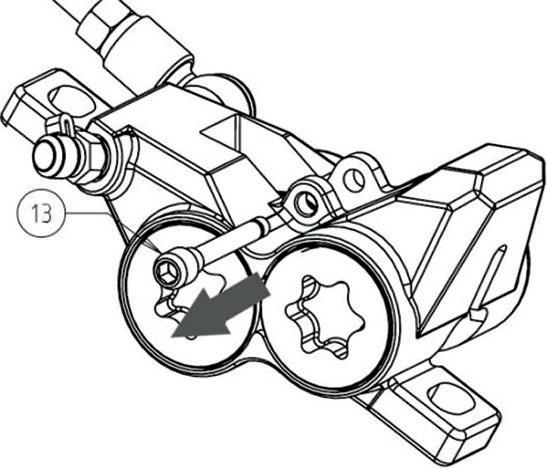
Svitare la vite delle pastiglie utilizzando una chiave a brugola da 3mm.
Unscrew the brake pads screw using a 3mm hex key. 13 13
Rimuovere le pastiglie dalla pinza. Remove the brake pads.
6.2
Inserire le pastiglie Fitting brake pads
Inserire le pastiglie nella pinza. Insert the brake pads.
Avvitare la vite delle pastiglia utilizzando una chiave a brugola da 3mm. Serrare a 1.5 Nm.
Screw the brake pads screw using a 3mm hex key. Tighten to 1,5 Nm.
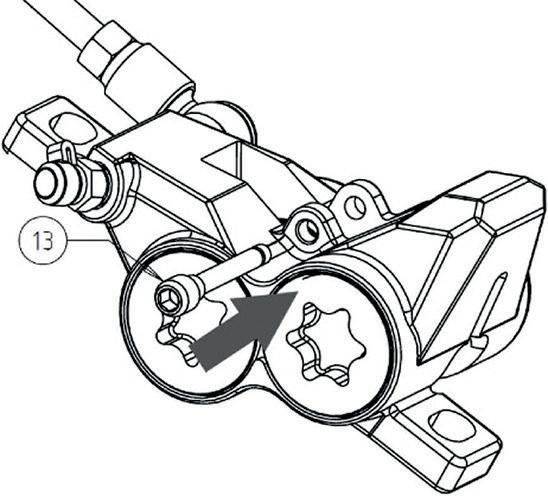
Inserire la coppiglia di sicurezza utilizzando delle pinze a becco lungo. Insert the safety clip using long-nose pliers.
*NB: Fare attenzione ad inserire completamente la coppiglia di sicurezza nell’alloggiamento della vite delle pastiglie. Pay attention to fully seat the safety clip into the screw groove.
La procedura di Spurgo è la stessa per gli impianti RGR ed RXC. The bleeding procedure is the same for the RGR and RXC systems.
*NB: Per i pompanti RGR Racing & Factory, occorre assicurarsi di spurgare (o riempire) l’impianto impostando la corsa morta al minimo (pistone tutto avanti), così da evitare un eccessivo accumulo di olio nel serbatoio. (Per ulteriori Informazioni vai alla sezione Regolazioni).
In the case of RGR Racing and Factory pumps, care must be taken to bleed (or fill) the system by setting the free stroke to min (full forward piston), in order to avoid an excessive accumulation of oil in the tank. (For further information go to the settings section.)
*NB: In caso di usura delle pastiglie e/o del disco, si potrebbe notare un allungamento della corsa della leva. Questo fenomeno è normale e non richiede l’aggiunta di olio nell’impianto.
In caso di rabbocco d’olio, si potrebbe raggiungere un quantitativo di olio eccessivo all’interno dell’impianto, tale da non consentire l’installazione di nuove pastiglie.
In the case of brake pad and disc wear, an elongation of the lever could be noticed. This phenomenon is normal and does not require the addition of oil to the system. Otherwise, an excessive amount of oil could be introduced that would not allow new pads to be installed.
7.1
1. 2.
3.
Operazioni preliminari
Initial operations
Installare il pompante sul manubrio, assicurandosi di posizionarlo parallelo al terreno.
Install the brake pump on the handlebar, pay attention to place the pump parallel to the ground
Rimuovere le pastiglie dalla pinza freno.
Remove the caliper from the frame.
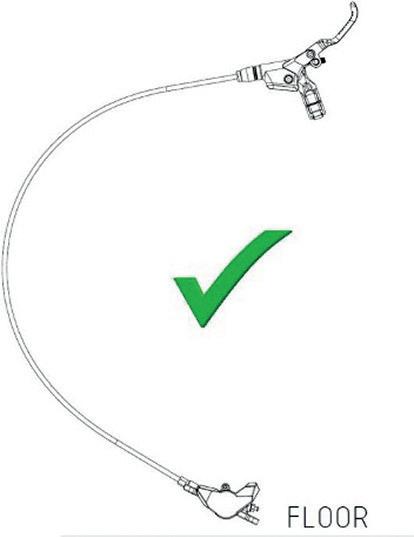
Fare attenzione a posizionare il pompante in una posizione rialzata rispetto alla pinza. Per un corretto riempimento, è essenziale che il tubo del freno scorra sempre verso l’alto senza creare sifoni.
Take care to position the brake pump in a raised position in relation to the caliper. For correct filling, it is essential that the brake pipe always runs upwards without creating siphons.

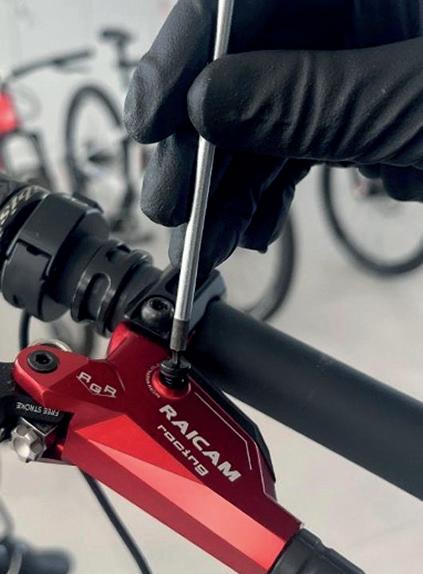
Aprire la porta di spurgo sul pompante svitando la vite di spurgo (usare una chiave a brugola da 2,5mm).
Open the bleeding port on the pump removing the bleeding screw (use a 2,5mm hex key).
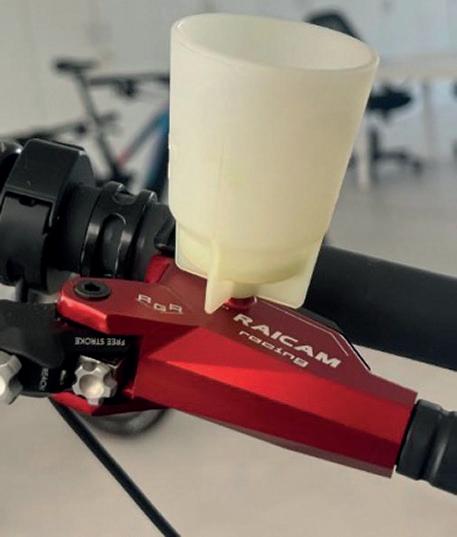
Avvitare il bicchierino alla porta di spurgo sul pompante. Apply the bleeding cup by screwing it into the bleed port.
7.2
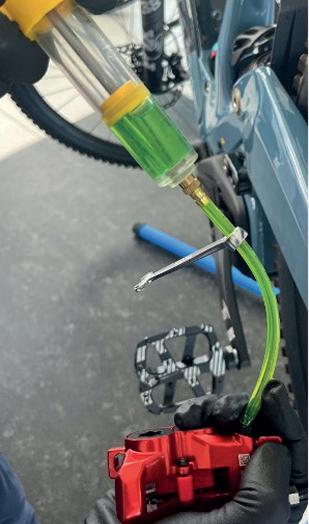
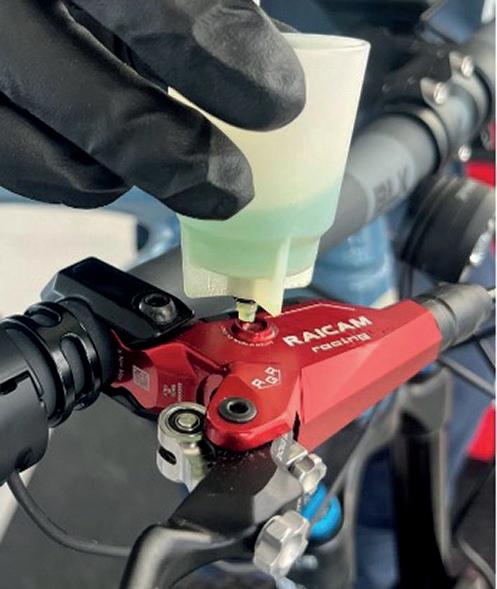
Versare l’olio minerale Raicam fino a 1/5 circa del bicchierino. Pour in Raicam Mineral oil until it fills about 1/5 of the cup.
Riempire la siringa con Olio minerale Raicam. Fill the syringe with Raicam Mineral oil.
Riempimento Filling
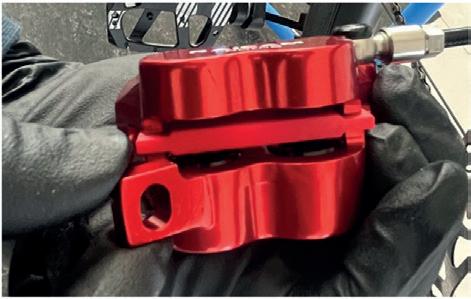
Rimuovere le pastiglie e spingere completamente i pistoncini all’interno della pinza, utilizzando una chiave inglese.
Remove the brake pads and push the caliper pistons completely into the caliper using a wrench.

*NB: Fare attenzione a pressare il pistoncino perpendicolarmente alla pinza, senza inclinarlo.
Take care to press the piston perpendicular to the caliper body without tilting it.
Inserire lo strumento di spurgo ed assicurarlo con la relativa vite. Fit the thick bleeding tool and secure it with the screw.
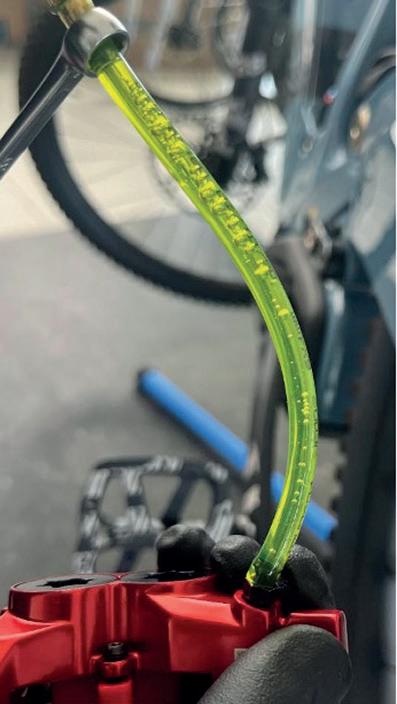
Collegare la siringa alla pinza, facendo attenzione a non intrappolare bolle d’aria tra la vite di spurgo ed il tubo della siringa. Connect the syringe to the clamp, taking care not to trap air bubbles between the bleeding screw and the syringe tube.
Allentare la vite di spurgo (3/4 di giro) con una chiave inglese da 7mm. Loosen the bleeding screw (3/4 turn) with a 7 mm spanner.
Pompare l’olio dalla siringa accumulandolo nel bicchierino di spurgo sul pompante, facendo attenzione a mantenere la pinza verso l’alto, così da non creare sifoni nel tubo, e non introdurre aria nell’impianto. Pump the oil with the syringe and accumulate it in the cup mounted on the pump, taking care to keep the clamp facing upwards, not to create siphons in the pipe and not to introduce air into the system.
Usare la siringa per risucchiare l’olio, fin quando il bicchierino non sarà quasi vuoto.
Using the syringe, suck in the oil until the cup is almost completely empty.
*NB: Evitare di risucchiare l’olio troppo violentemente, per impedire all’aria di entrare tra il tubo della siringa e la vite di spurgo della pinza. Avoid creating too violent a suction so as not to allow air to enter the syringe tube - bleeding screw interface.
Diverse bolle d’aria saranno visibili. Several bubbles will appear.
Ripetere i passaggi 12 e 13 finche non sarà più visibile aria nell’impianto. Repeat steps 12 and 13 until no more air bubbles escape.
Riavvitare la vite di spurgo con una chiave inglese da 7mm e rimuovere la siringa.
Close the bleeding screw with a 7 mm spanner and remove the syringe.
Eseguire 4-5 pompate, tirando con decisione la leva. Perform 4-5 pump strokes by pulling the lever firmly.
7.3
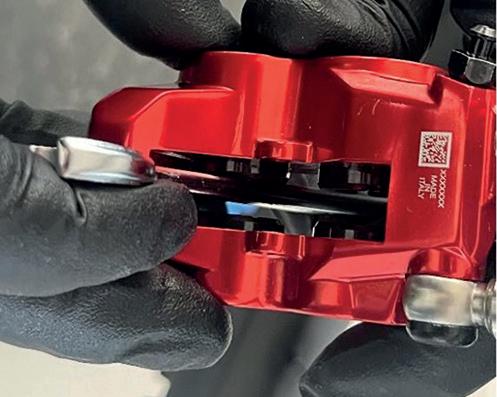
Rimuovere lo spessore di spurgo grande dalla pinza. Remove the thick bleeding block from the caliper.
Inserire lo spessore di spurgo sottile nella pinza, facendo attenzione ad inserirlo nell’apertura per il passaggio del disco.
Insert the thin bleeding block, taking care to insert it into the openings for the disc passage.
Questo blocchetto impedirà ai pistoncini di uscire completamente dalla loro sede.
This block will ensure that the pistons do not come out completely.
Con il bicchierino pieno di olio montato sul pompante, tirare la leva ripetutamente fino a mandare in battuta i pistoncini con lo spessore di spurgo.
Pump repeatedly (with the cup filled with mineral oil mounted on the pump) until all pistons are against the bleed block.
Potrebbero essere necessarie diverse pompate delle leva. This can require several actuations.
Rimuovere lo spessore di spurgo. Remove the thin bleeding block.
Assicurarsi di posizionare la pinza verso l’alto per facilitare il flusso d’olio.
Take care to position the clamp upwards and avoid siphoning into the pipe.
Con pinze RGR: In case of RGR calipers:
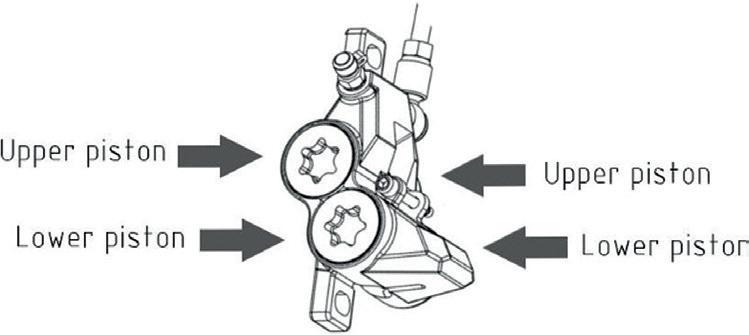
Premere i pistoncini inferiori finché non sono completamente all’interno della pinza; utilizzare una chiave inglese perpendicolarmente al pistoncino, un pistoncino alla volta.
Push the lower pistons until they are completely inside the caliper, use the handle of a spanner pushing perpendicular to the piston, one piston at a time. a.
*NB: Fare attenzione a pressare il pistoncino perpendicolarmente alla pinza, senza inclinarlo.
Take care to press the piston perpendicular to the caliper body without tilting it.
Take care to press the piston perpendicular to the caliper body without tilting it. b.
Premere i pistoncini superiori finché non sono completamente all’interno della pinza; utilizzare una chiave inglese perpendicolarmente al pistoncino, un pistoncino alla volta.
Push the upper pistons until they are completely inside the caliper, use the handle of a spanner pushing perpendicular to the piston, one piston at a time.
*NB: Fare attenzione a pressare il pistoncino perpendicolarmente alla pinza, senza inclinarlo.
Take care to press the piston perpendicular to the caliper body without tilting it.
Con pinze RXC: In case of RXC calipers:
Premere i pistoncini finchè non sono completamente all’interno della pinza; utilizzare una chiave inglese perpendicolarmente al pistoncino, un pistoncino alla volta.
Push the pistons until they are completely inside the caliper, use the handle of a spanner pushing perpendicular to the piston, one piston at a time.
*NB: Fare attenzione a pressare il pistoncino perpendicolarmente alla pinza, senza inclinarlo.
Montare lo spessore di spurgo grande e tirare la leva per far fuoriuscire i pistoncini (potrebbero essere necessarie diverse pompate).
Assemble the thick side of the bleed block and operate the lever to bring the pistons to a stop (some actuation may be required).
La leva dovrebbe ora restituire la sensazione di un sistema ben spurgato, con un punto di pressione ben definito e non spugnoso.
Se così non fosse, ripetere i passaggi da 17 a 24.
The lever should give the feeling of a bled system, with a clearly defined pressure point and not spongy.
If this is not the case, repeat steps 17 to 24.
Rimuovere lo spessore di spurgo grande dalla pinza. Remove the thick side of the bleed block from the caliper.
Premere i pistoncini finchè non sono completamente all’interno della pinza; utilizzare una chiave inglese perpendicolarmente al pistoncino, un pistoncino alla volta.
Push the pistons inside the caliper, use the handle of a spanner by pushing perpendicular to the piston, one piston at a time.
*NB: Fare attenzione a pressare il pistoncino perpendicolarmente alla pinza, senza inclinarlo.
Questo passaggio è necessario al fine di garantire il corretto gioco tra pastiglie e disco e la corretta quantità di olio nell’ impianto.
Take care to press the piston perpendicular to the caliper body without tilting it. This step is necessary to ensure correct clearance between pads and disc and the correct amount of oil in the system.
Inserire le nuove pastiglie e stringere la vite a 1,5 Nm con una chiave a brugola da 3mm e inserire la coppiglia di sicurezza.
Insert the new brake pads and tighten the pad screw to 1,5 Nm using a 3 mm hex key and insert the safety clip.
Montare e centrare la pinza sul telaio con il disco montato.
Assemble and center the caliper on the frame interface with the disc mounted.
Eseguire 4-5 pompate tirando la leva con decisione. Perform 4-5 pump strokes by pulling the lever firmly.
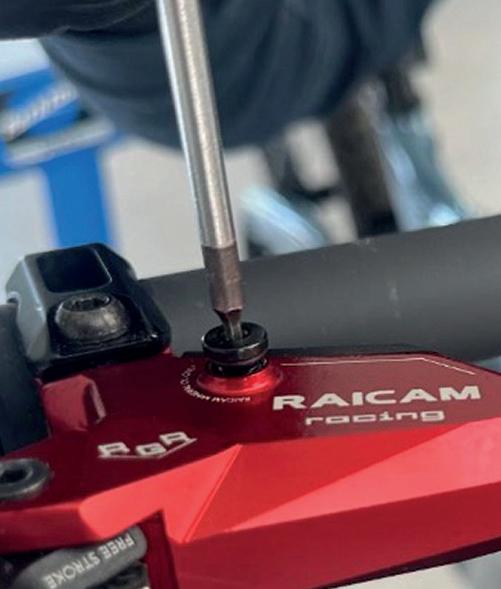
Rimuovere il bicchierino di spurgo e serrare la vite di spurgo del pompante, con una chiave a brugola da 2,5mm, serrare a 0,5 Nm.
Remove the bleeding cup and tighten the screw on the pump using a 2,5mm hex key, tighten up to 0,5 Nm.
*NB: Fare attenzione a non perdere l’o-ring della vite di spurgo. Pay attention not to lose the O-Ring.
Corsa della leva - RXC
Lever Reach - RXC
Nei pompanti RXC, la corsa della leva può essere regolata avvitando/svitando lo stelo tramite una chiave a brugola da 2mm. In RXC pumps, the reach of the lever can be set by screwing/unscrewing the push rod using a 2 mm hex key.

Avvitare la chiave a brugola in senso orario per allontanare la leva dal manubrio.
Turn the hexagonal key clockwise to position the lever away from the handlebar.
Svitare la chiave a brugola in senso anti-orario per avvicinare la leva al manubrio.
Turn the hexagonal key anti-clockwise to bring the lever closer to the handlebar.
Corsa della leva - RGR
Lever Reach - RGR
Nei pompanti RGR, la corsa della leva può essere regolata avvitando/svitando la regolazione più grande sulla leva. Non sono richiesti attrezzi per questa operazione. In RGR pumps, the reach of the lever can be set by screwing/unscrewing the larger screw on the lever. No tools are required for this operation.
8.3
Avvitare la regolazione in senso orario per allontanare la leva dal manubrio.
Turn the screw clockwise to position the lever away from the handlebar.
Svitare la regolazione in senso anti-orario per avvicinare la leva al manubrio.
Turn the screw anti-clockwise to bring the lever closer to the handlebar. 15
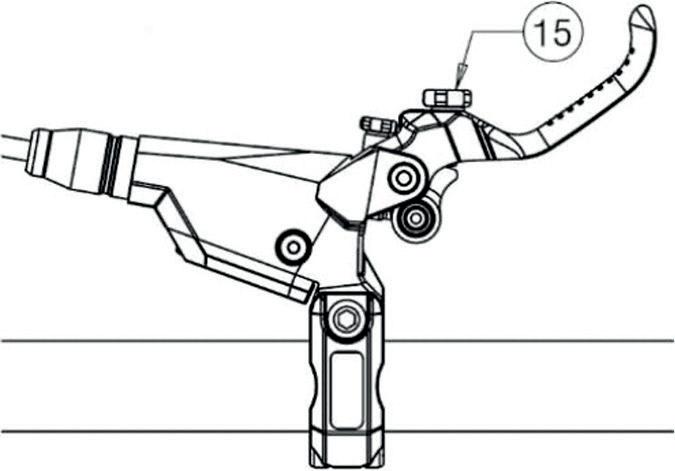
Corsa morta - RGR
Free stroke - RGR
La corsa morta può essere regolata solo sui pompanti RGR Racing ed RGR Factory. La stessa è regolabile avvitando/svitando la regolazione minore -----sul bilanciere.
Free stroke can be adjusted in RGR Racing and RGR Factory brake pumps only. The free stroke can be set by screwing/unscrewing the smaller screw on the rocker. 16 16
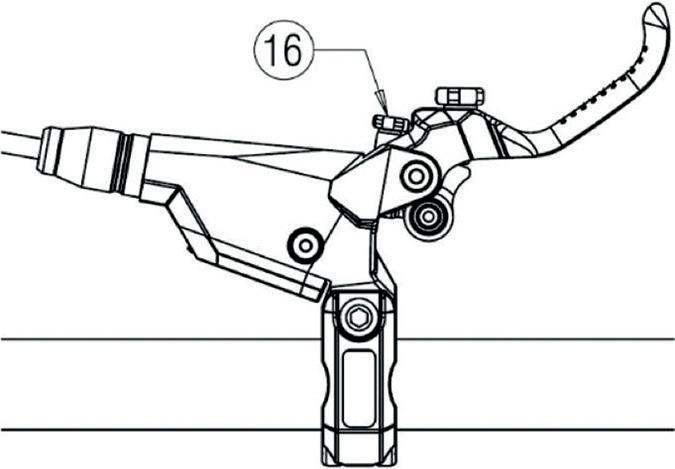
9.
Avvitare la regolazione in senso orario per portare il pistone avanti. Si ridurrà così la corsa morta al minimo e la frenata sarà più immediata e richiederà meno corsa della leva.
Turn the screw clockwise to position full forward the piston.
This will set the free stroke to the minimum, braking will be quicker and less lever travel will be needed to brake.
Svitare la regolazione in senso anti-orario per portare il pistone indietro. Si aumenterà così la corsa morta la massimo e la frenata sarà meno immediate e richiederà più corsa della leva.
Turn the screw anti-clockwise to fully retract the piston. This will set the free stroke to the maximum, braking will be less quicker and more lever travel will be needed to brake.
Sostituire le pastiglie prima di raggiungere lo spessore minimo del materiale di attrito di 0.5mm, oppure uno spessore totale della pastiglia di 2mm.
Per lo spessore minimo del disco, fare riferimento alle indicazioni riportate sul disco stesso.
Replace the pads before reaching a minimum friction material thickness of 0.5mm, or a total brake pad thickness of 2mm.
For minimum disc rotor thickness please refer to the indications written on the disc itself.