Secure. Certified. Connected.
Operator requires a NIAP PP 4.0 Secure KVM with 4 displays at the desktop. What you’ll need.
• Up to eight (8) – 4-port host computer(s)
• Two (2) – Universal 2nd Gen or Universal DisplayPort Secure KVMs (2-, 4- or 8-port)
Note: Number of host ports must match each SKVM.
• Four (4) – Console cables
• Up to thirty-two (32) – Host cables
• Up to eight (8) – USB/Audio cables (1 per host computer)
• F1D9022b06t – USB Keyboard/Mouse/Audio combo cable, 6’ OR
• F1D9022b10t – USB Keyboard/Mouse/Audio combo cable, 10’
Before you begin
Can your computer support 4 displays?
Four displays require support for four times the resolution of a single monitor setup, especially for higher resolutions like 4K. Not all computers support this.
Multiple monitor support is dependent on the graphics card on the host computer(s). To verify what graphics card is installed, you can typically search by going to Control Panel > Device Manager > Display Adapters. Search the graphics card manufacturer’s display
support section for multi-monitor support confirmation and number of monitors supported.
• One (1) – Remote control (2-, 4- or 8-port) with included RJ14 adapter
Note: Remote control ports must match SKVM host ports.
• F1DN-MOD-REM2
• F1DN-KVM-REM2
• F1DN-MOD-REM4
• F1DN-KVM-REM4
• F1DN-MOD-REM8
• F1DN-KVM-REM8
• One (1) - RCU Synchronized Replicator
• F1DN-RCURPLICTR with two (2) included RJ14 cables 1 2 4 3 2 1 3 4 1 2 4 3 2 1 3 4
Note: A Google search of the graphics card and the monitor setup (e.g. “Nvidia GTX 1660 four monitors”) often offers quick confirmation. Sample Display Configurations
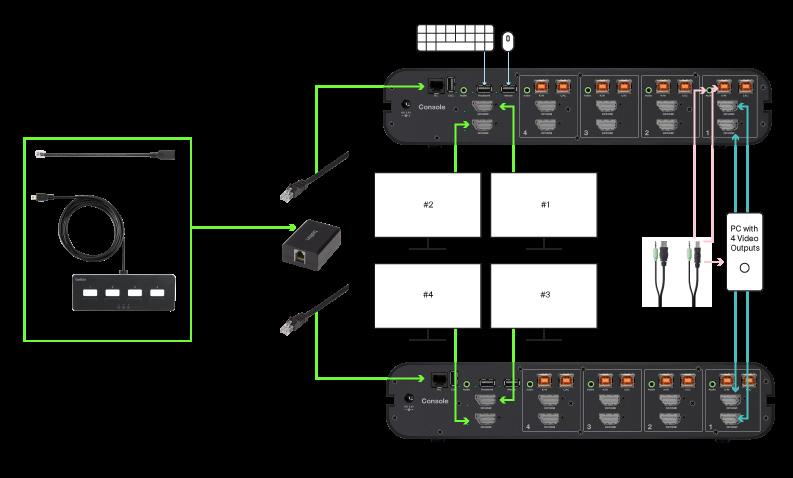
How to assemble a quad display SKVM setup
1 Disconnect power supply from all SKVMs and displays.
2. Connect display #1 to upper console port on SKVM #1.
3. Connect display #2 to lower console port on SKVM #1.
4. Connect display #3 to upper console port on SKVM #2.
5. Connect display #4 to lower console port on SKVM #2.
6. Connect two RJ14 cables to the OUT 1 and OUT 2 ports of the RCU Synchronized Replicator.
7. Connect the other ends of the RJ14 cables to the RC ports of SKVMs #1 and #2.
8. Connect RJ14 adapter to RCU IN port of the RCU Synchronized Replicator.
9. Connect the remote control to the RJ14 adapter.
a) Both SKVMs will require the same number of host ports for the REM2, REM4 and REM8 to be used as controllers.
10. Connect host port #1 to channel 1 upper host port on SKVM #1.
11. Connect host port #2 to channel 1 lower host port on SKVM #1.
12. Connect host port #3 to channel 1 upper host port on SKVM #2.
13. Connect host port #4 to channel 1 lower host port on SKVM #2.
14. Connect mouse and keyboard to SKVM #1.
15. Connect USB/Audio cables to channel 1 Audio and K/M ports on SKVM #1.
16. Repeat steps 10-15 for all host computers.
17. Connect power supply to all displays and power up.
18. Power on SKVM #1.
19. Power on SKVM #2.
20. Power on host PCs.
Two F1DN204KVM-UN-4 SKVMs shown with one 4-host PC
At Belkin International, we create products that help people realize the power of technology and make people’s lives better, easier, and more fulfilling. This has been Belkin’s mission since our inception in 1983. As a leading provider of SKVM switches for mission-critical applications, we positively impact and improve worker efficiency by delivering innovation and peace of mind to users working across multiple security enclaves. Our offer is certified to the latest Common Criteria NIAP Protection Profile for Peripheral Sharing Devices version 4.0 along with all applicable modules.
Belkin International, Inc.
555 S Aviation Blvd, Suite 180
El Segundo, CA 90245-4852
USA (310) 751-5569 belkin.com/cybersecurity