Technical Report Section
A1. Resolving Existing Issues
Cleaning up our modeling process is essential. However, without a dedicated BIM team or established templates for project guidance, we often find ourselves without a structured system. As an example, some commercial projects that are received in batches tend to follow a similar layout with some variations in plans or exterior elevations. To save time, drafters resort to duplicating models for new projects, then modifying the models to meet the needs, leading to the replication of standards; a problematic and confusing scenario. These models are cluttered with unnecessary elements: imported links that serve no purpose, redundant dimension styles, and numerous view templates that are either irrelevant or duplicated. These are elements that cannot be deleted from a working project model.
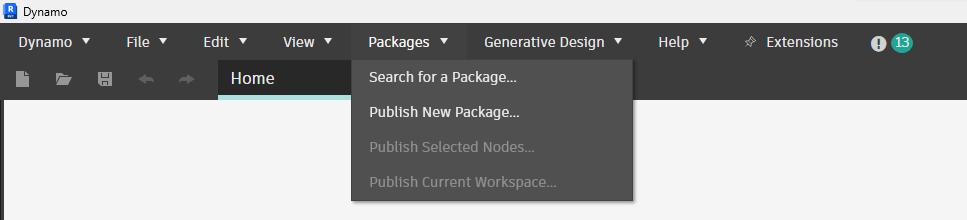
Luckily, Dynamo has what seems like an endless source of custom nodes created by users and shared among others to tackle commonly faced issues. Dynamo and Dynamo Player are found under the Manage tab of Revit. Dynamo Player is what allows Dynamo scripts to be run in Revit without users needing to understand the complexities of Dynamo. It is a way to execute pre-made Dynamo scripts by clicking on options. The custom Dynamo nodes are saved under Packages when one opens the Dynamo interface.
9
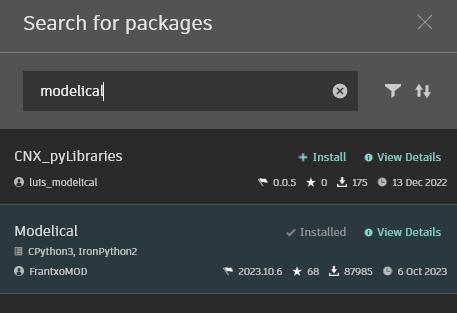
For example, I discovered and downloaded the Modelical package as I was browsing, which contains nodes for cleaning up drawings.
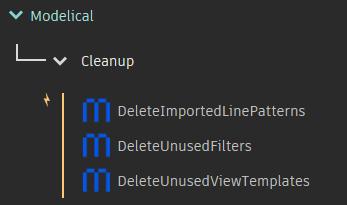
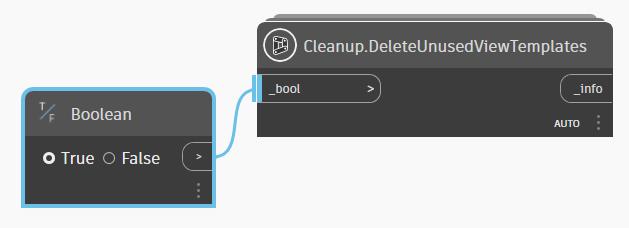
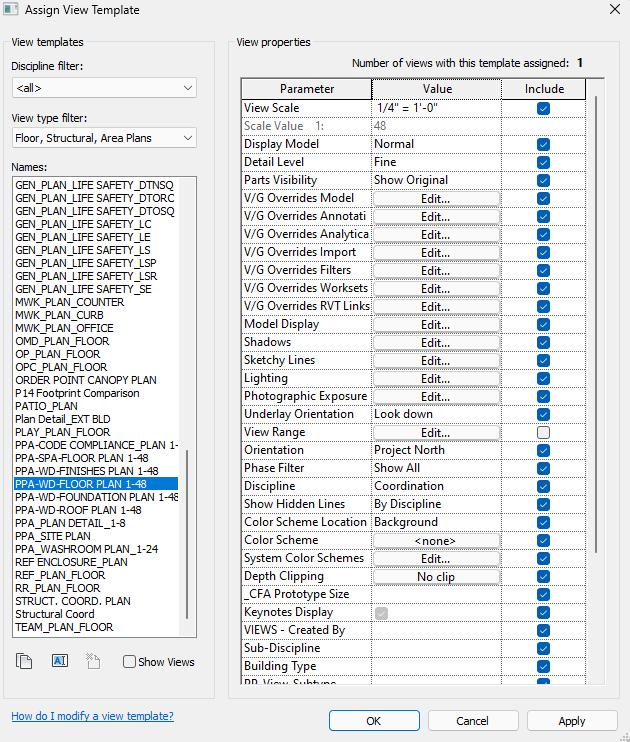
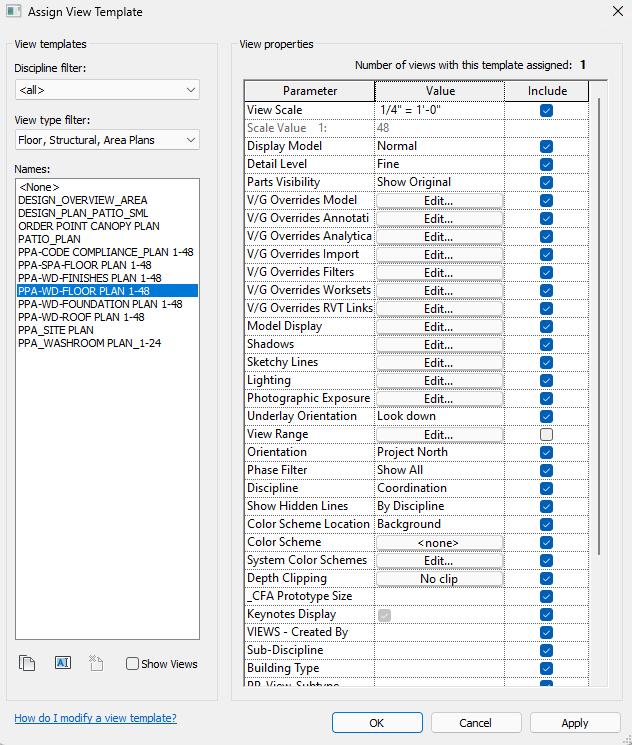
By simply using one node and a True/False Boolean, I was able to purge unused categories, such as view templates that are not in use, from a sample project within seconds. Notice the changes before and after using this tool.
The key here is to figure out which packages to search for This can be achieved by browsing the program to see what is available, as well as searching online forums or watching YouTube videos to get hints on which packages offer which nodes. Additionally, there is the option of creating your own packages and publishing them, but this often requires knowledge of programming languages such as Python, which integrates well with Dynamo.
Dynamo Script:
Before: After:
10
Moreover, at my workplace, we often model floors and spaces in Revit from an initial AutoCAD drawing, essentially tracing the CAD and duplicating work. Implementing a feature that automatically synchronizes layers from CAD to Revit views would greatly streamline our workflow.
A2. Comparing Efficiency
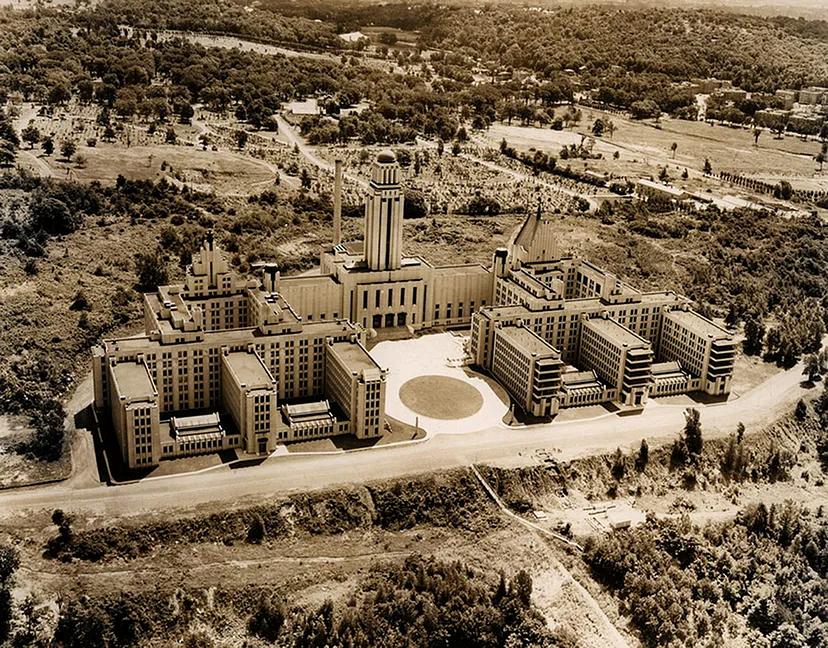
To compare the efficiency of using Revit alone versus using Revit along with Dynamo, I utilized a sample residential tower’s AutoCAD plan for reference from Bibliocad, a website that provides a vast database of CAD drawings and resources aimed at architects, engineers, and designers. This plan comes with wall, door, and window layouts as well as room names, some furniture, balcony, and stairs as shown in the image below
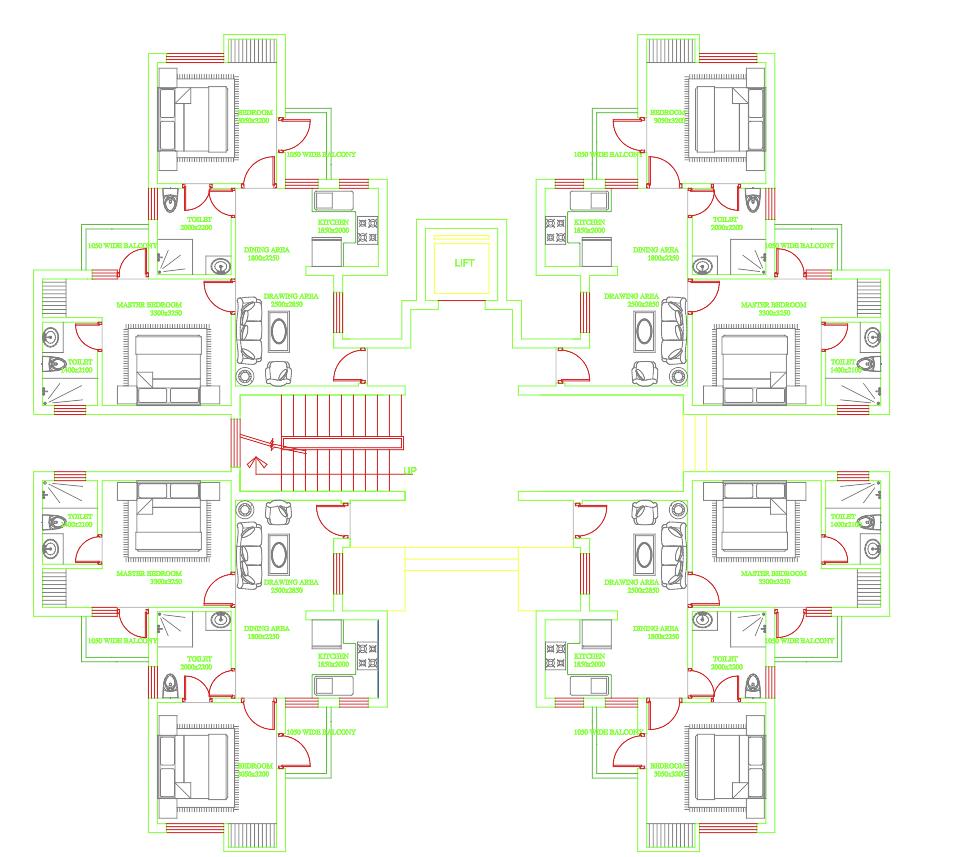
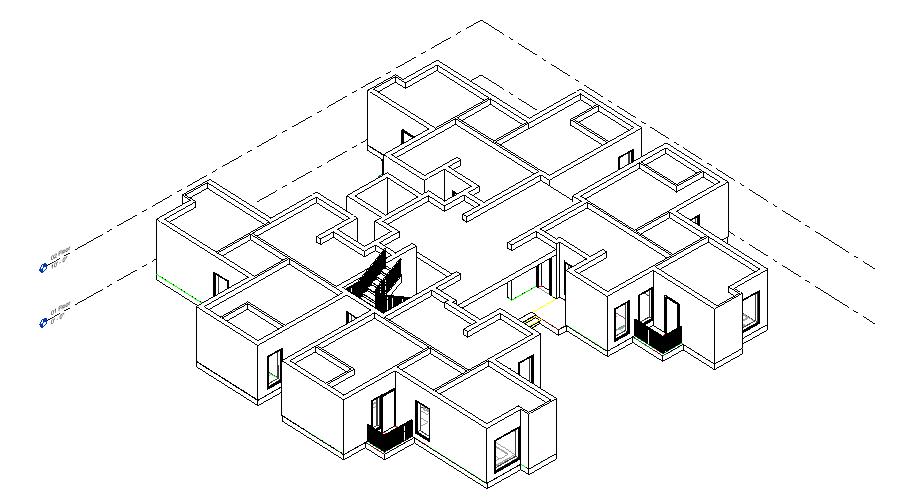
I linked the AutoCAD floor plan to Revit and fully modeled it, excluding furniture and equipment. Elevation views were created for the corridor and two typical unit types, which are mirrored on the opposite side of the floor plan.
11
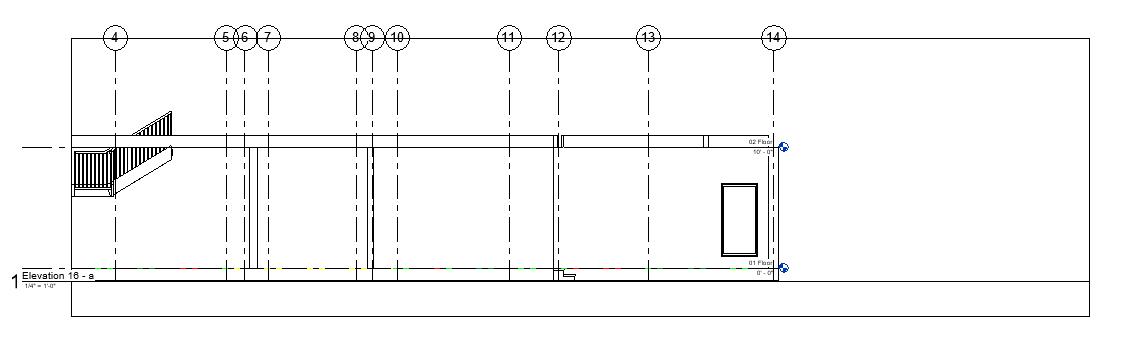
Elevations were not automatically cropped to fit the height of the room, revealing elements such as grids, which I prefer hidden. However, this issue can be easily solved by applying View Templates. Additionally, elevations were not named according to the room name or orientation they are taken from. Graphically, setting up and organizing the elevations on sheets took the longest time. An example of the untouched elevations is shown below
I tracked the amount of time it took for me to manually complete a few specific tasks, as shown in the following table, so that I could compare the execution time of doing these tasks manually on Revit against having Dynamo scripts do them.
TASK MODELING TIME ON REVIT (IN SECONDS) Tracing the floor slab 250 Tracing the interior and exterior walls 870 Adding and naming grids as a reference for structural consultants 480 Adding columns as reference for structural consultants 480 12
Layers in the AutoCAD file were reassigned and renamed to allow for successful Dynamo execution. Before starting each Dynamo script, I created a step-by-step list of procedures to follow for each task, to gain a clearer idea of how to write the script, as summarized through the following notes.
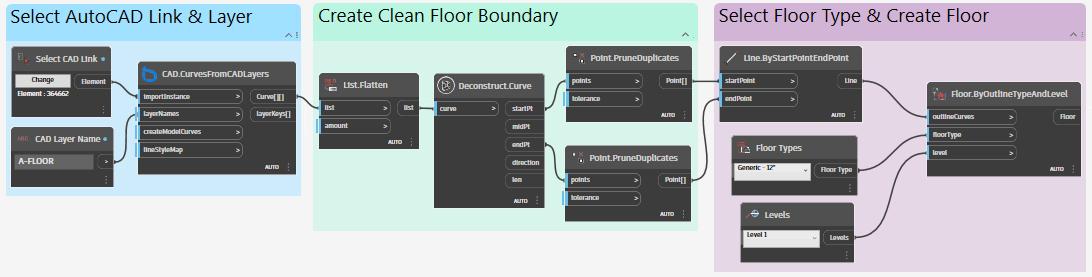
Task 1. Tracing the Floor Slab:
This task marked the initiation of my journey with Dynamo scripting, which naturally presented the greatest challenge as I familiarized myself with the interface, packages, and nodes. Some of the scripts in this study begin with the “Select Model Element” node, which selects the linked AutoCAD model and then specifies a layer to extract information from. For the floor slab, I referred to the “A-FLOOR” layer from the CAD file. I used the “CADCurvesFromCadLayers” node from a downloaded BimorphNodes package to outline the curves from the CAD floor in order to create my floor boundary, then assigned a floor type and level for the floor creation. I assigned input parameters to certain nodes to allow users to pick their options on Dynamo Player. Remarkably, the execution of these scripts typically transpires within mere seconds, almost in the blink of an eye.
Creating rooms with room separation and naming rooms 660 Creating ceilings for each room 170 Creating interior elevations for the corridor and two typical units Naming interior elevations and setting View Template 1315 Drawing a thick border around elevation view crops 450 TOTAL (SECONDS): 4675
13
Dynamo Script:

Task 2. Tracing the Interior and Exterior Walls:
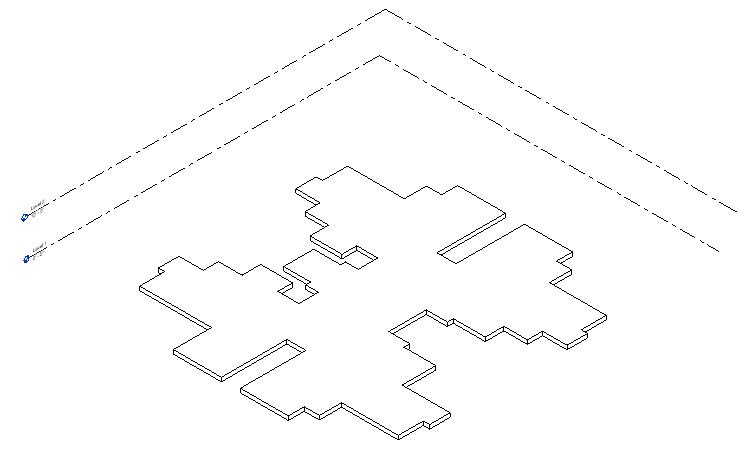
Getting a script to work for both the interior and exterior walls from the unmodified AutoCAD file was especially challenging because the geometry was not simple enough for Dynamo to understand it properly I recognized the need to adjust certain elements directly in AutoCAD before attempting to automate them with Dynamo. For this example, I created the centerline of the double wall lines in AutoCAD to use as input for Dynamo. This floor plan incorporates two different wall types, so I created two layers in AutoCAD for the distinct centerlines. It took me half an hour to do this.
AutoCAD Layers:

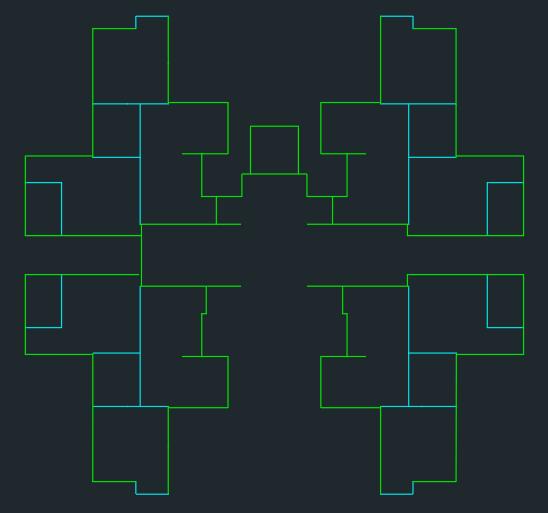
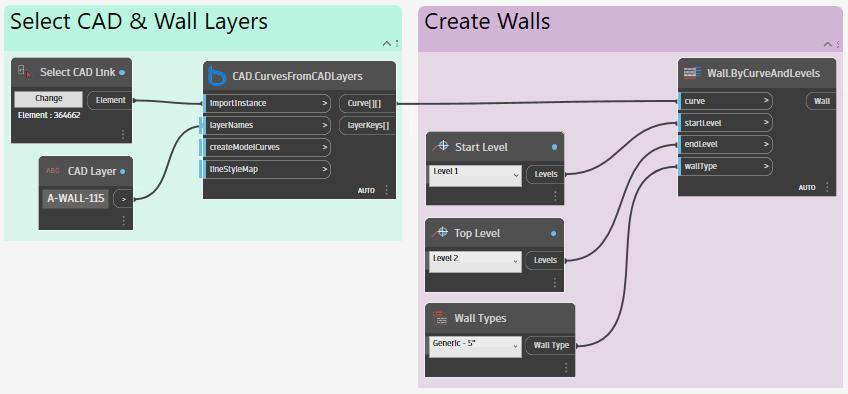
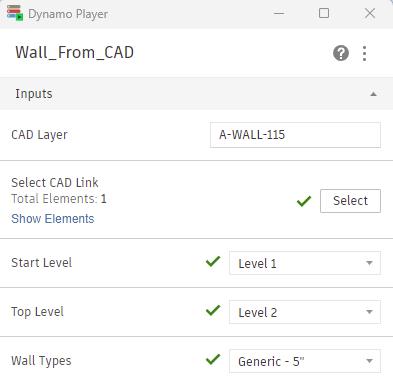
From here, the Dynamo steps were quite simple. I referred to layers "A-WALL-115" and "A-WALL-230" from the CAD file to extract curves. The Dynamo script is based on wall centerline curves, wall type, and levels as input parameters for Dynamo Player
Dynamo Player: Result:
Wall Centerlines on AutoCAD:
14
This task does not seem to be the most efficient use of Dynamo since time was spent on the AutoCAD file modification. The time it took for me to trace the walls manually on Revit was around 15 minutes, whereas creating wall centerlines on AutoCAD then running the script took a bit over half an hour In this case, it took longer to go through the process with Dynamo than it did with me drawing the walls manually on Revit. While this script may not be useful, a useful tool in relation to walls could be creating a script to place families such as doors and windows in specific wall locations.
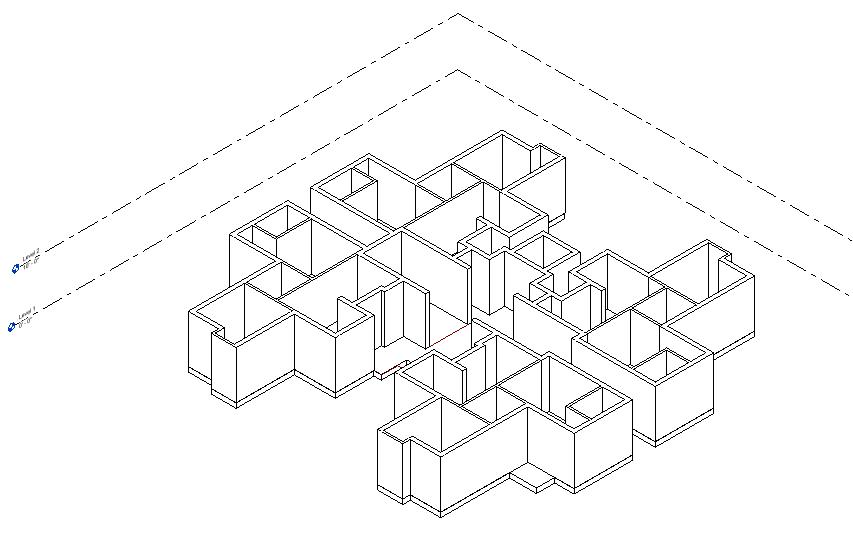
Task 3. Adding Grids:
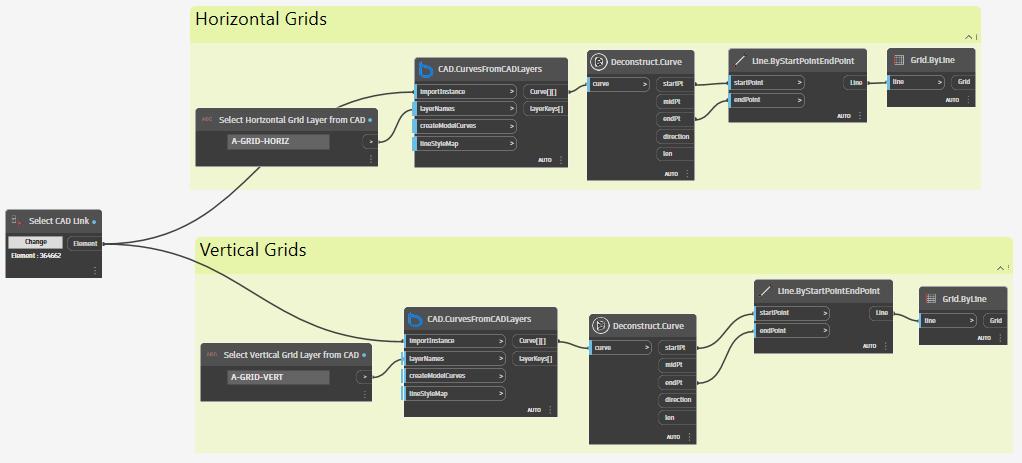
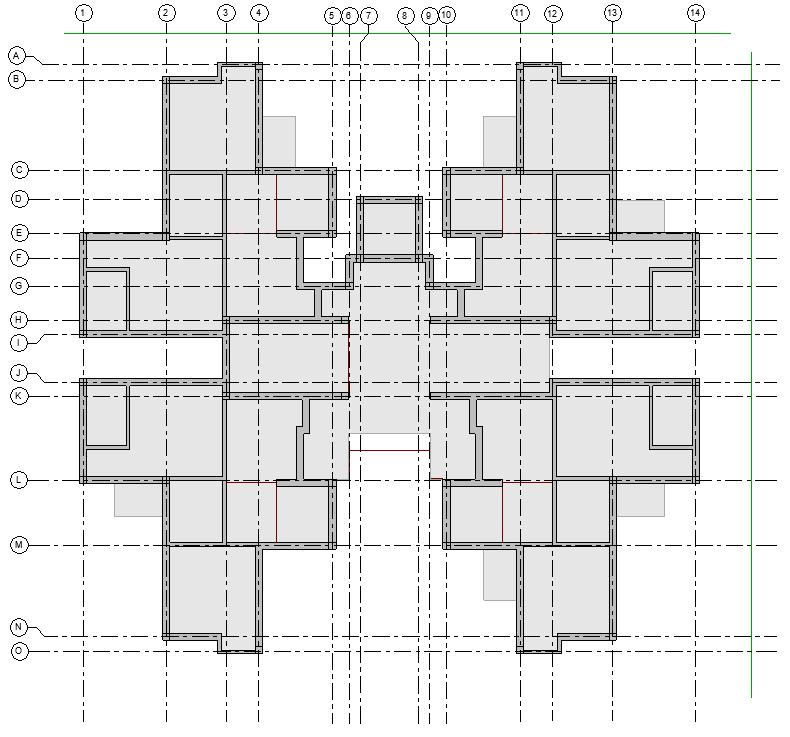
Note that the grids and columns are additions I made to the AutoCAD file and were not previously existing. Grids are created from curves on the "A-GRID-HORIZ" and "A-GRID-VERT" layers in the AutoCAD file.
Dynamo Script:
Dynamo Player: Result:
15

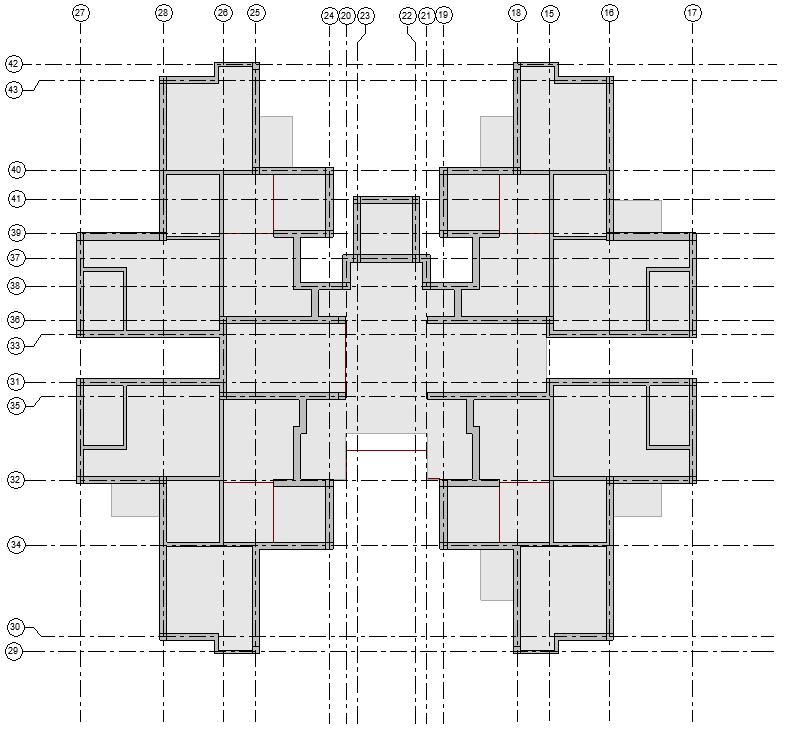
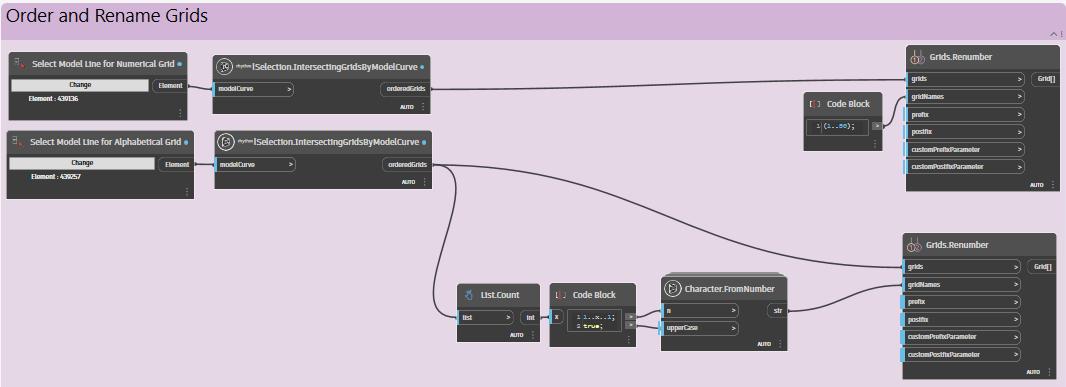
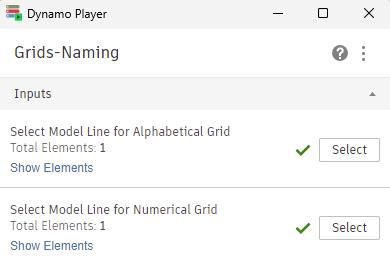
The naming of grids is not sorted properly, so for this, I created an additional script where drawing Model Lines on Revit gives me control over the direction and order of grid naming. Users can draw two Model Lines on Revit, crossing the horizontal and vertical grids, then select each line on Dynamo Player to sort the grids for alphabetical and numerical naming. The "Character.FromNumber" node is from the Clockwork package and converts a number into a character, where 'a' = 1 and so forth. The “Selection.IntersectingGridsByModelCurve” node is from the Rhythm package, and “Grids.Renumber” is from the Prorubim package.
Result:
Dynamo Script: Dynamo Player:
16
Task 4. Adding Columns:
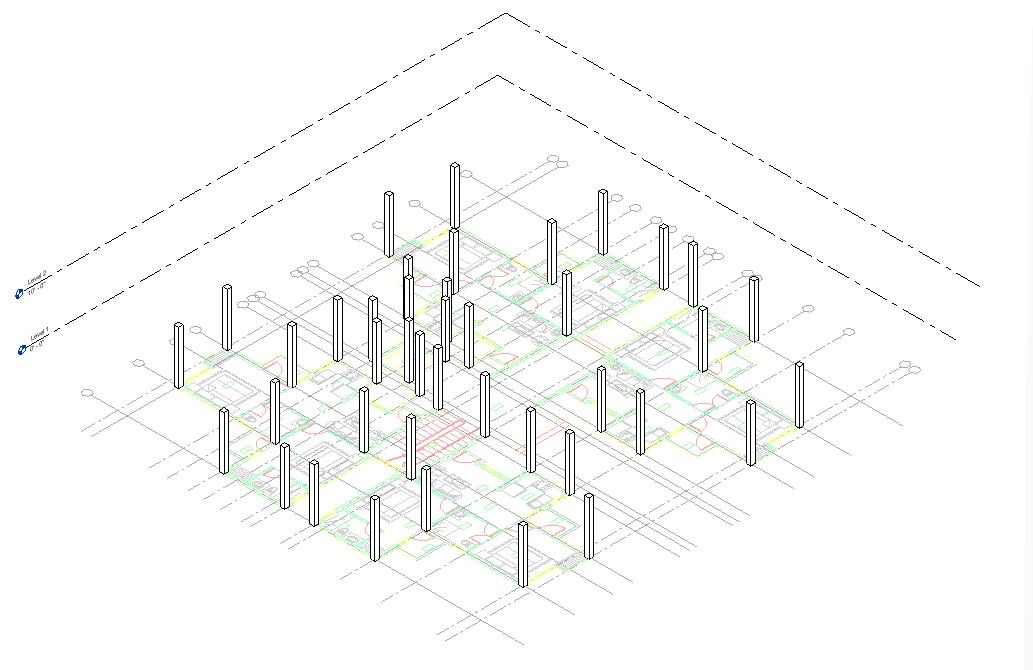
The columns I used in this project are all of the same type and dimensions. I referred to the “A-COLUMN” layer from the CAD file to get the boundary curve of columns. Then, I found the centerpoint of the columns using “ToColumnGeometry,” which is a node from the KYSUDO package, to create the columns in 3D from the specified level and column family type, exactly as shown in the CAD file.
Result:
Dynamo Script: Dynamo Player:
17


Task 5. Creating and Naming Rooms:
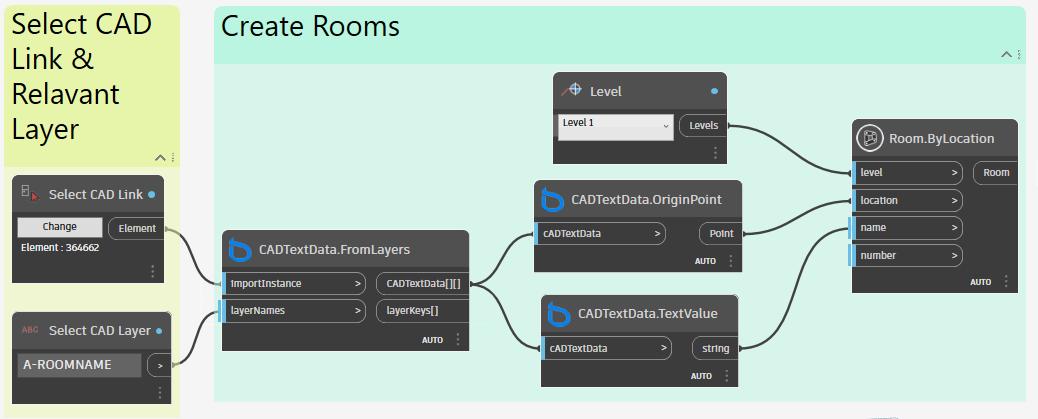
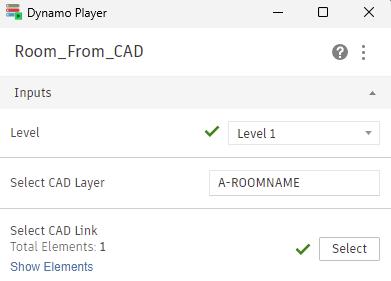
This Dynamo script was executed using the layer "A-ROOMNAME" to extract room names from the CAD file. Room names were obtained through nodes from the BimorphNodes package, specifically the "CADTextData.FromLayers" node, while the location of text was determined using the "CADTextData.OriginPoint" node, which served as the placement point for rooms. It is important to note that walls were established before this stage, allowing the script to use wall faces as boundaries for the rooms.
 Dynamo Script:
Dynamo Player: Result:
Dynamo Script:
Dynamo Player: Result:
18
Dynamo Script:
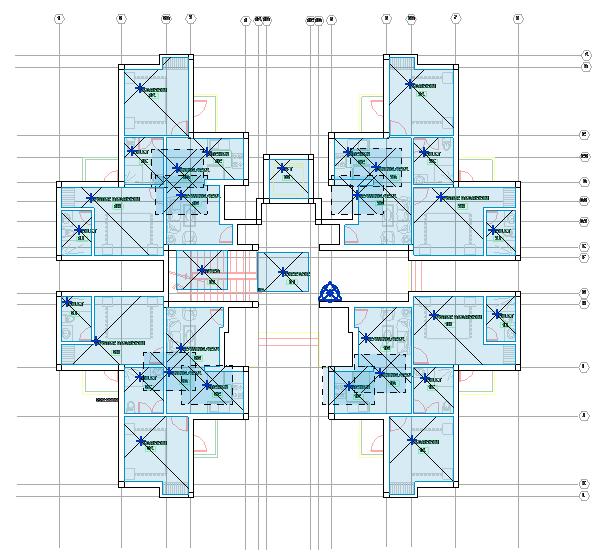
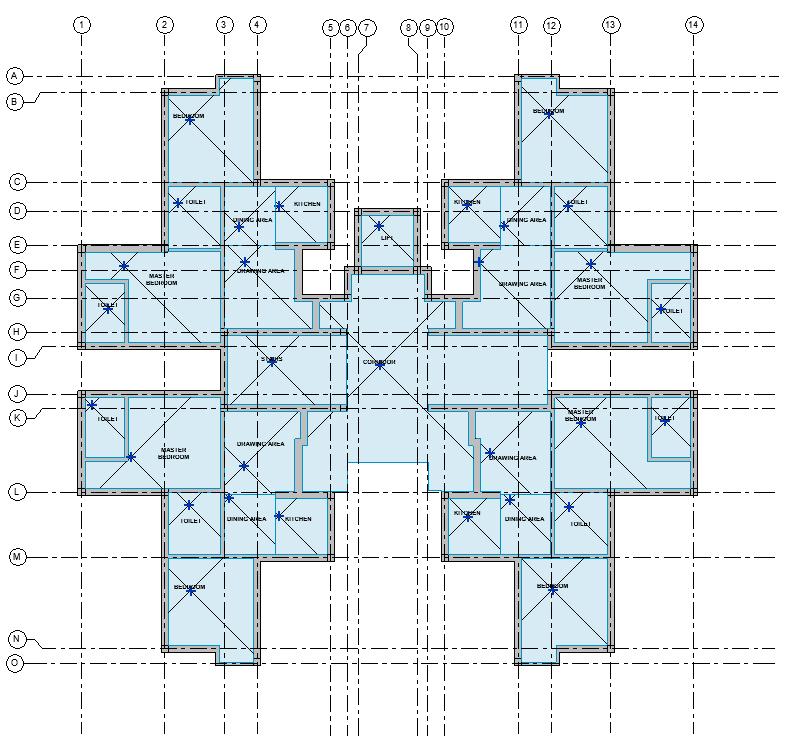
The previous plan shows the result of the Dynamo script. In cases where spaces lacked walls as boundaries, room separation lines were created manually The below plan shows the result of adding room separation lines and tagging the room names to complete this task.
 Dynamo Player:
19
Task 6. Creating Ceilings:
Ceilings were generated from room boundary curves and room names. To ensure smooth script execution, I only considered rooms that had been placed. To verify this, I created a room schedule to view all rooms and removed the ones that showed "Not Placed" under the area. The "List.FilterByBoolMask" node reviews all room names and only considers the ones matching the typed name under the “Code Block” node. The automatic ceiling height offset was set to 8 feet, so I ensured that this parameter was flexible in my Dynamo script for room height adjustment. The "Element.Set ParameterByName" node is what allows the "Height Offset From Level" parameter to be associated with an adjustable value. Ceiling types can also be selected in Dynamo Player and applied to specific rooms. This script must be run each time a new ceiling for a room type needs to be generated.
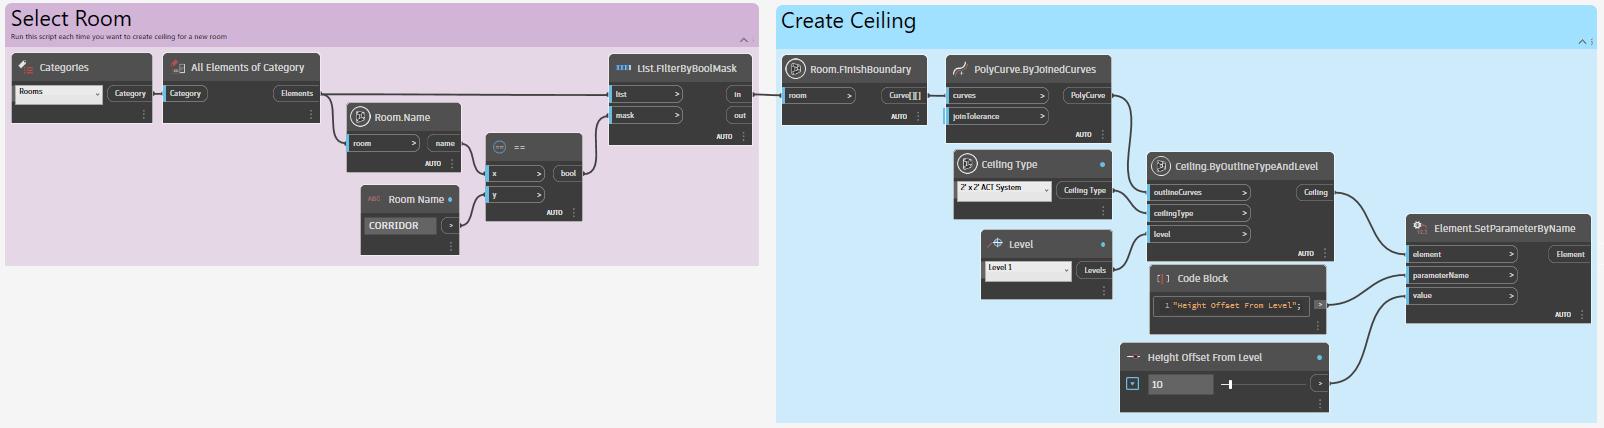
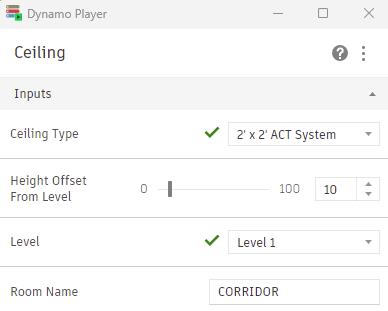
The same script can be created for floor finishes, just by replacing the final “Ceiling. ByOutlineTypeAndLevel” and “Ceiling Types” nodes with “Floor.ByOutlineType AndLevel” and “Floor Types” nodes.
Dynamo Script:
Dynamo Player:
Result:
20
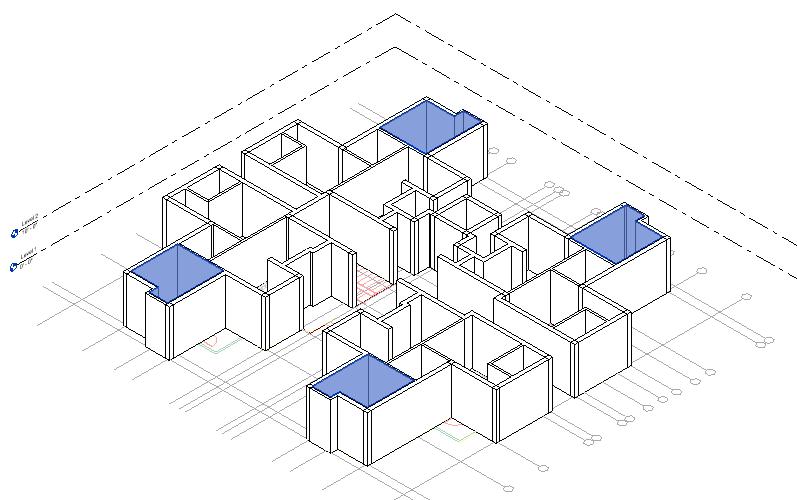
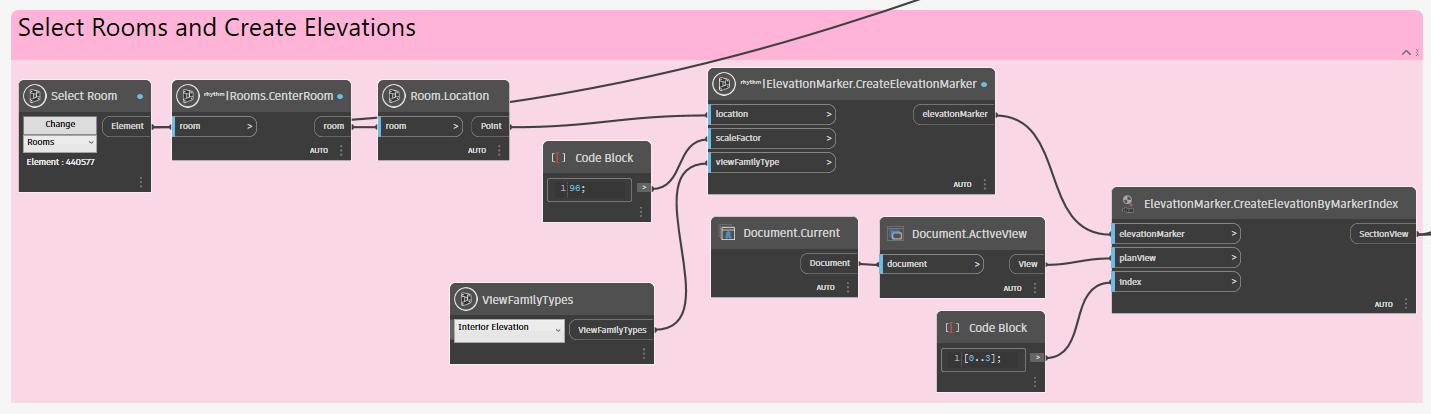
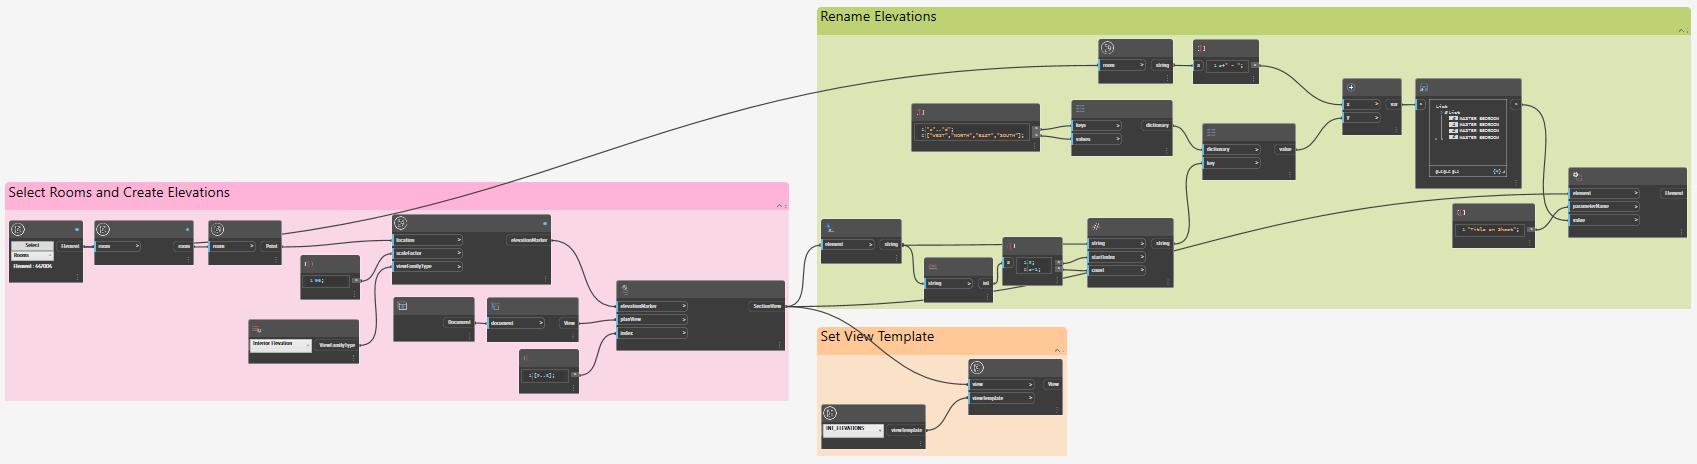
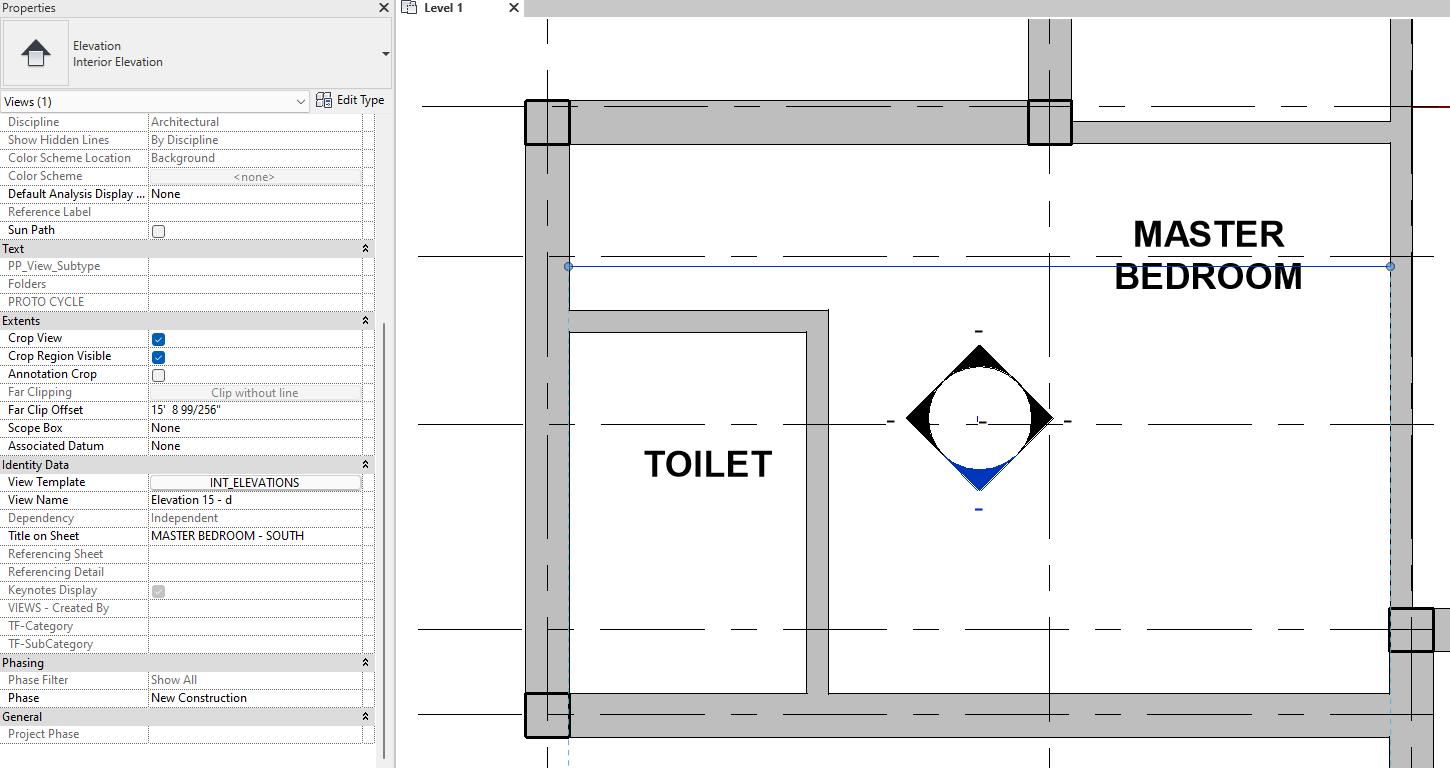
Task 7. Creating Interior Elevations:
This script is written to require one input, which is selecting a room, and another input which is selecting a View Template to apply to the interior elevations. Interior elevations are created from room locations. The “Rooms.CenterRoom,” “ElevationMarker CreateElevationMarker” and “ElevationMarker.CreateElevationByMarkerIndex” nodes are all from the Rhythm package. The “View Templates” and “View.SetViewTemplate” nodes are from the Archilab package.

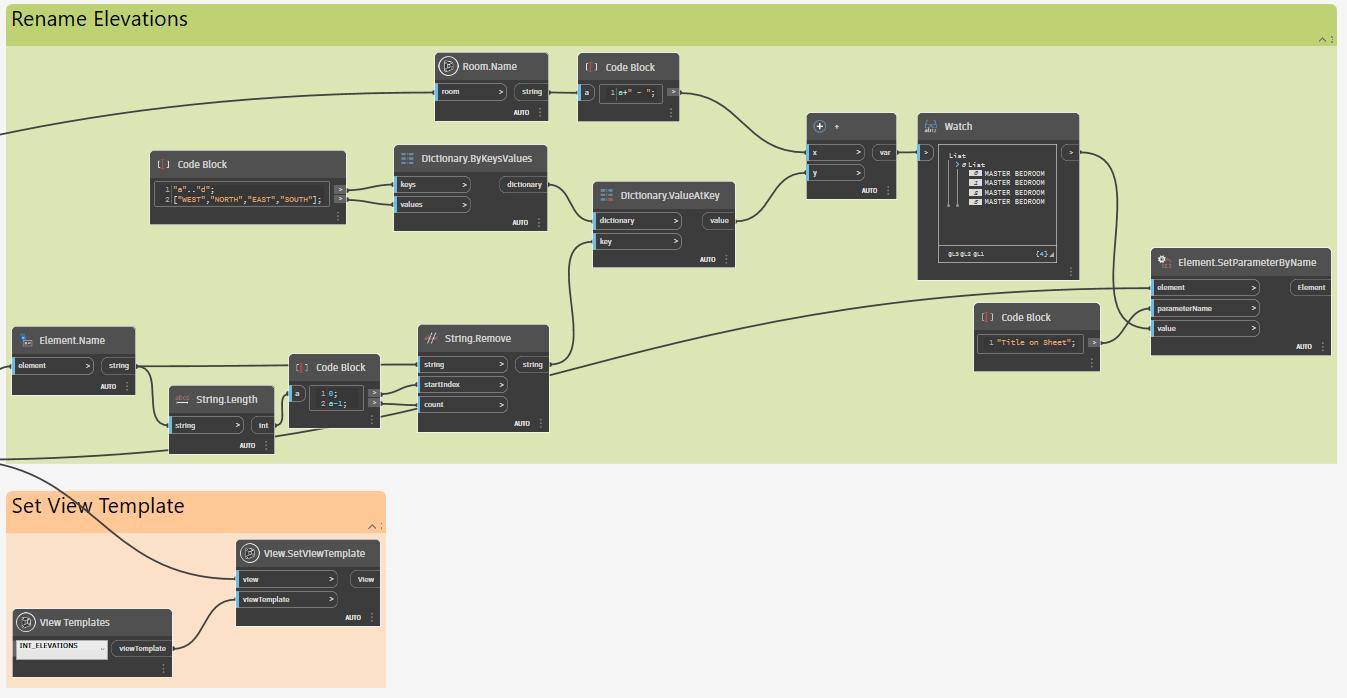
In the second part of the script, elevation titles on sheets are renamed using the room name followed by the direction, separated by a hyphen. For example, "BEDROOMNORTH." This renaming is made possible by Dynamo Dictionaries, where each room's direction is associated with a key, ensuring accurate naming for each elevation. Initially, the “String.Remove” node trims the string to only include letters a, b, c, and d, which then serve as the Dictionary keys. From here, key "a" is associated with the value "WEST," key “b” is associated with the value “NORTH” and so forth.
Dynamo Player:
Dynamo Script (Part 1):
21
Dynamo Script (Part 2):
Overall script and connections:
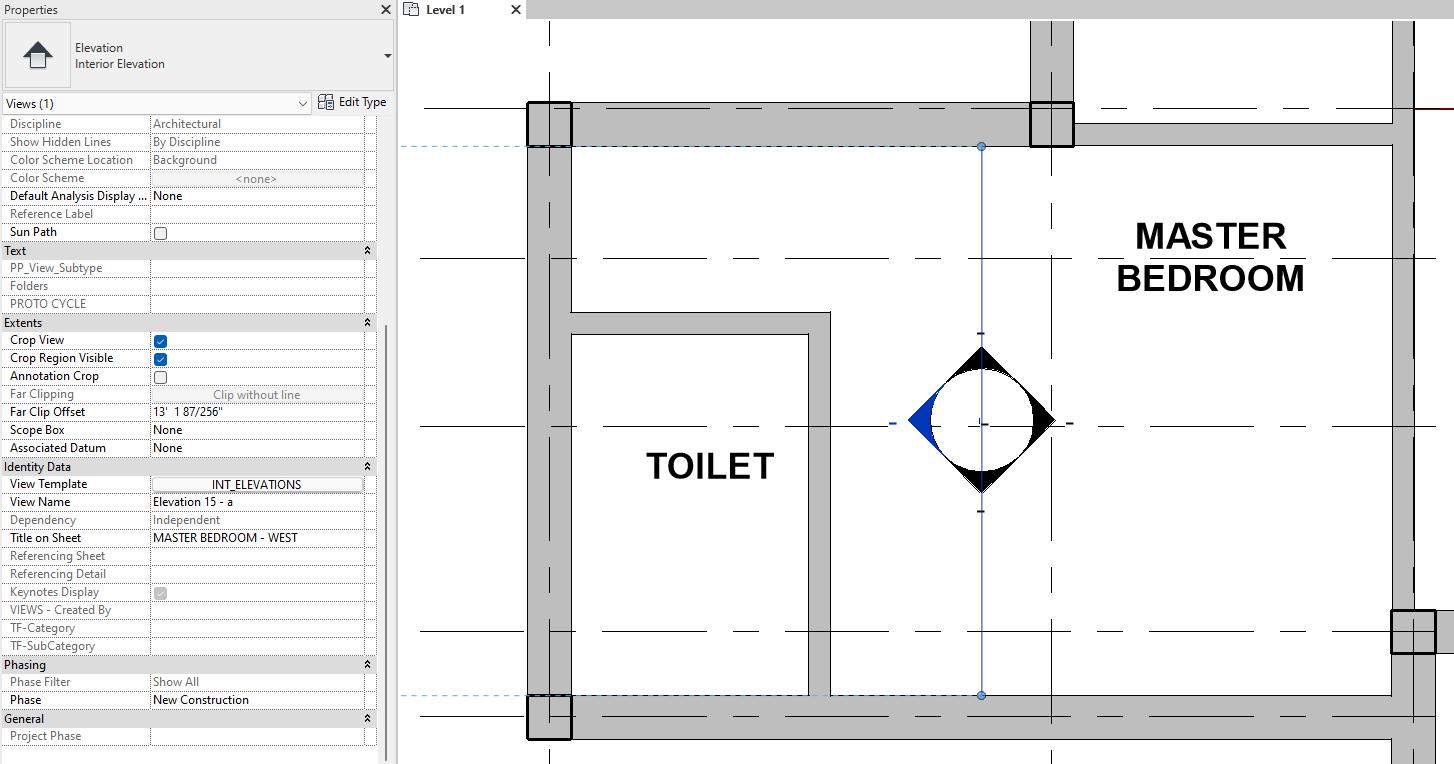
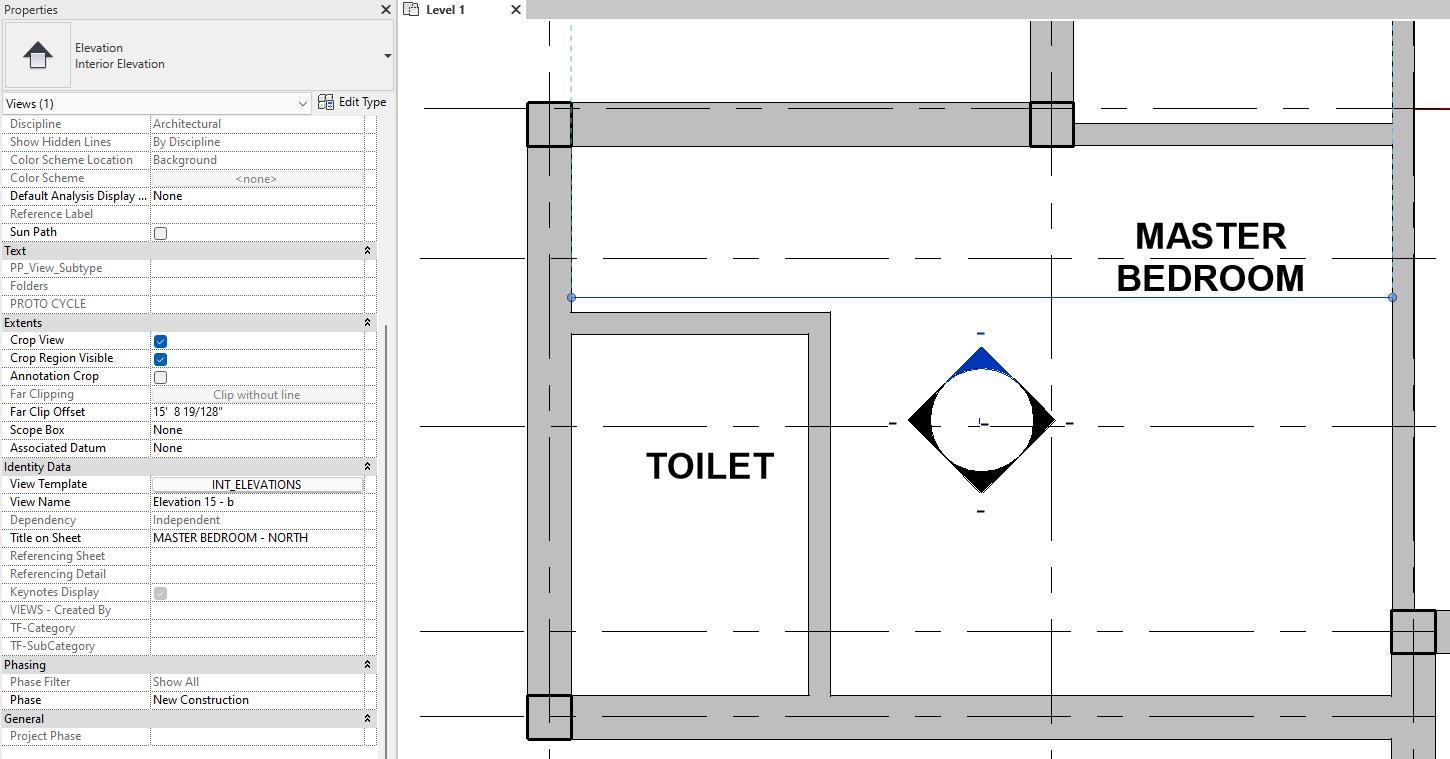
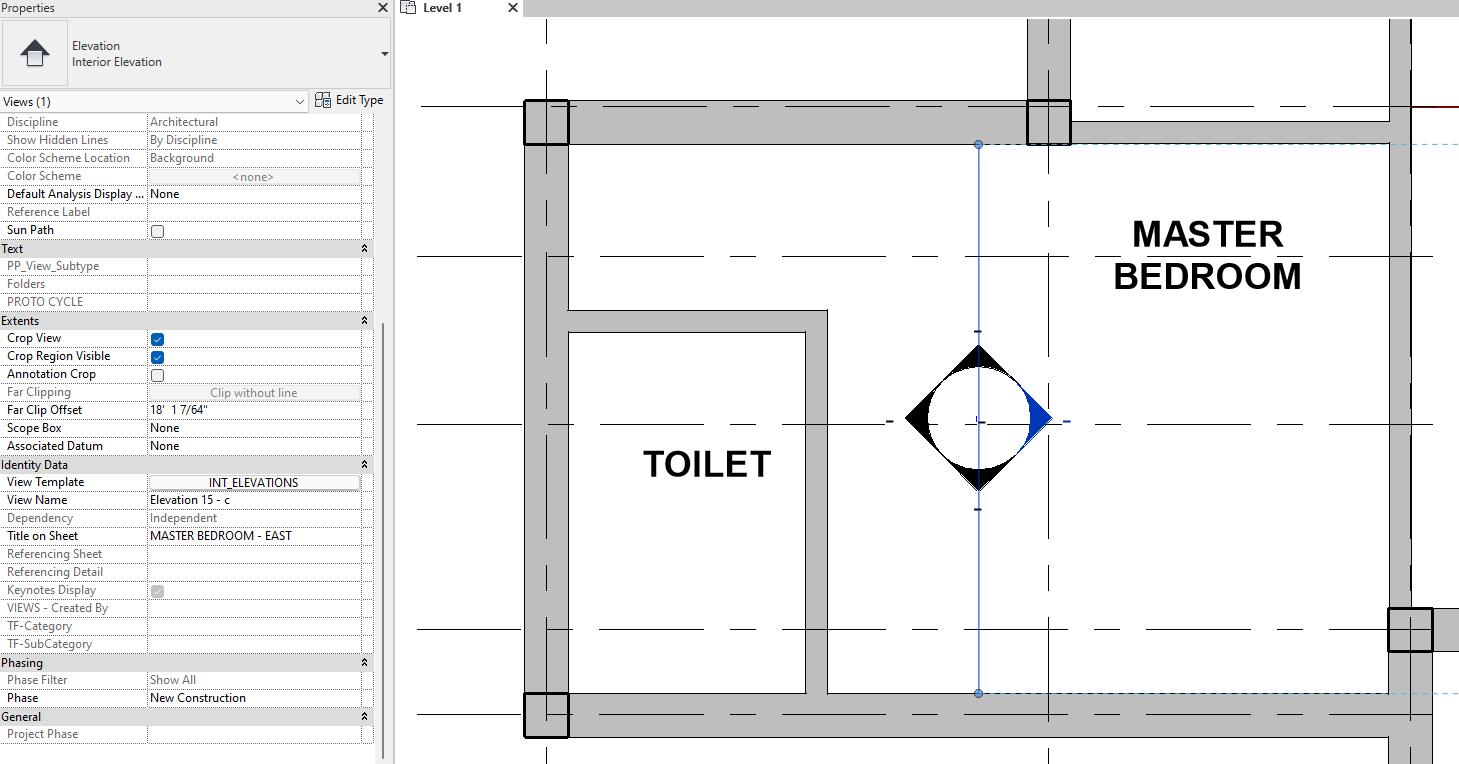
Results (Note the Title on Sheet and Added View Template):
22
Task 8. Introducing pyRevit:
Through this research, I discovered another tool, pyRevit, which is a free and open-source add in for Revit that can be downloaded online. It is another tool that allows users to automate time consuming and repetitive Revit tasks. Creating sheets on Dynamo is possible, but pyRevit already includes features to do so without having to develop a Dynamo script. The Sheets icon in the pyRevit tab has a Batch Sheet Maker tool.
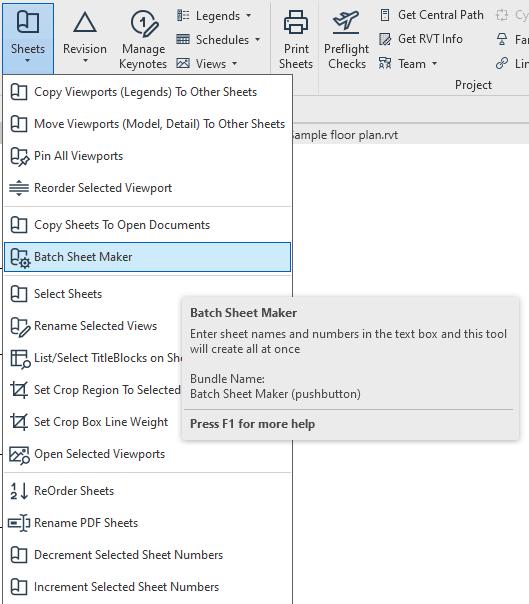
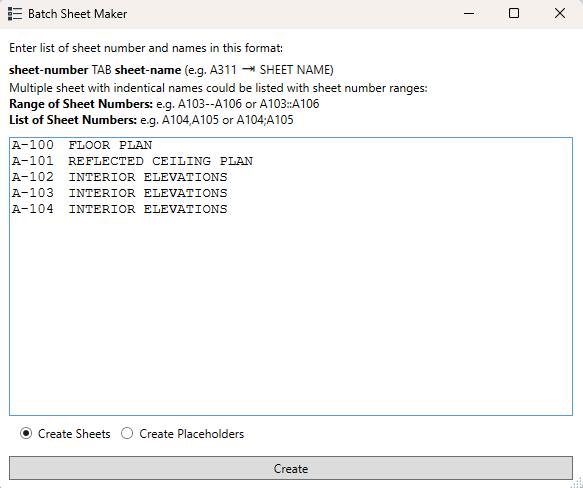
After clicking on it, the following dialog box pops up for users to enter the sheet number, press tab and enter the sheet name. A range of sheets can be created using the “::” symbol (eg. A510::1515).
23
After hitting Create, the tool asks for a Title Block selection for the sheets.

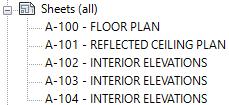
Following this step, all sheets are generated within seconds. This tool proves particularly advantageous for projects requiring the production of numerous sheets.
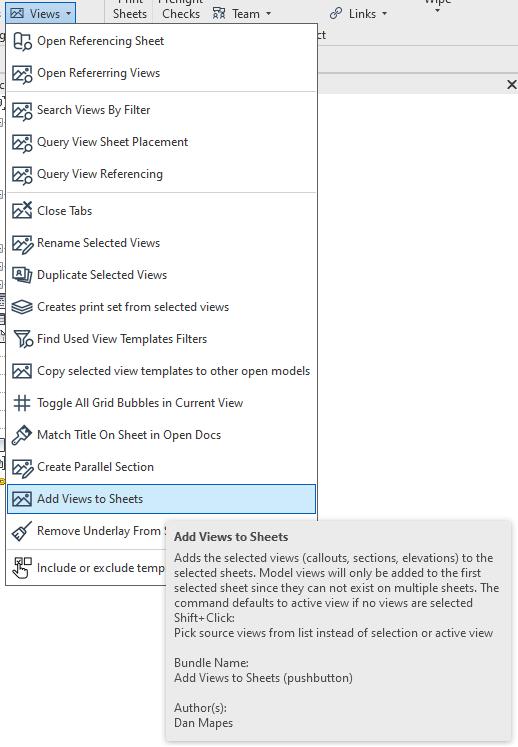
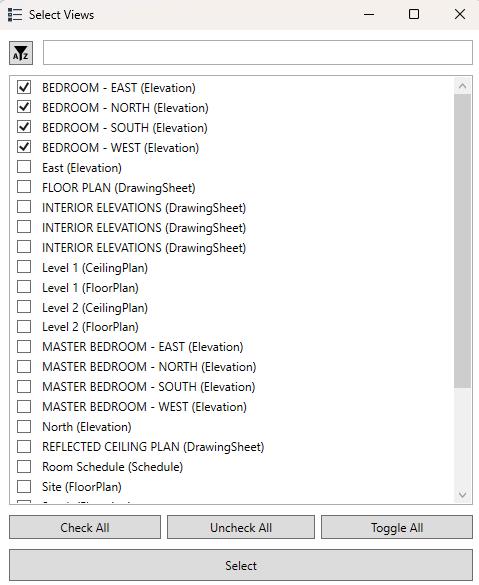
Another feature of pyRevit is its ability to add views to sheets, allowing users to select which views to load onto a specific sheet. However, this tool does not automatically organize the placement of views on sheets, so this task must be completed manually
In Revit, activating revisions and revision dates on sheets must be done manually, without the ability to apply changes to multiple sheets simultaneously. This manual process can be time-consuming, particularly when dealing with a large set of
Step 1
Step 2
24
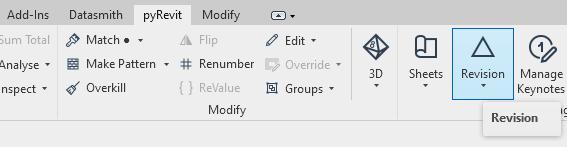
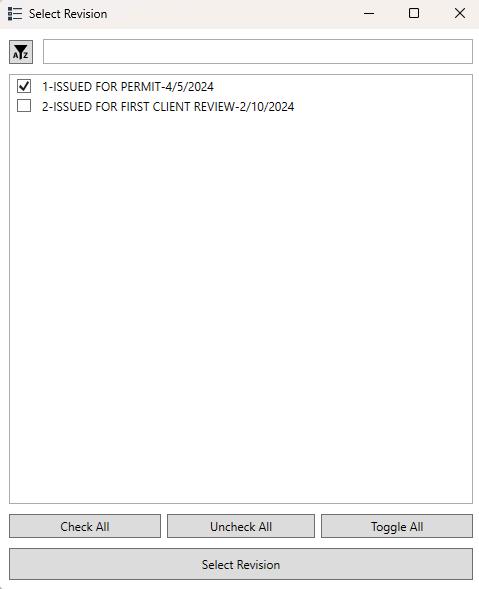
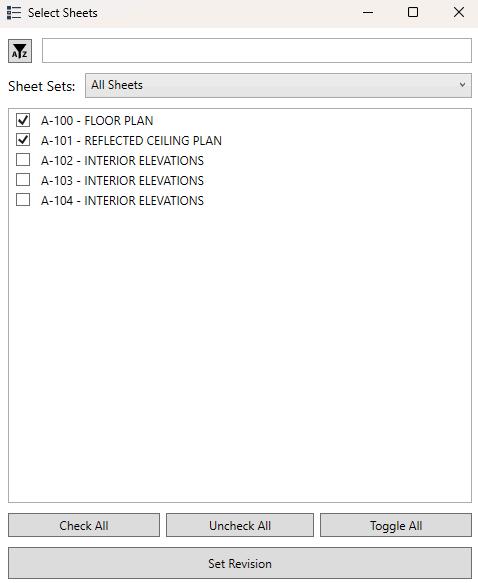
documents. However, in pyRevit, there is an option under the Revision icon called "Set Revisions On Sheet," which streamlines the process of setting revisions for sheets.
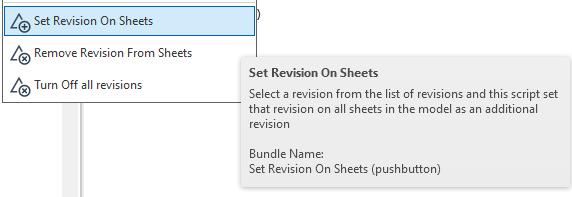
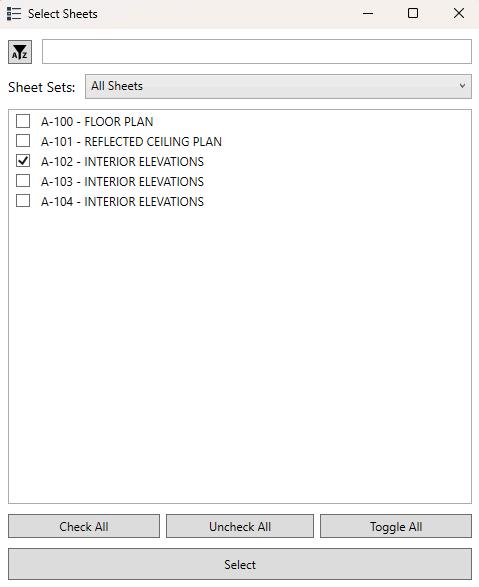
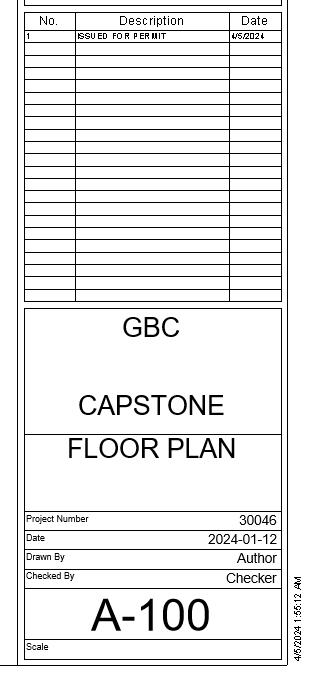
First, the revision is selected, followed by the selection of specific sheets to which the revision dates are to be added. This action results in the addition of the revision date to the selected sheets.
Step 1
Step 2
Result:
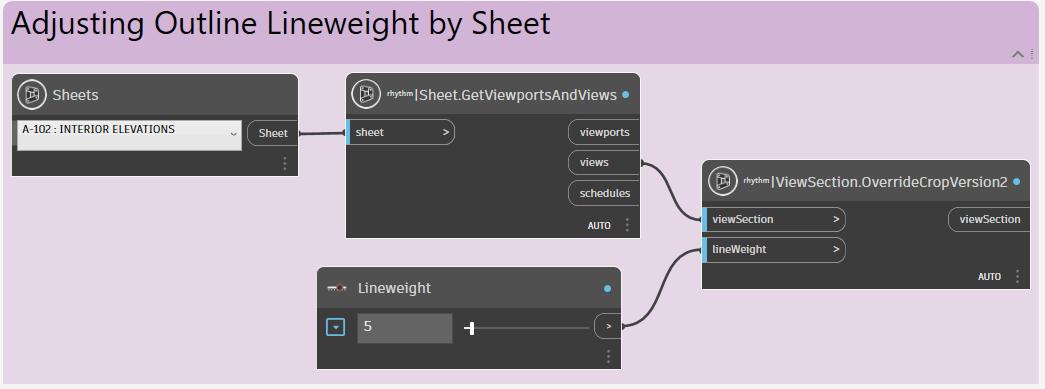
Task 9. Increasing the Lineweight of Elevation Crop Regions:
Graphically, elevations are often shown with a thick border around their crop region. To do this manually seems like an inefficient use of time. The following Dynamo script increases the lineweight of crop regions for views depending on the sheet the views are placed on. In this case, interior elevations are placed on the Interior Elevation sheets created in the previous task. Nodes from the Rhythm package are used for this script.
Dynamo Script:
25
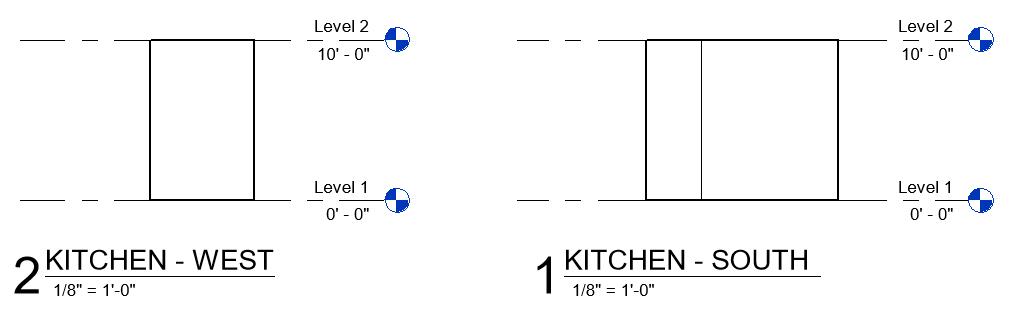
Dynamo Player:

Results:
User Challenges in Dynamo Workflows
Dynamo’s visual programming interface can be overwhelming and complex for beginners. Users who struggle to understand the logic behind the visual scripts may have trouble debugging and troubleshooting more complex workflows. More complex scripts may suffer from performance issues in their slow execution times or excessive memory usage. This can be problematic when working with large datasets. As one becomes more proficient in Dynamo, one would notice the lack of documentation and support resources compared to more established software tools. Users may struggle to find comprehensive tutorials or troubleshooting resources for specific issues. Dynamo is a tool for non-programmers, however, lacking knowledge of coding makes it difficult to understand Dynamo’s script structure. Unique and complex issues often require a combination of Dynamo and coding knowledge to be effectively addressed.
In my experience, the learning curve of Dynamo wasn't as steep, given my familiarity with Grasshopper, another visual programming software sharing common principles with Dynamo. Despite occasional challenges in finding online guidance for issues, I quickly adapted to the interface's uniqueness, appreciating its capacity for installing packages and crafting custom nodes. The following tables provide a summary of the comparison between specific tasks performed on Revit alone versus Revit + Dynamo throughout this study. Overall, Dynamo helps to get tasks done faster and projects finished quicker, but only if the user knows when to automate tasks and when not to. In the case of AutoCAD links, it all depends on how much manual cleanup is required before automating with Dynamo.
26
TASK MAKING SELECTIONS ON DYNAMO PLAYER (IN SECONDS) RUNNING DYNAMO SCRIPT (IN SECONDS) MANUAL ADJUSTMENTS (IN SECONDS) NOTES DYNAMO SCRIPTS SIGNIFICANCE (USAGE FREQUENCY) Tracing the floor slab 10 1 0 N/A LOW (High if room outlne already provided, otherwise there is manua work) Tracing the interior and exterior walls 20 3 1800 Needed to create wall centerines on AutoCAD whch took 30 minutes LOW (High if wall centerines already provided otherwise there is manua work) Adding and naming grids as a reference for structural consultants 13 3 10 Needed to create two Model Lne on Revt HIGH (Likely used once per project low script development tme) Adding coumns as reference for structural consultants 10 2 0 N/A HIGH (Likely used once per project, low script development tme) Creating rooms with room separation and naming rooms 8 2 60 Room separation lines needed to be created on Revit after running the script which took 1 minute HIGH (Likely used once per project, low script development tme) Creating ceilings for each room 49 7 0 Each space type takes 7 seconds for the selections on Dynamo Player and 1 second to run the script HIGH (Used many times per project) Creating interior elevations for the corridor and two typica units Naming interior eevations and setting Vew Template 50 10 60 Needed to adjust the view crops for some elevatons HIGH (Used many times per project) Drawing a thick border around elevaton view crops 12 3 0 There are 3 Interor Elevaton sheets The time shown is for al 3 sheets HIGH (Used many times per project low script development tme) TOTAL (SECONDS): 172 31 1930 TASK MODELING TIME ON REVIT (IN SECONDS) TOTAL TIME ON DYNAMO (IN SECONDS) TIME SAVED (IN SECONDS) PERCENTAGE SAVED Tracing the floor slab 250 11 239 96 % Tracing the interior and exterior walls 870 1823 -953 0 % Adding and naming grids as a reference for structural consutants 480 26 454 95 % Adding coumns as reference for structural consutants 480 12 468 98 % Creating rooms with room separation and naming rooms 660 70 590 89 % Creating ceilings for each room 170 56 114 67 % Creating interior elevations for the corridor and two typical units Naming interior elevations and setting View Template 1315 120 1195 91 % Drawing a thick border around elevaton view crops 450 15 435 97 % TOTAL (SECONDS): 4675 2133 2542 54 % 27
References
Autodesk University (2021, March 30). Improving efficiency: Dynamo for existing buildings. Medium.
https://medium.com/autodesk-university/improving-efficiency-dynamo-for-existing -buildings-10650f3e7e9a eLogicTech. (2019, June 7). How does Dynamo help in BIM workflow?. eLogicTech Solutions.
https://www.elogictech.com/blog/how-does-dynamo-help-in-bim-workflow eLogicTech. (2019b, November 21). Powerful features that differentiate revit API and Dynamo: ELogicTech blog eLogicTech Solutions.
https://www.elogictech.com/blog/dynamo-vs-revit-api
How Revit-Dynamo Automation Improves BIM Productivity. Engineering.com. (n.d.).
https://www.engineering.com/story/how-revit-dynamo-automation-improves-bim-p roductivity
LLC, S. E. C. (2023, February 7). The Benefits of Using REVIT for Architectural Building Information Modeling (BIM) LinkedIn.
https://www.linkedin.com/pulse/benefits-using-revit-architectural-/
Ramanauskas, R. (2020, March 20). Evaluating the value of computational BIM solutions such as Dynamo for revit Invoke SHIFT
https://www.invokeshift.com/evaluating-the-value-of-computational-bim-solutionssuch-as-dynamo-for-revit/ Releases Eirannejad/pyRevit. (n.d.). https://github.com/eirannejad/pyRevit/releases
Singh, H. (2024, January 31). How Revit Dynamo improves BIM workflows. Hitech CADD Services.
https://www.hitechcaddservices.com/news/how-revit-dynamo-can-improve-bi m-workflows/
UniquesCadd. (2023, May 10). Dynamo: How does it improve BIM workflow efficiency. Medium.
https://uniquescadd.medium.com/dynamo-how-does-it-improve-bim-workflo w-efficiency-b29efa33d8bf
28
Voyansi. (n.d.). Dynamo - Strengths and Limitations.
https://www.voyansi.com/blog/dynamo-strengths-and-limitations
Voyansi, & Capra, A. (n.d.). Visual programming and Dynamo: A Quick Guide. Voyansi. https://www.voyansi.com/blog/visual-programming-and-dynamo
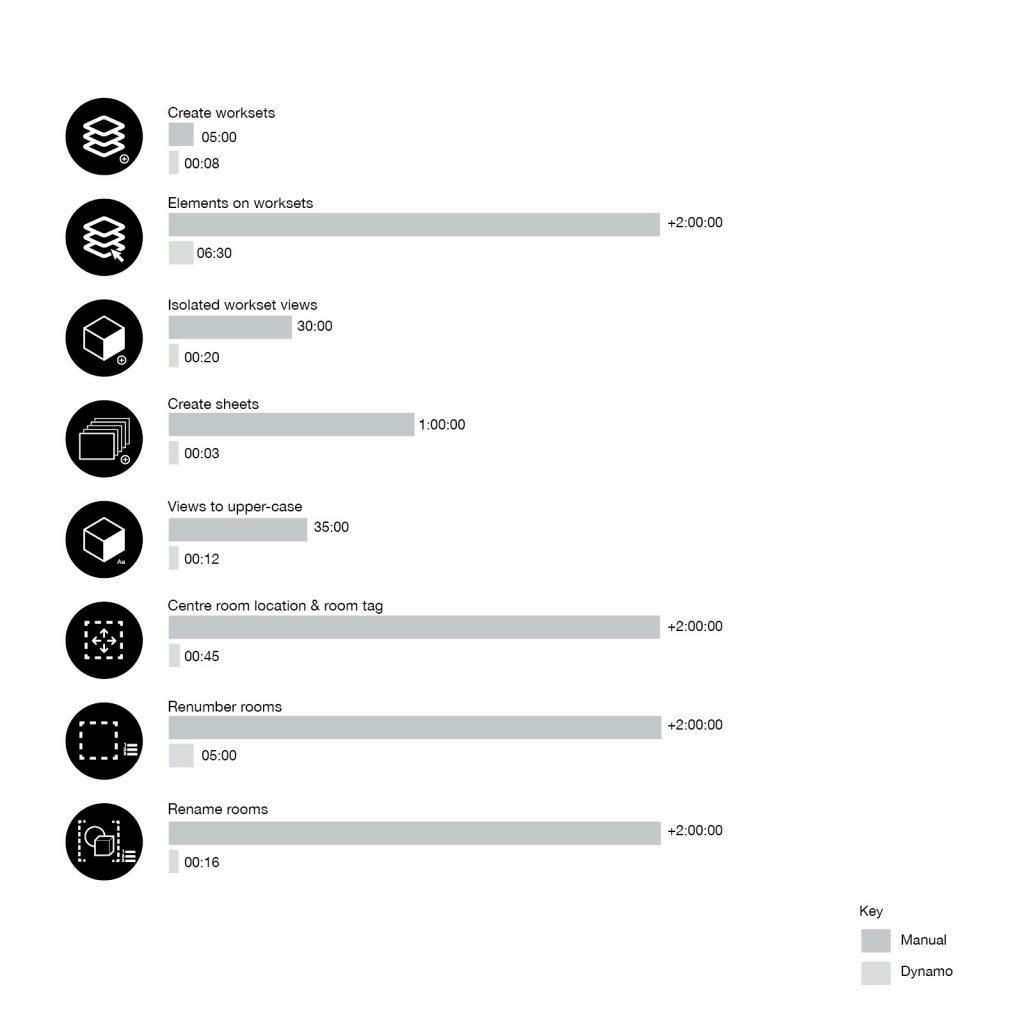
Wintour, P (2023, December 11). Improving operational effectiveness with Dynamo. Parametric Monkey
https://parametricmonkey.com/2019/02/18/improving-operational-effectiveness-wi th-dynamo/
29