FUN FOR KIDS CHRISTMAS SNOWFLAKES
These pretty snowfakes, based on traditional Scandinavian decorations, are surprisingly easy to make once you get started. YOU NEED Pencil, steel rule and scissors 1 sheet foam Double-sided sticky dots
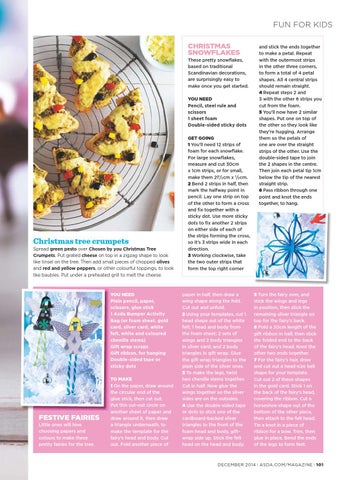
Christmas tree crumpets Spread green pesto over Chosen by you Christmas Tree Crumpets. Put grated cheese on top in a zigzag shape to look like tinsel on the tree. Then add small pieces of chopped olives and red and yellow peppers, or other colourful toppings, to look like baubles. Put under a preheated grill to melt the cheese.
YOU NEED Plain pencil, paper, scissors, glue stick 1 Asda Bumper Activity Bag (or foam sheet, gold card, silver card, white felt, white and coloured chenille stems) Gift wrap scraps Gift ribbon, for hanging Double-sided tape or sticky dots
FESTIVE FAIRIES Little ones will love choosing papers and colours to make these pretty fairies for the tree.
TO MAKE 1 On the paper, draw around the circular end of the glue stick, then cut out. Put this cut-out circle on another sheet of paper and draw around it, then draw a triangle underneath, to make the template for the fairy’s head and body. Cut out. Fold another piece of
GET GOING 1 You’ll need 12 strips of foam for each snowfake. For large snowfakes, measure and cut 30cm x 1cm strips, or for small, make them 211/2 cm x 1/2 cm. 2 Bend 2 strips in half, then mark the halfway point in pencil. Lay one strip on top of the other to form a cross and fx together with a sticky dot. Use more sticky dots to fx another 2 strips on either side of each of the strips forming the cross, so it’s 3 strips wide in each direction. 3 Working clockwise, take the two outer strips that form the top right corner
paper in half, then draw a wing shape along the fold. Cut out and unfold. 2 Using your templates, cut 1 head shape out of the white felt; 1 head and body from the foam sheet; 2 sets of wings and 2 body triangles in silver card; and 2 body triangles in gift wrap. Glue the gift wrap triangles to the plain side of the silver ones. 3 To make the legs, twist two chenille stems together. Cut in half. Now glue the wings together so the silver sides are on the outsides. 4 Use the double-sided tape or dots to stick one of the cardboard-backed silver triangles to the front of the foam head and body, giftwrap side up. Stick the felt head on the head and body.
and stick the ends together to make a petal. Repeat with the outermost strips in the other three corners, to form a total of 4 petal shapes. All 4 central strips should remain straight. 4 Repeat steps 2 and 3 with the other 6 strips you cut from the foam. 5 You’ll now have 2 similar shapes. Put one on top of the other so they look like they’re hugging. Arrange them so the petals of one are over the straight strips of the other. Use the double-sided tape to join the 2 shapes in the centre. Then join each petal tip 1cm below the tip of the nearest straight strip. 6 Pass ribbon through one point and knot the ends together, to hang.
5 Turn the fairy over, and stick the wings and legs in position, then stick the remaining silver triangle on top for the fairy’s back. 6 Fold a 30cm length of the gift ribbon in half, then stick the folded end to the back of the fairy’s head. Knot the other two ends together. 7 For the fairy’s hair, draw and cut out a head-size bell shape for your template. Cut out 2 of these shapes in the gold card. Stick 1 on the back of the fairy’s head, covering the ribbon. Cut a horseshoe-shape out of the bottom of the other piece, then attach to the felt head. Tie a knot in a piece of ribbon for a bow. Trim, then glue in place. Bend the ends of the legs to form feet.
DECEMBER 2014 | ASDA.COM/MAGAZINE | 101