OUILT 26 ISSUE Shibori Tie-dyeing - Ice Dyeing - Spray Dyeing Make your own fabric with Rit Dyes Adding lattice to your quilt top How to use Rit Dyes ♥ ♥ ♥ ♥ Raw edge and invisible machine applique Quilting with the Husqvarna Viking Tribute 150C Use the OmniArc Circle Cutter Ruler to create unique designs

2
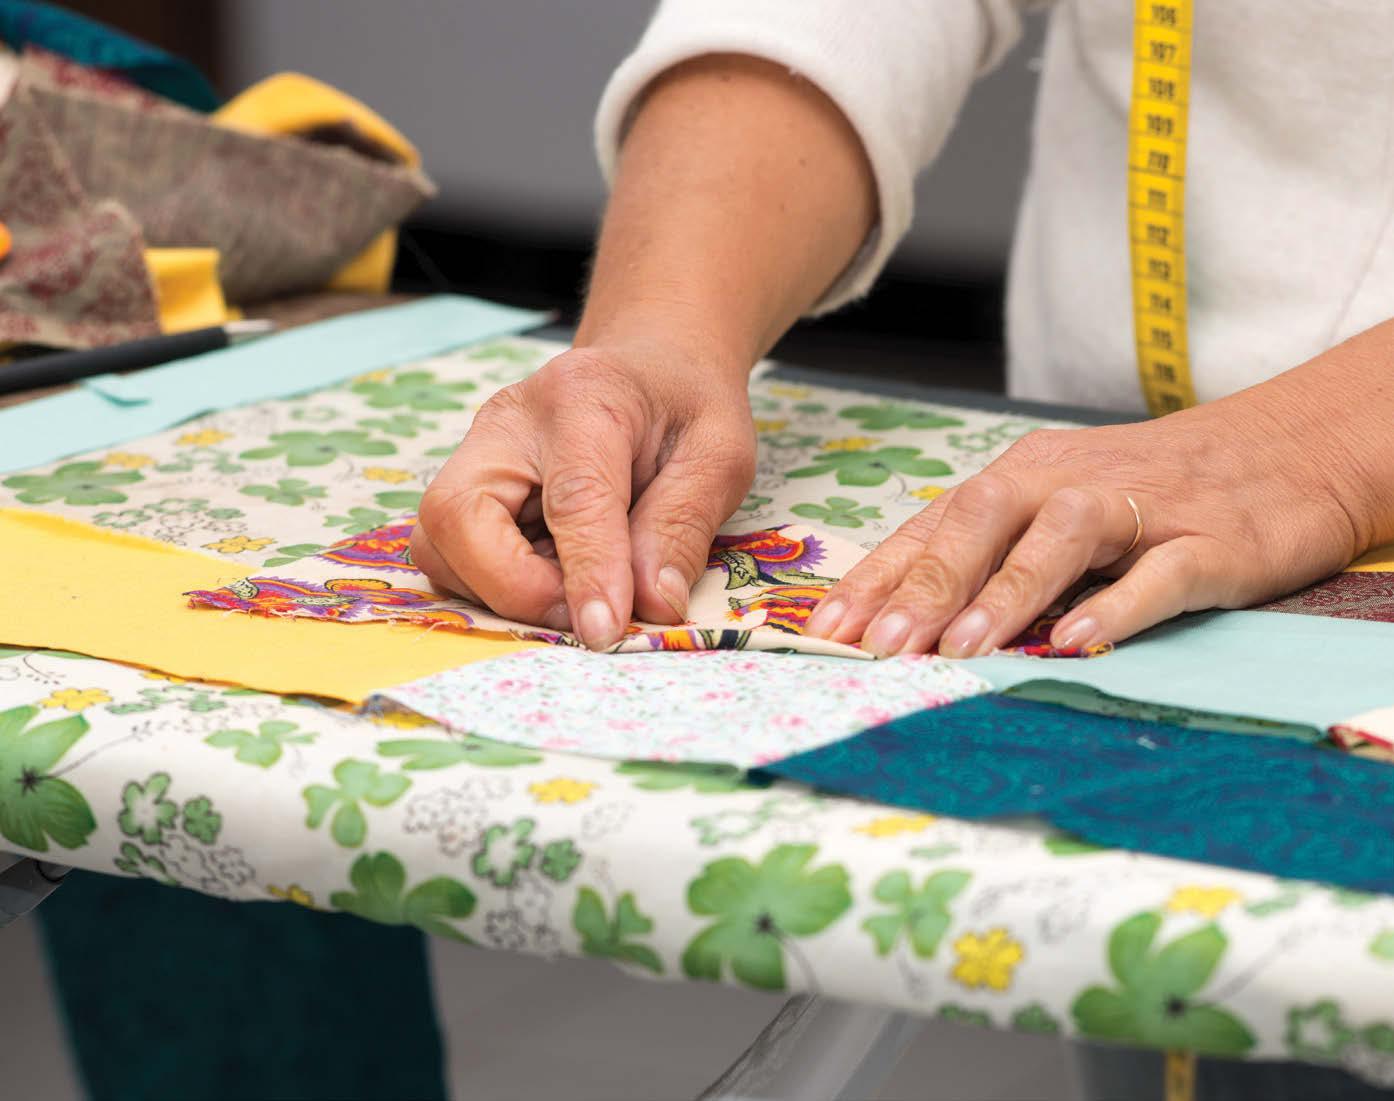
Let's play! Sure, let's play before we quilt! I invite you to make your very own quilting fabric using Rit Dye Kits! This would make your quilt a oneof-a-kind quilt! Playing with dyes isn't something very usual for quilters, we usually fall in love with a fabric collection and imagine the perfect pattern for it. But what if you explored your favorite colors or color combinations and what quilt pattern would you choose then?
What I love about Jean Boyd features in this issue is her simplicity in explaining how to work with Rit Indigo Shibori Tie Dye Kit and Rit All Purpose Dyes. As a quilter, she found the kits easy to use and even easier to find the project to show you how much the dye work can do all the talking on a simple quilt pattern. The table runner and cushion cover top show off the dye gradation and color patterns created on the fabric using simple squares and strips. She suggests three methods of dyeing your fabric so you can choose your preferred method to start with or explore all three!
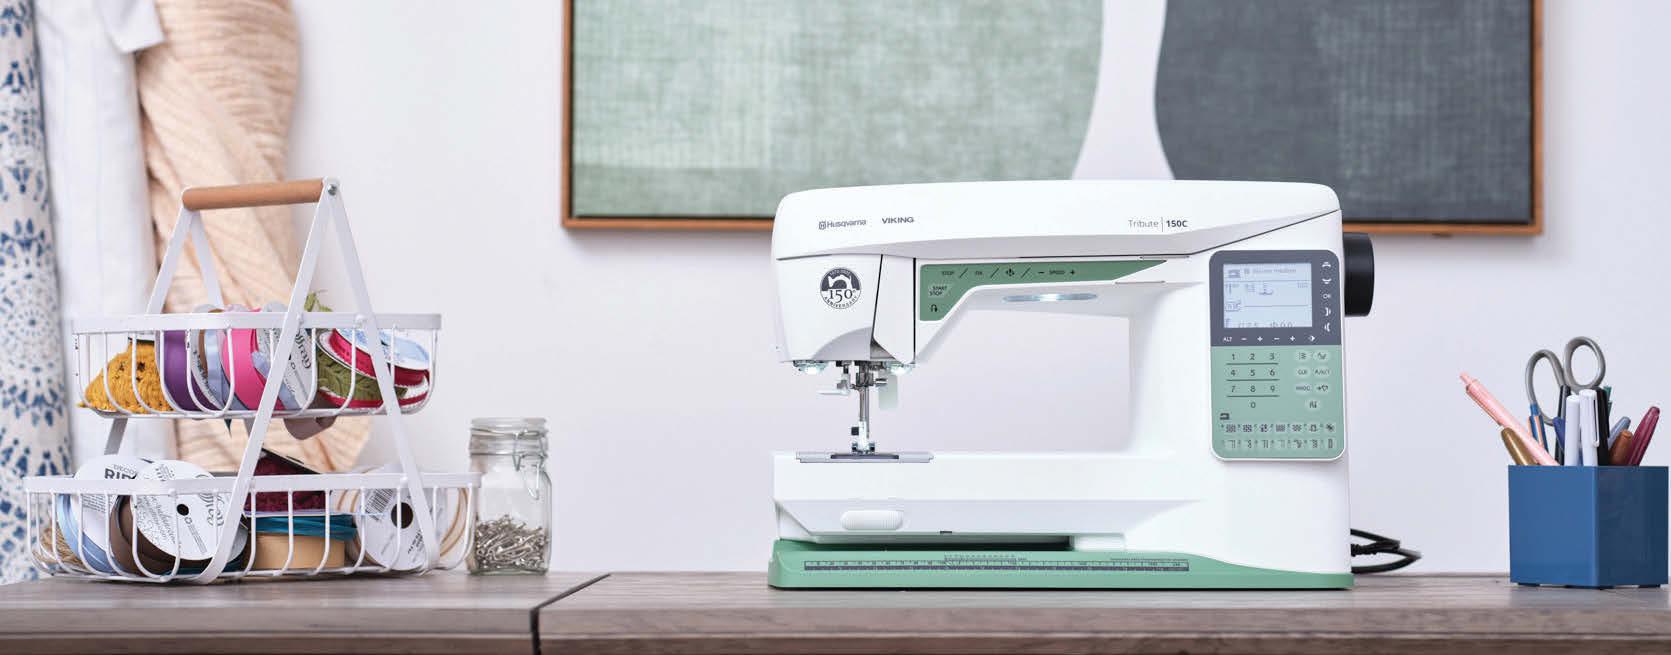
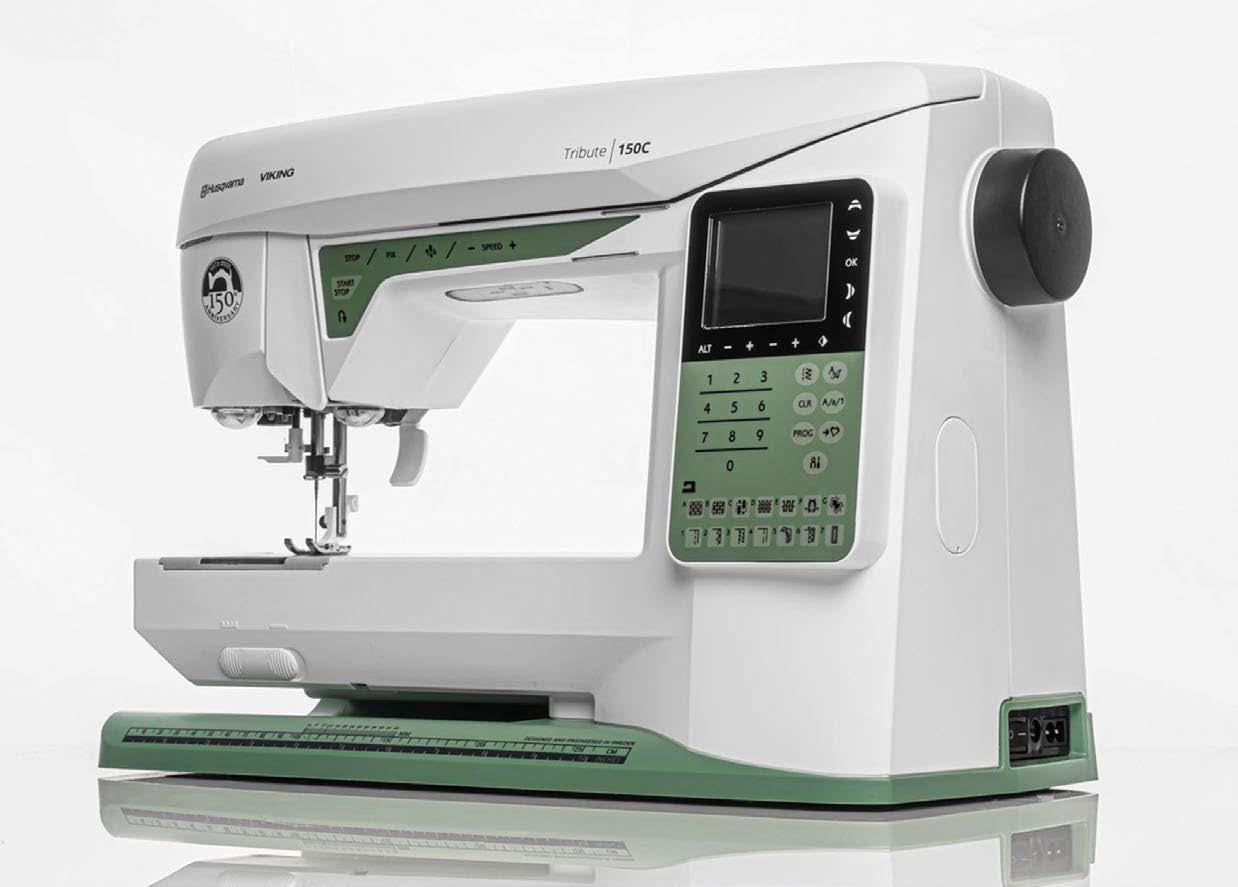
And last year Elaine Theriault reviewed the Husqvarna Viking Tribute 150C a new sewing machine in celebration of Husqvarna Viking’s 150th Birthday.
When I first saw the Tribute 150C, subconsciously, there was something familiar about it. When I read Elaine’s first article and followed the link to Husqvarna’s timeline, I realized what made it familiar, the color is modelled after their 1953 model! My mother is an avid sewist who still sews today at 86 on her Husqvarna Viking 1953 model! It’s still in great condition. The 1953 model in the timeline article is the sewing machine I grew up watching Mom sew on weekends, and the sewing machine I learned to sew on too. Aaawww.
Elaine has interesting things to say about the Tribute 150C like whom they had in mind when they designed it, its features and benefits, how it performs with straight stitching, raw edge and invisible machine applique, and of course, its quilting capabilities.


What would we do without exploring different methods of making quilts and considering new machines with features that simplify all your sewing tasks?
Enjoy the issue!

Cheerfully,

| issue 26 OUILT
Editor's Letter
OUILT
PUBLISHER, EDITOR-IN-CHIEF, ART DIRECTOR
Carla A. Canonico carla@QUILTsocial.com
PUBLISHER, ADVERTISING SALES
John De Fusco john@QUILTsocial.com
PHOTOGRAPHERS
Carla A. Canonico, John De Fusco
BLOGGERS/CONTRIBUTORS
Jean Boyd patternsbyjeanboyd.com
Elaine Theriault crazyquilteronabike.blogspot.com
GRAPHIC & WEB DESIGN
Carla A. Canonico carla@QUILTsocial.com
GRAPHIC ASSISTANT and SOCIAL MEDIA

Sondra Armas
Maria Corina Guillen
WEBSITE / BLOG : https://QUILTsocial.com
Like us on Facebook : QUILTsocial
Follow us on Pinterest : quiltsocial
Follow us on Instagram : quiltsocial
Follow us on Twitter : @QUILTsocial
WHERE TO GET YOUR COPY
QUILTsocial is a quarterly eMagazine published by A Needle Pulling Thread. It is available free for personal use online at https://QUILTsocial.com
A limited number of printed copies of QUILTsocial are available for purchase at select quilt shops and specialty stores. Ask for it at your local shop. QUILTsocial is not available by subscription.
QUILT SHOPS
If you are interested in carrying QUILTsocial in your store, please email john@QUILTsocial.com
EDITORIAL
Designers and other contributors who would like to be considered for future issues please email carla@QUILTsocial.com with a brief description of your work and your proposed project for the magazine.
©2023 QUILTsocial. All rights reserved. Issue 26. ISSN 2368-5913
No part of this publication may be reproduced without written permission from the publisher.
All designs, patterns, and information in this magazine are for private, non-commercial use only, and are copyrighted material owned by their respective creators or owners.
4 | issue 26 OUILT Advertiser Index 43 A Needle Pulling Thread Magazine 42 Business Directory 09, 17, 21 Craftables 44 Husqvarna Viking 02 PFAFF 0 4 QUILTsocial.com
FREE! ALL Visit QUILTsocial.com and download our free ebook Elaine’s Quilting Tech Tips! { daily blog { weekly newsletter { quar terly magazine { fun Facebook page { yummy Pinterest page { app on iTunes/Google Play { ALL of the above! projects techniques product reviews * * *
CONTENTS
6 Shibori tie-dyeing: What you need to get star ted
7 Tie-dyeing process: How to get Shibori style dyed fabric
9 3 tying and binding techniques for tie-dyeing
11 Squares make a great looking table runner: Make your own design
12 Binding a quilted table runner: An angled approach
14 Dyeing gradations using Rit All Purpose Liquid Dyes: Getting started
16 Using gradated fabrics to make a placemat and pillow top [Strip piecing]
18 Ice dyeing creates unique fabric for your quilted projects
20 Spray dyeing fabric with Rit dyes for a designer look
22 Use the OmniArc Circle Cutter Ruler to create unique designs
24 Introducing the Husqvarna Viking Tribute 150C - What's included
27 Features of the Husqvarna Viking Tribute 150C – Benefits included!
30 Straight stitching with a per fect seam allowance: How needle position helps
33 Raw edge and invisible machine applique - Tips for success!
37 Quilting with the Husqvarna Viking Tribute 150C: How to get great results!
| issue 26 5 OUILT
26
OUILT
Shibori tie-dyeing: What you need to get started
I've always been interested in creating my own designs on fabric, whether using markers, crayons, paints or dyes. Have a look at my previous QUILTsocial blog, Creating one-of-a-kind fabric with paint sticks and decorative stitches, where I explain how to use markers from the Mont Marte Signature Fabric Art Set to create special effects on fabric.
I'm using the Rit Indigo Shibori Tie Dye Kit to create some unique designs on fabric. Shibori is an ancient Japanese dyeing technique that involves folding or twisting cloth and then binding it to create various patterns. I recently took an indigo dyeing class from fiber artist Bethany Garner, in Kingston Ontario. Many of the same effects created with indigo dyeing can also be achieved using the Rit Indigo Shibori Tie Dye Kit, and that's what we're using in this feature. This kit is readily available at craft and fabric shops and it includes everything you need to get started. Here's what comes in the kit:
• Rit Indigo All-purpose Dye

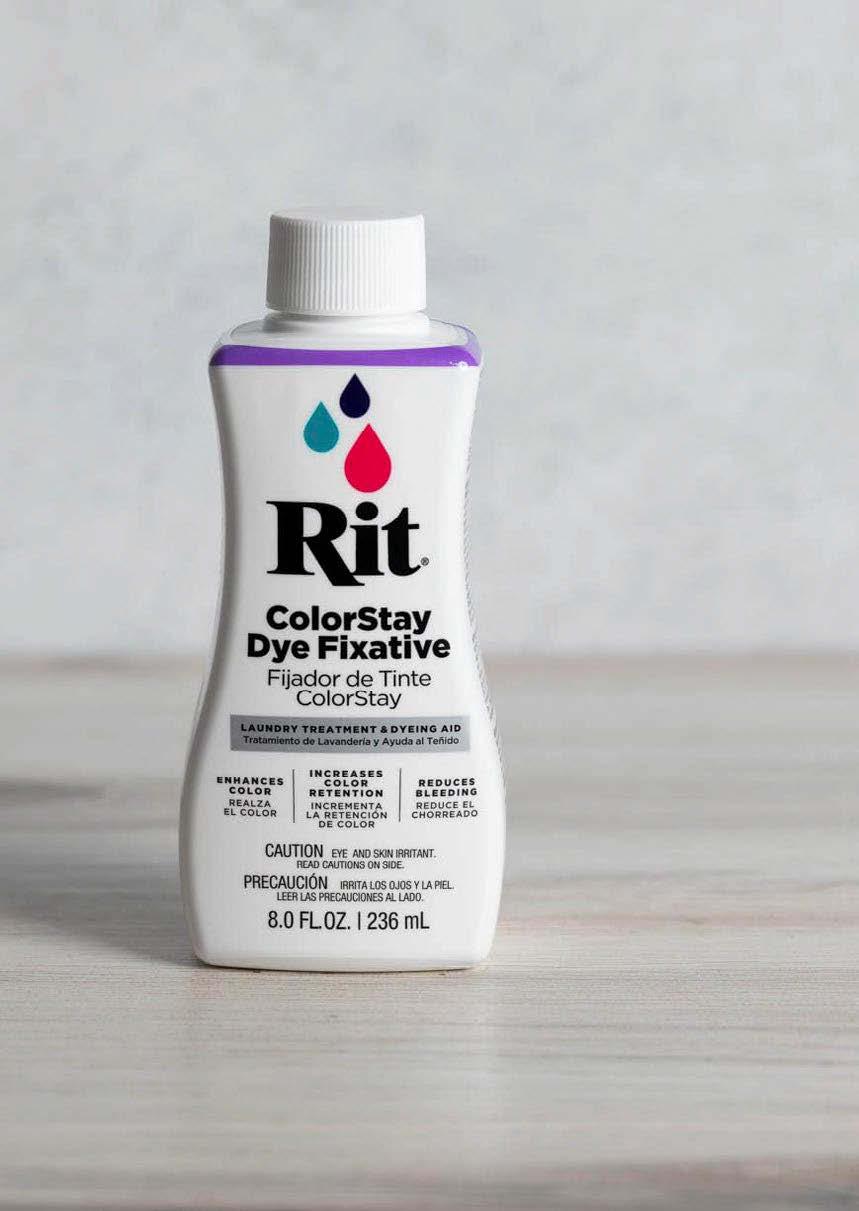
• Rit ColorStay Dye Fixative

• rubber bands
• twine
• small plastic squares
• plastic gloves
• instruction booklet
Jean Boyd
You might also like to gather up some other supplies such as tongs, clothes pins or clamps, wooden skewers or chopsticks, PVC pipe 2" – 3" in diameter and about 10" long, wooden craft sticks and wood or plastic circles or squares (2 of each).

When using the Rit Indigo Shibori Tie-Dye Kit, all you need to add is hot water, salt, liquid dish soap and fabric. I used PFD (prepared for dyeing) fabric, but you can use whatever cotton fabric you have on hand. If you're not using PFD fabric, make sure to wash your fabric first to remove any finishes that may be on it. There are also instructions for using this dye kit for other types of fabrics as well.
Get your fabric ready
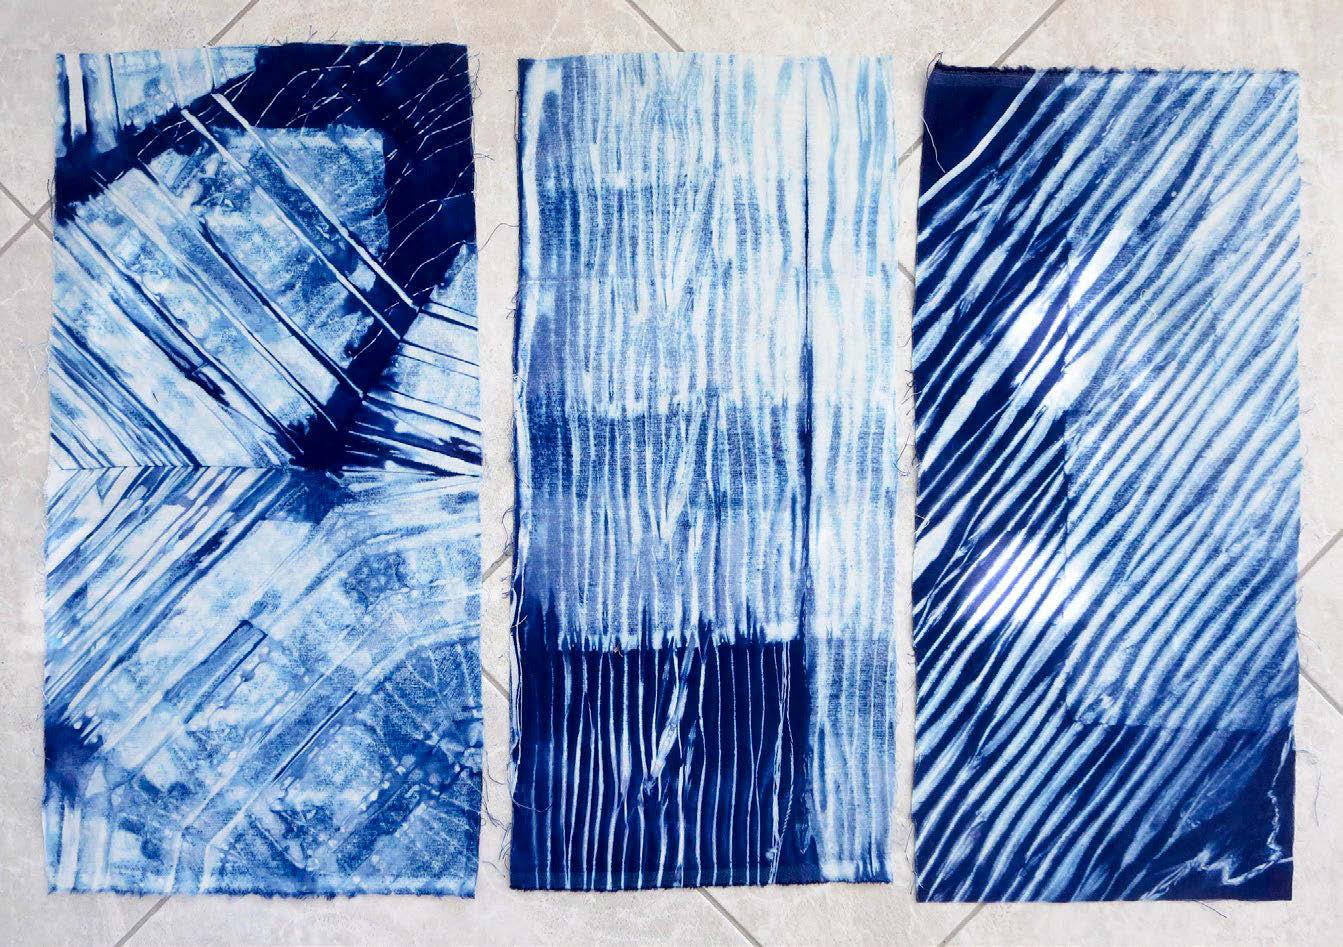
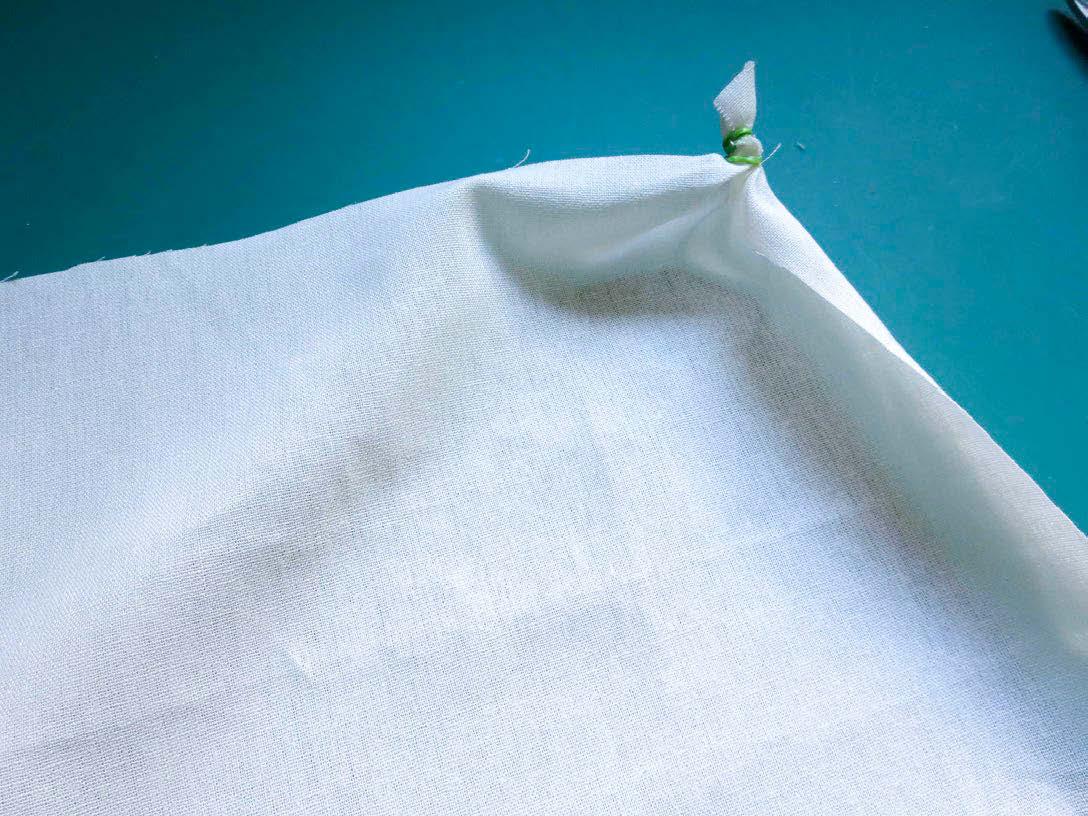
There are many different folding methods that’ll give an authentic Shibori look to your fabric. These are well described in the instruction booklet that comes in the kit. If you zoom in on the picture below, you'll be able to see how the fabric was folded to get the results shown in the pictures. You can also experiment and come up with your own folding designs.
You can also have a look at videos which show several folding and wrapping techniques.

6 | issue 26 OUILT
Mont Marte Signature Fabric Art Set
Here’s what’s in the Rit Indigo Shibori Dye Kit
Extra tools for dyeing
Instruction booklet for Shibori dyeing
Photos by Jean Boyd
Tie-dyeing process:
How to get Shibori style dyed fabric
I used pieces of PFD (prepared for dyeing) fabric that are approximately 11" x 20". The fabric must be wet before putting it in the dye bath. I found it easier to do the folding first, and then place the fabric in a basin of water until it is thoroughly wet. There are many suggestions for folding the fabric in the instruction booklet included with the kit, or you can experiment and create your own wrapping and folding techniques.
Wearing rubber or plastic gloves, add the well-shaken dye.
Now the fun begins! Carefully place the wet, folded fabric in the dye bath.

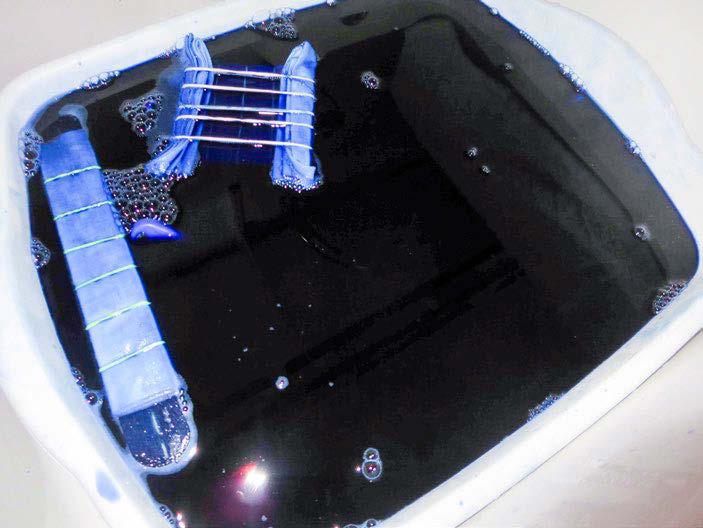
To dye one pound of fabric, mix ½ bottle of Rit Indigo Dye (4 oz) with 3 gallons of hot water (140°). Use your kitchen scale to weigh the fabric. For the fabric I used, one pound was about 2 yards of fabric. Fill a plastic container or stainless-steel sink with hot water. To enhance the color, add 1 cup of salt. To help promote level dyeing, add 1 tsp of liquid dish detergent.
Sometimes, the fabric floats to the top. I used my tongs to help keep the fabric under the surface. You can use any heavy article to weigh the fabric down.
When you're satisfied with the color, remove the fabric from the dye bath. 3 – 5 minutes is usually long enough, but you can leave the fabric in the dye bath for up to 20 minutes. Remember, the dyed fabric will be a lighter color when dry.
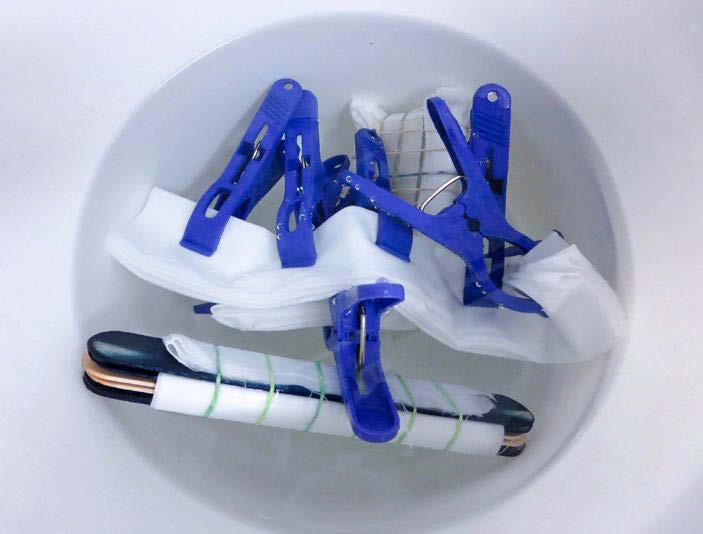
Now it's time to use the Rit ColorStay Dye Fixative to enhance the color and reduce bleeding. Mix ½ bottle (4oz) of Fixative with 3 gallons of water. Remove fabric from the dye bath and leaving it tied or bound, place it in the fixative and water bath.
Stir slowly and continuously for 20 minutes.
| issue 26 7 OUILT
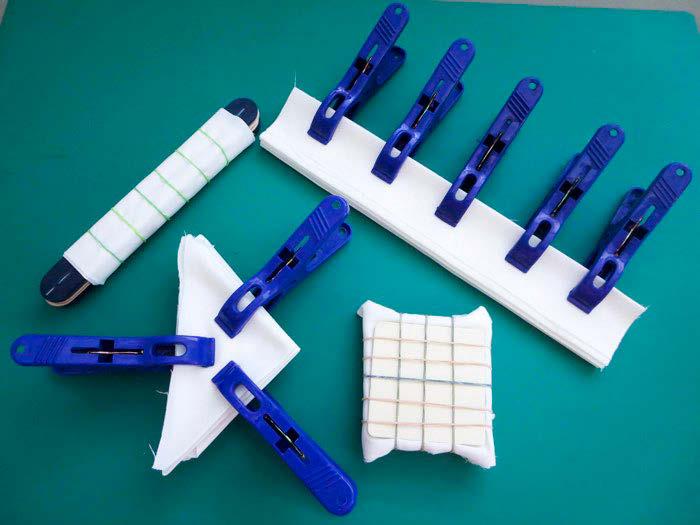
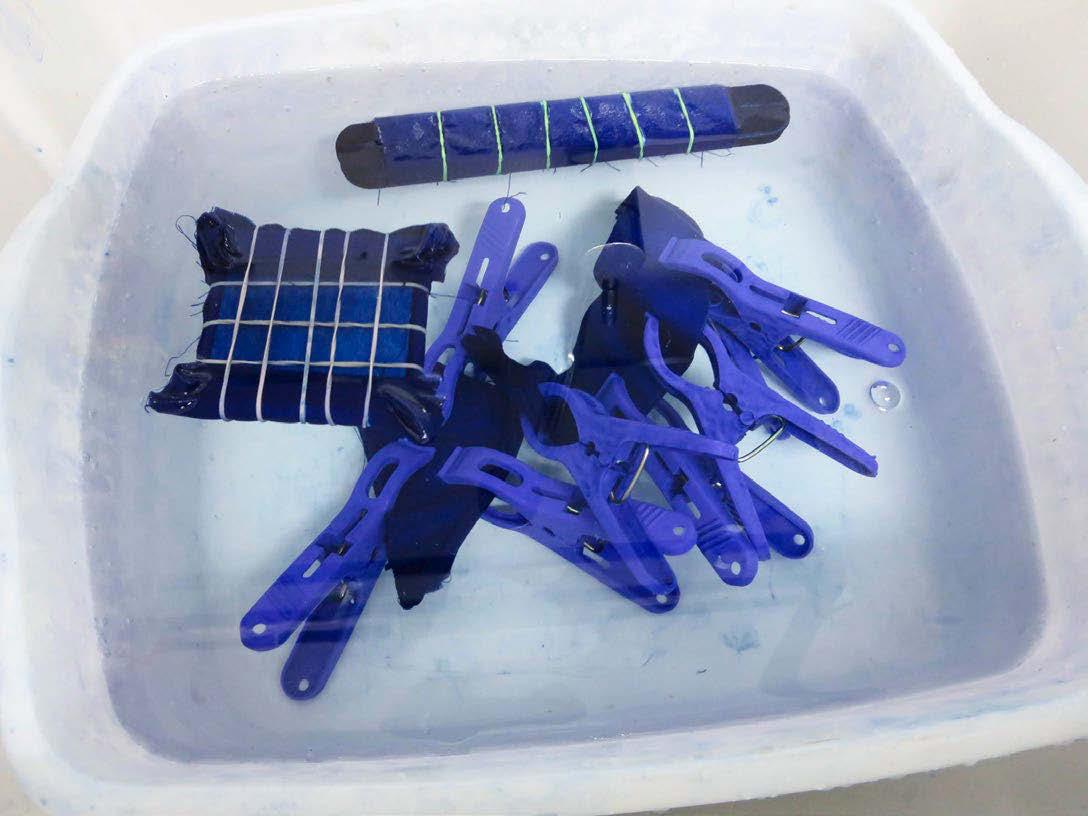
While the fabric is soaking, get the dye bath ready.
Fabric is wrapped, tied and clamped.
Fabric is soaking in water.
Fabric in the dye bath
Use tongs to help weigh fabric down.
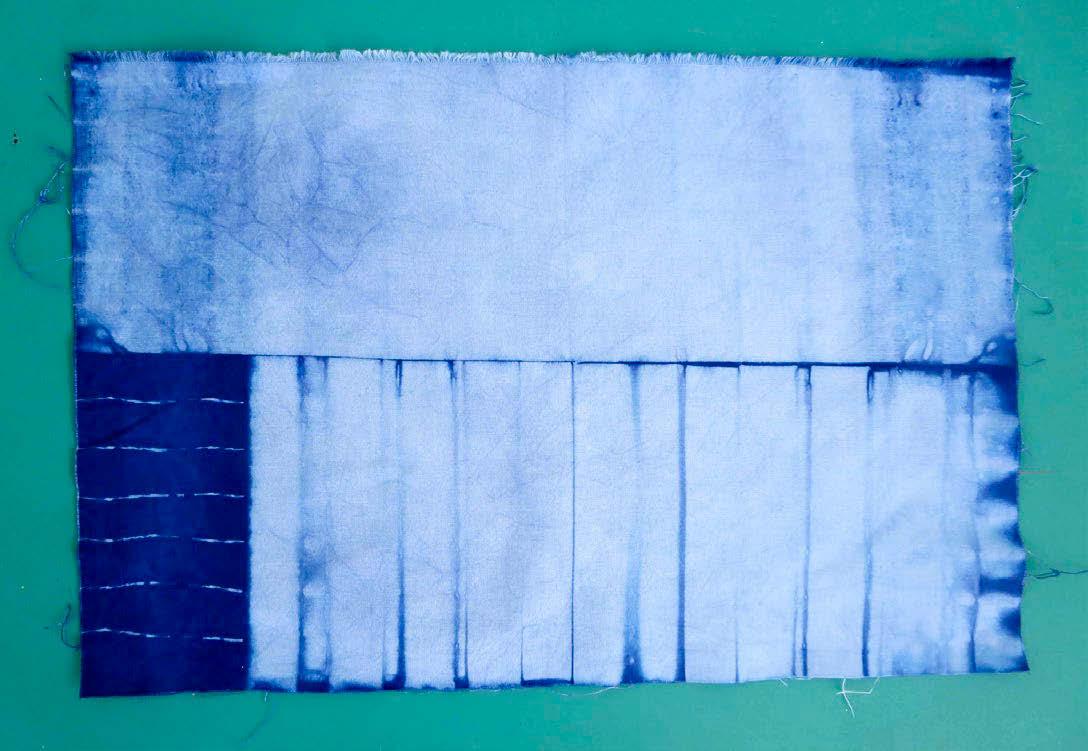
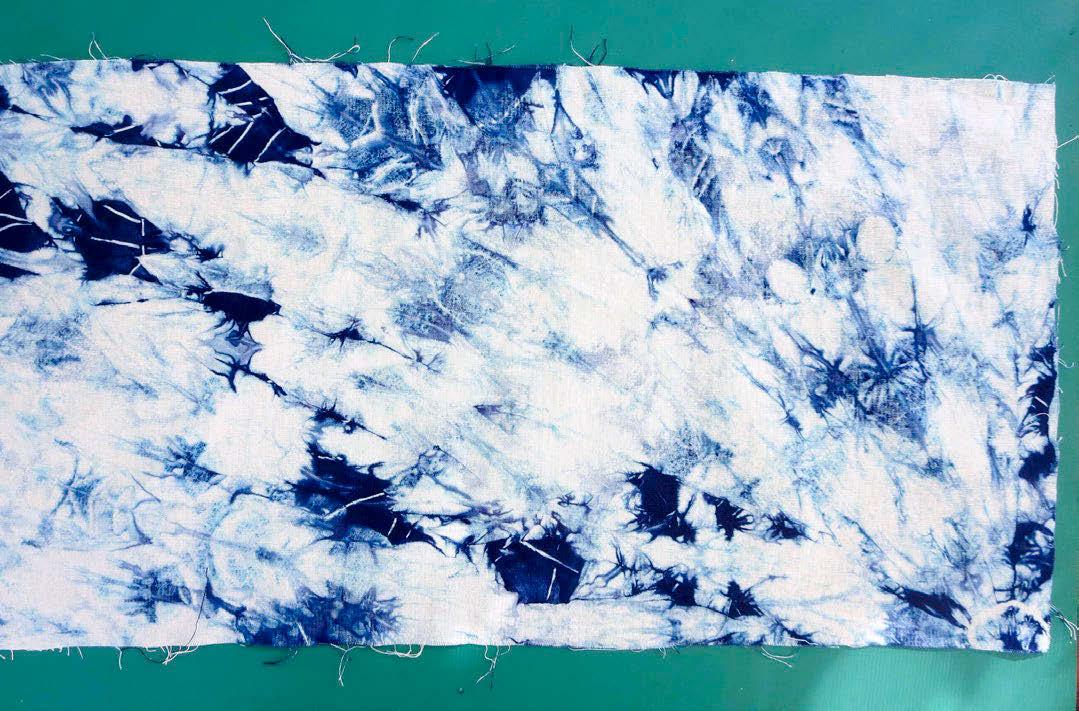
And now for the big reveal! Remove bindings, elastic, or string and get ready to admire your newly created fabric. Rinse fabric in cool water until the water runs clear. You can start using the fabric as soon as it’s dry. If you wish, you can wash your fabric in cold water with a mild detergent, rinse and dry.
And here's what I have now. A much more useful piece for me!
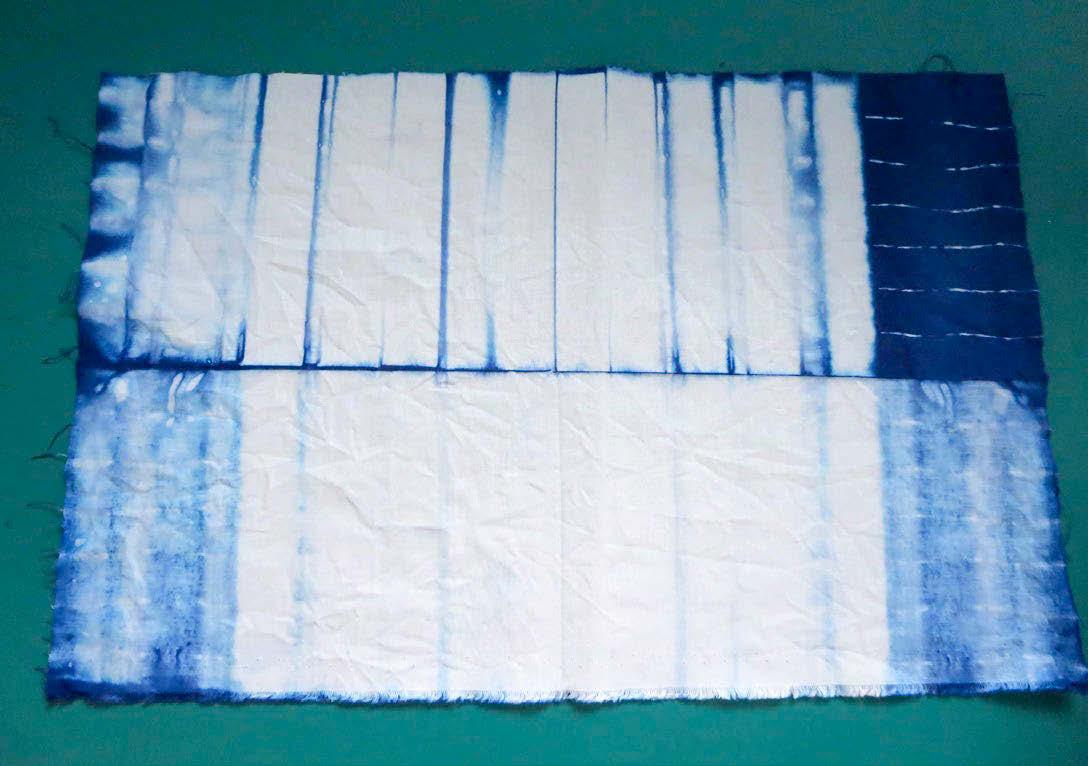
This piece had too much white in it for what I wanted, so I dipped it back in the dye for about 1 minute.
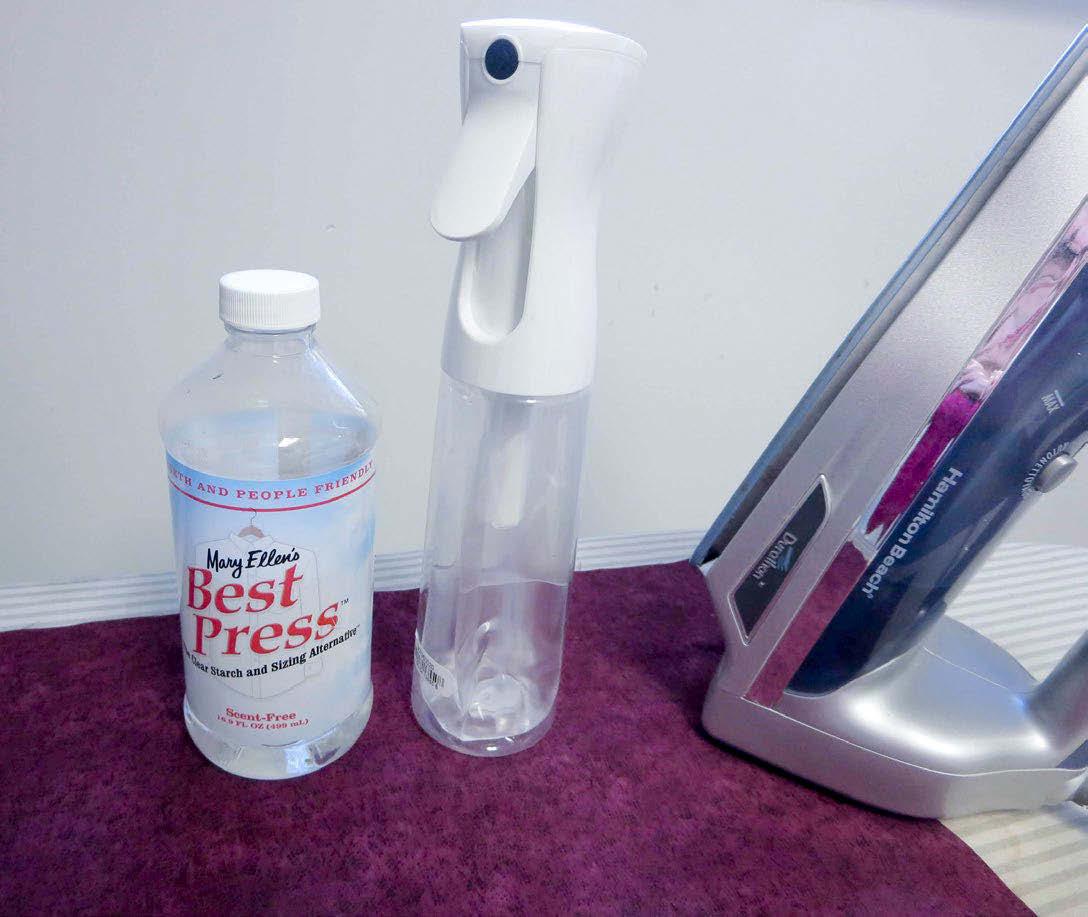
When I pressed my fabric, I used Mary Ellen's Best Press starch alternative in the Best Press Spray and Misting Bottle, which really got rid of the wrinkles created by all the twisting and folding!

Original fabric after dyeing
8 | issue 26 OUILT
Dyed fabric in the ColorStay Dye Fixative solution
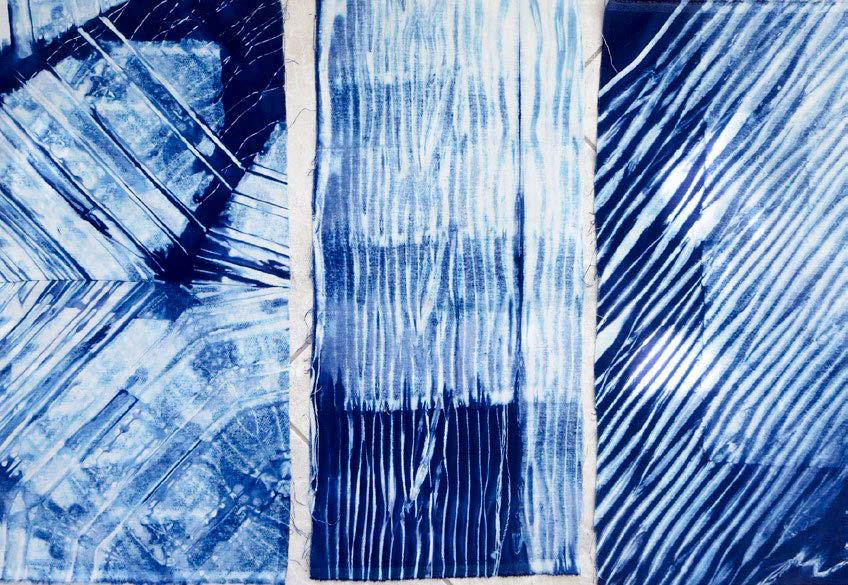
Shibori–style dyed fabric
Over–dyed fabric
Spray with Mary Ellen’s Best Press for wrinkle free fabric.
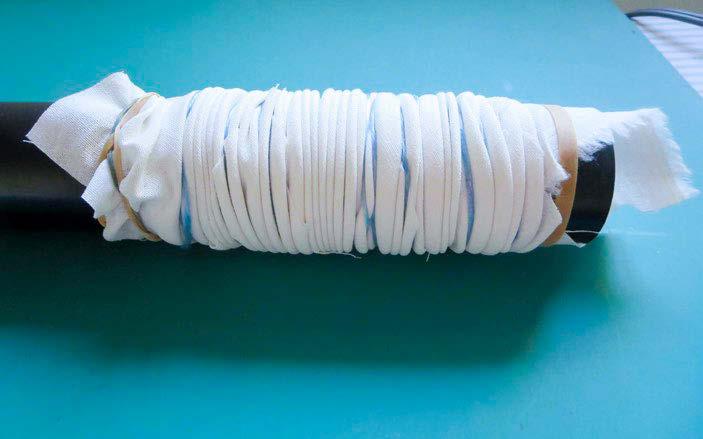
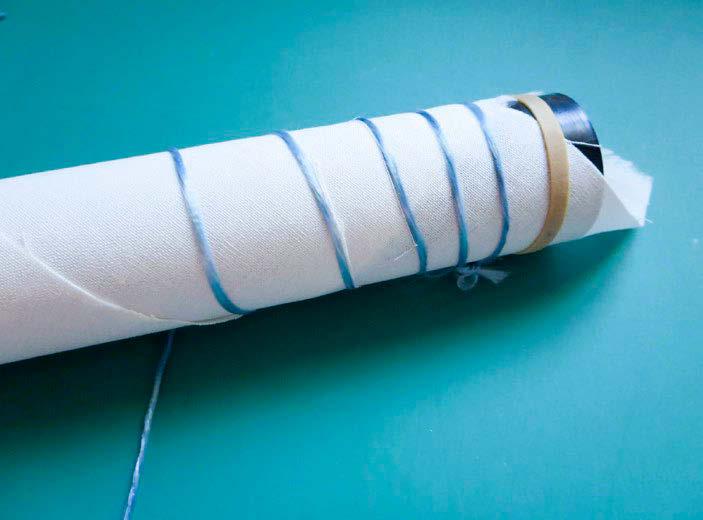
Here's another method of manipulating fabric before dyeing. This is one of my favorite methods for creating a Shibori-type design. Start with a piece of PVC plastic pipe. Mine was 2" in diameter and about 10" long. Any diameter will work and each size will give you a different effect. Start by anchoring one corner of the fabric on the pipe with a tight elastic band. Then wrap the fabric around the pipe. Wind string or rope around the pipe as you go.
When you get to the end of the fabric, secure the string or rope with a knot and put another elastic band around the bottom end to hold everything in place.

Soak the fabric in water and then dye it in the Rit Indigo dye solution using the method given. I used the same dye bath I already used.
3 tying and binding techniques for tie-dyeing
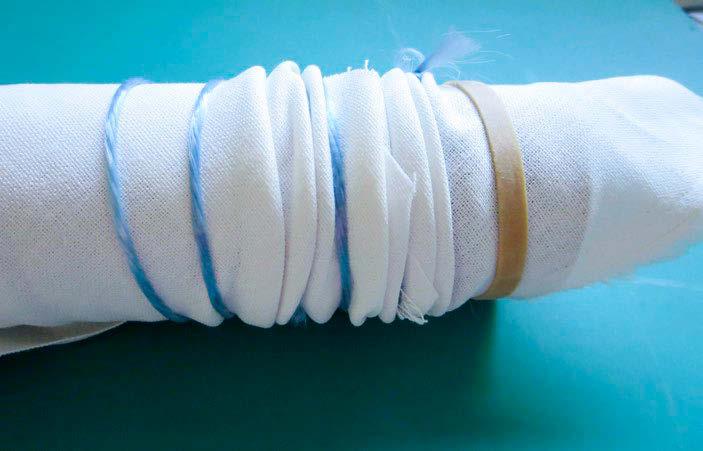
After you’ve wrapped a few inches, push the fabric up towards the starting point, making small folds. Pull the string or rope tightly to secure the folds and continue wrapping the fabric around the pipe.
| issue 26 9 OUILT
Start wrapping fabric around a PVC pipe.
Push the fabric toward the top of the PVC pipe.
Fabric is ready for dyeing.
Finished fabric after dyeing
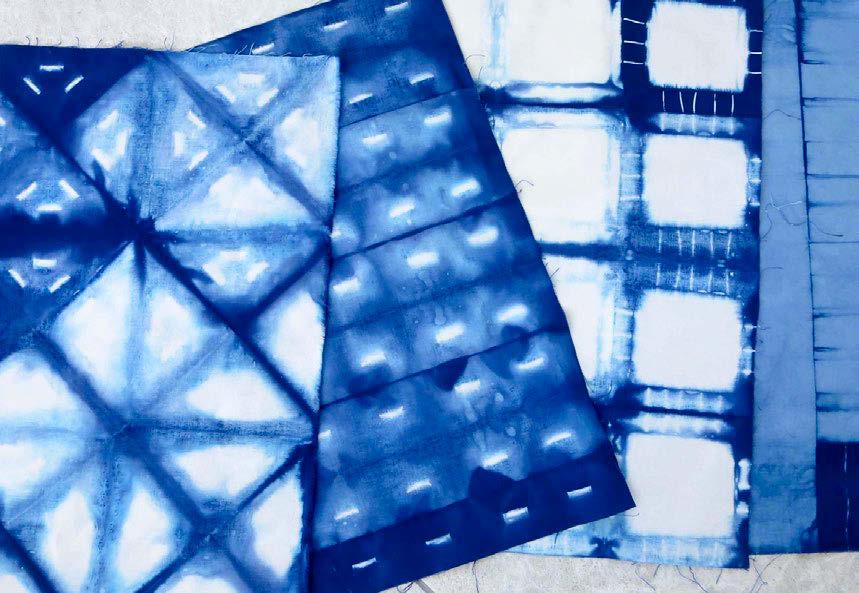
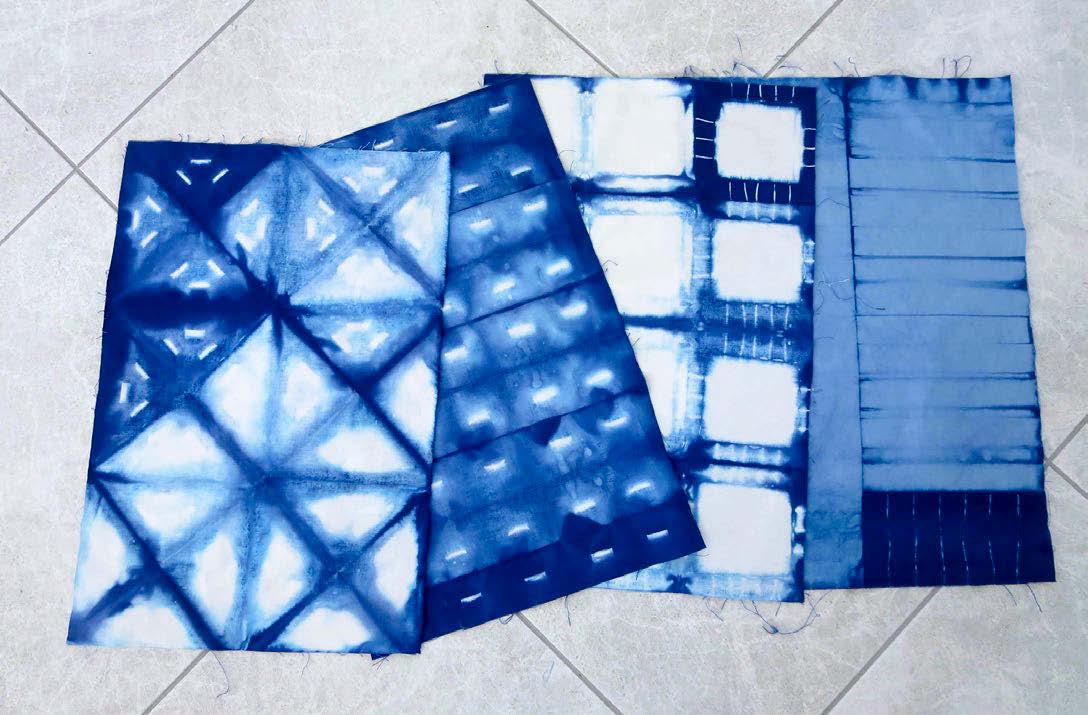
Here are fabrics I dyed using 3 variations of this technique. Here's another folding method that's easy to use.
Pinch one corner of fabric and secure with elastic.
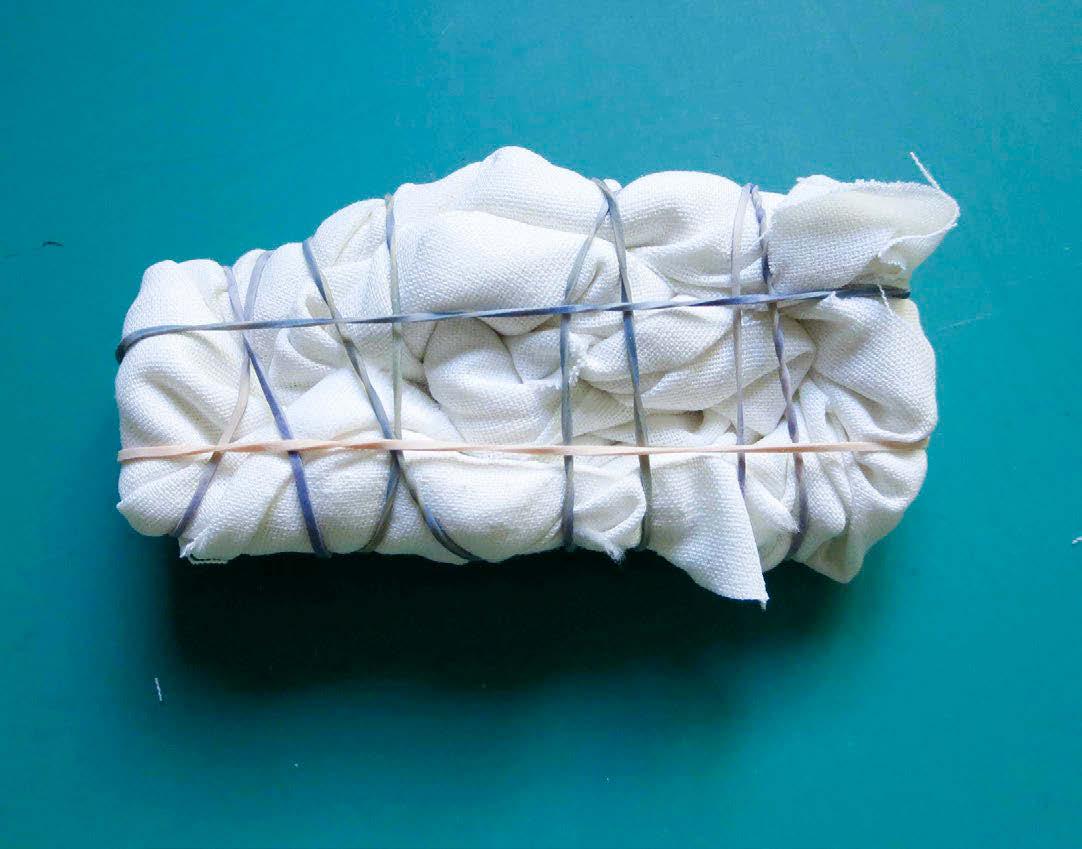
Hold the fabric by the corner and twist along the length. Then roll it all into a circle or rectangle and secure with several elastic bands. The tighter the elastics are, the more white fabric you’ll see after it’s dyed.
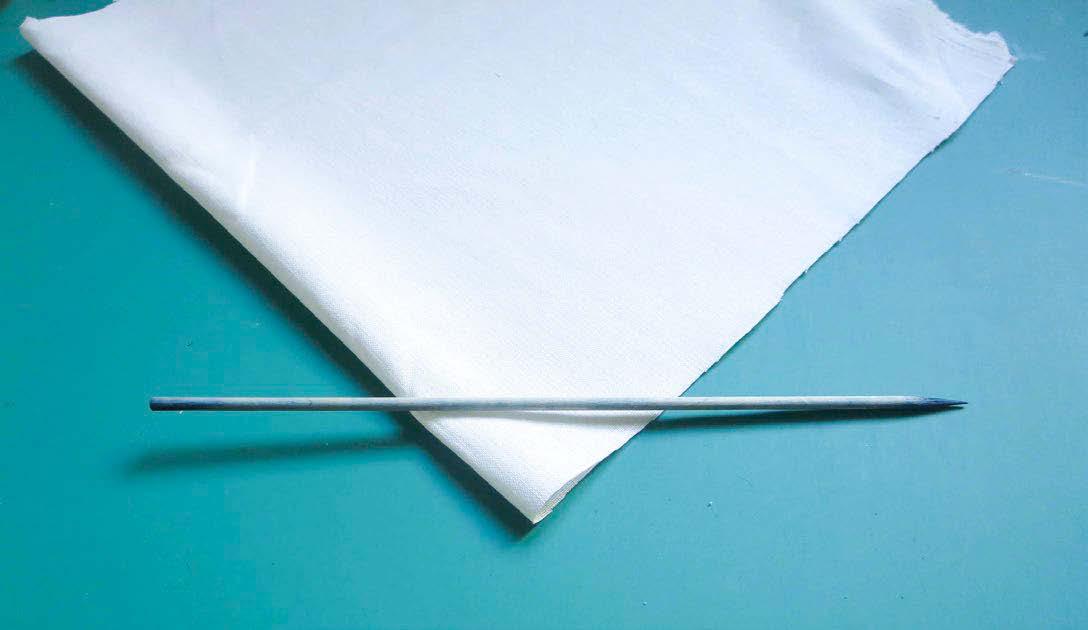
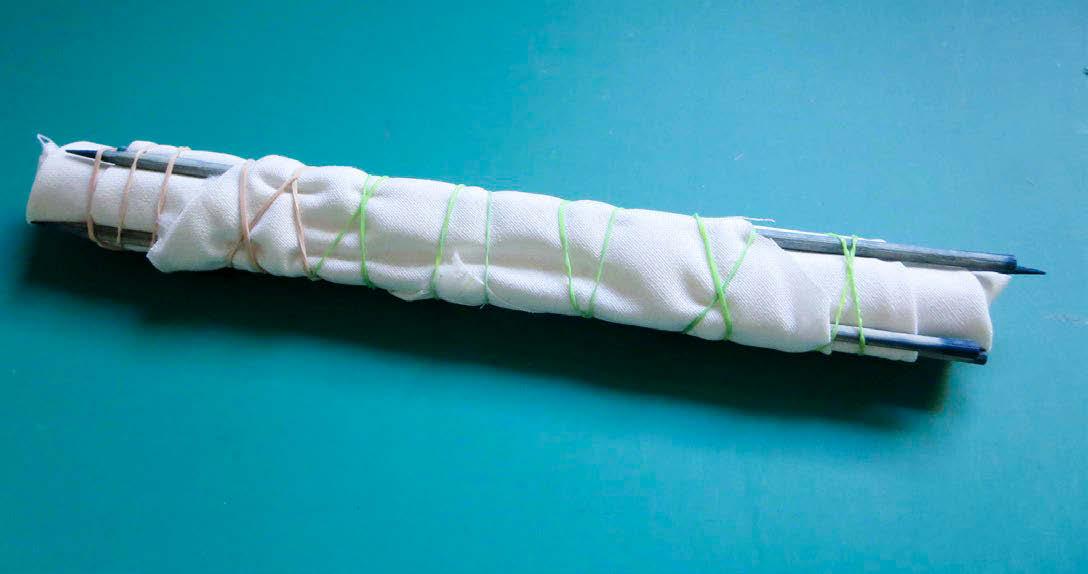
Here’s how this piece turned out after rinsing and drying. Another fun technique uses bamboo skewers or chopsticks. Place one skewer on a corner of the fabric. My fabric was doubled, but you can use a single layer if you wish.
Roll the fabric once around the skewer. Add another skewer and roll again. Keeping adding skewers and rolling the fabric until you have a little bundle of skewers and fabric. Wrap tightly with elastic or string, soak in water for a few minutes, then dye with Rit Indigo Dye
10 | issue 26 OUILT
Bundle of fabric wrapped around wooden skewers
Pinch and secure one corner of the fabric.
Fabric twisted into a rectangle
Finished fabric
Place 1 skewer on a corner of the fabric
Squares make a great looking table runner: Make your own design
Now let’s cut some of this beautiful fabric dyed with the Rit Indigo Shibori Tie Dye Kit, and make a quick table runner that’s 18½" x 39½" when finished.
• From fabrics of your choice cut the following:
» 3 – 9½" squares,
» 9 – 6½" squares, and
» 15 – 3½" squares.
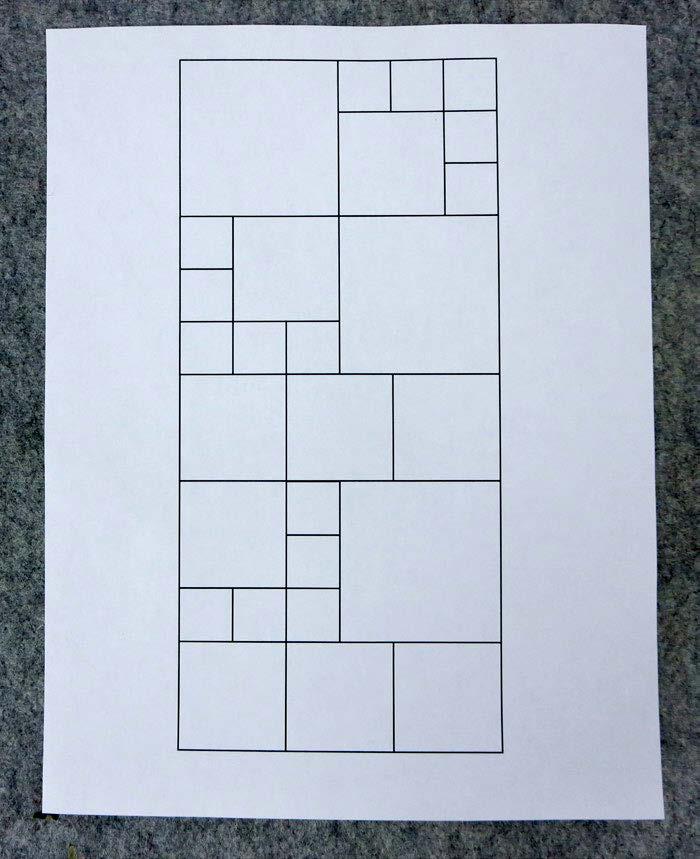
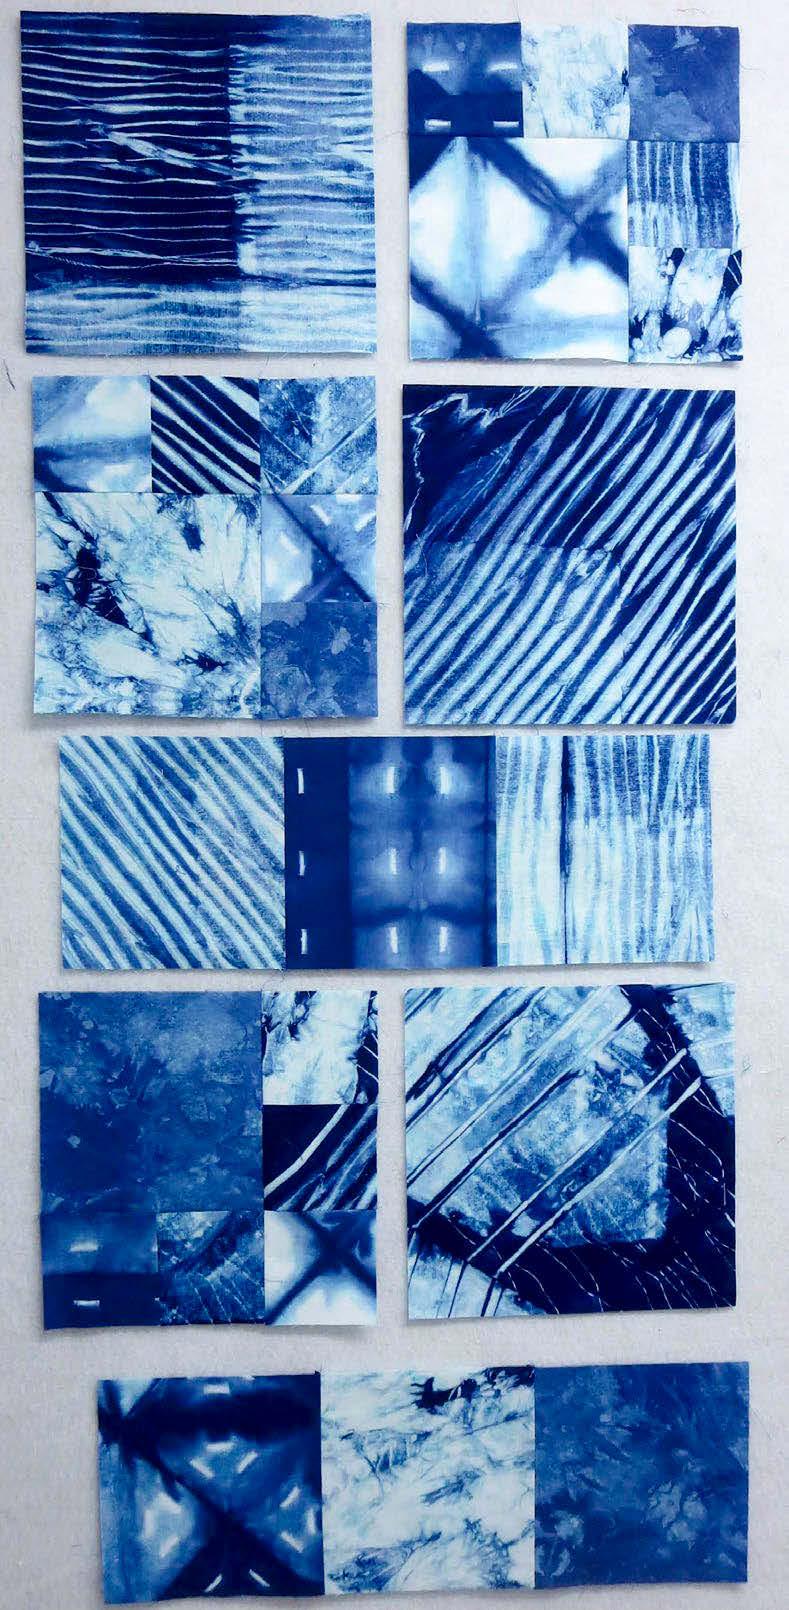
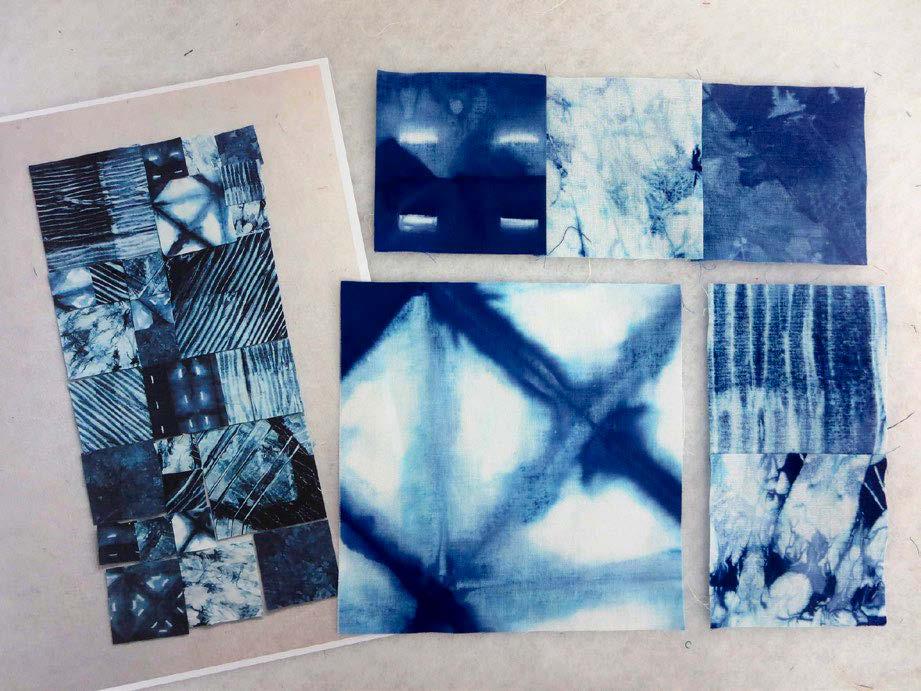
• Using this diagram as a guide, arrange the fabrics as desired. It's helpful to use a design wall or a similar flat surface for this step.
• When you're satisfied with your fabric and color placement, take a picture to use as a guide when sewing the squares together. It's easy to get the pieces mixed up in a design like this, so the photo is very useful for keeping everything in order.
• Sew 1 – 6½" and 5 – 3½" squares together as shown to make 1– 9½" block. Make 2 more blocks like this.You can see my photo of the quilt beside the block I’m working on.
• Sew 3 – 6½" squares together to make a row that measures 6½" x 18½".
• Make another row like this.
Putting it all together
• Following the diagram, sew a plain 9½" block and a pieced 9½" block together to make a row measuring 9½" x 18½".
• Make 2 more rows like this.
• Follow the diagram to sew the 3 – 9½" rows and the 2 –6½" rows together, pressing seams as desired.
| issue 26 11 OUILT
Design for a table runner
Squares for the pieced block are ready to sew together.
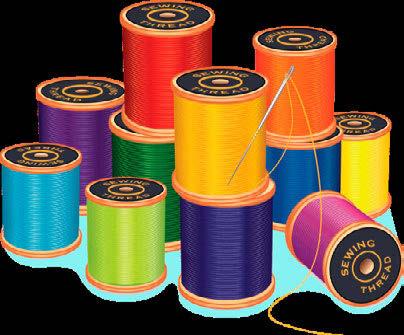
Just a few of the many Rit dye colors available
Rows are ready to sew together
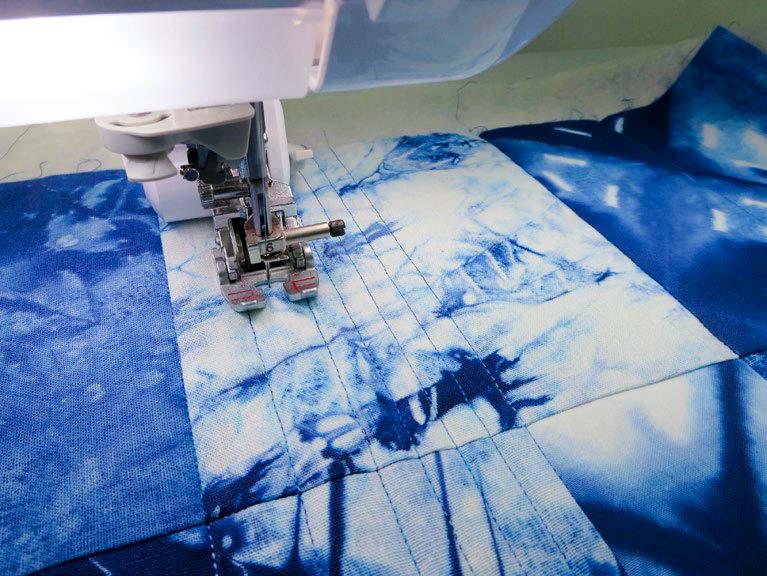
Quilting the table runner
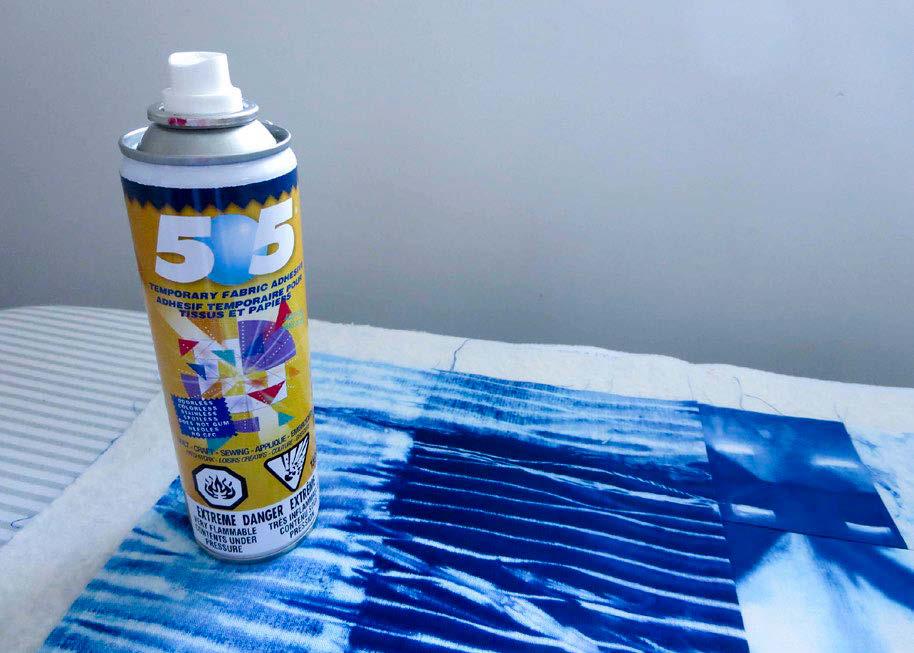
Layer backing, batting and quilt top. I used Odif 505 Temporary Adhesive for fabric to help the layers stick together and avoid having to baste the layers before quilting. Odif 505 is a temporary, repositionable fabric adhesive used to temporarily bond fabric. It's odorless and colorless and does not gumup sewing needles. It's also acid free and has no
CFC’s (Chlorofluorocarbons). Be sure to read the instructions on the can before using.
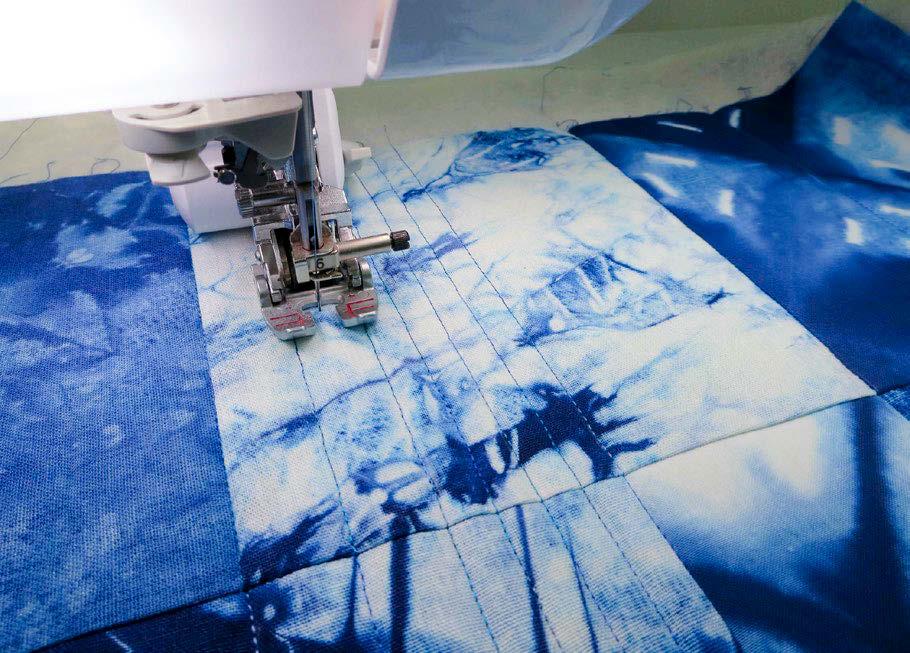
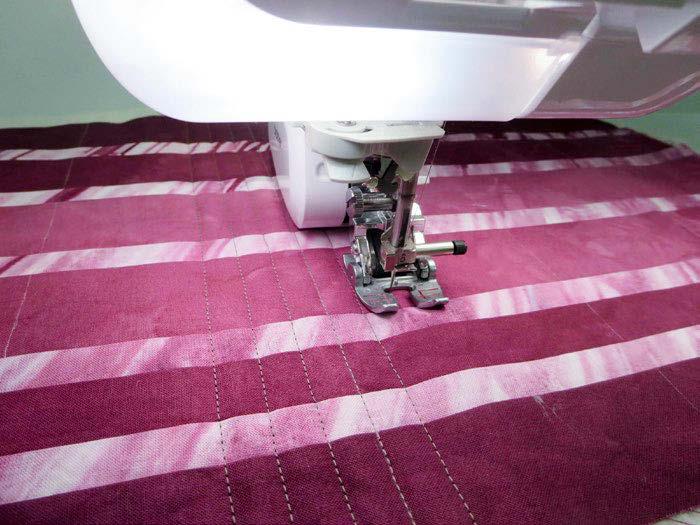
For the quilting, I used my walking foot to stitch straight lines 3/8" apart, but you can use any quilting design you like.
And here's my table runner all finished! I love the way the fabrics dyed with the Rit Indigo Shibori Tie Dye Kit work so well together.
Binding a quilted table runner: An angled approach
Now that the quilting is finished, it's time to sew on the binding. Here's my favorite way to sew on binding, but feel free to use your own method if you wish. For my method, you'll need 3 – 3" x WOF (Width of Fabric) strips of outer border fabric. This width of strip will give you a ½" finished-size binding.
• Trim excess batting and binding from the quilt top.
• Cut the ends of all strips at a 45° or 60° angle.
• Sew the 3" binding strips together, end to end, to make one strip long enough to go all around the quilt.
• Press seams open. Fold the strip in half lengthwise with wrong sides together. Press.
• Press under ¼" on one angled end of the binding.
• Lay the binding on top of the quilt so the folded cut edge is approximately at the center of one side. Align the cut edge of the binding with the edge of the quilt.
• Starting about 10" from the corner and using a scant ½" seam allowance, start sewing the binding. Stop sewing ½" from the edge of the quilt and backstitch to secure.
TIP Use a walking foot or even-feed foot.
• Fold binding up and then back down on itself to create a mitered corner.
• Sew from the edge of the quilt toward the next corner. Stop sewing ½" from the corner and backstitch to secure.
• Continue sewing the binding on the remaining sides in the same way. When you come to the last side, sew for a few inches, and then stop.
• Tuck the unfolded end of the binding inside the folded end.
• Adjust the binding so it fits along the edge of the quilt. Trim off excess binding. Finish sewing the binding.
• Fold the binding over to the back and hand-stitch in place. At each corner, fold the binding to create a 45° mitered corner. This can be stitched down or not, as desired.
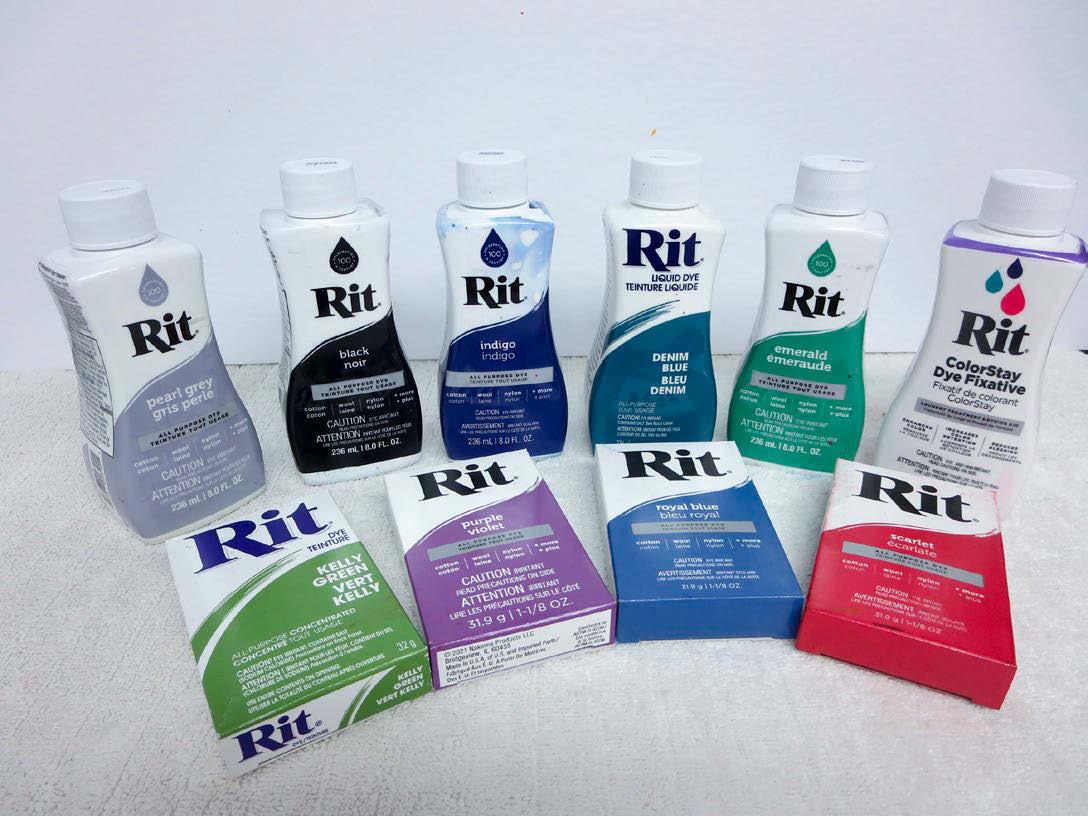
I hope you enjoyed learning about Shibori dyeing with the Rit Indigo Shibori Tie Dye Kit. I'm now planning to use more of the beautiful dyes from the Rit Dye collection to create even more unique fabrics for some upcoming quilt projects. There are dozens of colors available and the possibilities are endless!
Special thanks to Kingston, Ontario fibre artist, Bethany Garner, for her wonderful Indigo Dyeing Workshop, which was the inspiration for this feature using Rit Dyes
12 | issue 26 OUILT
Use 505 spray to bond fabric and batting together. Use a walking foot to stitch straight lines.
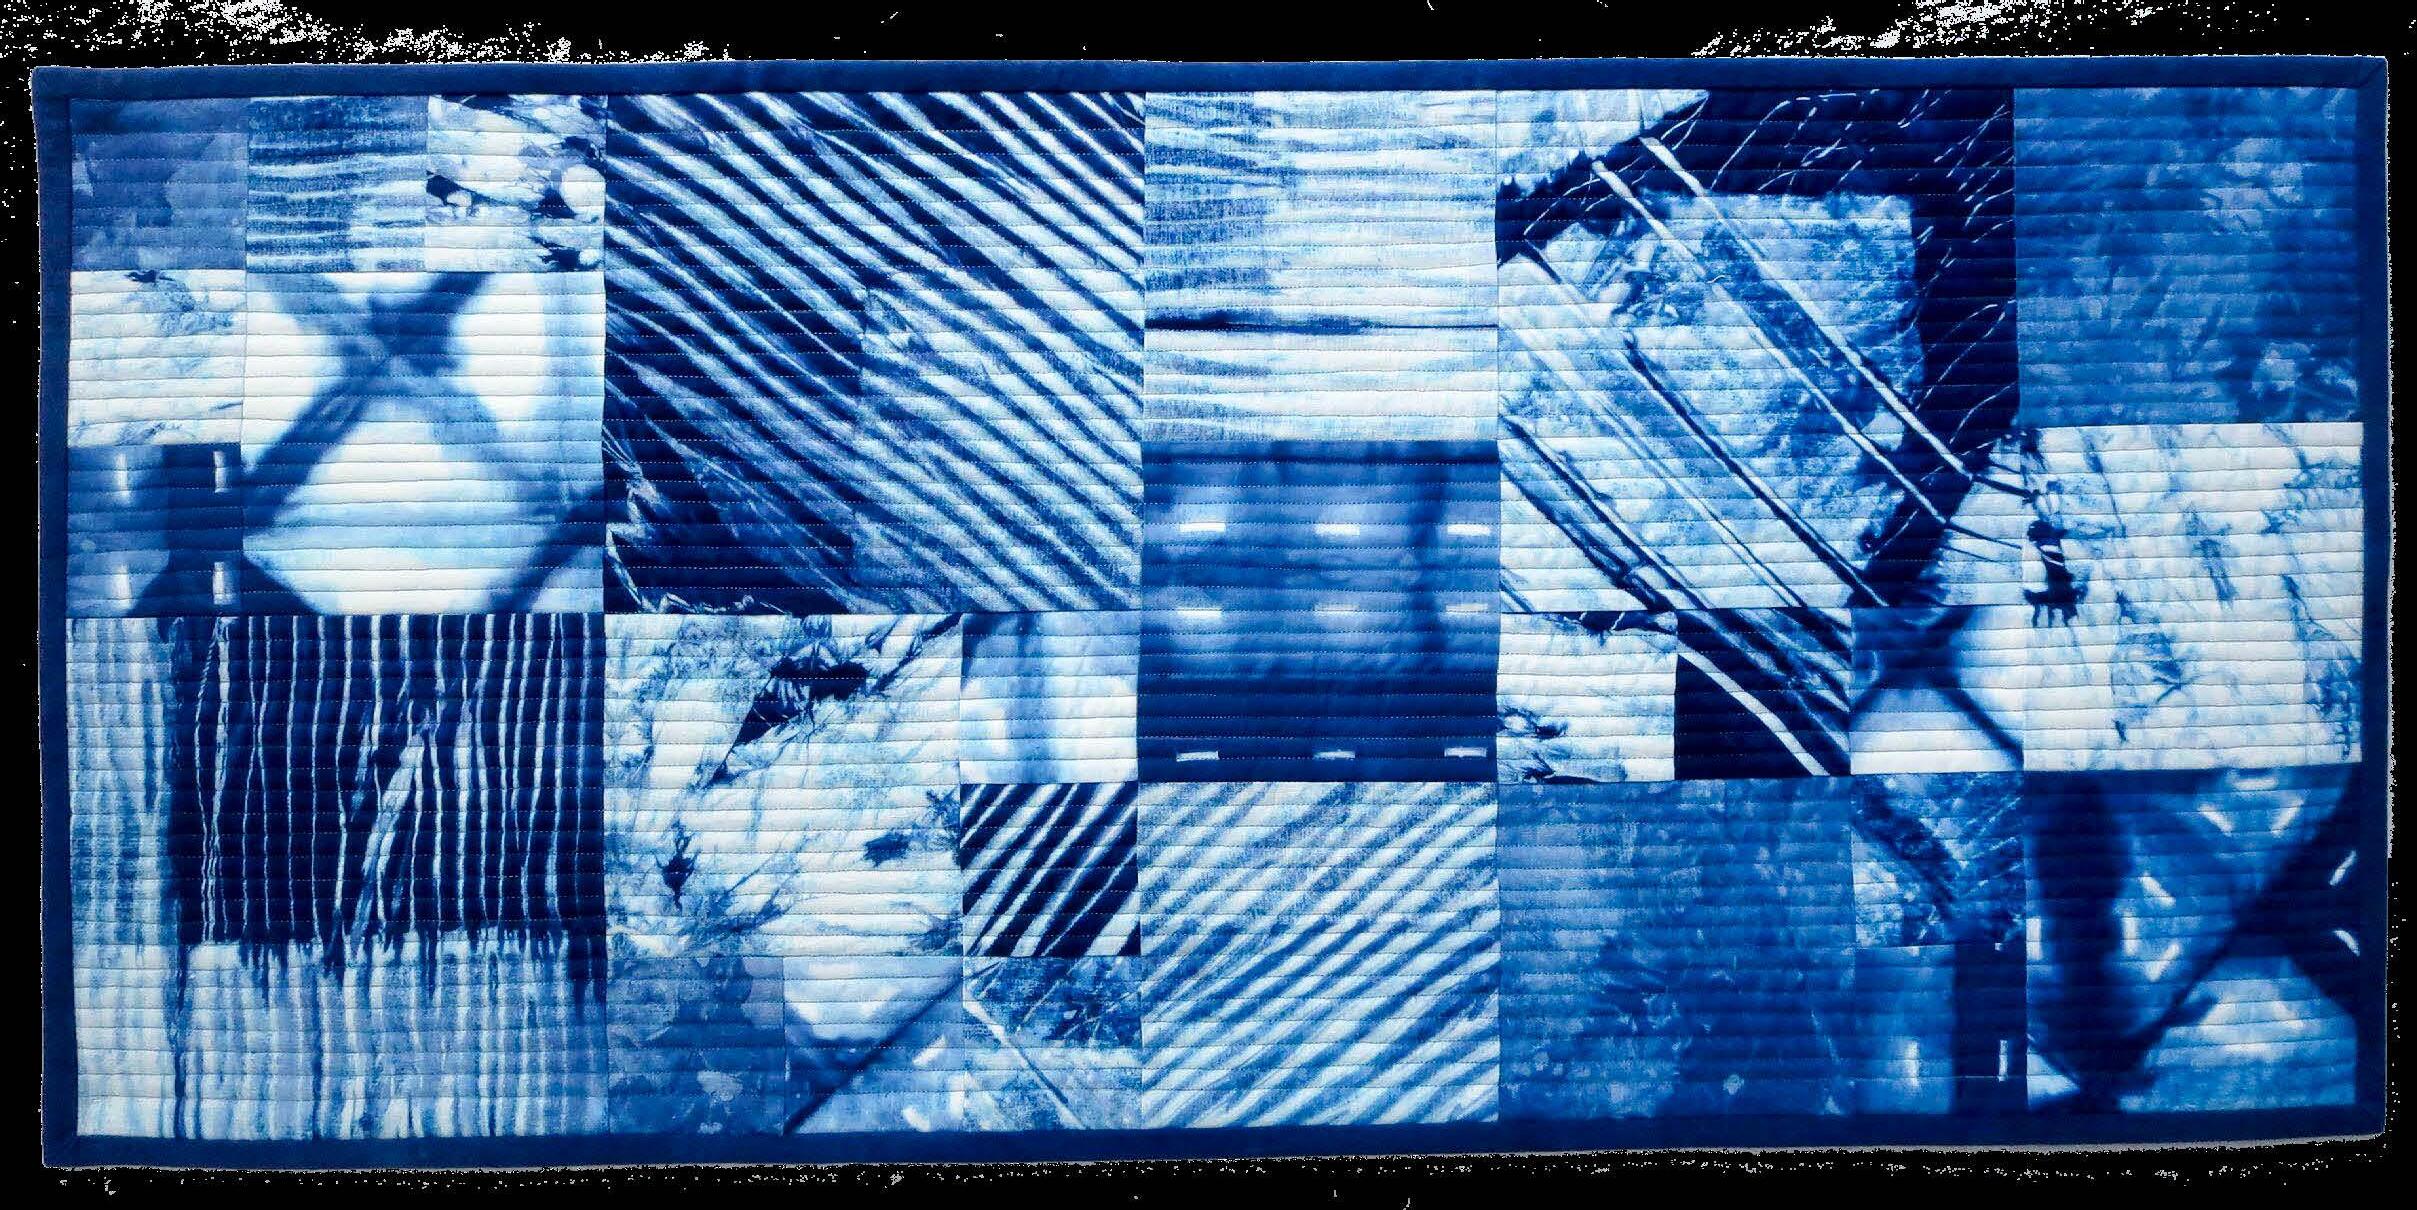


| issue 26 13 OUILT Finished table runner
Cut ends of binding strips at a 45° or 60° angle.
Start sewing the binding on one side of the quilt.
Fold binding to create a mitered corner.
Jean Boyd
patternsbyjeanboyd.com
Dyeing gradations using Rit All Purpose Liquid Dyes: Getting started
Jean Boyd
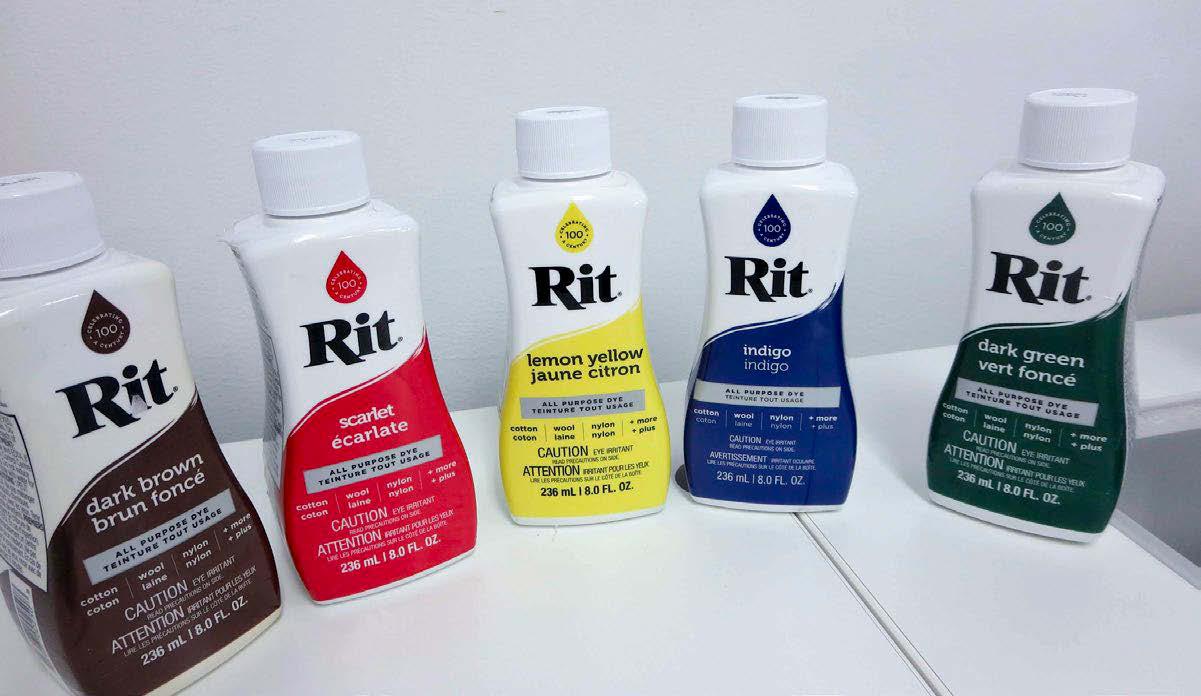
I'm using a variety of Rit All Purpose Dyes to create even more special effects on fabric. Rit dyes are readily available in craft and art supply stores.
Choose a few of your favorite colors of Rit All Purpose Dyes and some Rit ColorStay Dye Fixative and get ready to create!
Here's a list of some other supplies you'll need. When dyeing fabric, you don't want to use items that will be used in the kitchen for food. Many of these supplies can be found in your local Thrift Shops or Dollar Stores.
materials
fabric
• I used PFD (prepared for dyeing) fabric, but you can use whatever cotton fabric you have on hand. If you're not using PFD fabric, wash it first to remove any finishes that may be on it.
supplies
• set of measuring spoons and cups
• thermometer
• tongs and/or stirring stick (A paint stirrer works well.)
• tin foil, metal or glass pan about 9" x 13"
• wire cake rack about 8" square or a colander
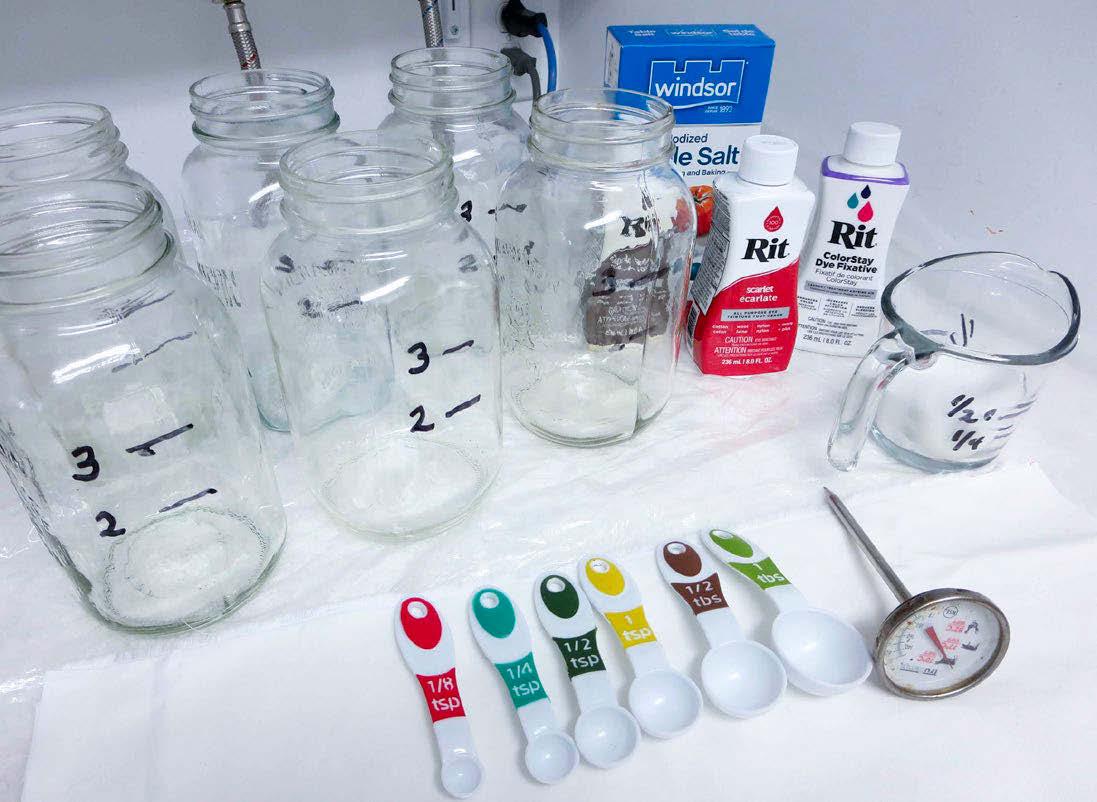
• six 4-cup glass sealer jars
• 2 or 3 small plastic spray bottles
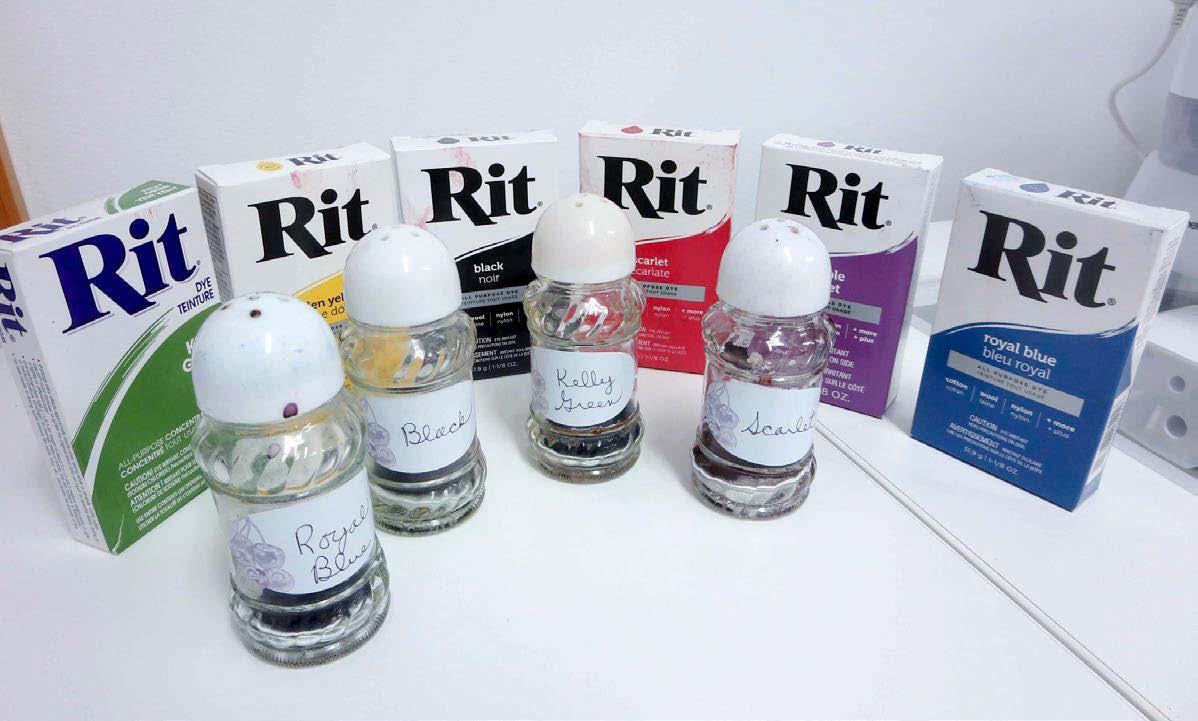
• salt or spice shakers with removable tops
• rubber gloves to wear when handling dyes and freshly dyed fabric
• small amounts of table salt and dish detergent
• plastic sheet to cover your work area
Supplies for dyeing
Let's get started
We start by dyeing 6 gradations or values of one color. I used Rit Scarlet and Indigo dyes but you can use whatever colors you like. Be sure to cover your work area with a plastic sheet and wear gloves when handling the dyes.
1. Cut fabric into 6 pieces, each 8" x 18". Soak fabric in water.
2. Put 3 cups of hot (140°) water in each of the 6 sealer jars.
3. Add 1 tablespoon of salt and a couple of drops of liquid dish detergent to each jar. The salt enhances the color and the detergent helps promote level dyeing.
4. M ix ¼ cup Scarlet and 1 tablespoon of Indigo in 1 cup of hot (140°) water.
5. Pour ½ cup of dye solution in Jar 1
6. Add ½ cup of hot water to the remaining dye solution.
7. Pour ½ cup of dye solution in Jar 2
8. Add ½ cup water to the remaining dye solution.
9. Pour ½ cup of dye solution in Jar 3.
Continue in this way until each jar contains dye solution. You'll have ½ cup of dye solution left over. Don't throw it out! We'll use it later.
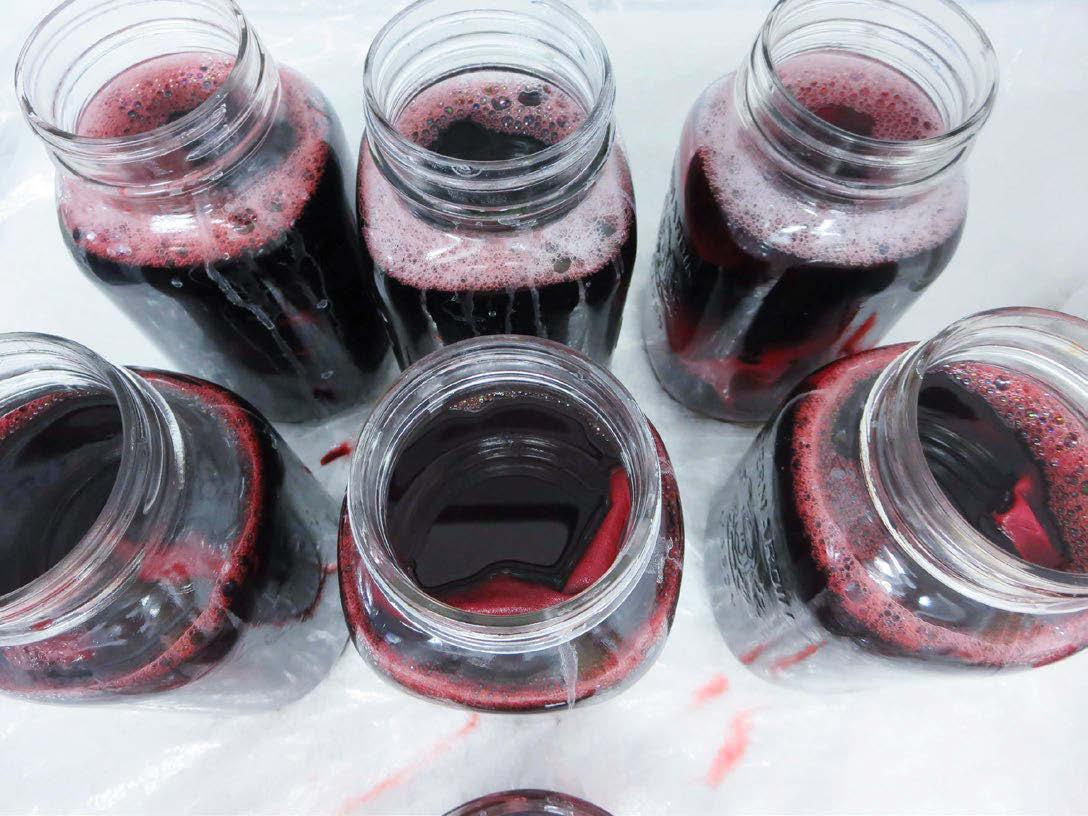
Wring out the fabric and place one piece in each jar. The fabric can be left in the dye bath for 3 to 20 minutes. The longer you leave it in, the darker the color will be.
Photos by Jean Boyd
14 | issue 26 OUILT
Rit Liquid and Powder All Purpose Dyes
You can stir the fabric occasionally or just let it sit in the dye bath for a more mottled look.
Now it's time to prepare the ColorStay Dye Fixative to enhance the color and reduce bleeding. Mix ½ bottle (4 oz) of Fixative with 3 gallons of water.
When you're satisfied with the color, wear rubber gloves and remove the fabric from the dye bath. Remember that the dyed fabric will be a lighter color when dry. Squeeze out the extra water from the fabric and place it in the fixative/water bath. Stir slowly and continuously for 20 minutes. Rinse fabric in cool water until the water runs clear. If you wish, you can now wash your fabric in cold water with a mild detergent, then rinse and dry.
When I was pressing my fabric, I used Mary Ellen's Best Press in the spray and misting bottle. That really gets rid of the wrinkles in the fabric and also puts a crisp finish on the fabric.
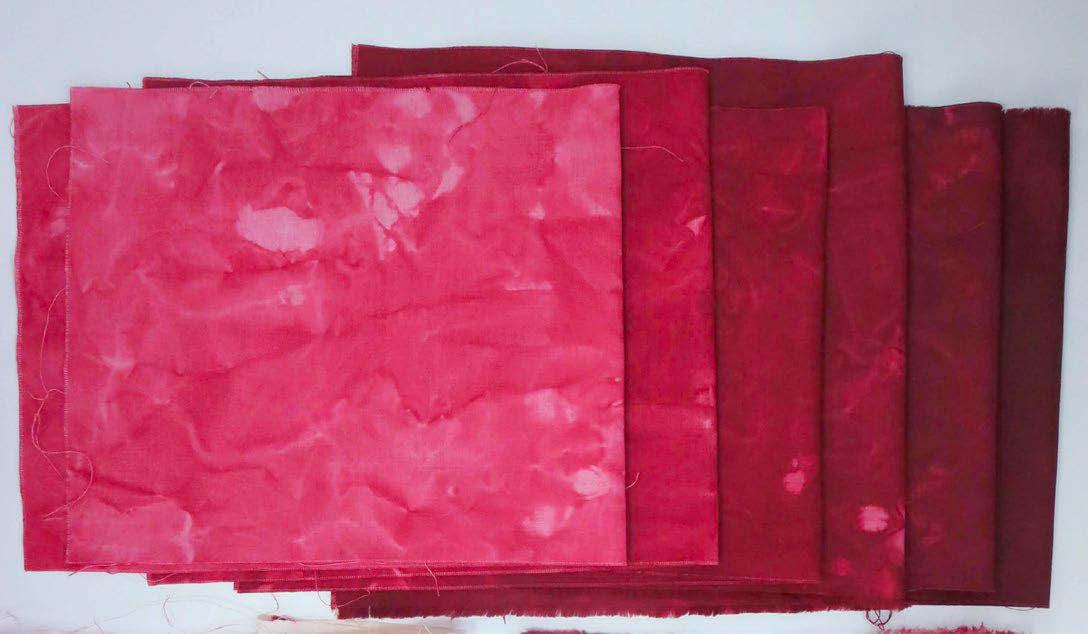
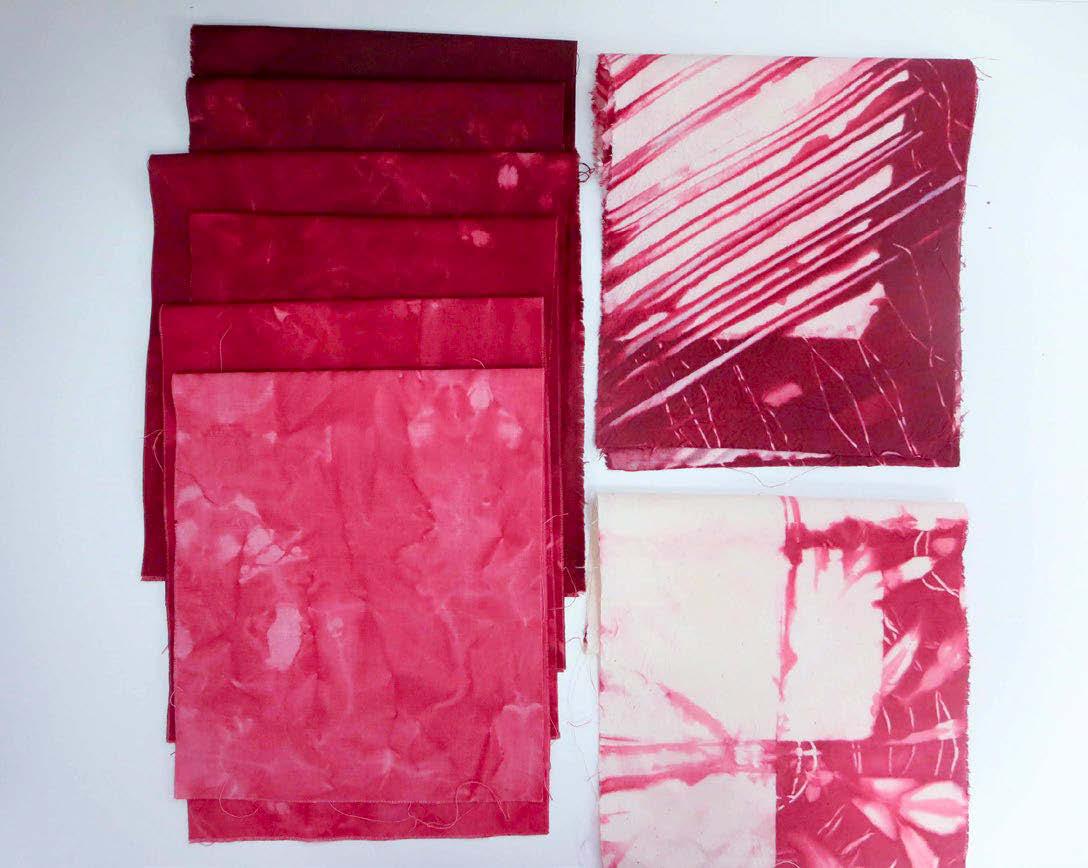
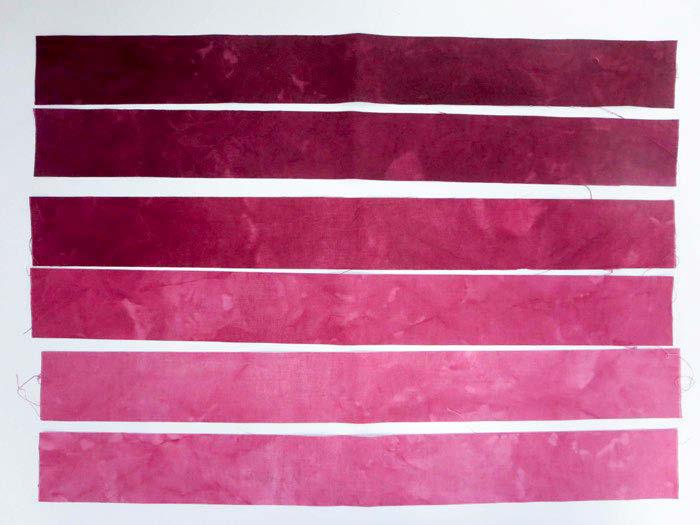
Now there are 6 pieces of fabric going from light to dark in the same color range!
You can pour all the extra dye solution from the 6 jars, plus the ½ cup that was left over, into one large pail. There is still enough dye to dye more fabric. I usually dye 1 or 2 fat quarters with the leftover dye solution. Follow the steps above for dyeing and rinsing in Rit ColorStay Dye Fixative. You can put the fabric in the dye bath or place it in a mesh bag and tie it tightly. This gives a very mottled look to the fabric.
And now there are 6 pieces of perfectly coordinated fabric plus 2 pieces that will be just right for accent fabrics.
6 values of one color plus accent pieces
| issue 26 15 OUILT
Fabric in the dye baths
Mary Ellen’s Best Press to get rid of wrinkles
6 values of one color
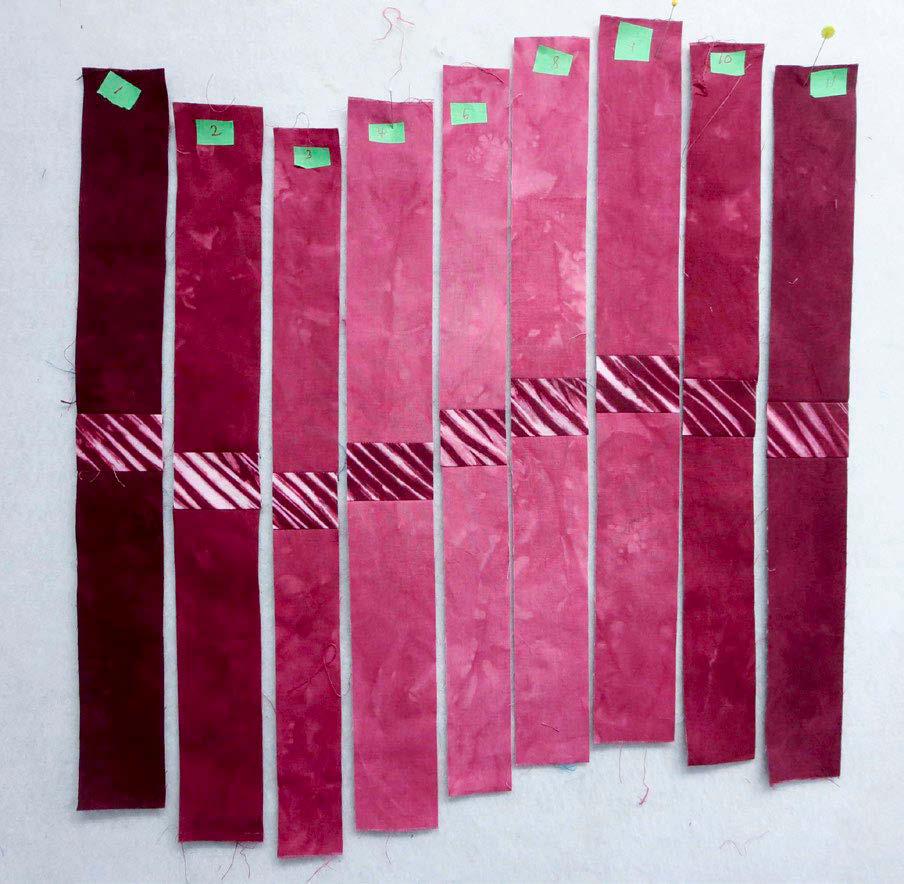
Using gradated fabrics to make a placemat and pillow top [Strip piecing]
Here’s how I used this fabric to make a quick and easy placemat.
From each of the six 8" x 18" fabrics, cut 1 – 18" strip. I cut a variety of widths from 2" to 1¼".
From the contrasting fabric, cut 5 strips 1" x 18".
Arrange the strips as shown in the photo and then sew them together. For 1 placemat, you should have a piece approximately 12" x 18".
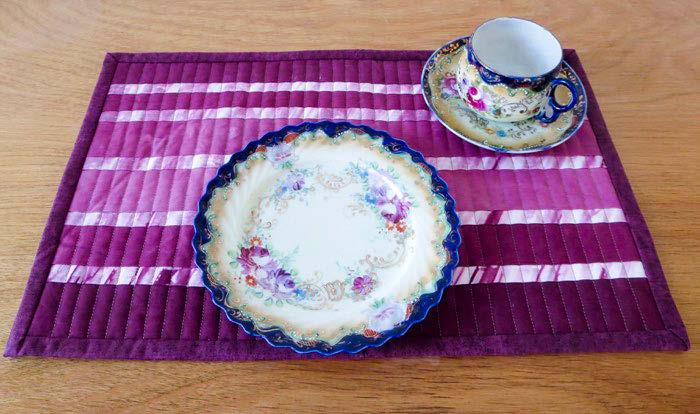
And here’s the finished placemat!
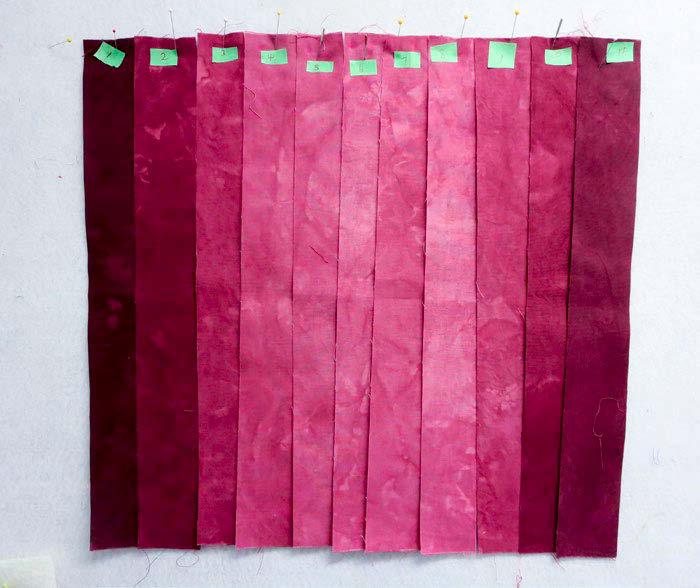
Arrange the strips as desired. I started with the darker values on the outside and the lighter values in the center. I numbered each strip so I wouldn't get mixed up when I took them down from my design wall.
Layer top, batting and backing. Quilt as desired. I did straight-line quilting with lines about ½" apart.
Trim the edges to square up the placemat. Sew on a binding and you have a one-of-kind placemat made with your hand-dyed fabric.
Here's another idea to create a piece you can use as a block in a quilt, a wall quilt, or a cushion top. Let your creative juices flow!
You’ll need the 6 pieces of 8" x 18" that were dyed using Rit All-Purpose dyes plus one piece of contrasting fabric that was dyed using the leftover Rit dye solution.
Cut 1 or 2 – 18" strips from each of the 6 values in a variety of widths. I cut a total of 9 strips from 1¾" to 2½" wide.Cut 1 –2" strip from the contrasting fabric.
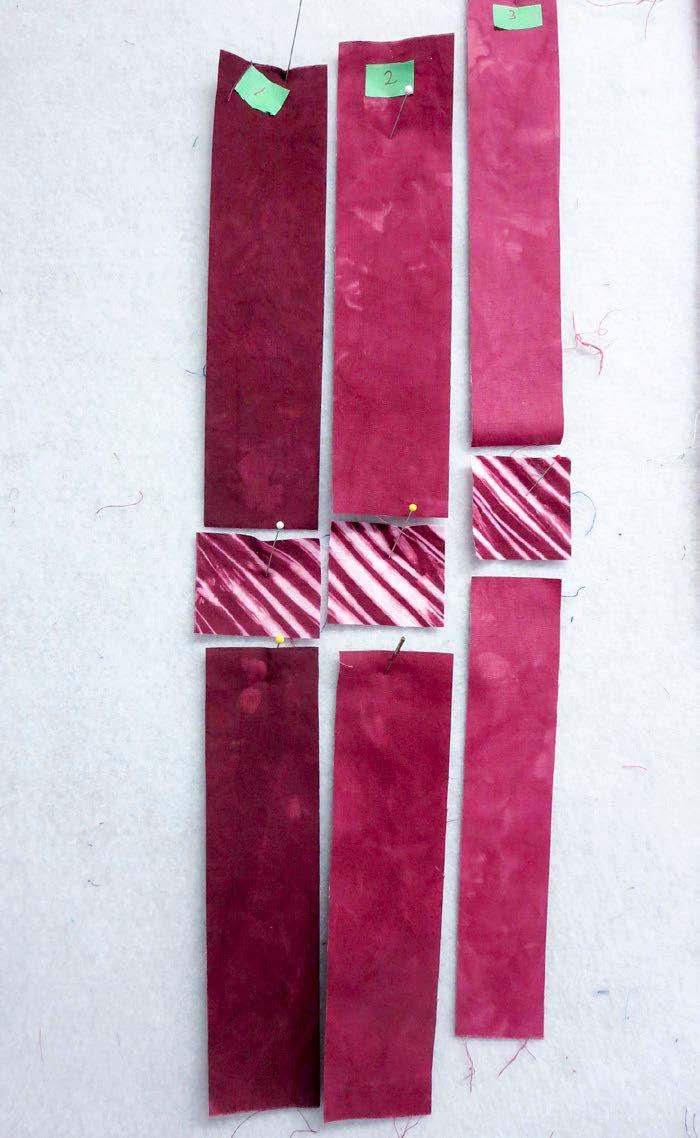
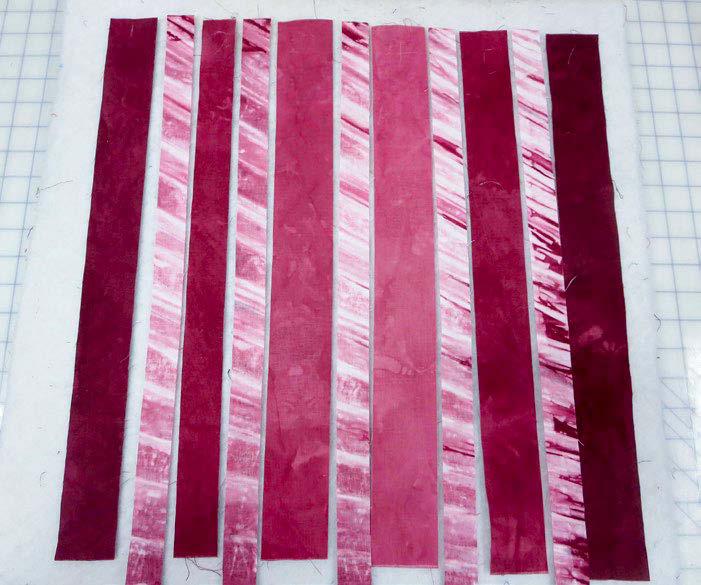
Cut each strip in half so all the strips are about 9" long.
Cut 1 piece of 2" contrasting fabric to fit between 2 strips. Sew the contrasting fabric between 2 – 9" strips. Continue sewing 2" contrasting strips between all the cut strips.
16 | issue 26 OUILT
Press seams in one direction.
Gradated strips with accent fabric strips
Strips are sewn together.
Stitch the layers together.
Finished placemat
Cut strips from gradated fabric.
Arrange the strips as desired.
Insert 2" strips between the cut strips.
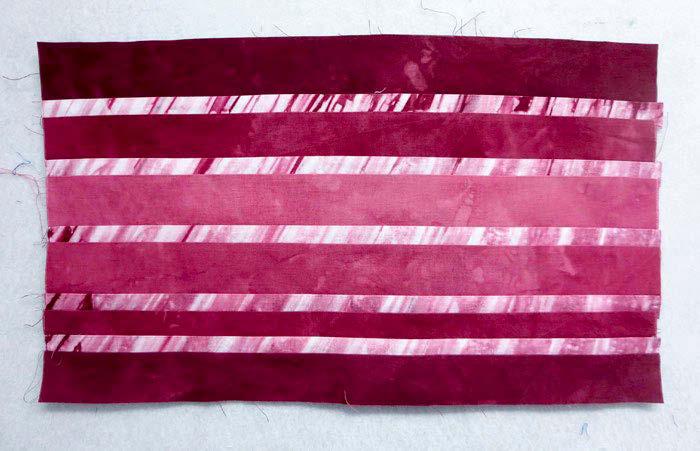
Arrange the strips as desired to make a wavy section with the contrasting fabric.
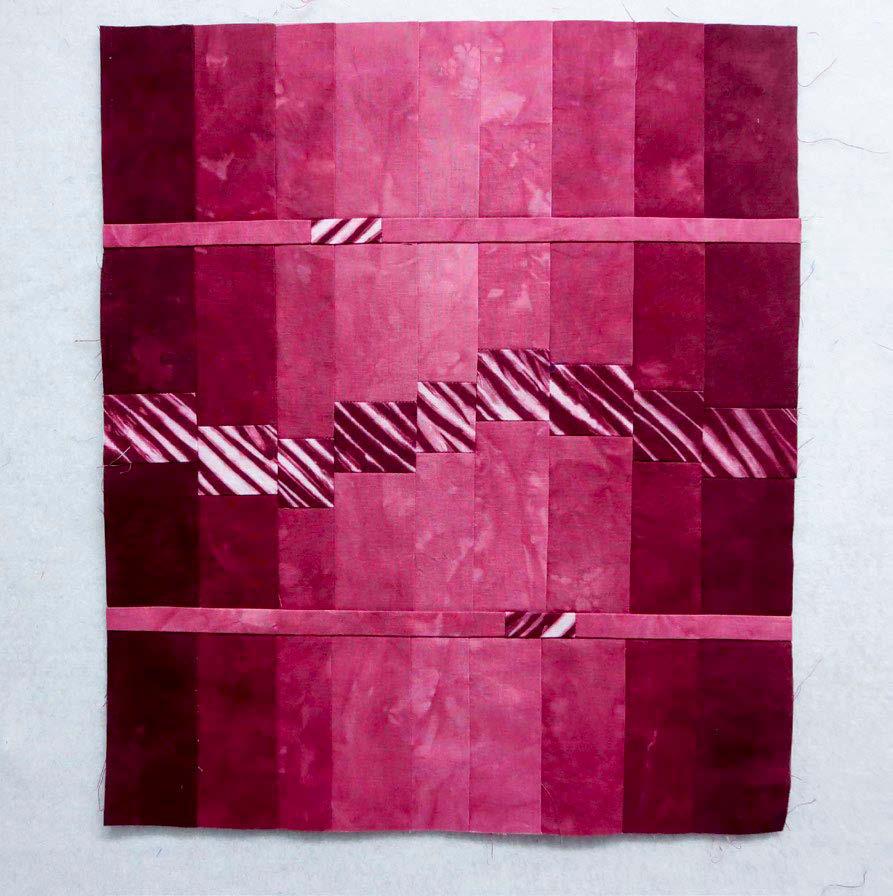
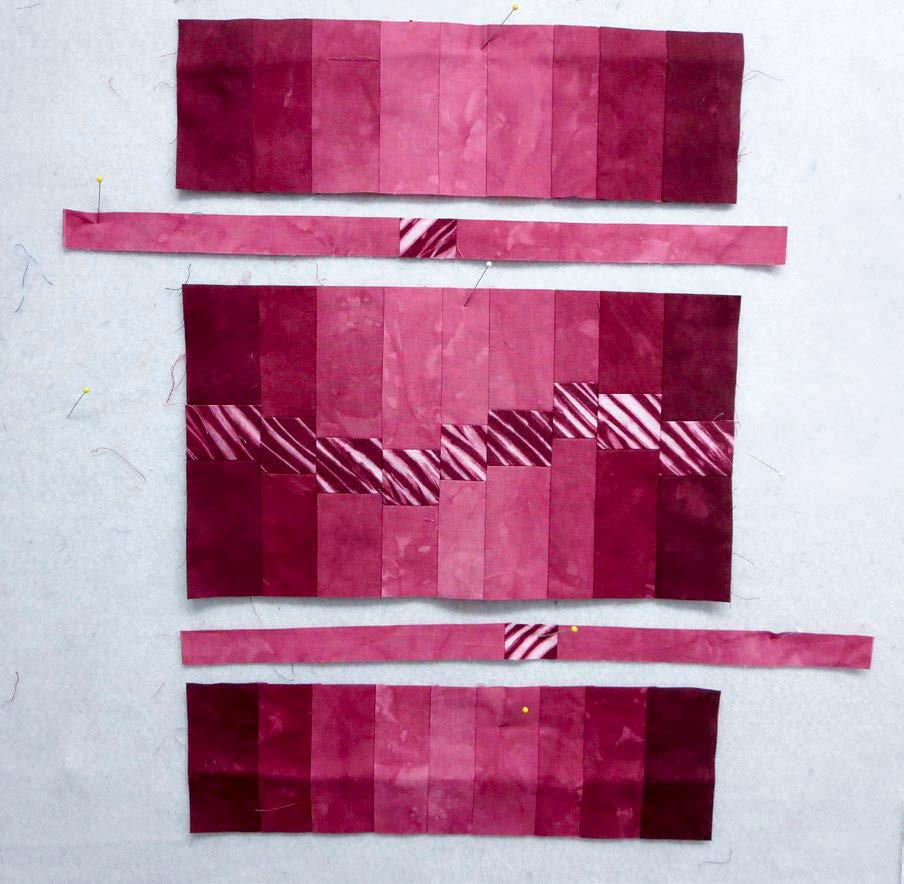
Sew the strips together to make a strip set. Press seams in one direction.


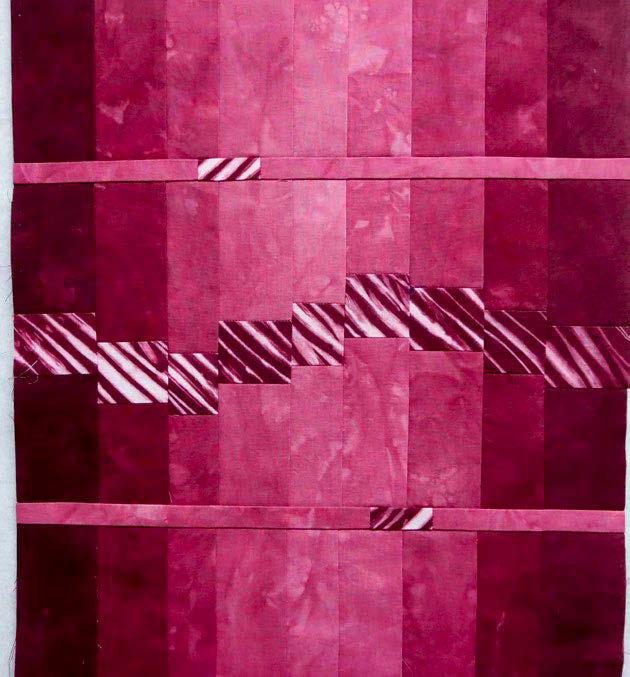
Trim top and bottom so the edges are even. You could leave it just like this, but for added interest, I cut the strip set horizontally and inserted 2 more contrast strips. There are no hard and fast rules when designing like this. Just create something that looks good to you!
And here’s my finished piece!
| issue 26 17 OUILT
Arrange strips in a wavy design.
Additional strips can be inserted if desired.
Finished quilt top
We'll use Rit powdered dyes and ice to create more unique fabric. Again, there are many different colors from which to choose.
Here's what you need to get started. When dyeing fabric, don't use items that will be used in the kitchen for food. Many of the following supplies can be found in your local Thrift Shops or Dollar Stores.
materials
fabric
• 1 fat quarter of PFD (prepared for dyeing) fabric. If you're not using PFD fabric, wash it first to remove any finishes that may be on it.
supplies
• 2 or 3 Rit powdered dyes in your choice of colors
• Rit ColorStay Dye Fixative
• tinfoil, metal, or glass pan about 9" x 13"
• wire cake rack about 8" square or a colander
• small plastic spray bottles
• salt or spice shakers with removable tops
• plastic sheet to cover your work area
• rubber gloves to wear when handling dyes and freshly dyed fabric
• ice cubes
Ice dyeing
creates unique fabric for your quilted projects
Method
Be sure to cover your work area with a plastic sheet and wear gloves when handling the dyes and wet, freshly dyed fabric. Masks are also recommended when using powdered dyes. For my ice dyeing, I like to use 2 or 3 different colors to create some interesting designs. Carefully put a small amount of each Rit powdered dye in a glass salt or spice shaker. I labelled my shakers because it's sometimes difficult to tell the color of the dye just by looking at it. Soak your fabric in water and then wring it out.
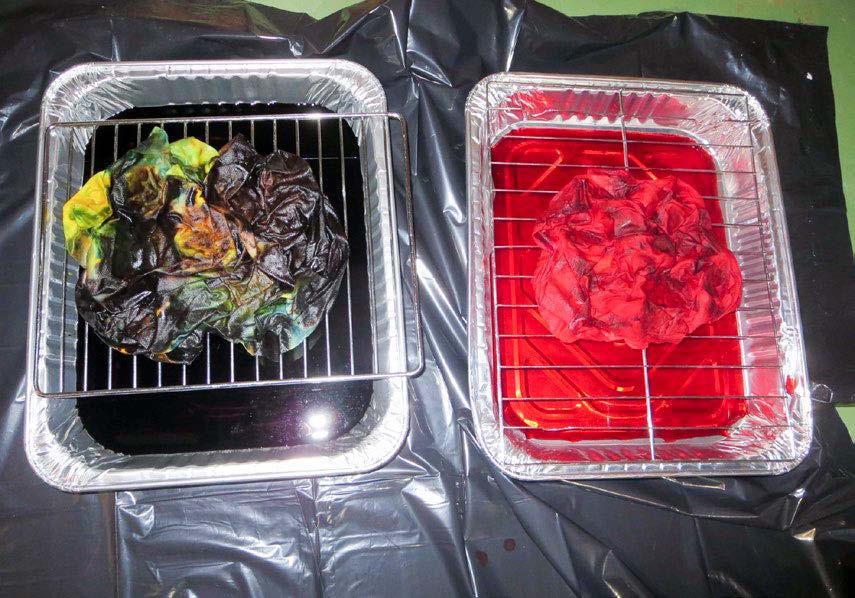
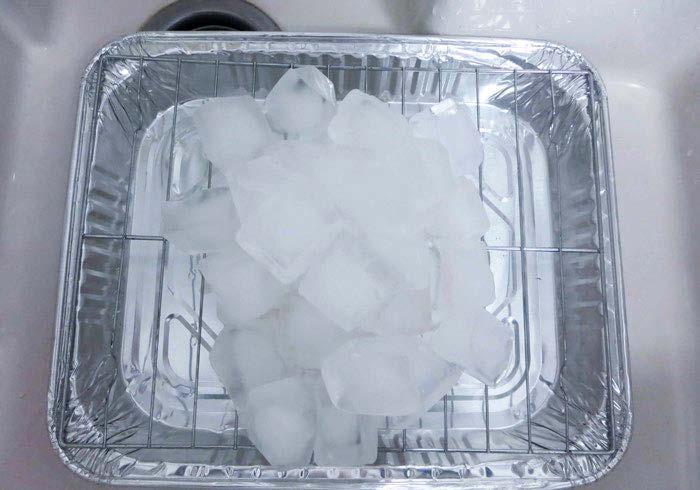
Scrunch up the fabric and set it on a wire rack or in a colander. Place the rack or colander over a 9" x 13" pan.
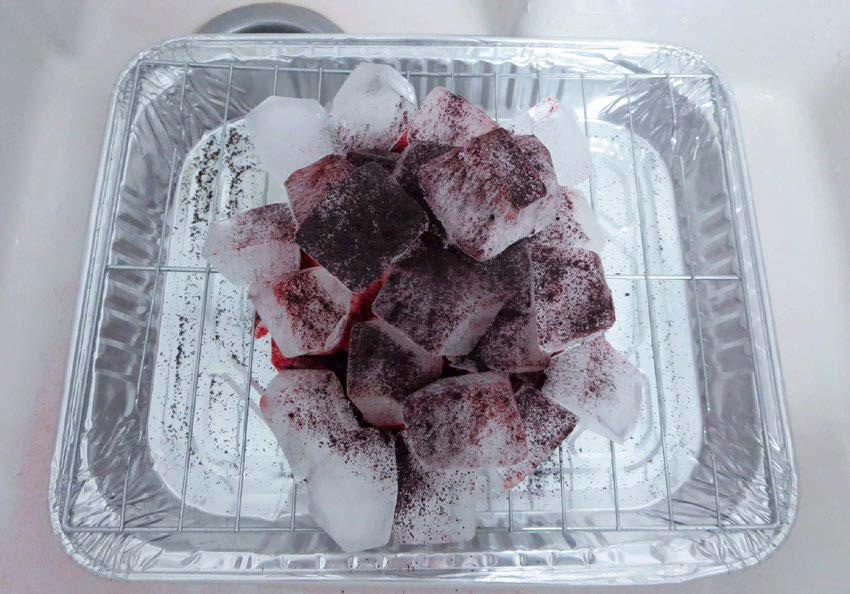
Sprinkle the dye over the ice cubes, one color at a time. You don't need a lot of dye, so sprinkle sparingly. The more dye you use, the darker the color will be.
Cover the fabric with ice cubes. I used 2 trays of ice cubes for my fat quarter of fabric.
Now comes the hard part – you have to wait until the ice melts before you can see your unique fabric creation! In the summer, you can set the dye pan outside and the ice will melt faster.
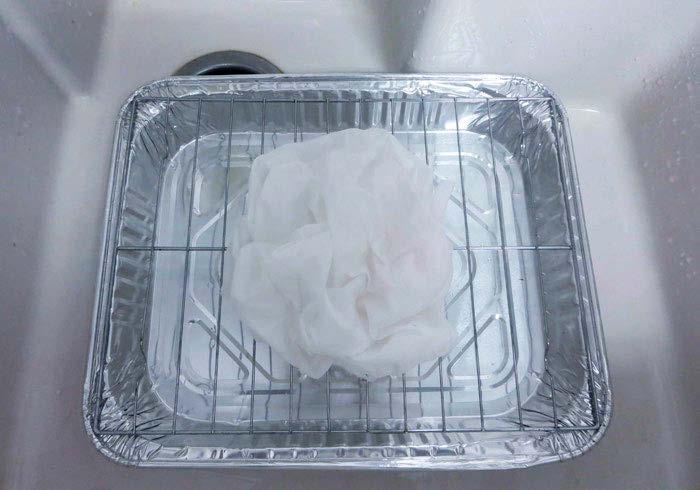
When the ice is completely melted, wring out the wet fabric. Spread it out on a plastic sheet. Pour the dye water into a glass jar or similar container. You can use it again to dye another piece of fabric.
18 | issue 26 OUILT
Wet fabric on rack
Cover the fabric with ice cubes.
Sprinkle dye on the ice cubes.
Ice cubes have melted
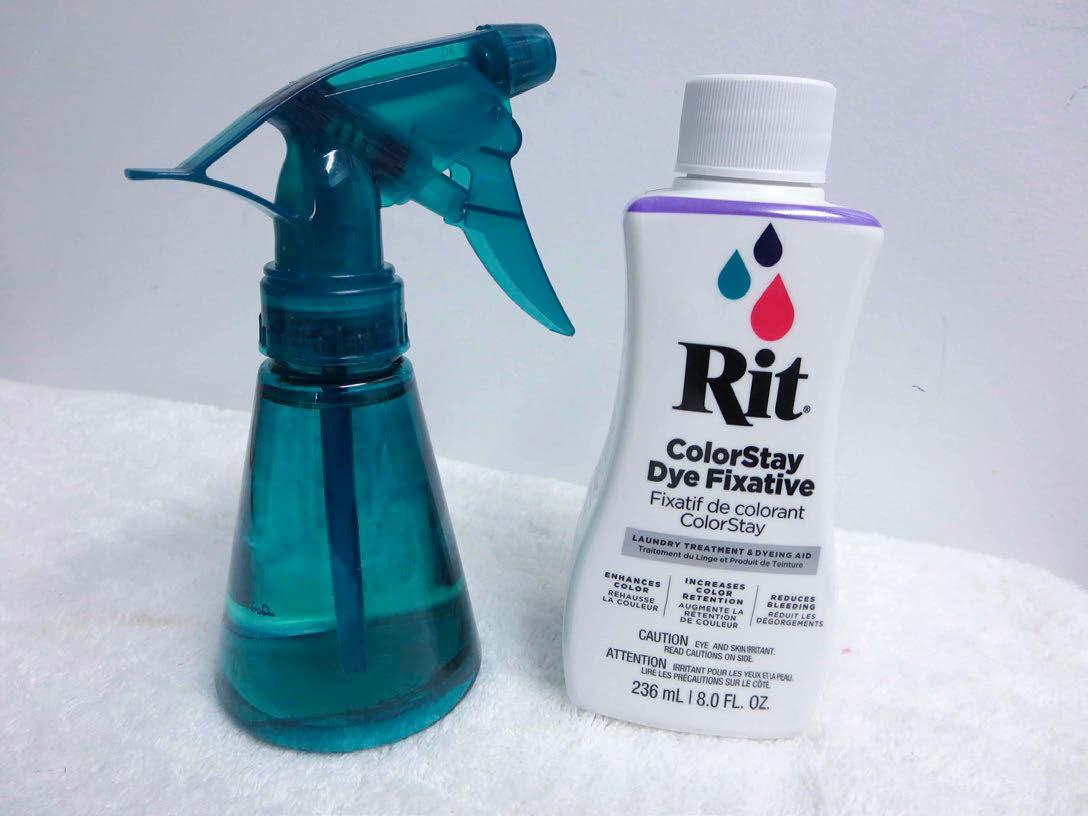
Rit ColorStay Dye Fixative
Put 2 tablespoons (T) of Rit ColorStay Dye Fixative in a small spray bottle and add about ½ cup of water. Spray liberally on both sides of the dyed fabric. Let the fabric sit for 10 – 15 minutes
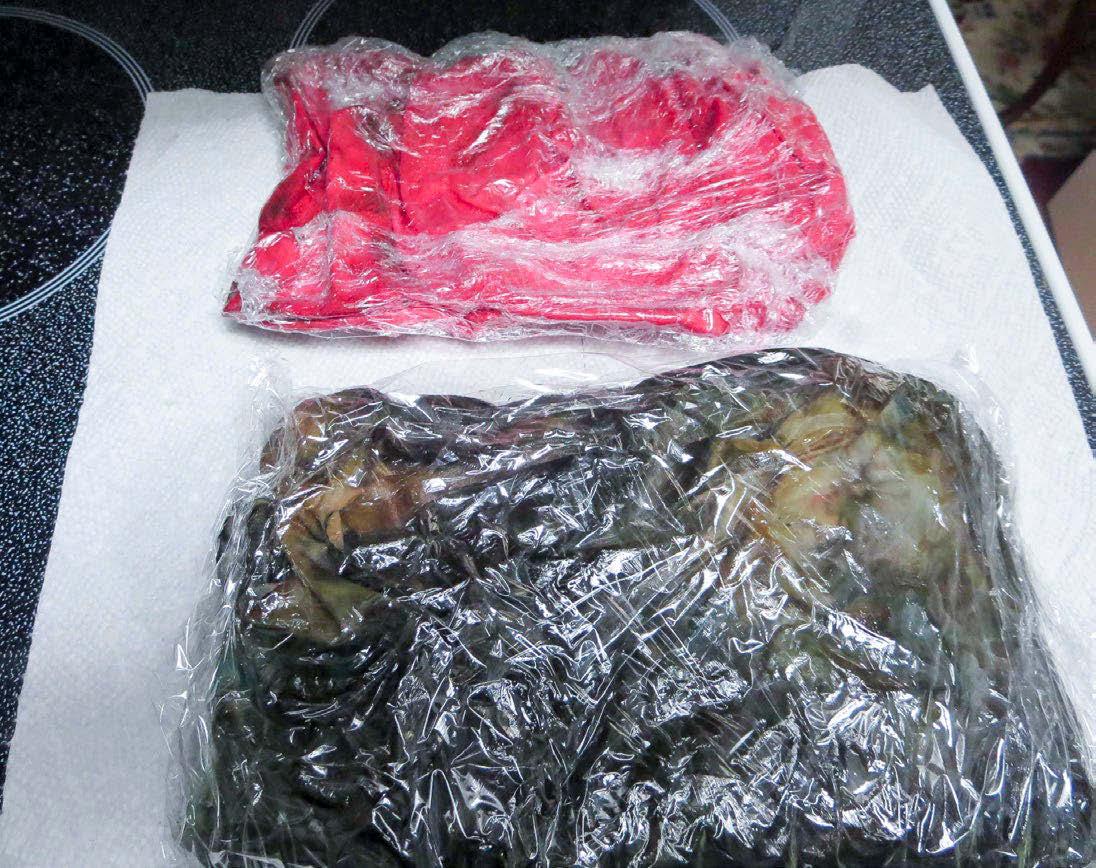
Rit dyes need heat to loosen the fabric to accept the dye. Because ice is used, there is no heat. You can use the following method to set the color as long as the fabric doesn’t have any metal parts on it.
After applying ColorStay Dye Fixative, wrap the fabric in plastic wrap and seal the edges. Place the wrapped fabric on a paper towel in the microwave and heat for 1 – 2 minutes on high. Watch carefully so the fabric doesn't burn. The plastic will puff up, creating a heat chamber that helps bond the dye with the fabric. Once the heating is done, remove the fabric and open the plastic, letting it cool down. If a microwave isn't available or feasible to use, and it's a hot sunny day, lay the wrapped fabric out in the sun for an hour.
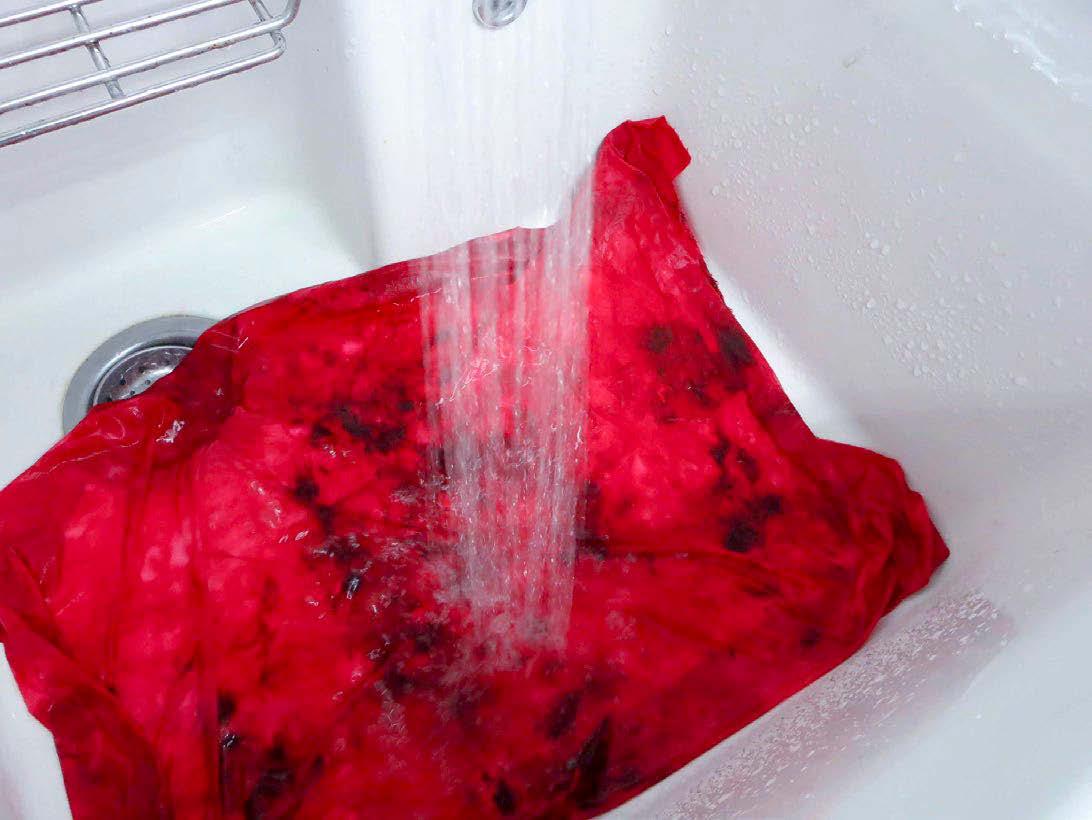
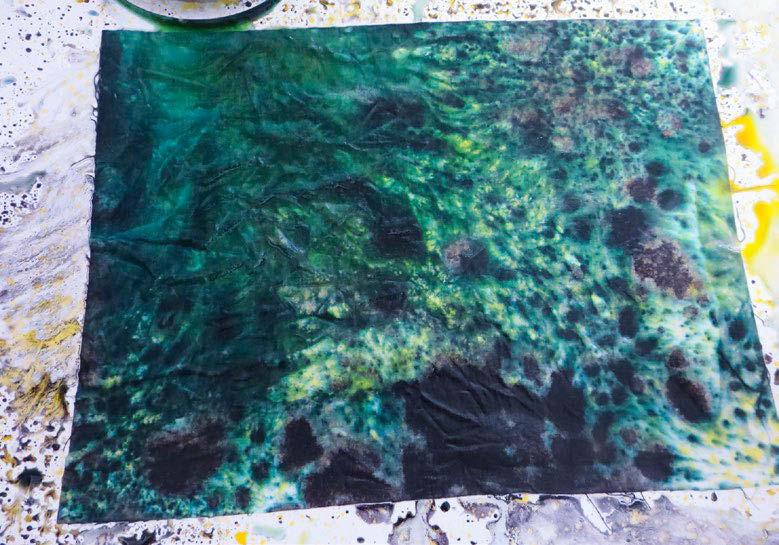
Rinse the fabric in cool water until the water runs clear. If possible, rinse the fabric flat to prevent unabsorbed dye from migrating to other areas. If you wish, wash in cold water with a mild detergent, rinse and dry.
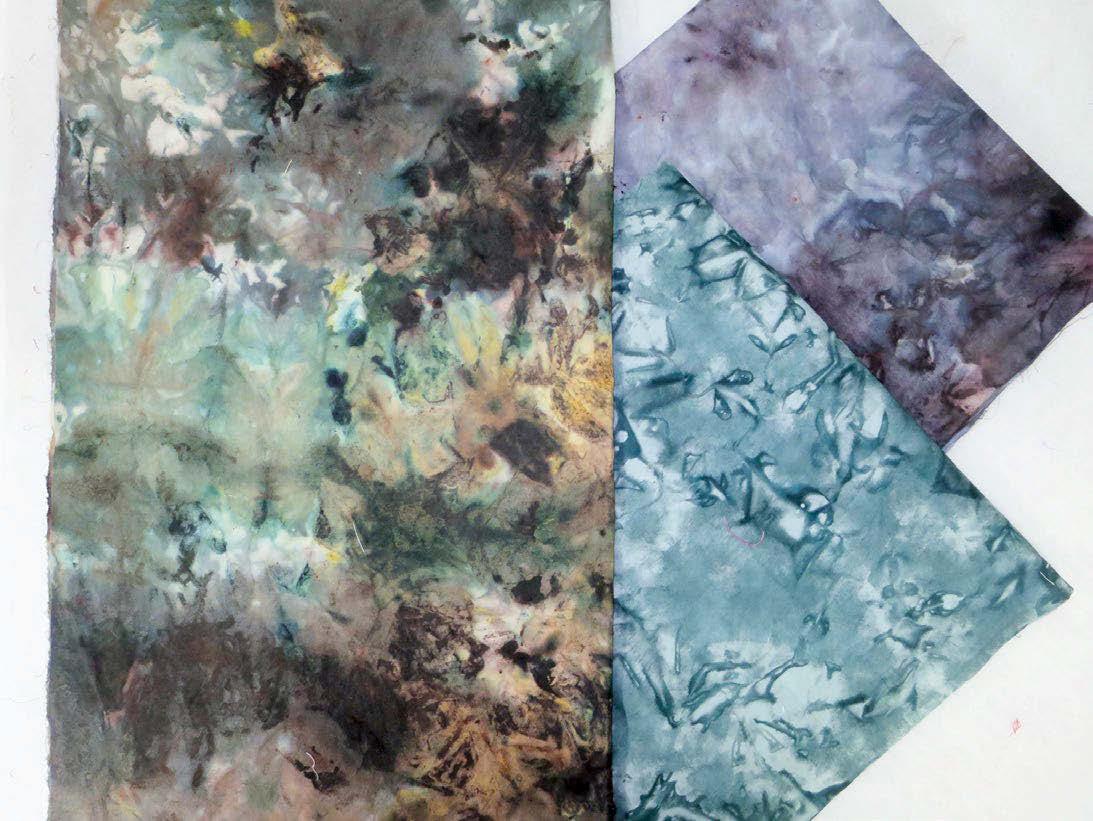
The results from ice dyeing are quite unpredictable, but I’ve loved every color combination I've tried. The fabric almost looks like a batik design.
Here's a video about How to Ice Dye with Rit Dye Powder
I think you'll enjoy. Be sure to check it out!
| issue 26 19 OUILT
The fabric just out of the microwave
Rinse in cool water.
Ice-dyed fabrics
Spray dyeing fabric with Rit dyes for a designer look
Now we'll look at another quick method to create some designer fabric with Rit dyes – spray dyeing!
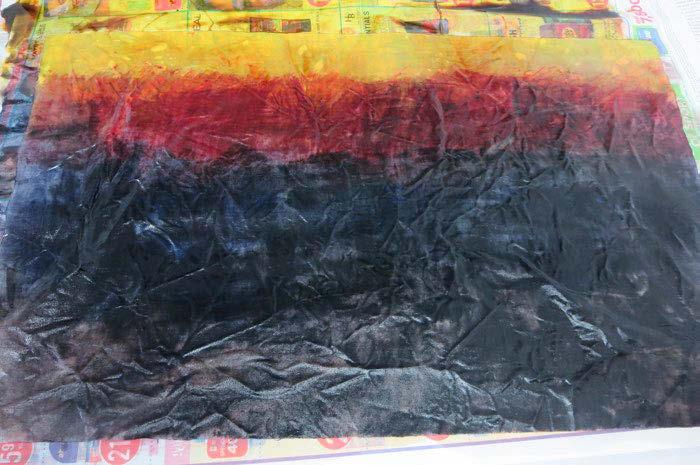
Here’s how!
Rinse your PFD (prepared for dyeing) fabric in water and wring it out. I used fat quarters or fat eighths.
Place a small amount of 2 or 3 colors of liquid Rit dye in small spray bottles. Lay fabric flat on a plastic sheet. Spray colors as desired on the fabric. Let the fabric sit for about 20 minutes to allow it to absorb the dye.
Rinse the fabric in cool water until the rinse water runs clear. If you wish, wash in cold water with a mild detergent, rinse and dry.
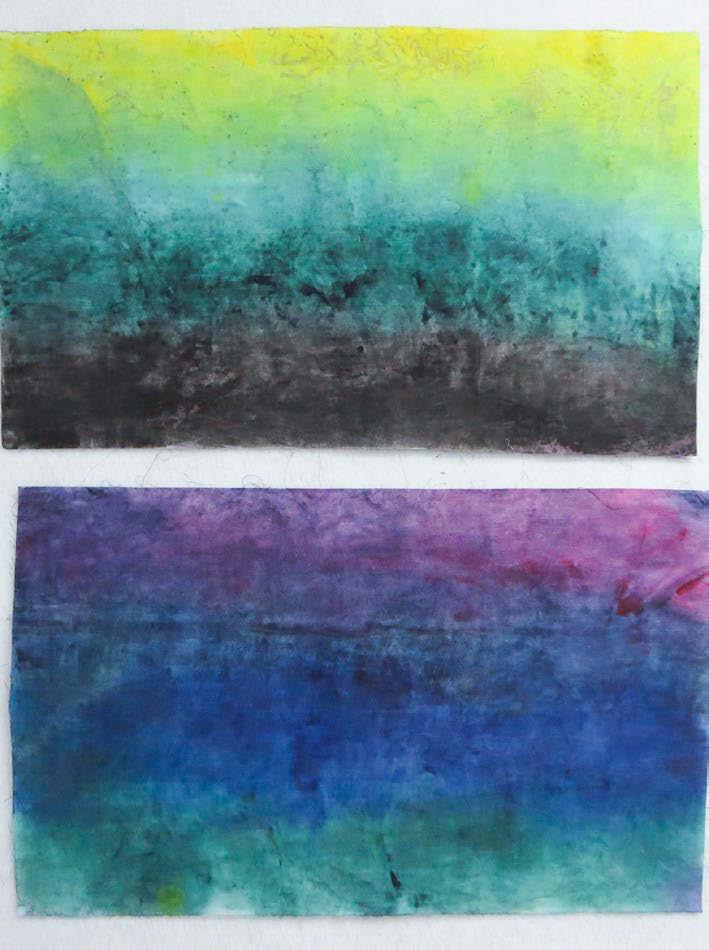
You can also try spraying the dye on the fabric and then spreading it around with a paintbrush. I used dark green, red, and yellow dyes on this fabric.
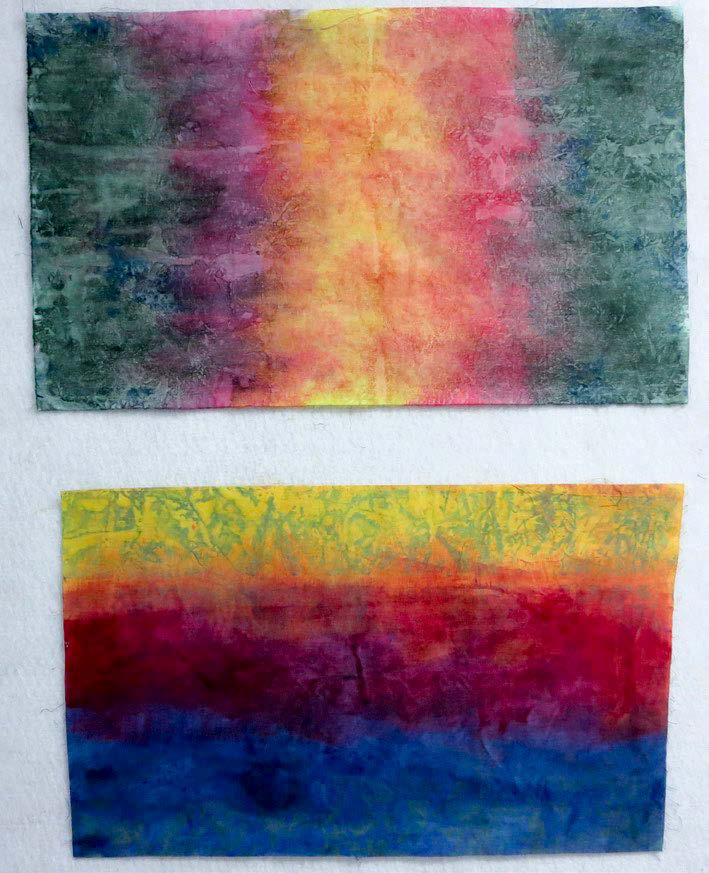
Here are 2 more pieces of spray-painted fabrics.
Put 2 tablespoons (T) of Rit ColorStay Dye
Fixative in a small spray bottle and add about ½ cup of water. Spray liberally on both sides of the dyed fabric.
Just as with ice dyeing, heat is needed to set the dye. After applying ColorStay Dye
Fixative, wrap the fabric in plastic wrap and seal the edges. Place the wrapped fabric on a paper towel in the microwave and heat for 1 or 2 minutes on high. Watch carefully so the fabric doesn't burn. The plastic will puff up, creating a heat chamber that helps bond the dye with the fabric. Remove the fabric from the microwave and open the plastic, letting it cool down. If a microwave isn't available or feasible to use, and it's a hot sunny day, lay the wrapped fabric out in the sun for an hour.
After the dye has been set for about 20 minutes, spray with Rit ColorStay Dye Fixative mixed with water in a small spray bottle. Set the color in the microwave as described above.
Here are 2 pieces of my spray-painted fabric. I think they’ll be perfect to use as a background for applique!
As you continue to explore using Rit dyes, you might like to try mixing your own colors. Check out this page on the Rit Dye website that gives you formulas for mixing dozens of different colors. Just click on a color and the formula comes up.
20 | issue 26 OUILT
Fabric sprayed with Rit liquid dyes
Green, red, and yellow Rit dyes painted on fabric
2 finished spray-painted fabrics
2 more finished spray-painted fabrics


21 Your Authorized Dealer for: BRAMPTON SEW N SERGE 7-289 Rutherford Rd S, Brampton, ON L6W 3R9 905-874-1564 www.BRAMPTONSEWNSERGE.com Arnprior Shopping Centre 375 Daniel St S, Arnprior, ON K7S 3K6 www.sewinspired.ca 613-623-0500 info@sewinspired.ca Sewing, Knitting & Having a Good Time Ottawa Valley Authorized Dealer 1-888-853-7001 www.thequiltstore.ca - - - NEWMARKET & BURLINGTON - -1-888-853-7001 www.thequiltstore.ca - - - NEWMARKET & BURLINGTON - -The Quilt Store, Evelyn’s Sewing Centre 17817 Leslie St #40, Newmarket, ON L3Y 8C6 905-853-7001 / 1-888-853-7001 The Quilt Store West 695 Plains Rd E #1, Burlington, ON L7T 2E8 905-631-0894 / 1-877-367-7070 1390 Clyde Ave, #107, Ottawa, ON K2G 3H9 Sales & Service of Baby Lock, Brother, and Elna sewing machines, and Q'nique longarm quilting machines 613-695-1386 www.ottawasewing.com Your Authorized Dealer for: Ottawa Sewing Centre www.kellyscreativesewing.ca 902-435-7380 Specialize in Sewing, Embroidery machines, Sergers and Long arm Quilting Systems 804 Main Street Dartmouth, Nova Scotia B2W 3V1 kellyscreativesewing@gmail.com Phone: 519-425-4141 info@kaquiltstudio.com www.kaquiltstudio.com K&A Quilt Studio Where Friends and Creativity Meet! Authorized distributors 90 Samnah Crescent Ingersoll, ON N5C 3J7
Use the OmniArc Circle Cutter Ruler to create unique designs
Let's use the OMNIGRIP OmniArc Circle Cutter Ruler with this fabric. I recently discovered this ruler and thought it would be perfect to use when trying out new design ideas with fabric dyed with Rit dyes. This 8'' x 8'' non-slip ruler has handy grooves for cutting circles and can be used with a 28mm rotary cutter. The Komfort KUT 28mm Rotary Cutter is perfect to use with this ruler.
Using this ruler, you can make finished size circles from 4'' to 12'' in size, as well as half circles, quarter circles and arcs. There are easy-toread angle markings and it’s transparent, with neon green doublesight lines that seem to glow on both light and dark fabrics.

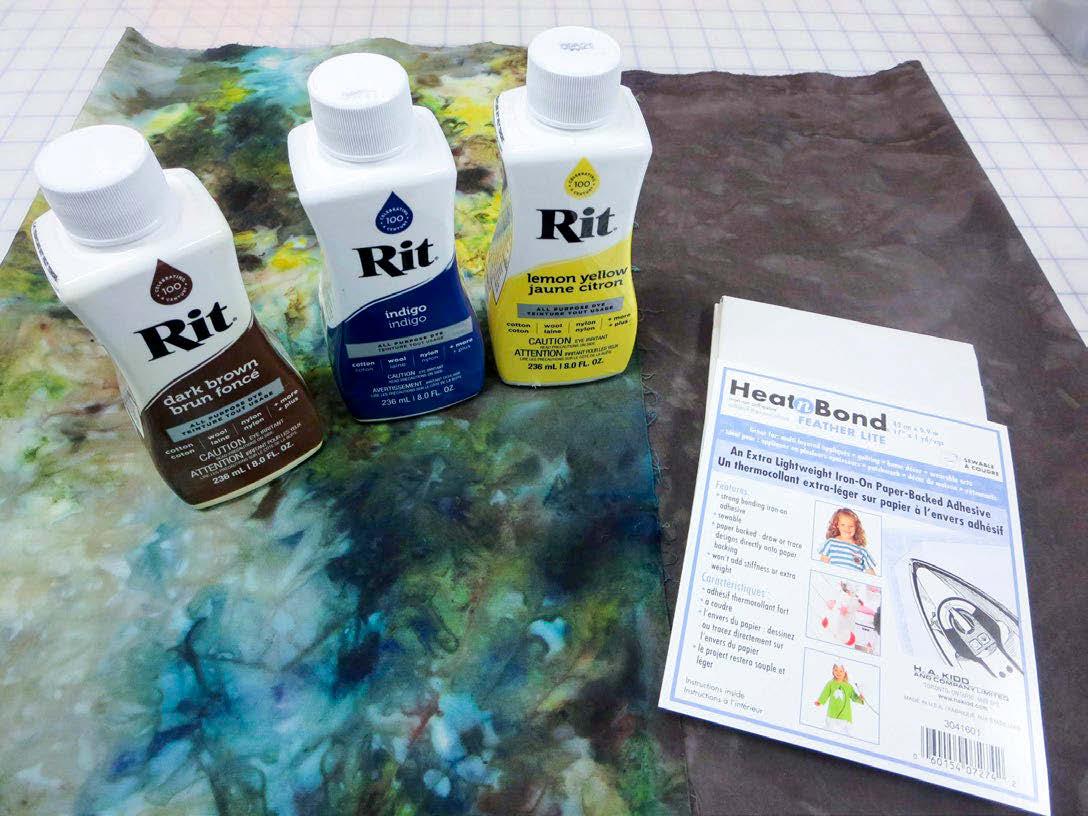
Here's a video that explains how to use the OmniArc Circle Cutter Ruler For my project, I chose one of my ice-dyed fat quarters and ironed HeatnBond Featherlite Iron-on Adhesive on the wrong side.
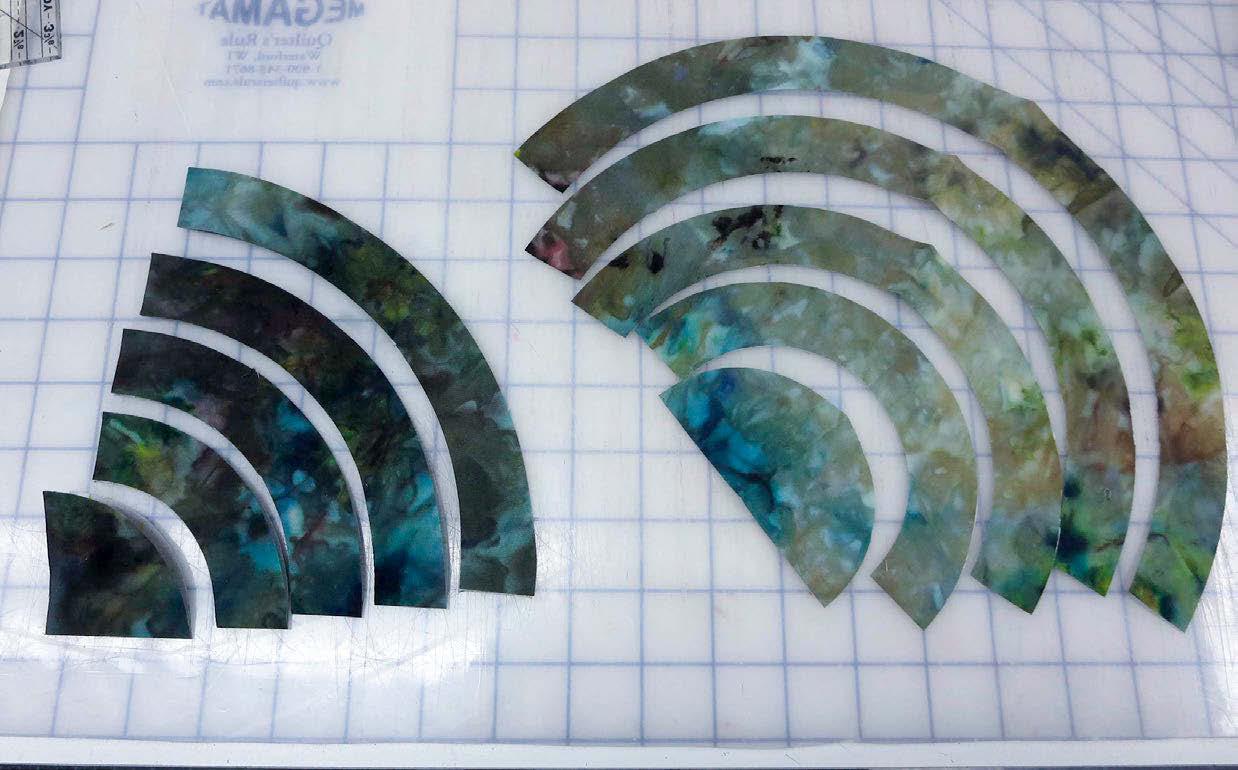
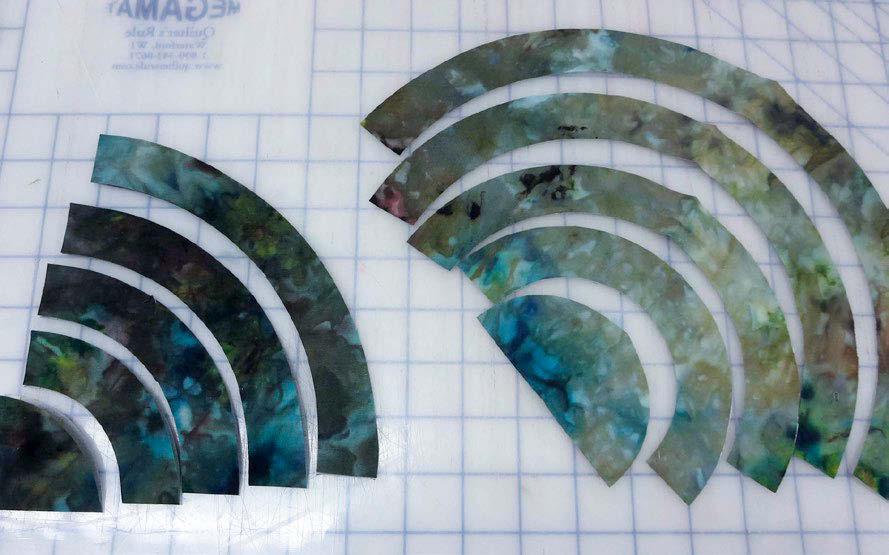
I wanted half-circle arcs, so I folded the fabric in half and then used the OmniArc Circle Cutter Ruler to cut the shapes.
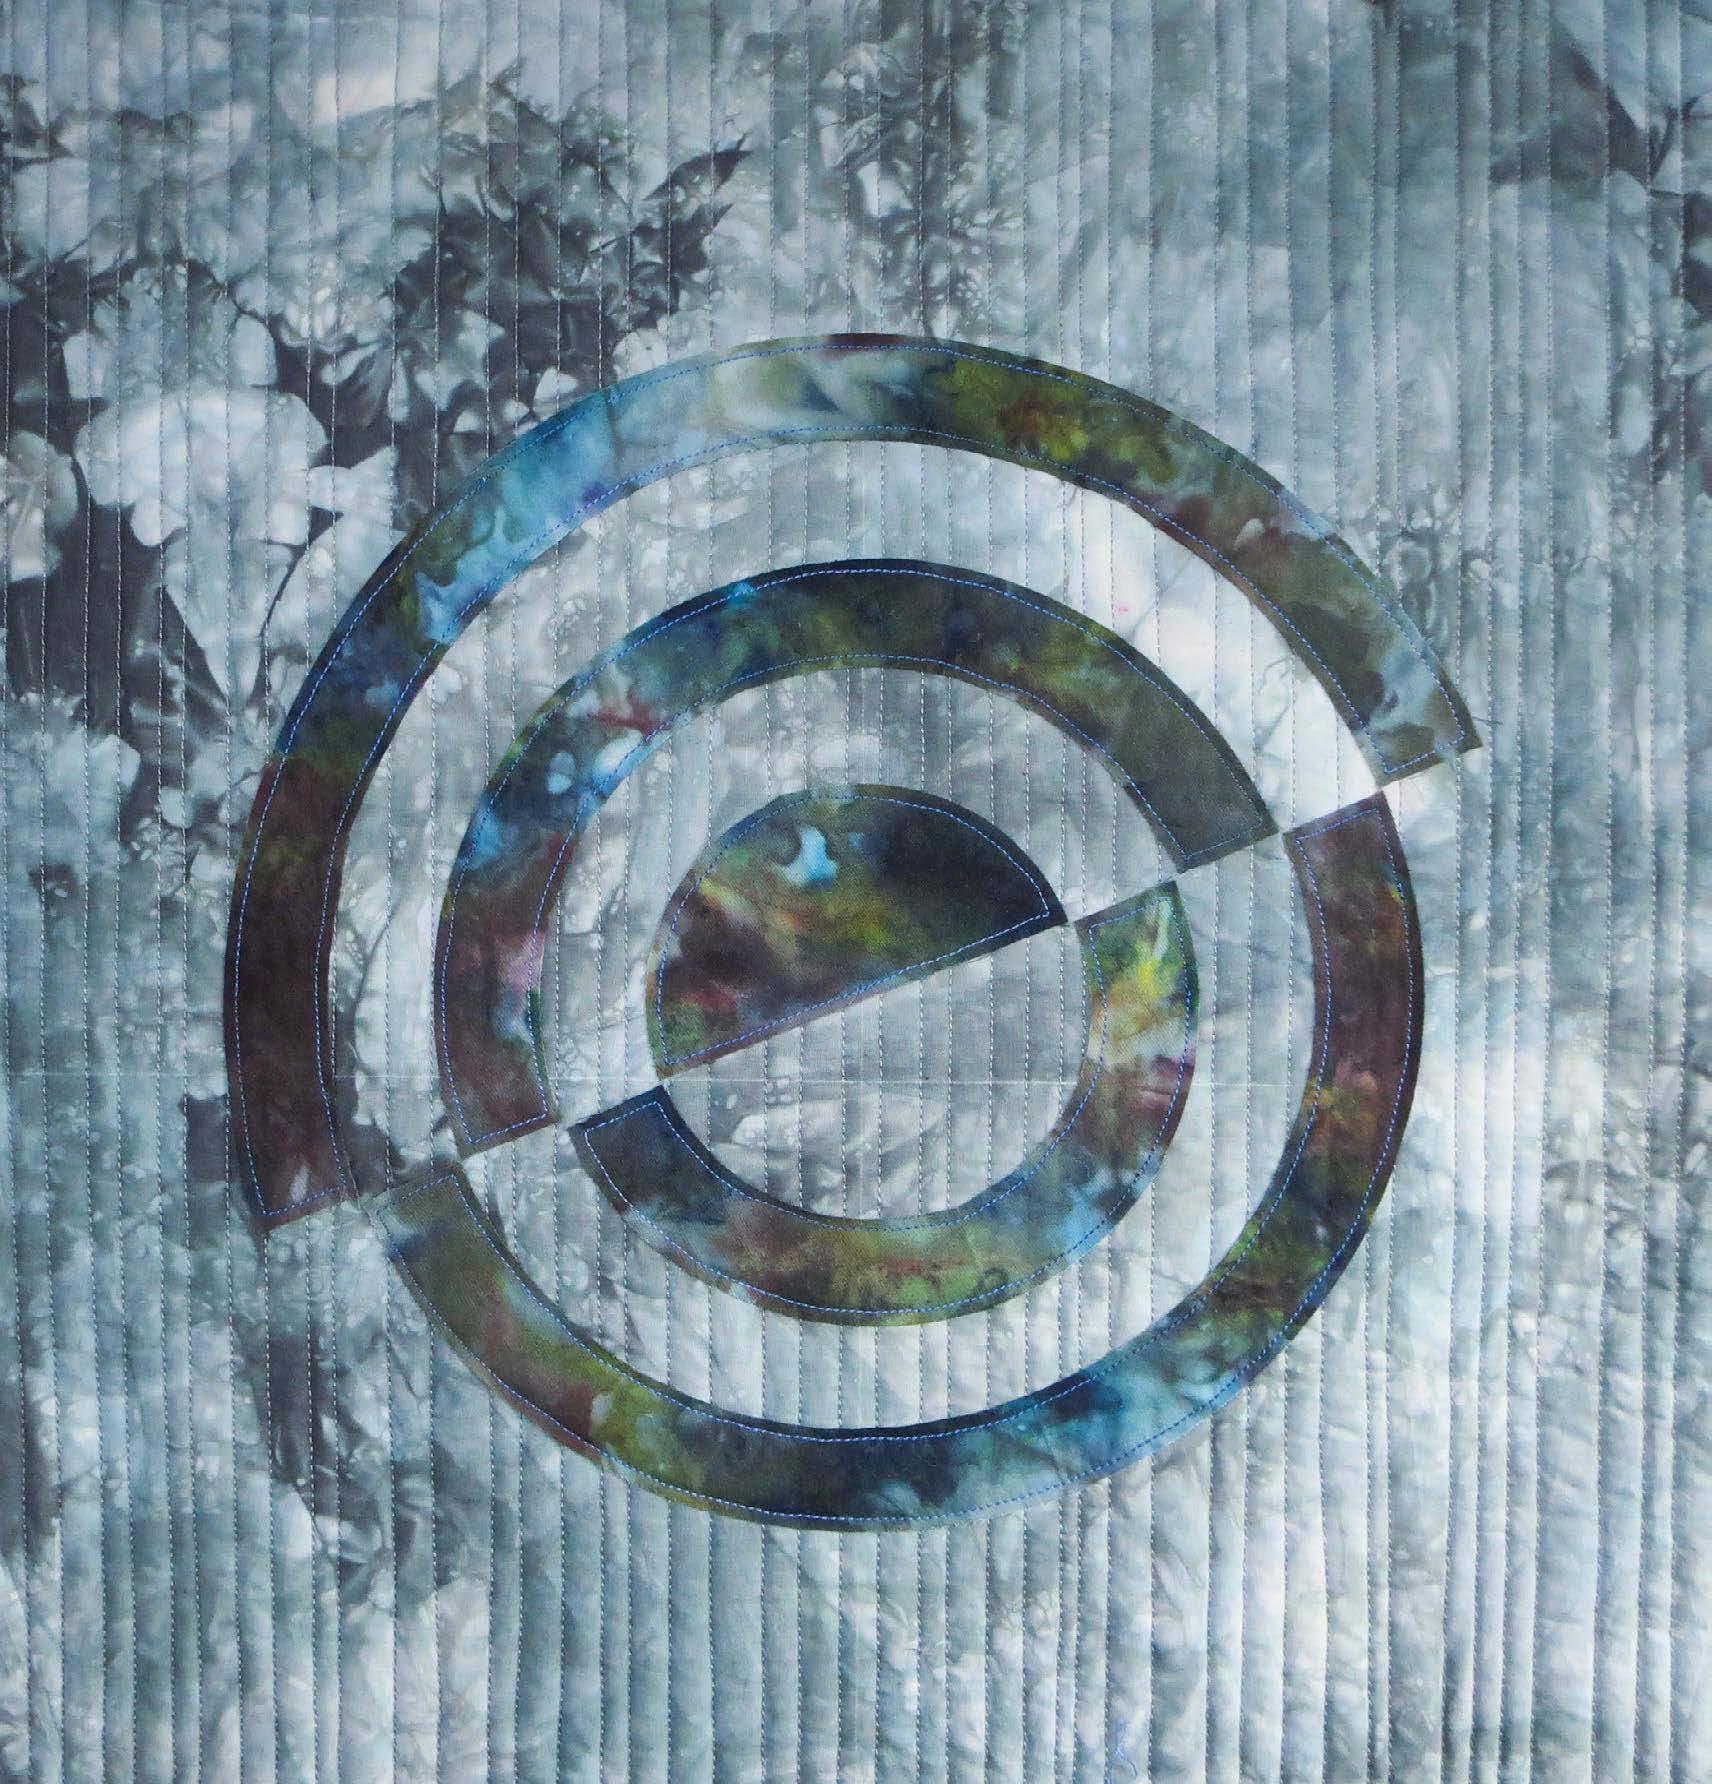
I tried several different arrangements of the half-circles using another piece of my Rit ice-dyed fabric for the background and this is the one I chose.
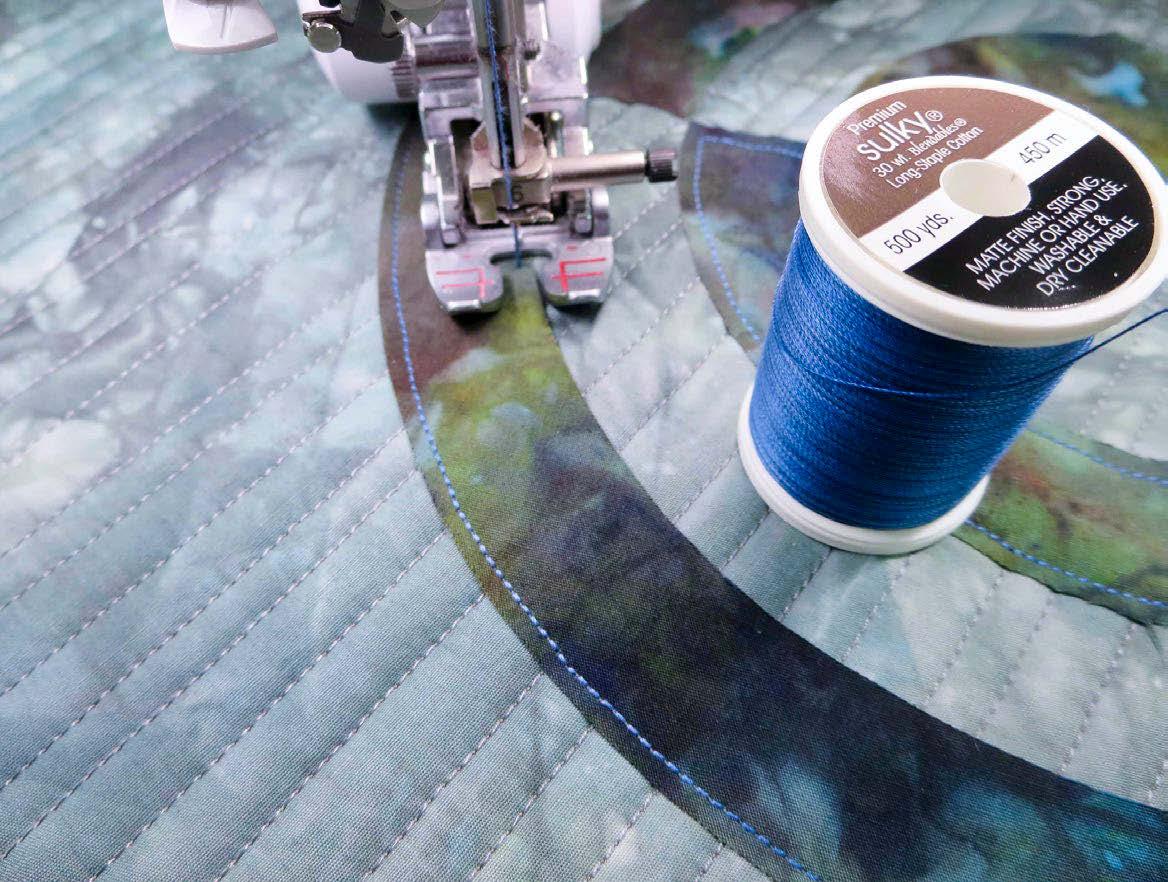
I quilted the background first, using straight lines ¼" to 3/8" apart. Once I decided on my final placement of the half-circles, I removed the backing from the HeatnBond Featherlite Iron-on Adhesive and pressed the shapes in place.
I stitched around the edges of the shapes with a blue Sulky Blendables 30wt thread from the Life in the Tropics thread collection. This variegated thread gives extra interest to the stitching lines.
22 | issue 26 OUILT
OmniArc Circle Cutter ruler and Komfort KUT 28mm rotary cutter
HeatnBond Featherlite Iron-on Adhesive ready to iron on ice-dyed fabric
Folded
fabric on the left and finished arcs on the right
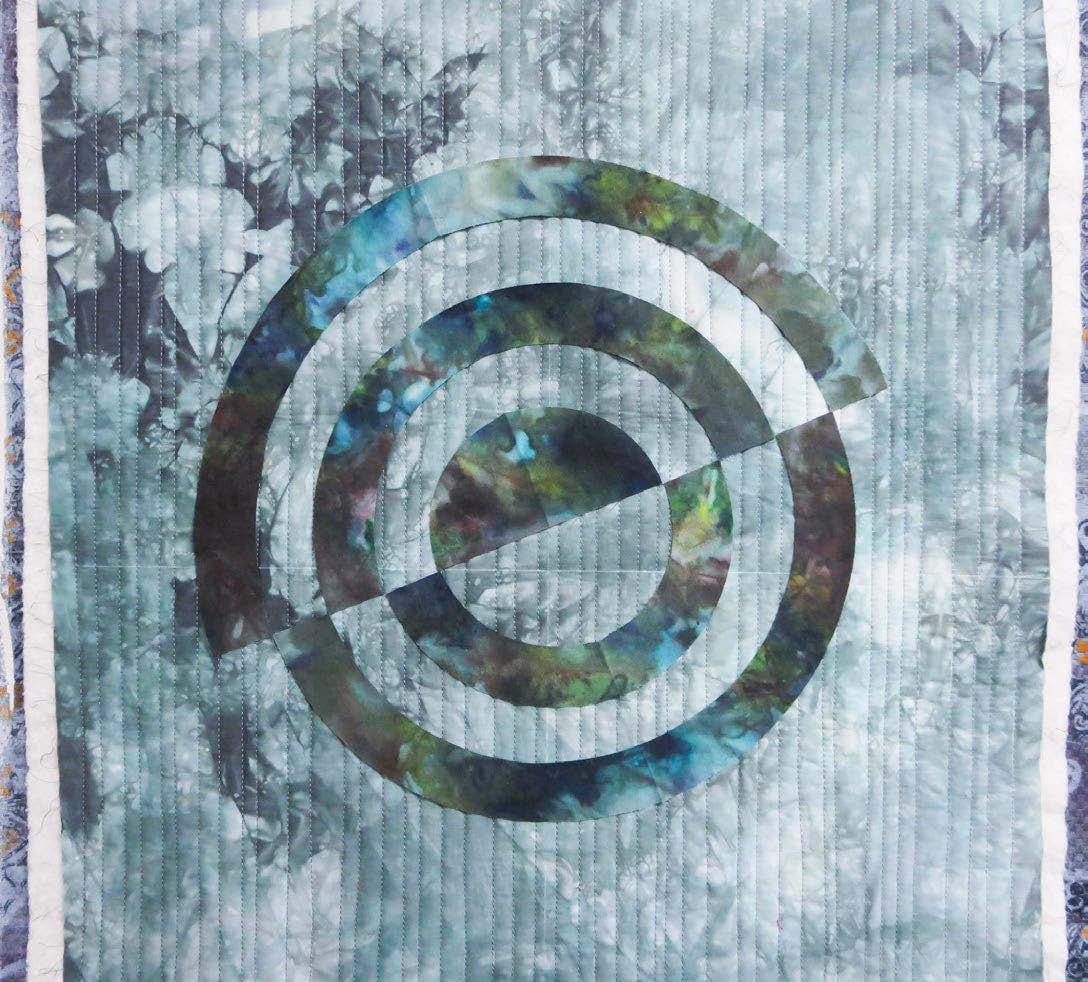
And here’s my finished project! The design possibilities are endless with these circle, halfcircle, and quarter-circle shapes, and they’re so easy to cut using the Omnigrip OmniArc Circle Cutter. Using them on my handdyed fabric – all created using Rit dyes - makes the process even more exciting!
I hope you'll enjoy using the Rit All-Purpose Dyes to create unique and original fabrics.
 Jean Boyd patternsbyjeanboyd.com
| issue 26 23 OUILT
Fabric arcs are ready to sew
Stitching the arcs
The finished project
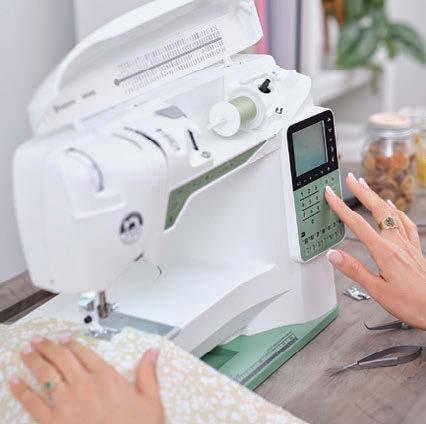
I'm so excited to share another fantastic sewing machine on QUILTsocial. In this feature, it's all about the Husqvarna Viking Tribute 150C
Did you know the company started in a town called Huskvarna, Sweden? And that it was a royal arms factory? Two centuries later, it turned its resources to manufacturing sewing machines. I didn't know that!
And now, the Husqvarna Viking sewing machine family is 150 years old! That's impressive, and we've seen tremendous changes over the years. I feel great pride in the Husqvarna Viking brand and know that to have been around this long, there are teams of brilliant engineers behind the scenes who continue to design and build quality machines with the features we love and use!
The design team still works in Sweden (wouldn't it be fun to check that out?), and with the help of sewists worldwide, continue to bring innovative products to us!
Who should look at the Tribute 150C sewing machine? If you're looking for a great sewing machine for a brand new sewist or a second machine to take to sewing retreats or classes with a reasonable price point, this is one to consider.
Buying a sewing machine for a new sewist is tough. How much should you spend, and where should you buy the sewing machine? If you purchase an inexpensive machine online with zero support, you may be extremely frustrated as you will have no one to turn to, to get help.
However, if you buy a more expensive sewing machine from a dealer, you'll get support, which is crucial to properly learning how to use the sewing machine. I get asked what sewing machine I recommend, and my first response is to look at the available support in your area.
If you follow me on QUILTsocial, you know I've reviewed many sewing and embroidery machines and often work on topof-the-line machines. I decided to put this sewing machine to the test and worked on various projects as if this were my only machine. You'll be hearing all about my adventures in this feature.
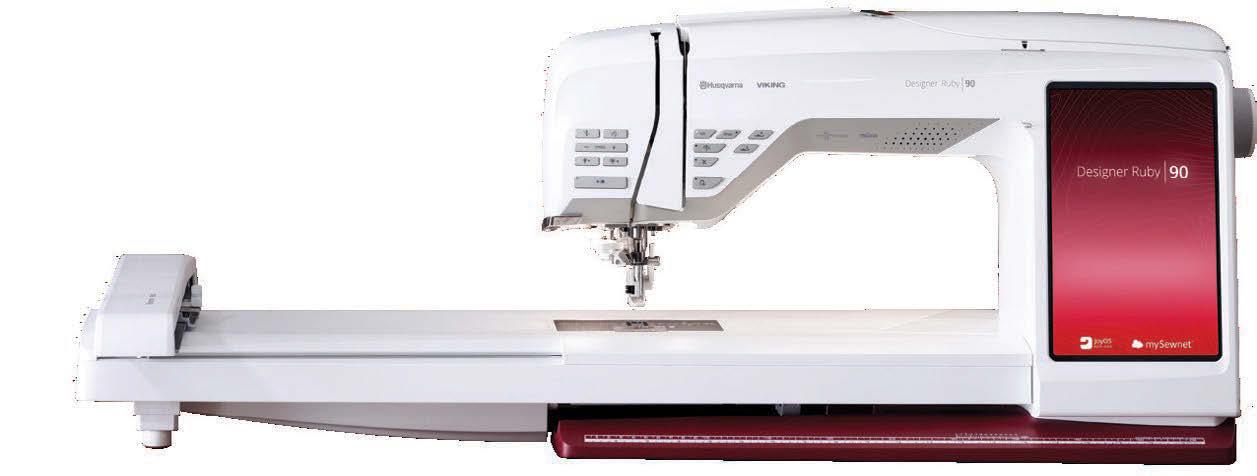
Introducing the Husqvarna Viking Tribute 150CWhat's included
Elaine Theraiult
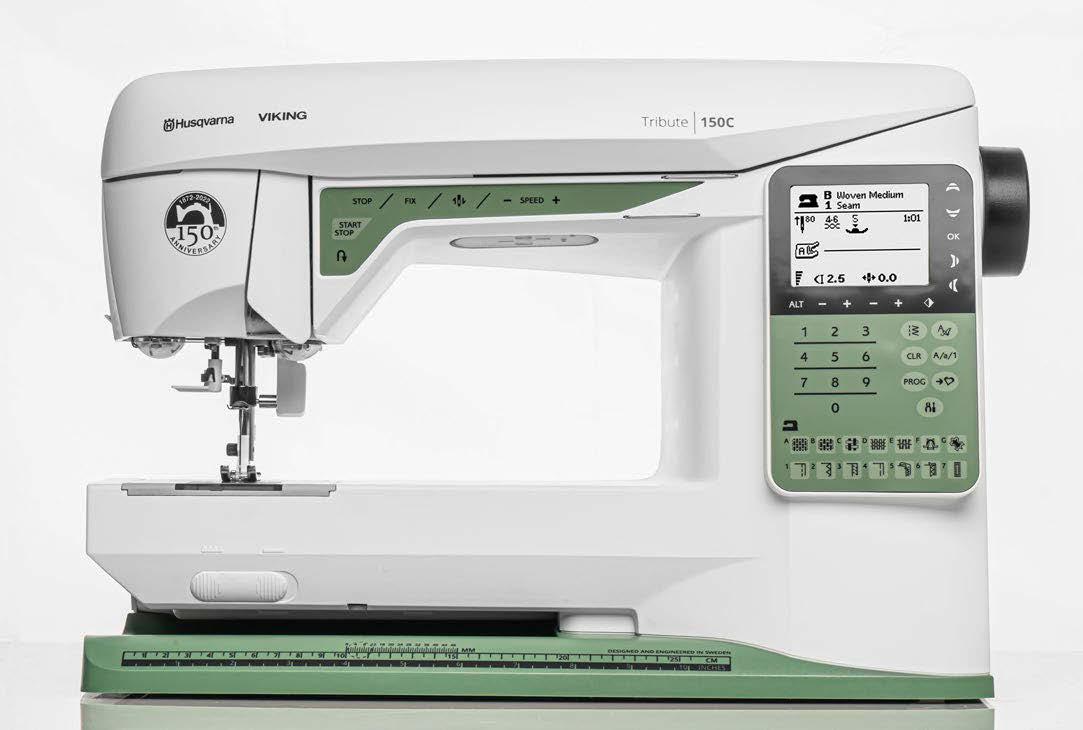
Did you notice the color of this new sewing machine? It's green and do you know why? It's reminiscent of the Husqvarna Viking sewing machine released in 1953. How cool is that? Most sewing machines were initially black but switched to green around 1947.
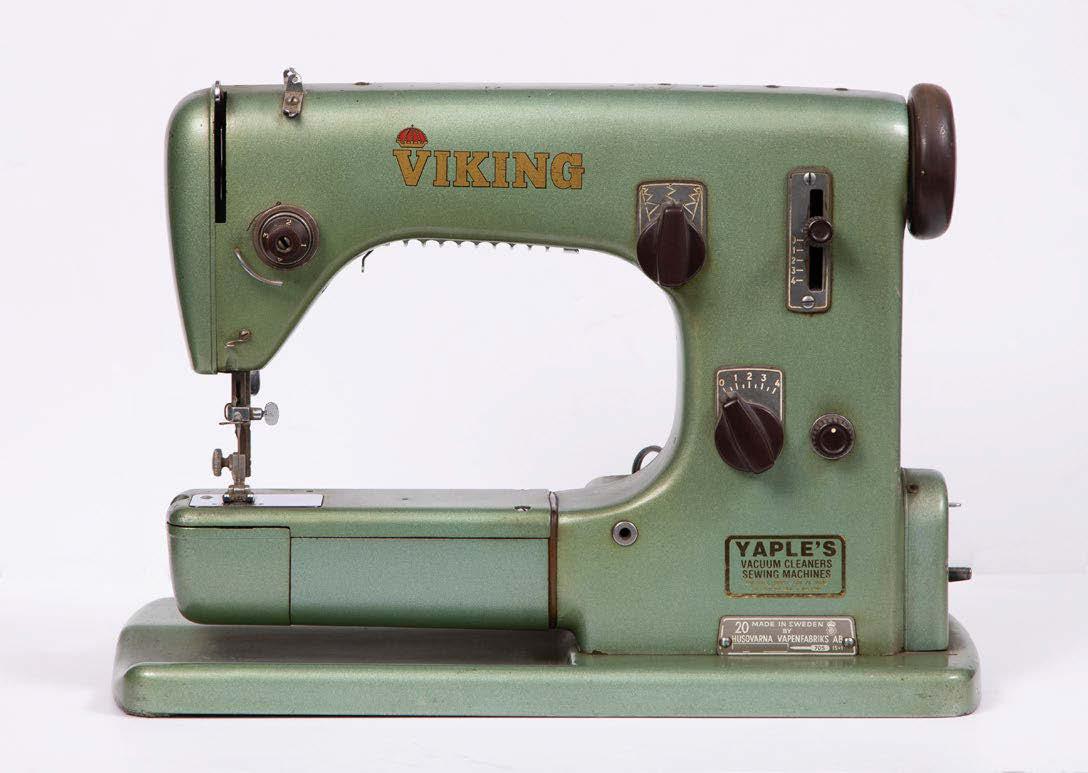
Check out the timeline of Husqvarna Viking – it's fascinating to see the progress through the years.
It's interesting to look at the first sewing machine introduced in 1872 and ask ourselves how the world of sewing machines has changed. While the essential functions of a sewing machine haven't changed a lot, we have many new features that make sewing pleasurable, easier, and faster than ever before.
One of the significant changes was the introduction of the motor in 1934. Then in 1979, the introduction of the computerized sewing machine revolutionized how we sew and what we can do with the sewing machine.
Let's look at what comes with the Tribute 150C.
24 | issue 26 OUILT
Photos by Elaine Theriault
Husqvarna Viking Tribute150C
Husqvarna Viking sewing machine circa 1953
One of the first things you notice when you unbox this machine is that it has no hardcover. WAIT – some people like the hardcovers, but seriously, how often do you use them? Most of my sewing machines are in constant use, so they are not covered, although they should be. And I find the hardcovers are bulky and hard to store.
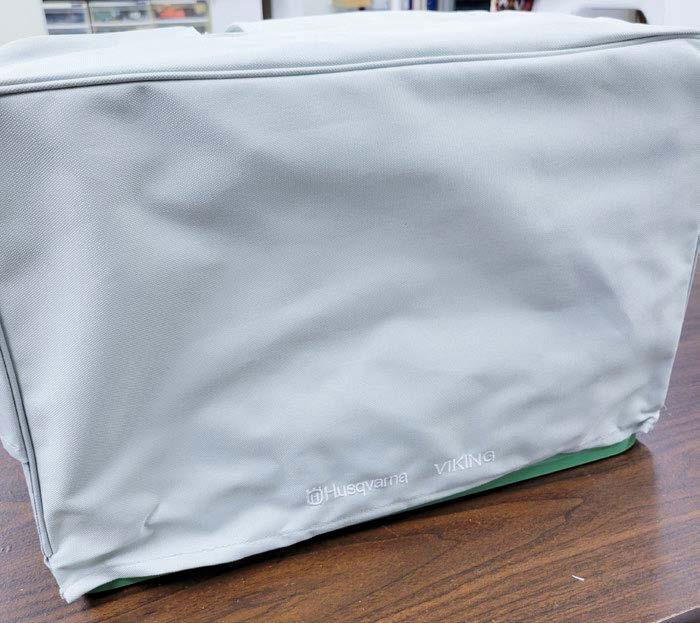
The Tribute 150C comes with a soft cover, meaning I could put it on the sewing machine at night to keep the dust off of it. I love this idea and wish I had soft covers for all my sewing machines. OK – so I should get busy and make some. You would be shocked at how much lint collects in your sewing room!
The soft cover is convenient for transporting the machine to a retreat or class. I don't have the travel case, which takes up a lot of room in my small car. And I rarely use the hard case to transport my sewing machines, as it also takes up a lot of space.
However, you want to protect the screens, so you don't get scratches on them, and the soft cover is perfect. It's super easy to tuck this small machine into the car along with your projects and be off to retreat or sewing day.
Do I love the softcover? You bet! Protection without the bulk. Now – a word of caution when transporting your sewing machine. Make sure it's secured in the car – I don't mean that you strap it down, although you could. But make sure the machine doesn't tip over when you turn a corner. Tipping over in the car would be bad, even with a hard case. And make sure to position the machine, so it doesn't get damaged by other objects. I often pack the machine between my soft project bags or invest in a travel bag.
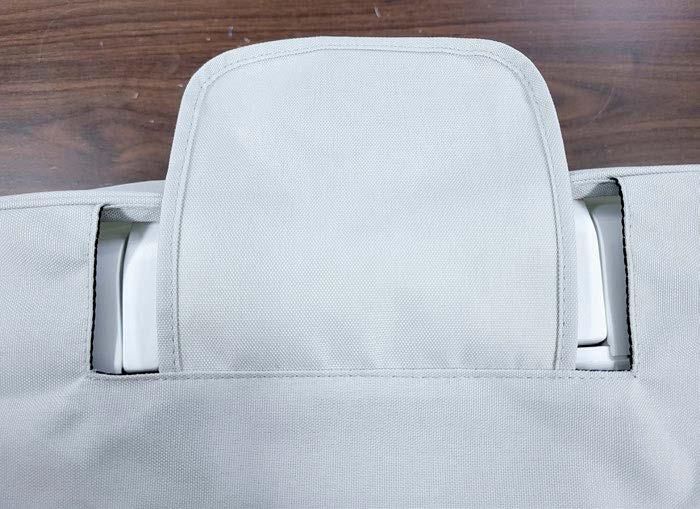
There's a flap at the top so you can easily access the handle, and the flap helps keep the dust out of the machine if it’s sitting. You can tell that thought went into the design to make this soft cover practical and functional.
The User's Guide
There's an accessory box at the back of the sewing machine where you can put all the included accessories. Again, if you read the User's Guide and identify each of the accessories, you'll be more innovative. I still hear from people who never knew what certain accessories were, nor did they know how to use them. If they’d read the User's Guide, they’d know this information!
Of course, there's the User's guide. It's not huge, but it has all the information you need to start. If you're new to sewing or need a refresher, it's always a good idea to check the User's Guide! I've mentioned before that even after sewing for many years, I've learned a lot from reading it.
Please do yourself a favor and read through it; check out the list of included accessories and the outline of the stitches in the A Menu. You don't need to read it all at once but set aside a couple of hours here and there. Understanding the features and how to use them will ensure you get the most from this fantastic sewing machine.
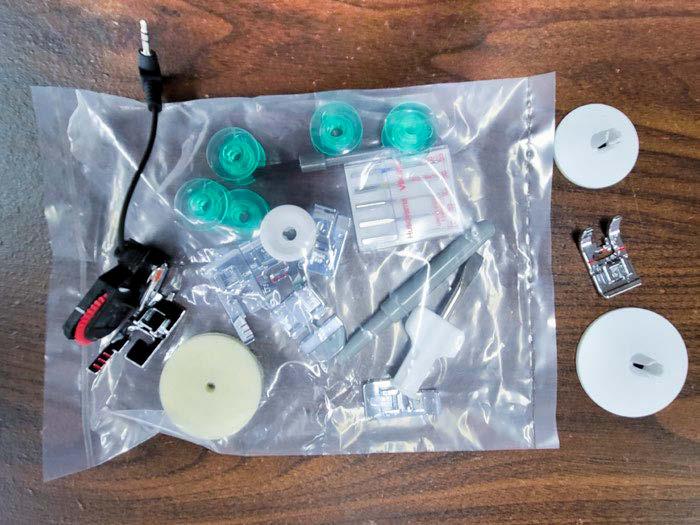
Speaking of accessories, here's the bag with all the accessories. There are several different-sized spool caps, a Sensor OneStep Buttonhole Foot, six other presser feet, and other accessories, so you have everything you need to get started. The one thing I'll say about these accessories is that they are of good quality. Again, this goes back to having the right tools to do the job. If the tools you get aren't great, your results may not be so good.
| issue 26 25 OUILT
Soft cover for the sewing machine
The flap allows access to the handle
Accessories for the sewing machine
It doesn't matter what kind of a sewist you are –quilter, garment, home dec – those six included presser feet allow you to sew seams, make buttonholes, insert zippers, blind hem a garment, use decorative stitches and more.
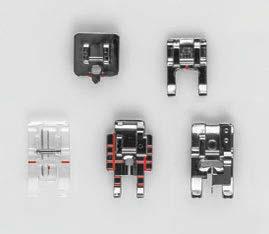
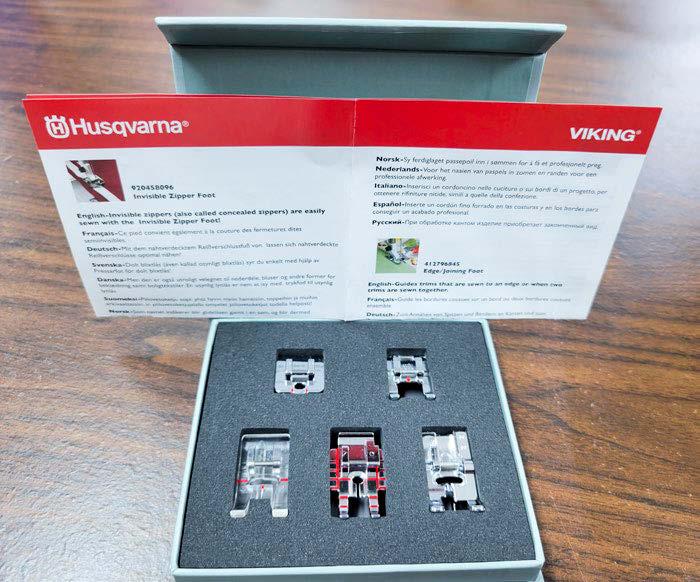
But as a bonus, the Tribute 150C has a pack of five additional presser feet. OH – I love extras, and these extra feet are five of the most popular feet purchased. They come in a nice little box, perfect for storage.
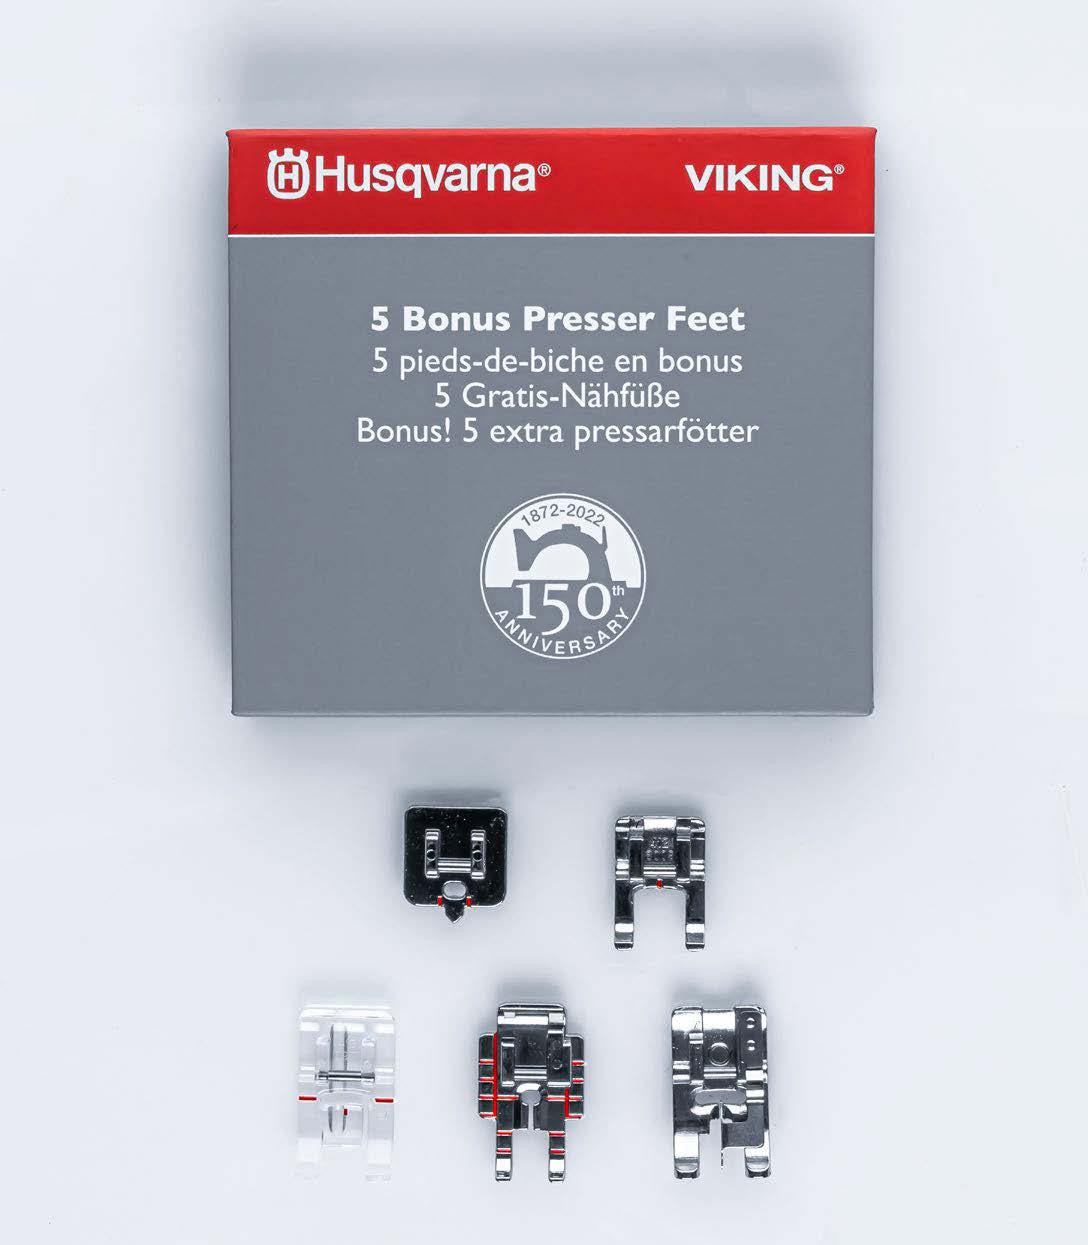
What? Do you want to know which feet are in the bonus box? Can you guess some of them? Do you recognize some of them?
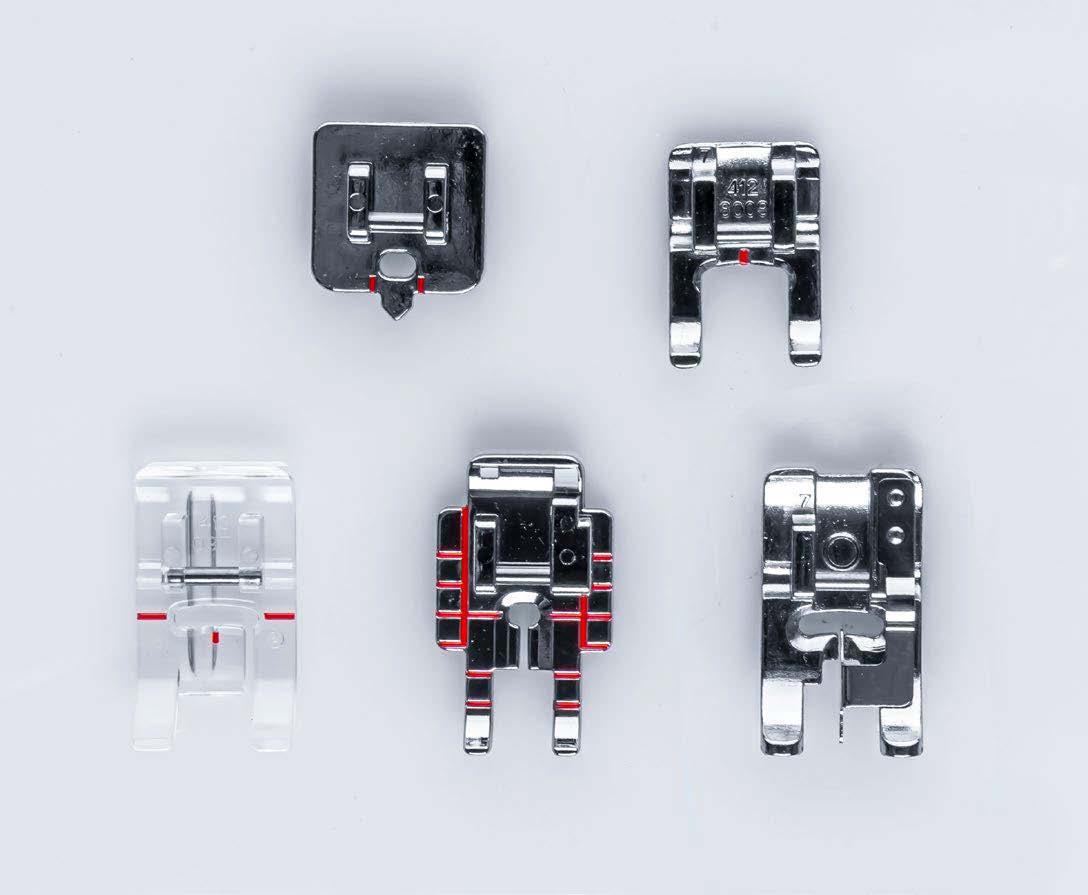
Here's a close-up of the feet. There's an Invisible Zipper Foot, The Open Toe Applique Foot, the Clear Piping Foot, the Adjustable ¼" Piecing Foot, and the Edge/Joining Foot. WOW – that's a bonus, alright – I love those feet. OK – I haven't used an invisible zipper foot much. But the rest of them – yep – I love them all.
I'll be using those feet later and showing you some of the fantastic features of the Husqvarna Viking Tribute 150C
I've decided not to do a specific project but instead will be substituting the Tribute 150C for my regular machine to see how it stacks up.
26 | issue 26 OUILT
Bonus presser feet
The bonus presser feet
Features of the Husqvarna Viking Tribute 150C – Benefits included!
We'll look at some of the main features of this fabulous sewing machine, and you can see all the features in the Features and Benefits document
The first thing we'll look at is an optional accessory. While I appreciate the 8" sewing area from the needle to the tower, I also like to have room on the left-hand side of the needle.
I always dig out the optional extension table. I love this extension table because it fits on all the Husqvarna Viking sewing machines in this size category. So, if your more advanced sewing machine is the same size, the table works interchangeably.
Yep – I use this ruler more than I thought I would.
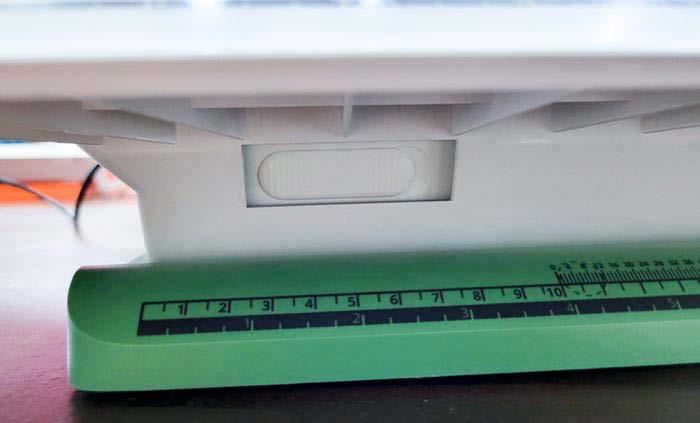
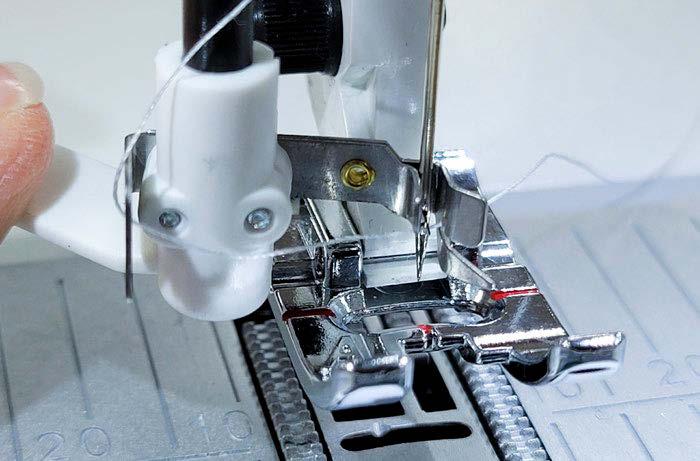
But if you don't have the extension table, guess what? There's a ruler along the base of the Tribute 150C, so you still have access whether or not you use the table. Notice the small ruler markings in MM. If you're making a buttonhole, this guide helps to determine the length of the buttonhole required when using the Sensor One-Step Buttonhole Foot. It's so helpful to have that little guide handy, so there's no need for guesswork when making buttonholes.
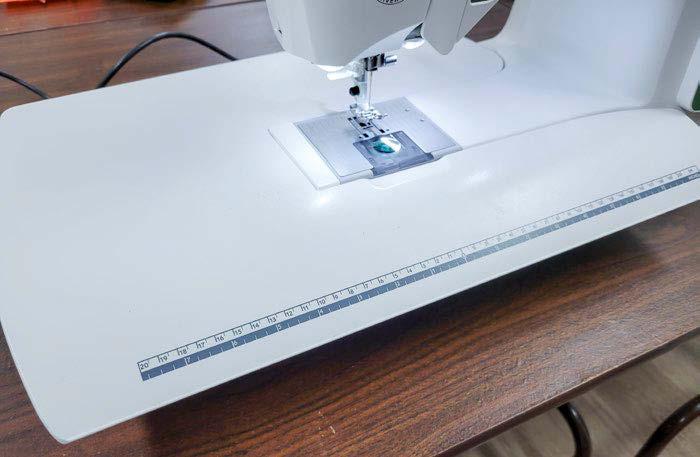
What can I say about the table except that I love the curved front? It makes a difference when sewing, and the curved front allows your arms to rest comfortably on the front edge and makes for a very comfortable sewing position.
Unless I forget it when I go to a retreat (which I never would), I always sew with the extension table on the machine. And you'll notice that it has a handy ruler along the front. Now, why would this be important? I've been working on many quilts with small pieces, many of which are similar in size. The last thing you want to do is rip, and I'm always in a hurry, so I don't label my pieces. So, the ruler comes in handy for identifying the piece size if needed. I also use the ruler to double-check that my pieced piece is the correct size.
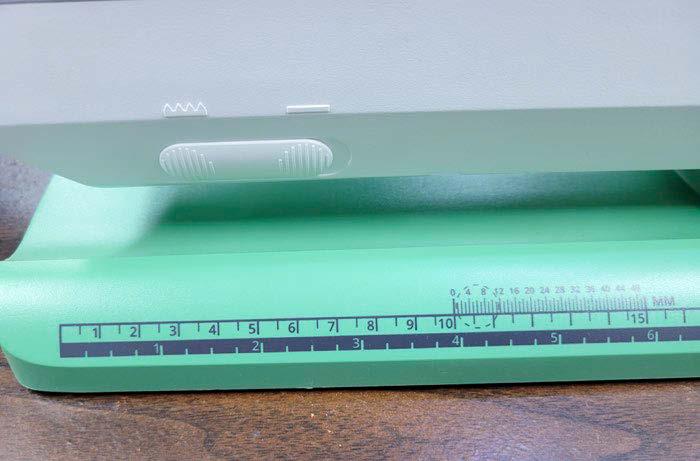
You'll also notice the slider to the left of the photo. This slider is used to raise and lower the feed teeth on the Tribute 150C. It's super easy; slide to the right to lower the feet teeth, then slide to the left to raise them. Did you know that raising the feed teeth is a two-step process? Push the slider to the left and take one stitch; the feed teeth pop back into position.
But what happens when you put the extension table on? I never noticed this before, but there's a slot in the extension table, so even if you have the extension table in place, you won't have to remove it to raise or lower the feed teeth. I love that.
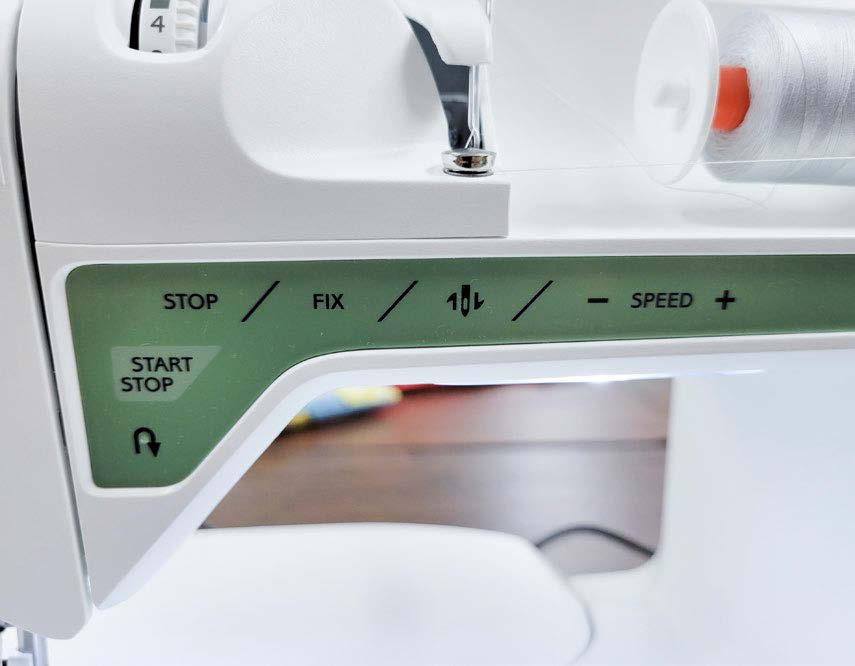
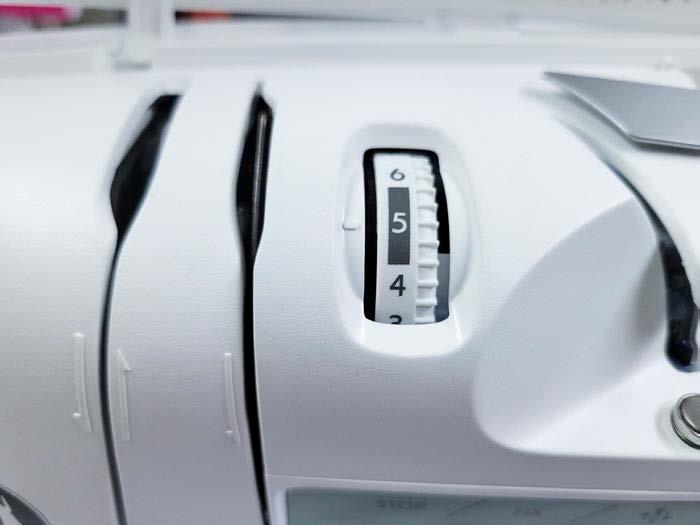
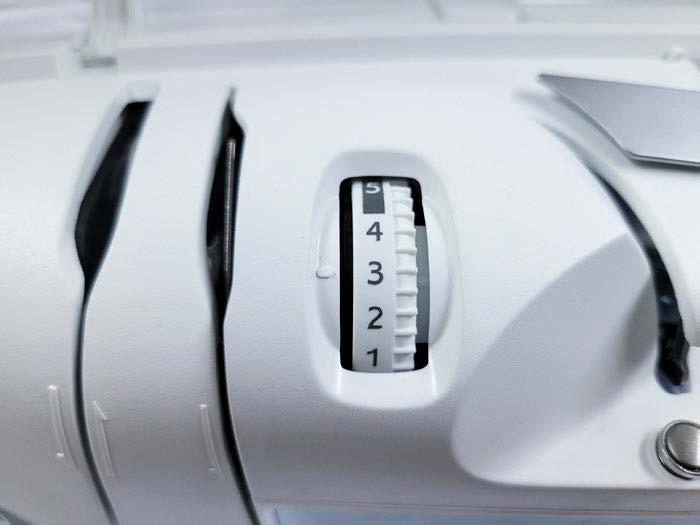
The function panel is positioned right over the workspace of the sewing machine. There's a speed control with five settings, which is very important if you're a new sewist doing decorative stitches, or need to sew at a constant speed. There's also a Needle Stop up/ down function, which I can't sew without, and the FIX function, which ties a knot at the beginning and ending of seams, and is essential for applique and quilting. The STOP function is helpful when doing decorative stitching or when you want to sew a single stitch sequence, and the START/STOP function is excellent for operating the Tribute 150C without the foot pedal. And, of course, there's a reverse function. That's a lot of functions, and I use them all depending on what I'm sewing.
| issue 26 27 OUILT
The optional extension table
A guide in MM to identify the size of buttonholes
The feed teeth slider is available even with the extension table in place
The function panel
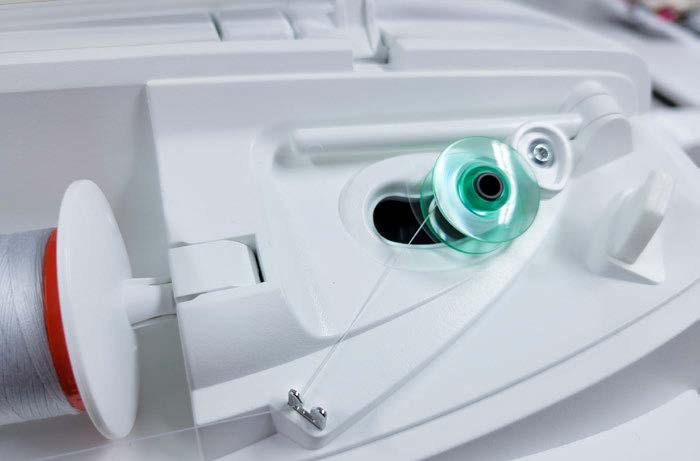
Let's see what else we have. Oh – I needed to wind a bobbin when I wanted to start sewing. It's super easy to wind bobbins, as the bobbin winder is on top of the machine well within easy reach. And the best part, there's a cutter right there (it's on the right-hand side in the photo) to make it easy to cut the thread when the bobbin is full. While I can use the foot pedal to wind the bobbins, I like to use the START/STOP button.
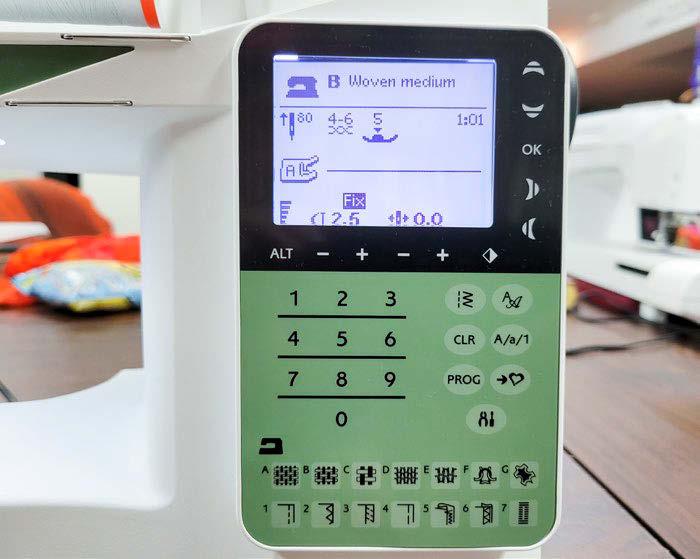
Let's look at the touch panel and screen, which is one area that’s changed significantly in the history of the sewing machine. I love having all that information on the touch panel. Before, there were various knobs or dials to change these settings, or the ability didn’t exist!
To enjoy your sewing experience, sit down with the User's Guide to review what each of those numbers on the screen means. It’s only a nine-page section in the Guide, so it won't take long to go through it.
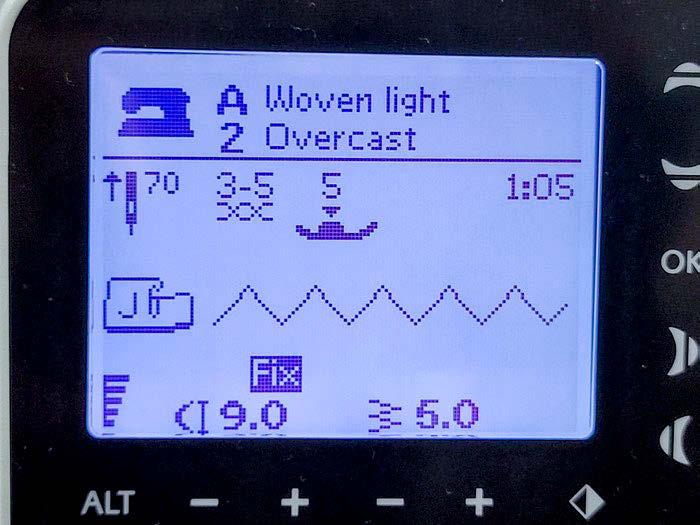
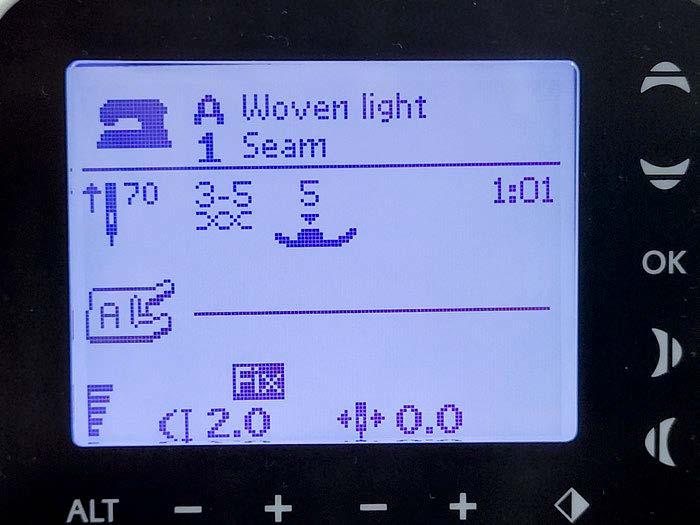
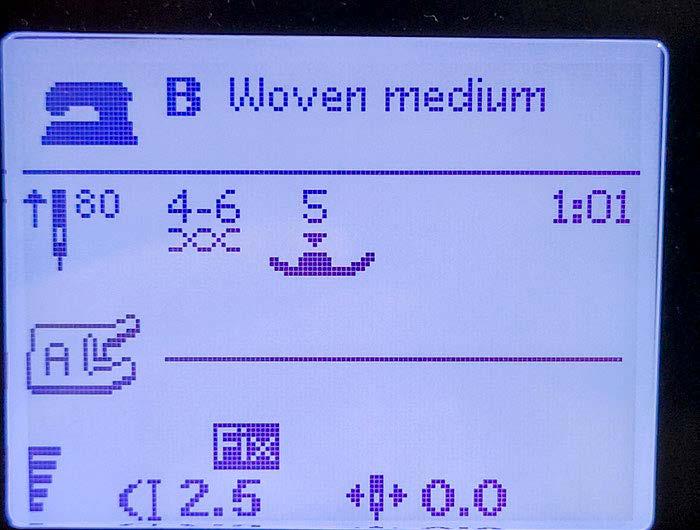
Here’s a quick overview of the screen settings. I used the Exclusive Sewing Advisor to select Woven Light fabric, and the technique is overcast. At the far left, the Needle Stop Up/Down is in the up position, and there’s a recommendation to use a size 70 needle. The tension recommendation is between 3 – 5, with a presser foot pressure of 5. Those are both dials on the sewing machine that you set manually.
Once you get the bobbin wound, it's time to thread the sewing machine, which is super easy as there's a builtin needle threader to get the thread through the eye of the needle. It doesn't get any easier than that!! Remember that the eye of a Size 8(60) needle is too small, and the hook of the needle threader will not fit through, so those small needles have to be threaded by eye!
There’s an illustration of the stitch on the screen and the stitch number from the stitch menus. The stitch length doubles as the density setting when you choose to work with a satin stitch, and the stitch width doubles as the needle position when using a straight stitch. You can mirror stitches, program stitch combinations, and save stitches. The tension, presser foot pressure, and speed settings are also found on the screen. It's critical to the success of your project that you become familiar with these functions.
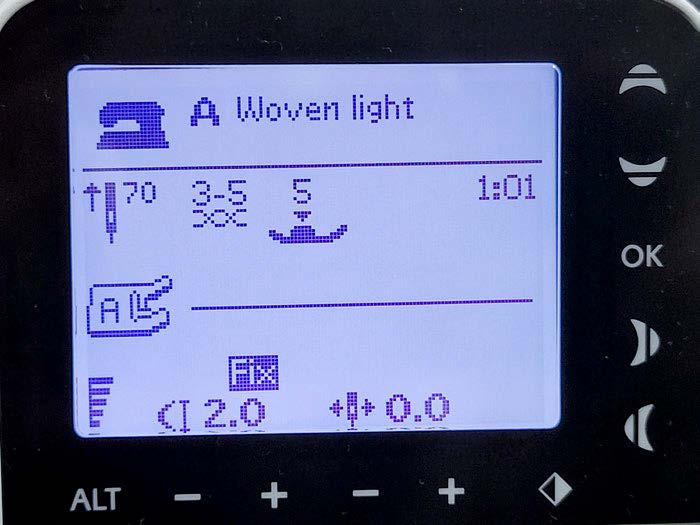
The selected stitch is 05 from Menu 1. The Exclusive Sewing Advisor recommends Presser Foot J for the Overcast technique, and there’s an illustration of the stitch. The speed control is at full speed. The FIX function is activated, and the length of the stitch is 9.0, while the width is 5.0.
Whenever I select a fabric type, weight, or stitch technique from the Exclusive Sewing Advisor, I’ll see the reflected recommendation on this screen. The default settings will appear on this screen if I choose a different stitch.
You can see why it’s essential to fully understand all the functions to appreciate the sewing abilities of the Tribute 150C.
See how easy it is to operate this sewing machine? There are enough features to keep the new sewist happy without immediately outgrowing their machine. Yet, there are also enough features for the more experienced sewist to use as a second machine.
But there's more!
28 | issue 26 OUILT
The touch panel on the Husqvarna Viking Tribute 150C
Threading the needle with the built-in needle threader
The touch panel
The Exclusive Sewing Advisor
The settings for the Overcast stitch
Winding a bobbin
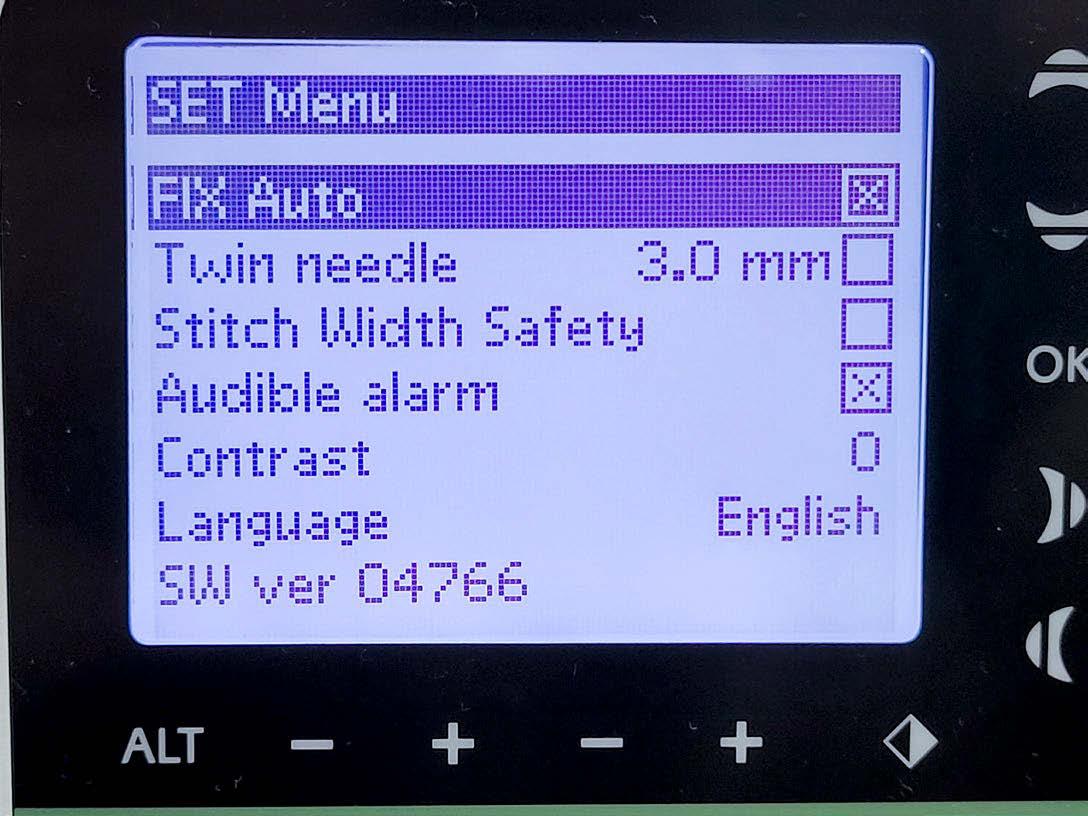
Here's a peek at the settings menu. If you choose not to use the FIX function for a specific project, you can turn it on or off in the Settings menu. If you're working with a twin needle, you must indicate the needle's width to prevent damage to the sewing machine. The stitch width safety will prevent the needle from moving out of the center position, which is handy if you use the Single Stitch plate (a separate option)–a great safety feature. Setting the audible alarm, selecting a language, and the screen contrast is also in the settings menu.
As you can see, this little machine packs a lot of features into it.
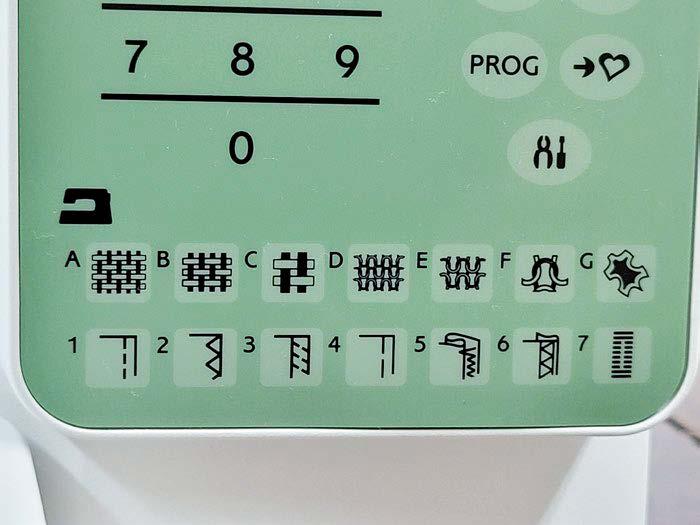
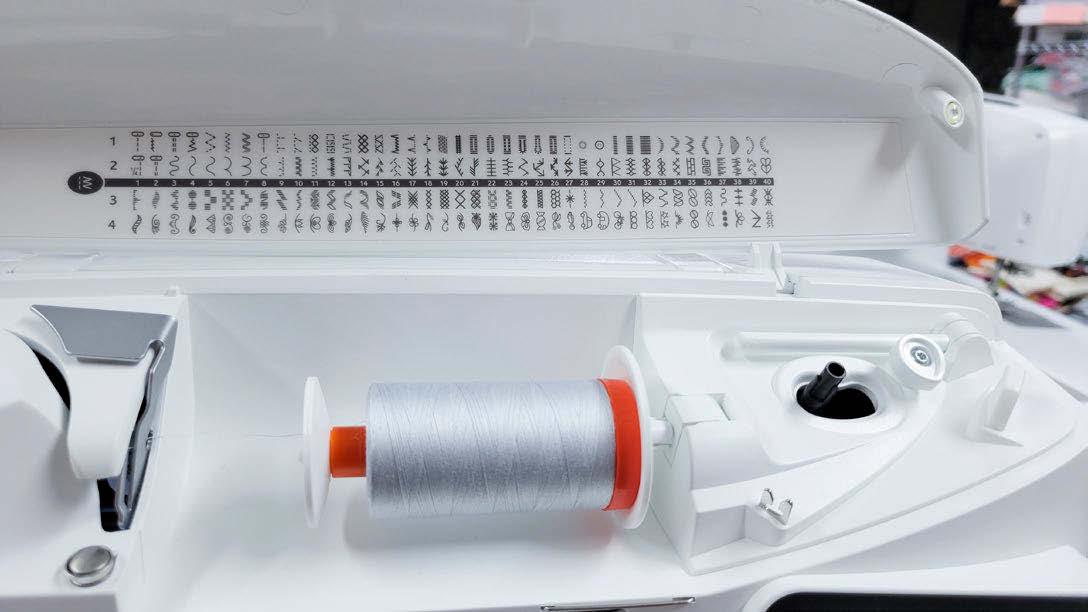
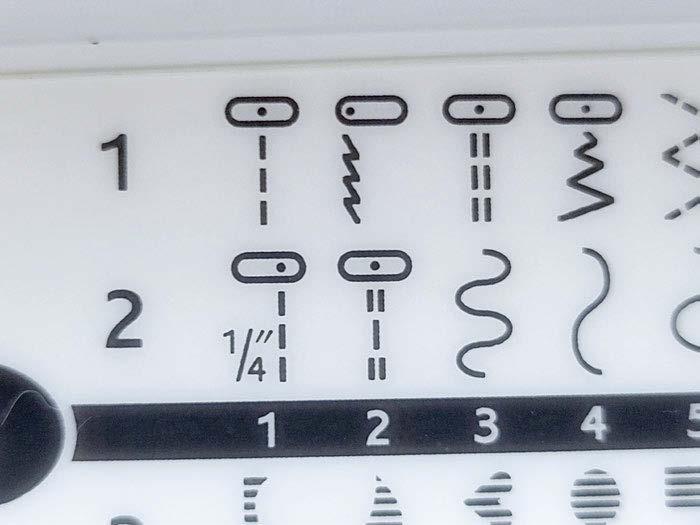
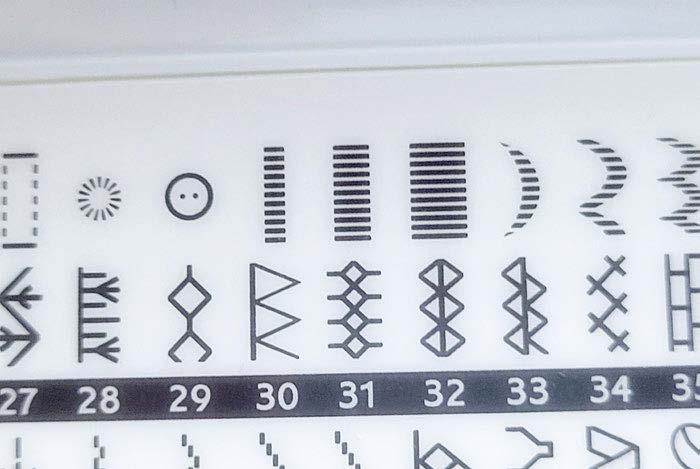
You'll find all of the stitches in four menus under the sewing machine's lid.
And what I love is that the most common stitches a quilter uses are in the stitch menus! You’ll find the satin stitch and three different blanket stitch styles, so applique will be a breeze.
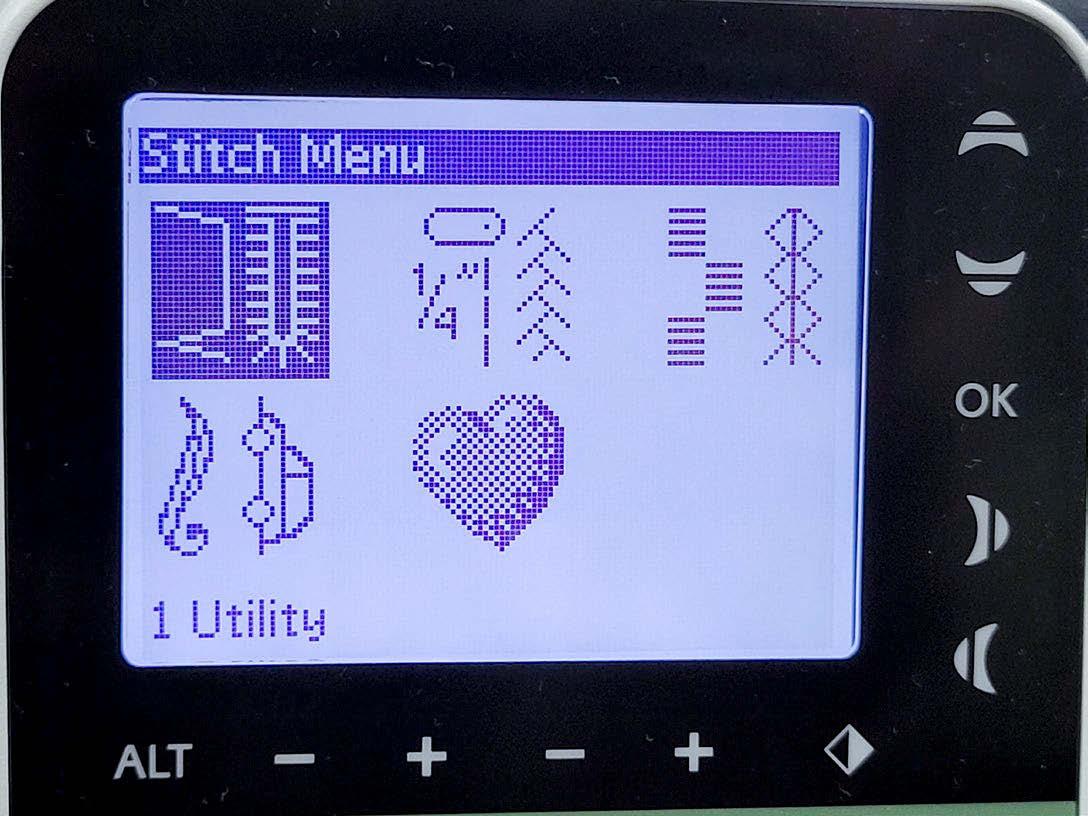
It's super easy to select a stitch by selecting the Stitch Menu on the Touch Panel, which gives you a choice of the four menus. Use the arrows on the side to highlight which menu you want. Then type in the stitch number on the number pad, and you’re good to go! You’ll find the stitch numbers under the lid.
So, for a small sewing machine, the Husqvarna Viking Tribute 150c packs a big punch! There are a lot of features on this machine that you'll find on some of the larger machines, making it perfect for the second sewing machine for taking to retreats and classes. This machine weighs a fraction of the larger machines, so it's easy to carry. It's also enough of a sewing machine for the new sewist.
I find it very frustrating for the new sewist when they come to class with a very inexpensive sewing machine, yet they want to work with the crazy fabrics. And while it's possible, it's very challenging, and many of them get frustrated, making it easy to give up.
With the Husqvarna Viking Tribute 150C, they won't have those same issues and will be able to sew pretty much anything! And the more they enjoy sewing from day one, the more likely they’ll stick with it. And let's face it, we all want new sewists!
| issue 26 29 OUILT
The Set Menu
A diagram of the stitches in each of the four menus
The Stitch Menu
Straight stitching with a perfect seam allowance: How needle position helps
I don’t want to focus on a new project, but instead of using my usual sewing machine to work on existing projects, I'll use the Tribute 150C. There's nothing better than seeing how it stands up to your regular sewing if you want to use it as a second machine for a retreat.
I'm predominantly a quilter like I assume most of you are. So, when I test out a new machine, I like to see how it pieces, handles applique and how easy it is to quilt a project. I'll also try to incorporate those bonus presser feet into my test drive.
As a quilter, it's pretty common to use a ¼" seam allowance. Gosh – I remember when I first started sewing with a ¼" seam allowance. I thought everything would fall apart as I was taught in Home Ec to use a 5/8" seam for garments. There's a specific stitch on the Tribute 150C (2:1) for ¼" seams.
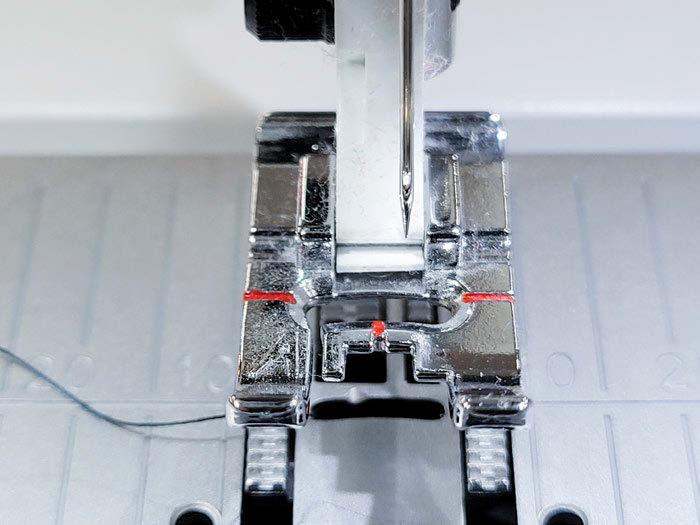
However, since I'm used to the Adjustable ¼" Piecing Foot and there's one in the box of bonus presser feet, why not?
Here are the other feet included in the box. And there's an instruction sheet on how to use the feet. Should you lose those instructions, you can always go to the Accessory User Guide online to identify different presser feet and learn how to use them. It's a great tool and free to download to your computer.
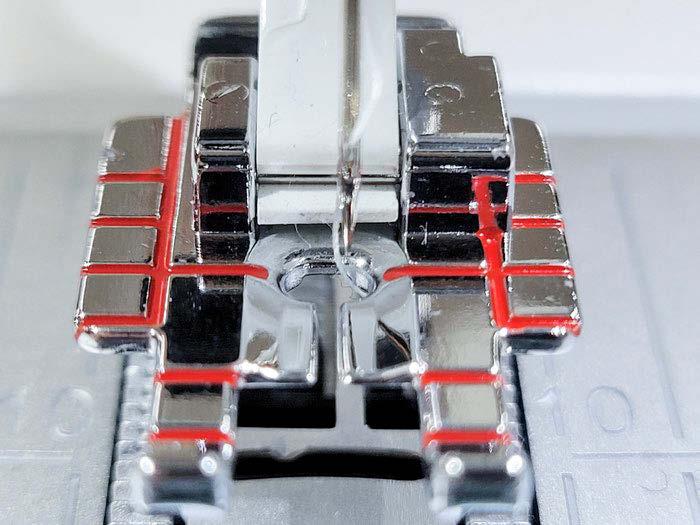
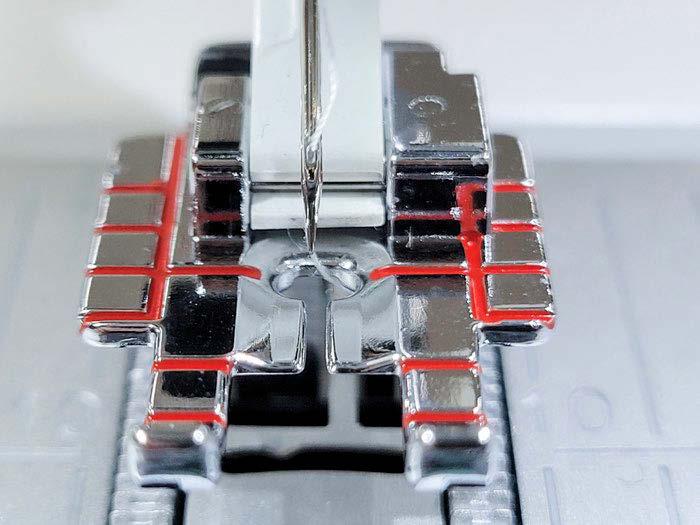
See all those markings on this foot? The outer edges of the front of the foot are ¼" from the needle, while the red lines are in 1/8" increments giving you lots of options for accuracy. Notice that the back end of the foot is wider; this is to provide good contact with the feed teeth to advance your seams smoothly and provide consistent stitches. What I love even more is that I can use this same foot for most Husqvarna Viking sewing machines, and I don't have to think about the ¼" seam allowance. Because I'm using the same foot, the seam allowance will be the same. That's a good thing since it can sometimes take a few years to sew one project, and it would be crazy to remember which sewing machine and presser foot was used for each project!
Selecting this stitch moves the needle to the ¼" position when using the Utility Foot A.
So, I'd be good to go even if I didn't get the bonus box of presser feet. Remember, it's always a good idea to test any new ¼" setting on a machine. Check out my blog post on How to test to get an accurate ¼” seam allowance
It's easy to change presser feet; gently pull forward on the presser foot attached to the ankle and then push the new presser foot into the slot in the ankle. I also love that these feet use the existing presser foot ankle, so it's easy to store the feet.
As mentioned above, do a test when getting a new foot to make sure you get the seam allowance you want. Once you're familiar with a ¼" seam allowance and you can recognize it by sight (seriously?? Yep – I can pretty much tell an accurate versus scant ¼" by eye), there's less need to test.
But did you know that thicker fabrics or different thicknesses of threads can affect your ¼" seam allowance? If that happens, you may need to move your needle slightly to the left or the right to get the appropriate seam allowance. With the Adjustable ¼" Piecing Foot and the Needle Position feature, it's a snap to move the needle and still use the edge of the foot as your guide.
30 | issue 26 OUILT
The built-in ¼" stitch
Using the built-in ¼" seam and the Utility Foot A
The bonus set of presser feet
The Adjustable ¼" Piecing Foot
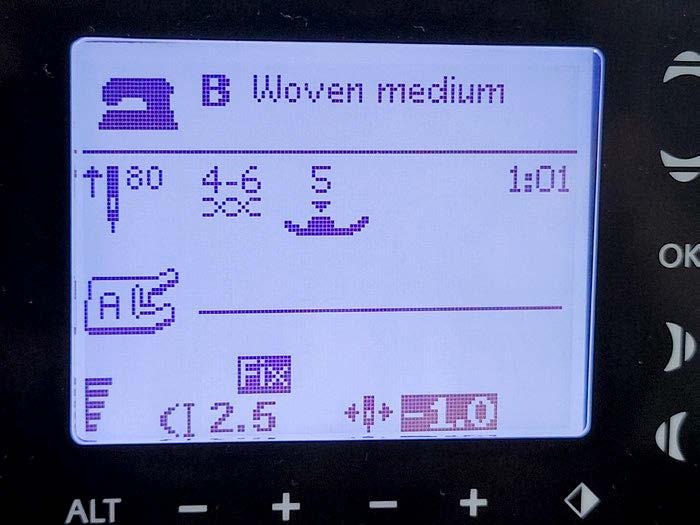
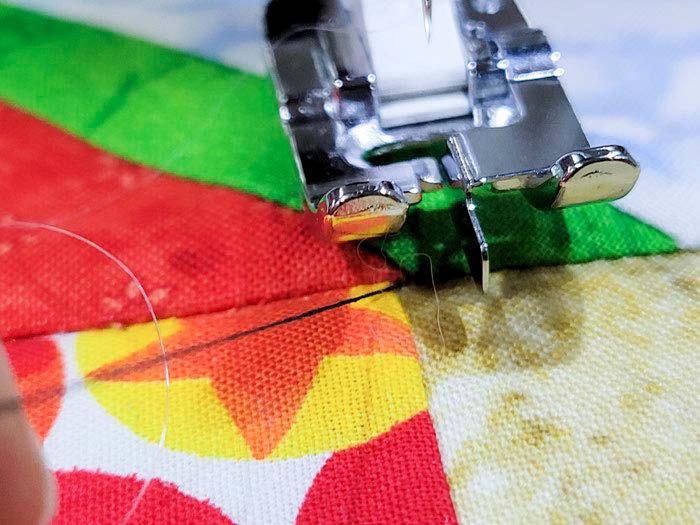
When you’re working with a straight stitch, the stitch width function doubles as a needle position button. In this case, I've moved the needle to the left, as indicated by the – 1.0 on the screen.
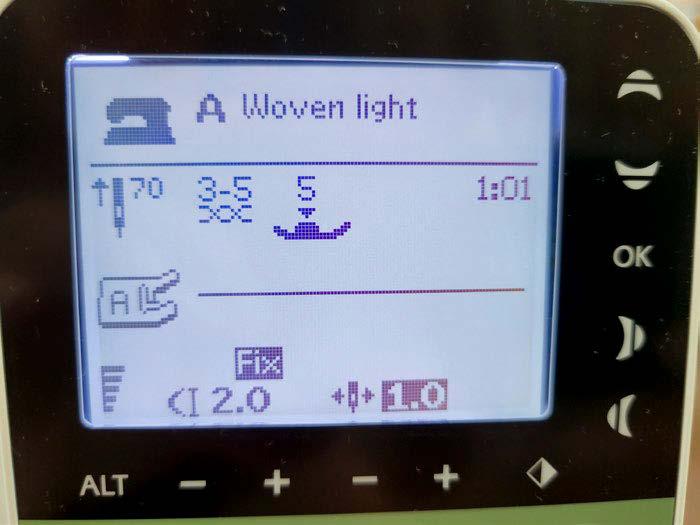
If the background of a setting changes color on the screen, you’re no longer in the default setting. As you can see below, the needle is back in the center position. The other difference you'll see between these screens is the stitch length. I like to sew with a stitch length of 2.0. By setting the Exclusive Sewing Advisor to Woven Light fabric (which is what quilting cotton is), the stitch defaults to 2.0. And every time I turn on the sewing machine, the stitch length is automatically set unless I change the Exclusive Sewing Advisor.
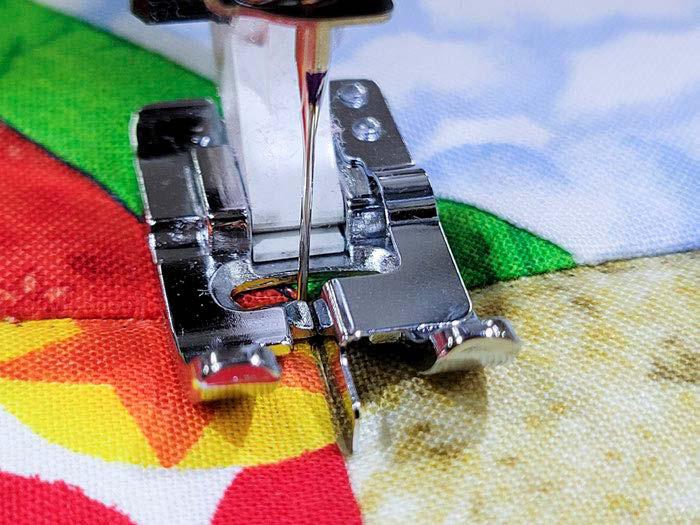
To help you understand needle position and how it can help you achieve a perfect or scant ¼" seam allowance, I attached the Adjustable ¼" Piecing Foot and chose Stitch A:1, which is a straight stitch. The needle is in the center position. Remember, when you select a straight stitch, you can move the needle to the left or right using the stitch width function.
We can see on the screen that the needle position is no longer the default as the background has changed.
I could also use the Exclusive sewing Advisor to set the technique to seam, as you can see below, but the default technique is to sew a straight line, so I don't need to select it.
When I move the needle position to the right, the needle moves to the right. There are 29 different needle positions (the center position and 14 to the left, and 14 to the right), so you can always find a needle position to suit your project.
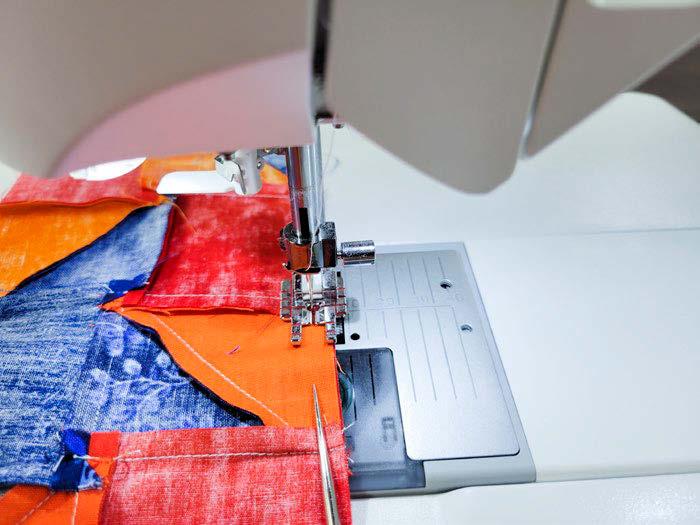
How was it to piece on the Tribute 150C? It was a breeze! Because I was already used to the Adjustable ¼" Piecing Foot, I didn't have to adjust my seam allowance. Sewing my project was almost the same as sewing on a larger machine. The larger machine is more powerful, but the Tribute 150C went through everything I sewed.
I did use a stiletto (as I do on my other machine) to keep seam allowances tucked where they should be and to help match up seams, as I don't use pins. But it worked like a charm!
| issue 26 31 OUILT
The needle position to the left of the center position
Using the Exclusive Sewing Advisor to set the stitch length
Selecting the SEAM technique in the Exclusive Sewing Advisor
The needle is in the center position with the Adjustable ¼" Piecing Foot.
The needle is to the right of the center position.
The needle position on the screen
Using a stiletto to tame the seam allowances
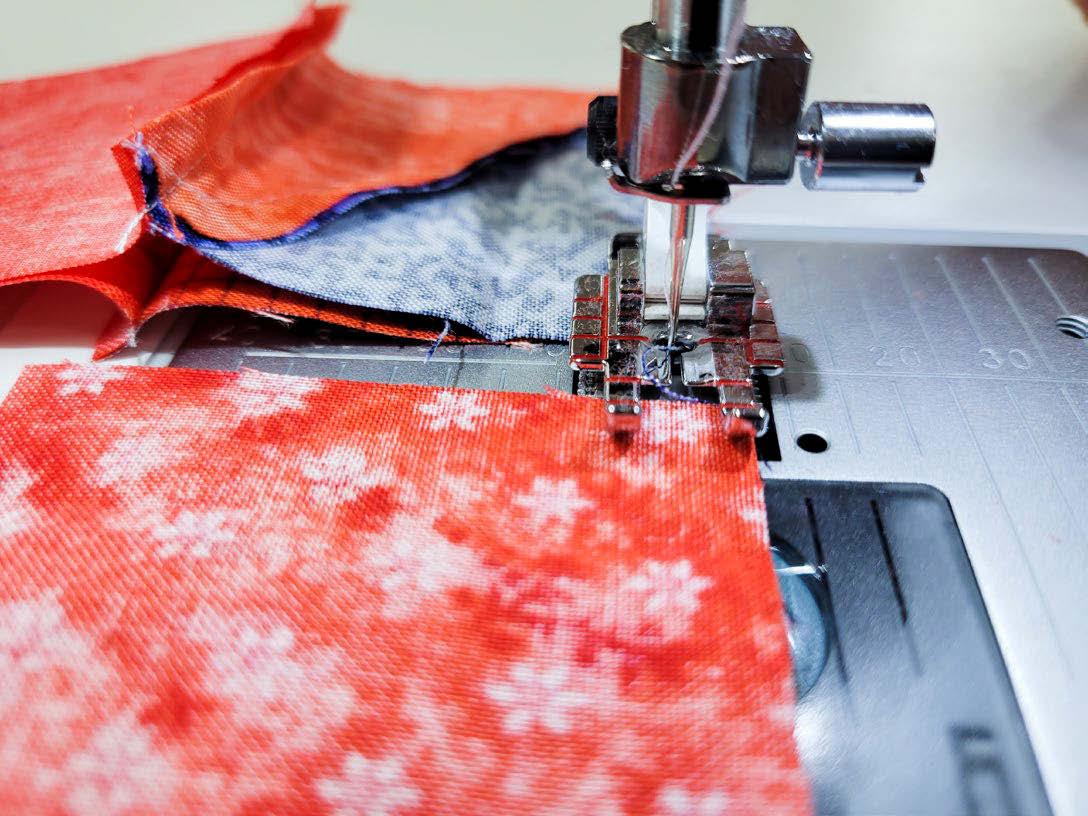
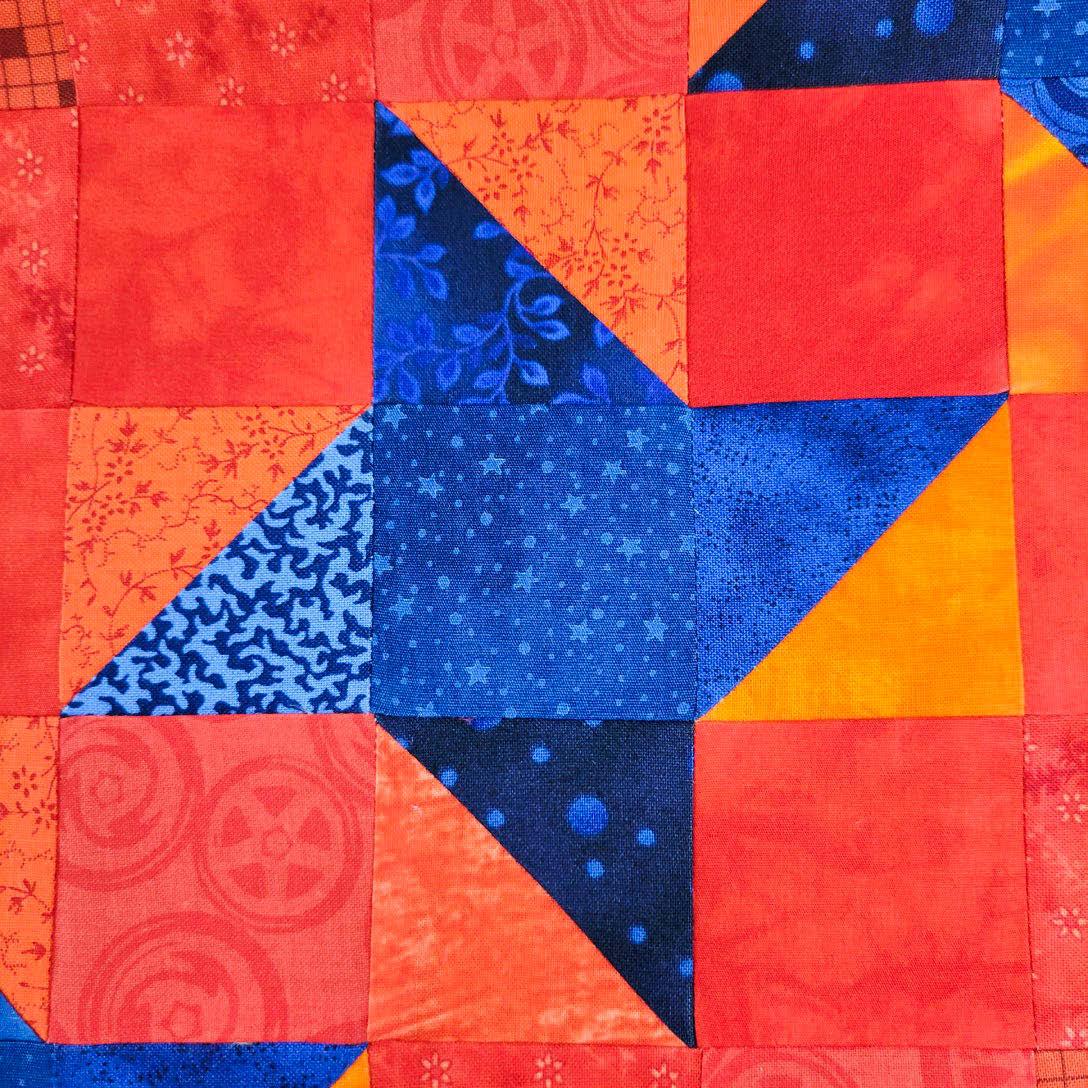
The seams were accurate, and the points matched up nicely! The Tribute 150C had no problem sewing through the bulk of those half-square triangles, which can be tricky. Make sure you use a new, sharp needle to prevent issues with the sewing machine hanging up on those thick, bulky points. I like the Microtex needles for their sharp point. Make sure to slow down, and sometimes, you may need to give the fabric a wee tug on the back. But the feed teeth should do most of the work.
I thought I’d better sew a block to ensure it was the size it was supposed to be. And this block was right on for the size.

What can I say – the Husqvarna Viking Tribute 150C performed very well on the piecing side! I could very easily sew on this machine at a retreat.
If you're looking for an excellent small second machine or something for a new sewist – I strongly suggest you look at this sewing machine.
Accurate piecing with the Adjustable ¼" Piecing Foot
When chain piecing, raise the presser foot slightly before inserting the next seam. The presser foot lever is easy to reach behind the head of the sewing machine, and it takes mere milliseconds to raise the foot, to prevent the seam's top piece from shifting.
Raise the presser foot slightly when chain piecing.
32 | issue 26 OUILT
An accurately pieced block
Raw edge and invisible machine appliqueTips for success!
I’m looking at how the Tribute 150C performs with machine applique, and I have both raw edge and invisible applique to do.
Let’s check it out.
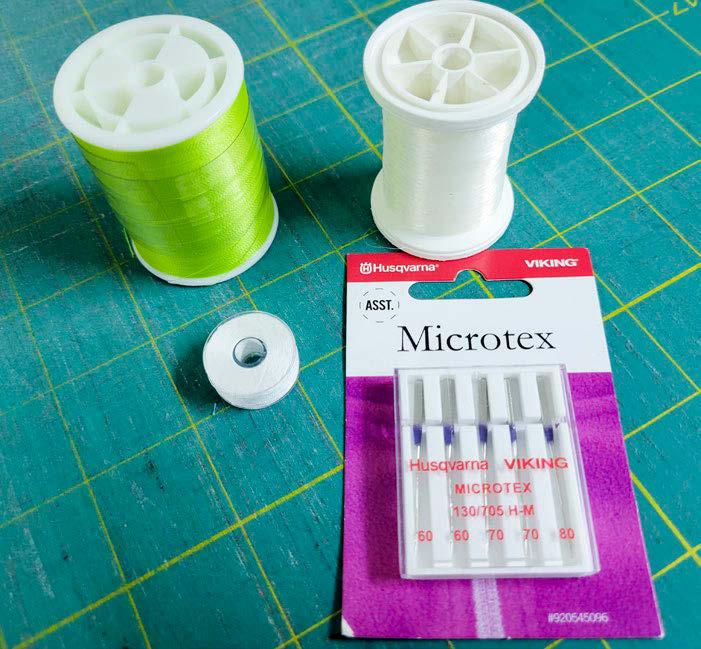
I’m starting with the invisible machine applique. Invisible applique means I don’t want the stitching to show, and seam allowances are added to each shape and turned under the applique. Here are the supplies I need. I can use an invisible thread or a thin (60 – 80wt) thread that matches the applique shape, and I like to use a size 60/8 needle when using thin threads. In the bobbin, I use a bobbin weight thread. You can buy prewound bobbins or wind your own.
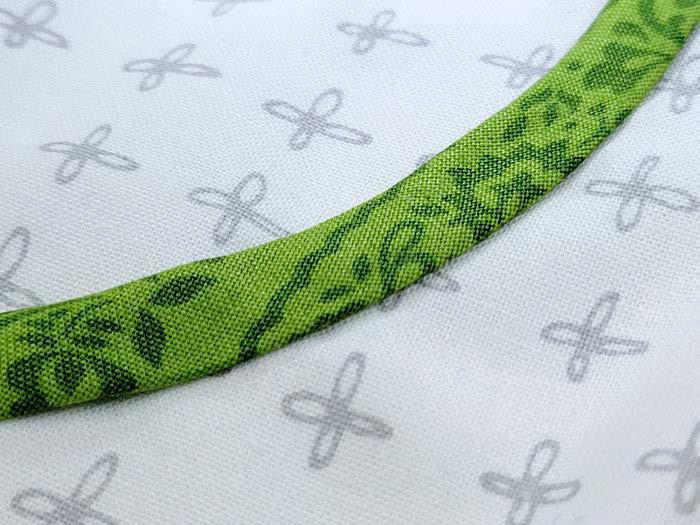
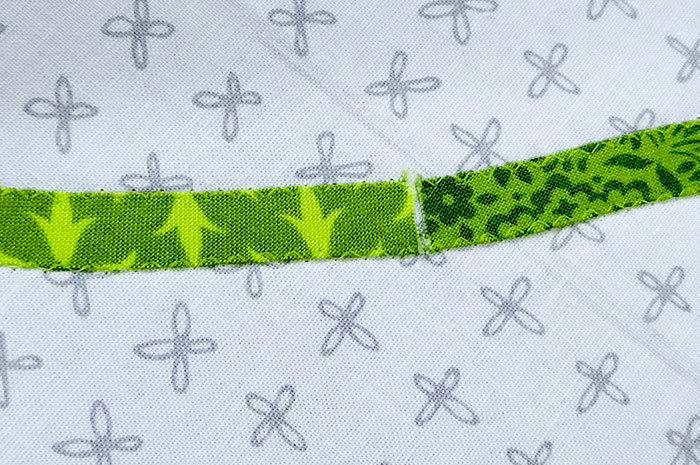
I always add seam allowances to my invisible machine applique and use various methods to turn those seams to the back of the applique. In this instance, I used a bias tape maker to turn the edges under and glued the bias to the background.
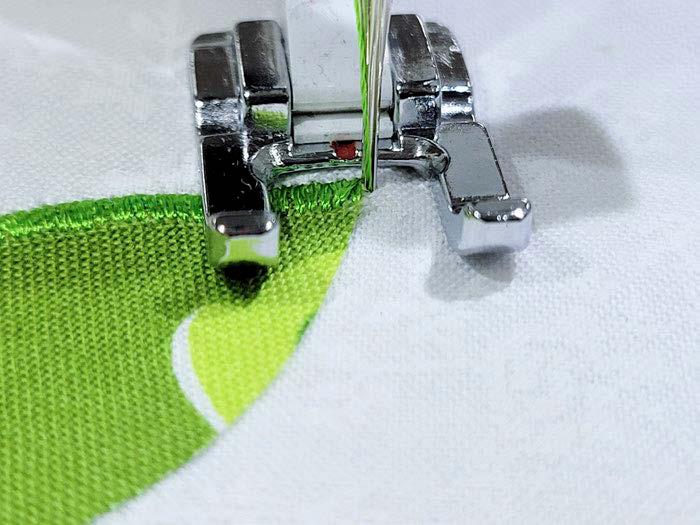
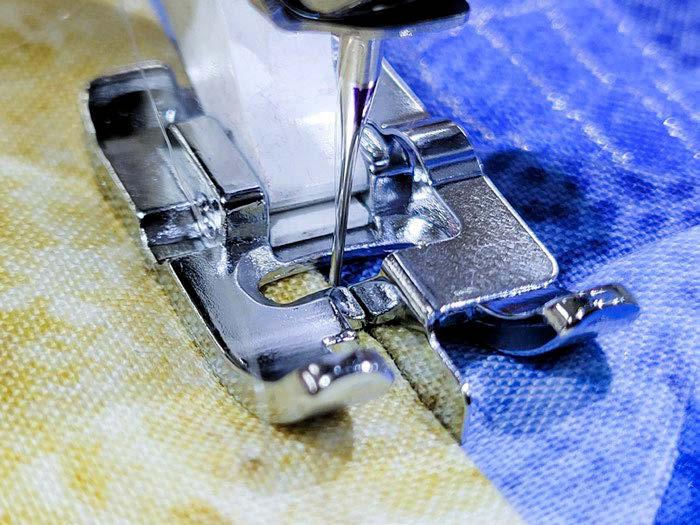
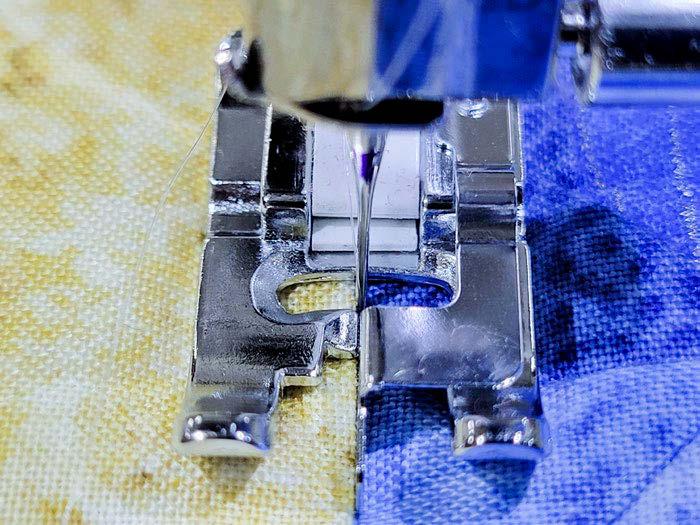
Thread the sewing machine, and we are ready to go. Wait! We need to choose the correct presser foot. While the Exclusive Sewing Advisor recommends the Utility Foot A, there’s a bar at the front of the foot that blocks my view of the points and indents which commonly occurs with applique.
Remember the box of five bonus feet? One of them is the Open Toe Applique foot. I won’t do applique without it!
Depending on the thread you use, watch if there are notches at the ends of the spool. If so, ensure the notch doesn’t interfere with the thread coming off the spool, which can cause the thread to catch and break a needle. In this photo, you can see the notch on the right-hand side about mid-way up the spool.
I used the thread in a horizontal position for all the applique and chose the appropriately sized spool cap. You want the spool cap to match the end of the spool of thread to allow the thread to pull off the spool smoothly.
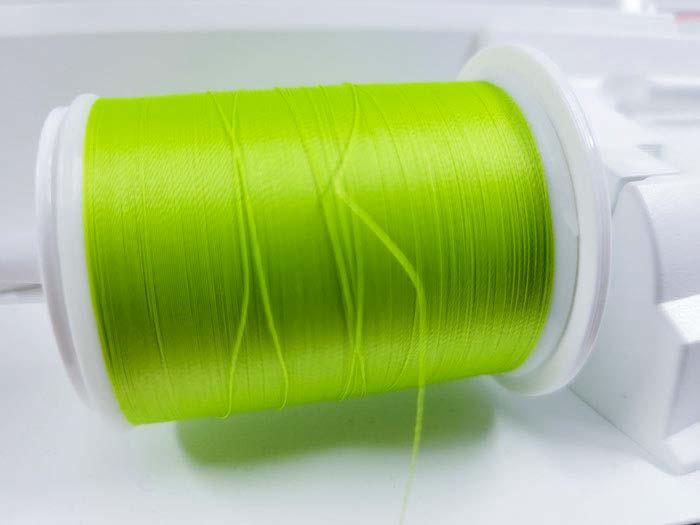
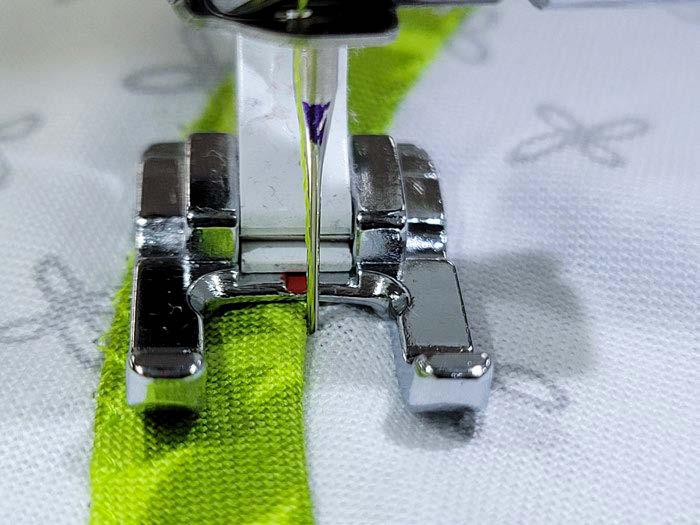
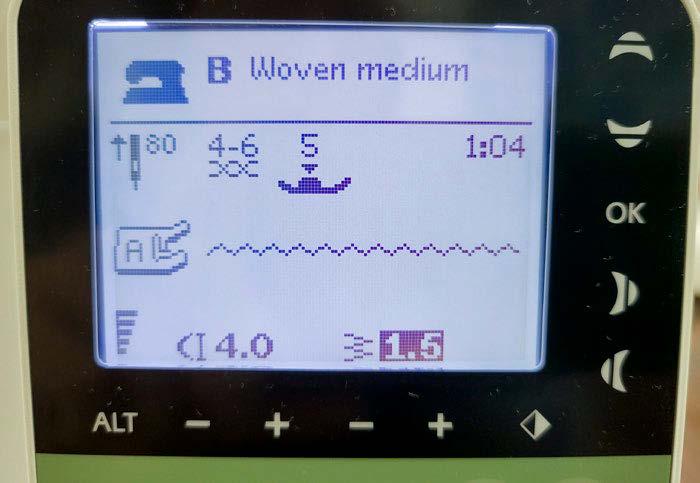
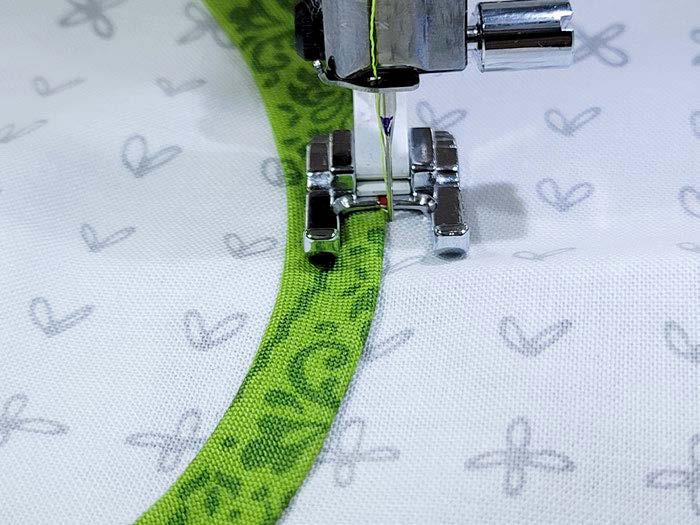
You can choose any stitch for the invisible applique, but I find a zigzag is the best. And my preferred settings are a stitch length of 4.0 and a stitch width of 1.5 wide. I want to use a narrower stitch width, but I’m not sure my eyes can handle the narrower width! If you can –go for it!
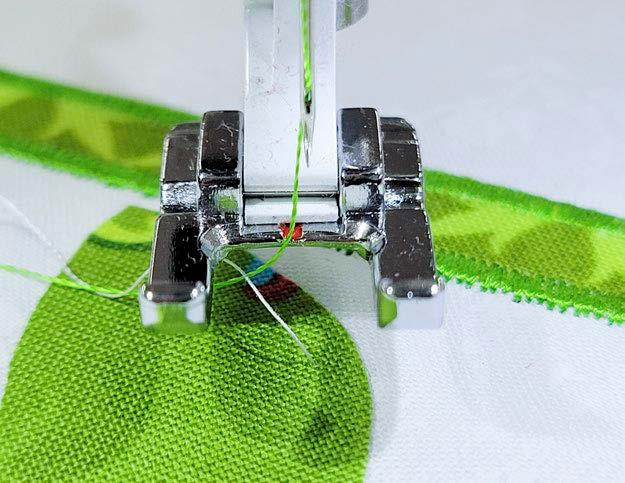
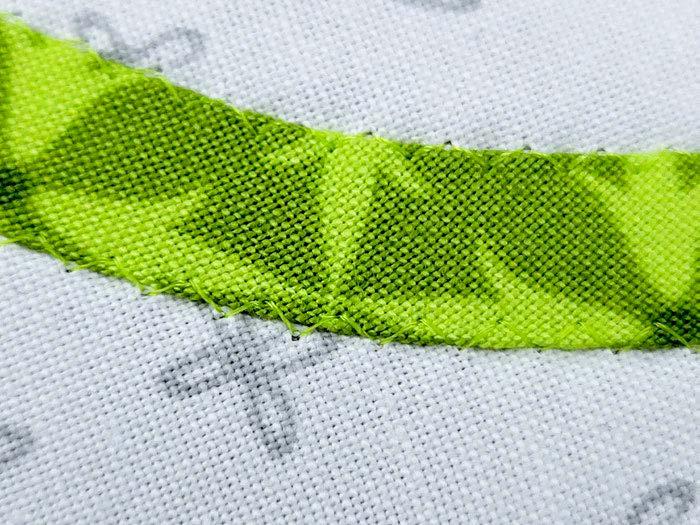
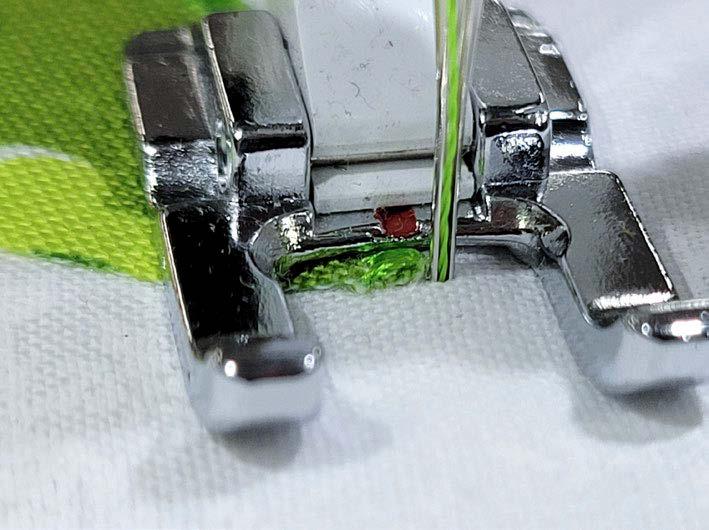
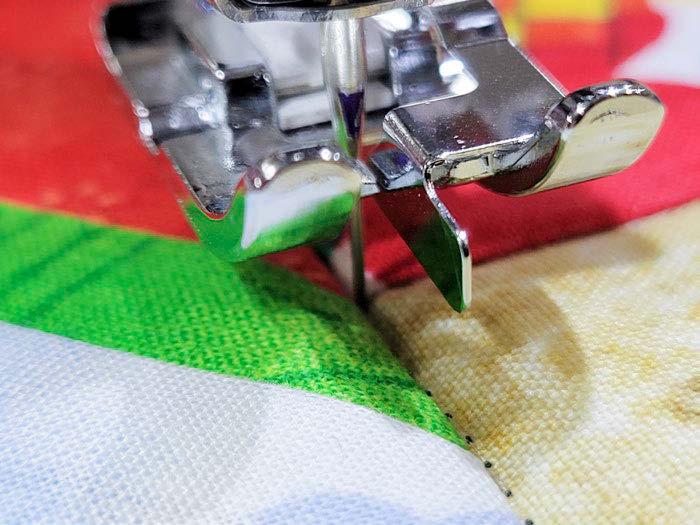
The needle swings left and right as it creates the zigzag stitch. Your job is to keep 99% of the stitch on the applique shape, in this case, the green. However, when the needle swings to the right, you want it to fall directly onto the background, just skimming the edge of the applique. This technique ensures that the edge of the applique is completely secured. You’ll end up with a small flap along the edge if you don’t stitch into the background.
Another thing to keep in mind is that you must pivot as you go around curves. In this case, you can see the fabric getting a bit bumpy on the right-hand side. I must lift the presser foot slightly to release the build-up and continue. Because the presser foot lever is handy right behind the needle, this is easy to do.
| issue 26 33 OUILT
Supplies for invisible machine applique
Position the spool so the notch doesn’t interfere with the thread.
A bias strip glued to the background
The settings for the zigzag stitch for invisible machine applique
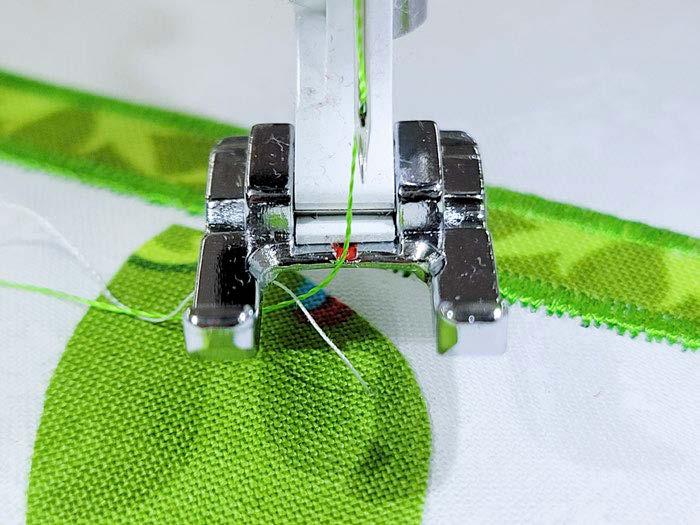
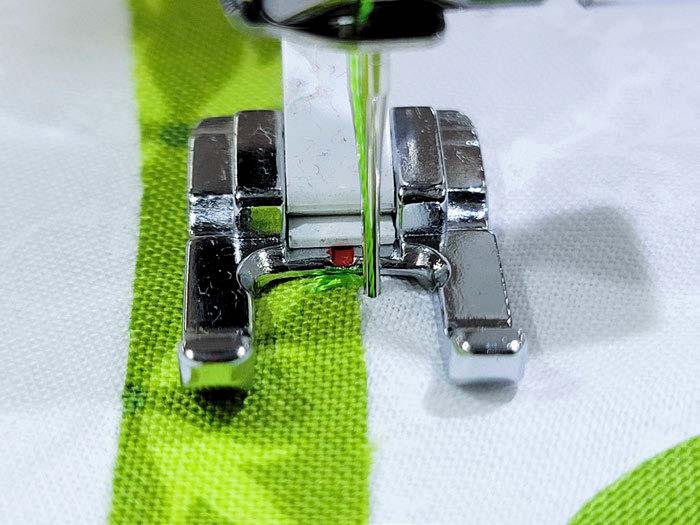
The Open Toe Applique Foot
Ensure the presser foot is always down when stitching. If you attempt to sew and the presser foot is up, you’ll get a pop-up message on the screen.

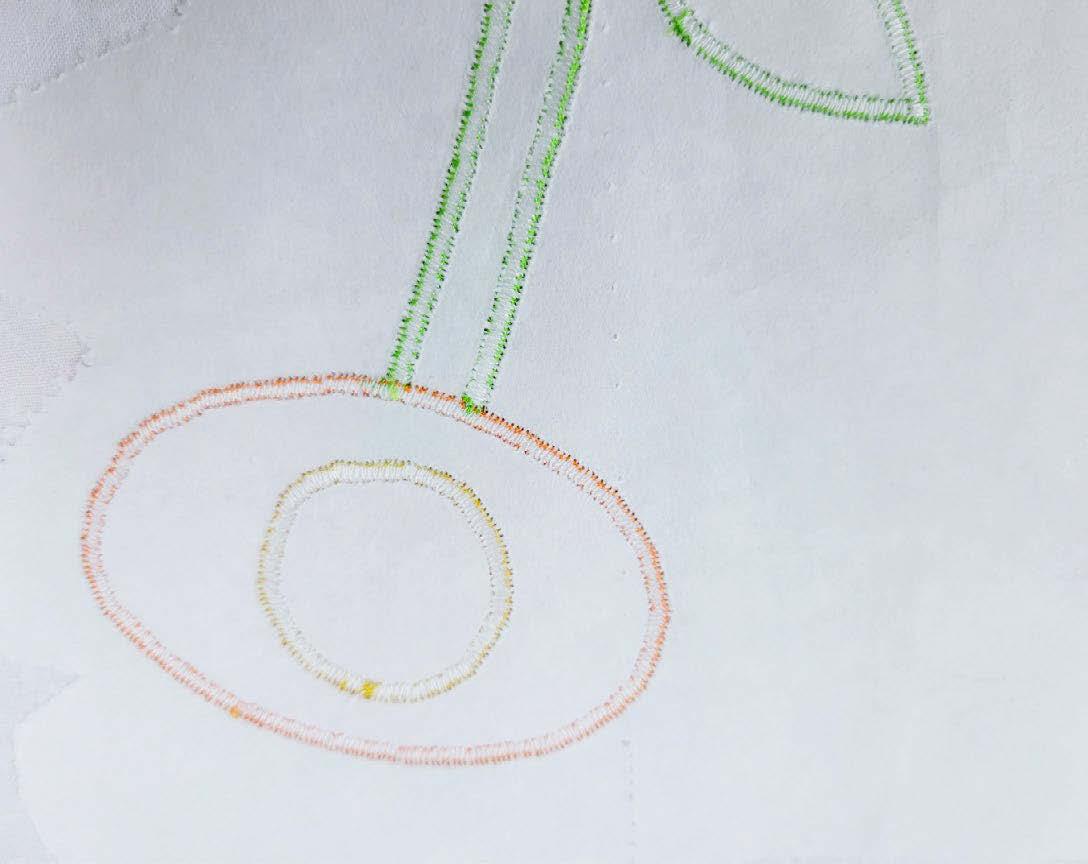
It’s not always easy to match the thread colors, so I go for the best match I can with the thread colors I have on hand. I’m thrilled with the results! There’s a gap between the two stems as a flower will go there, and the stitches are not as visible in real life.
Am I happy enough with the results to do an actual applique project with the Tribute 150C? Hey - that was a real applique project that needed to be sewn, and I’m thrilled with the results.
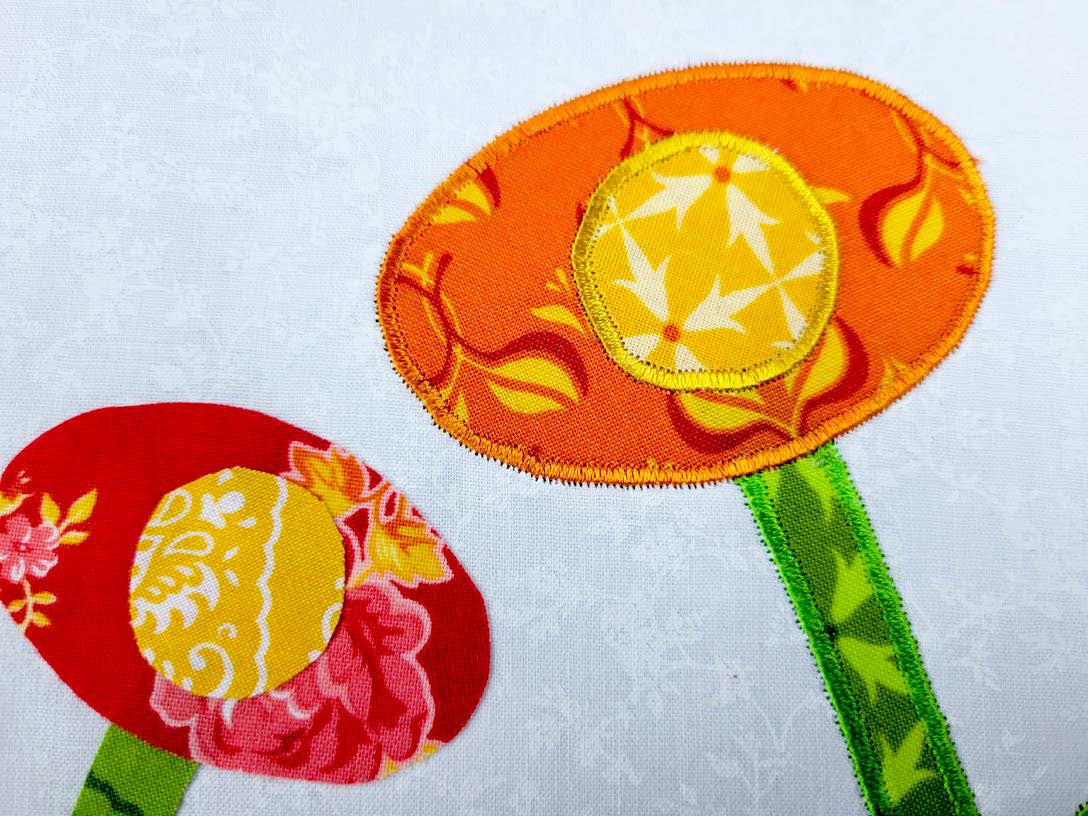
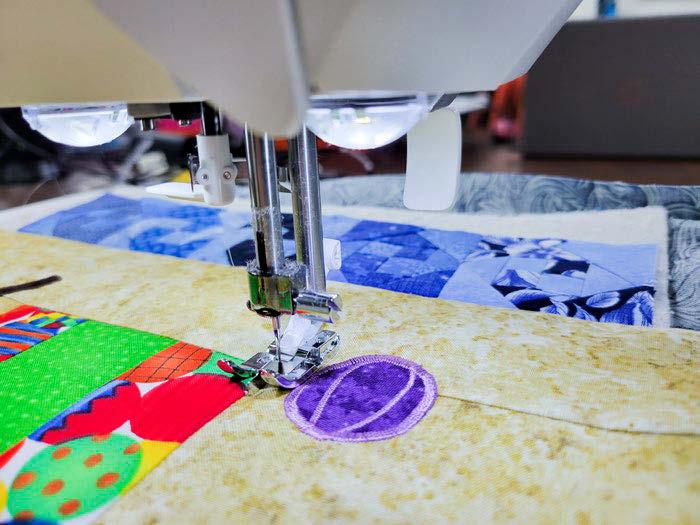
Now, I also have some raw edge applique to finish off. This technique is where I use a fusible product to fuse the applique shapes onto the background. I’m not a fan of the raw edges, so I like to stitch over them using either a satin stitch or a blanket stitch. Here, I’m using the satin stitch.
There are three preset widths of satin stitch on the Tribute 510C. Pick the one closest to the stitch width you want and adjust accordingly.
Don’t forget to pivot around those curves and corners. Pivoting eliminates puckering, and while you don’t need to pivot often, you need to pivot! Always pivot with the needle in the fabric on the fullest side of the curve. In this instance, that’s the outside edge. The pivot is like driving a car – it’s not an aggressive movement, just a slight turn of the fabric is enough.
Here’s what it looks like on the back. OK! The Tribute 150C did a fantastic job! The quality of the stitches is impressive, and I didn’t change any settings, not even the tension. The only thing I adjusted was the width and length of the stitch, which you can play around with to find a length and width that you like. If you want the zigzag to show, you may pick a thicker thread and the appropriate needle to go with it.
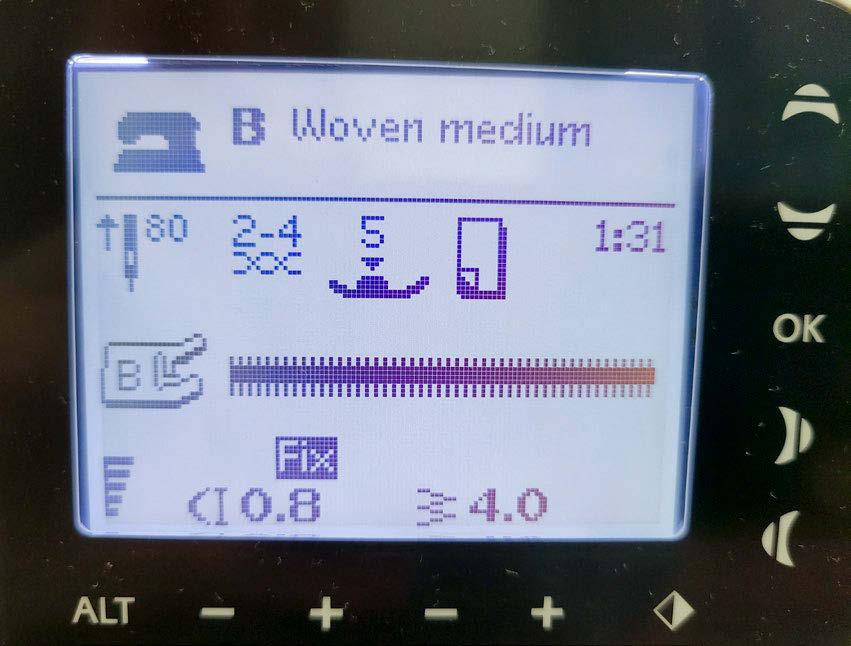
I chose stitch 1:31, the middle stitch with a default width of 4MM. You should play around with widths and stitch them out to know exactly how wide 4MM is. I’ll often change the width within the same project depending on the size of the applique shape.
As I’m now working with a satin stitch, I can use the stitch length to adjust the density. The default is 0.8, but if I want a denser line of stitching, I can reduce that setting. You don’t want to go too dense, which can cause the stitches to jam.
Here’s what it looks like when finished. See how the zigzag stitch sits mostly on the applique fabric while one side of it falls directly into the background.
34 | issue 26 OUILT
Pivot on the fullest side of the curve.
The zigzag stitch used for invisible machine applique
A light green thread stitched on two different colors of green fabric
The wrong side of the invisible machine applique
Three preset widths of satin stitch on the Husqvarna Viking Tribute 150C
The settings for a satin stitch on the Husqvarna Viking Tribute 150C
The needle is in the left position of the zigzag stitch
A pop-up message
This time, I’m using a thicker thread, and my favorite is the 40-weight threads used for machine embroidery. I still use the bobbin-weight thread in the bobbin, and I’ll use a larger needle – the 80/12 works great. Because this stitch is denser, I need an Inspira Tear-A-Way stabilizer on the back of the work to prevent puckering.
I like to pull my bobbin thread to the top so it doesn’t make a mess on the back or create loops on the top. I use the Needle Stop Up/Down to make this happen easily.
Pivoting at the point of a petal
Then pivot again, so the next stitch goes back onto the already stitched line of satin stitching and repeats when you get to the other end of the petal.
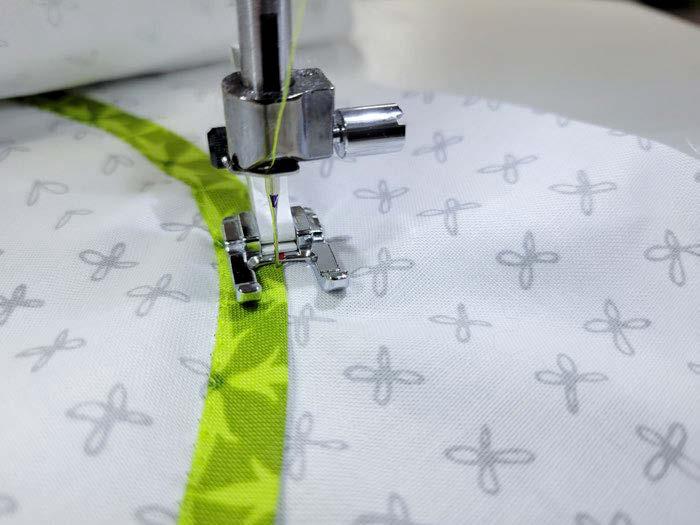
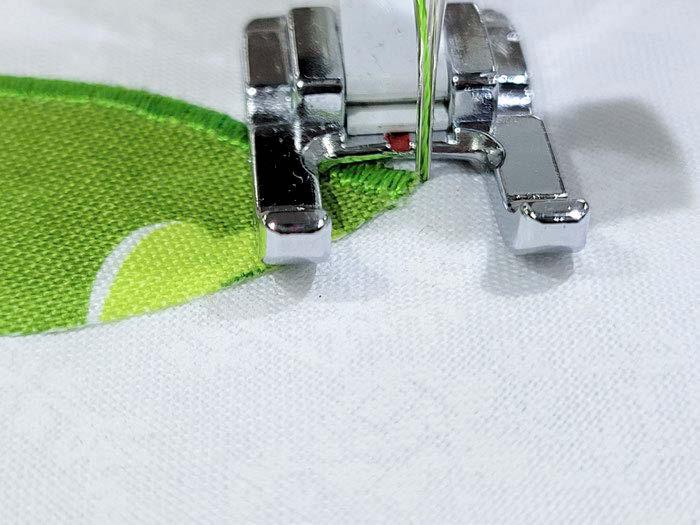
And yes – you guessed it – I’m using the Open Toe Applique foot again. Like we did for the invisible applique, you want to keep 99% of the applique stitch on the applique shape (the green), and when the needle swings to the right, it should skim the edge of the applique shape and go into the background. This technique ensures the edge of the applique shape is inside the satin stitching.
It was so easy to do the straight lines of the stems, but when I came to the leaves, I had to go around some sharp points. However, it’s super easy when you know this little trick.
Again, you’ll likely need to pivot on the curved sides of the petal, just like we did for the invisible machine applique. When you arrive at the point, stop with the needle at the outer point of the petal.
And there you have it – a great example of satin stitching that took so little time, yet the result is impressive. Am I impressed with the satin stitch of the Tribute 150C? You bet! Would I use this to do an actual project of my own? Guess what? This is an actual project I’m working on, and I’m thrilled with the results.
Lift the presser foot and pivot so the next satin stitch goes down the center of the petal. Remember – you are always pivoting on the outermost part of the applique shape. Take one stitch.

| issue 26 35 OUILT
The supplies for raw edge (satin stitch) applique
The needle skims into the background on the outside of the applique shape.
Pulling up the bobbin thread is easy with the Needle Stop Up/Down.
Stop with the needle at the outer point of the petal.
One more pivot to go around the point
The completed satin stitch
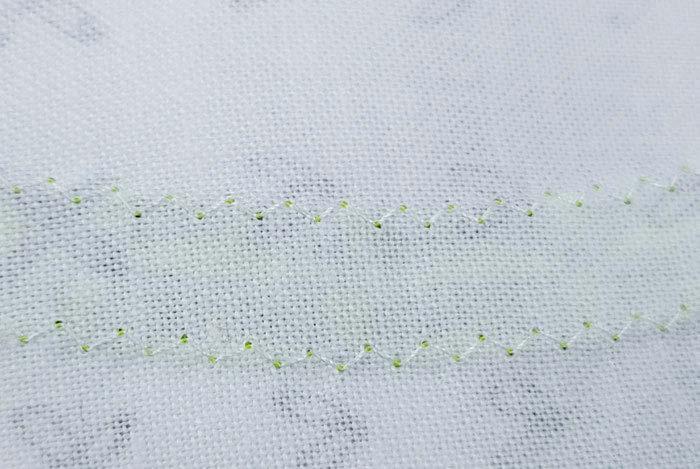
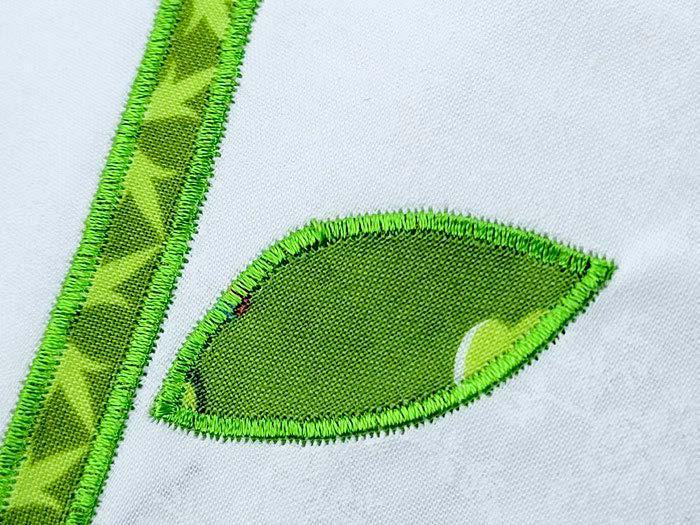
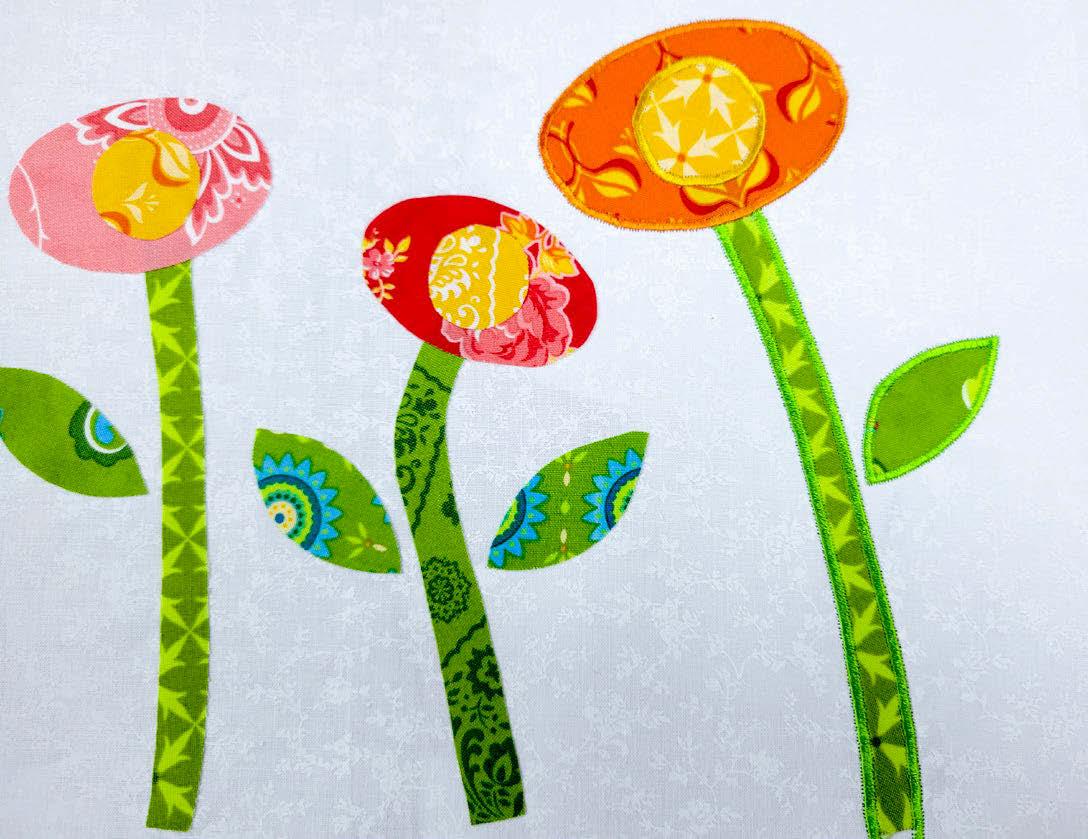
Here’s what the satin-stitched flower looks like next to one with no stitching. I love the look of the finished edge! I love that it doesn’t take much time to do this. I used to buy a lot of fabric, but now I buy a lot of thread. I could have used a contrasting thread color or a matching one – there’s no right or wrong, only what you prefer.
And here’s a tip if you’re doing sharp curves or smaller circles. You’ll have to pivot, but this time, you must pivot more frequently. Again – always pivot on the outer side of the applique shape. The more you pivot, the smoother the lines will be.
And this is the back before I tear the stabilizer away. You’ll see that the top thread appears around the satin stitch’s edges and is supposed to look that way. You don’t want the bobbin thread to show on the front. After I tear the stabilizer away and give it a good press, the block will be ready to be stitched into the quilt.
So, are you impressed? Imagine being a new sewist and getting those excellent results right from the start. I’d be so happy that I’d want to continue sewing. If my results were not so great, I’d be discouraged! And even better, I didn’t have to adjust the tension for either of those techniques, even though I used different thread weights in the top and bobbin! I just threaded the machine with the appropriate thread and matching needle size, and away I went.
Yep – I’d be thrilled to use the Husqvarna Viking Tribute 150C as my second machine for retreats and classes because I know I’ll get excellent results!
36 | issue 26 OUILT
A satin stitched flower on the right and two unstitched flowers on the left
Smooth lines of satin stitching around the flower shapes
The back of the satin stitching
Quilting with the Husqvarna Viking Tribute 150C: How to get great results!
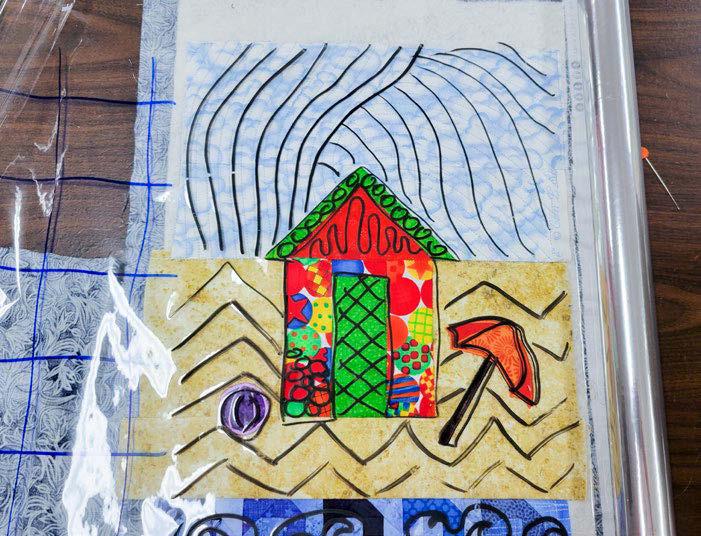
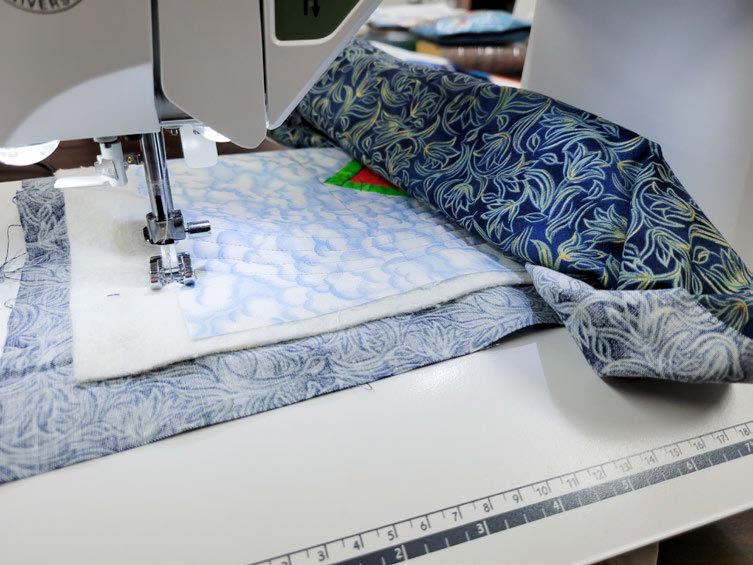
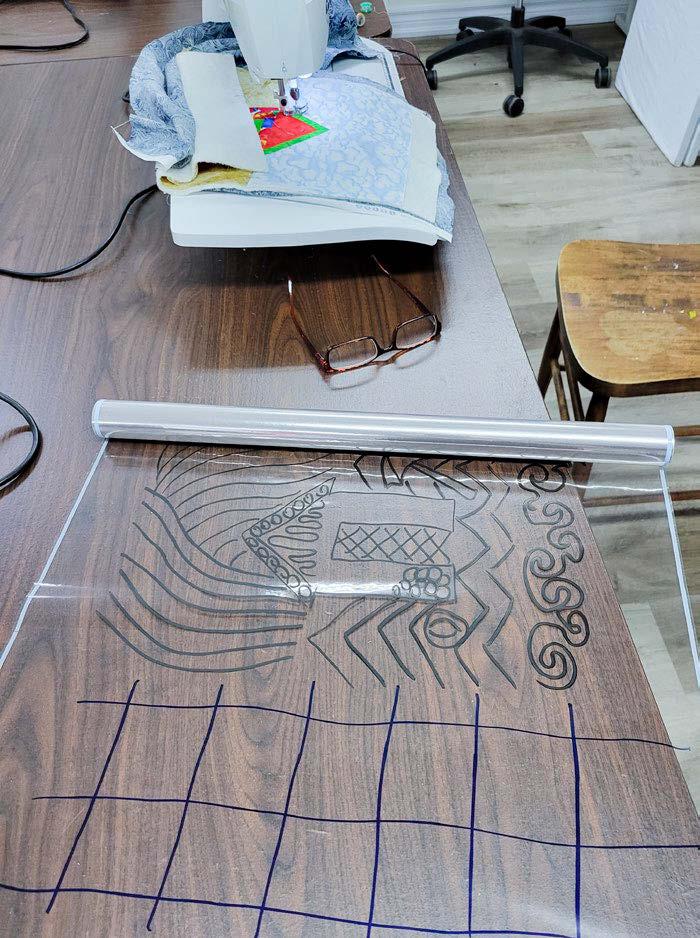
The piece I'm quilting is small, which is always a good place to practice and try new things. How large of a quilt can you comfortably fit in the throat space? How comfortable are you with maneuvering a large quilt around, and how much space do you have around the sewing machine? Are you going to free-motion quilt or do some straight lines?
I started by placing a layer of clear cellophane over my quilt and used a marker to play with potential quilting motifs.
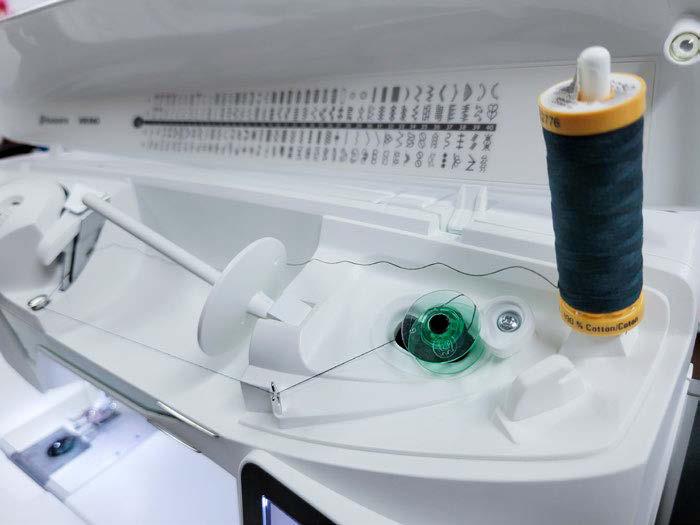
I found a busy fabric for the back, and I like to use the same color thread on the back as the backing. The first step is to wind a bobbin. Once you engage the bobbin winder, you get a pop-up message on the screen. I love the popup messages.

I used the second spool pin on the Tribute 150C to place the thread for the bobbin winding. You can use the spool pins to hold the thread, or if you're using a metal foot, you can wind the bobbin from the needle thread. But you must be using a metal presser foot, and the thread has to go underneath the presser foot. There's more on that in the User's Guide.
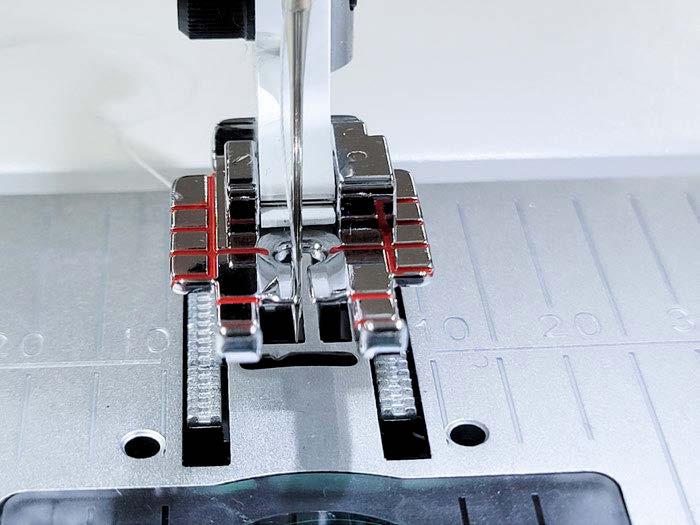
I wanted to start with stitch in the ditch around all the main pieces, partially because I wanted to try the Edge Joining Foot that comes in the bonus box. I can use the Interchangeable Dual Feed foot, but the wall hanging is so small that it won't shift The. Edge Joining presser foot has a guide in the center so you can adjust the needle position to the left or right to get it exactly where you want it. With this foot, doing stitch in the ditch is a dream!
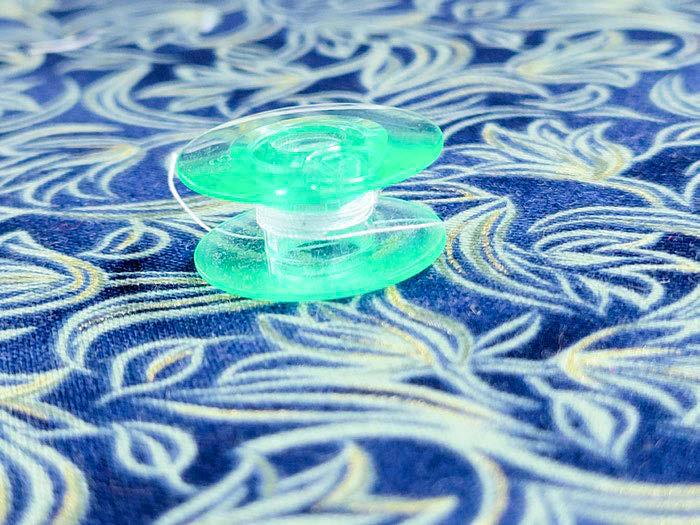
Here's a tip. If you have a partially filled bobbin or an almost empty one, don’t wind more thread onto it. Use it for hand stitching, empty the bobbin with another sewing project (like practicing free-motion quilting) or toss the thread. If you wind more thread onto the existing thread, the sewing machine can pick up the thread when it reaches the end, making a mess on the bottom of your project. I learned that the hard way!
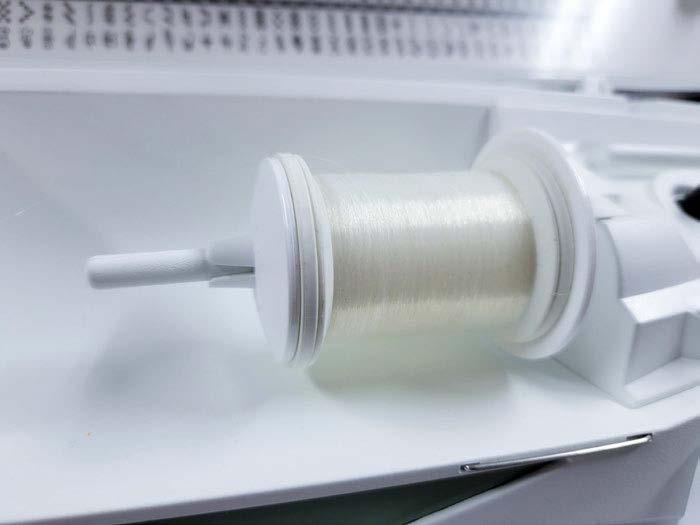
We've got a full bobbin and the quilting designs; it's time to pick the top thread. I'm doing some stitch in the ditch, as I don't want the quilting to show. I chose to use invisible thread and a size 60/8 needle. Be sure to use a good quality invisible thread as there are some that are not so good, such as ones that are too thick and wiry. You want the thin ones.
| issue 26 37 OUILT
Cellophane used to audition quilting motifs
The Edge Joining Foot
The bobbin winder is engaged
An almost empty bobbin – toss the thread
Winding a bobbin
Invisible thread on the sewing machine
It's essential to change the top tension when working with invisible thread. I have a regular 50-weight piecing thread in the bobbin. The invisible thread wants to stitch tight, which can cause puckering and unsightly stitches on the back. The typical tension setting is 5.
As I mentioned above, ensure the needle is right behind the flange, which is usually in the center position of the Edge Joining Foot. Then guide the presser foot along the seam, so you’re stitching on the low side of the seam. The low side is where the seam allowance is not as it was pressed to the other side. Here's another important note, you should not stitch in the ditch if you pressed the seams open, as you are only stitching the piecing threads to the batting, not the fabric.
The presser foot lever is right behind the needle, so giving it a quick lift to pivot is convenient.
Here are the default settings for the straight stitch (1:01). Remember, we can override those recommendations, as they are only a guide. The recommended tension is between 4 and 6.
Be sure to bring up the bobbin thread as it’s standard practice and prevents a mess on the wrong side of the project! Use the Needle Stop Up/Down.
Here, I've lifted the presser foot to verify the needle position in the corner and will put it back down after I've pivoted to continue stitching.
I loosened the top tension to 3, and I had zero issues.
The bar and the guide do not block the view, so it's easy to see where the needle is so you can pivot on the corners.
Sometimes, the needle doesn't want to come down in the exact spot I want. It's easy to manipulate the fabric – either by giving a gentle tug toward or away from me, to make the needle fall in the right spot. Who will know I did that?
Manipulate the fabric, so the needle falls in the correct spot.
38 | issue 26 OUILT
The default settings for the straight stitch
The top tension loosened to three
Using the Edge Joining Foot to do stitch in the ditch
Bring up the bobbin thread
Use the Needle STOP Up/Down to pivot on the corner.
Lift the presser foot lever to make it easy to pivot around the corners.
The presser foot is in the UP position
The typical tension of 5
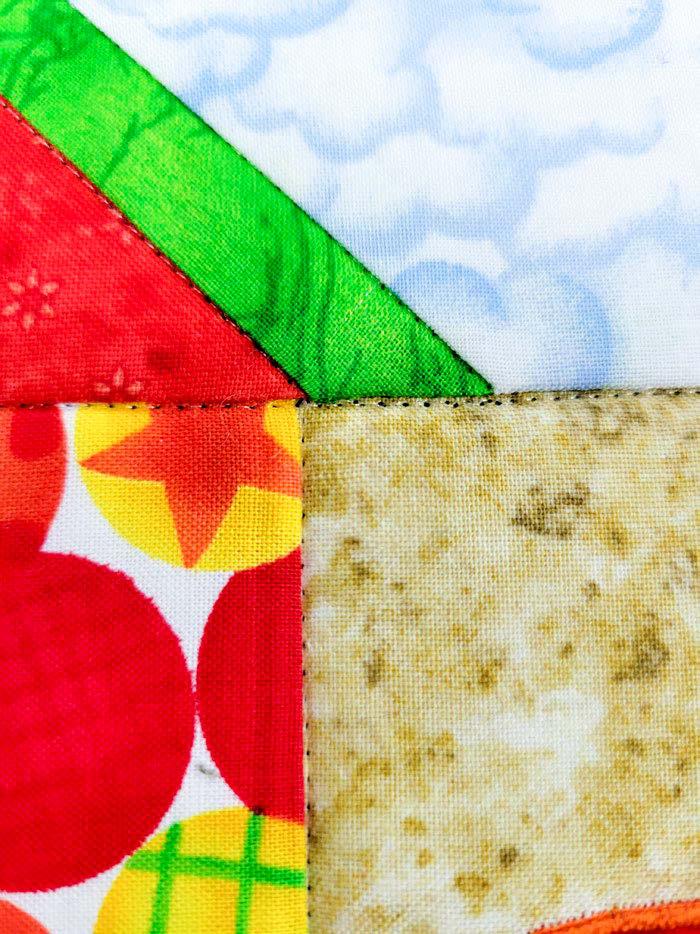
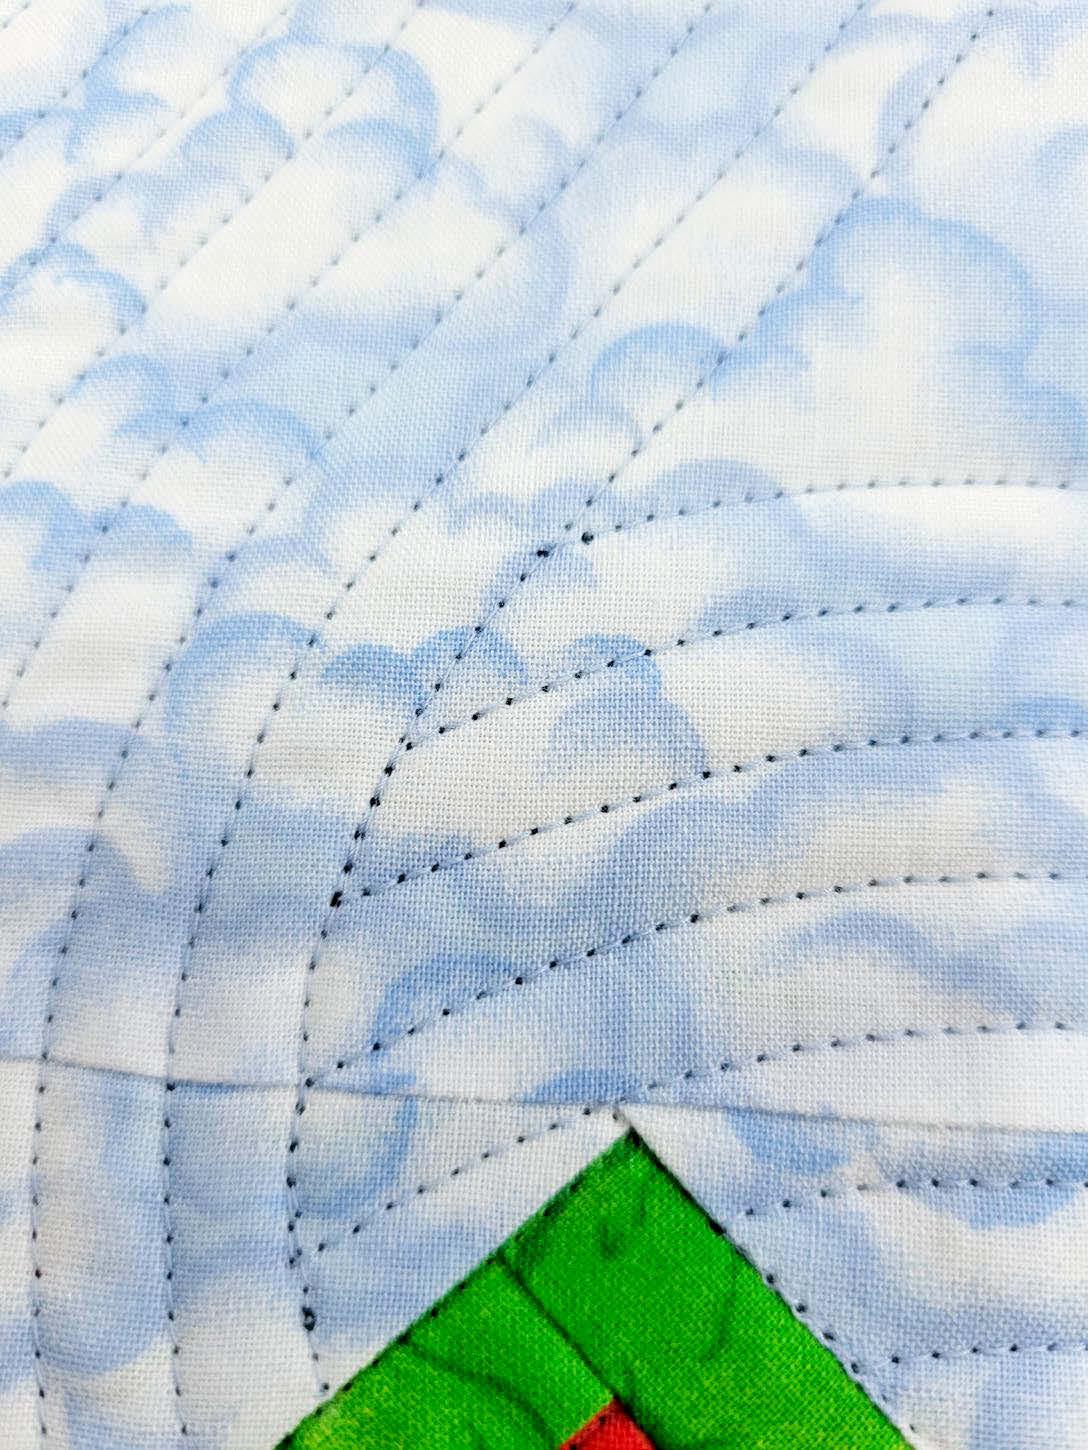
Here's what it looks like after I finished the stitch in the ditch. In some instances, I was right in the ditch of the seam allowance, and along the horizontal seam, my mind wandered because I could’ve stitched a bit closer. That's why we use invisible thread (or an 80-weight bobbin thread), so the stitches don't show. Don't forget I'm showing you a magnification of the real thing; it doesn't show so much in person.
Stitch in the ditch quilting
Look at the back of the project, where the tension is perfect. I don't see any invisible thread on the back, and the stitches are nice and even. It's so amazing to work on a sewing machine like the Tribute 150C that doesn't require any fussing to get it working properly. Imagine if I struggled with the invisible thread – I would likely never use it again. But I had zero issues!

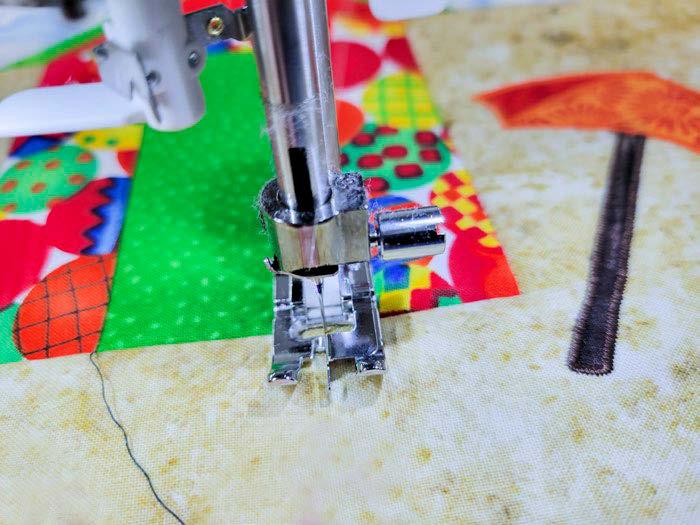
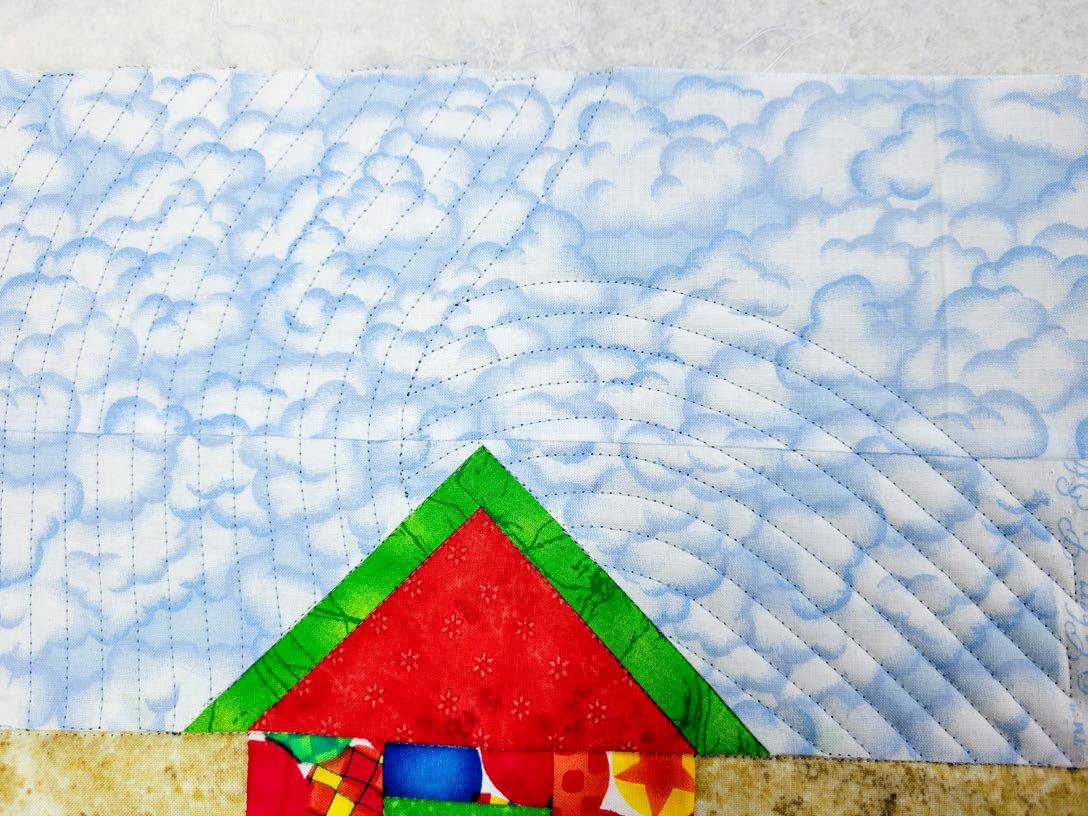
Now it was time to start with the quilting that shows. I used the same bobbin thread and chose a light-colored thread to match the sky. I could’ve used the optional Interchangeable Dual Feed Foot, but my piece is so tiny that I used the Utility Foot A. I looked at my quilting pattern on the cellophane and drew in one reference mark with chalk.
Then I started stitching. I used the width of the foot as a guide, so I only had to mark the initial line of stitching. I traveled along the seam line at the roof and along the outer edge of the quilt.
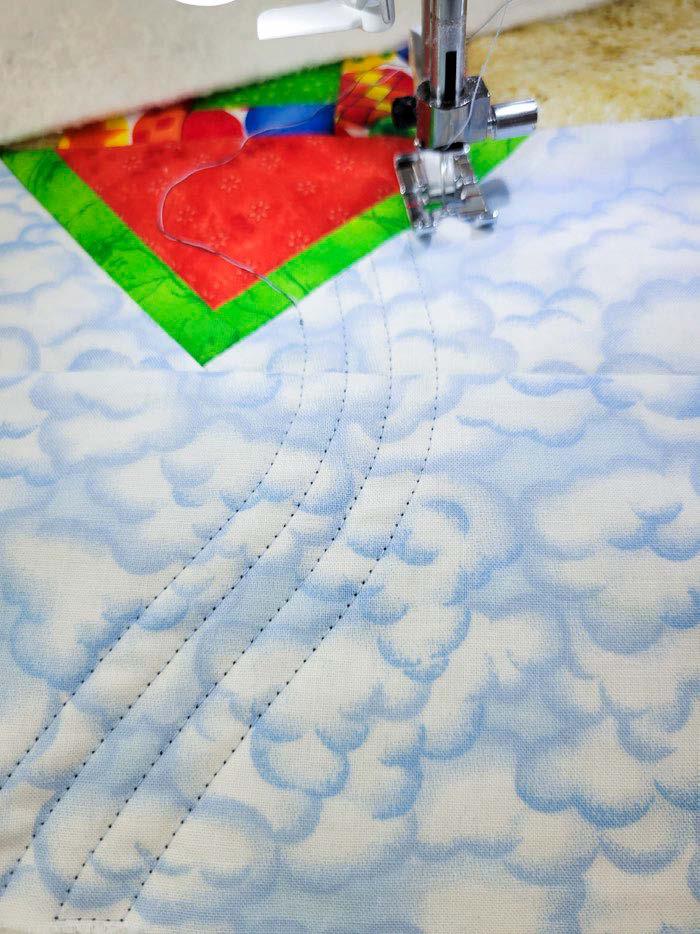
I kept the cellophane quilt map by the sewing machine to help me choose which section to quilt next.
There was a lot of rotating when I quilted the sky, which would be very cumbersome with a larger quilt. So, as you choose your design, think about how you can stitch it with few or no rotations, or if you're working on a small piece like this, it doesn't matter. The excess was rolled up in the throat space, even on this small piece.
| issue 26 39 OUILT
The back of the quilt project
Curved lines of quilting using the Utility Foot A
Using the cellophane quilt map when quilting
There's lots of room under the arm of the sewing machine.
Here's what the sky looks like when almost completed. I love it! It looks so whimsical, and I didn't drop the feed teeth! Get out the cellophane, look at other quilts and try to find something you can do!!
When I got to the center line on the second part, I traveled along the line of stitches instead of starting a new row. That's way faster, and if you're accurate enough, you'll be stitching right in the holes made by the first stitches. Unfortunately, I ran out of time to complete the quilting on the project, but I have many different styles of free-motion quilting feet that I can also use on the Tribute 150C. If I get a chance to work on this fantastic sewing machine again, I'll show you what I did.
But seriously --- how can you go wrong with this impressive sewing machine? I used the Husqvarna Viking Tribute 150C instead of my larger machine, and I did it all! I will admit, there are a few more conveniences and more room on the larger machine, but if I were learning to sew, not sure how much I'll do, or wanted a second machine for quilt retreats, this one requires some serious investigation.
It's a super sewing machine. I'd be running to my Husqvarna Viking dealer. If you or someone you know is looking for a smaller sewing machine, check this one out!
I hope you enjoyed all the tips, and fun I had with the Husqvarna Viking Tribute 150C Ciao!
Elaine Theriault crazyquilteronabike.blogspot.com
40 | issue 26 OUILT
The quilting in the sky
Traveling from one line to the next
don't miss these projects & tutorials online! READ NOW
Introducing Gütermann thread boxes –Great for multi-colored projects
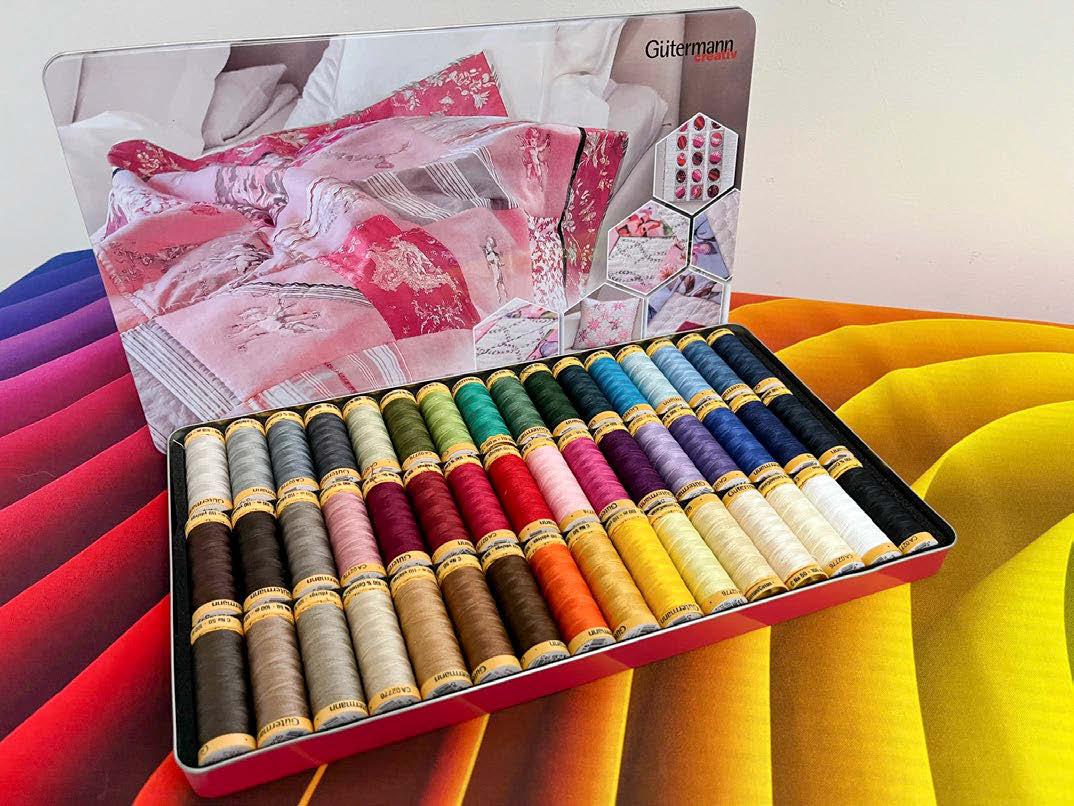
More features and benefits of the PFAFF powerquilter 1600 Get threaded!
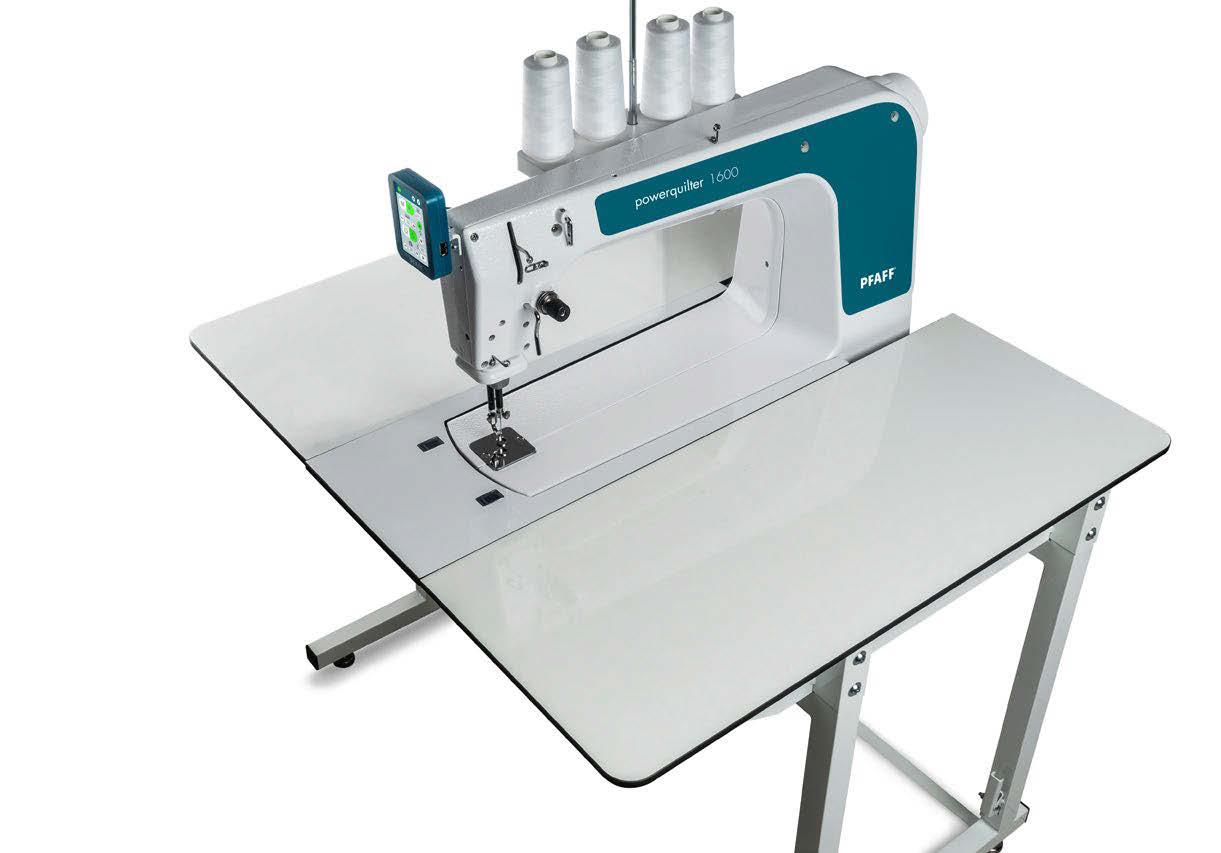
OLFA cutters cut through denim with ease
Make a denim quilt with Gütermann Denim Love Nostalgia Box
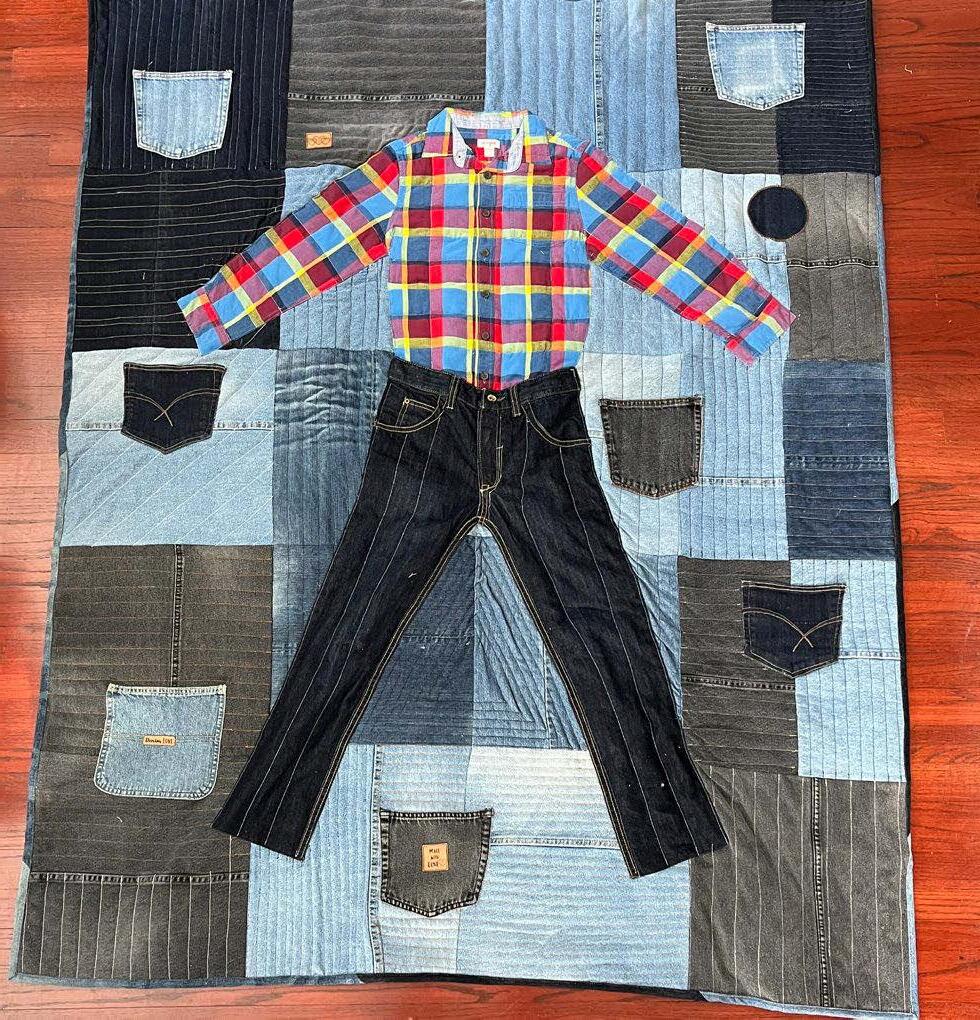
READ NOW
Using decorative stitches to create machine embroidery motifs HUSQVARNA VIKING DESIGNER EPIC 2
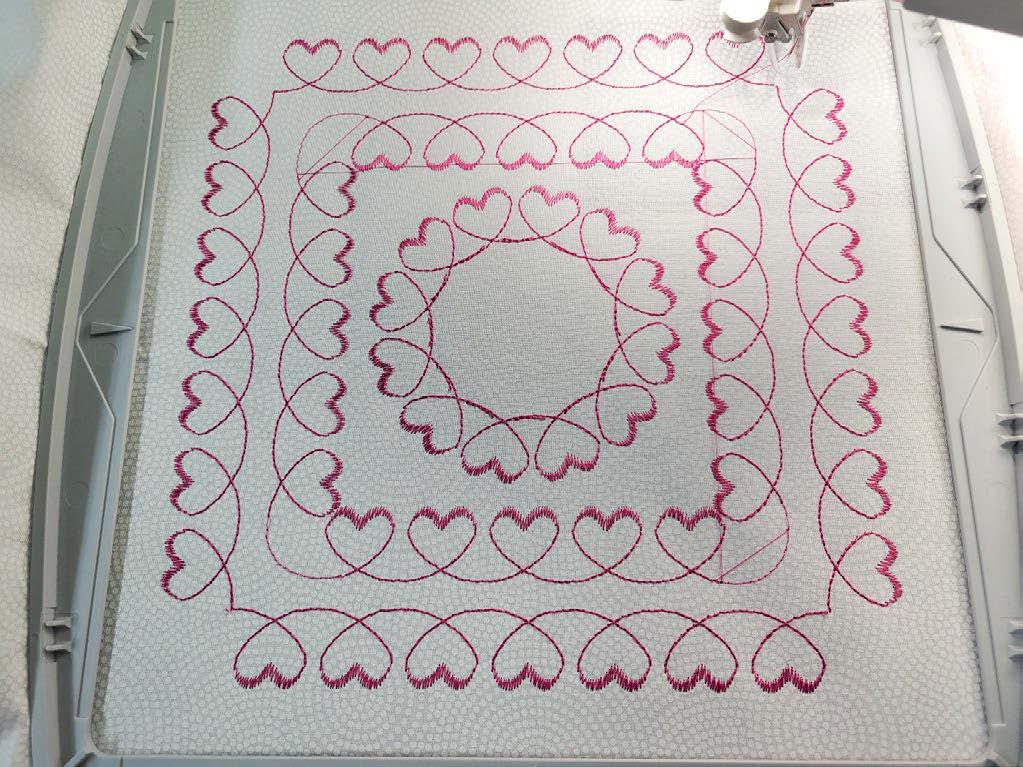
and there's so much more!
READ NOW
| issue 26 41 OUILT
NOW
READ
.com OUILT
DIRECTORY
CANADA
Brampton Sew & Serge
289 Rutherford Rd S, Unit 7, Brampton, ON L6W 3R9
905.874.1564 bramptonsewnserge.com
monique@bramptonsewnserge.com
Welcome to Your One Stop Sewing Centre! We are authorized dealers of Baby Lock, Husqvarna Viking, and Singer sewing machines and sergers. We also offer a full schedule of sewing classes for everyone.
Brandon Sewing Centre
821 Princess Ave, Brandon MB R7A 0P5, 204.727.2752
Bytowne Threads - Ottawa, ON
1.888.831.4095 bytownethreads.com
mlj@bytownethreads.com
Featuring Aurifil thread from Italy. Long staple Egyptian cotton threads - 270 colours in 12, 28, 40 and 50 wt; 88 colours in 80 wt. Polyester Aurilux - 240 high sheen colours. Wool threads - 192 colours. Many kits available. Check our website!
Canadian National Fabric - Brampton, ON
https://canadiannationalfabric.com/
info@canadiannationalfabric.com
We are an online fabric shoppe offering a wide variety of fabrics, patterns, books and notions for all your sewing needs. Flat rate Canada wide shipping of $10. Shop in person available by appointment!
Carellan Sewing Centre
1685 Corydon Ave, Winnipeg MB R3N 0J8 204.488.2272, facebook.com/CarellanSewingCentre
Country Concessions
35 King Street N, Cookstown, ON L0L 1L0 (new address) 705.458.4546, countryconcessions.com
Gitta's
271 Lakeshore Rd E, Mississauga, ON L5G 1G8
905.274.7198 g ittas.com
questions@gittas.com
Nestled in the east village of Port Credit, Gitta's is the place where stitchers meet with their stitching friends, shop for stitching supplies and see the new stitching designs from Europe and the United States.
Hardanger House, designs by Betty Stokoe Oldham
PO Box 1623, Penhold, AB T0M 1R0
403.573.2003 bettyoldham53@gmail.com
tnplisting.com/hardanger-house
Hardanger embroidery charts and kits. Designs feature contemporary adaptations of this traditional cutwork embroidery from Norway. Shop online at etsy.com/shop/ HardangerHouse. Some digital downloads available.
Haus of Stitches
626 Main Street, Humboldt, SK S0K 2A0
306.682.0772 or toll-free 1.800.344.6024
hausofstitches.ca
Our one of a kind store offers everything you need for sewing, quilting, knitting, rug hooking and needlework. Authorized dealers for Janome and Elna.
K & A Quilt Studio
90 Samnah Cres, Ingersoll ON N5C 3J7 (New Location!)
519.425.4141 kaquiltstudio.com
Where friends and creativity meet! Authorized distributor of Husqvarna VIKING sewing machines, and a Kimberbell Certified Shop. We stock full collections of quilting fabrics, featuring Northcott and Moda, plus lots of patterns, books, and samples to inspire you!
Kelly's Creative Sewing
804 Main St, Dartmouth, NS B2W 3V1
902.435.7380 k ellyscreativesewing.ca
kellyscreativesewing@gmail.com
We offer sales and on-site service of high-end domestic embroidery, sewing machines and sergers, as well as a variety of educational programs.
Ottawa Sewing Centre
1390 Clyde Ave, #107, Ottawa, ON K2G 3H9
613.695.1386 o ttawasewing.com
ottawasewing@gmail.com
Authorized Dealers for Brother, BabyLock, Elna, Q'nique & Grace quilting frames. Specialize in sales, parts & servicing for all makes & models of quilting/embroidery/sewing/ serger/overlock machines & cabinets by Sylvia Design.
Sew Inspired 375 Daniel St S, Arnprior, ON K7S 3K6
613.623.0500 sewinspired.ca
info@sewinspired.ca
Your Ottawa Valley PFAFF® Authorized Dealer. We have a large supply of quilting & sewing supplies, knitting supplies, as well as in stock PFAFF® sewing machines. We also have a listing of sewing and quilting classes.
Sew With Vision
480 Parkland Dr, Halifax, NS B3S 1P9
902.479.2227, s ewwithvision.net
Stitch By Stitch
550 Days Rd Unit 1, Kingston ON K7M 3R7
613.389.2223, stitchbystitchkingston.com
That Sewing Place
16610 Bayview Ave #10, Newmarket, ON L3X 1X3
905.715.7725, t hatsewingplace.ca
The Quilt Store / Evelyn's Sewing Centre
17817 Leslie St, Unit 40, Newmarket, ON L3Y 8C6
905.853.7001 or toll-free 1.888.853.7001
The Quilt Store West
695 Plains Rd E, Unit 6, Burlington, ON L7T 2E8
905.631.0894 or toll-free 1.877.367.7070
thequiltstore.ca
Now with 2 locations to serve you, we are your Quilt Store Destination! The staff here at The Quilt Store is always on hand to provide Quilt Wisdom, Quilt Inspiration and most of all we pride ourselves as the place to make... All Your Quilt Dreams Come True!
The Stitcher's Muse Needleart
#101 - 890 Crace St, Nanaimo, BC V9R 2T3
250.591.6873 thestitchersmuse.com
info@thestitchersmuse.com
A divine little shop with supplies for all your hand stitching needs! Friendly, knowledgeable, helpful staff. Cross stitch, canvaswork, needlepoint, embroidery, counted thread, lace making & more. Books, patterns, fabric, threads, tools.
The Yarn Guy
15 Gower St, Toronto, ON M4B 1E3
416.752.1828 or toll-free 1.800.836.6536
theyarnguy.com i nfo@sewknit.ca
See us on Facebook, follow us on Twitter! Knitting machines, sewing machines, repairs, parts for Passap, Studio, Singer, Silver Reed, Superba, White. Sewing notions and supplies, books, ball yarns, coned yarns, TAMM yarns, Paton's yarns, Bernat yarns, Phentex yarns, Bernat kits & crafts.
Upper Canada Quiltworks – Quiltworks Studio PO Box 64, Brockville, ON K6V 5T7
613.865.7299 uppercanadaquiltworks.com
uppercanadaquiltworksstudio@gmail.com
Quilt patterns and books, fabric and notions, felted wool, wool kits, punchneedle patterns and supplies and Valdani embroidery floss. Workshops in quilting, punchneedle, wool applique, rug-hooking, sewing, sign painting & more!
UNITED STATES
A Quilter's Folly
8213 Brodie Ln #100, Austin, TX 78745 512.899.3233, aquiltersfolly.com
A-1 Singer Sewing Center
1012 S Oliver St, Wichita KS 67218
316.685.0226, a-1singer.com
Charlotte Sewing Studio
1109 Tamiami Trl Unit 2, Port Charlotte FL 33953 941.235.3555, charlottesewingstudio.com
Close to Home Sewing Center
277 Hebron Ave, Glastonbury CT 06033 860.633.0721, closetohomestores.com
Discount Fabric Warehouse
933 Kanoelehua Ave, Hilo HI 96720 808.935.1234, discountfabricwarehouse.com
El Cajon Sew & Vac
1077 Broadway, El Cajon CA 92021 619.442.2585, sewezr.com
Hursh's Country Store 2425 W Main St, Ephrata PA 17522 717.721.2575, hurshscountrystore.com
Jessamine Quilt Shop LLC
1301 Old Cherokee Rd, Lexington SC 29072-9047 803.490.1031, jessaminequiltshop.com
JS Linen and Curtain Outlet 1250 Northside Dr, Statesville NC 28625 704.871.1939, jslinenoutlet.com/js-quilt-shop
Just Sew Studio
51 Third St NE, Waite Park MN 56387 320.654.1580, justsewstudiomn.com
Keeping You Sewing 226 4th Ave S, Clinton IA 52732 563.242.6135, keepingyousewing.com
Maryland Vacuum and Sewing Center 26845 Point Lookout Rd (Rt 5), Leonardtown MD 20650 240.309.4019, mdvacsew.com
New England Sewing 501 Hartford Rd, Manchester CT 06040 860.647.8119, nesewing.com
Options Quilt Shop
102 E Commerce St, Jacksonville TX 75766 903.586.9546, facebook.com/optionsquiltshop
Paramount Sewing & Vacuum 3960 Rickey St SE, Salem OR 97317 503.990.8186, paramount-sew-vac.com
Pick Your Stitch 6701 Manlius Center Rd, East Syracuse NY 13057 315.437.0962, pickyourstitch.com
Quality Vac and Sew
1213 Gilmore Ave Ste E2B, Winona MN 55987-2632 507.452.2203, qualityvacandsew.com
Quilter's Attic Sewing Center
118 Maple Ave, Pine Bush NY 12566 845.744.5888, quiltersattic.com
Quilters' Corner @ Middlebury Sew-N-Vac 260 Court St Ste 4, Middlebury VT 05753 802.388.3559, middleburysewnvac.com
Quintessential Quilts 940 East Main St, Reedsburg WI 53959 608.524.8435, qquilts.com
Select Sewing 2415 East 65th St, Indianapolis IN 46220 317.255.6332, selectsewingservice.com
Sew Special 688 W Main St, Uniontown PA 15401 724.438.1765, sew-special.biz
Sew What? Fabric Shoppe 7 W Front St, Addison NY 14801 607.359.4308, sewwhatfabricshoppe.com
Sewing Solutions 1505 S Glenburine Rd, Ste G, New Bern SC 28562-2689 252.633.1799, sewingsolutionsnc.com
Sierra Sewing, Quilting, and Vacuums 8056 S Virginia St Ste 6, Reno NV 89511 775.823.9700, sierrasewing.com
Singer Factory Distributor 4914 W Irving Park Rd, Chicago IL 60641 773.545.6834, singerfactorydistributor.com
Suddenly Sewing 5850 Kroger Dr Ste 110, Fort Worth TX 76244 817.741.5400, suddenlysewing.com
Thimbelina's Quilt Shop
118 North B St Ste B, Livingston MT 59047-2662 406.222.5904, thimbelinasquiltshop.com
Wise Monkey Quilting
501 Hwy 39 N, Denison IA 51442 712.393.7979, wisemonkeyquilting.com
42 | issue 26 OUILT
BUSINESS
To list your business in this space please call 1.866.969.2678.
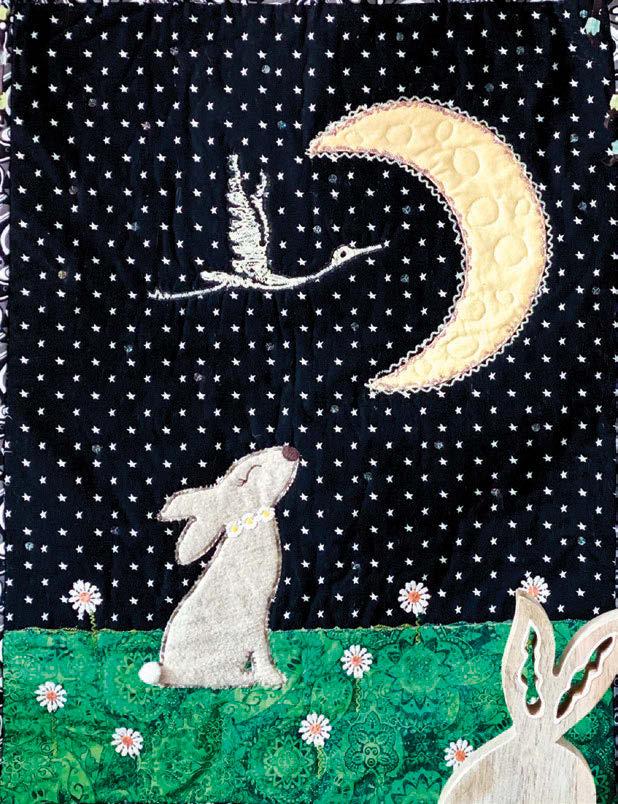
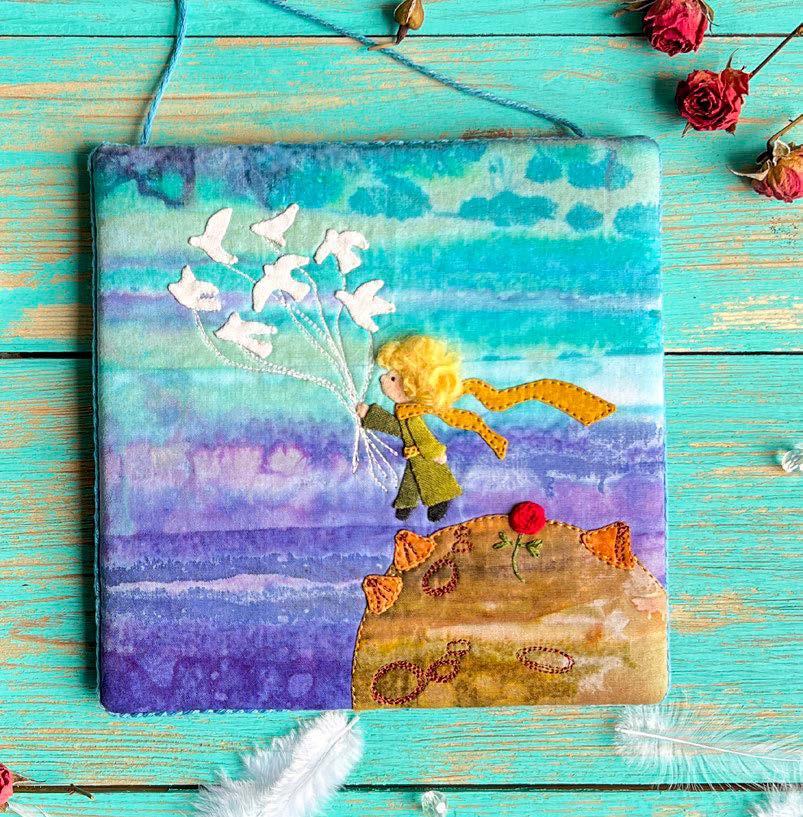
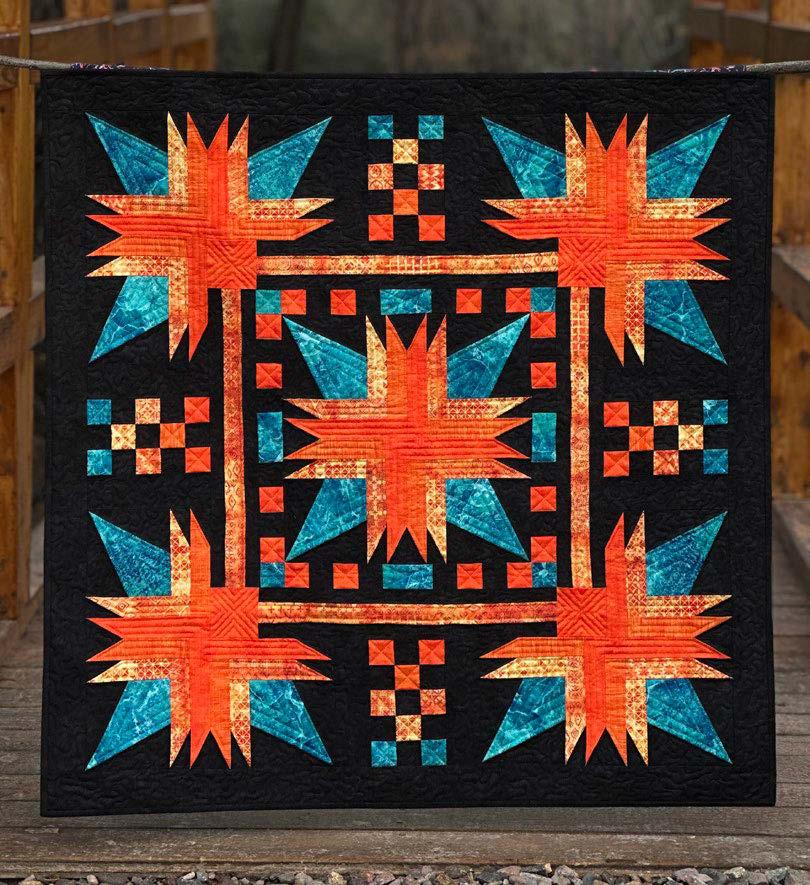
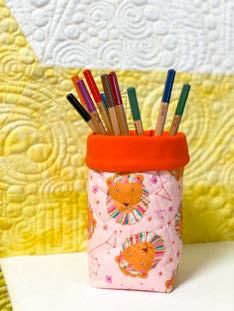
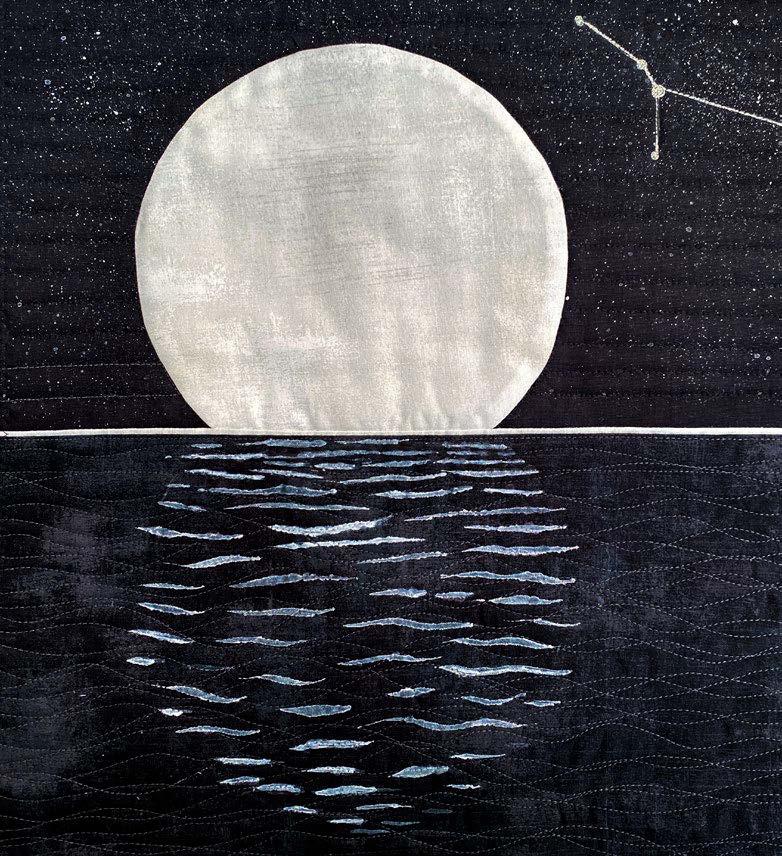
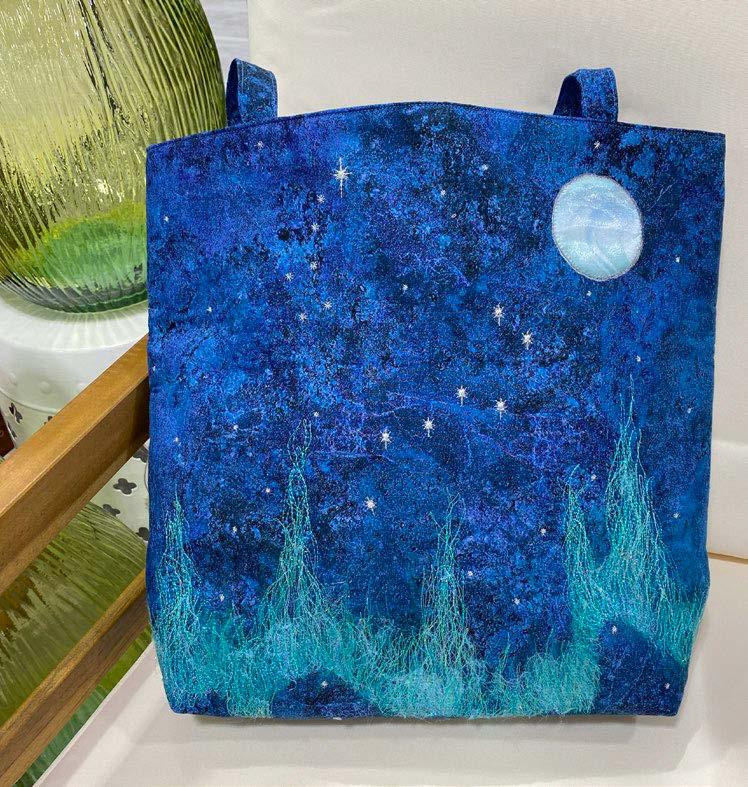
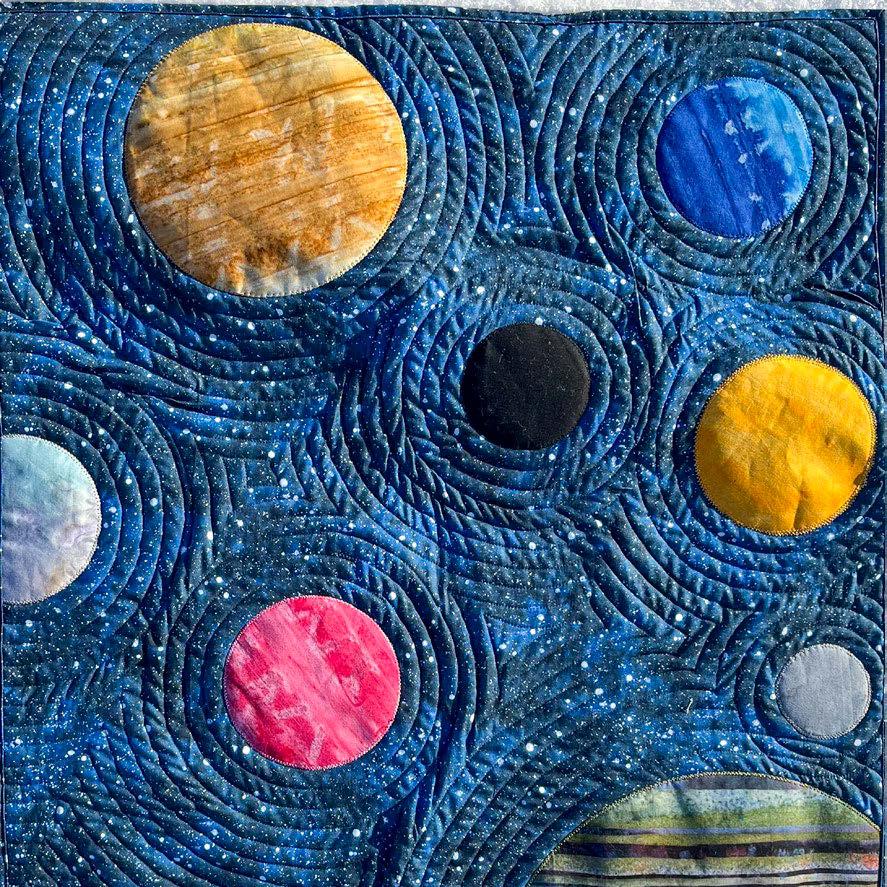

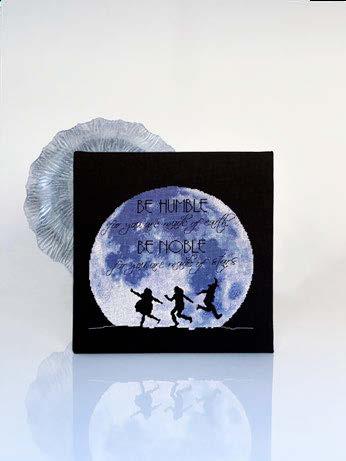
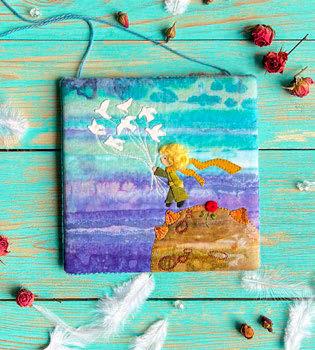

| issue 26 43 OUILT Visit www.ANPTmag.com to order! QUILT SEW KNIT CROCHET CROSS STITCH EMBROIDER HOOK RUGS Issue 62 A needle pulling thread 52 QUILT SEW KNIT CROCHET CROSS STITCH EMBROIDER HOOK RUGS Aneedle pulling threadwww.aneedlepullingthread.com 64 34 74 Inspired by the Universe Get quilting!