
OWNER’S MANUAL SPORTS BICYCLE INSTRUCTION MANUAL ・WARRANTY CARD
VERSION 2023
NESTO IS A SPORTS CYCLE BRAND THAT ENRICHES DAILY LIFE WITH THE CONCEPT OF “LIGHTER. FASTER. STRONGER”.
NESTO’S GOAL IS TO CREATE A “FUTURE” IN THE NEAR FUTURE WHERE EVERYONE CAN ENJOY A SPORTS CYCLE, AND WE BELIEVE THAT IT LIES IN THE MIDDLE BETWEEN COMPETITIVE SPORTS BICYCLES AND GENERAL BICYCLES.
WE HOPE THAT YOU CAN PLAY ON-ROAD AND OFF-ROAD AS YOU LIKE, AND FEEL THE EXCITEMENT FROM SPORTS TO DAILY PRACTICAL USE.
WITH THAT IN MIND, NESTO IS THE EPITOME OF A CROSSOVER WITH AN OFF-ROAD BIKE THAT CAN HANDLE ALL TERRAIN. BASED ON THE KEYWORDS “LIGHTER,” “FASTER,” AND “STRONGER,” WE HAVE BOTH A “PREMIUM MODEL” THAT INHERITS THE TRADITION OF COMPETITIVE SPORTS BICYCLES AND A “STANDARD MODEL” THAT EMPHASIZES FITNESS AND CITY RIDING. RESPONDS TO USAGE.
NESTO DEVELOPS WHAT USERS REALLY NEED FROM THE USER’S PERSPECTIVE. BY REFRAINING FROM EXCESSIVE SPECS AND PROVIDING SUFFICIENT BASIC PERFORMANCE AND HIGH EXPANDABILITY FOR THE FUTURE, WE ARE MAKING A BIKE THAT IS RATIONAL, FUNCTIONAL AND CAN BE ENJOYED FOR A LONG TIME.
A LITTLE FUTURE THAT YOU THINK NOW. ENRICH YOUR LIFE BY FINDING A SPORT CYCLE THAT SUITS YOU, AND MAKE SMILING YOUR STANDARD.
NESTO WILL EXPAND A NEW LIFESTYLE TO ENJOY BICYCLES.
● HOW TO CHECK AND ADJUST YOUR BIKE’S TIRE PRESSURE
● WHEEL CHECK
● RIMS AND QUICK-RELEASE
● BRAKES FUNCTION
● HOW TO USE THE DERAILLEUR
HEIGHT AND POSITION
● CHECK BEFORE BOARDING ● DAILY INSPECTION
WHAT IS A SPORTS BICYCLE?
CYCLING IS A FUN AND HEALTHY SPORT. IT ALSO CAN BE CONSIDERED TO BE IS A HAZARDOUS SPORT.
FIRST OF ALL, ON PUBLIC ROADS WHERE PEDESTRIANS, BICYCLES, MOTORCYCLES, AUTOMOBILES, ETC. COME AND GO, PLEASE BE AWARE THAT BICYCLES ARE LIGHT VEHICLES, IN OTHER WORDS, VEHICLES THAT SHOULD BE RIDDEN ON THE ROADWAY. DRIVING AS IF YOU WERE A PEDESTRIAN WITHOUT BEING AWARE OF THIS IS EXTREMELY DANGEROUS, NOT ONLY FOR YOURSELF BUT ALSO FOR BOTH PEDESTRIANS AND CARS.
■ PLEASE CONFIRM THE ENTRY OF THE WARRANTY
THE WARRANTY ONLY BECOMES VALID WHEN THE DEALER FILLS IN THE NECESSARY INFORMATION AND AFFIXES THE SEAL OF THE DEALER.
PLEASE BE SURE TO RECEIVE REGULAR INSPECTIONS.
PLEASE HAVE YOUR BICYCLE INSPECTED FOR THE FIRST TIME AND REGULAR INSPECTIONS (EVERY 6 MONTHS TO 1 YEAR) AT A BICYCLE SPECIALTY SHOP.
It’s your responsibility to understand the local regulations for operating this product in the area(s) where you ride and to comply with all applicable laws regarding bicycle lighting, riding on roads or paths, helmets, child carriers, and traffic.
Ride in designated bike lanes, on designated bike paths or as close to the edge of the road as possible. Use approved hand signals for turning and stopping. And watch for pedestrians – use caution when approaching pedestrian crossings and stop if there is a stop sign.
Always wear an approved helmet when riding your bike, and follow the helmet manufacturer’s instructions for fit, use and care. Failure to wear a helmet when riding may result in serious injury or death.
CHECK YOUR BRAKES FREQUENTLY. THE ABILITY TO STOP YOUR BICYCLE IS CRITICAL.
Roads are slippery when wet so avoid sharp turns and allow more distance stopping. Caliper brakes may become less efficient when wet. Leaves, loose gravel, and other debris can also effect stopping.
To brake efficiently, your front brake is there to stop you and the back brake is there to shave off speed. Be sure to apply equal force to both brakes at the same time.
Find a quiet area or section of road that you can use to practice your braking technique. Practice makes perfect!
Wet weather impairs traction, braking and visibility, both for the bicyclist and for other vehicles sharing the road. To make sure that you can slow down and stop safely in wet conditions, ride more slowly and apply your brakes earlier and more gradually than you would under normal, dry conditions. Allow increased braking distance in wet weather.
AVOID HAZARDS TO PREVENT LOSS OF CONTROL OR WHEELS DAMAGE.
If there is a step between the roadway and the sidewalk, make sure no one is behind you, then move slowly and as directly as you can over it.
If you try to lift it, the front wheel will become hooked, and you may fall. Gutters at roadway corners, streetcar rails, potholes in the road surface, gravel, and manhole ledges are also extremely dangerous. Keep an eye out for obstacles that might get your wheels caught and road conditions that make you lose grip.
It is recommended that you take out bicycle insurance (there are special contracts for bike insurance, etc.).
The maximum weight capability of Nesto’s bike is 80kg.
This is a suggested limit that varies based on how you ride and modifications (pneumatic pressure, spoke tension, etc.). Please consult your dealer
FAILURE TO DO SO MIGHT CAUSE SERIOUS DAMAGE TO OTHER PEOPLE, INCLUDING DEATH.
NO MAINTENANCE/INSPECTION
Regularly have your bicycle inspected at a cycling shop for safety.
PROHIBITION OF RECKLESS DRIVING
Reckless driving, such as climbing over bumps, jumping, and wheelies, can cause bicycle damage, falls, and serious injuries.
PROHIBITION OF MODIFICATION
Reckless modifications and adjustments by ordinary people without specialized knowledge can cause problems or accidents with the bicycle.
Replacing parts with sizes other than the original size may greatly impair the overall balance of the bicycle, so please refrain from doing so. Before using binding-type pedals, practice and get used to them.
Nesto models are designed for one passenger only. DO NOT carry any additional passengers on the front or rear of the bike.
PROHIBITION OF HANGING LUGGAGE ON THE HANDLEBARS
If a heavy object is hung on the handlebars, the handlebars may become unstable, and it could get stuck in the front wheels, causing the bicycle to topple over.
DO NOT APPLY WEIGHT TO THE STAND NEVER DO THE FOLLOWING DANGEROUS ACTS
The stand is not strong enough to stand on the bicycle. If you put a heavy load or weight on it, it may damage the stand or frame.
Cycling on the right side, wearing earphones, using a mobile phone while cycling, driving with an umbrella in the rain, ignoring traffic lights, passing through the left side of a car, drinking alcohol, drunkenness, cycling under the influence of alcohol, etc.
Tires are the only thing in contact with the ground. Of course, the driving force is an important part of transmitting the braking force during braking. The air pressure in the tires of a bicycle is much higher than that of a four-wheeled vehicle and must always be kept at an appropriate value.
The proper air pressure varies depending on the tire, but the minimum value (MIN) to maximum value (MAX), or only the maximum value, is indicated on the sidewall of the tire.
Please adjust within the range according to your weight and road conditions.
A simple check method is to use your thumbs to press hard until you feel a slight dent.
(タイヤ空気圧の目安)
(Estimated tire pressure)
Let’s manage within the specified range.
(1) Excessive air pressure is extremely dangerous, as it can cause the tire tube to burst and the tire to come off. Otherwise, it will cause deterioration of the driving and braking performance.
(2) If the air pressure is too low, it will damage the tire, making it more prone to punctures and reducing handling performance.
(3) When driving on bad roads or in the rain, lower the air pressure by about 10%. The contact area increases, and driving force and braking performance increase.
(4) If you are heavy, increase the air pressure, and if you are light, decrease it.
(5) The air pressure will decrease in a few days. This symptom is not a puncture. In 3-4 days the lighter tube will lose its weight faster. Air pressure adjustment may be required.
Check the wheels when checking the air pressure.
If the tread is worn or scratched, or if the side surface is deteriorated, please consult your dealer.
Depending on the position of the brake shoe, it may rub against the tire side. It is dangerous as it may cause an explosion (burst).
If you use it for a long time, the side (rim side) may be reduced by braking. Please be careful, as there is a risk of sudden damage.
Thin spokes transmit all kinds of power, such as driving force, braking force, and shock from the road surface. Check for tension, bends, etc.
Spokes are often the cause of wheel vibration. Please have it adjusted at your dealer.
When touring by car or train, the quick release of the wheels is convenient. Wheel fixing with a quick shaft has a higher fixing force than a nut-tightening wheel, but it is very dangerous if used incorrectly.
Please do not only read the explanation below but actually perform it under the guidance of your dealer. Make sure to receive practical training and experience the operation, such as the force with which the lever is pressed.
The structure is the same for both the front and rear wheels, but please note that the handling method is different for the front and rear wheels.
• Front wheel: Since the front fork end has a drop prevention stopper, it is necessary to adjust the adjustment nut when installing the wheel and tightening the quick lever.
• Rear wheel: It is necessary to put the chain on the rear gear before putting the wheel in the rear end. Set the rear shift lever to the top position beforehand and hook the chain to the top gear (the small tooth on the outside) to make it easier to engage.
① The left side of the brake lever is the rear and the right side is the front.
※ For some models assembled in Italy, the left front and right rear are reversed. Please note.
② Ideally, when the lever is pulled, the distance of B in the figure should be half of A or more than one finger.
③ Apply the brakes in the order “rear = left” ⇒ “front = right”. Braking only in the front will cause forward rolls, and braking only in the rear will lock the rear wheels and cause loss of control, which is extremely dangerous.
Braking requires accurate control according to conditions such as speed, degree of application, load balance between the front and rear wheels, lateral tilt of the vehicle, and road surface conditions.
Judgment according to the situation is important, but it is best to refrain from speed at any time.
If the rear wheels lock, the vehicle will be out of control, and if the front wheels lock, the body will be thrown forward, both of which will result in an accident.
The contact area between a bicycle tire and the road surface is very small. Conditions are even worse on wet roads, where the stopping distance after applying the brakes is about twice as long as in clear weather.
As a safe stopping distance, get into the habit of braking from 7 to 8 meters in front of you in fine weather and from 15 meters in front of you in rain.
A derailleur is a device that changes the gear ratio according to driving conditions such as road surface conditions, slopes, wind direction, etc. The road model is a close-ratio high-speed type, while the MTB is a wide-ratio climbing and rough road type. The left shift lever is for the front (front derailleur), and the right shift lever is for the rear (rear derailleur). Start running in a light gear and choose a gear that matches the rotation of your legs according to the situation.


Use the A lever to shift up and the B lever to shift down.
Operate the upshift with the A lever and the downshift with the B lever.
The rotation of the legs (the rotation of the gear crank) is called pedaling, and in sports cycling, use light gears and aim for 60 to 80 revolutions per minute. To keep this pedaling rhythm for as long as possible, choose a gear that matches the riding situation. If the load on the legs becomes heavy and the revs drop, the gear is lightened. Early shifting reduces the consumption of physical strength.
① Do not look down when shifting gears. Always look ahead while shifting gears.
② Be sure to shift gears quickly while pedaling. Never reverse gear rotation as the chain will come off.
① Most gear-shifting problems are caused by stretched wires or chains. The extension of the transmission wire can be adjusted with the adjuster at the base of the shifter, frame, or rear derailleur (see Figure A). Chain elongation requires chain replacement, please contact your dealer.
② In the case of shifting problems caused by a fall, the rear derailleur mount at the end of the frame may be bent inward. If the bend is slight, continue driving carefully without changing gears and take it to your dealer as soon as possible (see Figures B and C).
③ When the chain is in the position shown in Figure D, it may rub against the large front gears or front derailleur and make noise. It’s not a malfunction, but if it bothers you, you can solve it by shifting the rear gear to a gear that is 1 or 2 steps larger.
Also, as shown in Figure E, when the front and rear gears are large or small, the chain is most twisted. This puts a strain on the chain, gears, and derailleur, and accelerates wear, so avoid using it as much as possible.
The derailleur hanger is intentionally made of flexible material to protect the frame. Therefore, the derailleur hanger may bend inward or break due to various reasons.
・Fall down
(Even if the person himself/herself did not knock over the bike, it is possible that the bicycle was knocked over while the person was parked or otherwise unaware, or the bicycle was trapped on another bicycle.)
・Overshifting in low gear
・Repeated intense shifting
・Impact during transportation
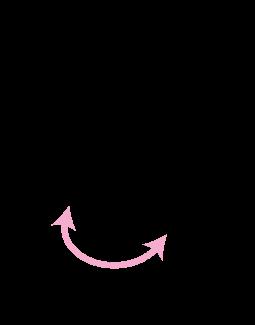
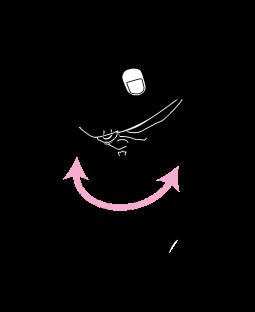
Raise or lower the saddle, fore/aft, angle, and distance from the saddle to the handlebars to adjust your riding alignment.
Decide on a comfortable posture that will not cause you to get tired even when running long distances, and a position that allows you to easily generate power.
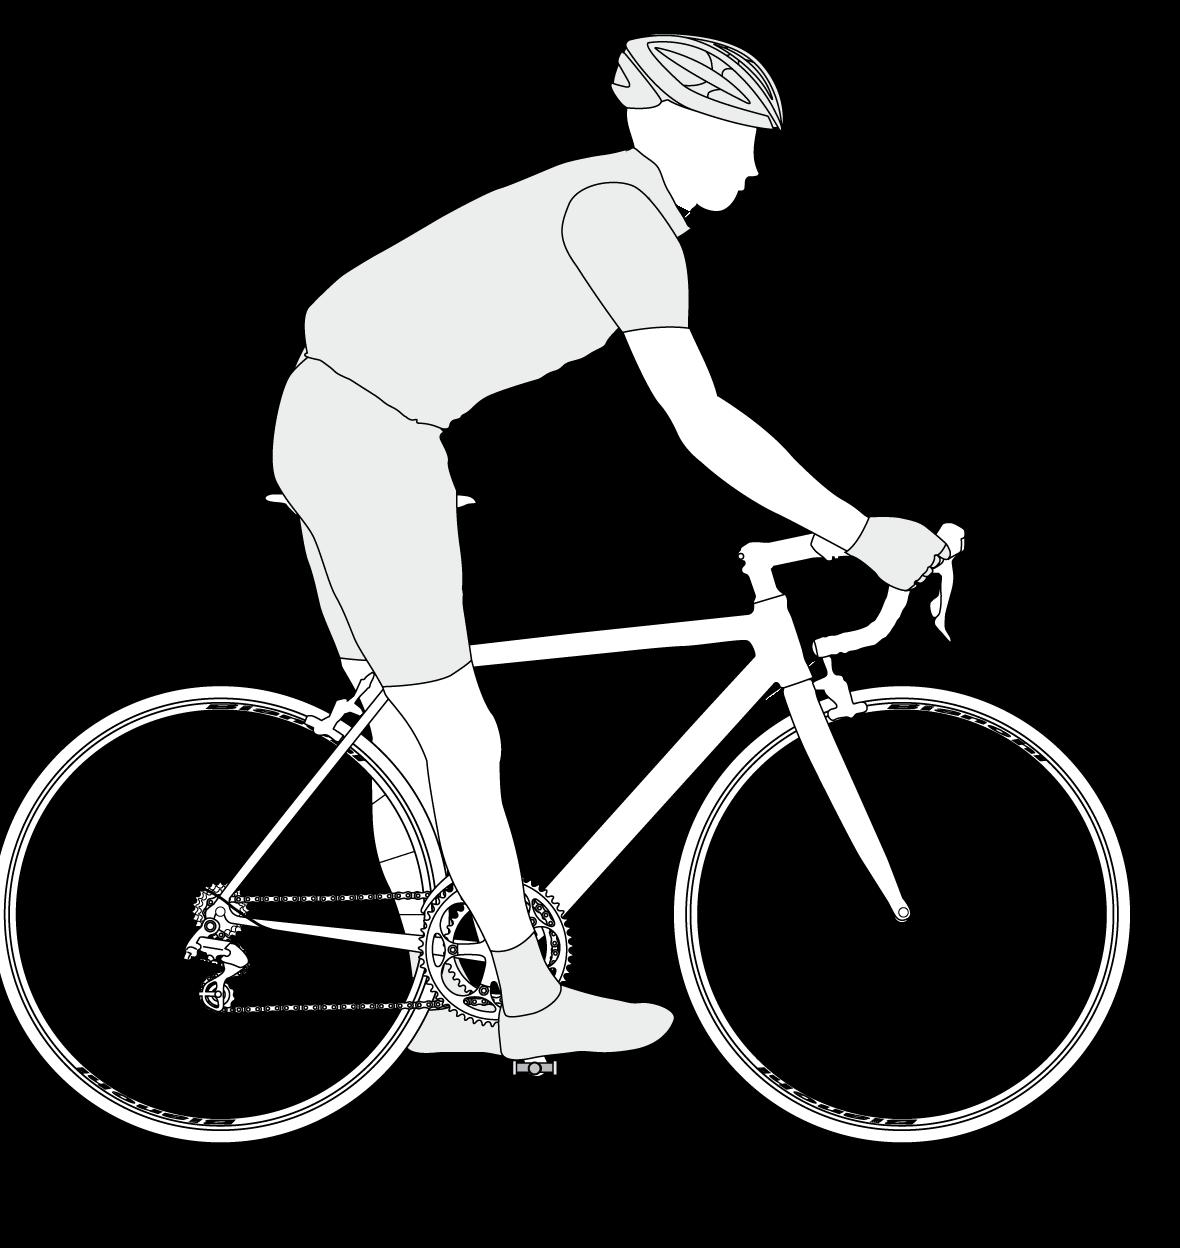
① Place the heel of the shoe on the pedal, raise the saddle until the leg is stretched, and fix it.
② Pull your foot forward and place it on the pedal 1/3 of the way from your toe. Your knees should be slightly bent at this point.
③ Also, the toes of both feet should reach the ground.
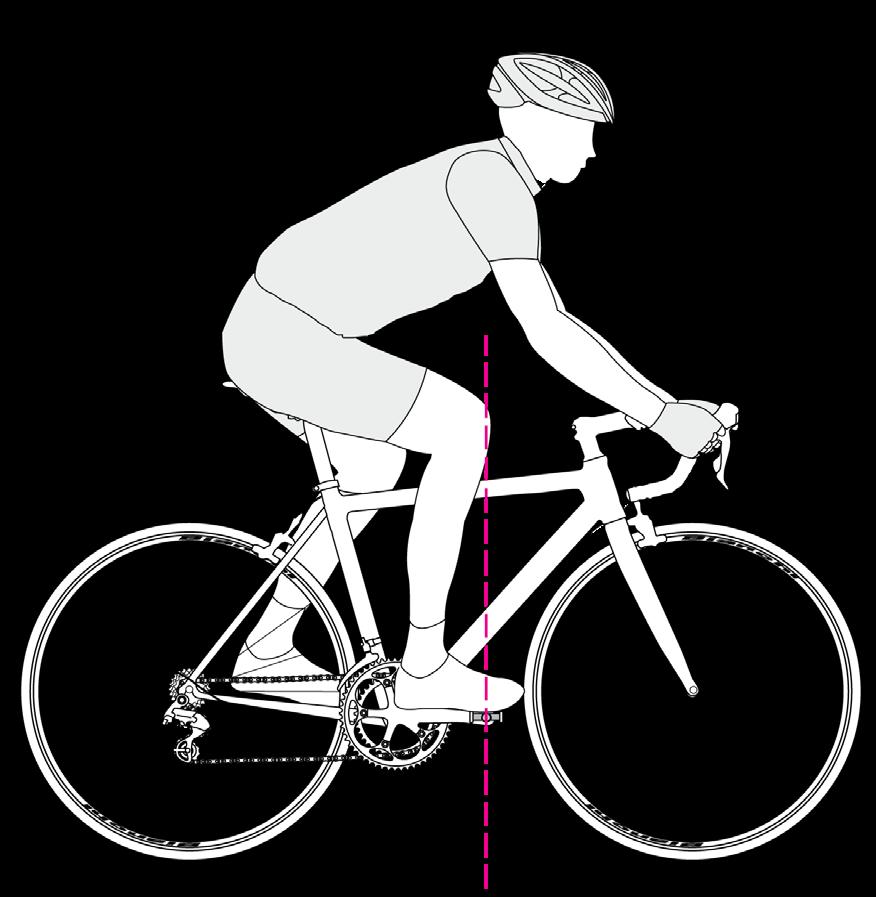
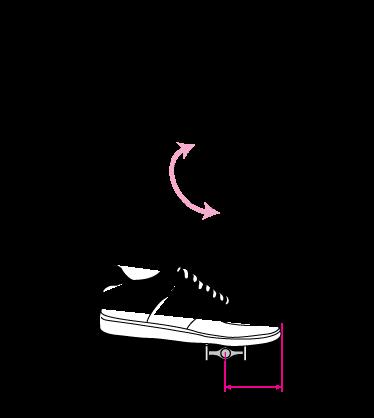
① Turn the cranks so that the pedals are in a horizontal position, with the right pedal at 3 o’clock. Sit on your bike and align the ball of your foot with the pedal axles.
② Ideally, the front of your kneecap should be aligned with the pedal axle. You can use a meter ruler or plumb line to help you visualize the vertical alignment.
① These steps above are only a guideline. As you get used to riding, it may be better to change the position, so please consult your dealer.
② Some part of the body hurts when running long distances. Even in such cases, please consult with the dealer as specifically as possible.
By altering the posture, the typical problem of “my butt hurts” can be solved.
Bike size isn’t just about height. The horizontal distance from the saddle to the handle is also an important factor.
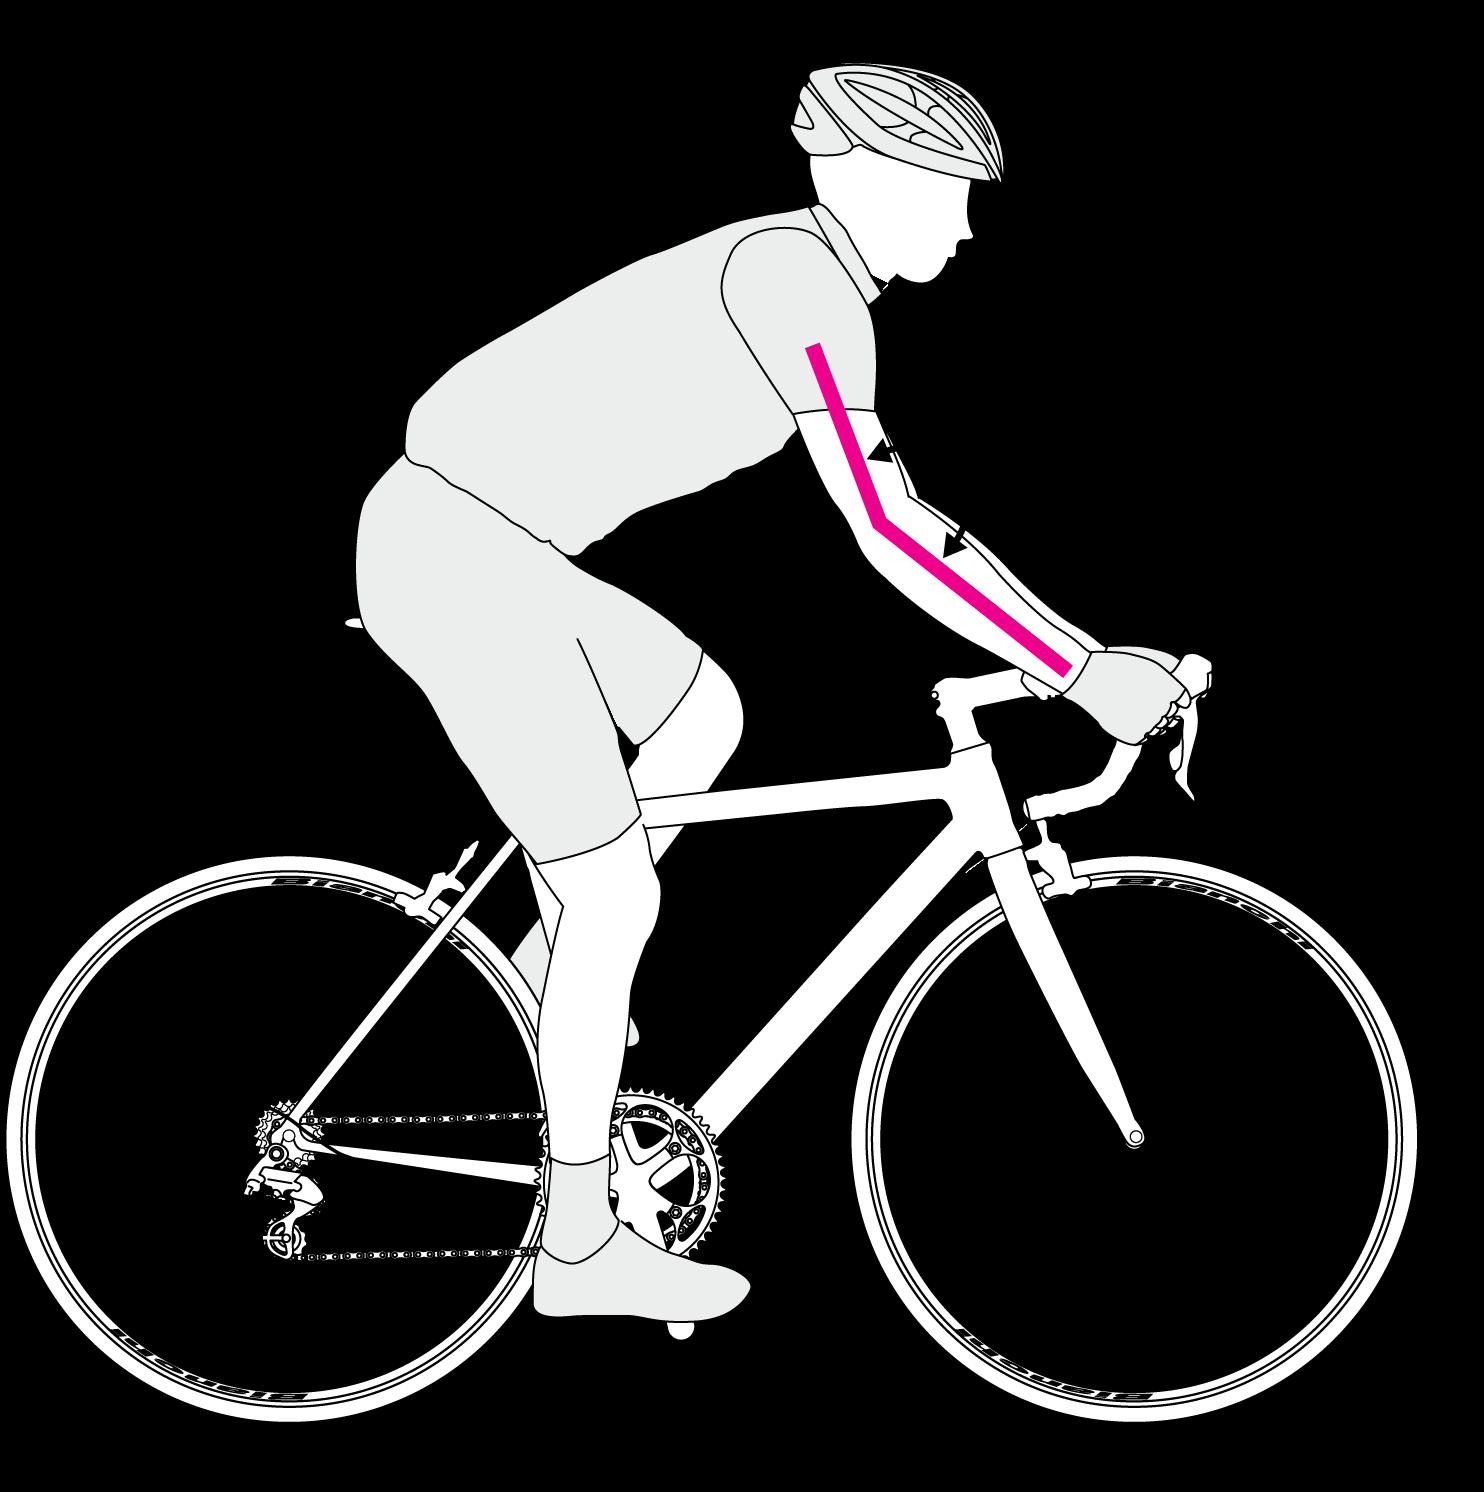
① If the elbows are slightly bent naturally while gripping the handle, the reach is suitable for the body. The ideal elbow angle is 150 degrees.
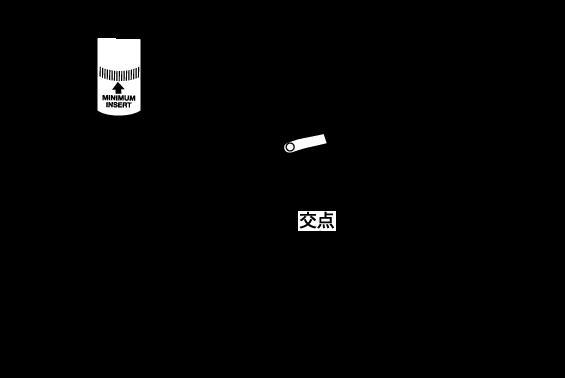
The seatpost and stem (plug-in, used on some models) are engraved with lift limit markings. It is very dangerous to use the seatpost or stem with this marking visible, as the seatpost or stem may break or the frame on the receiving side may crack.
Never pull up until you can see the engraving. Also, insert the seat post twice the length from the seat tube entrance to the intersection of the top tube and seat tube [Figure A].
If the insertion is insufficient, the frame may be deformed or damaged even if the limit indication engraved on the seat post is observed.
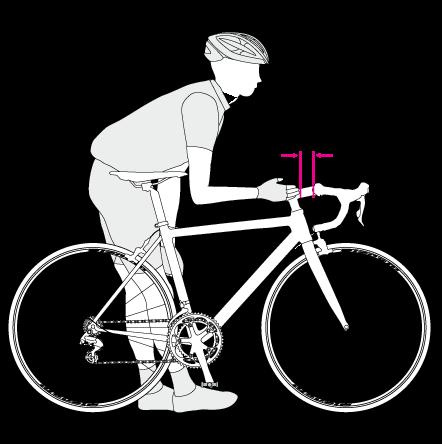
② Put your elbow on the tip of the saddle and look at the distance from the tip of your middle finger to the handle. If this interval is 2.5 to 5CM, it fits your body.
Before you begin riding, complete a “pre-ride inspection.” Once you get used to it, you can do it in a short amount of time.
Especially after performing maintenance using tools, it is also a confirmation that there are no oversights. It also prevents trouble and allows you to identify the signs of malfunction emitted from the bicycle. If you feel “unusual”, please contact your dealer.
Apply only the front brake and rock the vehicle back and forth. You can feel the rattling of the fork, head, front wheel, and front brake.
Lift the rear wheel about 10cm and drop it.
The chain will run wild, but you can hear the rattling of the rear wheels and rear derailleur.
Try pressing the left and right pedals sideways. You can feel the rattling of the crank and pedal.
Check your tire pressure.
At the very least, you need enough air pressure that you can press with both thumbs without denting.
Check the fixation of the handle and brake lever.
Hold the front wheel and shake the steering wheel and brake lever back and forth, up and down, and left and right with all your strength.
Check the saddle fixation.
Hold the frame and shake the saddle up and down, left and right. If it seems to move even if you shake it with all your strength, the tightening torque is insufficient.
Let’s spin the front and rear wheels.
You can check whether the wheel runout, tire fit, and brake shoe position are normal.
If any problem is found, immediately have it inspected at your dealer.
Keep your bicycle and accessories in good condition. A well-maintained bicycle is safe and comfortable to ride. The malfunction of the bicycle can be felt by the sound and feel.
Perform a self-inspection on a daily basis (approximately once a month), and if you feel something is wrong, contact your dealer immediately.
Check the bike carefully, especially if it has not been used in a long time.
Please refer to the terminology below when asking a question to a dealer: “What should I do...? Which part...? What will happen...?”
The more specific you can be, the more accurate the advice you will receive.
We want you riding your bike safely, so we make it easy to replace a damaged carbon frame or part through Carbon Care, a program exclusive to Trek owners. Through Carbon Care, Trek offers a significant discount to replace a damaged carbon fiber frame, fork, or part.
Carbon fiber is a lightweight, strong material, making it the material of choice for the manufacture of high-performance bicycle frames, forks, and other parts. Carbon fiber is also used by many other industries, including automotive and aerospace.
Like any material, carbon fiber can suffer damage. And not all damage to carbon fiber will be visible.
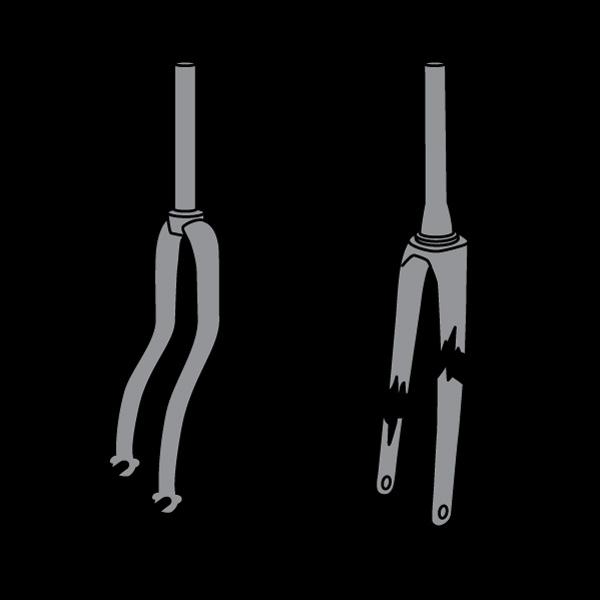
Left: Metal fork bent when overloaded.
Right: Carbon fork withstood a higher load, but completely separated when overloaded.
Compare a carbon fiber part to a metal part. When you damage a metal part, it will bend or deform. When you damage a carbon fiber part, the damage may not be visible to the naked eye and may not be safe to ride.
WARNING
Carbon fiber parts with damage can break suddenly, causing serious injury or death. Carbon fiber can conceal damage to a bicycle part. If you suspect your bicycle has had an impact or crash, immediately stop the bicycle. Replace the part before riding or take the bicycle to your bike shop for service.
While it is impossible to list all the scenarios that can damage a carbon fiber part, below are a few examples. If you experience any of the following, stop riding your bicycle immediately and take it to an authorized Trek retailer to replace the damaged part:
• You hit a curb, guardrail, pothole, parked car, or anything that causes the bicycle to stop abruptly.
• An object becomes stuck in the front wheel, causing the bicycle to stop abruptly.
• You get hit by a car or truck.
• You crashed your bicycle and it doesn’t feel or sound right.
• Your bicycle is in a roof rack when you drive your car into a garage.
If your carbon frame, fork, or part has been potentially damaged and you have any doubt about its integrity, you should replace it.
First thing to remember: If any NESTO model(s) you has purchased has a defect in material or workmanship, please contact your dealer or distributor for warranty service. Proof of purchase is required for all claims made under warranty. The warranty is valid for the original purchaser. In case, If the defect or defect cannot be repaired by replacing parts or modifying the bicycle, we will replace the bicycle.
CUSTOMER
NAME
PHONE
ADDRESS
Date of Purchase
Product model(s)
ADDRESS
STORE NAME
1. There is a defect in the materials or workmanship (Genuine defects usually present themselves within the first 10 km or while testing)
2. The cause of the change in the bike is NOT due to wear and tear or ageing.
3. Damage was NOT caused by use of bike for any activity that could endanger your or others’ lives or property.
4. Damage was NOT caused by use of bike for anything other than the intended purpose (for recreation).
5. Please send claims under this warranty directly to NESTO and proof of purchase will be required for all claims made under the warranty. Guarantee claims must be asserted within the official guarantee time period.
● If the warranty card is not presented or is not stated in the warranty card.
● Failure or damage due to inadequate storage (Failure or damage caused by leaving the product for a long time in a place exposed to sea breeze, rain, or in a hot and humid place).
● Defects caused by neglecting daily inspection and maintenance, inadequate or incorrect maintenance.
● Transportation expenses for alternative means of transportation required during the warranty repair period, and the cost or provision of alternative bicycles.
● Any other expenses not stipulated in this warranty.
● Repair due to consumption of the following consumables: tires, tubes, valves, saddles, pedals, brake shoes, bar tapes, grips, wires, chains, oils, and fats. Sensory defects such as subtle sounds and touches that do not interfere with practical use.
● Minor differences that occur in the production process.
● Defects caused by falling or being hit by the bicycle, participating in the competition, riding in places and conditions where bicycles are not usually ridden.
● When used by an unspecified number of people, such as for business purposes.