Solution Manual for First Course in the Finite Element Method 6th Edition by Logan ISBN 1305635116
9781305635111
Full link download:
Solution Manual:
https://testbankpack.com/p/solution-manual-for-first-course-in-the-finiteelement-method-6th-edition-by-logan-isbn-1305635116-9781305635111/
Chapter 1
A finite element is a small body or unit interconnected to other units to model a larger structure or system.
Discretization means dividing the body (system) into an equivalent system of finite elements with associated nodes and elements.
The modern development of the finite element method began in 1941 with the work of Hrennikoff in the field of structural engineering.
The direct stiffness method was introduced in 1941 by Hrennikoff. However, it was not commonly known as the direct stiffness method until 1956.
A matrix is a rectangular array of quantities arranged in rows and columns that is often used to aid in expressing and solving a system of algebraic equations.
As computer developed it made possible to solve thousands of equations in a matter of minutes.
The following are the general steps of the finite element method.
Step 1
Step2
Step3
Step4
Divide the body into an equivalent system of finite elements with associated nodes and choose the most appropriate element type.
Choose a displacement function within each element.
Relate the stresses to the strains through the stress/strain law generally called the constitutive law.
Derive the element stiffness matrix and equations. Use the direct equilibrium method, a work or energy method, or a method of weighted residuals to relate the nodal forces to nodal displacements.
Step5
Step6
Step7
Step8
Assemble the element equations to obtain the global or total equations and introduce boundary conditions.
Solve for the unknown degrees of freedom (or generalized displacements).
Solve for the element strains and stresses.
1 © 2017 Cengage Learning. All Rights Reserved. May not be scanned, copied or duplicated, or posted to a publicly accessible website, in whole or in part.
Interpret and analyze the results for use in the design/anal ysis process.
2 © 2017 Cengage Learning. All Rights Reserved. May not be scanned, copied or duplicated, or posted to a publicly accessible website, in whole or in part.
The displacement method assumes displacements of the nodes as the unknowns of the problem. The problem is formulated such that a set of simultaneous equations is solved for nodal displacements.
Four common types of elements are: simple line elements, simple two-dimensional elements, simple three-dimensional elements, and simple axisymmetric elements.
1.10 Three common methods used to derive the element stiffness matrix and equations are
(1) direct equilibrium method
(2) work or energy methods
3 © 2017 Cengage Learning. All Rights Reserved. May not be scanned, copied or duplicated, or posted to a publicly accessible website, in whole or in part.
(3) methods of weightedresiduals
The term‘degrees of freedom’ refers to rotations and displacements that are associated with each node.
Five typical areas where the finite element is applied are as follows.
(1) Structural/stress analysis
(2) Heat transfer analysis
(3) Fluid flow analysis
(4) Electric or magnetic potential distribution analysis
(5) Biomechanical engineering
Five advantages of the finite element method are the ability to
(1) Model irregularly shaped bodies quite easily
(2) Handle general load conditions without difficulty
(3) Model bodies composed of several different materials because element equations are evaluated individually
(4) Handle unlimited numbers and kinds of boundaryconditions
(5) Vary the size of the elements to make it possible to use small elements wherenecessary
4 © 2017 Cengage Learning. All Rights Reserved. May not be scanned, copied or duplicated, or posted to a publicly accessible website, in whole or in part.
Another random document with no related content on Scribd:
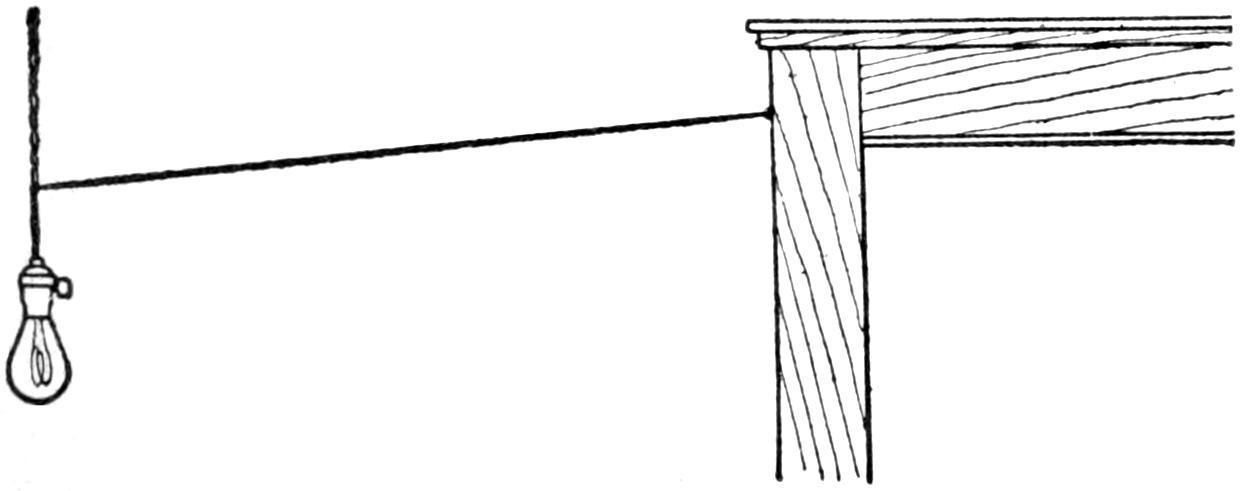
Any boy can easily convert a toy rubber balloon into a real flier by constructing the simple device shown in the illustration for filling it with hydrogen. Procure a clay pipe and break off the stem near the bowl. Bore a hole in a cork, or preferably a rubber stopper, selected to fit some bottle and insert the smaller end of the pipestem in the hole. As the stem tapers, if the hole has been made for the smaller end, a tight fit is assured by simply pressing the stem well into the cork. Tie the open end of the stem on the balloon tightly over the larger end of the pipestem, and have ready a thread to tie the stem of the balloon when it is filled.
Procure from a local drug store 1 oz. of hydrochloric acid. Place some nails, or better still, a few strips of zinc, in the bottle and cover them with a little water, then pour a small quantity of the hydrochloric acid into the bottle and assemble as shown in the illustration. In a few minutes hydrogen gas will be given off, and if the joints are tight, the balloon will begin to fill. After it has expanded as much as it will stand without breaking, tie the end with the thread, and cut off any parts of the mouthpiece that may weigh it down. If sufficient gas has been passed into the balloon it will rise to the ceiling. Balloons filled in this manner have risen to a height of several hundred feet.
Caution: Do not allow the hydrochloric acid to come in contact with the skin or clothing, as it may cause frightful burns. Do not under any circumstance fill the balloon near a flame or allow fire to come near the bottle.—Contributed by Ralph C. Jenkins, Manchester, Vt.
Smoker’s Cabinet or Cellarette
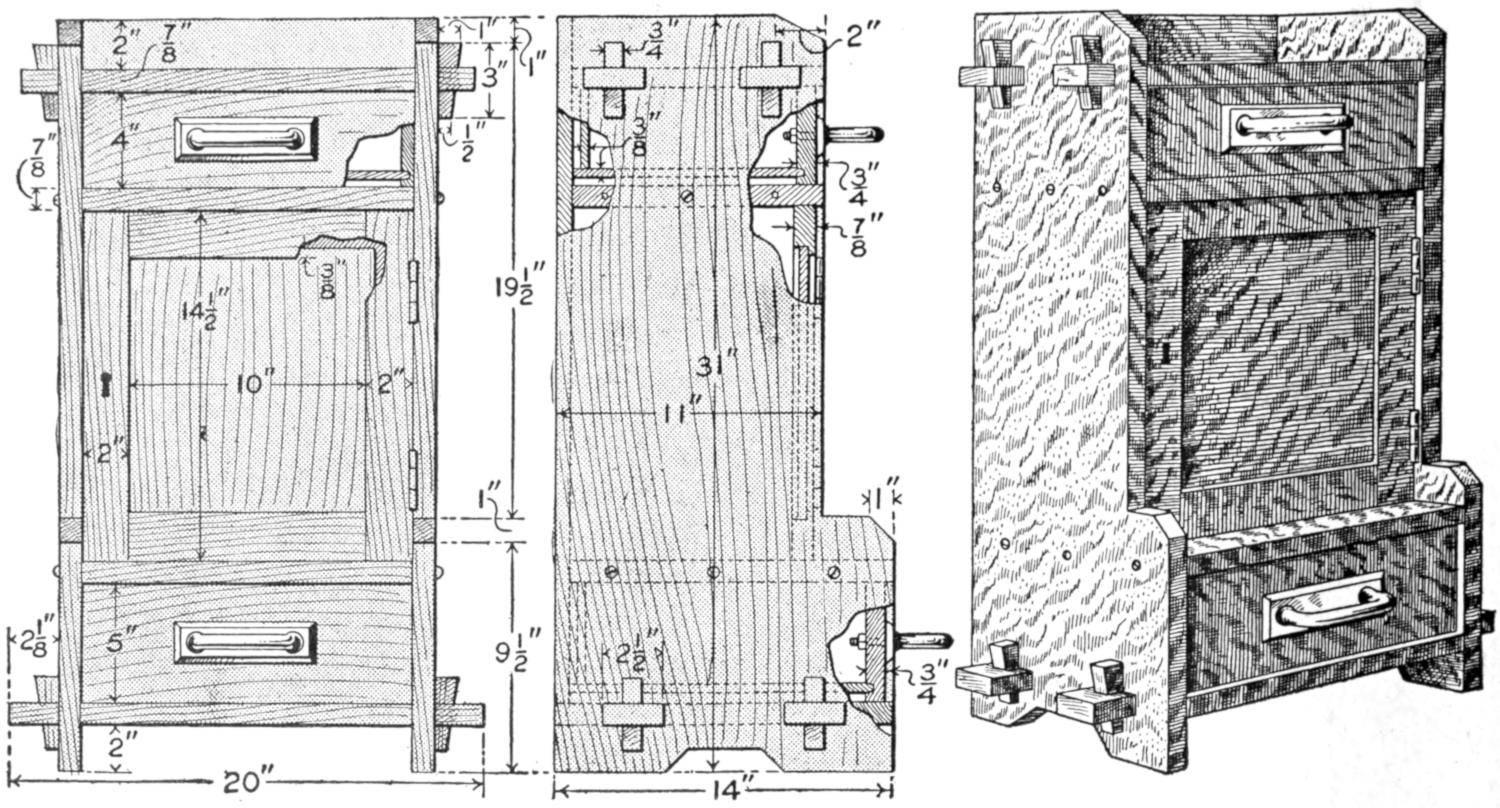
The Smoker’s Cabinet Makes an Attractive Addition to the Furniture of a Den, and should be Made Up and Finished to Match Other Pieces of the Room
This design, when completed, takes up a wall space 20 in. wide by 31 in. high, and extends out 14 in. The material necessary for it is as follows:
2 sides, ⁷⁄₈ by 14 by 31 in.
1 back, ³⁄₄ by 14 by 28¹⁄₈ in.
1 bottom, ⁷⁄₈ by 14 by 20 in
1 top, ⁷⁄₈ by 10¹⁄₄ by 18³⁄₄ in.
1 bottom shelf, ⁷⁄₈ by 10¹⁄₄ by 14 in Door:
2 stiles, ³⁄₄ by 2 by 14¹⁄₂ in.
2 rails, ³⁄₄ by 2 by 10 in (not including tenons, if such are desired) 1
panel, ³⁄₈ by 10³⁄₄ by 11¹⁄₄ in
Upper drawer:
1 front, ³⁄₄ by 4 by 14 in.
1 back, ³⁄₈ by 3¹⁄₄ by 13¹⁄₂ in
2 sides, ¹⁄₂ by 4 by 9⁷⁄₈ in.
1 bottom, ³⁄₈ by 9⁵⁄₈ by 13¹⁄₂ in.
Lower drawer:
1 front, ³⁄₄ by 5 by 14 in.
1 back, ³⁄₈ by 4¹⁄₄ by 13¹⁄₂ in.
2 sides, ¹⁄₂ by 5 by 12⁷⁄₈ in
1 bottom, ³⁄₈ by 12⁵⁄₈ by 13¹⁄₂ in.
1 piece for keys, ³⁄₄ by 2¹⁄₄ by 6¹⁄₄ in
1 pair hinges.
2 drawer pulls. Screws and nails.
In constructing the cabinet, the outer frame should first be made. The sides can be laid out and cut to the desired design. The top and bottom crosspieces should then be squared up, and the tenons cut as shown, the bottom tenons extending farther, to balance the design. The top is set in ³⁄₄ in. from the back edge. Holes should be marked and cut for the ³⁄₄-in. keys, after which the four parts may be assembled, and suitable keys driven in place. The back for the cabinet is made from ³⁄₄-in. material, squared up to fit between the sides, and be flush with their top edges while resting on the bottom crosspiece. It can be fastened in place with nails. The top and bottom pieces of the cabinet proper can then be made, and secured in place with round-head screws, after which the door may be made and fitted. The stiles and rails of the door should be rabbeted for a ³⁄₈-in. square groove, to hold the panel in place. The frame can be made sufficiently strong, if properly glued and held together with dowel pins passing through the stiles into the rails. If it is desired to fasten the frame with tenons, an extra amount must be added to the length of the rails given in the stock list. The panel should not be glued in place, as the shrinkage of the wood will cause it to crack.
In making the drawers, the front should be rabbeted for a groove to fit the drawer bottom, and sidepieces can be fitted and nailed in place. These should be rabbeted for grooves, into which the bottom and end pieces fit.
If the cabinet is finished in mission style, or fumed oak, hammered copper or brass hinges and drawer pulls will go well with the general appearance of the design.
Skis and Ski-running Running, Jumping and Climbing
By Stillman Taylor Part II
Before the beginner makes the attempt to ski, he should see that his complete outfit is perfectly suited to his purpose. The shoes should be nicely adjusted to fit snugly between the metal toe plates of the binding, and new holes should be punched in the straps wherever needed to adjust the harness snugly and comfortably to the feet. Many of the positions required in executing the various turns and swings may be practiced at home, that the novice may get some idea of the correct position of the feet and body assumed by expert skiers. For the initial practice outside, it is a good plan to select a frosty day when the snow is old and settled by the wind. This will introduce the novice to the sport under favorable conditions, while if the first trials are made shortly after a heavy snowfall, or upon a mild day when the snow is thawing, only discouragement will be experienced. Begin with one stick—or two if timid—and pick out an easy-sloping hill with a gradual run to the level ground. A few
scattered trees and rocks will do no harm, for it is a good plan to learn how to avoid them from the beginning.
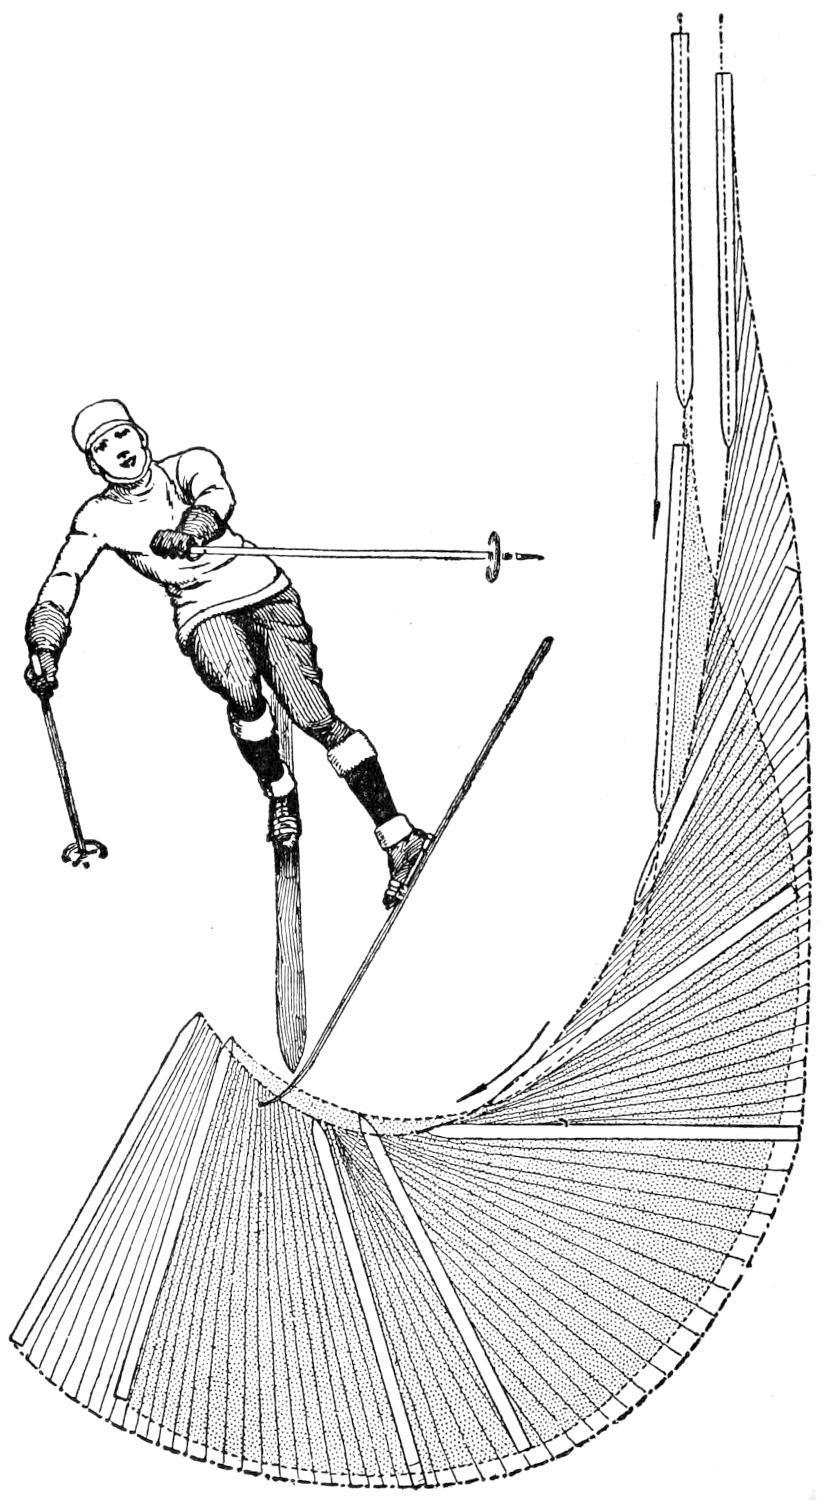
How to Turn on Skis
This and the correct manner of standing on skis are easily mastered if the beginner will but remember that the weight of the body should rest largely upon the advanced foot without bending the body at the ankle too much, or raising the heel from the ski. This is the correct position to assume when standing for a rest and for sliding, and this as well as turning should be practiced on the level. To make the kick turn, simply raise the point of the ski until the heel rests on the snow, as shown in Fig. 1. Swing the ski around by turning the point out and back until the two skis are point to heel, as shown in Fig. 2. When this, the most difficult position of the three, is assumed, raise the point of the other ski as high as convenient to avoid tripping, keep the heel down and swing the ski around over the heel of the other until both are facing in the same direction, as shown in Fig. 3. A little practice will make it possible for the novice to turn quickly, and if all turns are made with the advanced foot, when practicing on the level, no trouble will be experienced later on in attempting to turn on a steep slope. The stick is really indispensable for this practice, and while two may be used, the single stick will be found assistance enough for any active person.
When skiing on level ground the correct movement is rather more of a slide than the motion used in walking or skating. The body is thrown forward on one ski and the slide is made with both feet, most of the body weight being thrown on the advanced ski, while the rear foot is slid forward without stopping the forward travel, as shown in Fig. 4. The expert skier moves forward in long gliding steps without raising the ski, but bending the knees slightly to slide the ski ahead. The feet should be kept as close together as possible to make a narrow track and the stick used to lengthen the slide. At the beginning it is a good plan to endeavor to make a long slide with each advancement of the foot, rather than strive to take long steps. The speed of level running depends, of course, upon the condition of the snow. On hard, well-packed snow, sliding is easiest and greater
speed obtained, while in
deep and soft snow less speed is the rule.
When skiing on the hard snow of a road, four miles an hour is the average speed, and for average level running, the skier will cover about the same distance as when walking along a good path.

F�� 1
Raise the Point of the Ski until the Heel Rests on the Snow
F�� 2
Swing the Ski Around by Turning the Point Out and Back
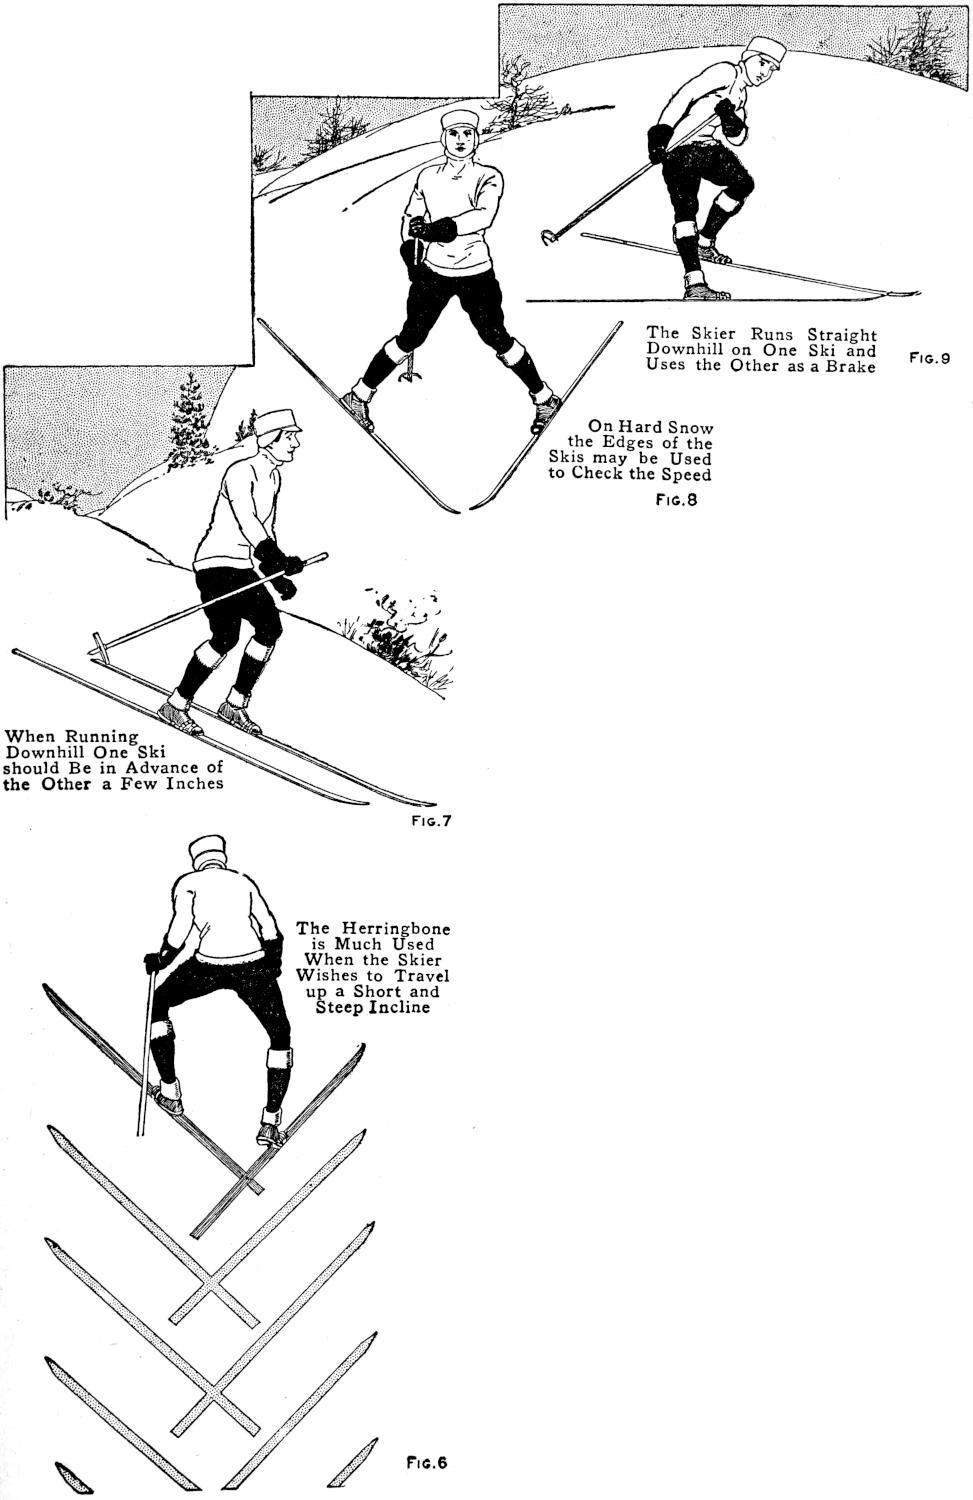
F�� 9
The Skier Runs Straight Downhill on One Ski and Uses the Other as a Brake
F�� 8
On Hard Snow the Edges of the Skis may be Used to
F��. 3
Raise the Point of the Other Ski as High as Convenient to Avoid Tripping
F�� 4
The Body is Thrown Forward on One Ski and the Slide is Made with Both Feet
F�� 5
The Skier Naturally Places His Skis at Right Angles
Rather than Permit the Slipping Backward
F��. 7 When Running Downhill One Ski should Be in Advance of the Other a Few Inches
Check the Speed
F��. 6
The Herringbone is Much Used When the Skier Wishes to Travel up a Short and Steep Incline
When traveling uphill, the regular sliding gait will suffice if the slope is gradual, but when a steep grade is encountered and the ski slips backward, the skier stands quite erect, raises the point of his ski about 3 in., and slaps it down smartly, without pulling it backward or making any attempt to push his body forward with the stick. This slap of the ski makes the smooth surface of the runner adhere better than when the runner is slid forward in the usual manner. If the hill is very steep, the skier will naturally place his skis at right angles rather
than permit the slipping backward. This is known as “side-stepping,” and is shown in Fig. 5. In doing this, the heel of the ski must be raised clear of the snow and the upper foot lifted uphill, then the lower foot brought up to the last step of the upper foot, hence it is extremely tiring for other than a short distance.
A variation of this movement, which is known to skiers as the “half side step.” and which is made by advancing the foot with the legs somewhat wider apart, and the skis placed at not quite so acute an angle with the hill, is more useful when climbing the ordinary steep grade and is far less laborious. If the skier knows how to handle his implements, side-stepping may be done backward when necessary.
The “herringbone” is another step which is much used when the skier wishes to travel up a short and steep incline. This step is made by stretching the legs rather wide apart and pointing the toes out, as shown in Fig. 6, at a decided angle, so that the knees are bent inward and the inside edges of the skis cut into the snow. A variation of this is the “half herringbone,” the skis being turned out at a less acute angle. These special steps for special purposes are all useful now and then in mountain climbing, but when a long distance is to be covered, the skier will conserve his energy by mounting the hill in a zigzag fashion rather than attempting to climb straight up. The track of the skier will then resemble the course of a boat tacking through a narrow inlet against a head of wind, and while more ground is covered than when going straight up the steepest part of the hill, progress is faster and much hard work is avoided.
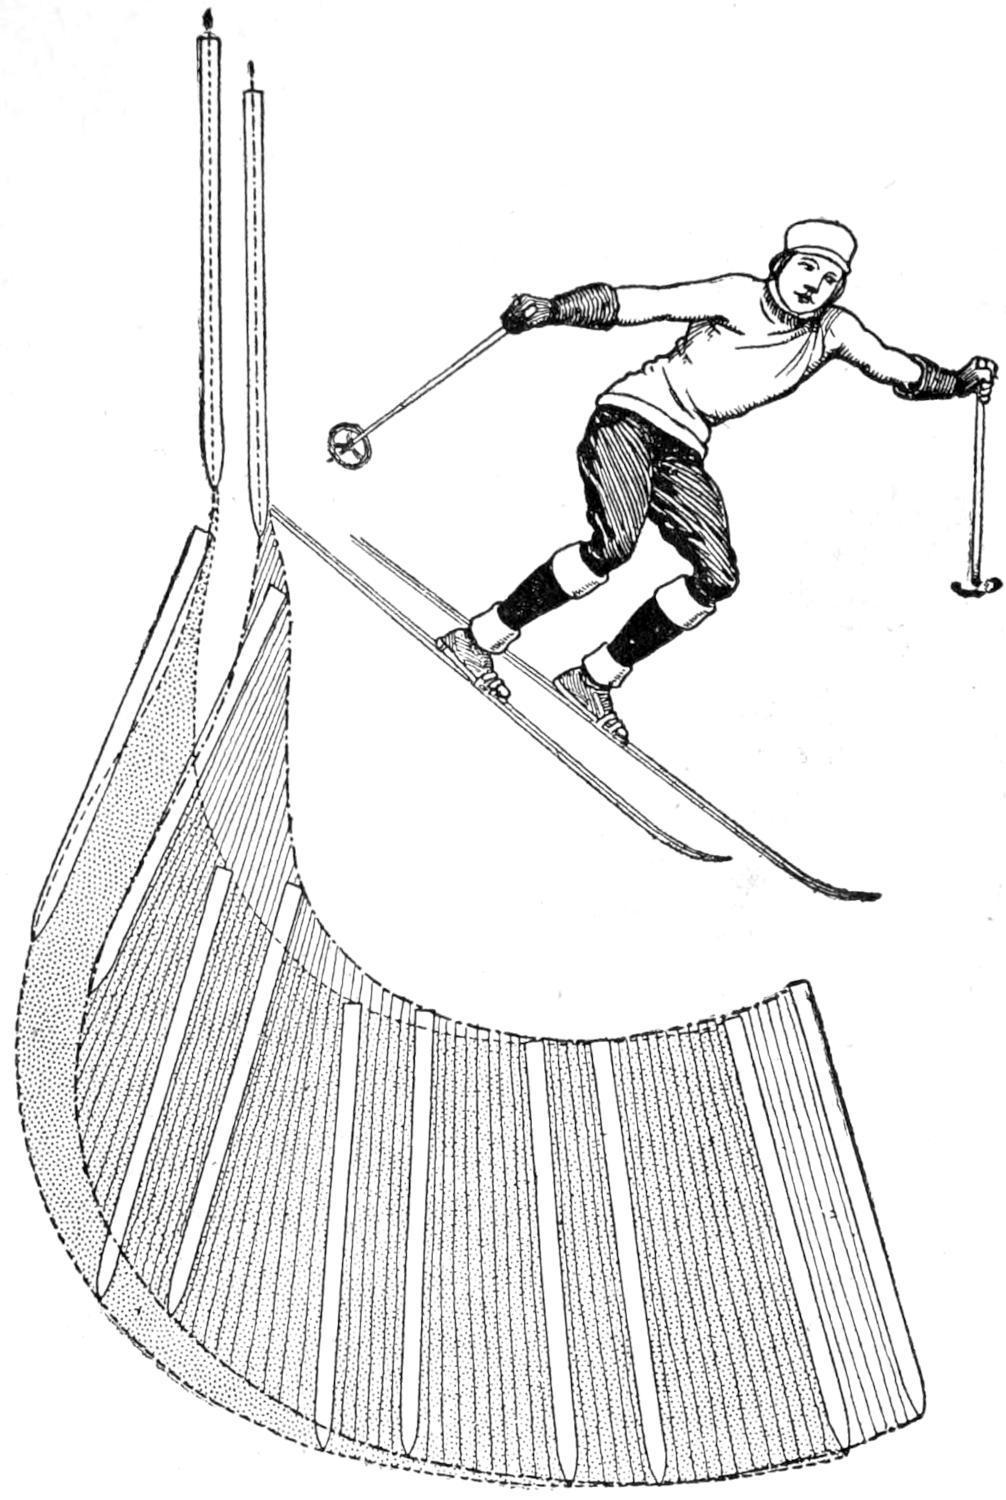
When running straight downhill, one ski should be in advance of the other a few inches, and the skis must be held quite close together so that they touch, or nearly so, as shown in Fig. 7. To make a narrow track, most expert skiers hold the knees together with the back knee slightly bent. However, the body should be perfectly and easily balanced. This is done, more or less, intuitively, by beginning the run with the body thrown on the advanced foot, and when full speed is attained the weight automatically shifts to the rear foot. The novice will find it difficult at first to keep the skis together, there being an almost uncontrollable desire to separate them to gain a better balance. A good track will come with a little practice, but if the skis are too short, or made without a groove, even an expert
would be compelled to keep his feet a trifle apart and make a double track in order to keep from falling.
F��. 10
The Christiania Swing is Accomplished by Pressing with Both Heels at the Same Time While the Stick Digs Well into the Snow Above
When making the start preparatory for coasting downhill, the novice may, if the slope is moderately steep, face in the desired direction and assume the proper position by supporting himself with the stick. On most very steep slopes, where the best coasting is to be had, this is quite out of the question, and the skier must step around quickly by moving the lower ski first. This will be somewhat difficult to do until the novice gains more confidence, which will quickly come after a little practice, and it is a good plan to practice starting from the slope without the aid of the stick to anchor the body. Owing to the fact that the skis do not reach much speed at the start of the coast, even the slow novice will have plenty of time to make the turn and face in the right direction before much speed is attained. A comparatively crouching position, secured by bending the knees and the body at the waist, will much lessen the liability of a fall forward. This position enables the skier to control the balance of his body with more certainty, and especially when coasting on a hill where patches of ice, or crusted snow, and soft spots of unpacked snow are encountered, a condition usually found wherever skiing is enjoyed. When coasting, the stick, or sticks, should be firmly grasped at the upper end with the looped thong, or strap, over the wrist, and the end dragging behind. Balancing is done entirely at the waist, and for straightaway running, the weight of the body will rest largely upon the rear ski. The long running surface of the ski will carry the skier over many bumps and hollows without disturbing the balance of the body or causing a fall, providing the novice does not lose his nerve. It is necessary to practice on rough and uneven ground if the skier desires ever to attain much expertness, and plenty of falls must be expected, but not dreaded by the beginner. A fall on skis is by no means fraught with danger, and one may fall with impunity providing all muscles are relaxed. Many beginners find falling the easiest manner of stopping, but this should not be necessary, providing the hints given are well understood and practiced. However, the novice should have no fear of falling if he
wants to become proficient on skis, and to offset any timidity, which so very often causes the novice to lean backward and fall in this direction, it is a good plan to lean well forward to check this natural tendency. Getting up after a fall is easily enough managed if the head is pointing up the slope, but when the position is reversed much floundering is necessitated. It would seem that this would be obvious to all, yet the majority of beginners often forget it altogether.
Braking with the stick is only effective when the body is properly balanced, and the stick is kept well forward and as nearly vertical as possible. Straddling the stick, sitting upon it, or leaning backward on it held at an angle, are slovenly methods which every novice should avoid.
The “snowplow” is most largely used by all good skiers for braking, stopping, and turning. This is accomplished by stretching the legs wide apart and at the same time turning the toes in as much as possible, thus presenting the side of the ski to the snow and retarding the speed. Aside from straddling the legs wide apart, the novice will have no trouble in learning this useful knack. For the first practice, pick out a fairly steep hill road, or a hillside where the snow is old and not soft. Begin the run as for coasting, and when good speed has been attained, spread the legs wide apart, turn the toes in and endeavor to control the speed with the skis rather than depend upon the stick. On hard snow the edges of the ski may be used to check the speed, but on ordinary soft and well-packed snow, the runner may be kept quite flat. This is well shown in Fig. 8.
The knack of “stemming” is a variation of the snowplow, inasmuch as the skier runs straight downhill on one ski, and turns the heel of the other ski outward and downward and uses it as a brake, as in Fig. 9. This is a very useful movement, and is largely used when coasting down steep slopes, and when one has learned the knack of it, stemming will serve for braking and steering, and is useful for stopping by turning the skiing course uphill. To earn it, select a steep hillside, coast down at an angle, with the feet a trifle part, and endeavor to retard the speed with the stick and turn the heel of the lower ski outward. This makes the turn and the skier faces uphill and comes to a stop. By turning the heel of the lower ski outward and the heel of the upper ski inward, the skis will travel downhill with a sort of
snowplow movement. When practicing these movements, the beginner should endeavor to use the stick as little as possible and learn to depend upon the skis for controlling the speed.
The “side slip” is useful on steep slopes, and is done by turning the skis so that the runners are at a decided angle to the course traveled. This affords the maximum braking by the skis alone, and is especially effective when combined with the braking done with the stick. Side-slipping may, of course, be done while the skier is traveling forward, by keeping the skis close together so that the edges almost touch. While this movement checks the speed in much the same manner as stemming, side-slipping is less tiresome, since the weight of the body gives the required braking effect, while, in stemming, the muscles are called upon to keep the heel pressing outward.