Living a Dream: Stitching at the Royal School of Needlework
50 by Ann Hammel Murphy
MJ Kinman: Architect of the Gem Quilt
52 by Ann Hazelwood
Orphan Rescuers
A Flash of Red: A mysterious quilting series
Tipsy Lane Floor Canvas
Clue 1 of 5 by Wendy Sheppard –Intermediate by Tami Pfeil –Easy by Gyleen X. Fitzgerald –Intermediate
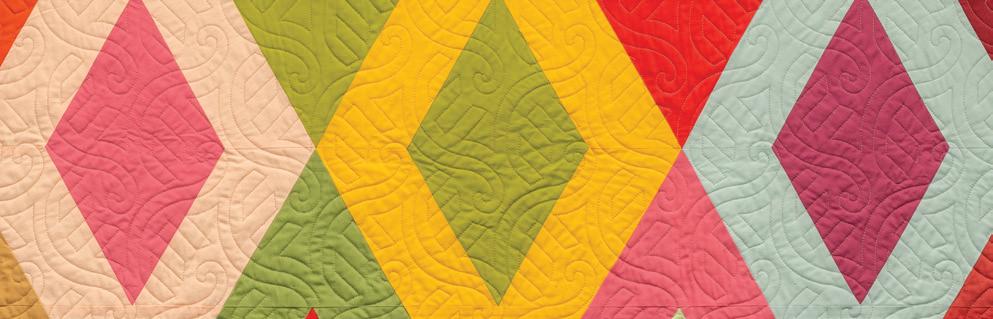
Double Diamonds 54 by Linda J. Hahn –Easy
Somewhere in Paradise
Garden Tiles
by Sarah Fulks –Easy
Batten Down the Hatches, AccuQuilt-friendly
by Laura Strickland –Challenging
Venture into Landscape Quilting: Constructing Your Quilt
Notable Quilter: Eleanor Burns
Part 4 of 5 by Kathy McNeil by Linda LaPinta by Deb Geyer
Attention to Detail
Blooming Midsummer Flowers by Noriko Nozawa
Threaducation, presented by Wonderfil
The Power of 12wt and Heavy Threads by Calista Ngai
Quilting with Confidence, presented by Gammill
Choosing Your Marking Tools by Eva Birch
92 Some Bunny Loves You by Mary Hertel Made by Marney Collectibles
EDITOR from the
Evolution of influence
When “influencers” are mentioned today, the term often refers to those on social media who shape our interests and behaviors as they share their stories, photos, videos, and chats with others and create their brand through these efforts.
As I continue to think about the history that’s documented through the pages of past issues of American Quilter magazine, my mind turns again to the evolution of quilting. The resurgence of this timeless art and craft in the late 1970s and early 1980s engaged countless home sewists. Through local groups of friends, newspapers, and magazines, they shared innovative methods, tools, and designs (often using historical quilt blocks) that had captured their interest and eventually inspired the imaginations of sewists. The quilters of this resurgence era became our influencers.
Pamela Weeks, a curator at the New England Quilt Museum and author of the Did You Know? column has evolved as the quilt historian for our magazine. Many readers have told me how much they enjoy learning about the histories of quilt designs, quilters, and quilts that she continues to research and share with us.
We’ve asked Deb Geyer, the executive director of The Quilters Hall of Fame, to join Pamela with a column that focuses on the influential quilters and quiltmaking in past decades. You’ll learn the backstory of notable quilters throughout their
quilting journeys, along with their contributions to the quilting community: methods, tools, books, and the classes they’ve offered.
In the January 2025 issue of AQ, Deb shared her conversation with Barbara Brackman, whose major work of compiling and documenting traditional quilt blocks in the Encyclopedia of Pieced Quilt Patterns (1993) is historical. For this issue, Deb talked with Eleanor Burns, known worldwide for her Quilt In A Day television series. Watch for Deb’s interview with Ricky Tims in the May issue of AQ; Ricky is one of the first male quilters recognized for his unique approach to quilting and shares the stage with Alex Anderson on the first quilting show delivered via the Internet. I hope you will enjoy learning more about some of the influencers in the Notable Quilter series too!
I find it mind-boggling when I think about all of the tools and techniques that enrich our quilting experience today—brought to us by those who innovate and influence. And we can’t forget about those near to us, our heritage of family and friend quilters who also influence our quilting journeys!
Tricia Patterson
Editor in Chief
P.S. To all of you who have sent emails to me with your thoughts and suggestions for AQ: I thank you!
Our editorial team strives to provide the content in the American Quilter magazine without error. Please let us know if you find a mistake in a pattern or article by sending an email to editor@americanquilter.com. We post pattern corrections at americanquilter.com/blog/aq-magazine/
Did You Know?
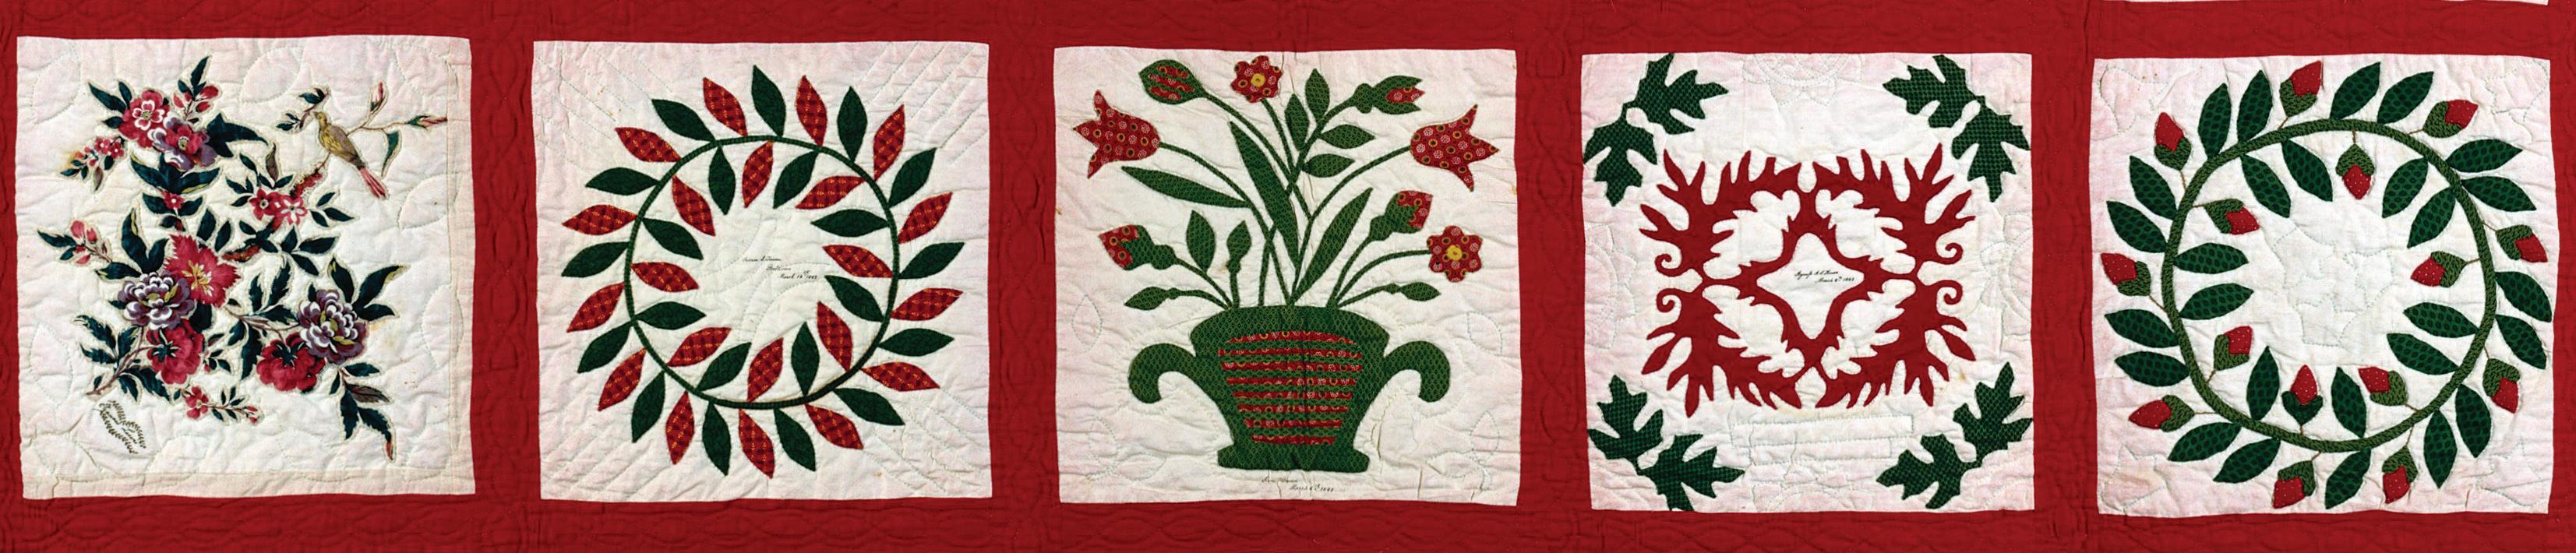
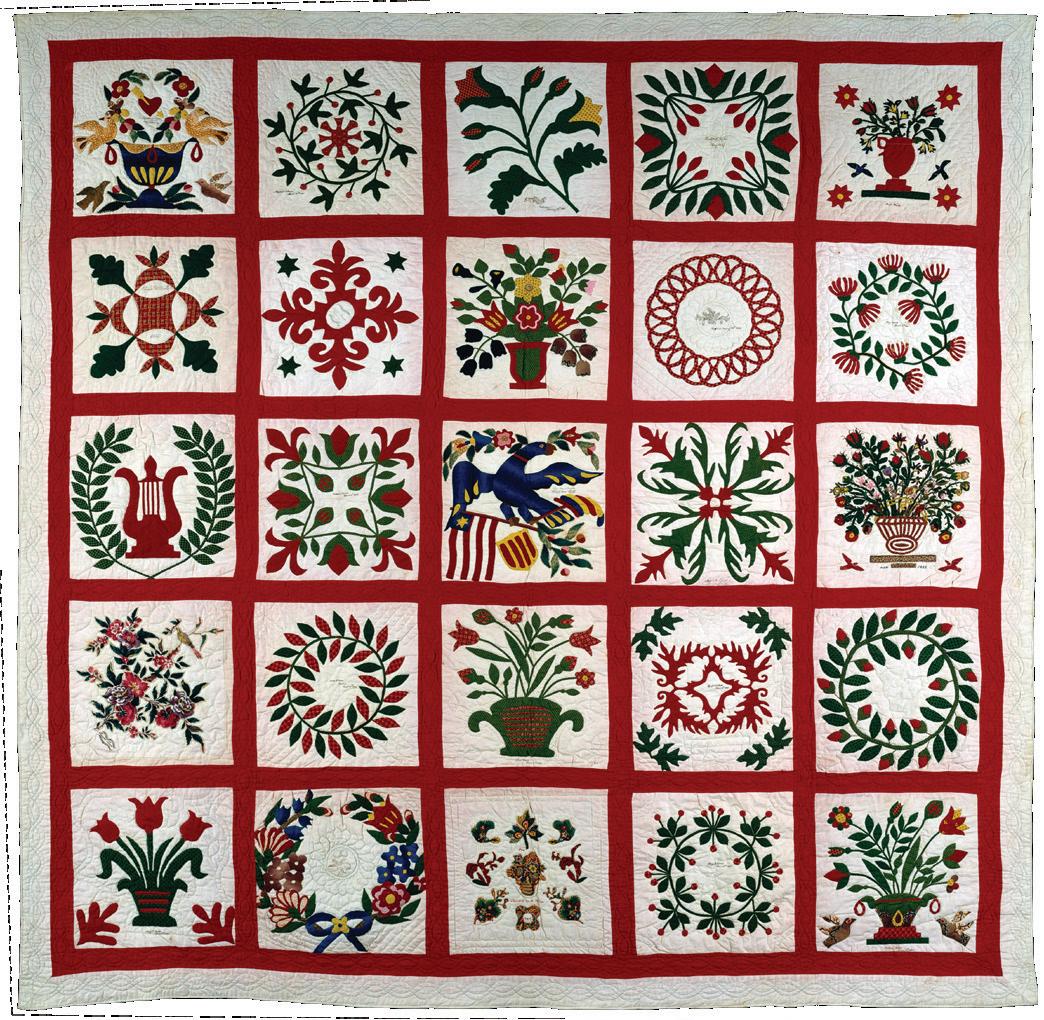
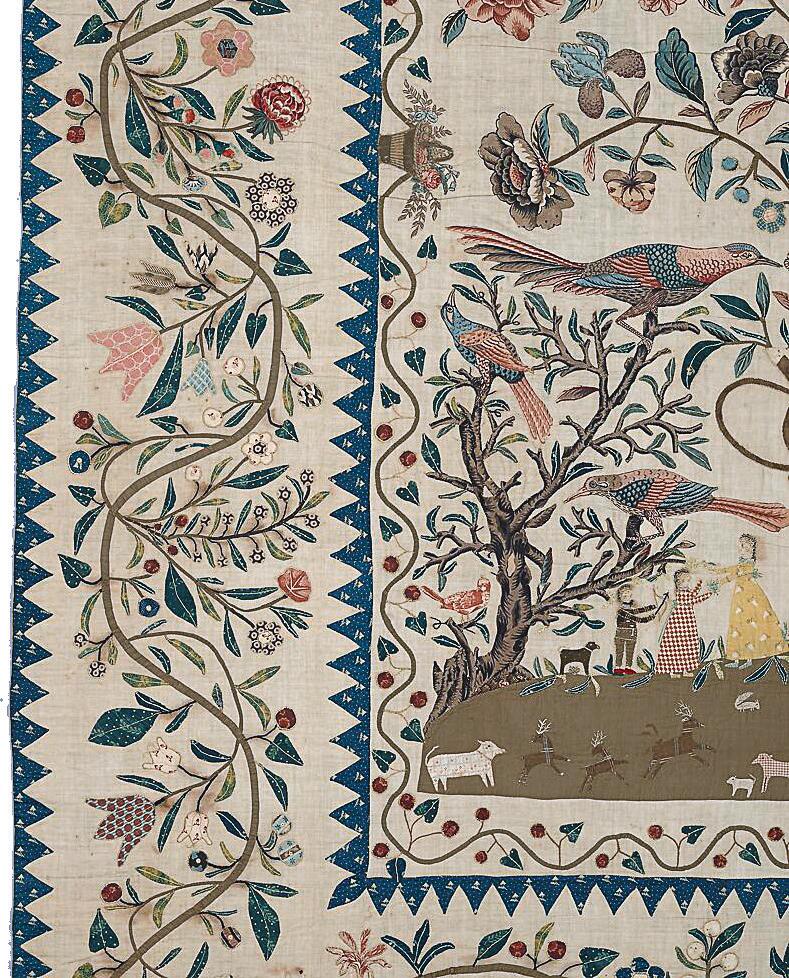
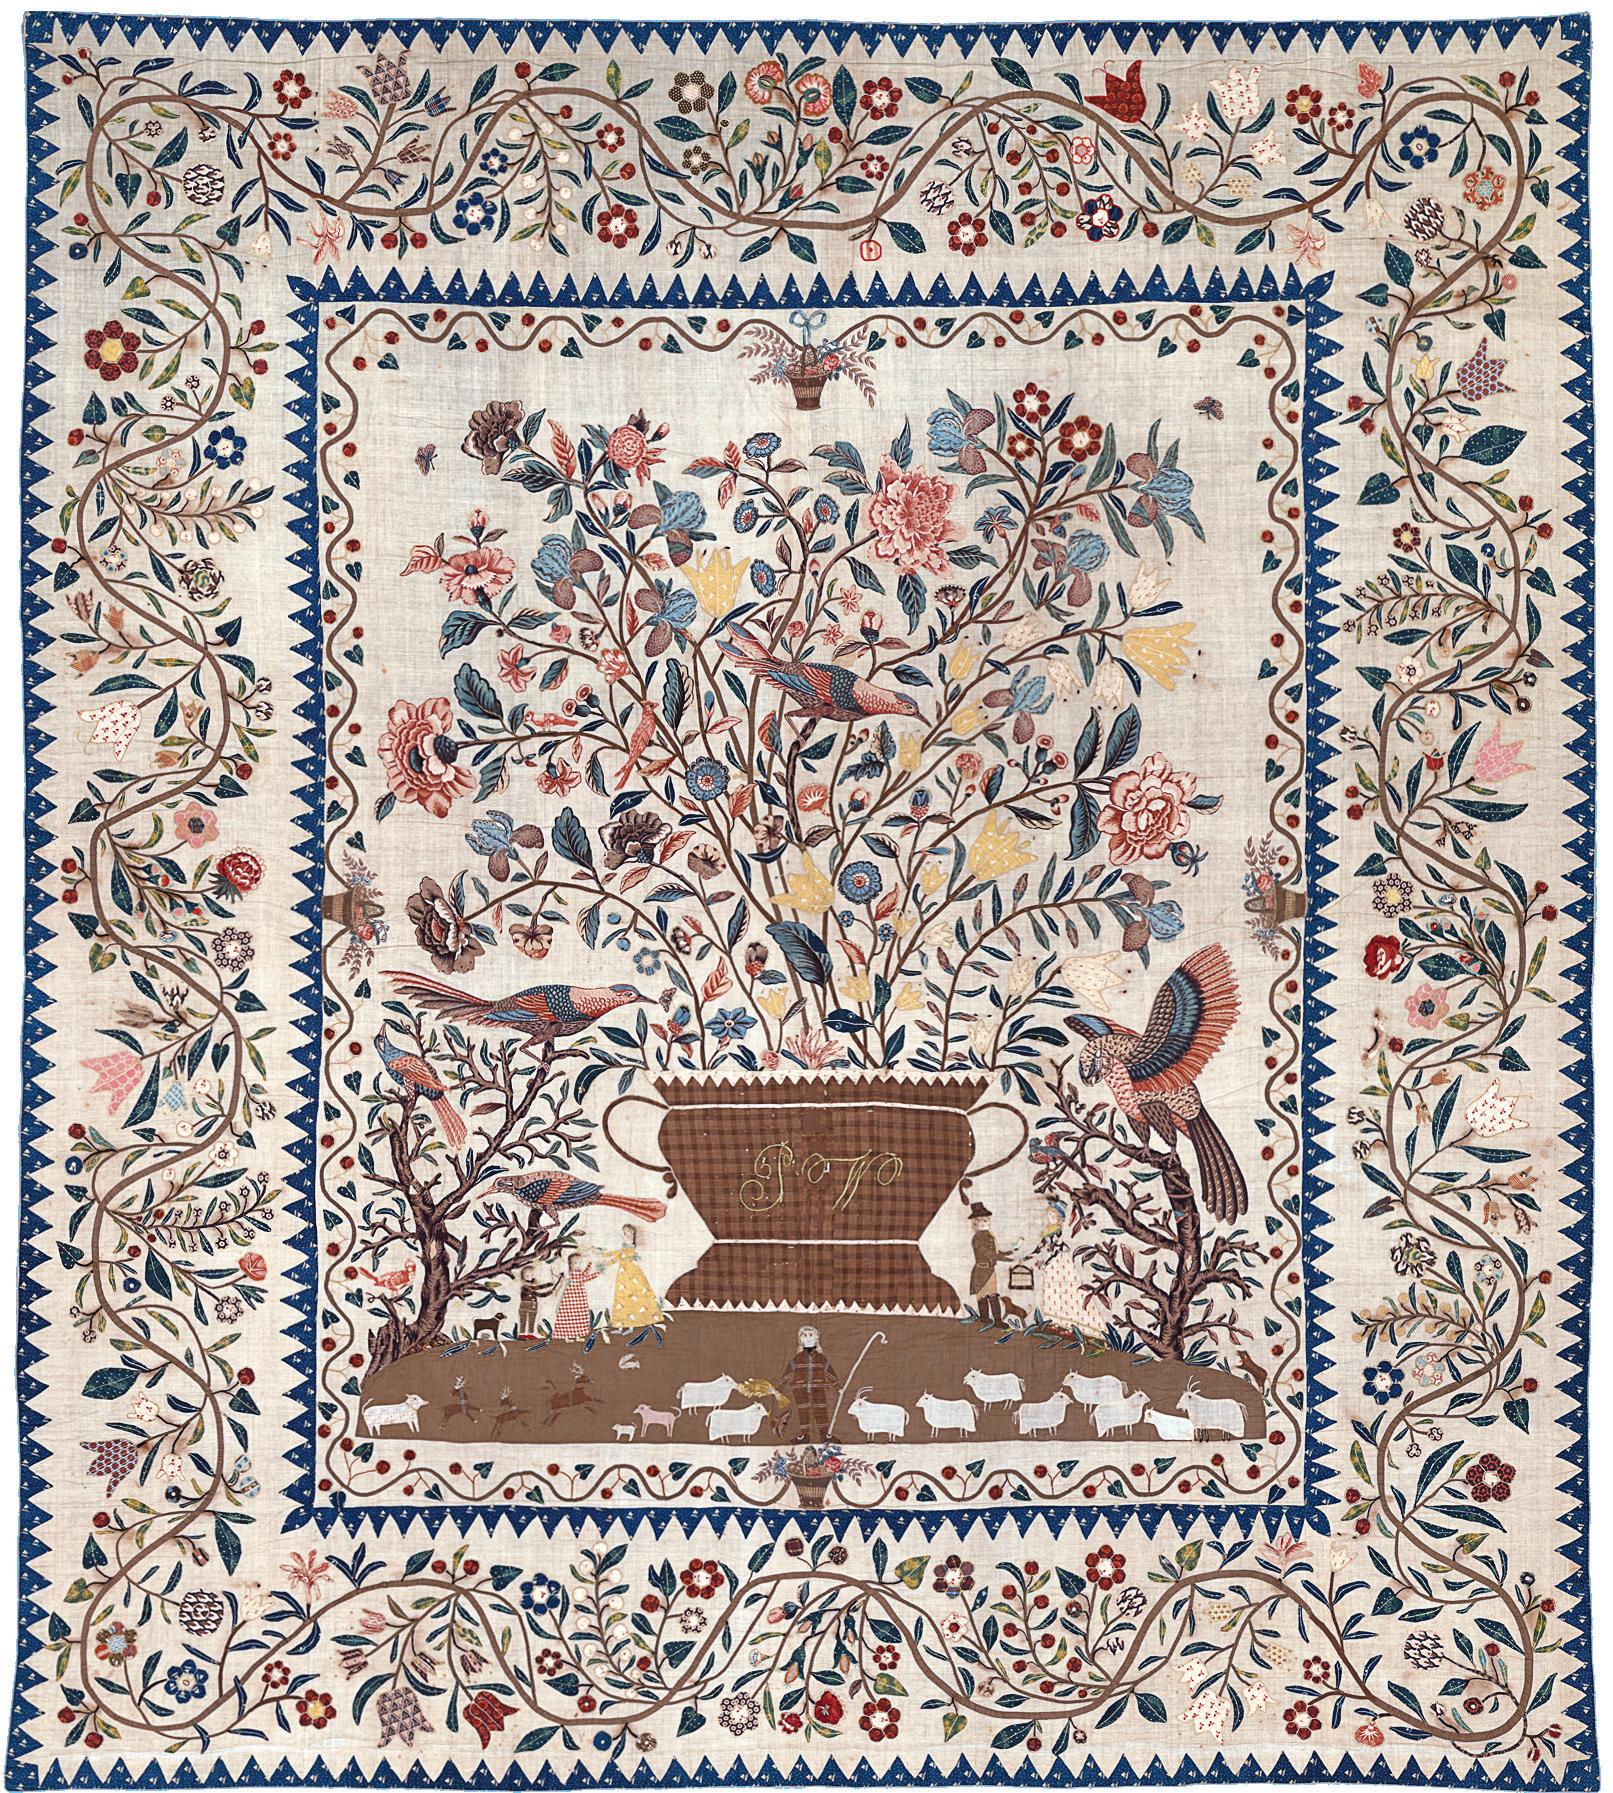
Birds in Quilts
“Bird, bird, bird, b-bird's the word!” That’s a bit silly, but birds are a very popular motif found in quilts, antique and new. Take a look back at your July 2024 issue of American Quilter to see the number of birds among the top prizewinning quilts at the AQS QuiltWeek in Paducah. The stunning Best of Show winner, Serenity by Molly Hamilton-McNally, featured swans, parrots, and love birds! However, because there have been so many quilts that feature birds through many decades, we will confine this article to the 1800s.
In the United States, during the Federal Period of the first quarter of the nineteenth century, the American eagle was nearly ubiquitous on the many patriotic quilts made at the time. This was a time of patriot fervor, following the successful American Revolution that overthrew English rule and intensified after the War of 1812. Eagles were quilted on elegant whitework bed coverings and appliquéd with laurel leaves in one talon and arrows of war in the other, all under an arch of thirteen stars.
During the red-and-green appliqué fever of the mid-nineteenth century, a time when Baltimore Album quilts were popular, birds appeared in vining borders, hovering over fruit-filled baskets, and on branches in the quilt blocks. In the same era and even earlier, bird motifs were printed on cotton and the fabric used for curtains and wholecloth quilts.
Birds were also popular in indigo quilts during the last quarter of the 1800s. Some indigo and white quilts were styled to look like woven coverlets, with an abundance of birds in the borders. Don’t forget the crazy quilts from the same period. Birds were painted on blocks in some quilts and embroidered on others. Birds are an ever-popular subject for quilts and art.
Top: Members of the Brown and Turner families, Baltimore, Maryland; Quilt, Album pattern, 1846-1852. This Album quilt, in which nearly every block is signed and dated by a different person, features six blocks with bird motifs. Most of the blocks were appliquéd by members of the Brown and Turner families and donated to the museum by a descendant. Bequest of Margaret Brown Potvin, 1988.134. Collection of the Metropolitan Museum.
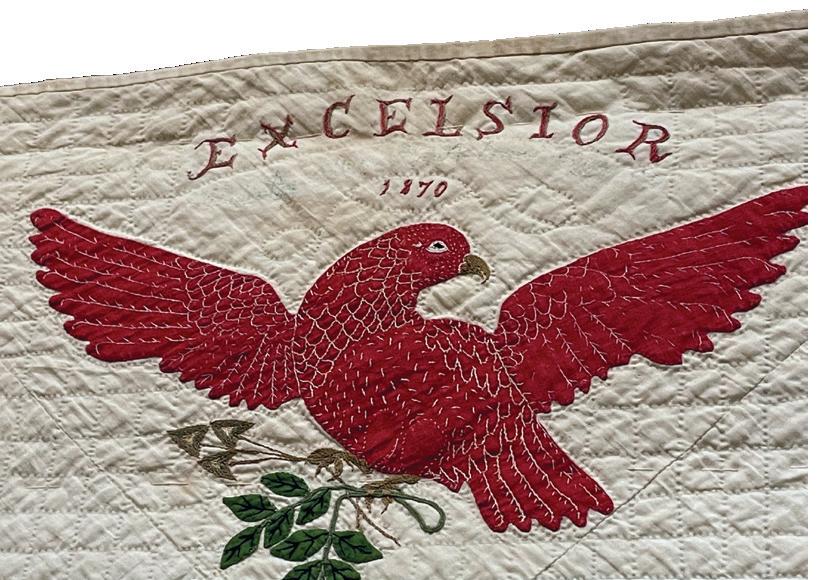
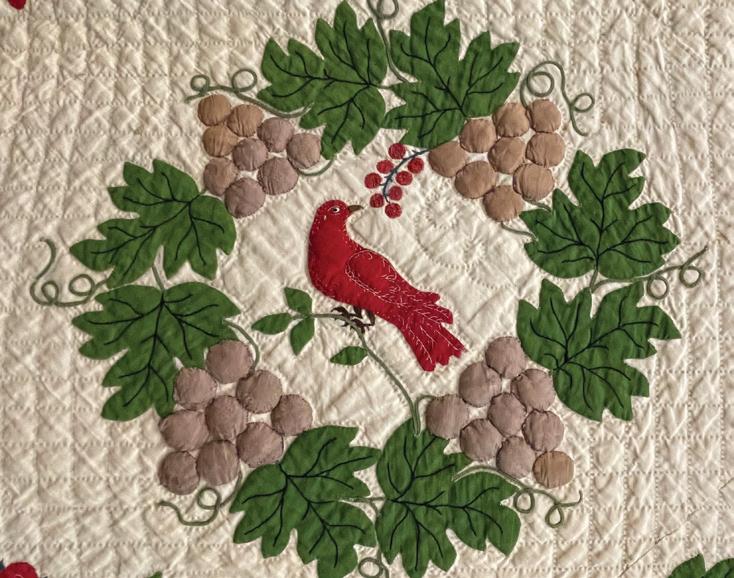
Left and middle: Maker unknown, New York; Excelsior Floral Wreath with Floral Border, circa 1870. Excelsior is the state motto for New York and the eagle is featured as the most important element in this quilt. The floral wreaths that surround the bird, fish, and fruit motifs are gorgeous! Collection of Deb Grana.
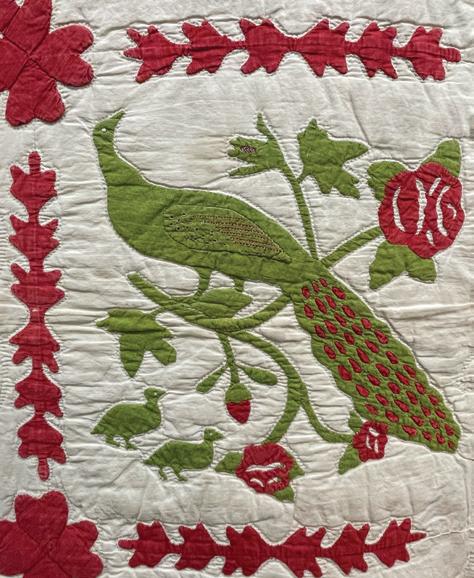
Right and top left, facing page: Maker unknown, New York; Peacock Floral, circa 1850. This wonderful original design includes the birds, wide floral borders, and open cut roses often found in New York quilts. Collection of Deb Grana.
By Pamela Weeks, Biney Family Curator, New England Quilt Museum
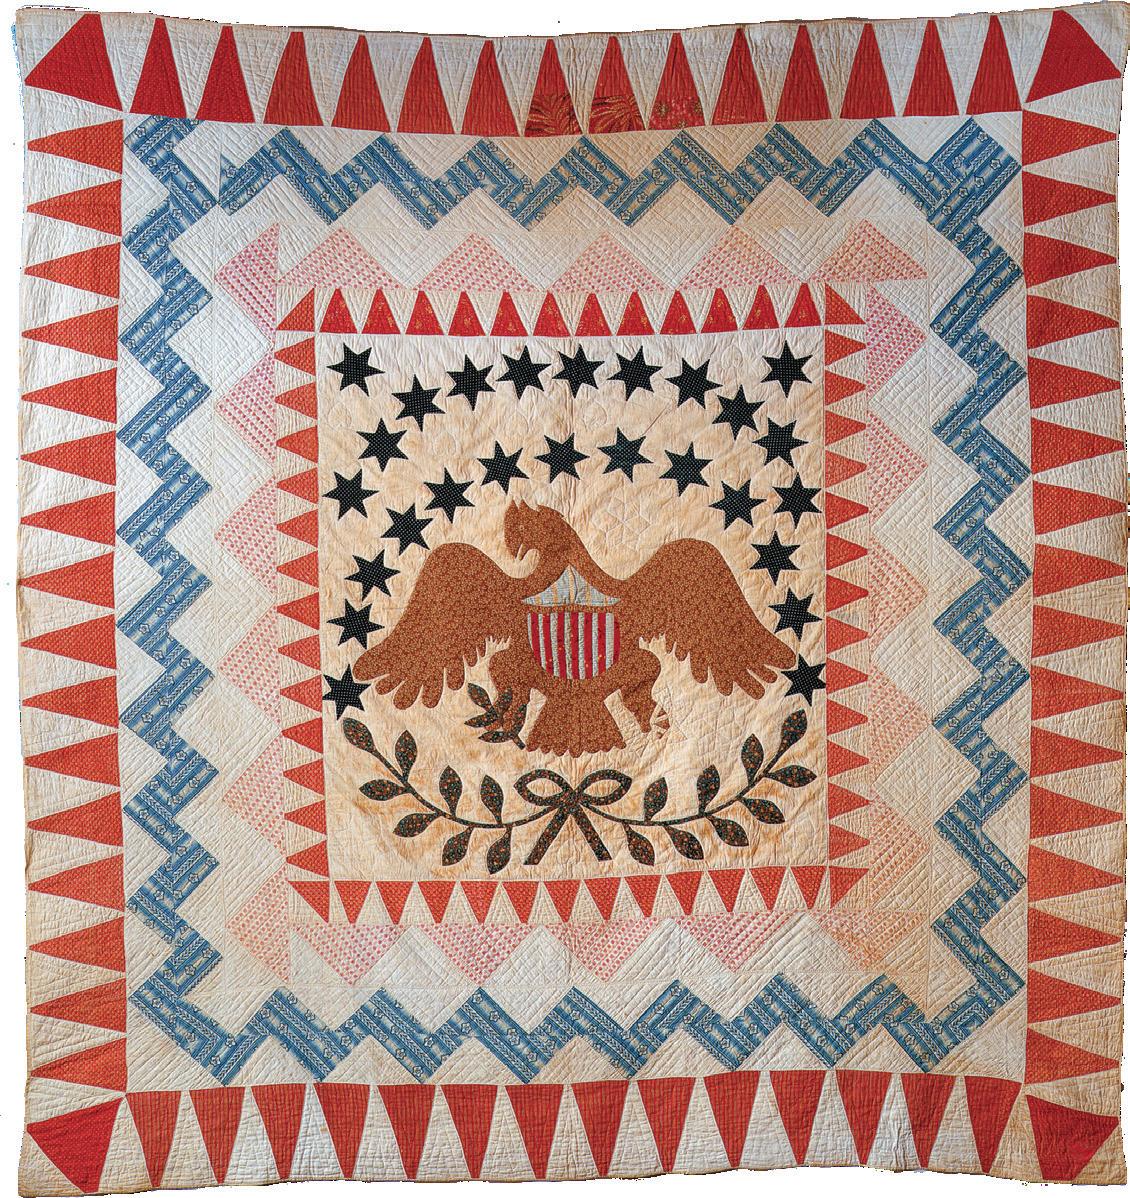
Bottom left: Maker unknown, perhaps made in New England; Eagle Quilt, 1837–1850. After the Great Seal of the United States was adopted by the Continental Congress in 1782, the image of the American eagle became an extremely popular design element, used to adorn all types of late-eighteenth- and early-nineteenth-century decorative art objects. Gift of Mrs. Jacob Kaplan, 1974.32. Collection of the Metropolitan Museum.
Magazines for Quilters
Pamela Weeks
and bottom right: Probably made by
for
New
New York; Phebe Warner Coverlet, circa 1803. The maker was influenced by the central flowering-tree motif common in popular imported Indian bed hangings, called "palampores," as well as by the pastoral landscape needlework pictures often worked by young women. Gift of Catharine E. Cotheal, 38.59. Collection of the Metropolitan Museum.
Above
Sarah Furman Warner Williams
Phebe Warner,
York,
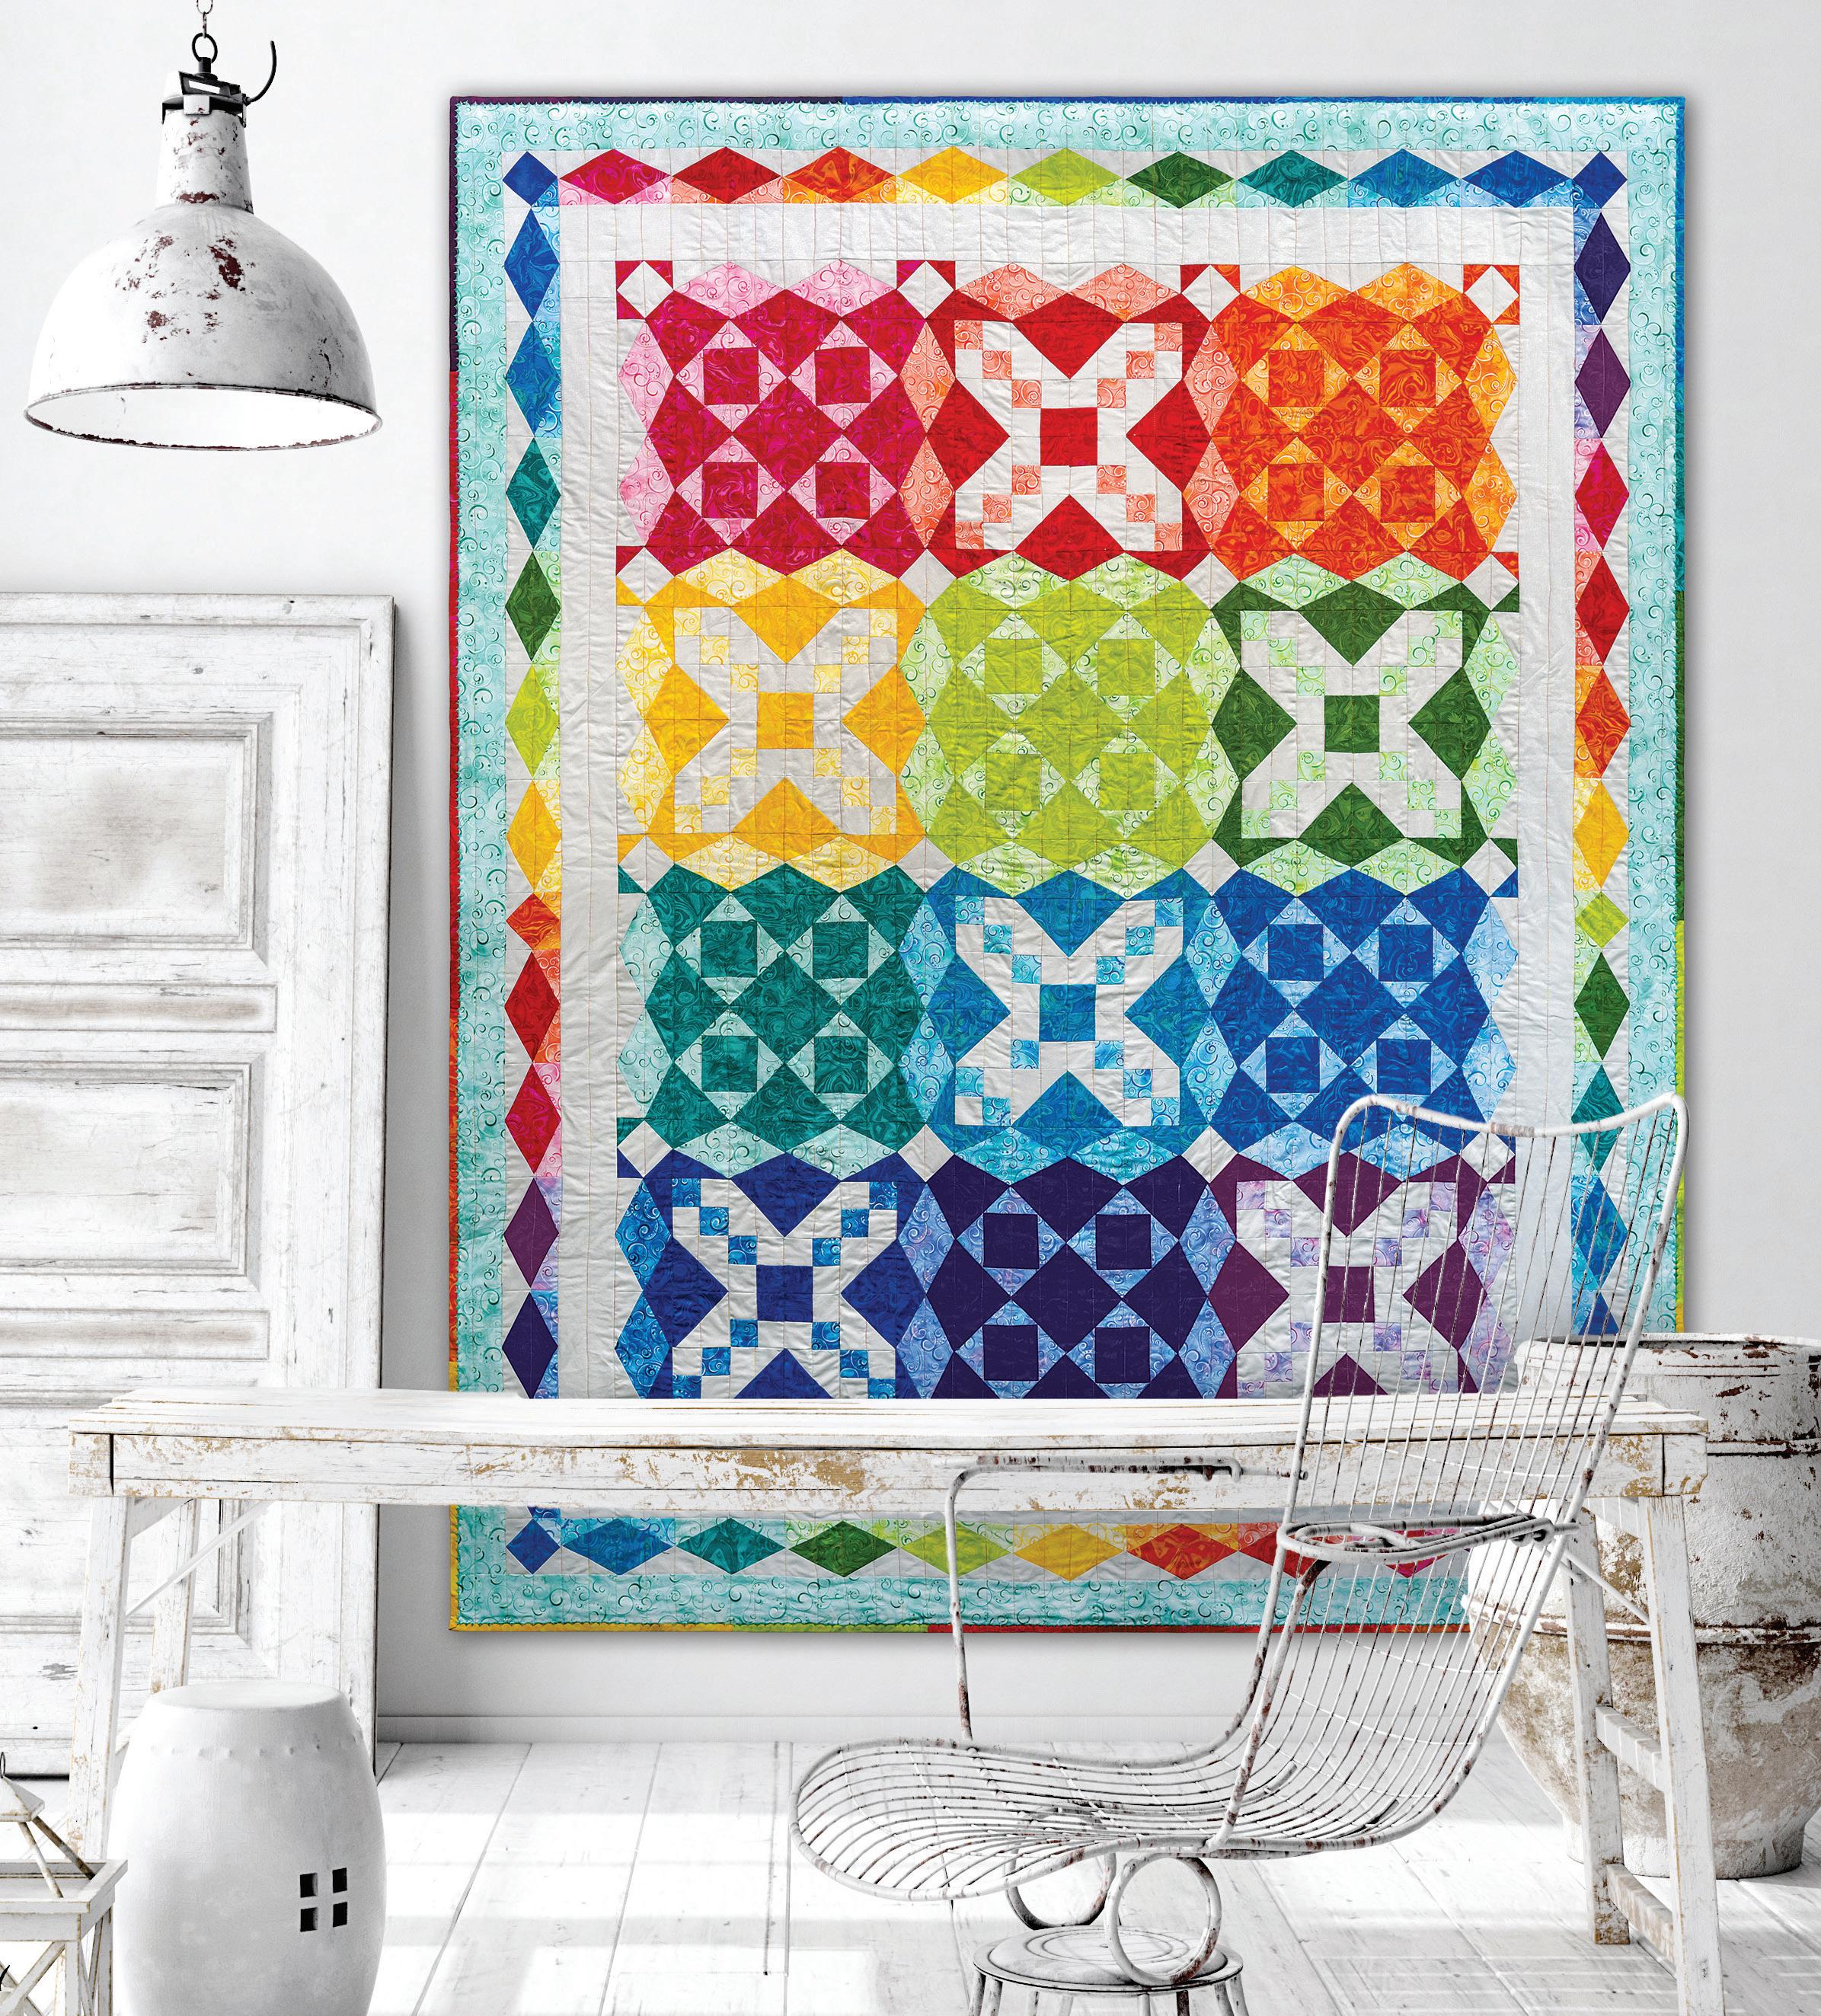
Wendy Sheppard
A mysterious quilting series
A Flash of Red Mystery Quilt Clue 1 of 5
by Wendy Sheppard
Skill Level: Intermediate ¦ Finished Quilt Size: 63" x 63" ¦ Finished Block Size: 18" x 18"
Clue 1
Looking for fun, inspiration, and a little bit of mystery in your next quilting project? Wendy Sheppard has a special design for you! For those new to the mystery quilt concept, instructions for A Flash of Red will be published in 5 installments. The quiltmaker will not know the final layout until part 5. The design is perfect for quilters of all skill levels (beginners, just take your time!), as it is composed of easy-to-sew units arranged in intriguing, creative ways. In Clue 1, you’ll select fabrics and then cut and construct 6 interesting center units.
Choosing fabrics
Fabric #1 appears in the background of this design. Choose a light value in a solid, a tone-on-tone, or another low contrast fabric.
Fabrics #2 through #7 are the most prominent in this quilt. Definitely keep A Flash of Red in mind as you select these fabrics. Medium to dark values of red through orange/red in solids, tone-on-tones, or low-contrast prints will work best.
Fabrics #8, #9, and #10 are lighter in value than the dominant fabrics, but in the same color family. Look for low-contrast prints or tone-on-tones in medium to dark pinks.
Fabrics #11 and #12 are light and dark greens. Fabric #13 is a strong bright yellow, and Fabric #14 is a black solid or tone-on-tone. For the binding, purchase more of one of Fabrics #2 through #7, or wait for the big reveal in Clue 5 and then make your final binding decision.
After selecting your fabrics, cut a swatch of each and glue the swatches next to the color names in the Materials chart (page 22). Use the chart as an aid to avoid confusion as you cut and sew fabrics.
Getting started
To make best use of fabric, all cutting for Fabric #1 is given in this clue. Other fabrics are cut as they are needed for each clue. Label pieces with their fabric number and piece letter as you cut, for example, Fabric #2 - D. Set aside all leftover fabrics from each clue for future instructions. Now, let’s sew!
Materials and fabric color key
Note: Requirements are based on 42" usable width of fabric (WOF).
Binding – 5/8 yard
Backing – 4¼ yards
Batting – 71" x 71"
Cutting
Note: All strips are cut across the WOF.
From Fabric #1:
6 strips 3½" x WOF (border)
3 strips 2" x WOF (sashing)
9 rectangles 7½" x 10½" (S)
9 rectangles 5½" x 8½" (N)
9 squares 5½" x 5½" (M)
9 rectangles 3½" x 7½" (L)
9 rectangles 3½" x 5" (T)
18 squares 3½" x 3½" (P)
2 squares 3" x 3" (I)
9 rectangles 2½" x 3½" (K)
98 squares 2½" x 2½" (D)
6 rectangles 2" x 18½" (X)
4 rectangles 2" x 3½" (C)
29 squares 2" x 2" (B)
18 rectangles 1½" x 3½" (J)
4 rectangles 1½" x 3" (G)
44 rectangles 1½" x 2½" (E)
4 rectangles 1½" x 2" (F)
90 squares 1½" x 1½" (A)
8 squares 1" x 1" (H)
From Fabric #2:
4 squares 2½" x 2½" (D)
4 rectangles 2" x 3½" (C)
4 squares 2" x 2" (B)
8 rectangles 1½" x 2½" (E)
7 squares 1½" x 1½" (A)
From Fabric #3:
6 squares 2½" x 2½" (D)
8 squares 2" x 2" (B)
4 rectangles 1½" x 3" (G)
From Fabric #4:
2 squares 3" x 3" (I)
7 squares 2½" x 2½" (D)
2 rectangles 2" x 3½" (C)
1 square 2" x 2" (B)
8 squares 1½" x 1½" (A)
Please respect copyright laws. This pattern may be copied for personal use only. Reproduction for resale is strictly prohibited.
Piecing Center Units 1, 3, 5, 6, 7, and 8
Note: Press seam allowances in the direction of the arrows. Label each center unit for easier block assembly later.
Sew 3 rows using 5 Fabric #2 A squares and 4 Fabric #1 A squares (fig. 1). Join the rows to make 1 nine-patch measuring 3½" square from raw edge to raw edge.
Draw a diagonal line on the wrong side of each of 8 Fabric #1 B squares. Place a marked square on a Fabric #2 C rectangle, right sides together (fig. 2). Sew on the marked line. Trim away the excess fabric, leaving ¼" seam allowances; press. Repeat on the opposite end of the rectangle to complete a flying geese unit (FG) measuring 2" x 3½". Make 4 FG.
Arrange and sew 3 rows using 4 Fabric #2 B squares, 4 FG, and the nine-patch (fig. 3). Join the rows to complete Center Unit 1, measuring 6½" square.
Draw a diagonal line on the wrong side of each of 12 Fabric #1 A squares. Place a marked square on a Fabric #2 D square, right sides together ( fig. 4). Sew on the marked line. Trim away the excess fabric, leaving ¼" seam allowances, to complete Unit A-D. Make 4 A-D units.
Living a Dream: Stitching at the Royal School of Needlework
By Ann Hammel Murphy
When you were a child, you may have had palace dreams. Who could hear the Cinderella story without imagining the high ceilings, the ballrooms, and your dress-swooping entrance? Keep that thought, add one of your favorite pastimes, and tie it all up with an impressive learning experience.
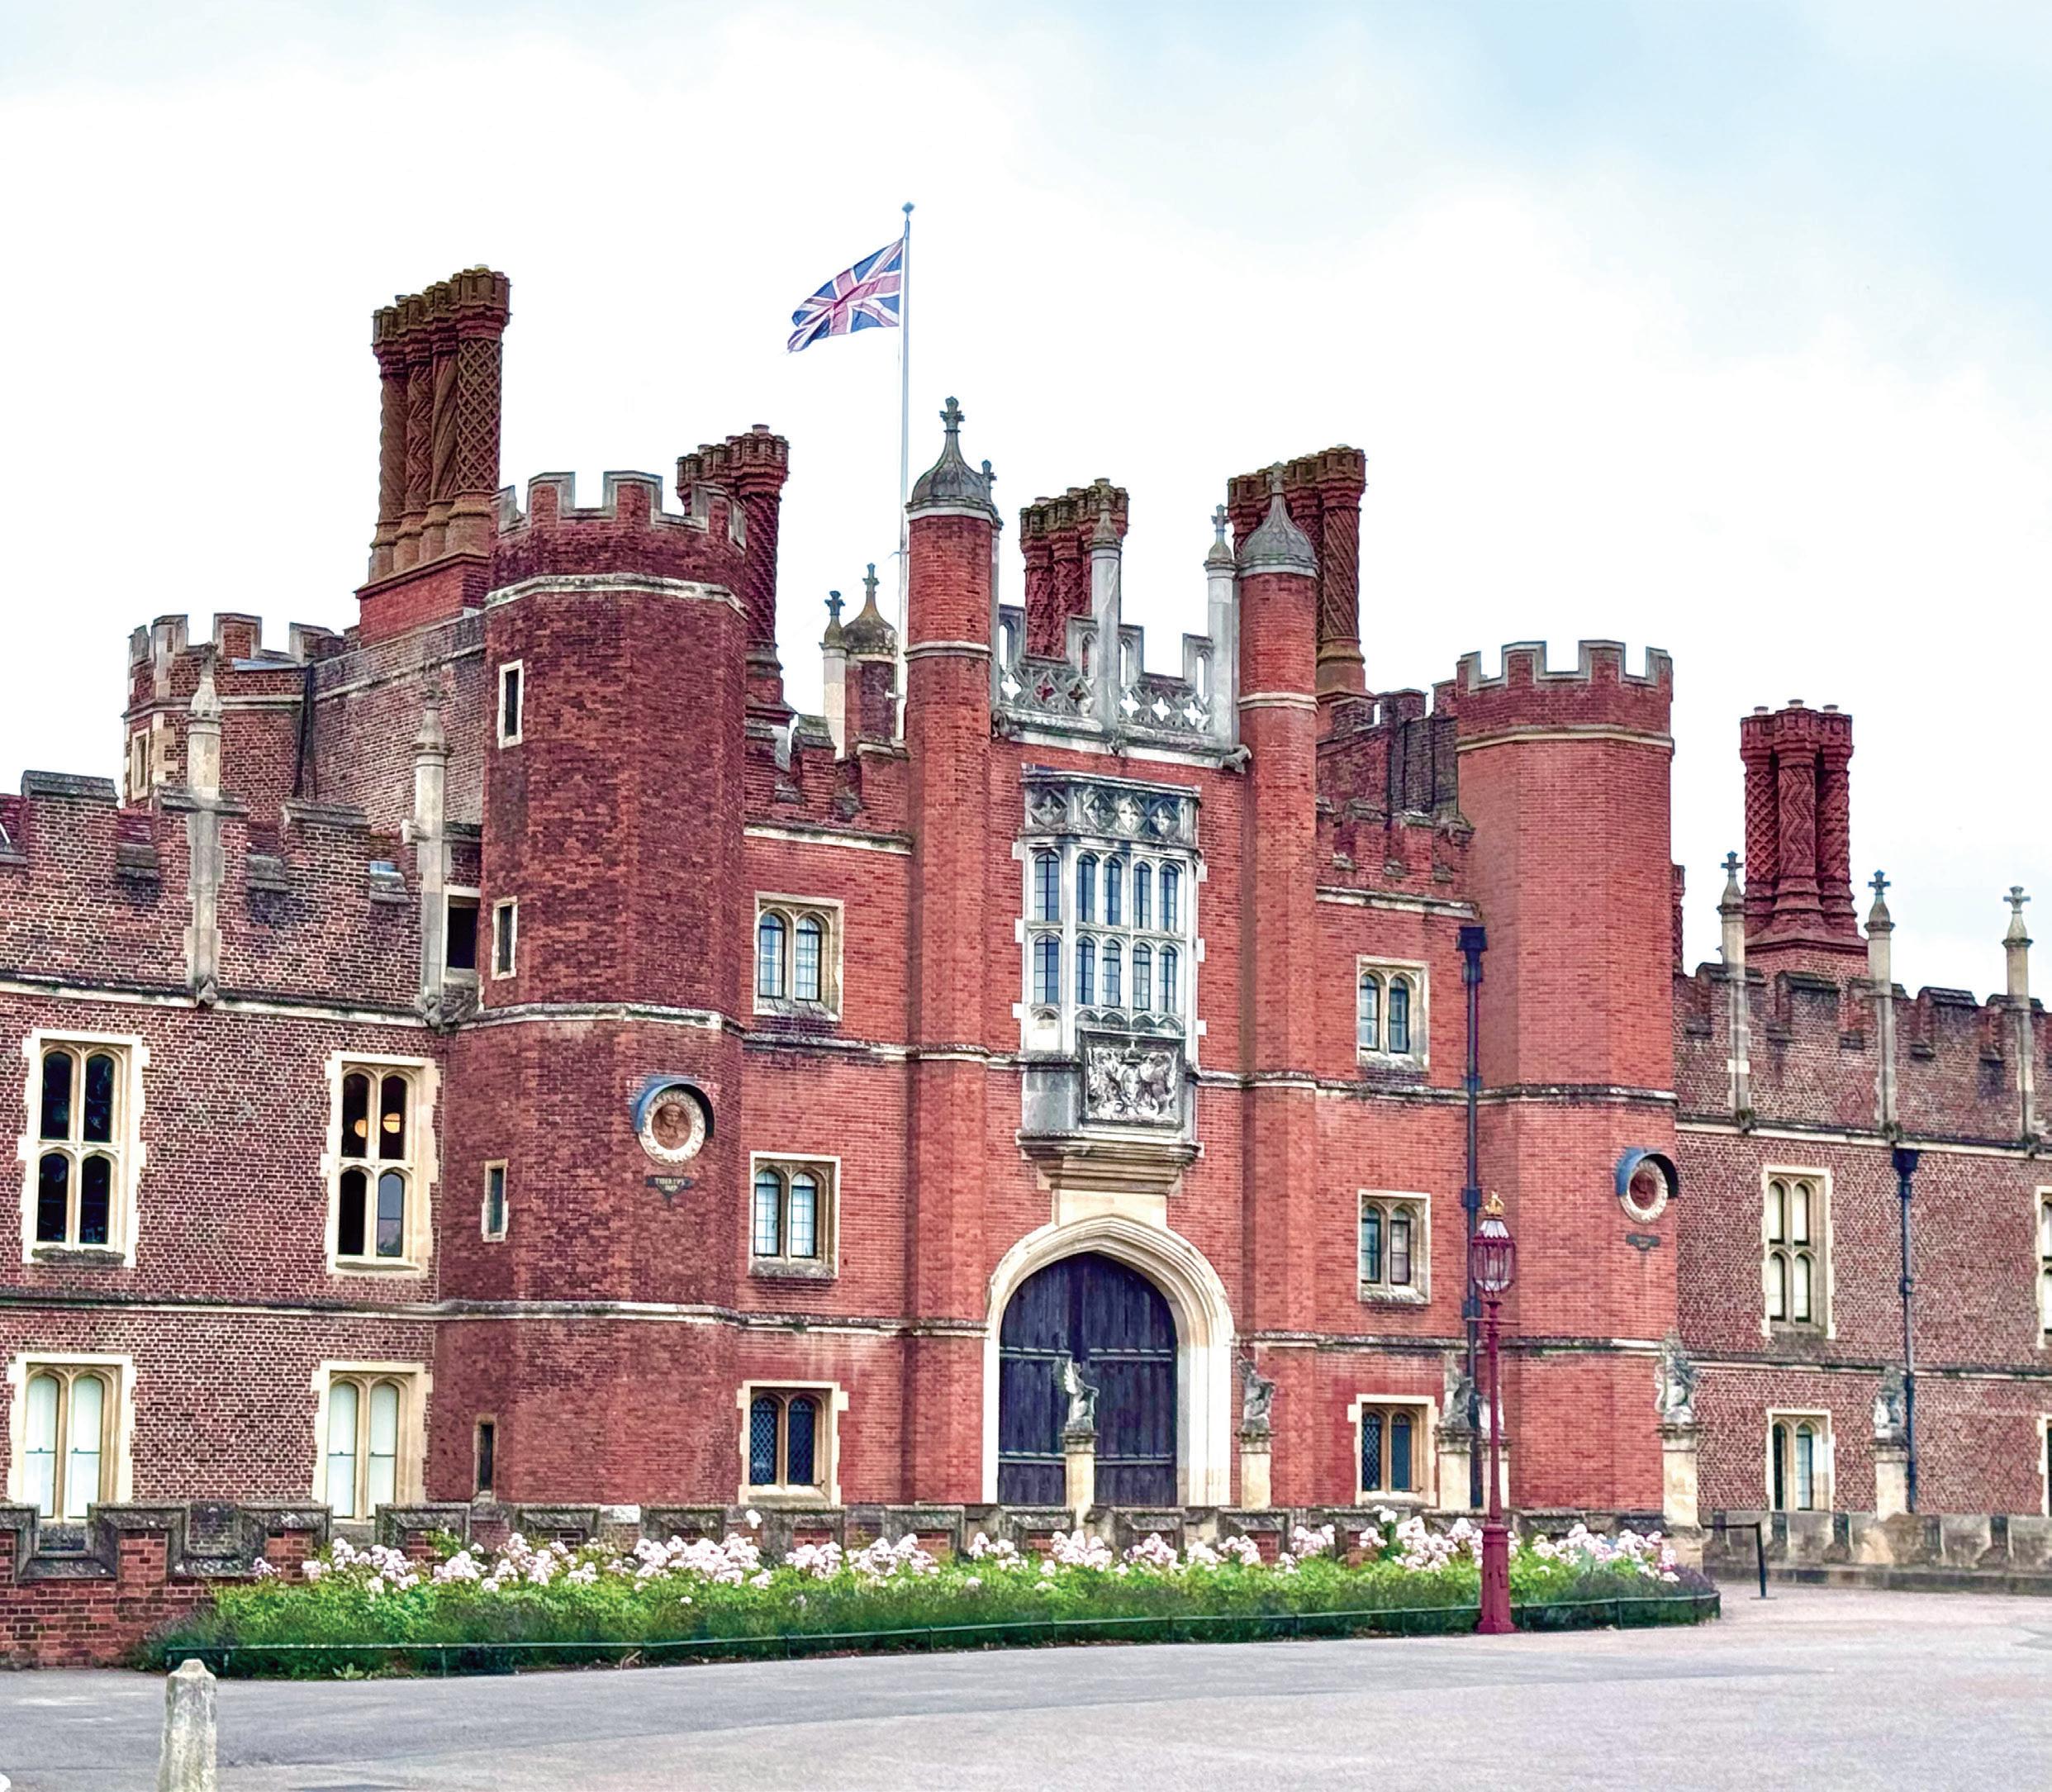
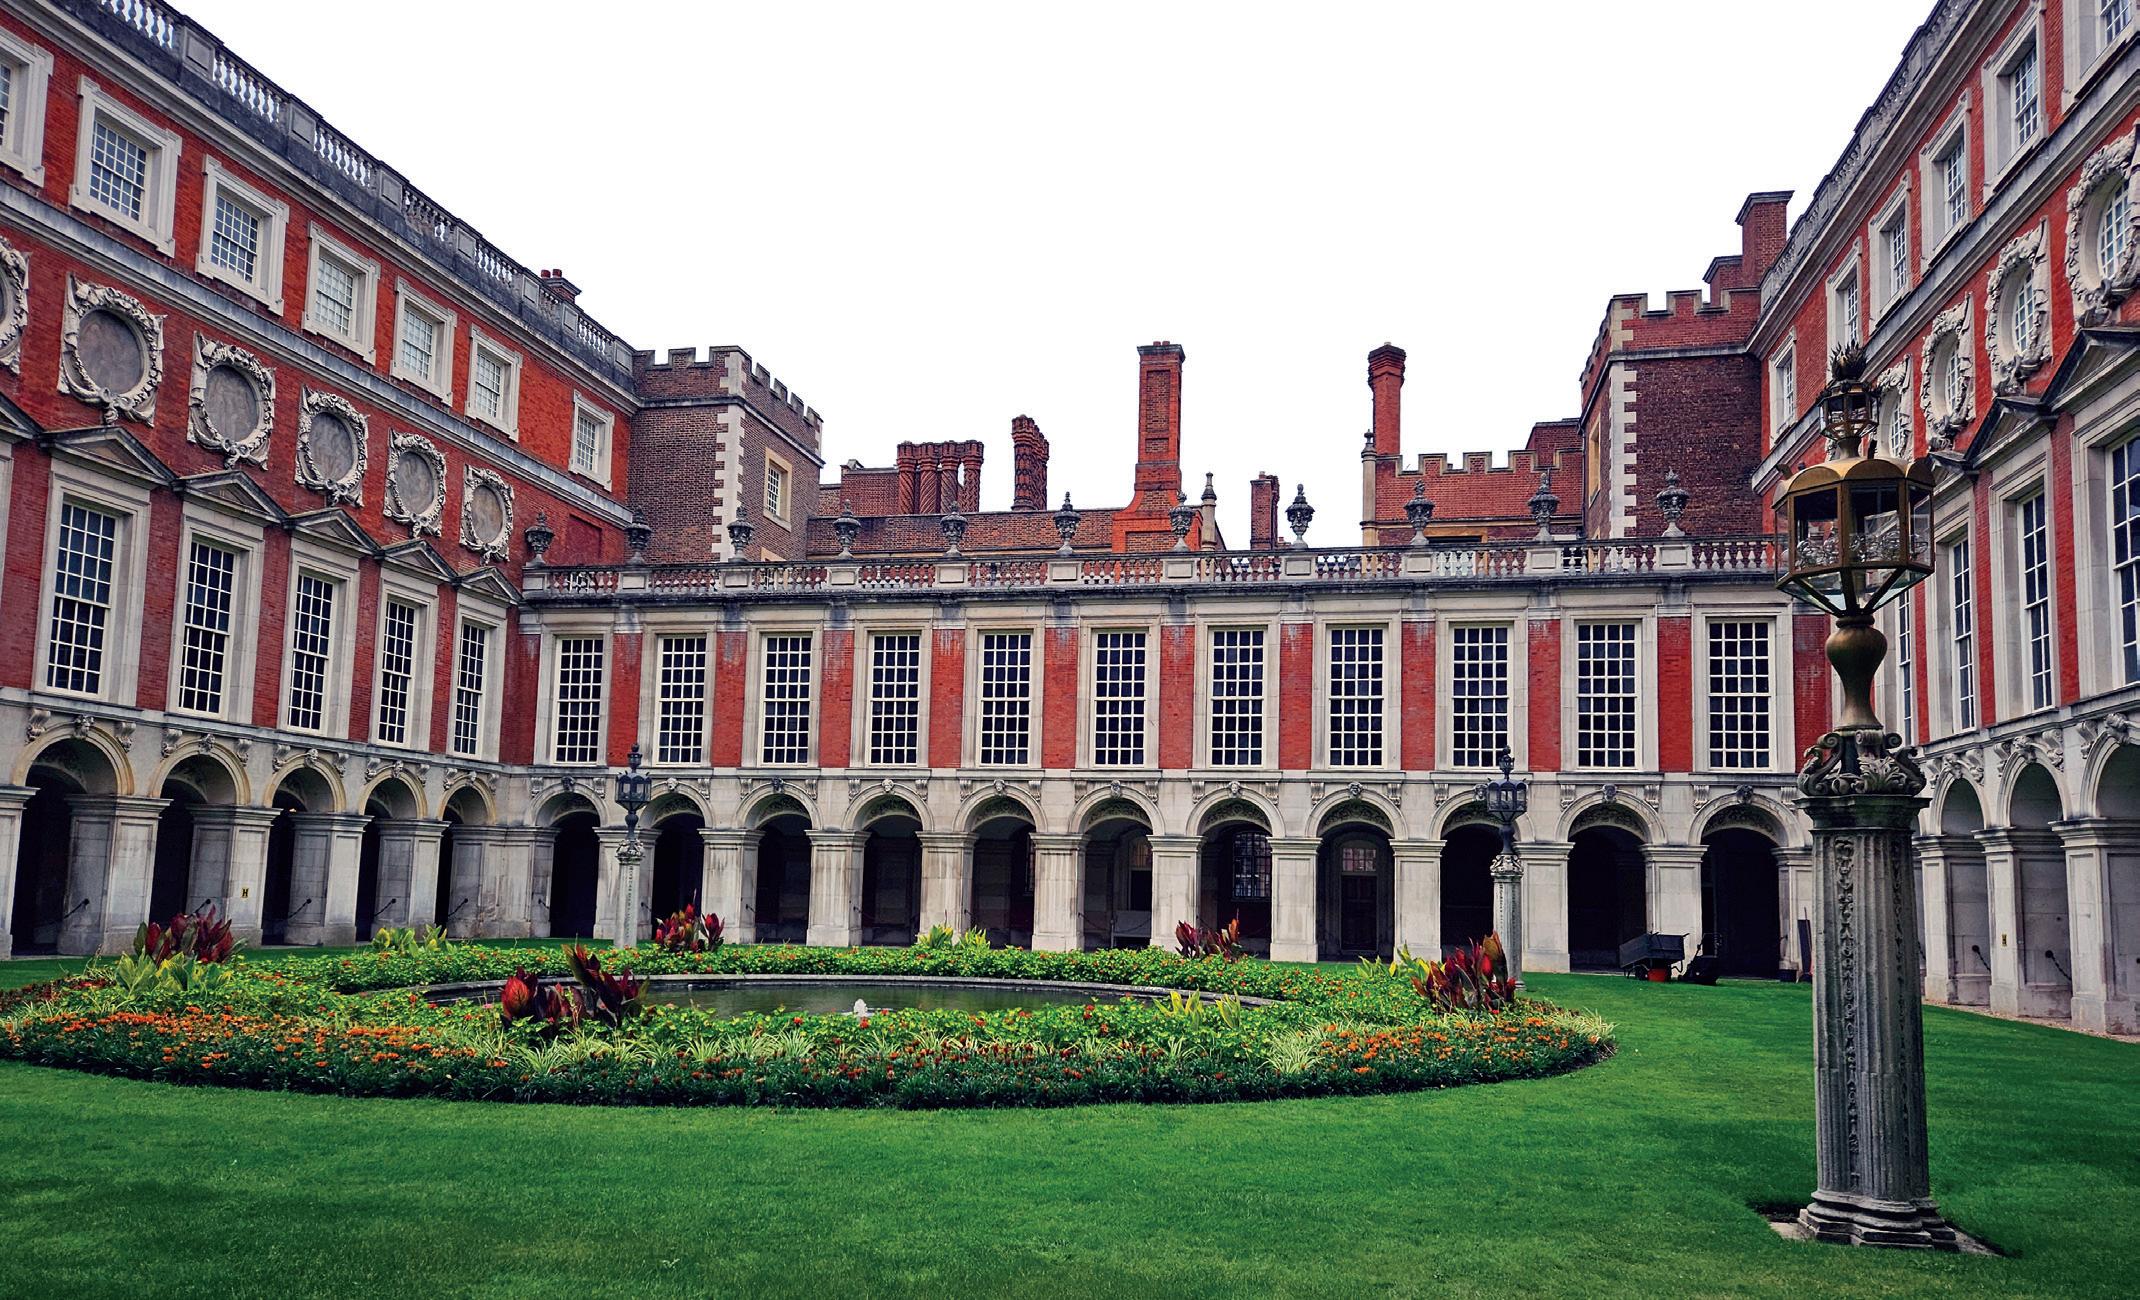
Above and bottom right: Hampton Court Palace, London, England.
Photo by Carolyn Nelson.
A memorable embroidery experience
When I signed up for a textile tour of the United Kingdom, an embroidery class was offered at the Royal School of Needlework (RSN) located at Hampton Court Palace in London, England. Embroidery as an art form has captured my heart lately. While some folks back home didn’t particularly understand my giddiness, all of the guests on our tour certainly did. Two days into our two-week trip, we walked down the long path leading to Hampton Court Palace, past gorgeous inner-court flowers, through arched hallways, up flights of stairs to the classrooms of the RSN.
What a day it was! I can’t imagine a more perfect textile experience than to enter the halls of a 500-year-old palace in England with a purpose: to learn to stitch in a manner worthy of honoring a modern-day king and queen. The teaching staff at the RSN are superb—including our teacher who was part of the design team and also embroidered a portion of King Charles and Queen Camilla's historic coronation robes and other pieces.
We walked into a bright, airy classroom on the third floor of the castle, welcomed by royal purple project kit bags placed at each workstation and a standalone embroidery frame to use during our stay. The kit included needles, gold (real gold!) and other colored threads, an extensive pattern booklet, and fine linen. Smiles were radiating all around the room! Huge windows let in plenty of light and gave incredible views of the well-kept palace grounds.
Royal School of Needlework Coat of Arms, hand embroidered by RSN Apprentices in 1987.
Photo provided by Royal School of Needlework.
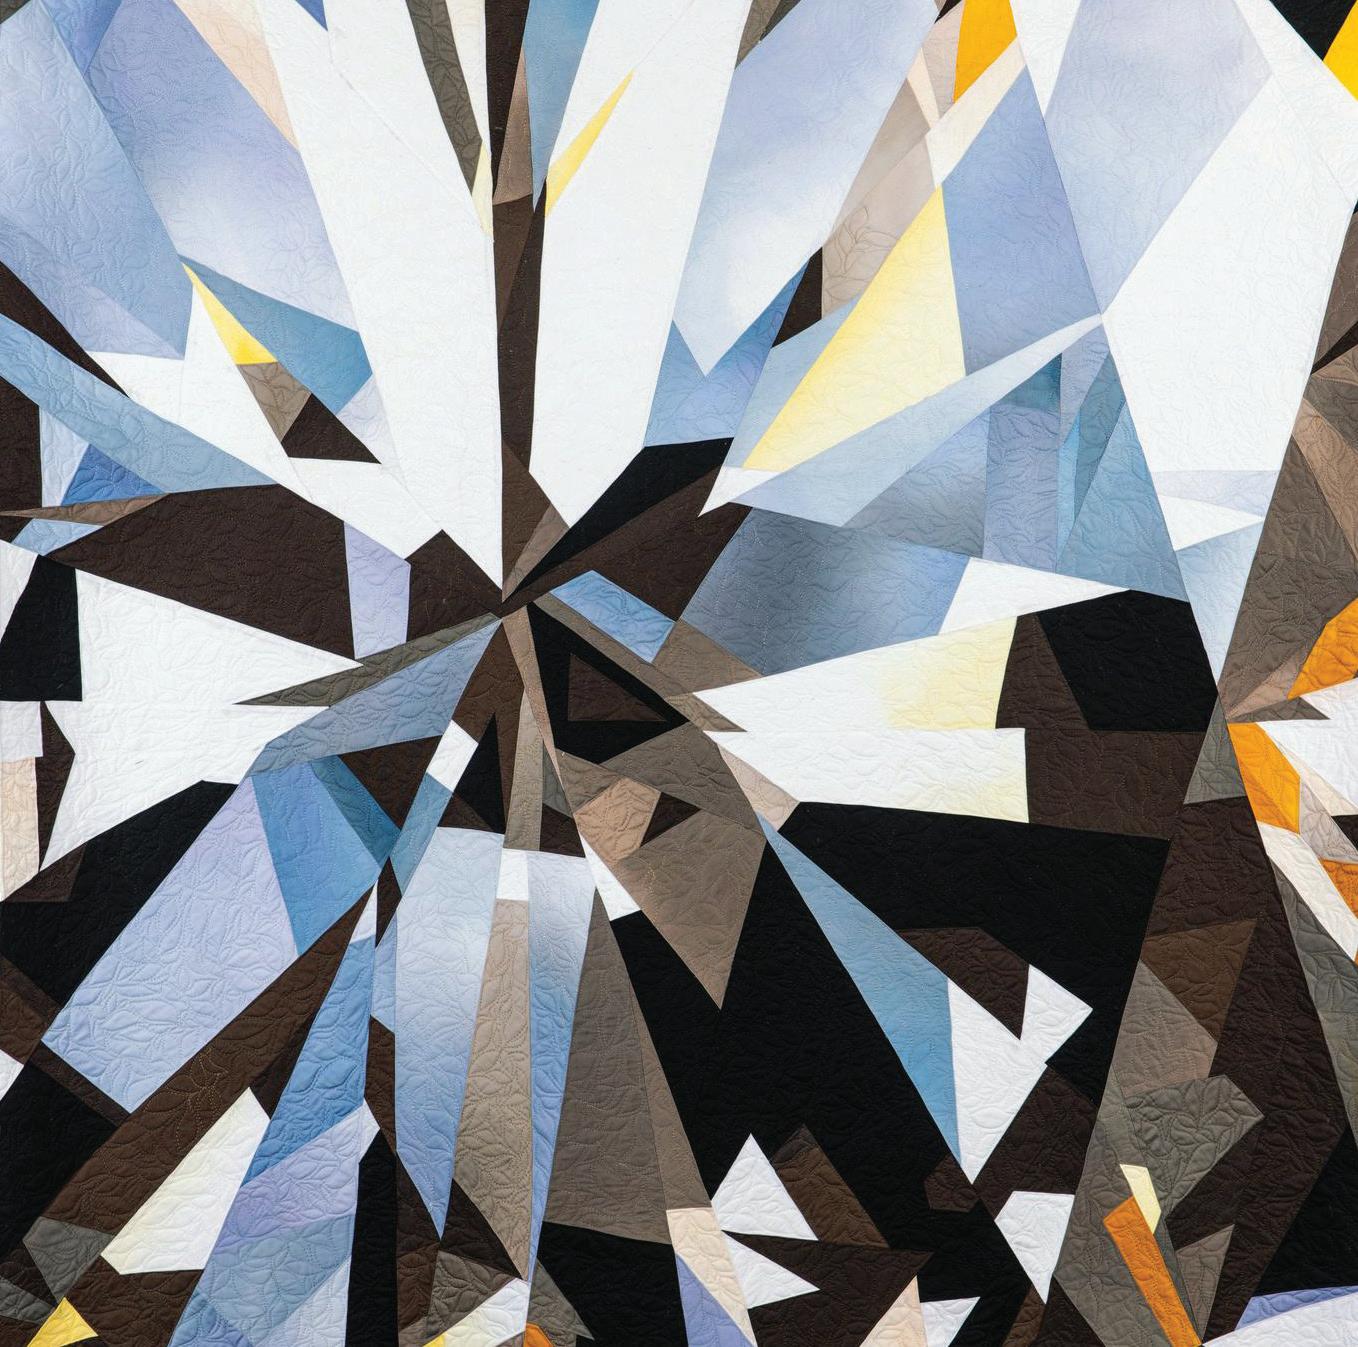
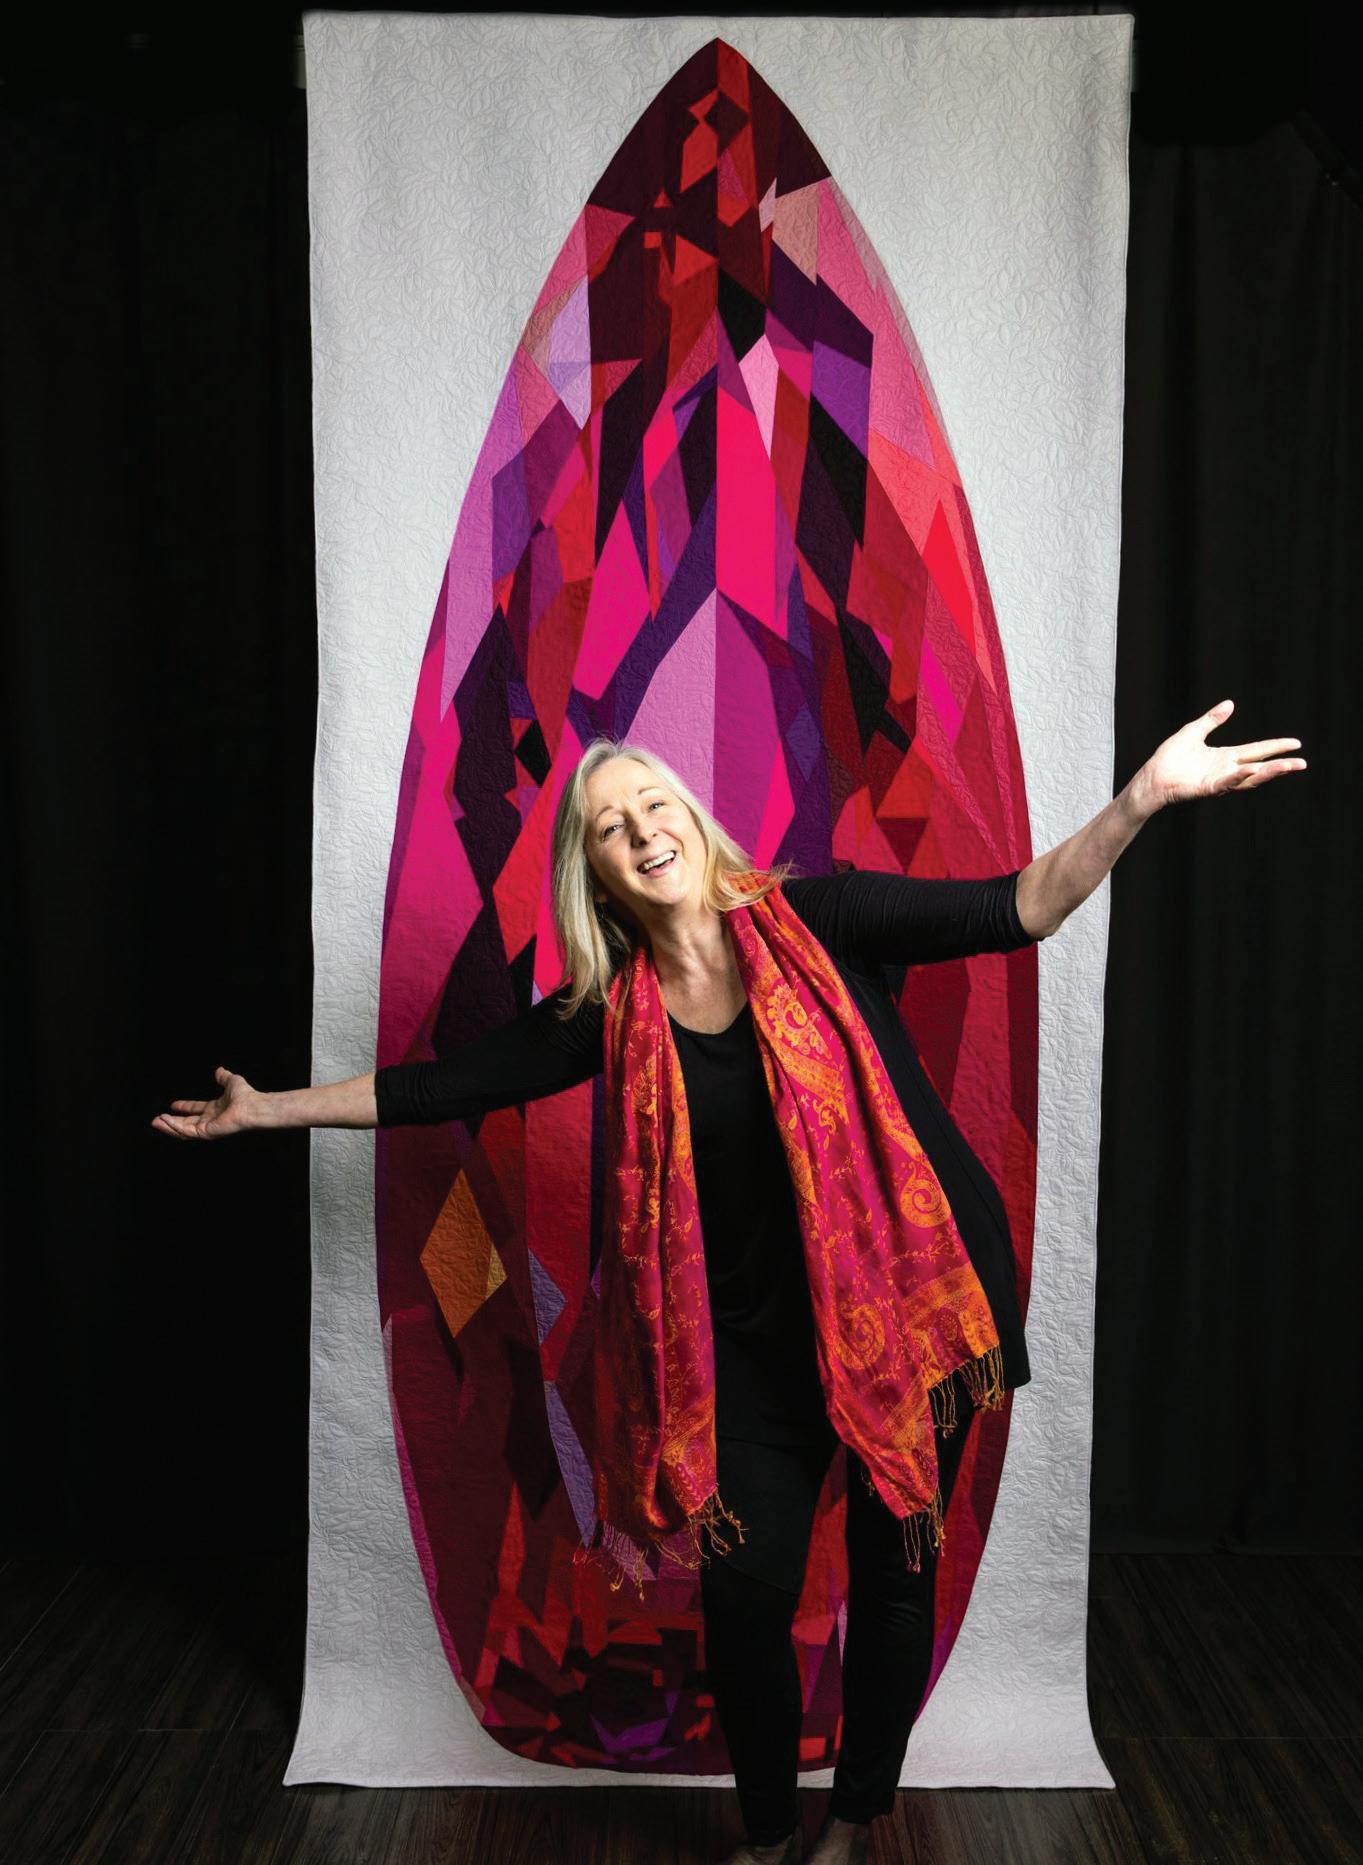
MJ Kinman Architect of the Gem Quilt
By Linda Elisabeth LaPinta
Although more than a few fiber artists have made the leap from full-time gigs in the corporate world to following their heart by creating art, when Louisville quilt artist MJ Kinman catapulted through the glass ceiling she landed in the multi-faceted realm of scintillating precious gems. After training as a social worker, MJ’s career shifted to managing information technology projects. She learned to quilt in 1987 and served as the first executive director of the Alliance of American Quilts in 2003. Artistically, MJ realized that by rendering a more literal take on the Diamond in the Square quilt she fabricated to enliven her living space, she could forge from fiber what were, to her knowledge, the first visually accurate textile representations of gems.
MJ, arguably the principal architect of the gem quilt, grew up confident that her paternal grandmother’s costume baubles that she played with for hours as a child were crown jewels. In 2014, her time invested in holding those vibrant rhinestones to the light paid off as she examined genuine precious and semi-precious stones. “I experienced something of an epiphany when I discerned the patterns in the chaos of light and color in gemstones,” she states. “As soon as I figured out how to identify the anatomy of a faceted stone,” she adds, “I could replicate it.”
What’s important to note is that MJ thinks big. Her fiber art isn’t for beds, but walls must be up to snuff to embrace her work too. Quilts that are ten feet tall and four-and-a-half feet wide demand to be supported by some serious real estate, such as that owned by The National Quilt Museum and the International Quilt Museum. MJ’s exact and intricate renderings of gems can and often are mistaken for photographs. She followed her first textile jewel series, Angle of Repose, with a second such series, Bourbon Diamonds.
The fact that MJ also embraces her adopted state of Kentucky’s love for bourbon earned the quilt artist the bonus recognition of a commission from Maker’s Mark Distillery to create the nine-foot-high Maker’s Flame, a work of fiber art that appears to be lit from within. This opportunity added leading bourbon-tasting
MJ Kinman with Torch Song, 50" x 120", part of the National Treasures series, 2022
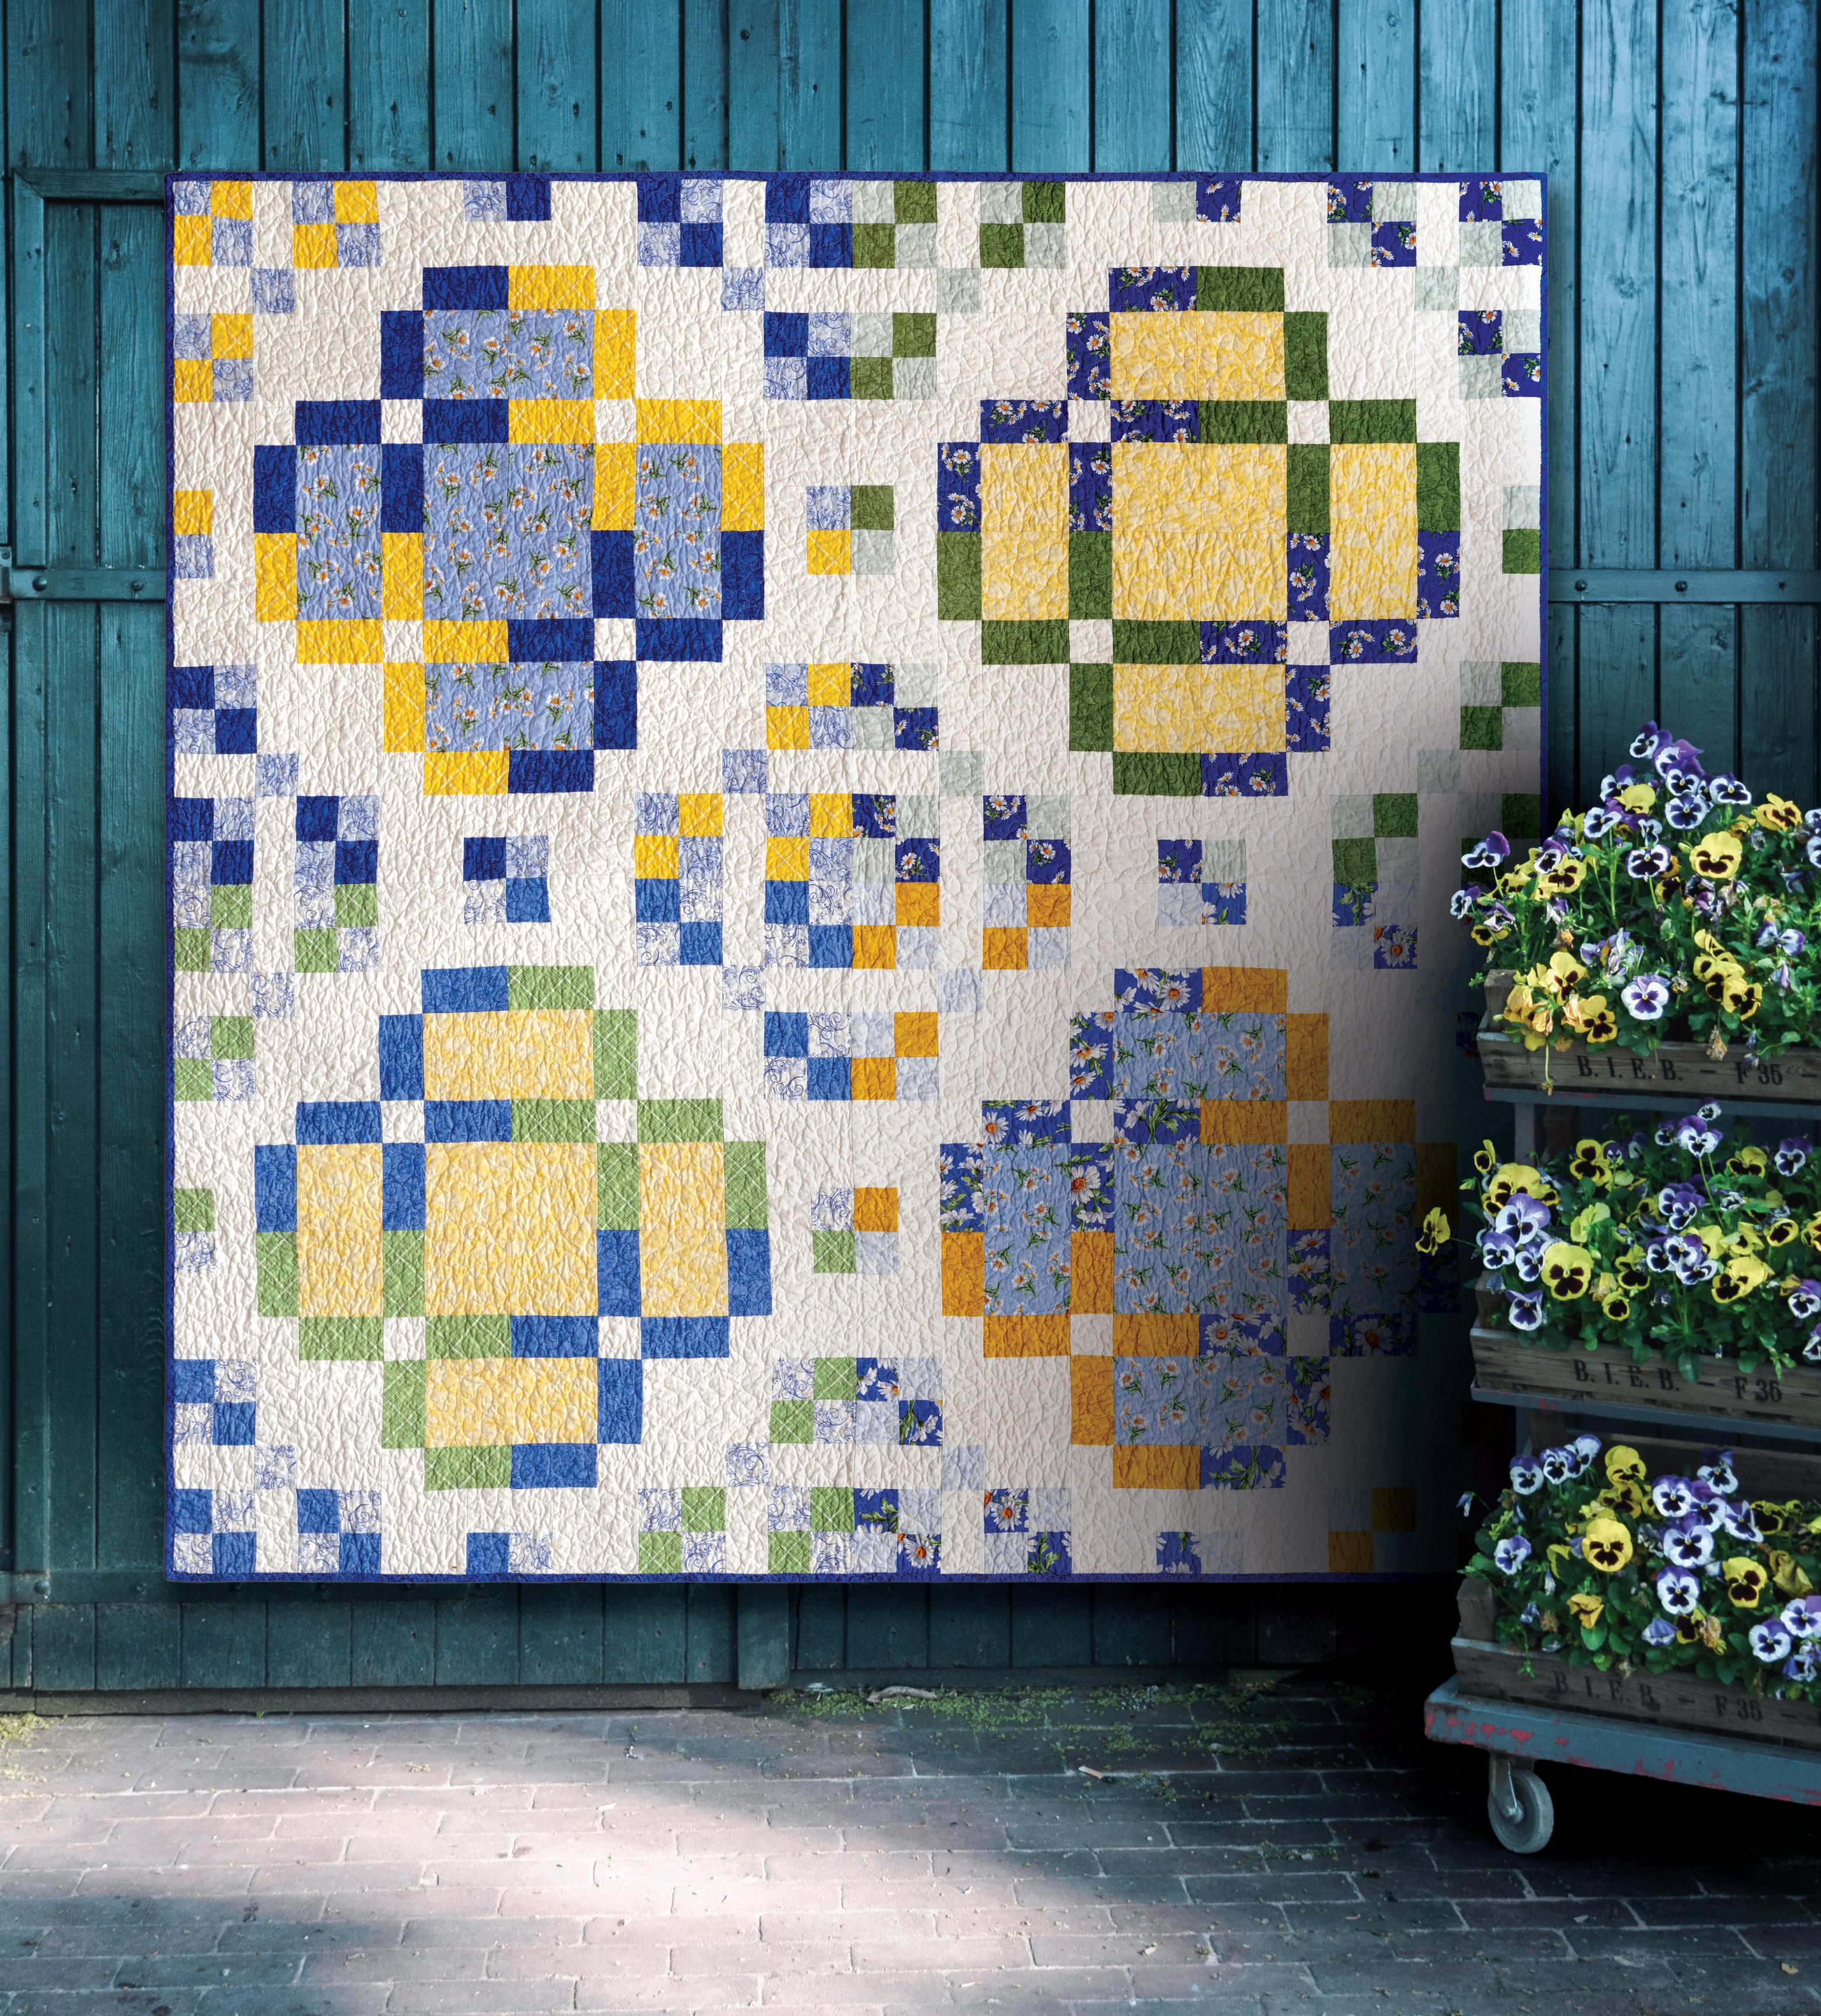
Fulks
by Sarah Fulks
Showcase pretty fabrics in this easy-to-piece bed quilt.
Skill Level: Easy ¦ Finished Quilt Size: 80" x 80" ¦ Finished Block Size: 20" x 20"
Materials
Note: Requirements are based on 42" usable width of fabric (WOF).
White-on-white print – 2½ yards
Light blue prints #1, #2, #3, and #4 – 1/3 yard each
Dark yellow, orange, dark green, and medium green prints – 1/3 yard each
Dark blue prints #1, #2, #3, and #4 – 1/3 yard each
Medium blue print and light yellow print – 3/4 yard each
Cutting
Note: All strips are cut across the WOF.
From the white-on-white print:
48 squares 5½" x 5½" (C)
64 rectangles 3" x 5½" (B)
80 squares 3" x 3" (A)
From each of the 4 light blue prints:
32 squares 3" x 3" (A)
From each of the dark yellow, orange, and 2 green prints:
12 rectangles 3" x 5½" (B)
14 squares 3" x 3" (A)
From each of the 4 dark blue prints: 12 rectangles 3" x 5½" (B) 14 squares 3" x 3" (A)
From each of the medium blue and light yellow prints: 24 squares 5½" x 5½" (C)
Binding: 9 strips 2¼" x WOF
Backing: 3 panels 30" x 88"
Binding – 2/3 yard
Backing – 77/8 yards
Batting – 88" x 88"
Garden Tiles
Fabrics from
Please respect copyright laws. This pattern may be copied for personal use only. Reproduction for resale is strictly prohibited.
By Sarah Fulks of SnuggleBugStitching
the All About Daisies collection by Jackie Robinson for Benartex
Venture into Landscape Quilting:
Constructing Your Quilt
Part 4 of 5 By
Kathy McNeil
Photography by Bruce McNeil
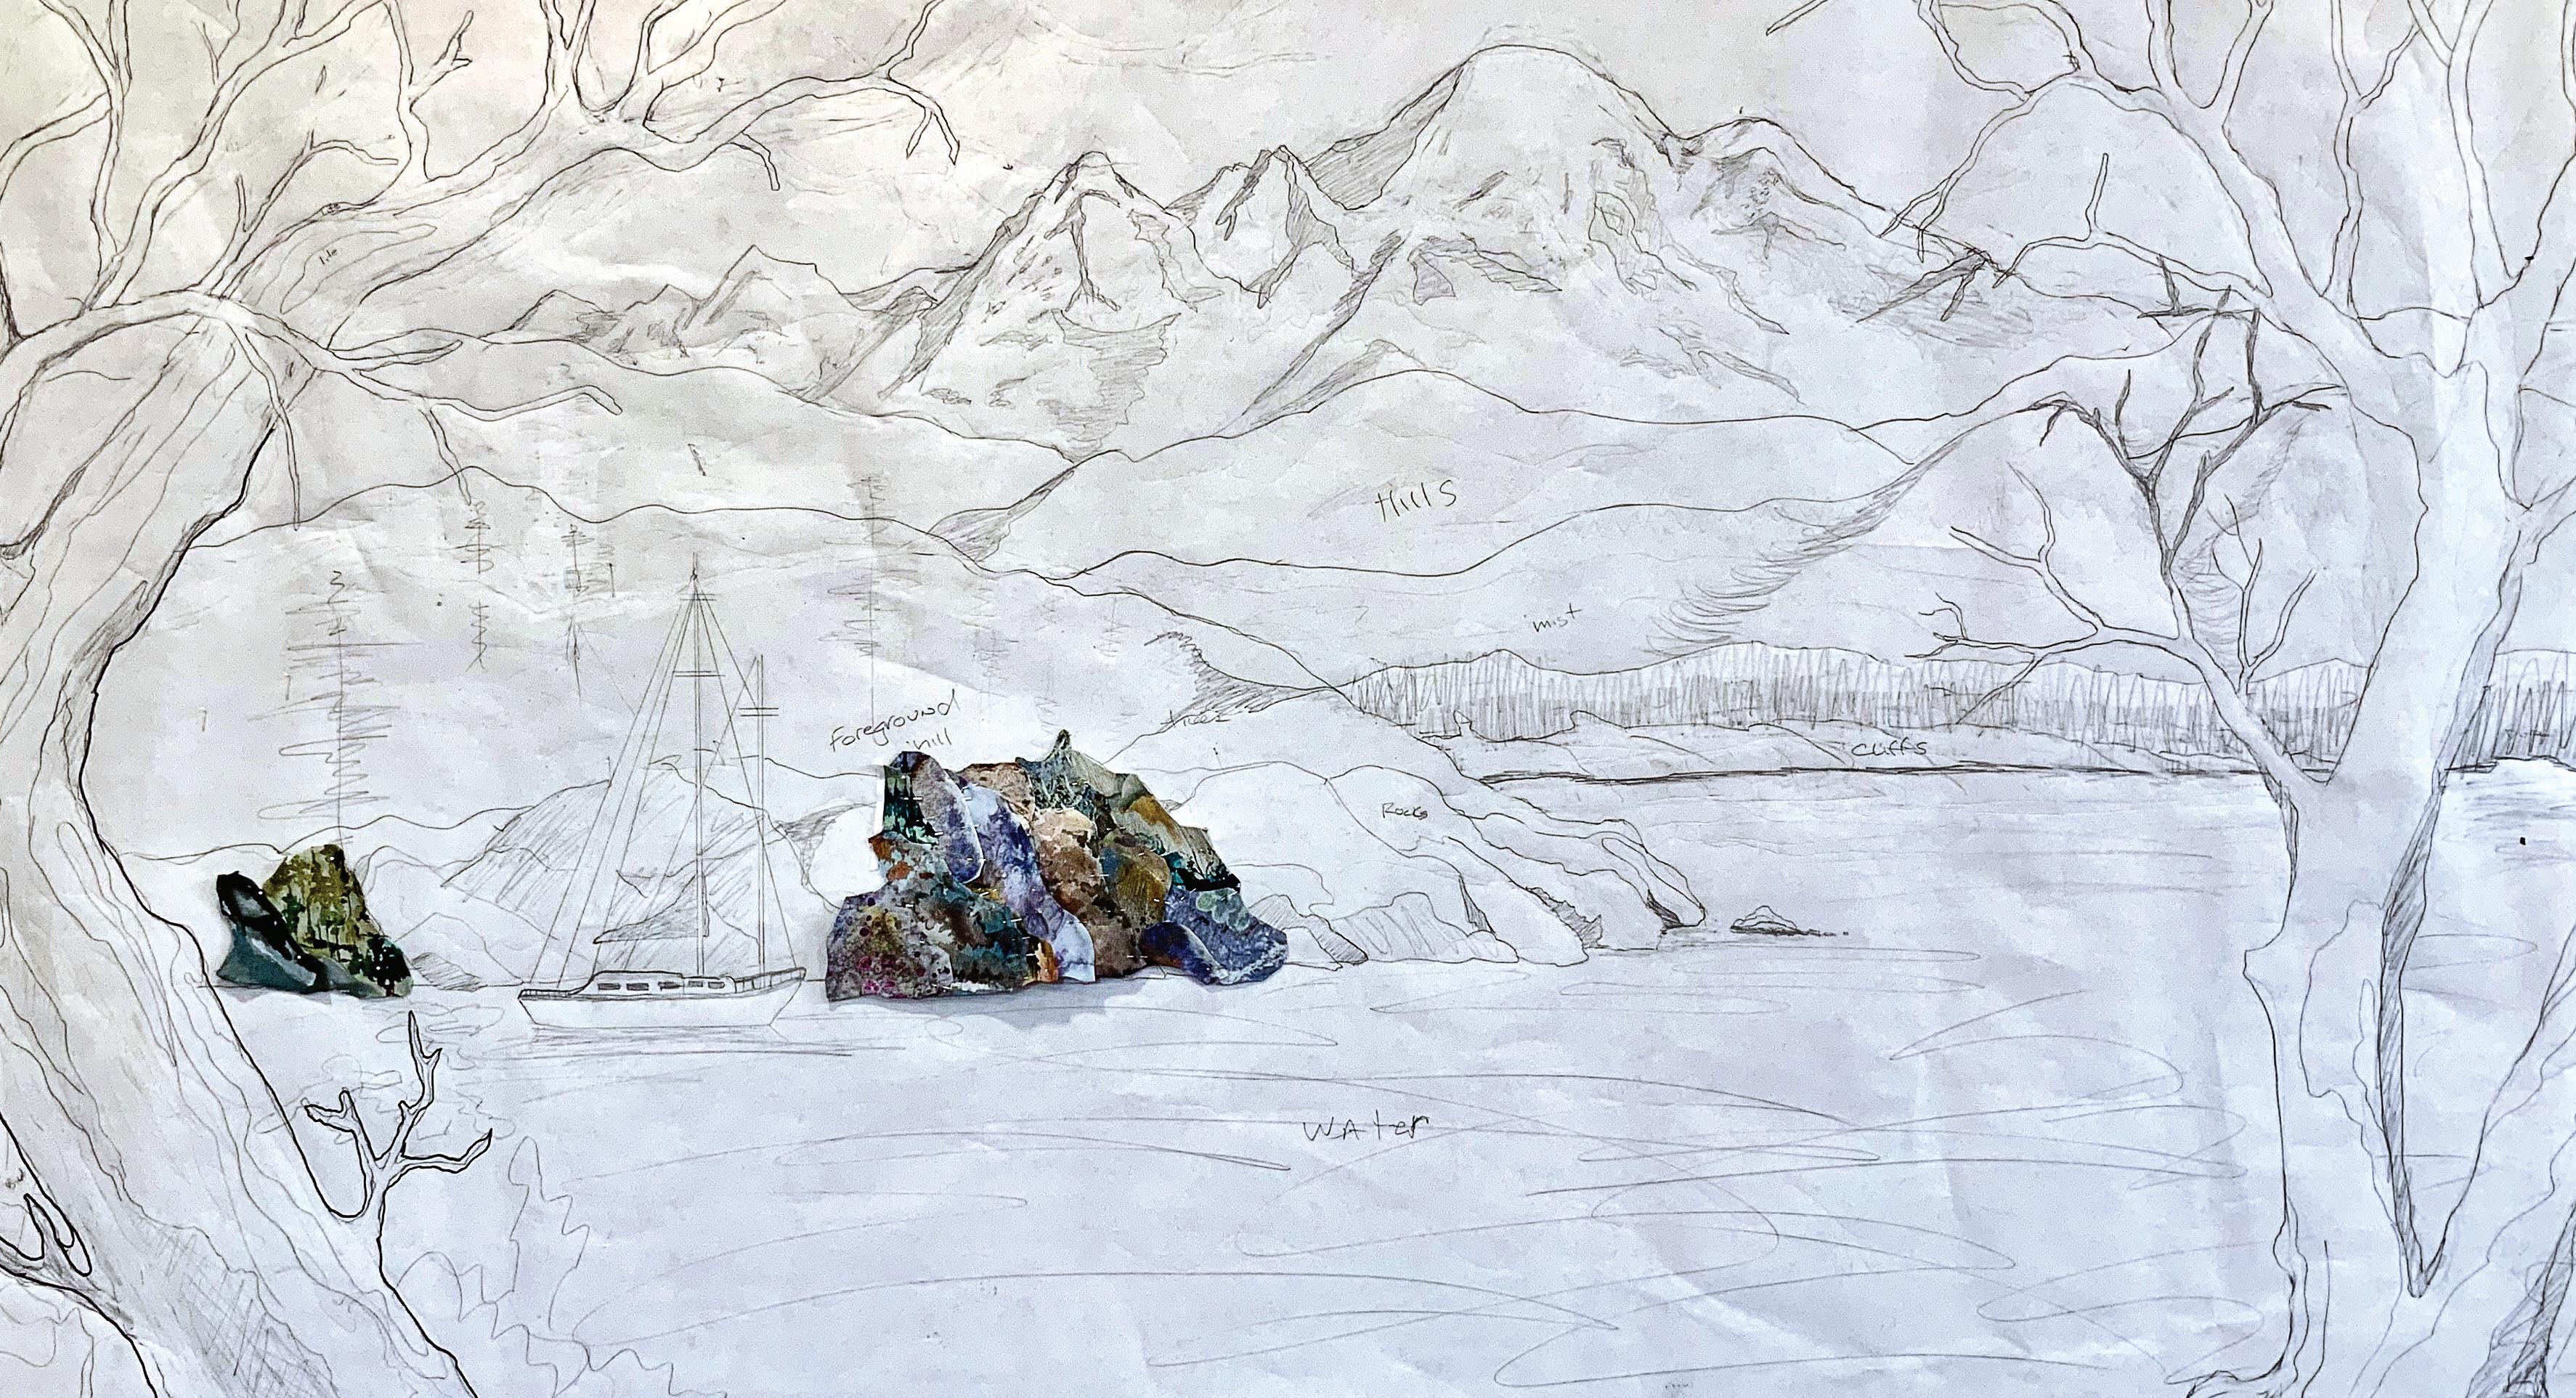
I begin construction of a landscape quilt by pinning my enlarged pattern to a design wall. I don’t use a foundation fabric like muslin. Instead, I begin constructing each unit separately by appliquéing or fusing all the individual pieces together. I’ll describe raw edge- and turned-edge appliqué techniques in this section. As I complete each unit, I pin them over the pattern on the design wall (Photo 1.). Units can then be sewn to other units, creating a completed section. All the land elements are finished before I audition sky fabric prints behind the hills and mountains. I’ll also share how I create sky and water backgrounds with both pieced and appliqué methods.
Photo 1. Units pinned to the pattern on my design wall; Salish Sisters by Kathy NcNeil, 2022
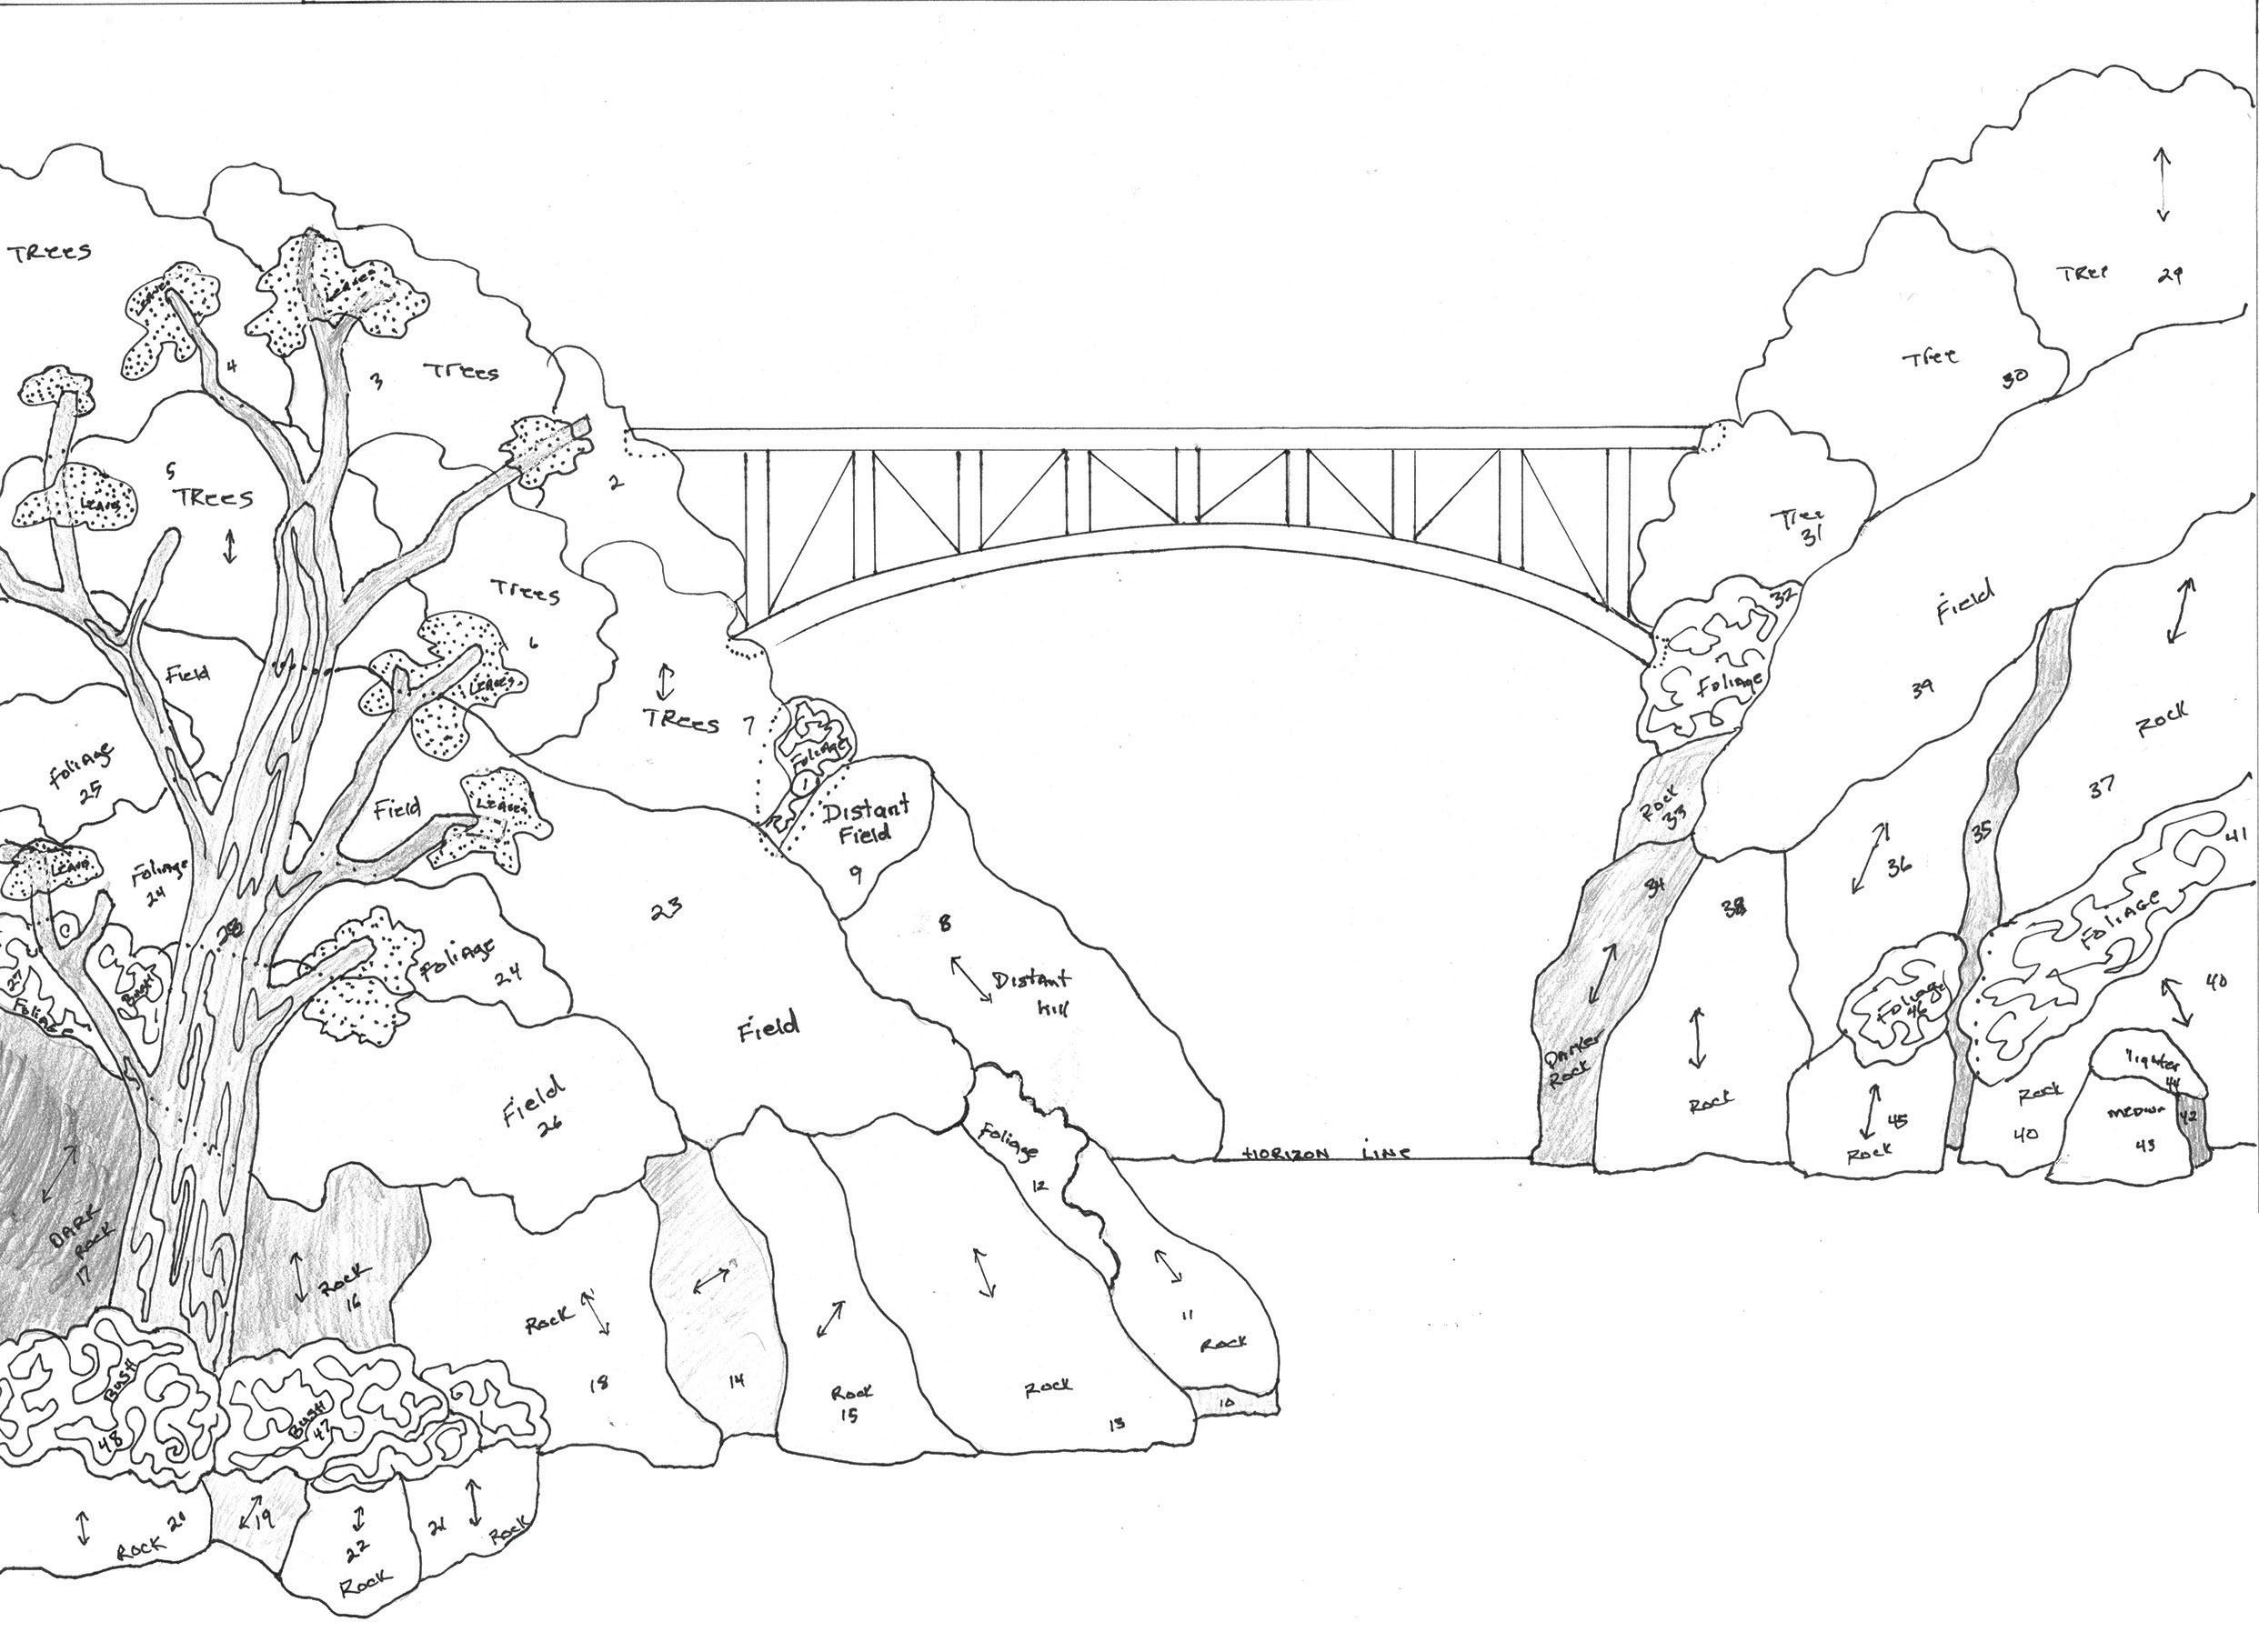
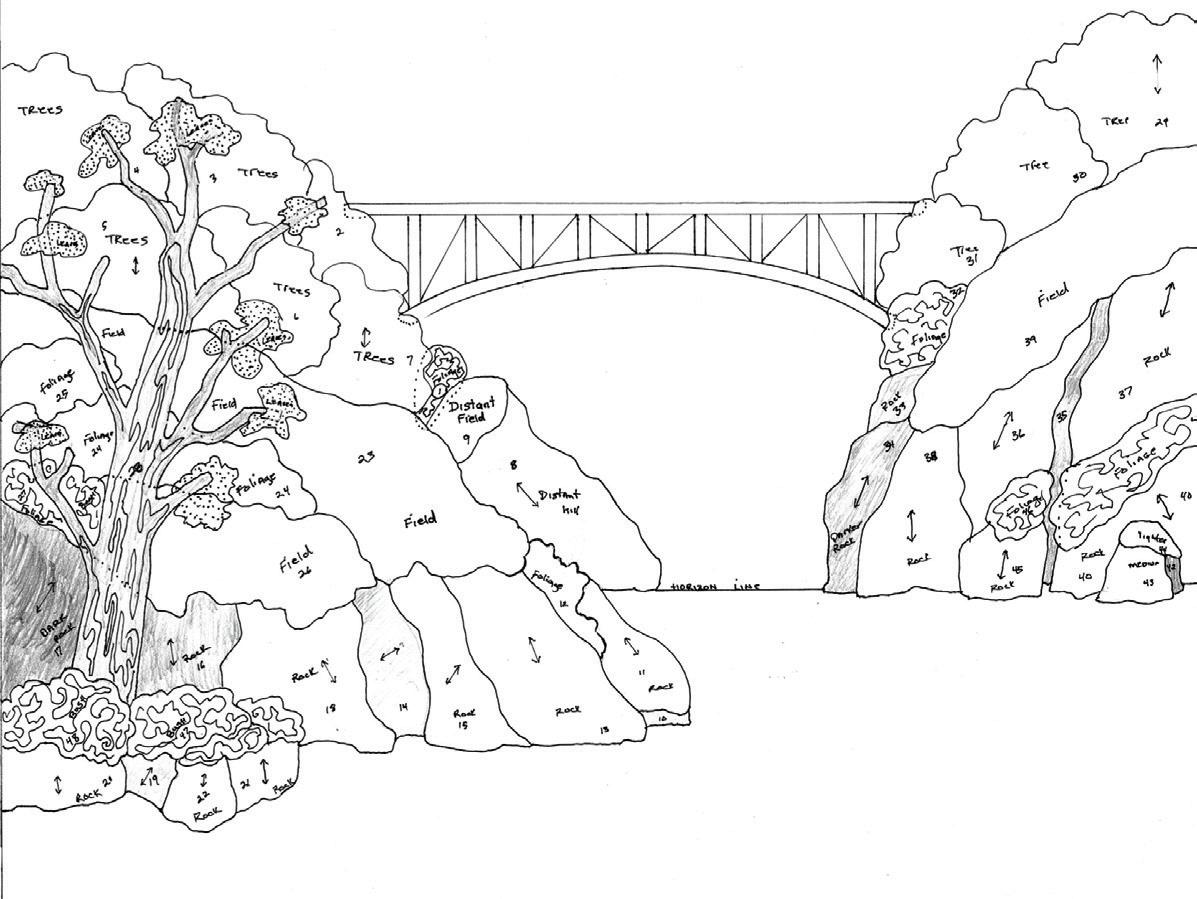
To depict the bridge in Deception Pass Bridge (Photos 2 and 3.), I simplified the original scene in the photo by removing the entire hill behind the bridge at the left of the background. (See Part 2: Preparing a Pattern, AQ November 2024.) While still capturing the depth I hoped for, I intensified the areas of interest. The foreground was enhanced by the addition of a tree in the left foreground positioned slightly at a diagonal and leaning to the right, to lead the viewer’s eye into the scene. The hill on the left is closer than the hill on the right, which is shaded darker so that it visually recedes it to the back of the landscape.
Design advantages of unit appliqué
Unlike many other landscape quilters, I always start by creating the featured focal area of the landscape first. If I am happy with the fabric choices that I have auditioned for the most prominent area, I continue to make more units. What is the focal feature or area of your landscape? The focal object or featured area should have more details and have the highest contrast in color, value, or shape.
Remember that warm colors (e.g., red, orange, gold) jump forward visually and are more captivating. Cooler colors (e.g., blue, green, purple) naturally recede. When you start by creating the focal area or an object first, everything else can be auditioned against it and toned down if needed. Ideally, we want the viewer to be attracted by the visual impact of the focal feature, and then set out to explore the entire scene.
Too often, quilters start with the background first, only to have that area refuse to recede and allow the focal area to shine. It’s hard to know how many of the fabrics in the mid-ground or background need to be muted without determining the foreground first.
Photo 2. (left), Deception Pass Bridge, Island County, Washington; Photo 3. (right) Deception Pass Bridge pattern by Kathy NcNeil, 2024
Laura Strickland
by Laura Strickland
Storm at Sea and Jacob’s Ladder blocks combine in a rainbow of color.
Skill Level: Challenging ¦ Finished Quilt Size: 66" x 81" ¦ Finished Block Size: 12" x 12"
Materials
Note: Requirements are based on 42" usable width of fabric (WOF).
Silver solid – 25/8 yards
Dark pink, orange, lime, teal, blue, and violet prints – 5/8 yard each*
Light pink, orange, lime, blue, and violet prints – ½ yard each
Dark coral, yellow, green, turquoise, navy, and purple prints – ½ yard each*
Cutting (continued on page 78)
Light coral, yellow, green, turquoise, navy, and purple prints – 3/8 yard each
Light teal print – 11/4 yards**
Backing – 51/3 yards
Batting – 74" x 89"
Foundation piecing paper or AccuQuilt Go! dies
*Includes binding.
**Includes outer border.
Please respect copyright laws. This pattern may be copied for personal use only. Reproduction for resale is strictly prohibited.
Note: All strips are cut across the WOF unless otherwise noted. Label the pieces with fabric name and letter as you cut them. Foundations are on pages 84 and 85.
From the silver solid:
24 squares 4" x 4" (E)
20 squares 3" x 3" (foundation piecing area B1)
8 squares 3" x 3"; cut each square diagonally once to make 16 triangles (areas B2, B3, B4, B5)
136 rectangles 2½" x 4" (areas C3, C4)
96 squares 2" x 2" (D)
6 strips 3½" x WOF (inner border)
From the dark pink print:
8 squares 4½" x 4½"; cut each square diagonally once to make 16 triangles (areas A6, A7, A8, A9)
4 rectangles 4" x 7" (area C1)
4 squares 4" x 4" (area A1)
5 squares 3" x 3"; cut each square diagonally once to make 10 triangles (areas B2, B3, B4, B5)
16 rectangles 2½" x 4" (areas C2, C5)
1 strip 2¼" x 28" (binding)
From the dark orange print:
8 squares 4½" x 4½"; cut each square diagonally once to make 16 triangles (areas A6, A7, A8, A9)
3 rectangles 4" x 7" (area C1)
4 squares 4" x 4" (area A1)
From the dark orange print (continued):
5 squares 3" x 3"; cut each square diagonally once to make 10 triangles (areas B2, B3, B4, B5)
1 square 3" x 3" (area B1)
16 rectangles 2½" x 4" (areas C2, C5)
1 strip 2¼" x 28" (binding)
From the dark lime print:
8 squares 4½" x 4½"; cut each square diagonally once to make 16 triangles (areas A6, A7, A8, A9)
3 rectangles 4" x 7" (area C1)
4 squares 4" x 4" (area A1)
2 squares 3" x 3"; cut each square diagonally once to make 4 triangles (areas B2, B3, B4, B5)
1 square 3" x 3" (area B1)
16 rectangles 2½" x 4" (areas C2, C5)
1 strip 2¼" x 28" (binding)
From the dark teal print:
8 squares 4½" x 4½"; cut each square diagonally once to make 16 triangles (areas A6, A7, A8, A9)
4 rectangles 4" x 7" (area C1)
4 squares 4" x 4" (area A1)
3 squares 3" x 3"; cut each square diagonally once to make 6 triangles (areas B2, B3, B4, B5)
16 rectangles 2½" x 4" (areas C2, C5)
1 strip 2¼" x 28" (binding)
From the dark blue print:
8 squares 4½" x 4½"; cut each square diagonally once to make
16 triangles (areas A6, A7, A8, A9)
3 rectangles 4" x 7" (area C1)
4 squares 4" x 4" (area A1)
3 squares 3" x 3"; cut each square diagonally once to make
6 triangles (areas B2, B3, B4, B5)
1 square 3" x 3" (area B1)
16 rectangles 2½" x 4" (areas C2, C5)
1 strip 2¼" x 28" (binding)
From the dark violet print:
8 squares 4½" x 4½"; cut each square diagonally once to make
16 triangles (areas A6, A7, A8, A9)
2 rectangles 4" x 7" (area C1)
4 squares 4" x 4" (area A1)
3 squares 3" x 3"; cut each square diagonally once to make
6 triangles (areas B2, B3, B4, B5)
1 square 3" x 3" (area B1)
16 rectangles 2½" x 4" (areas C2, C5)
1 strip 2¼" x 28" (binding)
Cutting continued on page 78
Batten Down the Hatches
By Laura Strickland of Orange Blossom Quilt Design Studio Fabrics by Benartex
Laura Strickland
Cutting (continued)
Note: All strips are cut across the WOF unless otherwise noted. Label the pieces with fabric name and letter as you cut them.
From the light pink print:
4 rectangles 4" x 7" (C1)
8 squares 3½" x 3½"; cut each square diagonally once to make 16 triangles (areas A2, A3, A4, A5)
8 rectangles 2½" x 4" (areas C2, C5)
From each of the light orange and light blue prints:
4 rectangles 4" x 7" (C1)
8 squares 3½" x 3½"; cut each square diagonally once to make 16 triangles (areas A2, A3, A4, A5)
1 square 3" x 3"; cut the square diagonally once to make
2 triangles (areas B2, B3, B4, B5)
6 rectangles 2½" x 4" (areas C2, C5)
From the light lime print:
8 rectangles 4" x 7" (C1)
8 squares 3½" x 3½"; cut each square diagonally once to make
16 triangles (areas A2, A3, A4, A5)
1 square 3" x 3"; cut the square diagonally once to make
2 triangles (areas B2, B3, B4, B5)
6 rectangles 2½" x 4" (areas C2, C5)
From the light violet print:
6 rectangles 4" x 7" (C1)
8 squares 3½" x 3½"; cut each square diagonally once to make
16 triangles (areas A2, A3, A4, A5)
1 square 3" x 3"; cut the square diagonally once to make
2 triangles (areas B2, B3, B4, B5)
4 rectangles 2½" x 4" (areas C2, C5)
From each of the dark coral, dark yellow, and dark green prints:
4 rectangles 4" x 7" (area C1)
4 squares 4" x 4" (E)
3 squares 3" x 3"; cut each square diagonally once to make
6 triangles (areas B2, B3, B4, B5)
16 rectangles 2½" x 4" (areas C2, C5)
4 squares 2" x 2" (D)
1 strip 2¼" x 28" (binding)
From the dark turquoise print:
4 rectangles 4" x 7" (area C1)
4 squares 4" x 4" (E)
2 squares 3" x 3"; cut each square diagonally once to make 4 triangles (areas B2, B3, B4, B5)
16 rectangles 2½" x 4" (areas C2, C5)
4 squares 2" x 2" (D)
1 strip 2¼" x 28" (binding)
From the dark navy print:
2 rectangles 4" x 7" (area C1)
4 squares 4" x 4" (E)
5 squares 3" x 3"; cut each square diagonally once to make 10 triangles (areas B2, B3, B4, B5)
2 squares 3" x 3" (area B1)
16 rectangles 2½" x 4" (areas C2, C5)
4 squares 2" x 2" (D)
1 strip 2¼" x 28" (binding)
From the dark purple print:
3 rectangles 4" x 7" (area C1)
4 squares 4" x 4" (E)
5 squares 3" x 3"; cut each square diagonally once to make 10 triangles (areas B2, B3, B4, B5)
16 rectangles 2½" x 4" (areas C2, C5)
4 squares 2" x 2" (D)
1 strip 2¼" x 28" (binding)
From each of the light coral, light yellow, light green, and light turquoise prints:
6 rectangles 4" x 7" (area C1)
8 rectangles 2½" x 4" (areas C2, C5)
12 squares 2" x 2" (D)
From the light navy print:
4 rectangles 4" x 7" (area C1)
1 square 3" x 3"; cut the square diagonally once to make 2 triangles (areas B2, B3, B4, B5)
4 rectangles 2½" x 4" (areas C2, C5)
12 squares 2" x 2" (D)
From the light purple print:
4 rectangles 4" x 7" (area C1)
6 rectangles 2½" x 4" (areas C2, C5)
12 squares 2" x 2" (D)
From the light teal print:
4 rectangles 4" x 7" (C1)
8 squares 3½" x 3½"; cut each square diagonally once to make
16 triangles (areas A2, A3, A4, A5)
8 rectangles 2½" x 4" (areas C2, C5)
7 strips 3½" x WOF (outer border)
Backing:
2 panels 38" x 89"
Cutting*
AccuQuilt dies can save time when cutting the following pieces:
Foundation A, B, and C pieces = Go! Storm at Sea Block on Board (55221)
*In some cases, die cutting may require slightly more or less yardage than listed in this pattern.
Fun Things
Piecing the blocks
Note: Press seam allowances in the direction of the arrows. Make 24 accurate copies of Foundation A. Following the numerical order found on the pattern, foundation piece 24 A units in 6 groups of 4 matching units (fig. 1). Trim excess fabric and paper along the outer lines, being sure to leave ¼" beyond the points of the triangles for seam allowances.
Join 4 matching A units to make Block Y, measuring 12½" square from raw edge to raw edge (fig. 2). Make 6 Y blocks.
Draw a diagonal line on the wrong side of each silver E square. Place a marked square on a dark coral E square, right sides together (fig. 3). Sew ¼" from each side of the marked line; cut on the marked line. Repeat to make a total of 8 coral half-square triangle (HST) units. Trim each unit to 3½" square, centering the seam lines. In the same way, make and trim 8 each yellow, green, turquoise, navy, and purple HST units.
Join 2 light coral and 2 silver D squares to make a coral corner four-patch measuring 3½" square (fig. 4a). Make 4. In the same way, make 4 each of the corner four-patches with light yellow, green, turquoise, navy, and purple D squares.
Join 1 light coral, 2 silver, and 1 dark coral D squares to make a coral center fourpatch (fig. 4b). Make 4. In the same way, make 4 each of the yellow, green, turquoise, navy, and purple center four-patches.
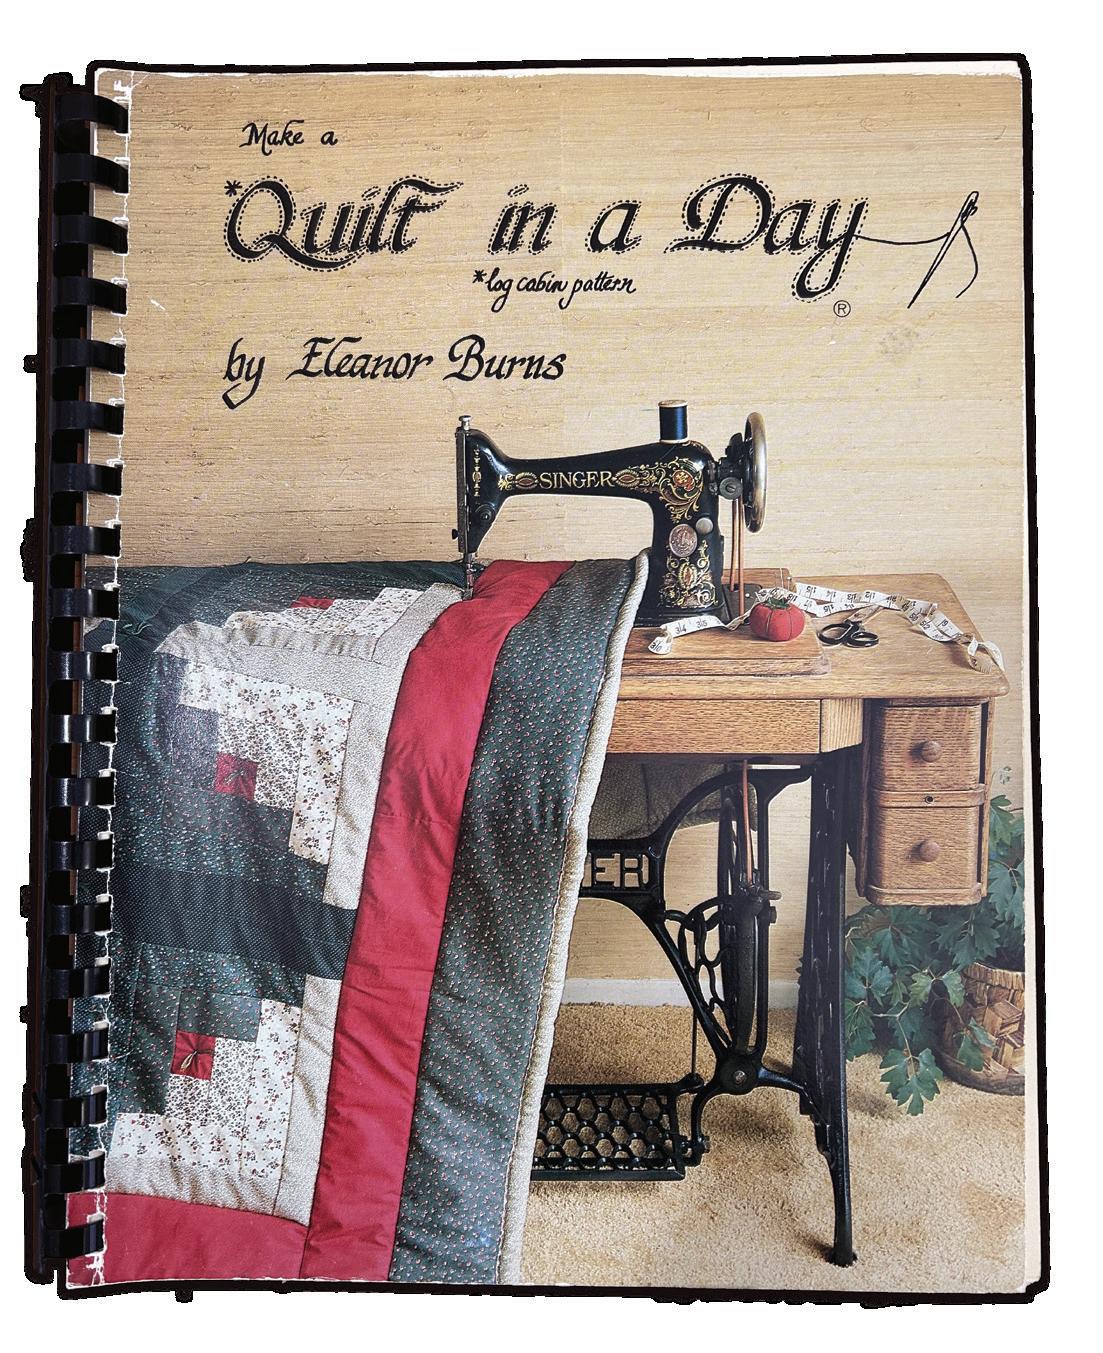
Notable Quilter: Eleanor Burns
By Deb Geyer, Executive Director, The Quilters Hall of Fame
“You might as well cut all the center squares that you need right now. This is just an easy assembly line way to make a Log Cabin: cutting and stacking. That’s all you do,” Eleanor says in her warm, encouraging voice as she moves around the classroom during a Log Cabin class. "It's time for pedal to the metal!"
In the beginning
Eleanor’s quilting story began over 50 years ago. She had just resigned from teaching to raise two sons and her husband Bill had entered law school. Her family had no income. She loved sewing clothes, and the bicentennial was coming up. She went to the local Parks and Recreation Department and suggested she could teach a class for making double knit dresses. The response was, “No . . . but can you teach quilting?” With no hesitation, Eleanor said, “Sure, I can teach quilting!” She perused magazines to learn how to make quilts. With her creativity and ingenuity, soon she was offering “Patchcraft” classes. Her classes featured making pillows, purses, and other small items using patchwork patterns.
In the mid-1970s, quilter’s cotton was not widely available, so Eleanor used corduroy scraps from a local clothing factory. Orion, her youngest son, would throw out fabric scraps from inside the factory dumpster to his older brother, Grant, outside. One day, Orion threw out a scrap of corduroy that was a continuous piece of waistbands with the pockets sewn at regular intervals. As Eleanor pulled and pulled this waistband out of the dumpster, she had an “ah-ha!” moment. The idea for strip piecing the parts for blocks was born.
Now, Eleanor was ready to teach a real quilting class! To speed up the process, she taught her students to tear their strips. “The faster you tear, the better you feel!” She taught the Log Cabin pattern, a favorite traditional quilting pattern that builds the block by adding “logs” to each side. This pattern adapted easily to her new string piecing technique. Each time she taught the class, she came up with more ideas to simplify assembly. Eleanor’s strategic decisions always focused on family and students and to make quiltmaking more accessible and less intimidating for beginners.
An author is born
Eleanor decided to write a book about her Log Cabin pattern and assembly methods. Her husband, Bill, drew the pictures and typed the directions. In December of 1978, they made copies of the book at their local Kinko’s copy print shop and advertised in Family Circle magazine. Published under the Quilt in a Day trademark, the book assembly and shipping department was in their garage on top of Orion’s changing table (no longer used for changing)! They sold hundreds of books, 20-25 at a time. With this success, Eleanor began to see how people loved the idea of a simpler way to quilt.
As the book spread out across the country, Eleanor began traveling to teach. While she loved being with the students, traveling and being away from her kids became overwhelming. She decided to rent a studio so students could come to her. She carefully chose the location—near her home and kids. Over the years, Quilt in a Day expanded in the same building until eventually she purchased the whole building. In 1987, Eleanor presented her videos at the same time as Nancy Zieman for The Learning Channel. She also produced
a continuous series on the Public Broadcasting Station (PBS).
As the quilting industry developed over the years, Eleanor adapted new techniques to her teaching. She continued to publish books, totaling 140 today. Quilt in a Day also produces quilting tools, and Eleanor has designed fabric collections for Benartex.
Where is Eleanor today?
In 2025, Eleanor celebrates her 80th birthday and the 50th anniversary of her first Log Cabin class. She still loves quilting and sews every day. She lives in a beautiful log home on nine acres, surrounded by nature. Eleanor represented the Tacony Corporation which set up a studio adjoining her log home with multiple sewing
machines and tables. She welcomes students into her studio for classes occasionally, and still enjoys talking to others and encouraging them and their work. Orion is now the General Manager for Quilt in a Day and the company still spreads the love of quilting to the world.
Eleanor’s enduring passion for quilting and teaching and her warmth, humor, and encouragement have made her a favorite in the quilting world. Her enterprising spirit, her extraordinary ability to make complex things simple, and her passion for sharing what she’s learned with others have been keys to her success. These attributes have earned her many awards, such as the Michael Kile Lifetime Achievement Award presented by Quilts, Inc. In 2005, Eleanor was voted “All American Quilter” by American Quilter’s Society members, and in 2012 Eleanor was inducted into The Quilters Hall of Fame.
Blue Velvet, 92" x 92", quilt and eagle die designed by Eleanor Burns, made by Teresa Varnes and quilted by Judy Jackson, 2011
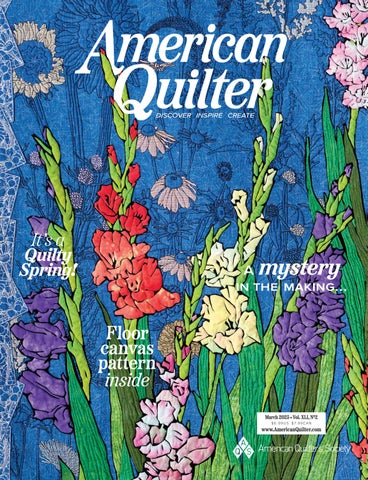
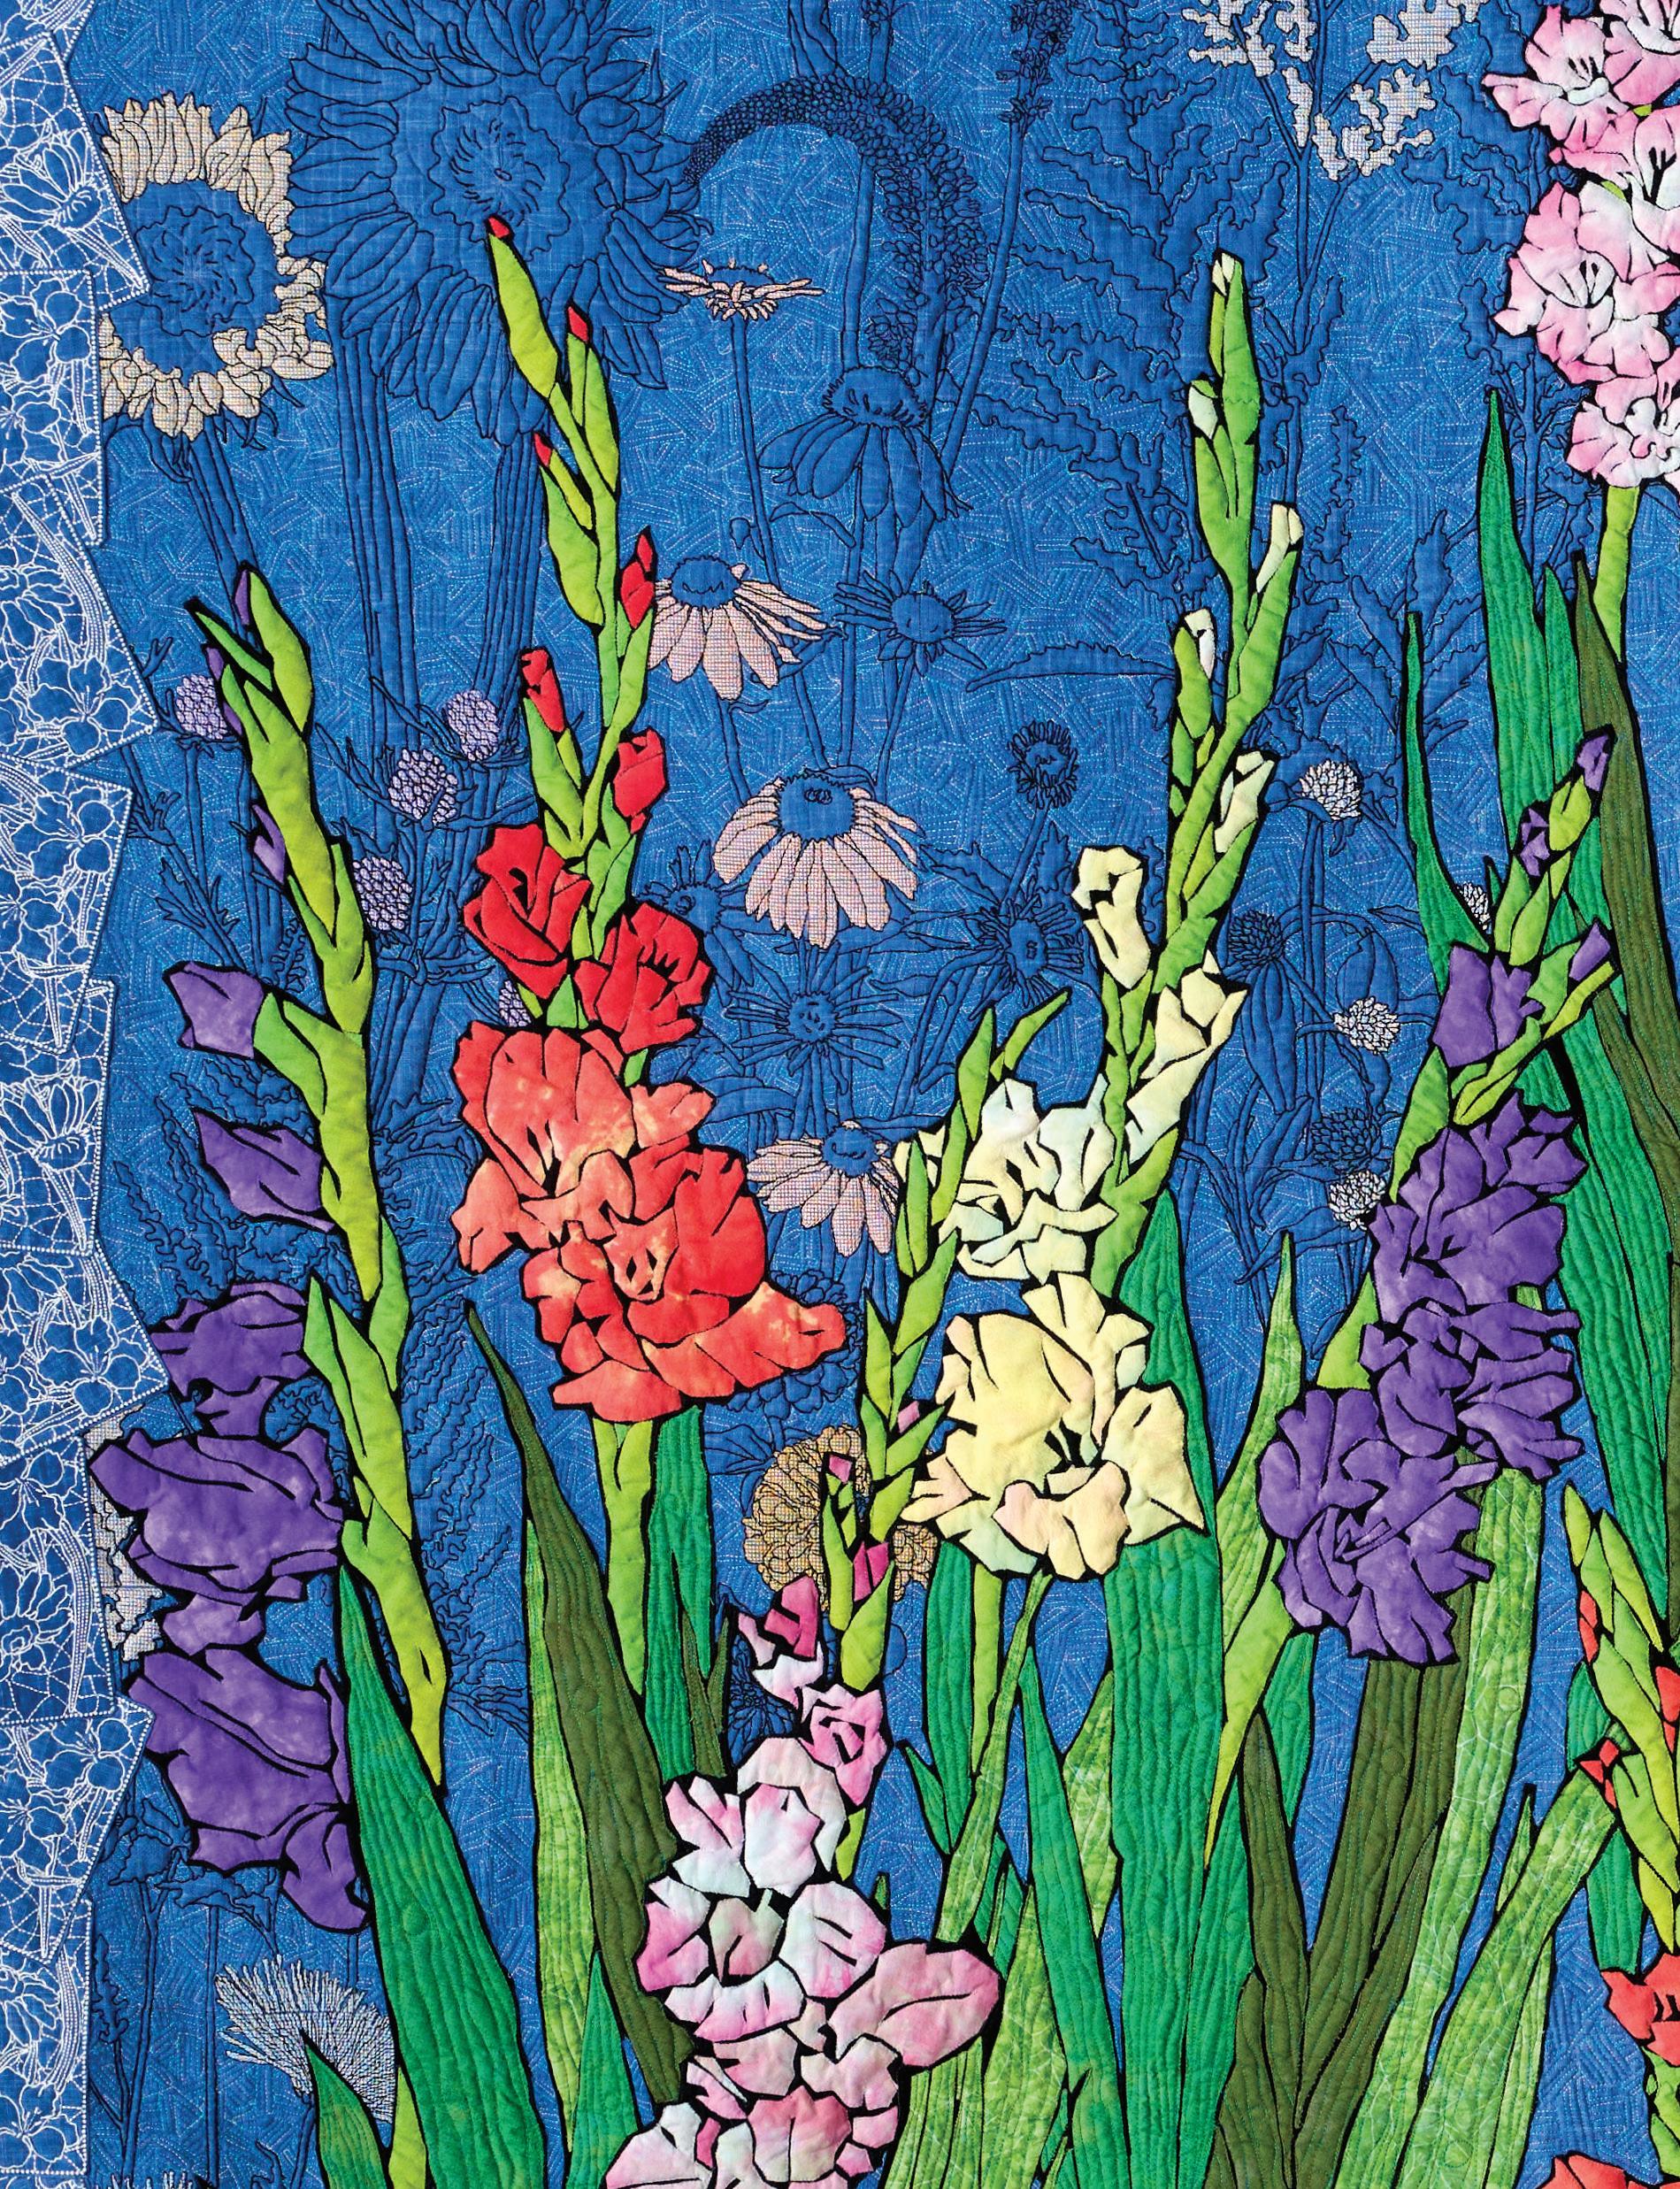
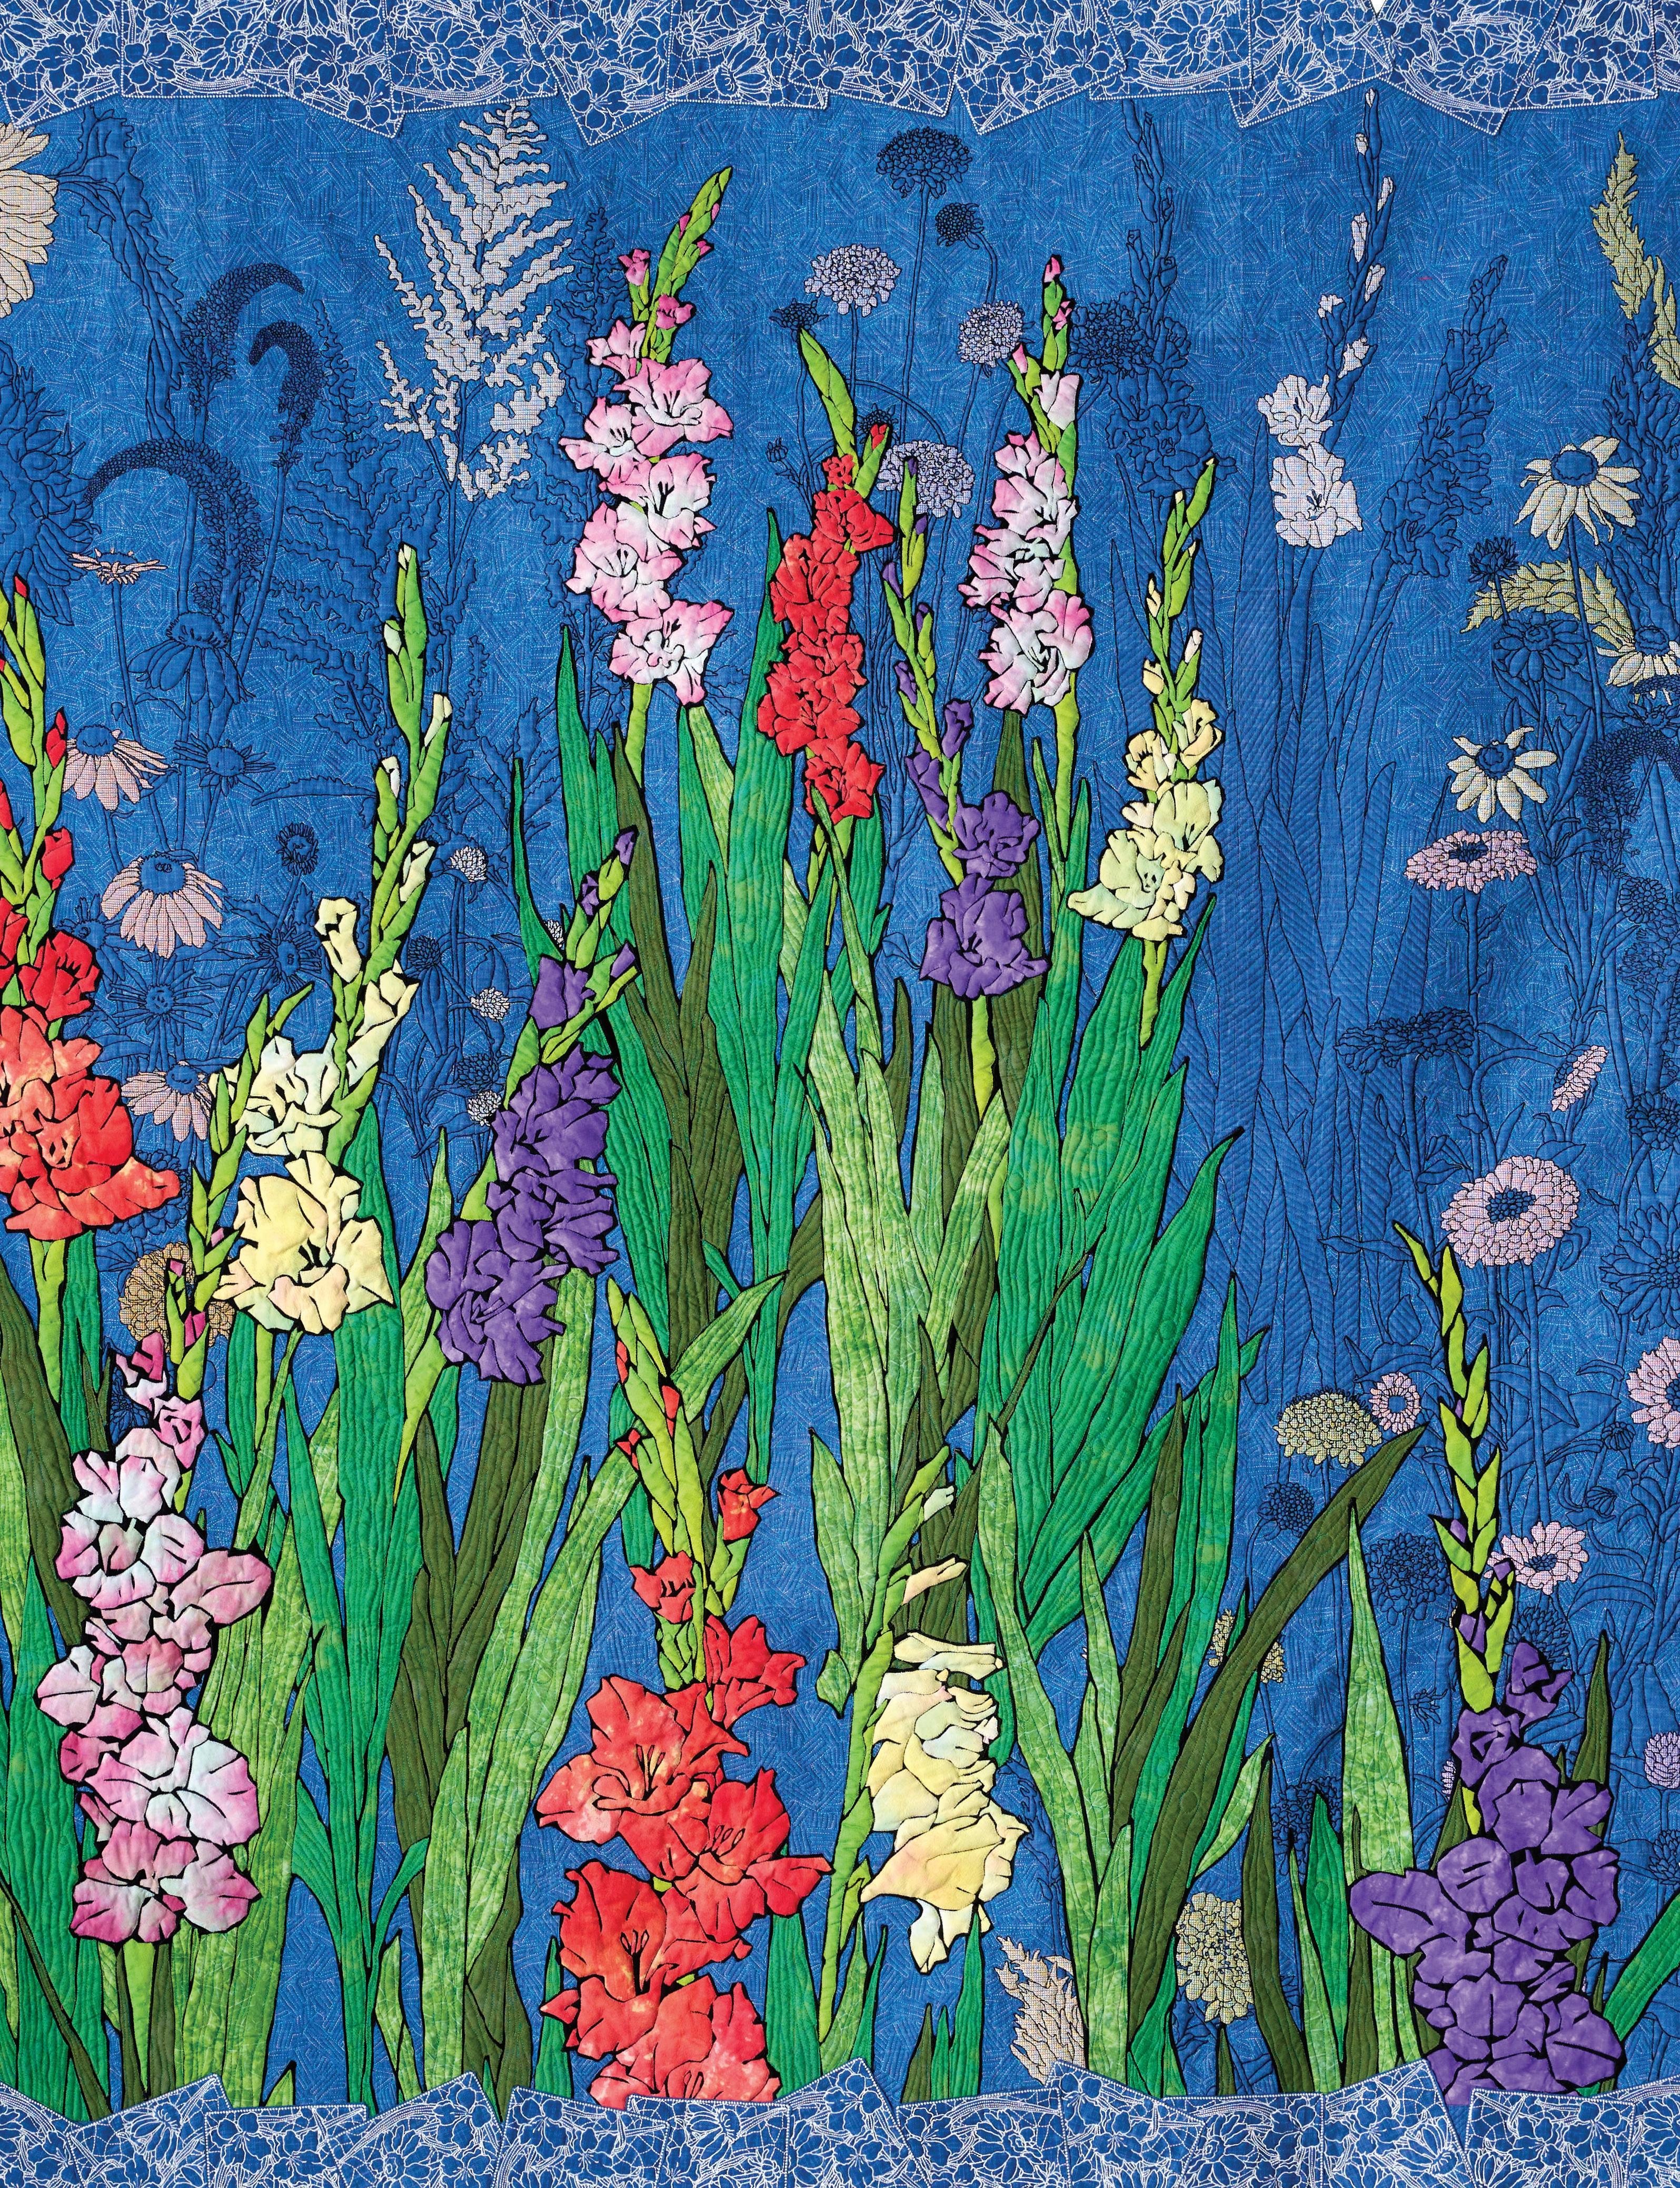
With an eye to the detail of her vision, Noriko Nozawa shares a love of flowers in this snapshot of a garden. You see it in the textures of the fabrics she selected for the flowers, the leaves outlined with thread in the foreground of the quilt, and the blackwork that fills in the garden background. Noriko, a sewing machine embroidery artist, shared her approach to making the summer quilt of a Four Seasons series.
To begin, Noriko drew a life-size illustration of summer flowers with computer software and divided the quilt design into smaller pieces to fit the frame size of her domestic sewing machine. Using embroidery software, she created a detailed embroidery plan for each part of the quilt. Noriko embroidered the background blackwork before adding the colorful gladiolus flowers and leaves appliqué for the quilt center, being careful to maintain the alignment of the edges of the embroidery with the appliqué.
Noriko didn’t stop growing flowers with the center of her quilt! Before quilting the whole quilt, she scattered 64 embroidery-quilted floral blocks for a border—much as flowers might grow in a garden. She wanted the lace pattern in each of the border blocks to provide a sense of unity to the whole. Noriko connected the blocks to the center of the quilt with a zigzag stitch of transparent thread, leaving a thin seam allowance so she could cut away the overlapping parts.
“Machine embroidery can become too industrial,” Noriko shared with AQ, “When I incorporate machine embroidery into my quilts, I want the end result to be as warm as possible, like hand stitching. Even when I embroider lines in flowers, I intentionally draw them roughly to make them more like they are in real life.”