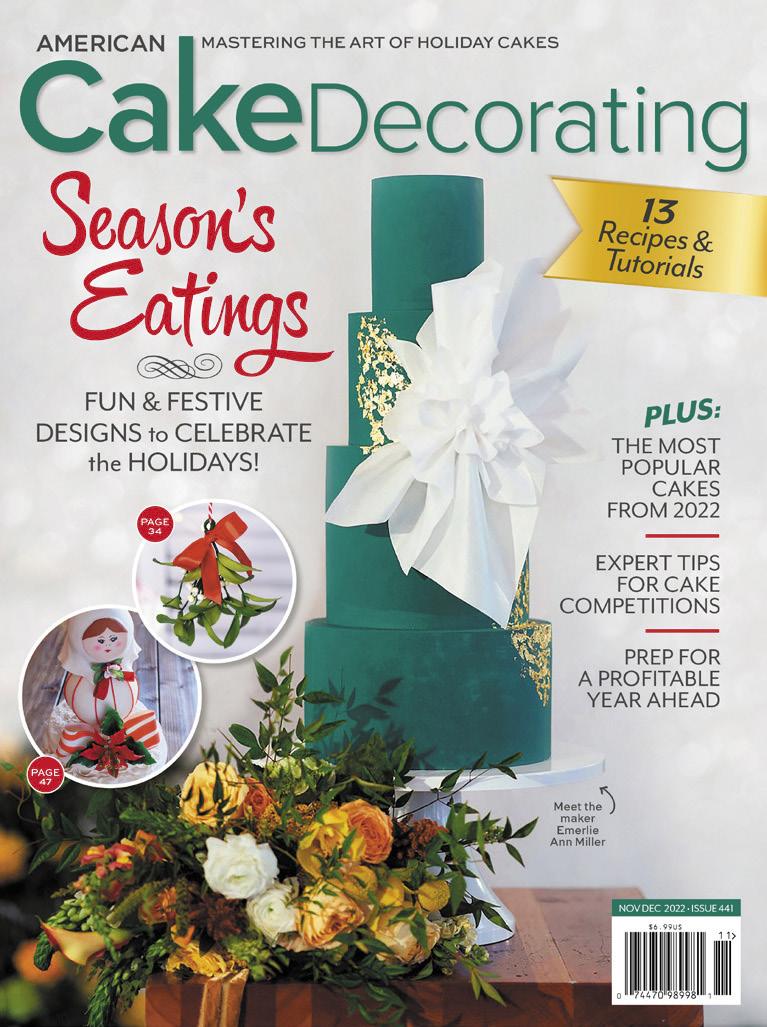
CASTASPELL


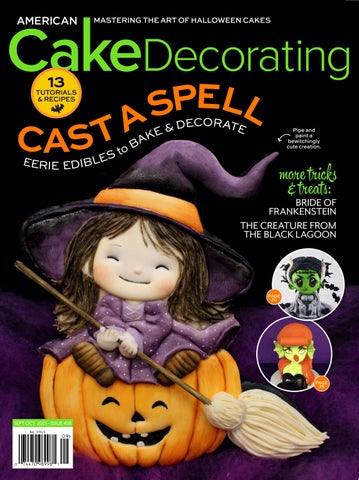
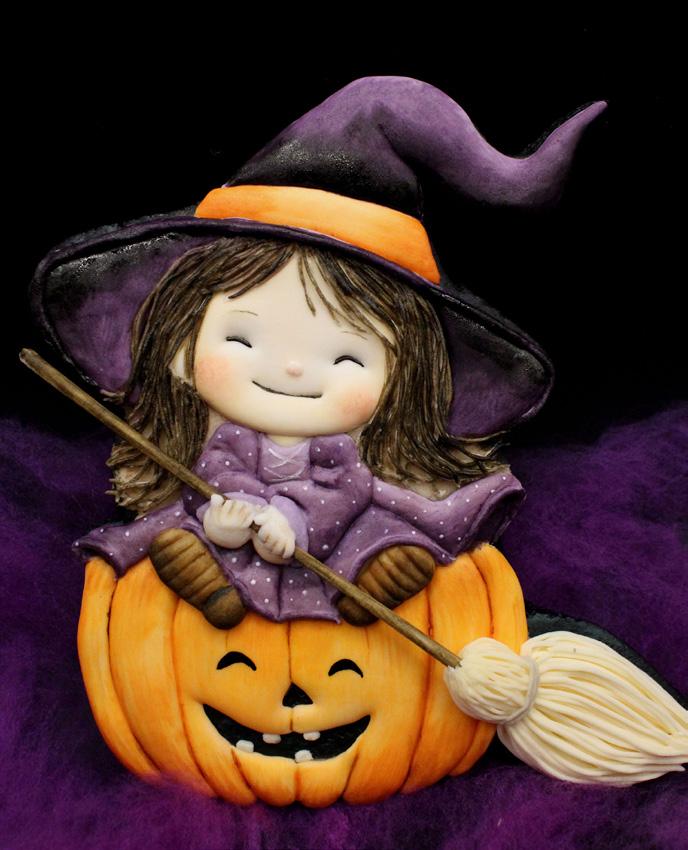
Calling all ghouls and goblins! Spooky season is fast approaching, as is that telltale chill in the air that makes us head back inside and get back to baking. If you’re all about Halloween, pick your poison: You’ll find Frankenstein’s bride, a gothic skull cake, the Creature from the Black Lagoon, and so much more. Start off sweet (literally!) with cover star Clarisa Borunda’s spellbindingly cute witch cookie and then fill, carve, mold, and paint your way all the way
through October 31. There are all levels of skills and creepiness covered. And don’t worry about getting too spooked! Remember, it’s all about to get eaten anyway.
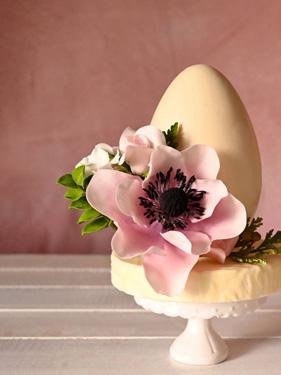
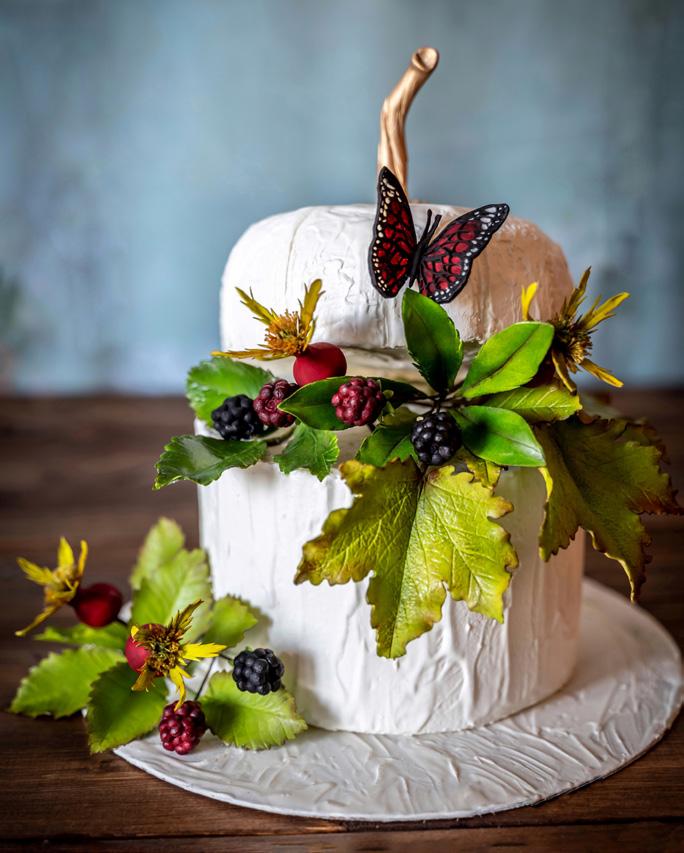
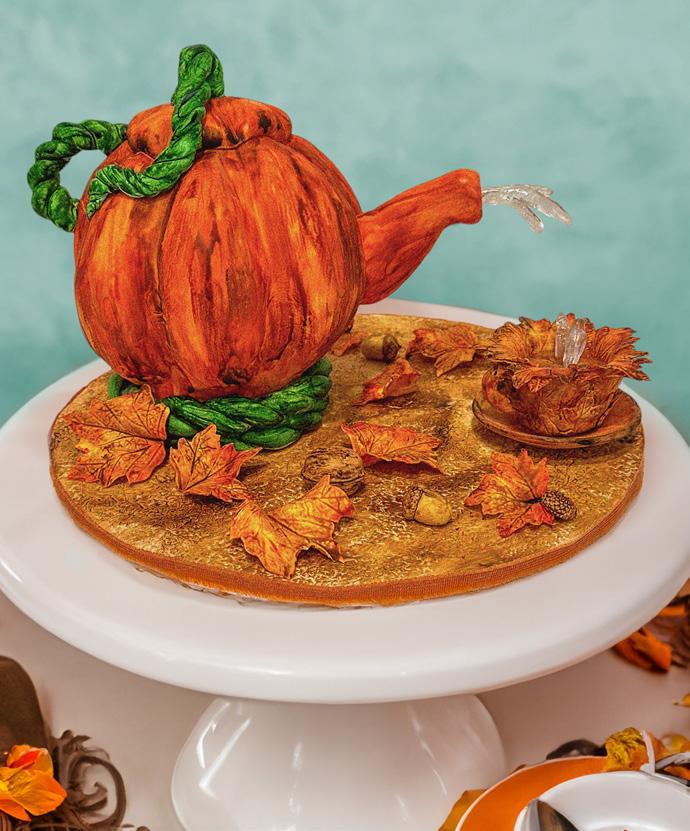
Of course, even if you aren’t into the spooky stuff, you’ll have plenty to look forward to! Try decorating edible mugs as you sip on a pumpkin spice latte or learn to turn gum-paste filler flowers into a simple yet stunning seasonal display. Make a pumpkin teapot or pipe some colorful candy leaves to mimic the changing trees.
Find inspiration in a retro roller rink cake collab, learn how to capitalize on holiday orders, and try out some newly released bakeware that you’ll have well beyond the busy season too. Whatever you decide to make, you’ll have a spooktacular time trying out new tricks and treats!
From my kitchen to yours,
Join our incredible community of cakers on your favorite platform, and don’t forget to sign up for our newsletter to stay up to date on all things cake!


americancakedecorating.com/blog americancakedecorating.com

facebook.com/groups/ACDCakeTalk facebook.com/americancakedecorating
instagram.com/americancakedecorating
Want to pitch an idea or just want to say hello? Email annmarie@americancakedecorating.com.
PUBLISHER/CEO
Grace McNamara
ASSOCIATE PUBLISHER
Ania McNamara-Munzer
MANAGING EDITOR
AnnMarie Mattila
CREATIVE DIRECTOR
Brenda Drake Lesch
COPY EDITOR
Maude Campbell
SOCIAL MEDIA COORDINATOR
Corina E. Buzdugan
CONTRIBUTORS
Stephanie Ashcraft, Joel Basco, Lauren Borquez Jones, Scott Bradshaw, Clarisa Borunda, Amy Goff, Cydni Mitchell Hodges, Maggy Morales, Anna Oliinyk, Dana Pollack, Jean A. Schapowal, Veronica Seta, Sabrina Siguoin, Tammy Varela, Wilton Sweet Studio
SUBSCRIPTIONS l 651-330-0574 l 1 YEAR $19.95

Editorial Director:


Please direct all correspondence, photos, and press releases to AnnMarie Mattila, annmarie@americancakedecorating.com, or mail to American Cake Decorating, 4707 Hwy 61 N #255, St Paul, MN 55110.
Subscription Questions & Changes:
Send address changes to, New Mailing Address: American Cake Decorating, 4707 Hwy 61 N #255, St Paul, MN 55110 or email contact@americancakedecorating.com. Please notify us of address changes four to six weeks ahead of time. The post office is under no obligation to forward your magazine. If the postal authorities notify us that your magazine is undeliverable, we have no further obligation unless we receive a corrected address within one year. We cannot be responsible for non-delivery. The staff of American Cake Decorating magazine and AIM Communications LLC have reviewed contributions and advertising materials with the understanding that the information is original, accurate, and reliable, but we cannot be held responsible for such content. Please note that some of the techniques may be suitable for private home use, but are not necessarily appropriate for cakes destined for sale. American Cake Decorating magazine (ISSN 1094-8732) published bimonthly by AIM Communications, LLC, 4707 Hwy 61 N #255, St Paul, MN 55110. Tel: 651-330-0574; Fax: 651-756-8141. Visit our website at www.americancakedecorating.com. Periodicals postage paid at St. Paul, MN, and additional mailing offices. Postmaster: Send address changes to American Cake Decorating magazine, 4707 Hwy 61 N #255, St Paul, MN 55110. Allow 60 days for address change. Copyright ©2025 by AIM Communications, LLC. Reproduction in whole or part without written permission prohibited.
September | October 2025. Issue 458.
THIS
CAKE TALK | 4
News, events, and more.
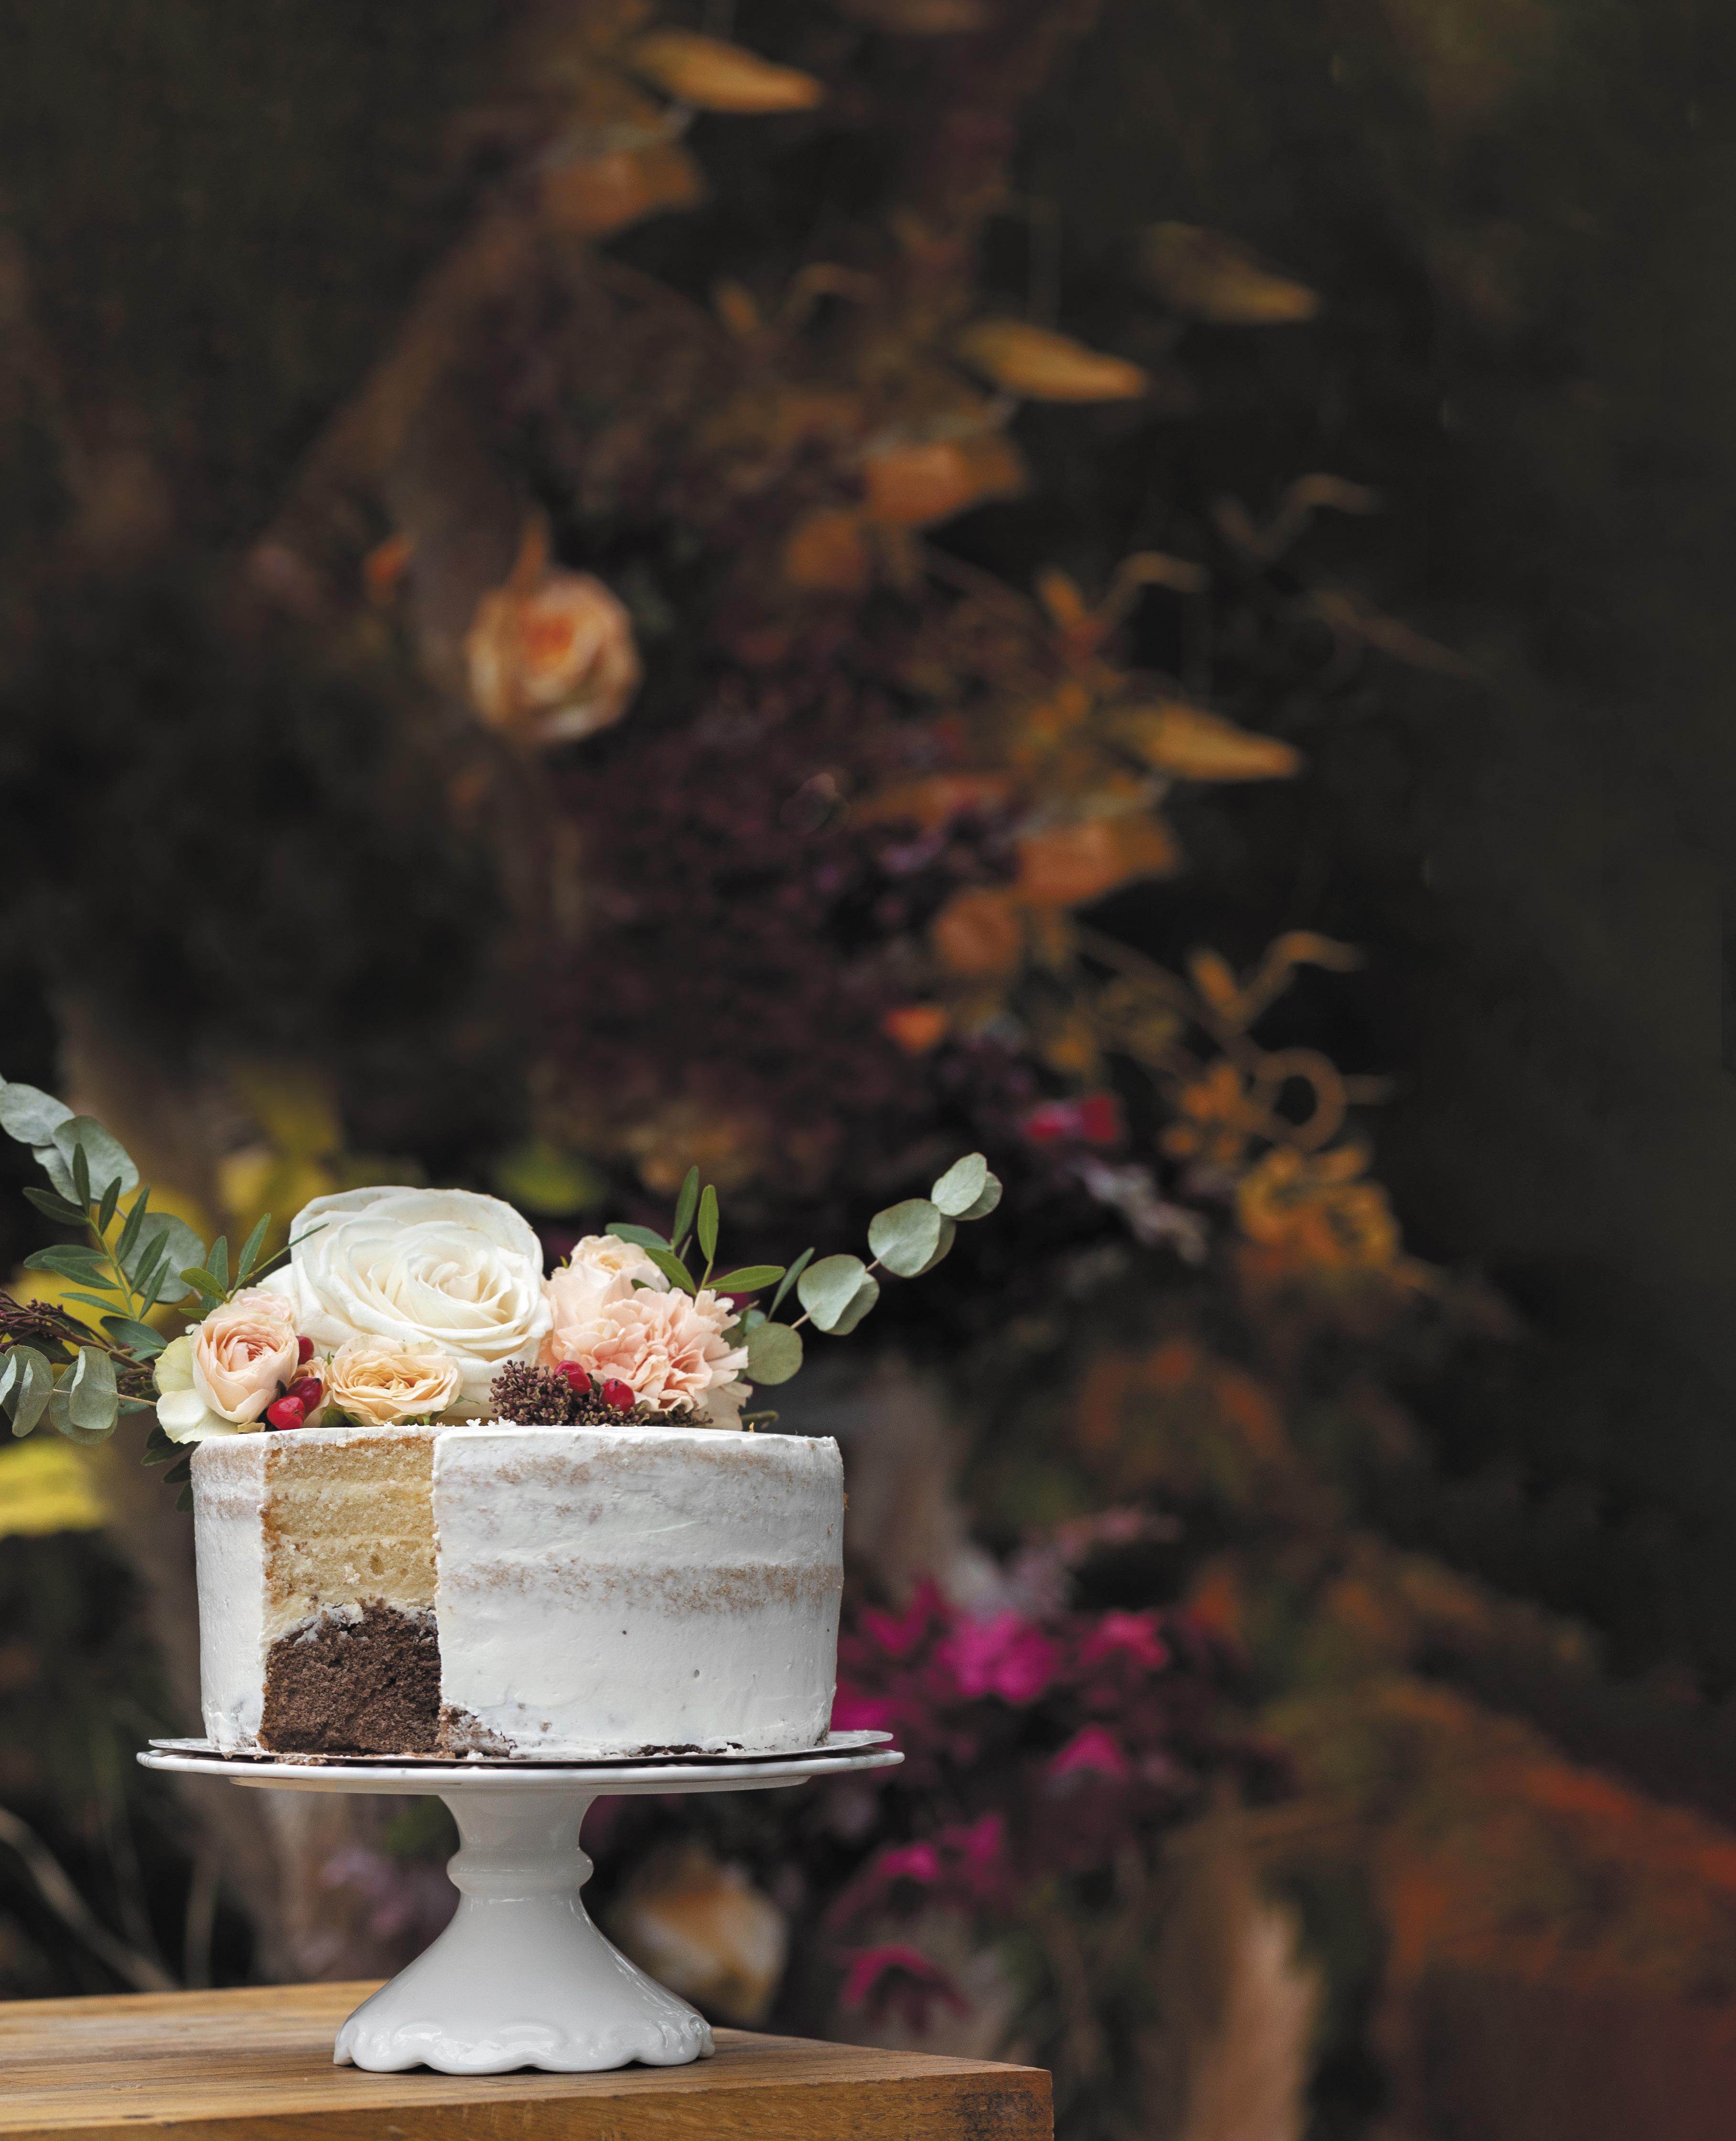
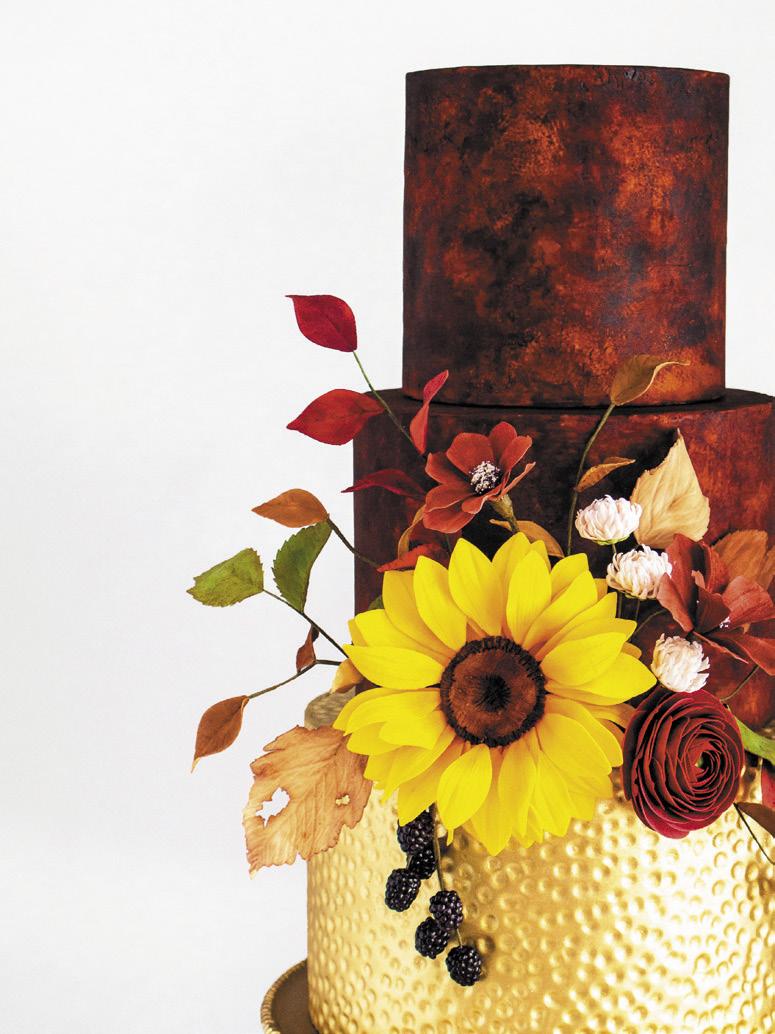
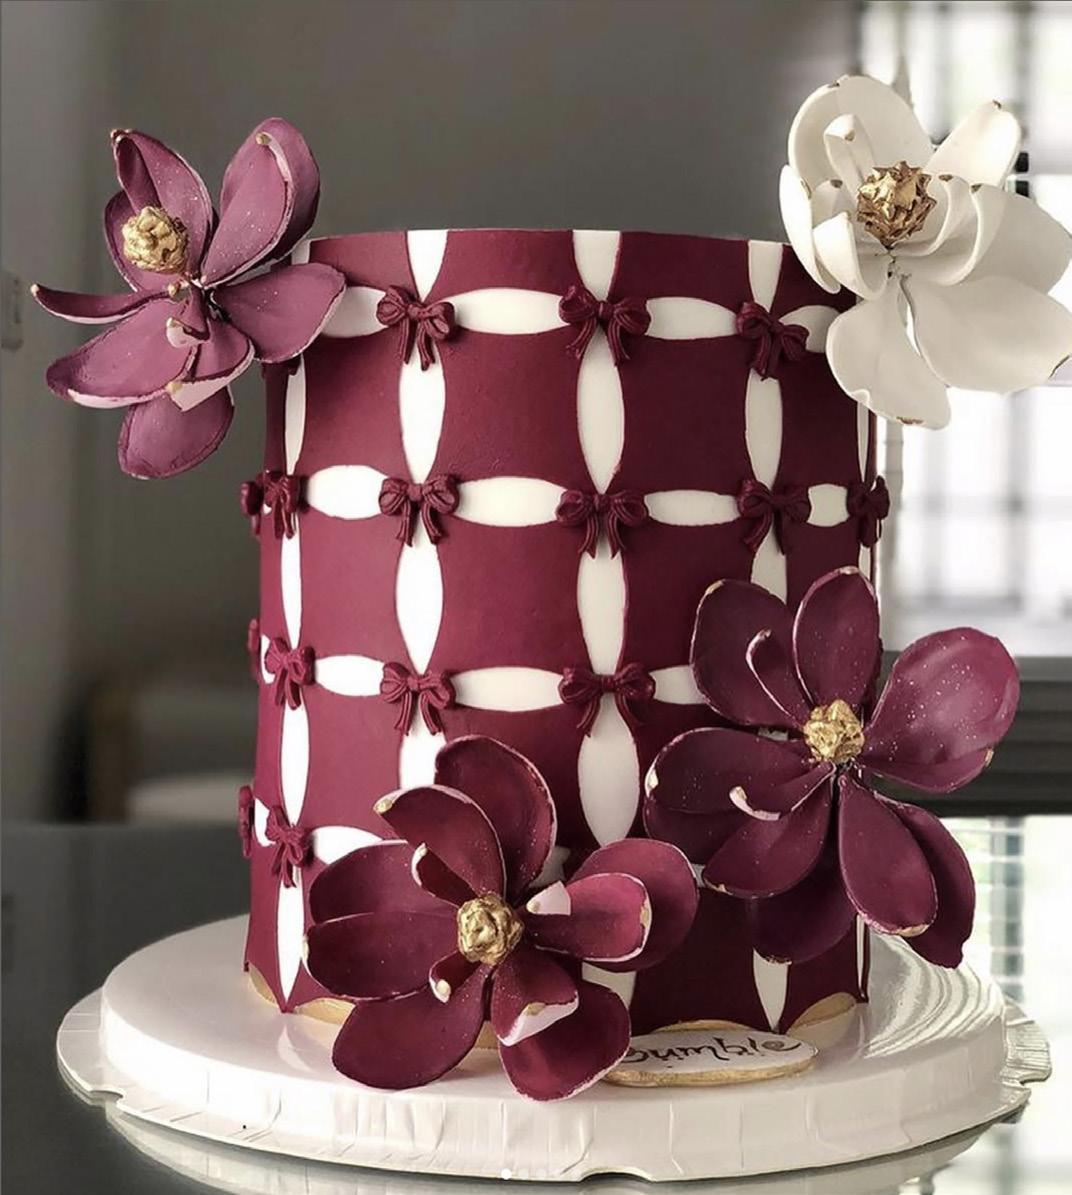
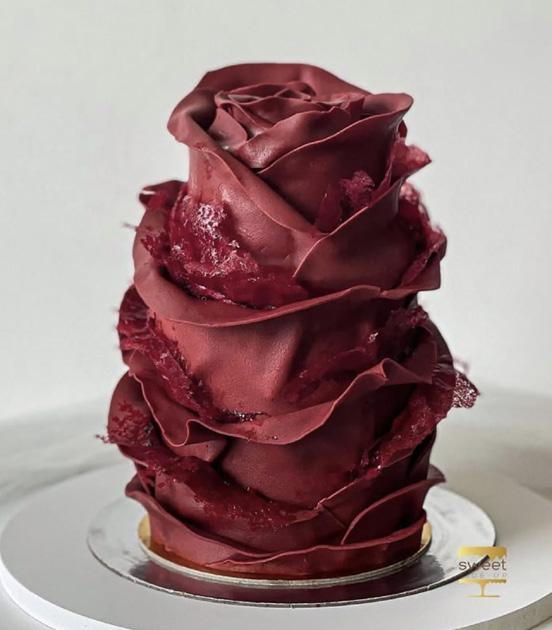
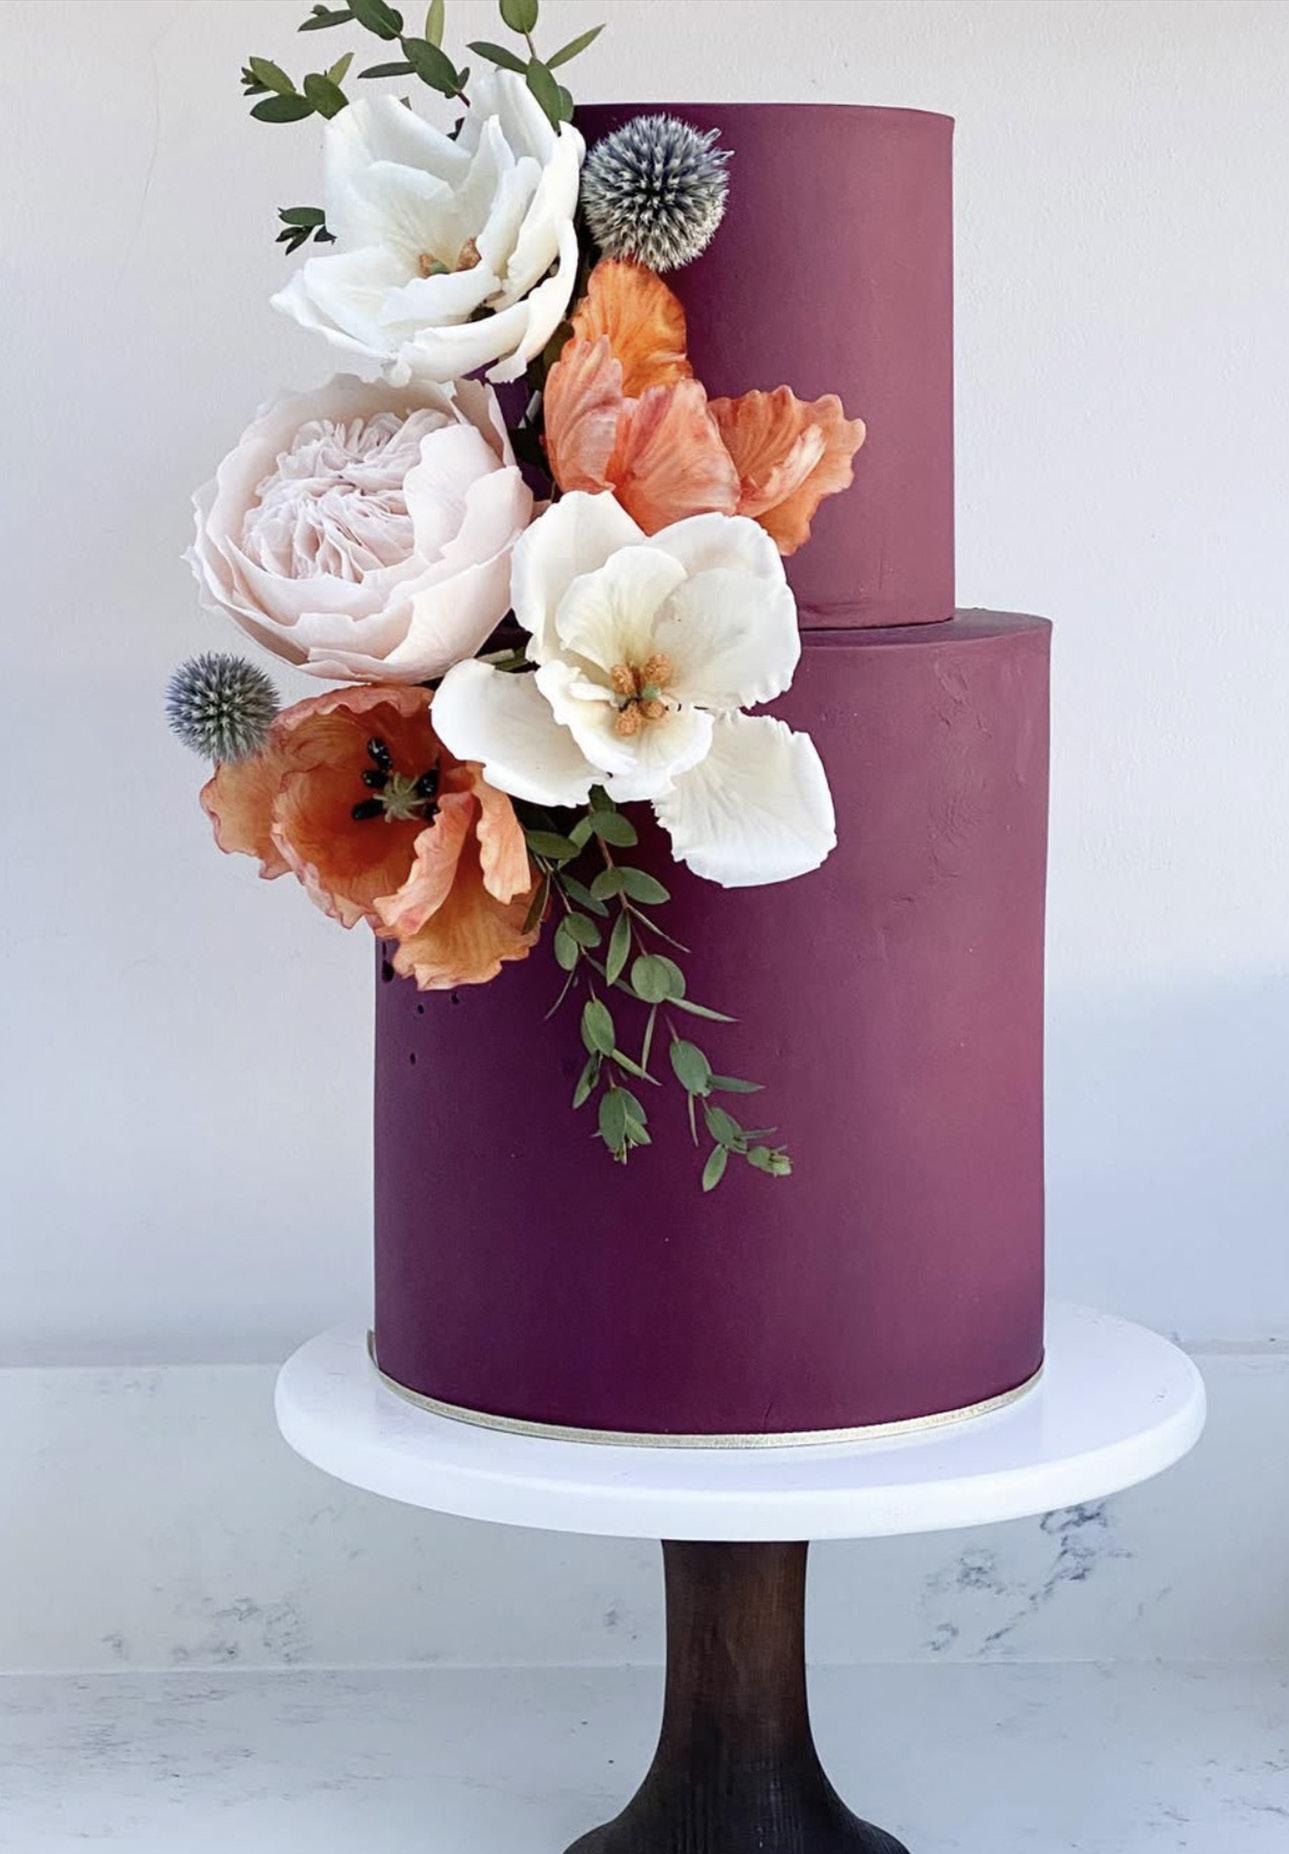
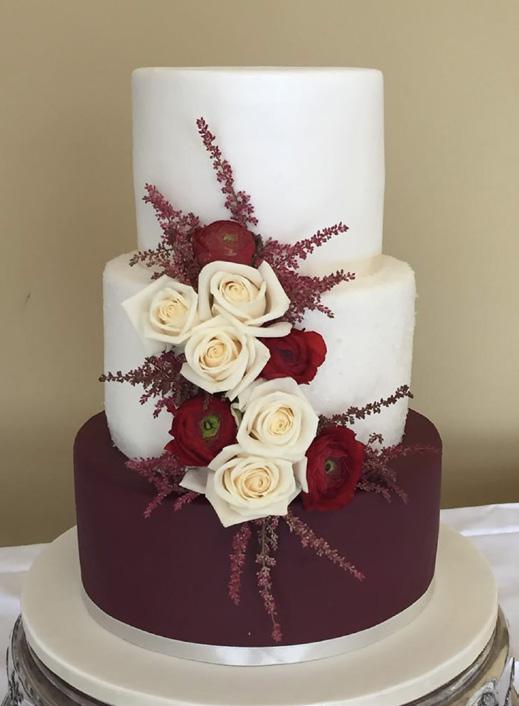
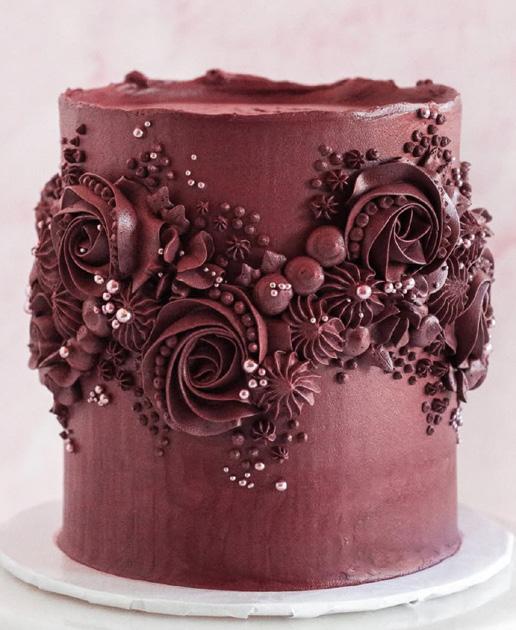
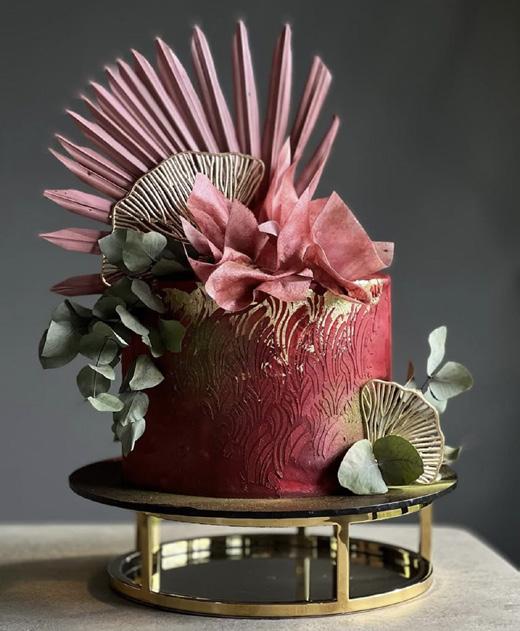
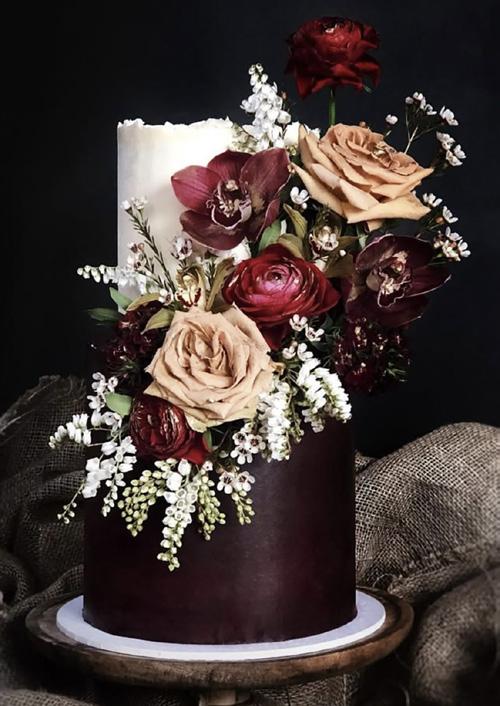
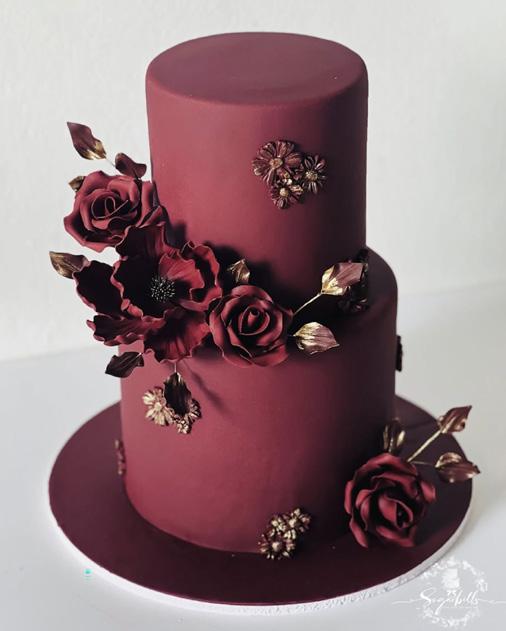
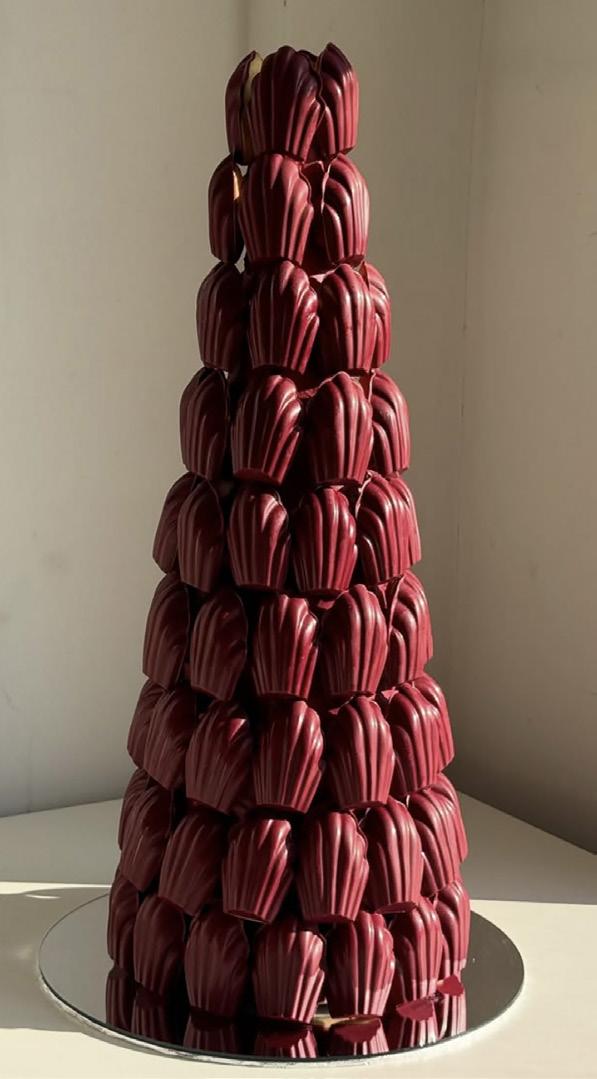
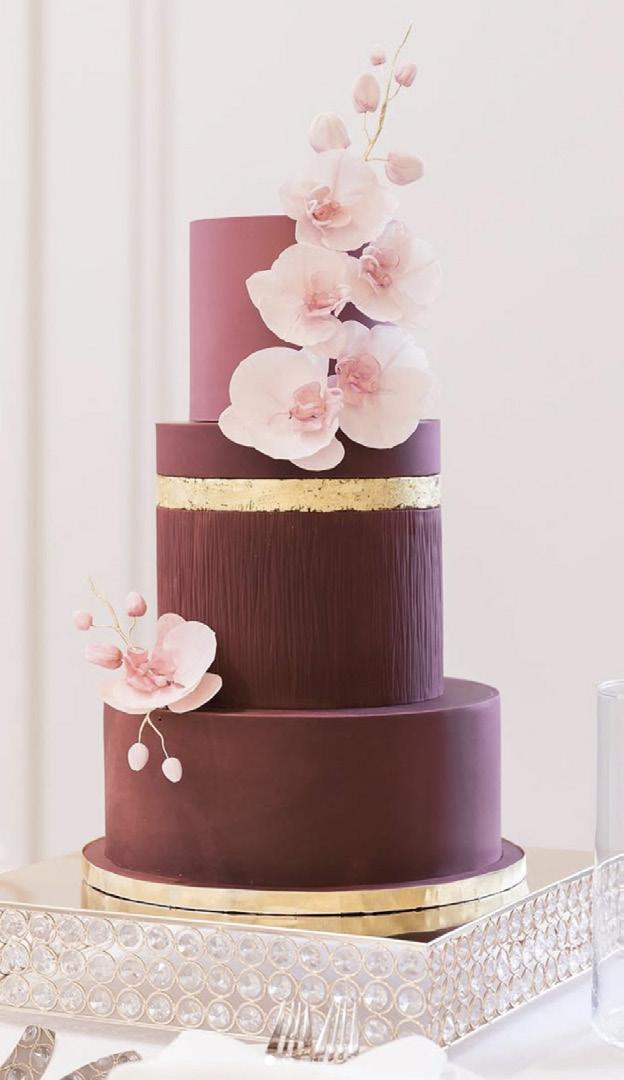
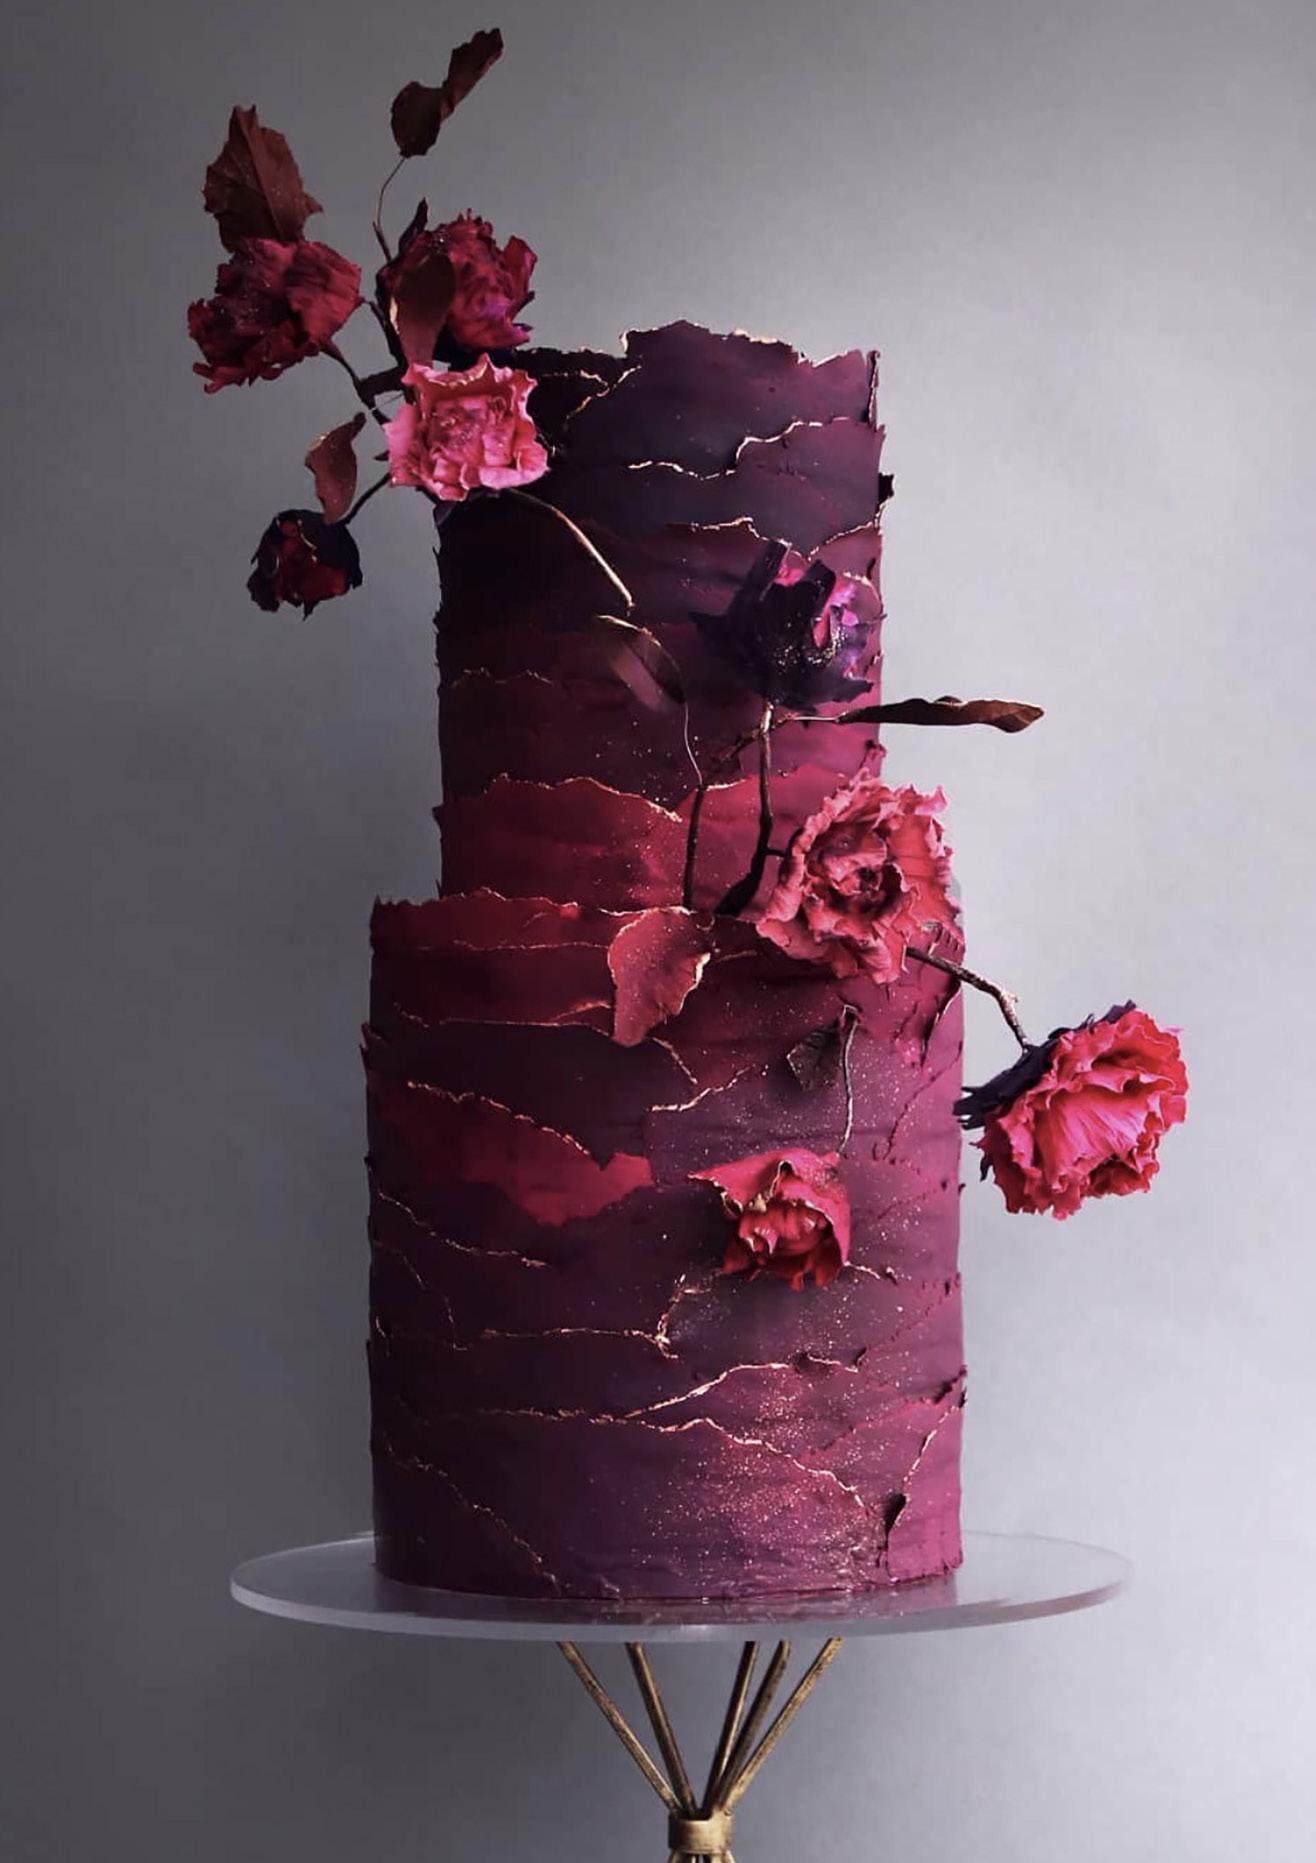
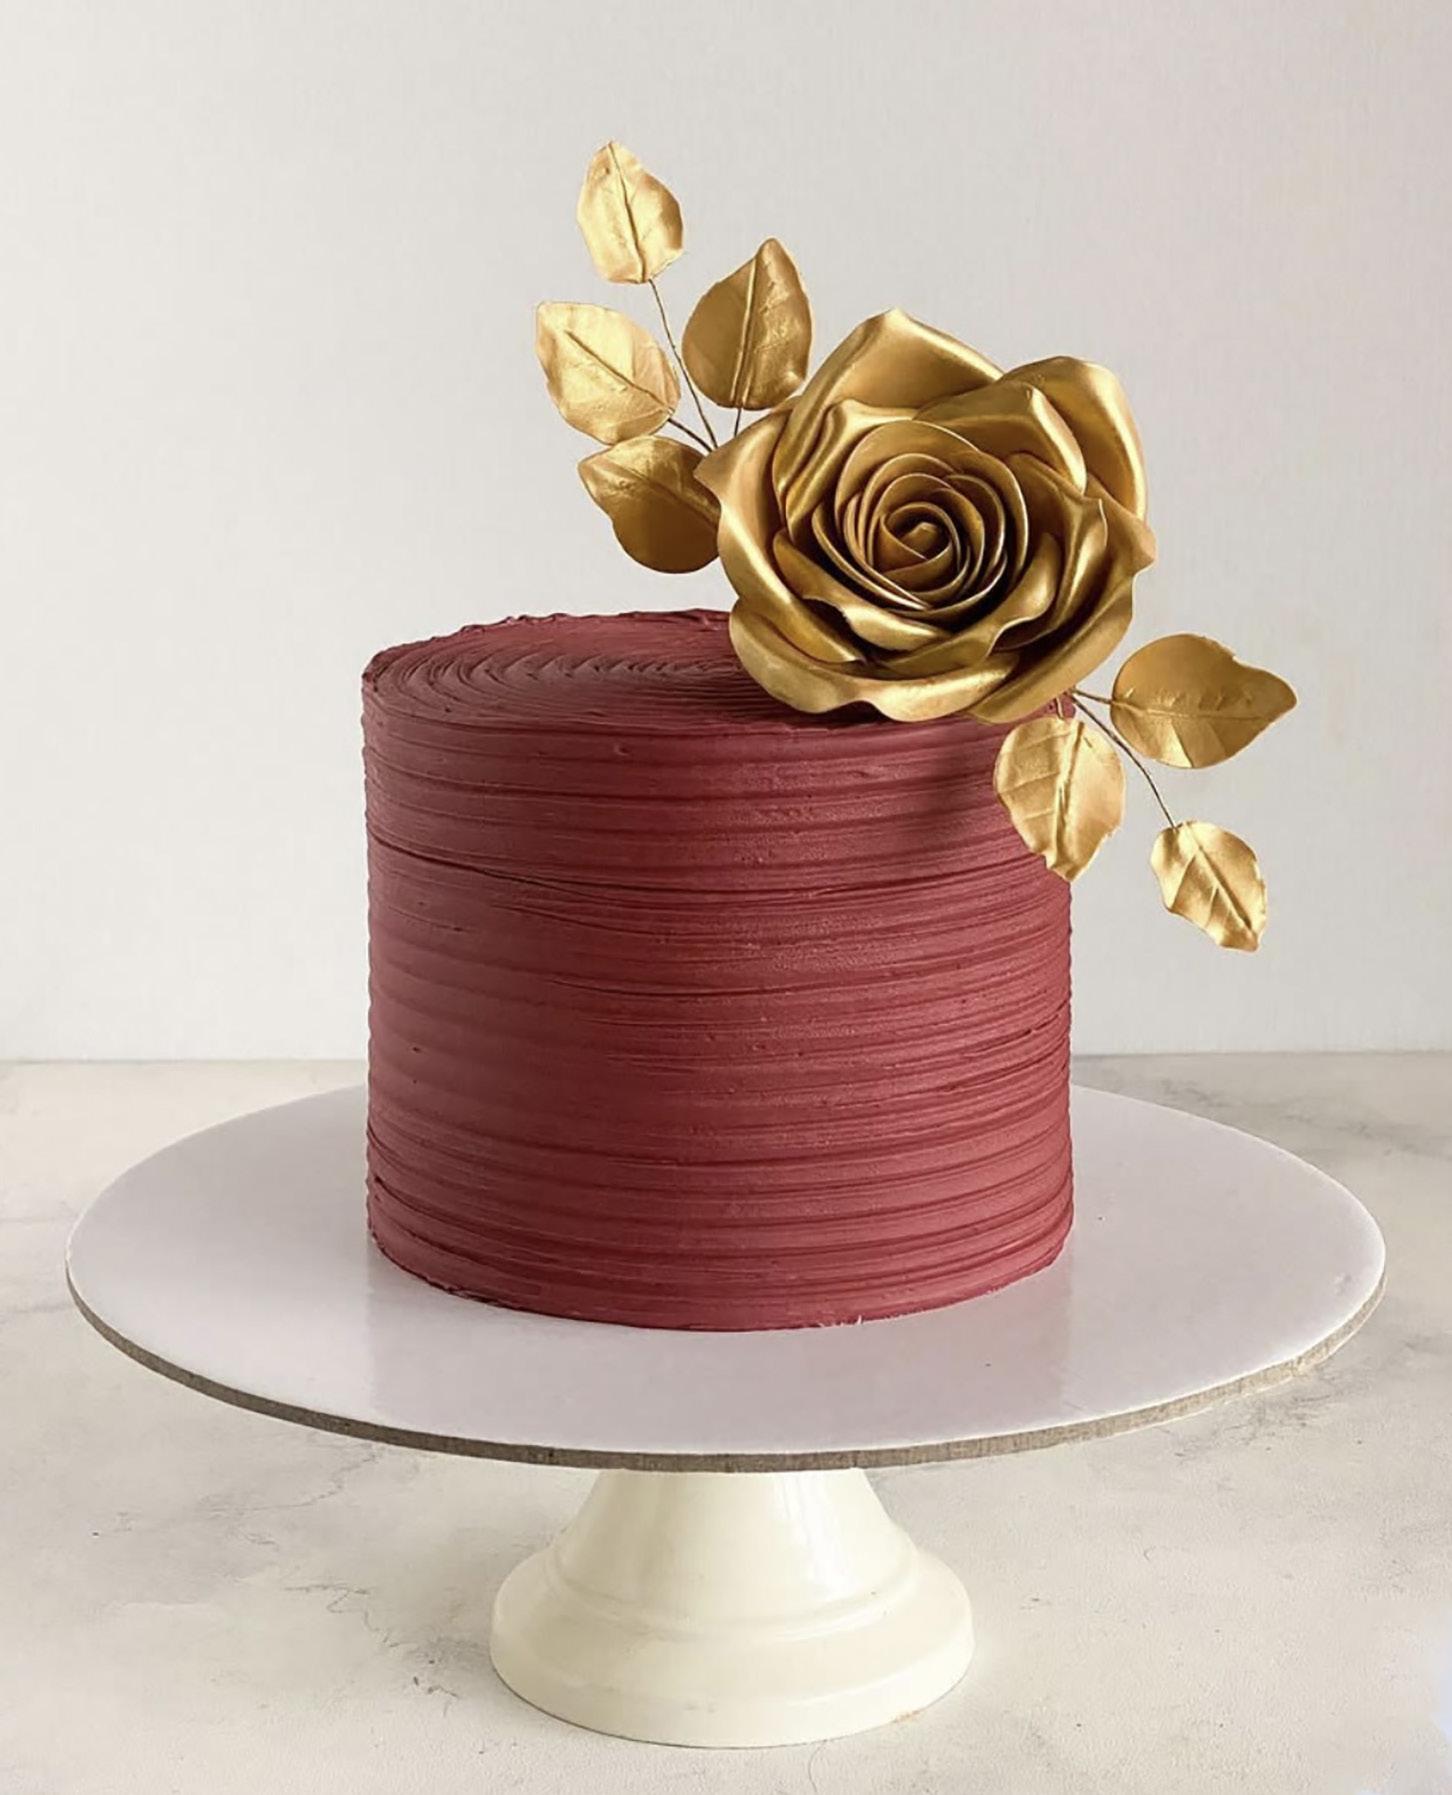
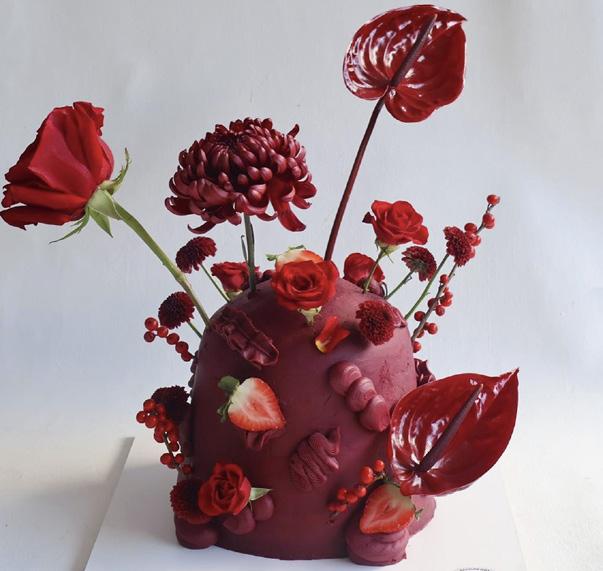
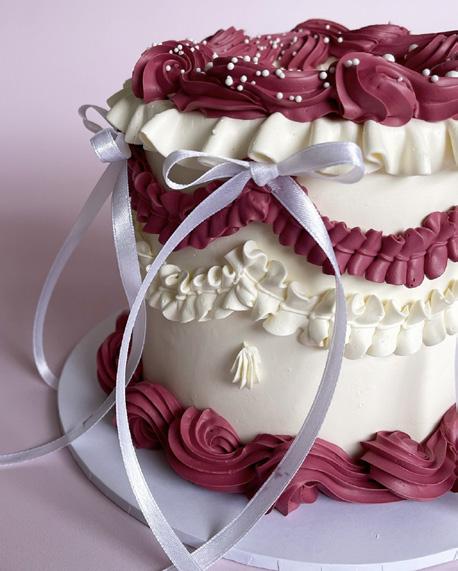
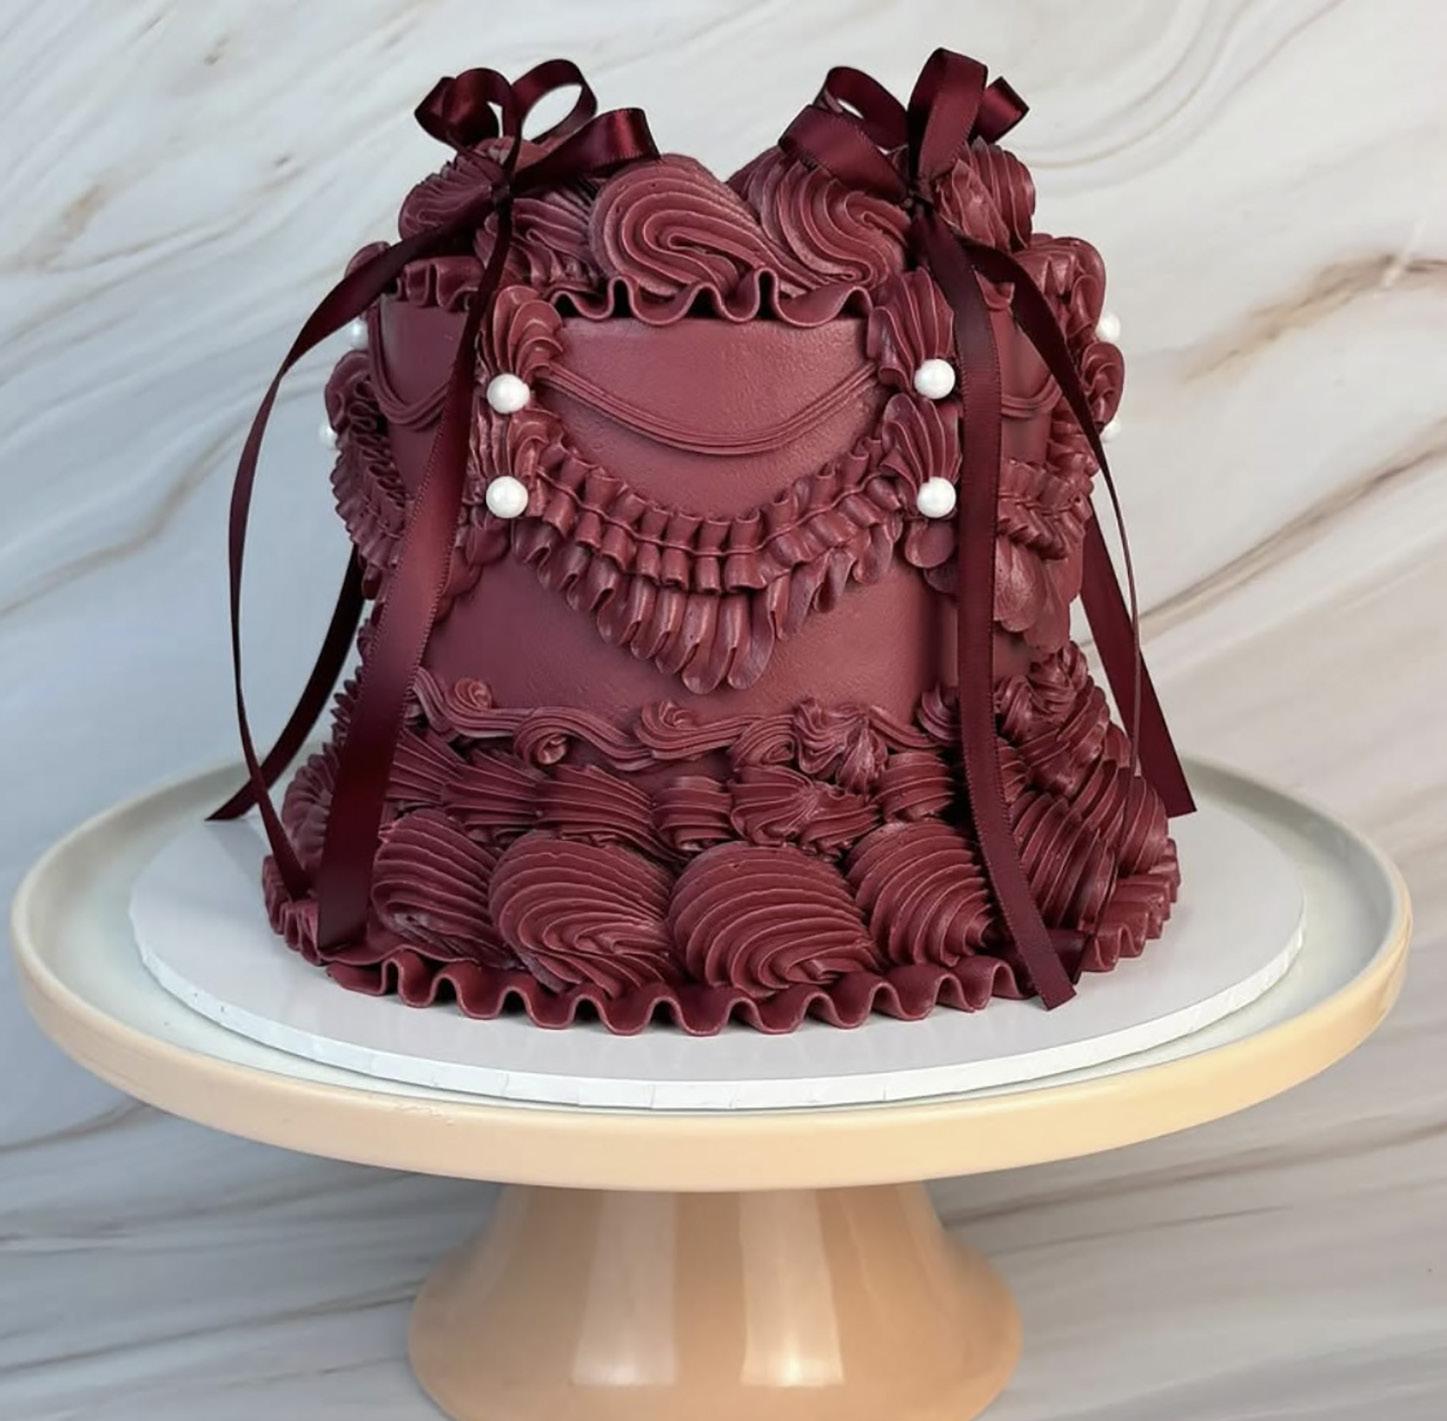
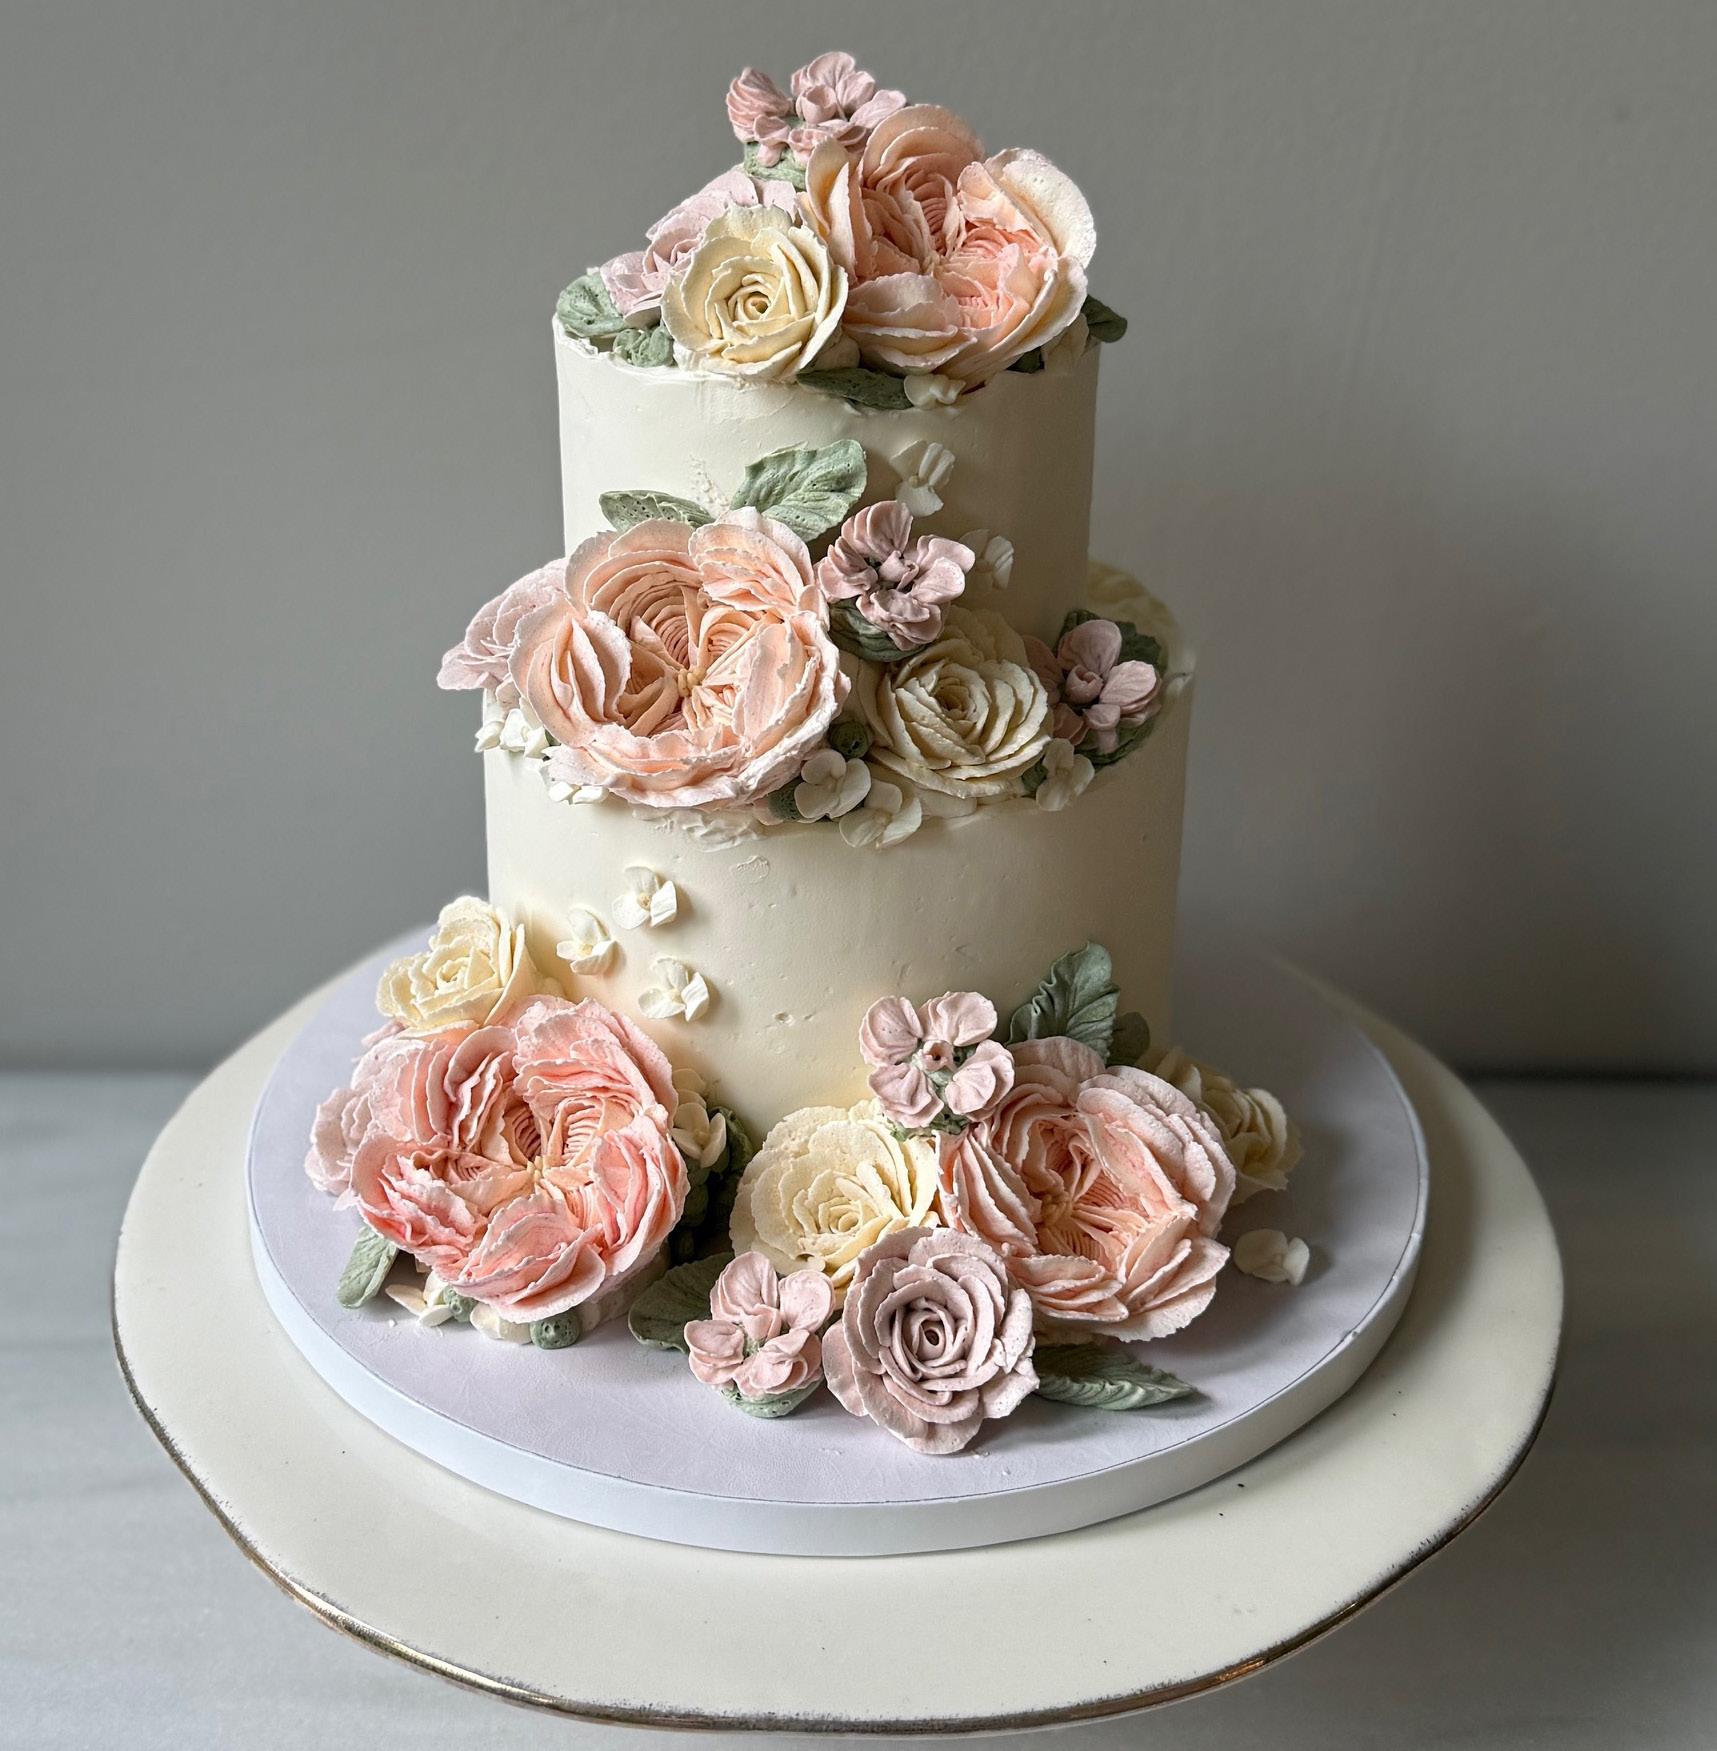
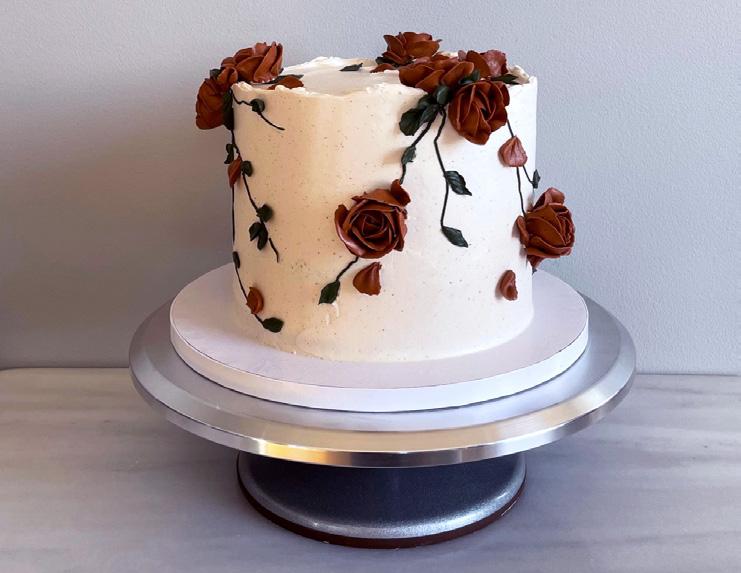
YOU MADE IT! | 6
Burgundy is the color of the season.
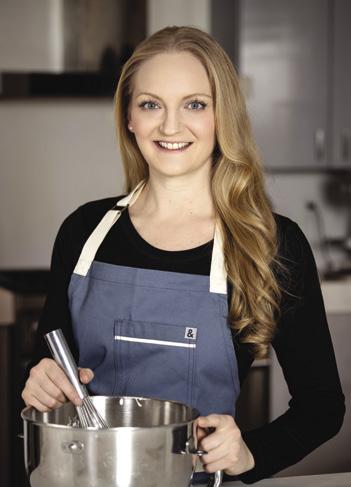
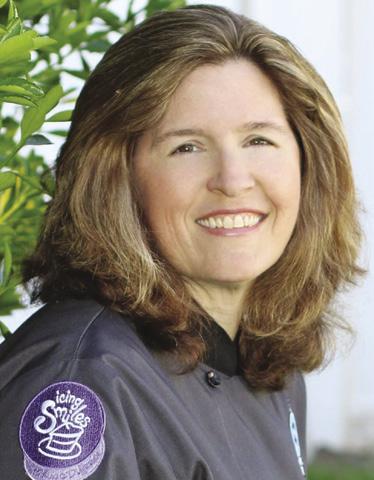
MEET THE MAKER | 18
Linda Tuthill’s journey from blogger to baker.
SWEET BOSS | 28
Cyd Mitchell Hodges’ Halloween advice.
CAKE COLLABORATION | 44
Go skating at a retro roller rink.
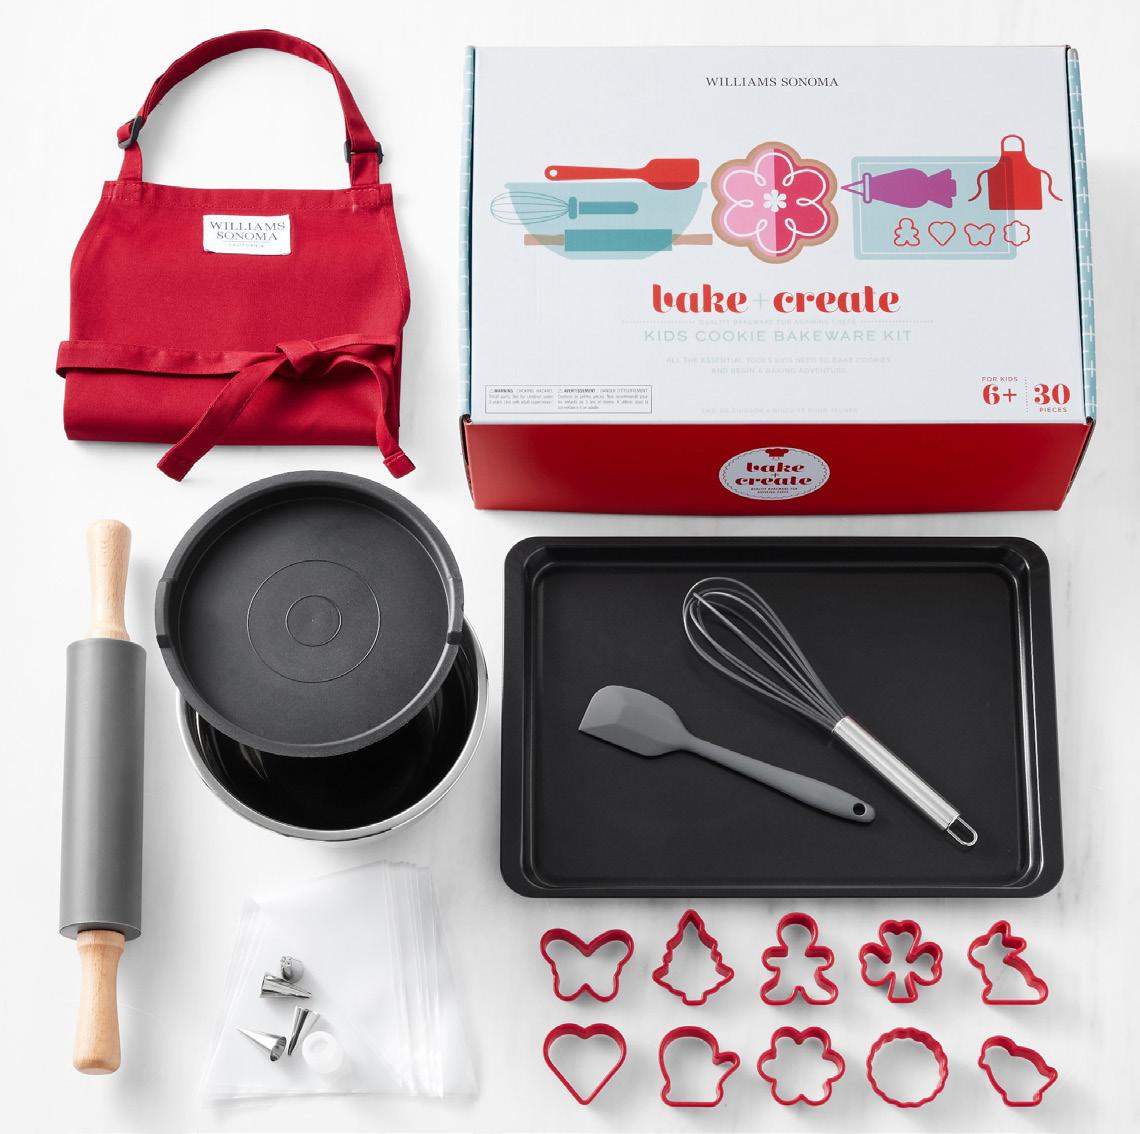
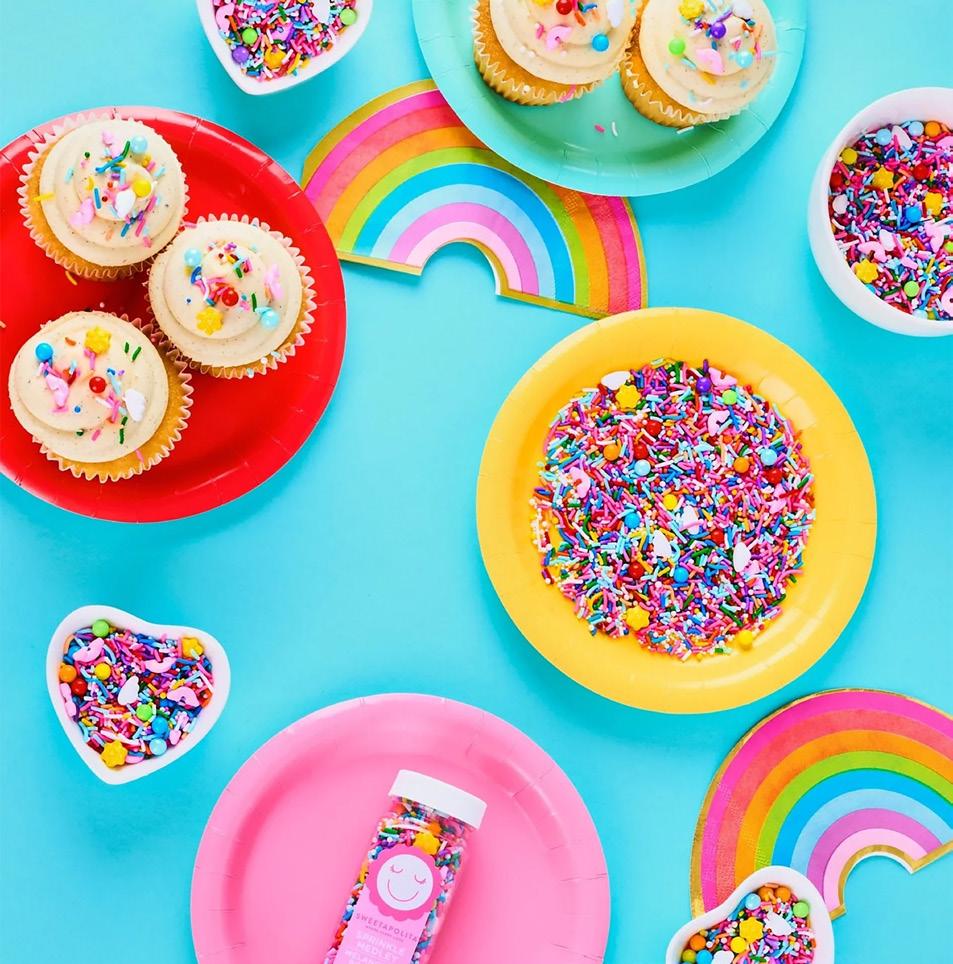
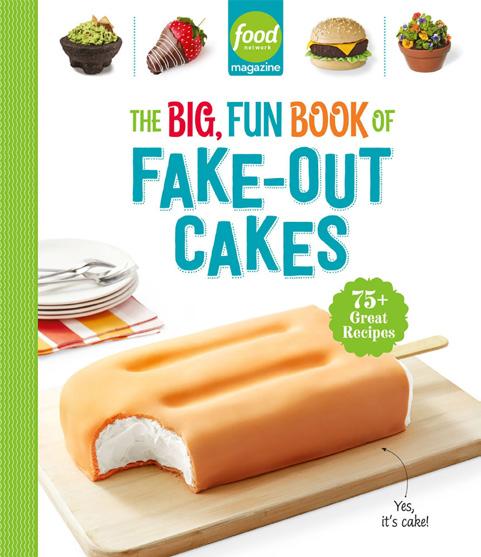
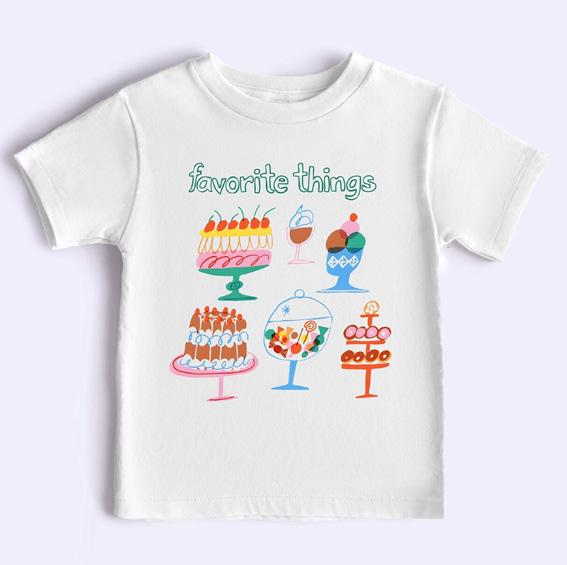
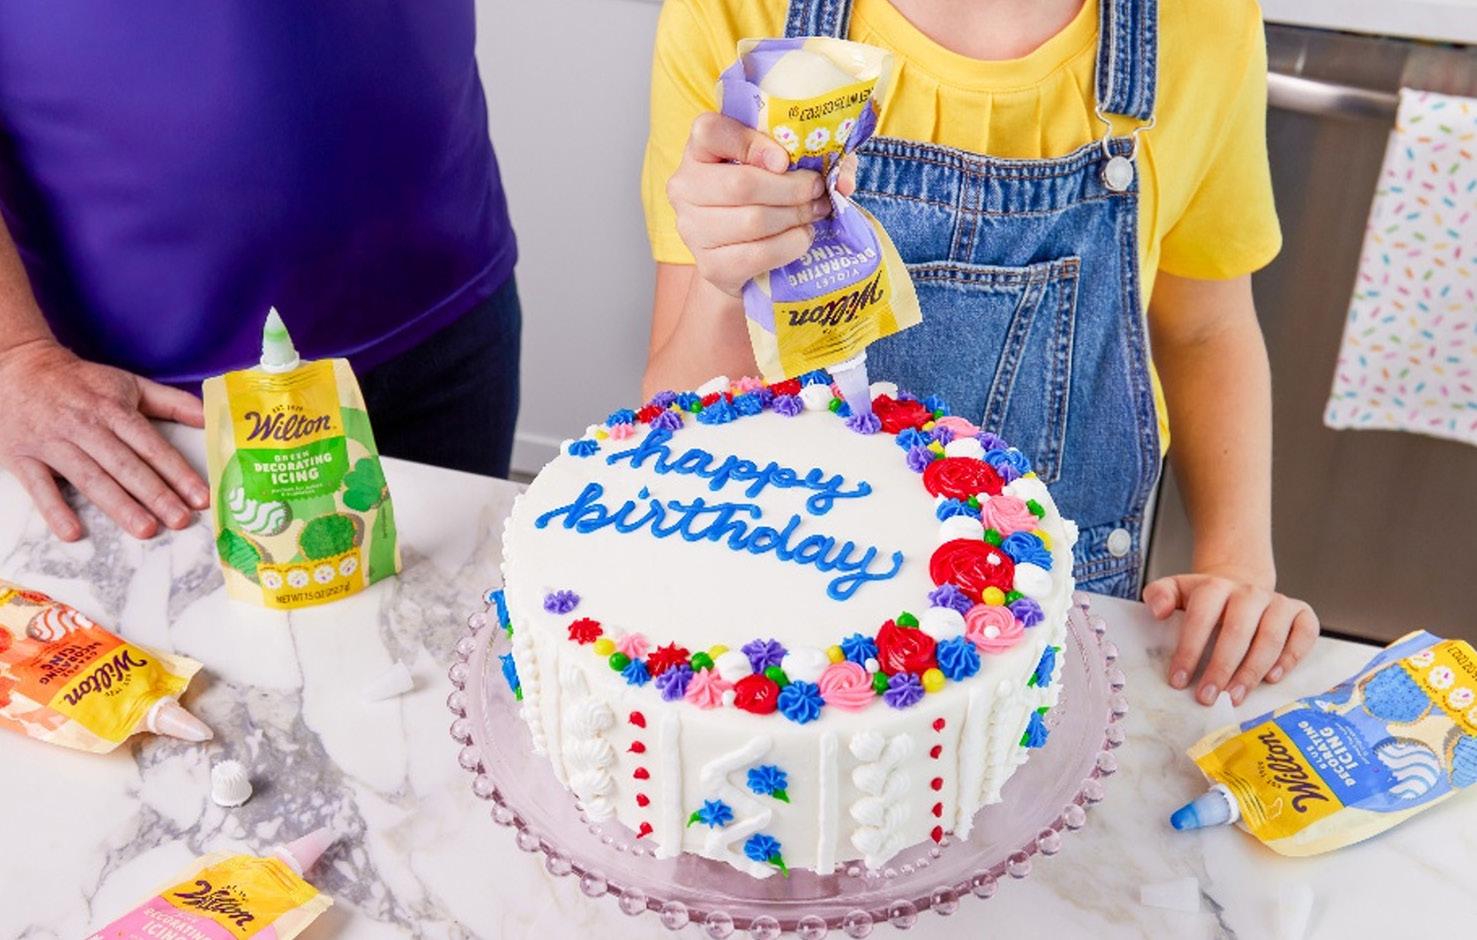
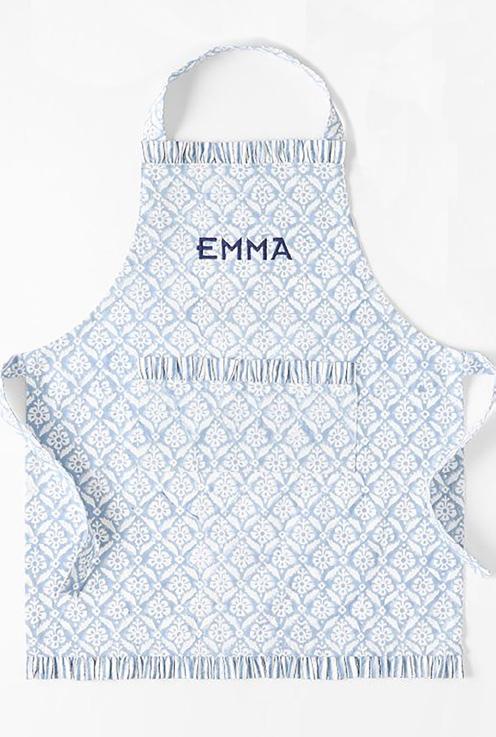
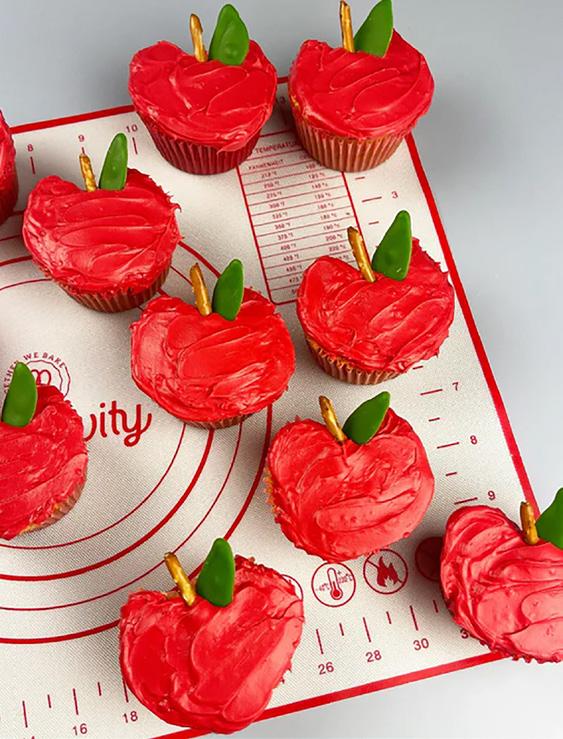
BACK TO SCHOOL | 55
Shop cake products for the kids.
8
31 56 ON THE COVER
THE CAKE ALCHEMIST | 66
Scott Bradshaw stings with a wasp’s nest.
PRODUCT SPOTLIGHT | 69
Upgrades to everyday essentials.
LAST BITE | 74
Chocolate peanut butter cake.
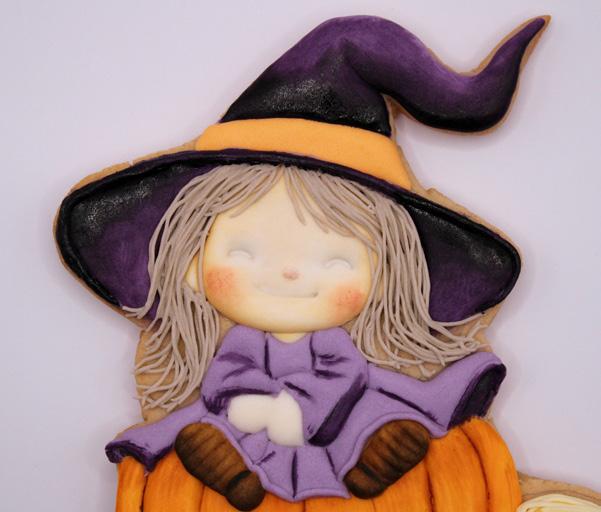
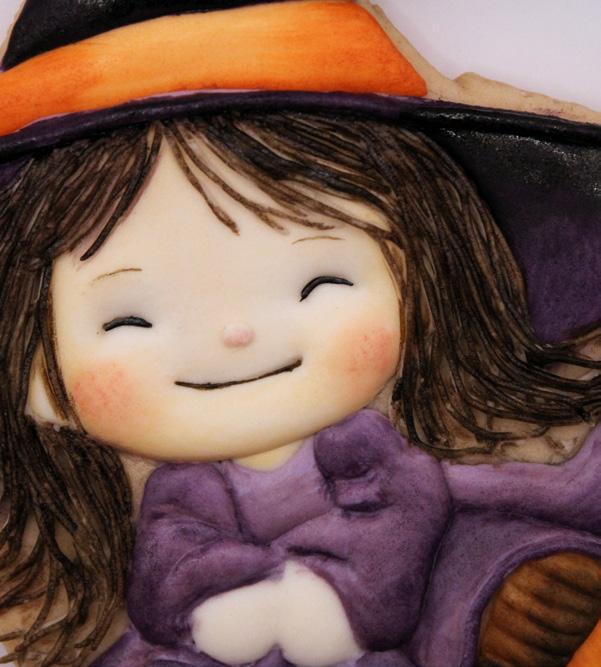
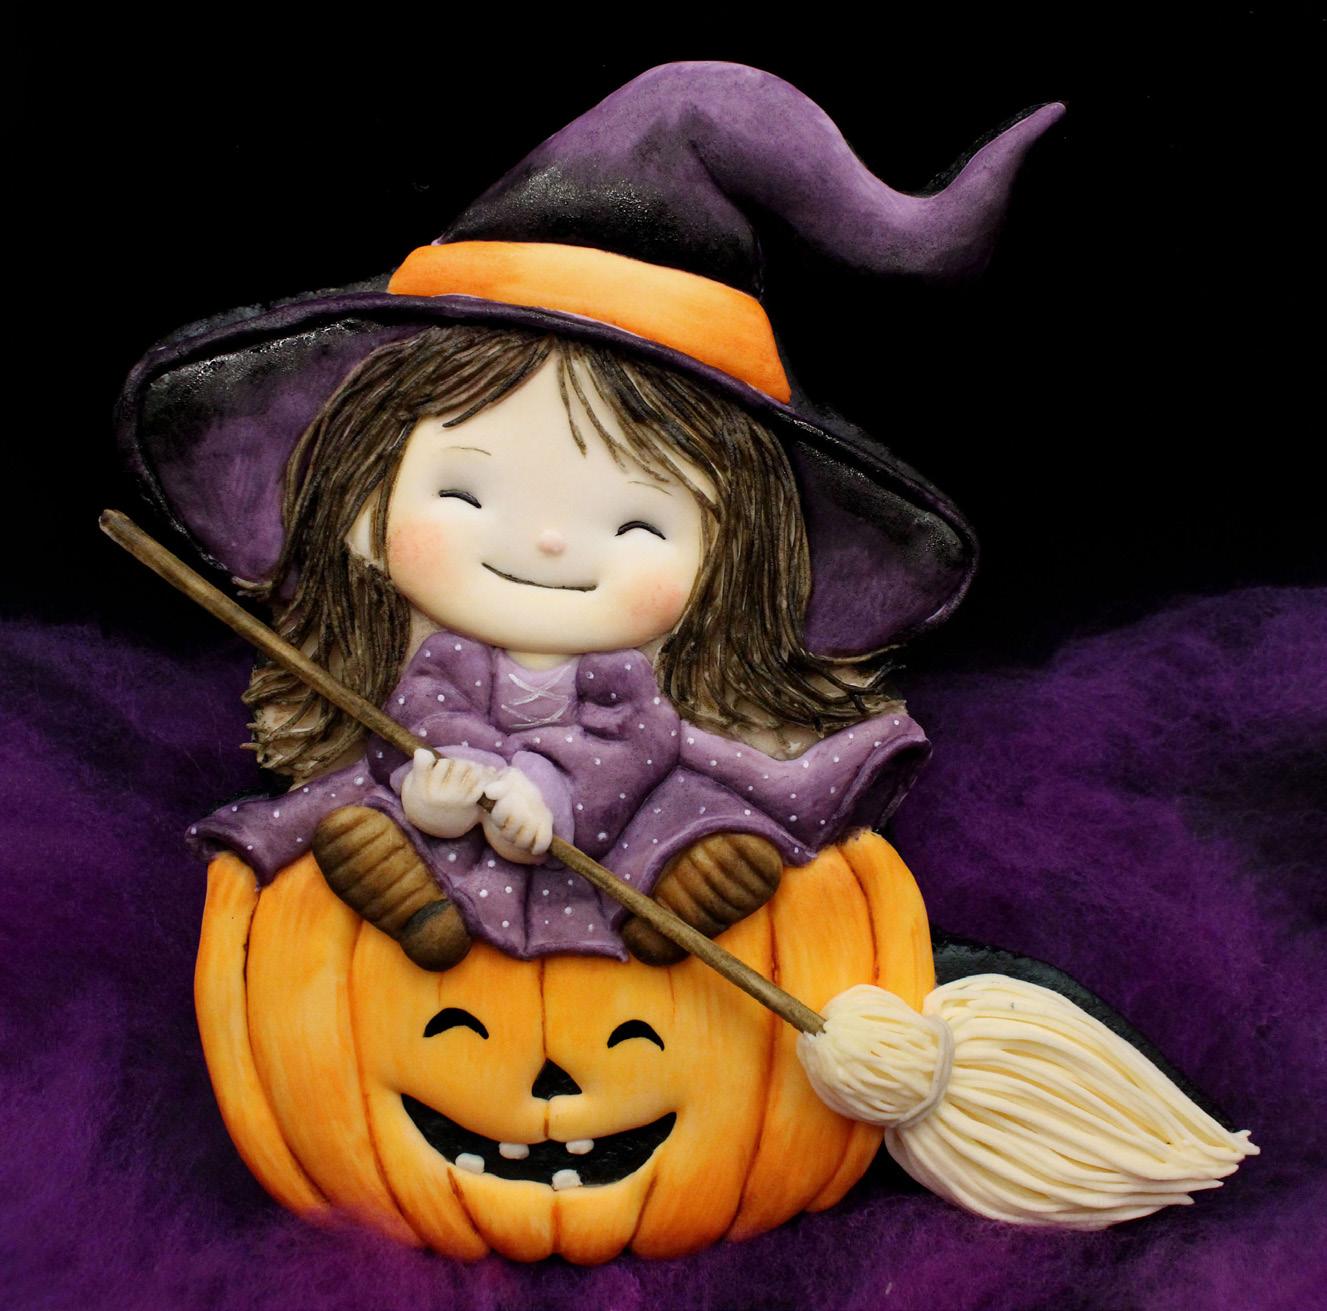
CAST A SPELL | 8
Cover star Clarisa Borunda’s witchy vibes.
PUMPKIN SPICE
LATTE | 13
Take a seasonal sip with Anna Oliinyk.
FRANKENSTEIN’S BRIDE | 20
Jean Schapowal carves a monster.
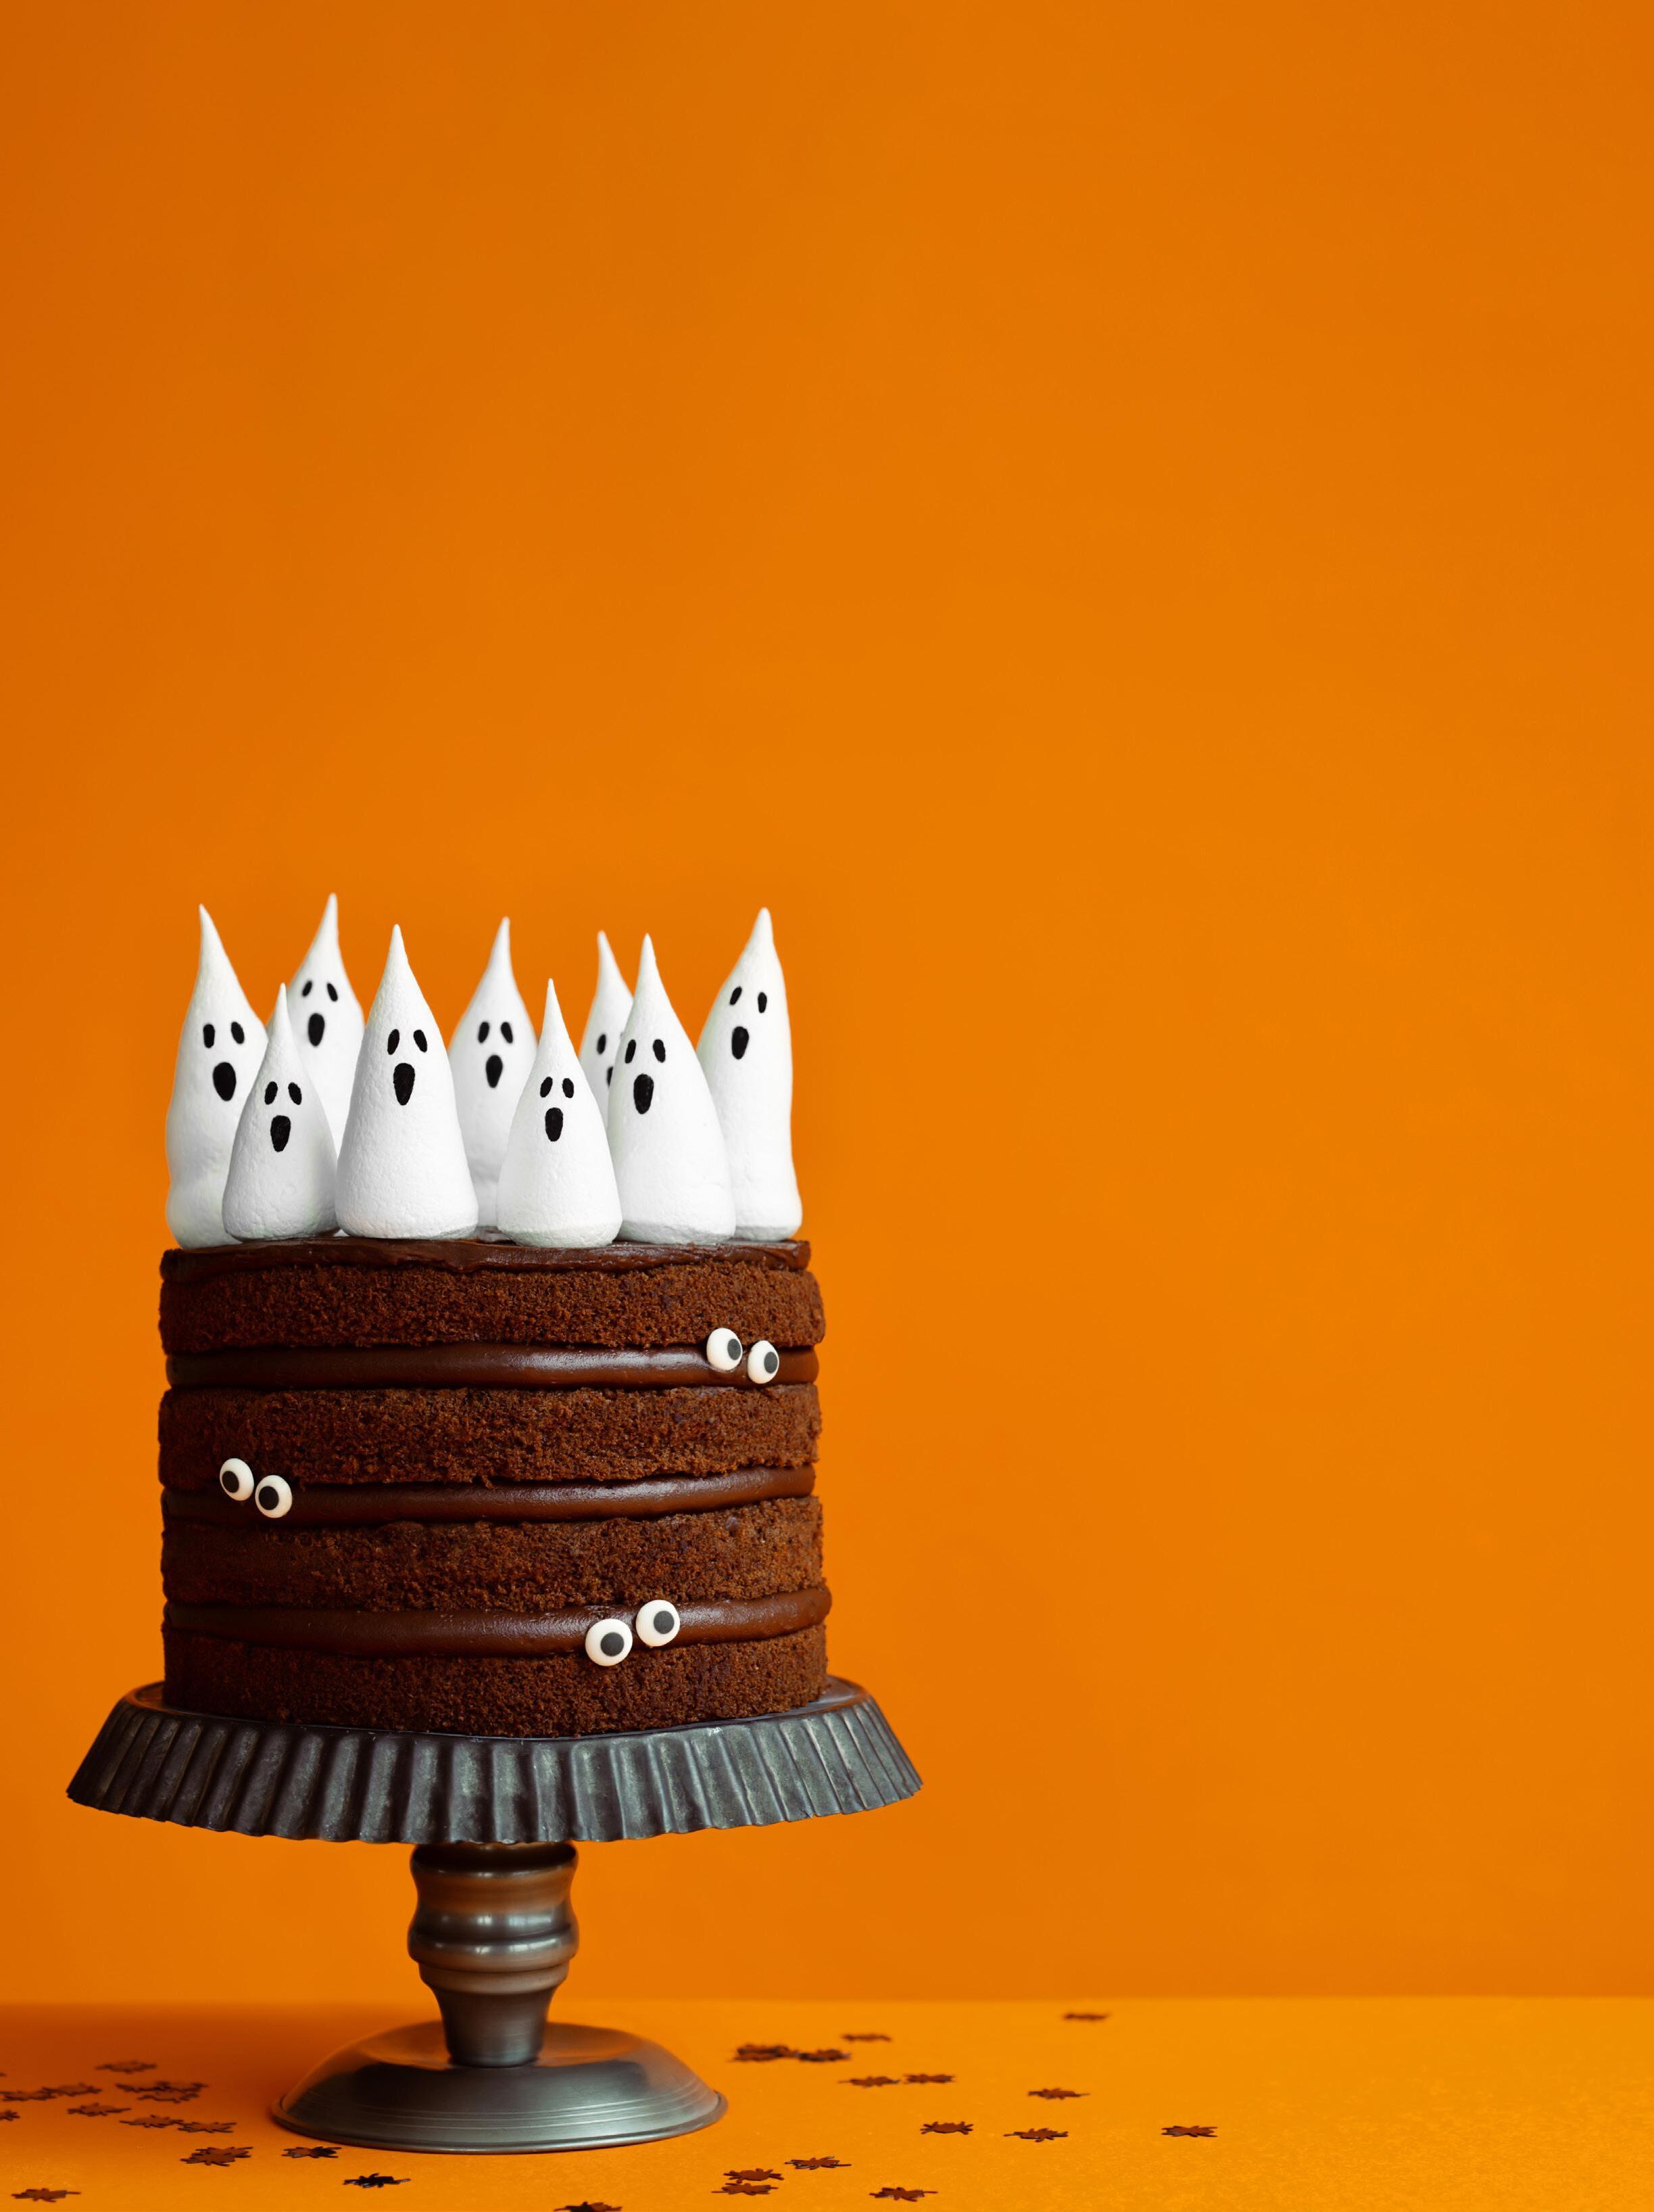
CHOCOLATE LAYER CAKE | 26
From the pages of Dana Pollack’s new book.
ROSE HIPS & BLACKBERRIES | 31
A seasonal spray from Veronica Seta.
COLORFUL CANDY LEAVES | 36
Wilton Sweet Studio’s easy celebration cake.
CREATURE FROM THE BLACK LAGOON | 39
Lauren Jones’ lady from the lake.
PUMPKIN TEAPOT | 50
Seasonal tea service from Tammy Varela.
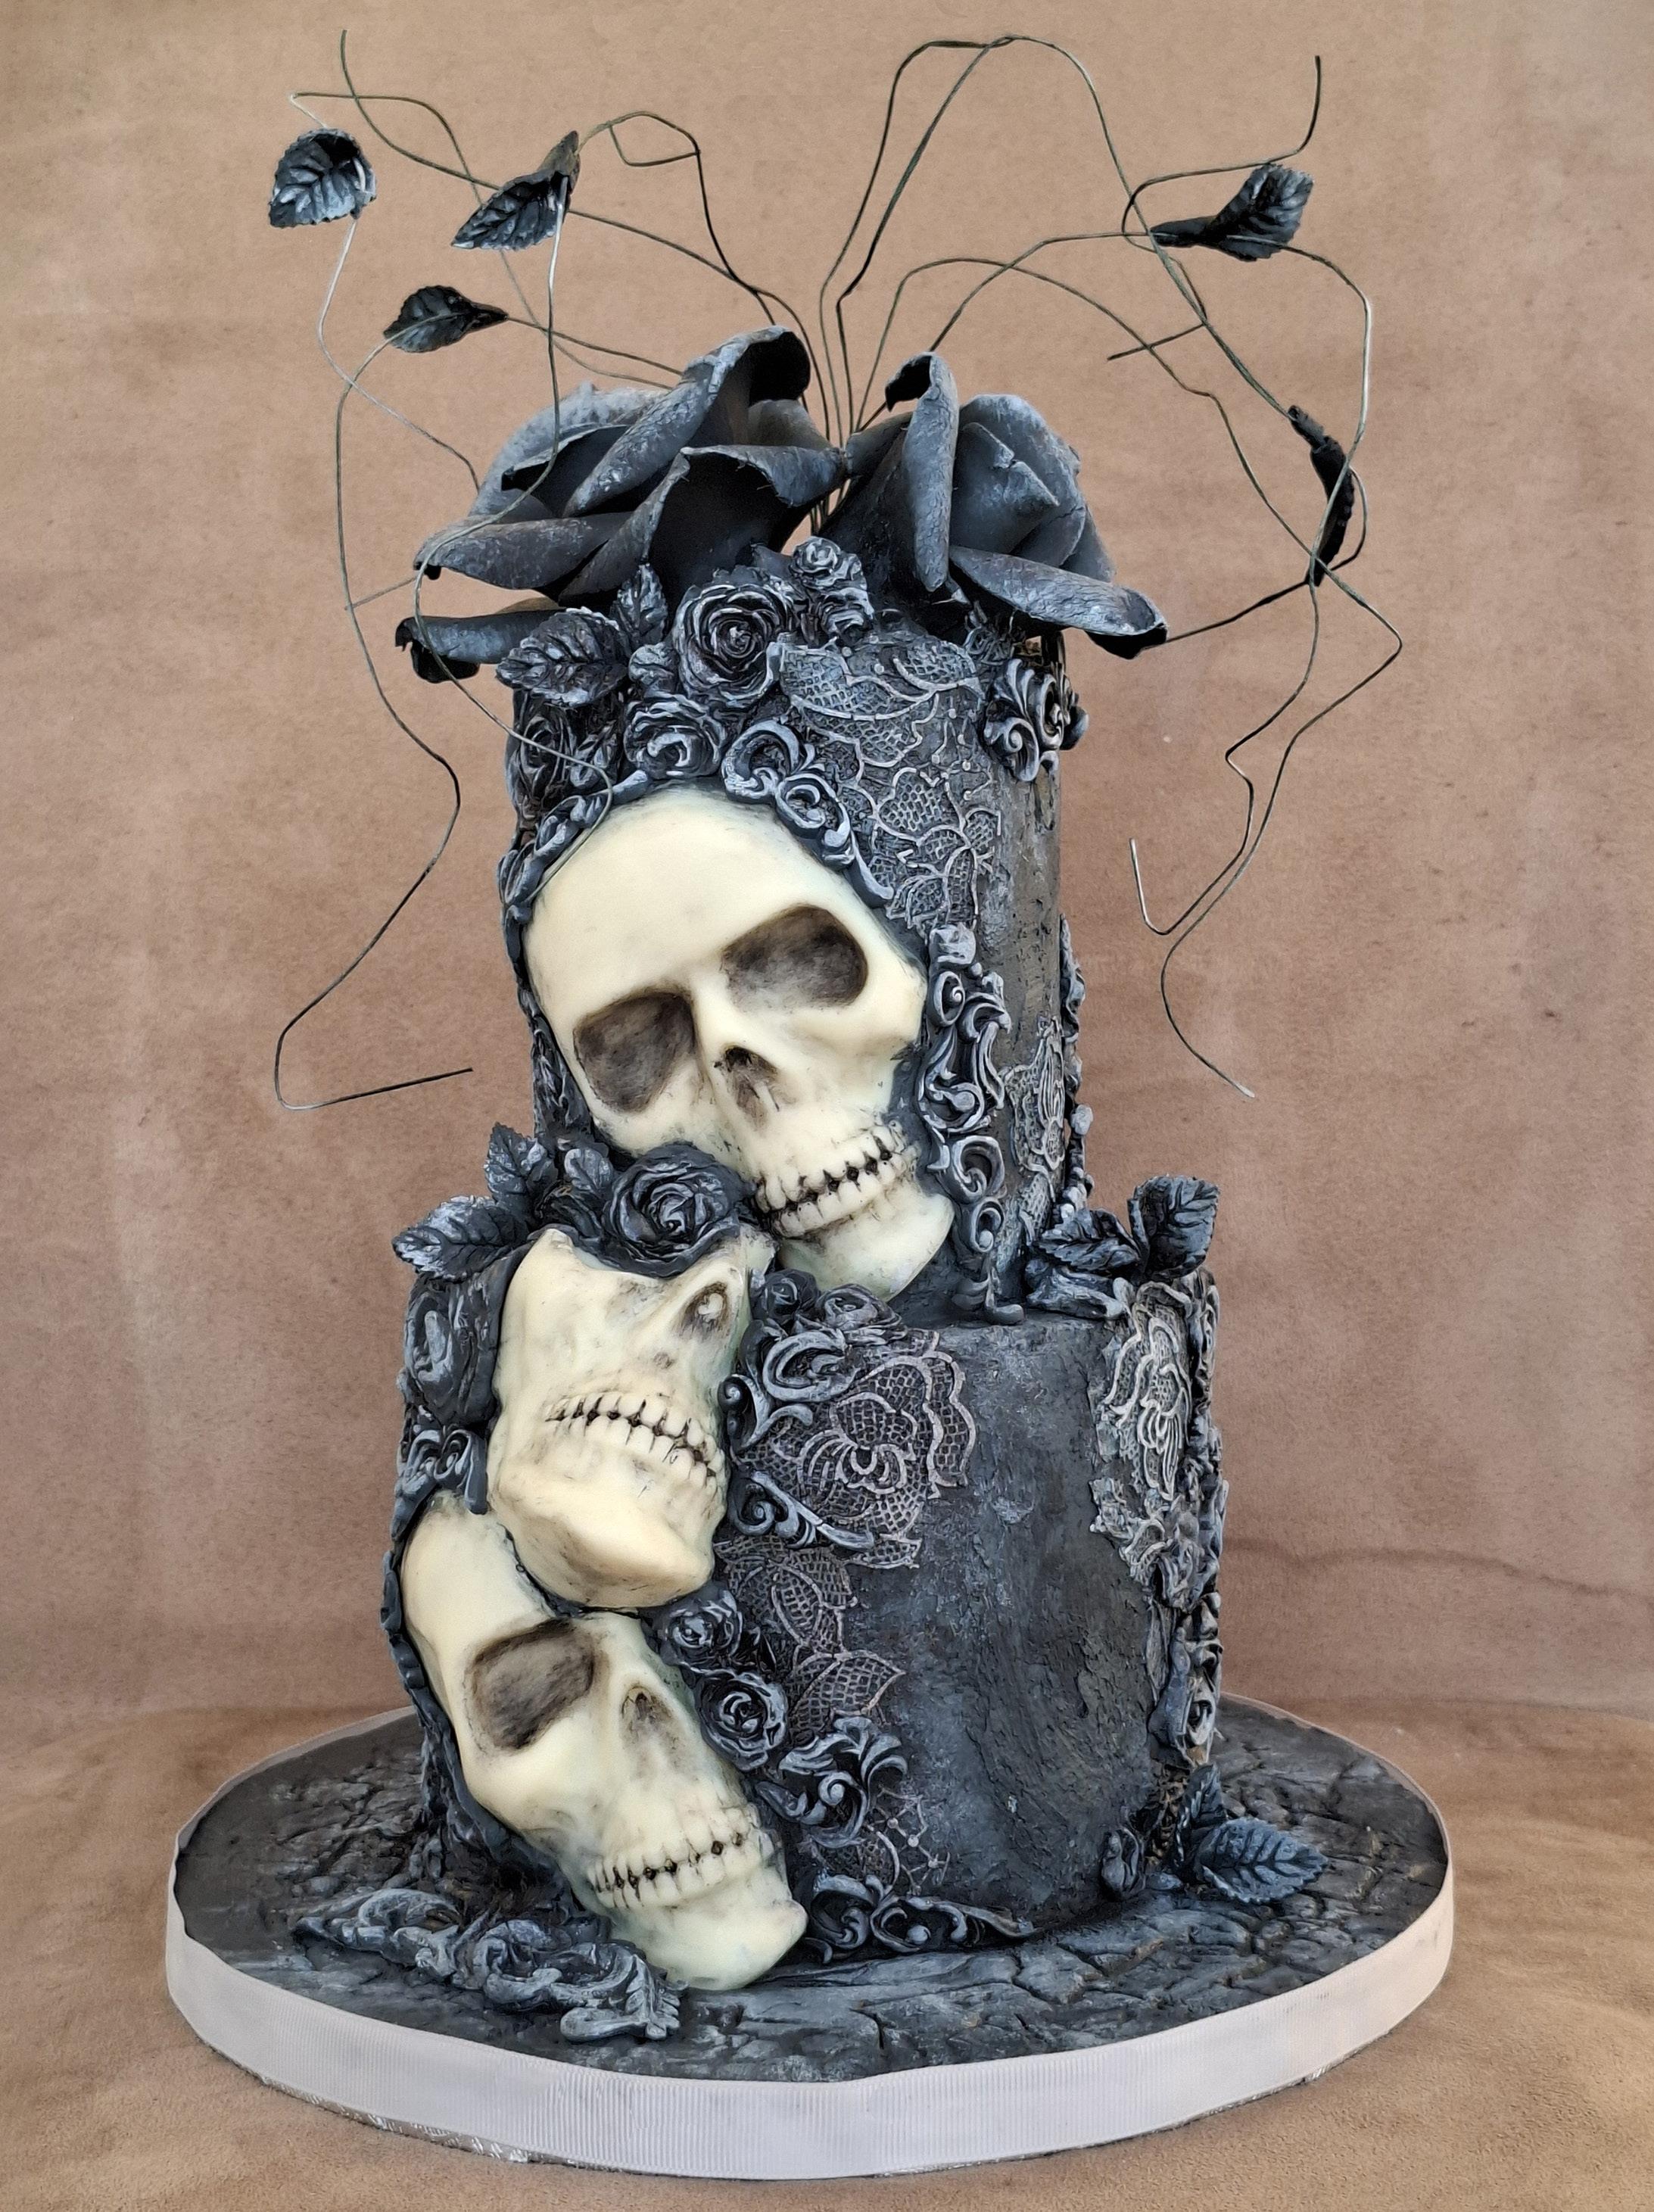
MODERN GOTHIC | 56
Sabrina Sigouin’s molded skulls and lace.
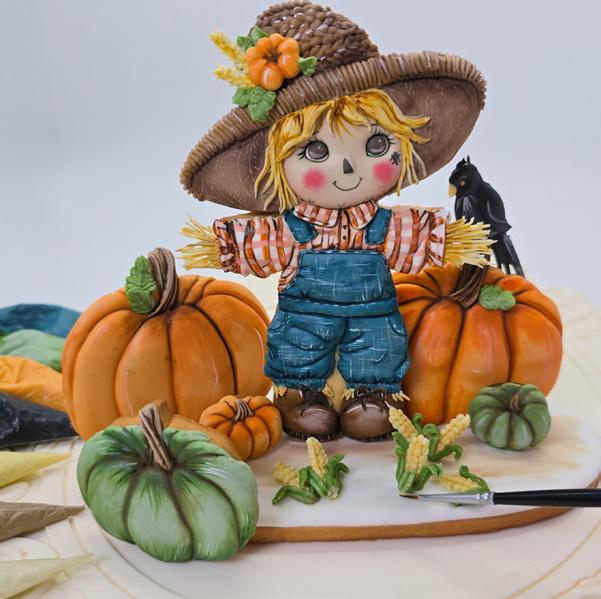
PUMPKIN HARVEST | 60
A sweet scarecrow from Maggy Morales.
THE MIGHTY MANANANGGAL | 70
Joel Basco’s vampire-like witch.
CAKE DIFFICULTY KEY EXPERT:
BEGINNER: INTERMEDIATE: ADVANCED:
Connect with the community here and on social media for irresistible cake inspiration, sweet giveaways, essential news, and exclusive offers.
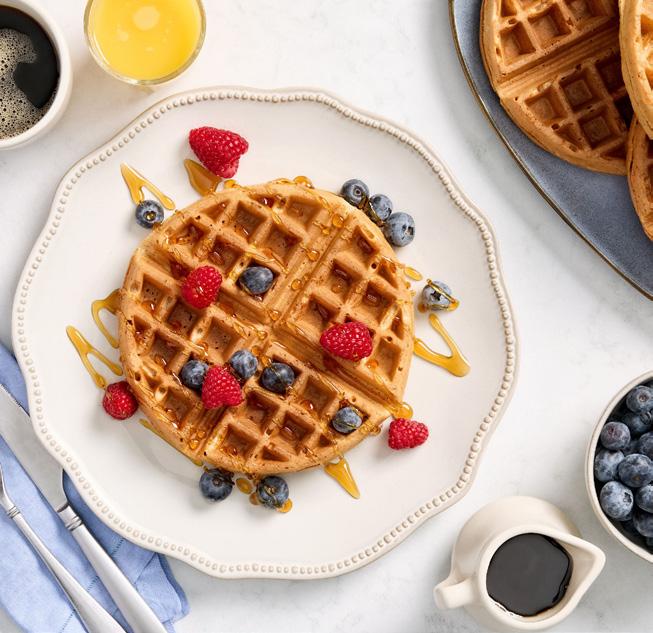
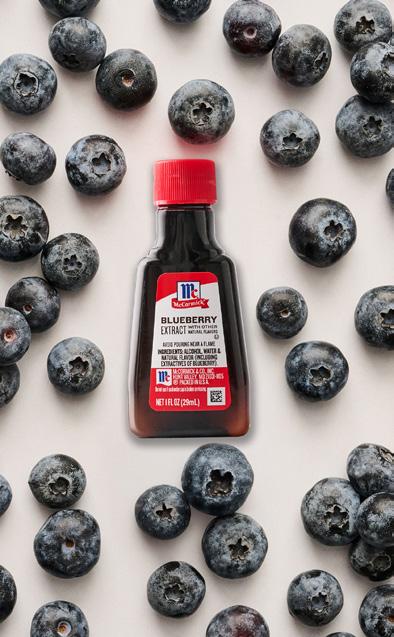
McCormick Releases a Berry New Extract
Introducing Artistica edible modeling paste! From cake designer and ACD contributor Sabrina Sigouin of La Belle Pâtissière, the new product is available in white and a range of 12 rich colors, suitable for every type of project. Let your imagination run wild! To order, visit labellepatissiere.com
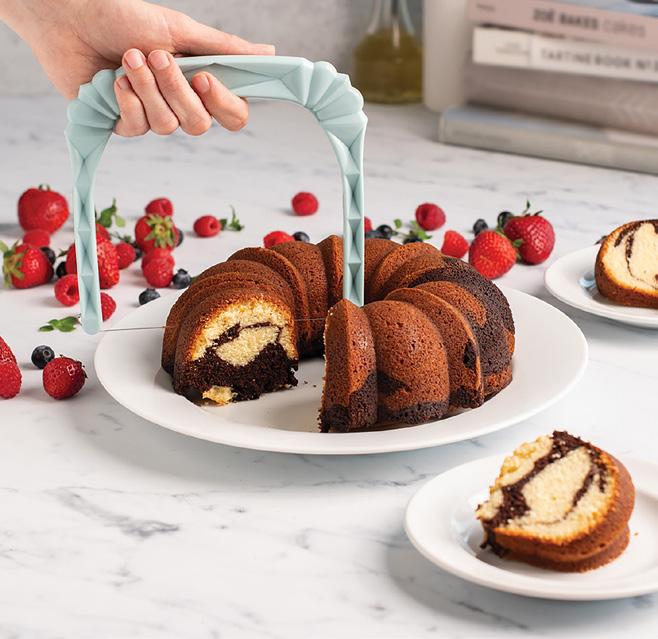
Nordic Ware Is a Cut Above the Rest
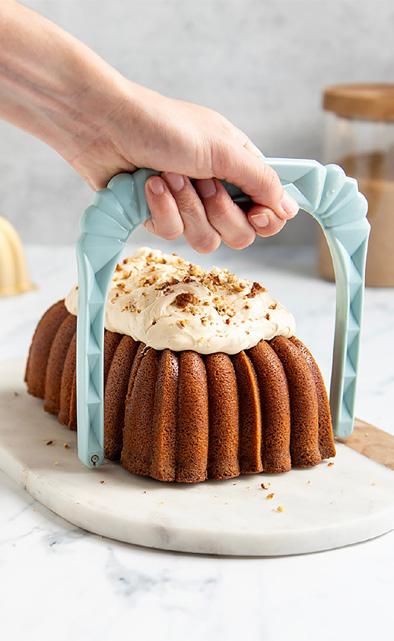
Perfect slices, no mess, no stress: Nordic Ware’s new Bundt Slicer Tool makes slicing through all types of cakes and frosting effortlessly without the hassle of a knife. Designed with a unique wire-cutting system, it glides cleanly through even the most delicate cakes, minimizing crumbs and keeping every slice intact. No more wiping your knife between cuts!
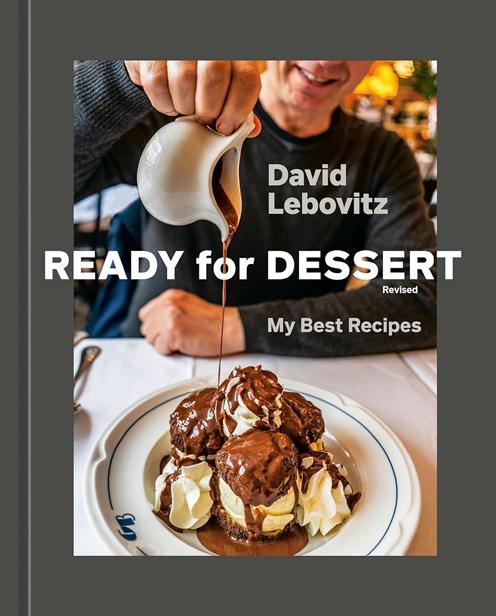
Ready for Dessert, Revised: My Best Recipes
By David Lebovitz
Ten Speed Press (September 30, 2025)
Professional cook and baker David Lebovitz is a master of perfectly pitched desserts and irreverent humor—a combination that has won him and his books hundreds of thousands of fans. This completely revised edition of Ready for Dessert is a compilation of David’s favorite and best recipes.

Chocolat: Parisian Desserts and Other Delights
By Aleksandra Crapanzano
Scribner (October 14, 2025)
Whether a dark chocolate mousse served whimsically in an ice cream cone or a lavender chocolate tart to delight your guests, Chocolat celebrates simplicity and endless versatility, promising inspiration with every page. Alongside the userfriendly recipes are stunning illustrations by Parisian artist Cassandre Montoriol.
Dorie’s Anytime Cakes
By Dorie Greenspan
Harvest (October 21, 2025)
Over the years, the recipes Dorie Greenspan always comes back to are the simplest cakes. They’re the kinds of cakes you can whip up, put out, and know that anyone with a hankering can come by and cut a sliver or a hunk. Anytime.
Beyond Baking: Plant-Based Baking for a New Era
By Philip Khoury
Quadrille (October 14, 2025)
These recipes are the result of years of rethinking everything—what gives structure, what builds richness, what creates lift and tenderness—without relying on eggs, dairy, or highly processed alternatives. Instead, they use familiar, natural ingredients to achieve results that feel completely fresh.

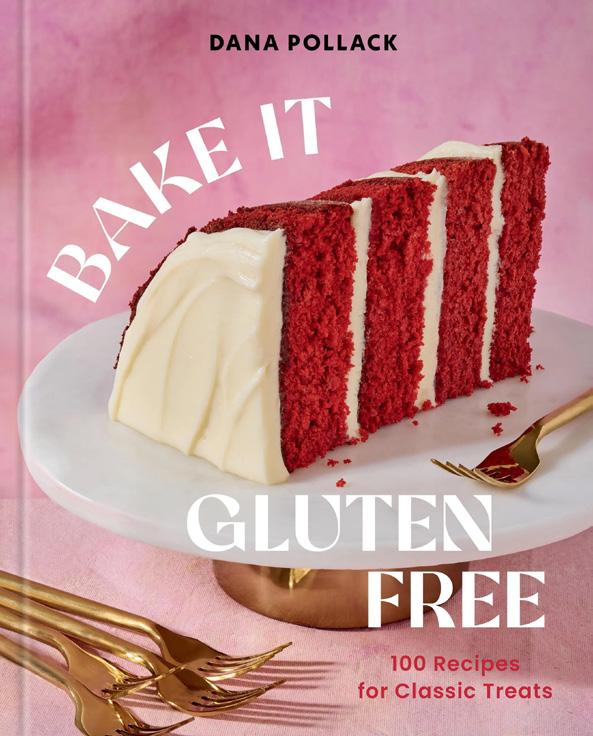
Bake It Gluten Free: 100 Recipes for Classic Treats
By Dana Pollack
Union Square & Co. (October 21, 2025)
Pollack takes classic recipes and transforms them into gluten-free versions that don’t sacrifice any of the flavor of the originals. It also includes detailed information on technique and ingredient substitutions, ensuring that whatever you choose to bake, you can bake it gluten-free.
101 Greatest Treats on the Planet: The Ultimate Collection of Must-Try Desserts
By Erin Mylroie
Page Street Publishing (September 9, 2025)
Never scramble for a crowd-pleasing dessert again! With options for every birthday, holiday cookie swap, special occasion, or weekday, this foolproof collection of delicious desserts is guaranteed to become a staple in your kitchen. With endless possibilities, you can make every day a celebration.
According to major retail brands, burgundy is the trendiest color for the second half of 2025. See how cakers make it pop. And remember: Don’t forget to tag us on social media to possibly be featured in an upcoming issue.
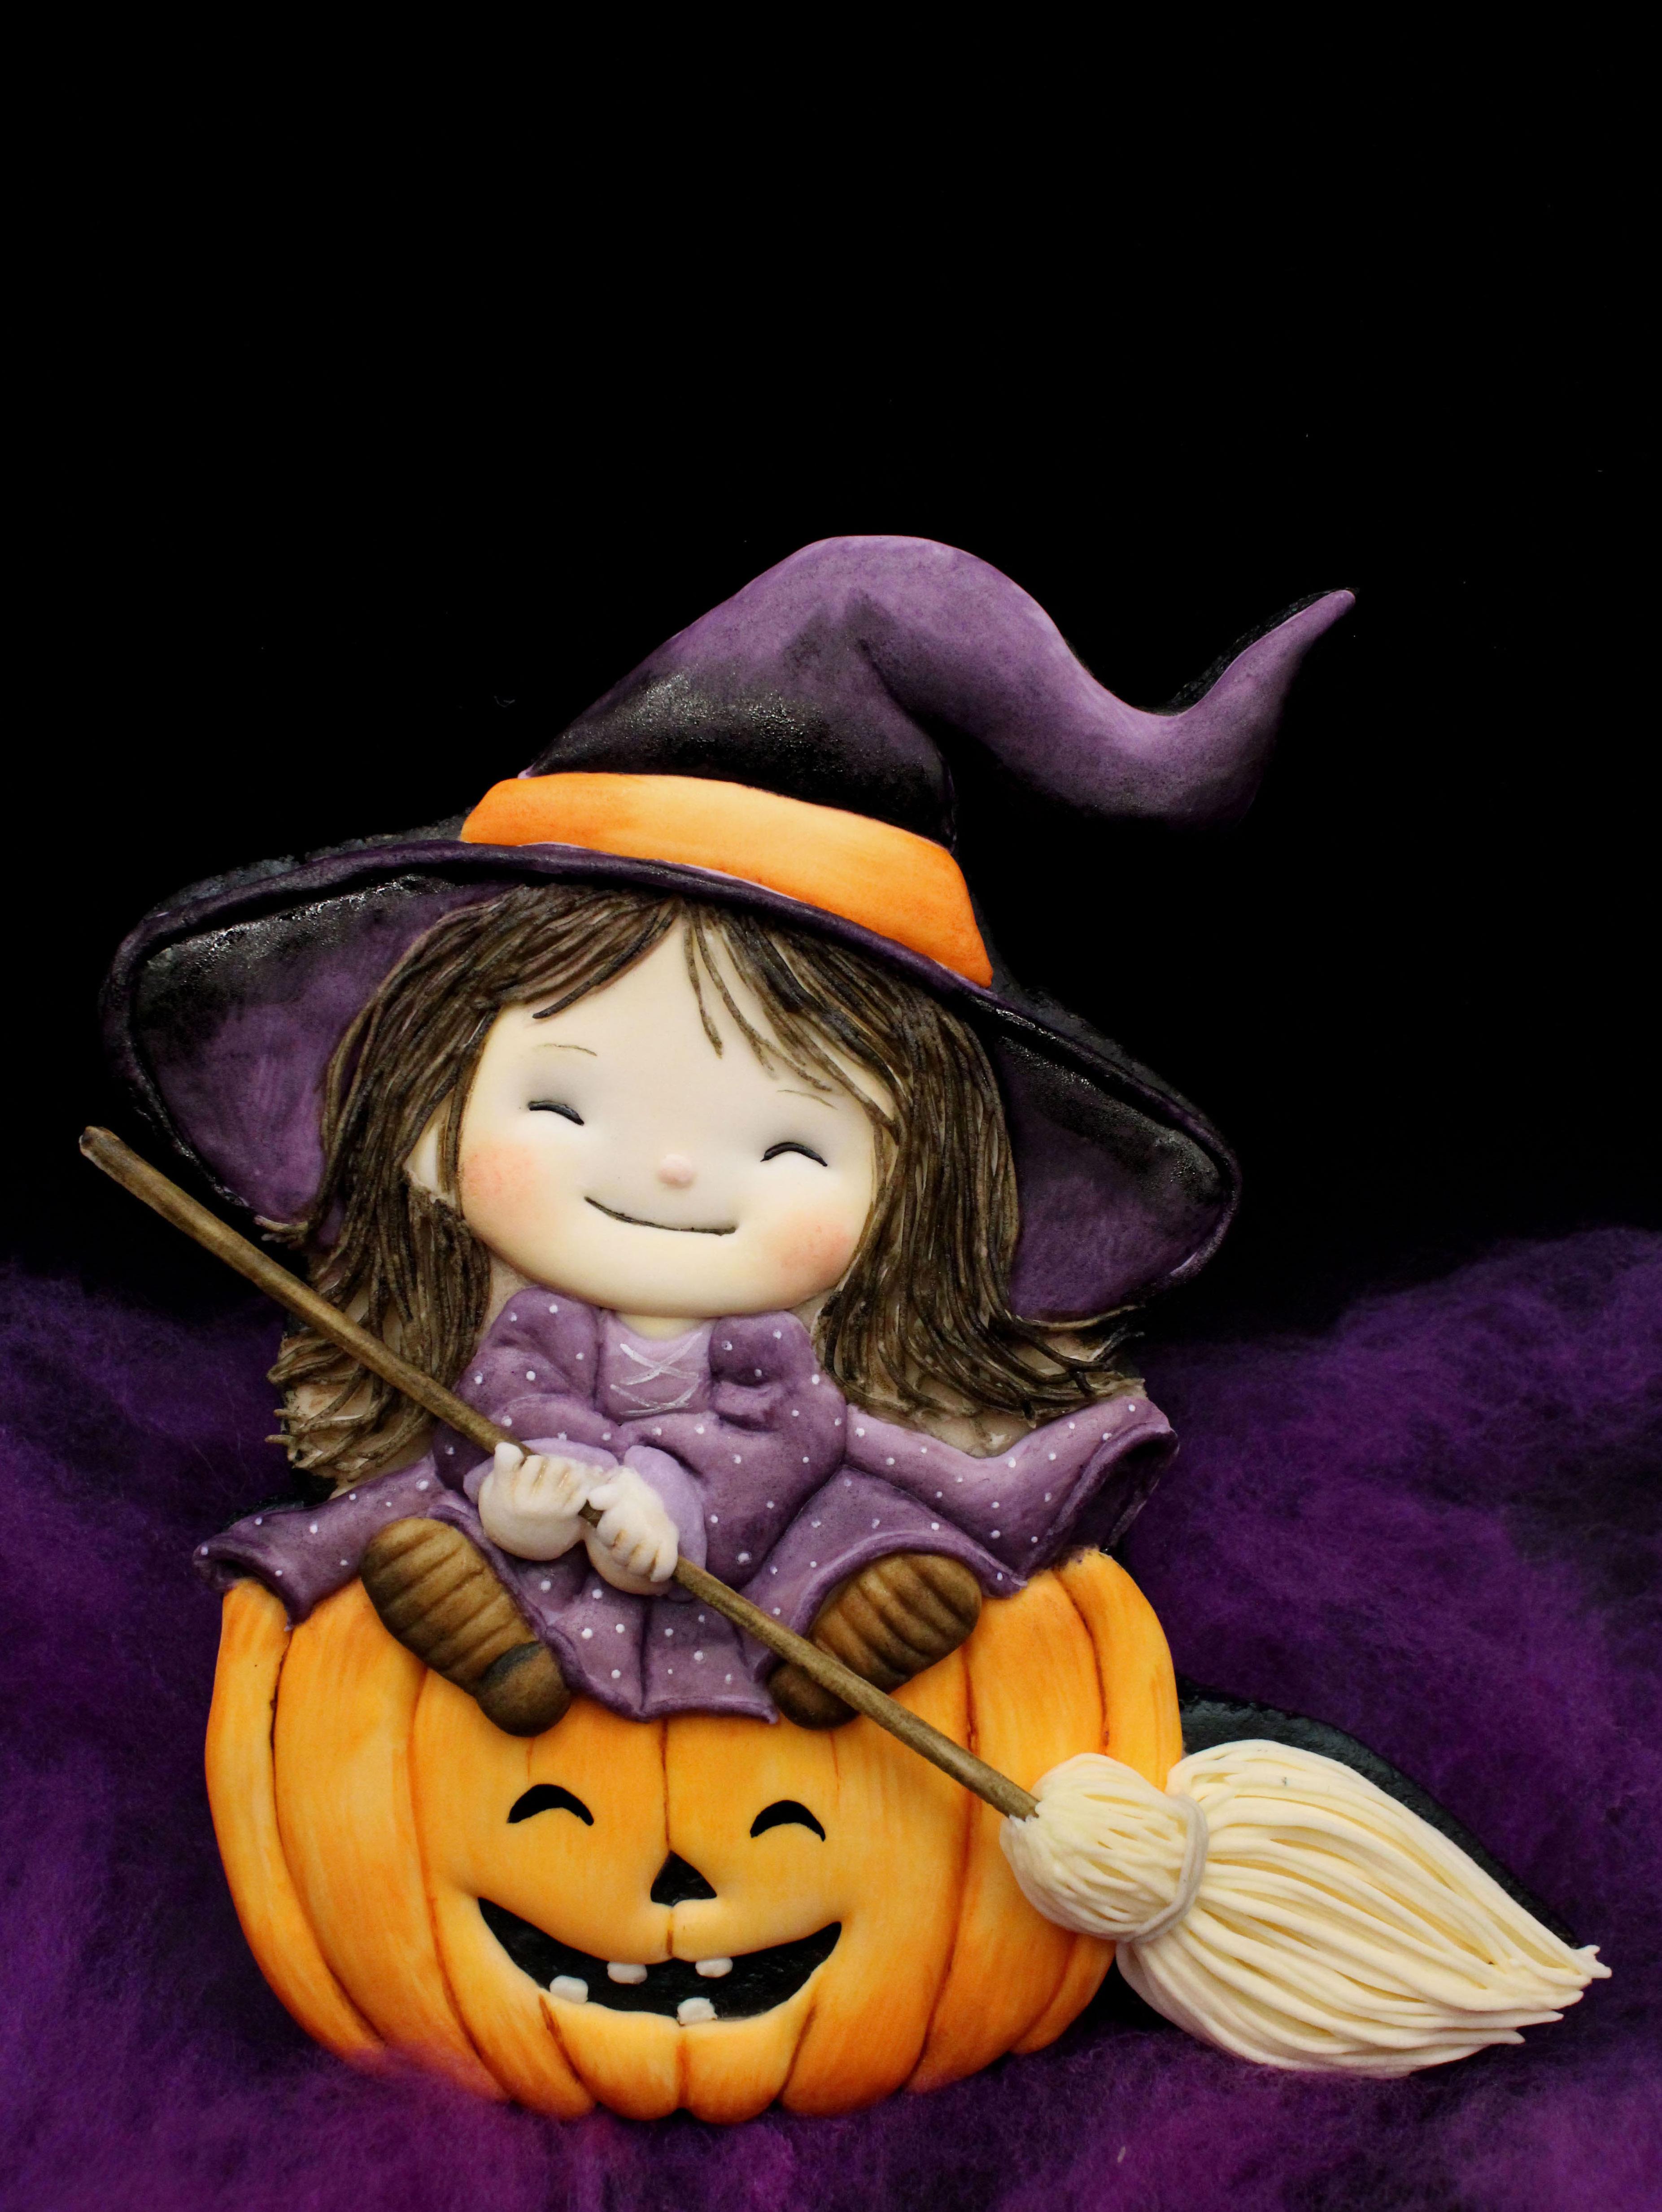
BY CLARISA BORUNDA
Edibles:
Sugar cookie
Gel food color: black, yellow, orange, brown, white, beige, and purple
Water
Royal icing: light brown, beige, light yellow, orange, and purple
Equipment:
Projector
Nontoxic pencil
Paintbrushes
Cellophane bag or acetate
Piping bag
Piping tips: #1, #2, and #3
Dehydrator
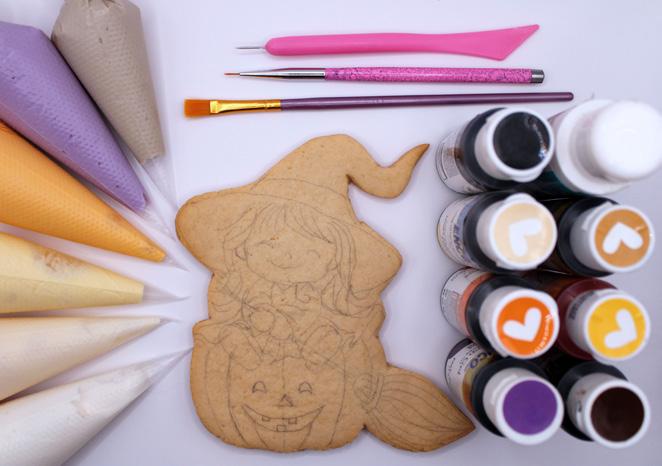

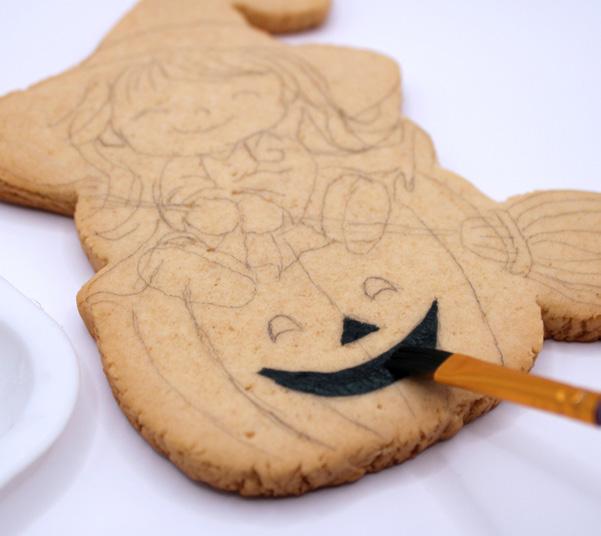
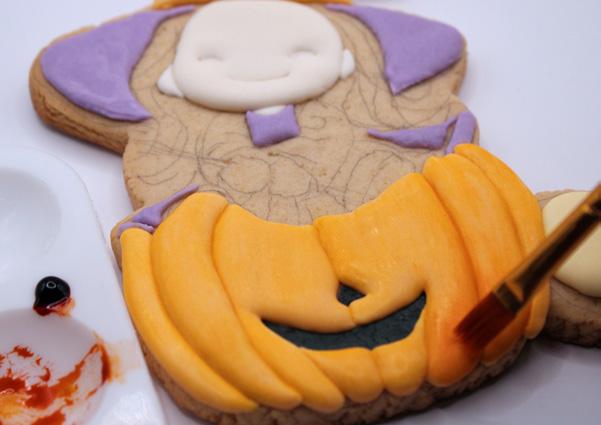
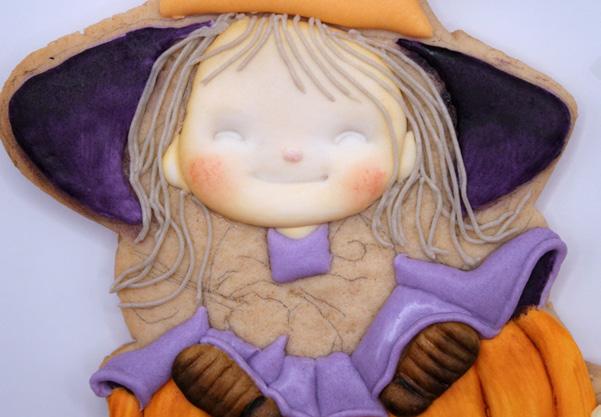
1. Using a projector, draw the witch on the cookie with a nontoxic pencil. Before you begin filling in the icing, dilute black gel food color in water and use a flat paintbrush to color the inside of the pumpkin’s nose and mouth.
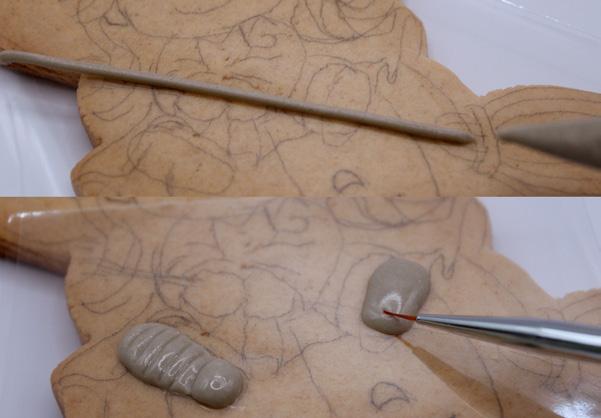
2. Using a cellophane bag or piece of acetate, make transfers for the shoes and broom handle. Fit a piping bag with a #3 tip and light brown royal icing. For the handle, pipe a straight line. For the shoes, apply the icing with circular movements. Use a moistened liner brush to texture the soles.
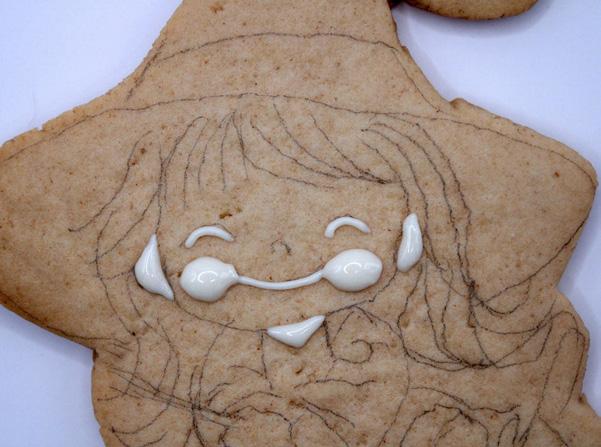
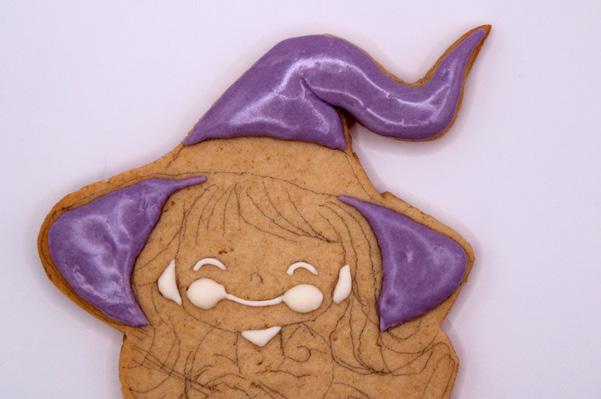
3. Using beige royal icing and a #2 piping tip, fill in the cheek area, ears, and neck and outline the eyes and mouth.
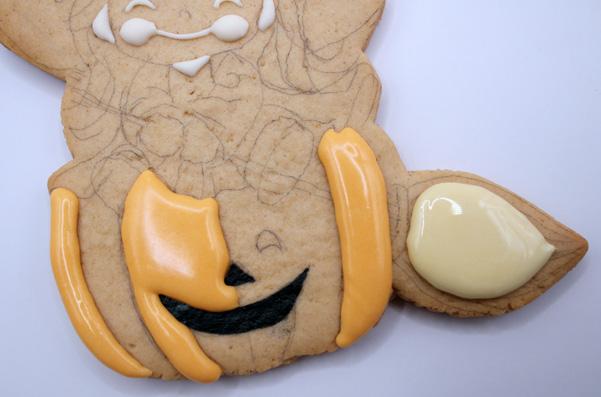
4. Using light yellow royal icing, pipe 2 layers on the broom. Fill in the pumpkin with orange royal icing, 1 segment at a time. Start from the outside and work inward, leaving a space between each segment.
5. Let the icing dry for a couple of minutes and finish filling in the missing areas.
6. Use purple royal icing to fill in the hat. Apply a very light layer, then fill it with more volume from the bottom to the top. Remember to mark the crease in the fold of the hat.
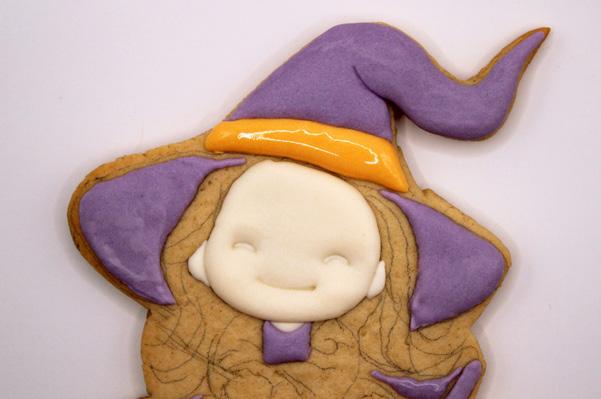
7. Return to the face and cover it entirely with beige royal icing, starting with the forehead and working your way down to the neck.
8. Pipe an orange ribbon on the hat and pipe some edges where the dress folds. Allow the cookie to dry for several hours before continuing.
Clarisa Borunda is a graphic designer based in Mexico but loves to make cookies with royal icing. She has been in the cookie world since 2014 and has taught online classes and participated in international collaborations and competitions. In 2022, she won first place in the decorated cookies category at the Expo Reposteria Cd. Juarez. She has been a judge in the Benji López Cortadores national online cookie contest, the Sri Lanka Cake Awards, and the Asia Cake Awards. facebook.com/sweetmemoriesbyclarisaborunda/ instagram.com/clarisaborunda/
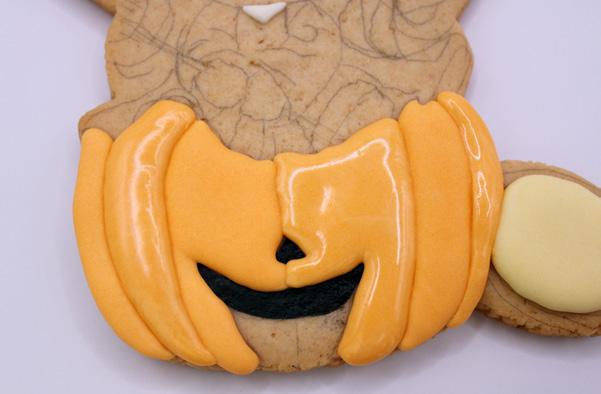
1. Wet a flat brush and dip it in a pinch of yellow gel food color. Apply the color very lightly to the pumpkin. Blend it with the same brush. Then, increase the intensity with orange gel food color. To give it a little more depth and highlight, add a pinch of brown.
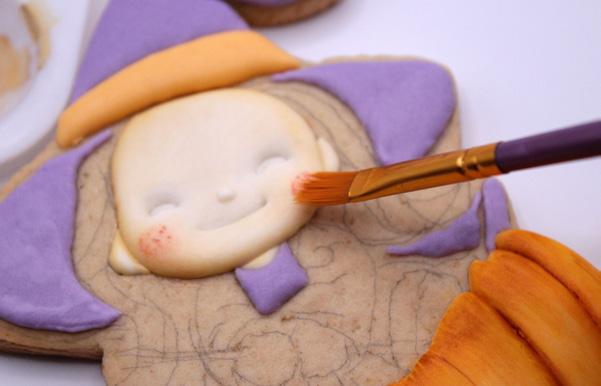
2. Taking a bit of white and beige gel food colors, apply the color around the face with a moistened brush. For the cheeks, add a little more color with a pinch of orange mixed with white, blending in the same way.
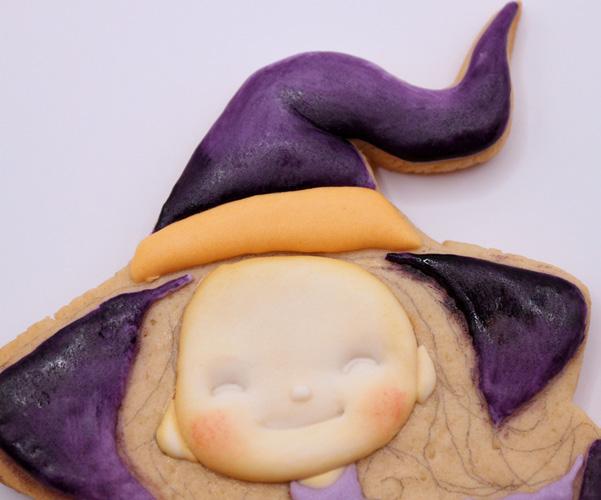
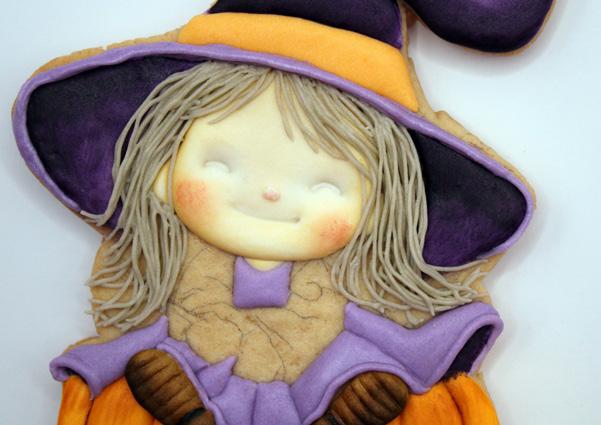
3. To add shadows to the hat, use purple gel food color and a flat brush, applying less color at first and then increasing to a greater intensity. Let it dry between coats.
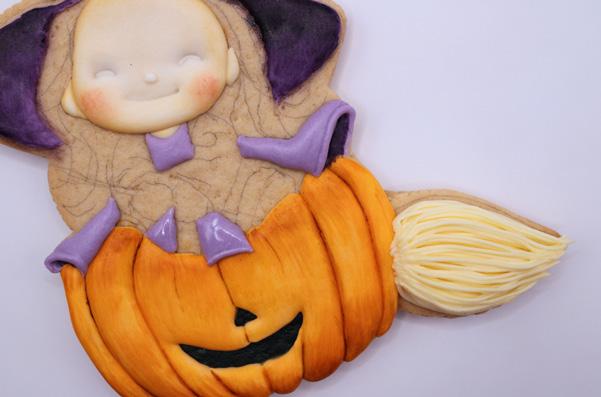
4. Return to the lower area of the dress and pipe folds with purple royal icing, finishing with a trim on the edge of the dress.
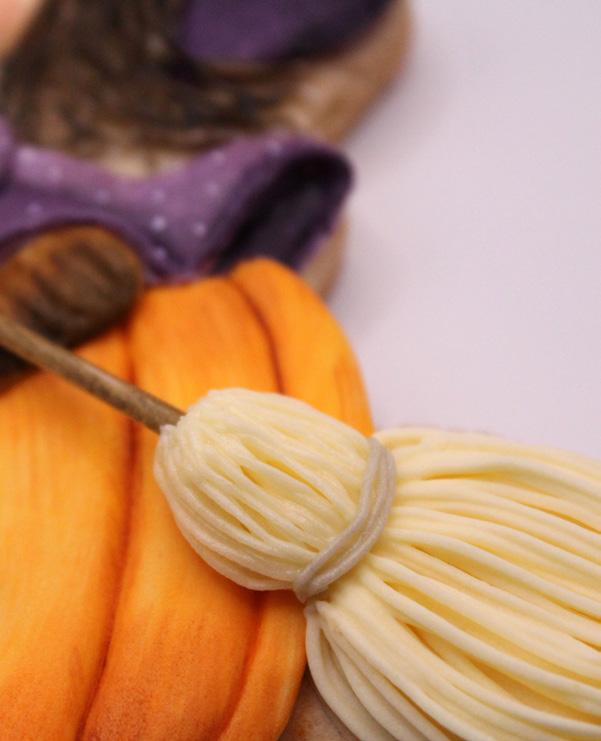
5. With light yellow royal icing and a #1 piping tip, pipe the broom bristles, starting from the handle down to the tip with curved strokes.
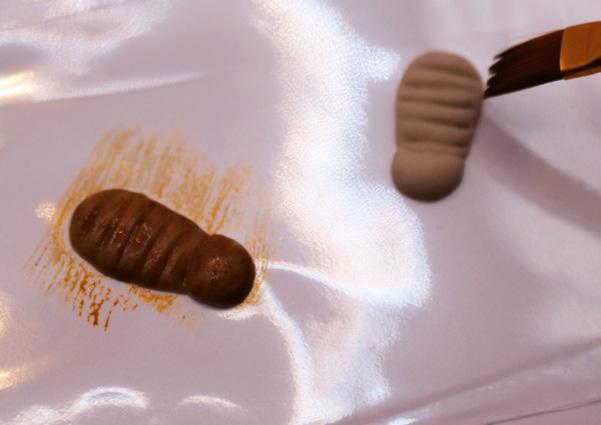
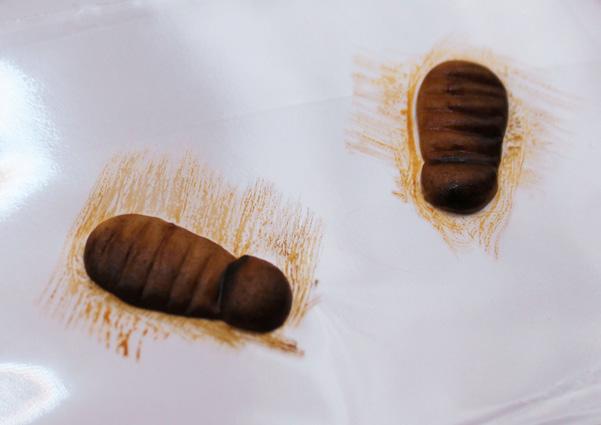
1. Add highlights to the shoes and broom handle with brown gel food color and a flat brush. Begin by diluting it with water for the first coat. Let the shoes dry and then add a second coat.
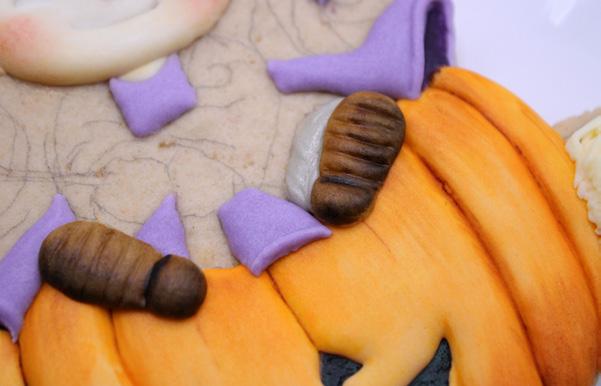
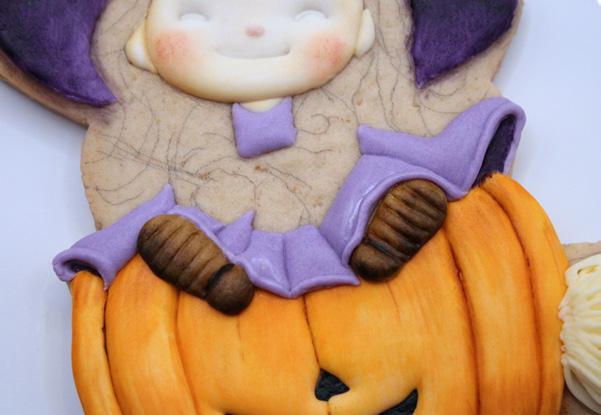
2. Glue the shoes to the cookie.
3. Finish filling in the dress around the shoes with purple royal icing.
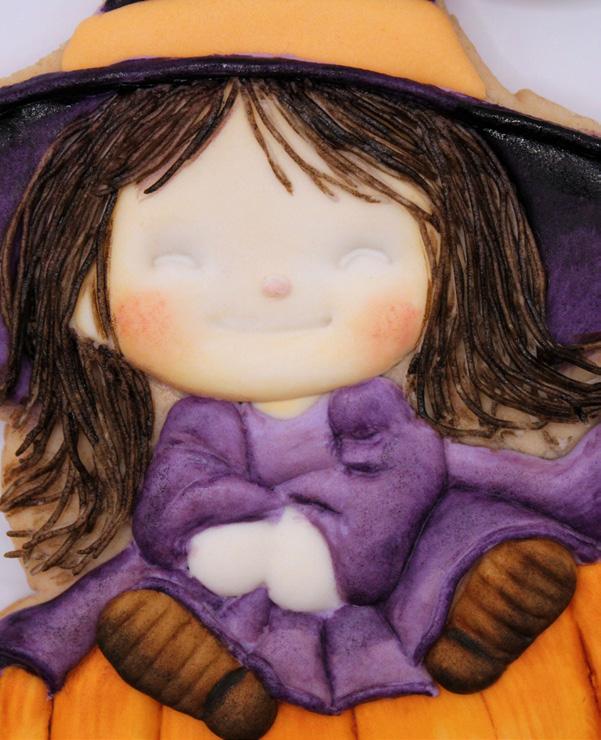
1. Using a #1 piping tip with light brown royal icing, pipe 1 strand at a time, starting from the top of the head and working toward the bottom. Use curved movements to make it look as natural as possible.
2. Once you finish the hair, finish the edge of the hat.
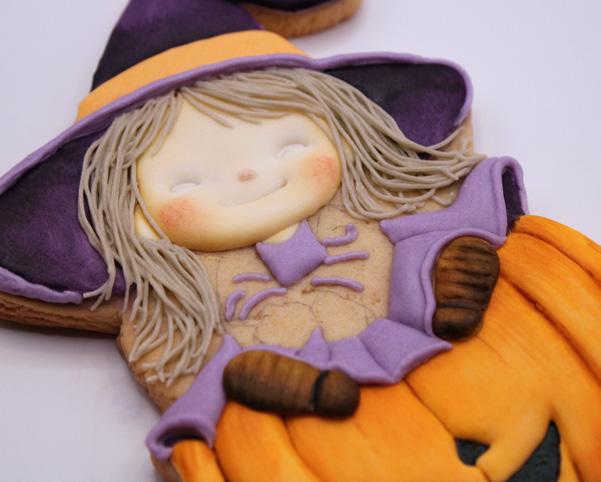
1. Pipe some thin lines of purple royal icing as barriers for the sleeves.
2. Fill both sleeves and, with the help of a damp liner brush, define the previously marked lines. Let it dry for about 20 minutes in the dehydrator or for 2 hours at room temperature.
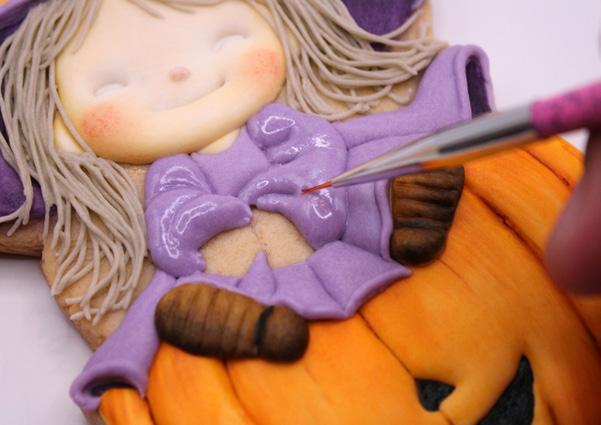
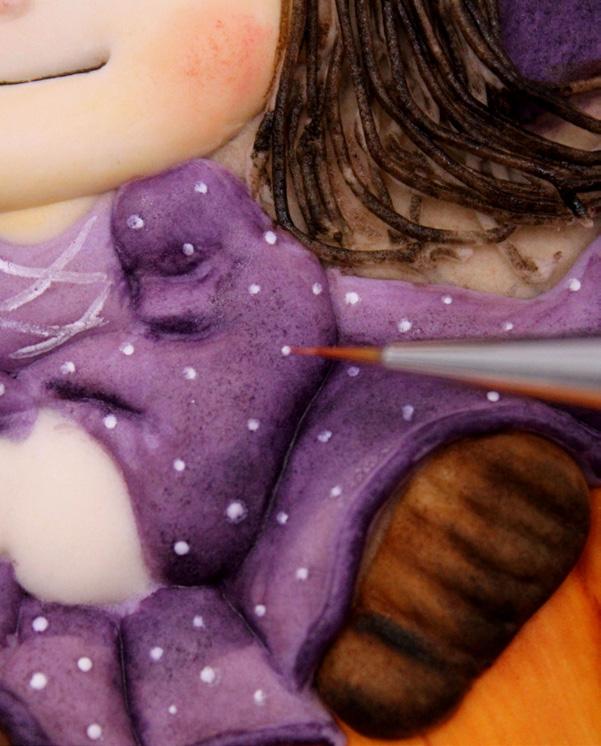
3. Paint the dress with a flat brush and a little bit of purple gel food color, blending it with the same brush but clean.
1. Dilute brown gel food color with water and use a flat brush to paint the hair.
2. Continue to paint, playing with light and shadows, darkening the parts that are farther back.
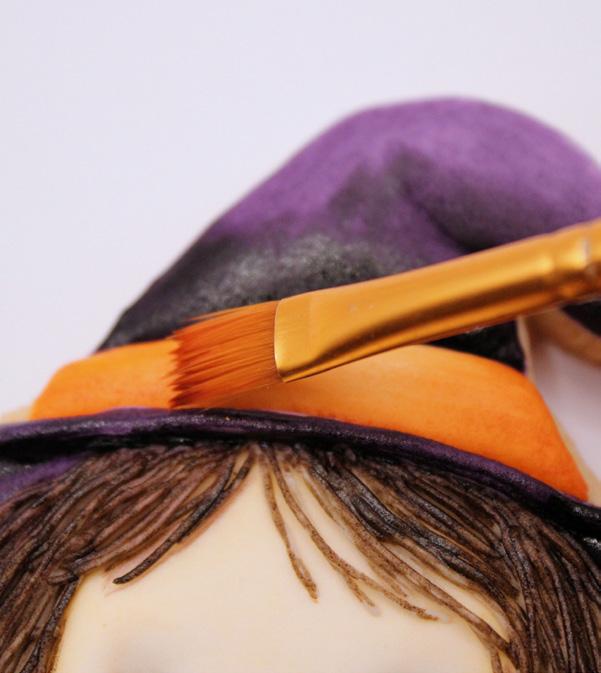
3. Paint the hat’s ribbon with orange gel food color and the hat’s edge with purple.
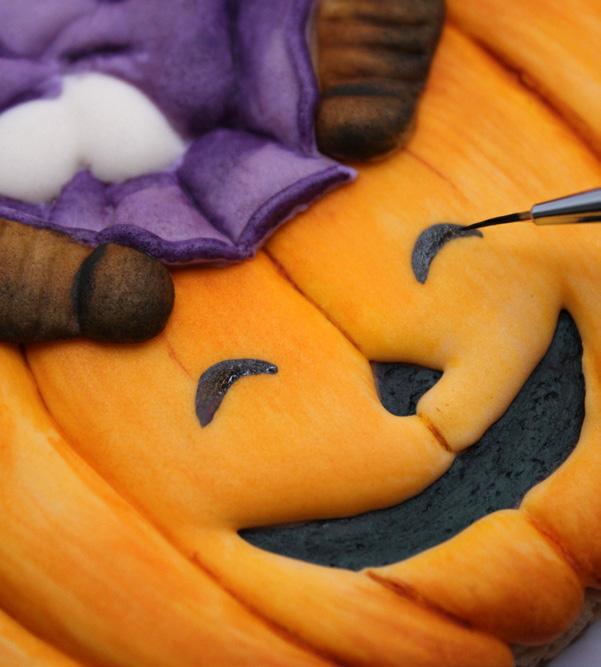
4. Use a liner brush and black gel food color to draw the eyes on the pumpkin.
5. Use a liner brush and black gel food color to paint the witch’s eyes and mouth. Paint the eyebrows brown.
6. Use a liner brush and white gel food color to paint polka dots on the dress.
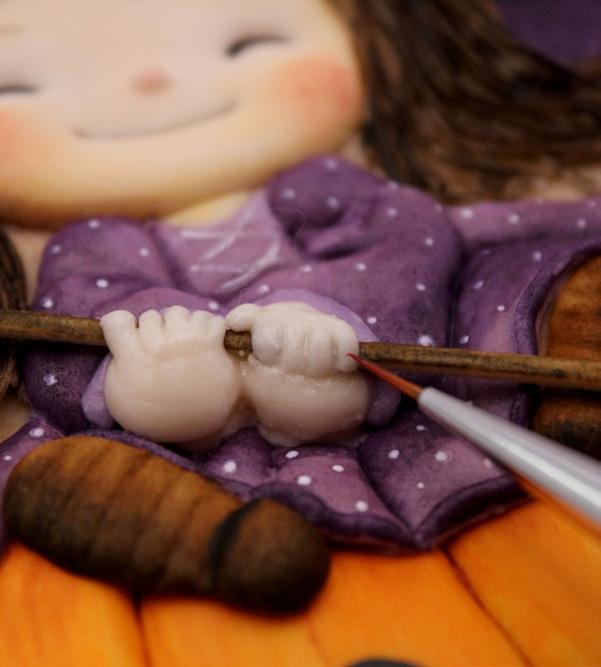
7. Glue the broom handle in place and then pipe the hands with beige royal icing. First, pipe small lines on the broom handle for the fingers and then fill in the rest of the hand. With a damp liner brush, define the division between each of the fingers.
8. Finish the broom by piping more bristles at the top and pipe brown royal icing for the cords that hold the bristles. ACD

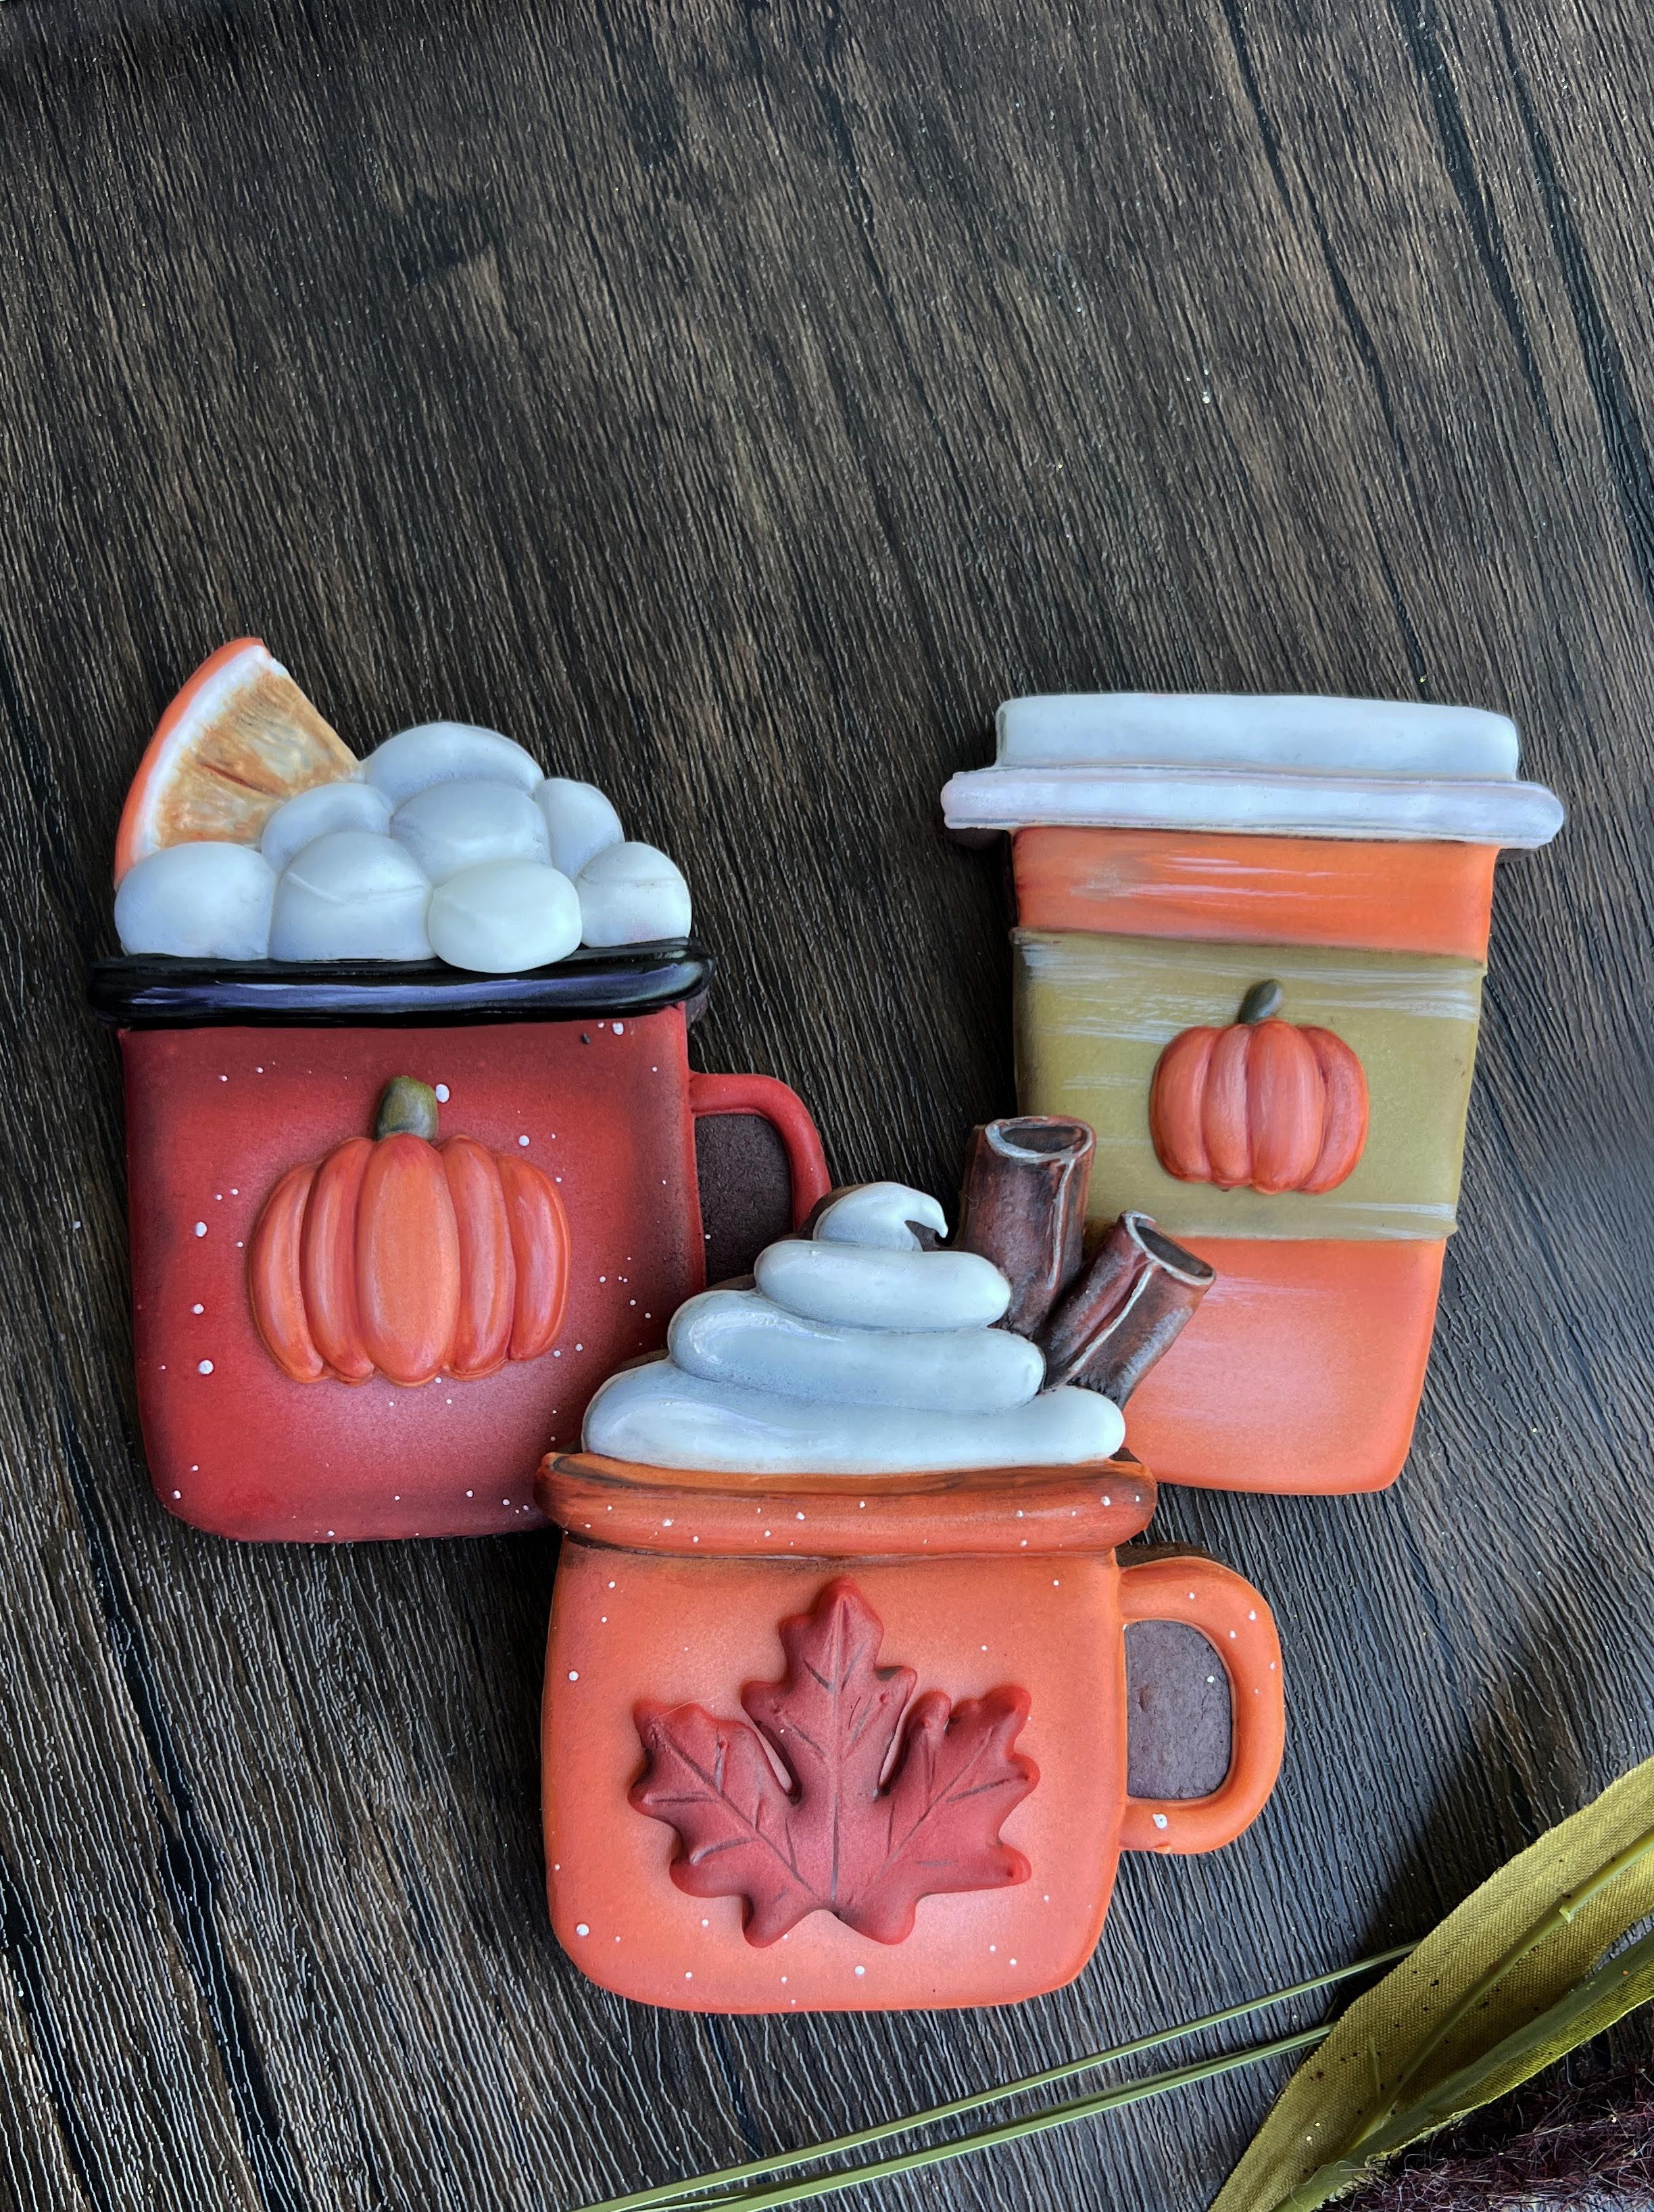
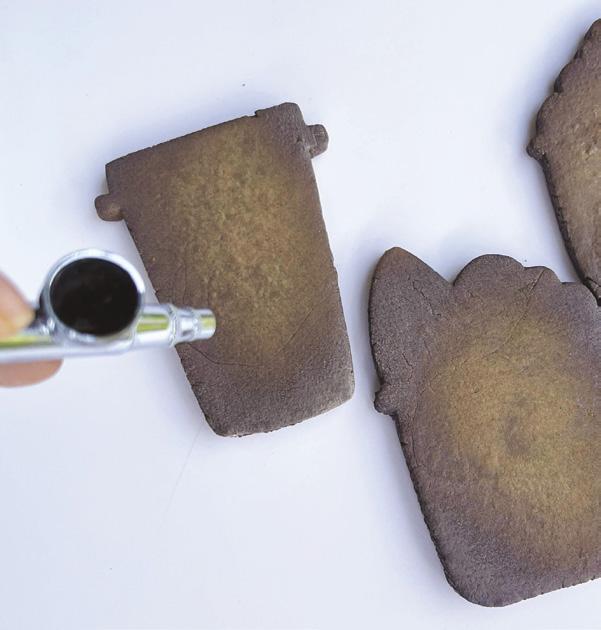
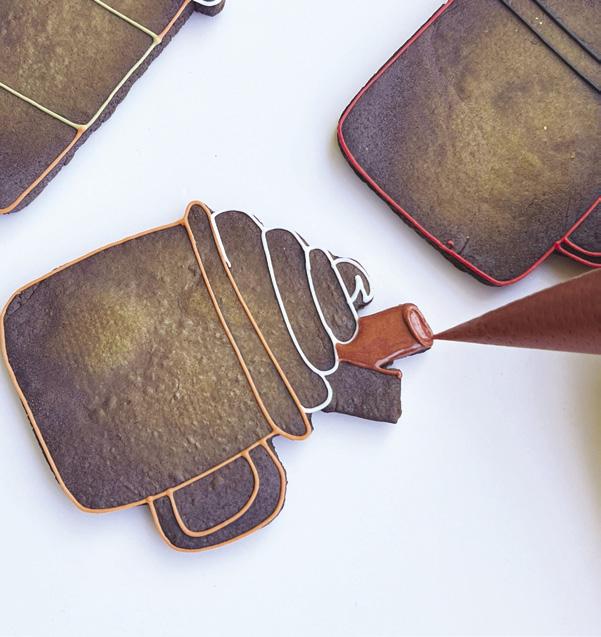
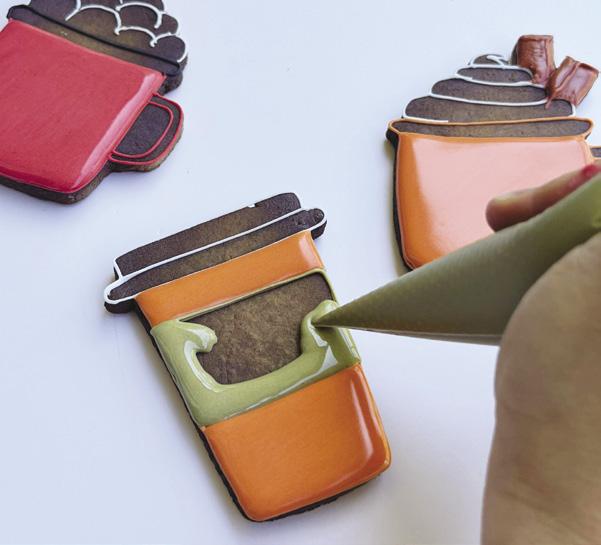
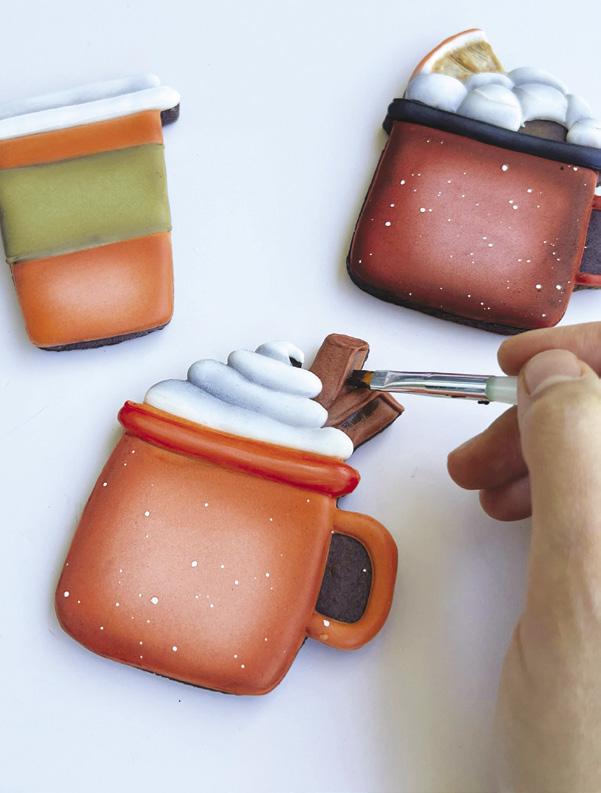
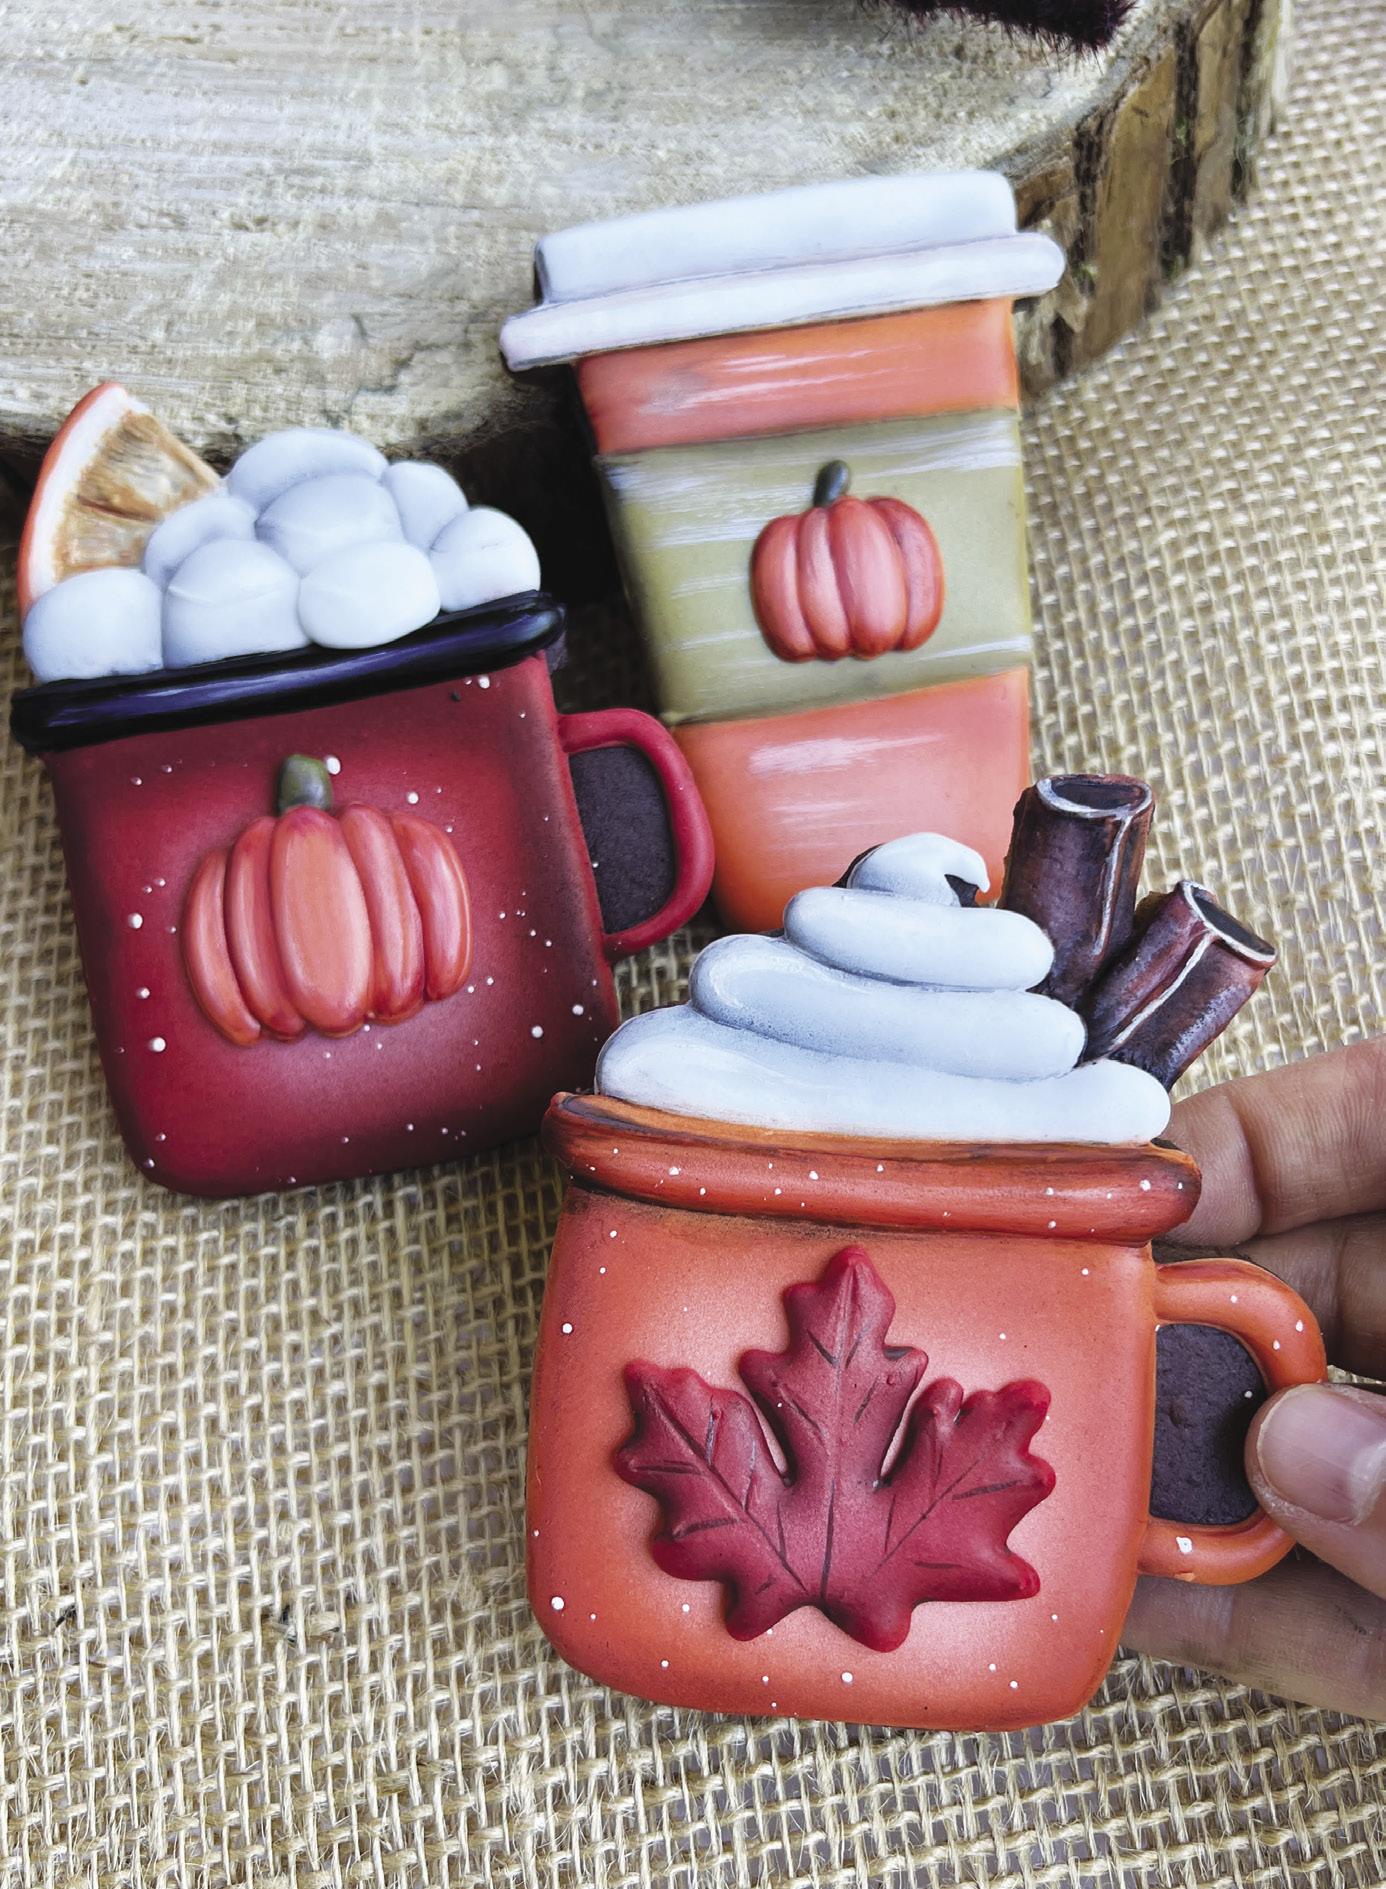
BY ANNA OLIINYK
Capture the essence of fall in three charming mug cookies.
Edibles:
Royal icing: orange, red, white, olive, black, and brown
Chocolate mug-shaped cookies
Airbrush color: brown, orange, red, and olive
Assorted petal dusts
Gel food color: white and russet
Pearl metallic edible paint
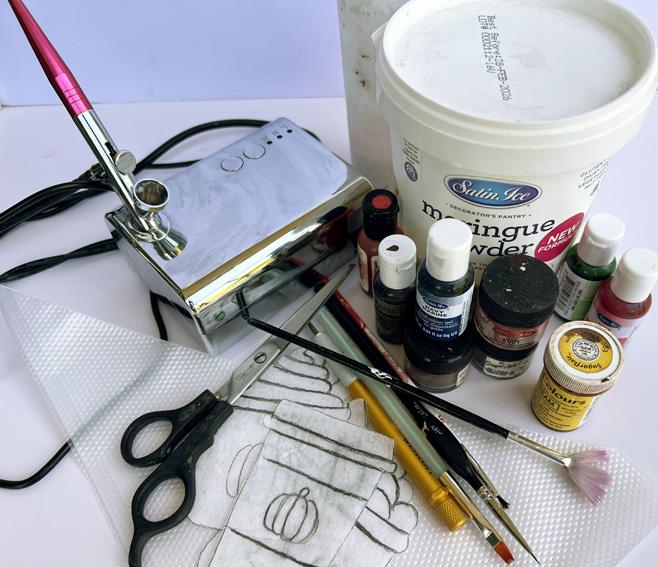
Equipment:
Piping bags
Airbrush
Acetate
Paintbrushes LEVEL:
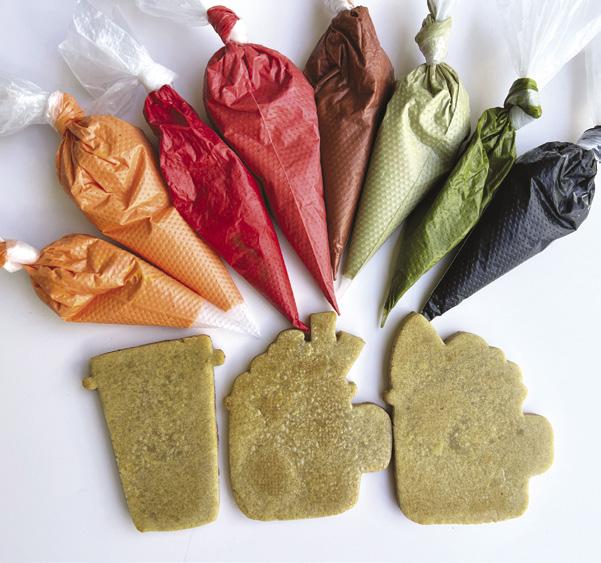
1. Prepare the royal icing. When mixing colors, make them a few shades lighter than the desired tone because they always darken. For orange, red, and white royal icing, make 2 consistencies:
1 for piping and 1 thinner for flooding larger areas.
2. Use your favorite chocolate cookie recipe to create 3 mug cookies. You can also add a brown airbrush color for more depth.
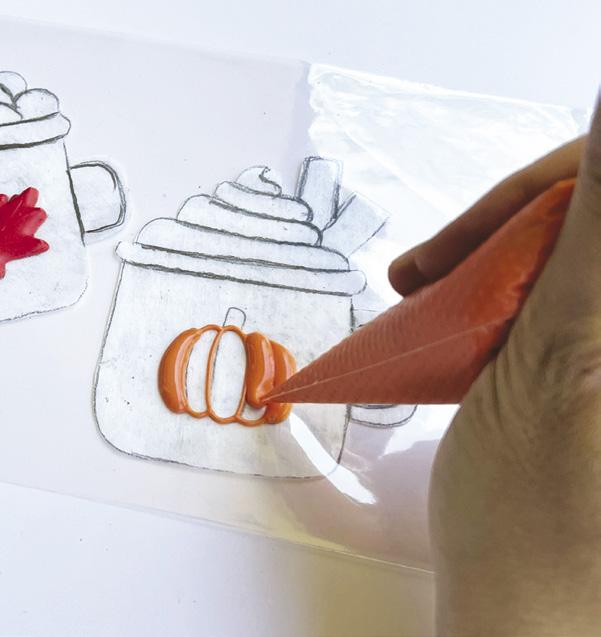
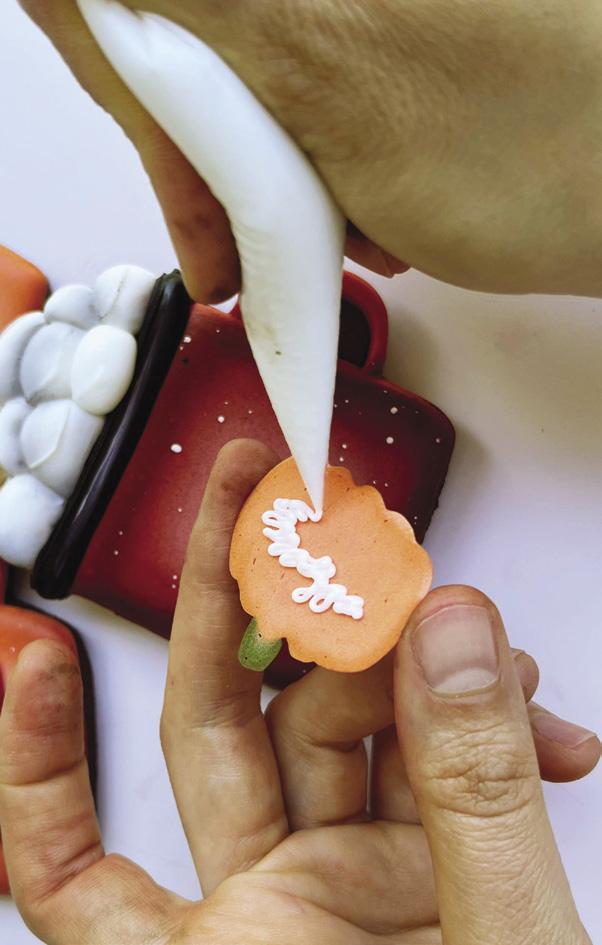
3. Pipe 2 orange pumpkins and a red maple leaf onto a piece of acetate with stiff-consistency royal icing. Set them aside to dry.
4. Outline the mugs with pipingconsistency royal icing.

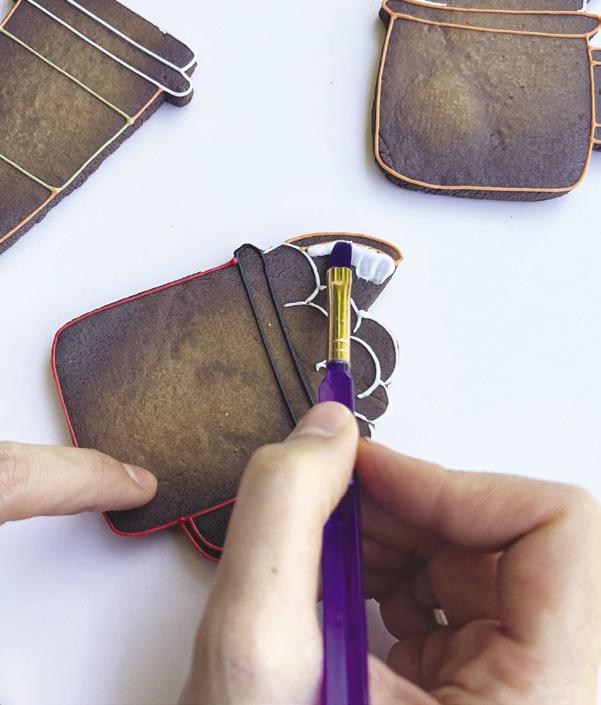
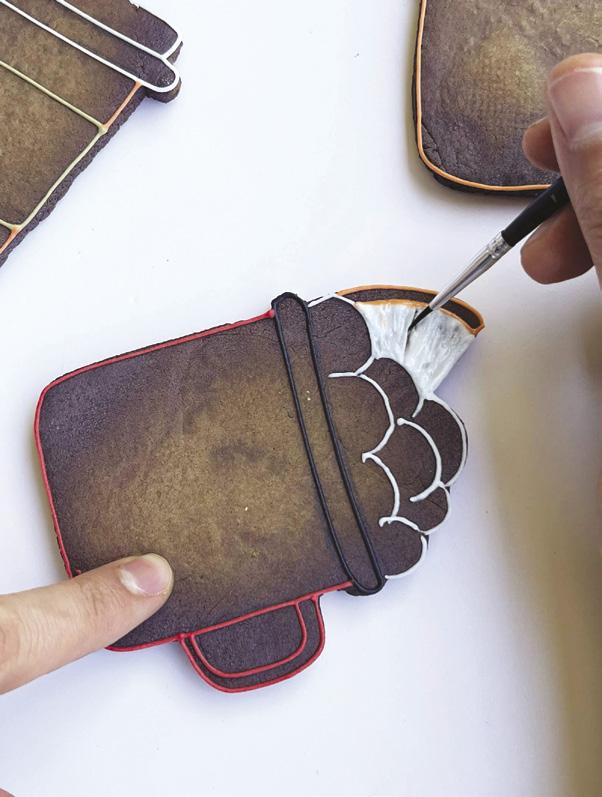
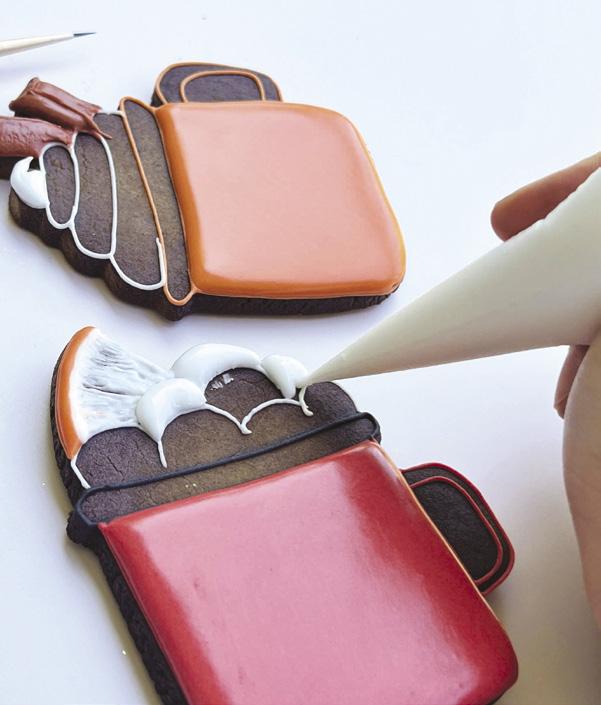
1. Outline the orange segment with orange royal icing. Pipe a thick white icing line across the wedge, then immediately use a slightly wet, medium wide brush to pull the icing inward. Keep the brush lines visible to give it texture.
2. Use a slightly damp thin brush to divide the wedge into sections.
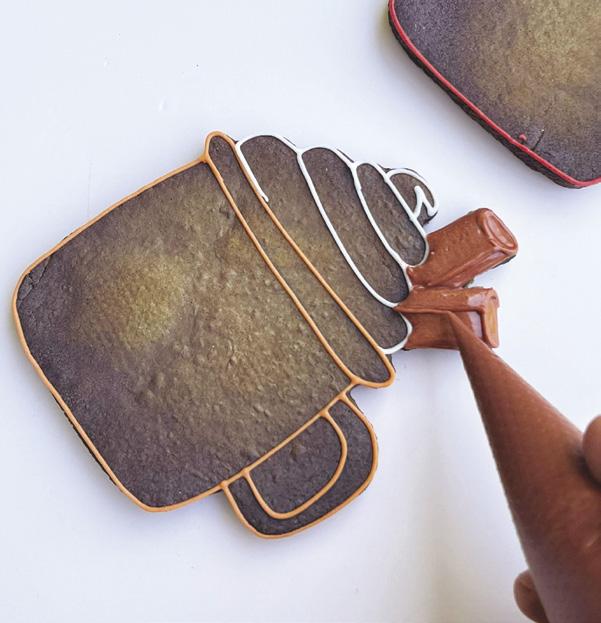
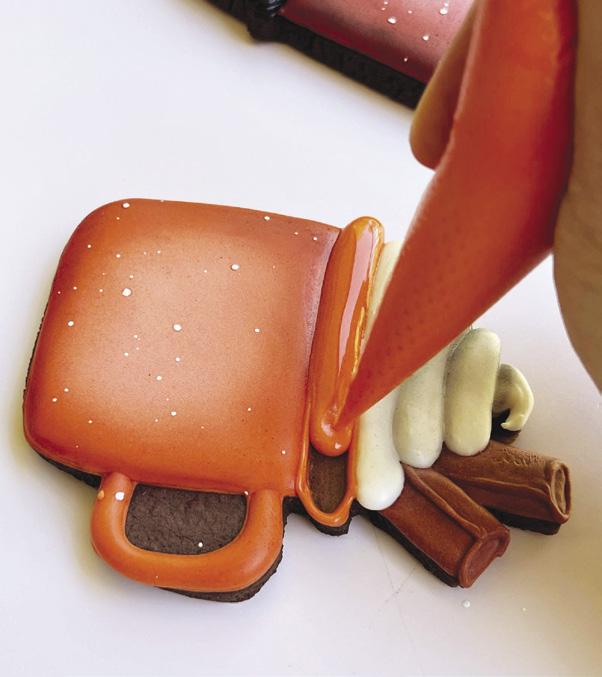
3. Pipe the cinnamon sticks with brown royal icing. Divide each stick in half to show its curved structure.
4. Add more royal icing to 1 side of each cinnamon stick to create dimension, then pipe an outline on top to emphasize the separation between the halves.
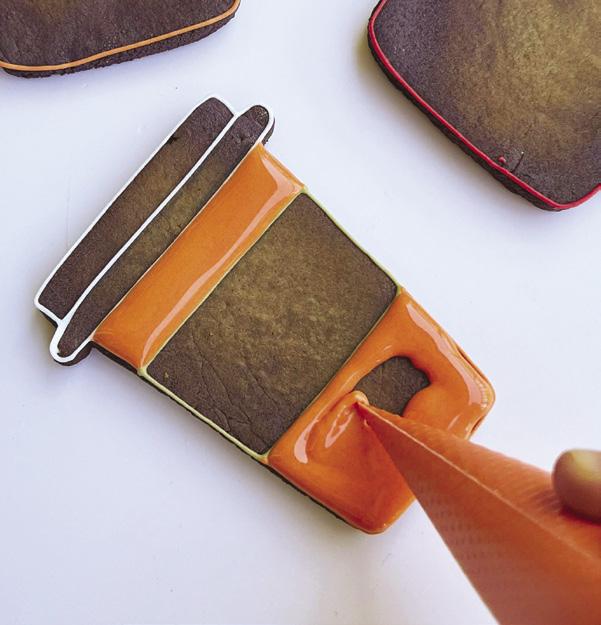
5. Flood the previously outlined large sections with royal icing. Work from the outer edges inward, covering them evenly as you go. Let them dry before moving on to nearby details.
6. Pipe the striped section with olive royal icing. Use a consistency between piping and flooding. This way it will hold its shape but still settle smoothly.
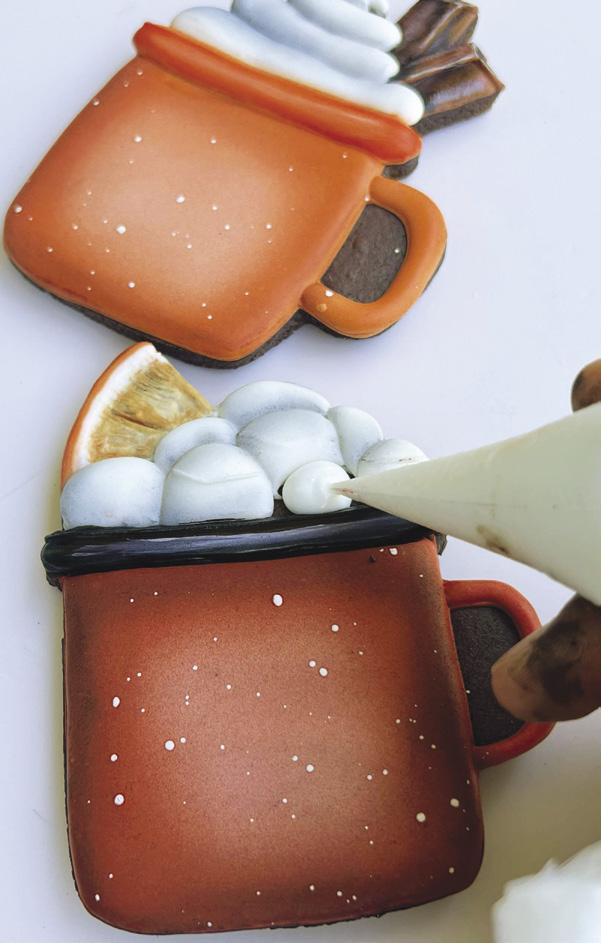
7. Using white pipingconsistency royal icing, pipe the marshmallows. Pipe small icing balls by using the tip of your bag to push icing from the inside out gently. Leave space between each marshmallow.
8. Pipe swirls with white piping-consistency royal icing to mimic whipped cream. Let each one set slightly before piping the next.
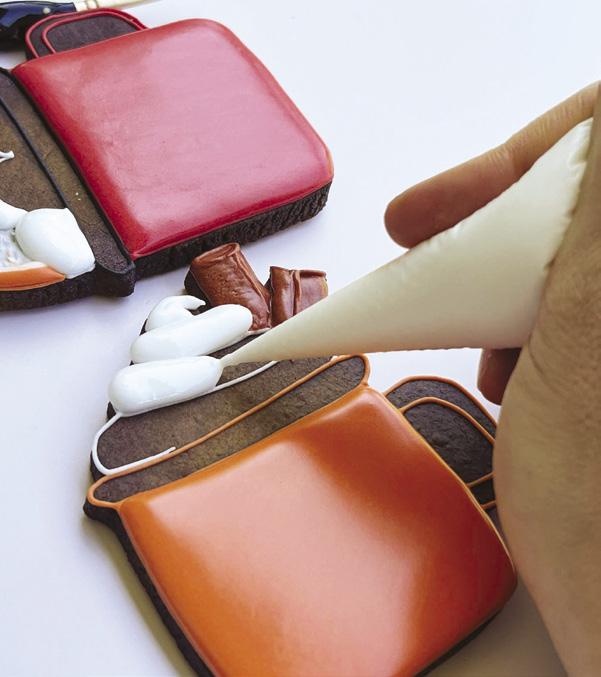
p: ALWAYS FILL THE ELEMENTS THAT APPEAR FARTHER IN THE BACKGROUND FIRST. THEN, GRADUALLY BUILD TOWARD THE FOREGROUND.
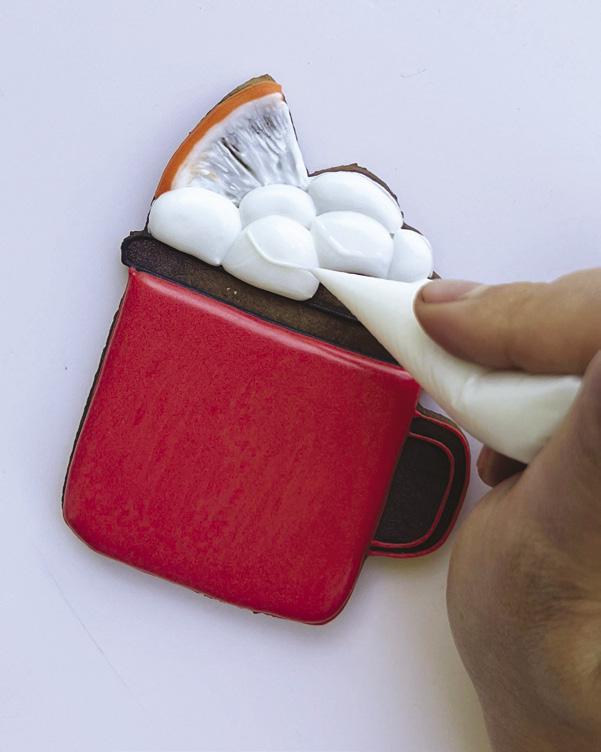
1. Pipe tiny outlines with white royal icing on top of the marshmallows to give them a cubed look.
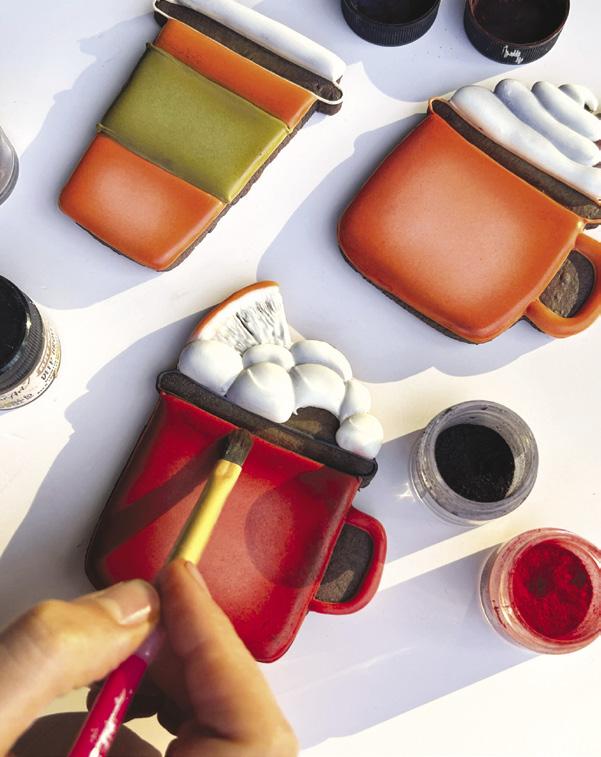
2. Once dry, lightly airbrush the mugs using a color 1 to 2 shades darker than the base icing for the orange, red, and olive sections. Cover the white areas to prevent accidental color bleeding.
3. Deepen shadows with dry petal dusts. Choose a color slightly darker than your icing or even use black or chocolate for dramatic depth.
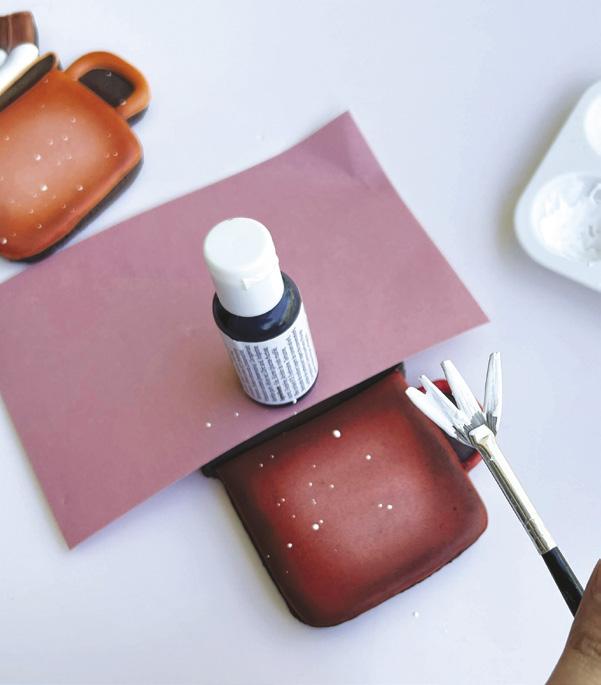
4. Mix white gel food color, a bit of white royal icing, and pearl metallic paint. Dip a fan brush into the mixture and flick it over the cookies to create tiny white speckles for a ceramic-style finish.
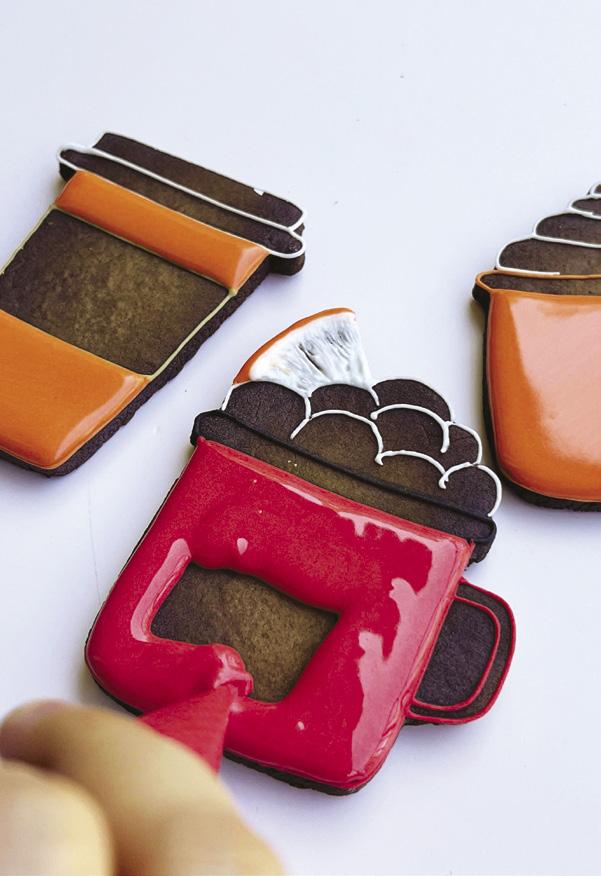
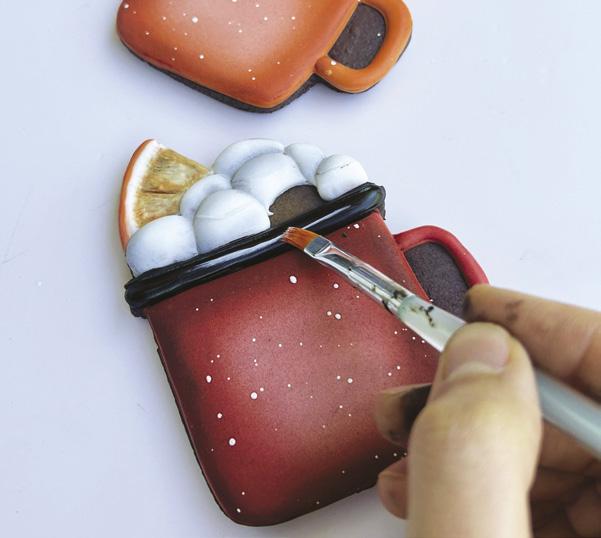
5. Using piping consistency, pipe the mug rim starting with the outline. Fill it in, then finish with a top outline just along the upper edge to separate the rim from the cup.
6. For the orange slice and cinnamon sticks, apply russet gel food color on the edges. Use a clean damp brush to pull the color inward. Add a touch of white in the center to brighten them.
7. Add tiny highlights on the mugs with white gel food color for a more dimensional look.
8. Pipe the final marshmallow after the rim is dry.
9. Gently peel off the pumpkin and maple leaf transfers from the acetate and use thick icing to attach them securely to your mugs. ACD
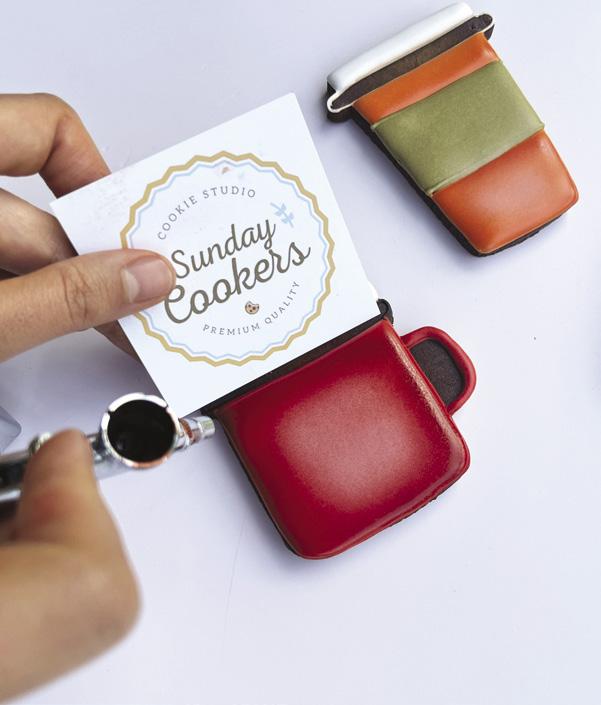
Anna Oliinyk is a skilled cookie decorator originally from Ukraine and currently based in Portland, Oregon. She co-manages Sunday Cookers with her husband, where she specializes in intricate cookie decorating and teaching. A proud mother of two, her journey in the world of baking began eight years ago when she adorned Christmas cookies for her children. What started as a hobby quickly evolved into her true passion and purpose in life. Since 2017, she has been teaching cookie decorating thraough online classes, covering various skills, including floral cookies, 3D designs, and unique piping techniques. In 2022, she earned a silver medal at Julia M. Usher’s Cookie Art Competition and a gold medal at the That Takes the Cake Show in 2023. Anna also had the privilege of appearing on season five of Food Network’s Holiday Wars
sundaycookers.com instagram.com/sunday_cookers/
American Cake Decorating: How did you start baking?
Linda Tuthill: Like many, I started baking with my mom back when I needed to stand on a stool to reach the counter. I always loved sweets, and we spent many years perfecting our chocolate chip cookies. We also grew a lot of what we ate, whether it was vegetables from our garden or berries at my grandparents to make jam for our breakfast. I wanted to apply this concept to my baking as well. While I’m certainly not milking cows for my own milk and butter right now, I’ve always wanted to use the freshest, most locally sourced ingredients possible. I am a self-taught baker, trying and testing recipes since I was a teenager. I love the process, the science, and certainly the end result is super rewarding!
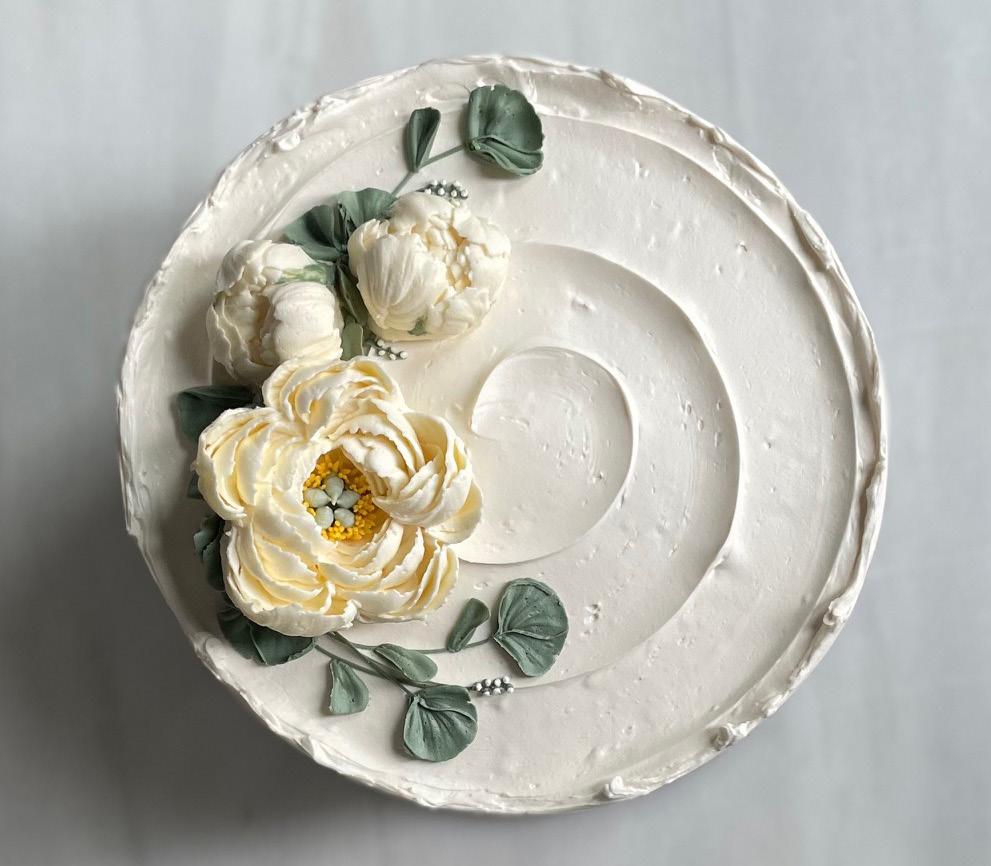
ACD: Where do you find inspiration?
LT: Nature is my biggest inspiration. The colors of the different seasons, the shapes of flower petals, and the way tree branches sway in the wind. From there, I like to gather details for the event itself; invitations, dress patterns, fabrics that are being incorporated, so my end design is a reflection of the person I am creating for.
ACD: What has been your biggest accomplishment so far?
LT: Growing this business from nothing. Perhaps it’s taken me longer
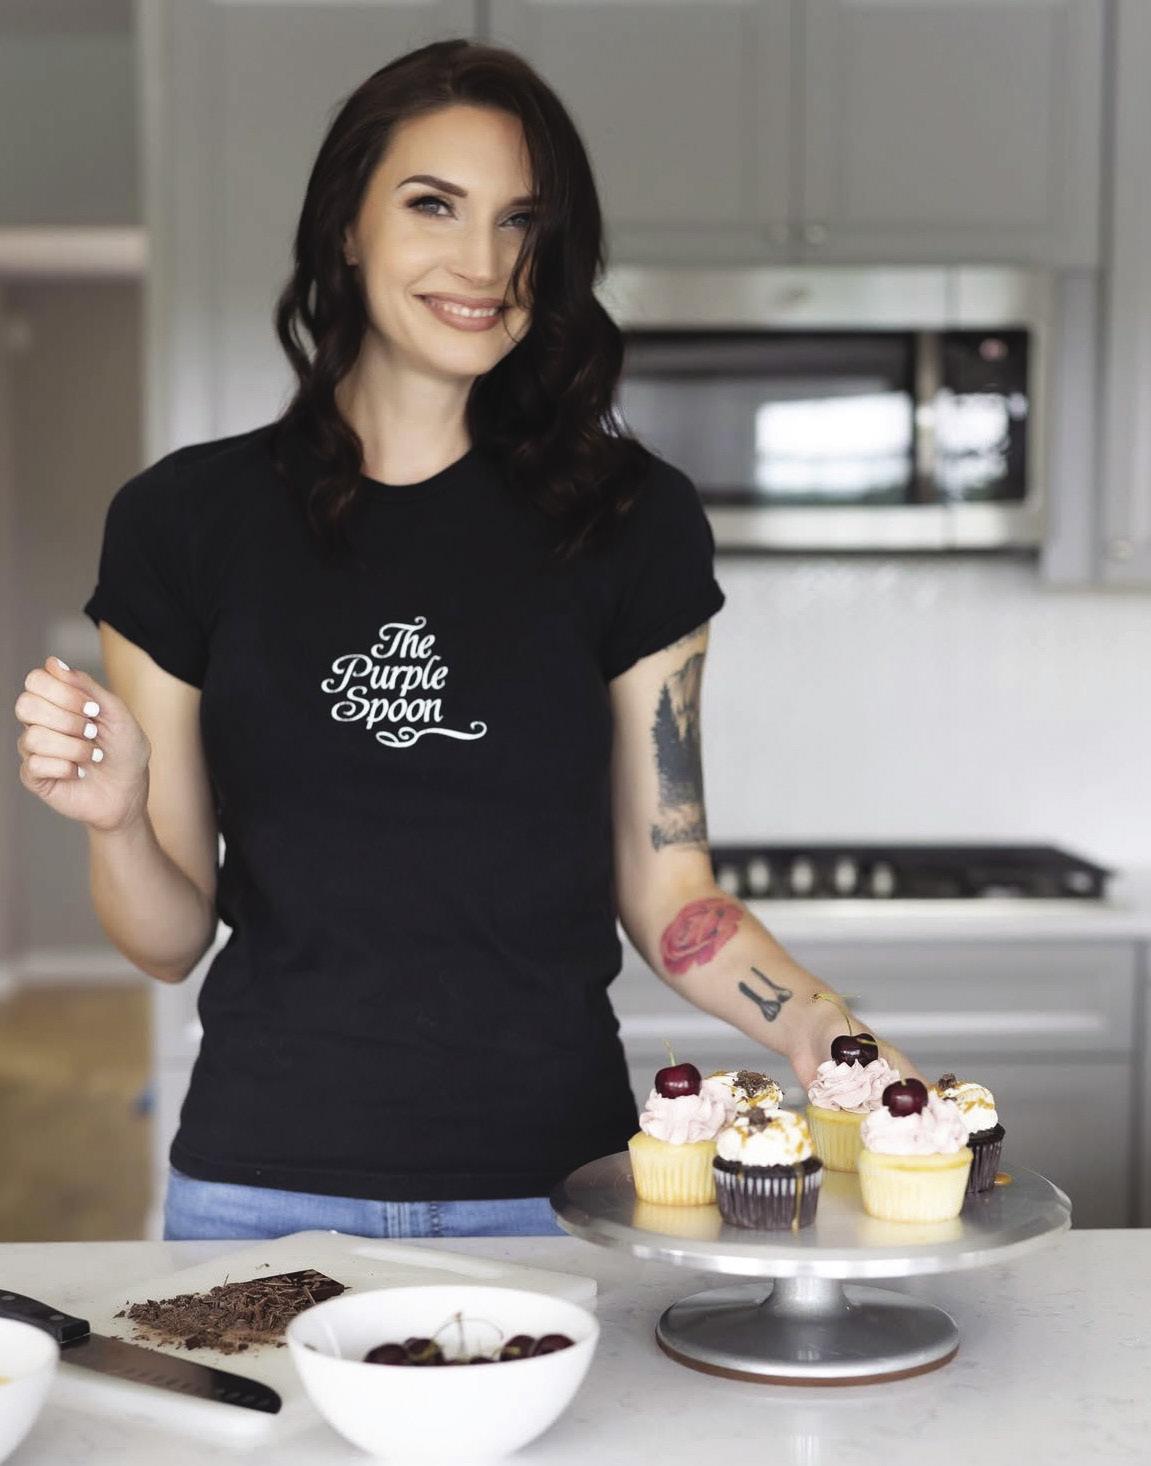
From a blog to a from-scratch bakery, this self-taught baker shares her journey.
than others, but I started this business with a love for dessert, a love for sharing dessert with people, and a dream. I’m completely self-taught, so each creation brings me joy and a sense of accomplishment as I watch my skills grow. It’s also taken me places I never dreamed. Wedding cakes were never on my radar, and my first cake, while tasty, was hardly a creation anyone would pin for inspiration. Being able to now bake and decorate cakes
for people’s once-in-a-lifetime event is an amazing experience for me.

ACD: How do you manage your business with all your other ventures?
LT: It really boils down to passion. While I am very good at timelines, schedules, planning, and multitasking, a lot of it comes down to really loving what I’m doing and a drive to excel. The day-to-day managing is not always pretty, and it’s not always
perfect, and I certainly don’t always feel like I am successfully managing, but I have a drive and a dream, and I truly love every bit of the process.
ACD: What’s next for you?
LT: Some of this is still a secret! My next goal is to provide a more custom, hands-on experience for each of my customers. So, we’ll just say some really awesome things are in the works to get to this step! ACD
Combining two decades in the luxury wedding industry with her childhood growing up on her grandparents’ farm, Linda Tuthill seamlessly integrates natural ingredients, traditional techniques, and a high attention to detail into each delicious creation. With a passion for crafting unforgettable culinary experiences, Linda’s creations not only tantalize taste buds but also capture the essence of each special occasion she contributes to. Why the purple spoon? Linda became enamored with Julia Child during her brief stint as a stay-at-home mom with her son. The very first episode of The French Chef that she saw was her tarte tatin. As Julia is explaining how to slice and prepare the apples, she just slips in, “and you stir it with a purple spoon!” Linda just loved how absolutely random a comment it was (and how can you go wrong with the color purple?). The quip was used repeatedly as she baked the following months. Her love of baking and sharing quickly turned into a blog and The Purple Spoon was born.
thepurplespoon.com instagram.com/thepurplespoon
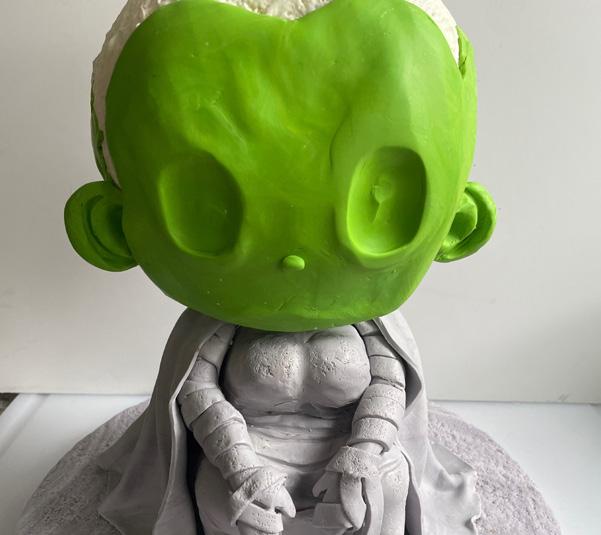
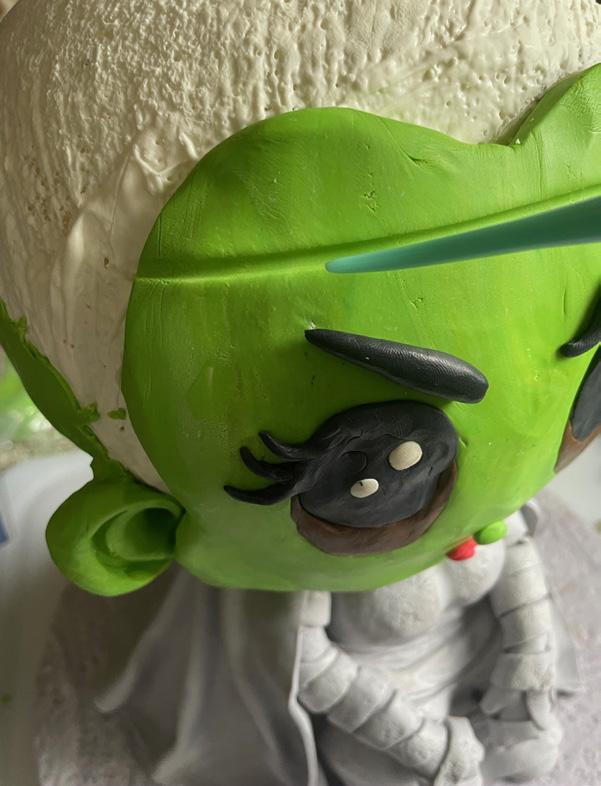
More cute than scary, this sculpted cake will make any Halloween party a hit!
BY JEAN A. SCHAPOWAL
Jean A. Schapowal from Cakes with Character is an awardwinning cake artist based in Long Island, NY. Having been a cartooning and illustration major in art school, Jean has been bringing her cartoony comic-book style to her cake creations for more than 15 years. Jean competes regularly in cake shows across the country, placing with many of her entries, and contributes to many online cake collaborations and has even appeared on numerous TV cake challenges. She loves to create fun and engaging pieces, cakes that “pop.” When people see one of her creations, they can say, “Oh, that’s a Jean cake!”
cakeswithcharacterbyjean.com facebook.com/momschap instagram.com/momschap
Edibles:
Fondant: white, black, and red
4- and 5-inch cakes
Chocolate ganache
Chocolate or candy melts
Modeling chocolate: lime, light gray, black, brown, and white
Petal dust: slate gray, black, and lime green
White edible paint
Equipment:
10-inch round cake drum
Stiff brush
Styrofoam half sphere
Marker
Knife
Aluminum foil
Rolling pin
Bat cutter
20-gauge floral wire
Ball tool
Dresden tool
Dowels
Ball tool
Scallop and comb tool (PME)
Paintbrushes
WHAT YOU NEED
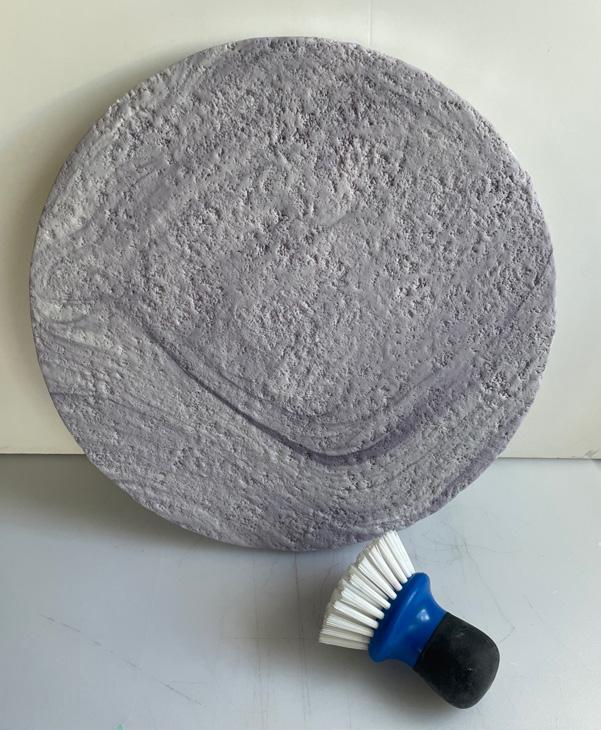
1. Cover a round cake drum with marbled white and black fondant. Texturize with a stiff brush. Set aside.
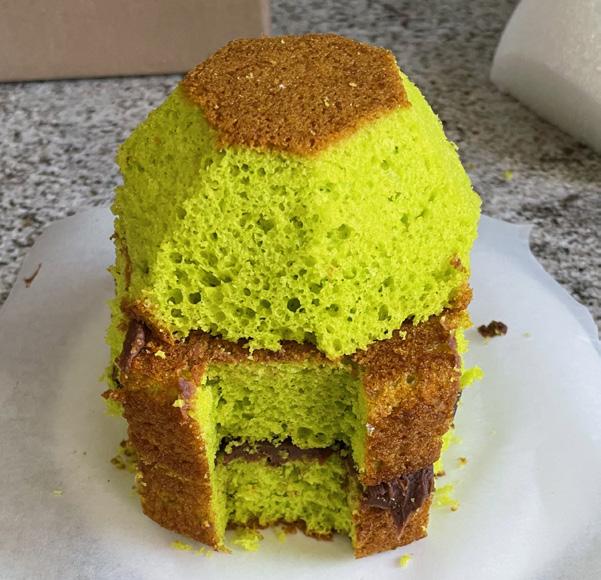
2. Stack and fill one 4-inch cake and two 5-inch cakes with chocolate ganache for the body.
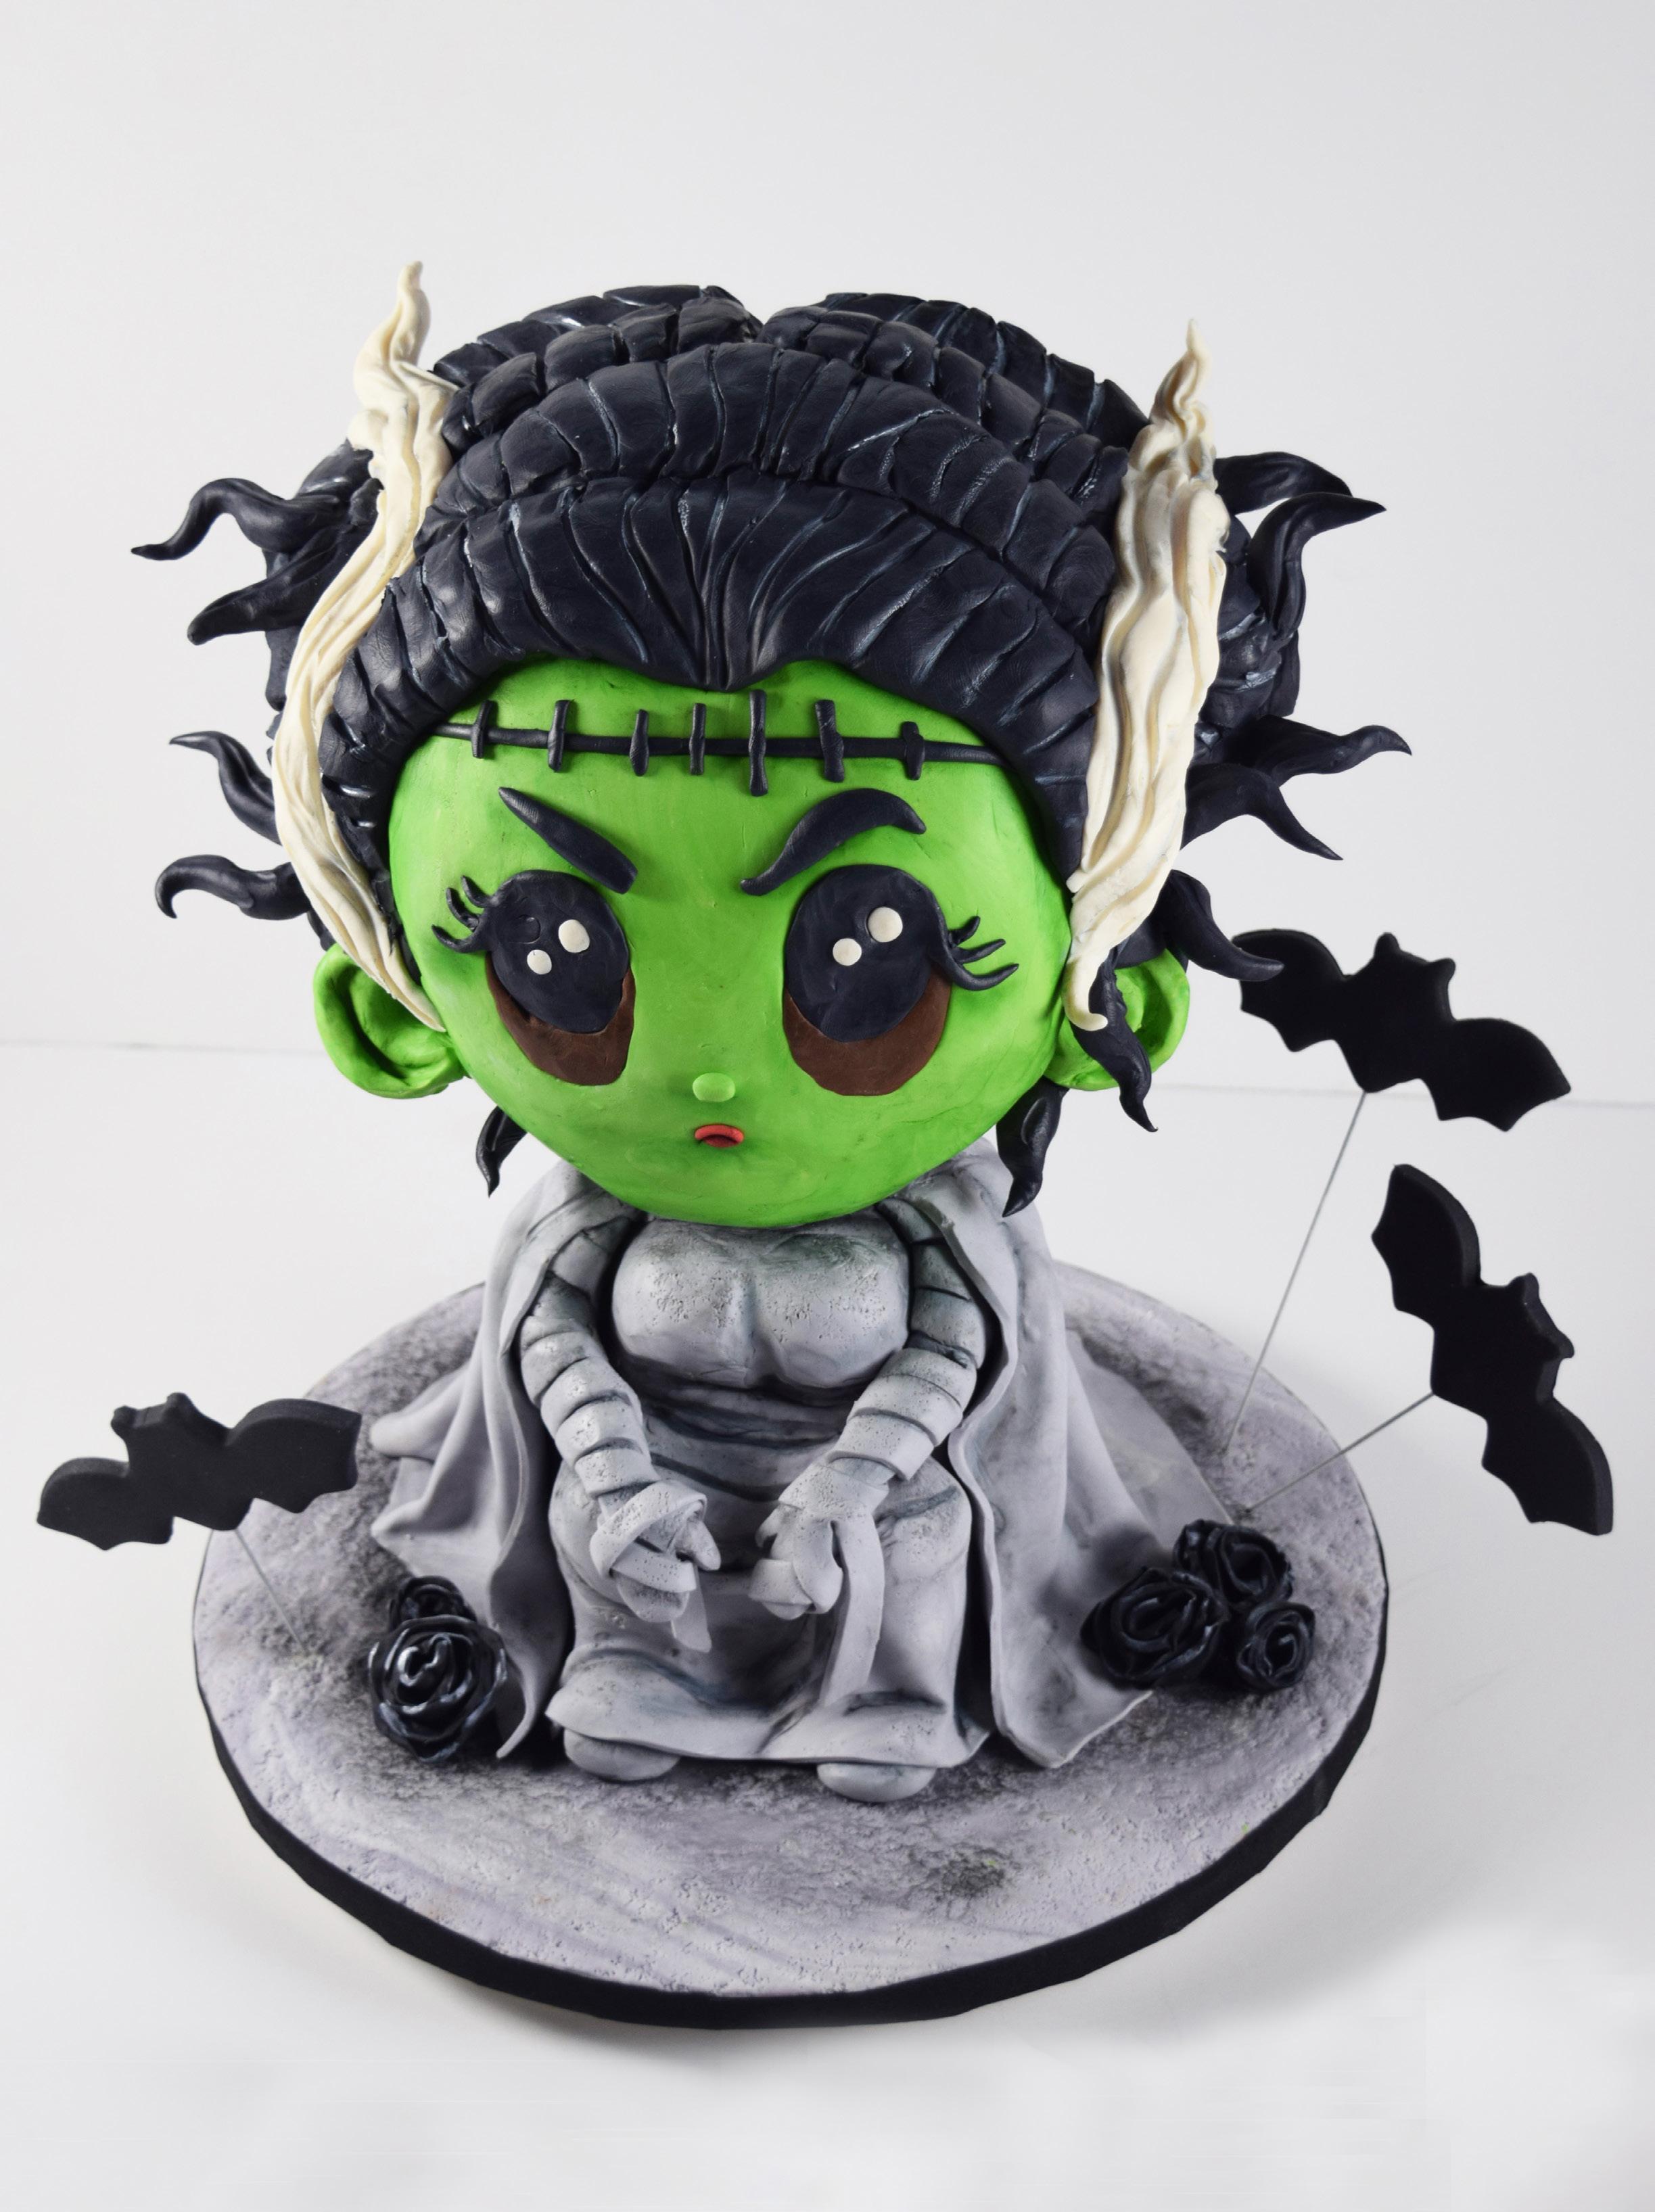
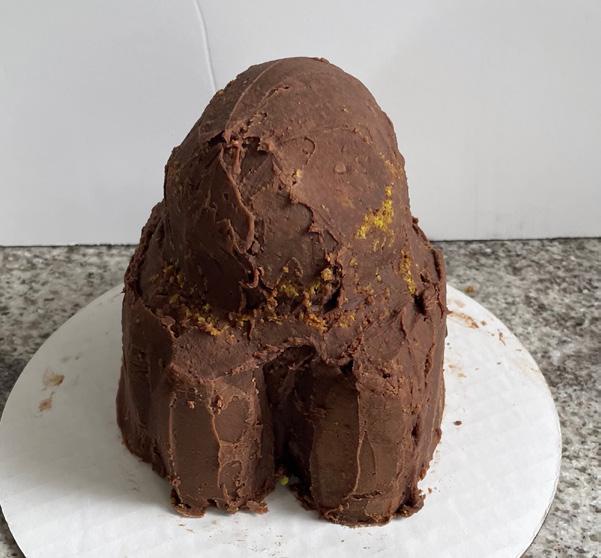
3. Cover the cakes with ganache and set aside.
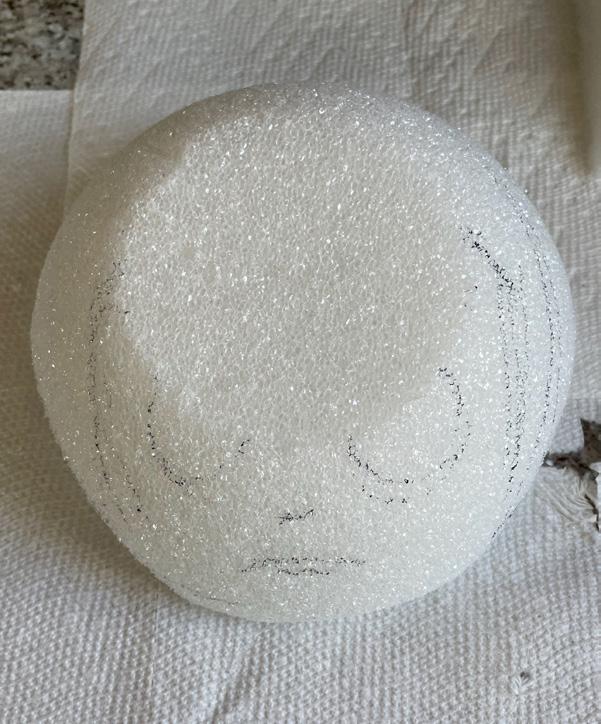
4. Take a 7.5-inch Styrofoam half-sphere and draw out a basic face for placement. Carve down the sides to form a chin, make a flat cut for the chin, and then make a cut to create a flat surface for the face.
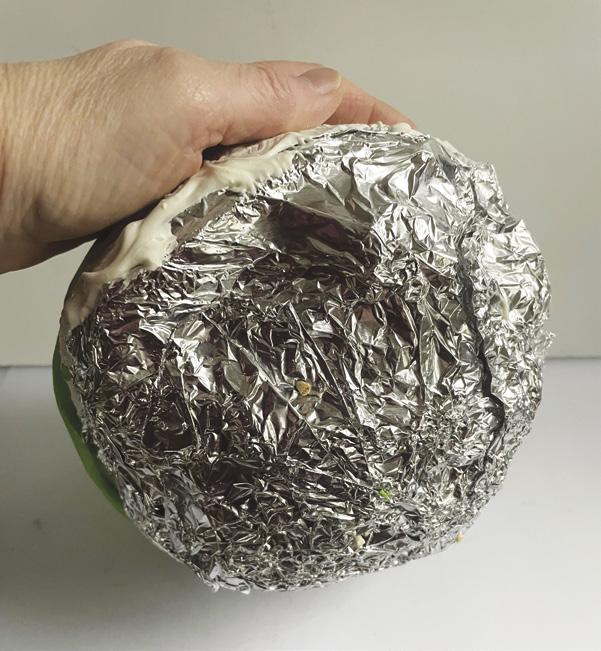
5. Cover the back side with aluminum foil and then cover the Styrofoam half with melted chocolate or candy melts. Set aside.
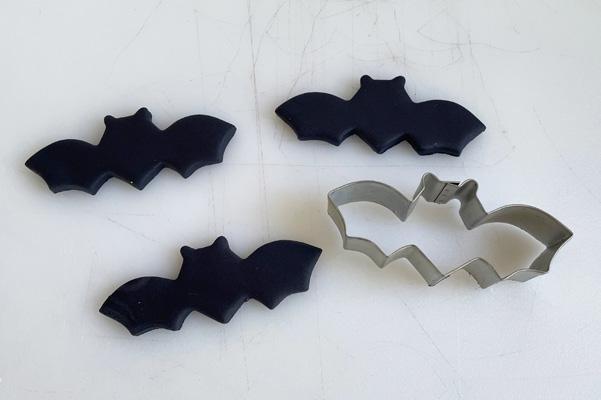
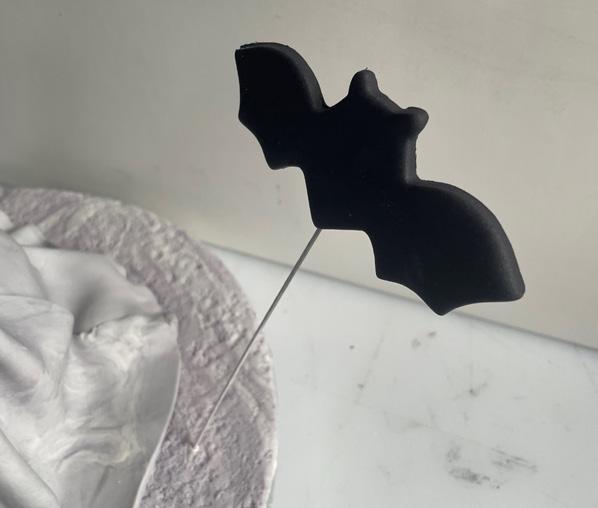
1. Roll out some black fondant. Using a bat cutter, cut out a bat.
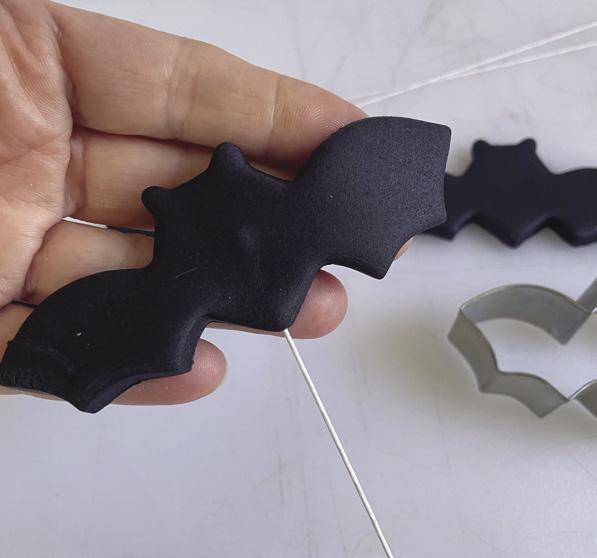
2. Insert a 20-gauge floral wire into the bat’s body. Set aside to firm up.
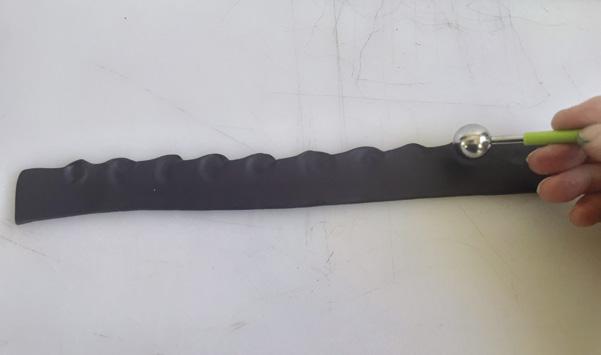
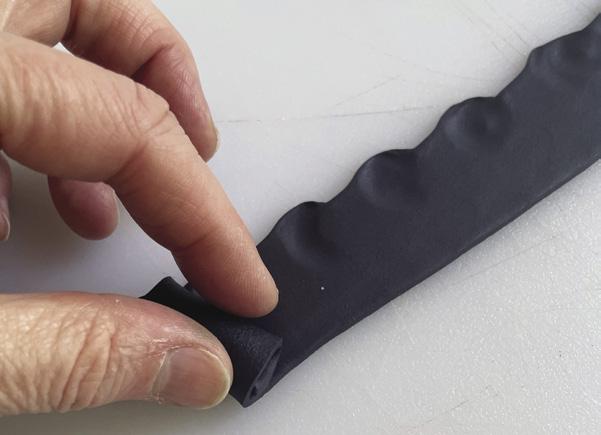
3. Roll out ½- to 1-inch-wide strips of black fondant in various lengths. Create a scalloped pattern along 1 edge by pushing a ball tool into the fondant.
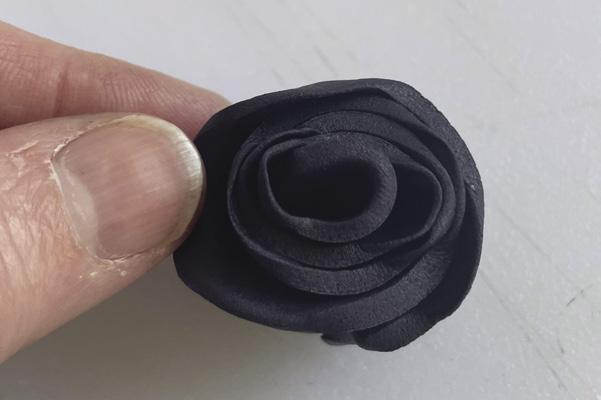
4. Begin rolling up 1 end. Use your fingers or a Dresden tool to separate and widen the petals of the flower you created.
5. Make a few of these flowers in different sizes. Set aside to dry.

1. Place the cake on the cake drum and attach it with a dowel. Round the bent knees a little more and add a bust using modeling chocolate. Brush some additional melted chocolate over those areas for additional support.
2. Cover the neck area with lime green modeling chocolate and form feet with light gray modeling chocolate.
3. Cover the body with light gray modeling chocolate. Using a Dresden tool, begin to accentuate the folds in her dress.
4. Roll out a rope of light gray modeling chocolate for her arms. Flatten 1 end and cut out a thumb, followed by the rest of her hand.
5. Cut out a few thin strips of light gray modeling chocolate and wrap them around the arms for bandages.
6. Use a stiff brush to texturize the bandages.
7. Using the Dresden tool, bend, form, and attach the arms, smoothing as you go along.
1. Roll out some light gray modeling chocolate for her cape. Form some folds with a dowel.
2. Pinch them together at 1 end. Create 3 total pieces for the cape.
3. Using the Dresden tool, drape the cape pieces over her body, shape them, and smooth as you attach them.
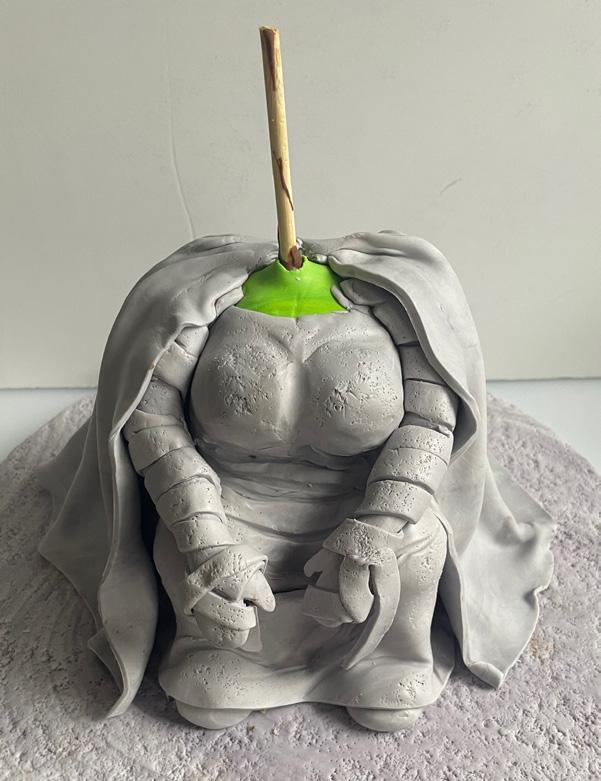
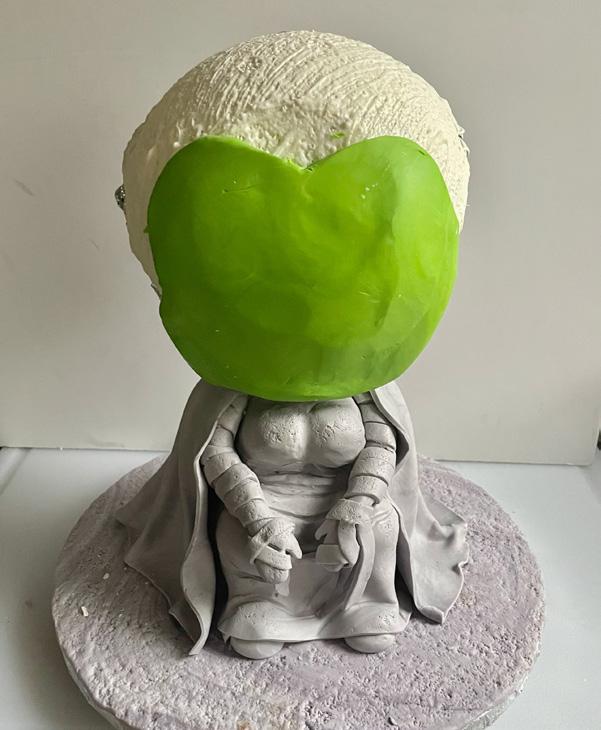
1. Add some lime green modeling chocolate to the Styrofoam for her face. Attach the head to her body over the dowel.
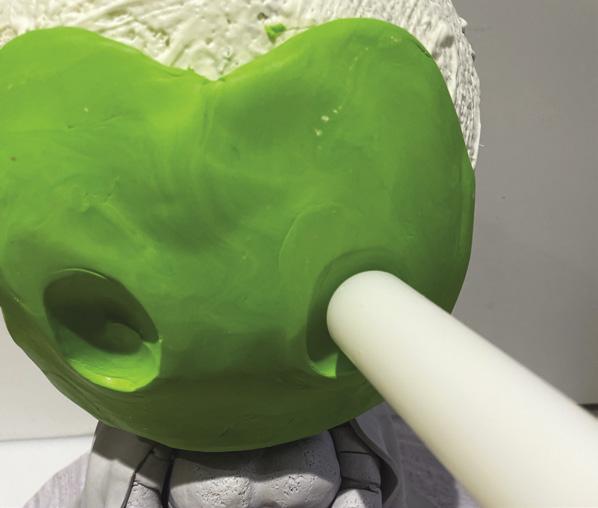
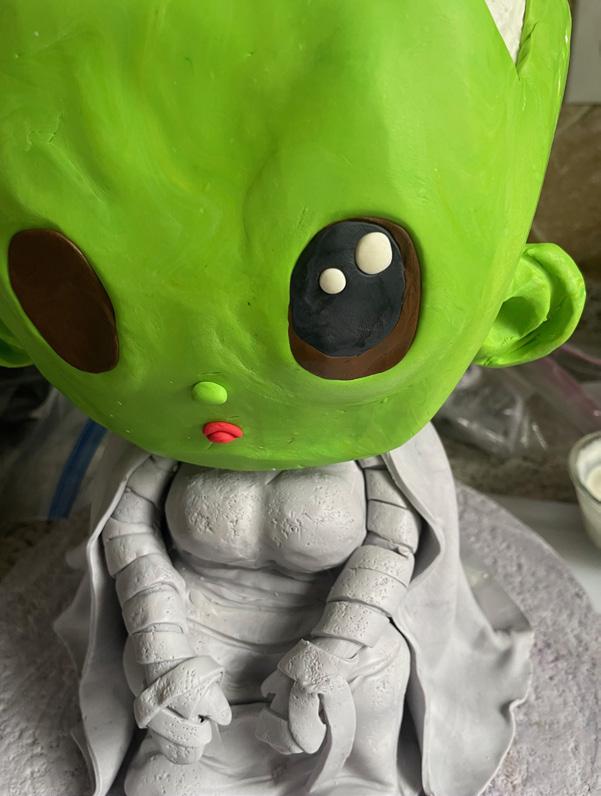
2. Using the end of a rolling pin or the ball tool, form her eyes.
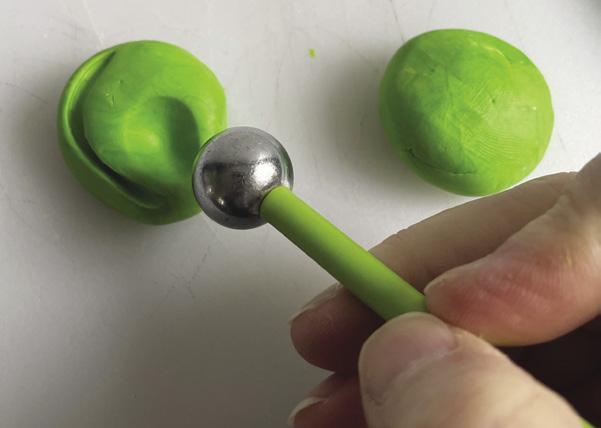
3. Shape 2 gumball-size pieces of lime green modeling chocolate for the ears. Use the Dresden tool to create the rim and the ball tool for the opening.
4. Attach the ears by pushing them into the head with the ball tool.
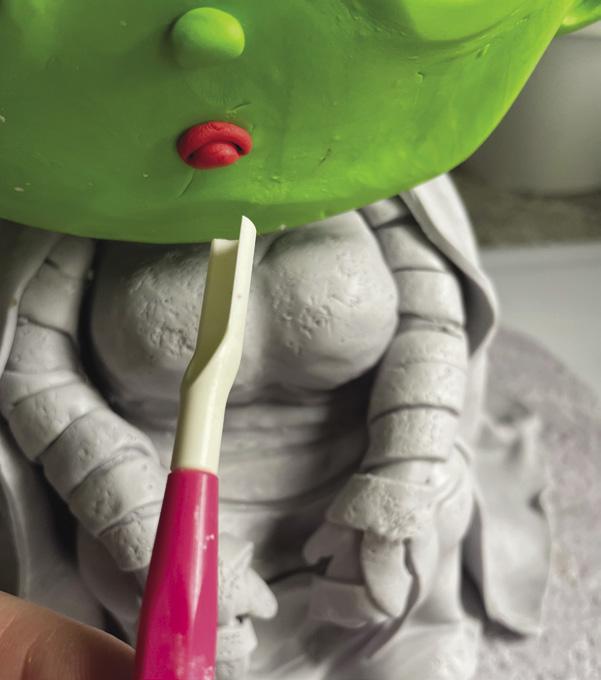
5. Add a tiny nose with lime green modeling chocolate.
6. Create a mouth out of red fondant using a scallop and comb tool. Place the mouth on the face and curve the mouth.
7. Add some brown modeling chocolate for the eyes and layer black on top with the ball tool. Add white modeling chocolate accents.
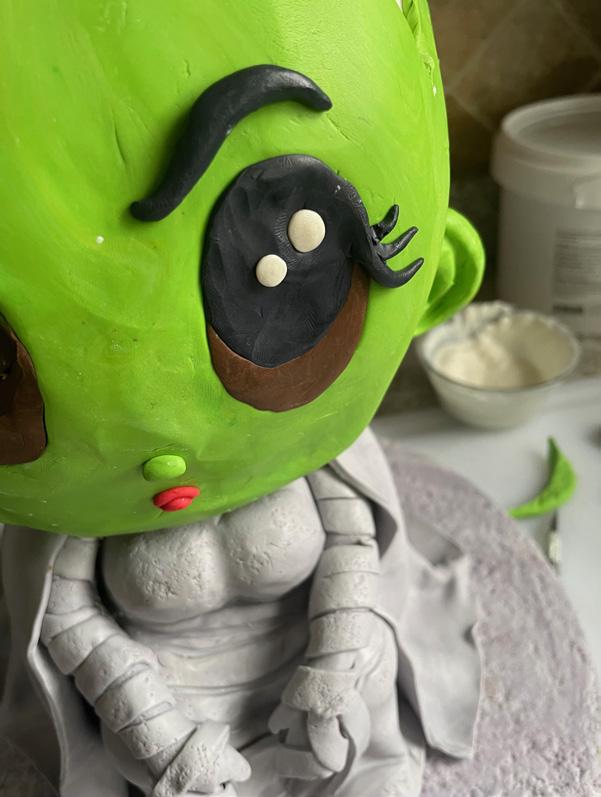
8. Roll out small strips of black modeling chocolate and attach them for the eyelashes and eyebrows.
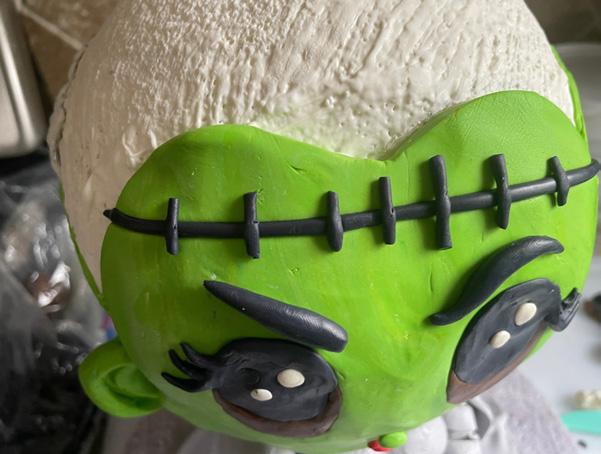
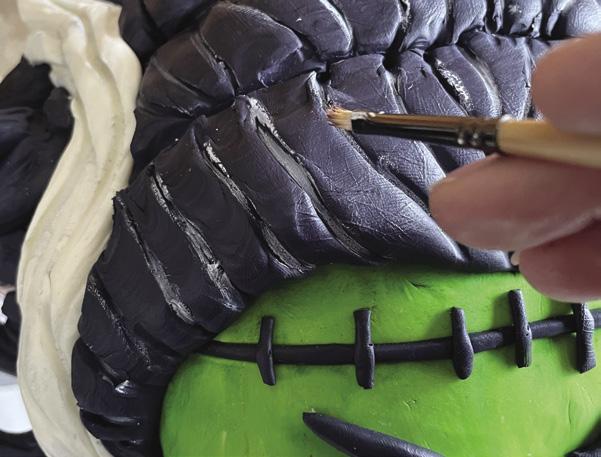
9. Using the Dresden tool, create a line across her forehead.
10. Add a thin strip of black modeling chocolate to the line and then small cross-stitches going the opposite way.

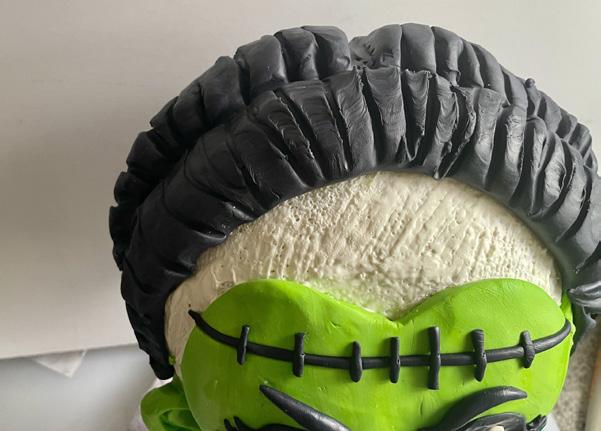
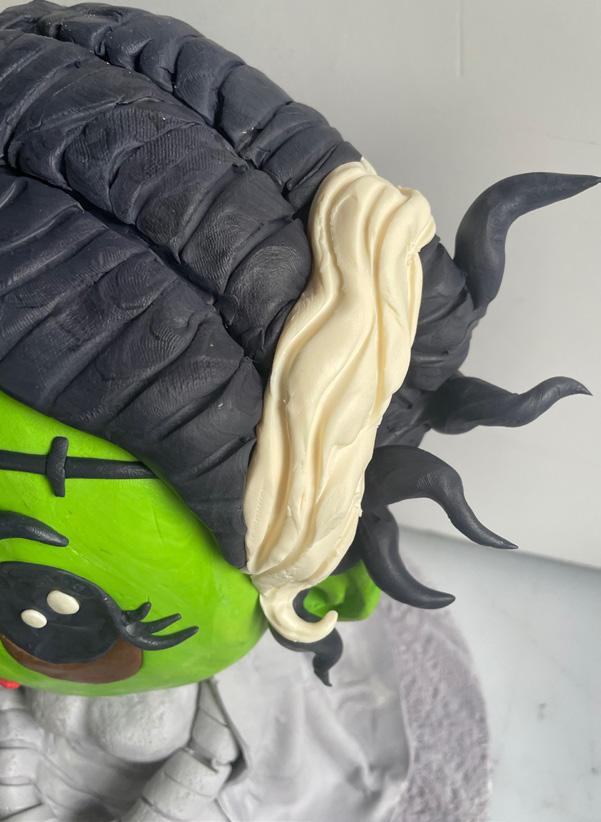
1. Roll out a thick black rope of black modeling chocolate to create her hair. Using the Dresden tool, create lines for sections of her hair. Repeat 3 more times.
2. Create some loose pieces of hair by rolling pieces into a teardrop shape, twisting, and attaching them throughout with the Dresden tool.
3. Add a strip of white modeling chocolate to each side and a few loose strips as well.
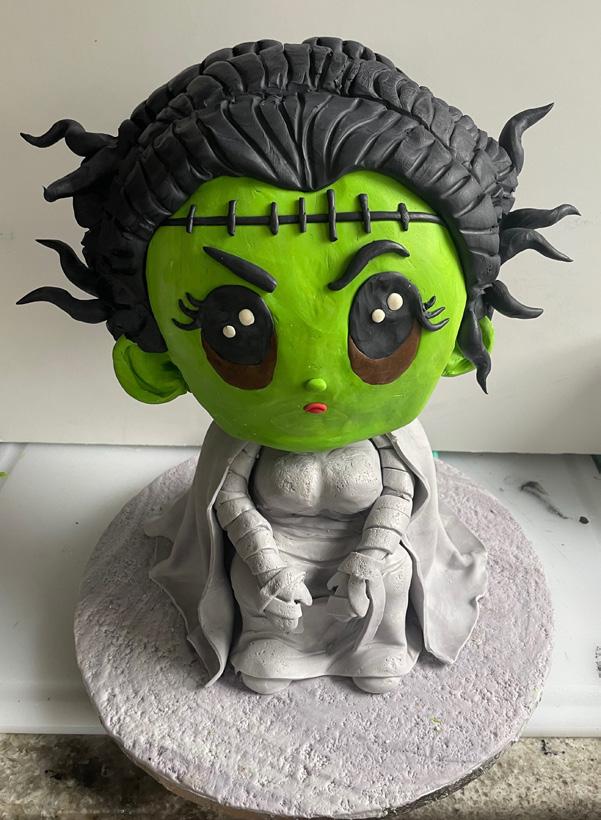
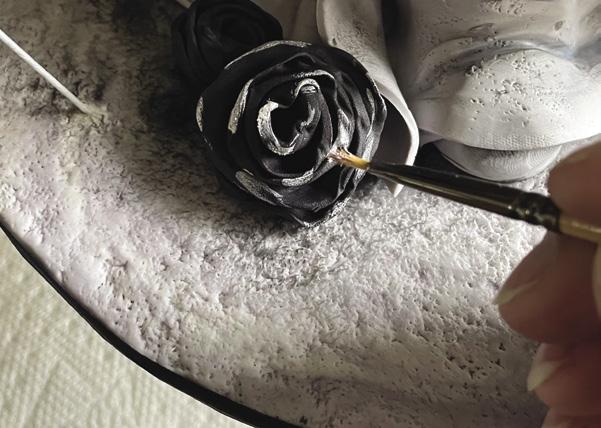
1. Add the roses to the cake board.
2. Attach the bats to the cake drum. Use a bit of melted chocolate to secure them.
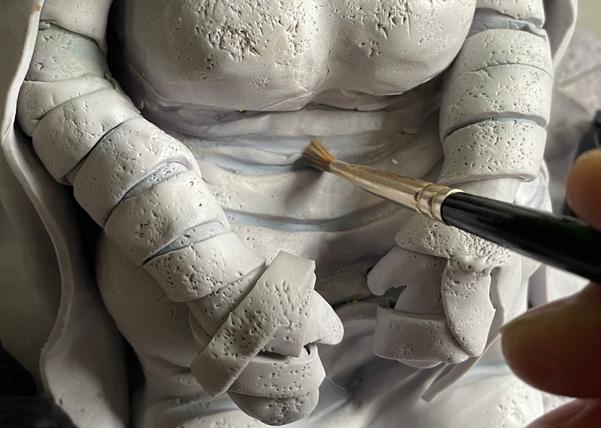
3. Dust the bride’s dress with slate gray and black petal dust. Dust her face with some lime green petal dust.
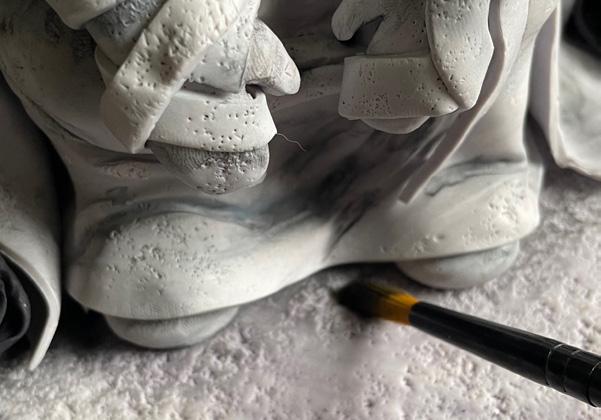
4. Dust the cake board and around the bride with some black petal dust.
5. Dry-brush the roses and the bride’s hair with white edible paint. ACD

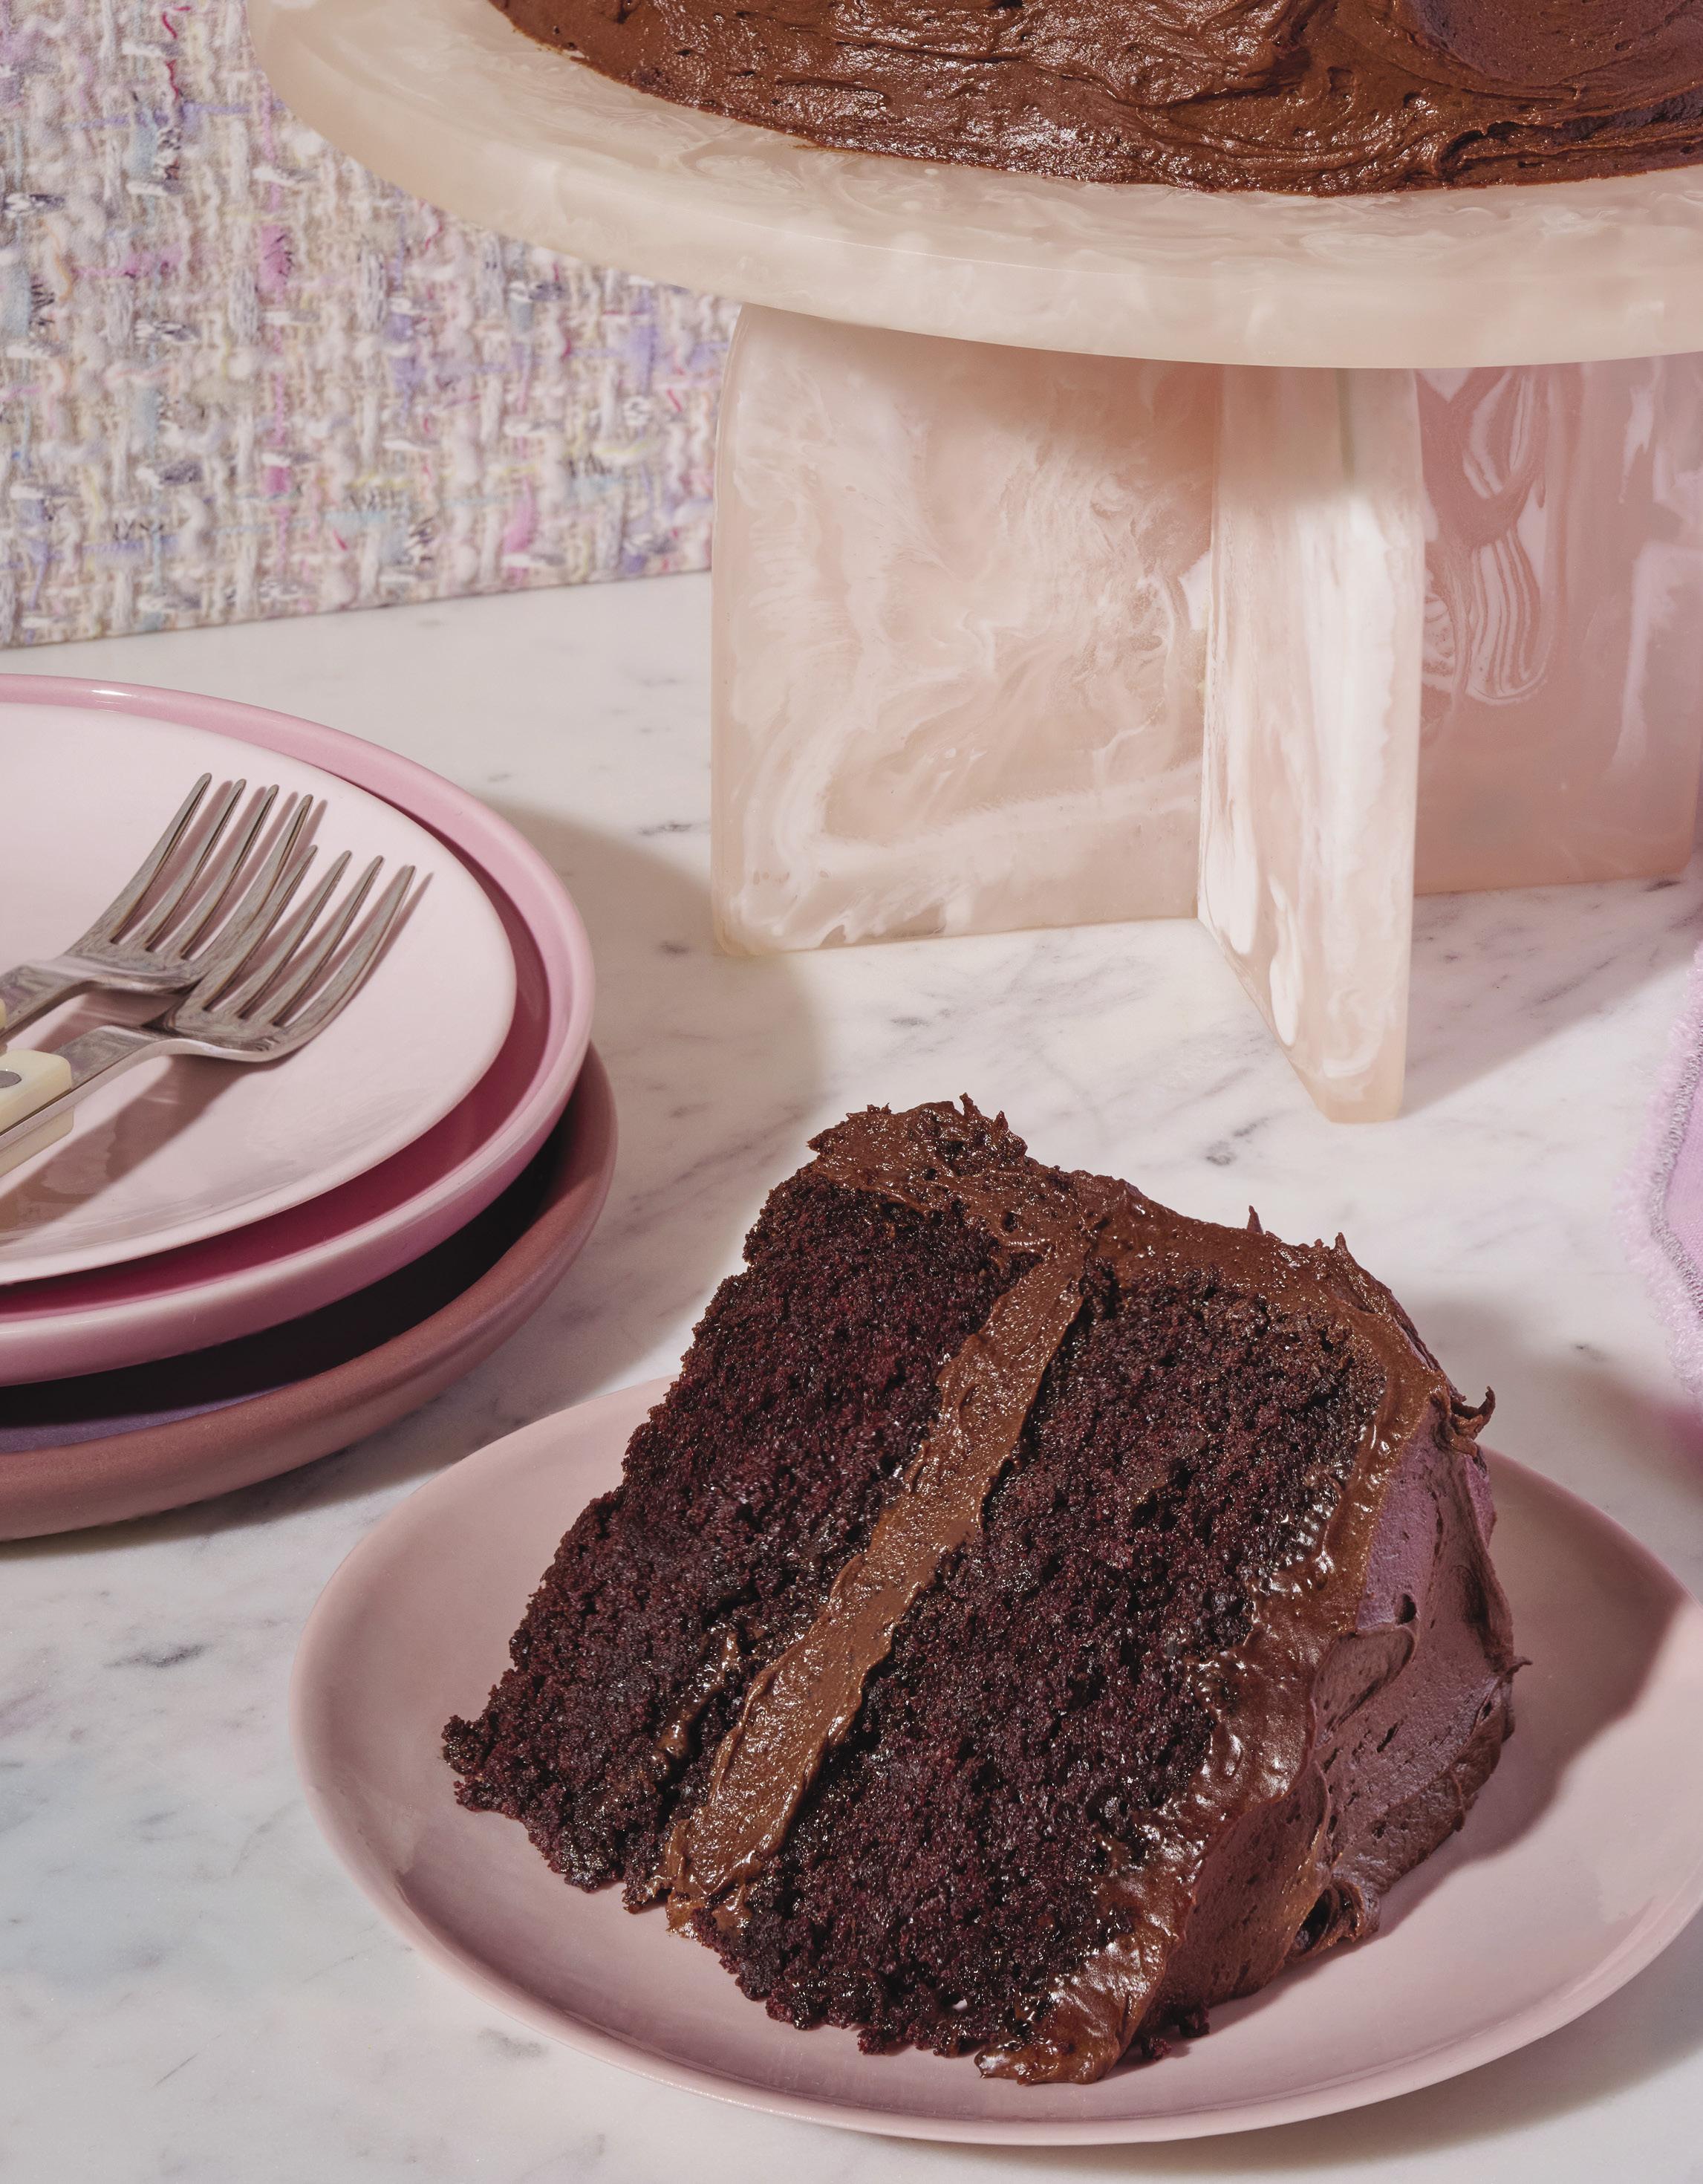
Using coffee in this cake batter really enhances the rich flavor of the chocolate, but if you aren’t a coffee drinker, don’t fret. Hot water will work, too! This batter is super loose, but it will bake up perfectly into—dare I say—the most moist chocolate cake you’ve ever had.
BY DANA POLLACK
LEVEL:
Makes one 8-inch two-layer cake; serves 12 to 14
1¾ cups (240 grams) gluten-free 1:1 replacement flour blend
¾ cup (75 grams) unsweetened cocoa powder
1½ teaspoons baking powder
Bake It Gluten Free by Dana Pollack
© 2025 Published by Union Square & Co., an imprint of Grand Central Publishing, a division of Hachette Book Group. Photography by Morgan Ione Yeager.
1½ teaspoons baking soda
1 teaspoon kosher salt
2 cups (400 grams) granulated sugar
½ cup (100 grams) neutral oil, such as avocado, sunflower, grapeseed, or canola oil
2 large eggs
2 teaspoons pure vanilla extract
1 cup (225 grams) whole milk
1 cup (225 grams) hot coffee
½ cup (1 stick) unsalted butter, melted
3 cups (340 grams) powdered sugar
2⁄3 cup (65 grams) unsweetened cocoa powder
2⁄3 cup (75 grams) whole milk
1 teaspoon pure vanilla extract
1. Preheat the oven to 350°F. Line two 8-inch cake pans with parchment paper cut to fit the bottom of the pan and spray with cooking spray.
2. In a medium bowl, combine the flour, cocoa powder, baking powder, baking soda, and salt.
3. In the bowl of a stand mixer fitted with the paddle attachment or in a large bowl using a handheld mixer, combine the granulated sugar, oil, eggs, and vanilla and beat on medium speed until combined. Add the dry ingredients in three additions, alternating with the milk, and beat until smooth. Add the hot coffee and beat until combined and smooth (the batter will be very thin).
4. Divide the batter evenly between the prepared pans. Bake for about 45 minutes, until a toothpick inserted into the center of each cake comes out with just a few moist crumbs attached. Remove from the oven and let the cakes cool in the pans for at least 1 hour, then transfer to a wire rack to cool completely, at least 1 hour more.
1. In the bowl of a stand mixer fitted with the whisk attachment or in a large bowl using a handheld mixer,
combine the melted butter, powdered sugar, cocoa powder, milk, and vanilla and beat on medium speed until combined. Scrape down the
sides of the bowl and beat on high until light and fluffy, 2 to 5 minutes.
2. Spread or pipe the frosting on top of one cooled cake layer.
Stack the second layer on top and then spread or pipe the remaining frosting over the top and sides of the cake. Refrigerate until ready to serve, up to 1 day. ACD
BY CYDNI MITCHELL HODGES
Halloween might seem like a whirlwind of sugar, costumes, and chaos, but behind all that spooky fun lies a golden opportunity for your baking business.
Sure, you’re slammed with themed treat boxes, custom party orders, and maybe even a few last-minute cake emergencies. But what if, this year, you used that Halloween hype as the start of something bigger?
Instead of letting seasonal sales come and go, you can turn those one-time buyers into loyal, year-round clients. It just takes a
little intention and a few clever strategies to make your spooky season a steppingstone to deeper customer relationships.
Not all Halloween offerings are created equal, especially when your goal is to cultivate lasting client relationships. The key is to focus on treats that not only capture the festive spirit but also resonate deeply with the audience you want to attract and retain. Take a moment to think about your ideal client. What are their tastes and preferences? What do they appreciate most about your brand? Are they drawn to sophisticated, artfully decorated cakes with elegant spooky elements or do they prefer whimsical, playful treats designed for family-friendly celebrations?
Once you’ve identified who you want to reach, tailor your Halloween menu accordingly.

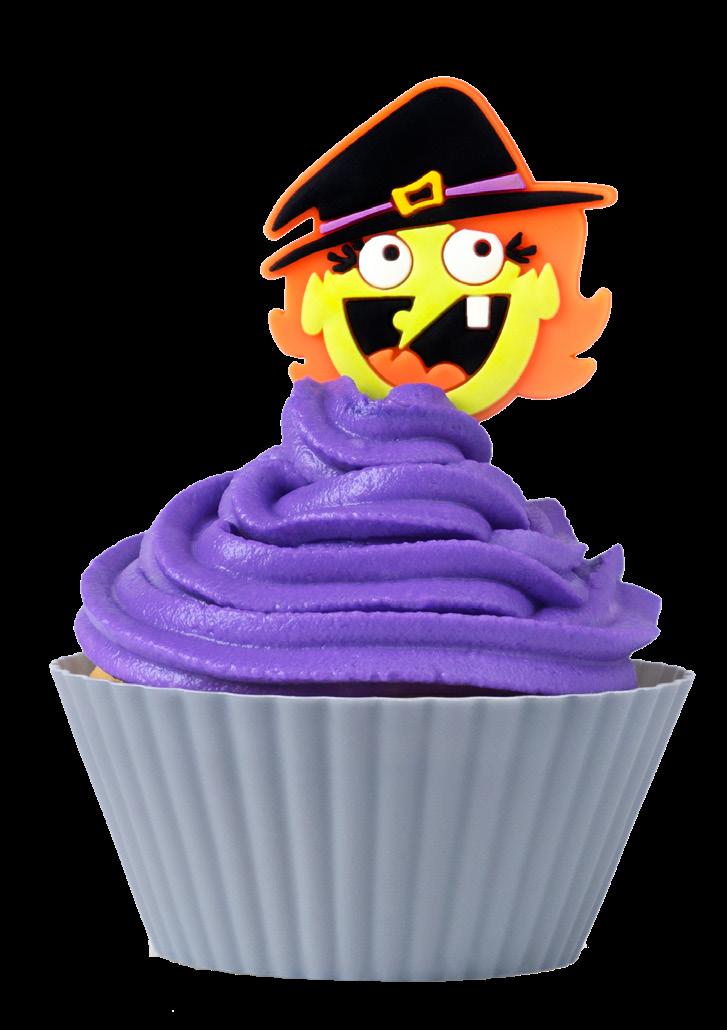
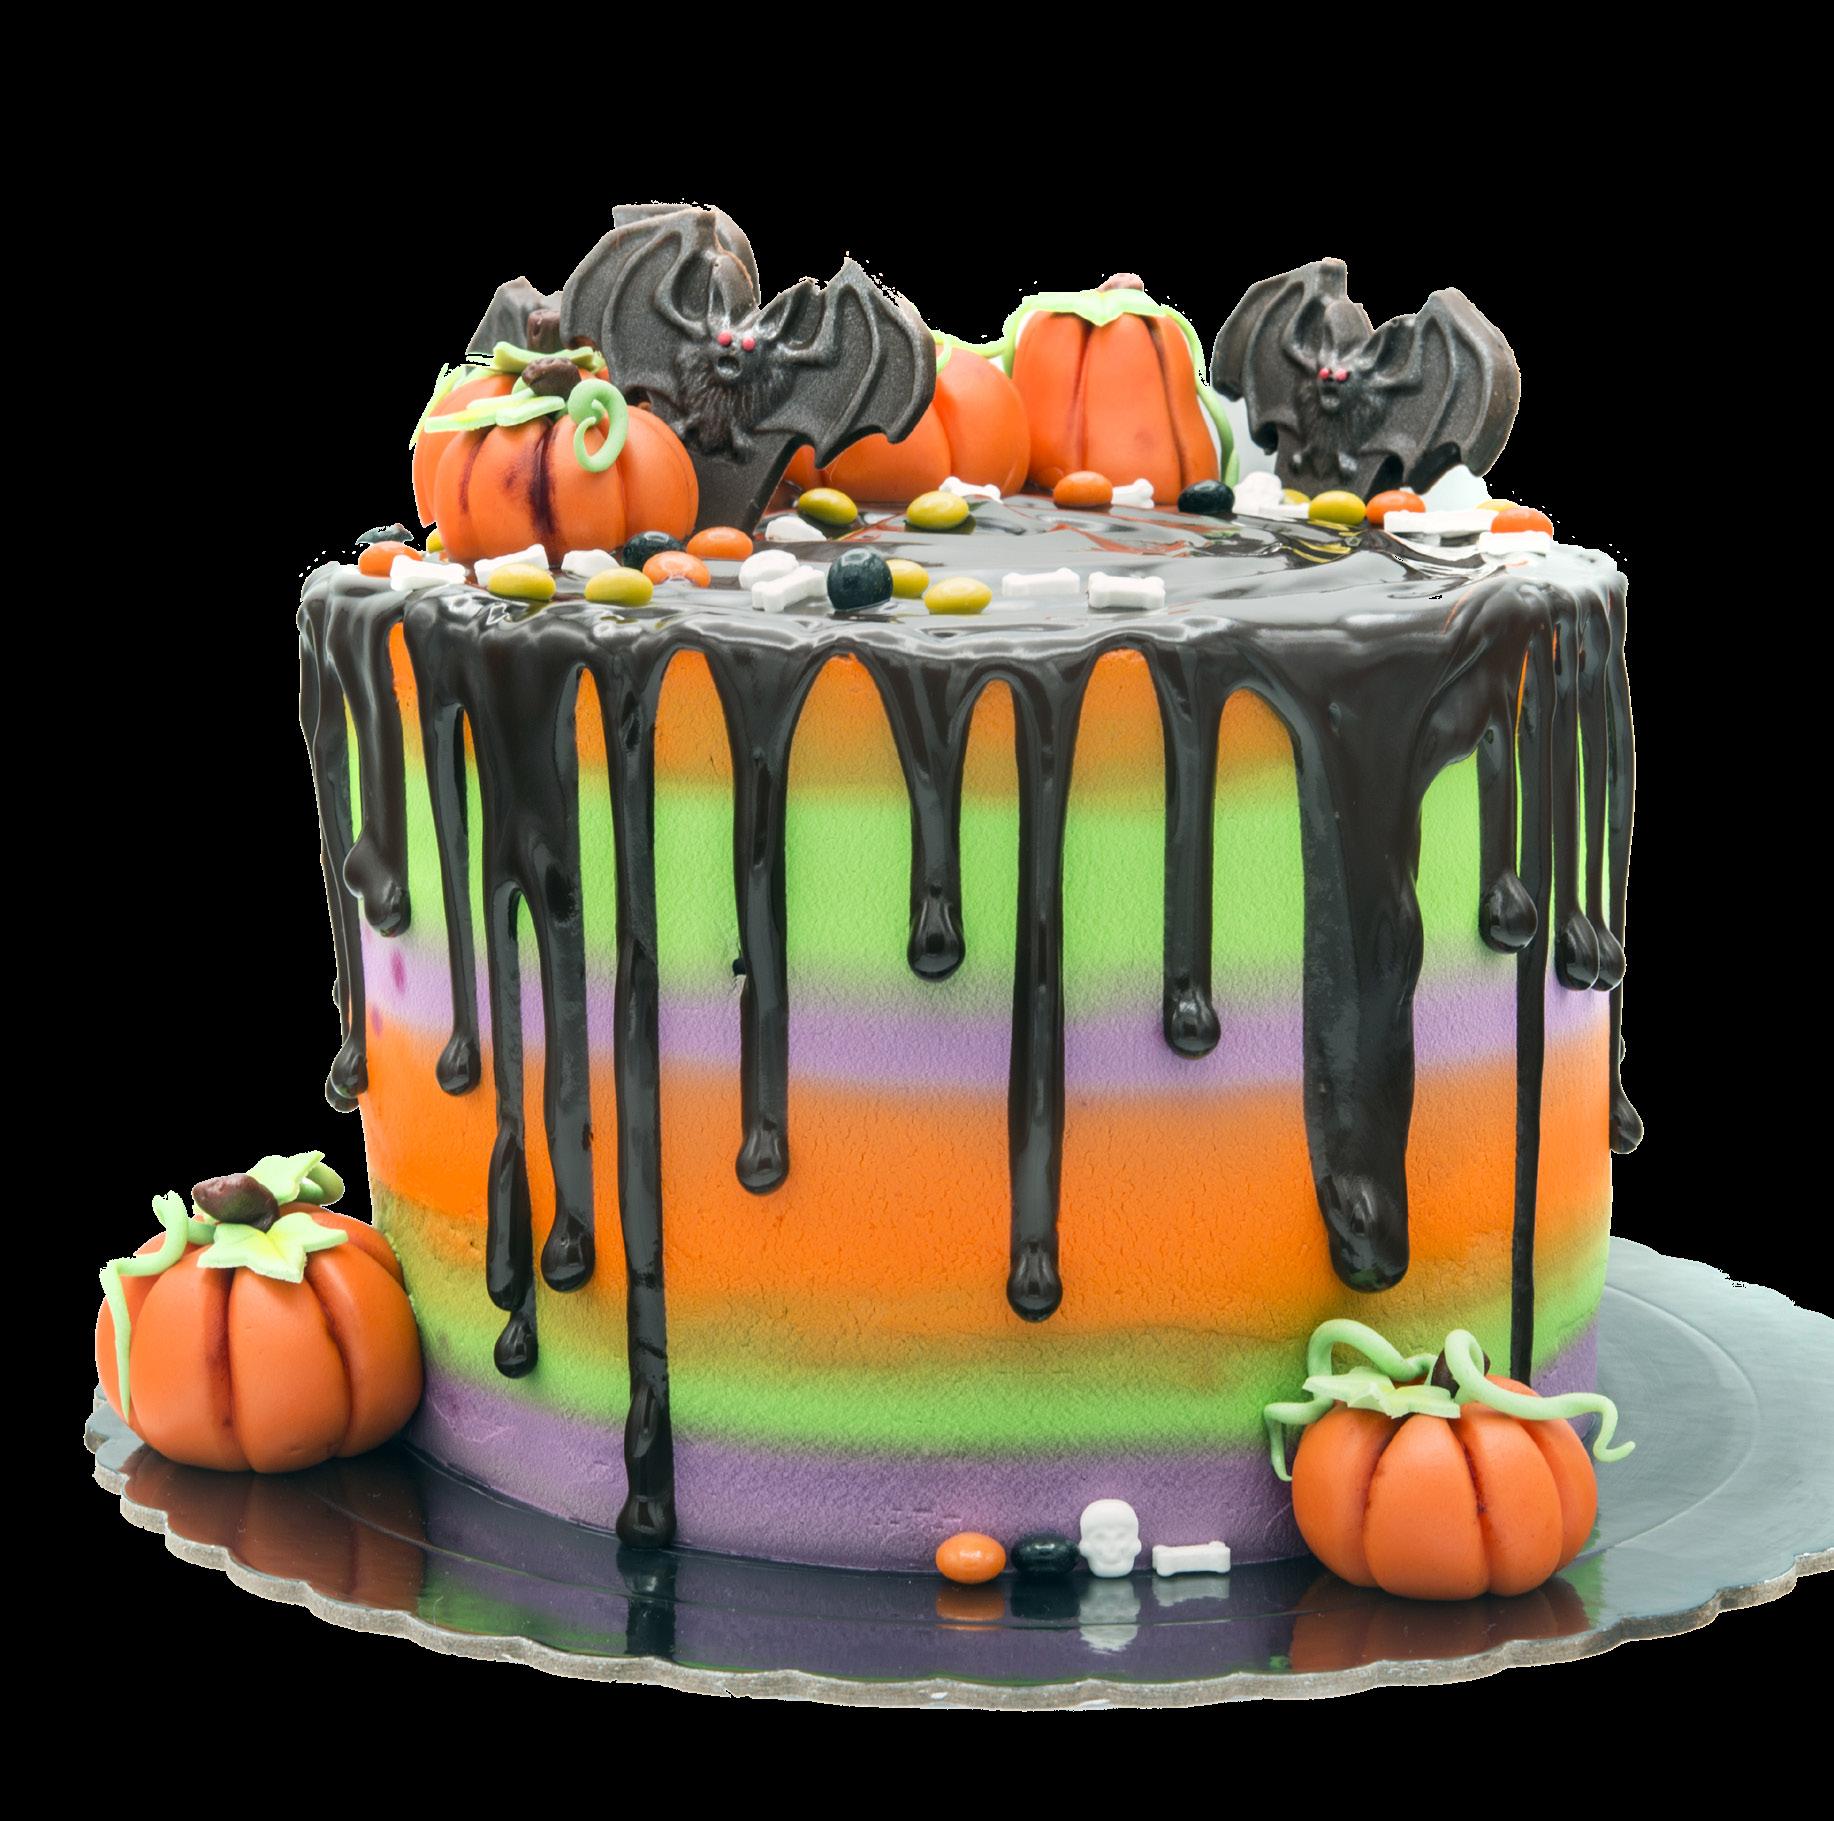
For example, if you specialize in upscale custom cakes, consider creating a limited-edition collection that blends seasonal flavors like salted caramel and cinnamon with dark, moody designs that feel luxurious rather than cheesy. For bakeries serving families and kids, colorful “monster” cupcakes, DIY cookie decorating kits, or playful “boo boxes” bursting with fun surprises might be a perfect fit. Remember, every product you launch during Halloween is a reflection of your brand identity. By aligning your offerings with your ideal client’s tastes and values, you’re not just selling a treat, you’re inviting customers into your world and setting the foundation for a relationship that extends far beyond October.
It can be tempting to focus solely on fulfilling those Halloween orders flooding in and miss out on the golden opportunity of capturing your customers’ contact information. Resist the urge to skip this step. The payoff can be worth far more than the few seconds it takes. Think of this process as your own trick-or-treat moment where you gather little goodies that will keep your business thriving long after the season ends. Make it easy and enticing for customers to share their email
addresses or follow your social media accounts. For instance, include a beautifully designed card inside each Halloween order inviting customers to join your mailing list in exchange for exclusive sneak peeks or early access to upcoming holiday specials. You could offer a small incentive such as a discount on their next order, a free recipe download, or an entry into a festive giveaway to encourage sign-ups.
If you take orders online or in-person, incorporate clear, friendly prompts to collect names, emails, and even birthdays to personalize future marketing. This information allows you to nurture relationships long after the last pumpkin has been carved.
Additionally, consider using social media calls-to-action, like encouraging customers to tag you in their Halloween treat photos, which not only spreads word of mouth but also builds community around your brand. Every piece of contact information you gather is a direct line to reconnect and remind clients of your amazing creations throughout the year.
A beautifully frosted cake or creatively themed treat is just the beginning. Those details catch the eye, but what truly lingers in a customer’s mind is how you make them feel from start to finish. The product is important, but the experience is what transforms a one-time purchase into a longterm relationship.
Think about the small touches that elevate the process. Were your pickup instructions clear and easy to follow? Did your packaging
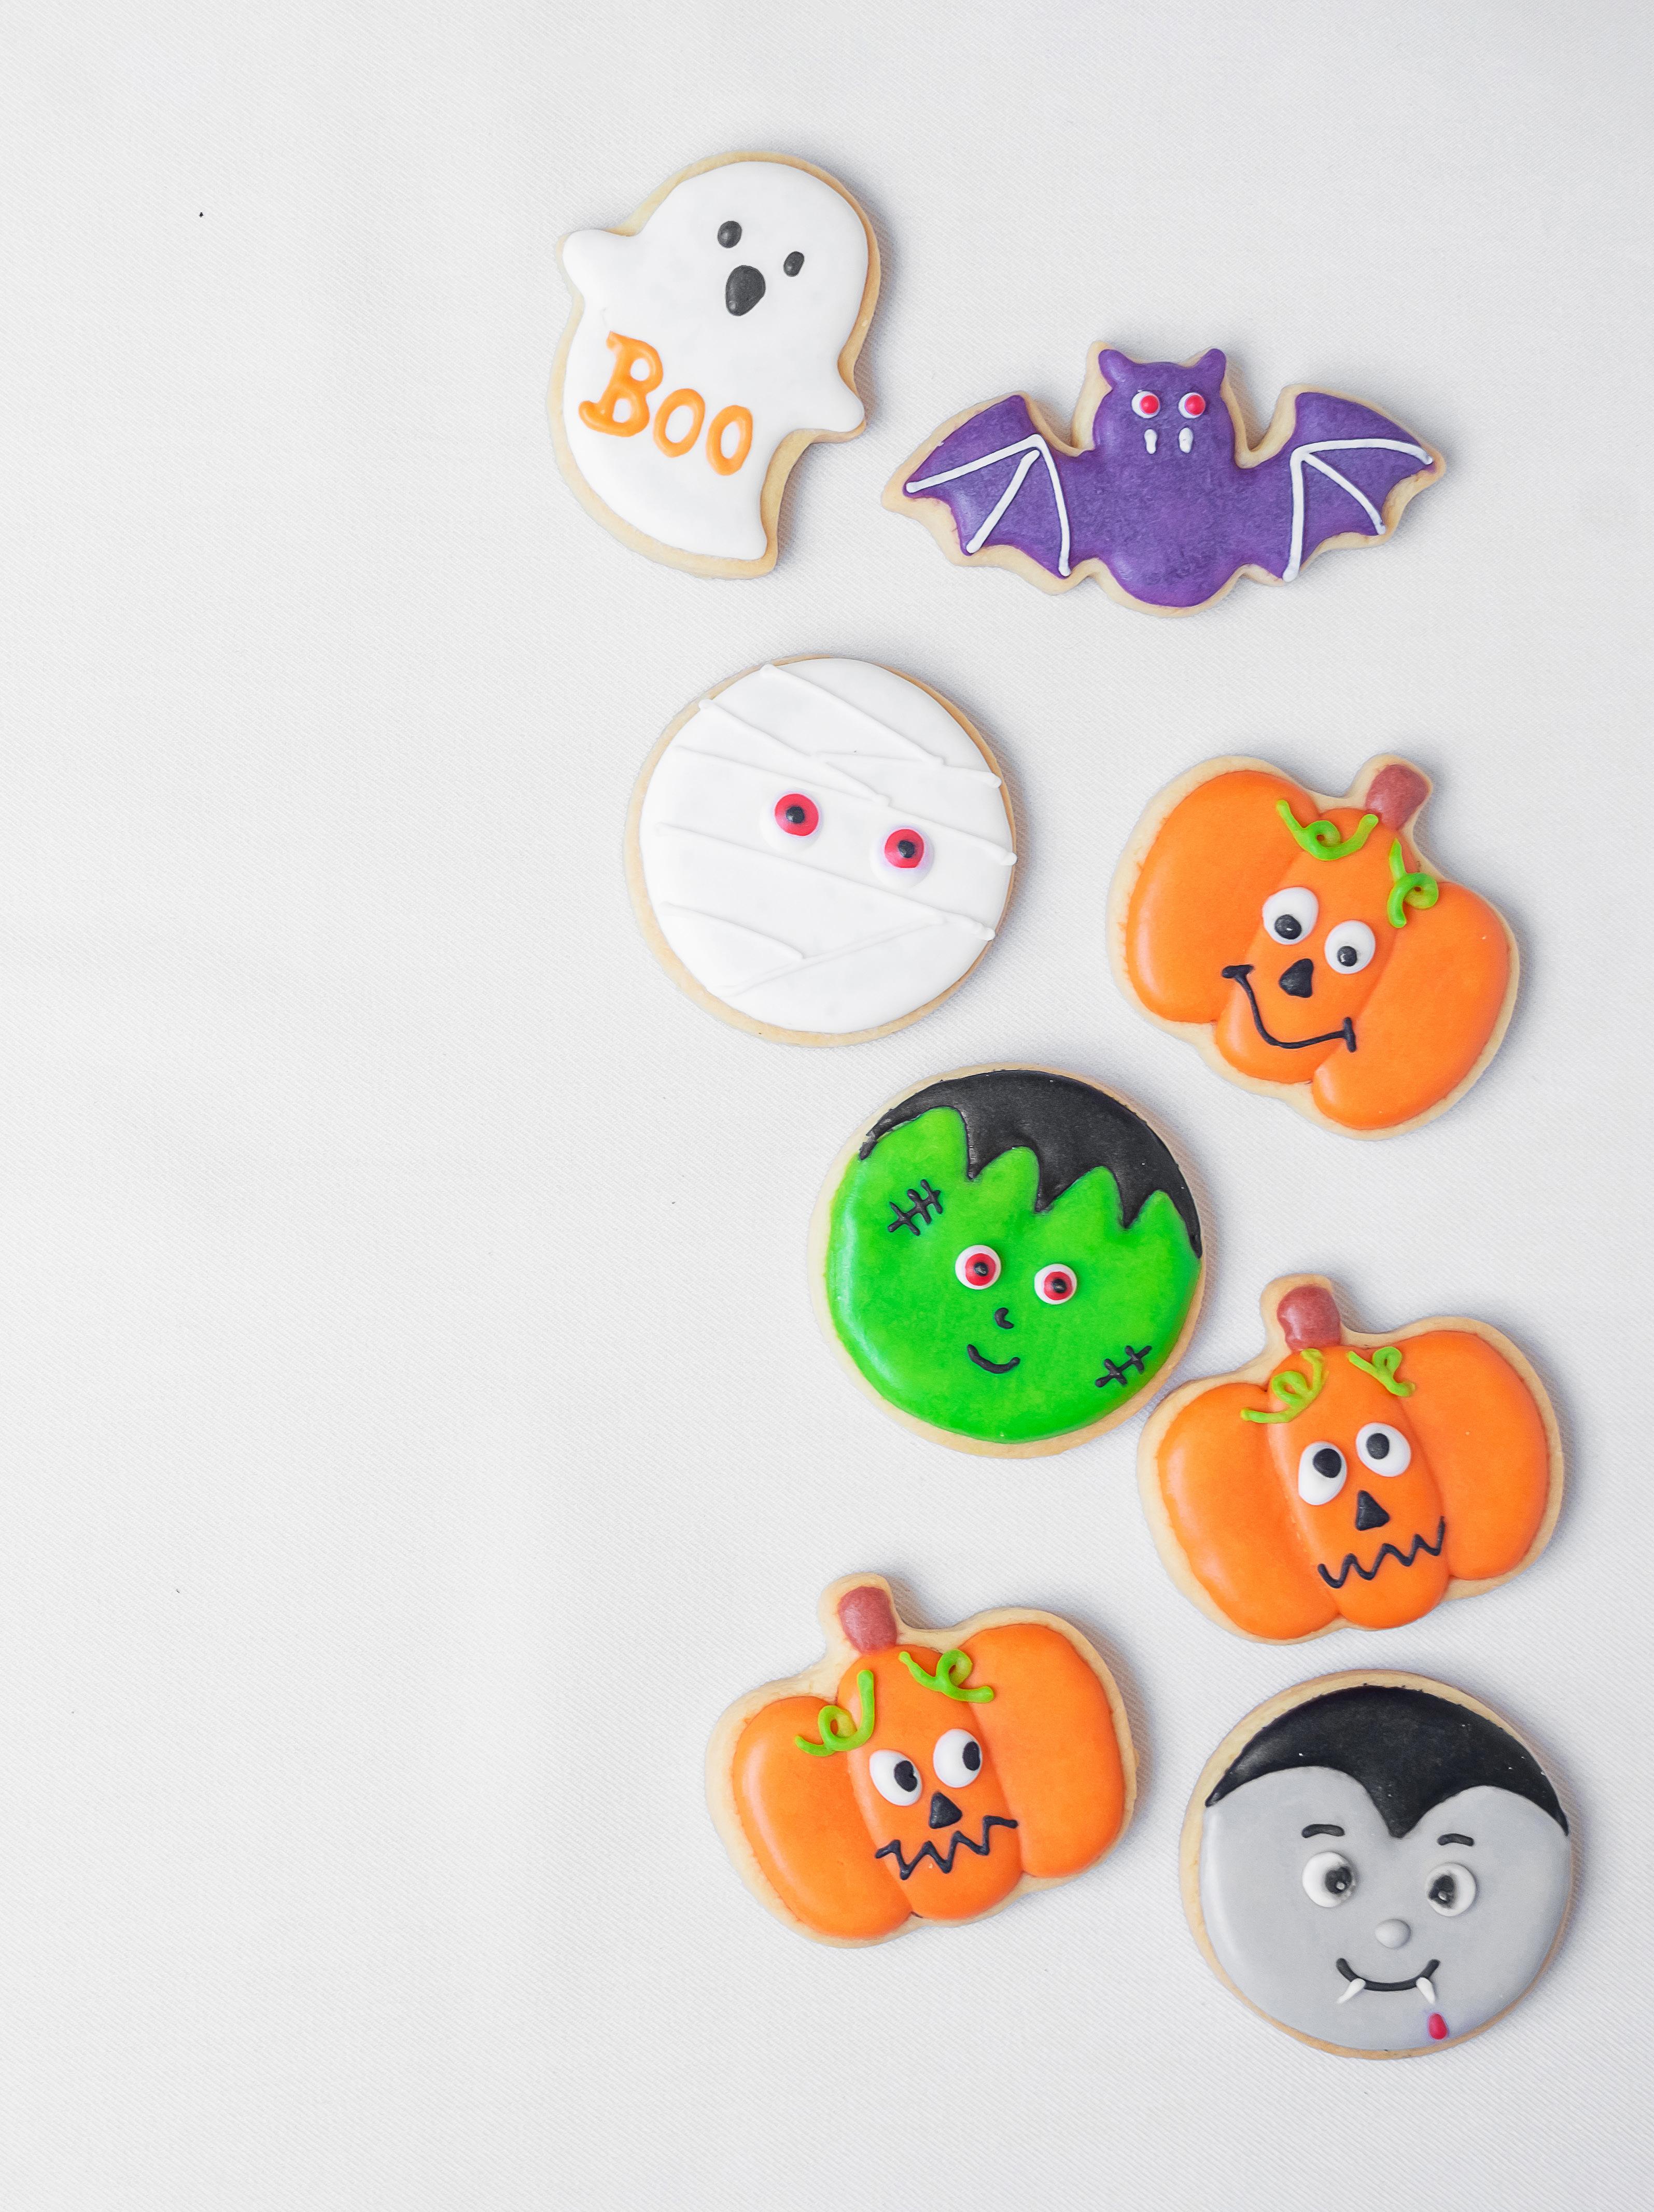
Include something they’ll remember you by like a sweet note or a cookie!
not only protect the product but also add a festive, thoughtful flair that made opening it feel like unwrapping a gift? Did you slip in a sweet note, a thank-you card, or even a small surprise, like a single cookie or sample, that made them feel valued and appreciated?
Every step in the buying journey is a chance to reinforce your professionalism, creativity, and care. These details don’t have to be elaborate or expensive, but they do have to feel genuine. When people walk away not just satisfied with your work but delighted by the experience of ordering from you, they’re far more likely to return for birthdays, baby showers, graduations, and every holiday in between.
The week after Halloween is the perfect time to follow up while your treats are still fresh in your customers’ minds (and maybe even in their fridges). That short window is your best chance to keep the momentum going and turn seasonal excitement into an ongoing relationship.
Send a short, cheerful email with a sneak peek of your upcoming Thanksgiving or Christmas offerings. Share photos of your favorite Halloween bakes on social media and invite customers to tag you in theirs. You can even reward repeat orders by offering a small loyalty perk such as a “VIP preorder” window for the next holiday season, a returning customer discount, or a bonus item with their next purchase. Even a simple “We’d love to bake for you again!” message can make customers feel remembered and valued.
The goal is to remind them, gently
but clearly, that you’re here and ready to help make their next celebration special. By staying in touch and offering a reason to come back, you
can keep your business top-of-mind long after the costumes are tucked away and the last piece of Halloween candy has been eaten. ACD
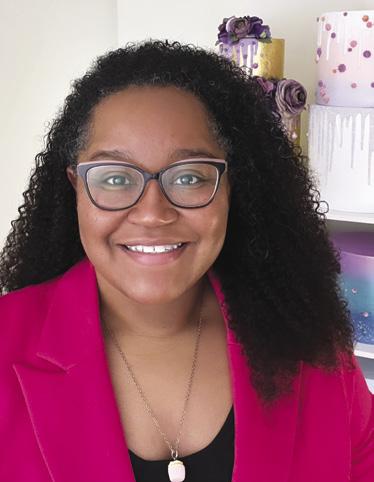
Cydni Mitchell Hodges (a.k.a. Cyd) is the chief operating officer and co-owner of the Sugar Geek Show, a recipe blog and online education platform for baking enthusiasts and sugar artists. Since 2014, Cyd has served as a food business coach through her brand Sweet Fest, an online company that supports the business needs of the sweet community in the areas of professional development, marketing, branding, and web design. By trade, Cyd is an accountant and a financial analyst with a master’s degree from the Kenan-Flagler Business School at the University of North Carolina at Chapel Hill. She is the founder of the Sugar Coin Academy, an online business academy for business owners in the baking and sweets industry, and she is also the organizer of The Ultimate Sugar Show, Georgia’s largest annual baking and sweets expo in Atlanta. She is also the business blogger for the Retail Bakers of America and a columnist for American Cake Decorating thesweetfest.com • facebook.com/thesweetfest • instagram.com/sweet_fest

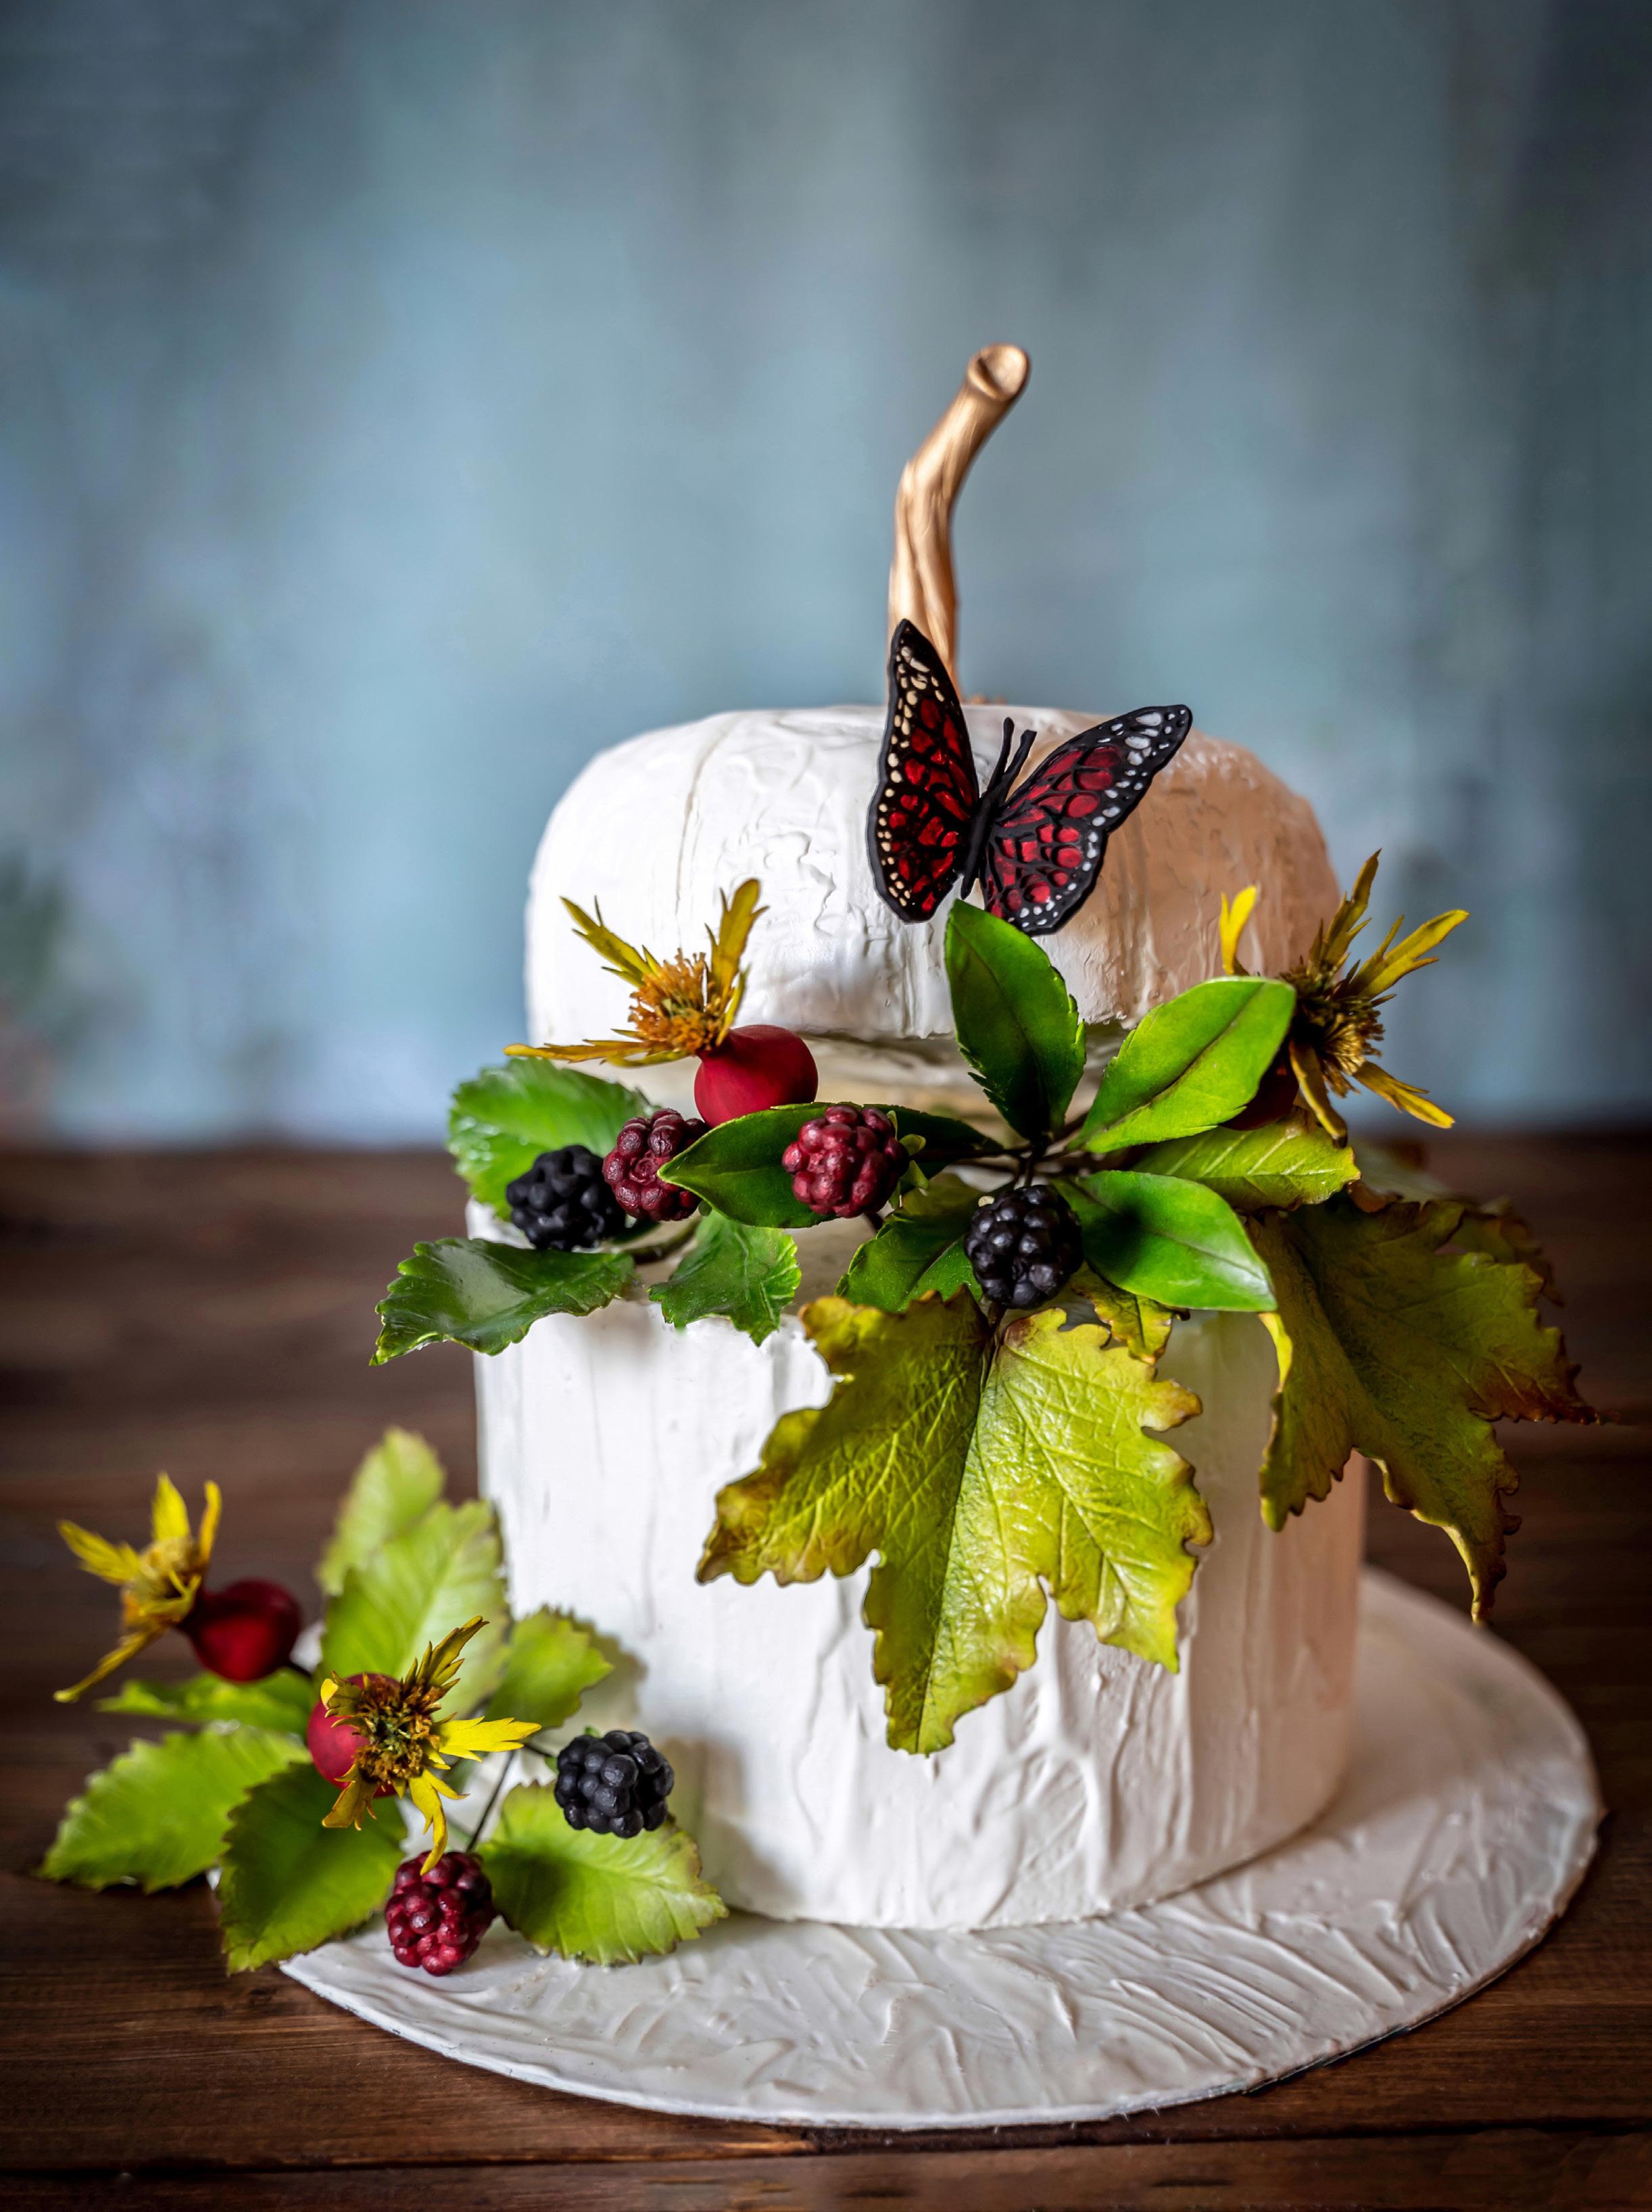
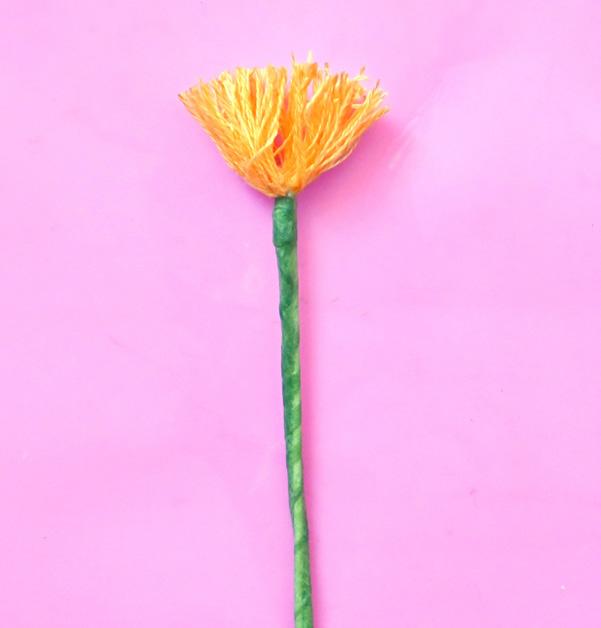
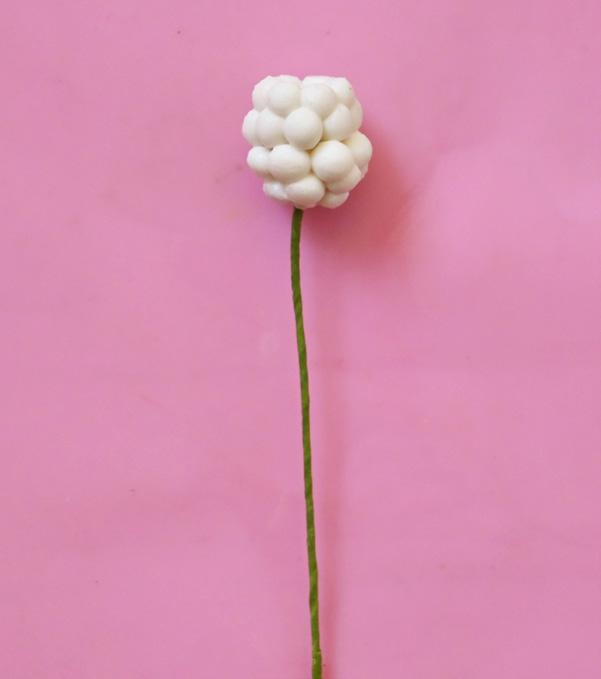
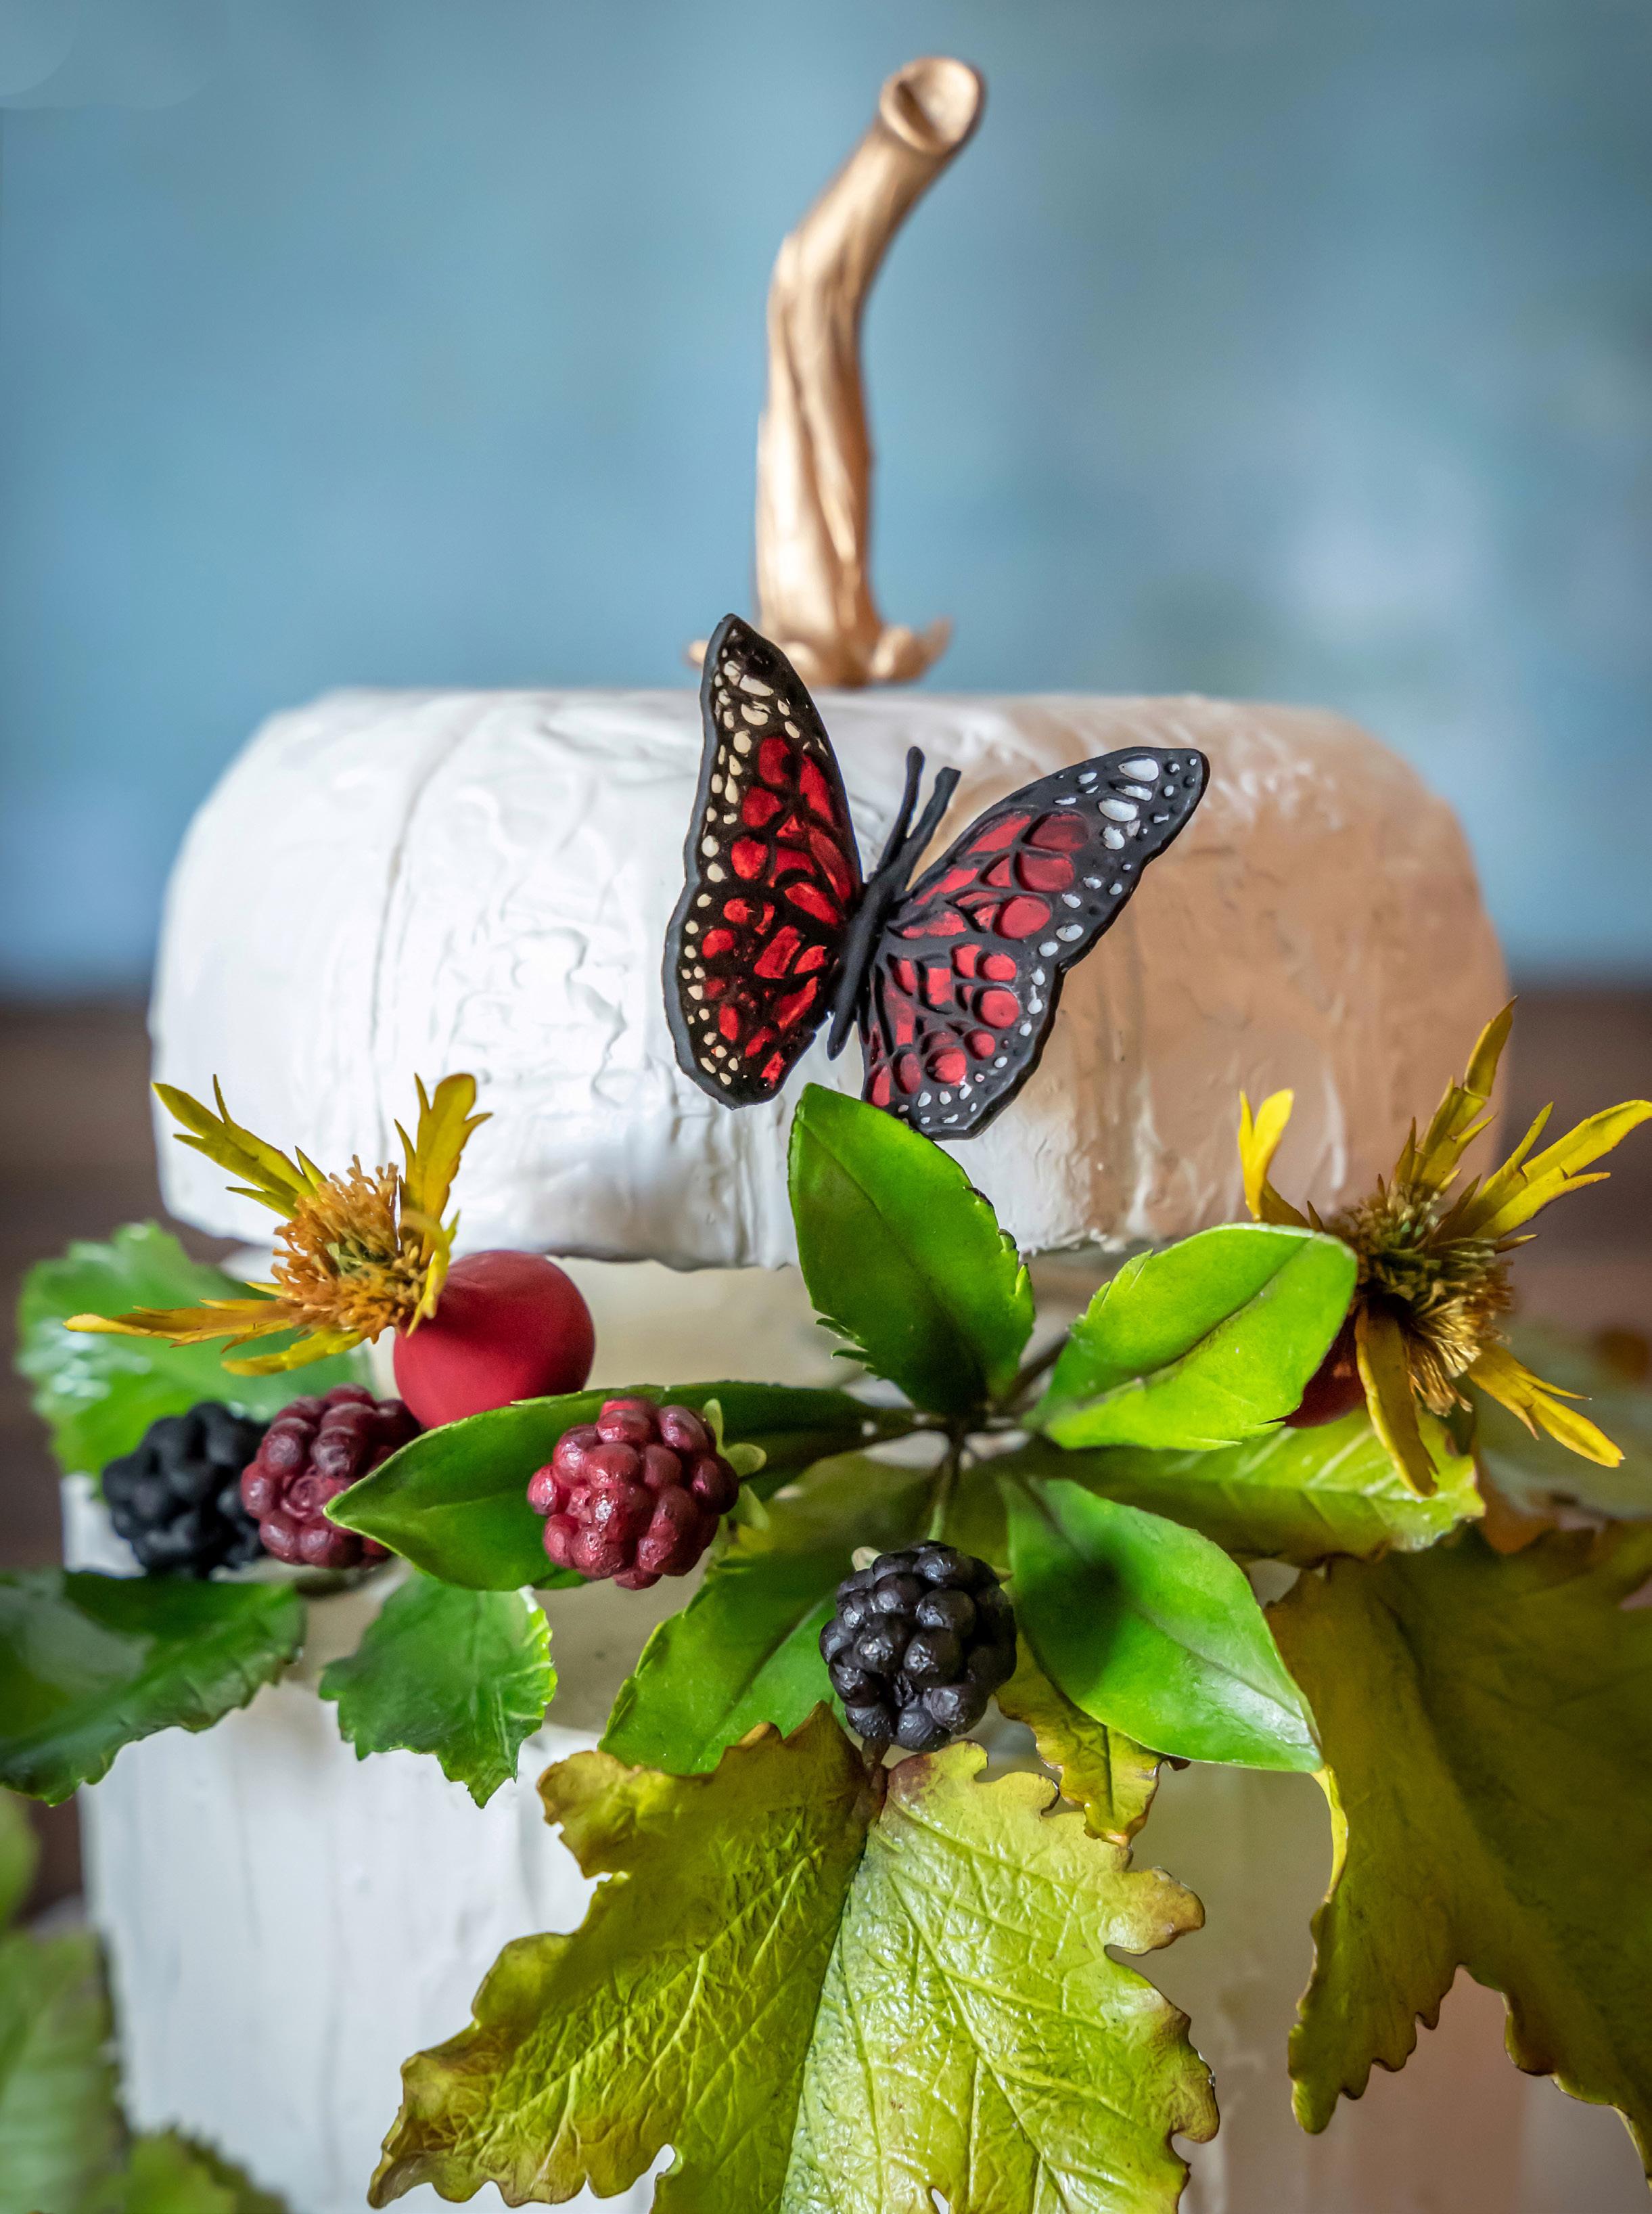
BY VERONICA SETA
Seasonal sprays don’t have to feature large flowers. Show off small fillers instead!
Edibles:
Pale green gum paste (Satin Ice)
Edible glue
Petal dust: chocolate brown, foliage green, aubergine, ruby, black, and burgundy (Sugarflair)
Airbrush colors: green and yellow
White modeling paste
Alcohol
Edible glaze
Equipment:
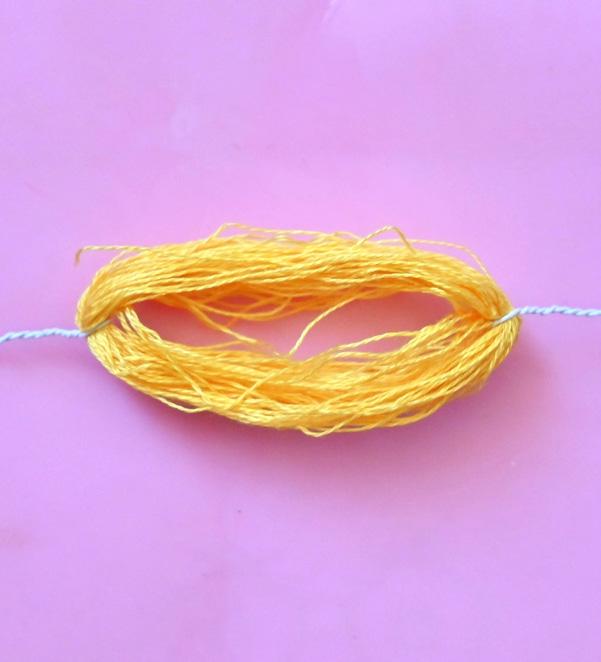
Pale lemon yellow cotton thread
CelPad
Flexi scraper (Flower Pro Collection by Katy Sue Designs)
Floral wires: 20, 22, 24, 28, and 30 gauge (Hamilworth)
Light green floral tape (Hamilworth)
Paintbrushes (Cerart)
Airbush
Tweezers
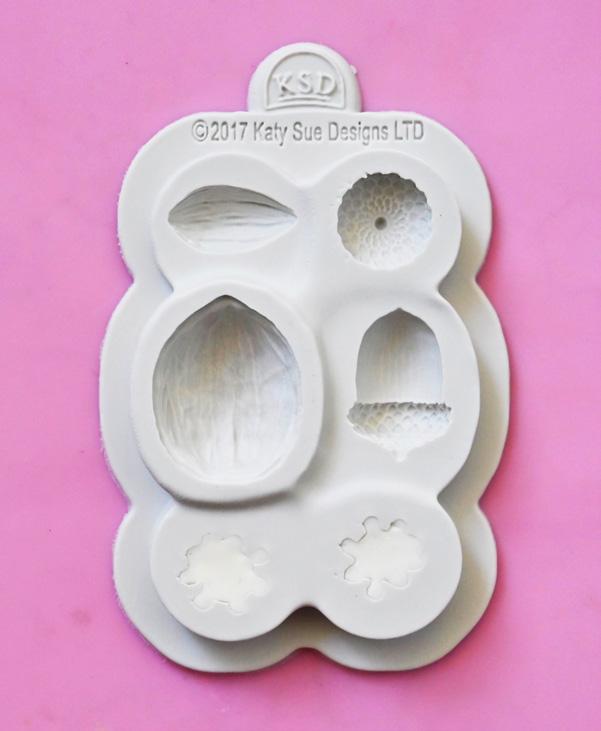
Measuring mold (Flower Pro Collection by Katy Sue Designs)
Toothpicks
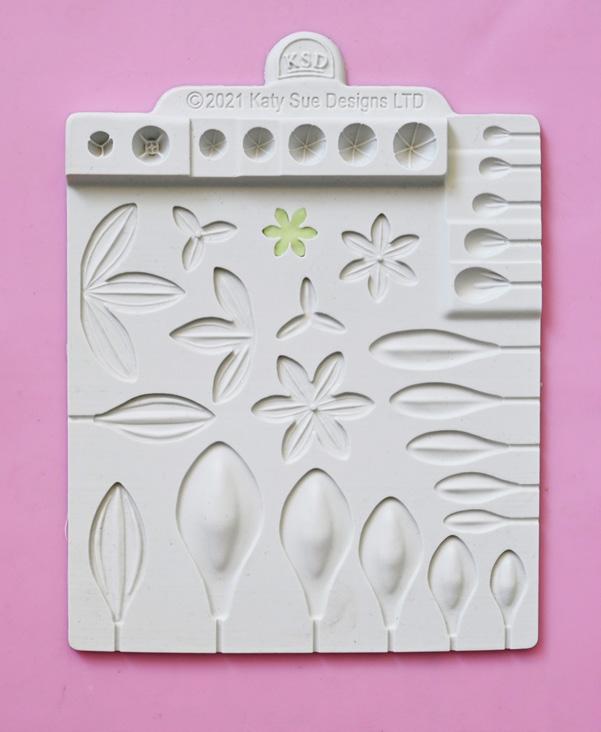
Blackberry and oak leaves mold (Flower Pro Collection by Katy Sue Designs)
Ultimate succulents mold (Flower Pro Collection by Katy Sue Designs)
Companion tool (Flower Pro Collection by Katy Sue Designs)
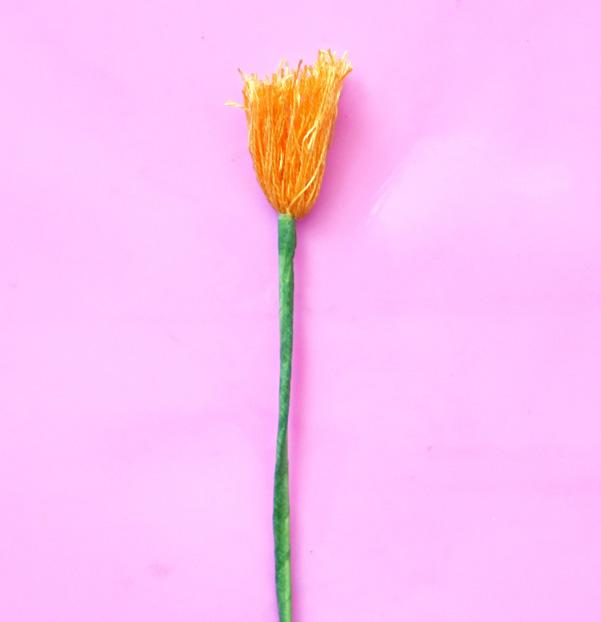
1. Wrap pale lemon yellow thread around the end of a flexi scraper 75 times.
2. Remove the thread from the scraper and attach each end of the loop by twisting two 28-gauge floral wires.
3. Cut the loop in half.
4. Add half-length 24-gauge floral wire and a 20-gauge floral wire. Tape the wires together with light green floral tape.
5. Cut the cotton to ¼ inch.
6. Dust the stamens with chocolate brown petal dust and the centers with foliage green.

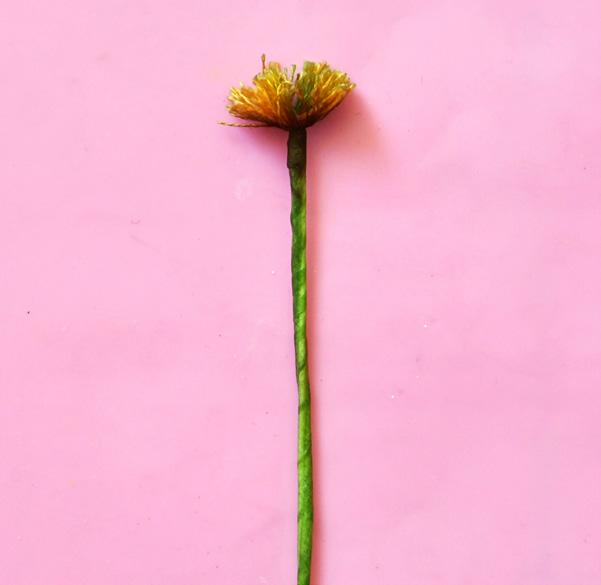
1. Cut three 30-gauge floral wires into 15 pieces total for the calyxes of 4 rose hips.
2. Roll a small ball of pale green gum paste. Dip the wire into edible glue and press it into the ball so the wire comes out at the other end. Roll the paste on the wire and into a thin sausage shape, about ¾ inch long.
3. Place the calyx onto the soft side of a pad and flatten it with the flexi scraper. With the shaft of a companion tool, widen the paste, pinch it to give it a taco shape, and cut the edges like a calyx. Repeat the process to create 15 in total. Set them aside to dry.
4. Airbrush each piece with a mix of green and yellow. When the colors are dry, dust the edges with aubergine petal dust and the base with chocolate brown.

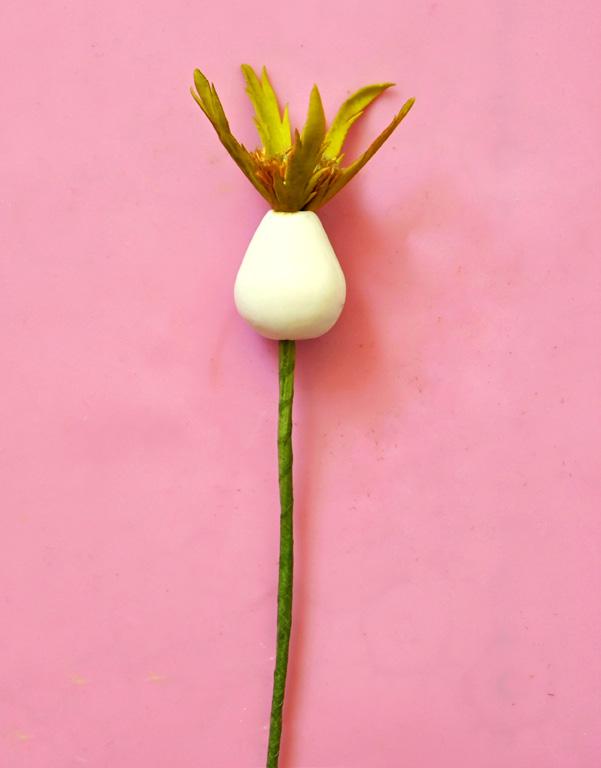
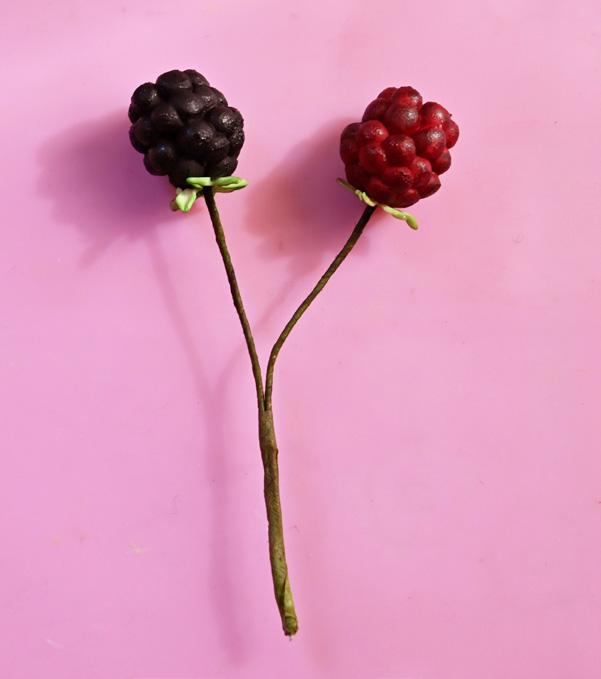
1. Assemble 5 calyxes around each stamen with the light green floral tape, bending them at a slight angle with a pair of tweezers. Color the tape with a mix of ruby and chocolate brown petal dusts.
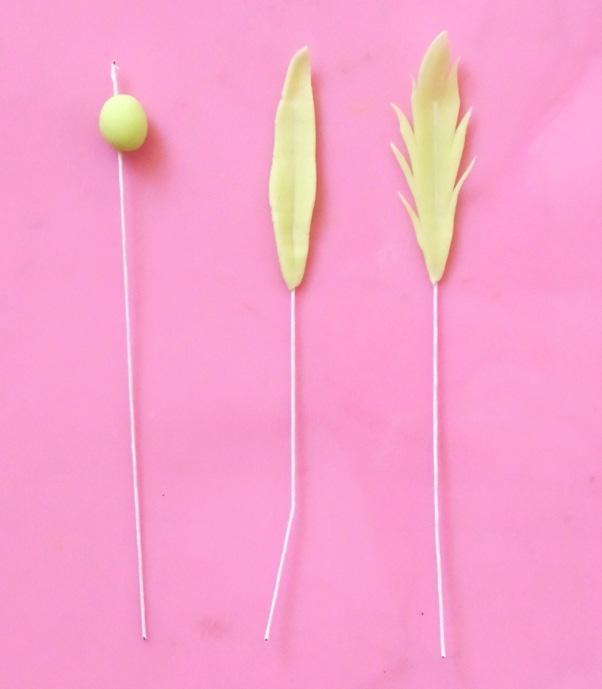
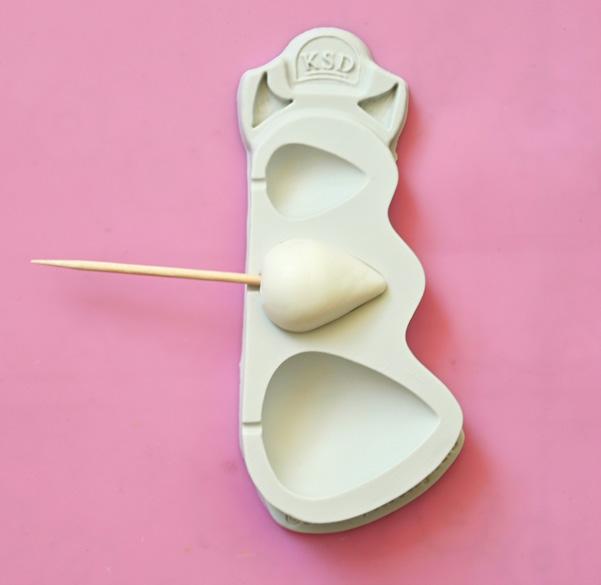
2. Take a small ball of white modeling paste and form a cone shape. Place the cone in the measuring mold’s #3 cavity to shape it. Press a toothpick through its center to create a hole.
3. Brush edible glue at the base of the calyx and insert it through the cone. Let it dry.
4. Dilute ruby petal dust in a few drops of alcohol and paint the rose hip. When the color is dry, dust the base and top of the rose hip with aubergine petal dust. Glaze it to set.
Tip: YOU
CAN ALTERNATE CURVEDUP CALYXES WITH OPEN ONES TO GIVE A MORE NATURAL EFFECT.

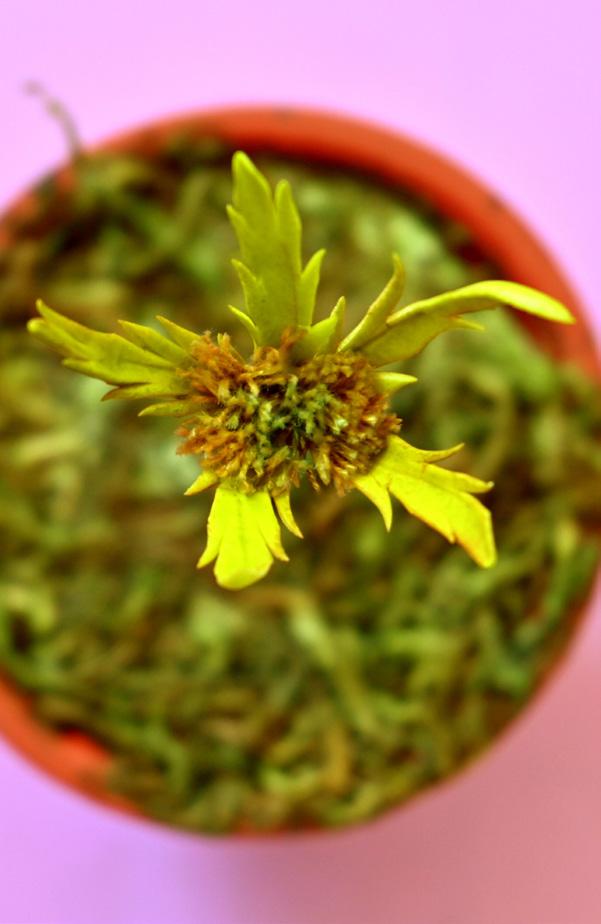
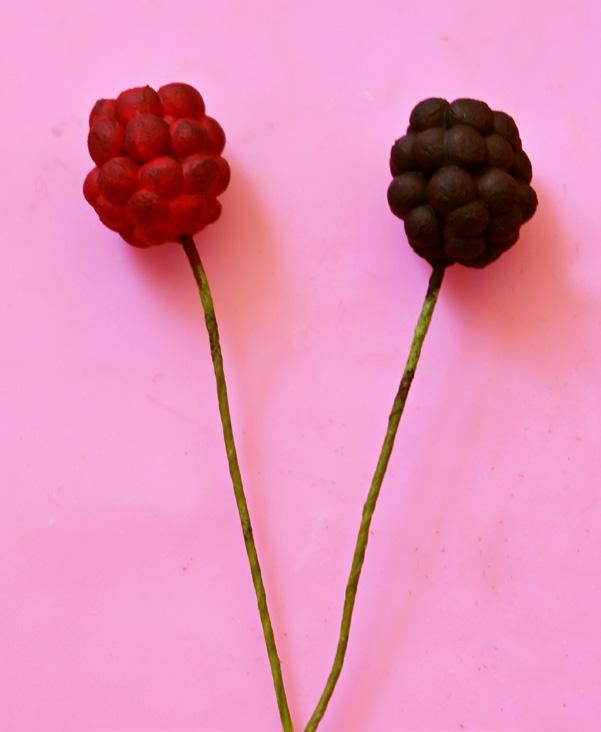
1. Press 2 small balls of white modeling paste in the blackberry cavities of the mold.
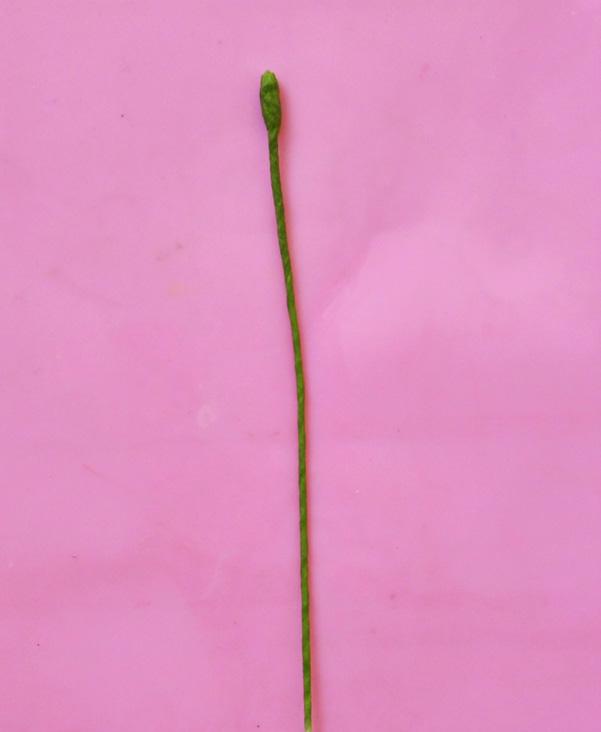
2. Wrap light green floral tape around the tip of a 22-gauge floral wire 10 times. Then, wrap the tape around the rest of the wire. Dust it with a mixture of ruby and aubergine petal dusts.
3. Dip the prepared wire in a bit of edible glue and press it into the topper part of a blackberry half. Spread more glue and stick the other part of the blackberry to the first half, smoothing and attaching the 2 pieces together very carefully to avoid misshaping them. Let it dry. Repeat to create more berries.
4. Dilute black and aubergine petal dusts in a few drops of alcohol and paint the blackberries. For lighter blackberries, paint with a mix of ruby and burgundy petal dusts diluted in alcohol. After they dry, enhance the red berries with aubergine petal dust.
5. Press a small ball of pale green gum paste in the calyx cavity of the succulent mold. Flex the mold and remove the paste very carefully. Thin the edges of the calyx with the companion tool and give it shape.
6. Spread a bit of edible glue on the center of the calyx and attach it at the base of the blackberry. Let the calyx dry before dusting it all around with foliage green petal dust. ACD
T
FROM
PLACE IT IN THE REFRIGERATOR FOR A FEW MINUTES.
REMEMBER TO MAKE A SMALL HOLE IN EACH PIECE BEFOREHAND SO THAT IT WILL BE EASIER FOR YOU TO INSERT THE WIRE.
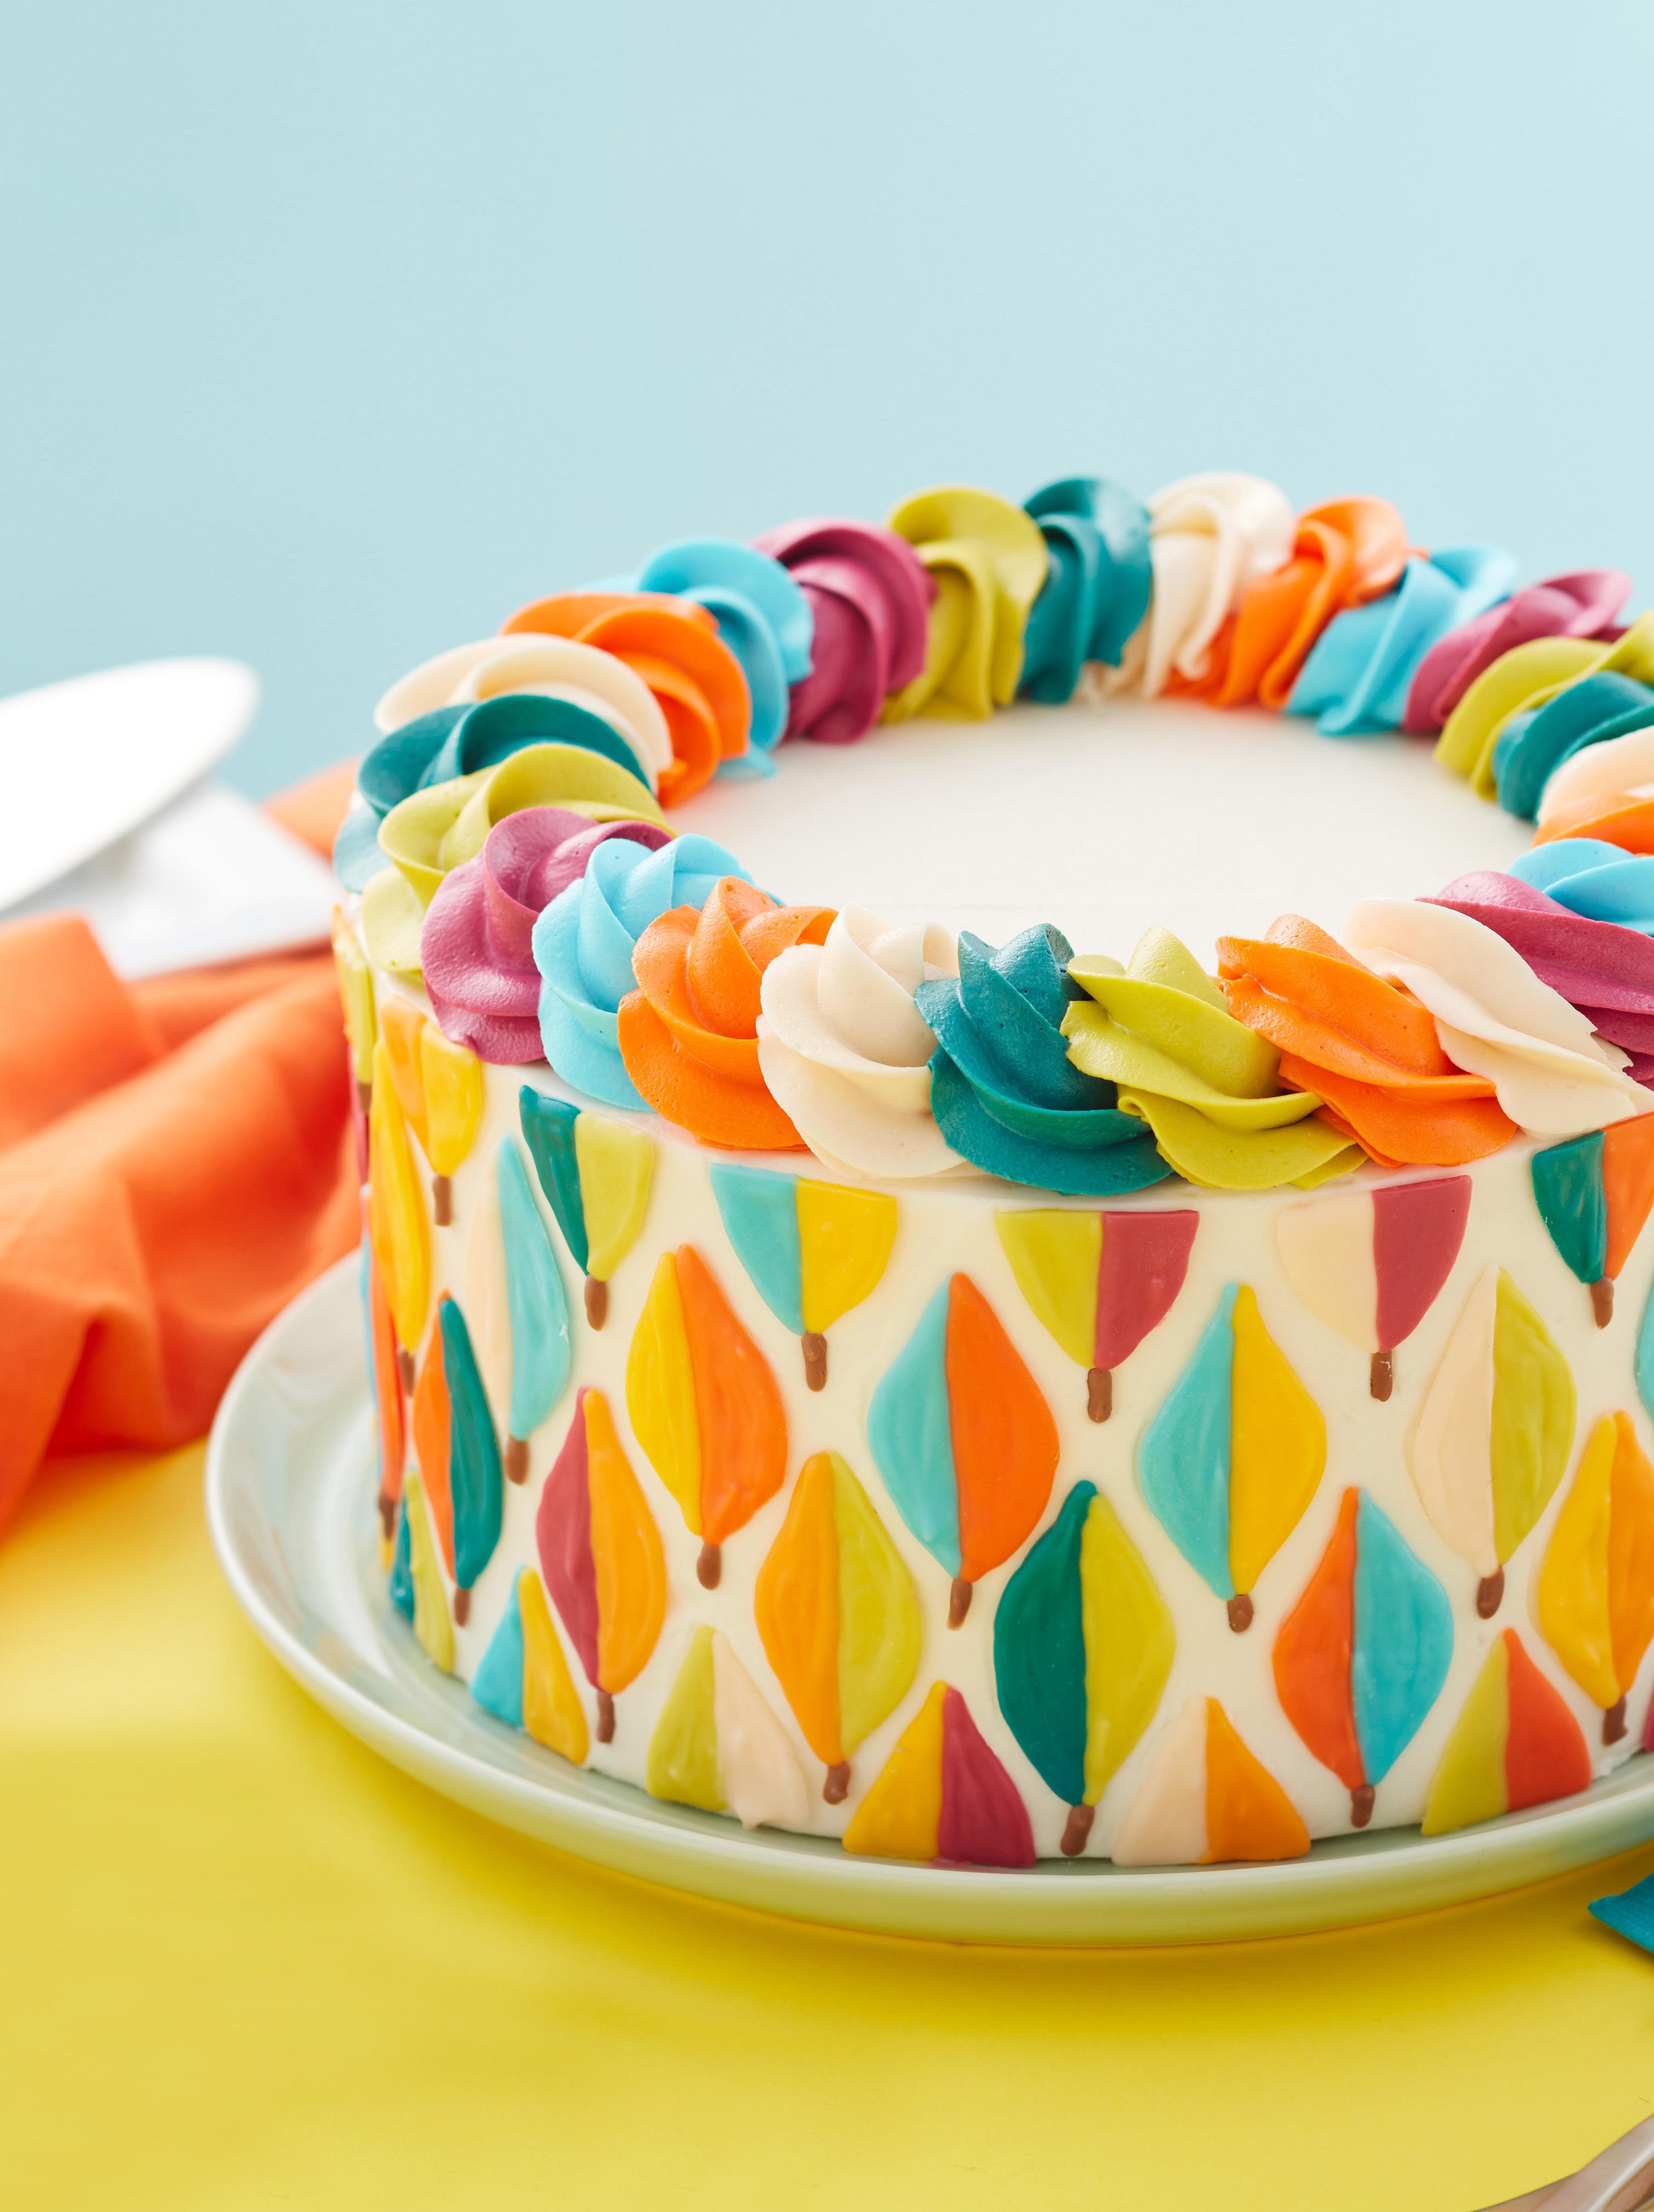

BY WILTON SWEET STUDIO
Decorated in bold jewel tone colors, this cake is perfect for any fall holiday or celebration. Two-tone leaves are made using candy melts, then are arranged in a pattern around the edge of the cake. A swirl border in alternating colors adds a crowning touch to this delicious dessert.
LEVEL:
Edibles:
Candy melts: yellow, orange, white, vibrant green, blue, light cocoa, bright pink, turquoise, and green (Wilton)
Candy color: yellow, red, and blue (Wilton)
Light cocoa candy melts drizzle pouch (Wilton)
Cake
Creamy white decorator icing (Wilton)
Icing color: golden yellow, leaf green, orange, red, rose, burgundy, juniper green, royal blue, kelly green, sky blue, and ivory (Wilton)
Equipment:
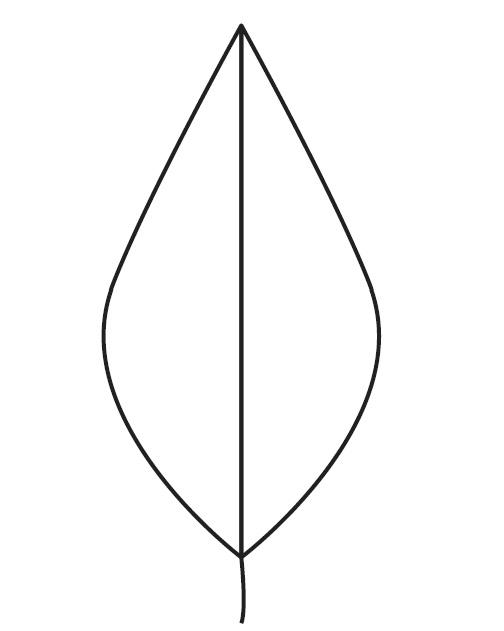
Leaf template
Cake board
Parchment paper
Parchment bags
Decorating bags
#1M piping tips (Wilton)
1. Print out the leaf template. Place it on a cake board, then cover it with parchment paper. Prepare 9 parchment bags, separately, with melted gold, yellow, light green, blue, ivory, vibrant orange, maroon, teal, and brown candy using the color combinations provided.
2. Alternating colors as desired (reserving brown for the stems), pipe leaves. Repeat for a total of 34 whole leaves, 17 top half leaves, and 17 bottom half leaves. Chill until set, about 20 minutes.
1. Level and stack cake layers for a 4-inch-tall cake. Ice the cake smooth.
2. Arrange the candy leaves around the cake, starting from the bottom and working toward the top. Keep the cake chilled.
3. Tint ½ cup of icing each light green, orange, maroon, dark teal, sky blue, and ivory using the color combinations provided.
4. Prepare 6 decorating bags with #1M tips and fill them with the icing colors. Using a spiral border technique, pipe a border around the top edge of the cake, alternating colors. ACD
Gold: 5 ounces yellow candy + 2 ounces orange candy + yellow candy color
Yellow: 3 ounces white candy + yellow candy color
Light green: 2 ounces vibrant green candy + 2 ounces white candy
Blue: 4 ounces blue candy
Ivory: 5 orange candy wafers + 2 light cocoa wafers from candy pouch + 4 ounces white candy
Vibrant orange: 3 ounces orange candy
Maroon: 2 ounces bright pink candy + red candy color + touch of blue candy color
Teal: 5 ounces turquoise candy + 2 ounces green candy
Brown: Remainder of light cocoa drizzle pouch
Light green: golden yellow + touch of leaf green
Orange: orange + touch of red
Maroon: rose + burgundy + red
Dark teal: juniper green + royal blue + kelly green
Sky blue: sky blue
Ivory: ivory
Check out Wilton Sweet Studio classes for more hands-on tutorials. Visit wilton. com/wilton-sweetstudio/classes.
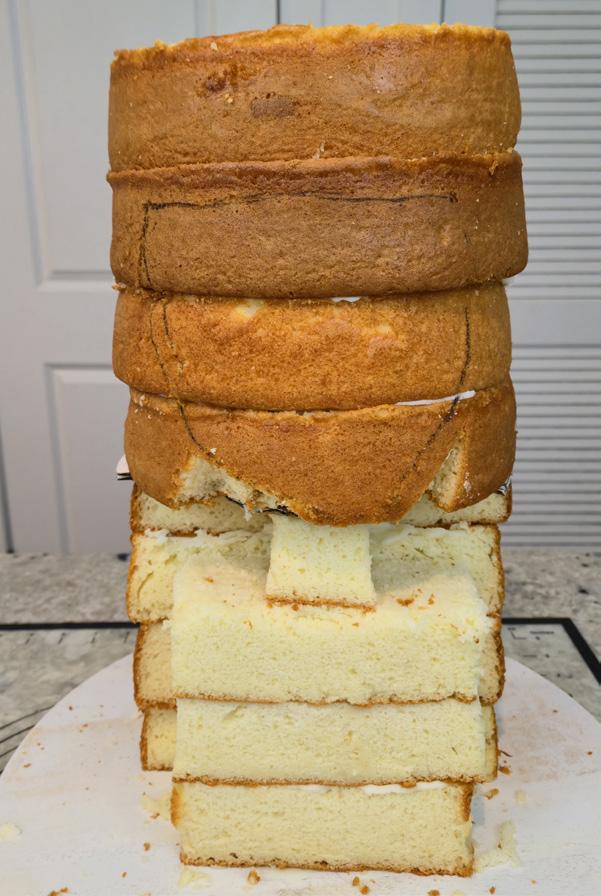
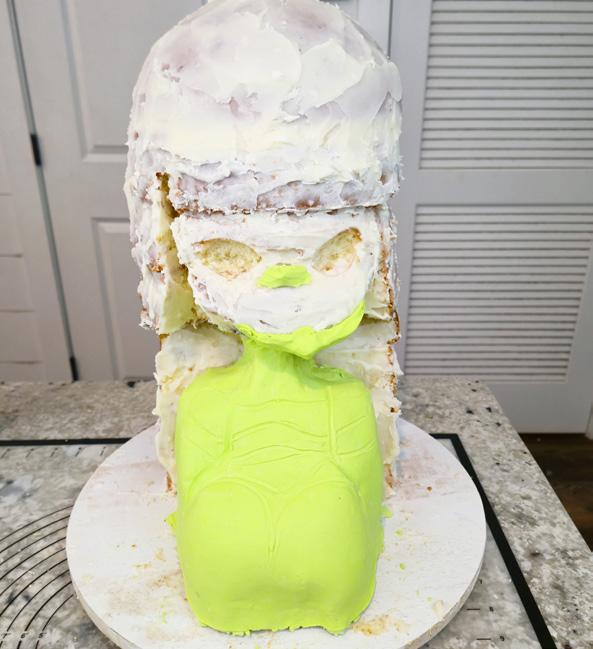
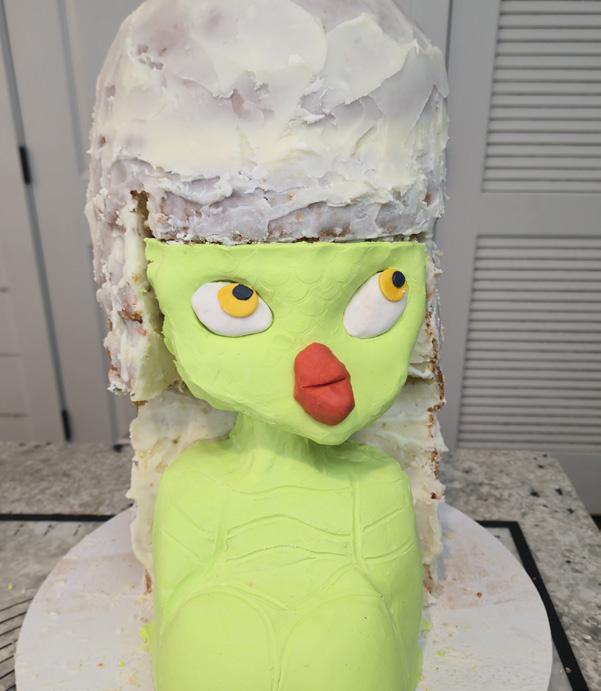
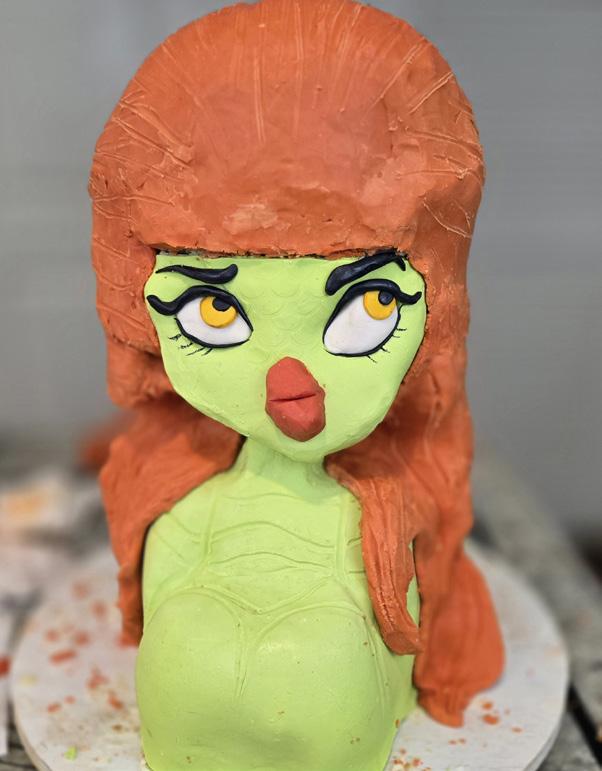
BY LAUREN BORQUEZ JONES
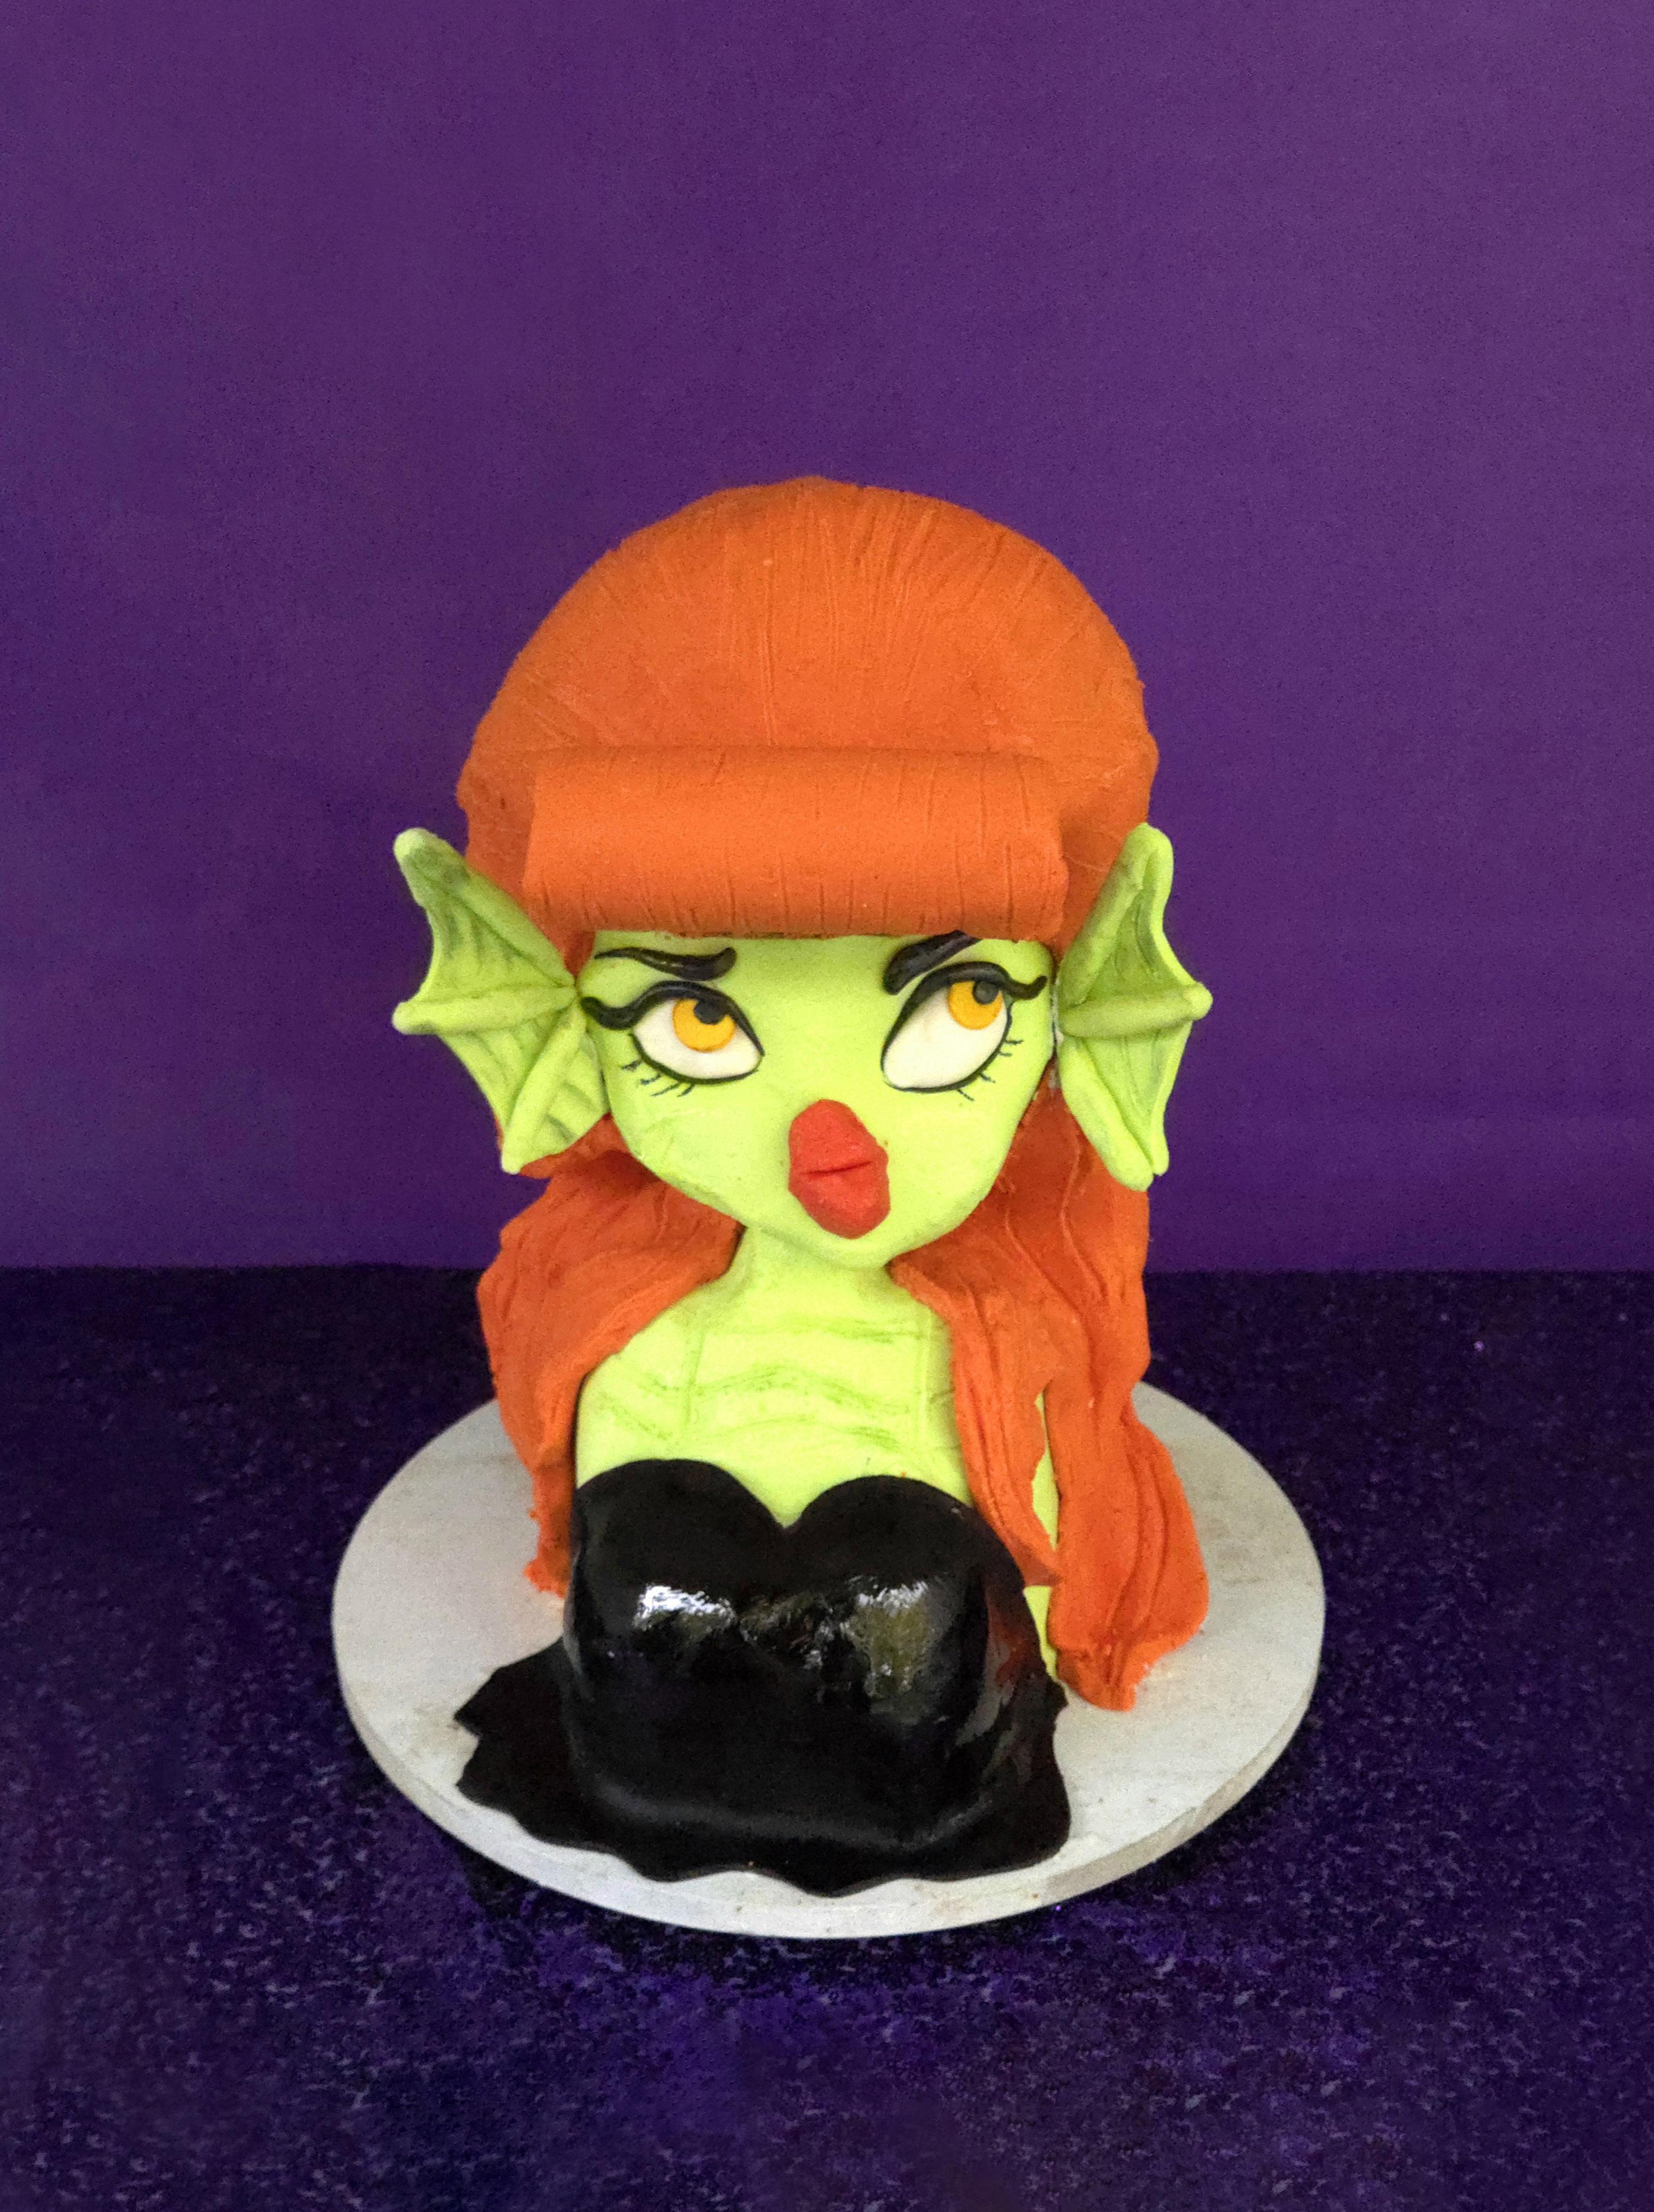
Carveyour way to a mysterious sea creature.
Edibles:
Cake: 10 (8-inch) rounds and 1 square
Ganache
Edible marker
Modeling chocolate: green and orange
Fondant: white, orange, and black
Gel food color: gold and black
Piping gel
Equipment:
Wooden cake drum
Threaded rod
Character template
Nuts and washers
Cake board
Knife
Rolling pin
Modeling tools
Scales impression mat
Circle cutter
Small paintbrush
Gill template
Toothpicks
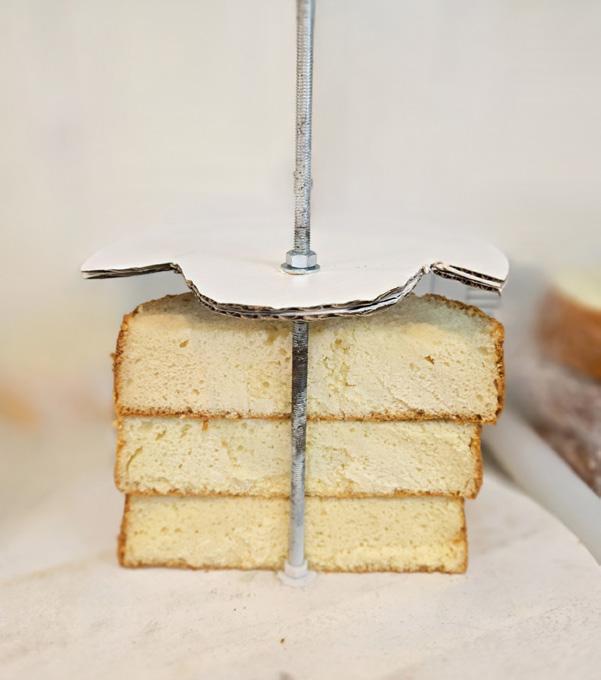
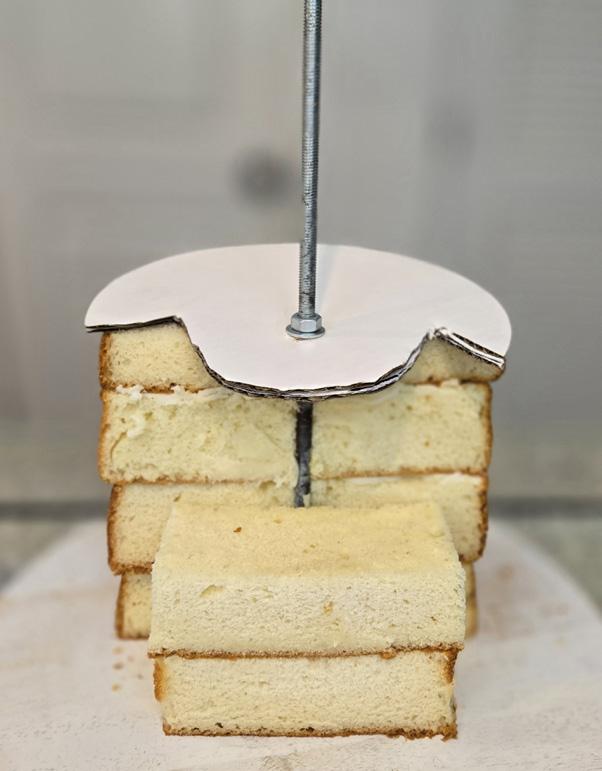
1. Assemble the cake stand. Make sure to secure a center rod into a wooden cake drum. Using your character template, place a washer and nut where the head will sit above the neck area.
2. On the sides of a cake board, cut out an area to make a prominent space in the front for the face to be supported. Slide your cut cake board down to the marked area and secure it with an additional nut and washer.
3. Cut 4 to 5 layers of round cake in half and stack them along the back of the cake under the cake board. This will be the creature’s hair. For a firmer structure, use ganache in between each layer of cake.
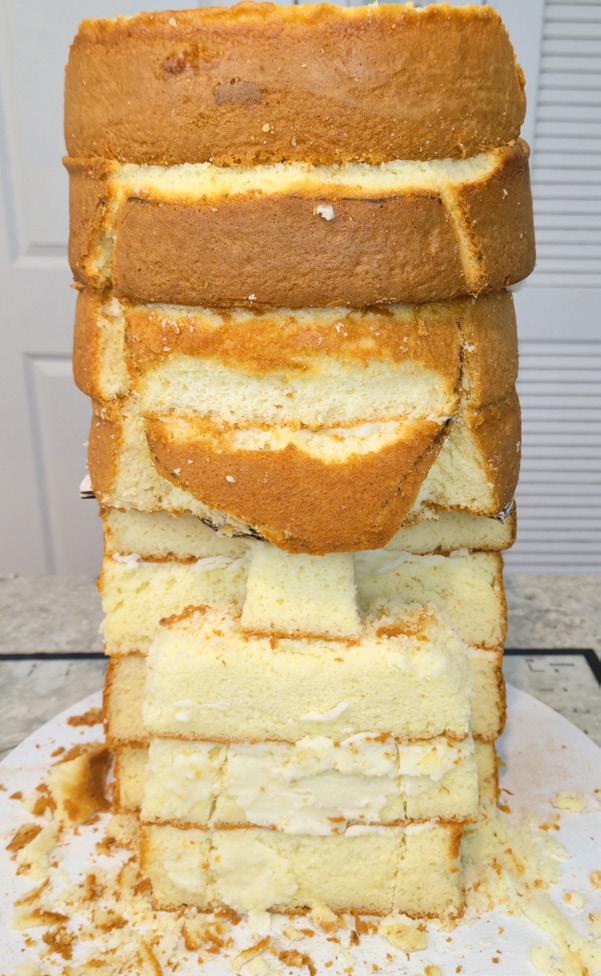
4. Begin stacking the front side of the cake with rectangular pieces to build up the chest area.
5. Cut a smaller rectangle for the neck area.
6. Stack and fill the cake layers for the head. Add about 4 round layers for the face and
the top of the hair. Use an edible marker to sketch out a template for the face.
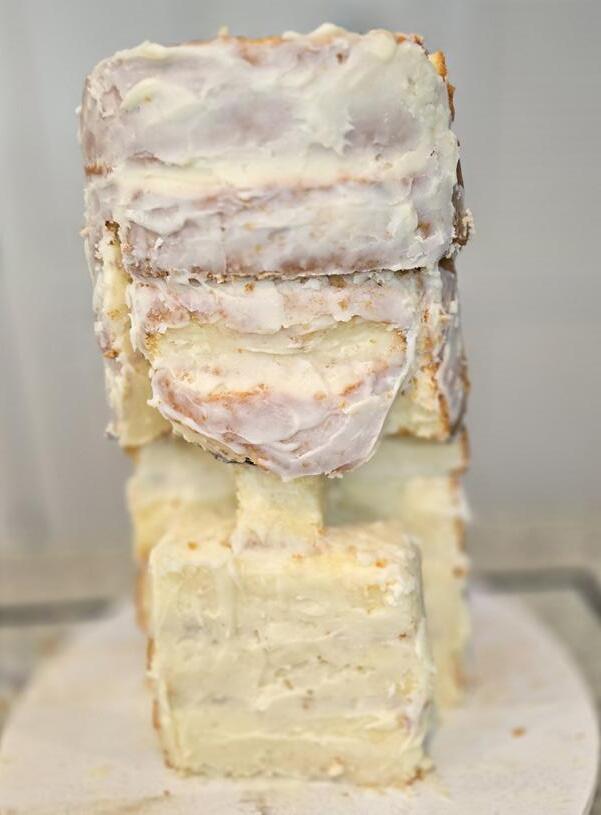
7. Begin carving out a face shape.
8. Continue to carve out the eyes and chest area. Then, cover all the layers in ganache.
1,2, &3
4
Lauren Borquez Jones, owner of Bunny Cakes, began her self-taught baking journey in 2022. Prior to delving into the confectionery world, her background was in event design. Her dessert tables were featured in numerous national publications. She also collaborated with brands such as Pottery Barn, Coke, Nabisco, etc. Taking the leap of creating the desserts she once styled and plated became a natural fit for her. French macarons and fondant cakes are her areas of specialty, but she can’t wait to see what future project might be in store. She has a love for themes and a keen attention to the smallest of details.
facebook.com/share/25NZcWkxNjFG188c/?mibextid=qi2Omg instagram.com/bunnycakestn
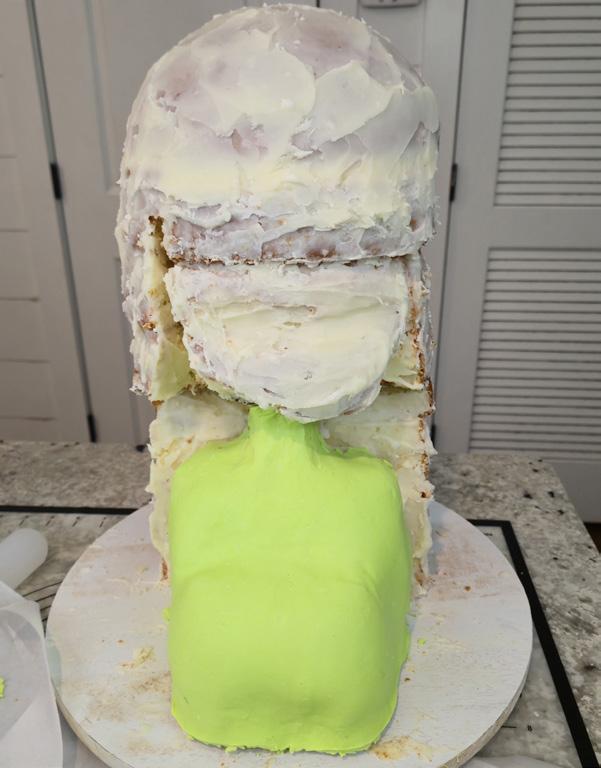
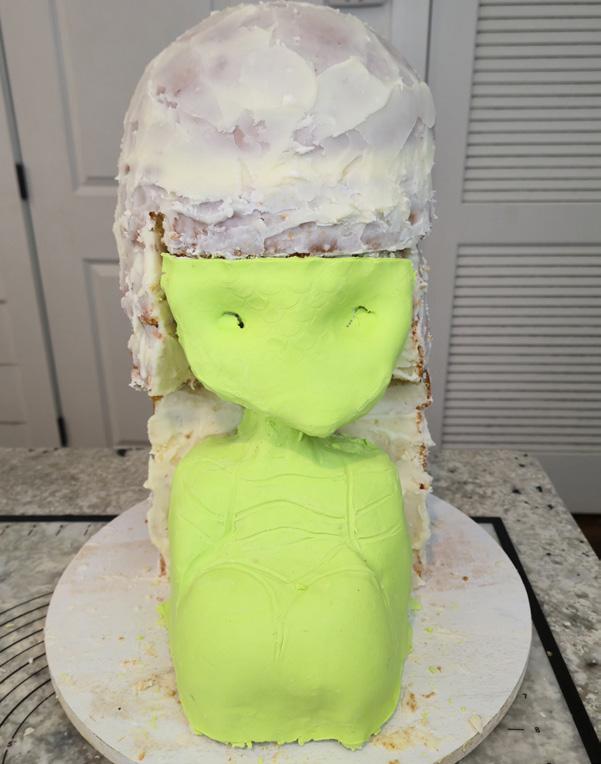
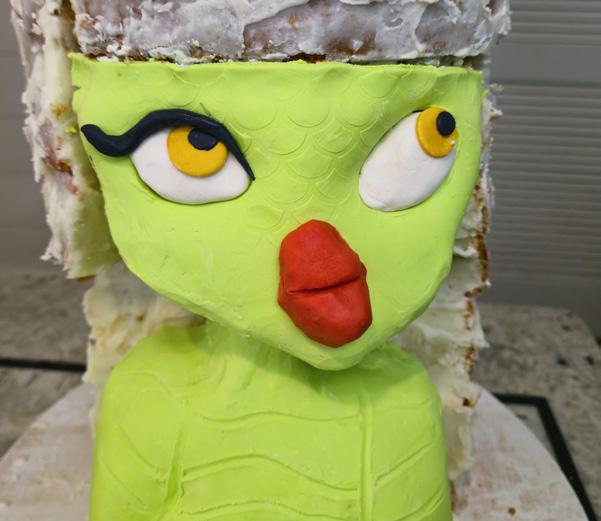
1. Roll out green modeling chocolate as thin as possible. Cover the body first.
2. Add pieces of green modeling chocolate to enhance the nose and chin. Then, cover the entire face.
3. Add details to the skin with a modeling tool and use an impression mat for the scales on the forehead.
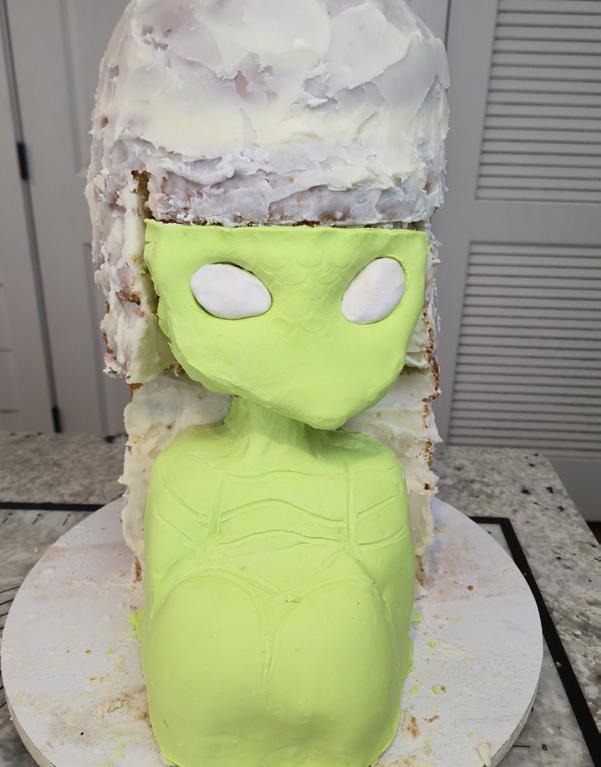
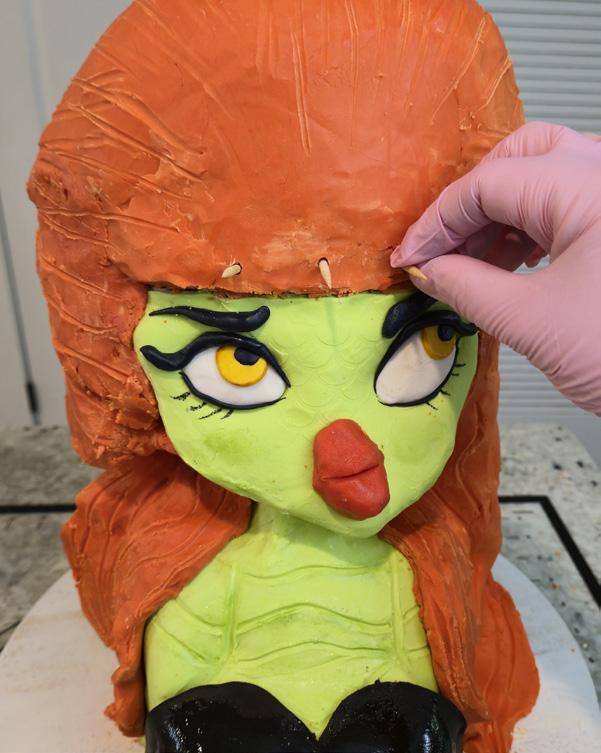
1. Use white fondant to fill in her eye area.
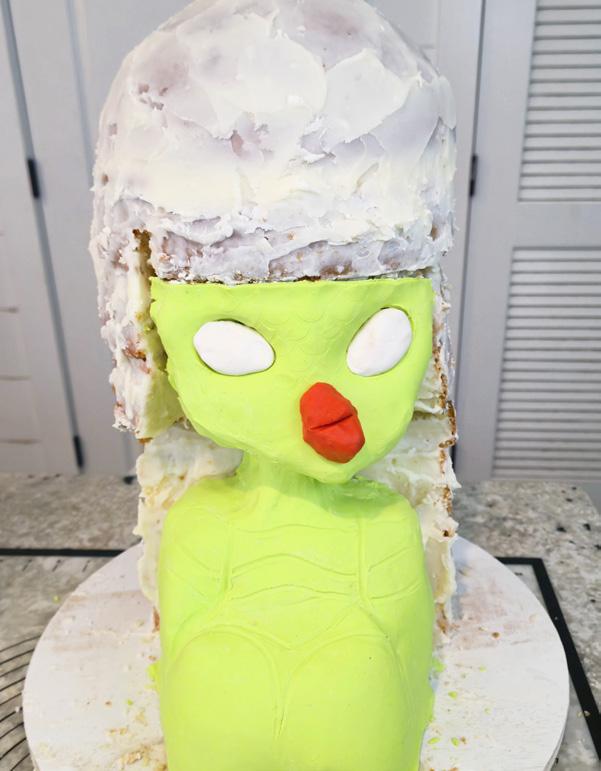
2 Roll an oblong ball of orange modeling chocolate for the mouth and create a crease in the middle to detail her lips with a modeling tool. Attach it to the face.
3. Use a circle cutter to cut out orange and black fondant for the irises and pupils.
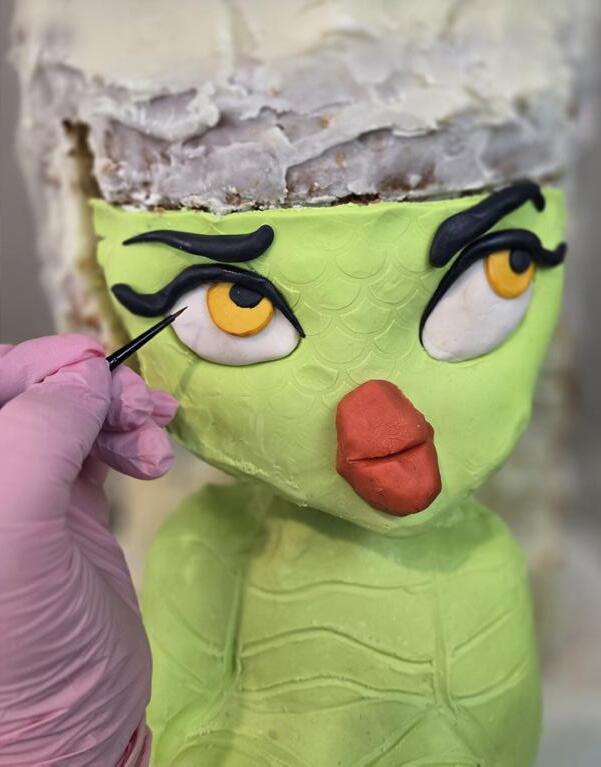
4. Roll out thin snake shapes for the eyeliner and eyebrows.
5. Add dimension to the eye area by painting diluted gold gel food color around the outside of each iris.
6. Paint bottom eyelashes with a small paintbrush and black gel food color.
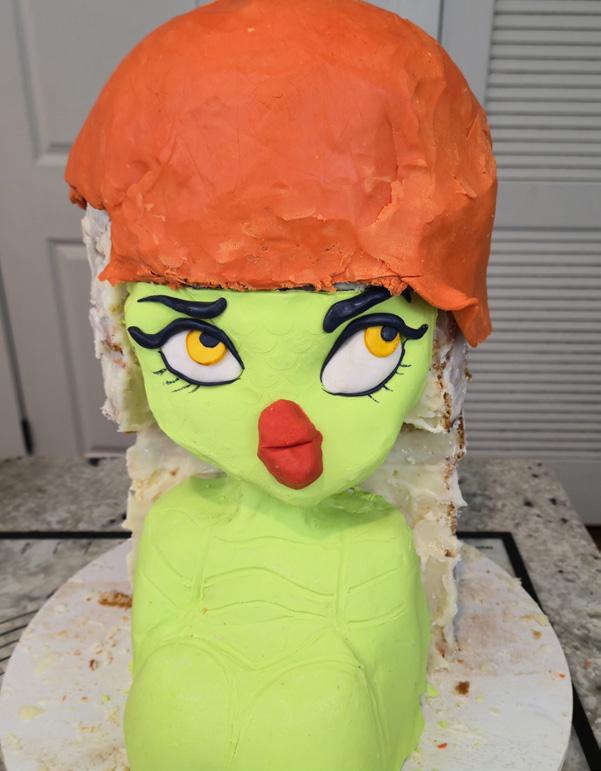
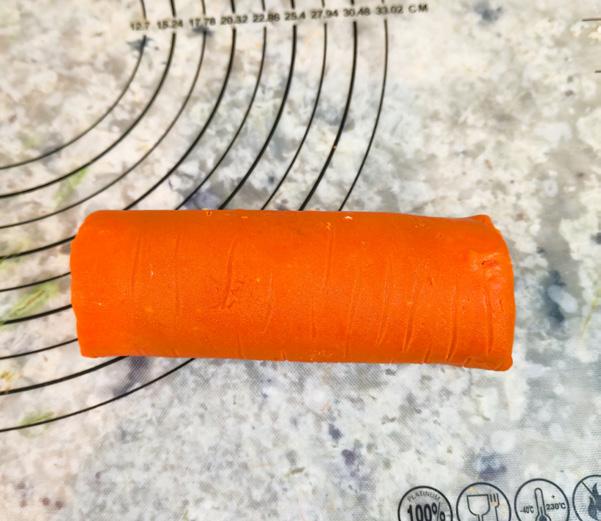
1. Roll out orange modeling chocolate and begin covering the top of her head, working your way down.
2. To add dimension, draw lines in the hair with the modeling tool.
3. Create a template for gill-like ears and use it as a guide to cut out green modeling chocolate.
4. Roll snake pieces out of green modeling chocolate, place them on top of the cutout gills, and draw lines in between each row.
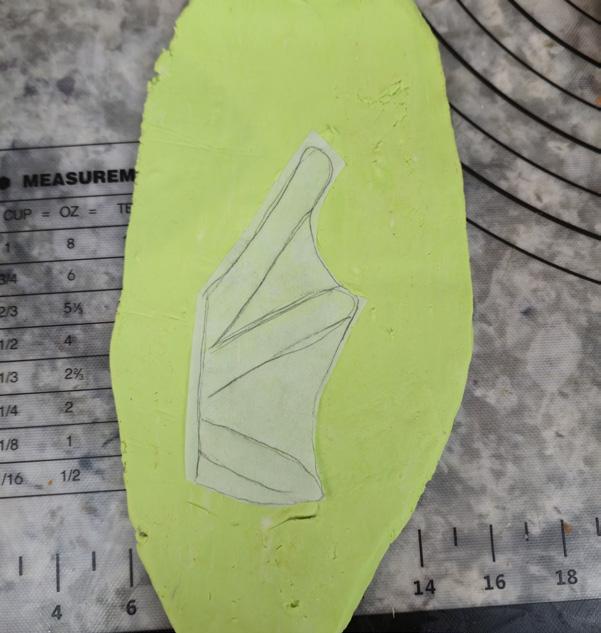
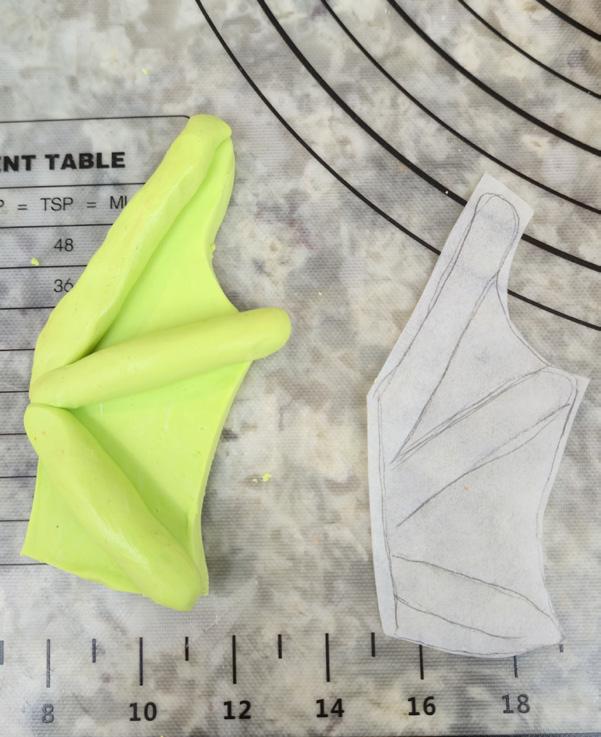
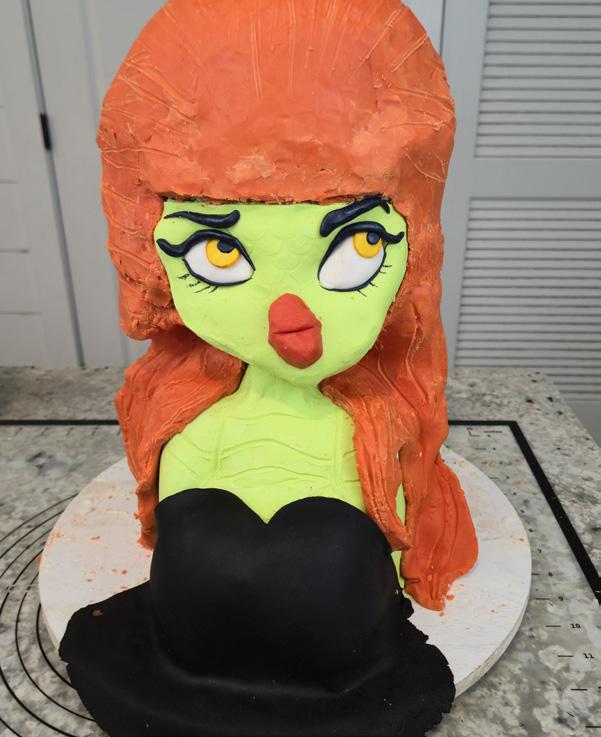
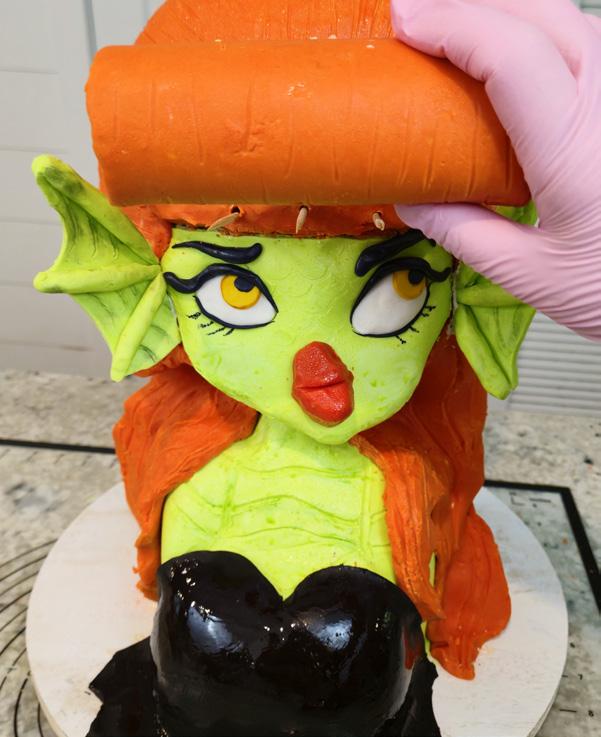
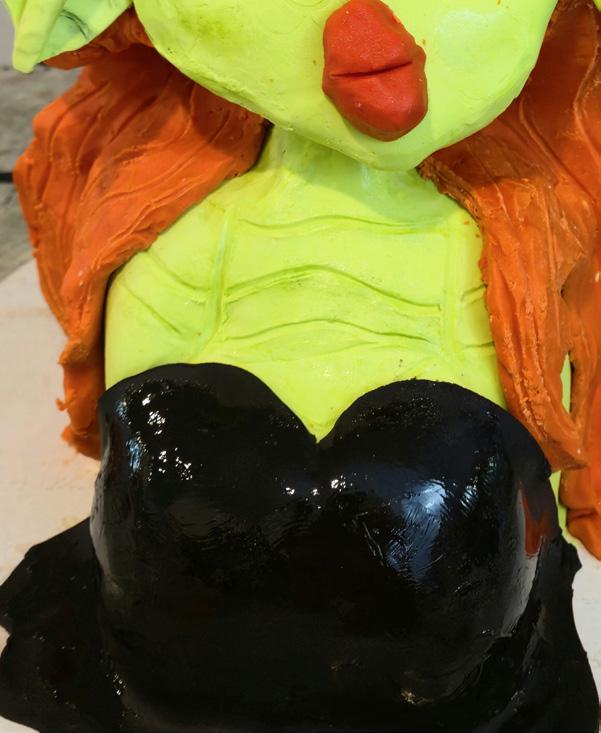
5. Roll out black fondant for the top of her dress and adhere it to the chest. Cut the bottom of the black fondant in a wavy pattern to mimic the black lagoon water.
6. Roll an oblong piece of orange modeling chocolate for her bangs. Add lines to mimic hair.
7. Place toothpicks near the top of the forehead to secure her bangs.
8. Attach the gill ears and then the bangs.
9. Use piping gel to give her dress a shiny, water-like appearance. ACD

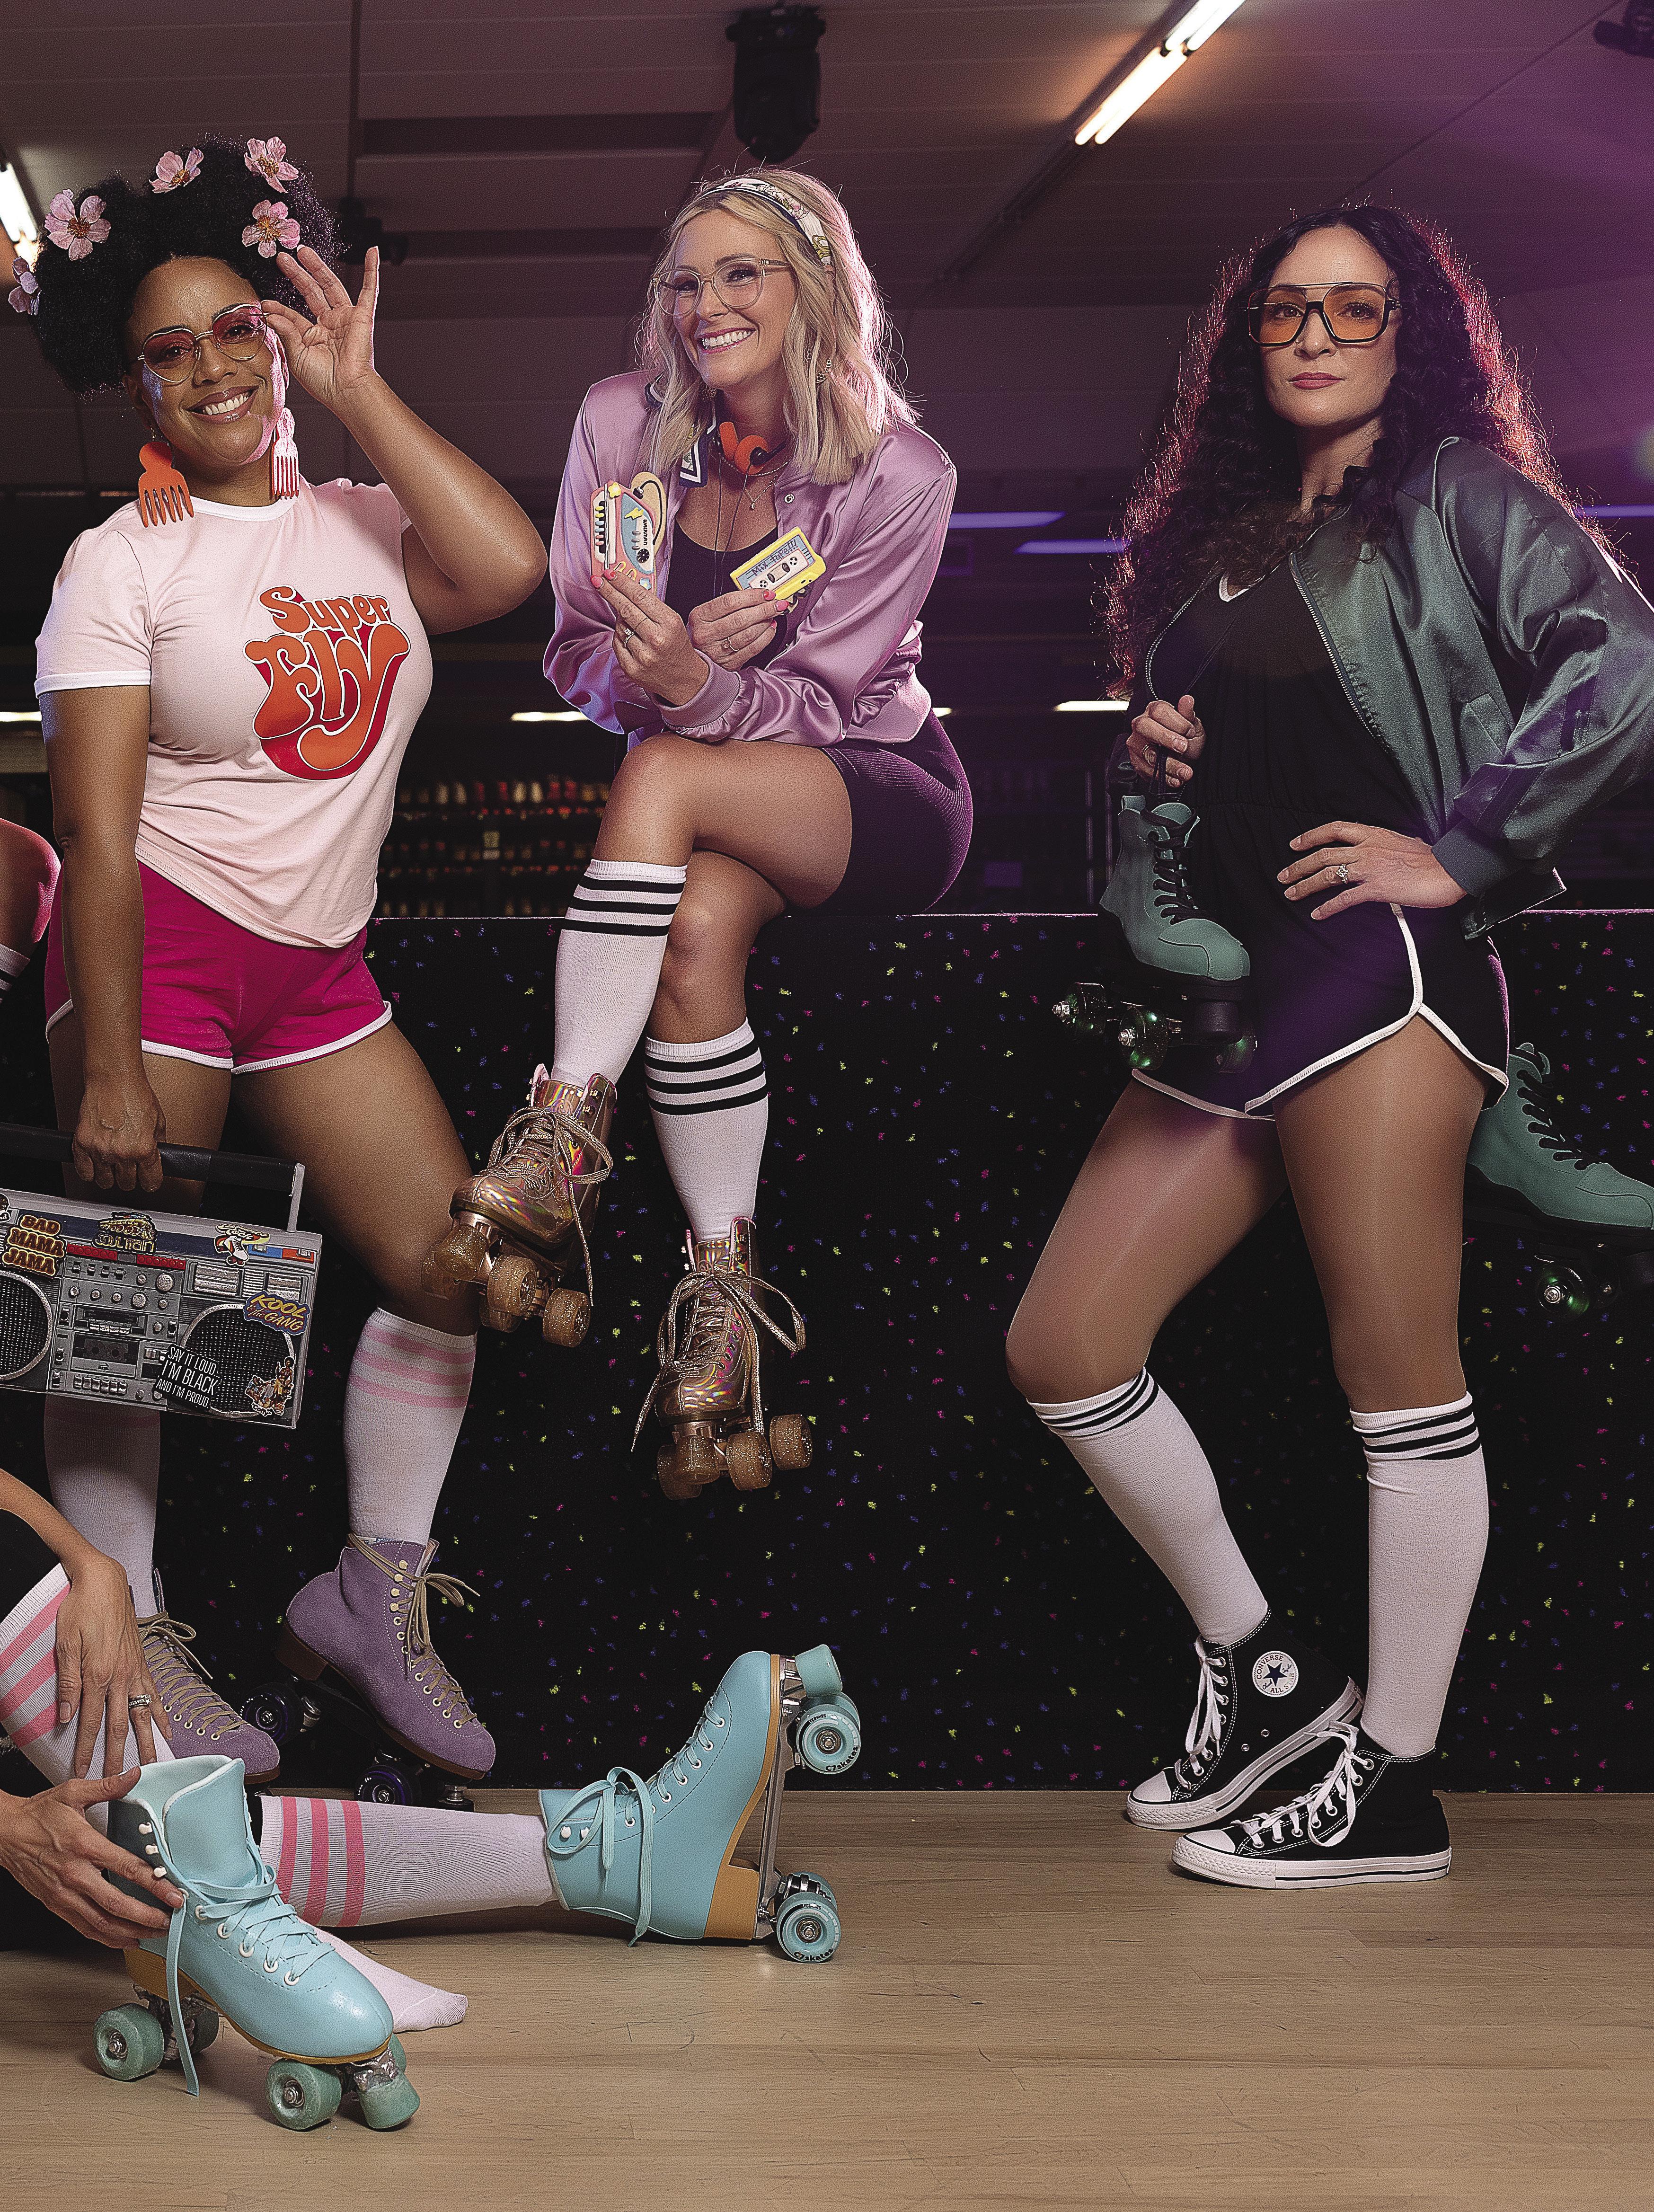
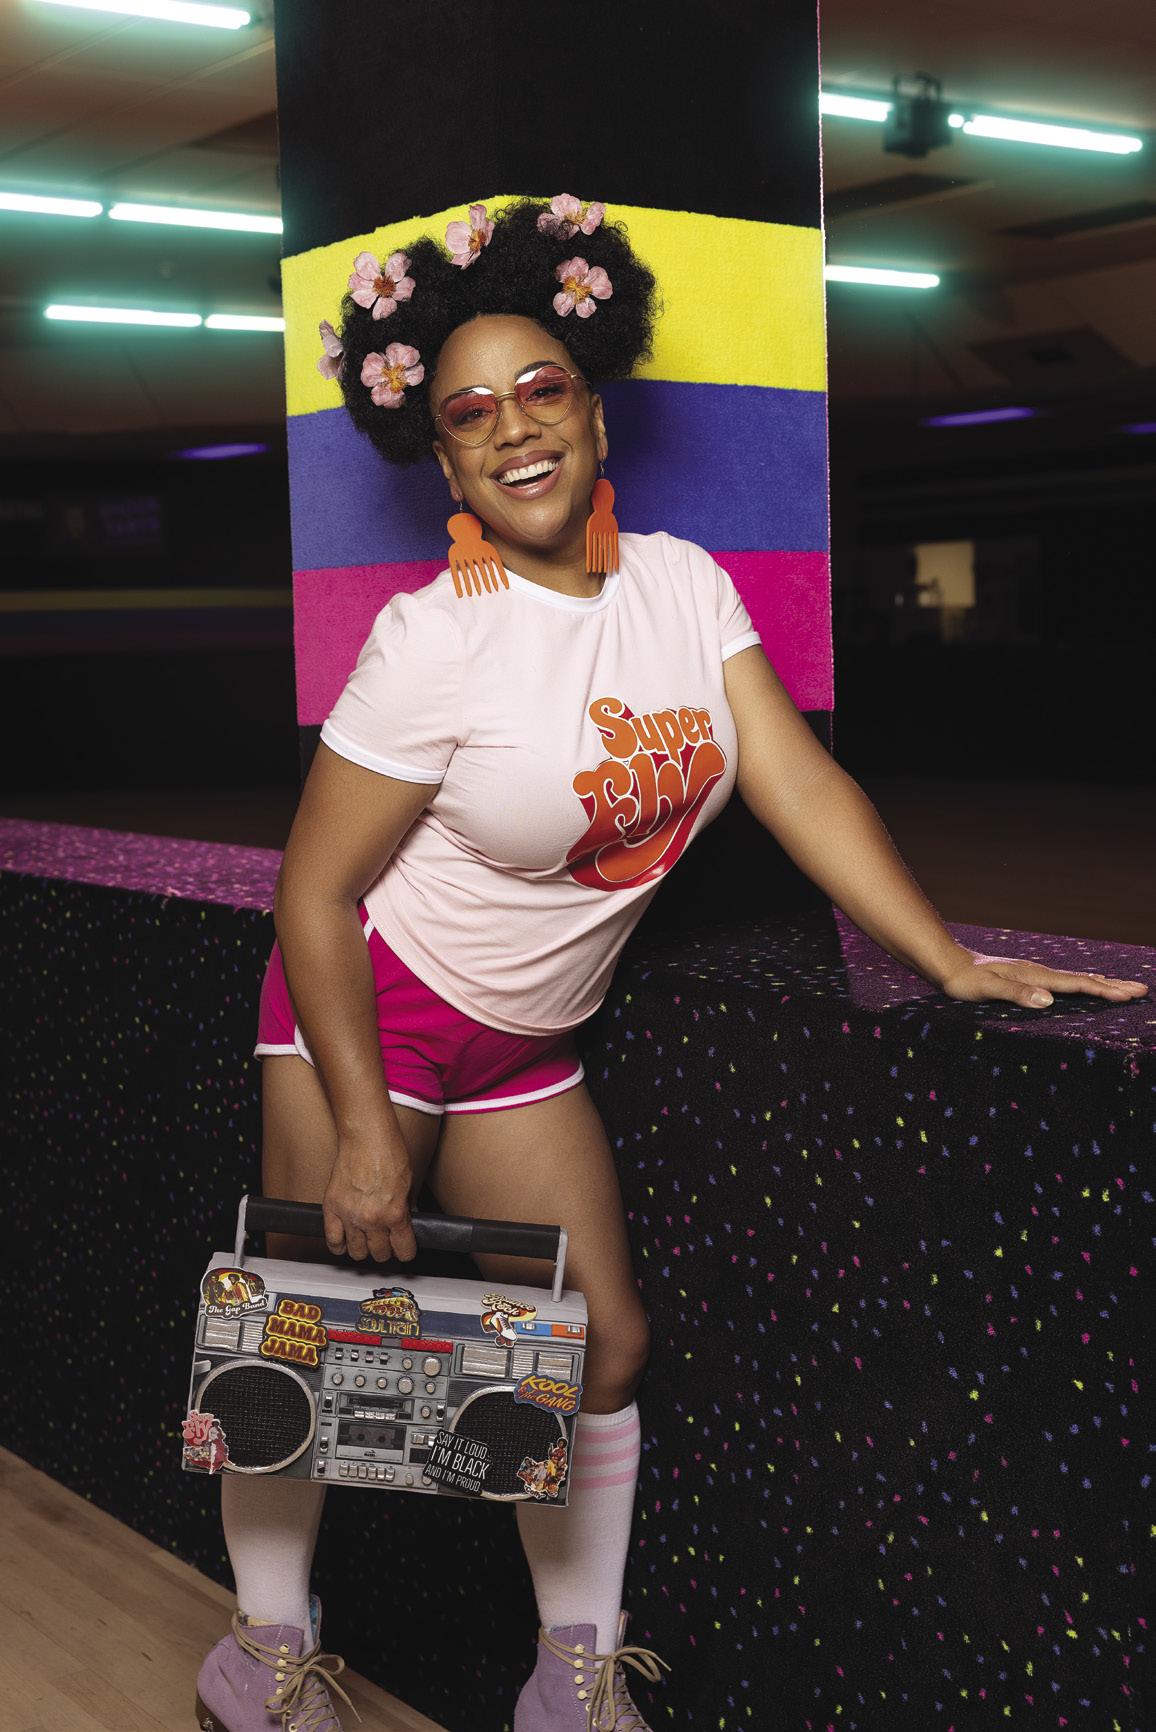
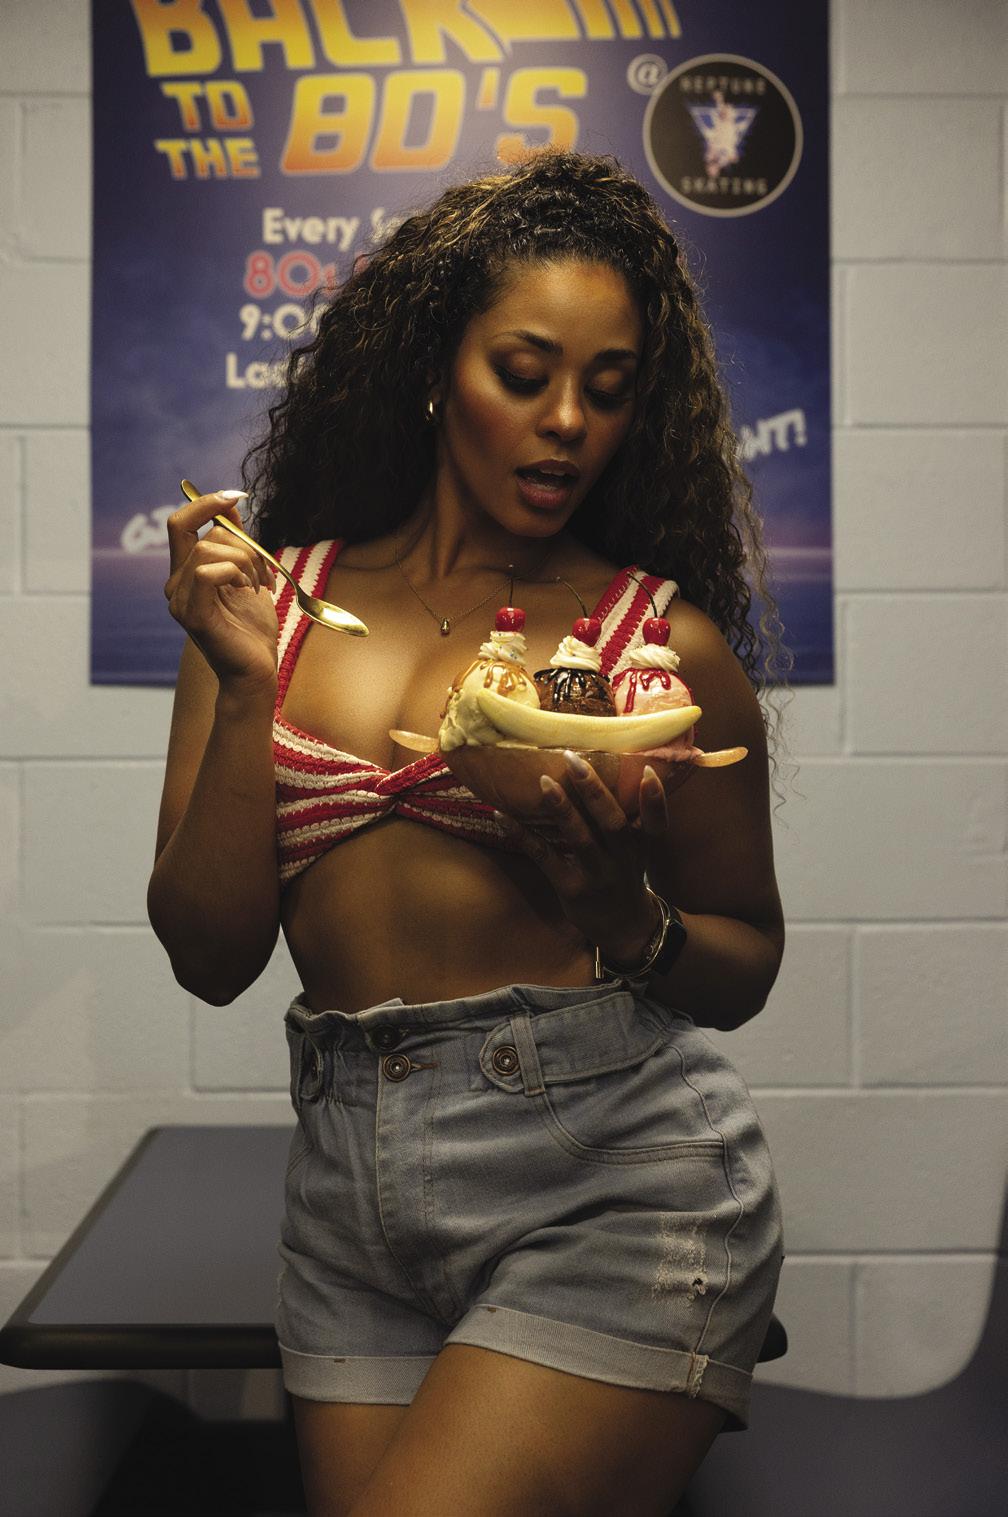
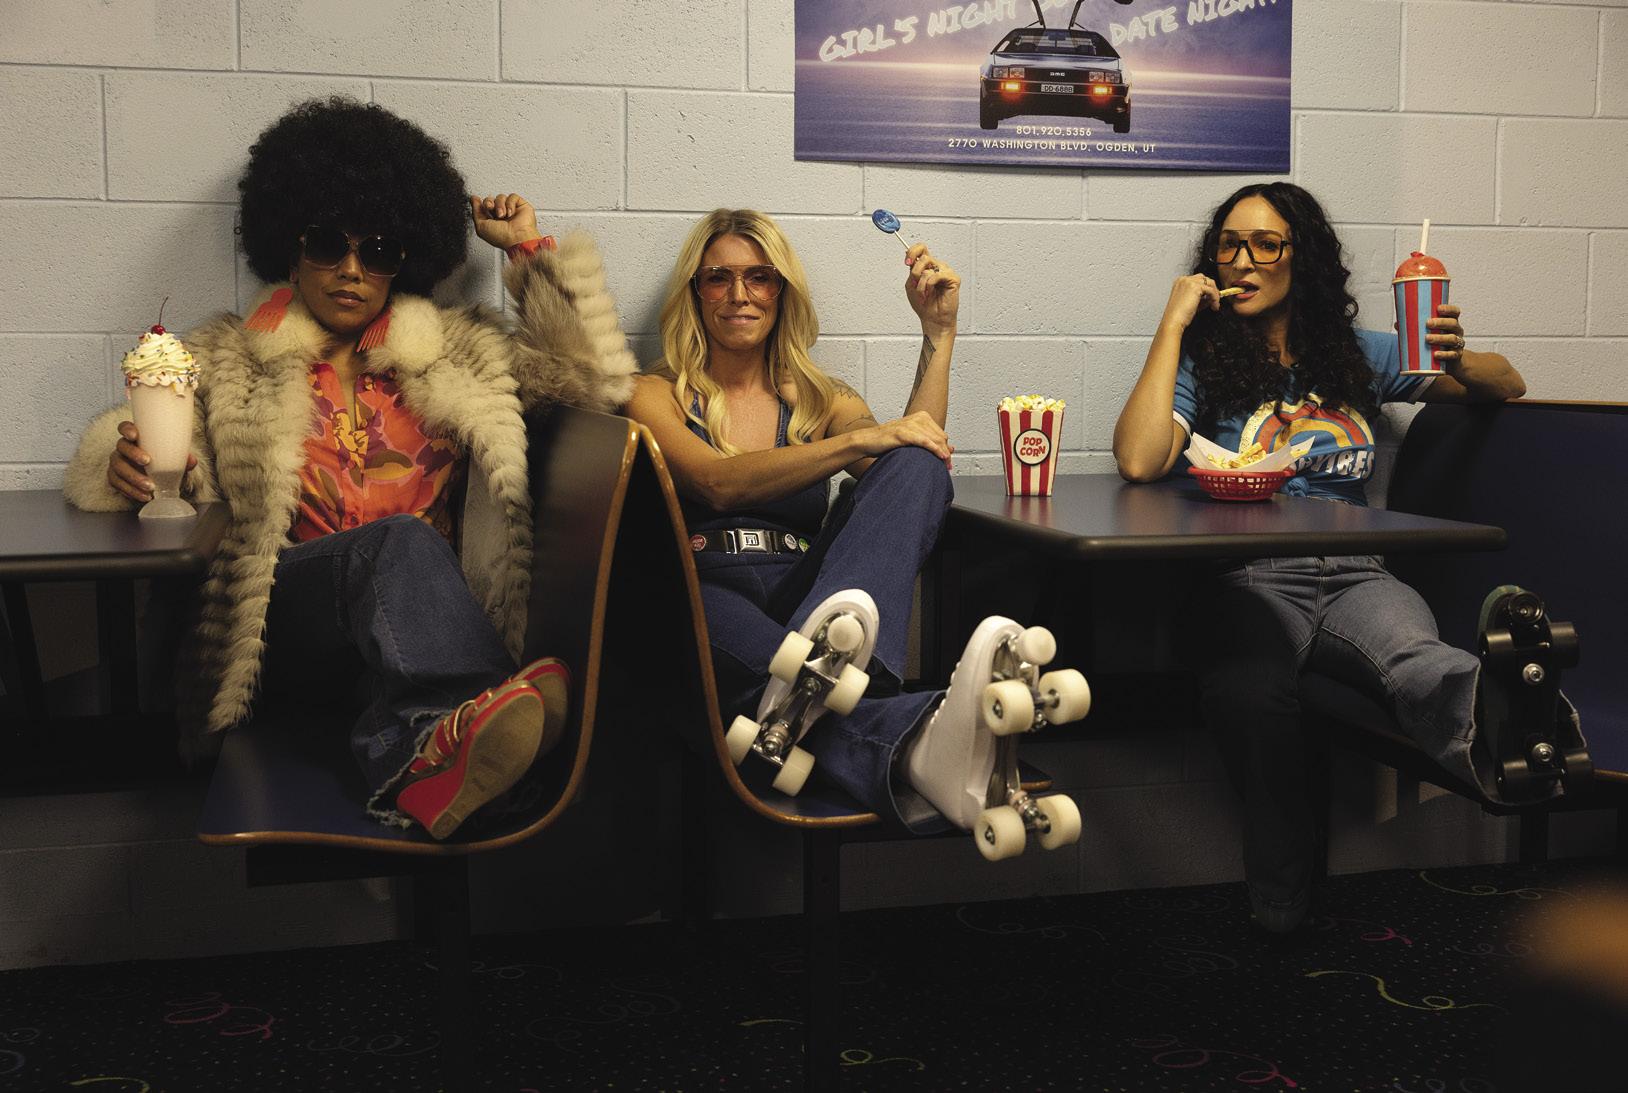
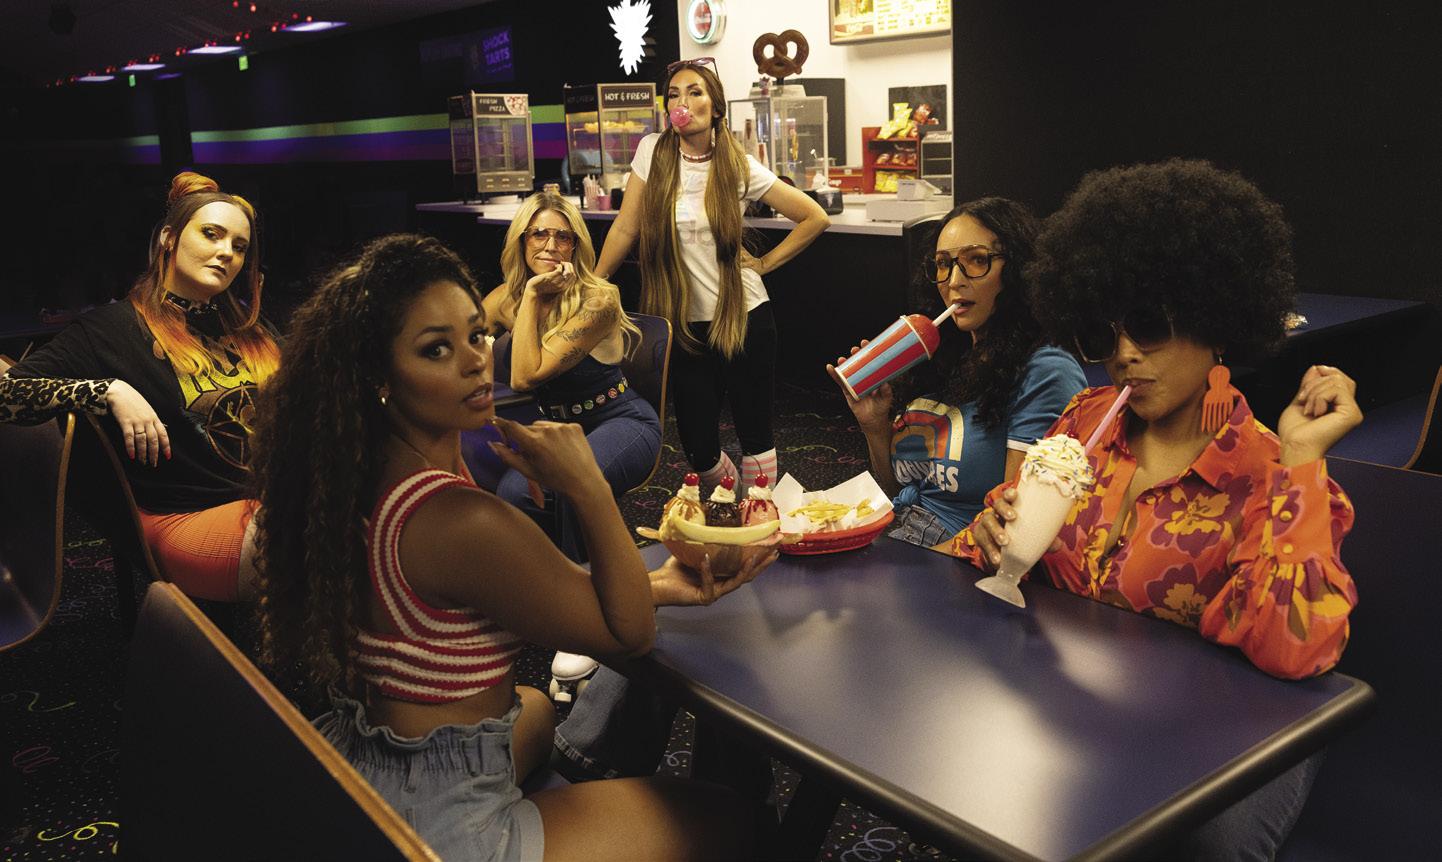
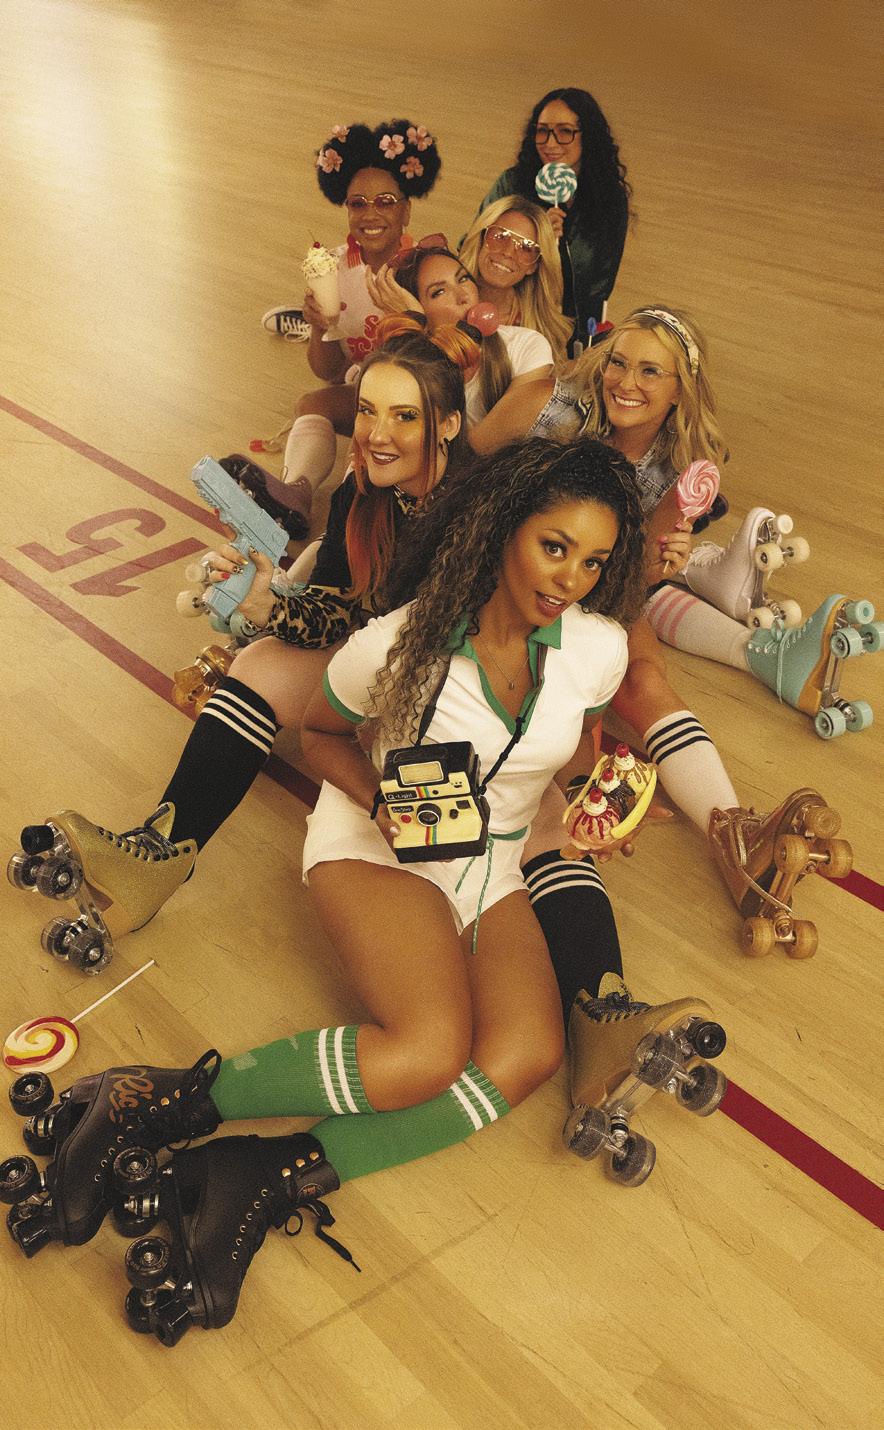
Want a taste of nostalgia? Head to the roller rink with a group of cake designers and everything will be edible!
PHOTOGRAPHER:
AMY MADE THE GRAVITY-DEFYING ROLLER SKATES WITH A CUSTOM STRUCTURE SO THAT YOU CAN CARRY THEM BY THE SHOELACES!
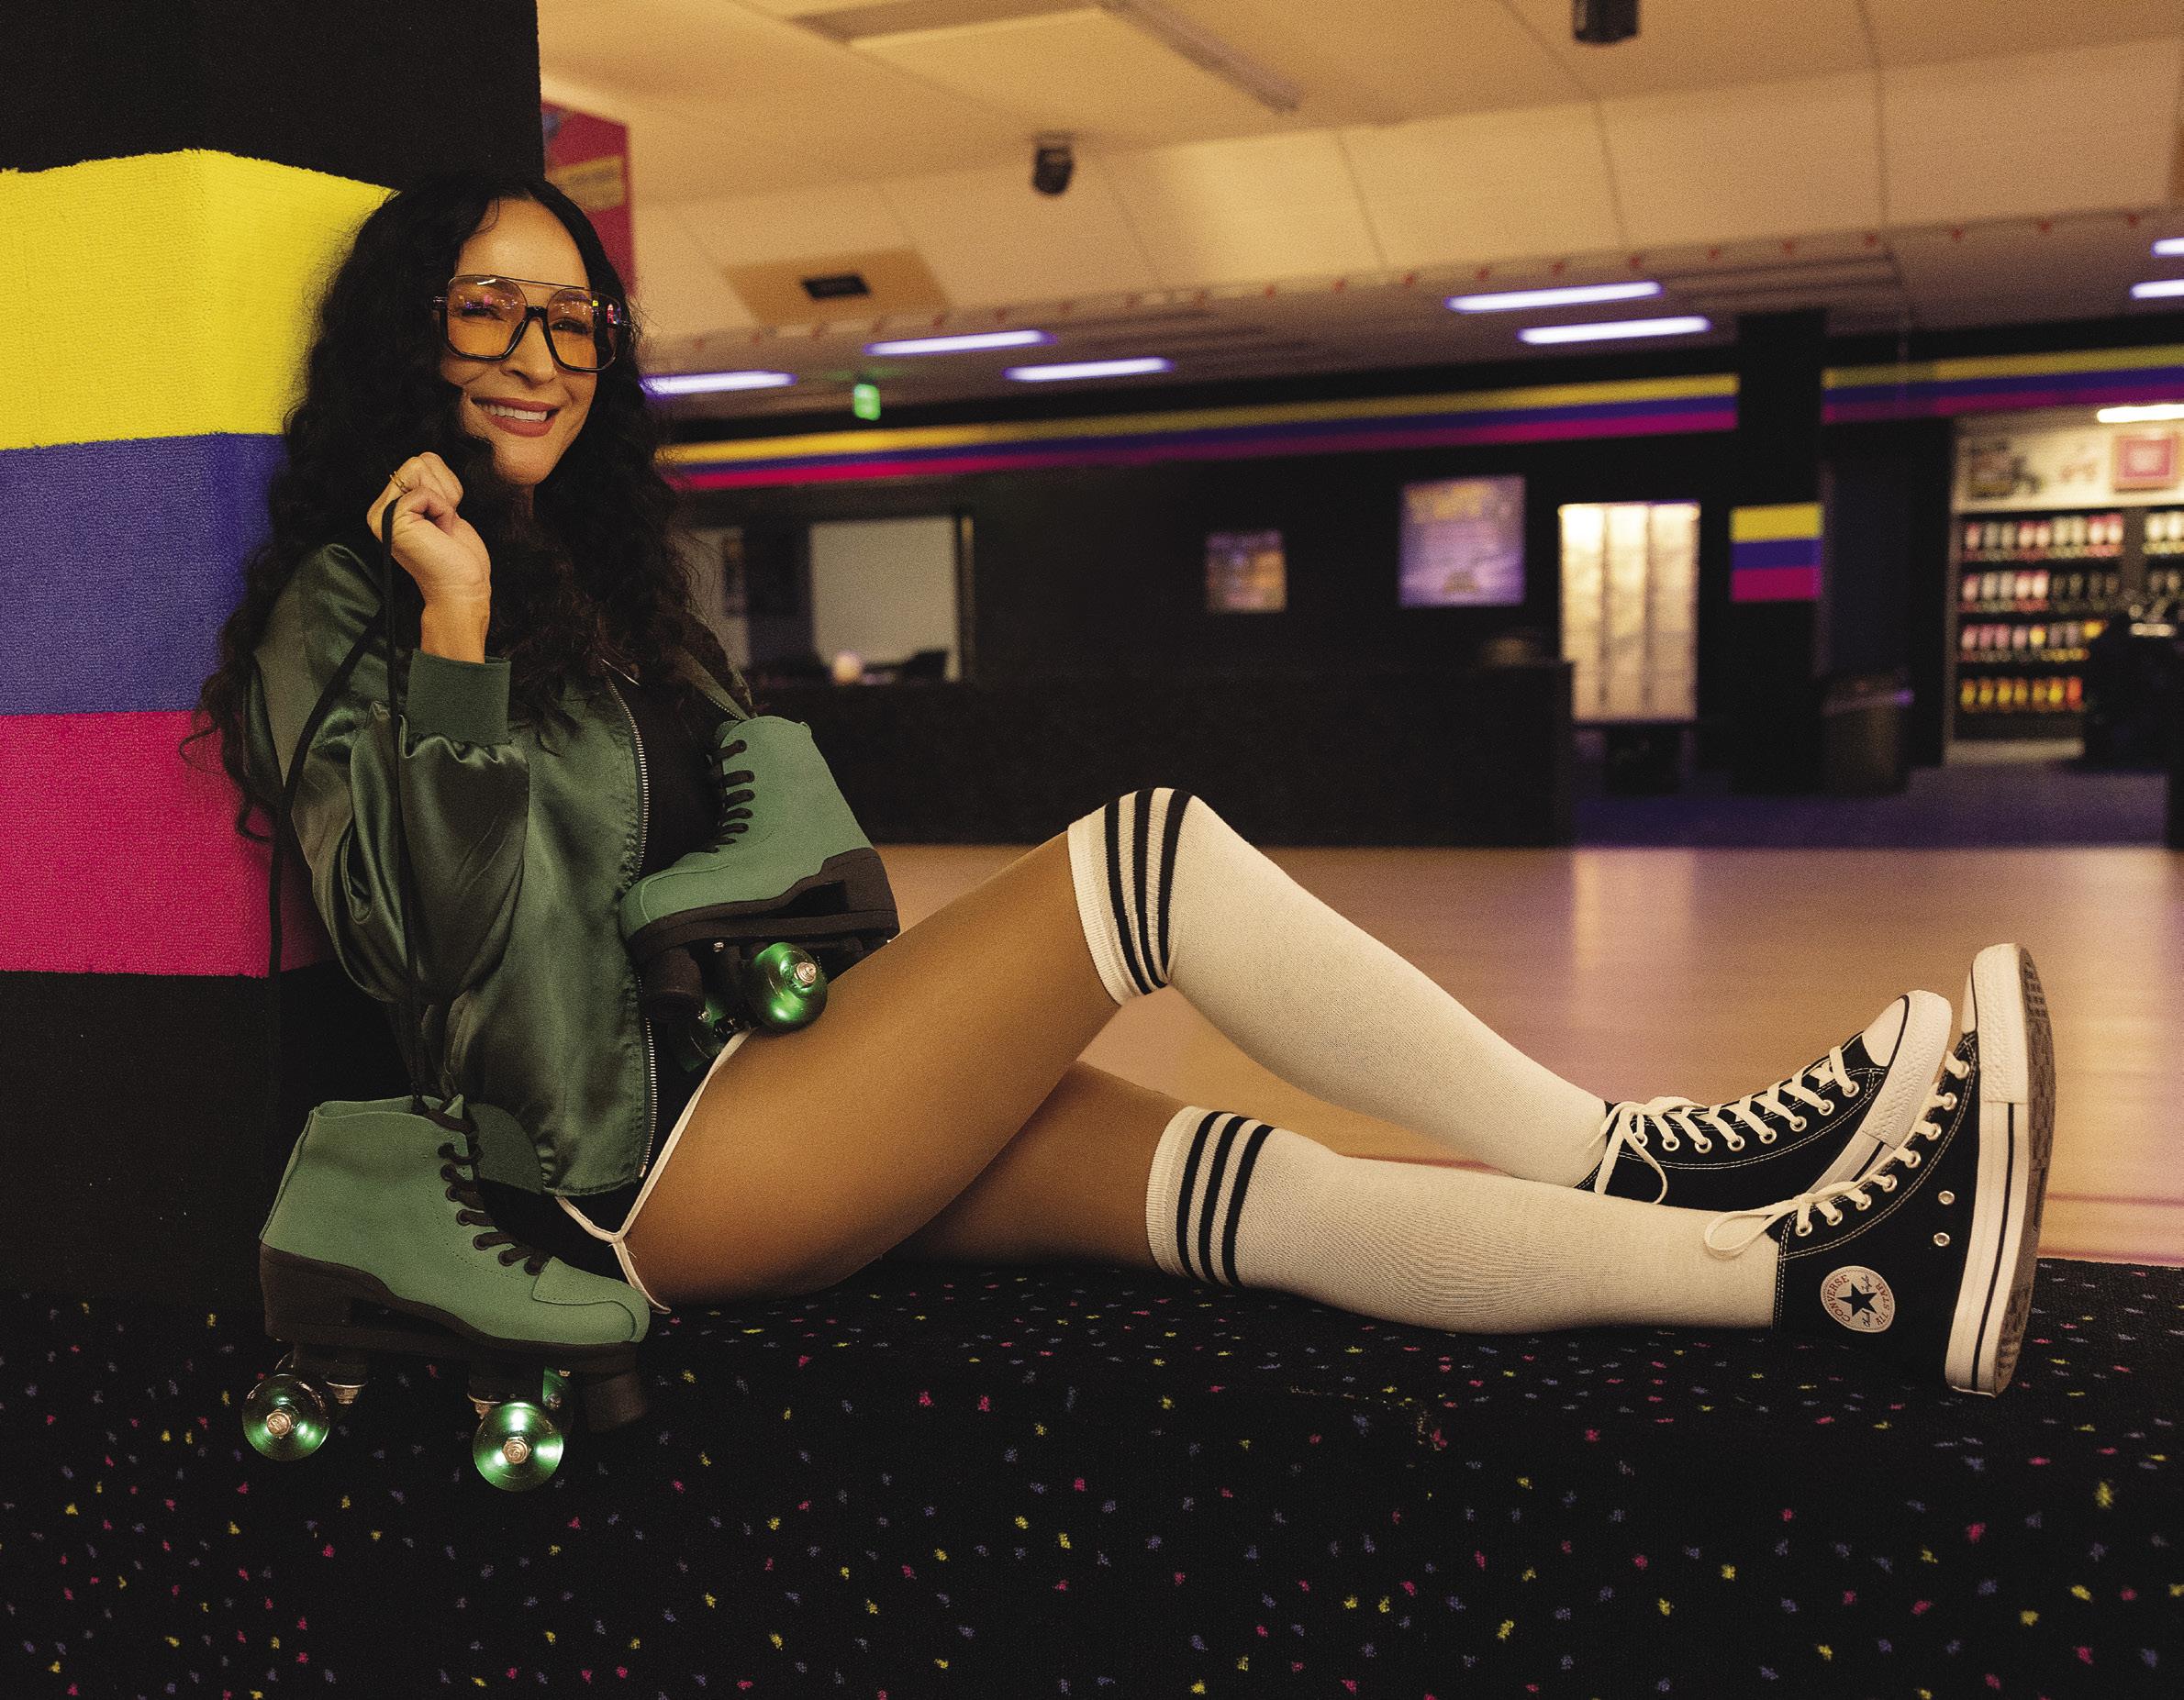
Amy Michelle Goff is the host of this collaboration. She made gravity-defying roller skates with a custom structure so that you can carry them by the shoelaces! The wheels, made from isomalt, really move and light up. She also created a French fry basket, made from fondant and modeling chocolate, with a wafer-paper lining. The slushie is a fondant cake with an isomalt dome lid, and the
lollipop is pulled sugar.
Jessica Villeneuve made the boombox out of vanilla cake and fondant. It’s built on a custom structure so it could be carried like a real radio, and there’s even a Bluetooth speaker inside so it plays music. The edible flowers are hand-painted and made from wafer paper. The milkshake glass is made from isomalt and filled with vanilla cake and Swiss meringue buttercream. The afro pick
earrings are made from fondant and sealed with edible glaze.
Emerlie Ann Miller made the arcade guns with a custom silicone mold filled with layers of cake and buttercream, then covered in candy melts. The tickets are edible images printed on wafer paper, cut, and glued together using wafer-paper conditioner.
Mitzi Torgersen made a set of hand-decorated royal icing sugar cookies to replicate a realistic


Follow the artists on Instagram!
AMY MICHELLE GOFF instagram.com/frostedcustomcakes.ut instagram.com/sugarelevatedbyamy
JESSICA VILLENEUVE instagram.com/jessicakesutah
EMERLIE ANN MILLER instagram.com/emerlieannmiller
MITZI TORGERSEN instagram.com/happyconfetti
KARIANN RUGG instagram.com/cakedame
MANDY CLIFFORD instagram.com/mandyscustomcakes
NAYARA RANIERI instagram.com/nrcakedesigner


NAYARA MADE A DECORATIVE FONDANT
LOLLIPOP AND MANDY MADE THE GUM BUBBLE FROM BLOWN ISOMALT SUGAR.
Walkman, mixtapes, a groovy ’70s woman, a milkshake, and a roller skate.
Kariann Rugg made the viewfinder in a homemade mold from fondant. The popcorn box is made of fondant, and the popcorn is made of hand-painted meringue. The lollipop is made of marbled fondant in a homemade mold.
Mandy Clifford carved an edible
skate cake and covered it in fondant. The wheels and hardware are made out of chocolate and cast with a custom mold. The gum bubble is made from blown isomalt sugar. The candy necklace is made from a variety of fondant colors, punched into rounds, and strung together on elastic string once hardened.
Nayara Ranieri created a
realistic Polaroid camera by layering vanilla cake filled with ganache on a Styrofoam base. It is covered in fondant with an isomalt sugar lens. The banana split is entirely edible, with an isomalt sugar cup holding scoops of ice cream made from red velvet cake. It’s covered in ganache and fondant. She also made a decorative fondant lollipop. ACD
THE MILKSHAKE GLASS IS MADE FROM ISOMALT AND FILLED WITH VANILLA CAKE AND SWISS MERINGUE BUTTERCREAM.
THE POPCORN BOX IS MADE OF FONDANT, AND THE POPCORN IS MADE OF HANDPAINTED MERINGUE.
THE SLUSHIE IS A FONDANT CAKE WITH AN ISOMALT DOME LID, AND THE LOLLIPOP IS PULLED SUGAR.
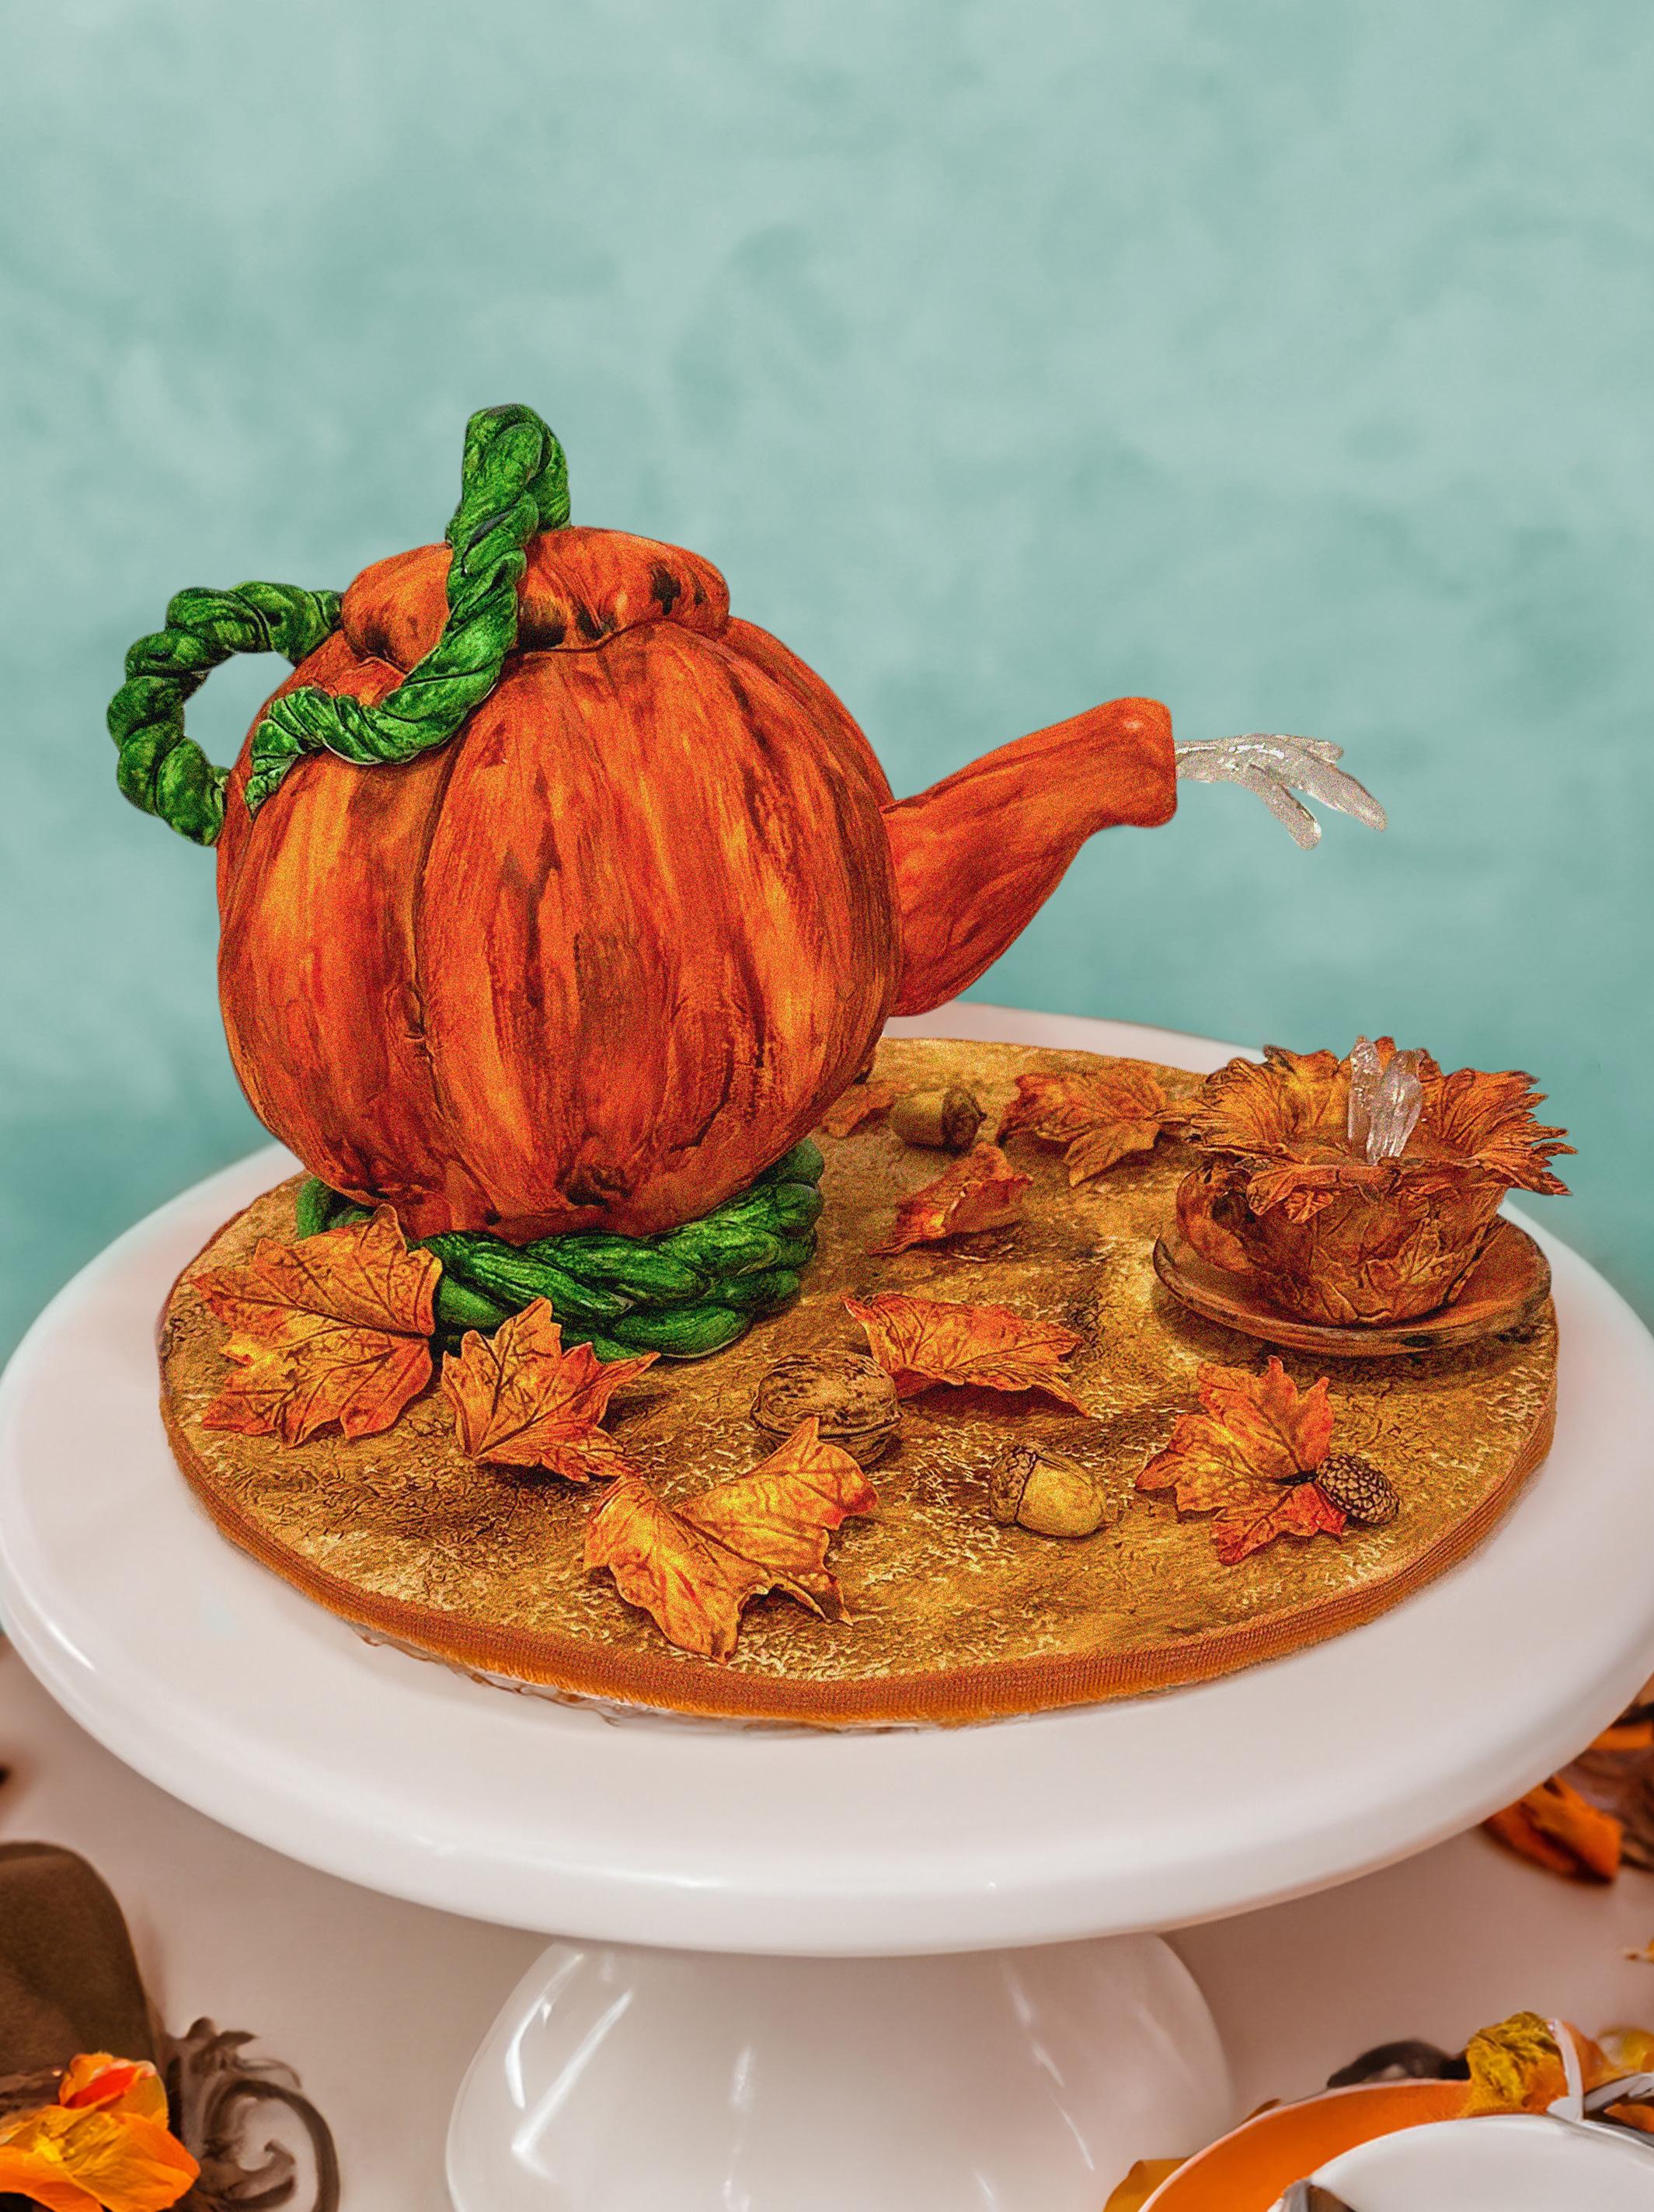
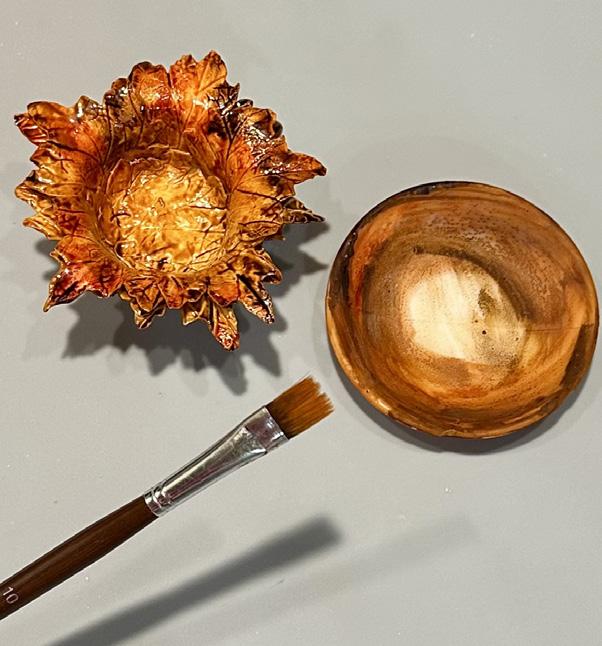
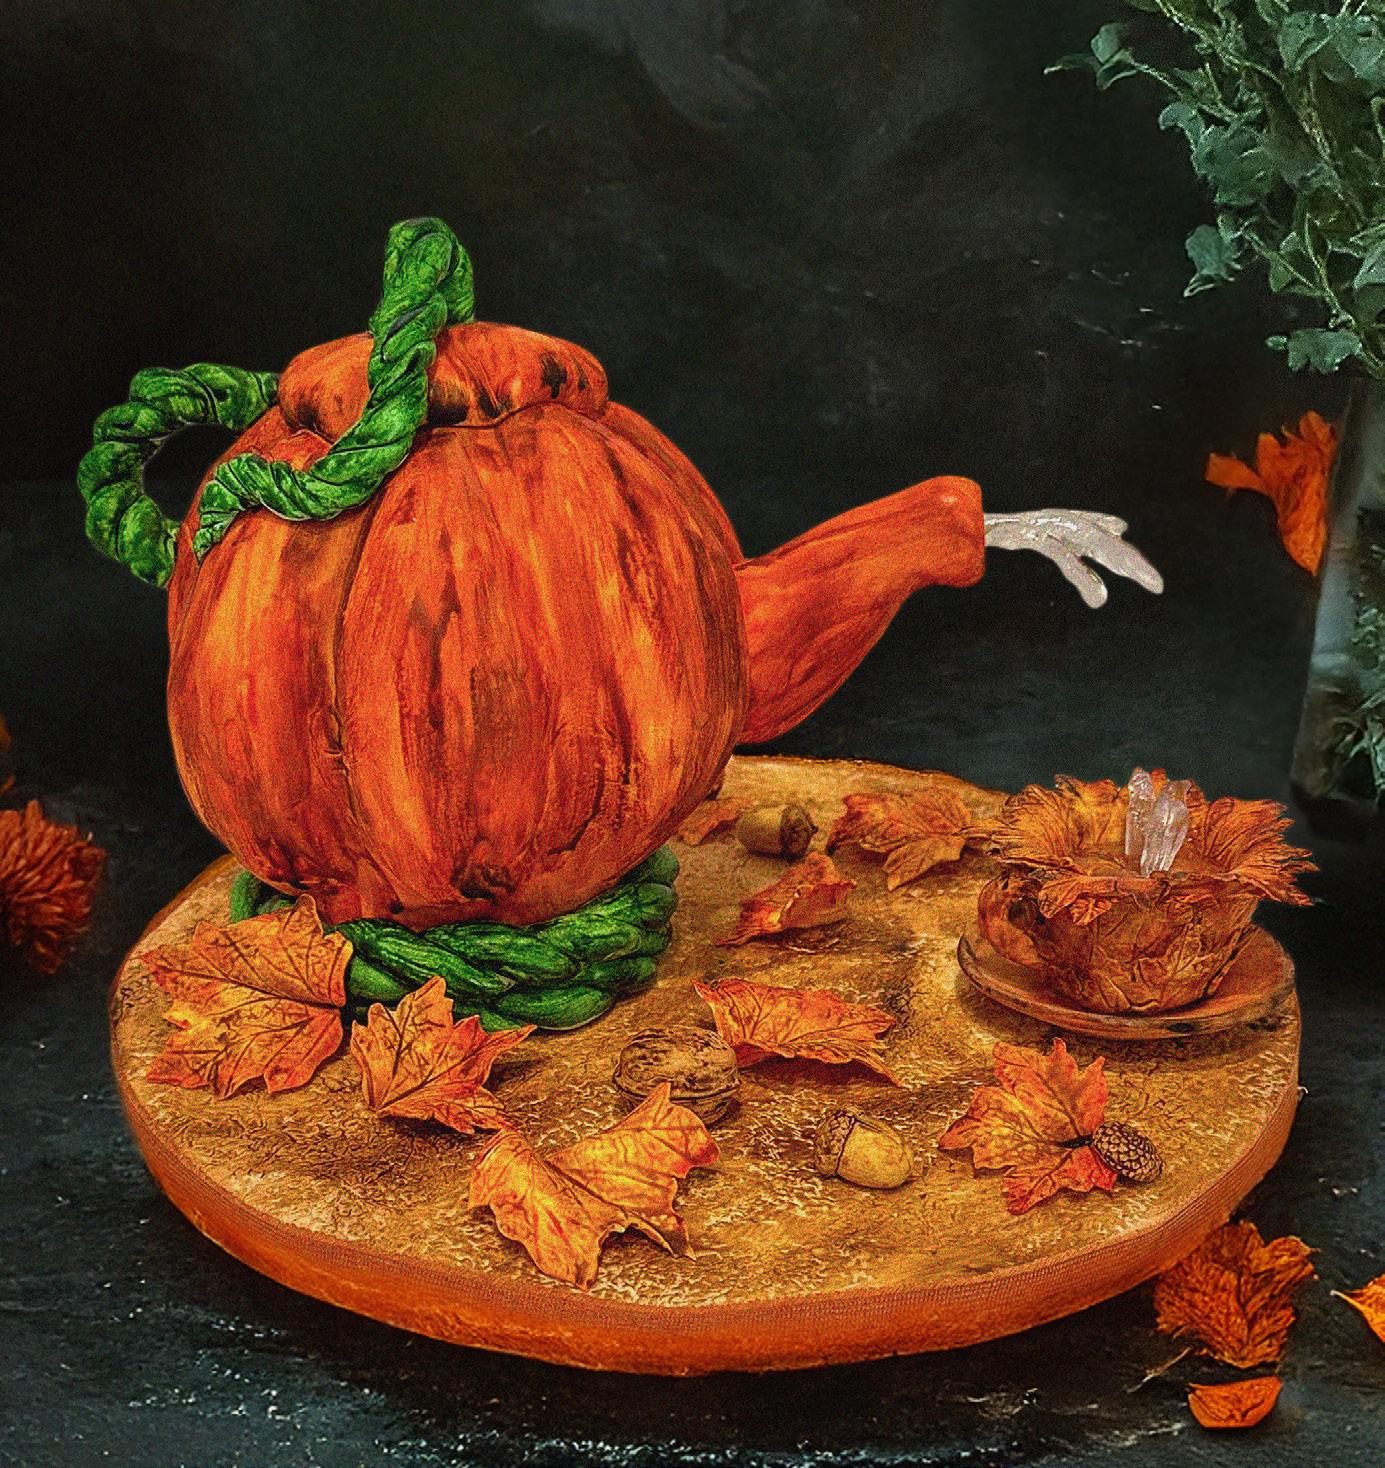
BY TAMMY VARELA
Make a seasonal creation, complete with a maple leaf teacup and autumnal accents.
Edibles:
Fondant: ivory, white, orange, and light yellow (Satin Ice)
Water
Gel food color: ivory, yellow, peach, orange, brown, moss green, and red (AmeriColor)
Vodka
Sphere cake
Chocolate ganache
Edible glue
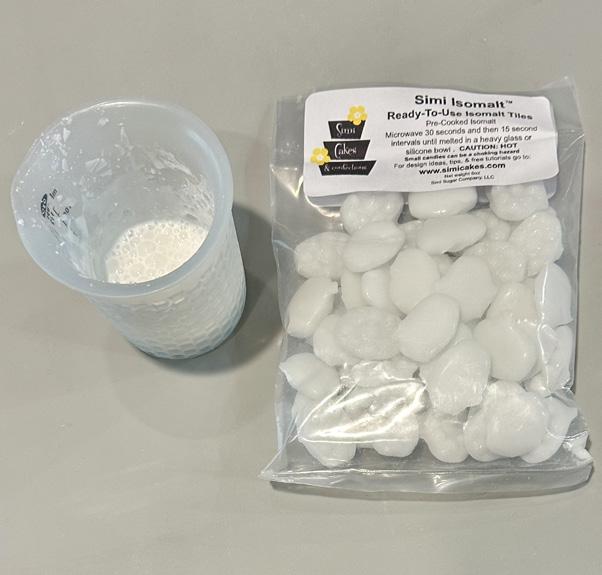
Isomalt: white and clear (Simi Cakes)
Edible glaze spray (PME)
Equipment:
Rolling pin
Drum
Aluminum foil

Paintbrushes
Glue
Styrofoam disc
Cake board
Dowel
Maple leaf cutters
Maple leaf veiner mold (Flower Pro Collection by Katy Sue Designs)
Wavy foam mat
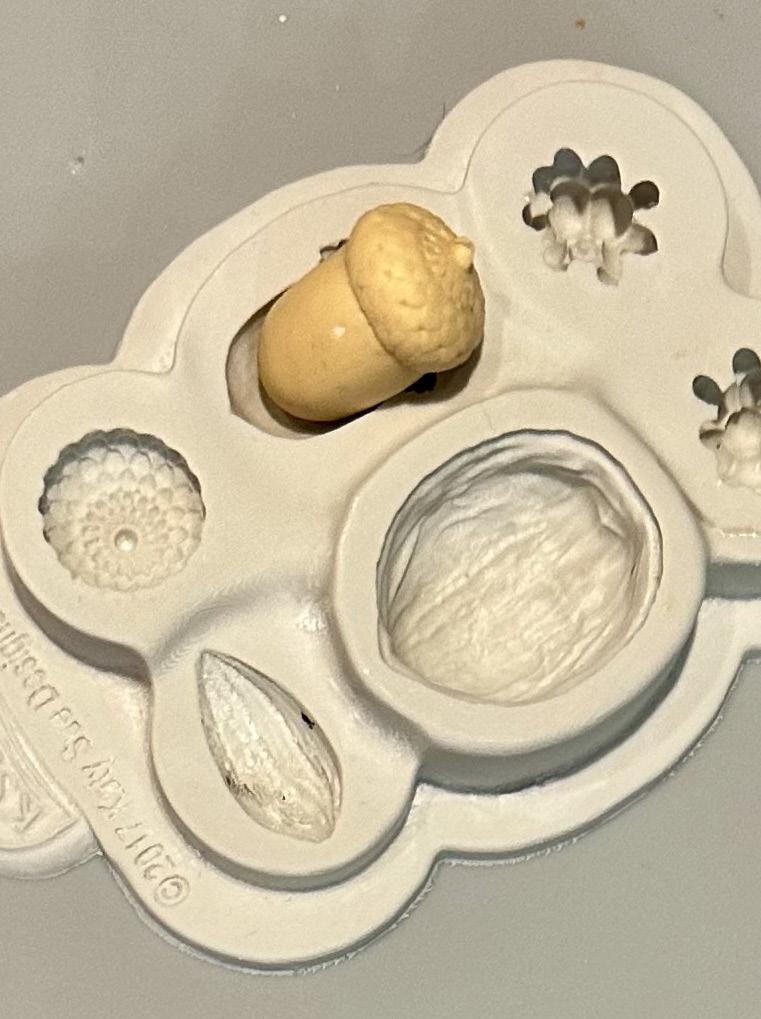
Acorn mold (Flower Pro Collection by Kate Suy Designs)
Silicone cup
Cup and plate mold (Simi Cakes)
Silicone mat
Toothpick
Tammy Varela is a well-known award-winning cake and sugar artist from Atlanta, GA. She’s a master at combining both sugar and cake to create some of the most unique pieces of edible art in the industry. She also recently won the ACA 2023 Rising Star Award.
artisticcakedesigns.com facebook.com/artisticcakedesigns instagram.com/artisticcakedesigns1 WHAT YOU NEED

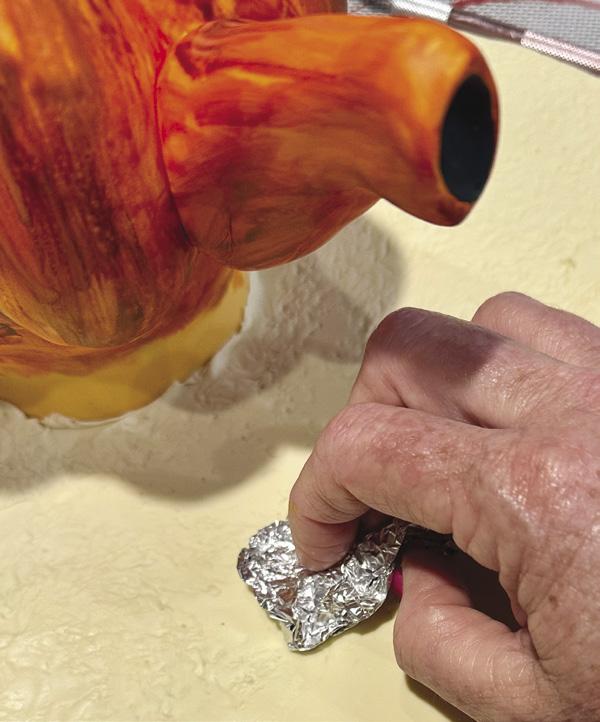
1. Roll out ivory fondant and lay it over a drum. To adhere, spritz a small amount of water onto the board first. Take a crumpled ball of aluminum foil and press it into the fondant for a rough-looking texture.
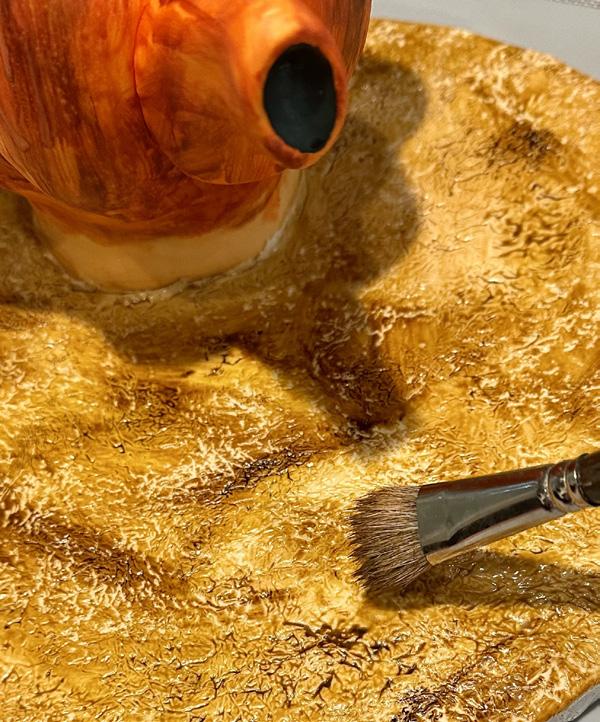
2. Mix some ivory gel food color with vodka and stipple the board. Use thick amounts in a few areas to give depth.
1
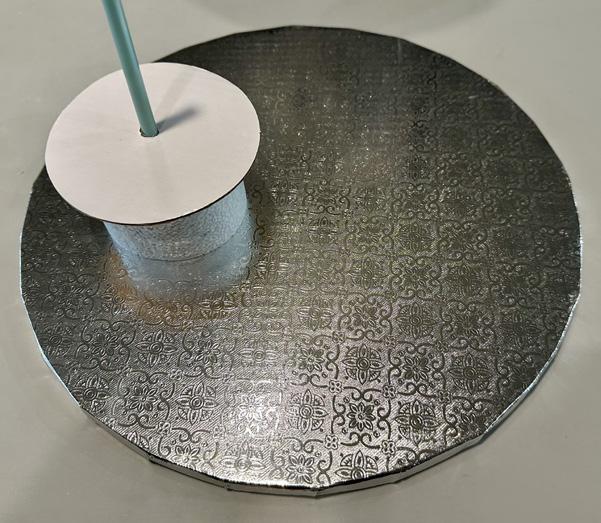
1. Place glue on a 4-inch Styrofoam disc. Stick a dowel in the middle and make sure it goes through the base for added stability. Add a cake board on top of the Styrofoam.
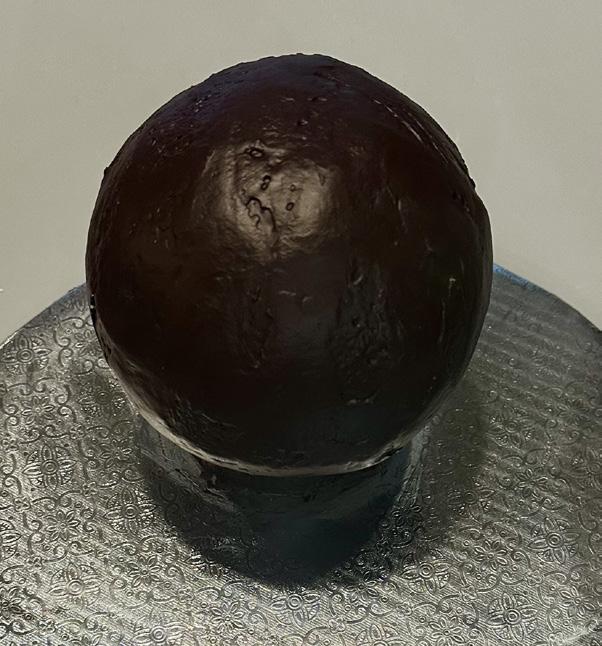
2. Cover a sphere cake in chocolate ganache and then smooth it. Place it in the fridge for a few hours to solidify.
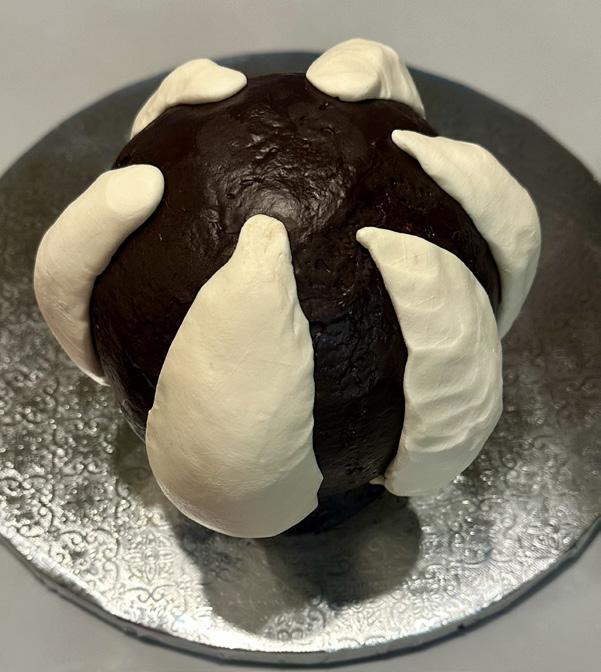
3. Add fondant pieces to the outside of the cake to give the look of the sections of a pumpkin.
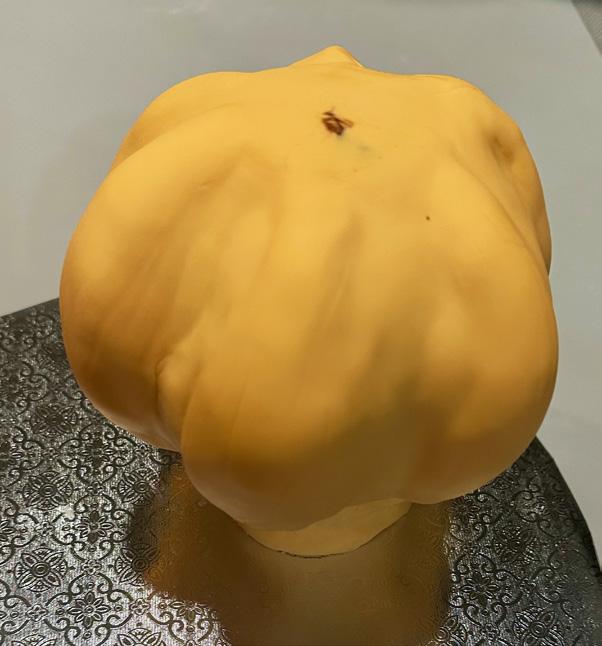
4. Combine white and orange fondant in a 3:1 ratio and cover the cake. Smooth it out and make sure the fondant gets into the grooves.
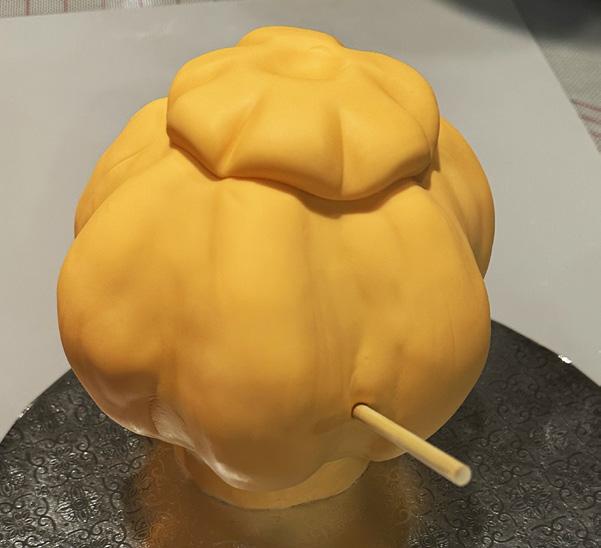
5. Make a topper from the same fondant. Make an indent for the stem. Stick a dowel into the cake where the pour spout will go.
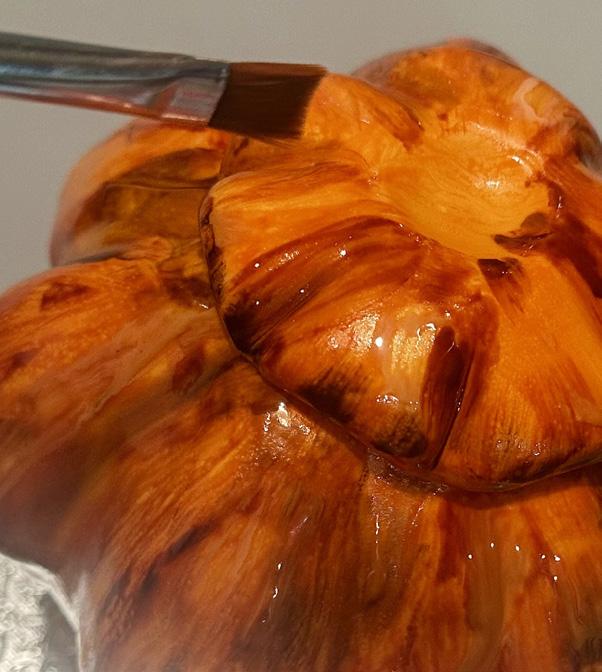
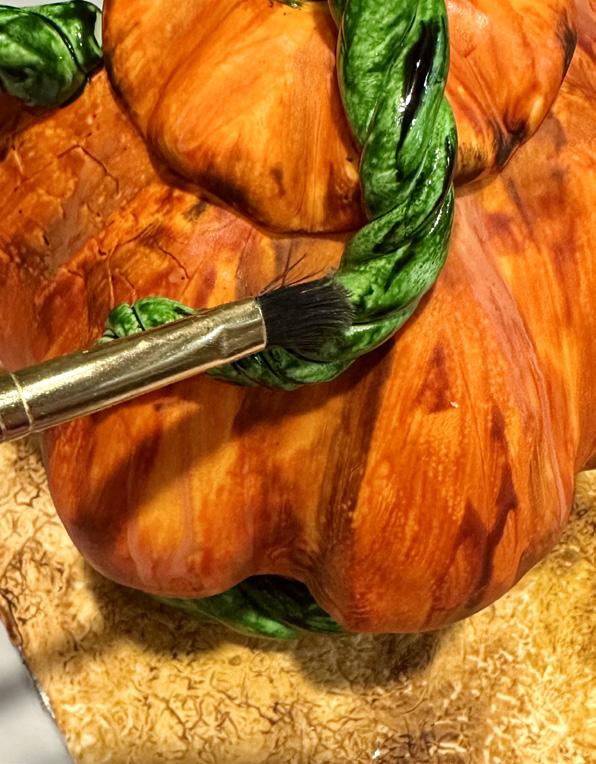
6. Paint the pumpkin cake with gel food color in this order: yellow, peach, orange, then brown. Thin the gel colors with a small amount of vodka for more control.
7. Paint the stem and base with moss green gel food color. Be sure to highlight some areas with a heavier amount of color.
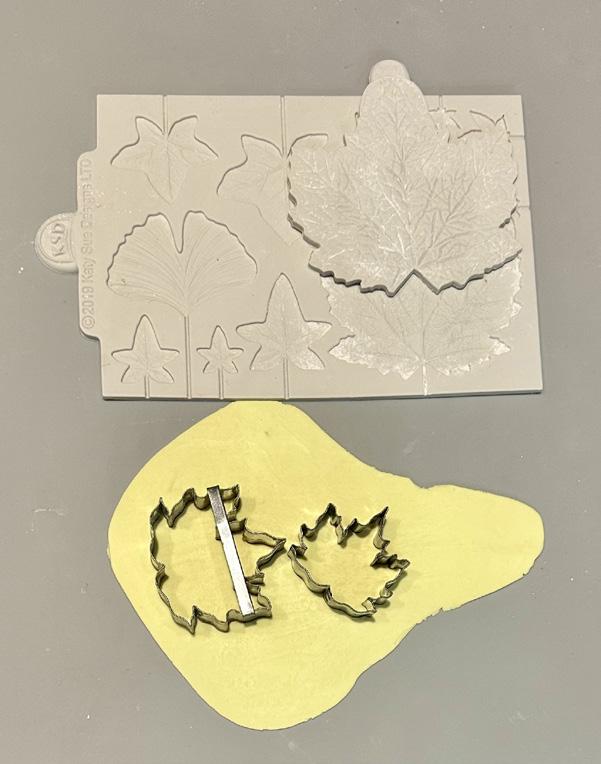
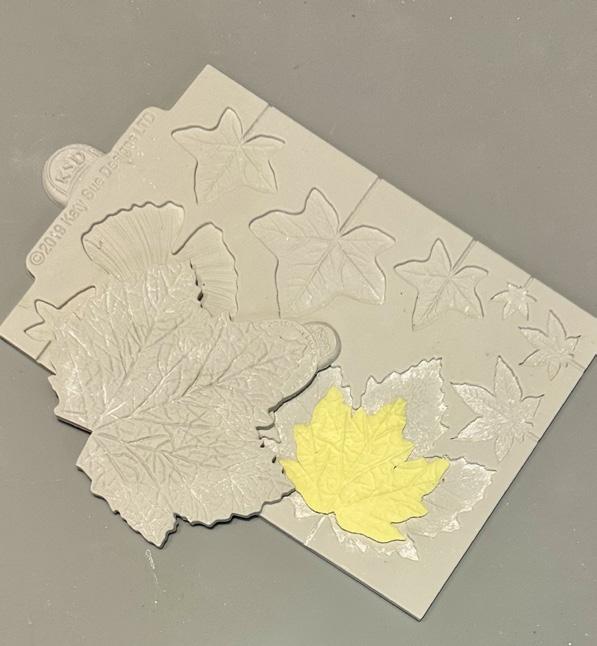
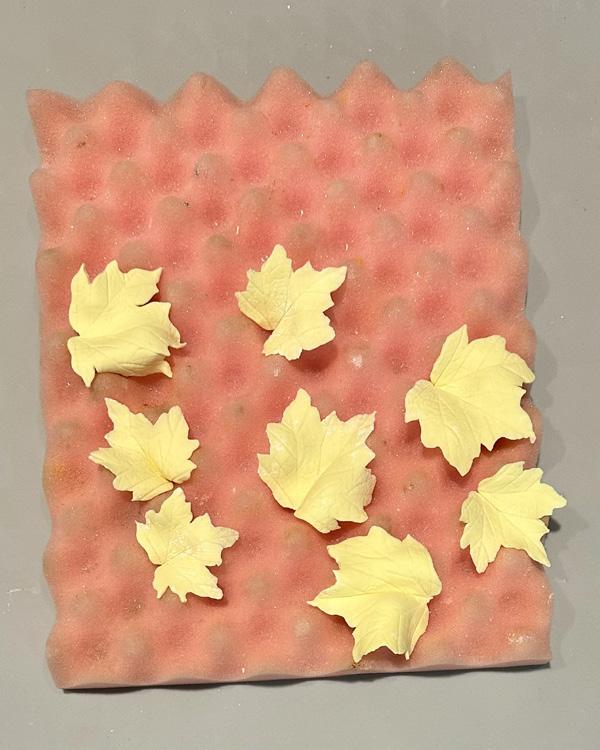
1. Roll out some light yellow fondant into a thin sheet. Use maple leaf cutters to cut out the leaves.
2. Press the leaves into a veiner mold.
3. Place the leaves on a wavy foam mat. Let them dry for 24 to 48 hours.
4. Press light yellow fondant into an acorn mold.
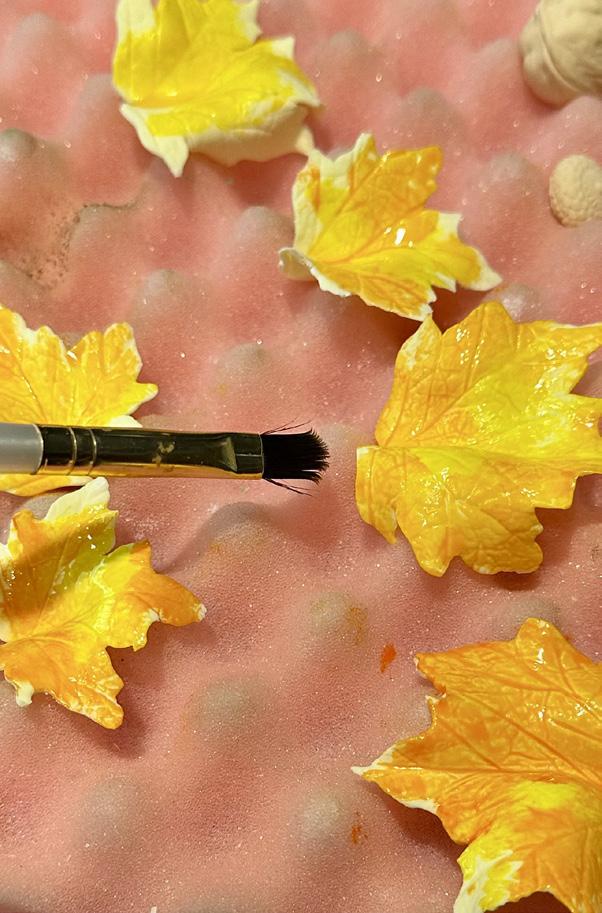
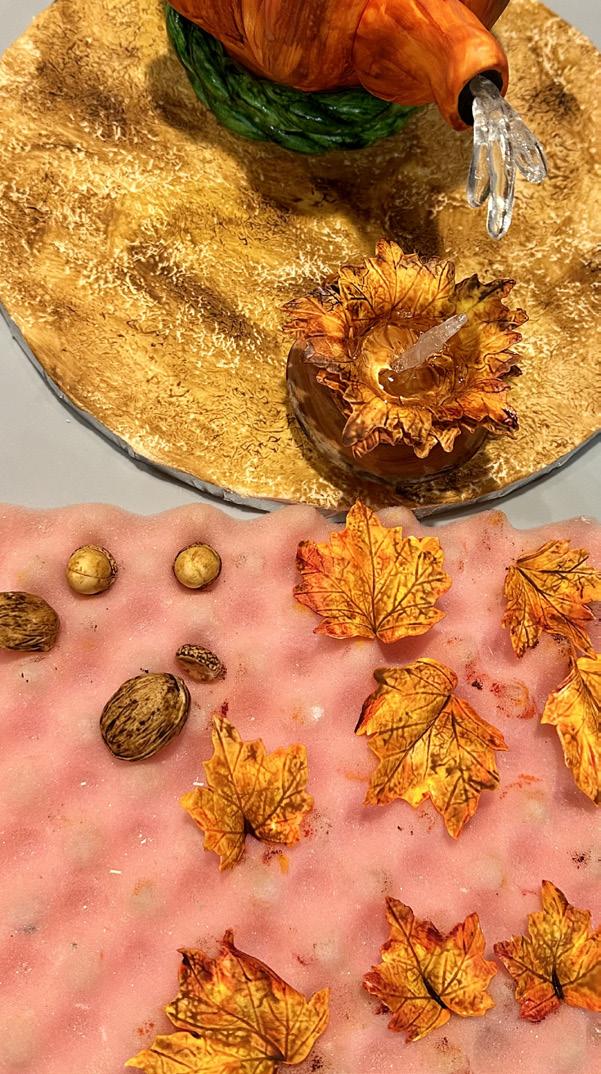
5. Paint the leaves and acorns with gel food colors diluted with vodka. Start with yellow, then orange, red, and brown. Let them dry for 24 hours.
6. Attach the leaves and acorns with edible glue.
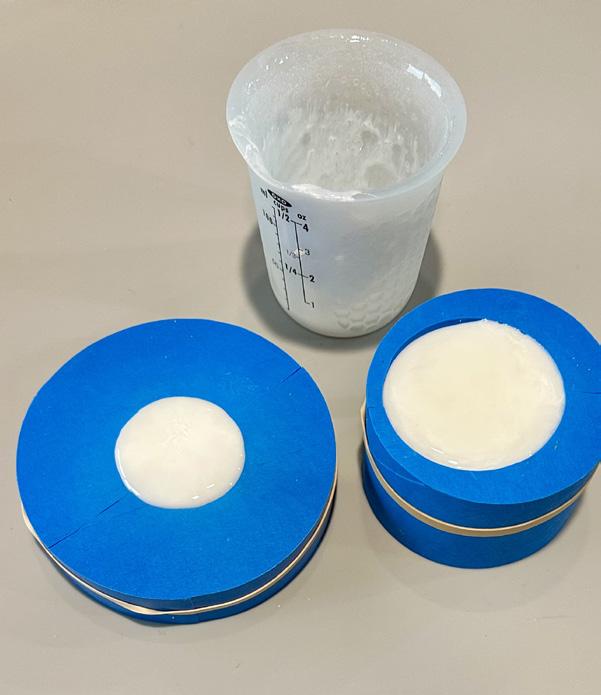
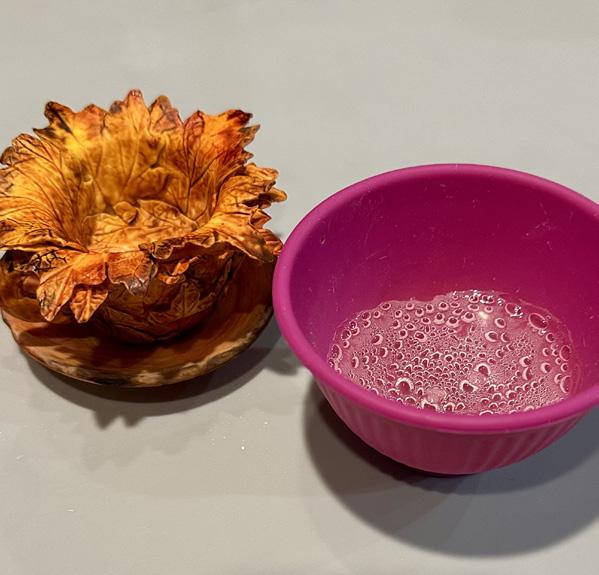
1. Heat about 3 ounces of white isomalt in a silicone cup. Start with a 30-second intervals in the microwave and then 15-second intervals until the isomalt bubbles. Let it sit for about 1 minute before using.
2. Pour the isomalt into a cup and dish mold and fill it to the top. Let it sit at room temperature for about 15 to 20 minutes to cool and harden.
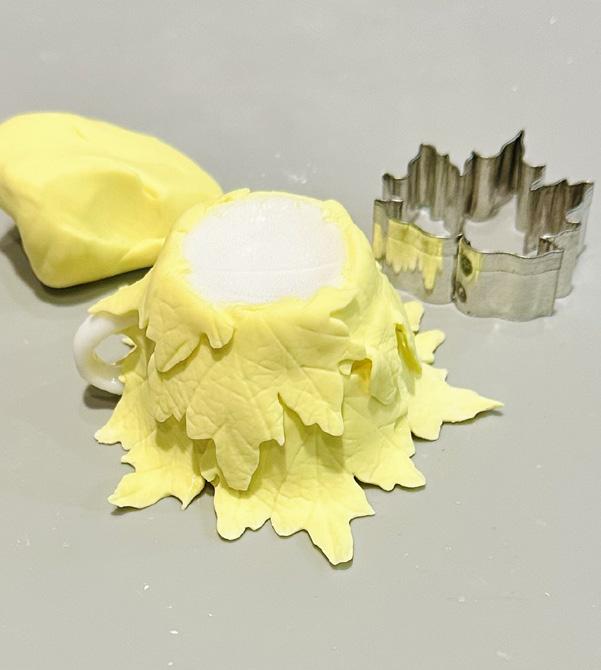
3. Cut out more maple leaves from light yellow fondant.
4. Remove the cup from the mold and place it upside down on a silicone mat. Use a very light amount of edible glue to adhere the leaves to the isomalt cup. Go all around the cup. Let it dry for about 24 hours.
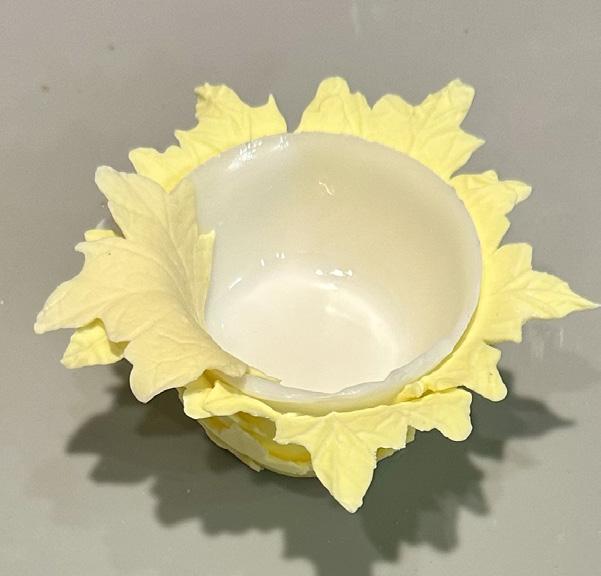
5. Once dry, turn the cup over and place leaves on the inside of the cup. Let it dry for another 24 hours.
6. To paint the cup and dish, use a mix of yellow, orange, red, and brown gel food colors just like the leaves. Let them dry for about 24 hours.
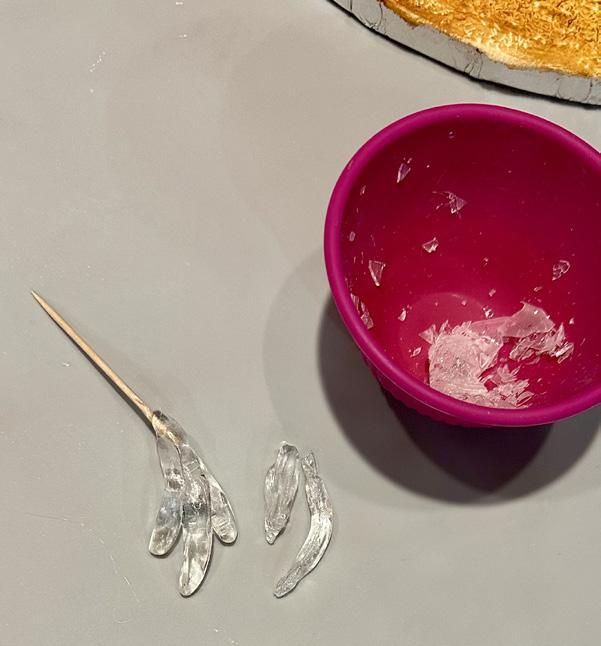
7. Heat about 1 ounce of clear isomalt. When it stops bubbling, lightly pour it into a silicone cup and let it sit for about 15 to 20 minutes to cool.
8. Create drops for the teapot and cup from the clear isomalt. Attach the isomalt drops to a toothpick so they can be stuck into the teapot. To seal the isomalt, spray it with edible glaze. ACD


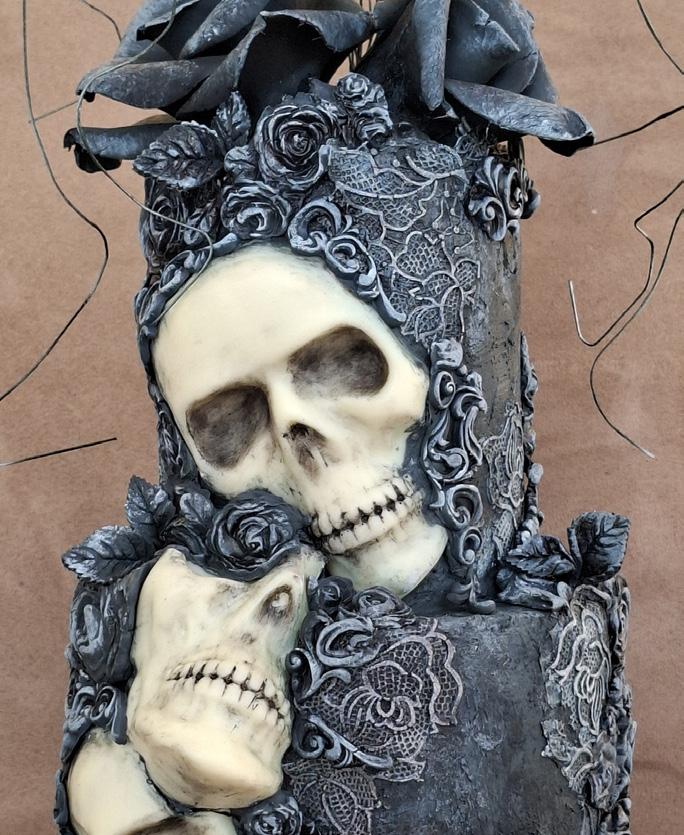
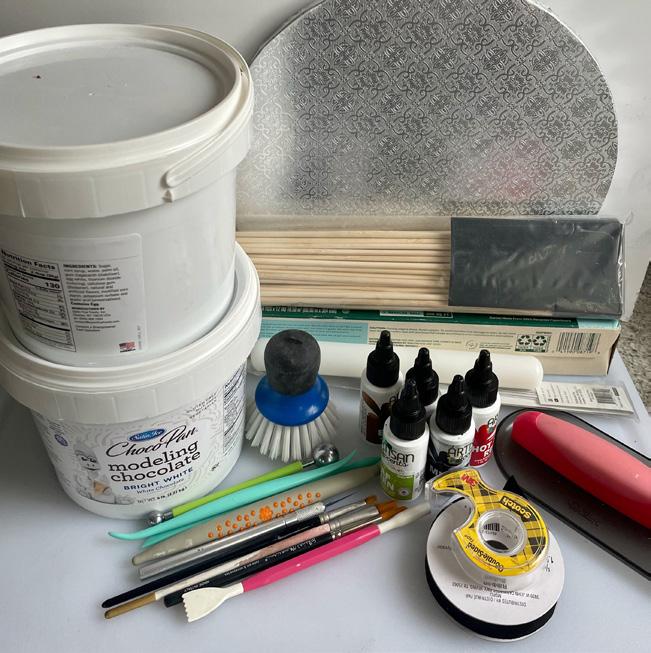
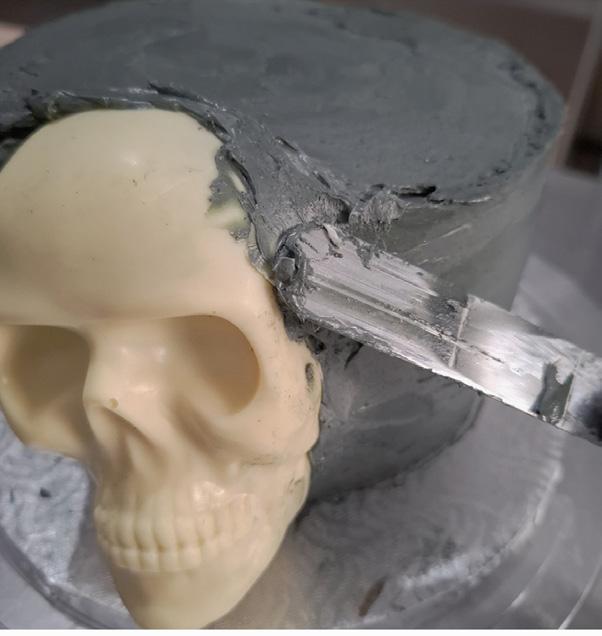
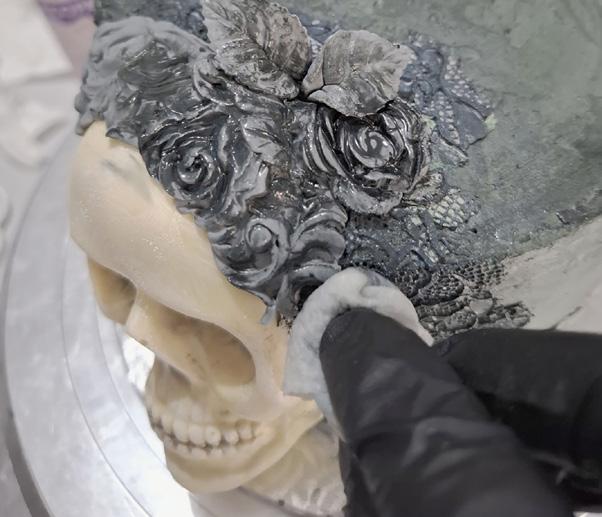
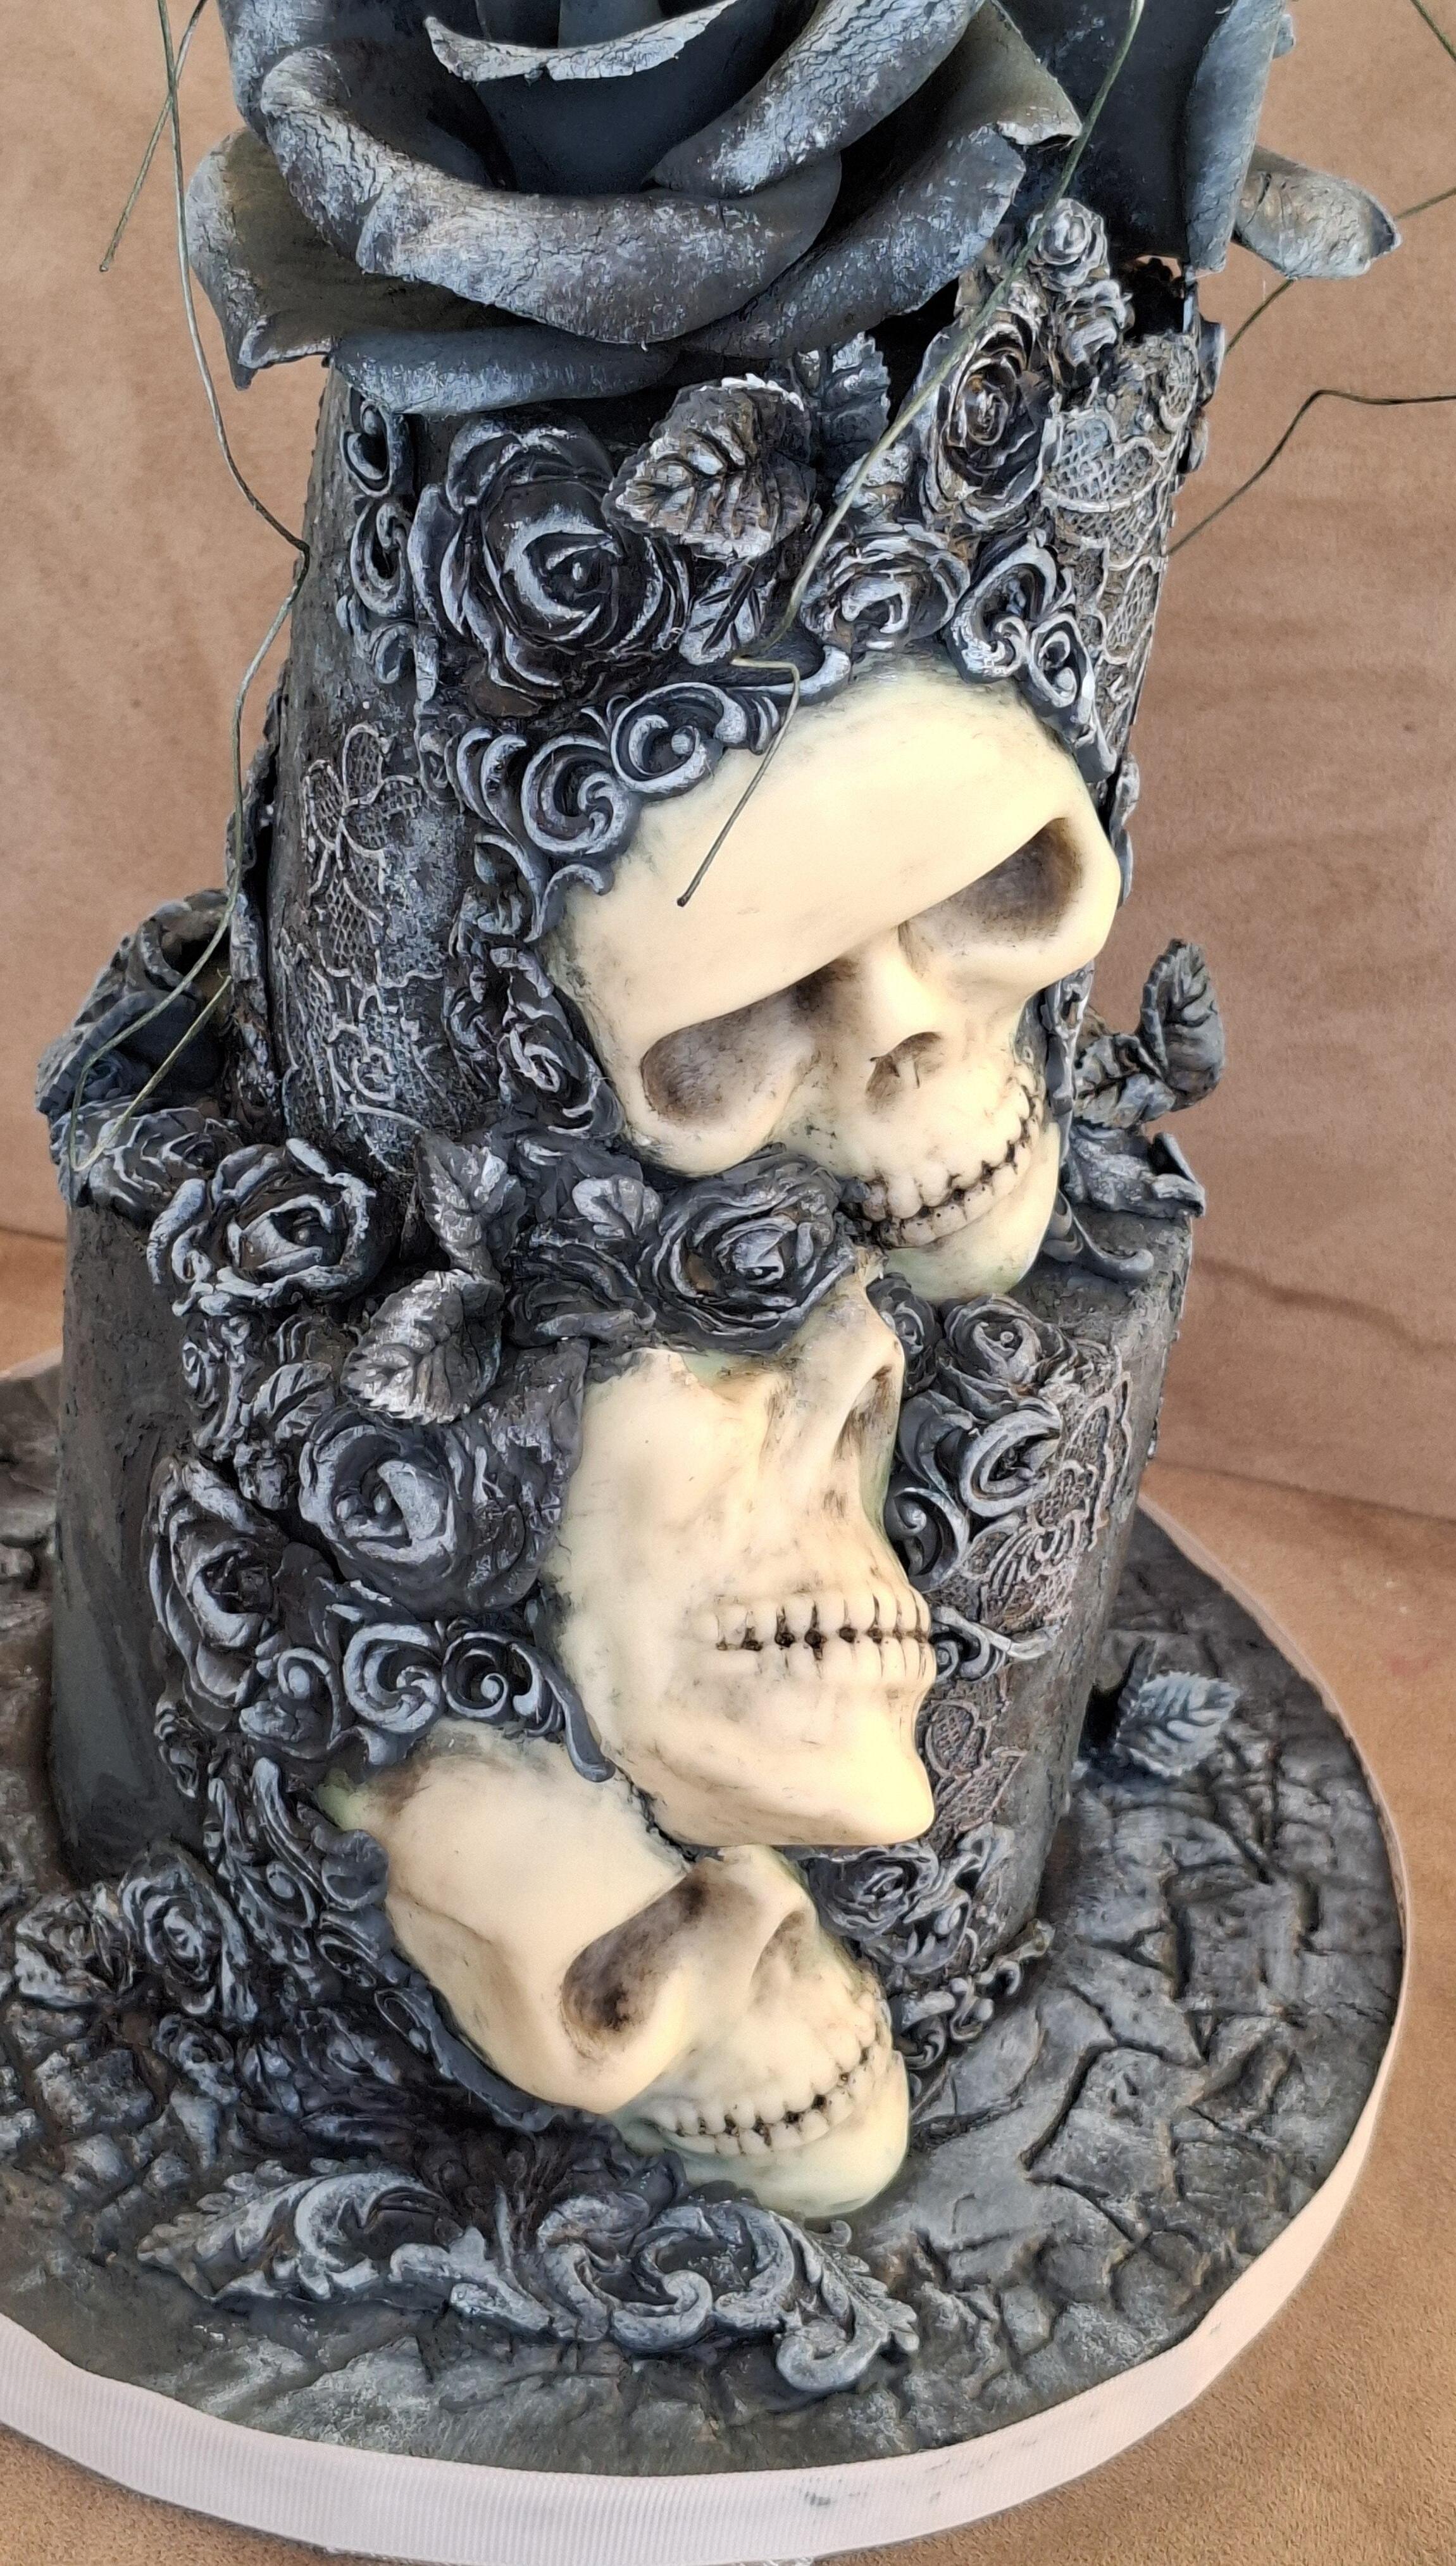
BY SABRINA SIGOUIN
LEVEL:
Edibles:
White chocolate
Cake
Buttercream
Gel food color: black, white, and gray
Gray fondant
Equipment:
Skull mold
Spatula
Paintbrushes
Paper towels
Lace mold
Filigree mold
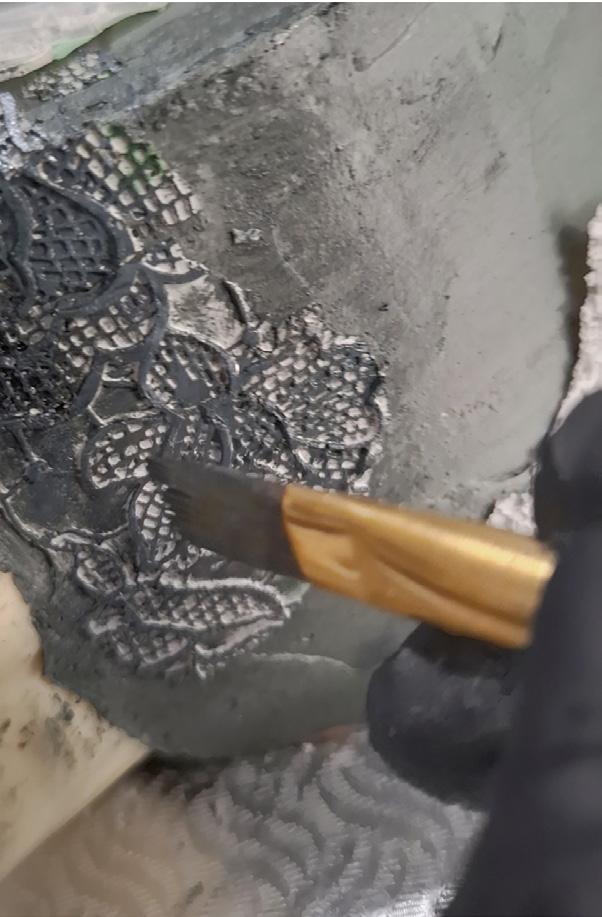
Rose mold
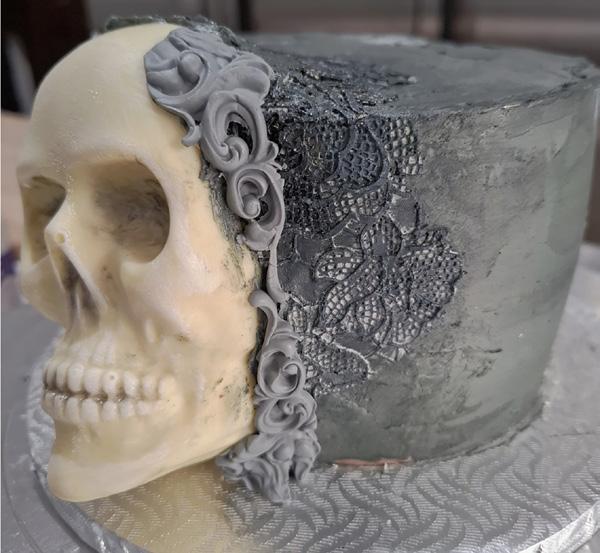
Leaf mold
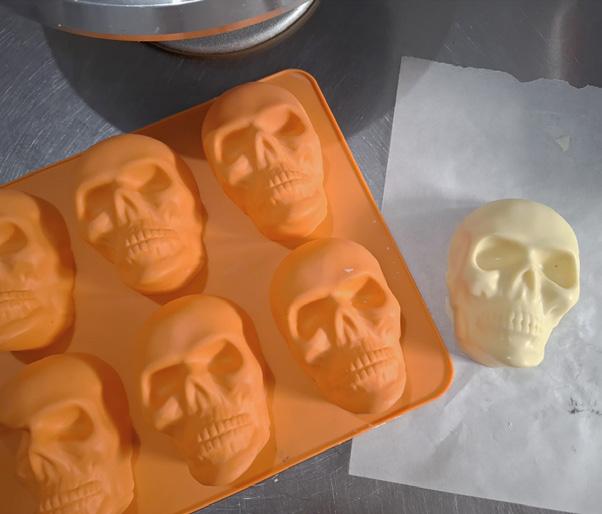
1. Mold the skulls in white chocolate. Place them in the refrigerator for 30 minutes to harden before demolding.
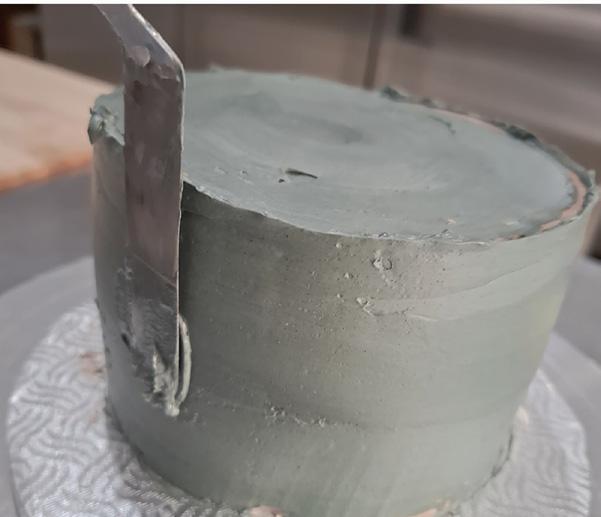
2. Fill and frost a cake with buttercream.
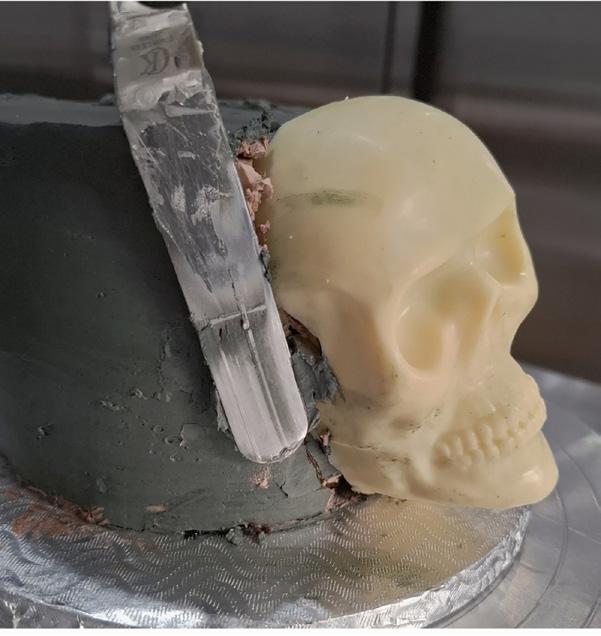
3. Embed a skull into the cake and coat the sides with buttercream.
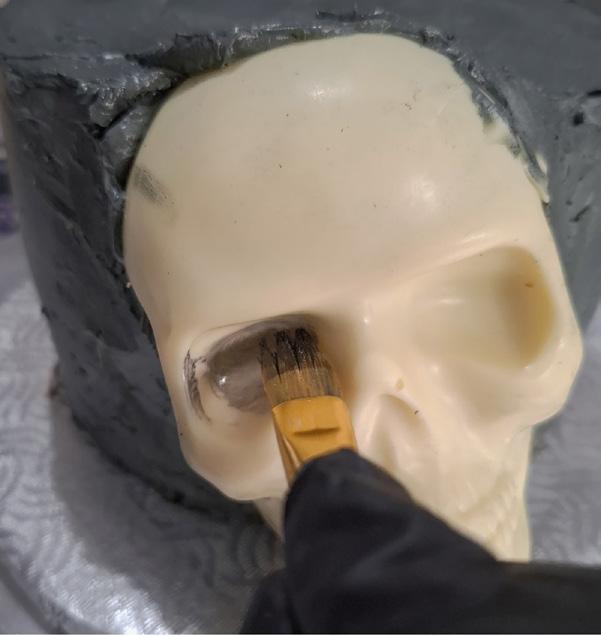
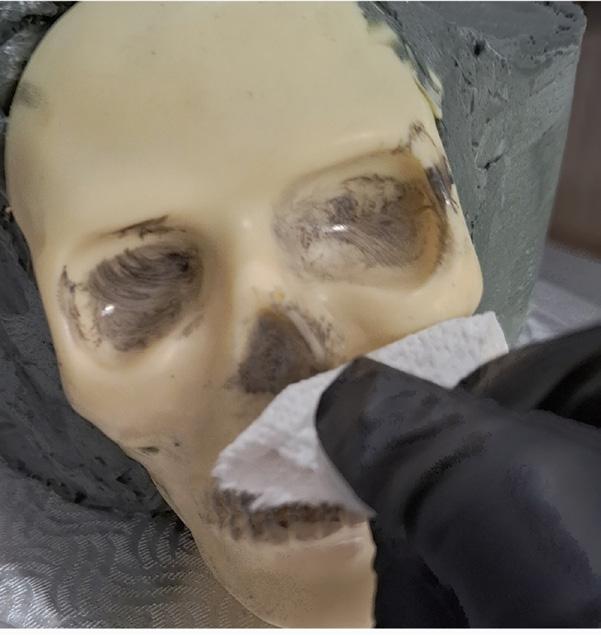
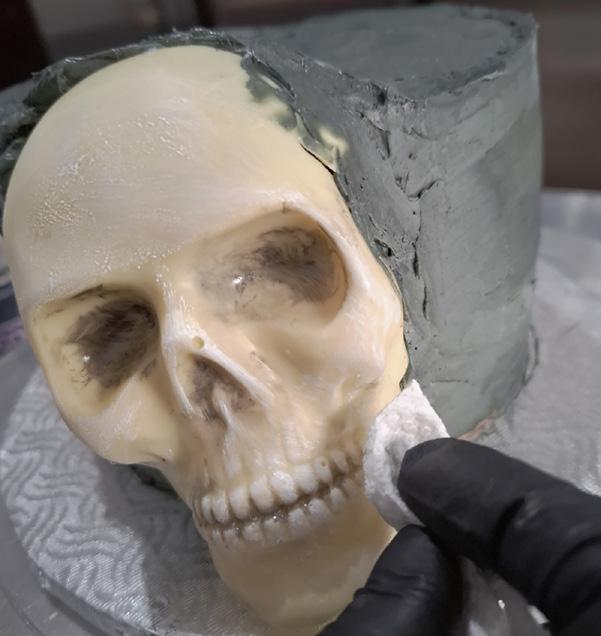
4. Paint the cavities of the skull with black gel food color and wipe away the excess with a paper towel.
5. Paint the protruding surfaces of the skull with white gel food color.
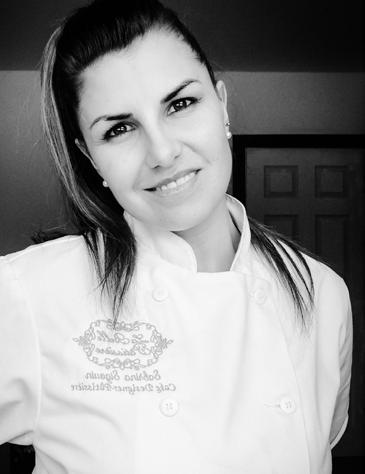
Sabrina Sigouin, cake designer and owner of La Belle Pâtissière, was an interior designer for seven years before she decided to return to school to follow her pastry dreams in 2015. Since 2016, Sabrina has created her own custom cake company, enjoyed Canada’s Baking and Sweets Show as an award winner in 2019, and most recently was a Food Network competitor in 2021.
labellepatissiere.com facebook.com/labellepatissiere instagram.com/labellepatissiere
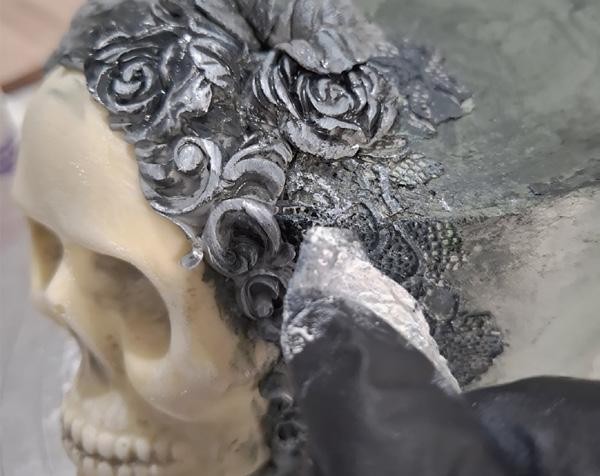
ADD THE APPLIQUÉ
1. Add gray fondant to the lace mold. Apply the fondant lace to the cake and paint it with gray gel food color.
2. Add gray fondant to the filigree mold. Remove it and attach along the contour of the skull.
3. Add gray fondant to the rose mold. Remove it and attach the roses in several spots.
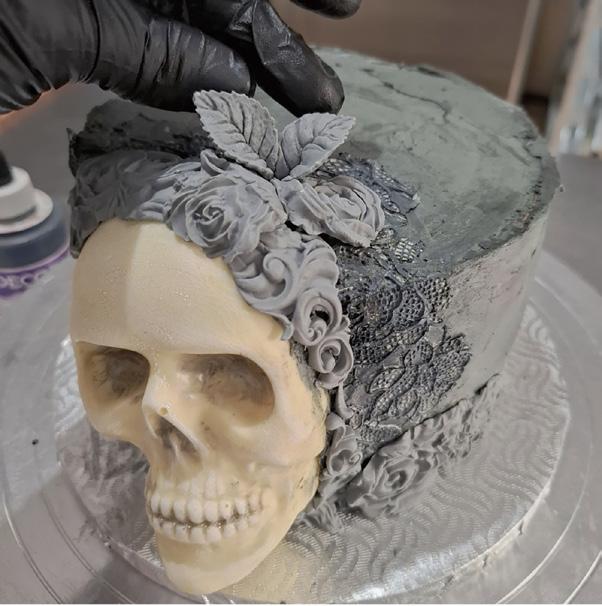
4. Add gray fondant to the leaf mold. Remove it and attach them near the roses.
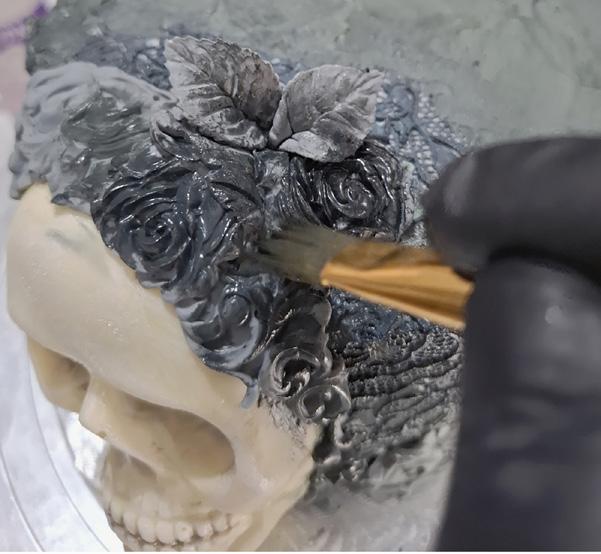
5. Paint the details of the roses and leaves with gray gel food color.
6. Wipe the excess paint off the top of the details with a damp paper towel.
7. Gently apply white gel food color on top of the details to create an antique effect. ACD
ip: YOU CAN USE TEMPERED WHITE CHOCOLATE OR MELTED WHITE CANDY MELTS TO CREATE THE SKULLS.
LEVEL:
LEVEL:
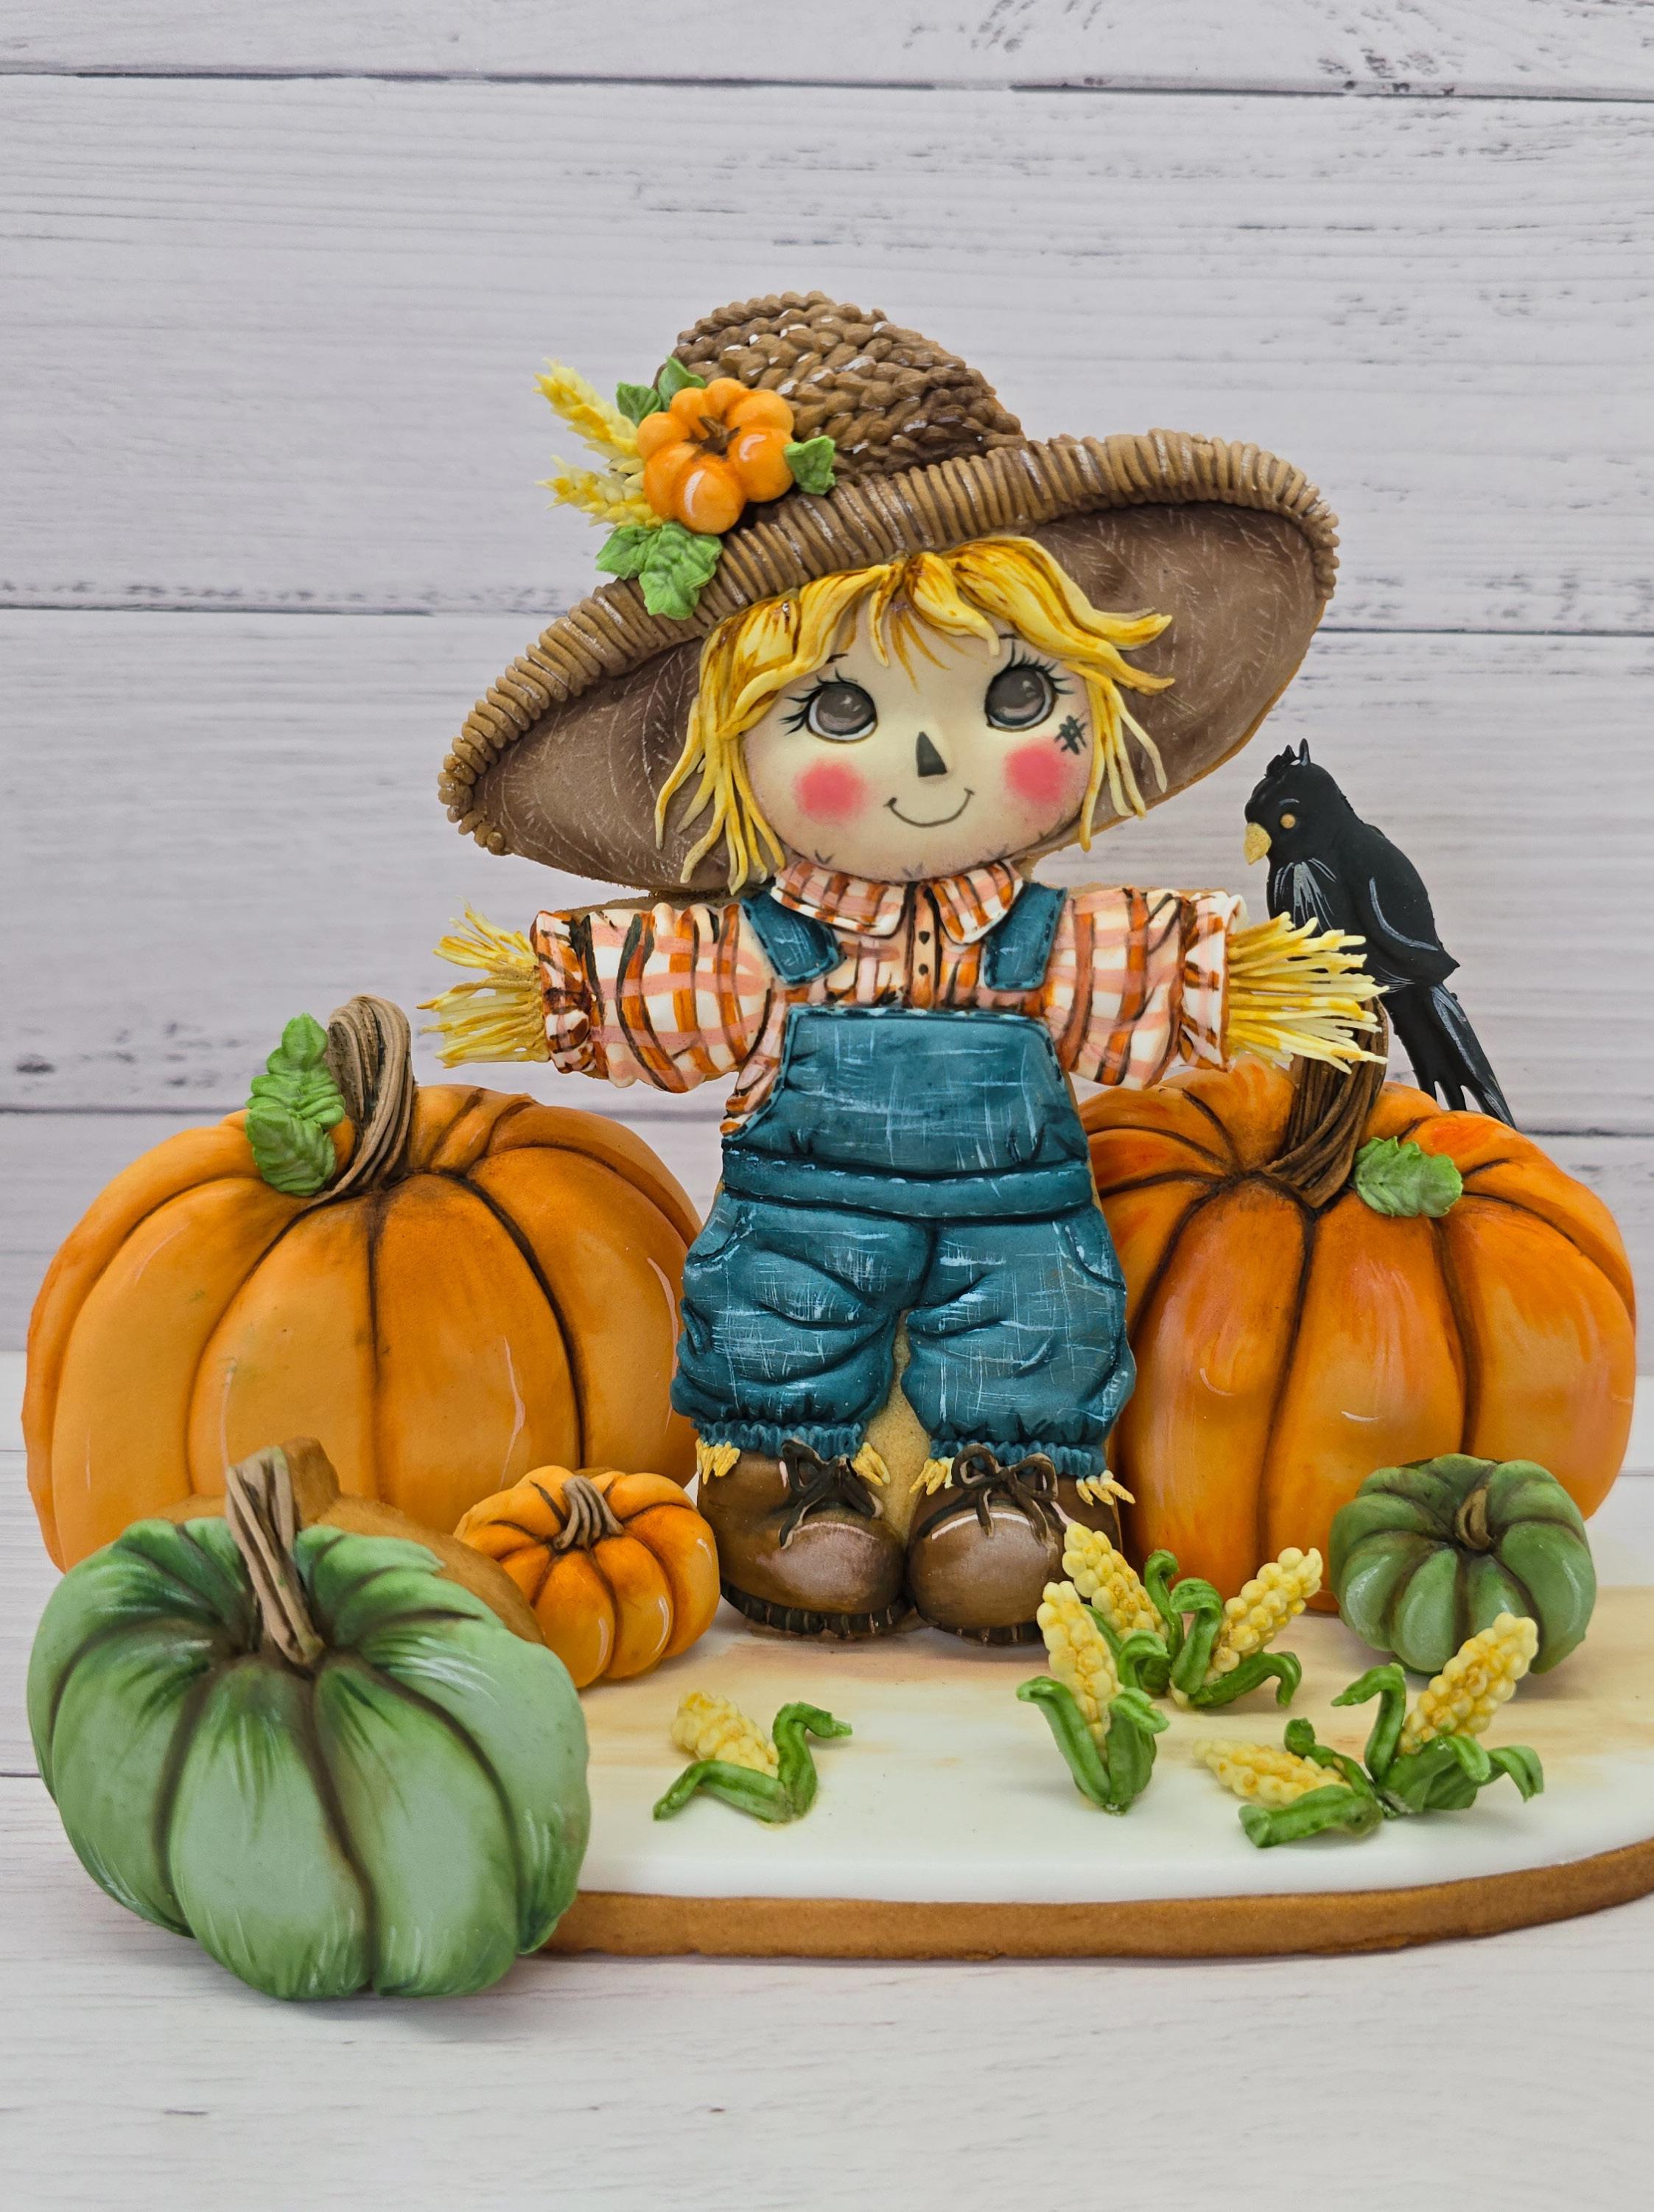
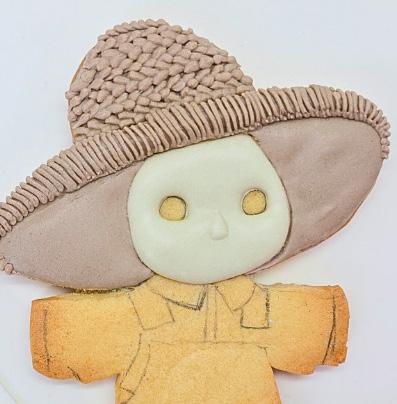
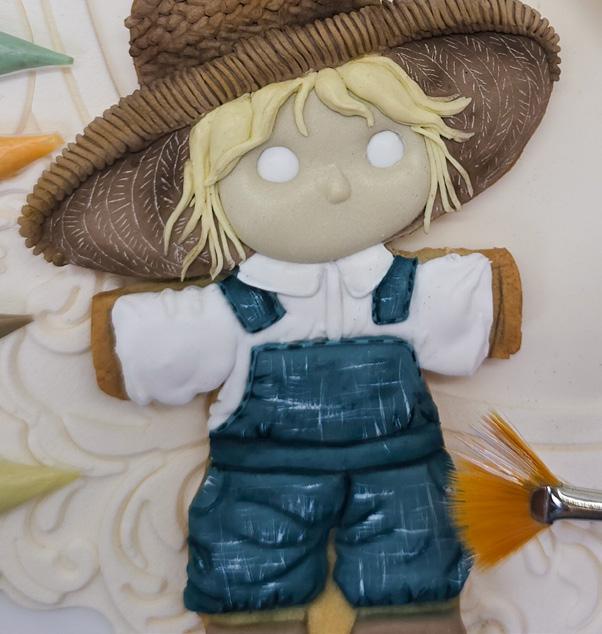
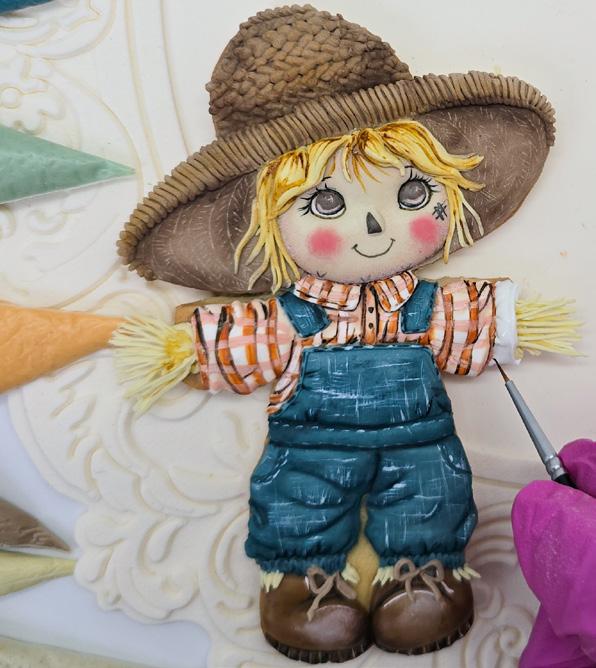
If autumn is one of your favorite seasons, this intricate cookie is for you.
BY MAGGY MORALES
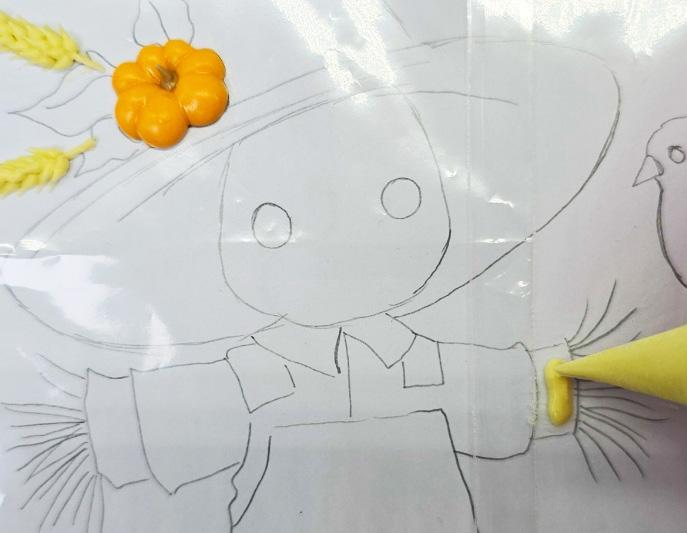
Edibles: Scarecrow cookie
Royal icing: sand, light brown, blue, white, light yellow, burnt orange, and moss green
Pumpkin cookies
Powder food color: dark brown, light brown, and pink
Gel food color: blue, white, light brown, burnt orange, black, dark brown, and moss green
Oval cookie
Equipment:
Piping bags
Spatula
Paintbrushes
Cellophane
X-Acto knife
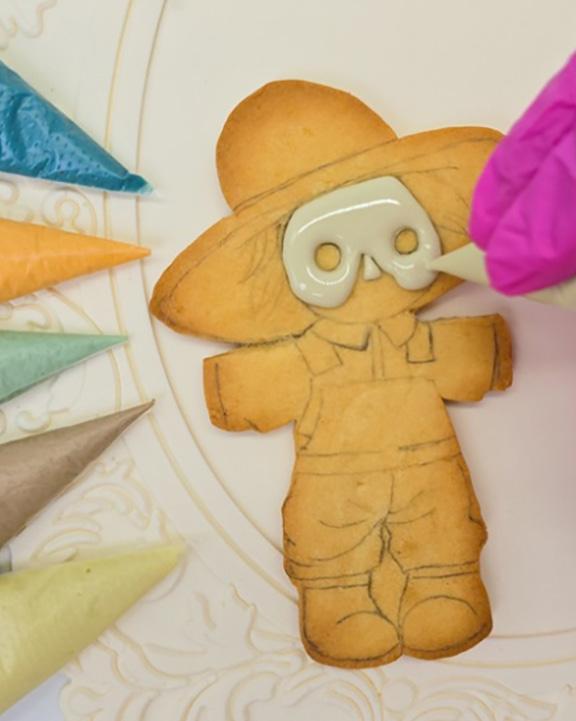
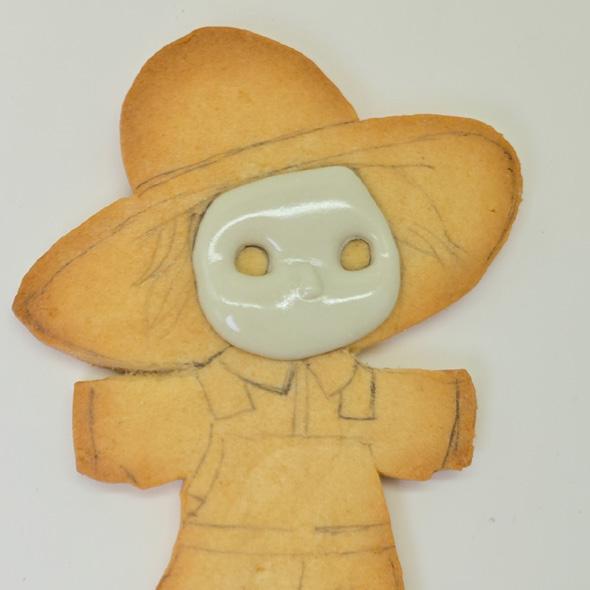
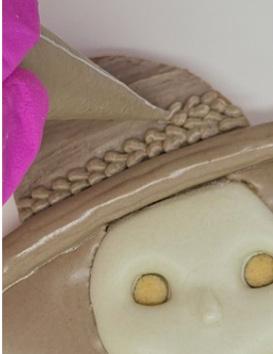
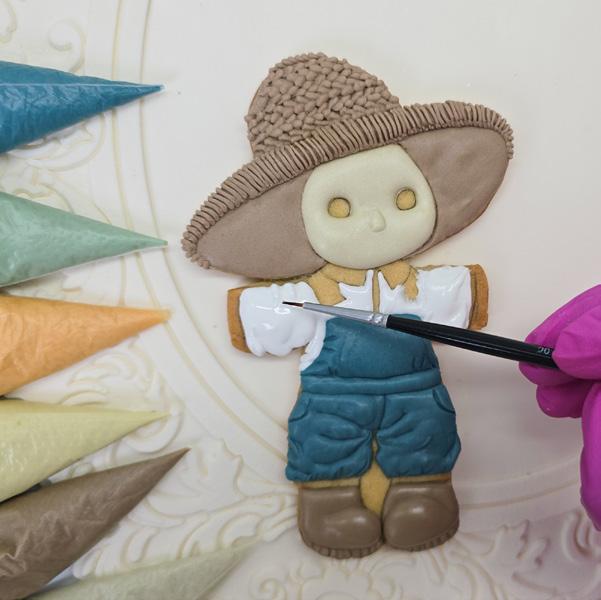
1. Using sand royal icing, outline the contour of the eyes and draw a triangle around the nose. To fill the face, start from the forehead and work your way down to the beard area, respecting and leaving the nose area for last.
2. Put a small drop of sand royal icing over the nose area again, gently making it larger and larger so it stands out while still maintaining the triangular shape.
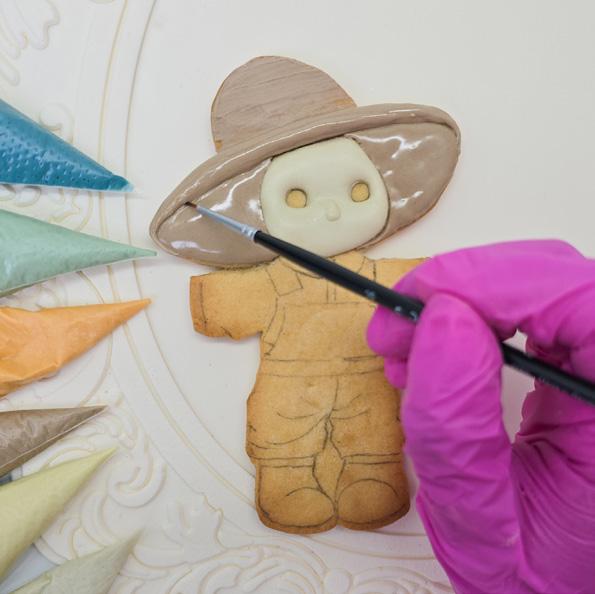
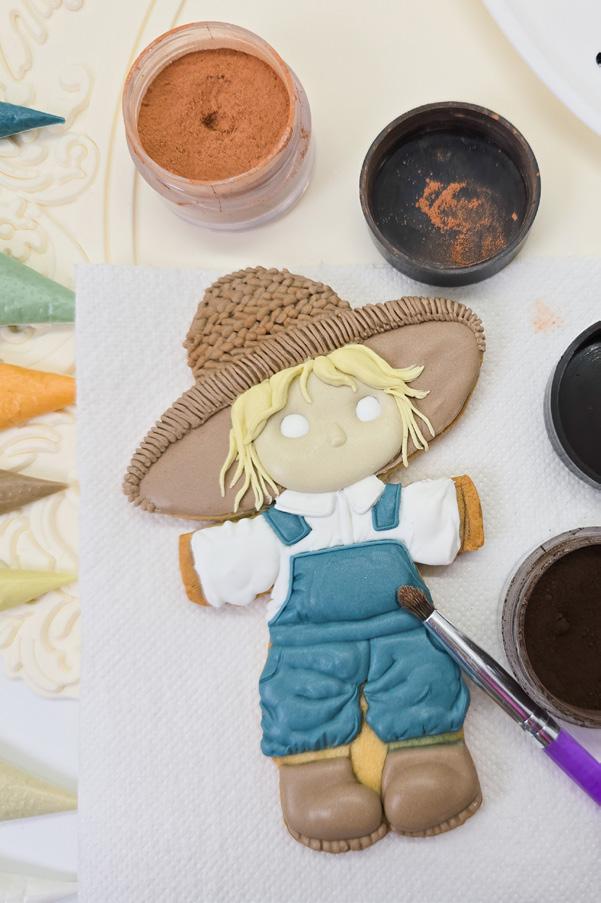
3. Using light brown royal icing, fill the bottom of the hat, adding a small amount of icing so it doesn’t go higher than the face. Just above the face, add a generous amount of royal icing, and on top, add a little icing and spread it with a spatula. Use a paintbrush to clean the area.
Maggy Morales lives in Monterrey, Mexico. She started making cookies for her children eight years ago and, little by little, her small cookie company, The Sweet Spot Cookies, began to grow. She specializes in 3D cookies and is currently a teacher of this sweet art. With each cookie, she tries to reflect her style and personality— and, above all, she uses her techniques to make them beautiful.
thesweetspotcookies.mx facebook.com/thesweetspotcookies instagram.com/thesweetspotcookies
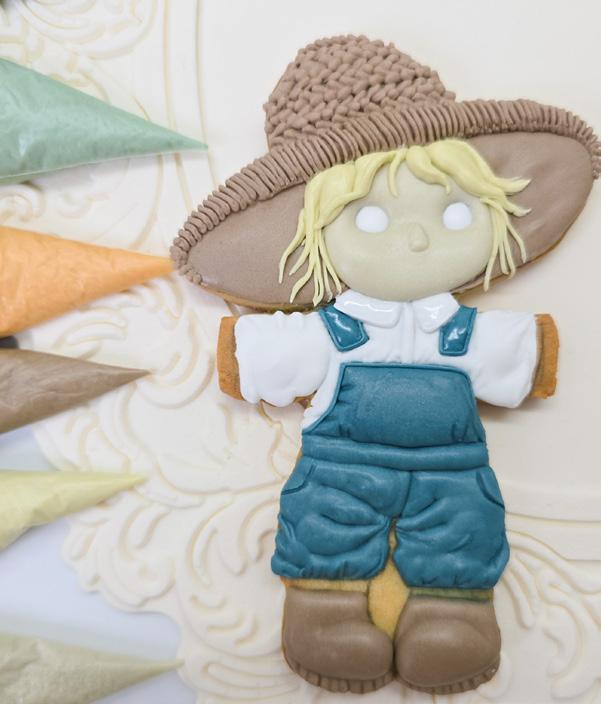
4. Use light brown royal icing with a firm consistency to pipe the hat. Place a drop of royal icing on the right side and gently pull it toward the center. Place another drop on the left side and pull it toward the center. Repeat to create a woven pattern. Alternate the directions as you pipe up the hat. Then, cover the brim of the hat with vertical lines.
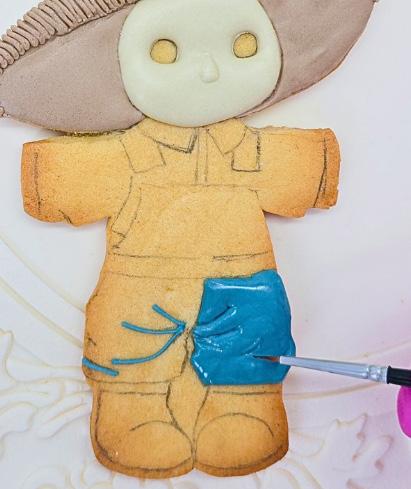
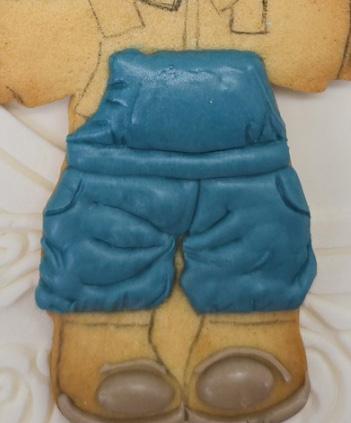
5. With blue royal icing, pipe wrinkle lines in the overalls, then fill them with more icing. Use a wet brush to accentuate the wrinkles in the clothes, making them more realistic.
6. Fill the waist area and then the chest of the overalls, concentrating a little more volume in the middle and making sure to mark plenty of wrinkles with the wet brush.
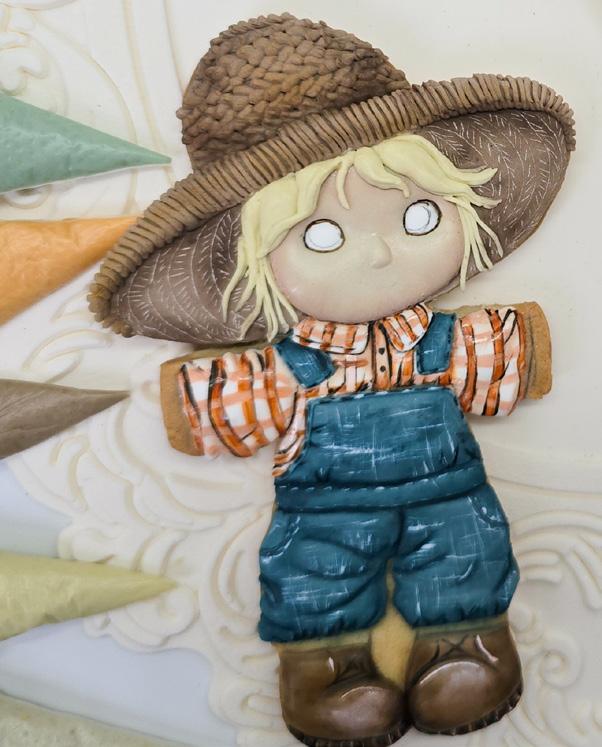
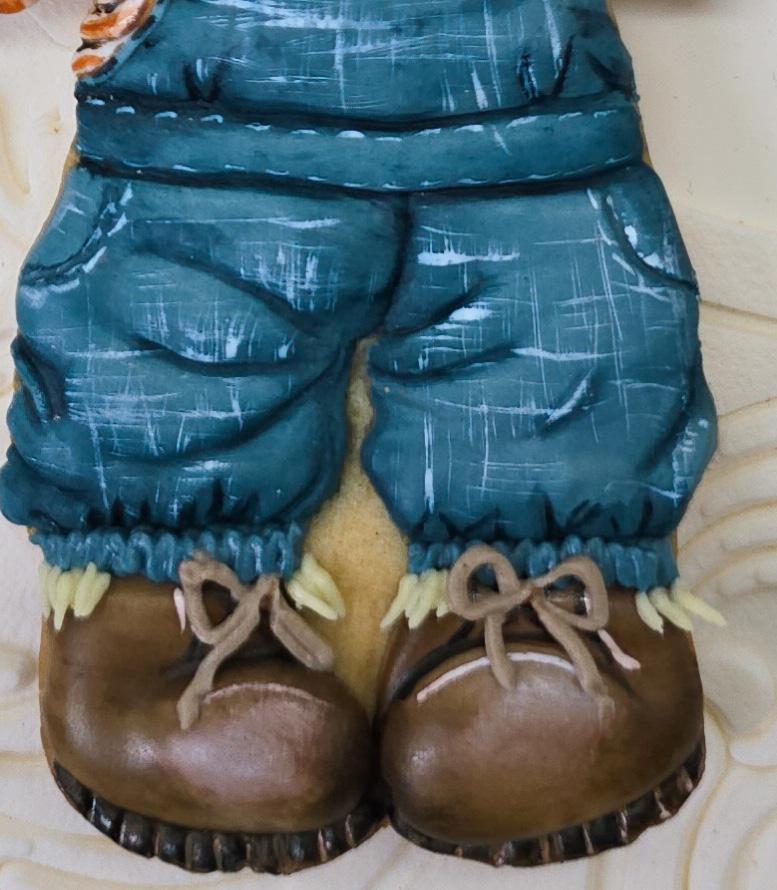
7. Use light brown royal icing to create the toes of the boots and then pipe a thick line on the soles. Texture it with a paintbrush.
8. Fill the shirt with white royal icing. To mark the wrinkles, draw small lines over the icing already applied. To achieve a more natural look, soften the edges so they are hidden. Use a damp brush to enhance the wrinkles.
9. Fill the eyes with white royal icing. Fill the overall straps with blue royal icing and then the collar of the shirt with white royal icing. With light yellow royal icing, pipe the hair.

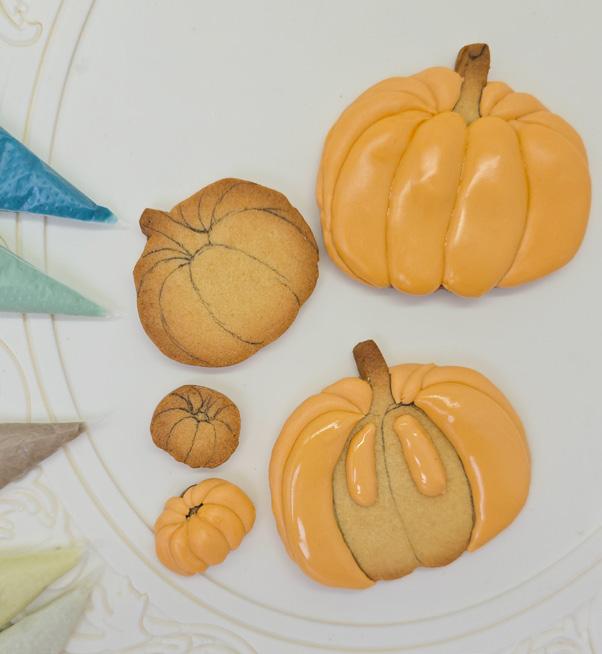
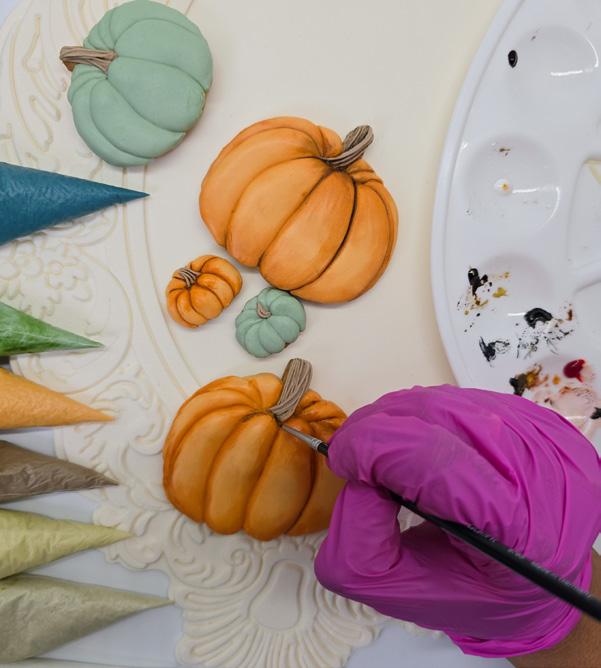
1. Use burnt orange royal icing to fill the back areas, then the sides, and then the front areas. Apply the icing in a circular motion, smoothing it out, and then leave it to dry. Add a double layer to the front areas to give them more volume.
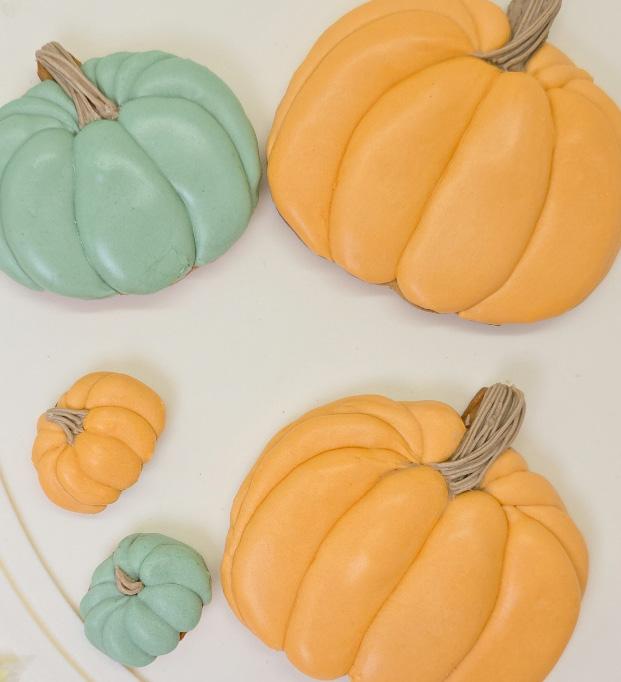
2. Pipe light brown royal icing for the stem. Start by adding a small amount of icing to the designated area, then pipe vertical lines to add texture. To make it look more realistic and give it a twisted effect, pipe a few lines starting from the lower left corner of the stem and extending
toward the upper right edge. Decorate more pumpkins in moss green.
3. Pipe transfers on cellophane over the scarecrow design. Pipe a small pumpkin, the wheat ears, a bird, and some corncobs. To make the straw for the sleeves, place a small amount of light yellow royal icing on the cuffs, then begin drawing slightly messy lines until they’re completely covered. Let everything dry completely before peeling them off.
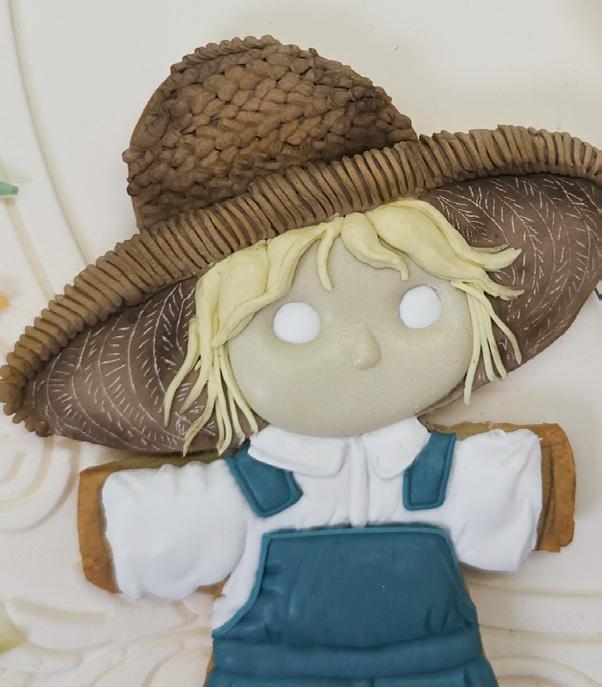
1. Use dark brown powder food color to shade the inside and sides of the hat. Shade the center with light brown.
2. Use an X-Acto knife to texture the inside of the hat, drawing tiny diagonal lines and alternating them to create a woven effect.
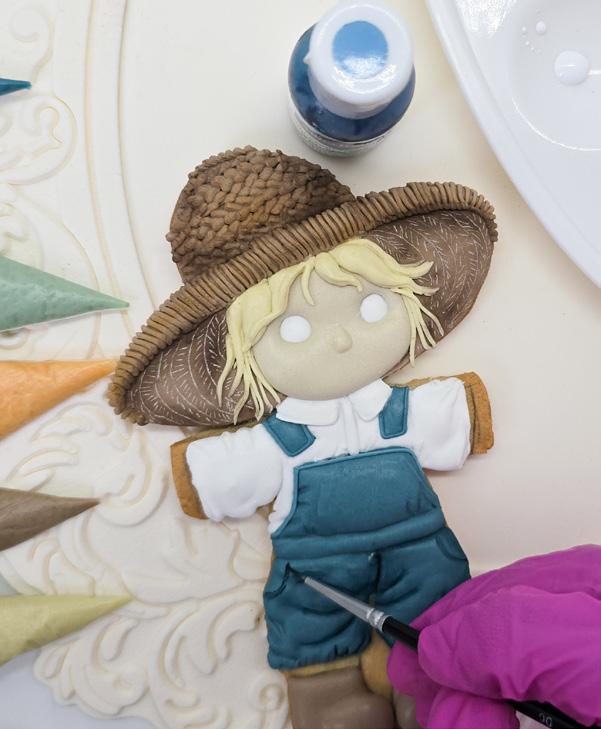
3. Shade the overalls with blue gel food color. Use a thin brush to apply paint to the wrinkles and then blend the paint, leaving the raised areas unpainted.
4. To make a denim effect, use a fan brush dipped in white gel food color, separate the bristles of the brush, and draw very soft horizontal and vertical lines.
5. To shade the shirt, use a very light brown gel food color to mark all the wrinkles and the lower areas. Then, with burnt orange gel food color, draw thick vertical lines, and with a lighter shade, draw horizontal lines, going over the orange lines that we already marked, to make the squares of the shirt.
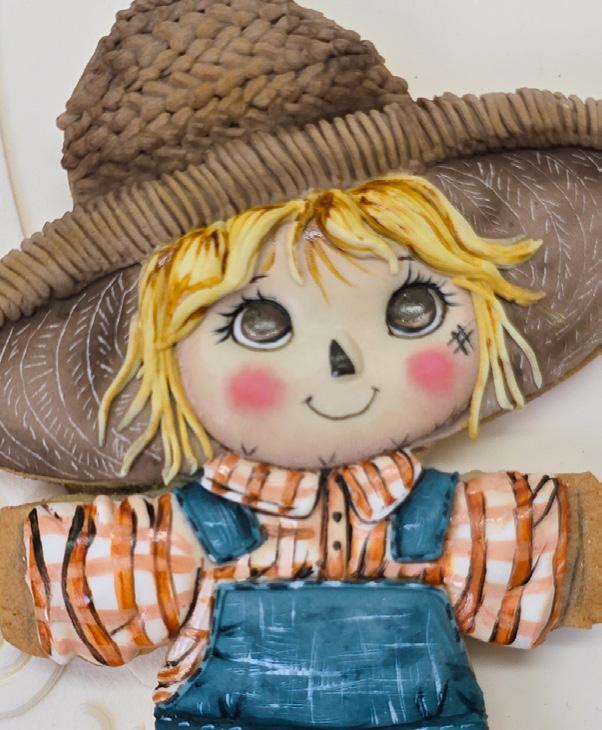
6. To shade the face, create a coffee color with a mix of white and brown gel food colors. With a liner brush and black gel food color, paint the contour of the eyes.
7. Using dark brown gel food color, paint the eyes. Add a little light with white paint on the lower part of the eye. With the liner brush, draw very thin eyelashes, eyebrows, a little mouth, and a nose with black gel food color. Use pink powder food color for the cheeks.
8. Shade the shoes with dark brown gel food color. With light yellow royal icing, pipe hay between the pants and shoes. Pipe blue royal icing to mimic elastic on the pant hems. Finish by piping light brown royal icing as the shoelaces.
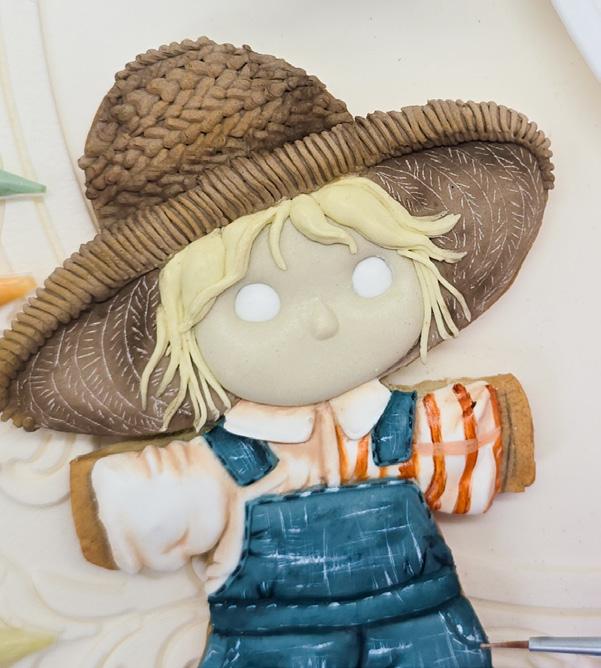
1. Pipe a little royal icing on the cuff of the shirt and stick the straw on. Then, cover that area with white royal icing. When it’s completely dry, follow the same design as the shirt.
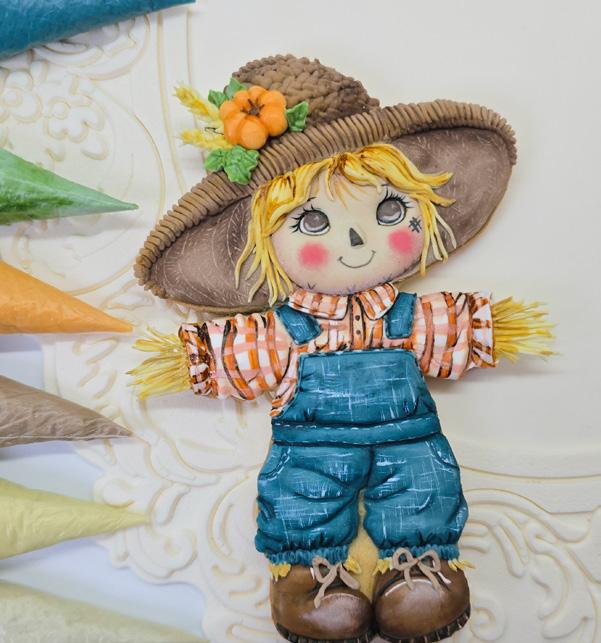
2. Attach the pumpkin and wheat transfers to the hat and pipe a few moss green leaves.
3. Paint shading details onto the orange pumpkins with burnt orange gel food color. Use brown gel food color to outline each area to give them more depth. Shade the green pumpkins with moss green gel food color.
4. Assemble all the cookie pieces on a pre-glazed oval cookie as the base. ACD Tip: USE MEDIUM-CONSISTENCY ROYAL ICING FOR THIS PROJECT UNLESS OTHERWISE STATED.

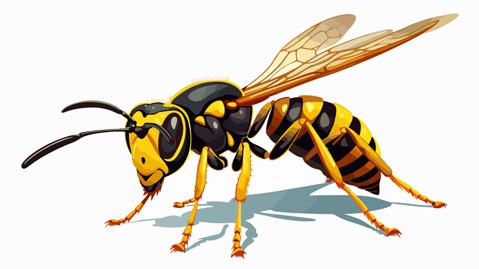
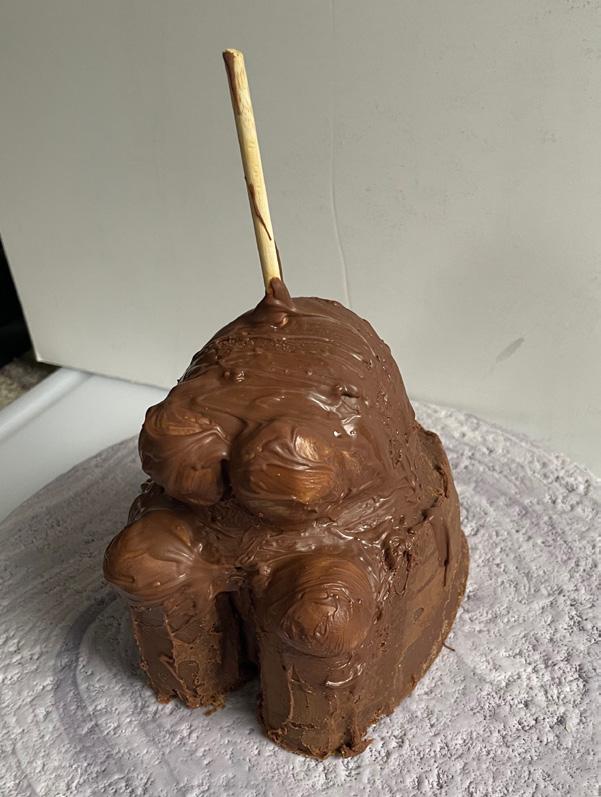
There are two kinds of people in this world: 1. Those who hear “wasp’s nest cake” and assume it involves an emergency room. 2. Those who’ve eaten it at a church bake sale right next to the “salad” made of marshmallows and crushed pineapple.
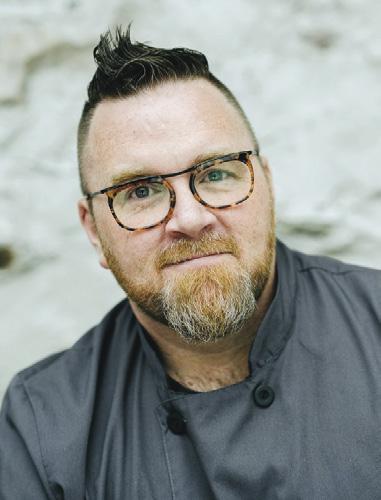
Scott Bradshaw is the owner of sevenravensbakehouse.com, an entertaining blog which strives to get people to look at food and recipes in a twisted way … as twisted as an old phone cord. Scott grew up in Texas, and has lived in Arizona, Nevada, and Missouri. He makes Plainville, Massachusetts, his home these days with his saintly husband and a bossy little Pomeranian.
sevenravensbakehouse.com tiktok.com/@goosecaboose70
BY SCOTT BRADSHAW
I met wasp’s nest cake at a church bake sale. It sat quietly on a foldout table between a Crock-Pot full of boiled hot dogs and a pan of lemon bars that were aggressively lemoning. Someone’s great aunt, probably named Carol, hovered nearby and muttered, “You have to try the hornet one. I used real milk.”
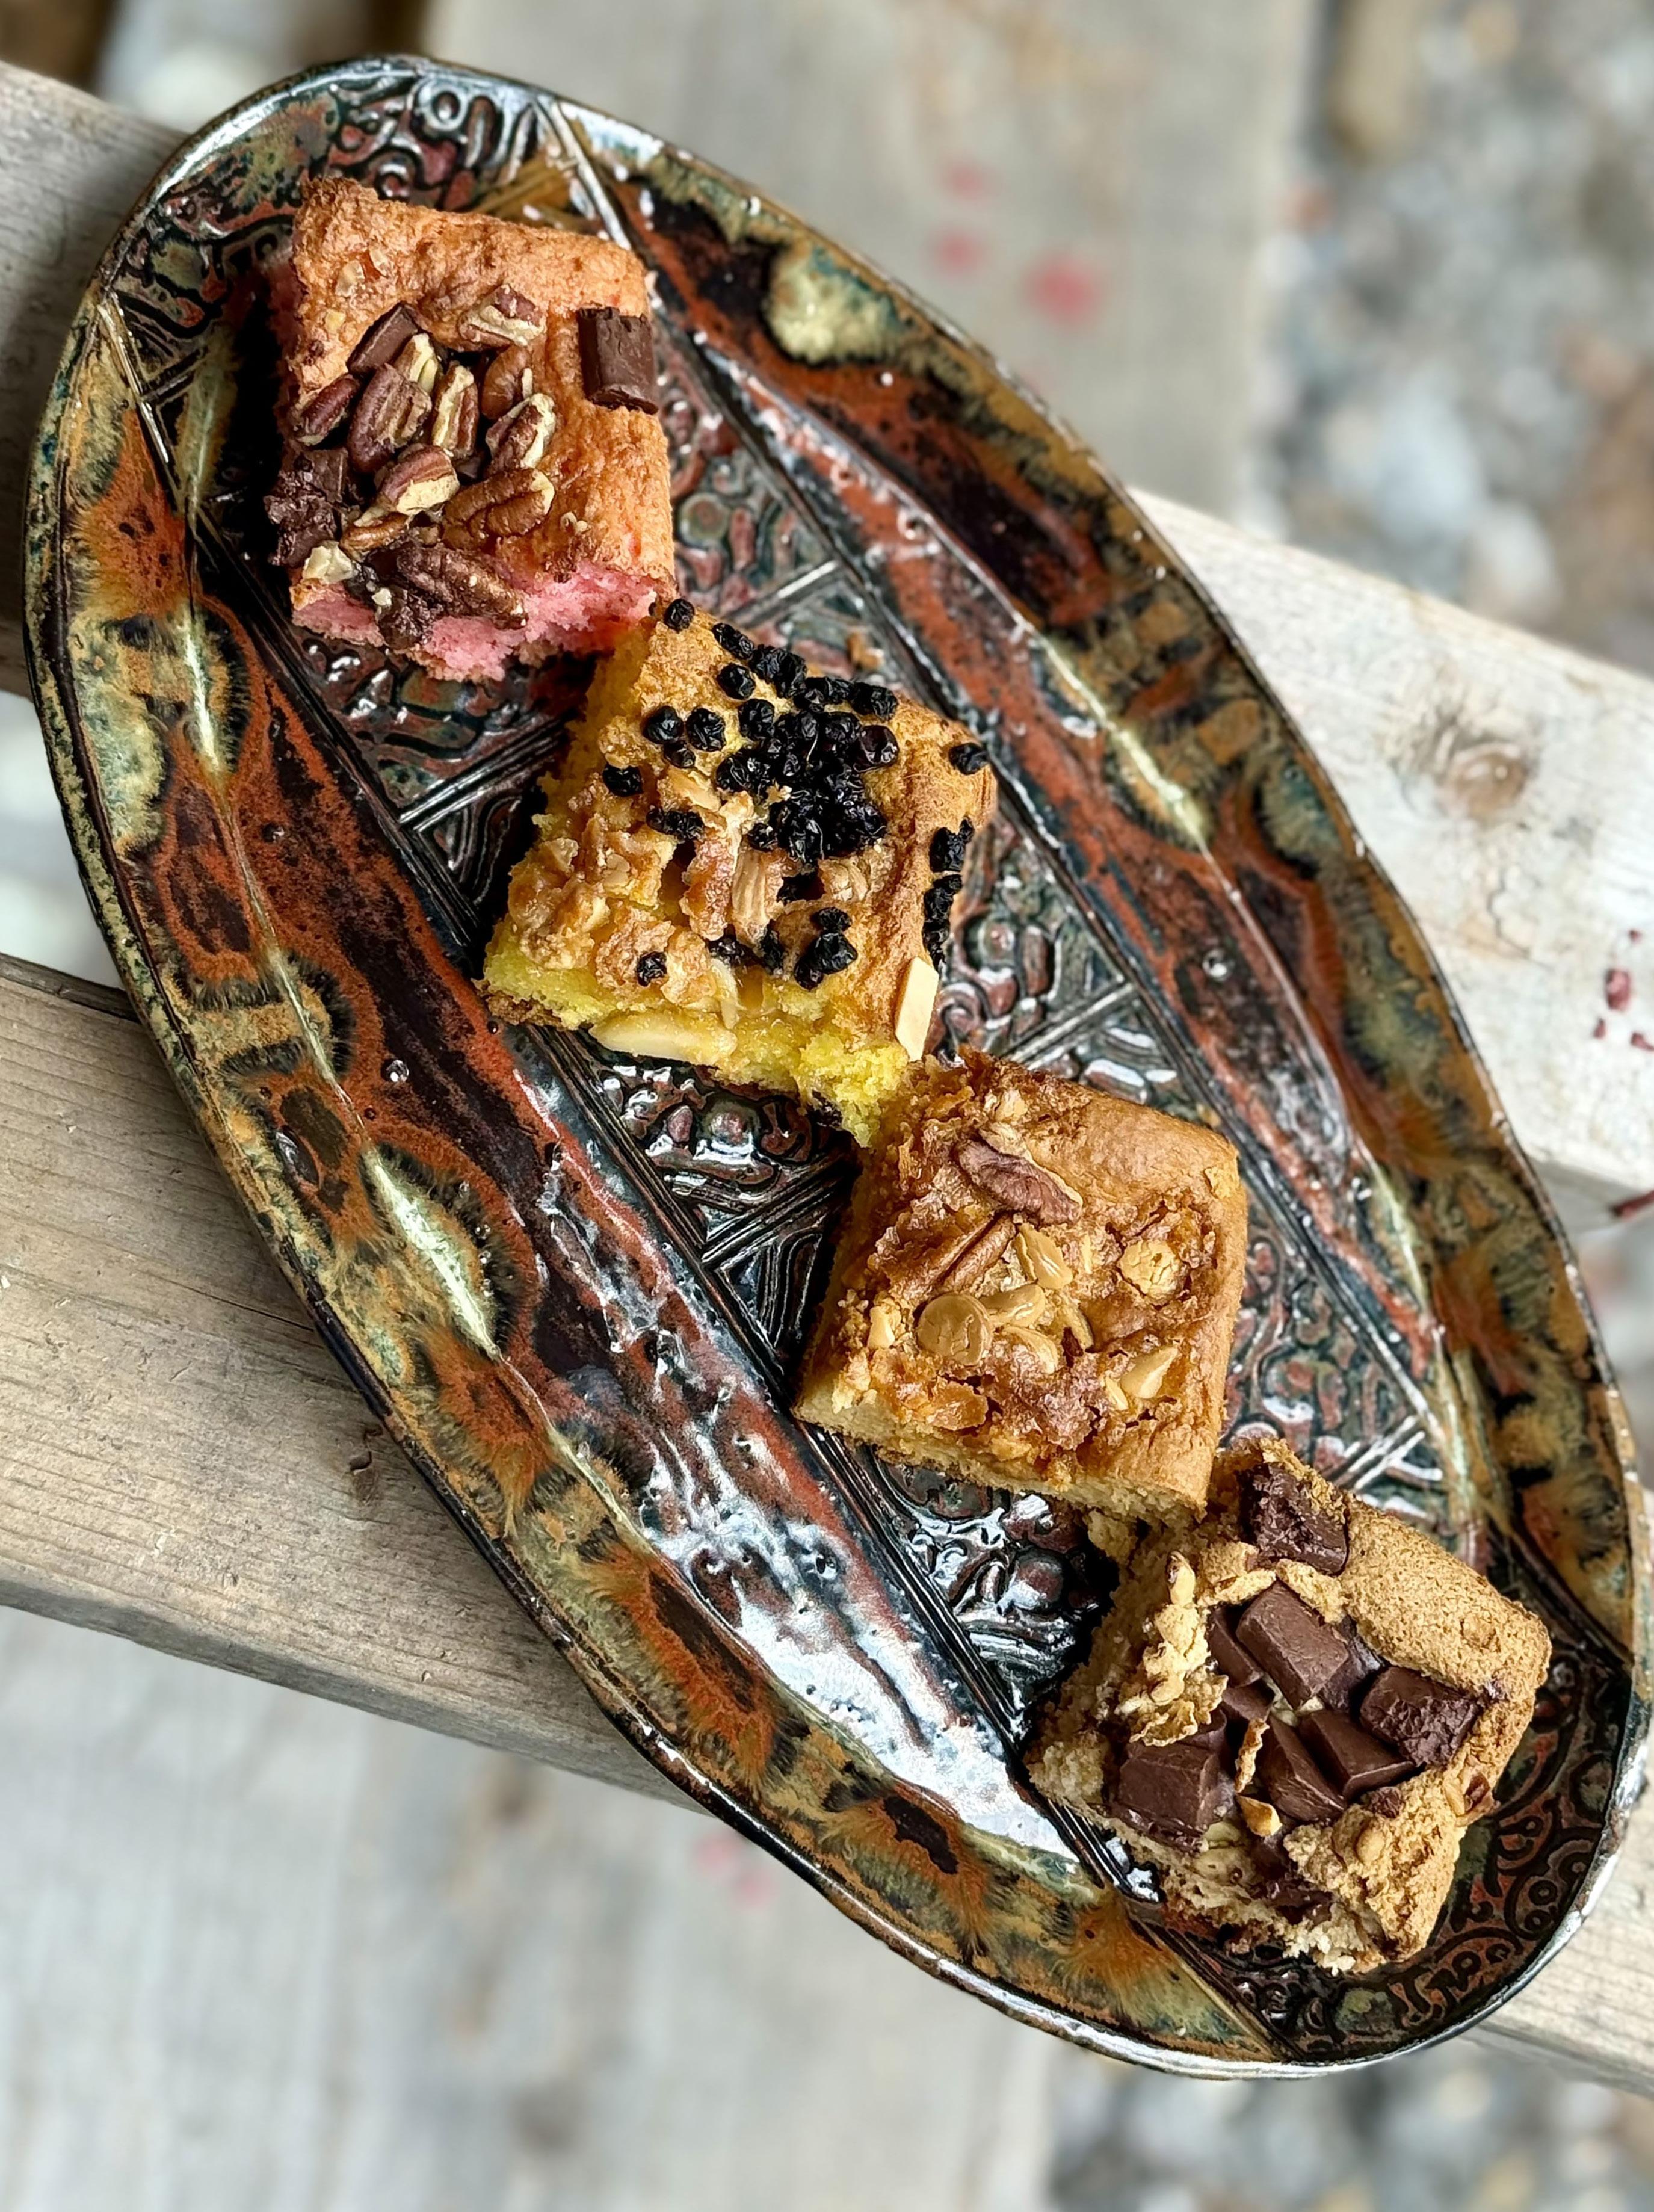
Despite sounding like something you’d fling out a window while screaming, wasp’s nest cake (sometimes called hornet’s nest cake, depending on your region, congregation, or species preference) is a sleeper dessert. It doesn’t look like much. It doesn’t announce itself. But it will fly quietly into your life, burrow into your recipe box, and become the thing you’re “just bringing real quick” to every potluck from now until you die because it’s simple. It’s a butterscotch-pecan-laced casserole of gooey cake meets crunchy top, made from a humble box of cake mix and a few pantry staples.
This cake likely appeared on the side of a pudding box sometime in the 1970s, when suburban America was high on instant everything and a can
of condensed soup could end up in dessert. The wasp’s nest cake was a hit because it was easy, cheap, and impossible to screw up.
The name? Unconfirmed. Maybe the top reminded someone of a nest, with pecans and chips scattered like crunchy chaos. Or maybe Barb from the Kiwanis Club was bored and buzzed on white zin. Who’s to say? Either way, the name stuck. So did the recipe.
It is not: fancy, fussy, remotely modern. It is: chewy, buttery, rich with butterscotch flavor, a casserole pretending to be cake. The texture is its trademark. The top becomes a crackly, candy-like crust while the interior stays dense and soft. The butterscotch chips sink in like treasure. The pecans hover on top, toasting as they bake. Imagine a blondie and a pudding cake hooked up in a casserole dish. Now, imagine they invited pecans and butterscotch chips to the party and baked themselves into something warm and nostalgic. That’s the vibe.
But is it cake? Technically, yes. Spiritually, it’s a bar because it
Tip: THIS CAKE TASTES EVEN BETTER THE NEXT DAY, ONCE THE FLAVORS MELD AND THE TEXTURE
TOPPED
behaves more like a dessert bar than a traditional cake. You don’t frost it. You don’t layer it. You don’t even really serve it warm. You bake it, cool it, and cut it into squares like God and Tupperware intended.
The pudding mix gives the batter extra moisture and structure. The milk loosens it up just enough to let the butterscotch chips drift downward, caramelizing in the middle. And the dry cake mix? It’s not mixed as directed on the box—just added straight to the pudding mixture for a denser, more compact result. Science? Yes. Sorcery? Also yes.
THE HIVE IS FLEXIBLE
The original wasp’s nest cake is a butterscotch-and-pecan classic, but
once you understand the formula, the hive is yours to command. Think of the base as a framework— pudding mix, milk or liquid, dry cake mix, chips, and nuts—and then let chaos reign.
For the holidays, lemon cake mix with lemon pudding, white chocolate chips, and a handful of dried cranberries make a tart-sweet square that tastes like a Hallmark movie baked itself. Add a little orange zest and it becomes aggressively festive. Pair it with a candle that smells like pine and seasonal emotional baggage.
Feeling tropical? Swap in banana cake mix (or yellow with a banana pudding cheat), toss in caramel chips, and top with toasted walnuts. It’s a bananas Foster fever dream in casserole form. Serve it to guests you
like just enough to give them sugar … but not enough to make pie from scratch.
Want to walk on the dark side? Try chocolate cake mix, chocolate pudding, semisweet chips, and chopped almonds. Suddenly, you’re halfway to a brownie but with the nostalgia of a dessert from a 1976 church bake-off. Bonus: sprinkle with espresso powder and pretend you’re classy.
There’s no wrong way to nest. Just follow the ratio and let the chips fall (and sink) where they may. It is perfect in its vintage simplicity—a mash-up of cake, pudding, candy, and crunch that dares to call itself dessert without a crumb of shame. Call it wasp’s nest cake. Call it hornet’s nest cake. Just don’t call it fancy. This is potluck royalty.
WASP’S NEST CAKE (A.K.A. HORNET’S NEST CAKE)
INGREDIENTS
1 (3.4 ounces) box instant vanilla or butterscotch pudding mix
1¾ cups whole milk
1 (14.25 ounces) box yellow cake mix
1 (11 ounces) bag butterscotch chips
1 cup chopped pecans
1. Preheat oven to 350°F. Generously grease a 9 x 13–inch baking dish.
2. In a large bowl, whisk together the pudding mix and milk until smooth and slightly thickened.
3. Add the dry cake mix to the bowl. Stir until just combined.
4. Pour the batter into the greased dish and spread it evenly.
5. Sprinkle the butterscotch chips and chopped pecans over the top like you’re feeding squirrels.
6. Bake for 35 to 40 minutes, until the edges are golden and the center is just set.
Optional: Dust with powdered sugar. Add a fake plastic wasp if you enjoy drama and lawsuits. ACD
Improve your baking by finding upgrades for your everyday essentials.
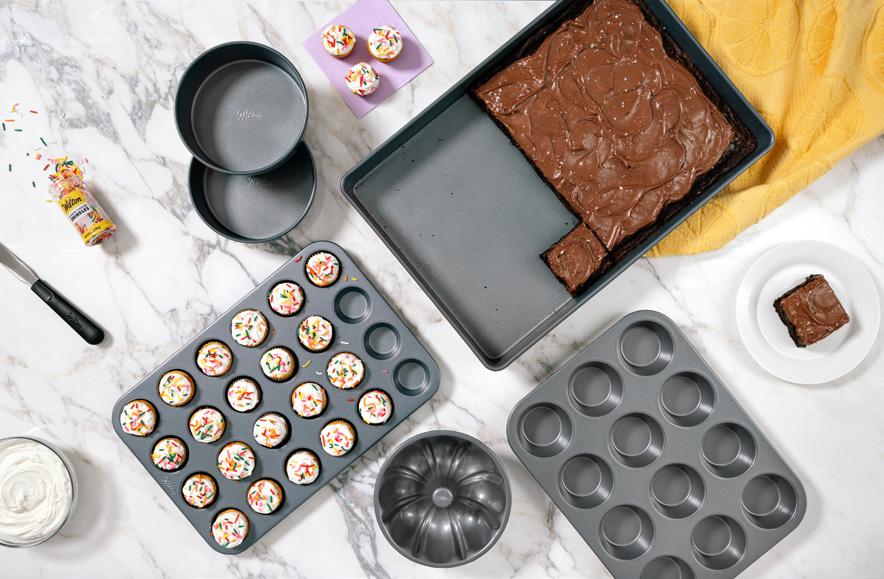
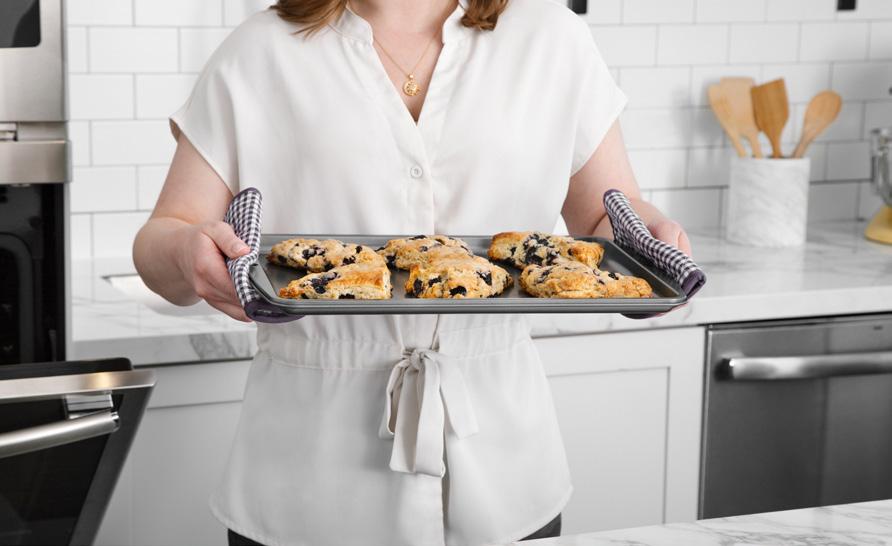
At the heart of Wilton’s new product lineup is the brand’s commitment to making baking and decorating more accessible, more fun, and more flavorful. The newly structured bakeware portfolio makes it easier for consumers to “pick their pan” and find products that suit their baking needs, experience level, and budget. Choose between Everyday for kitchen newbies and budding bakers, Premium for baking hobbyists and busy parents, Ultra for high-performance home baking, and Aluminum for professional precision. All Wilton bakeware is designed in the USA and made without PFAS “forever chemicals” for safety—all while delivering quick-clean, nonstick performance.
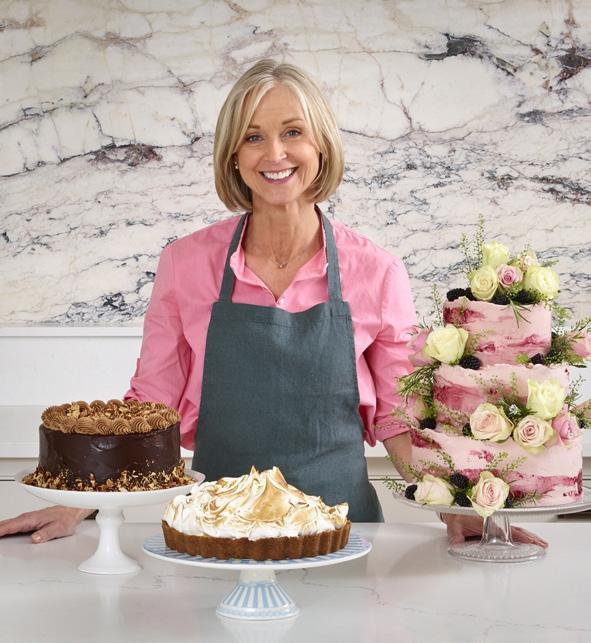
World-renowned cake artist, baking expert, and founder of Little Venice Cake Company Mich Turner launched her first-ever U.S. debut collection exclusively on HSN. Already creating buzz among foodies and design lovers alike, the curated bakeware line features professional-grade baking tools designed to make home baking both accessible and aspirational. The collection is every bit as elegant and elevated as you’d expect from the woman behind cakes for royalty, celebrities, and luxury brands. Products range from $20 to $70. For more information, tune into HSN or log on to hsn.com
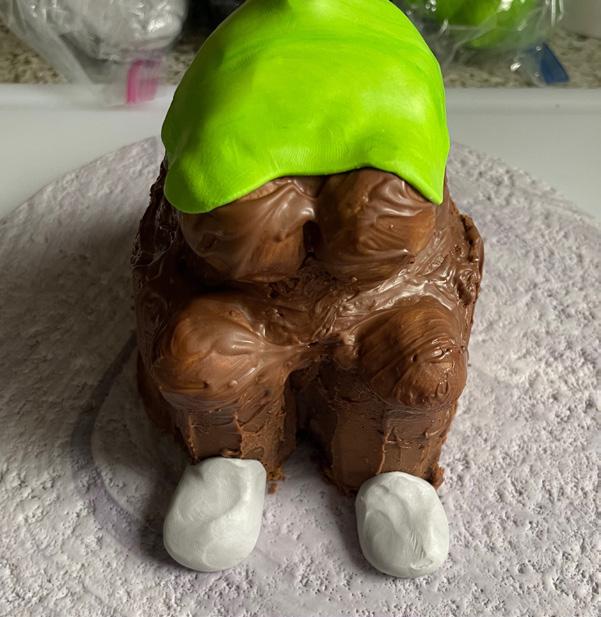
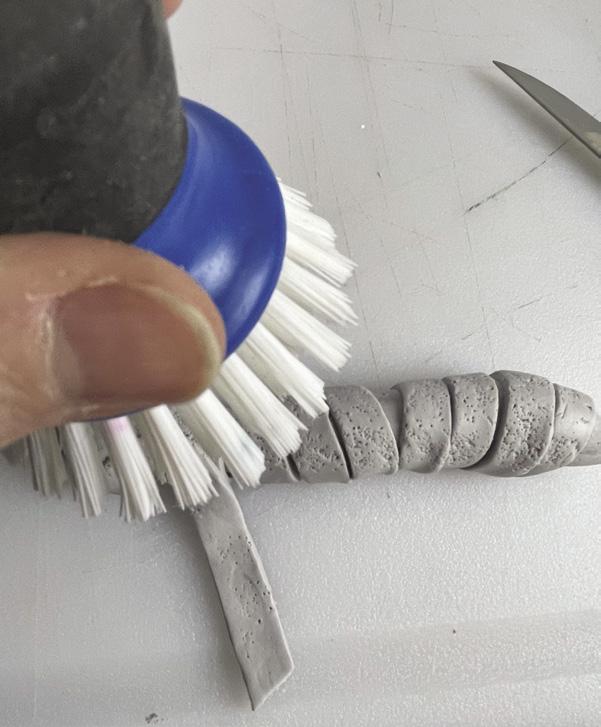
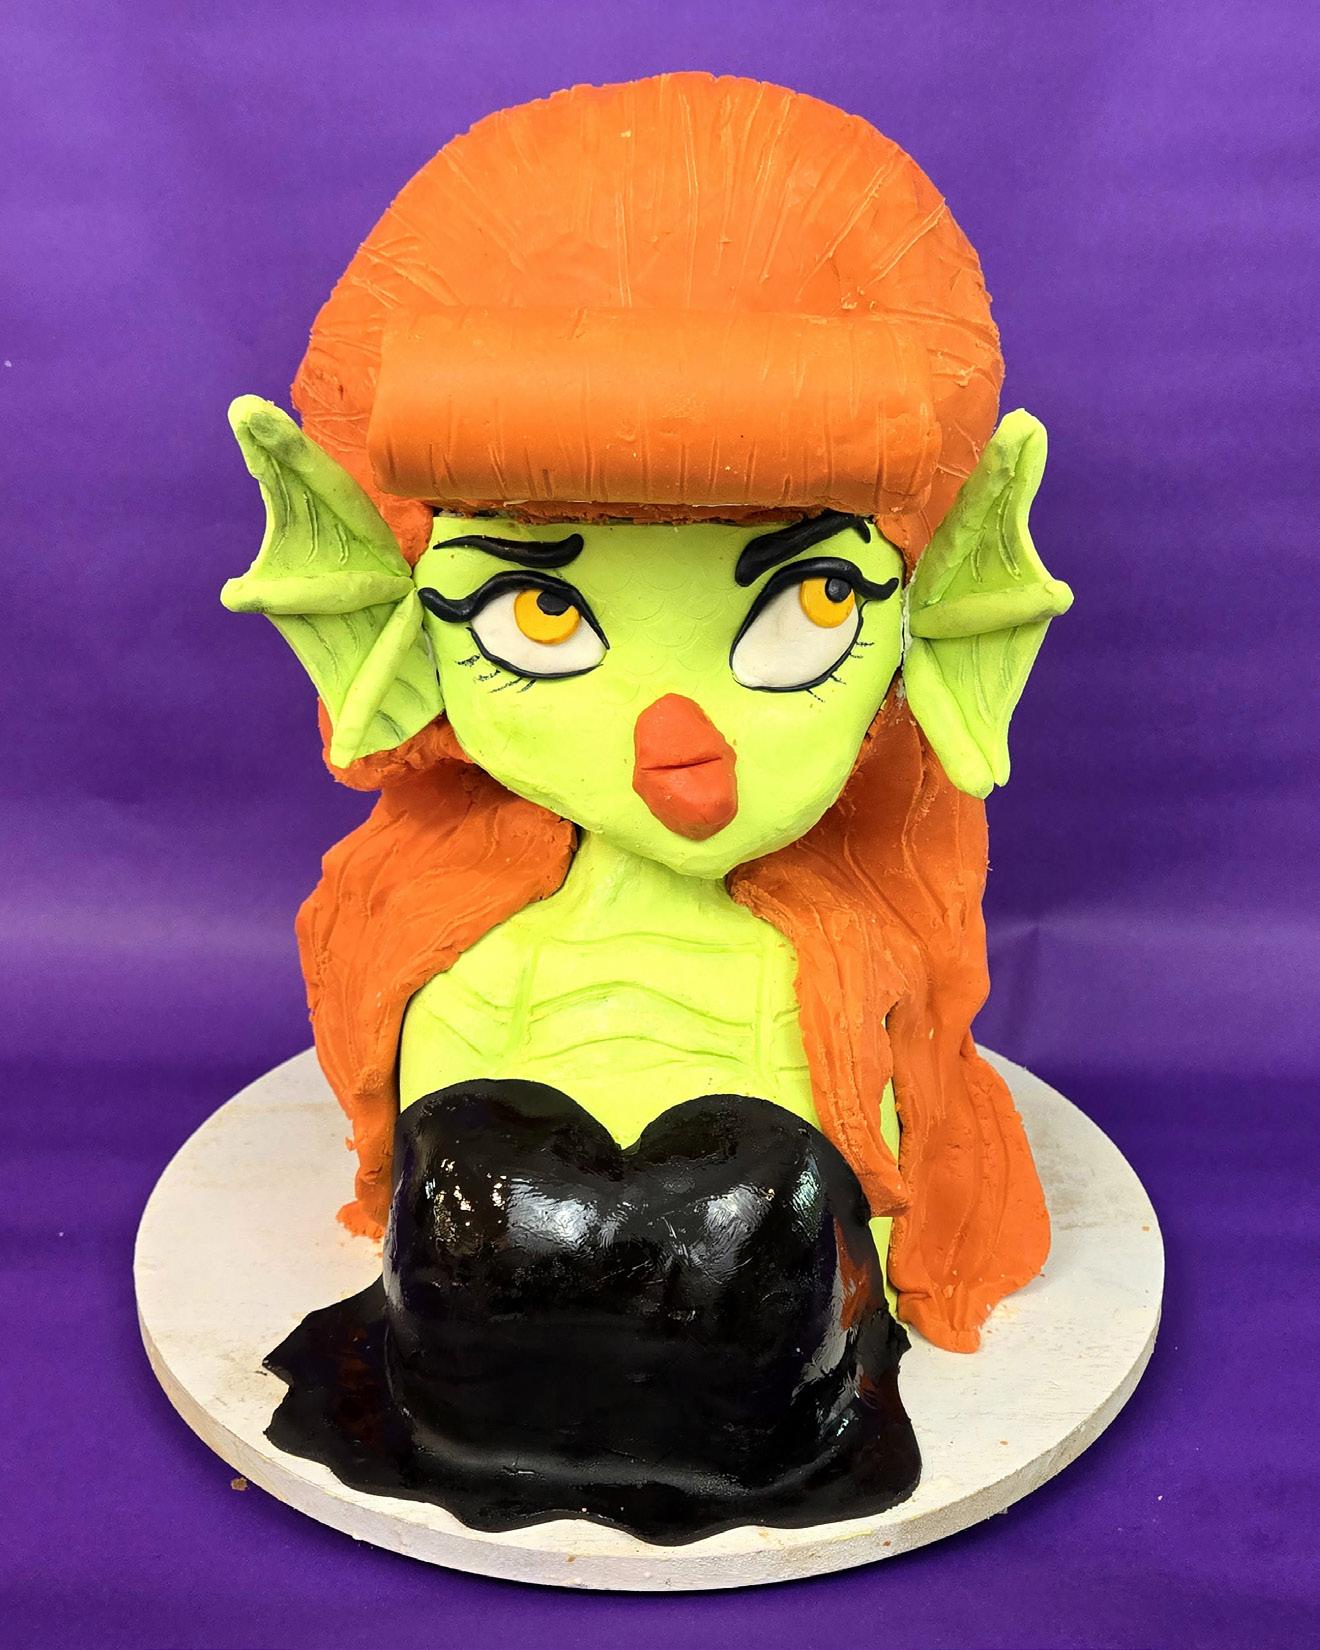
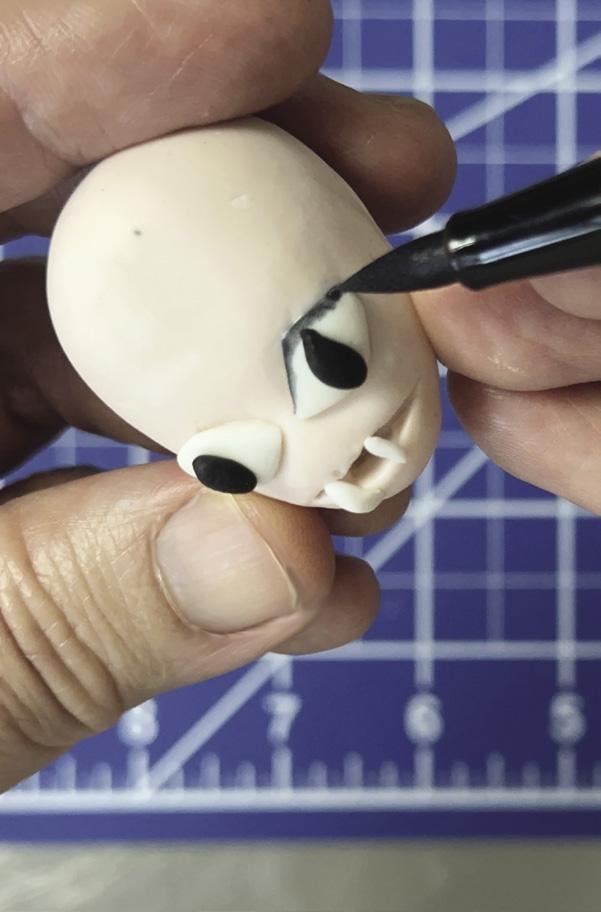
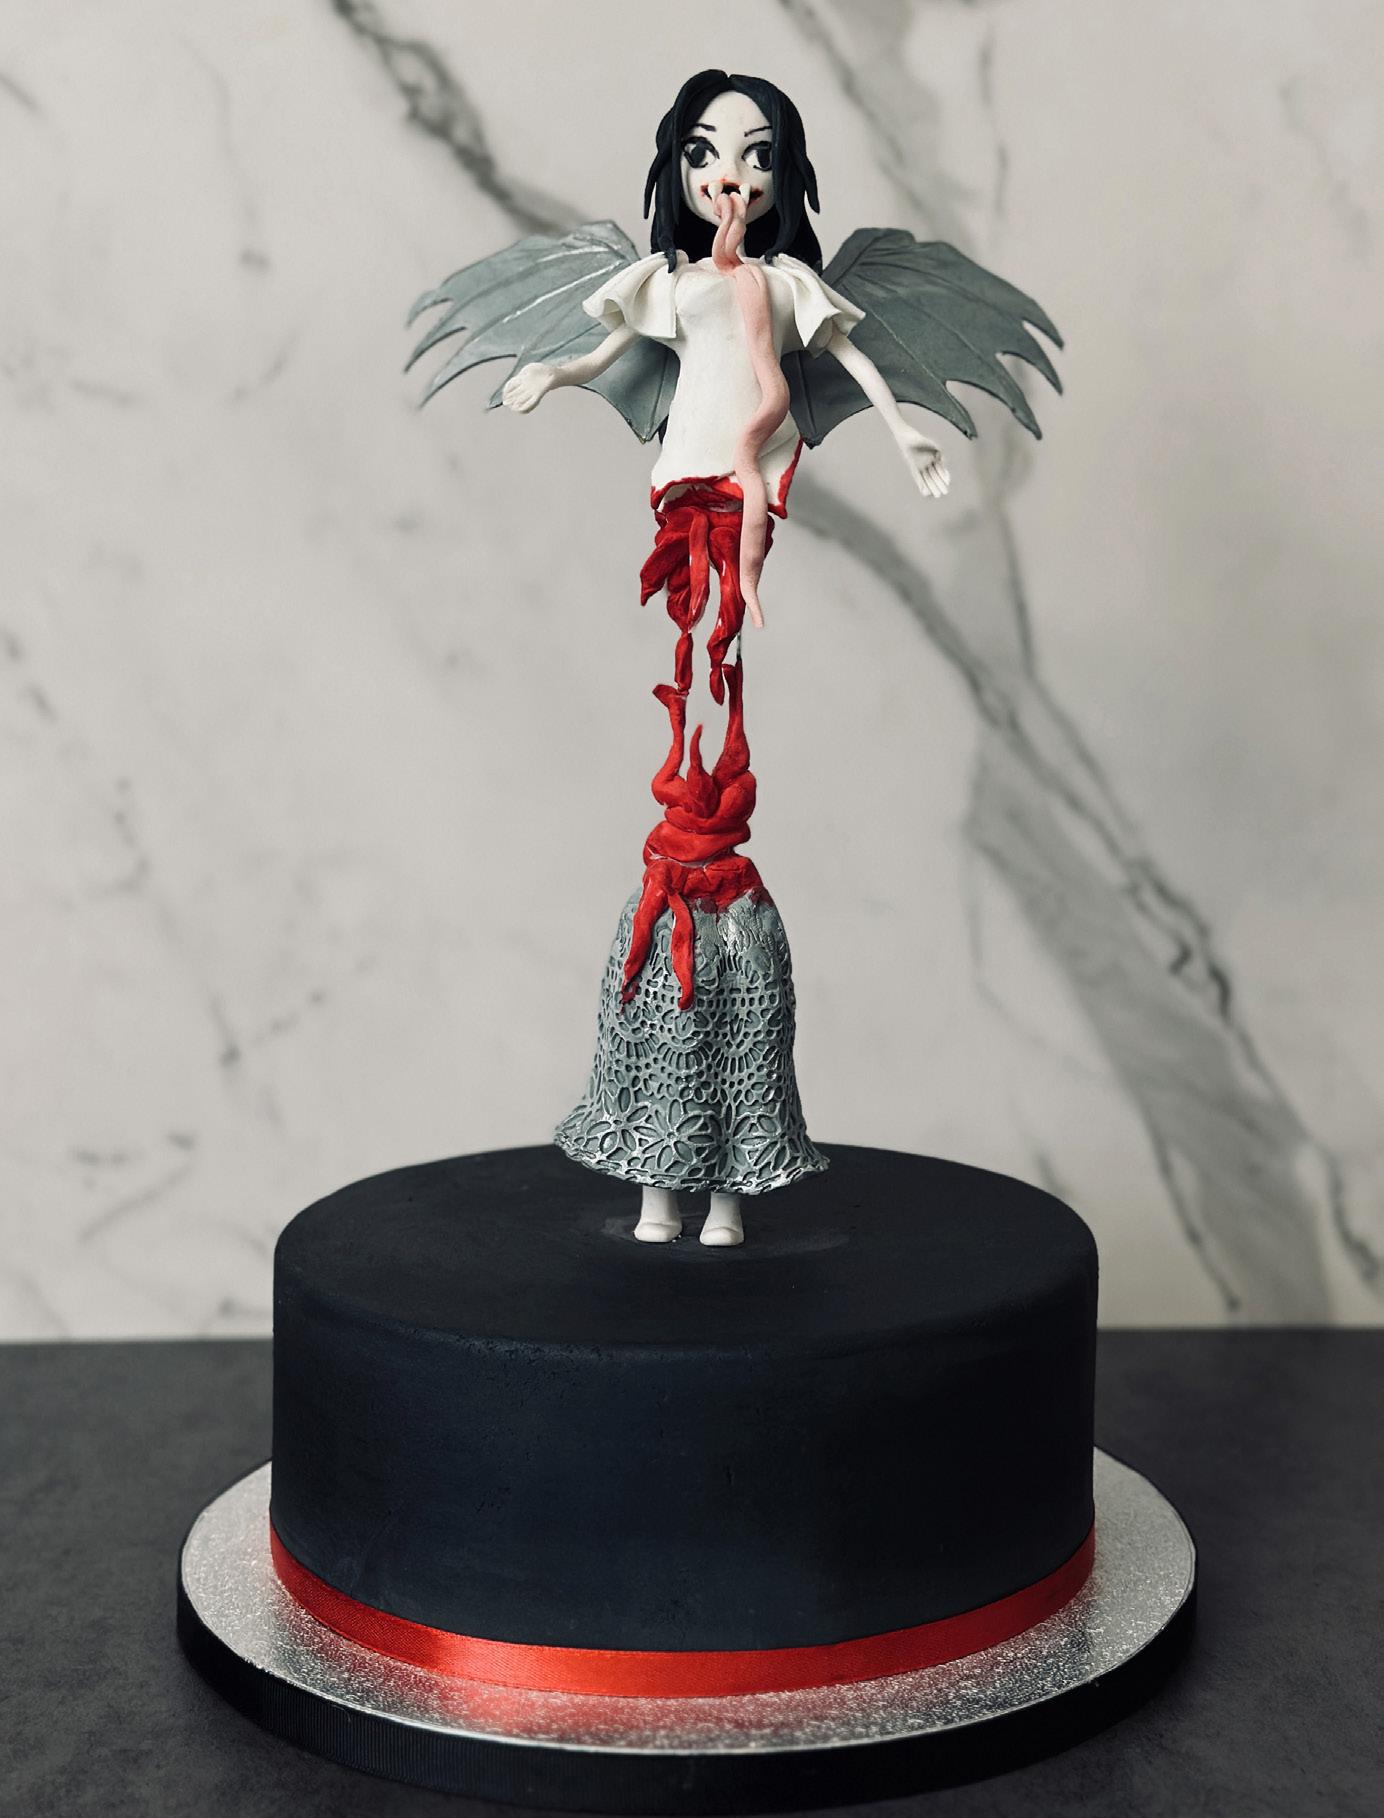
In Philippine folklore, the manananggal is a vampire-like witch that detaches her upper torso from her lower body and then takes flight during the night to hunt her victims. It’s hauntingly perfect for a spooky holiday.
BY JOEL BASCO
LEVEL:
Edibles:
Fondant: flesh-colored, white, gray, red, and pink
Royal icing or edible glue
Edible markers
8-inch round cake
Red food coloring
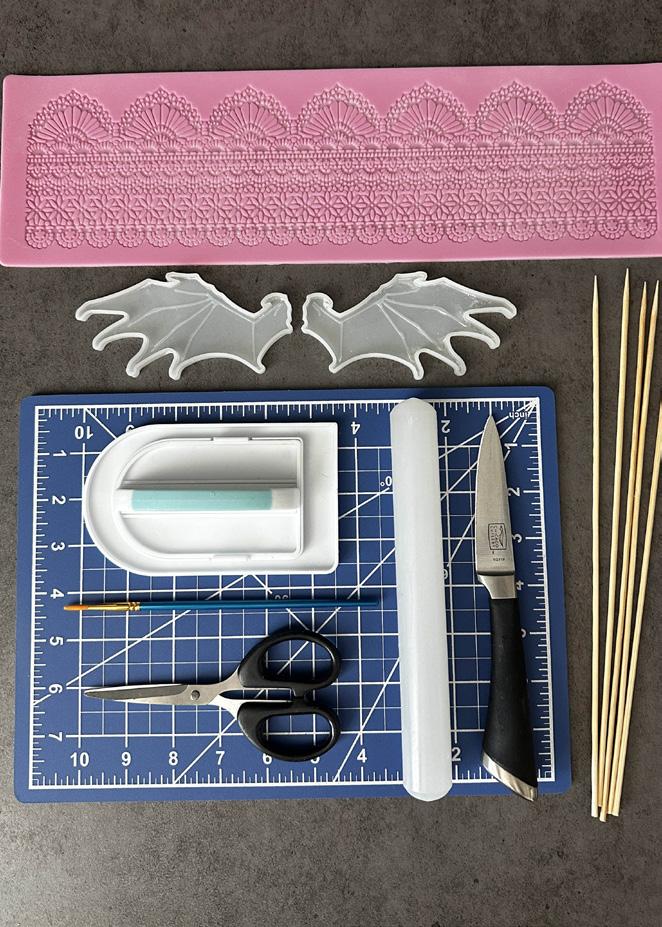
Equipment:
Silicone bat wing mold
Skewers
Rolling pin
Silicone lace mold
Paintbrush
YOU NEED
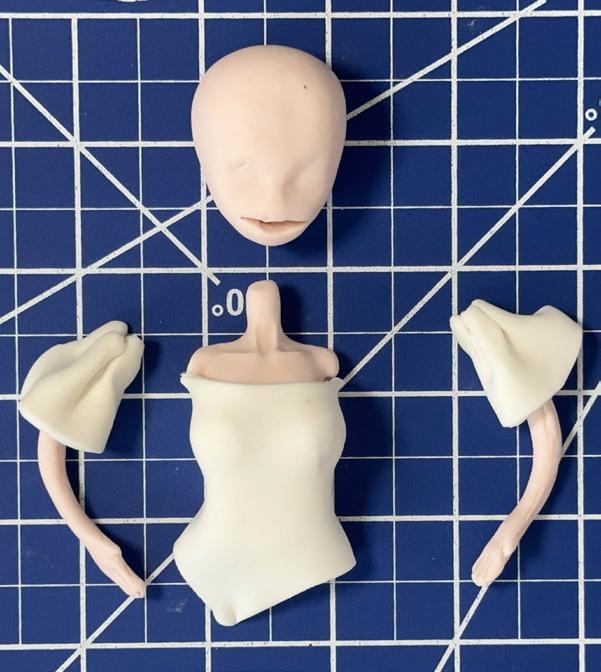
1. Make the head, the torso, and arms out of flesh-colored fondant. Add sleeves and a bodice out of white fondant. Attach the parts with royal icing or edible glue and let them dry.
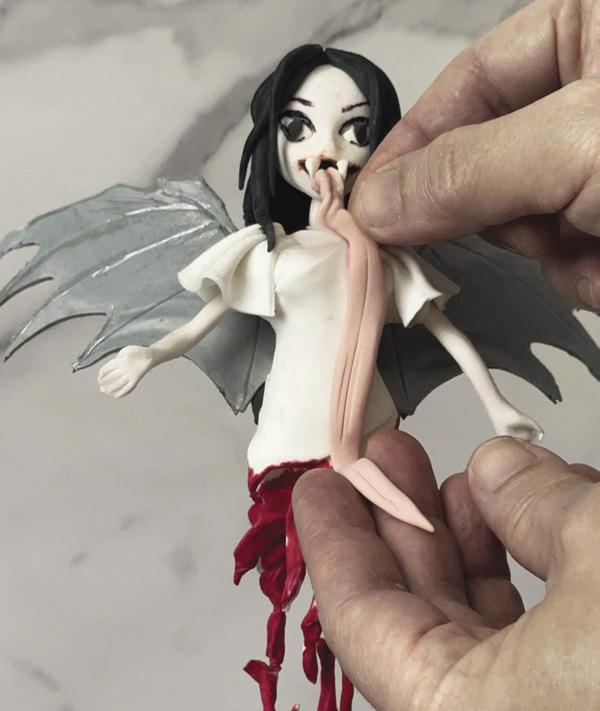
2. Draw facial features on the head using edible markers and attach 2 small white fondant pointed pieces for the fangs.
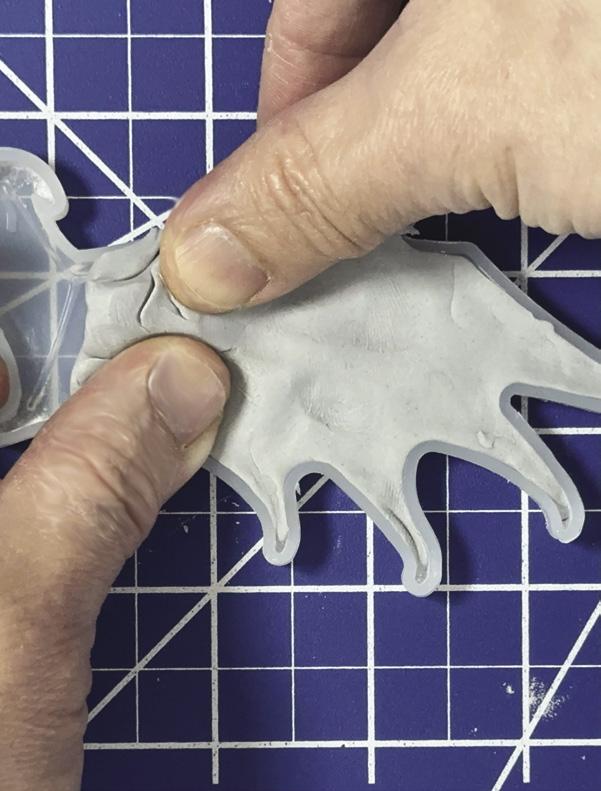
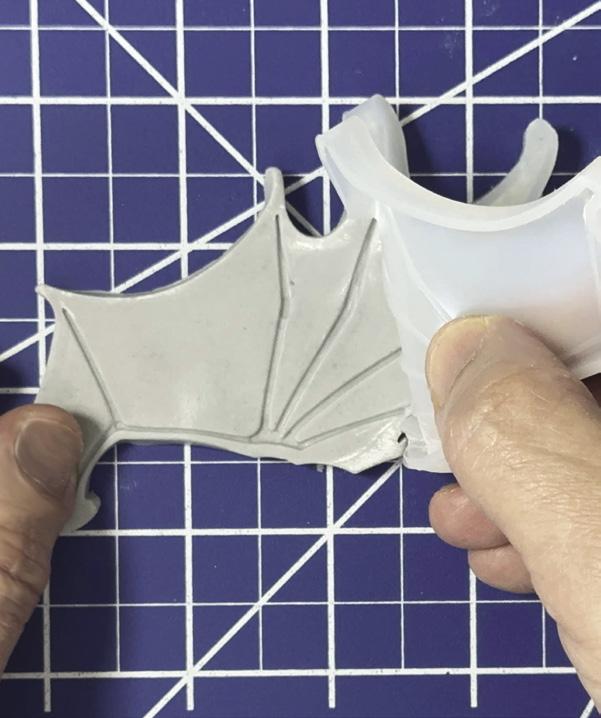
3. To make the bat wings, press gray fondant into a bat wing mold. Let them dry, then attach them to the back of the torso with royal icing.
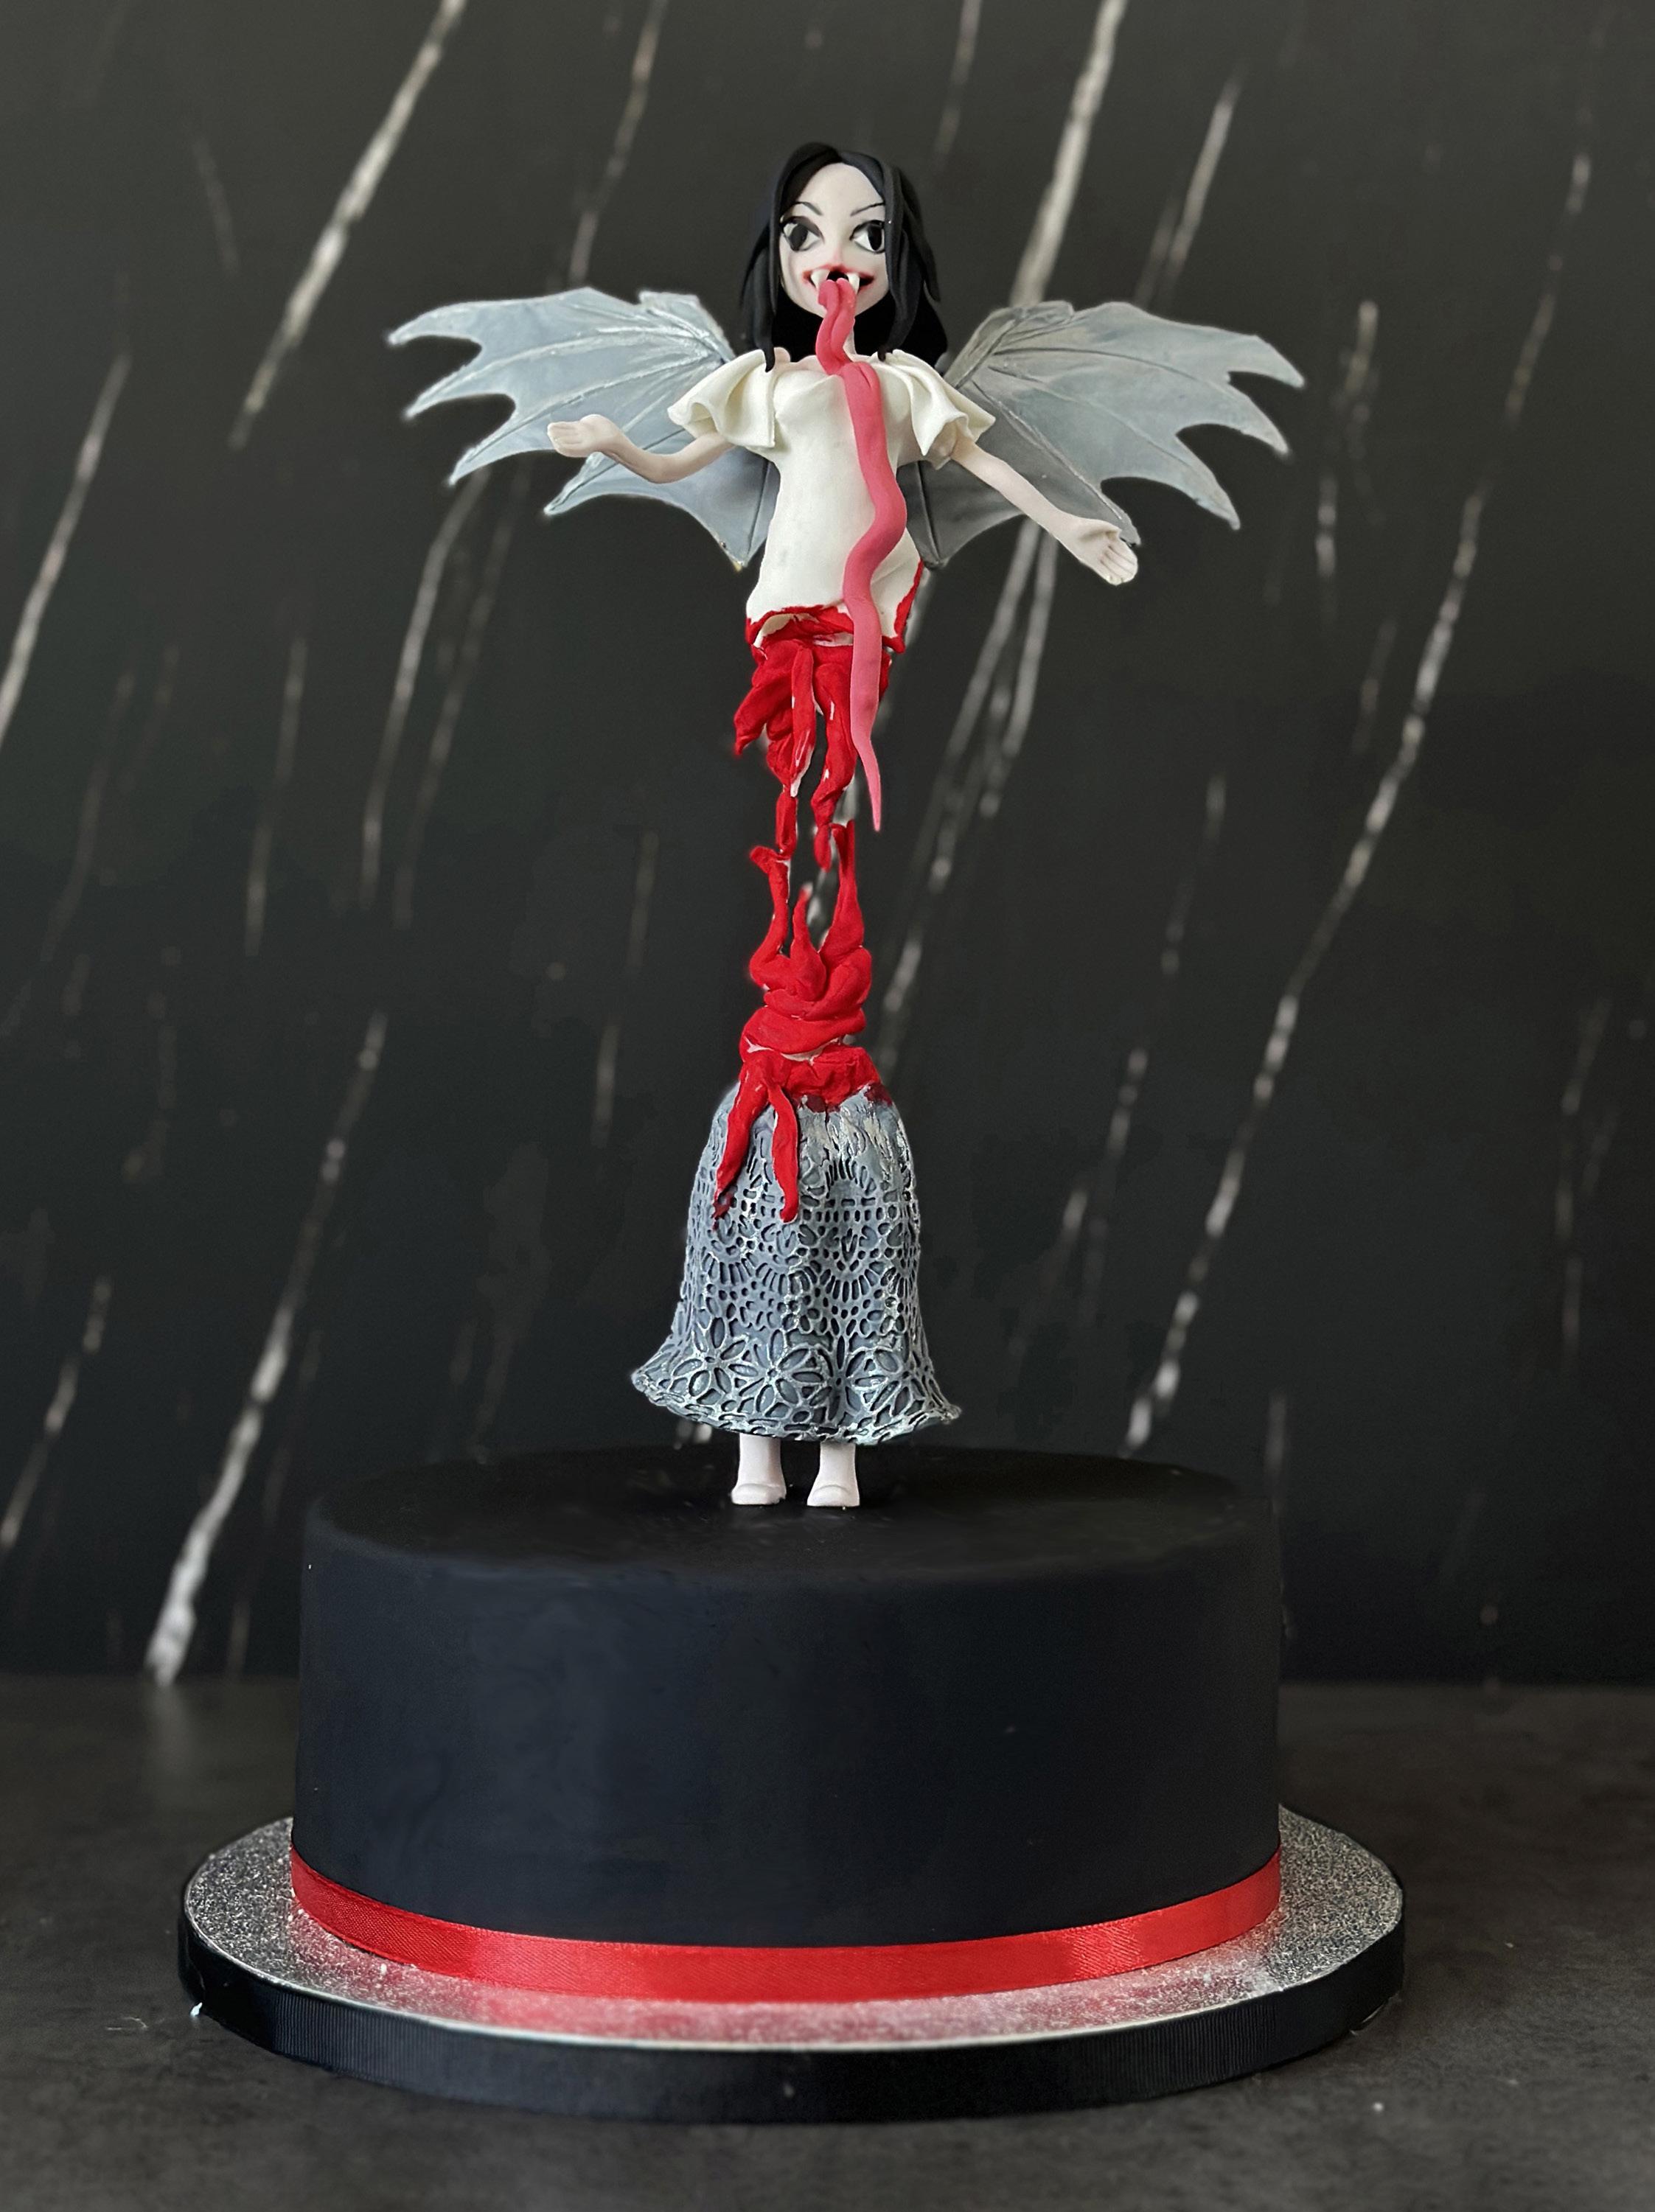
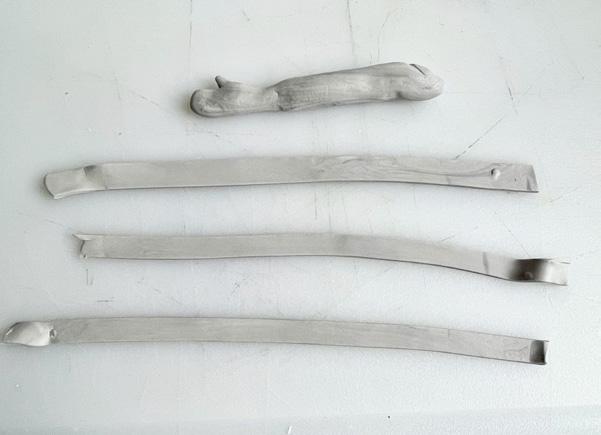
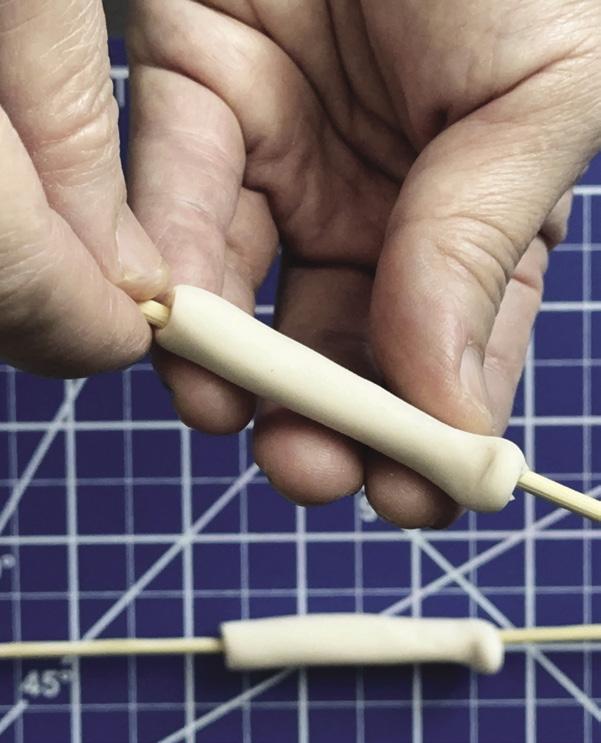
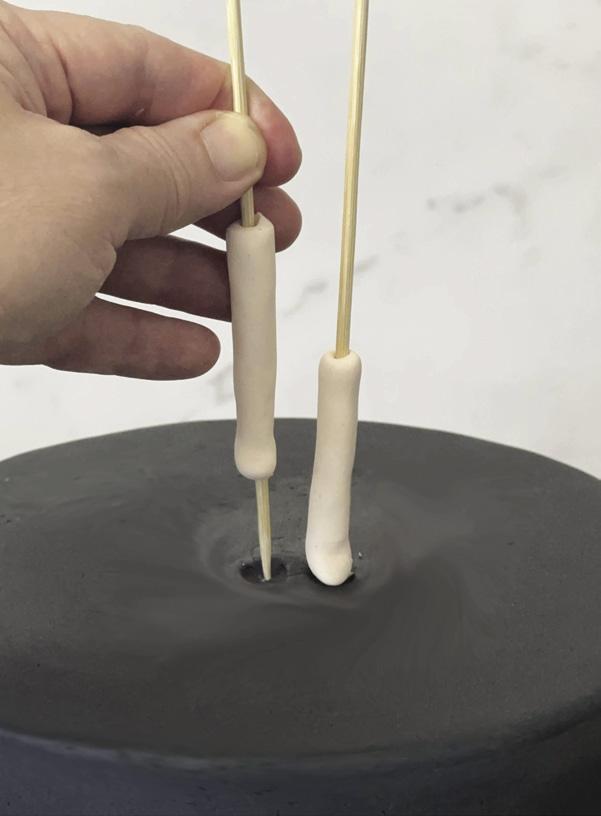
4. Make the legs out of fleshcolored fondant. Run skewers through each leg, making sure the skewers extends beyond the feet.
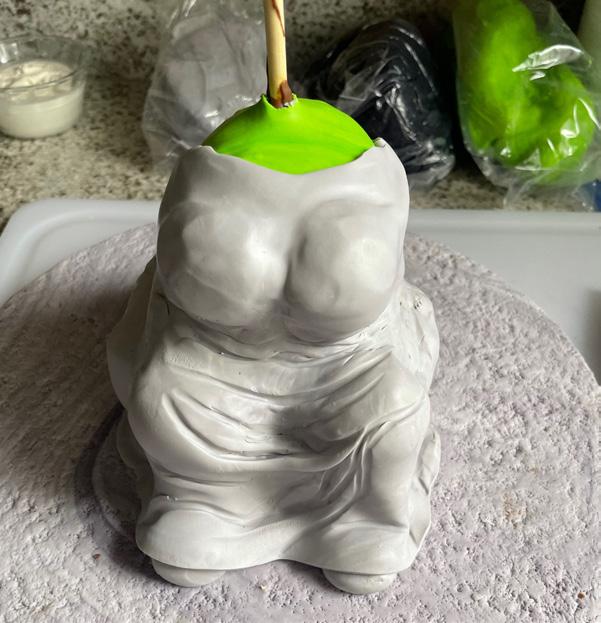
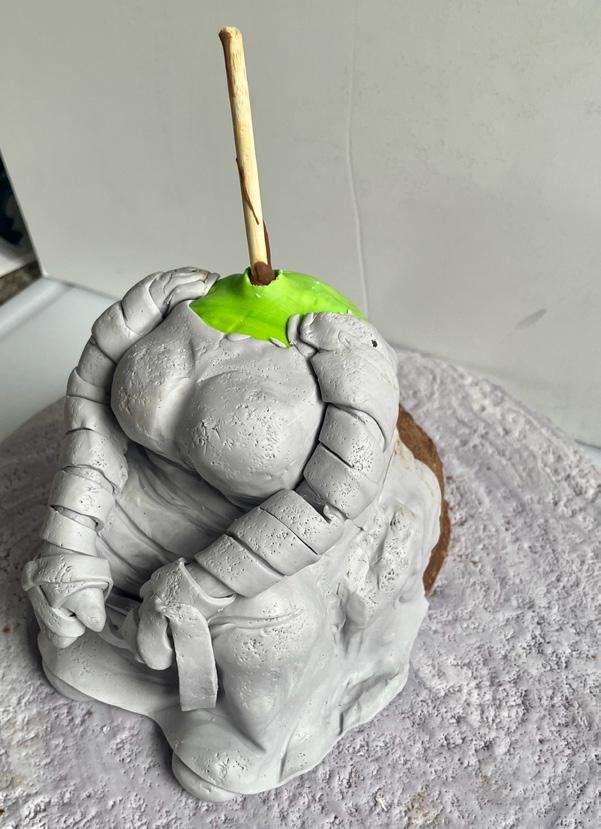
1. Place the legs on the cake, making sure that the skewers run all the way to the cake board.
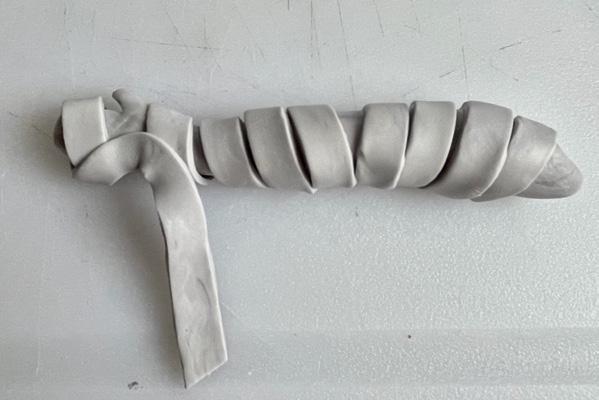
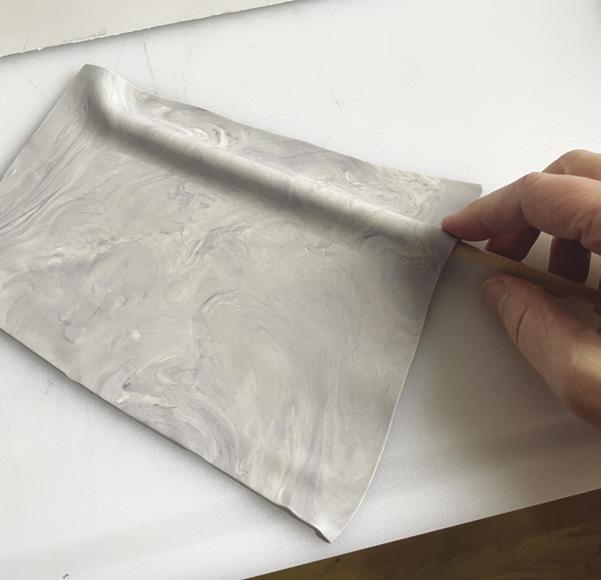
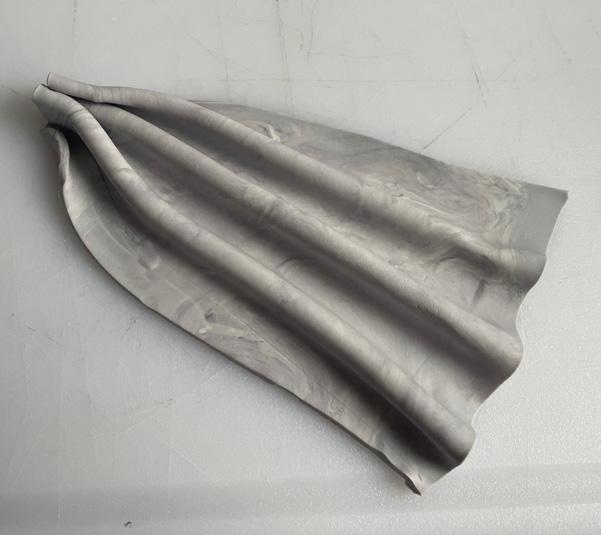
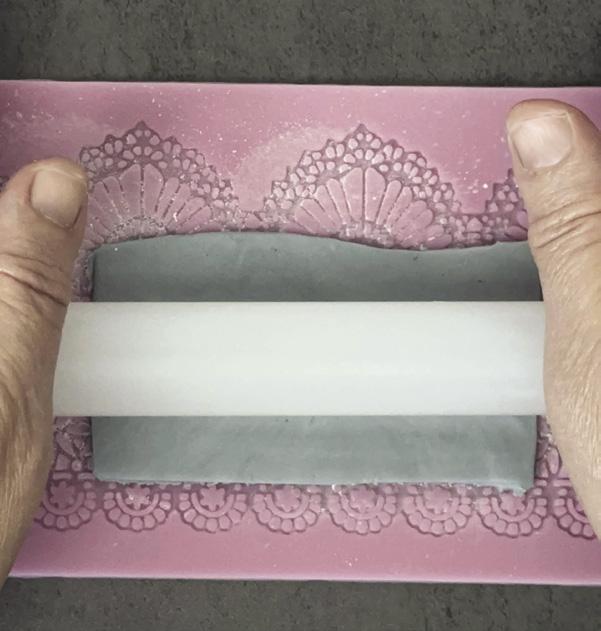
2. Roll out gray fondant to make the skirt. Use a lace mold to give the skirt some texture and attach it over the legs.
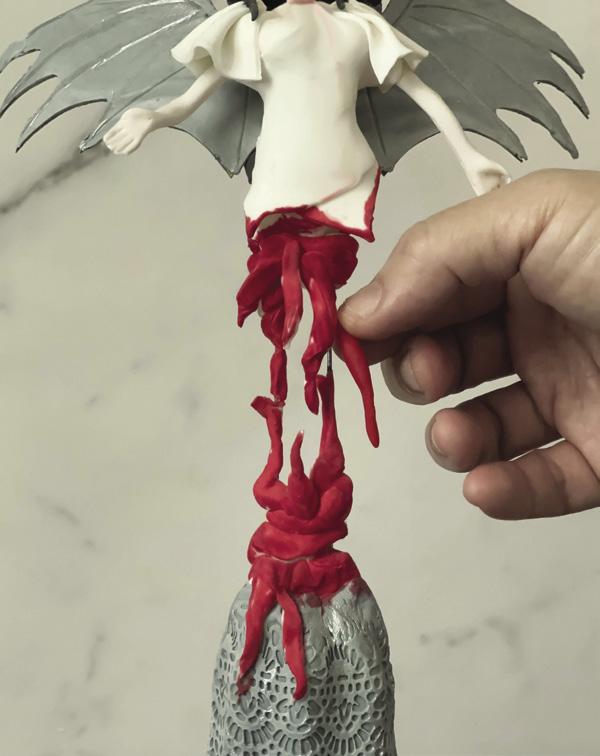
3. Attach the torso on the top end of the skewers. Add pieces of red fondant starting from the waist to cover the skewers and paint the bottom of the torso with red food coloring to look like dripping blood.
4. Roll out a long piece of pink fondant, slightly flatten it, and attach it to the mouth. ACD


Growing up in the Philippines, Joel P. Basco was always amazed watching his aunt make elaborate wedding cakes, but it wasn’t until his 30s that he discovered his passion for making cakes. While working as an IT professional in New York City, he started taking classes at the Institute of Culinary Education, Wilton School of Cake Decorating, and the New School to hone his skills. He relocated to Florida and, in December 2015, he partnered with Daniela Borquez to form J&D Cakes in Boca Raton, specializing in edible works of art. He has participated in several competitions, including Cake Wars, winning season 3. Sadly, in 2022, he had to give up ownership of his business to become a full-time caregiver for his elderly mom. He created JPBaked Art to continue his passion for making cakes and creating digital content. He also recently published his first cake decorating book called Celebrating
in Cakes
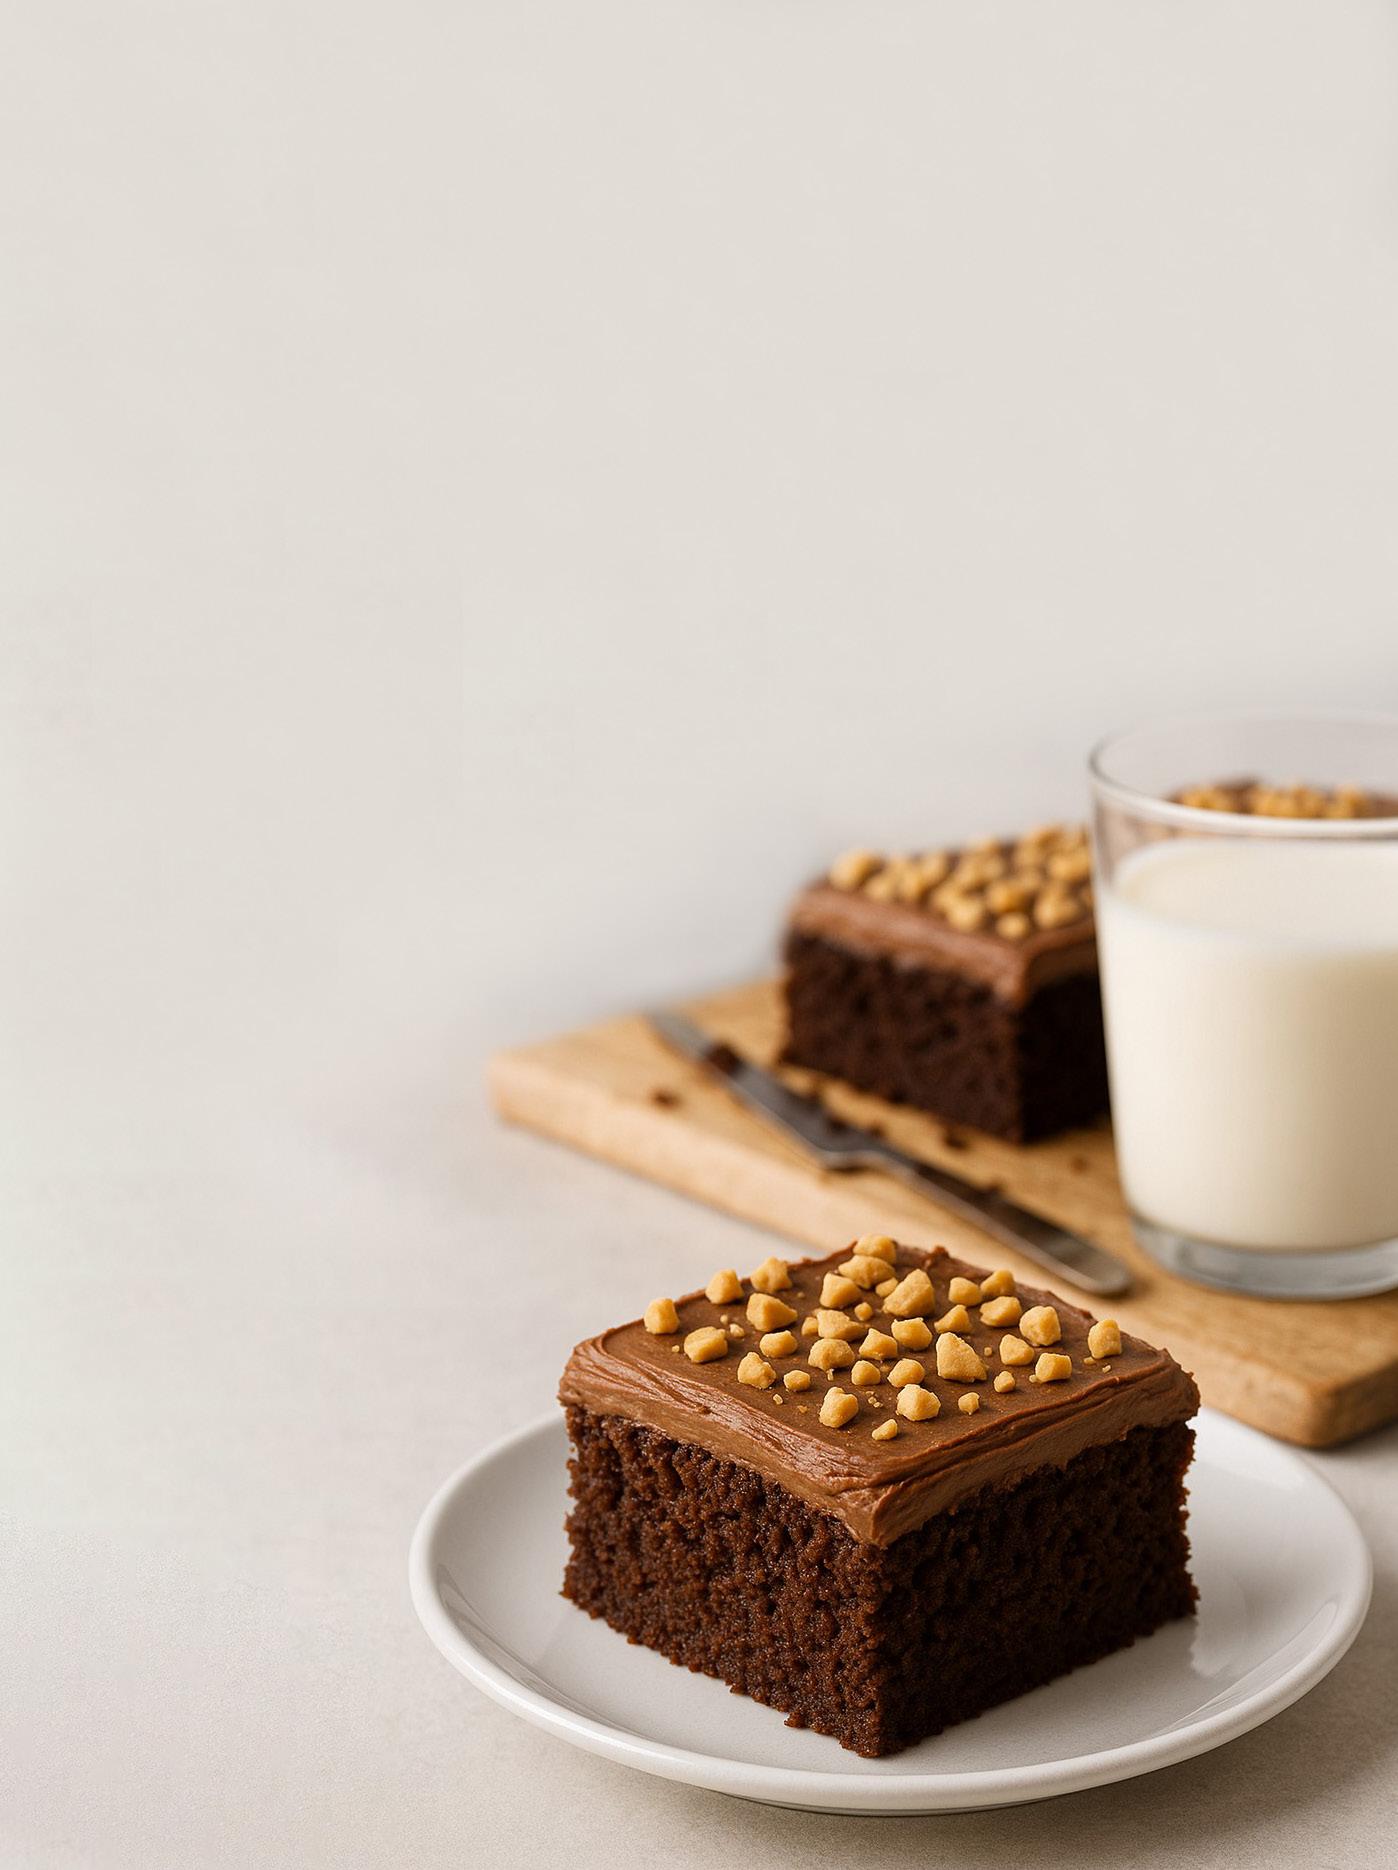
BY STEPHANIE ASHCRAFT
1 box chocolate cake mix
Ingredients listed on back of box
½ cup chunky peanut butter
1 cup semisweet chocolate chips
Makes 20 to 24 servings CAKE FROSTING
1 container (16 ounces) chocolate frosting
¼ cup creamy peanut butter
½ cup chopped peanuts (optional)
INSTRUCTIONS
1. Preheat oven to 350 degrees.
chocolate chips. Pour the batter into a greased 9 x 13-inch pan. Bake 25 to 30 minutes, or until a toothpick inserted in the center comes out clean. Allow cake to cool completely.
3. For the frosting, in a bowl, mix frosting and peanut butter together. Spread over top of cooled cake. Sprinkle with chopped peanuts, if desired. ACD
2. Make batter according to package directions. Mix in peanut butter with a hand mixer. With a spoon, stir in
Recipe excerpt from 101