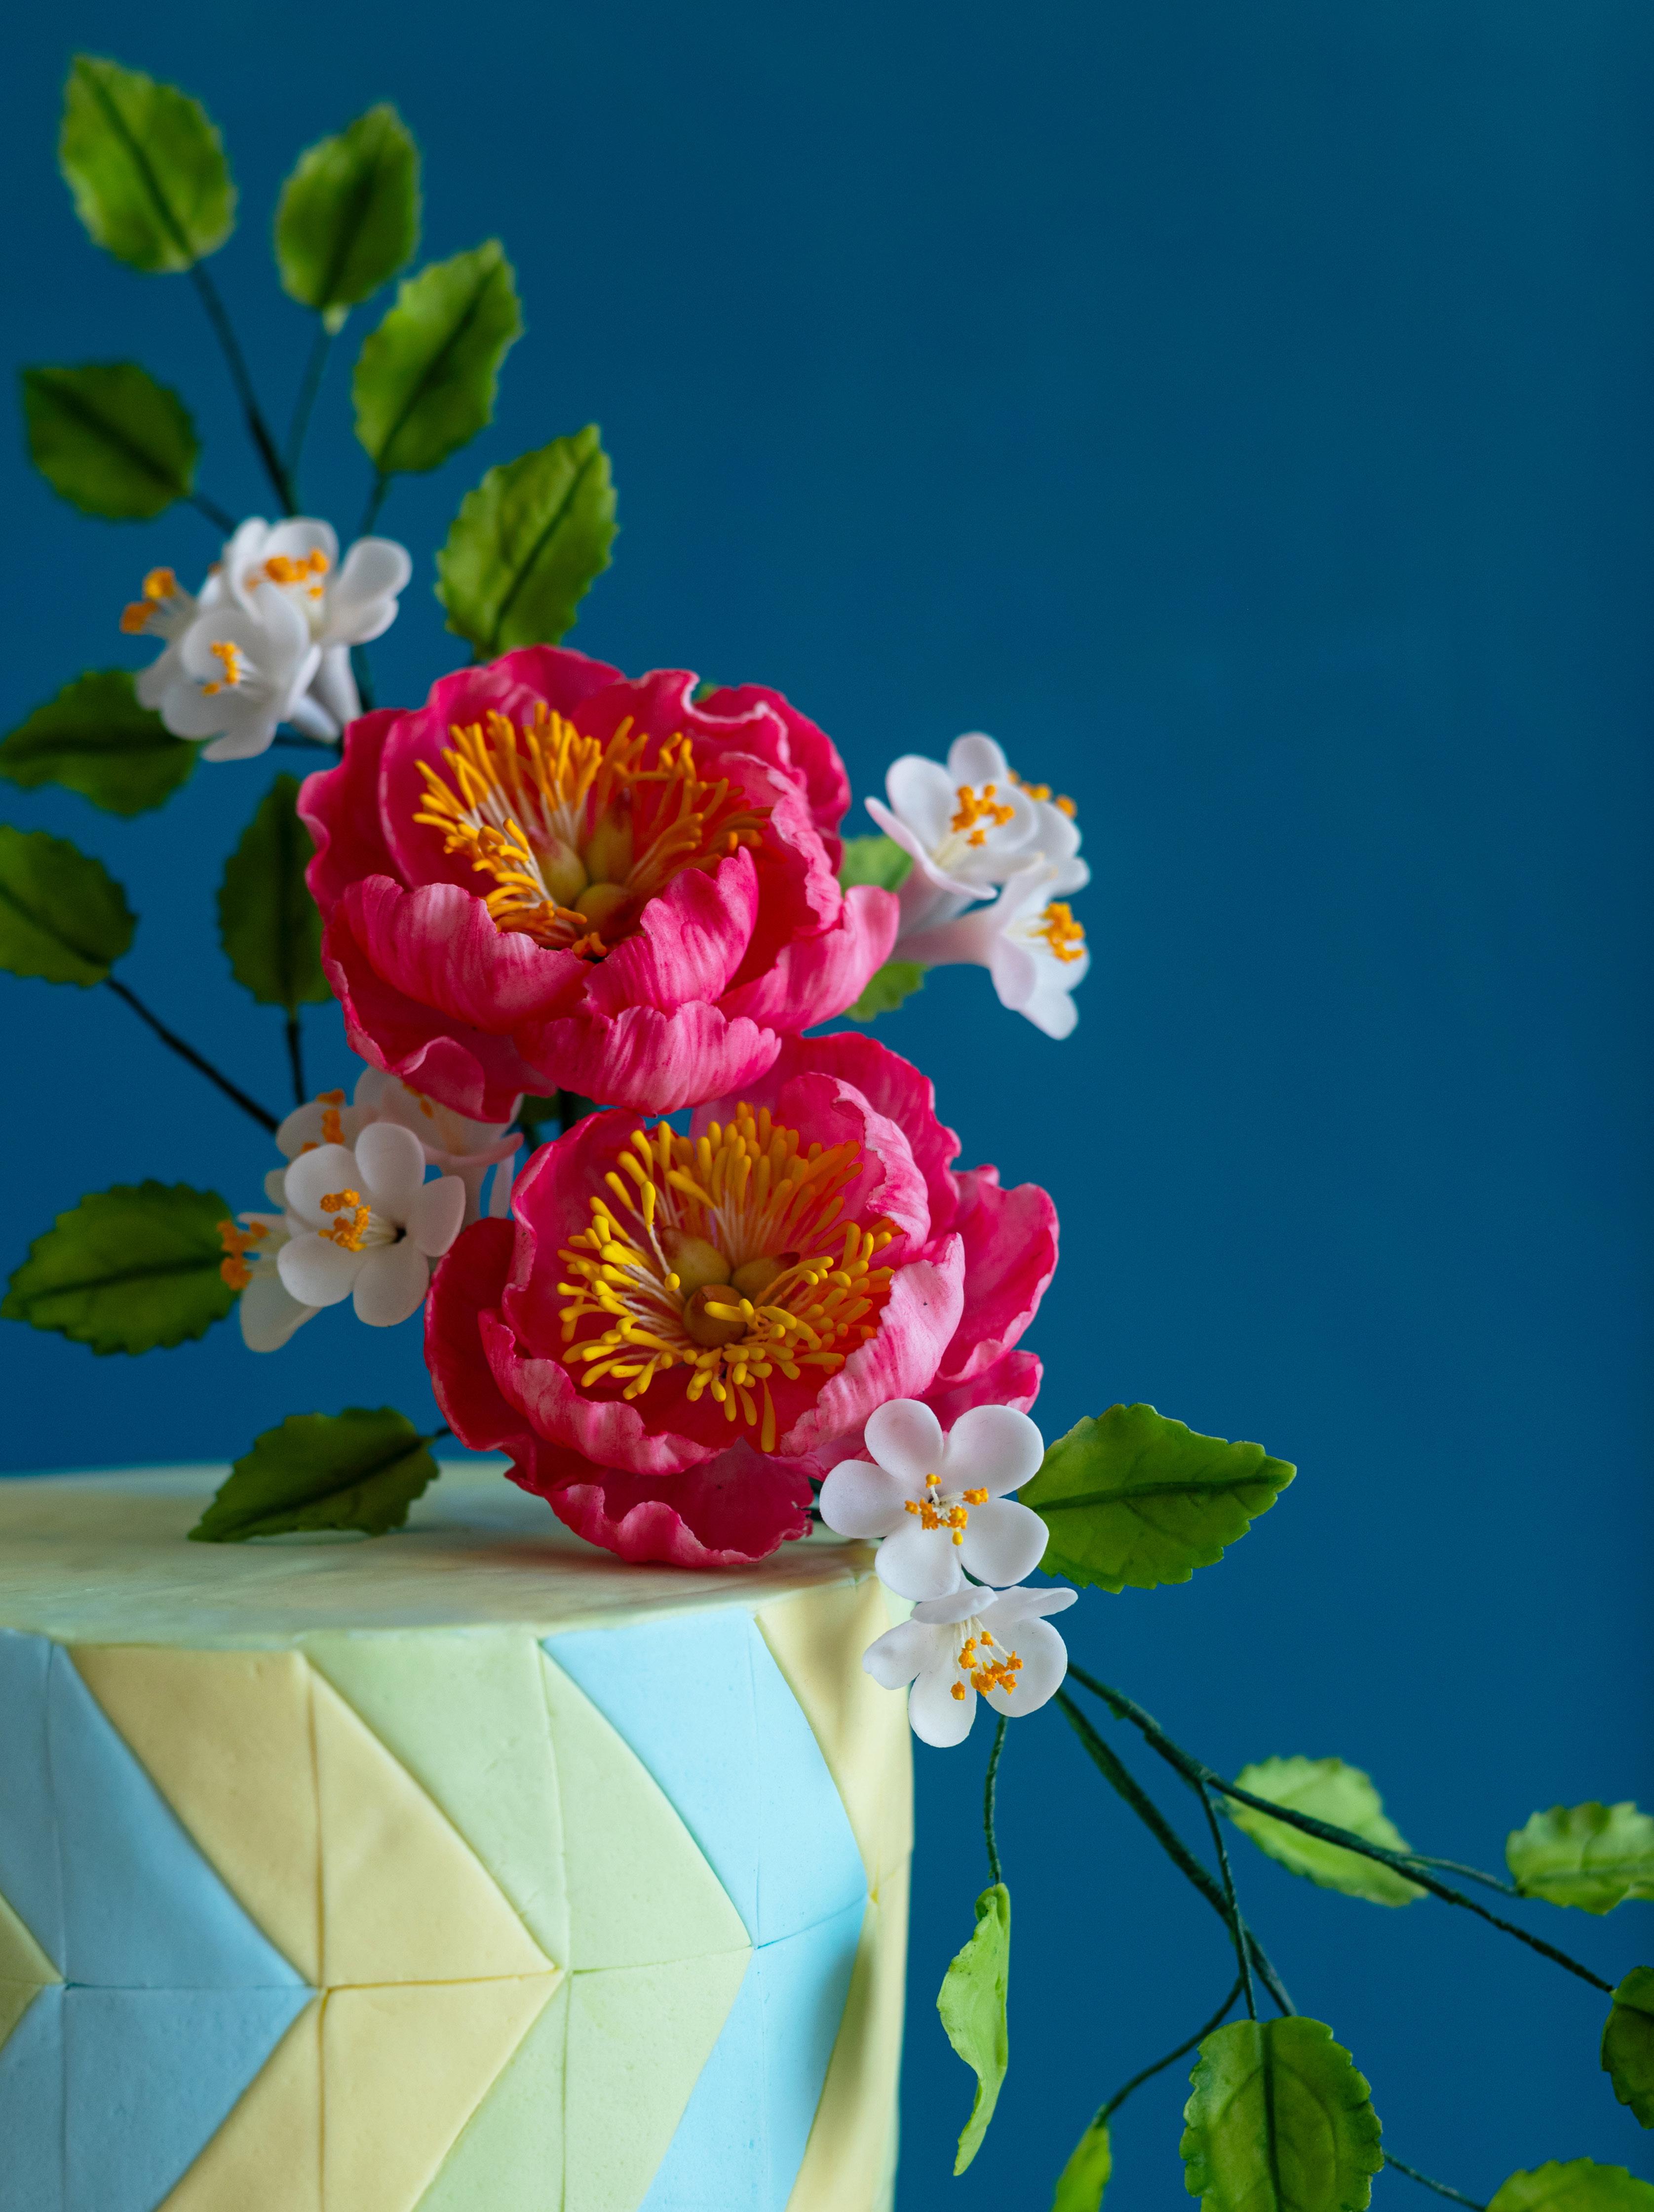


Filler flowers help complete the spray.
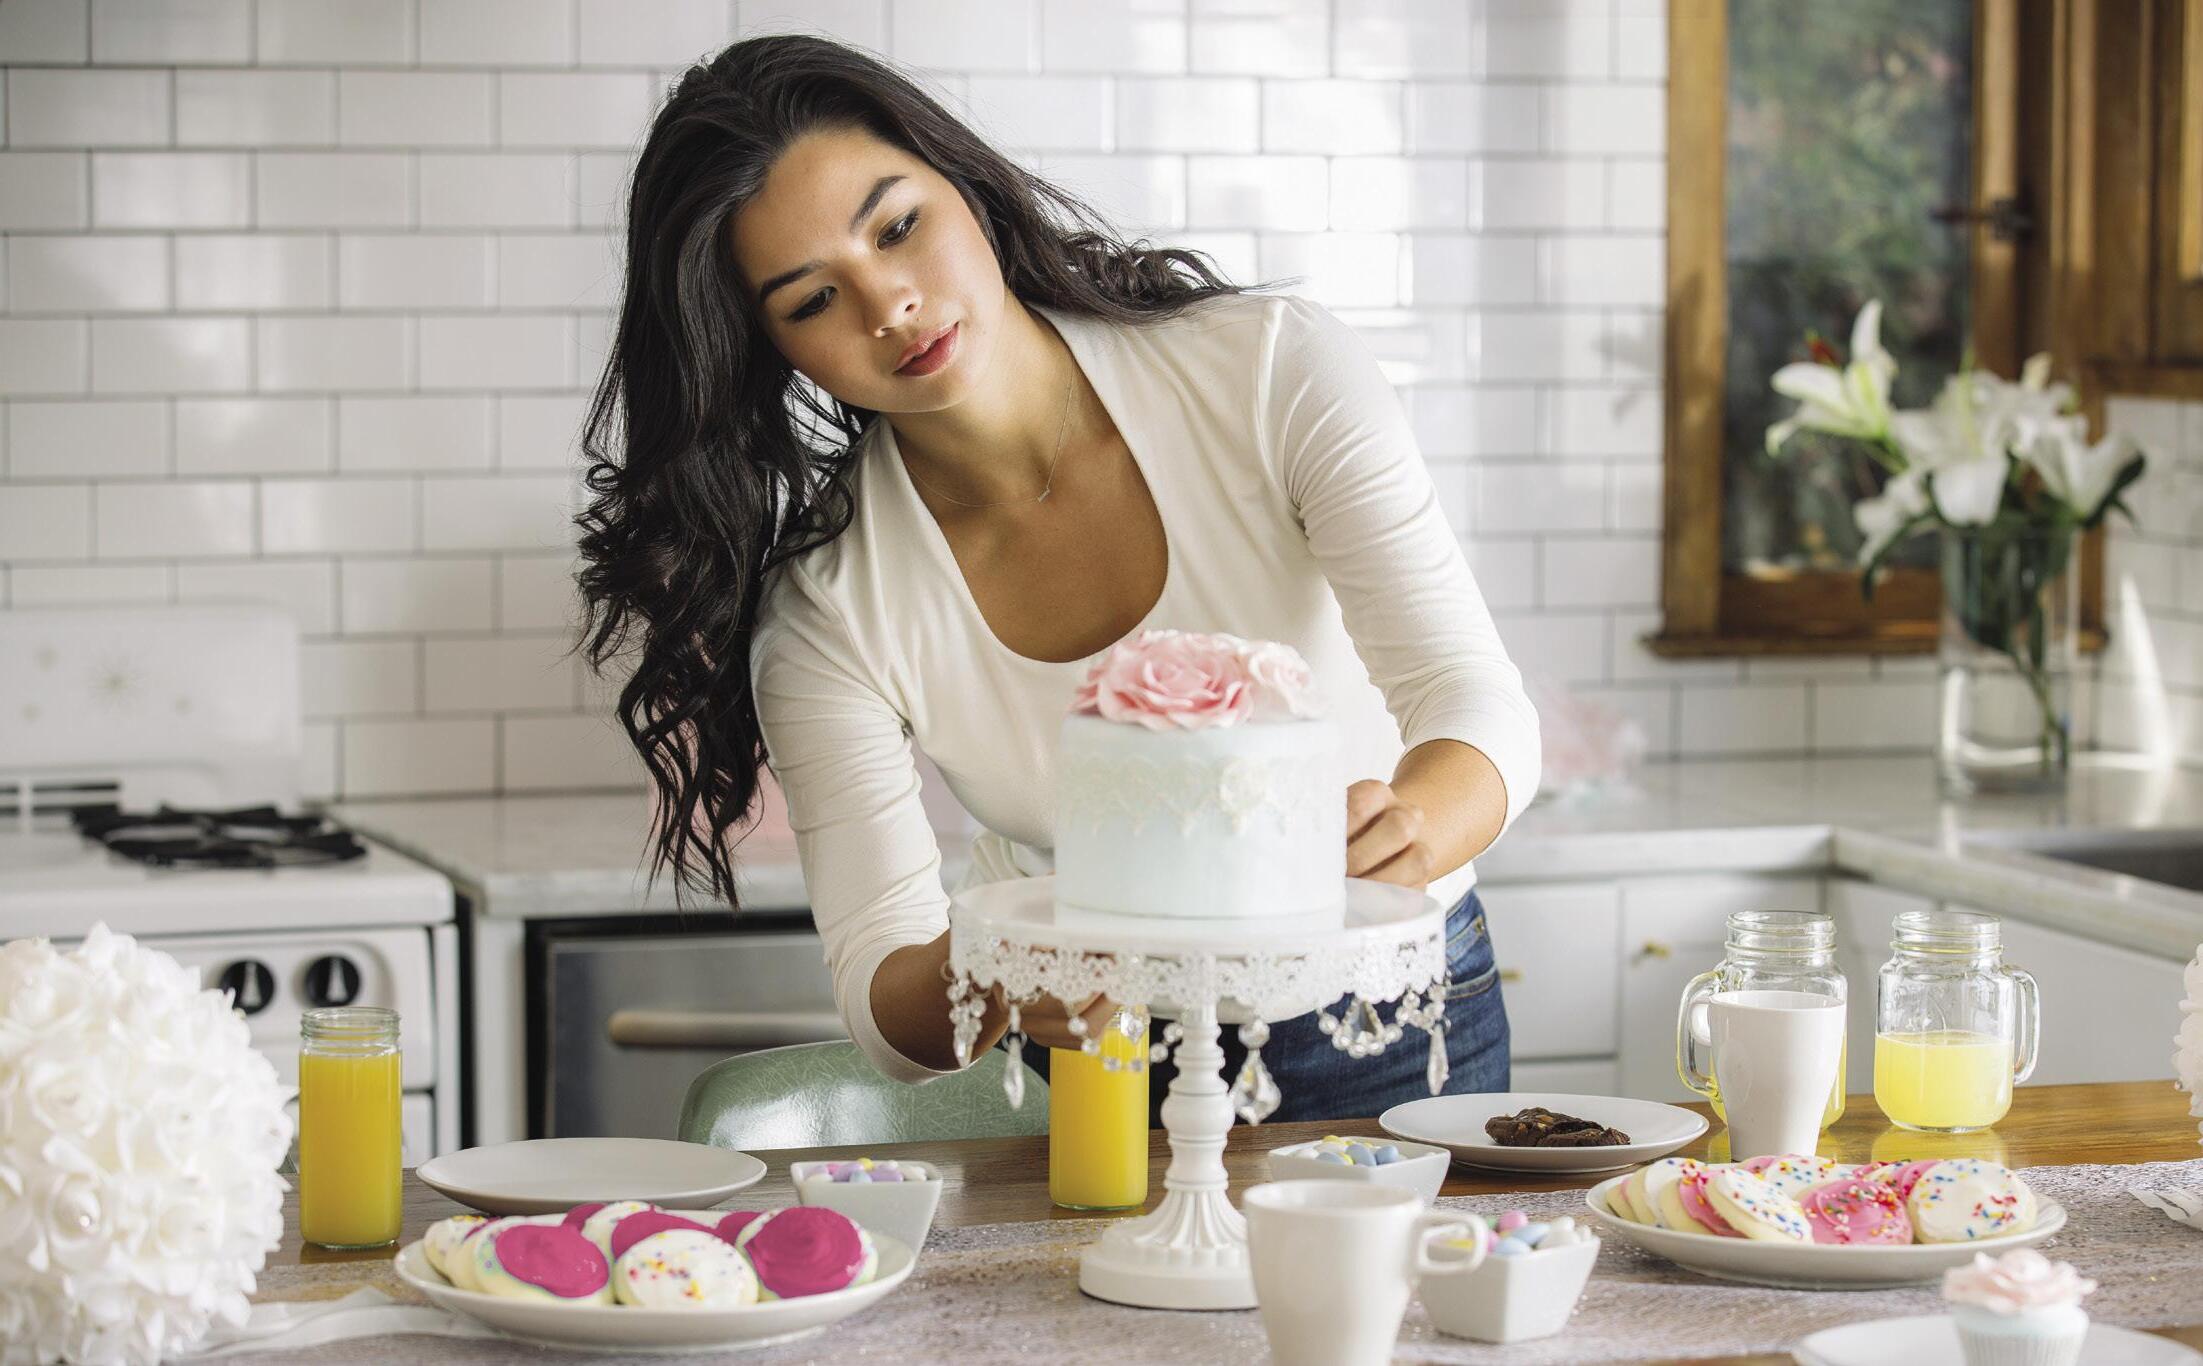
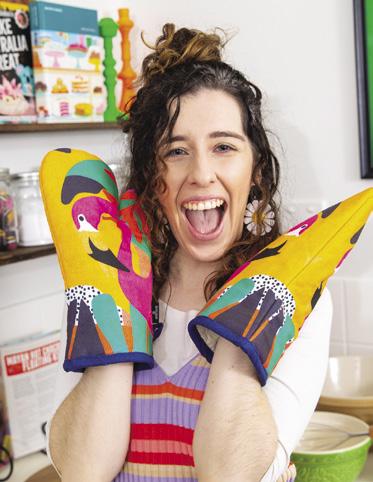
It’s officially wedding season again! Besides perhaps the winter holidays, May kicks off probably the busiest time of year for many cake bakers. And no matter your skill level or booked orders, you probably want to learn something new to sharpen your skills and impress those guests.
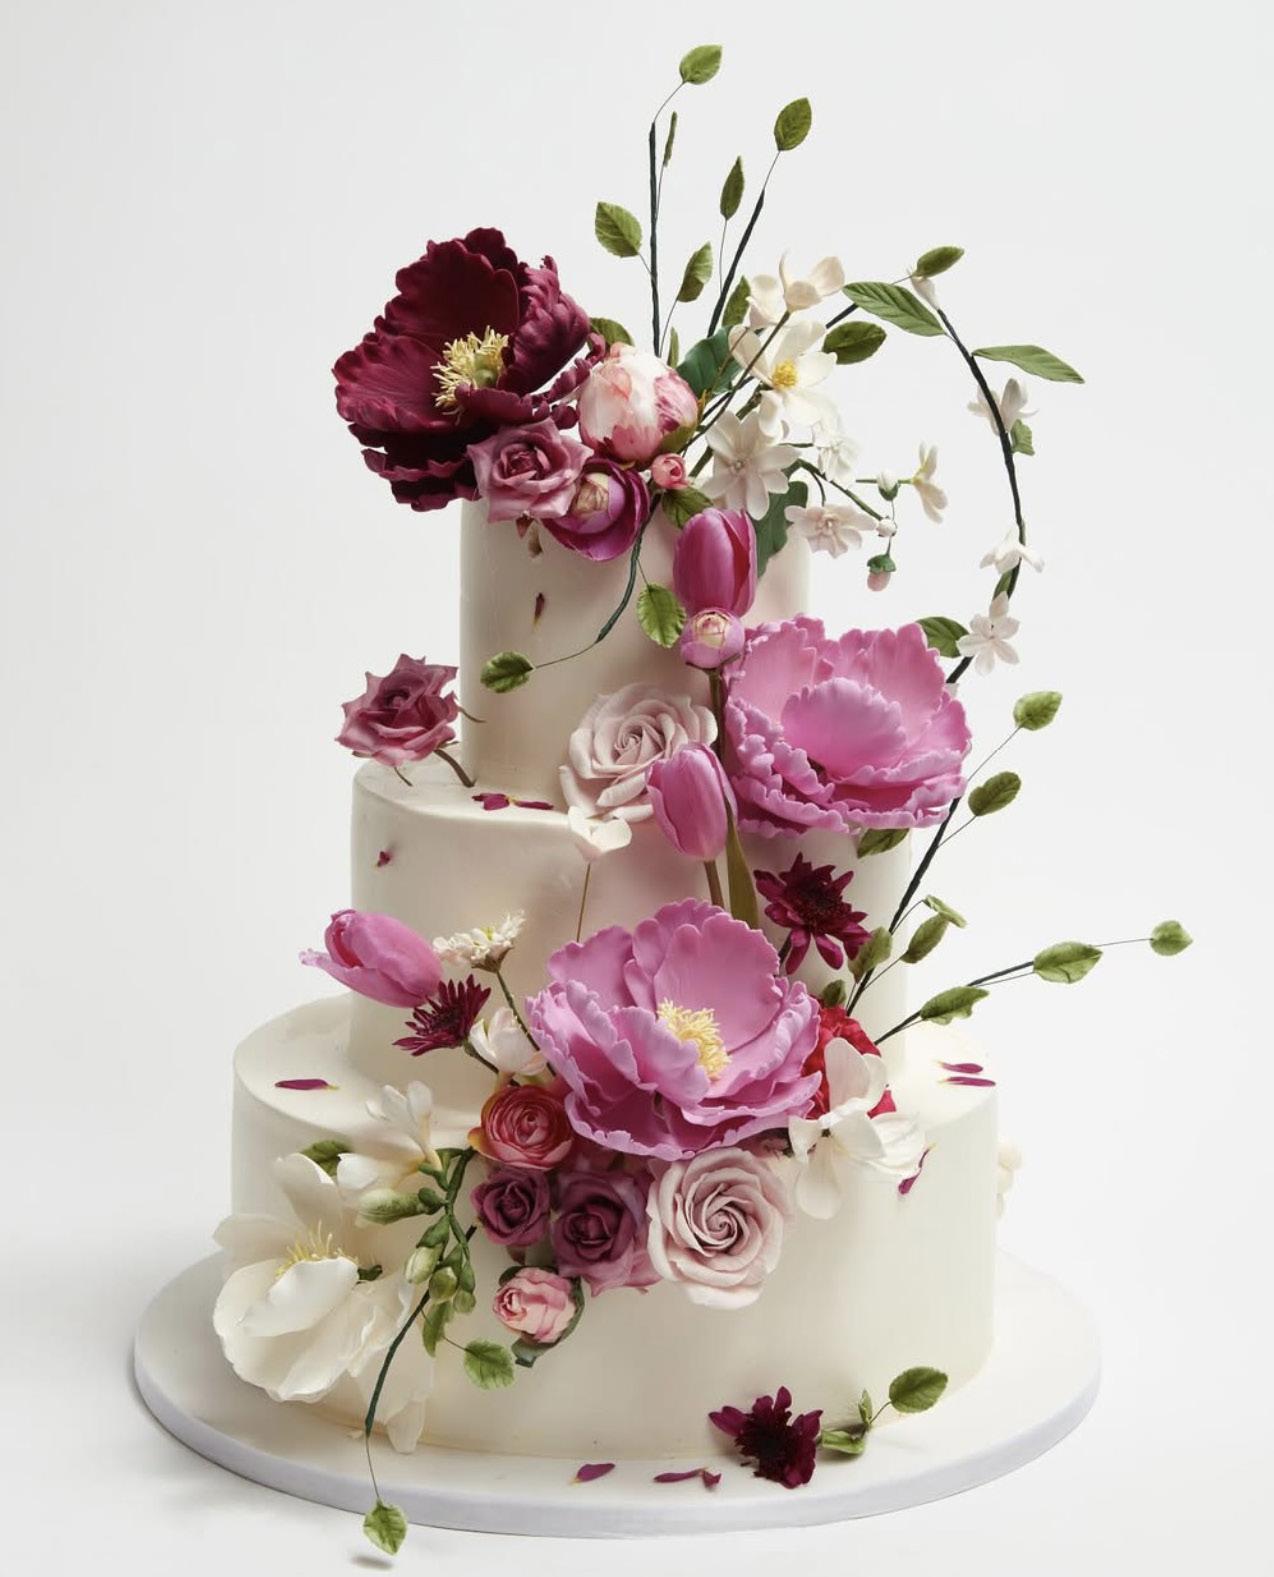
For starters, how about classic gum-paste peonies?
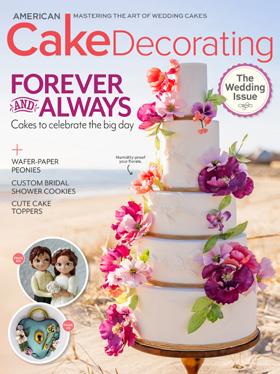
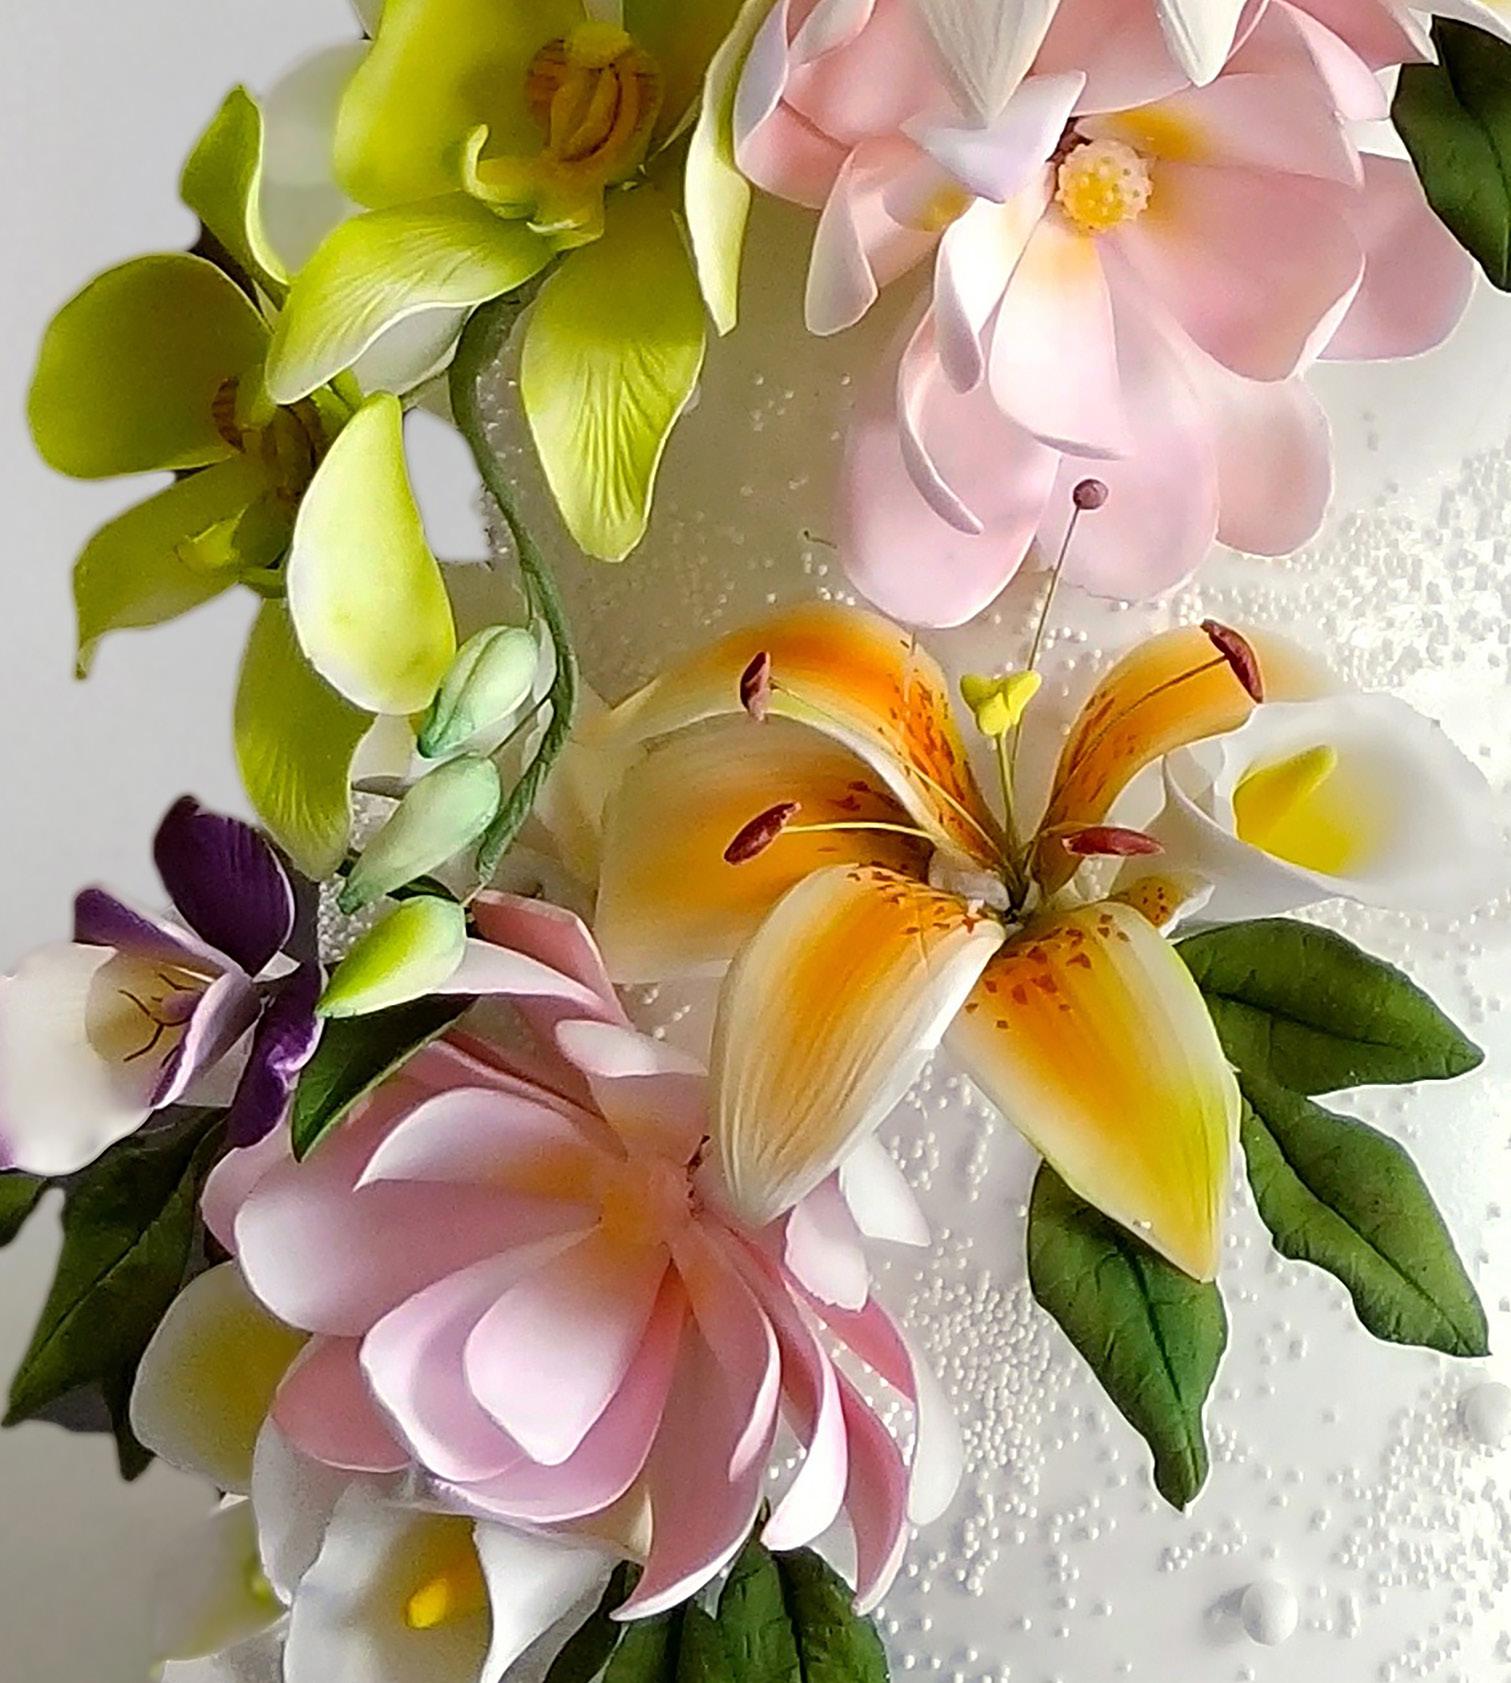
Cover star Shumaila Rai shows you how! It’s incredible how just a few of these showstoppers can make a huge impact on a cake. You’ll also find a cascade of florals featuring gum-paste lilies for a tropical twist and a simple yet effective hibiscus.
Of course, there are more ways to create florals, including the cutest buttercream bouquet of cupcakes and a delicately piped cookie featuring a lovely bride. Or mold them out of bread with Scott Bradshaw, as he teaches you all about the traditional Ukrainian loaf korovai.
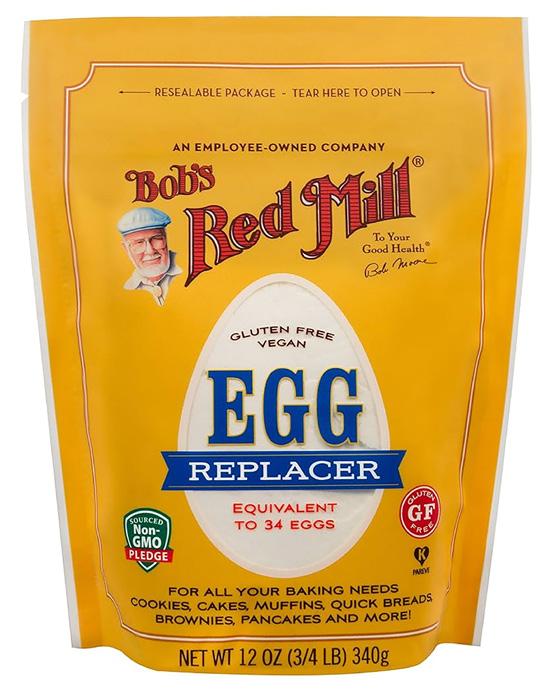
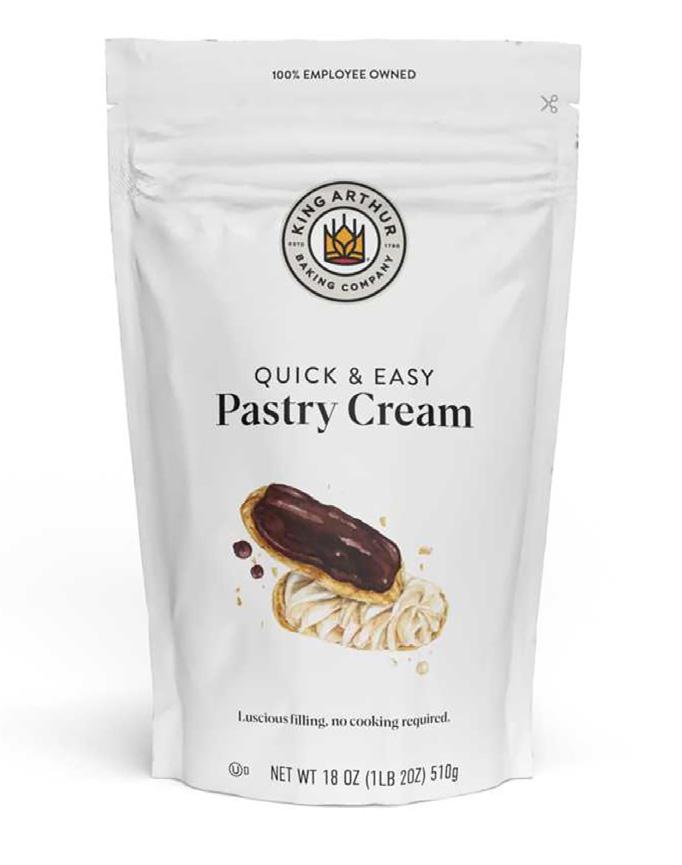
And if you’re feeling a little anxious about rising prices, try some expert advice! Cyd Mitchell Hodges walks you through the best ways to pivot your business to make more income. And we found the very best egg replacements just in case you need easy subs. So, what are you waiting for?
It’s time to get crackin’.
From my kitchen to yours,

We’d like to meet you…
Join our incredible community of cakers on your favorite platform, and don’t forget to sign up for our newsletter to stay up to date on all things cake!

Email annmarie@americancakedecorating.com. americancakedecorating.com instagram.com/americancakedecorating
americancakedecorating.com/blog facebook.com/americancakedecorating

Want to pitch an idea or just want to say hello?
PUBLISHER/CEO
Grace McNamara
ASSOCIATE PUBLISHER
Ania McNamara-Munzer
MANAGING EDITOR
AnnMarie Mattila
CREATIVE DIRECTOR
Brenda Drake Lesch
COPY EDITOR
Maude Campbell
SOCIAL MEDIA COORDINATOR
Corina E. Buzdugan
CONTRIBUTORS
Scott Bradshaw, Rokosolana Bulvarenko, Amber Comadira-Smith, Benjamin Delwiche, Nica Krasina, Cydni Mitchell Hodges, Anna Oliinyk, Shumaila Rai, Yazmin Rodriguez, Veronica Seta, Sabrina Sigouin, Tammy Varela, Wilton Sweet Studio, Angela Wojtaszczyk
SUBSCRIPTIONS l 651-330-0574 l 1 YEAR $19.95

Editorial Director:


Please direct all correspondence, photos, and press releases to AnnMarie Mattila, annmarie@americancakedecorating.com, or mail to American Cake Decorating, 4707 Hwy 61 N #255, St Paul, MN 55110.
Subscription Questions & Changes:
Send address changes to, New Mailing Address: American Cake Decorating, 4707 Hwy 61 N #255, St Paul, MN 55110 or email contact@americancakedecorating.com. Please notify us of address changes four to six weeks ahead of time. The post office is under no obligation to forward your magazine. If the postal authorities notify us that your magazine is undeliverable, we have no further obligation unless we receive a corrected address within one year. We cannot be responsible for non-delivery. The staff of American Cake Decorating magazine and AIM Communications LLC have reviewed contributions and advertising materials with the understanding that the information is original, accurate, and reliable, but we cannot be held responsible for such content. Please note that some of the techniques may be suitable for private home use, but are not necessarily appropriate for cakes destined for sale. American Cake Decorating magazine (ISSN 1094-8732) published bimonthly by AIM Communications, LLC, 4707 Hwy 61 N #255, St Paul, MN 55110. Tel: 651-330-0574; Fax: 651-756-8141. Visit our website at www.americancakedecorating.com. Periodicals postage paid at St. Paul, MN, and additional mailing offices.
Postmaster: Send address changes to American Cake Decorating magazine, 4707 Hwy 61 N #255, St Paul, MN 55110. Allow 60 days for address change. Copyright ©2025 by AIM Communications, LLC. Reproduction in whole or part without written permission prohibited.
May | June 2025. Issue 456.
Connect with the community here and on social media for irresistible cake inspiration, sweet giveaways, essential news, and exclusive offers.
Save the date for Oregon’s Sugar Arts Expo. The new location is 15 minutes from the Portland Airport in the East County of Portland at Four Points by Sheraton Portland East. Join the community of sugar art enthusiasts, from hobbyists to professionals, and elevate your baking and decorating skills together from September 25–28. For more information, visit oregonsugarartists.com.

The art of cake decorating will take center stage at the Retail Bakers of America’s 24th annual Pillsbury Bakers’ Plus Creative Cake Decorating Competition. As one of the most anticipated events at the International Baking Industry Exposition (IBIE), this prestigious competition shines a light on the world’s top professional cake decorators from September 14–17 in Las Vegas, Nevada. Professional cake decorators, pastry chefs, and sugar artists currently working in the industry with a minimum of two years of cake decorating experience are welcome to apply. To learn more about IBIE 2025 and register for the event, visit bakingexpo.com.

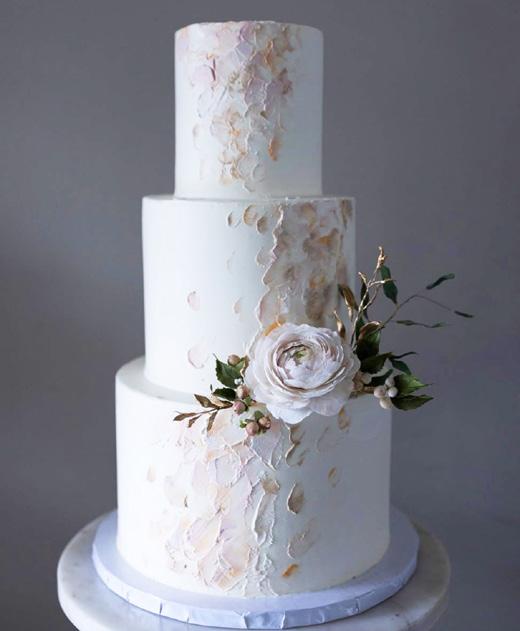
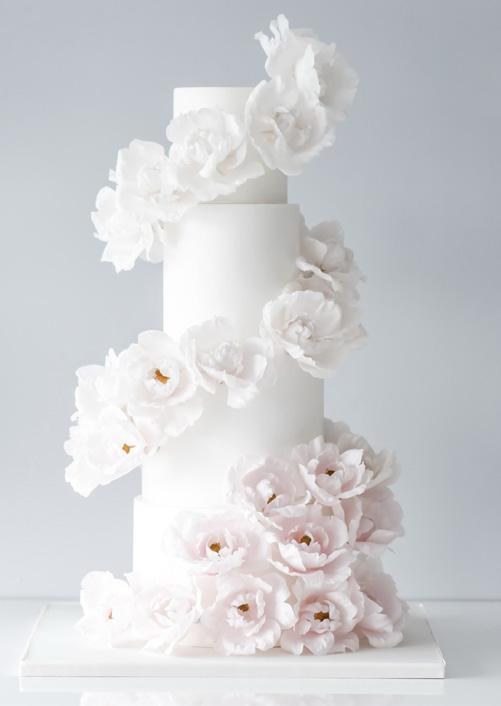
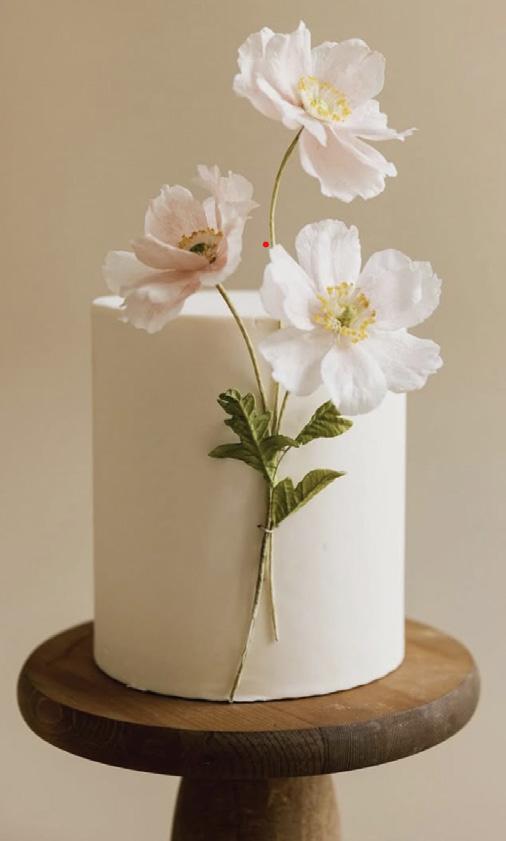
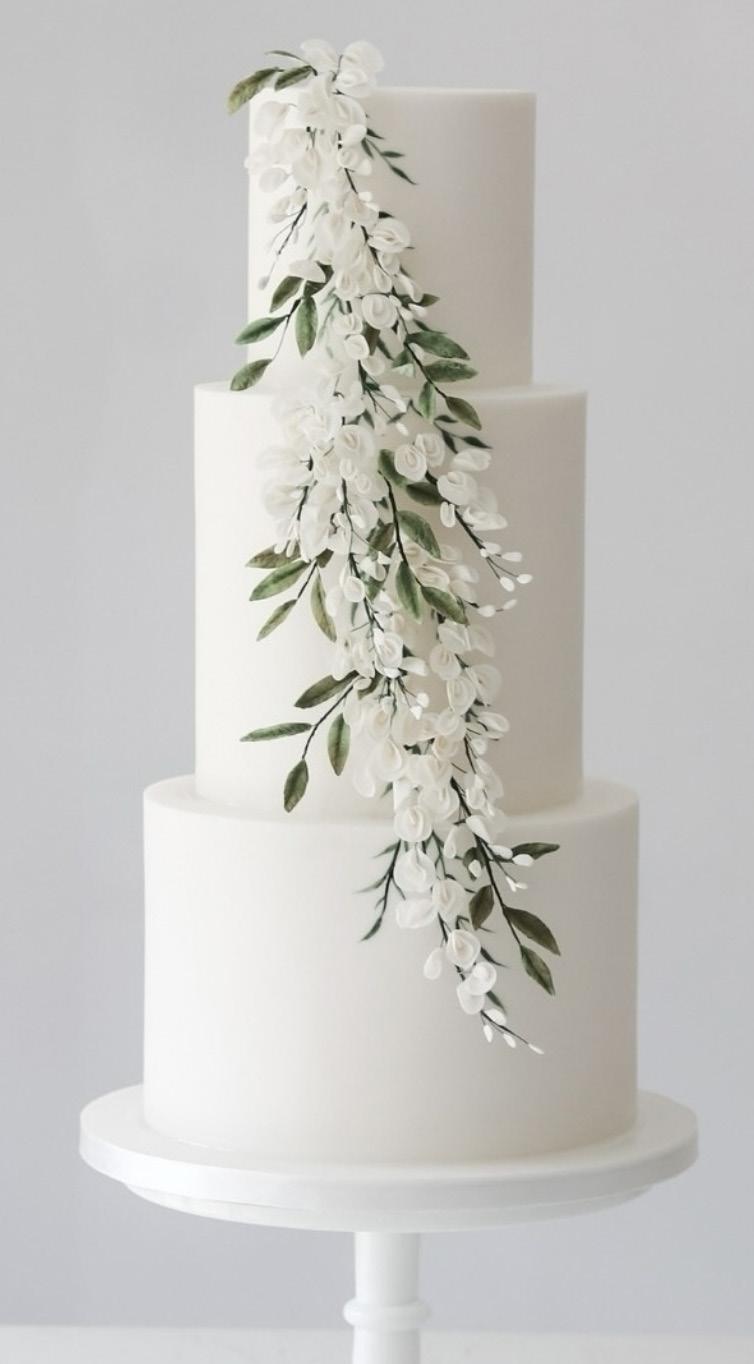
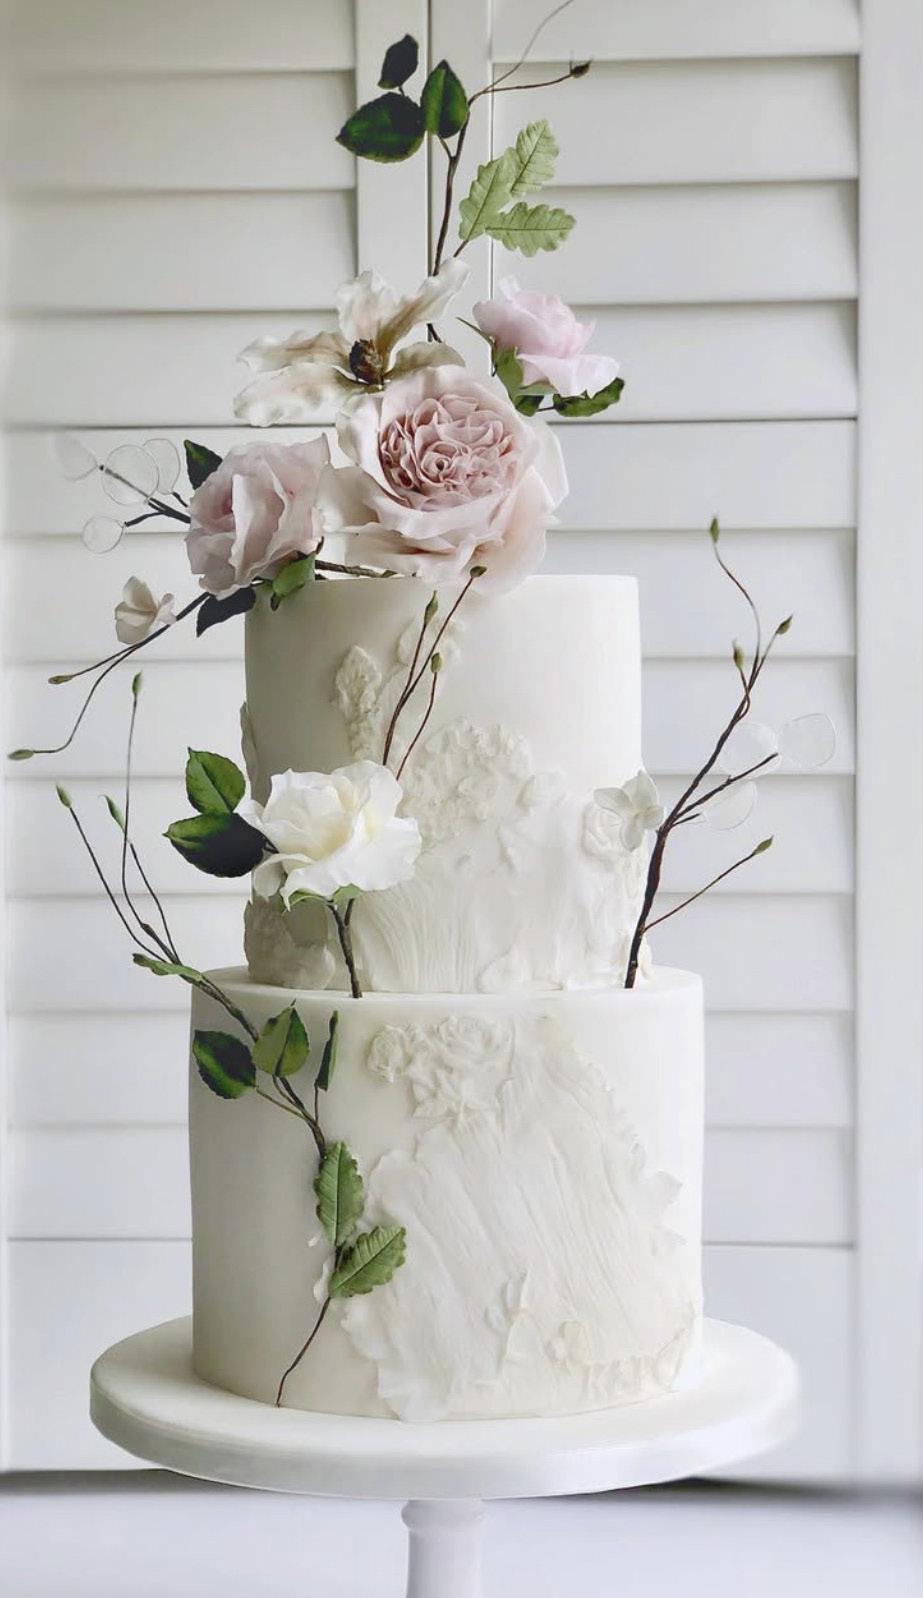
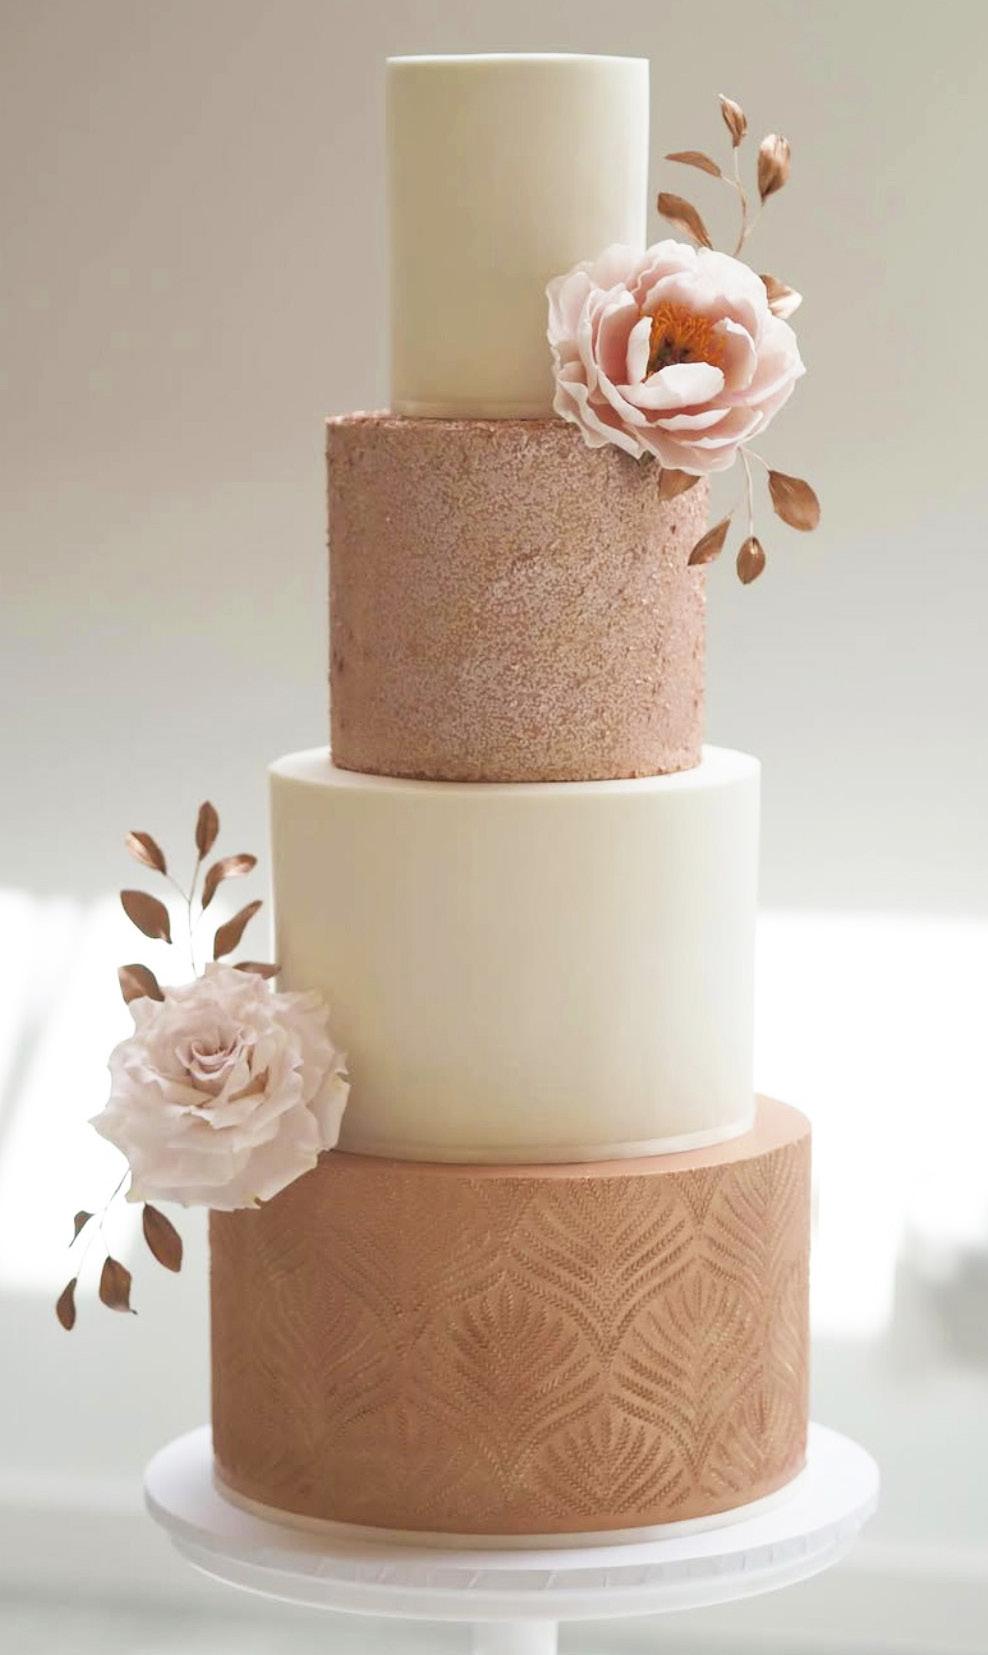
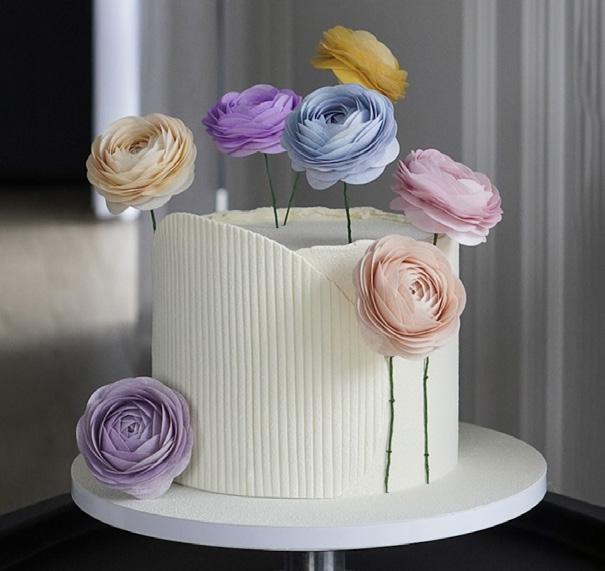
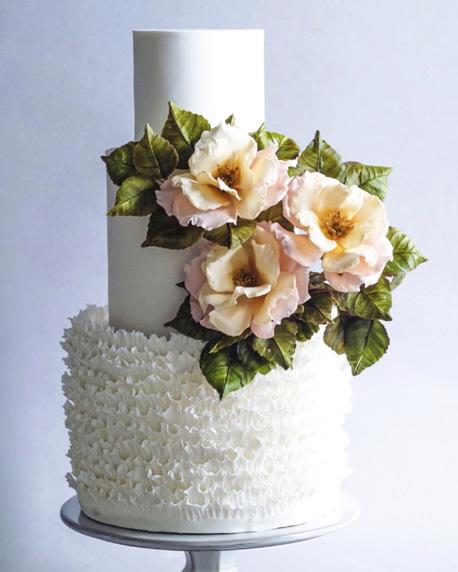
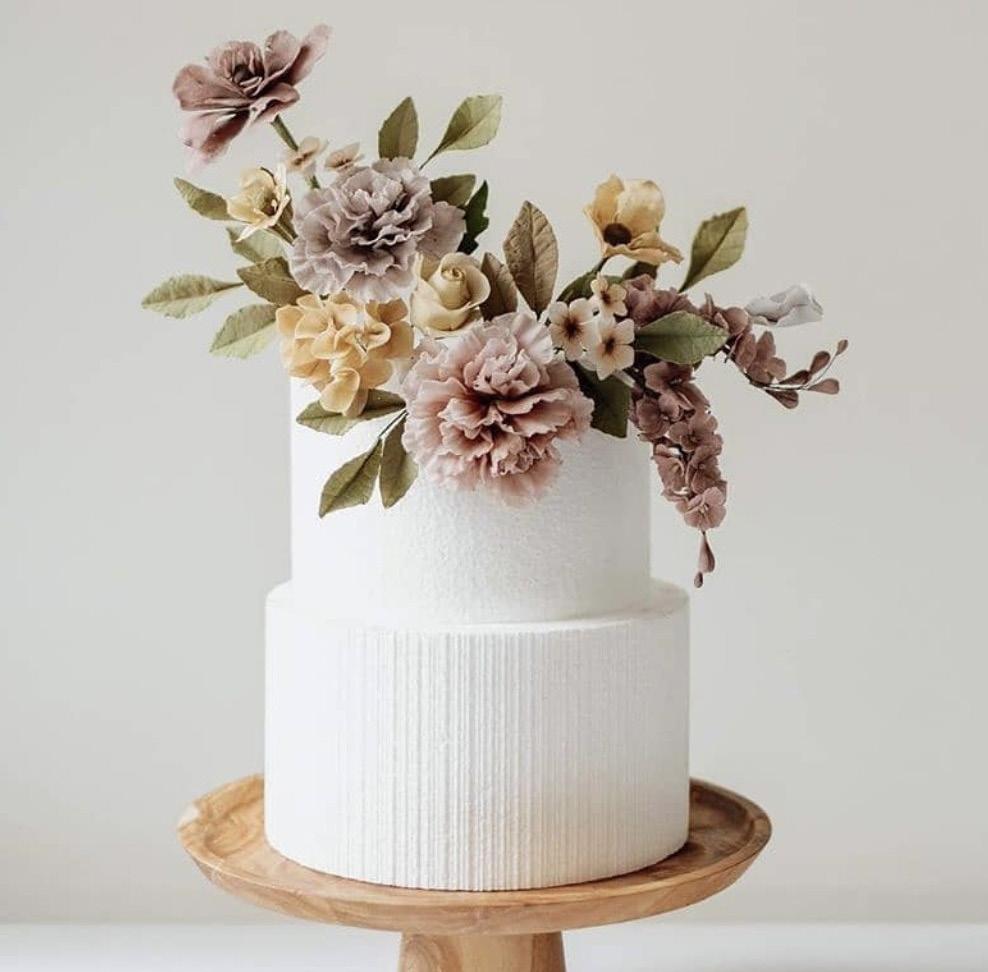
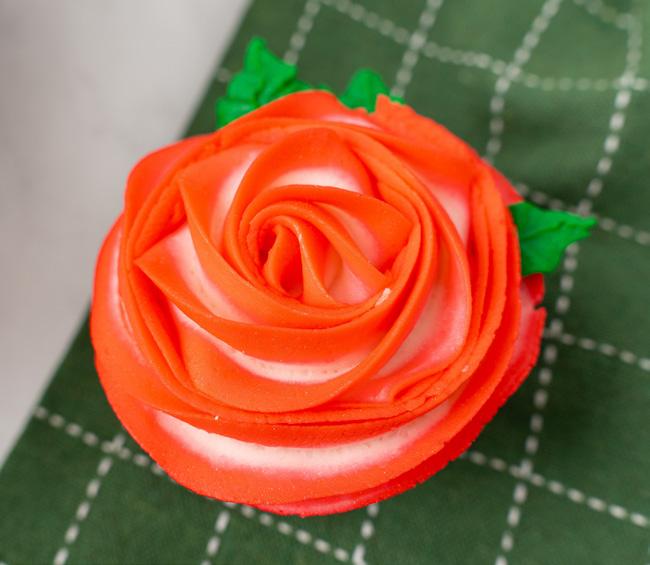
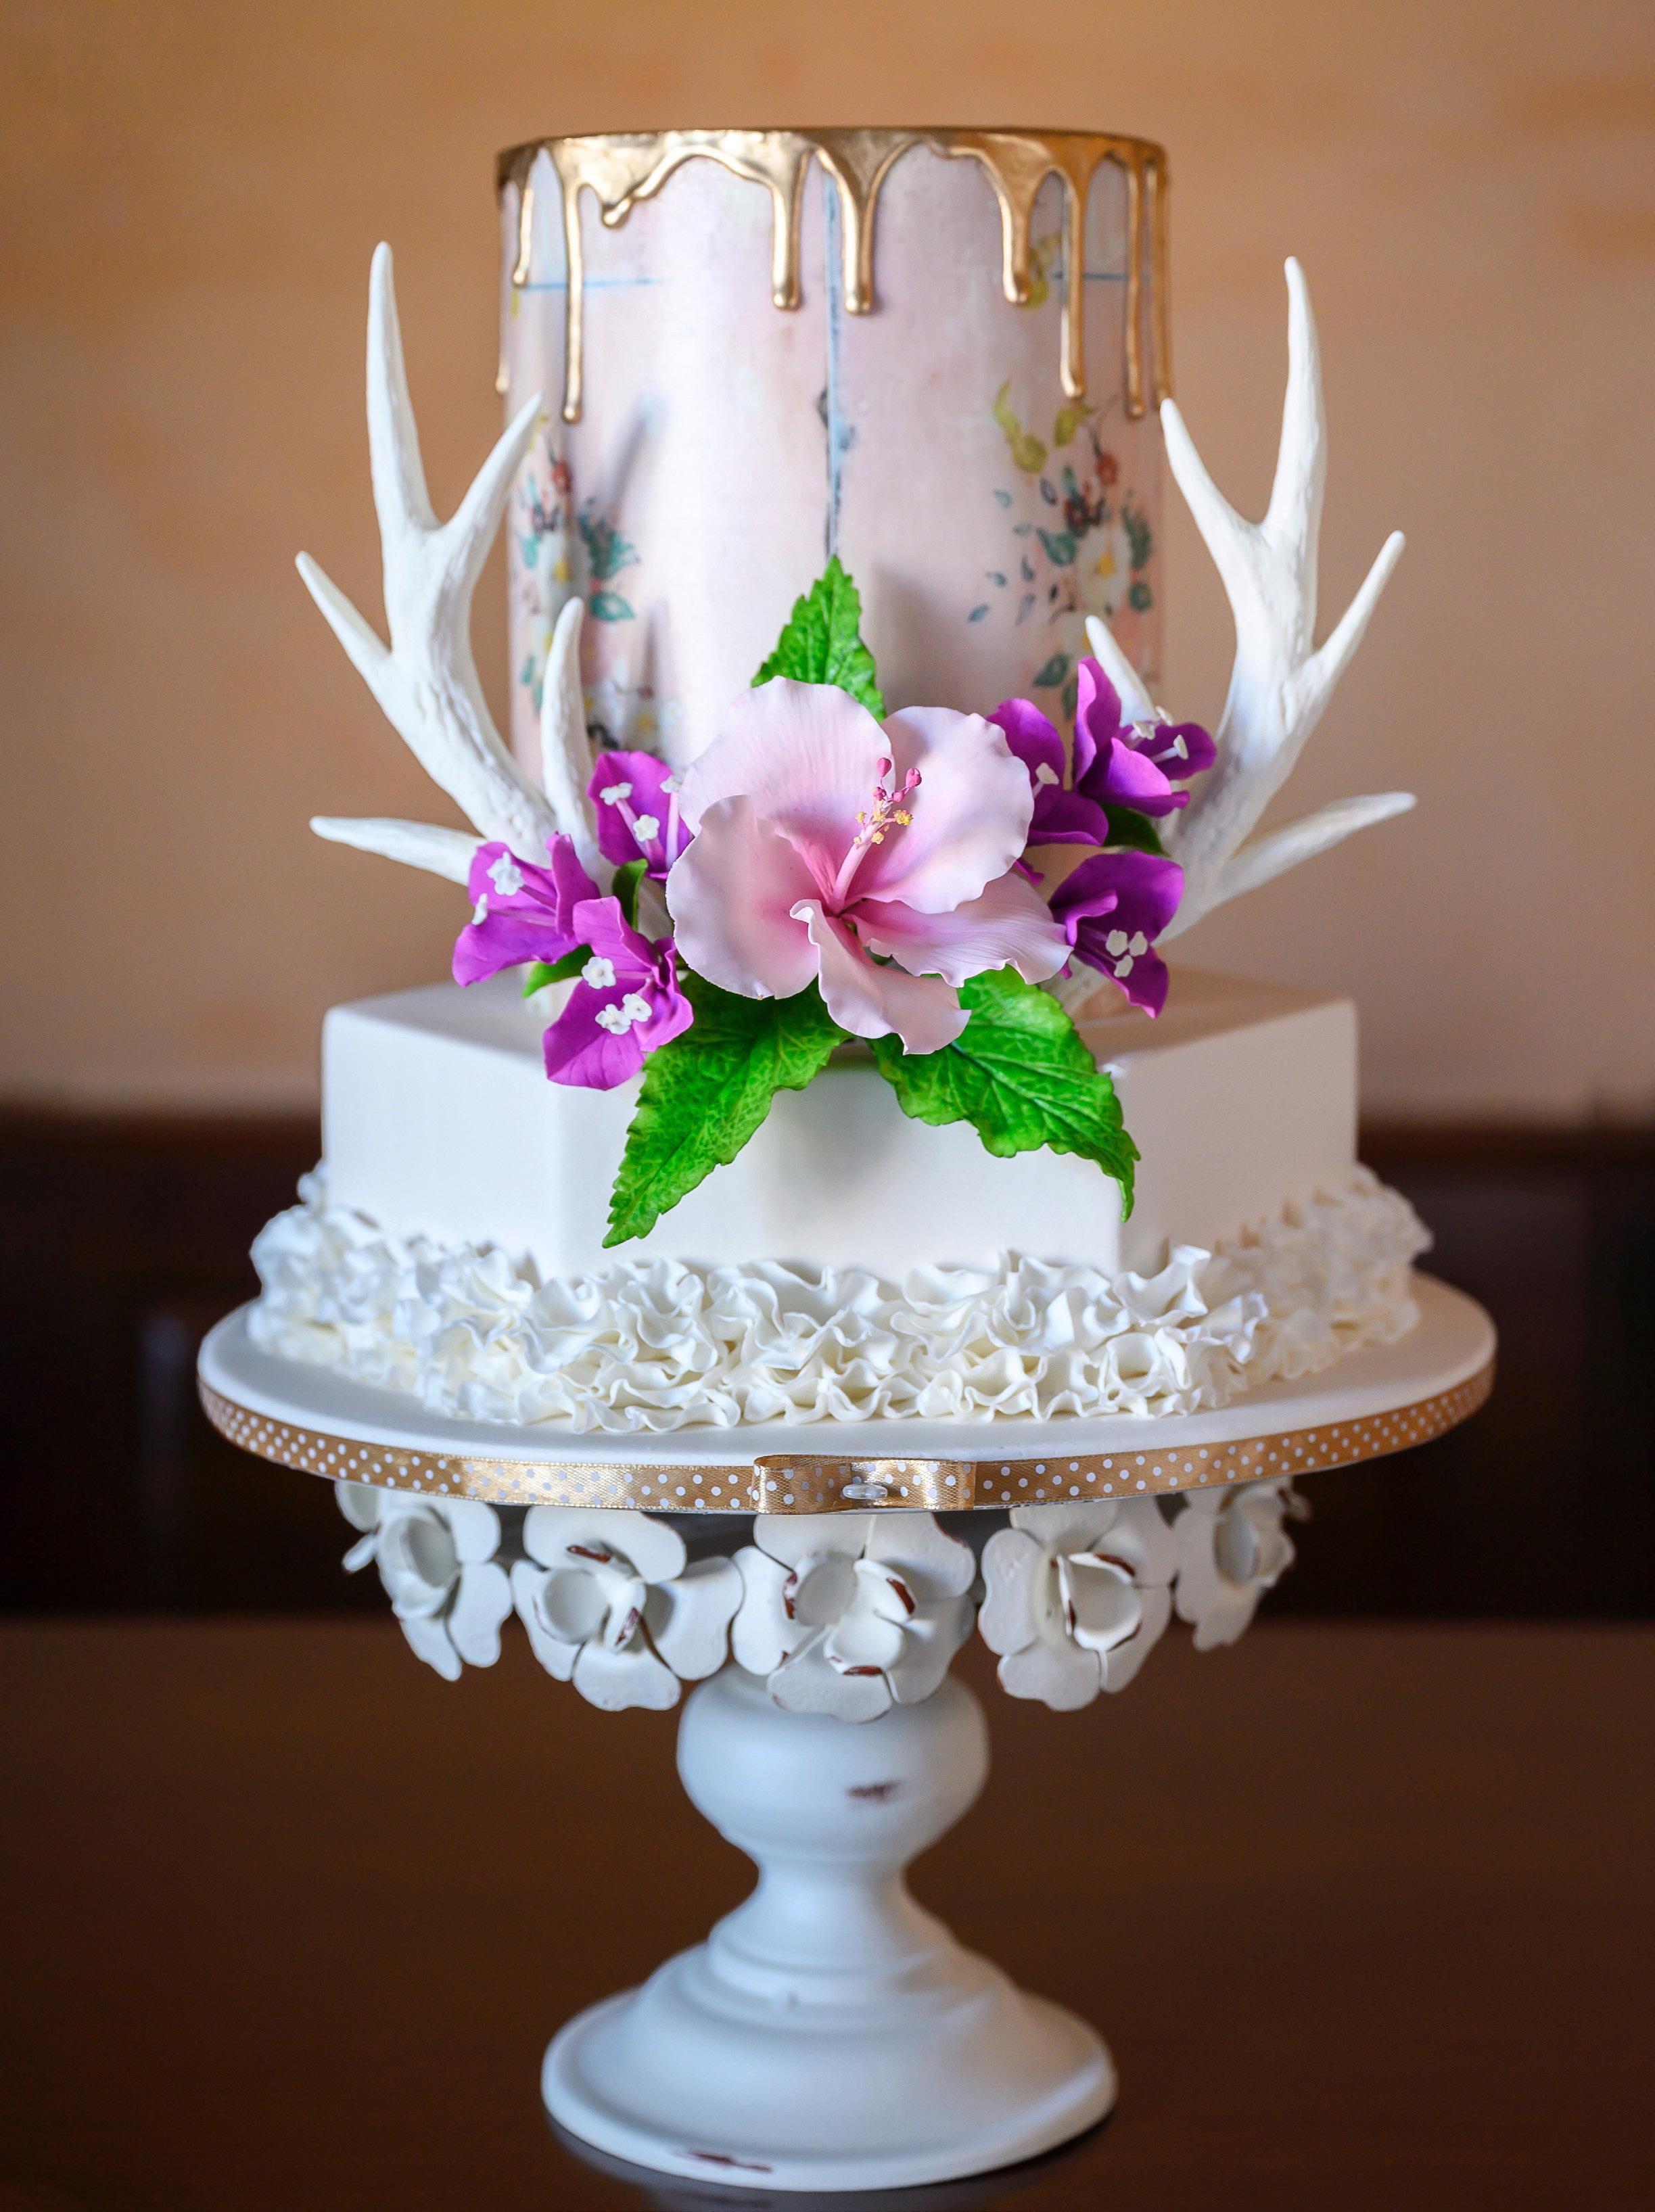
Celebrate wedding season with stunning sugar flowers.
And remember: Don’t forget to tag us on social media to possibly be featured in an upcoming issue.


facebook.com/AmericanCakeDecorating instagram.com/AmericanCakeDecorating
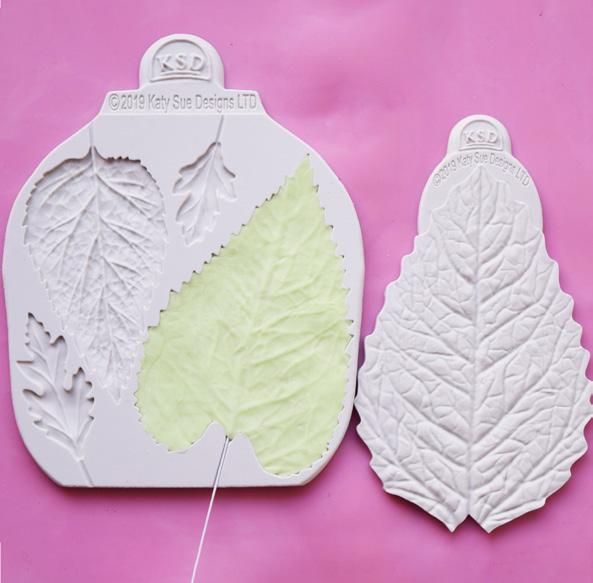
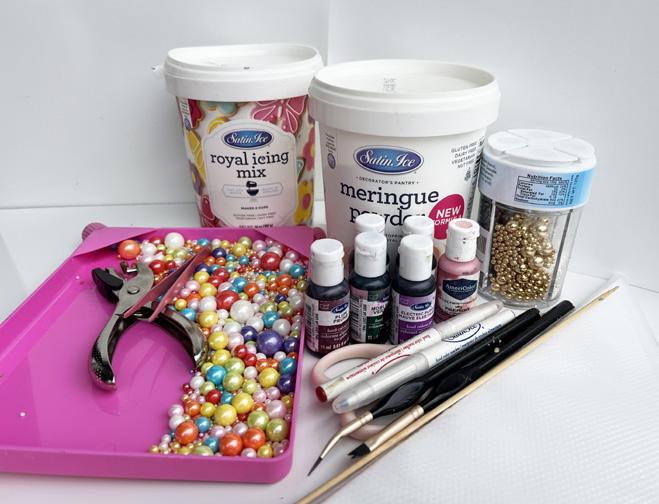
LEVEL: COMPONENTS
Edibles:
Gum paste: light green and white
Petal dust: spring green, burgundy, deep pink, and white
Edible glue
Equipment:
Floral wire: 18, 24, and 28 gauge
Pliers
Yellow double-headed stamen
Paintbrushes
Light green floral tape
Rolling pin
Peony petal cutter
Groove board
Foam pad
Ball tool
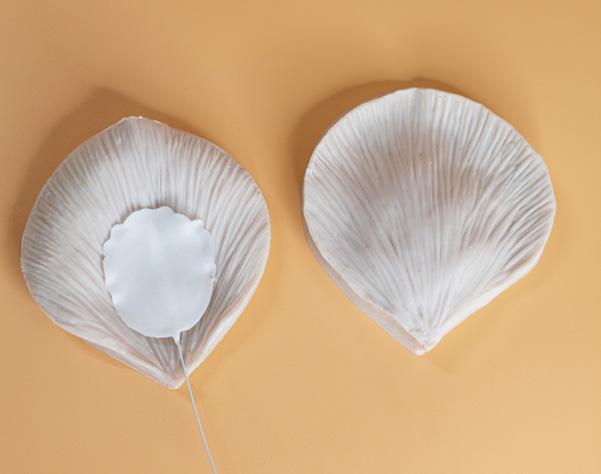
Silicone peony veining mold
Spherical mold
Leaf cutter
Bumpy Foam

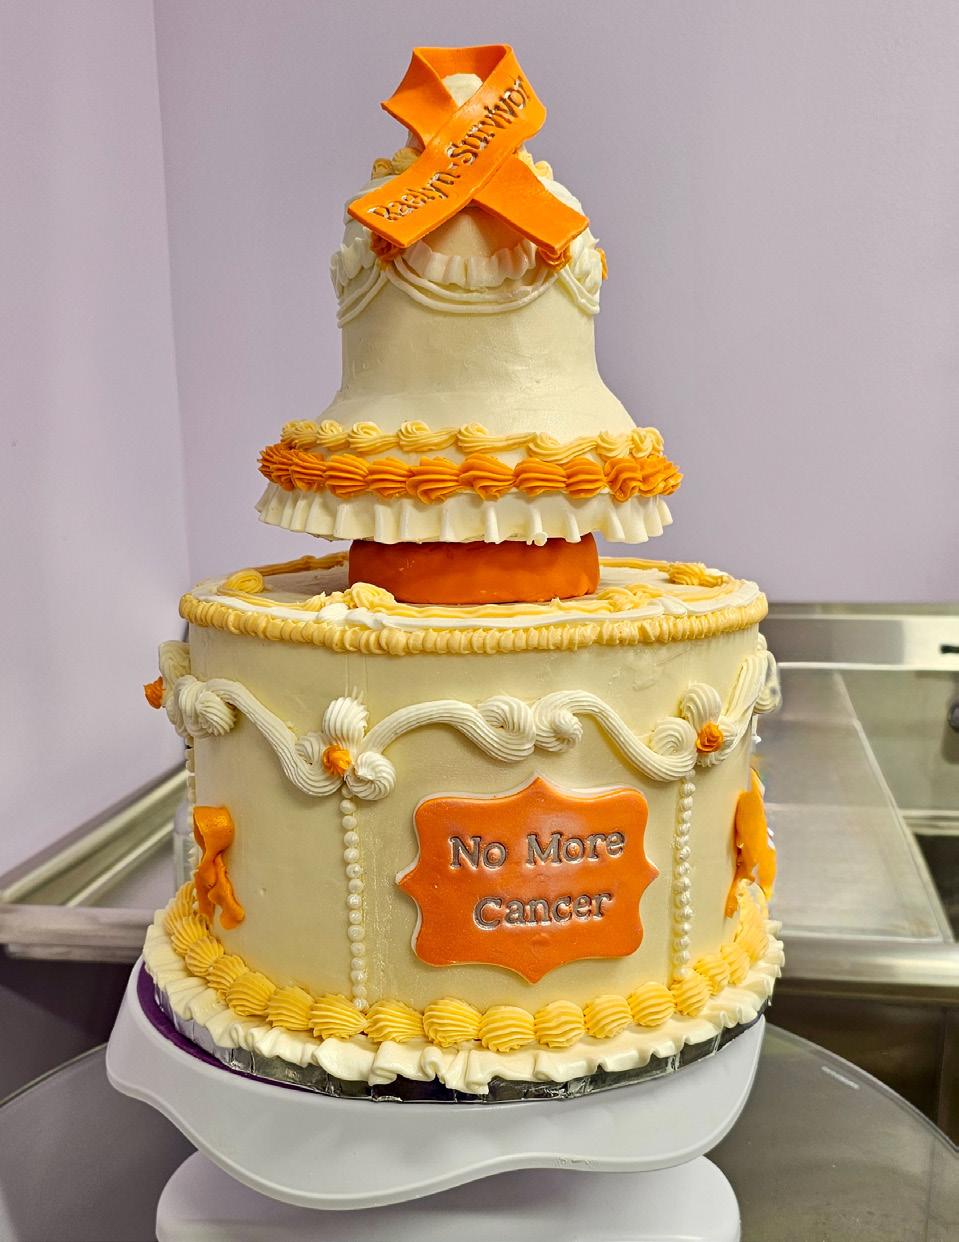
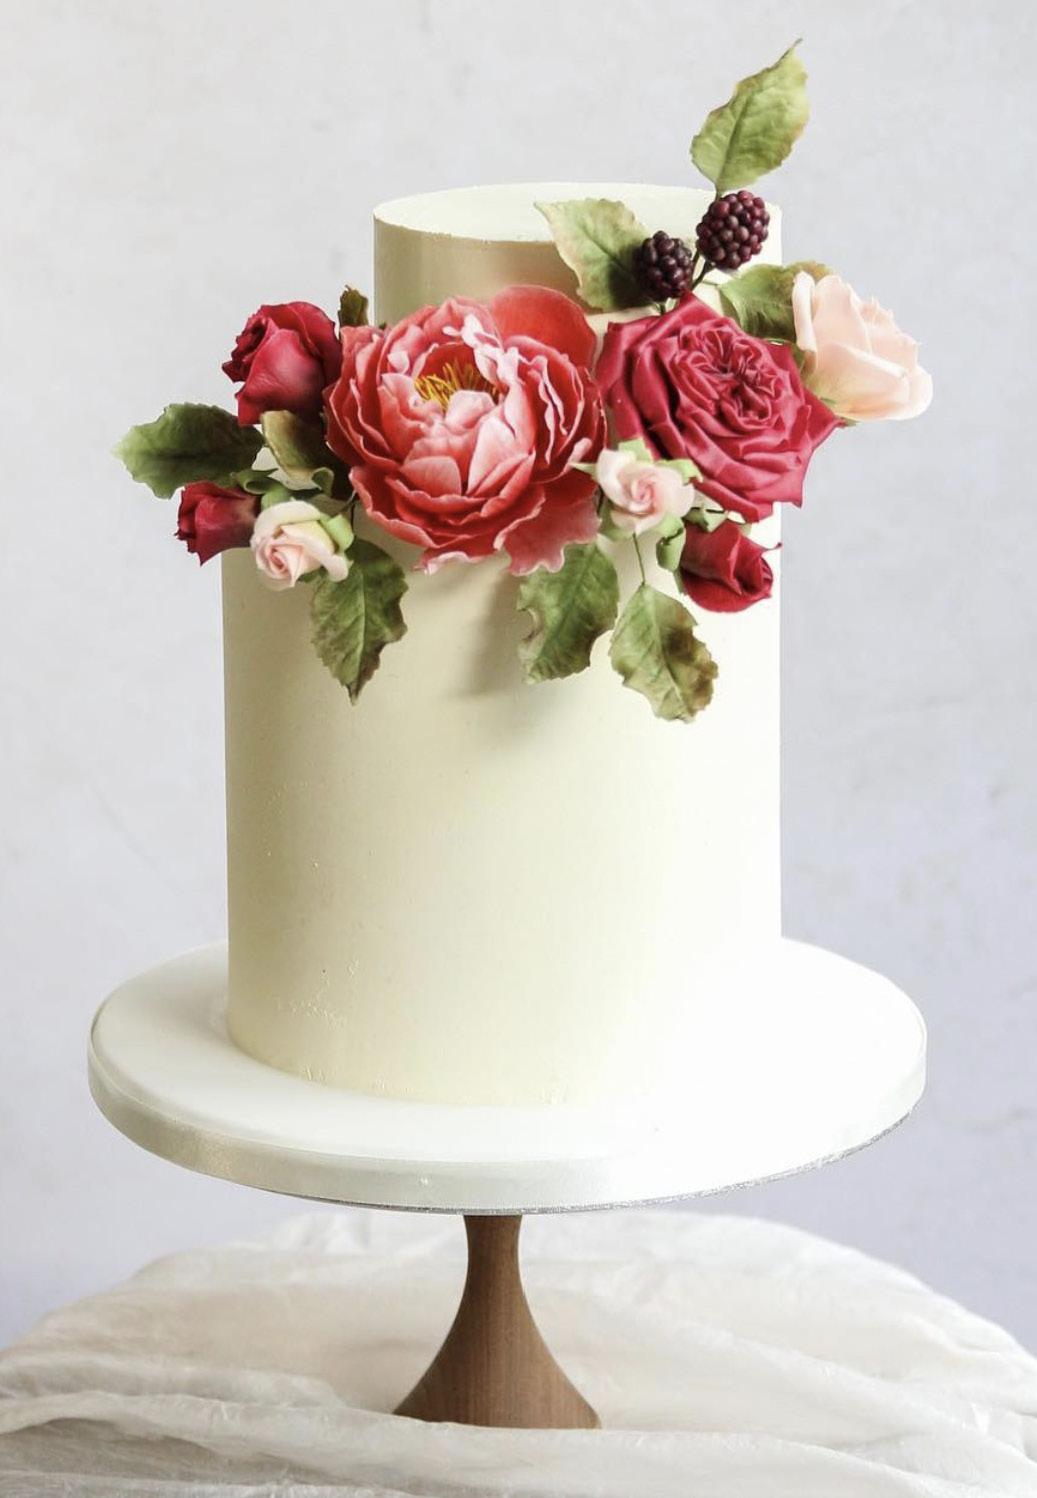
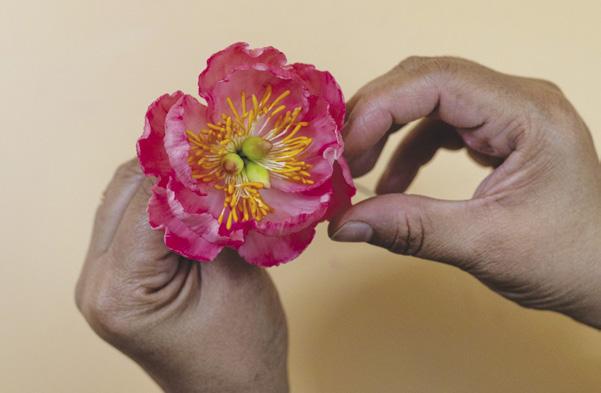
Nothing is more impressive than a showcase sugar peony or two on a wedding cake.
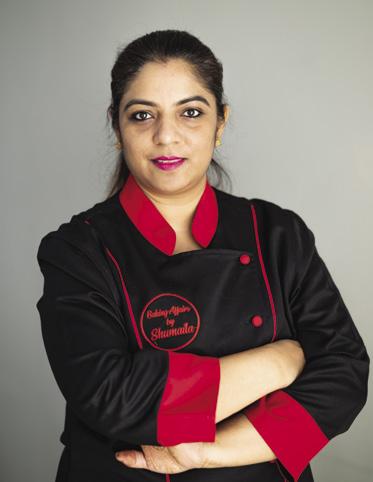
BY SHUMAILA RAI
1. Take 3 pieces of 24-gauge floral wire and use pliers to make a small hook in each piece.
2. Roll 3 pea-size balls of light green gum paste and shape them into teardrops. Push the hooks into the rounded ends of the teardrop shapes and secure them to the wire by twirling the gum paste at the base in between your fingers.
3. Use your index finger and thumb to pinch a slight ridge down 1 side. Also bend the tips slightly toward the ridge. Let them dry overnight.
5. Dust the dried pistils with spring green petal dust. Start dusting from the base so the green is deeper at bottom and graduates to a lighter green at the top.
6. Brush the tips of the pistils with burgundy petal dust.
7. Attach the pistils together with floral tape.
8. Position the stamen slightly lower than the pistils. Tape 5 stamen bunches 1 by 1 with floral tape around the stamen. Use your fingers to spread them out so they look more natural.
4. Take a bunch of doubleended yellow stamen. Cut a 24-gauge floral wire in half, put it in the center of the stamen, fold over the wire, and use pliers to secure it tightly. Repeat to make 5 bunches.


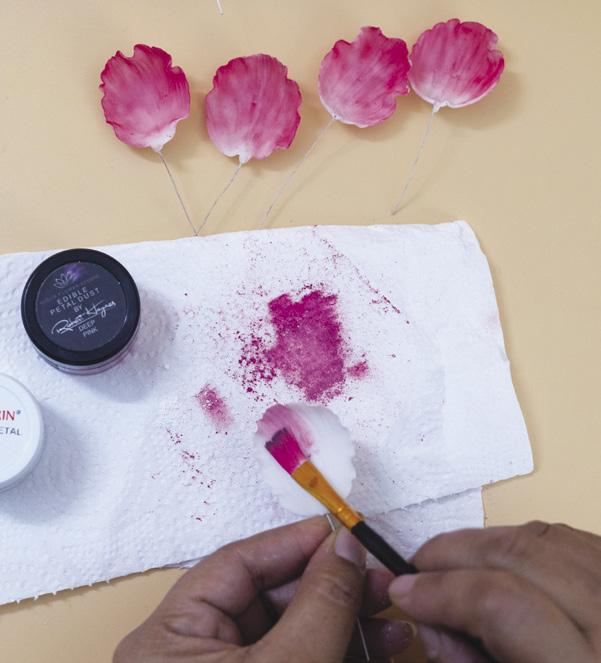
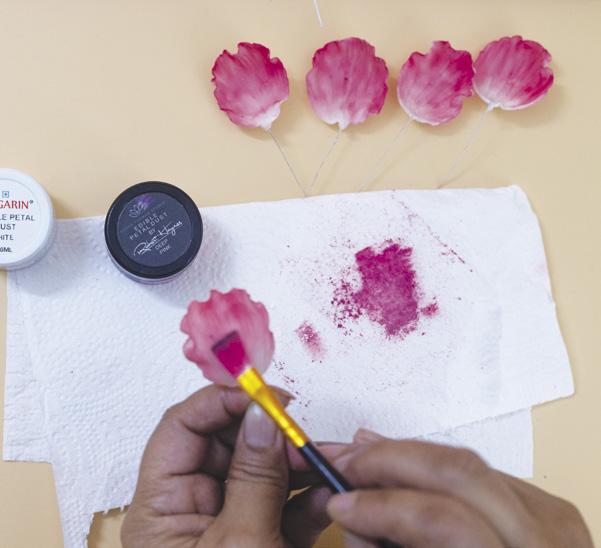
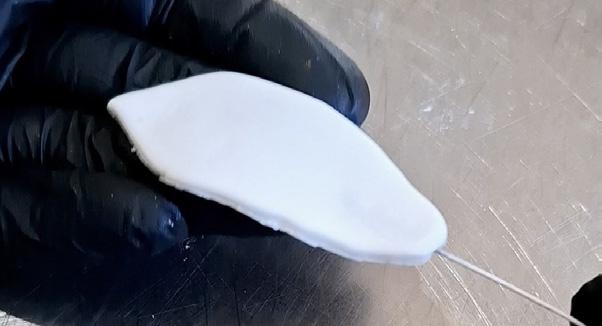
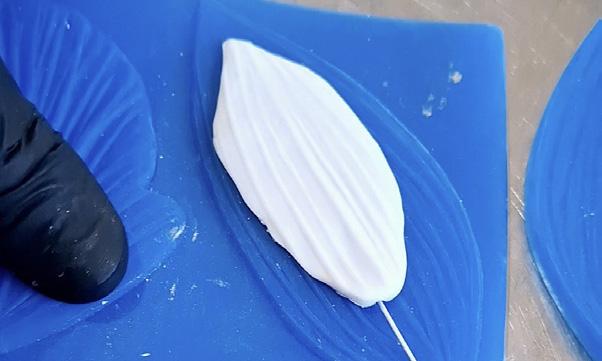
1. Mix deep pink petal dust with some white to tone it down. Use a flat and soft brush to dust the petals from the top toward the base. Allow the color to taper off toward the middle.
2. Dust the back side of the petal in the same manner.
3. Tape 2 petals to the base of the center and attach with floral tape.
4. Tape the next set of petals so they overlap each other.
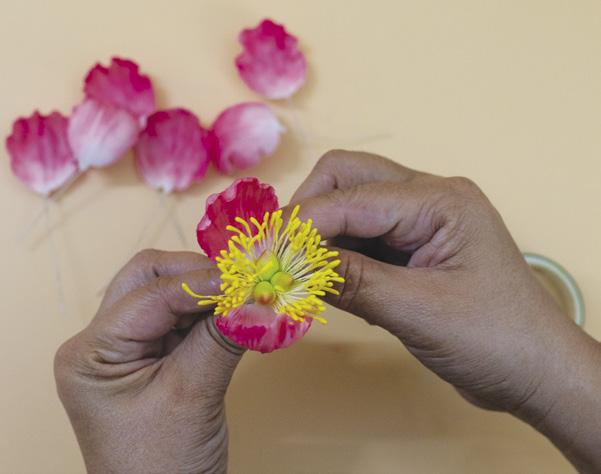
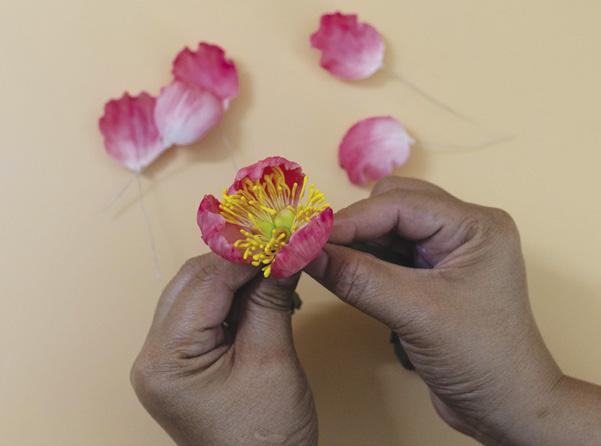
5. As you add more rows of petals, take a piece of 18-gauge floral wire and insert it into other wires to add stability. Continue to tape down the length of the stem with floral tape. ACD Tip: KEEP A SHEET OF ACETATE BESIDE YOU AS YOU CUT OUT THE PETALS AND PLACE THEM UNDERNEATH IT TO KEEP THEM FROM DRYING OUT.
Shumaila Rai is based in Gurgaon, India. Her journey from hobbyist to professional baker has been an adventure. After completing her MBA, she entered the corporate world but found solace in baking. During a three-year stint in Japan, she became captivated by Japanese cuisine and decided to pursue baking as a profession. In 2017, Shumaila founded Baking Affairs by Shumaila. The joy on people’s faces when they see her creations fuels her determination. She loves working with fondant and creating unique textures and patterns. She has been featured in publications like Cake Masters and D’Licious, among others. She was the winner of the Asia Cake Oscar in the rising star category in 2023 and a finalist for the ICA wedding cake in 2024.
instagram.com/shumaila_bakingaffairs
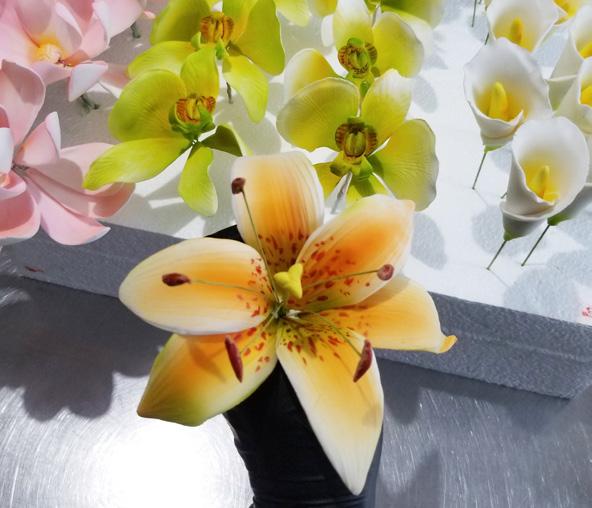
BY SABRINA SIGOUIN
Experience a taste of the tropics with a cascade of flowers, including striking orange lilies.
Sabrina Sigouin, cake designer and owner of La Belle Pâtissière, was an interior designer for seven years before she decided to return to school to follow her pastry dreams in 2015. Since 2016, Sabrina has created her own custom cake company, enjoyed Canada’s Baking and Sweets Show as an award winner in 2019, and most recently was a Food Network competitor in 2021.
labellepatissiere.com facebook.com/labellepatissiere instagram.com/labellepatissiere
Edibles:
Gum paste: yellow, brown, and white
Orange petal dust
Water
Equipment:
Nontoxic pencil
Paintbrushes
Piping bags
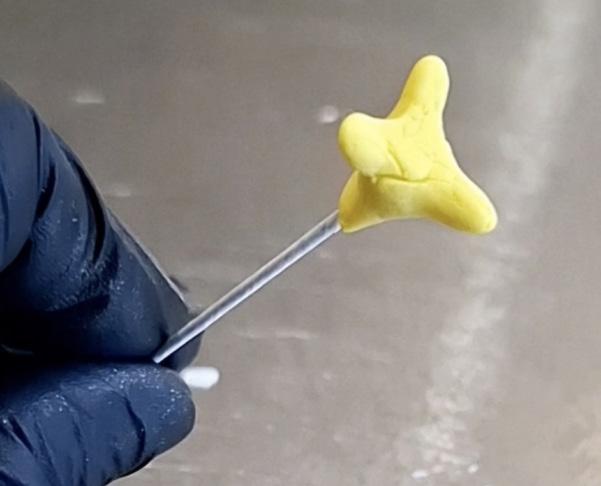
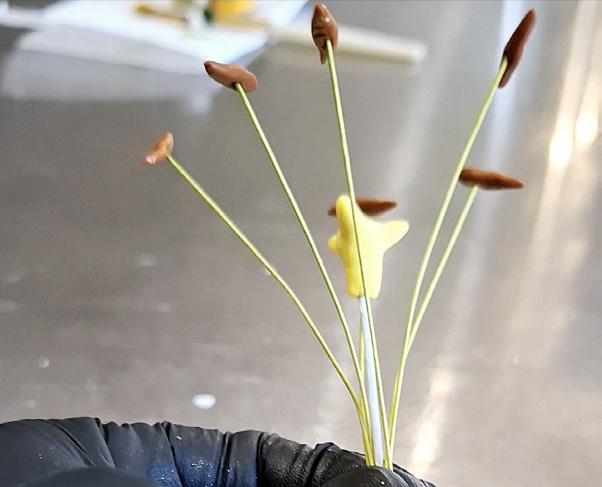
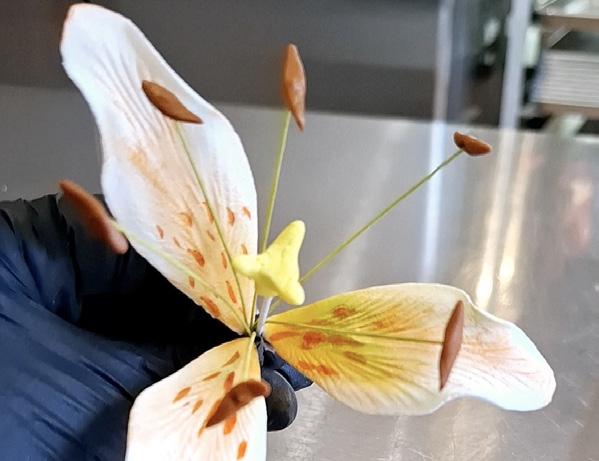
1. Take a small piece of yellow gum paste and form it into 3 points. Insert an 18-gauge floral wire.
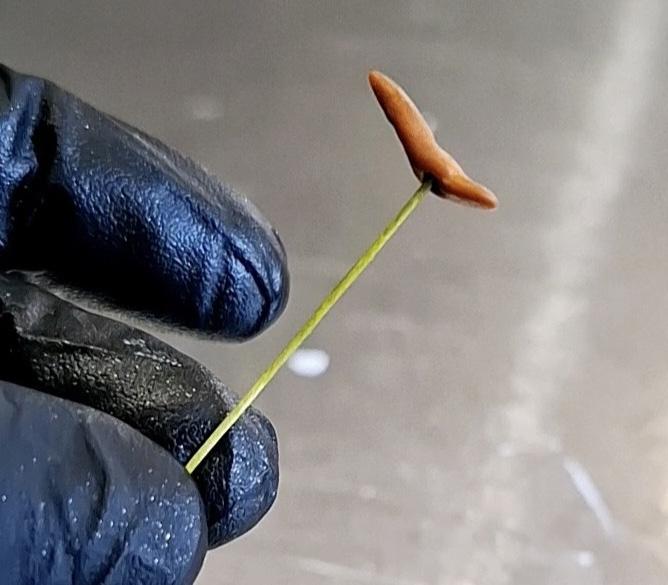
2. Create 6 stamens with brown gum paste with 24-gauge floral wires inserted into them.
3. Assemble by placing the yellow center in the middle, surrounded by the 6 stamens with floral tape.
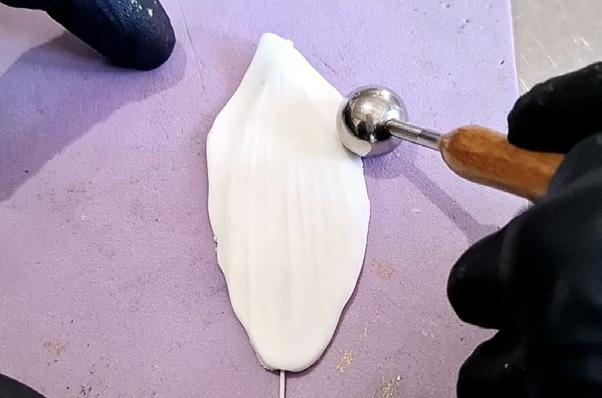
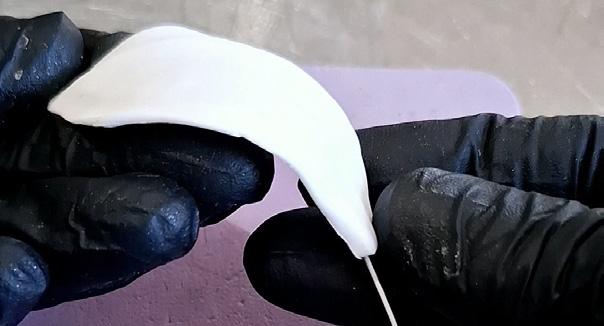
1. Roll out white gum paste and use the orchid petal cutter to create 6 petals. Insert 24-gauge floral wires into each.
2. Press each petal into the silicone veining mat.
3. Use a ball tool to thin the edges of each petal.
4. Curve the petals downward and allow them to dry fully.
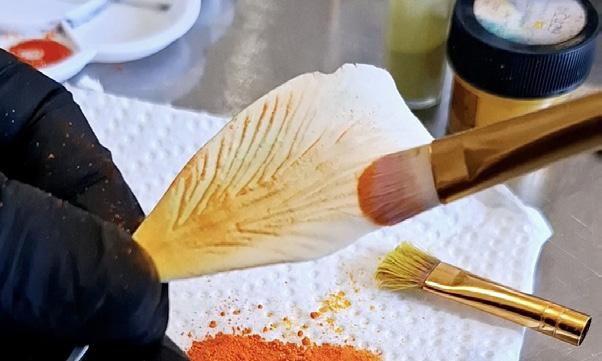
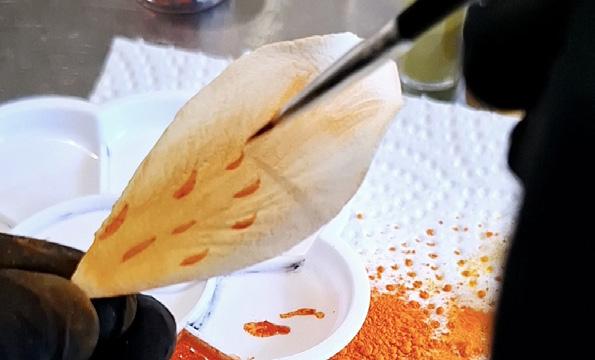
1. Once dry, apply orange petal dust to the petals, starting at the base and working upward.
2. Mix orange petal dust with a little water and paint small lines on each petal.
1. Assemble 3 petals in a triangular shape around the center with floral tape.
2. Attach the next 3 petals in between the first 3 petals. ACD
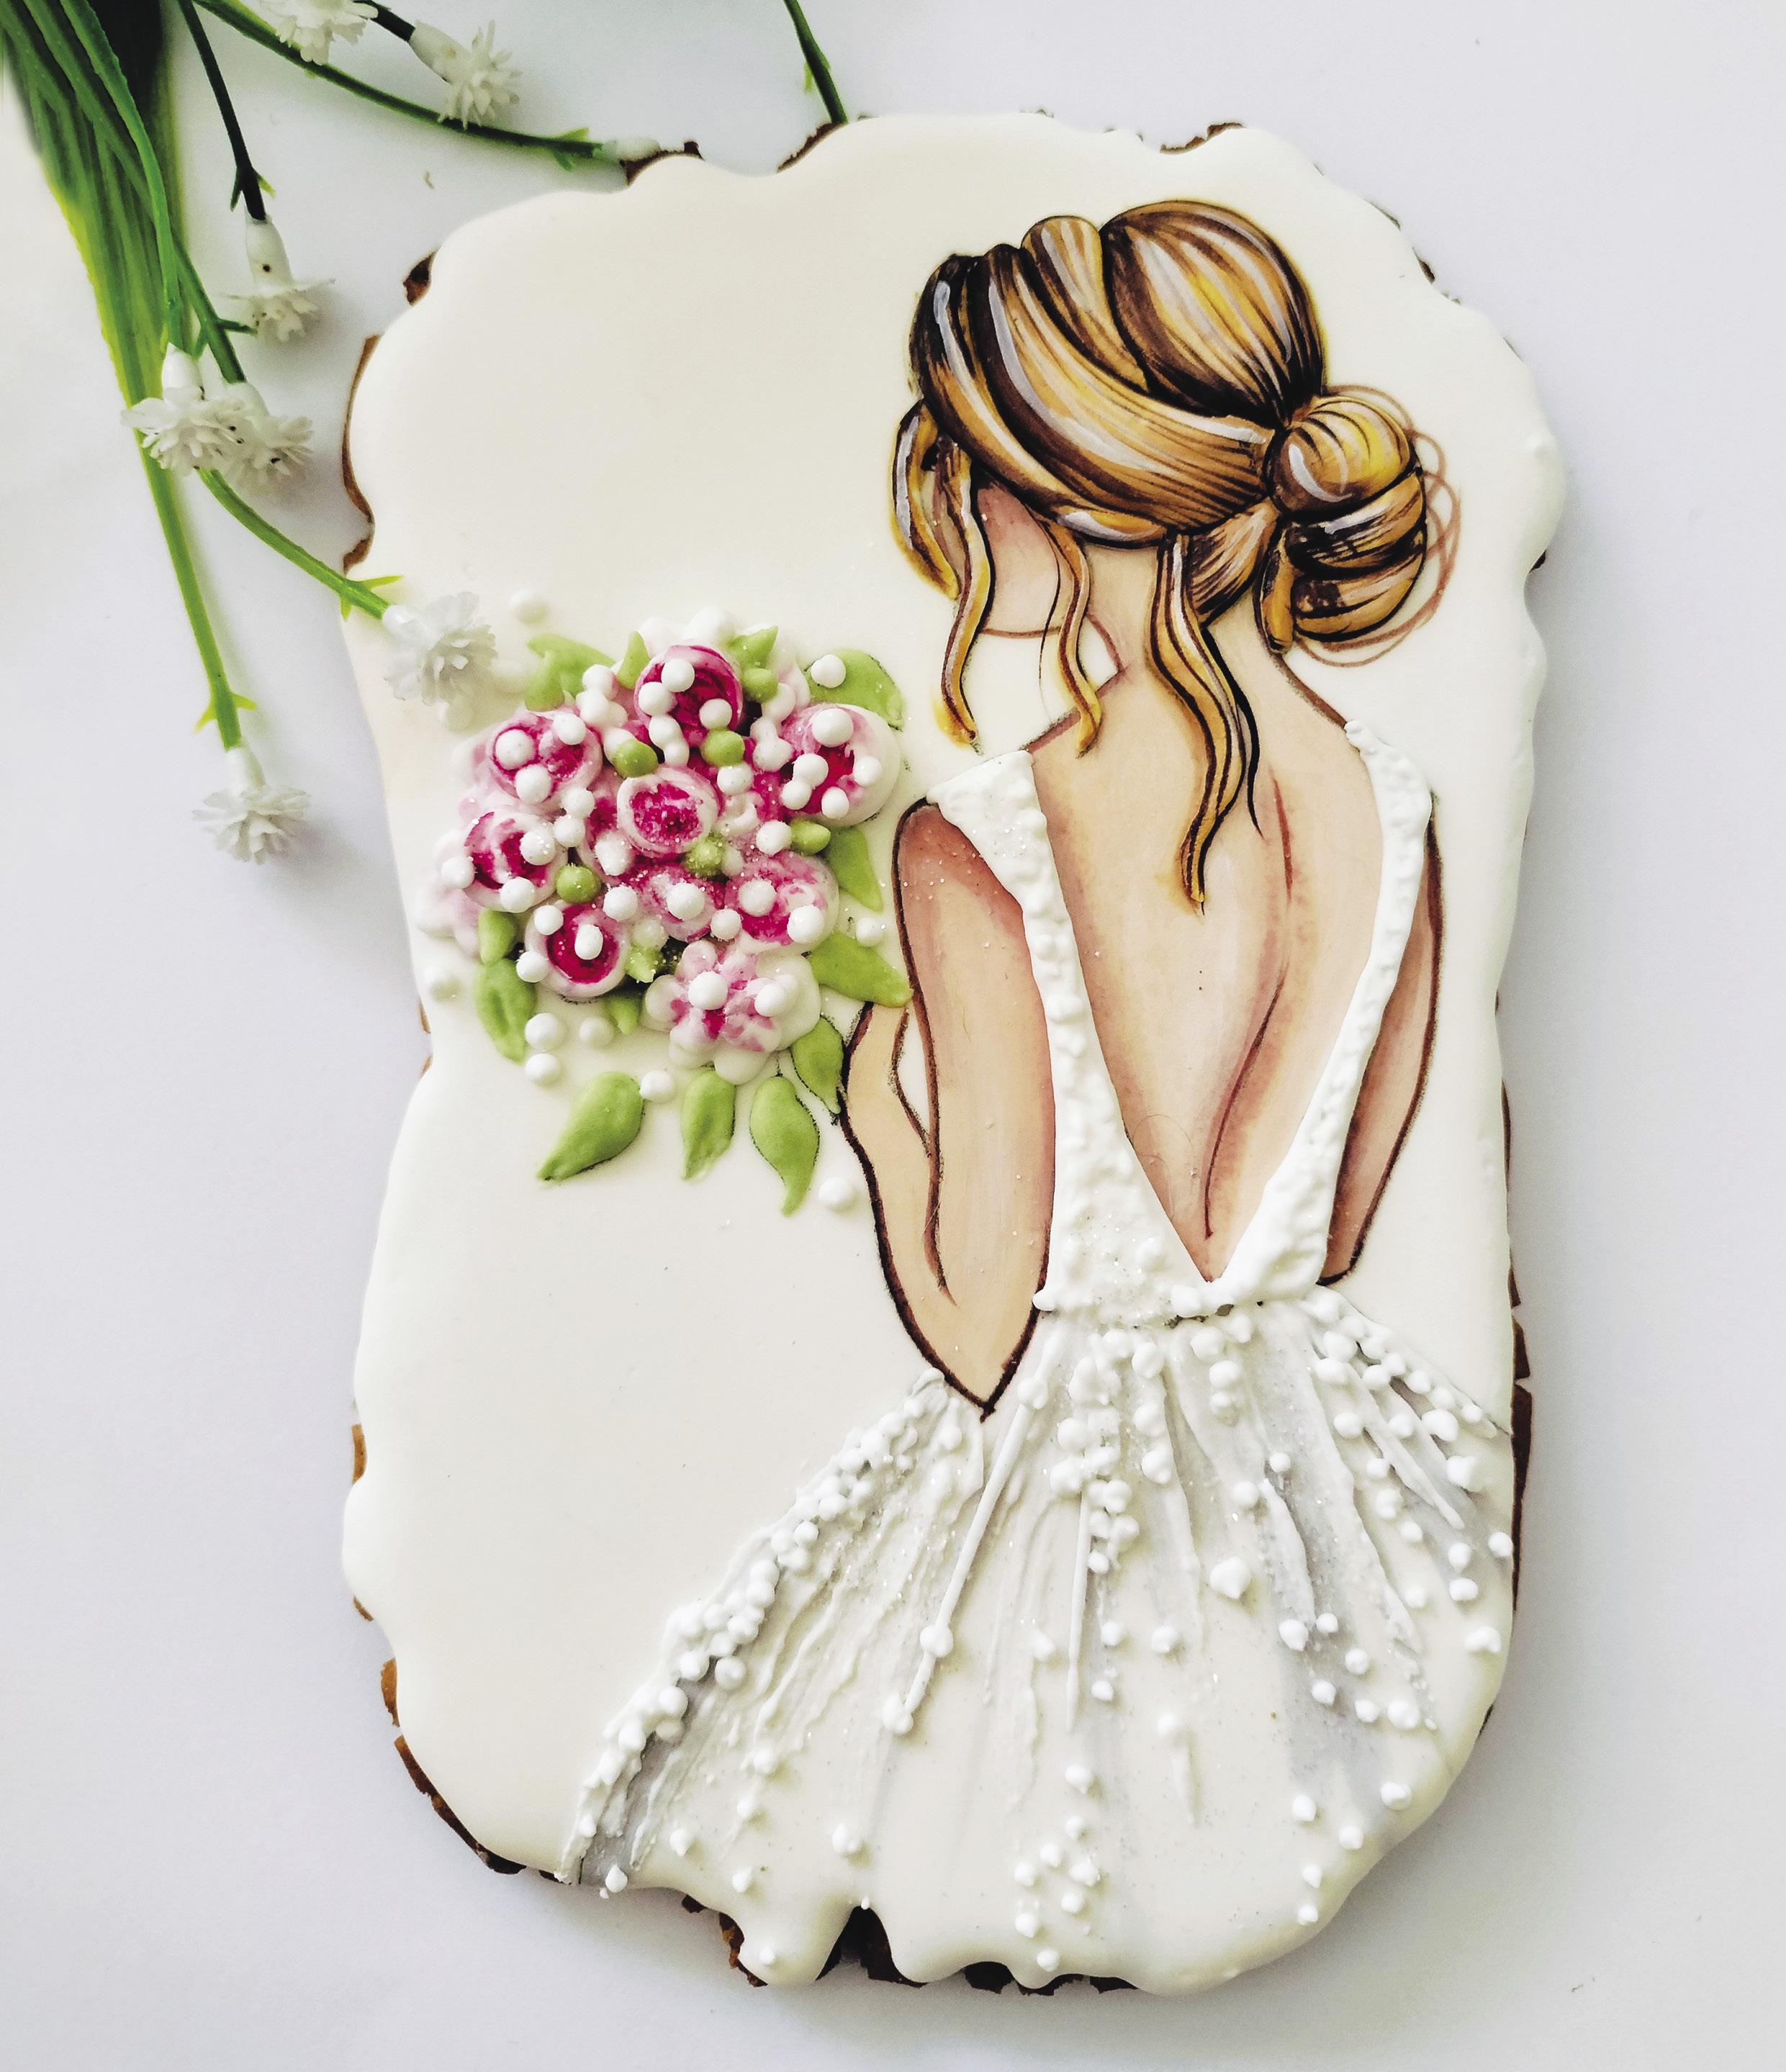
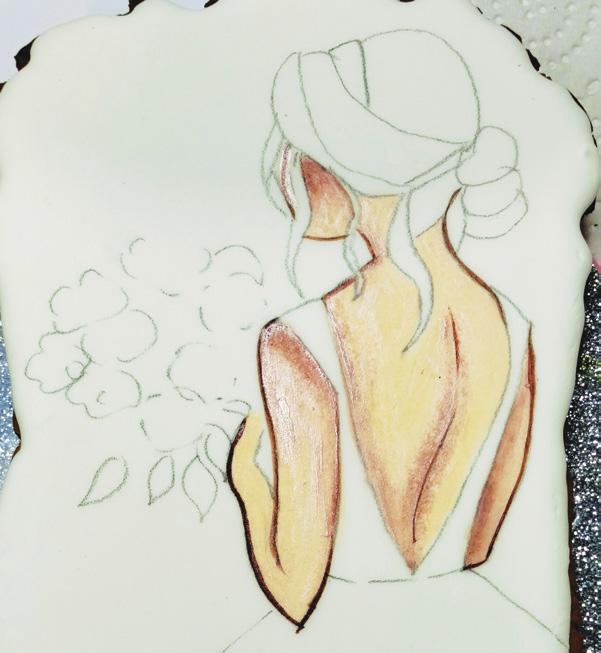
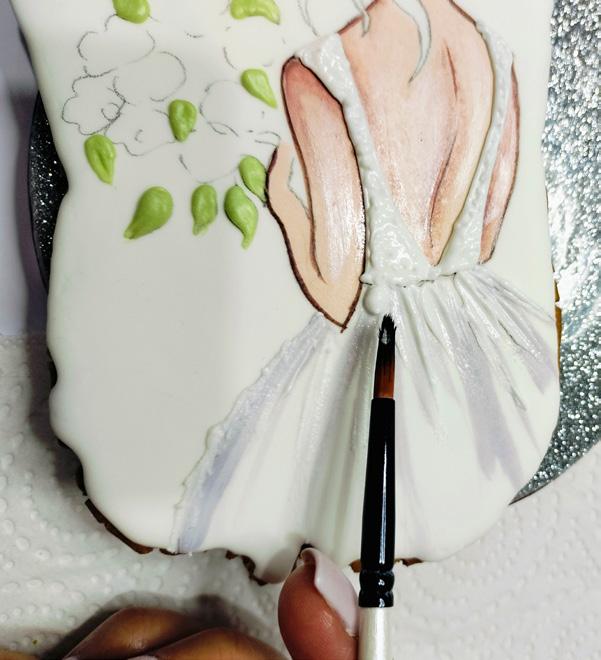
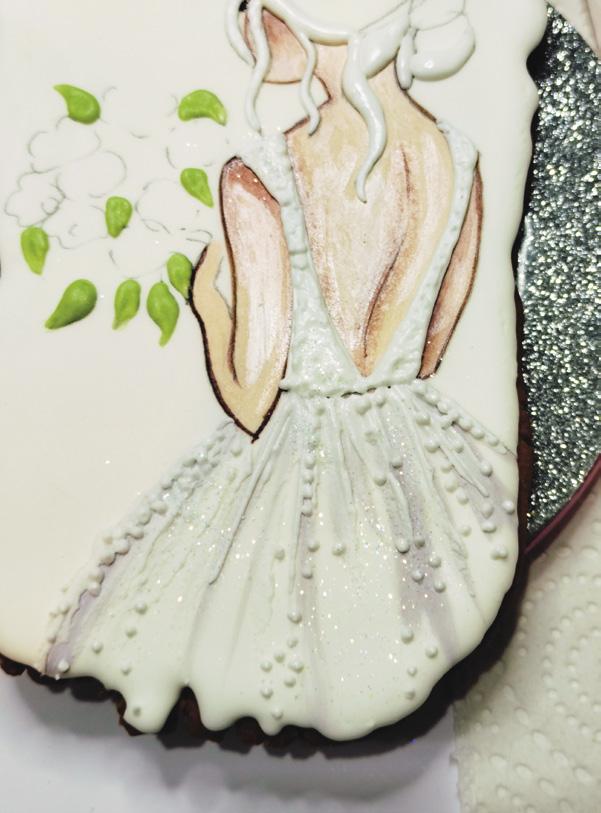
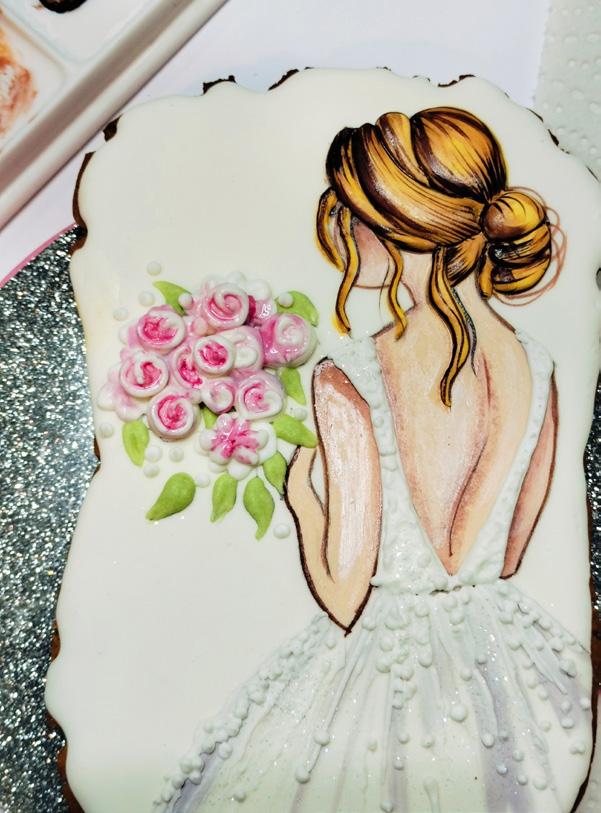
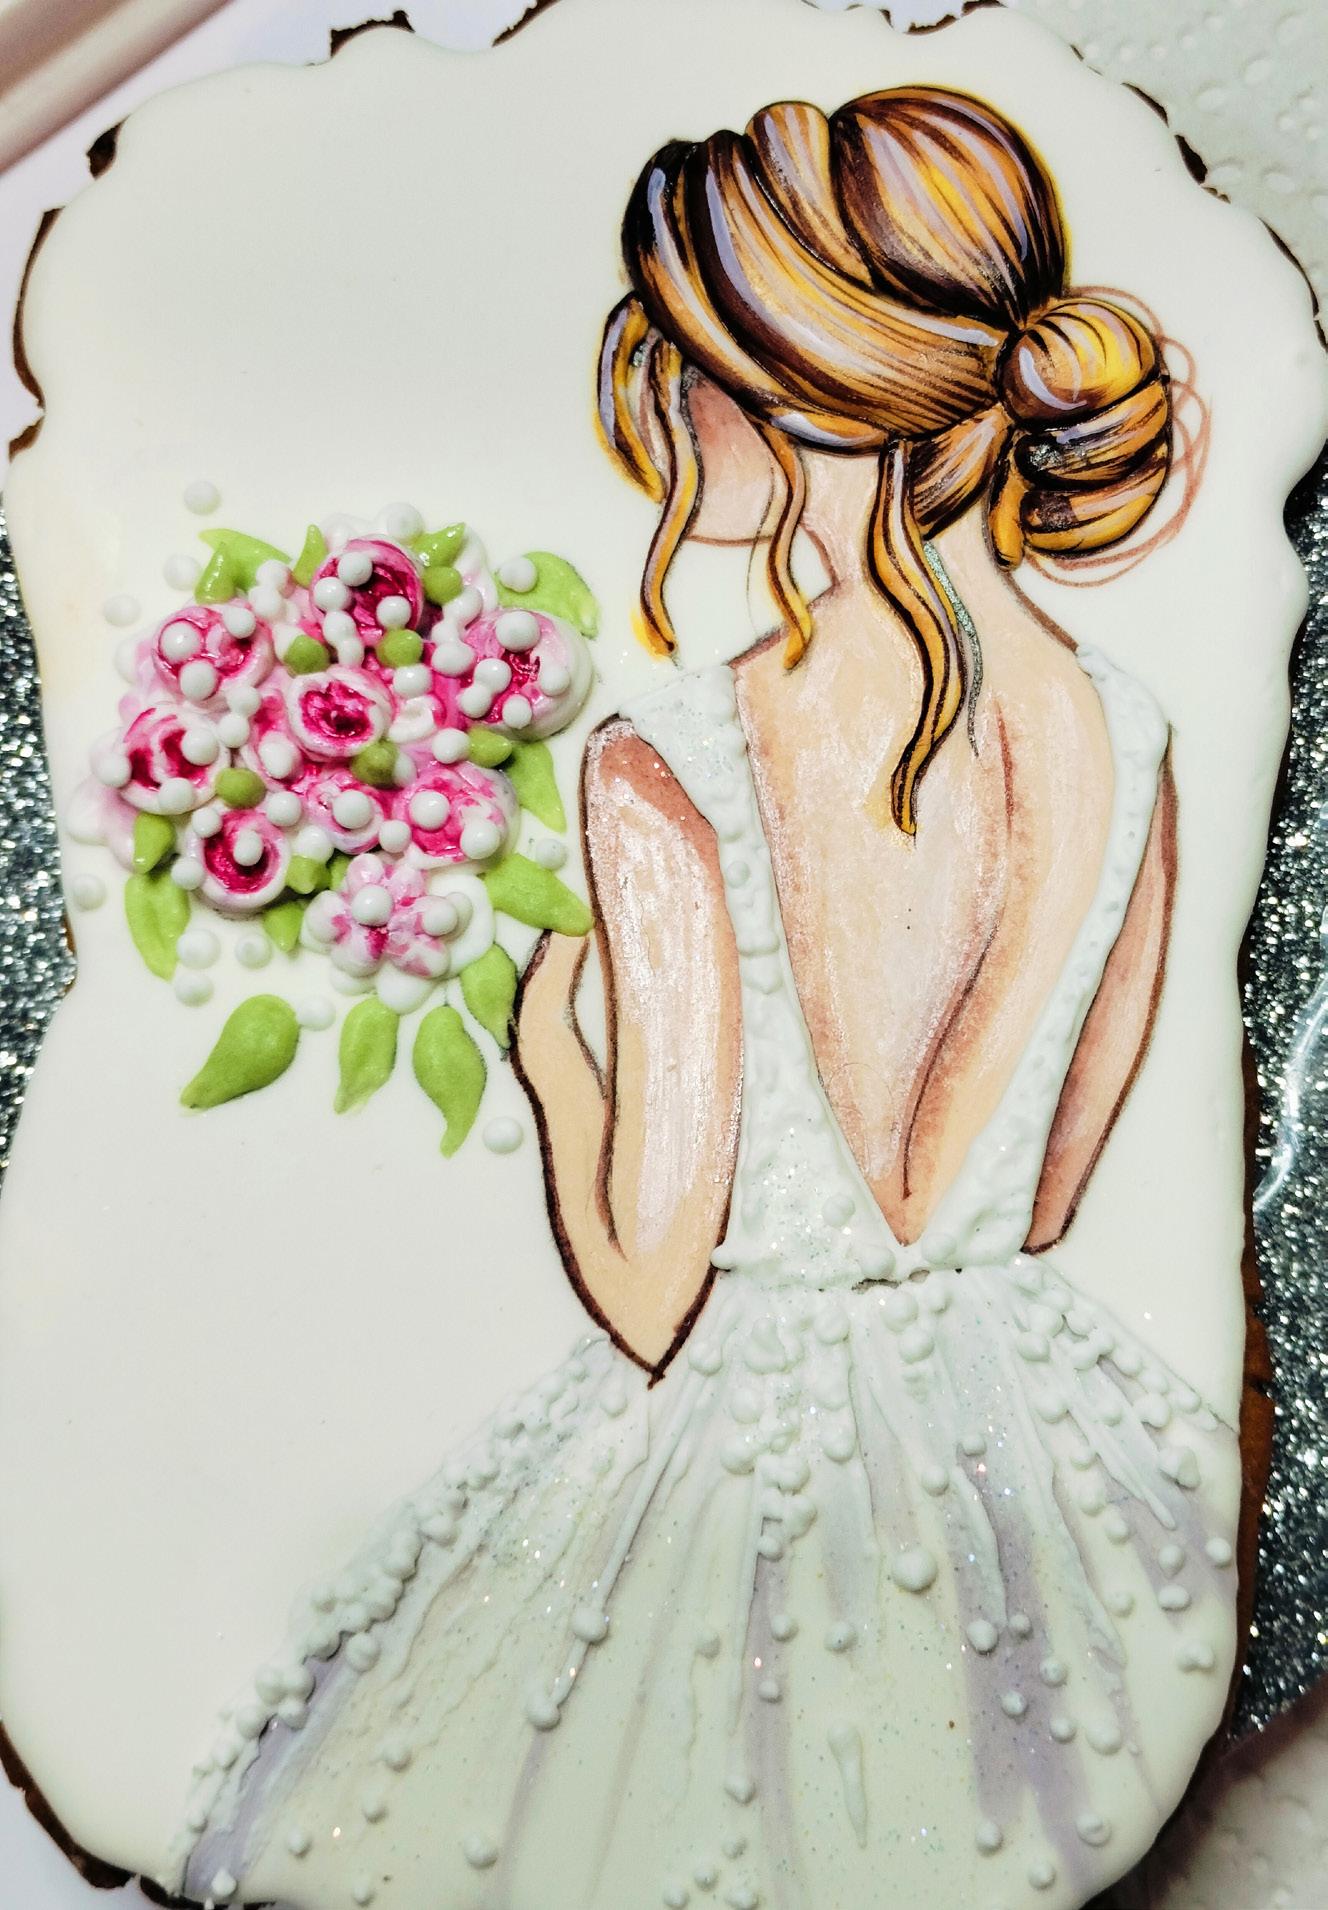
1. Pipe the leaves of the bouquet with green royal icing.
2. Mix white gel food color with a bit of black to create gray. Then, shade the skirt of the dress.
3. In the neckline area of the back of the dress, cover it with white royal icing in small dots to simulate embroidery. On the dress’ skirt, pipe white royal icing and use a damp brush to drag it in the direction of the lines to simulate the dress’ folds.
4. Pipe small dots all over the skirt of the dress and add edible glitter to give it shine.
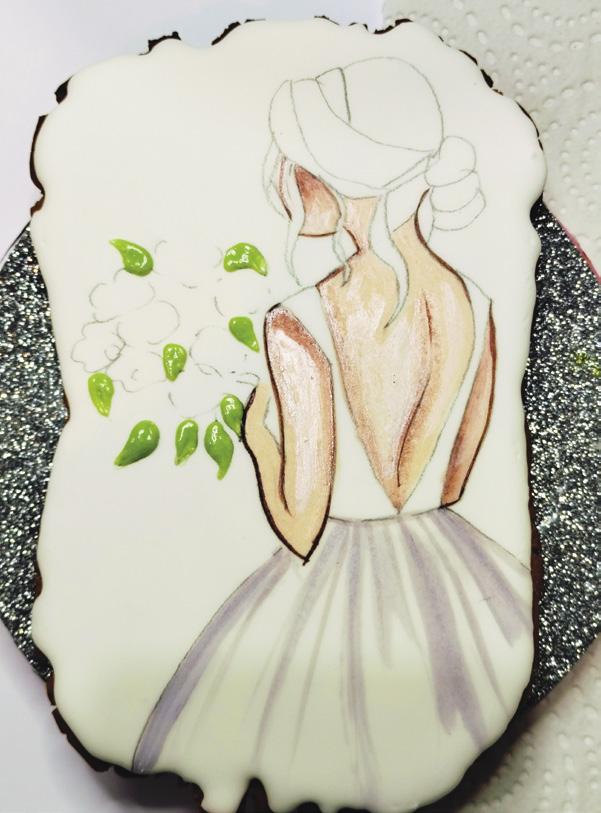
1. Pipe a layer of white royal icing for the bride’s hair.
2. Begin piping the flowers as the first layer of hair dries.
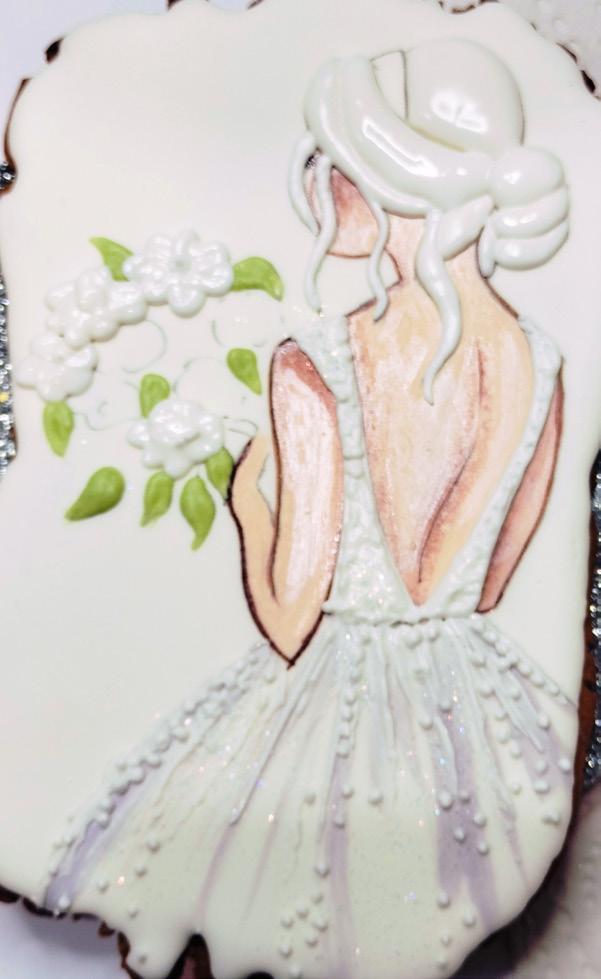
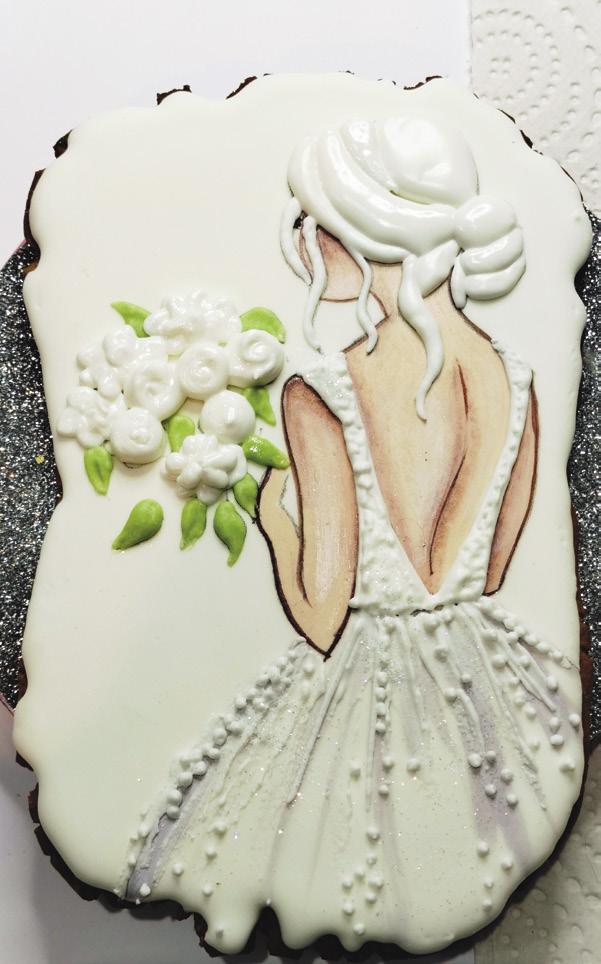
3. Add another layer of hair and rosettes for the bouquet. PAINT
1. Paint the first layer of the bride’s hair with a mixture of white and yellow gel food color mixed with water.
2. Dilute brown gel food color with water for a softer tone and paint the shadows of the hair, blending in the direction of the hair to look natural.
3. To give the hair the final shades, use undiluted brown gel color with gentle brushstrokes.
4. Mix white and pink gel food color and paint the flower. Once dry, apply a second coat with a stronger pink and paint only the centers of the flowers.
5. Place small dots of white royal icing on the bouquet and sprinkle edible glitter to complete it. ACD
Right now, I am learning how to make panettone, which is something that I hadn’t made before a few months ago. I really like the process of learning the function of each of the ingredients in a recipe and how the mixing method affects the final result. Both the list of ingredients and the mixing are especially crucial for panettone, so it has been a lot of fun trying out different recipes and slowly improving with each batch.
ACD: What do you find is the hardest recipe type to develop?
BD: In my experience, cake recipes are the most challenging to develop. My coffee cake recipe, for example, required the most tests and retests of any recipe in my book. It took me nine versions to get it how I wanted! I was aiming for a very particular velvety and soft texture, and I had to perfectly balance the structural ingredients (like flour and eggs) with the enriching ingredients (like sugar and butter). In the end, the key to my recipe was including an extra egg so that the extra protein could help bind the cake together just enough to get the texture I was after.
ACD: Where do you find your inspiration?
BD: I draw a lot of inspiration from the bakers I have worked with over
the years. I have learned so much from them. I feel so lucky to have had such amazing teachers who were always willing to answer my questions and show me new techniques. I also read a lot of cookbooks and especially love books that have teaching elements to them. When I first picked up BakeWise by Shirley Corriher, it was a revelation! She explained each decision that she was making and offered case studies and examples for so many of the recipes in her book. Knowing that there is always so much to learn keeps me inspired and excited.
ACD: What is your biggest accomplishment so far?
BD: Writing my first cookbook, Dessert Course: Lessons in the Whys and Hows of Baking. I have vivid memories of walking into a great local bookstore in Los Angeles just about a year before I started working on my book. I asked one of the employees if he could recommend any books on baking and specifically ones that had a teaching and learning tilt to them. As my wife and I walked out of the store, I mentioned to her that I hoped to one day write a book and be on the list of books that someone might get recommended if they asked the same question I had. I’m so thrilled that this book could make my dream a reality!
ACD: What would you like to accomplish next?
BD: I hope to continue making videos, developing recipes, and inspiring people to learn about baking. My dream would be to have a show similar to the style of Good Eats (which I think sparked the initial interest in so many people, myself included, to learn about their food). In my show, I would break down the ingredients in recipes, talk about different paths to follow when making the same dessert, and generally be a baking teacher. This would combine my biggest passions in life: teaching, baking, math, and science. ACD
BY BENJAMIN DELWICHE
LEVEL:
2 cups (400 grams) granulated sugar
1½ sticks (170 grams) unsalted butter, softened
2 large eggs
6 egg yolks
1 tablespoon vanilla extract
2½ cups (325 grams) cake flour, sifted
1½ teaspoons baking powder
½ teaspoon baking soda
1 teaspoon table salt
2 tablespoons (25 grams) vegetable oil
1 cup (227 grams) buttermilk, room temperature

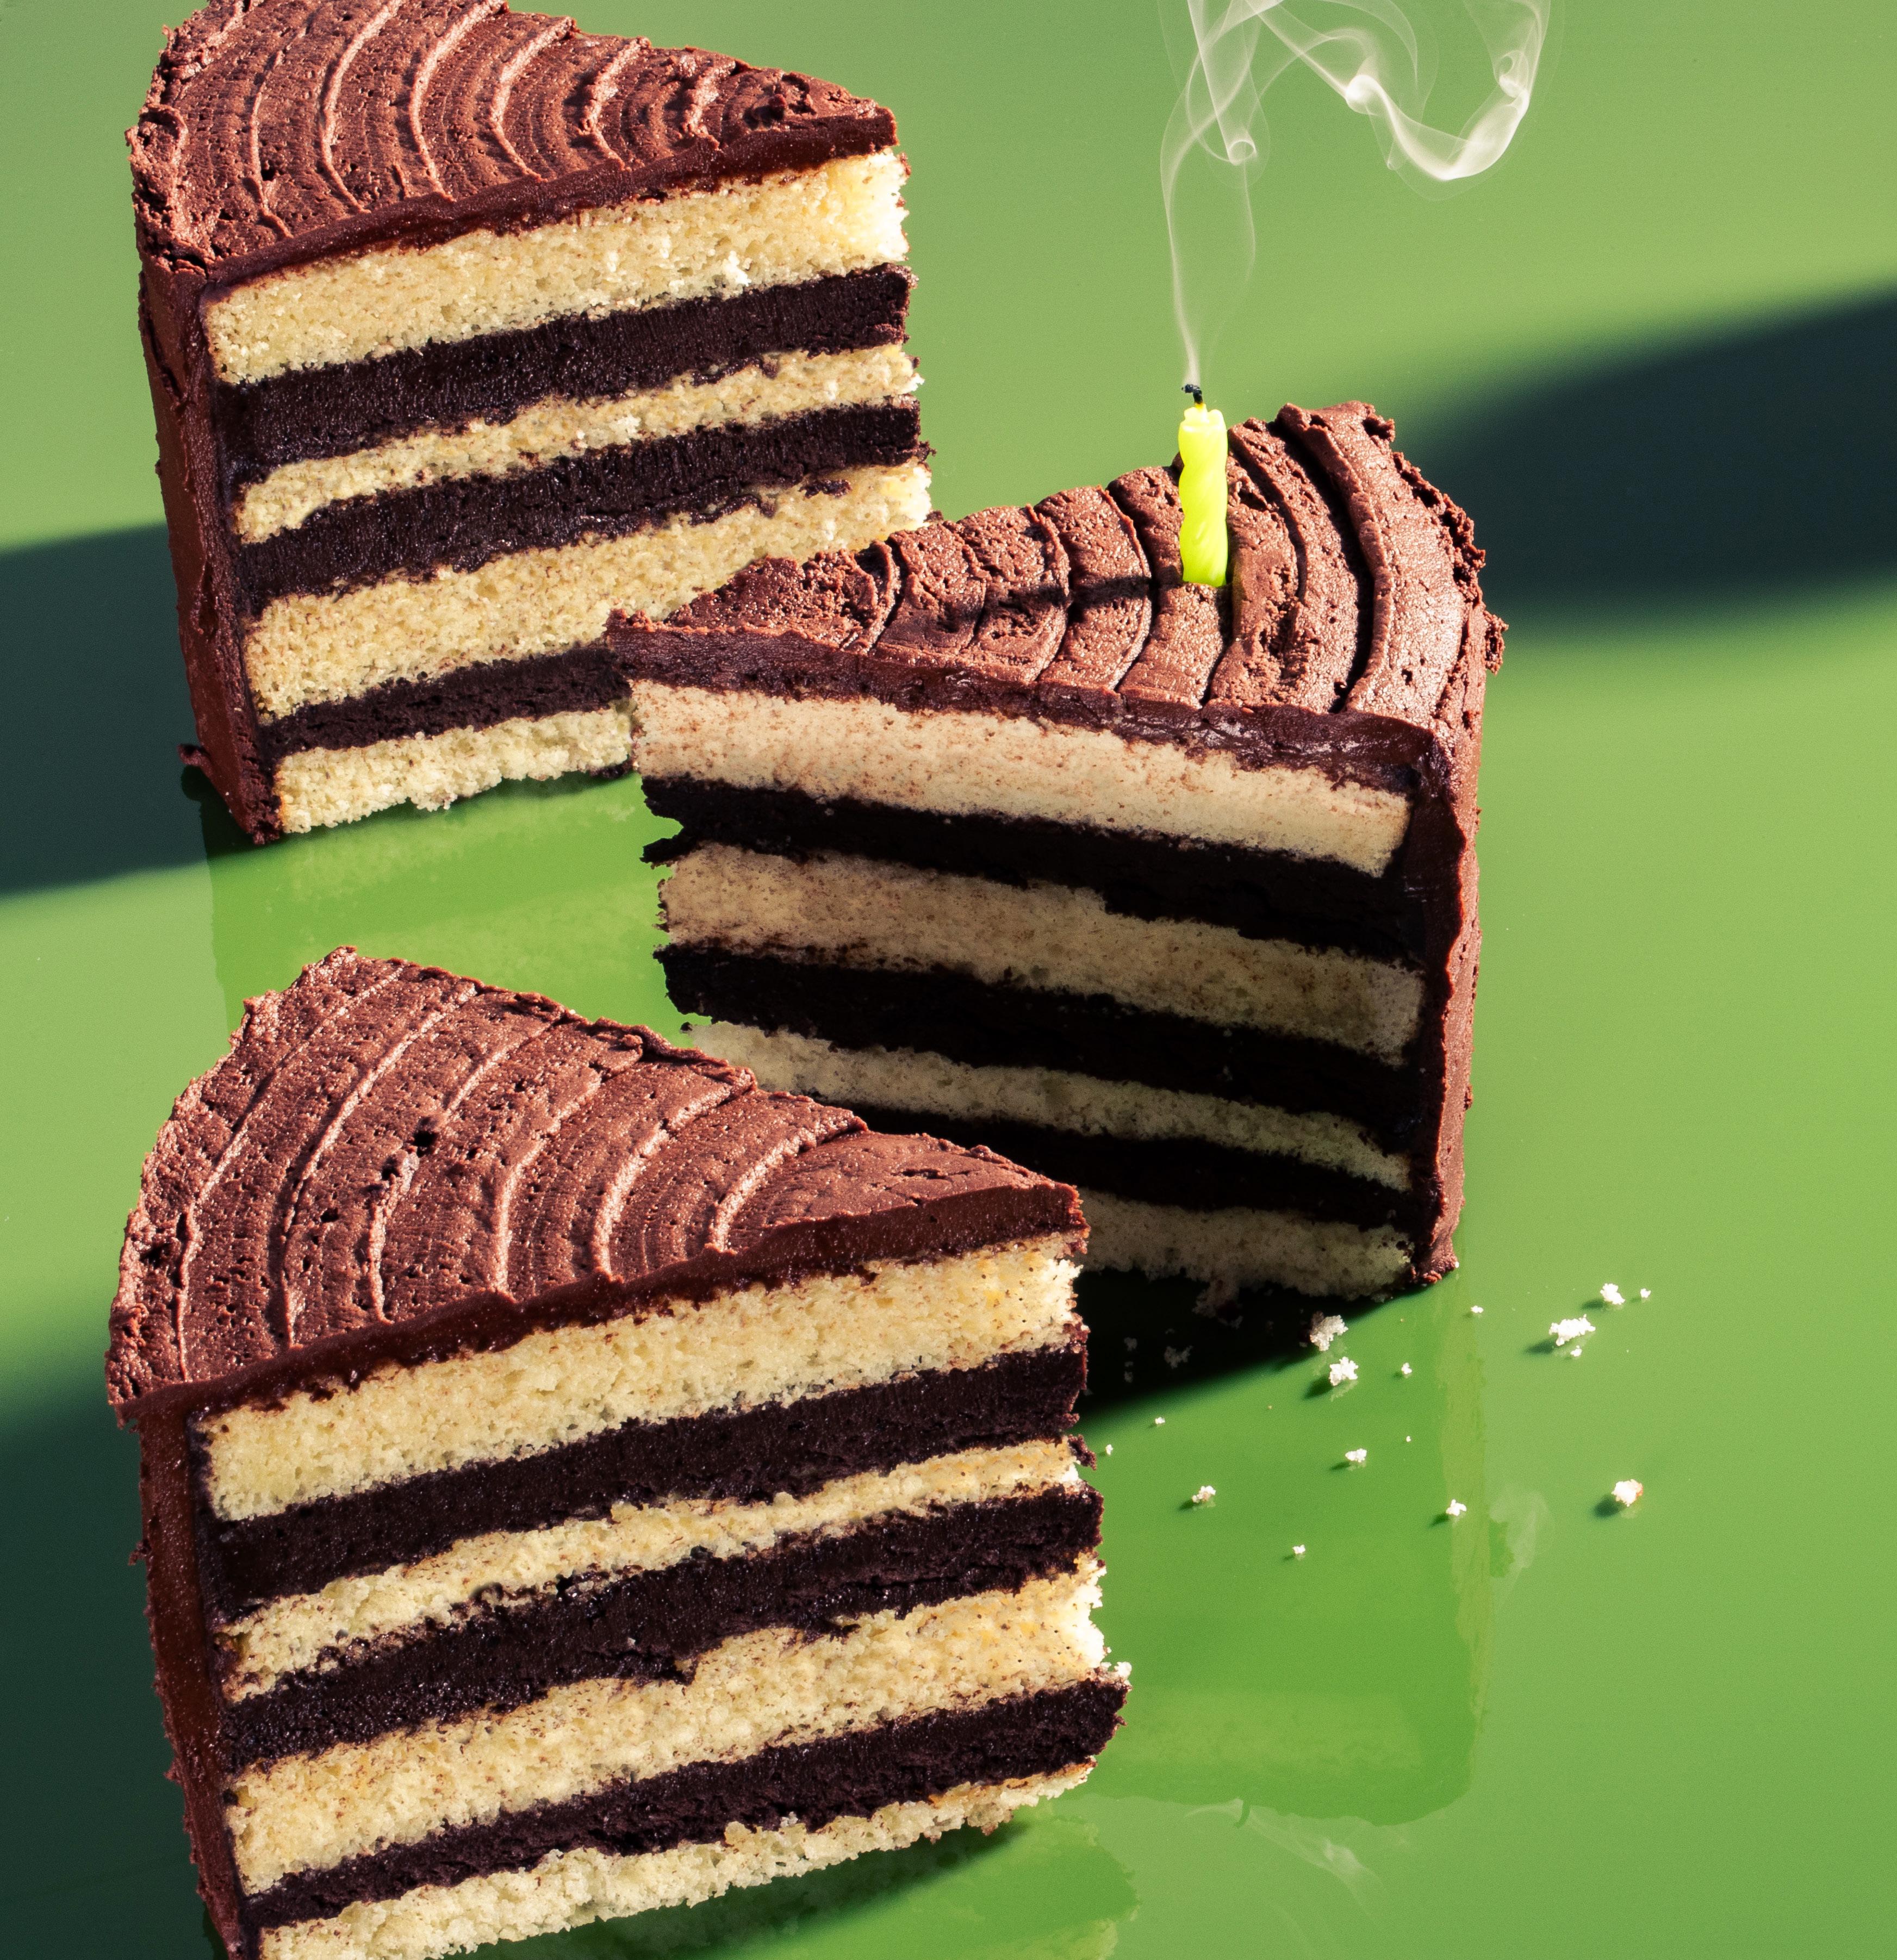
1. Preheat the oven to 350°F (180°C) and prepare the cake pans with nonstick baking spray and a circle of parchment paper on the bottom.
2. Follow the Classic Creaming Method (see right).
3. Divide the cake batter evenly between the two cake pans and bake for 35 to 40 minutes or until a toothpick inserted in the center comes out with a few moist crumbs attached.
4. Let cool in the pan for 10 minutes and then flip out onto a baking rack to cool completely.
5. Once completely cool, level the top of each cake and then cut in half to end up with 4 layers.
6. Alternate the cake layers with your choice of filling and then go around the cake with a thin coat of your choice of frosting.
Photography: Haley Hunt Davis
Excerpted from Dessert Course: Lessons in the Whys and Hows of Baking. Copyright 2025 by Benjamin Delwiche. Reproduced by permission of DK. All rights reserved.
7. Let the cake chill in the fridge for 30 to 60 minutes to firm up before finishing the cake with a final coat of the frosting.
Traditional pound cake gets its name from the amounts of each ingredient it contains: one pound each of sugar, butter, eggs, and flour. The only leavening agent in this original cake is the air mixed into the batter when creaming the butter and sugar. While many modern pound cakes, including my own, adjust these ratios slightly and include baking powder as an additional leavener, the success of the cake still relies on the air incorporated during the creaming step of the mixing process.
1. Add the sugar and softened fat to the bowl of a stand mixer fitted with the paddle attachment. Mix on low speed until combined and then increase the speed to medium. Mix until the fat has lightened in color and nearly doubled in volume (5 to 7 minutes).
2. Reduce the speed of the mixer to medium and add the eggs one at a time. Wait until each egg is fully incorporated before adding the next.
3. Stop the mixer and, using a silicone spatula, scrape down the sides and bottom of the mixing bowl and the paddle attachment. Return the bowl to the mixer and mix on
medium speed for another 30 seconds.
4. Separately mix the dry and wet ingredients. Alternate adding the dry and wet
ingredients to the mixing bowl, with three additions of the dry and two of the wet. Stop mixing as soon as you can’t see any streaks of dry flour. ACD
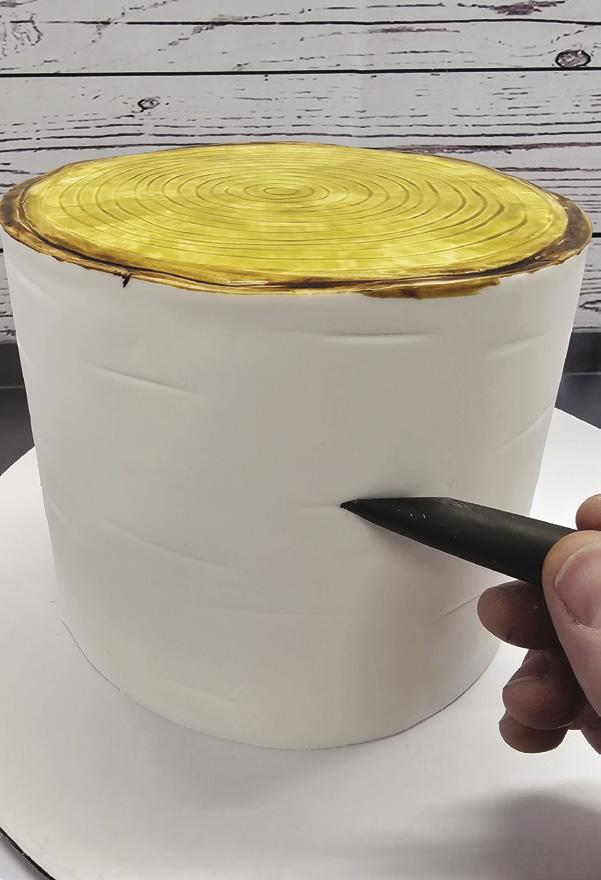
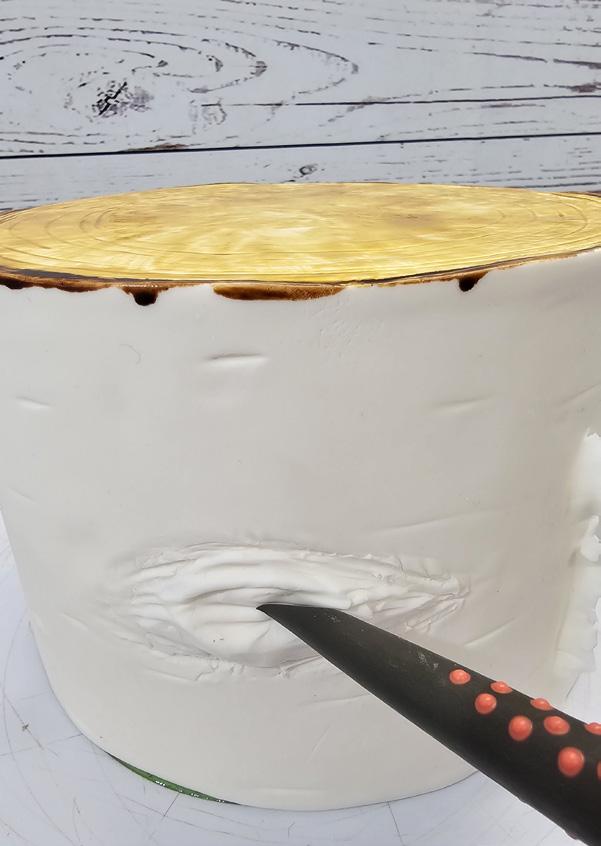
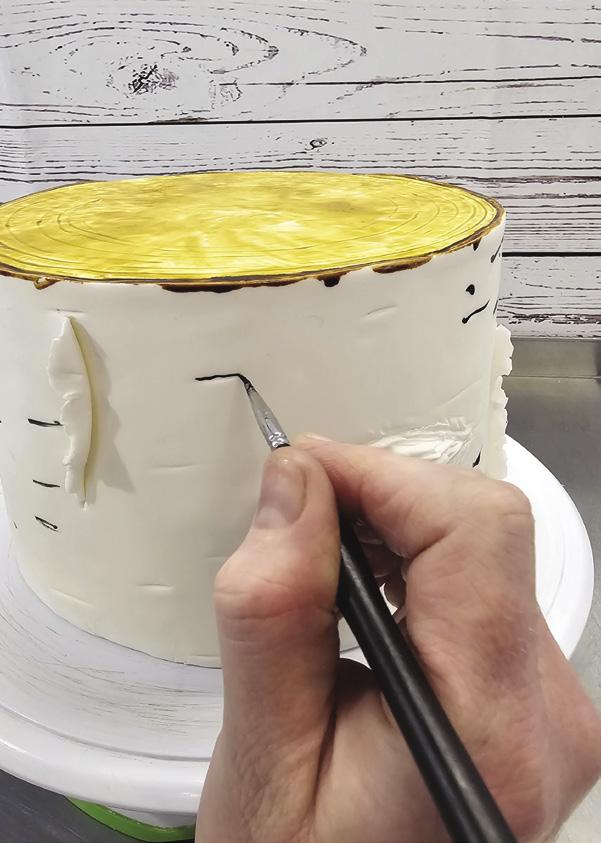
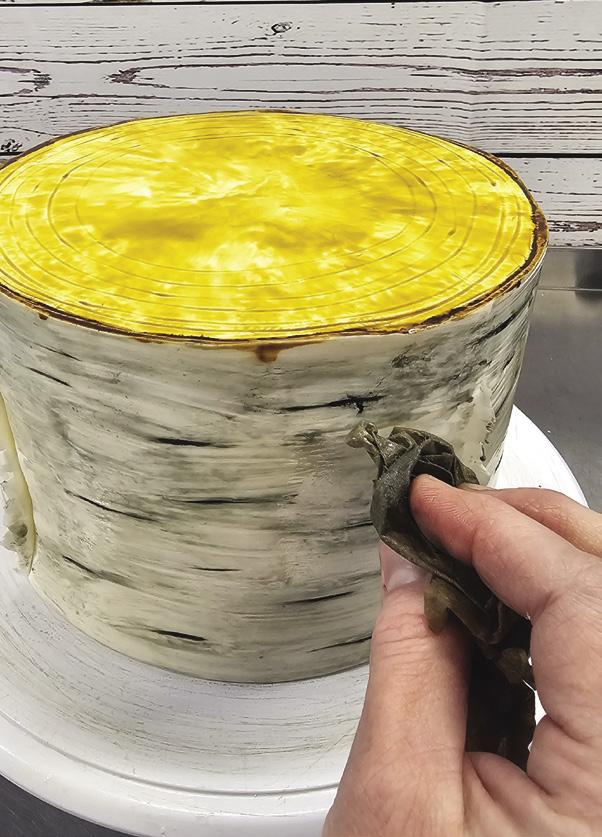
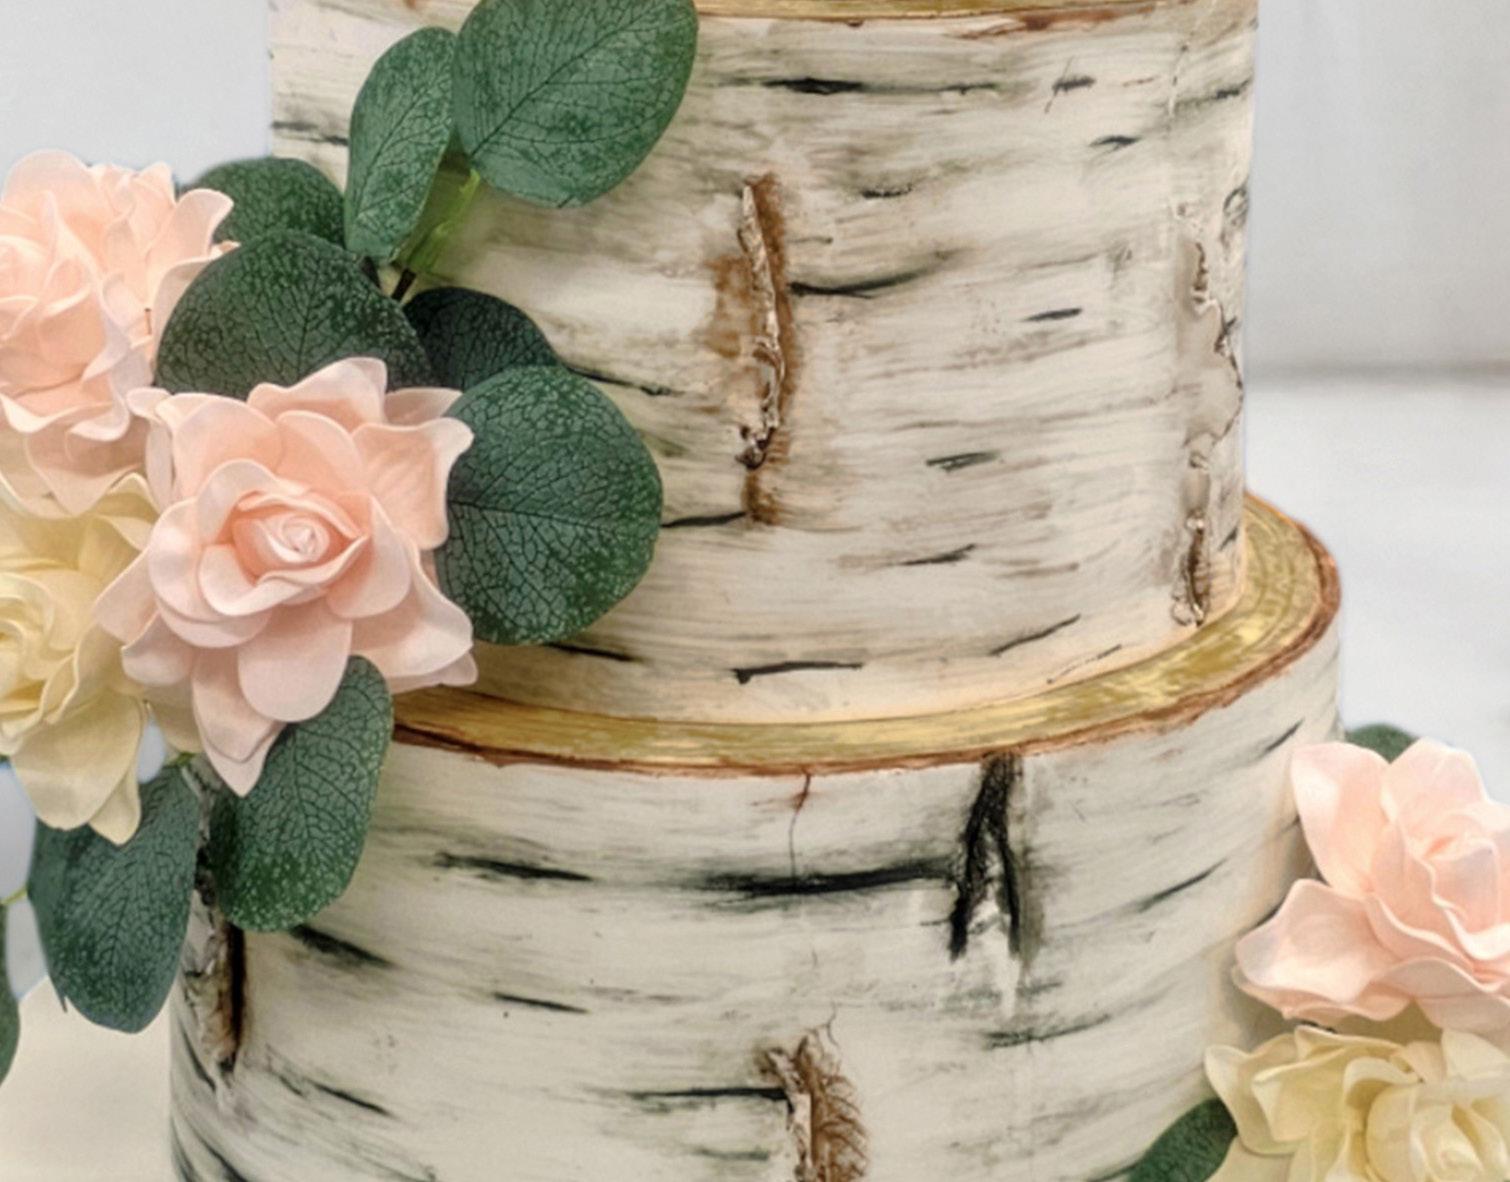
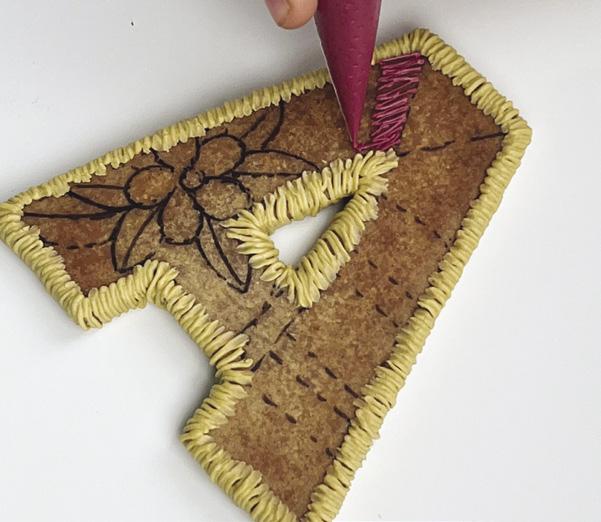
Perfect the technique of realistic birchwood for rustic-themed cakes.
BY ANGELA WOJTASZCZYK
LEVEL:
COMPONENTS
Edibles:
Filled and frosted cake
White fondant
Gel food color: ivory, chocolate brown, and black (AmeriColor)
Water
Equipment:
Rolling pin
X-Acto knife
Fondant smoother
Pizza cutter
Sugar shapers (Innovative Sugarworks)
Paint palette
Paintbrushes
Napkin or sponge
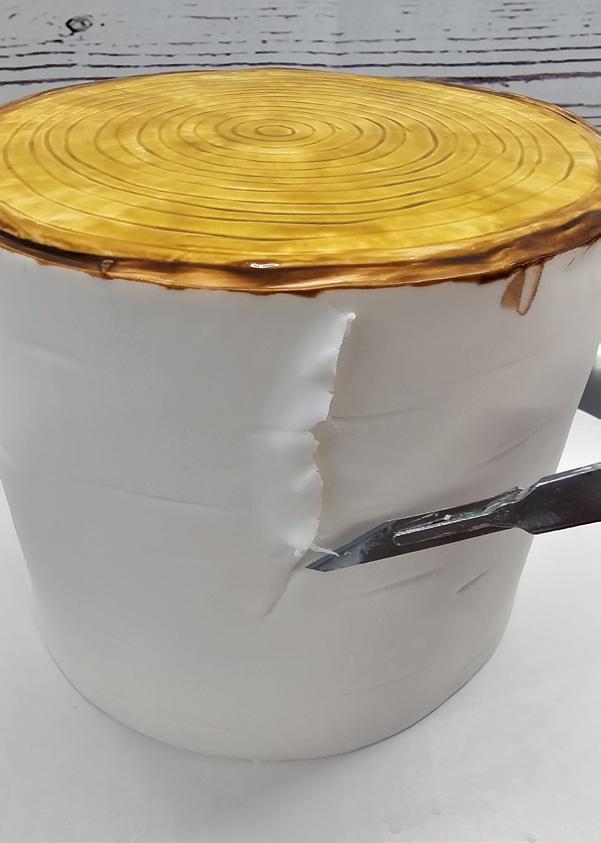
1. Roll out enough white fondant to cover the top of the cake, allowing some to hang over the sides. Use an X-Acto knife to trim off the excess around the top edge and smooth out the fondant.
2. Roll out a long piece of fondant to wrap around the sides of the cake. Make

sure it is wide enough to cover the sides from bottom to top. After wrapping the fondant around, use the X-Acto knife to cut off the excess fondant above the top edge and a pizza cutter to cut off any excess fondant around the base. Smooth out the fondant with a smoother and an edge smoother around the top edge as needed.
Angela Wojtaszczyk was born and raised in Virginia. After being a police officer for five years, she became a home day care provider for a short while, and that was when her interest in edible arts and baking started. In 2013, she started playing around with recipes to achieve the desired taste, texture, and moisture. Her belief was always that cake should not only look great but taste great. Through the years, she adjusted her business to fit with the world around her, but her passion is in the artistry. She offers custom cakes of all kinds and other treats through her business, Wonderfully Mad Arts, and supplies some of her baked goods to 13 different store locations throughout her area.
wonderfullymadarts.com facebook.com/wonderfullymadarts Instagram.com/wonderfullymadarts
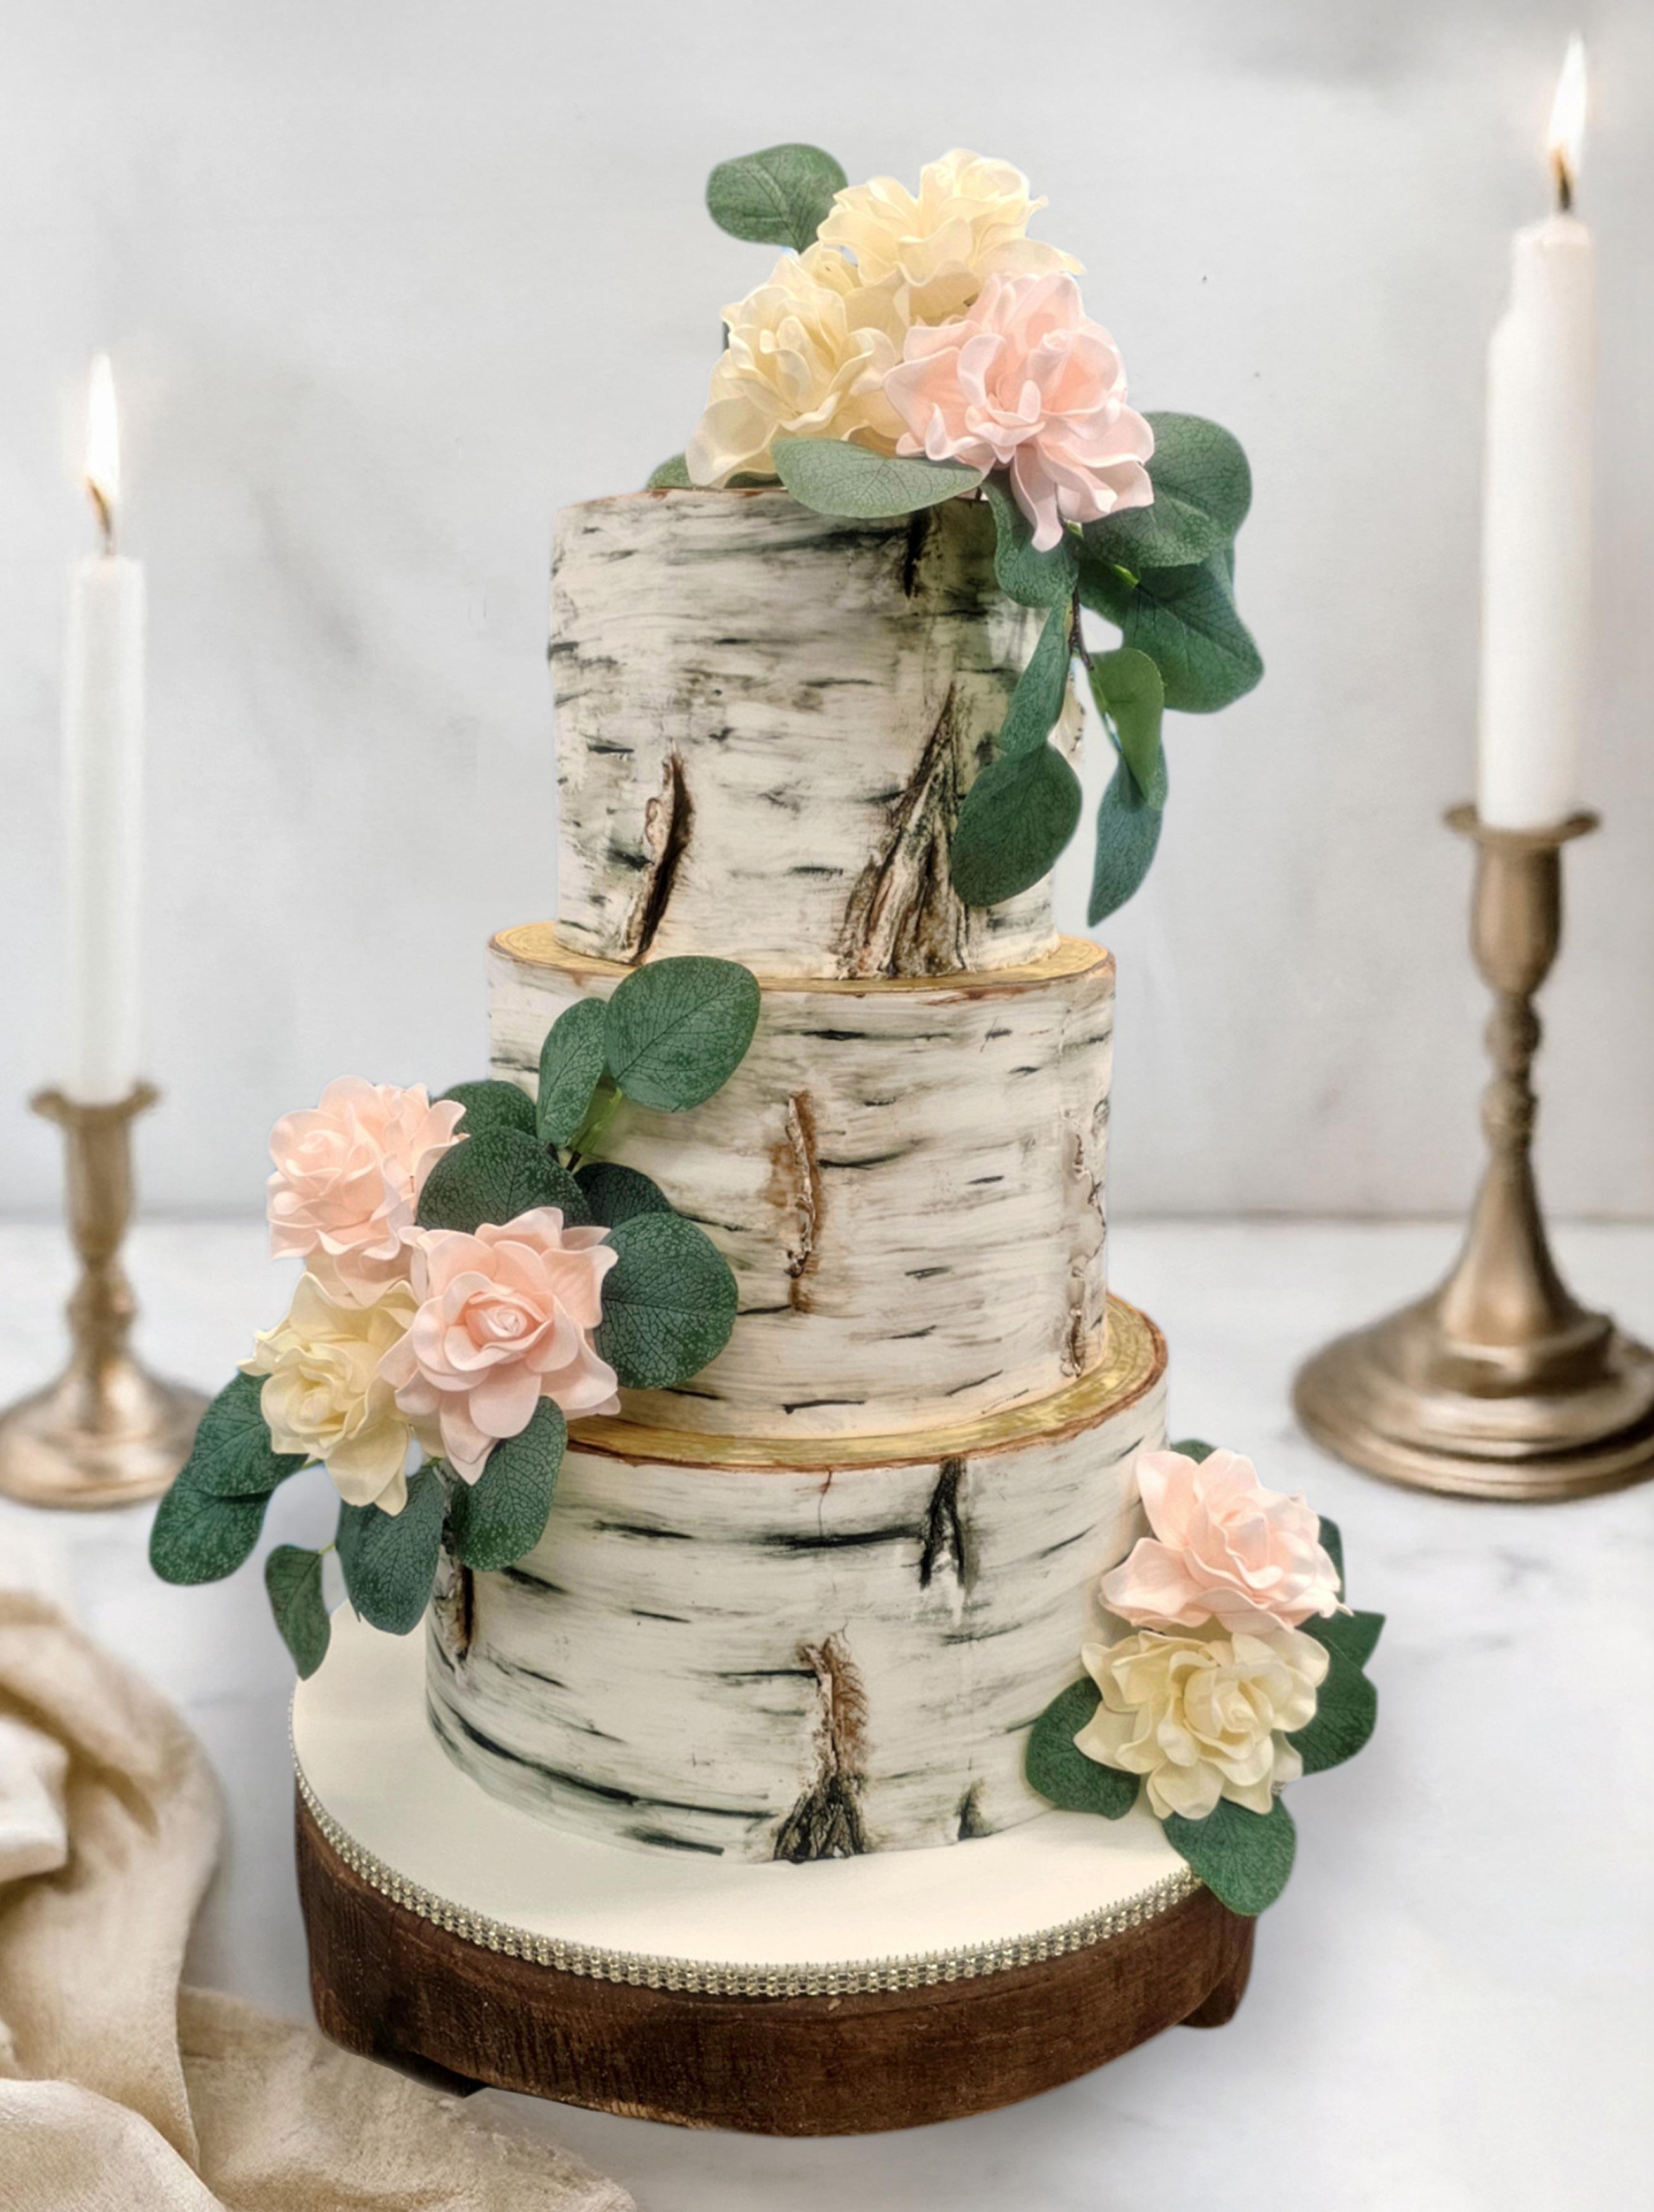
way through the entire thickness of the fondant. Once the cut is complete, use the X-Acto knife to curl the edge away from the cake.
3. To create the knots in the bark, use a small amount of fondant and stick it to the side of the cake. Use a sugar shaper to smooth the edges, shaping it into a knot with grooves.
4. Using the small paintbrush and black gel food color, paint the lines that you create around the sides.
5. Mix some of the chocolate brown gel food color with a small amount of black and paint along the ruffled edges of the peeling bark, the crevasses created by the peeling bark, and the knots and splits.
6. To finish off the look of the birch bark, use a wet napkin or sponge and wipe horizontally along the sides of the cake. This will smear the food color to create a more realistic birch. ACD
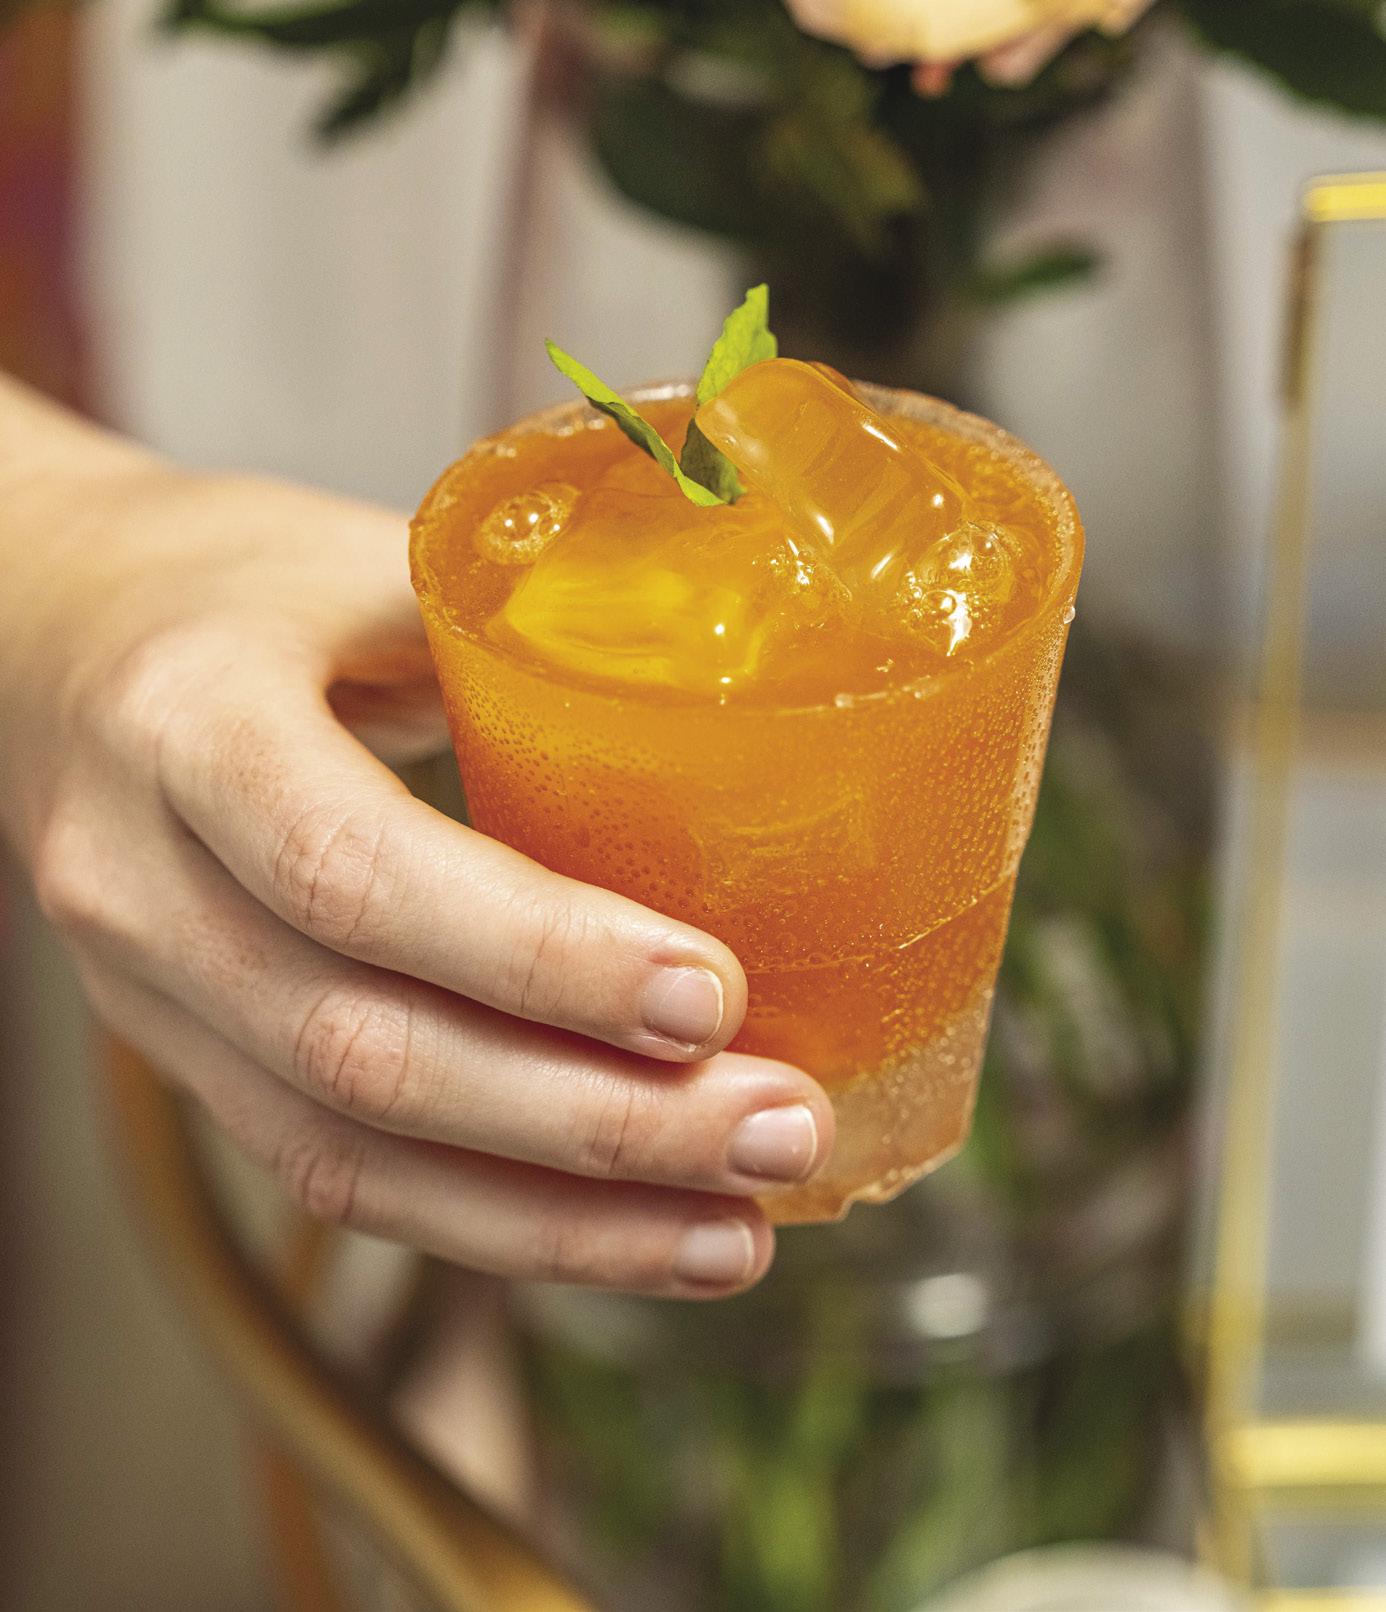
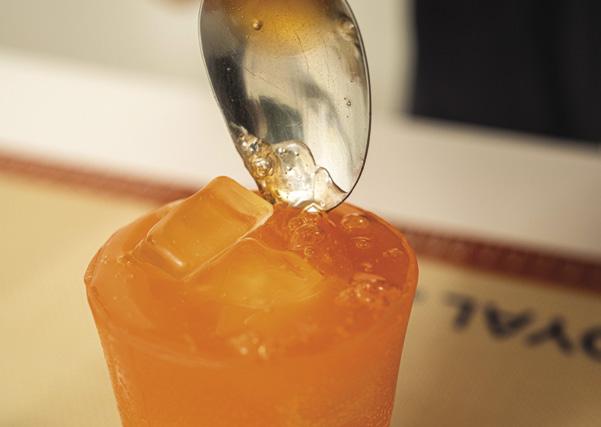
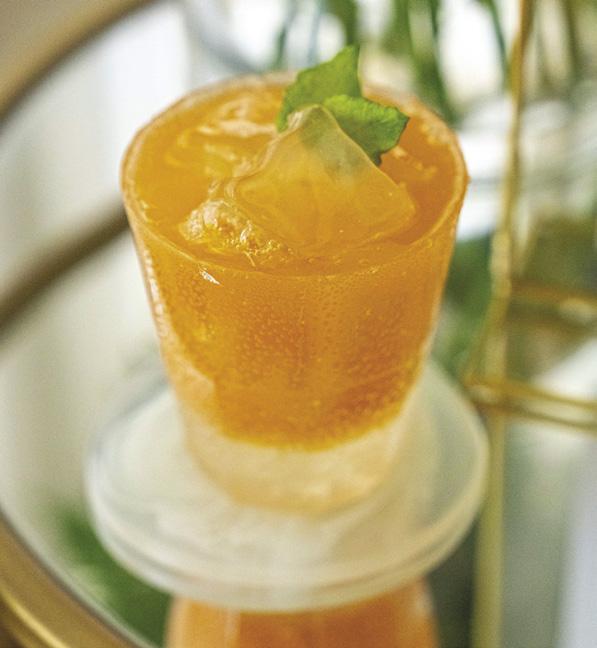
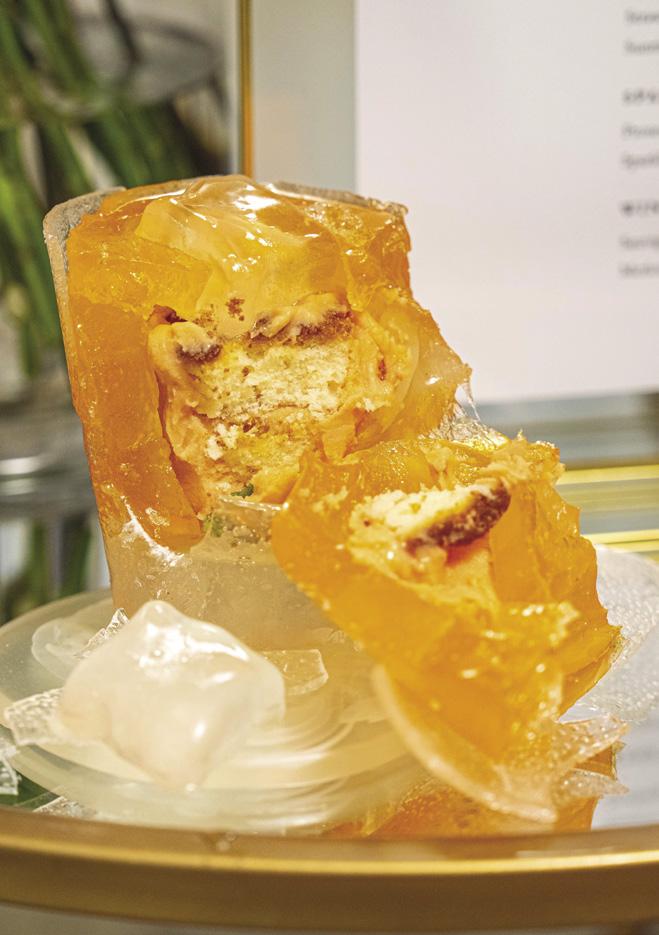
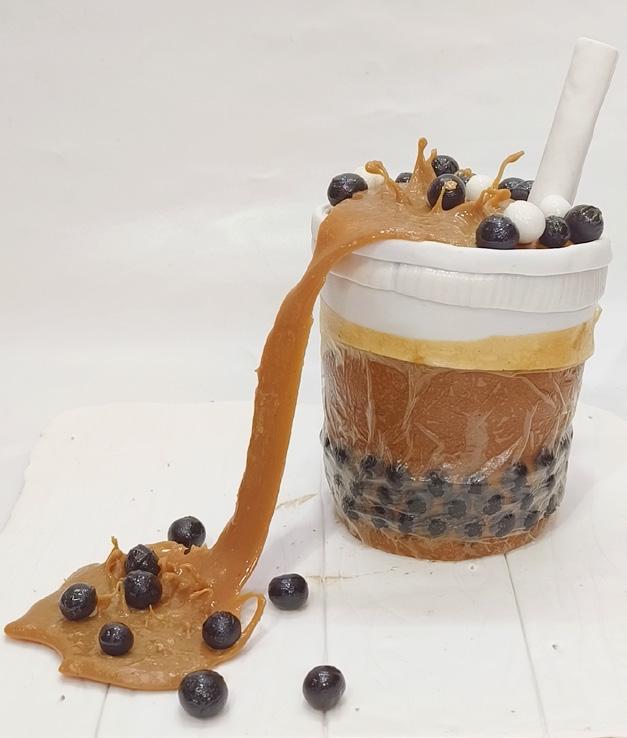
A cake so convincing, you’ll want to take a sip!
BY AMBER COMADIRA-SMITH
Edibles:
Clear isomalt
Edible glaze
Granulated sugar
Powdered gelatin
Water
Candy flavoring
Citric acid
Orange gel food color
Orange ganache
Small ganache-covered cake
Wafer-paper mint leaves
Equipment:
Silicone mat
Cotton gloves
Non-latex gloves
Silicone tumbler glass mold
Rubber bands
Microwave-safe bowls
Toothpick
Kitchen torch
Frying pan
Airtight containers
Moisture absorbers
Silicone ice cube mold
Spatula
Spoon
Straw
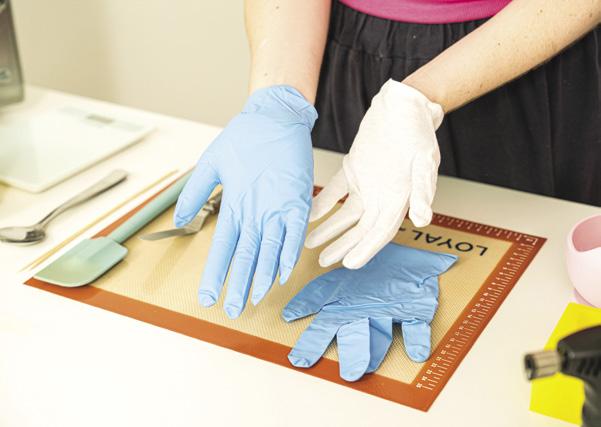
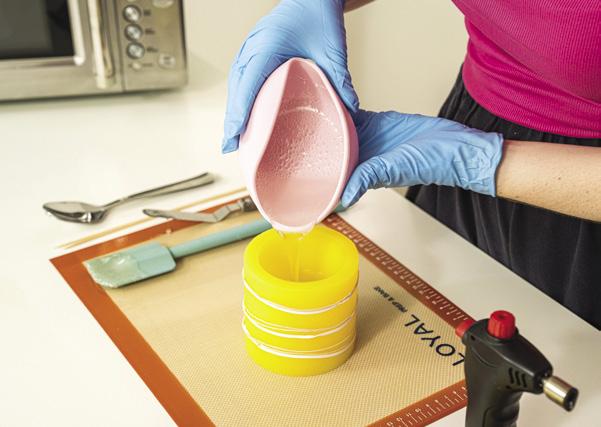
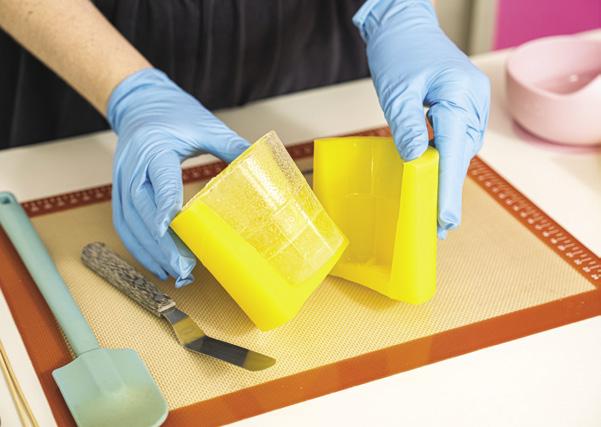
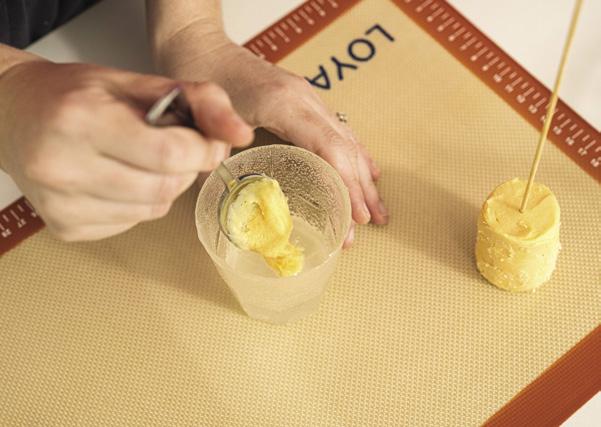
1. Cover your work surface with a silicone mat to protect your kitchen from isomalt. Wear cotton gloves for insulation, then layer non-latex gloves on top to shield your hands from heat and stickiness.
2. Join the 2 pieces of the tumbler glass mold together, securing them with rubber bands at the top, middle, and bottom. Ensure everything is aligned properly for a clean finish and to prevent leaks.
3. Pour clear isomalt nibs into a silicone microwave-safe bowl. Microwave for 30 seconds initially, then 20-second
Meet Amber Comadira-Smith, the award-winning and cake-obsessed founder of Cake with Amber in Australia. Her sweet journey started in 2013 when she stumbled on the first episode of The Great Australian Bake Off. Originally a graphic designer struggling with her creative worth, Amber found her passion and obsession in cake decorating, reigniting her creative spark. Starting with fondant food miniatures on cupcakes, Amber has mastered the art of creating jaw-droppingly realistic food cakes. Today, she’s on a mission to inspire cake lovers and decorators alike, empowering them to unleash their creativity and craft amazing cakes with confidence!
cakewithamber.com.au facebook.com/cakewithamber instagram.com/cakewithamber
Photographer: Wezzy Crüze
bursts until fully melted and boiling. Let it sit for 1 to 2 minutes to allow the bubbles to dissipate.
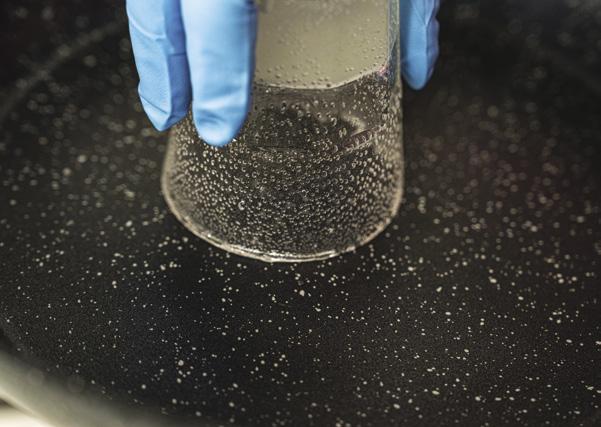
4. Carefully pour the hot isomalt into the mold until it fills about ½ to ¾ of the way up. Slowly tilt and rotate the mold, guiding the isomalt up the sides little by little until it reaches the rim. This movement coats the mold and creates the outer shell of the glass.
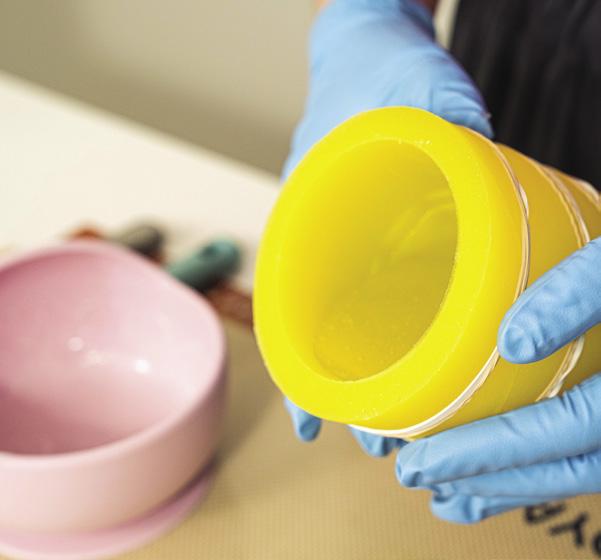
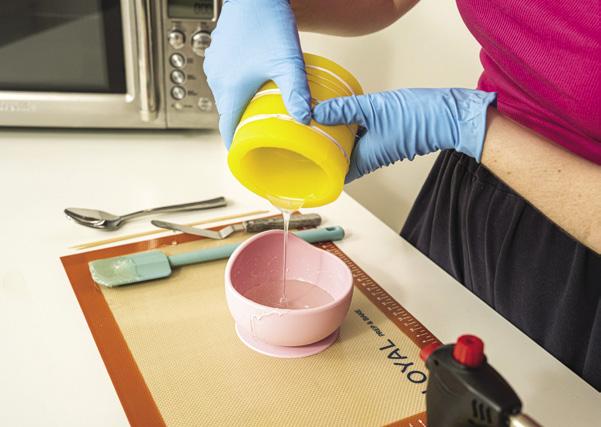
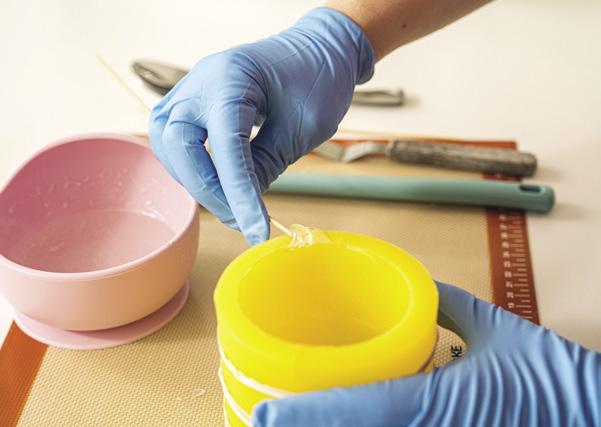
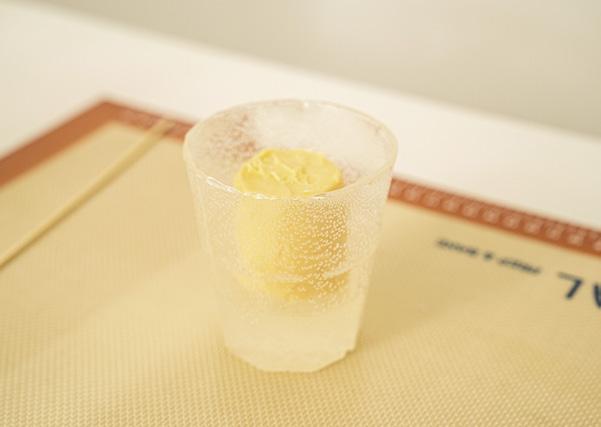
5. Pour out the extra isomalt until only slow, long drips remain. Place the mold back upright on the table and clean up the rim with a toothpick. It will be sticky, but patience and persistence are key.
6. Reheat the leftover isomalt until boiling and repeat the pouring and rotating steps 3 to 5 times to thicken the glass edges. Make sure to leave a small pool of isomalt at the base to mimic the solid bottom of a real glass. Let the mold sit for at least 2 hours to cool and harden.
7. Carefully remove the rubber bands, then gently pull back the mold’s edges to release the suction. Slowly extract your isomalt glass.
8. To smooth out the excess bubbles, lightly wave a kitchen torch over the base of the glass. Avoid holding the flame in one spot for too long or the isomalt will start melting and warping.
9. To help soften and smooth out the rim, heat a frying pan on medium-high and gently press the rim of the glass on
the pan for half a second. Don’t overdo it, otherwise the rim of the glass will start to warp. For an extra layer of protection, spray your isomalt piece with a clear edible glaze. Allow the glass to dry overnight.

Tip: ISOMALT IS SENSITIVE TO HUMIDITY, WHICH CAN MAKE IT STICKY AND CLOUDY. TO PREVENT THIS, STORE YOUR ISOMALT PIECES IN AN AIRTIGHT CONTAINER WITH A MOISTURE ABSORBER.
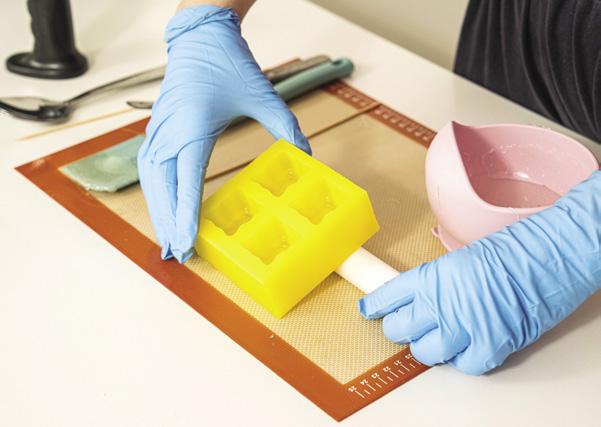
1. Heat up the isomalt until it’s fully melted and boiling. Once the bubbles have dissipated, carefully pour the isomalt into a silicone ice cube tray, filling each cavity about halfway.
2. Use a kitchen torch to lightly pass over the surface and remove any bubbles.
3. To give the ice cubes a more natural, irregular shape, place a small tool like a spatula underneath 1 side of the tray to tilt it slightly while the isomalt sets. This will help create cubes that aren’t perfectly square, making them look more realistic.
4. Let the ice cubes set for around 45 minutes before carefully popping them out onto a silicone mat. Once released, give them a quick torch over the surface to remove any final bubbles and rough edges. Spray them with a clear edible glaze and store in an airtight container with a moisture absorber.
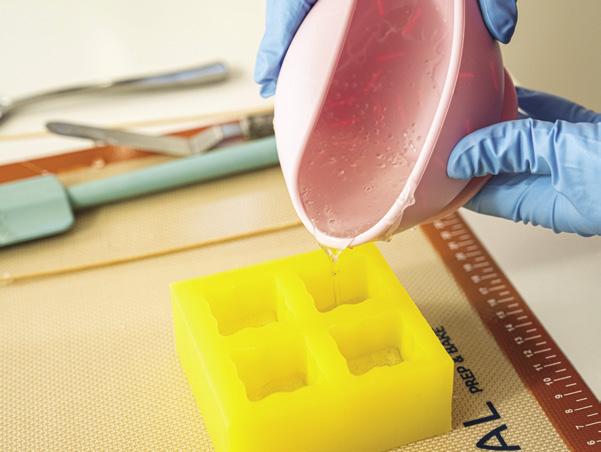
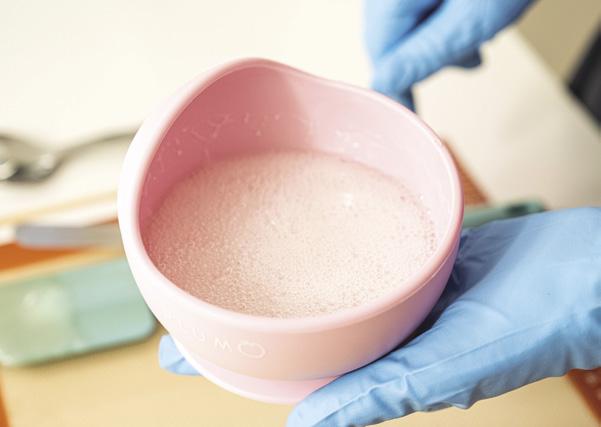
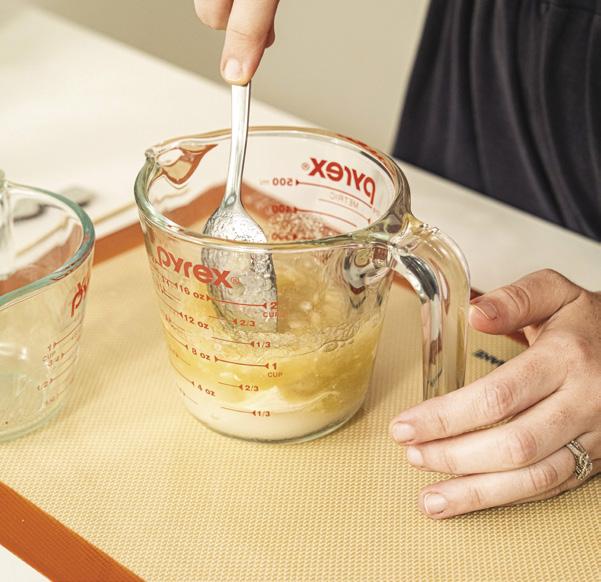
1. In a microwave-safe bowl, mix 100 grams of granulated sugar, 40 grams of powdered gelatin, and 140 grams of water together, then let it bloom for 5 minutes.
2. Microwave the mixture for 30 seconds and stir gently. Switch to 15-second bursts, stirring gently in between, until the gelatin granules are completely dissolved.
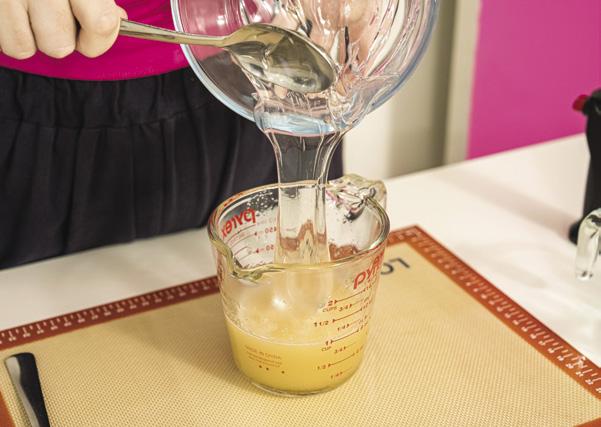
3. Mix in 170 grams of glucose syrup, any desired candy flavoring, and a good pinch of citric acid and stir to combine. Let the mixture sit for 15 minutes until the mixture turns clear.
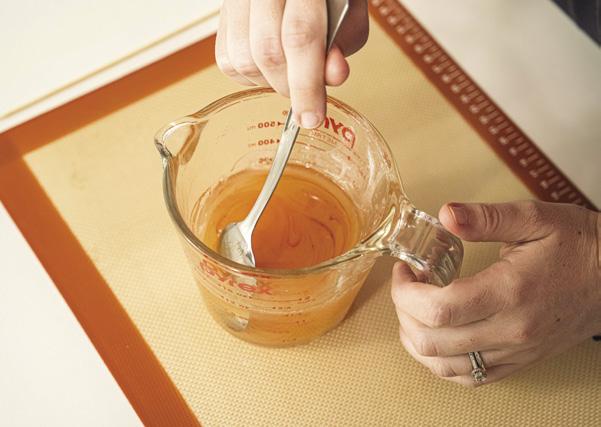
4. With a spoon, skim off any foam or residue on the surface to keep the final liquid
smooth, glossy, and clear.
5. Pour a small portion of the mixture into your ice cube mold and leave it to set for about 45 minutes before removing.
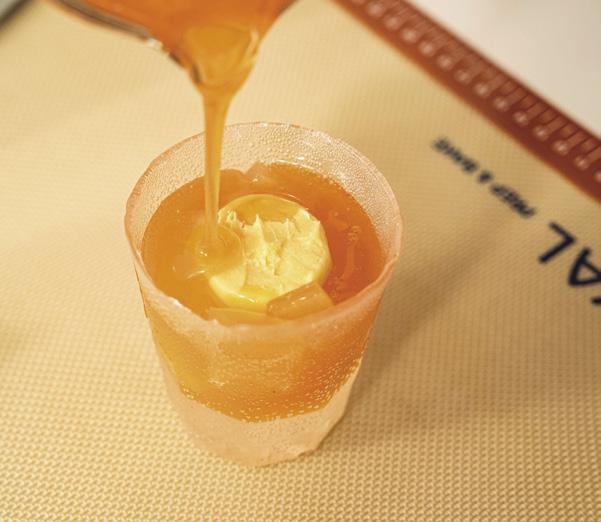
6. With the leftover mixture, add orange food color and stir until mixed through. Let it cool until it just begins to thicken and set but is still slightly warm.
1. Place a small amount of ganache at the bottom of your isomalt glass.
2. Gently place the cake inside the glass. It should be about ¼ inch from the edge and at least ½ inch below the rim of the glass.
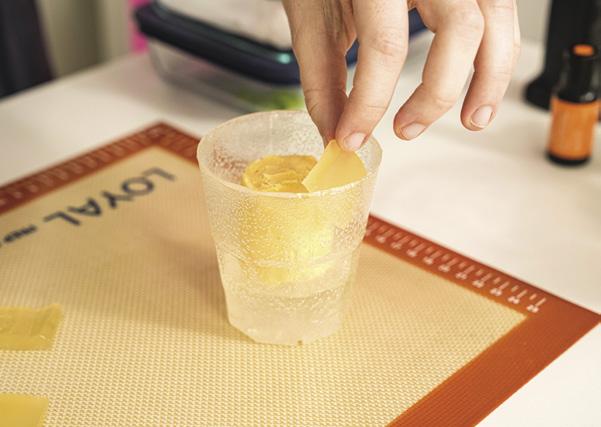
3. Cut the gelatin ice cubes into small squares and insert them around the cake to give the illusion of ice.
4. Carefully pour the warm gelatin into the glass, aiming around the sides of the cake and filling the glass until it’s just below the rim. If the gelatin mixture is too thick to pour, give it a small burst in the microwave to loosen it up.
5. Add the isomalt ice cubes on top of glass, arranging them to cover the top of the cake. If the gelatin liquid has spilled over the top of the glass, use a spoon to remove some of the excess.
6. Push air through a straw into any leftover gelatin mixture
to create bubbles. Scoop the gelatin up with a spoon and place it around the isomalt ice at the top of the cake.
7. For the final touch, add waferpaper mint leaves. Serve the cake immediately or about 1 to 2 hours after making it. ACD

Tip: MAKE SURE THE GANACHE MATCHES OR CLOSELY RESEMBLES THE COCKTAIL’S “LIQUID” COLOR.


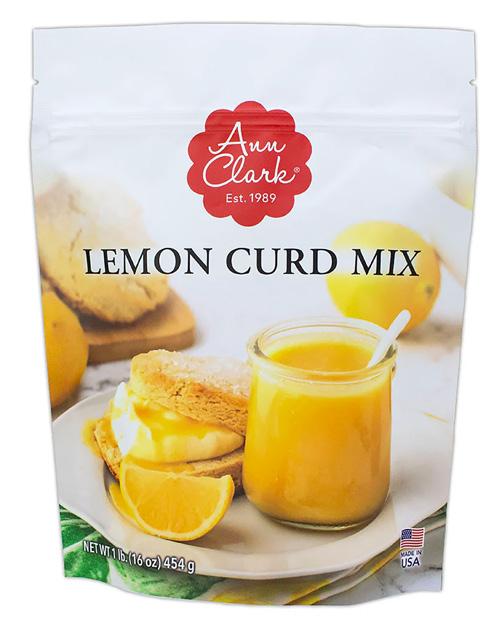
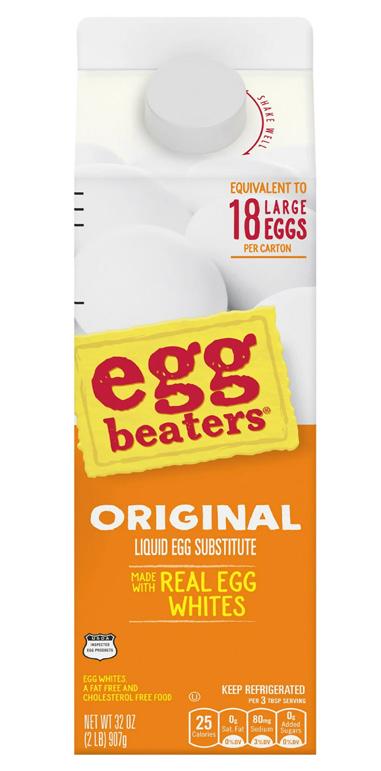
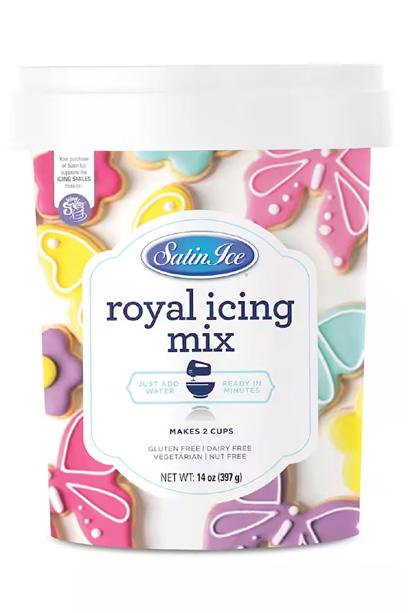
No eggs? No problem. Use these store-bought alternatives to avoid shortages and price hikes.


BY WILTON SWEET STUDIO

zinnias and arrange them together like a bouquet.
Edibles:
Piping tips: #2D, #81, #104, #233, and #352 or #353 (Wilton)
Disposable piping bags
Cake stand or serving tray
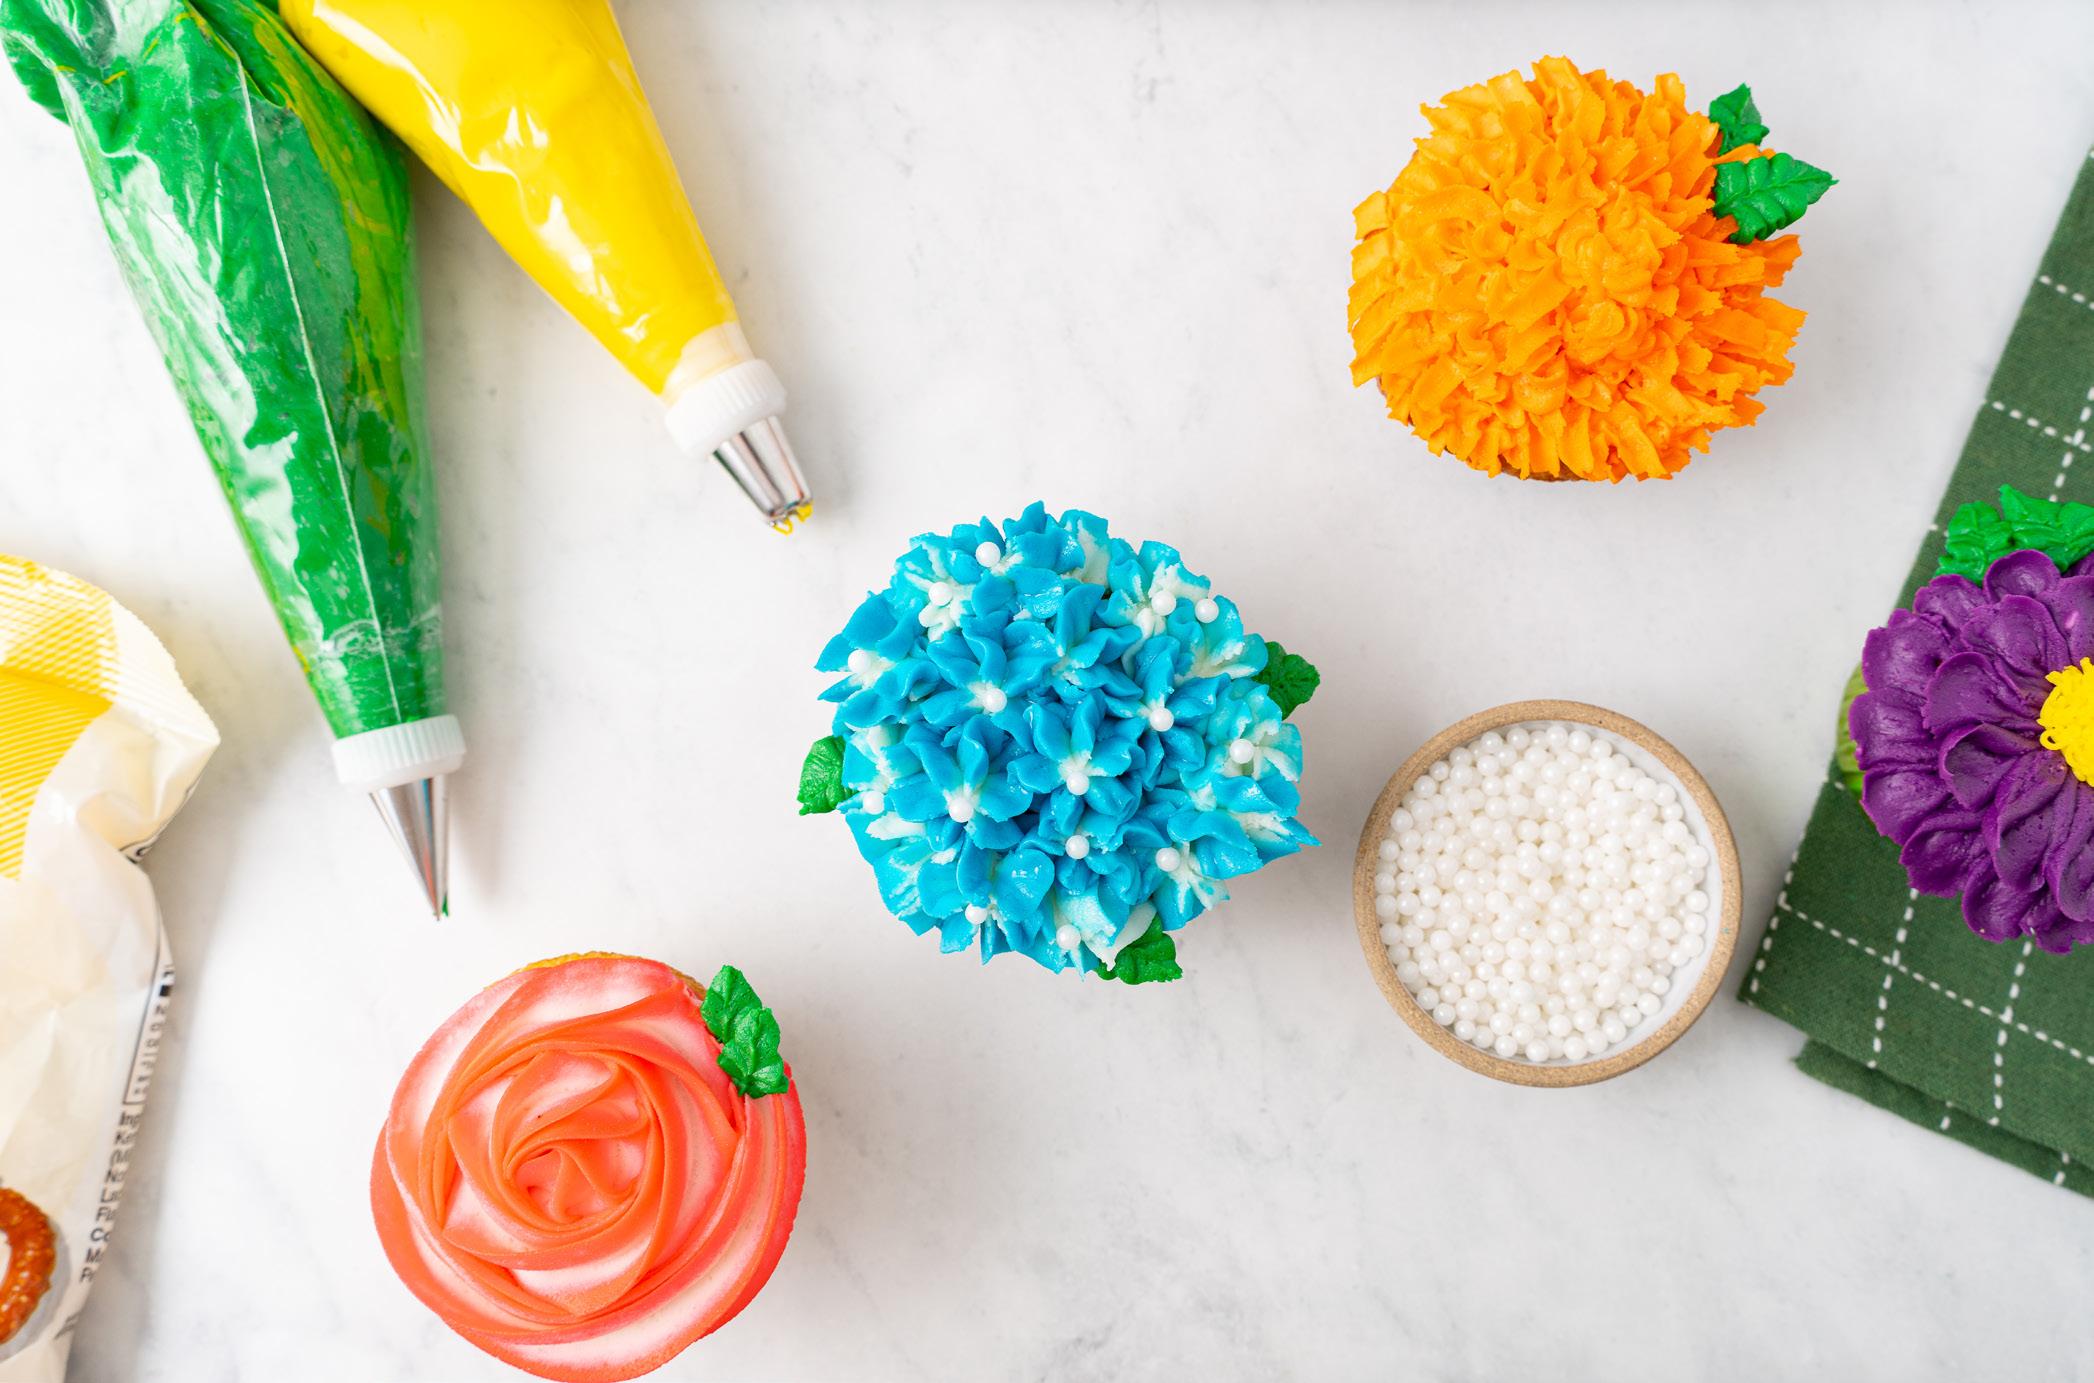
1. Prepare a piping bag with a #2D (large drop flower) piping tip. Divide your buttercream frosting into 2 parts, 1 slightly larger in quantity. Tint the smaller portion with pink gel
food color. Leave the other larger portion the natural off-white buttercream color. Spread the pink frosting around the inside edges of the decorating bag. Fill the middle of the bag with the white frosting.
2. Pipe a rosette on top of the cupcake by holding the bag straight up, with the tip just slightly above the surface, starting at the center of the cupcake. Squeeze to form a star, then without releasing pressure, use a circular motion to pipe a tight circle around the starting point of your rosette until you reach the edge of the cupcake.
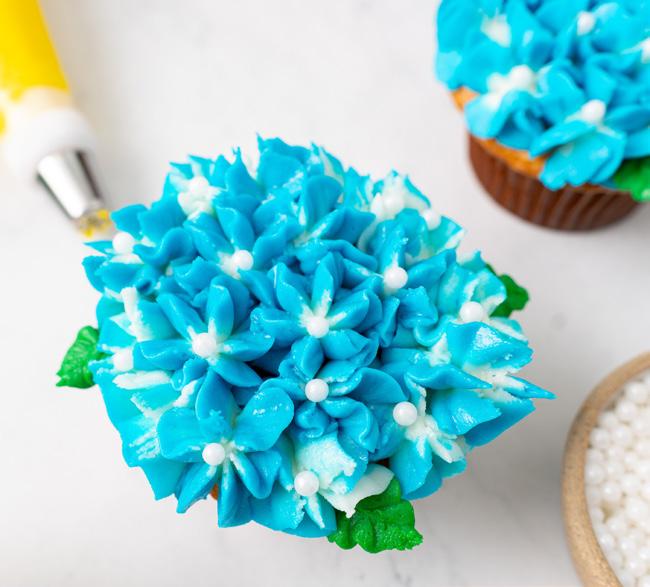
1. Prepare a piping bag with a #2D piping tip. Divide your buttercream frosting into 2 equal parts. Tint 1 portion with blue gel food color. Leave the other portion the natural off-white buttercream color. Spread the blue frosting
around the inside edges of the decorating bag. Fill the middle of the bag with the white frosting.
2. Starting on the outside edges of the cupcake, pipe starshaped petals by holding the bag straight up, with the tip just touching the surface. Squeeze and let the icing build to form a flower petal. Stop squeezing before pulling the tip away. Repeat all the way around the cupcake, then fill the center with more petals until the cupcake surface is completely covered.
3. Place a white sugar pearl in the center of each starshaped petal.
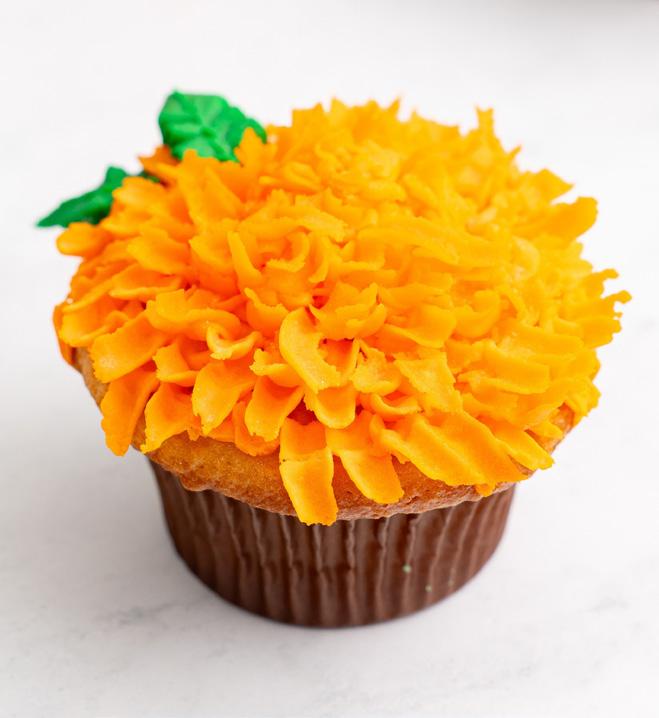
1. Prepare a piping bag with a #81 (U-shaped petal) piping tip. Tint your buttercream frosting with orange or golden yellow gel food color and add to the decorating bag.
2. Hold the piping bag at an angle on the outside edge of the cupcake, with the tip just touching the surface and the rounded end down (looking like a smile). Squeeze firmly and pull out ⅜ to ½ inch. Lift up and away slightly as you release pressure for each petal. Repeat, turning the cupcake as needed to form the first row of petals around the edge of the cupcake.
3. Pipe a second row of petals like the first row. Petals should be placed between the petals of the previous row, slightly overlapping. Continue piping rows of petals, gradually moving the decorating bag so that each row angles upward a little more than the row below it until the cupcake surface is completely covered.
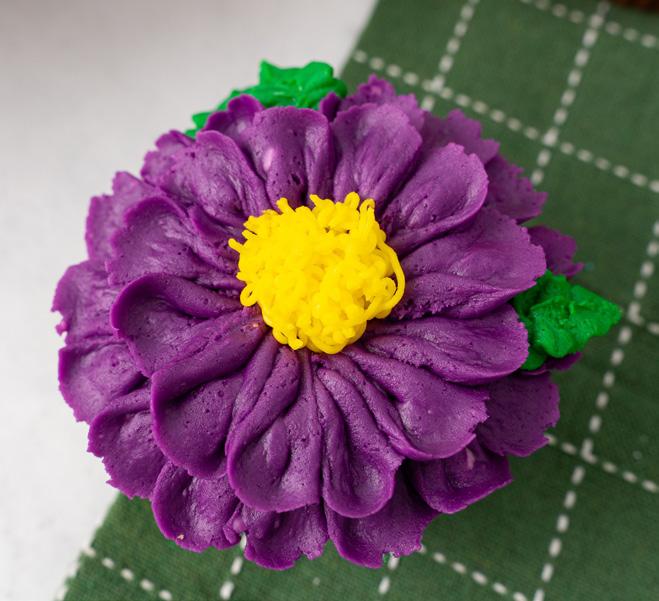
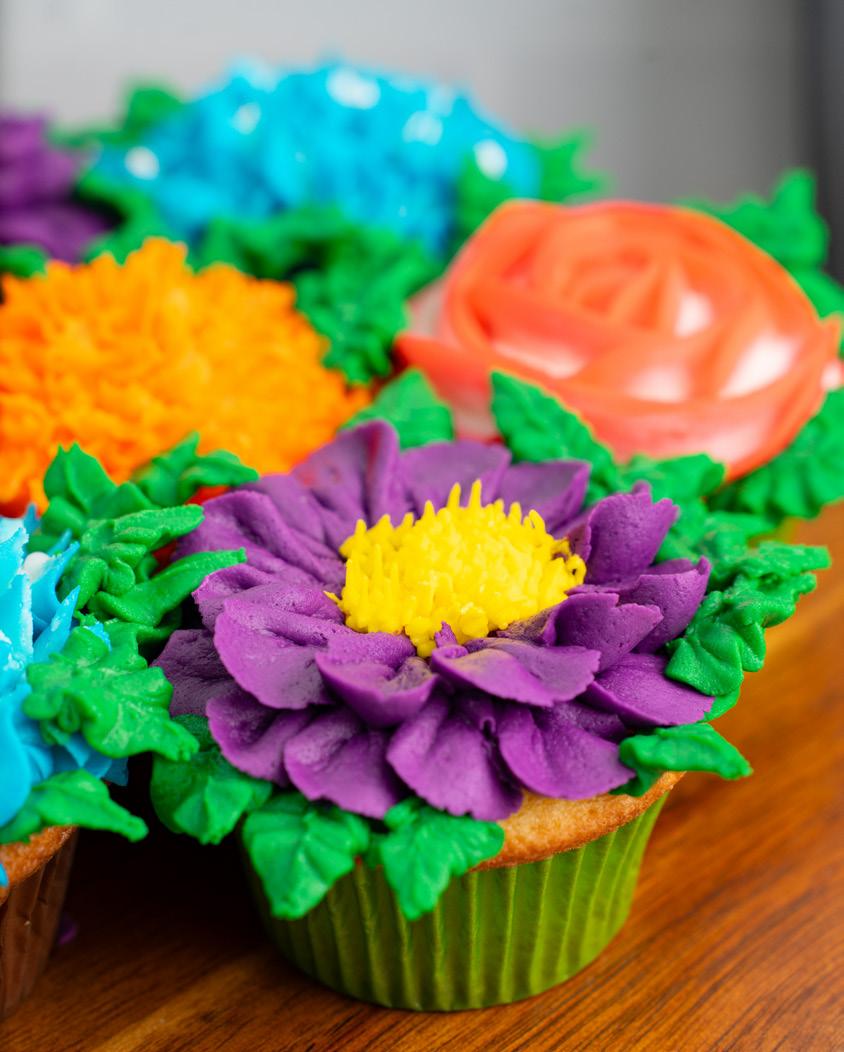
1. Divide a small portion of your buttercream frosting into a separate bowl. Tint the larger portion fuchsia using rose gel food color, then add a small amount of violet gel food color until you’ve reached your desired color. Add to the piping bag with the #104 petal tip. Tint the smaller portion dark yellow using a combination of orange and yellow gel food color. Add to the decorating bag with the #233 grass tip. (no pic)
2. To make the petals, hold the decorating bag with the fuchsia frosting at a 45-degree angle at 3 o’clock (9 o’clock for lefthanded decorators), with the wide end lightly touching the outside edge of the cupcake, narrow end pointing out and angled slightly upward. Squeeze and move the tip in a loop that ends back at the starting point of the petal. Stop squeezing and pull the tip. Repeat until the outside edge is covered in petals, then repeat with another row of petals inside, slightly overlapping the first row. Leave an opening in the center of the cupcake.
3. Create the flower center by holding the decorating bag, with the yellow frosting straight up in the center of the cupcake with the tip about ⅛ inch above the surface. Squeeze the bag and pull up and away until the icing strands are at
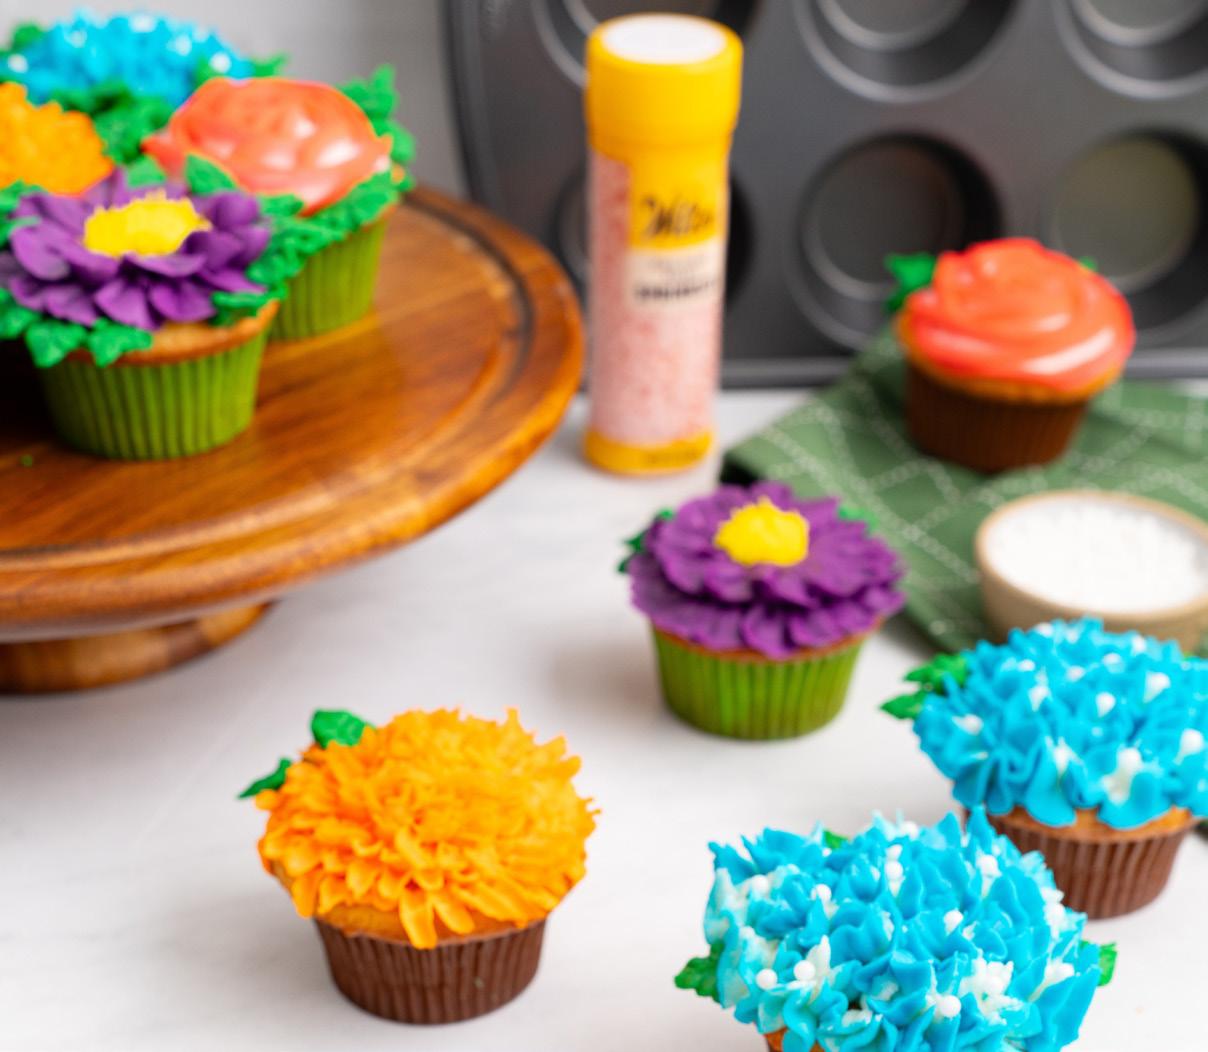
1. Arrange 7 cupcake flowers together on a cake stand or serving tray in a circular cluster, with 1 cupcake in the center and 6 cupcakes surrounding the center cupcake.
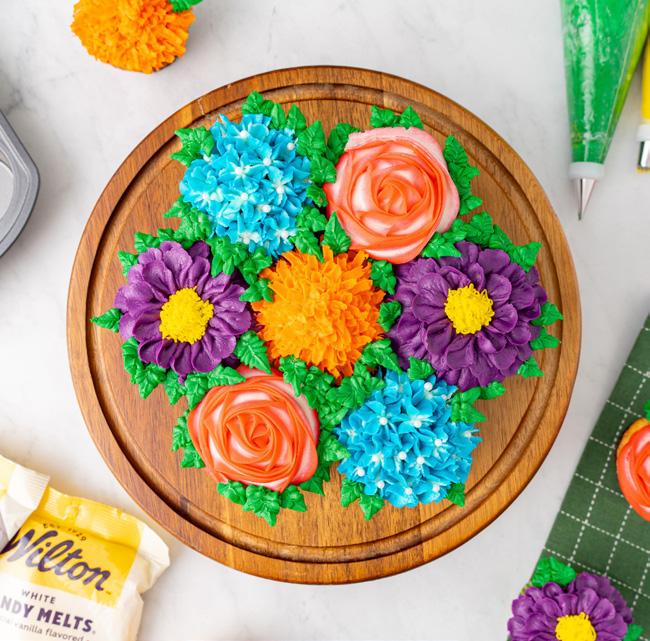
2. Prepare a decorating bag with a #352 or #353 leaf tip. Tint your buttercream frosting with green gel food color and add to the piping bag. Add leaves in the gaps between the cupcakes and around the edges of the bouquet. Hold the bag at a slight upward your desired length, then stop the pressure and pull the tip away. Repeat to fill the center of the cupcake.
angle from the surface. The 2 points of the tip must be vertical (so that it looks like an open beak). Squeeze hard to form the base of the leaf. As you squeeze, slowly pull
the tip slightly upward (this will give the leaf a little lift). Relax pressure as you pull away to form a leaf point. Stop squeezing before pulling the tip away. Repeat, layering
onto other leaves as needed, until you have filled in the gaps and have added your desired amount of leaves to the outside edges of the bouquet. ACD
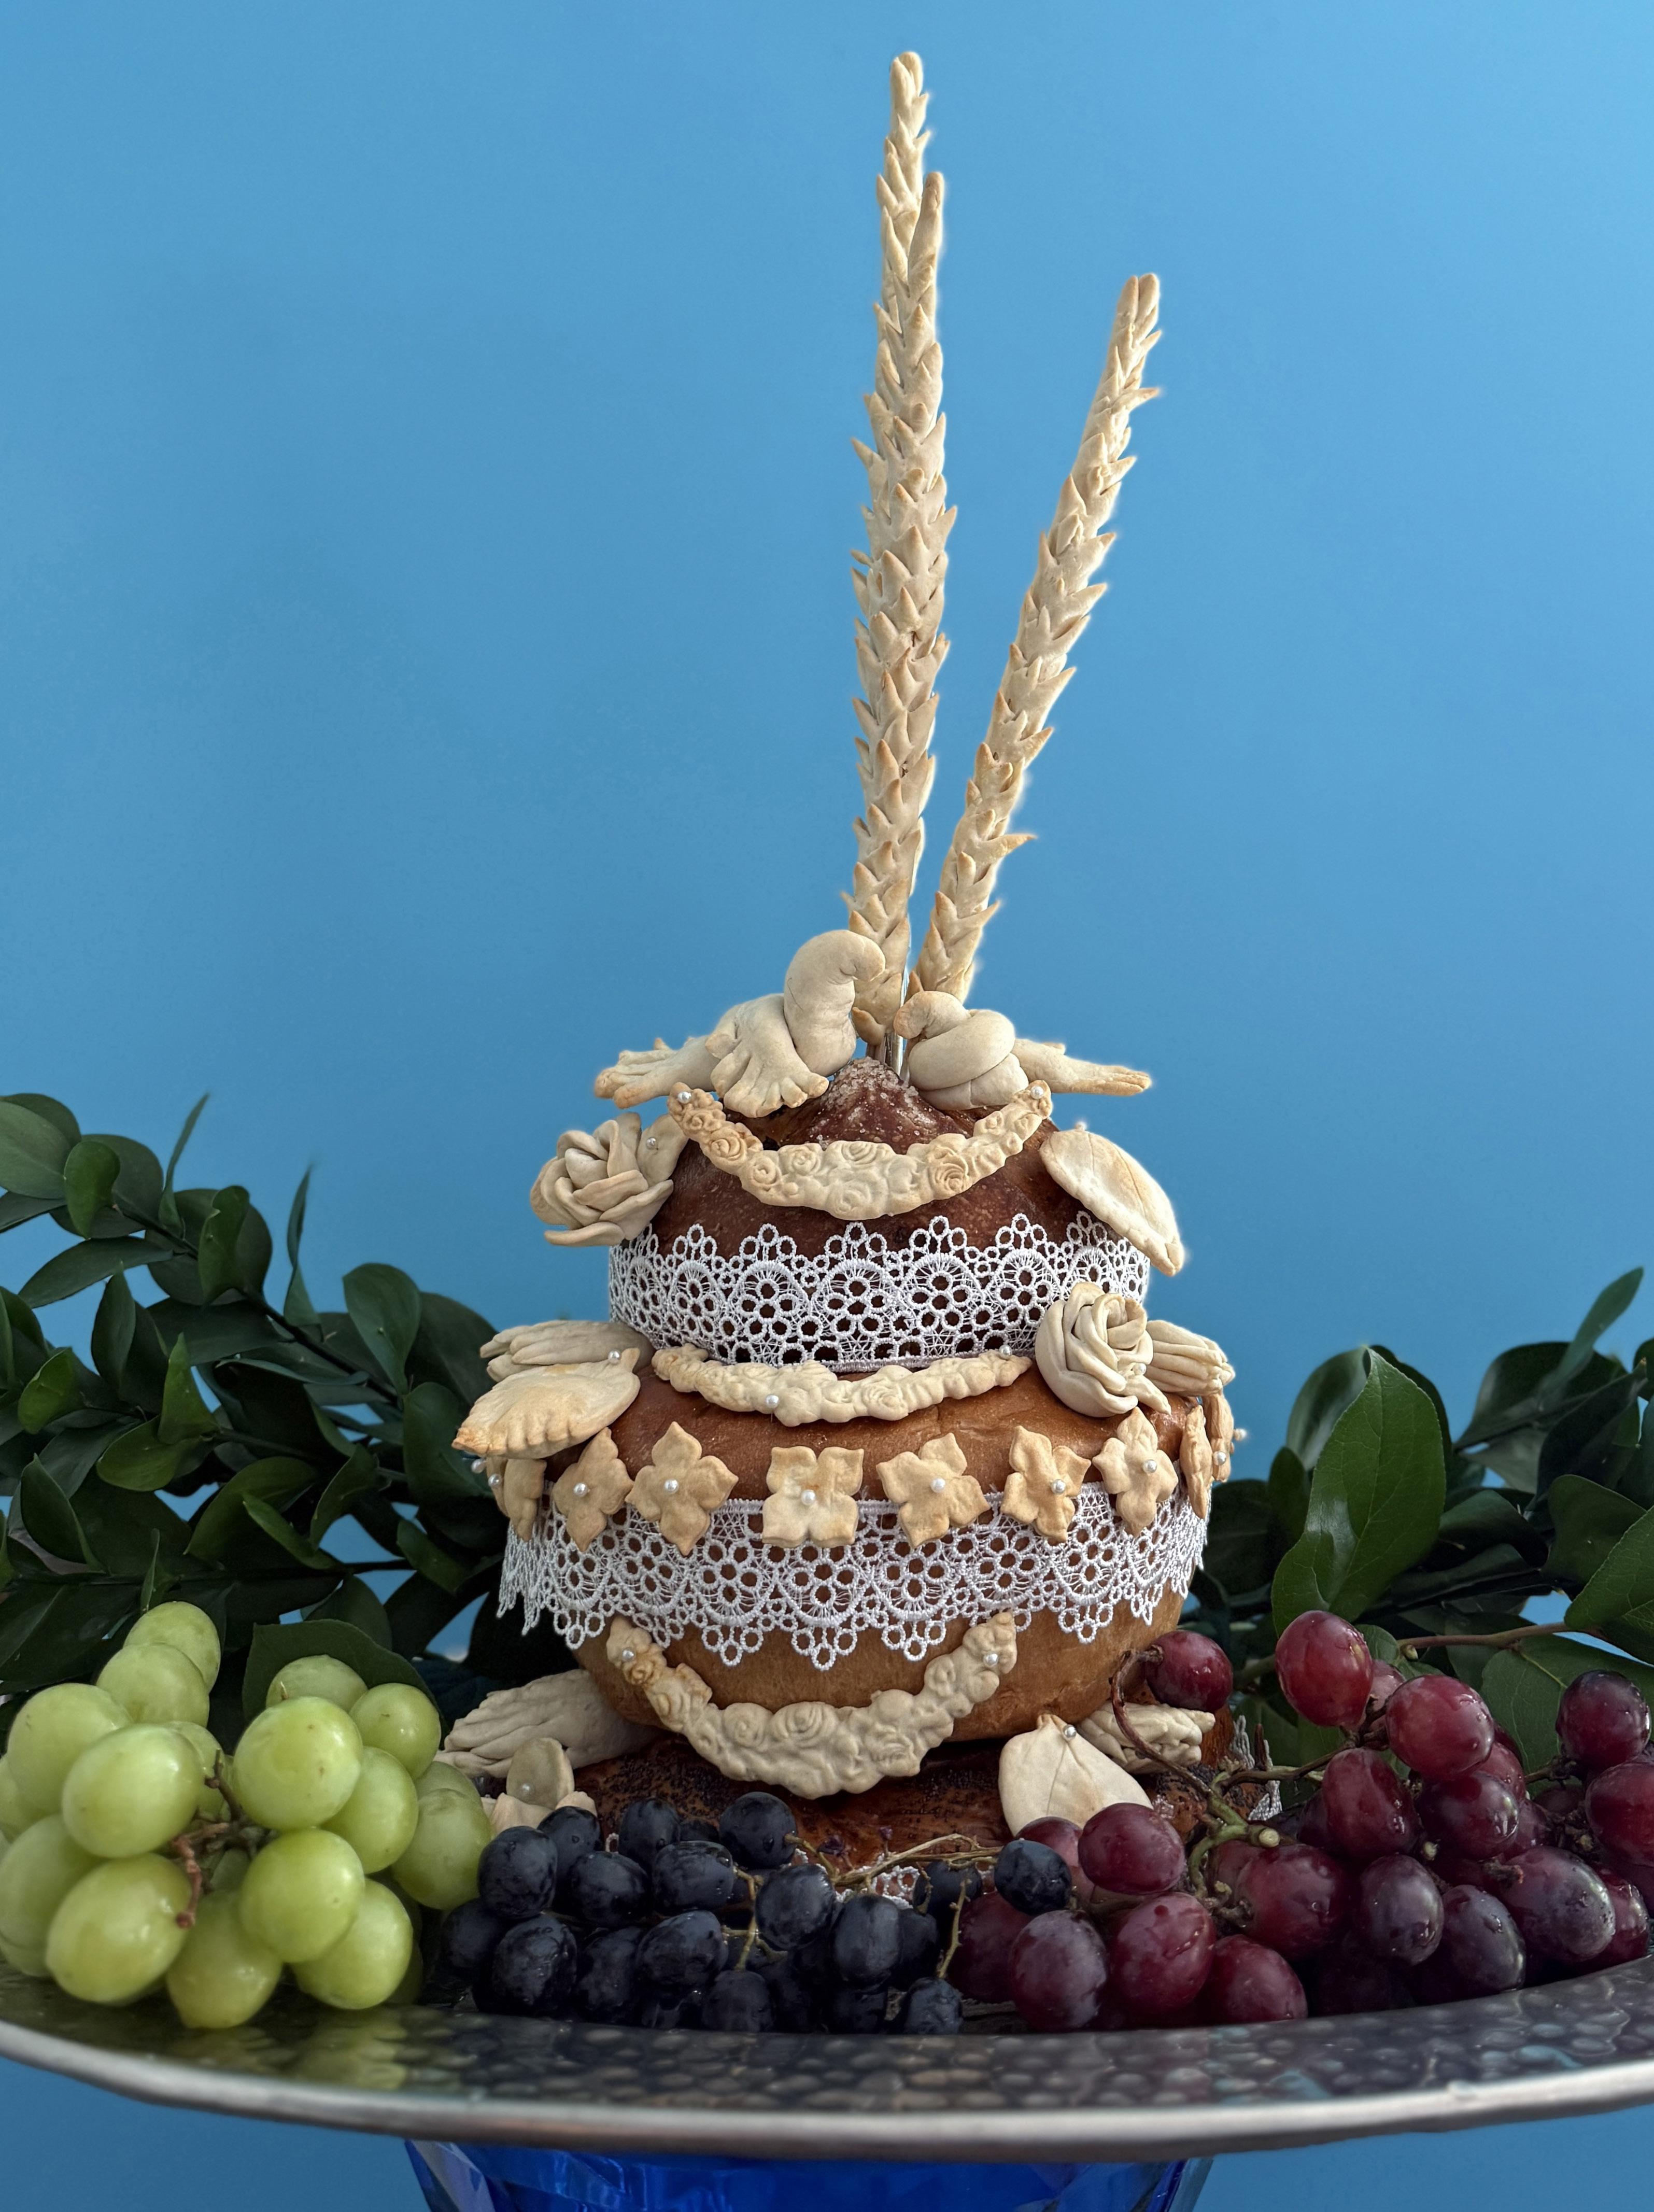
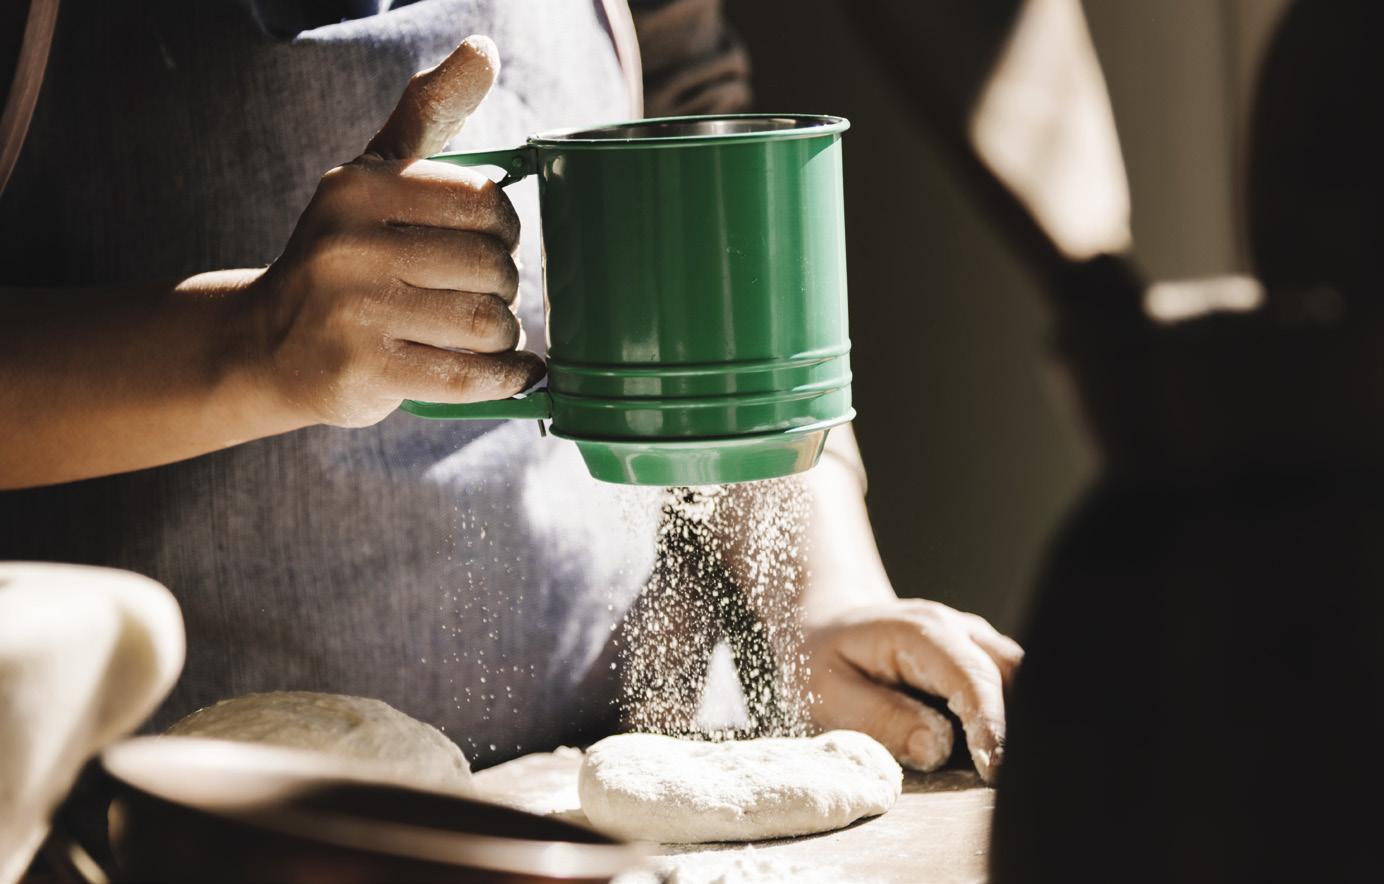
Guests who attend a traditional Ukrainian wedding encounter the majestic masterpiece that is korovai. This glorious bread, which is as much a symbol of tradition as it is a carbohydrate powerhouse, is the centerpiece of any self-respecting Ukrainian wedding. But don’t let its unassuming appearance fool you: Korovai is not just bread—it’s the bread, the whole loaf, the wedding world’s ultimate carb-loaded crown jewel. And if you think it’s just an edible centerpiece, think again. This custom is packed with layers of symbolism, superstition, and a whole lot of flour power.
BY SCOTT BRADSHAW
In its most basic form, korovai is a round, decorated bread traditionally baked for weddings. But this isn’t your average loaf of bread—oh no, this beauty comes with a twist. It’s braided, often adorned with intricate symbols (like birds, flowers, and wheat sheaves), and baked with so much care and attention that it practically becomes a work of art.
The origins of the tradition of korovai are steeped in the earthy

Scott Bradshaw is the owner of sevenravensbakehouse.com, an entertaining blog which strives to get people to look at food and recipes in a twisted way … as twisted as an old phone cord. Scott grew up in Texas, and has lived in Arizona, Nevada, and Missouri. He makes Plainville, Massachusetts, his home these days with his saintly husband and a bossy little Pomeranian.
sevenravensbakehouse.com tiktok.com/@goosecaboose70
charm of rural Ukraine. Historically, the bride’s and groom’s families would gather to bake the korovai, symbolizing the union of two families (and also probably making sure they had enough bread to feed all the guests, because, let’s face it, Ukrainian weddings are known for their hearty appetites). The bread represents life, fertility, and prosperity, which, when you think about it, is an ambitious list of goals for any food item. But no pressure, korovai.
The bread is treated with the reverence it deserves, and that means a series of highly ritualized steps to ensure happiness and good fortune for the newlyweds. At the wedding, the korovai is presented to the couple by the bride’s parents. But the drama doesn’t end there. The bride and groom each take a piece and offer it to their parents, symbolizing respect for their families. After that, the couple offers it to the guests, ensuring that everyone gets a little piece of good fortune—because nothing says “wedding bliss” like passing around large amounts of bread.
In some regions, there’s even a fun little game involved. The bride and groom take a bite of the bread, and whoever gets the bigger piece is
considered to be the “leader” of the marriage. Talk about a bread-based power struggle. Who knew that a korovai could hold the key to marital dominance? Let’s hope it doesn’t get too crumby.
By the end of the wedding, the korovai has gone from a humble loaf of bread to a true symbol of the couple’s union. But, let’s be honest, it’s also the perfect way to make sure no one leaves the reception hungry. The korovai is typically sliced and passed around, giving everyone one last taste of wedding joy before they head out into the night.
And hey, if you happen to get a slice with the biggest piece, congratulations—you’re the leader of the dance floor now. Just be prepared for all those extra bites of bread to fuel your moves. You’ll be rising to the occasion and dough-ing your best to show everyone that you’re the real star of the night.
So, the next time you find yourself at a Ukrainian wedding, don’t just admire the korovai from afar. Take a bite and savor the symbolism. It’s bread, but it’s also a tradition that has been kneaded into the hearts of Ukrainians for generations. It’s truly a wedding bread that’s worth loafing around for!
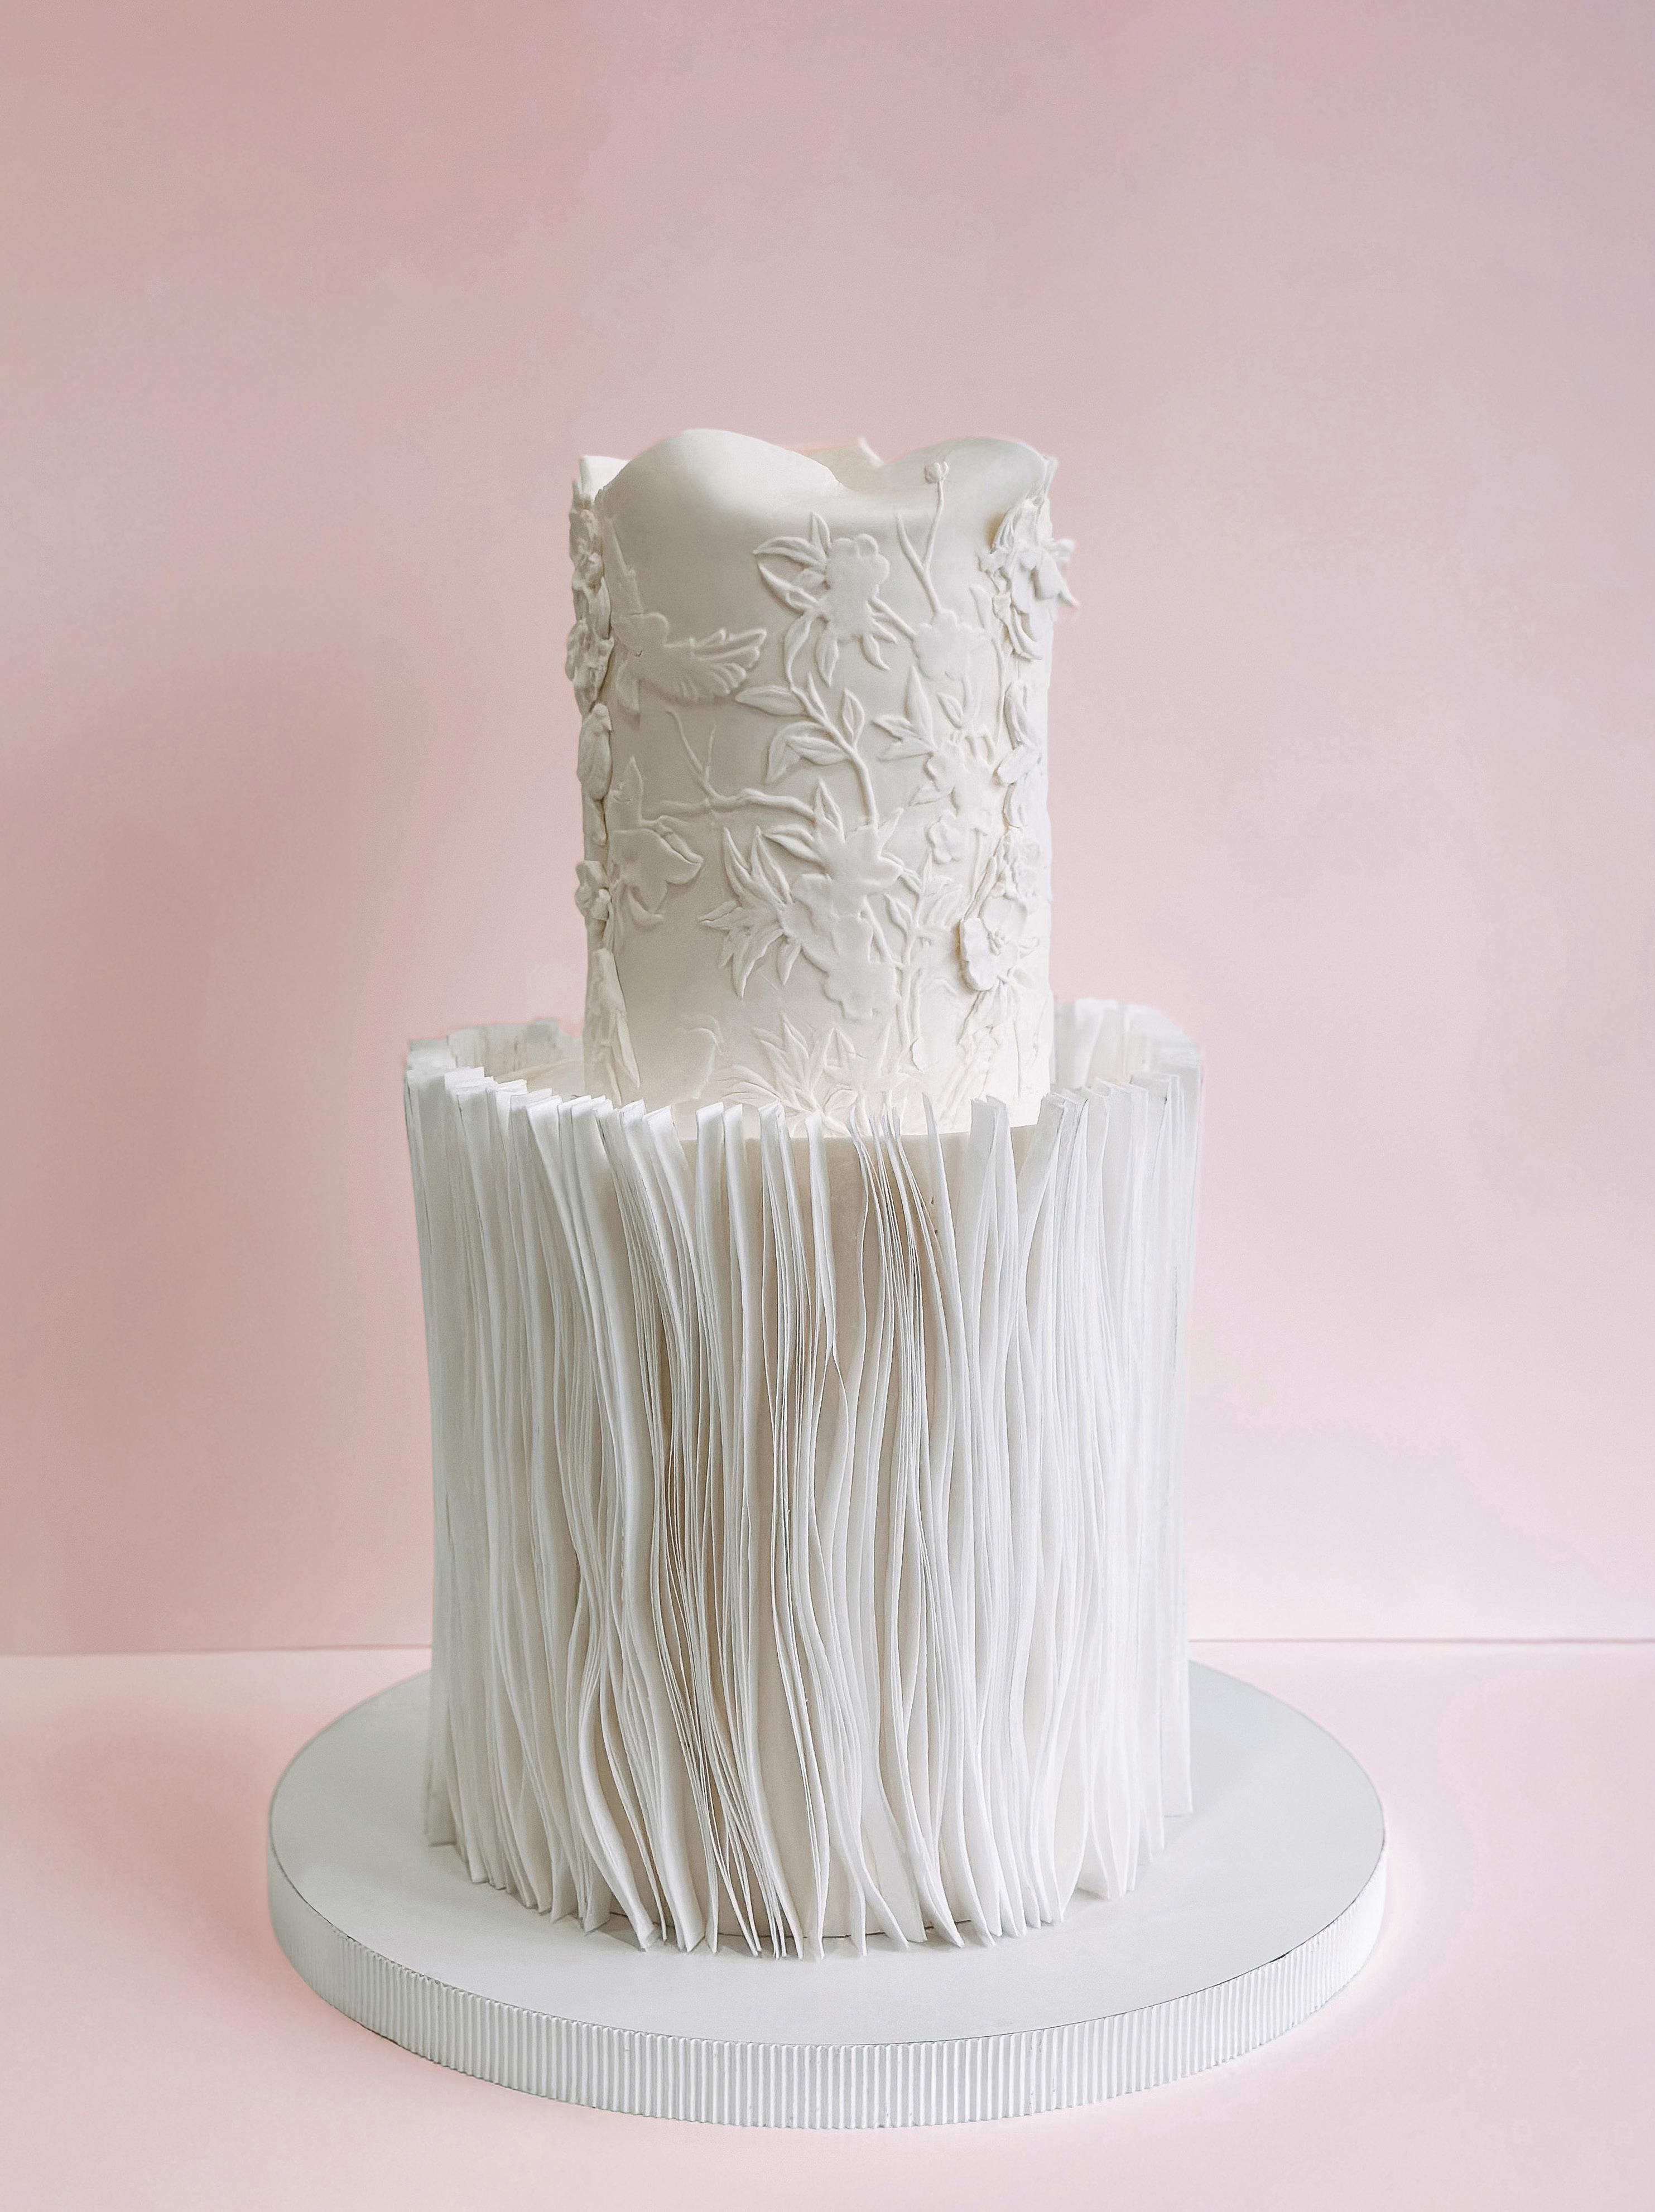
A few easy techniques create an elegant cake design, perfect for any special occasion.
BY ROKSOLANA BULVARENKO


Edibles:
2-tier cake
Cornstarch
Fondant
Wafer paper
Water
Edible glue
Ganache
Equipment:
Rolling pin
Ruler
Nontoxic pencil
Scissors
Paintbrush
Toothpick or bamboo skewer
Decorative silicone mold
Fondant smoother
CMC glue
WHAT YOU NEED

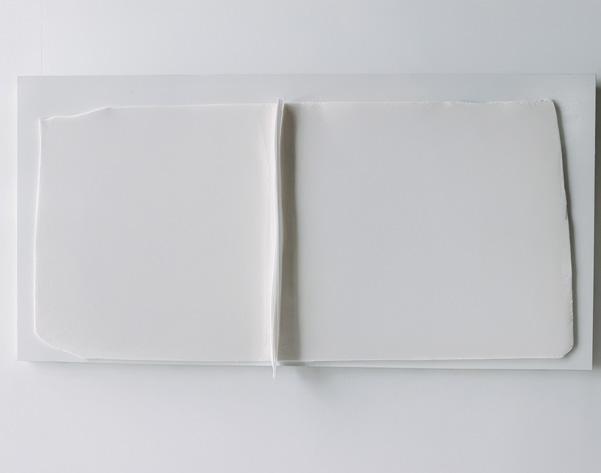
1. Measure the height and circumference of the cake. Dust your work surface with cornstarch and roll out fondant to match the cake’s height and circumference.
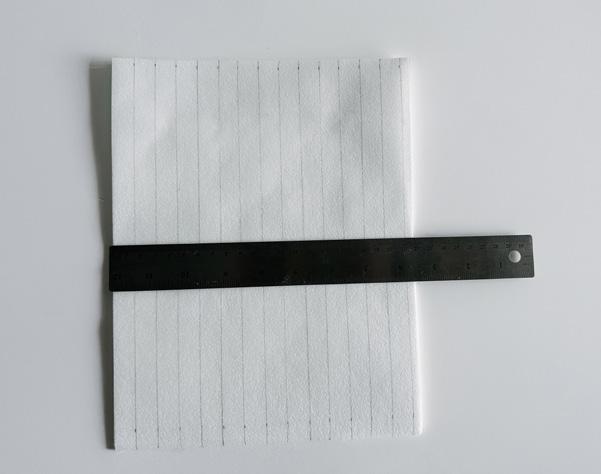
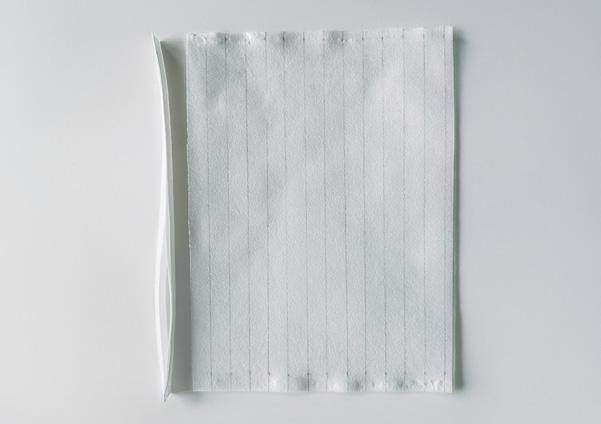
2. Take a sheet of wafer paper and mark ½-inch strips with a ruler and a nontoxic pencil.
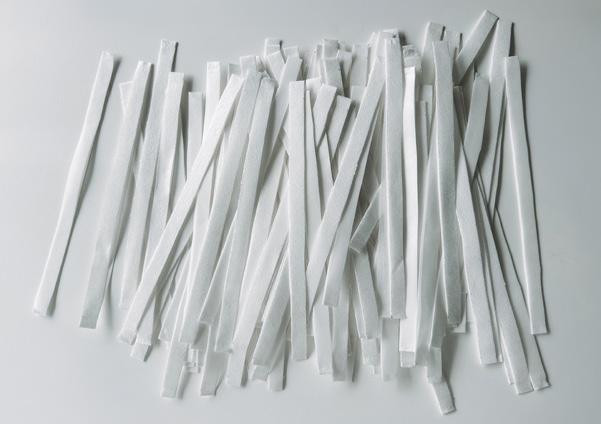
3. Take 3 additional sheets of wafer paper and attach them with water along the top and bottom edges. You should have 4 sheets layered together. Then, cut them into strips. The number of strips needed will depend on the cake’s size and placement density.
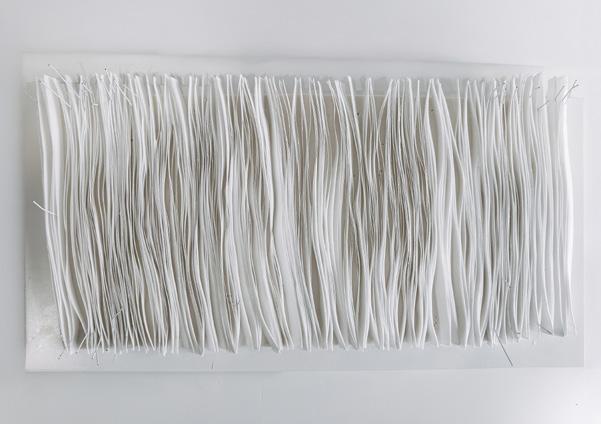
4. Using a paintbrush, apply a thin layer of edible glue to the area where you want to attach the first strip to the fondant. Secure the strip in place. If additional support is needed, hold it temporarily with a toothpick or a bamboo skewer. Repeat the process with the remaining strips, adjusting the density as needed. For the best visual effect, attach the strips closely together. Once all strips are attached, allow them to dry for 20 to 40 minutes, depending on the size of the decoration.
5. Before applying the fondant wrap, coat the cake with ganache. Then, attach the fondant to the bottom tier. If any areas of fondant do not adhere tightly, carefully apply chocolate ganache to the back of the decoration and secure it with toothpicks.

Now based in Chicago, Roksolana Bulvarenko is a pastry artist originally from Ukraine. Her journey in pastry arts began five years ago during her maternity leave, and in that short time, she transitioned from baking at home to teaching both online and in-person master classes. To date, she has conducted more than 30 workshops in Ukraine, the Czech Republic, and the U.S. Her expertise lies in cake creation and decoration, ranging from simple designs to complex techniques, as well as developing original recipes and producing online courses.
instagram.com/roksolana_bulvarenko
1. Dust your work surface with cornstarch and roll out fondant to the required size. Flip the fondant over, apply a thin layer of ganache, and wrap it around the cake. To smooth the seam, lightly dust it with cornstarch and blend with a fondant smoother.
2. Lightly dust the silicone mold with cornstarch. Roll out a piece of fondant to a slightly larger size than the mold. Place the fondant over the mold and gently press it in with a rolling pin.
3. Carefully remove the fondant from the mold and cut out the desired elements.
Tip: IF THE CAKE HAS A LARGE DIAMETER, DIVIDE THE FONDANT INTO 2 SECTIONS TO MAKE IT EASIER TO HANDLE.
4. Apply a small amount of edible glue or water to the back of each piece and attach to the cake’s surface. ACD

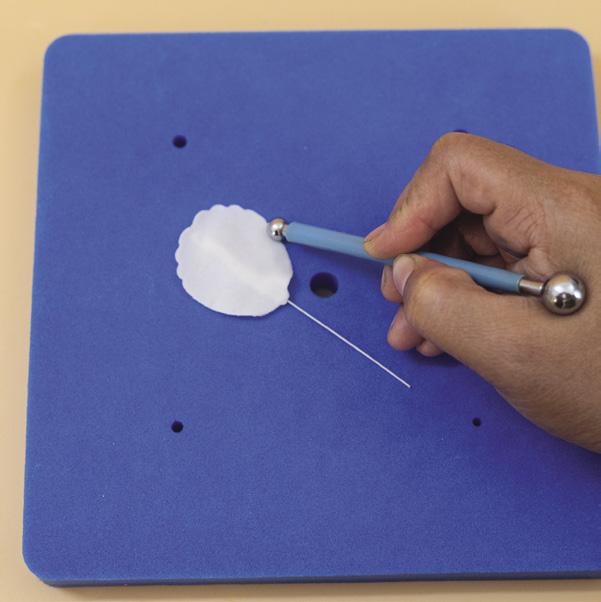
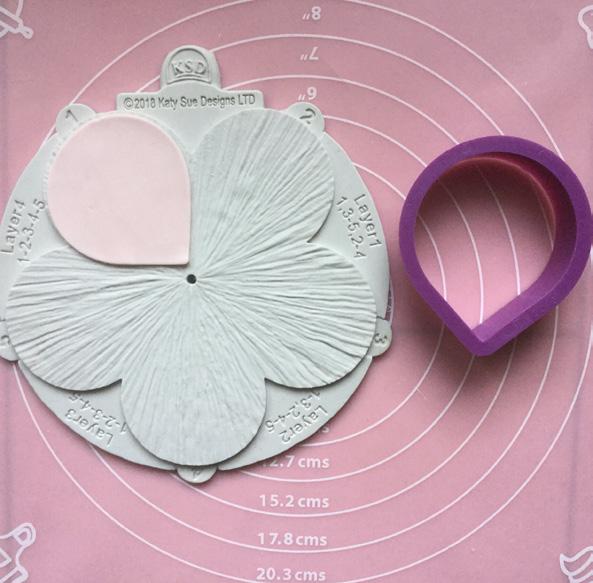
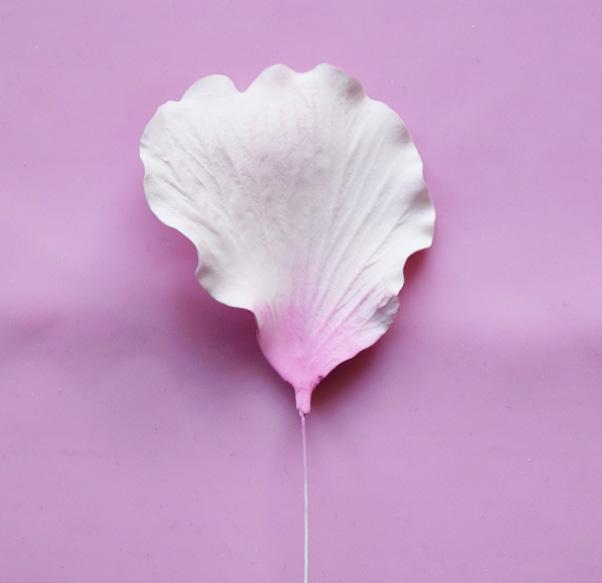
1. Make a sausage shape with light pink gum paste. Roll out the gum paste on a CelBoard. Cut 5 petals with a large rose petal cutter. Insert a 26-gauge floral wire moistened with egg white.
2. Vein each petal. Turn the petals upside down before frilling their edges with a companion tool. Let them dry.
3. Lightly dust the petals with pink petal dust and only the bottom with candy floss and azalea petal dusts.
1. Roll a small sausage shape with light green gum paste. Roll out the gum paste on the CelBoard. With a multi-petal cutter, cut 5 sepals. These will be the hibiscus’ calyx.
2. Insert moistened 33-gauge floral wires into them. Put the sepals on a CelPad and roll their edges with a ball tool. Cut their edges with a pair of small scissors. Let them dry.
3. Dust them with foliage green petal dust. Glaze them to set.
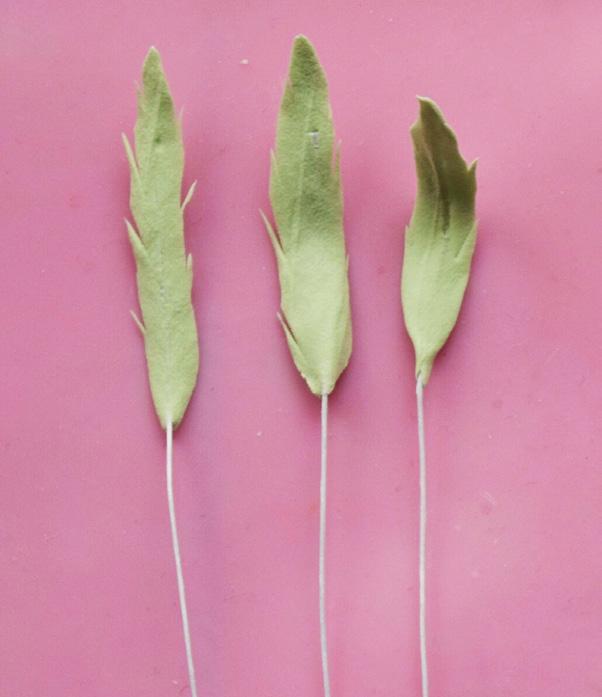
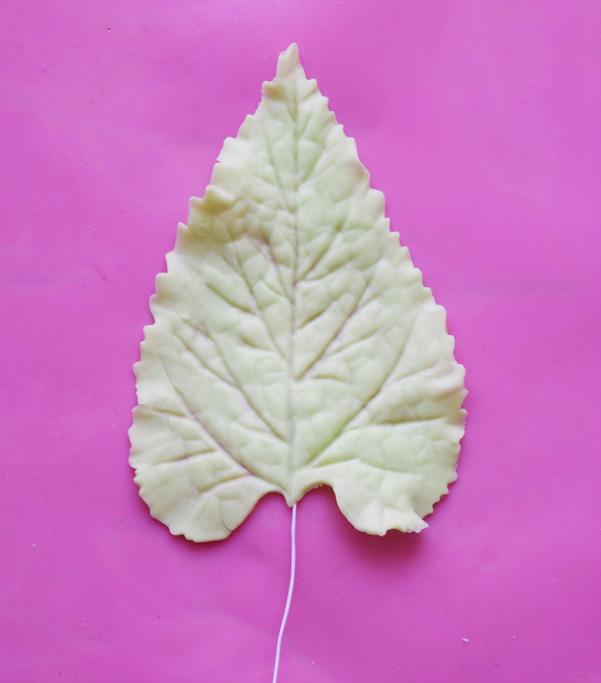
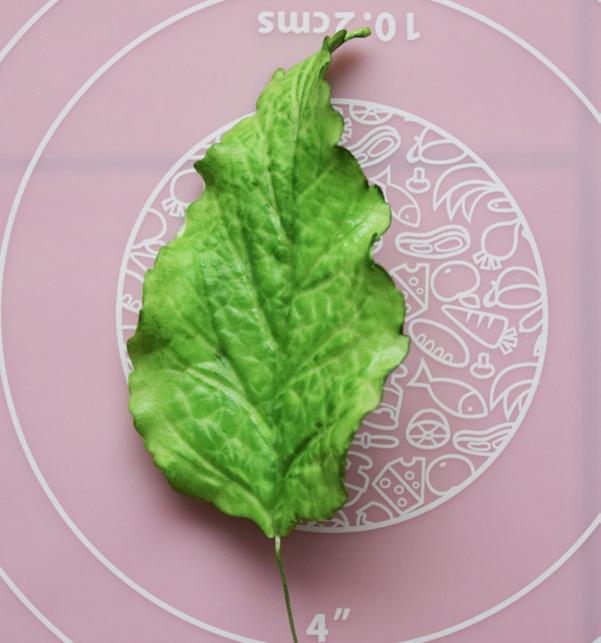
1. Roll a ball of light green gum paste into a carrot shape. Brush egg white along the top of a 26-gauge floral wire and insert it into the thick end of the carrot, shaping it at the base.
2. Flatten the carrot, dust it with cornstarch, and place it into the sunflower leaf mold, with the wire in the recess at the base. Press and work the paste to the edges of the mold. Remove gently to avoid breaking. Prepare 3 leaves.
3. Turn the leaves upside down and frill them with the companion tool. Let them dry on aluminum foil to give them shape.
4. Airbrush the leaves with a mix of yellow and green. Glaze them when dry.
1. Tape the center of the flower, the petals, the calyx, and the leaves with light green floral tape. Dust the tape with foliage green and azalea petal dusts. Dust them with foliage green petal dust. Glaze them to set. ACD
BY CYDNI MITCHELL HODGES
With rising ingredient costs and a general shift in consumer spending, Sweet Bosses across the country are making tough decisions about sustaining their passion while keeping their businesses viable. A pivot doesn’t mean walking away from what you love. Instead, it’s about getting creative with what you already have: your tools, your space, your recipes, and, most of all, your talent. The fact is, there are so many ways to reshape your business while keeping your heart and signature style at the center.
Here are six smart and sustainable ways to pivot in your baking business. Each tip is designed to help you repurpose your equipment, supplies, and hardearned skills into something just as sweet (and profitable) as what you’ve built so far.
Let’s face it: Although custom cakes are works of art, they can also be time-consuming and costly to produce, especially when clients request elaborate designs but hesitate on price. However, dessert boxes can offer a simpler, scalable, and equally delightful alternative. With the tools, recipes, and packaging you already use, you can create curated boxes filled
with themed treats like brownie bites, mini Bundts, cookies, or dipped strawberries. These can make beautiful gifts for birthdays, corporate events, holidays, or even just a little pick-me-up. Best of all? They can be prepped in batches and sold with set pricing. No custom quote required.
While some consumers are cutting back on goods, most are still eager to invest in experiences, especially ones that bring joy, creativity, and a chance to learn something new. That’s where your expertise becomes a powerful asset.
Share your knowledge by hosting cozy in-person workshops in your kitchen (or theirs) or teach virtual classes from the comfort of your
workspace. Whether you’re showing folks how to perfect their pie crust or decorate sugar cookies like a pro, you can create an experience they’ll remember. You can also offer downloadable guides, class recordings, or DIY kits as upsells that add even more value to your teaching while also providing an additional revenue stream.
If you’ve got popular recipes and dry ingredients already stocked on your shelves, consider turning them into bake-at-home kits. These mixes can give your customers the joy of baking from home without the guesswork. Package up your signature cookie mix, cake batter blend, or even seasonal baking flavors in attractive bags or jars. Add a cute label, write
up a clear instruction card (or a QR code to a video tutorial), and you’ve got a shippable, giftable product perfect for online sales, local shops, or weekend markets.
And here’s a bonus: If the kits don’t sell as quickly as expected, you can still use them to streamline your own prep for in-house baking. It’s a smart way to reduce waste and save time during busy production days.
If you have a licensed kitchen that meets health codes, you might be sitting on a valuable resource. Homebased bakers, small food businesses, and content creators are often on the lookout for a clean, professional space to work.
By renting out your kitchen during your off-hours or offering co-baking sessions where you guide people through their own baking, you can create a steady stream of additional income using the space you already own or rent. It’s a great way to support other makers while making the most of your setup.
If you’re looking for consistent orders that don’t rely on individual

customers, consider wholesale baking. Many cafés, small grocery stores, and coffee shops would love to carry fresh, locally made baked goods, but they don’t have the space or team to do it themselves.
Consider providing items like muffins, cookies, quick breads, or breakfast pastries on a weekly basis. Wholesale orders will help you streamline your production and establish consistent revenue. You can even offer co-branded packaging or seasonal exclusives to keep things exciting and build a loyal wholesale client base.
You carry so much knowledge as a Sweet Boss! Why not turn that expertise into content that can generate passive income? Whether you love writing, filming, or designing, there’s a way to share your insights with a wider audience.
You can start a baking blog, launch a YouTube or TikTok channel, or create printable resources like recipe e-books, planners, or tutorials. These digital offerings don’t just build your brand, they can open the door to ad revenue, affiliate income, and product sales. This pivot is such an easy lift because you’re already creating the content. You just need a
system to share and monetize it!
Trust me, pivots aren’t a sign of failure! They’re a sign of resilience. You’ve built something amazing, and with a few thoughtful shifts, you can continue doing what you love in a way that’s sustainable and inspiring. Take a moment to reflect on what you already have: your skills, your setup, your story. That’s your foundation. These pivot ideas are simply new ways to build on it. They are shifts that honor your passion while meeting the moment we’re all navigating.
ACD
Cydni Mitchell Hodges (a.k.a. Cyd) is the chief operating officer and co-owner of the Sugar Geek Show, a recipe blog and online education platform for baking enthusiasts and sugar artists. Since 2014, Cyd has served as a food business coach through her brand Sweet Fest, an online company that supports the business needs of the sweet community in the areas of professional development, marketing, branding, and web design. By trade, Cyd is an accountant and a financial analyst with a master’s degree from the Kenan-Flagler Business School at the University of North Carolina at Chapel Hill. She is the founder of the Sugar Coin Academy, an online business academy for business owners in the baking and sweets industry, and she is also the organizer of The Ultimate Sugar Show, Georgia’s largest annual baking and sweets expo in Atlanta. She is also the business blogger for the Retail Bakers of America and a columnist for American Cake Decorating.
thesweetfest.com facebook.com/thesweetfest instagram.com/sweet_fest
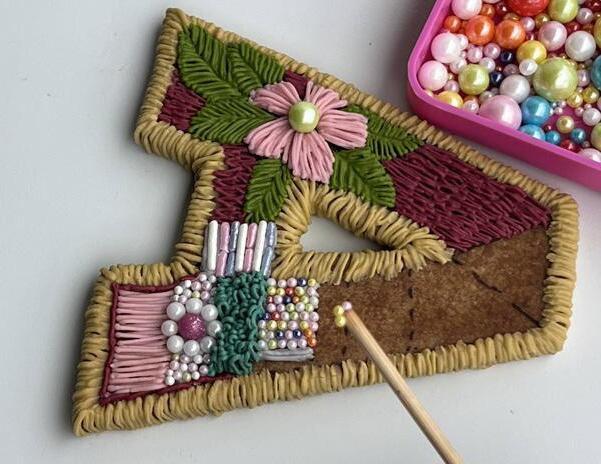
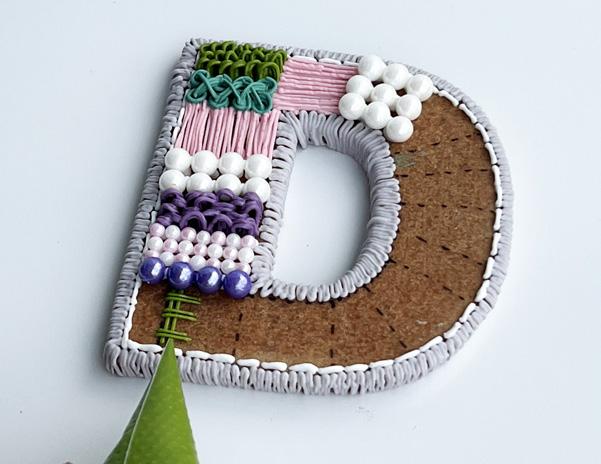
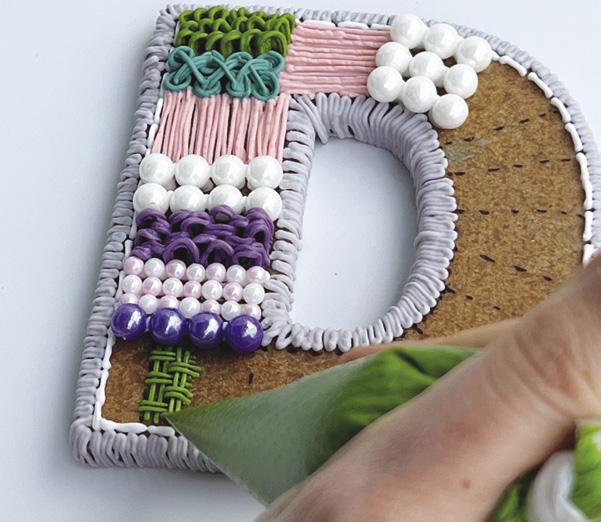
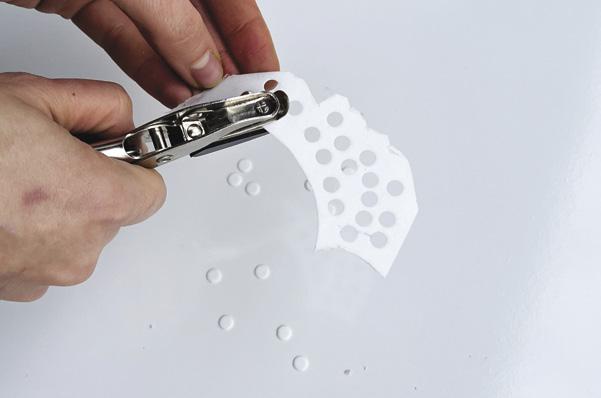
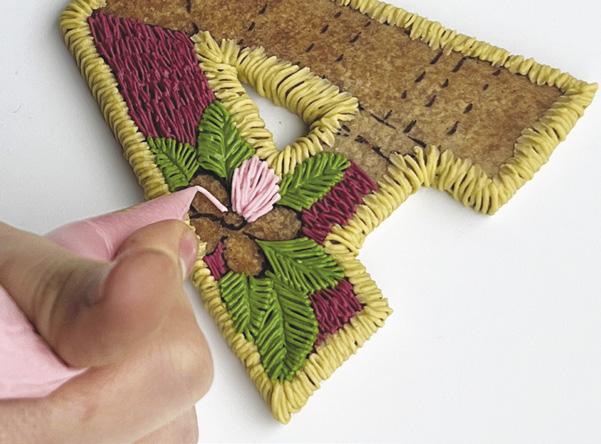
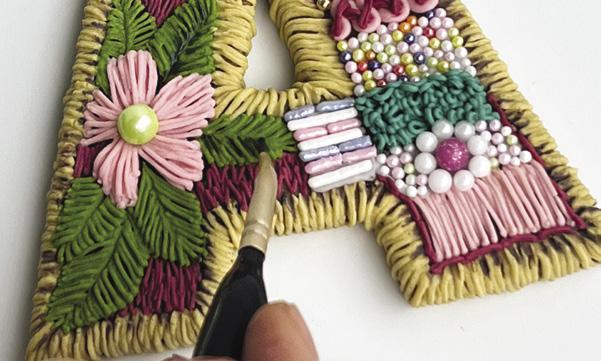
Combine intricate royal icing piping techniques with beaded details to create an embroidered patchwork design.
BY ANNA OLIINYK
Edibles:
Royal icing (Satin Ice)
Gel food color: pink, green vert, olive green, purple, plum, violet, and gold (Satin Ice)
Various sugar pearls and sprinkles
Sugar water
Wafer paper
Edible black marker (Satin Ice)
Equipment:
Piping bags
Nontoxic pencil
Skewer
Hole punch
Paintbrush
PREP THE PROJECT
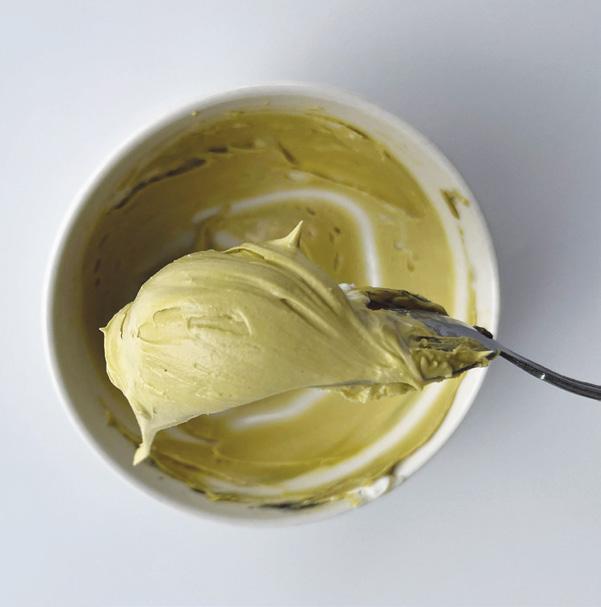
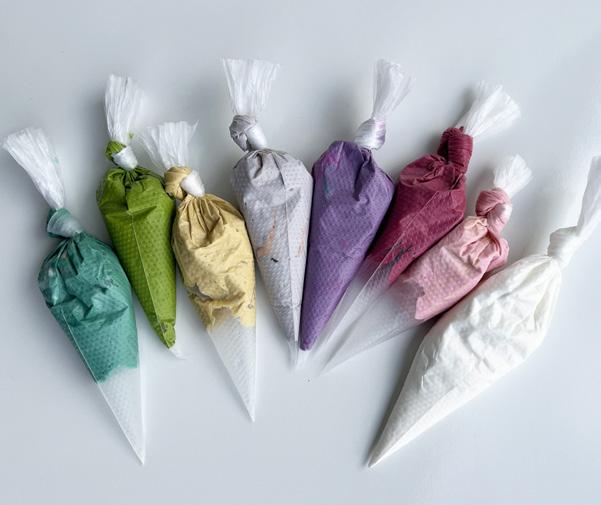
1. Mix your royal icing. The consistency should be thicker than piping consistency but softer than floral icing. When you scoop it with a spoon, it should retain its shape while still being slightly pliable.
2. Color the royal icing with gel food color and fill piping bags.
3. Sketch your design on baked and cooled sugar cookies with a nontoxic pencil. Be as creative as you like. Remember, embroidery is an organic process and it’s perfectly fine if your design evolves as you work.
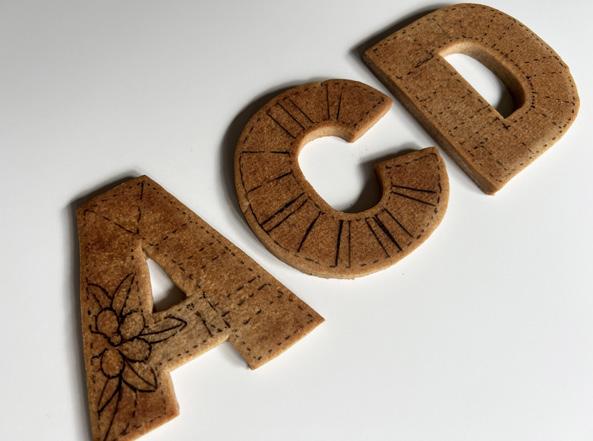
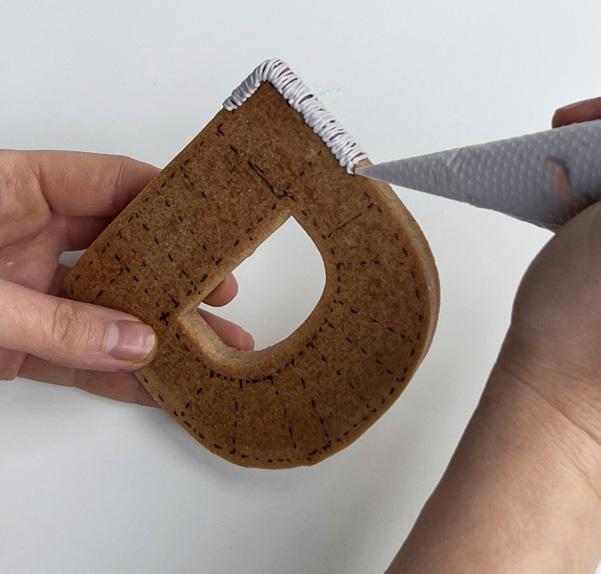
1. Begin by stitching the entire border of the cookie using short, overlapping outlines. Work from the front to the back to create a stitched effect.
2. Using the same short stitching technique, outline the letter. Pipe 1 full outline, then go over it a second time to add depth.
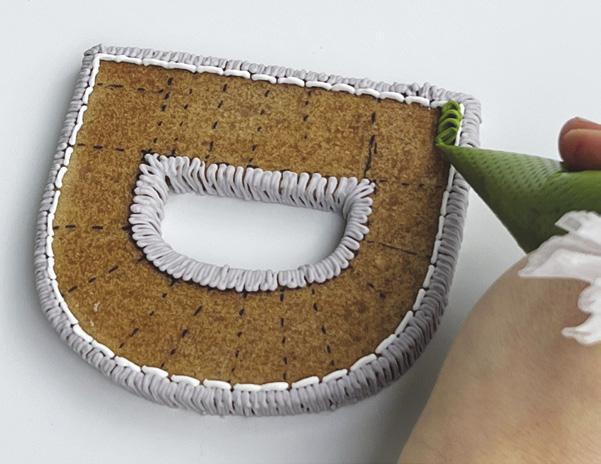
3. For the first section inside the cookie, pipe upside-down U shapes to form raised stitches. Pipe several at a time
to create a stable structure, ensuring each new row slightly overlaps the previous one.
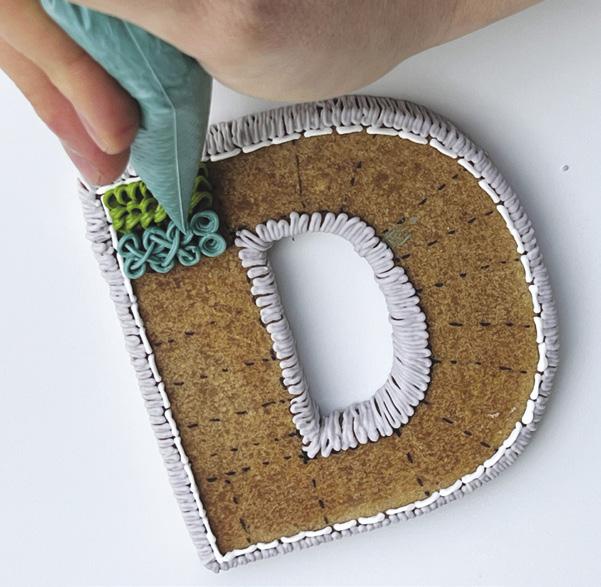
4. For the next section, create stacked stitches. Start by piping tiny circles stacked on top of each other to create a raised pattern. Add 3 to 4 layers for a realistic effect. Then, add fine cross-stitching over the circles to enhance the embroidered look.
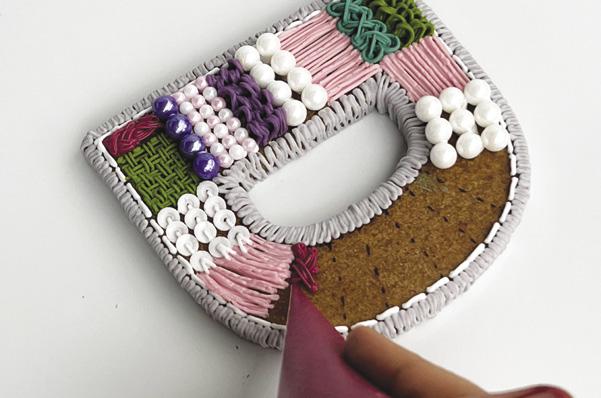
5. To add more texture, create an adjacent section with overlapping short outlines. Slightly overlap each stroke from start to finish to replicate the appearance of thick thread.


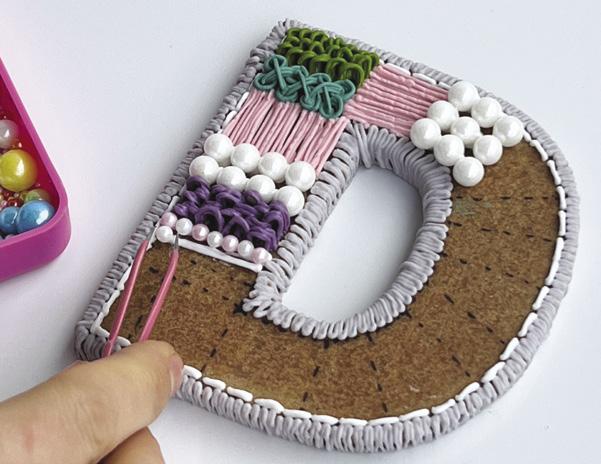
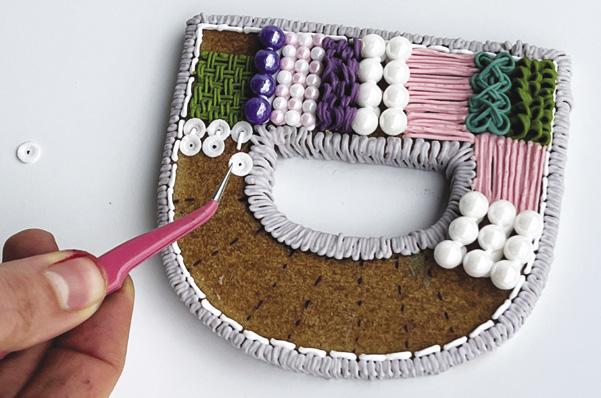
1. For a beaded embroidery effect, attach sugar pearls or sprinkles in different sizes and colors. Secure them with a small dot of royal icing beneath each bead.
2. To mimic real stitching, add a tiny icing dot on the side of each bead, making it look like it’s sewn onto the next one.
3. When placing tiny sugar beads, dip the end of a skewer in sugar water. This makes it easier to pick up and place small decorations.
1. Pipe 2 parallel lines. Add 3 short perpendicular lines between them, leaving small gaps.
2. Cover these short lines with another 2 parallel lines. Repeat the perpendicular short lines, this time in a checkerboard pattern.
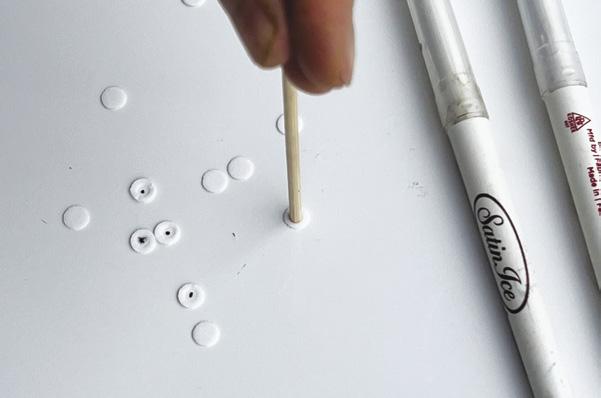
1. Use a hole punch to cut tiny circles from wafer paper.
2. Press the center of each circle with a skewer to curve it slightly.
3. Use an edible black marker to dot the center of each sequin.
4. Attach the first row of sequins to the cookie, then pipe tiny stitch marks from the center of each piece before layering the next row.
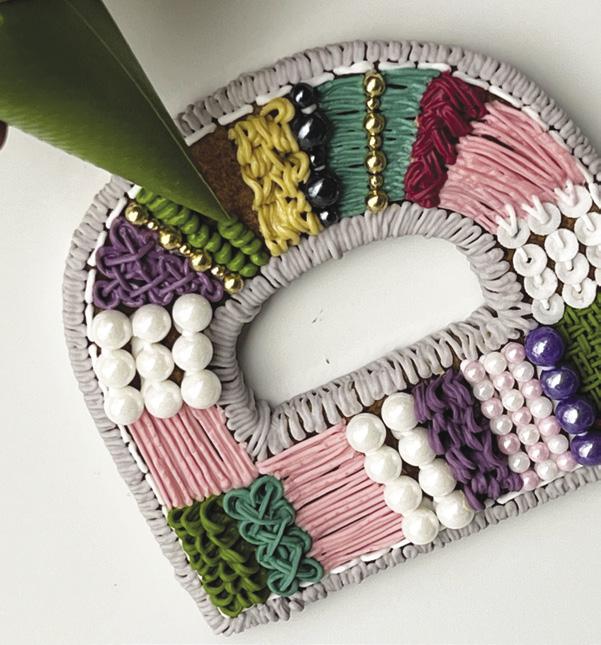
1. To create a braided effect, pipe 3 thin lines. Then, alternate the direction and pipe another 3 thin lines to overlap at the bottom. Continue this process.
2. For a coiled effect, pipe small, tight spirals. This adds depth and texture.
1. Pipe the background of the design first using a zigzag motion.
2. Using the same zigzag technique, pipe the farther leaves before adding the ones that appear closer.
3. Finally, pipe the flower petals, layering them for dimension.
4. For added realism, use a fine paintbrush and dark gel colors to shade certain areas, mimicking the natural shadows of embroidery threads. ACD

Anna Oliinyk is a skilled cookie decorator originally from Ukraine and currently based in Portland, Oregon. She co-manages Sunday Cookers with her husband, where she specializes in intricate cookie decorating and teaching. A proud mother of two, her journey in the world of baking began eight years ago when she adorned Christmas cookies for her children. What started as a hobby quickly evolved into her true passion and purpose in life. Since 2017, she has been teaching cookie decorating thraough online classes, covering various skills, including floral cookies, 3D designs, and unique piping techniques. In 2022, she earned a silver medal at Julia M. Usher’s Cookie Art Competition and a gold medal at the That Takes the Cake Show in 2023. Anna also had the privilege of appearing on season five of Food Network’s Holiday Wars
sundaycookers.com instagram.com/sunday_cookers/

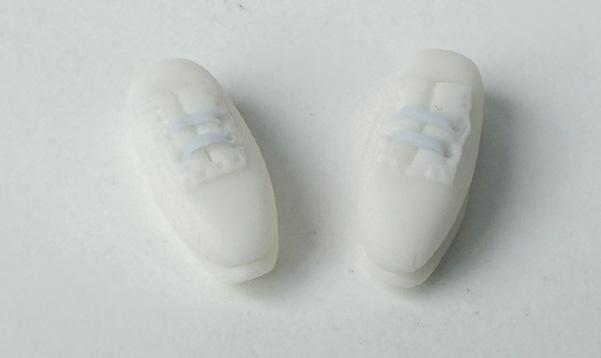
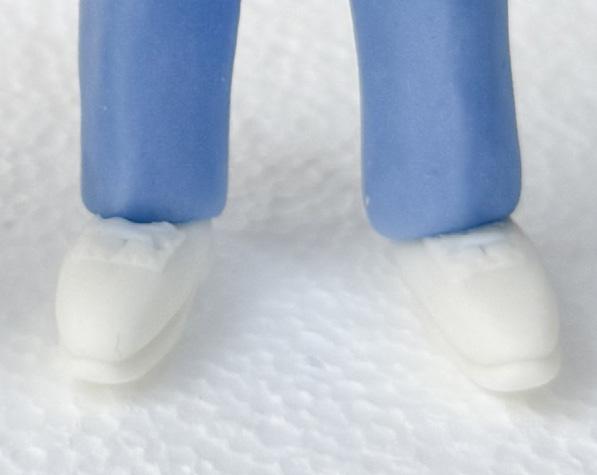
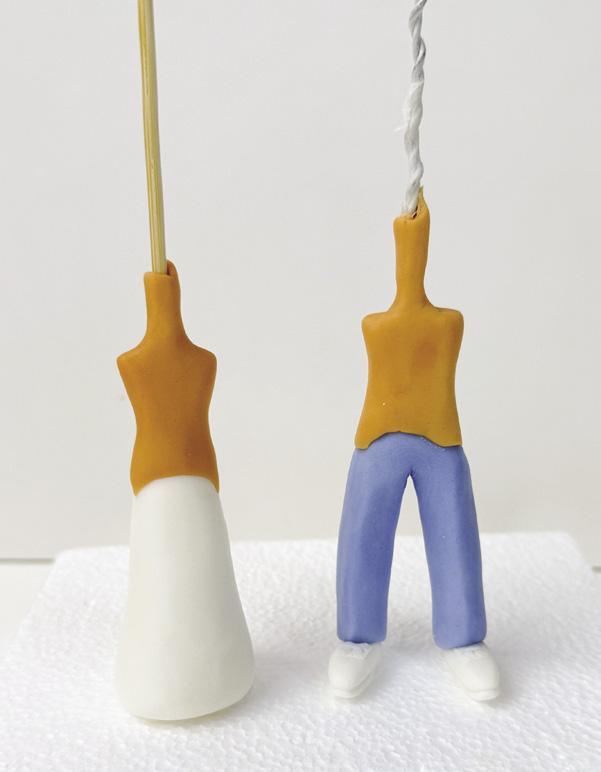
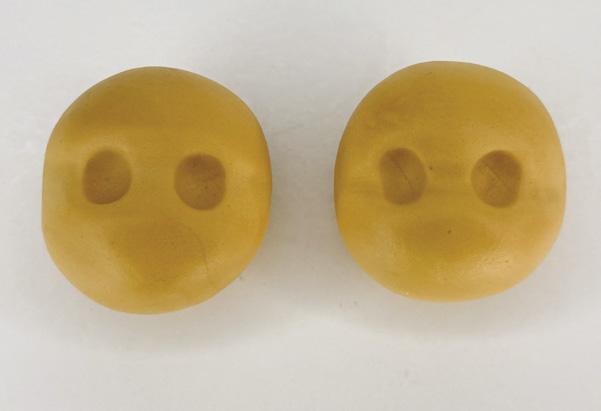
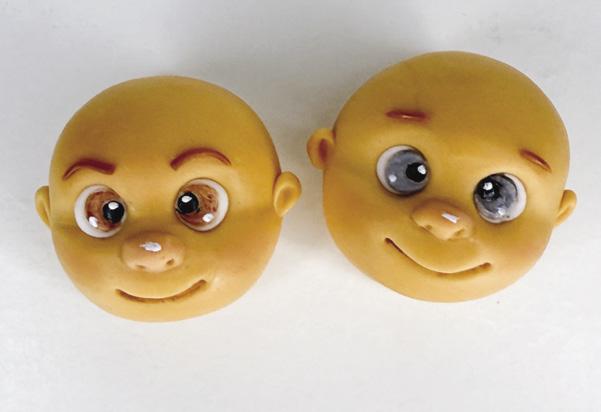
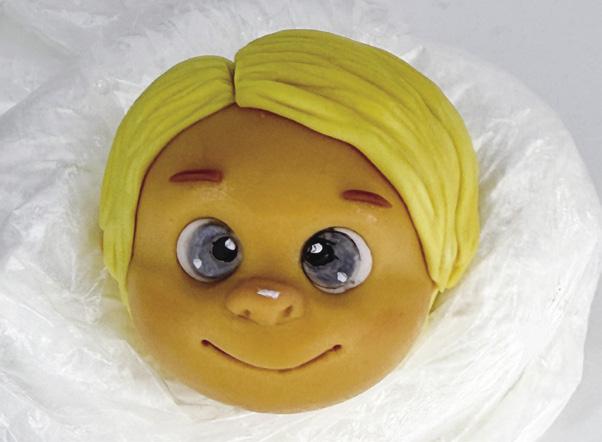
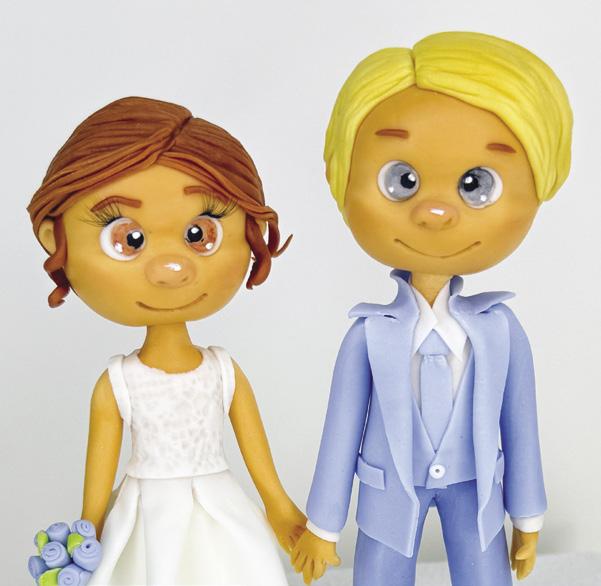
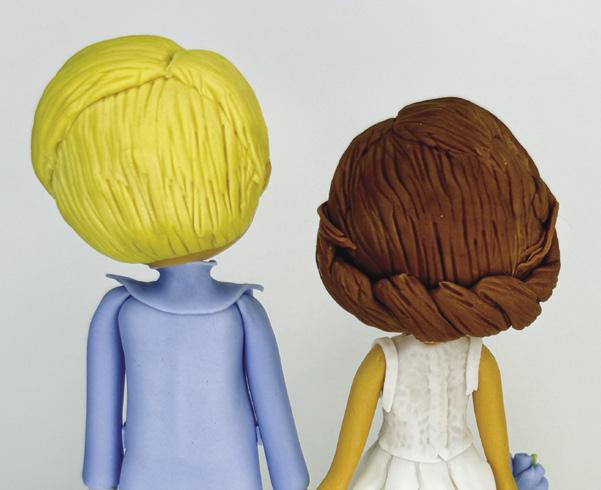
A miniature bride and groom are a classic wedding cake topper.
the bottoms with water for the soles.
2. Roll out 2 small rectangles and stick them to the tops of the shoes. Use a toothpick to create indentations to mimic stitching.
3. Roll out a small piece of blue fondant and cut them into strips. Attach them to the shoes to create shoelaces.
4. Place the shoes at the bottom of the pants.
1. For the torsos, roll beige fondant into carrot shapes and then slightly flatten them. With water, dampen the skewer on the bride and the wire on the groom. Carefully place the fondant pieces onto the bodies, smoothing the connection points and shaping the waists, shoulders, and necks.
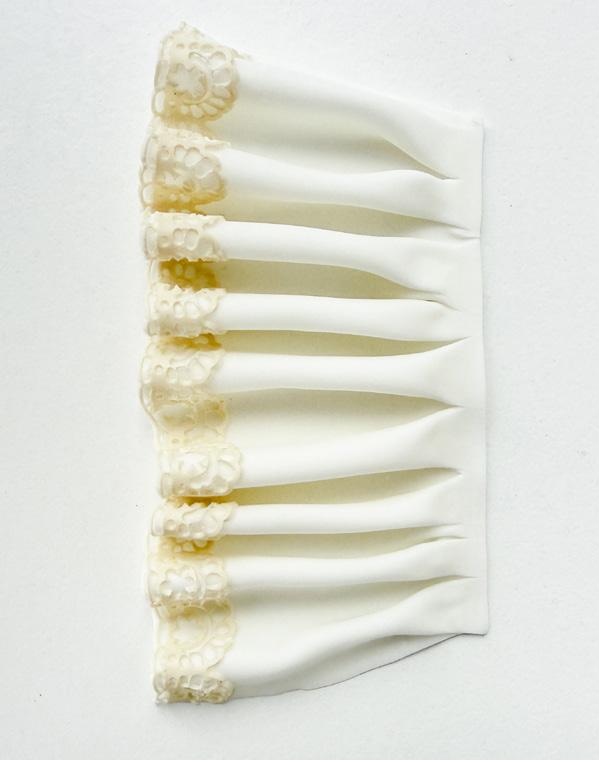
2. For the bride’s skirt, thinly roll out a piece of white fondant and cut out a rectangle. Lightly moisten 1 long edge with water and carefully attach edible lace, pressing
to secure it firmly. Gather the fondant into neat pleats, smooth the top edge with a rolling pin, trim off any excess, and gently refine it with your fingers to create a soft, natural look.
3. Lightly moisten the inside of the skirt with water and carefully place it onto the structure. Smooth out the connection point to create a seamless transition. Trim off any excess and use a flat modeling tool to define and adjust the pleats to give the skirt a natural, flowing appearance.
4. For the bride’s bodice, thinly roll out a small piece of white fondant. Press a lace texture mold firmly on top to create a pattern. Cut out a rectangle and then use a small round cutter to create a neckline at the top center. Lightly moisten the bride’s body with water and carefully place the bodice onto it. Smooth out the seams and trim off any excess.
5. For the groom’s shirt, thinly roll out white fondant. Cut out a rectangle and then cut out the neckline in the center of the top edge. Dampen the groom’s torso with water and attach the shirt tightly to the body. Smooth out the seams and trim off any excess.
6. Thinly roll out blue fondant. Cut out a small tie and attach it to the shirt. Cut 2 identical triangles for the vest and position them so that the bottom corners meet to form a V shape.
7. Roll out white fondant and cut out a small strip. Trim the
edges at an angle to create a collar and attach it over the tie. For the button, roll out a tiny white ball and place it where the vest meets. Use a toothpick to add a small indentation to the center.
8. Thinly roll out blue fondant and cut out a rectangle. Gently fold the narrow edges inward to form the jacket’s lapels, being careful not to press too hard to retain their volume. Lightly moisten the back with water and attach the jacket. Cut out 2 small strips and attach them to the sides for pockets. Cut out another small strip and secure it to the top of the jacket for the collar.
1. Roll out 2 balls of beige fondant to form the heads. Use a modeling tool to create a slight indentation in the center of each head. Use a ball tool to create the eye socket indentations.
2. Roll 2 small pieces of beige fondant into ovals and attach them to the faces. Use a toothpick to create the nostrils. With the modeling tool, gently carve smiles.
3. Roll 4 small balls of white fondant for the eyes. Use gel food colors to paint the eyes. Allow the paint to dry fully.
4. Roll 4 small ropes of brown fondant and attach them as eyebrows. Roll out 3 small beige fondant balls, shape them into ears, and attach them to the sides of the heads.
5. Using an X-Acto knife, make small cuts between the eyes and the face on the bride. Use tweezers to attach the false eyelashes.

1. For the bride’s hair, roll a ball of brown fondant and flatten it to cover the entire back of the head and the center of the forehead. Use a sharp modeling tool to carve hair texture, drawing the lines from the top down. Roll 2 small pieces of brown fondant into carrot shapes, slightly flatten them, and carve the hair texture with a sharp tool. Attach these pieces to the center of the head and then tuck them behind the ears. Attach 2 small curled strands in front of the ears. Then, thinly roll out brown fondant, cut out 8 thin strips, gather them into 2 bundles, and attach them as bangs. Allow the fondant to dry.
2. For the groom’s hair, roll yellow fondant into a ball and flatten it so that it covers the entire back of the head and the center of the forehead. Use the sharp modeling tool to carve the hair texture. Make several small carrotshaped pieces from yellow fondant, flatten them, carve the hair texture, and arrange them on both sides of the head to add volume until your desired hairstyle is achieved.
3. Carefully trim the excess length of each figure’s neck. Then, shorten the internal supports. With water, moisten
the necks and the supports slightly and gently place the heads onto the structures.
4. For the bride’s braid, roll a small log of brown fondant. Fold it in half and gently twist it into a spiral. Lightly press it and then use the sharp modeling tool to carve the hair texture. Taper the edges and use water to securely attach the braid to the lower part of the head. ACD

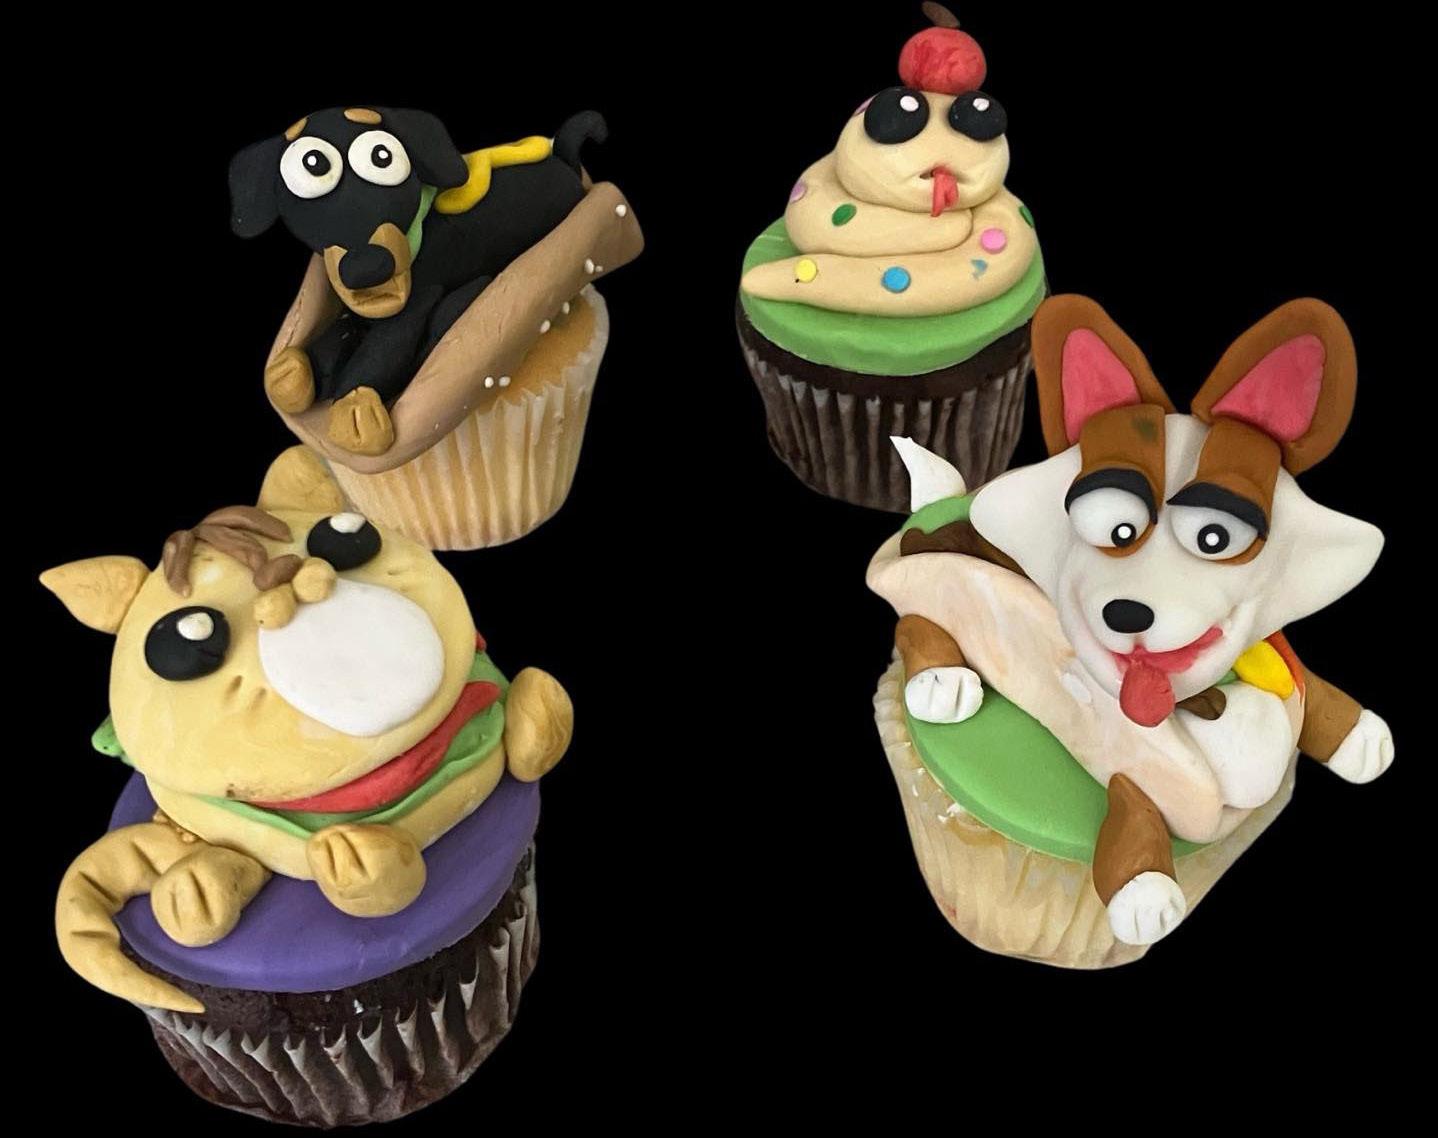
ORGANIZED BY TAMMY VARELA
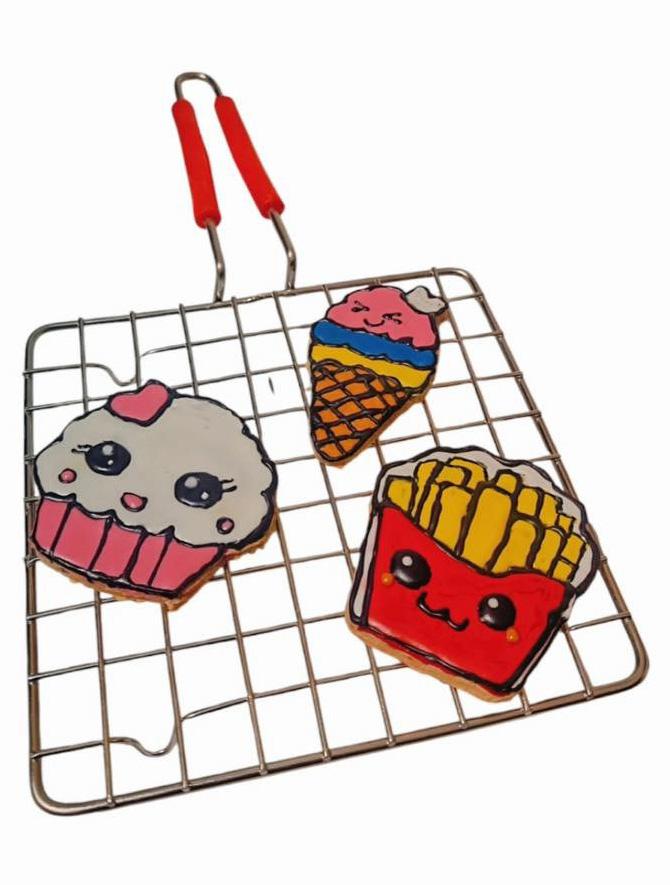
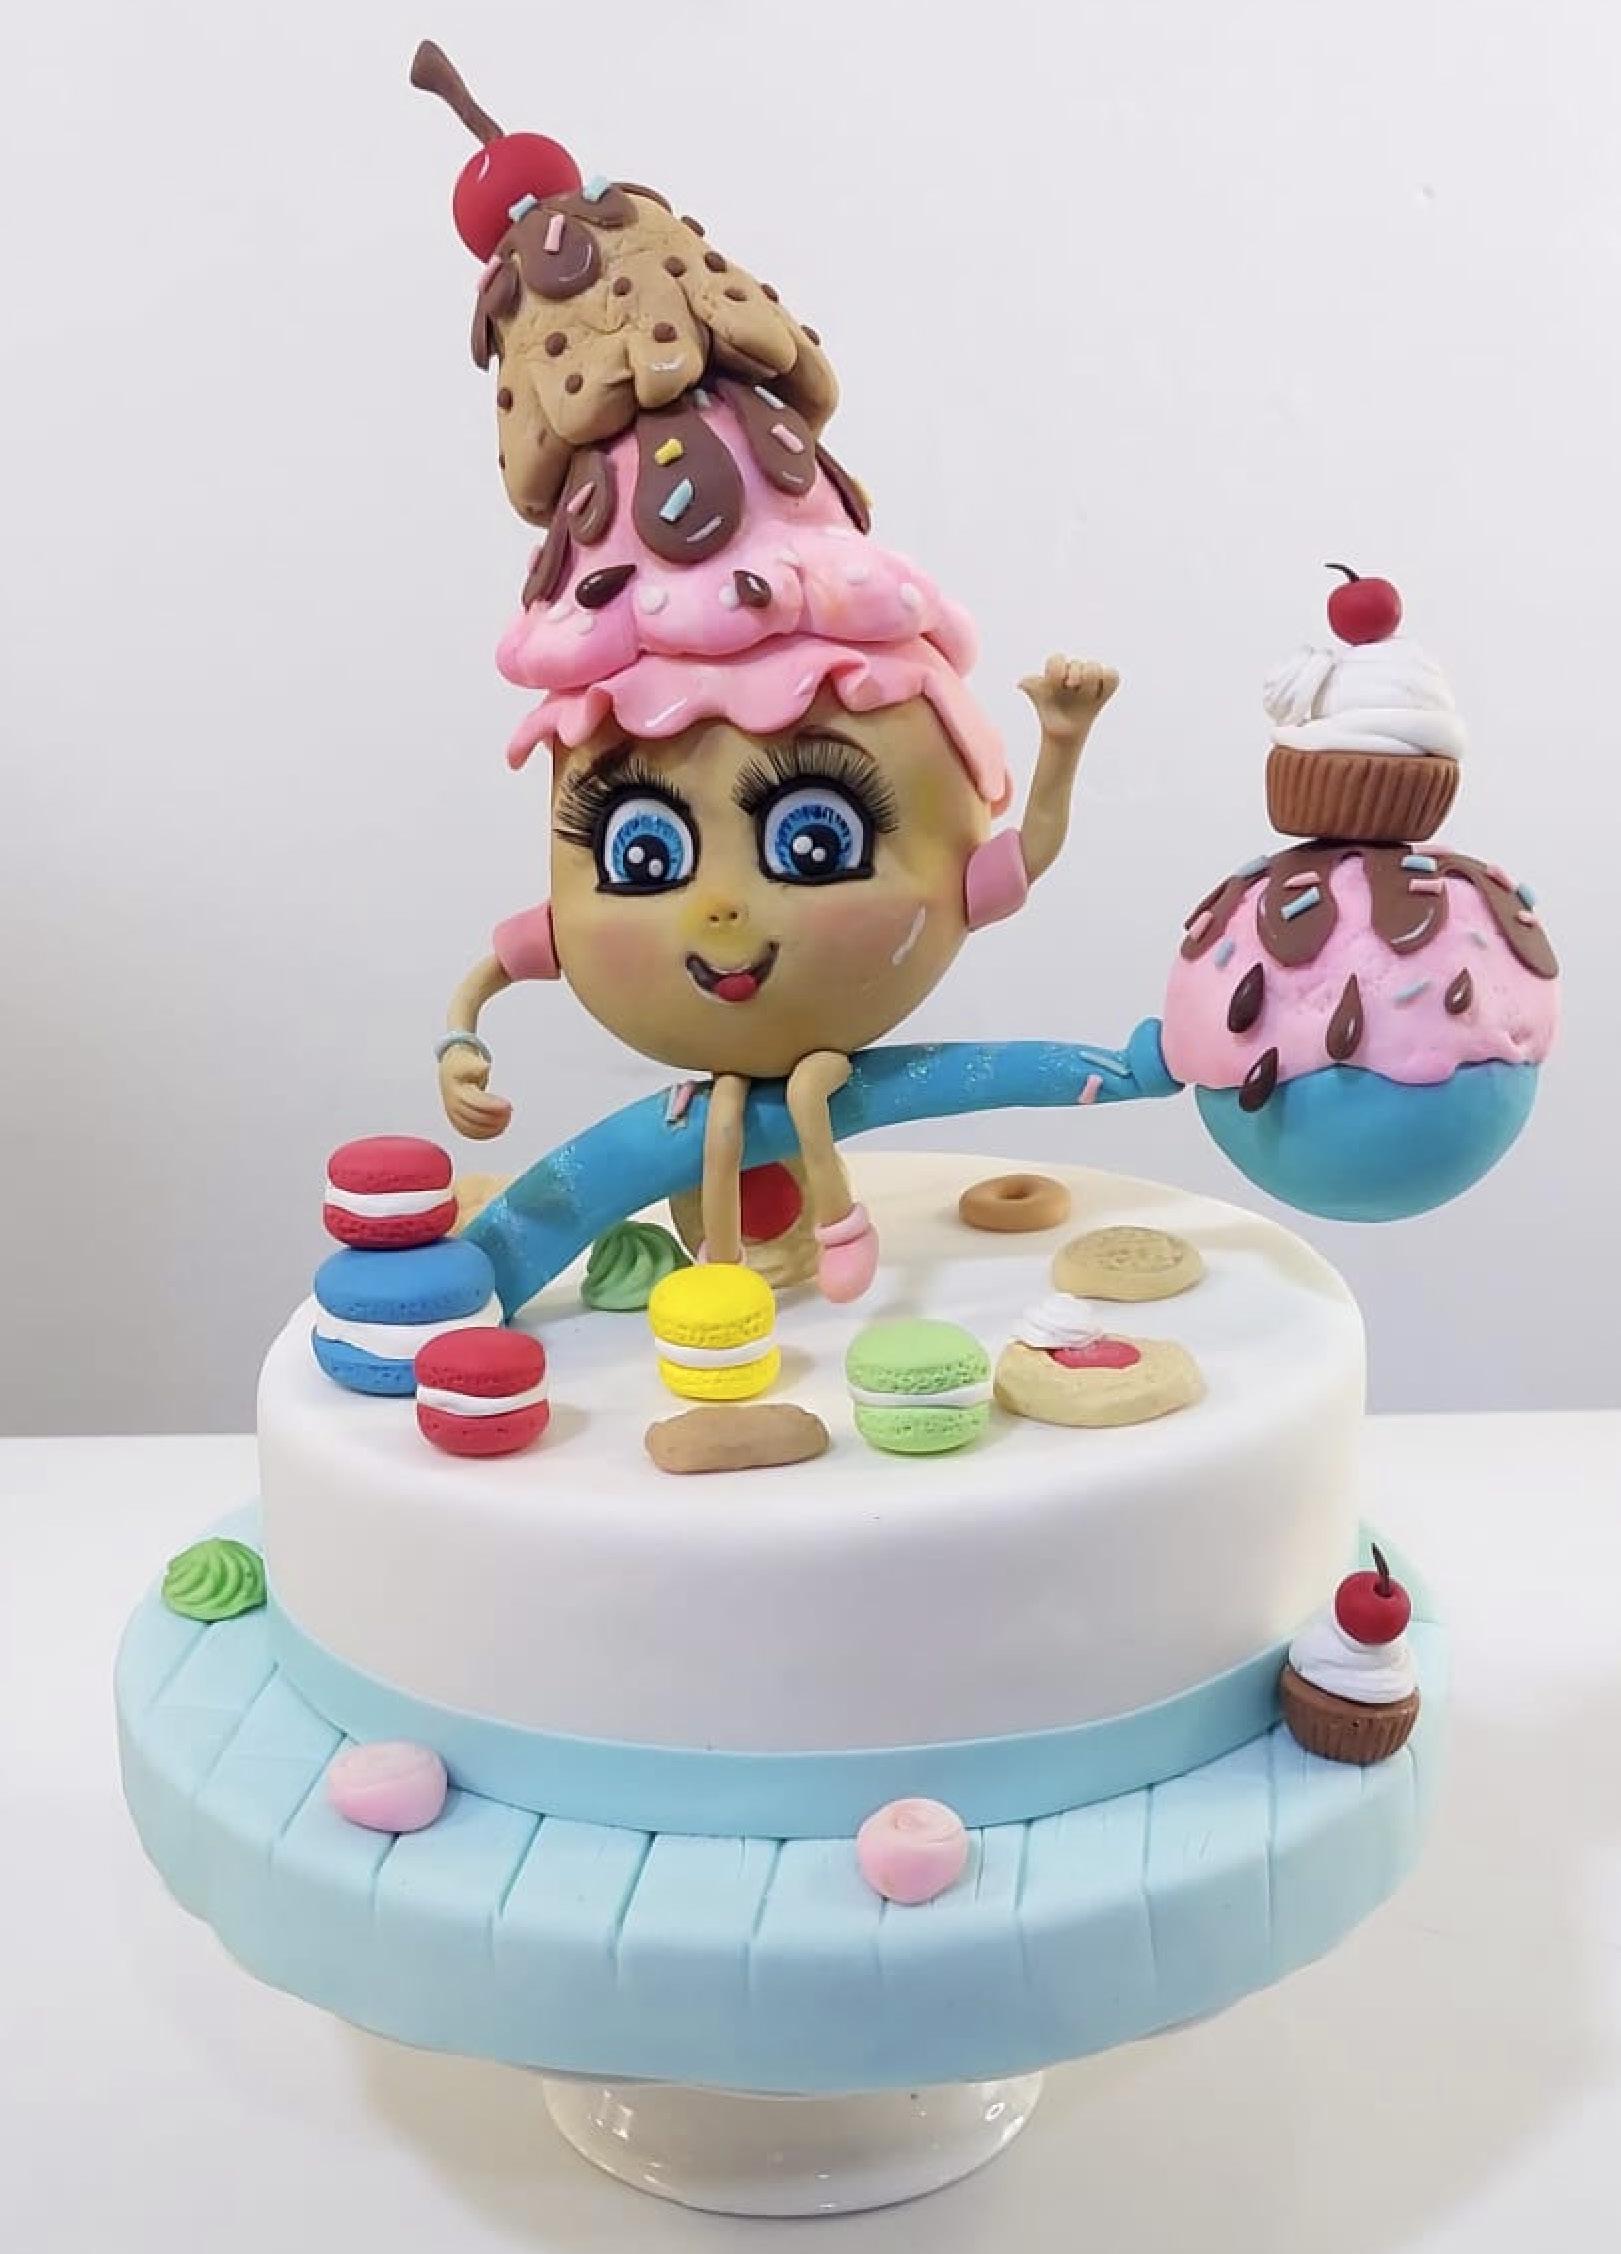
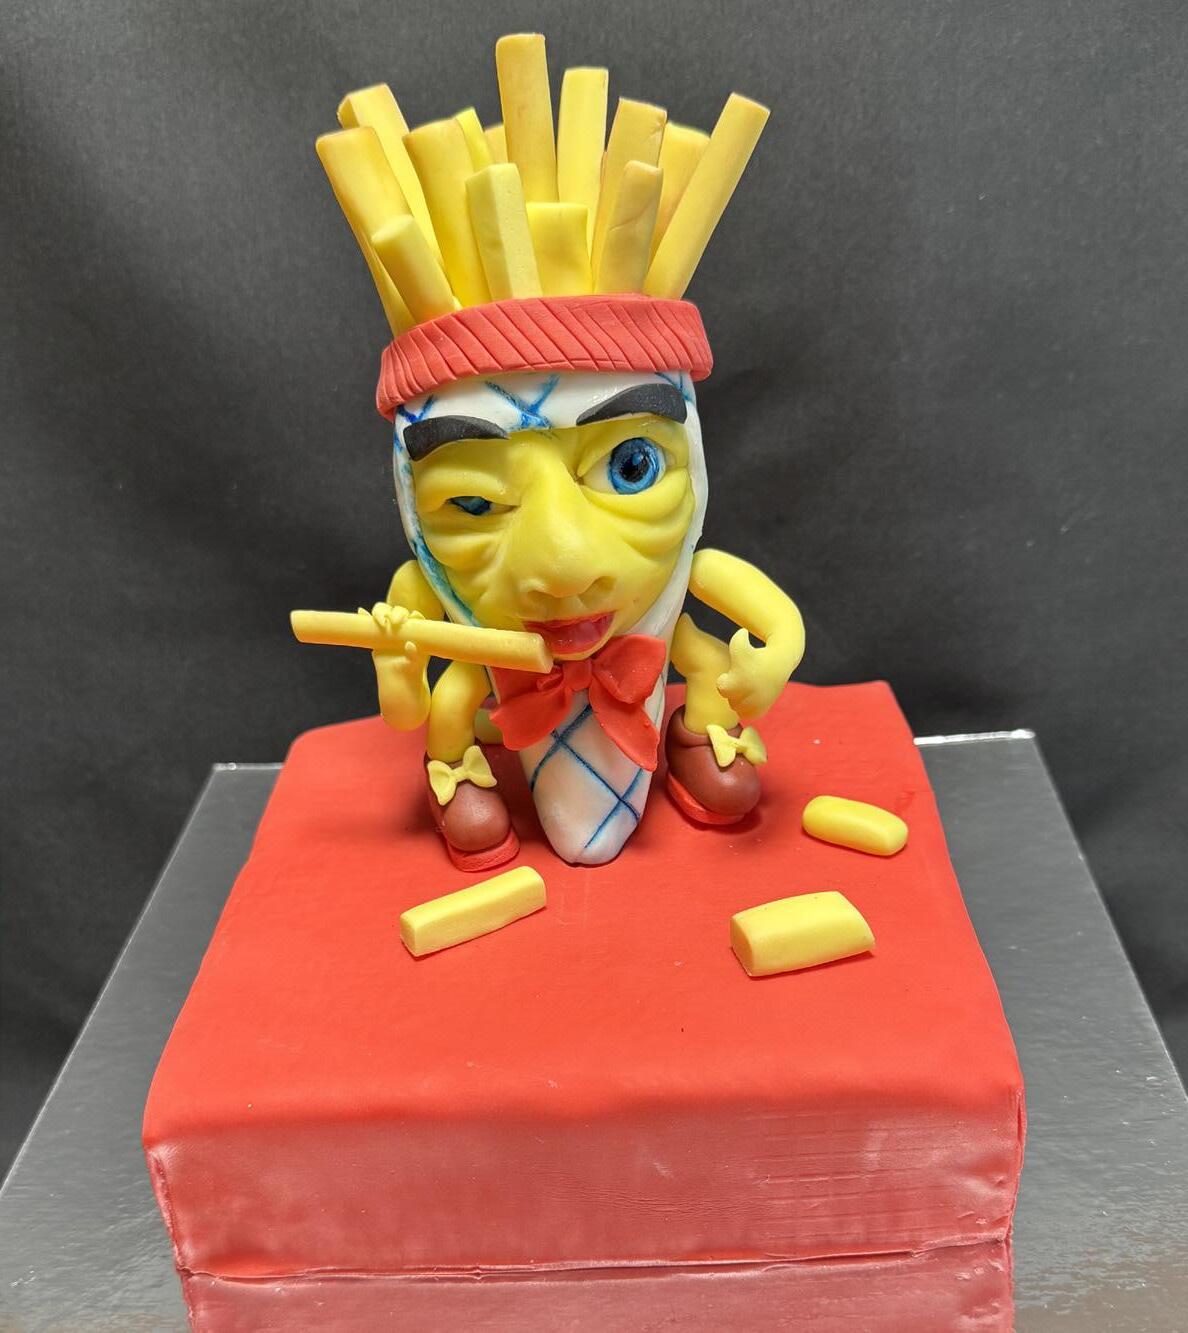
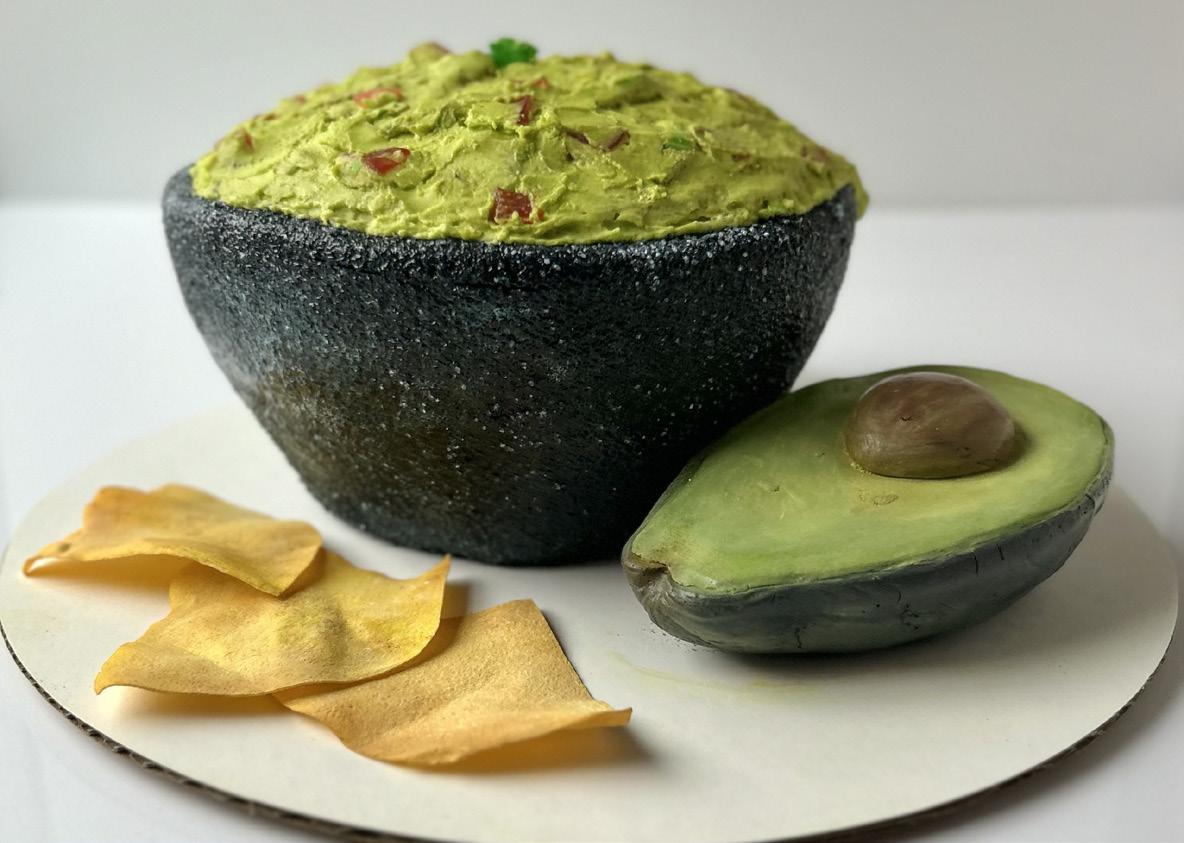
The Food Cake Collaboration is where food, cake, and creativity come together. This is an international collaboration where cake and sugar artists have fun creating food out of cake, cookies, isomalt, chocolate, or any other sweet media. The food can look like a cartoon, hyperrealistic, or anything in between.
Momina Akhatar
Priyanka Barkakati


BY NICA KRASINA
Add 1 to 2 drops of food coloring to the mixture if desired. The glycerin will keep it pliable for application.
INGREDIENTS
1 teaspoon gelatin
30 milliliters cold water
50 grams cornstarch
30 grams powdered sugar
1 teaspoon glycerin
INSTRUCTIONS
1. Soak the gelatin in cold water and let it bloom for 5 to 10 minutes.
2. In a small saucepan, combine the cornstarch and powdered
sugar. Gradually add the water, mixing well until a smooth paste forms.
3. Place the saucepan over medium heat and stir continuously until the mixture thickens. When it starts to pull away from the spoon, remove it from the heat.
4. Melt the bloomed gelatin in a double boiler or microwave, then stir it into the hot mixture. Add the
glycerin for a more pliable texture. Mix thoroughly.
5. Allow the mixture to cool slightly but keep it thick and tacky.
6. Use a pastry scraper to spread the mixture onto a silicone lace mat, smoothing it evenly. Remove any excess to create a neat, detailed design. Let it dry for a couple of hours. Once the lace is fully dry, carefully peel it off the mat. ACD