




“I'm so glad I signed up with USRider. I was on the side of a busy Highway alone and nobody to help me. Then I pulled out my USRider card, and called them, a very nice helpful person was on the other end and within 30 minutes they had me a tow truck. All this was covered by my membership. It's nice to have back up when you need it. Thank you USRider!”
-“Apryl was wonderful! She was in constant contact with me while I was on the side of the road with my horse trailer and horse. I couldn't have gotten a better Member Care Specialist to help me with my blown tire. She IS THE BEST! ”
- J Brosz, Tuscon AZ August 2022
“Great Service All people that are on the road with horses need your service’s. I’m very impressed with your service. I recommend to all.”
-T Hayden, Rapid City SD September 2022
“USRider always provides quick, expert assistance. A bonus service is that it will provide assistance even if the member is not driving, and, of course, takes care of a horse and trailer. I and my family have been members for years. ”

- K Haynes, Murfreesboro TN August 2022
Travel with confidence knowing USRider will get you back on the road safely and efficiently, should unexpected vehicle or trailer problems occur.
Look for aftermarket attachment options to help you install your camera securely by suction, tape, or even as a screw mount around your rearview mirror.
Installing a dash cam on your truck gives you video proof that could help you prove your case if you were to ever have an accident. A dash cam constantly records footage as you drive and may also begin recording if your parked vehicle is shaken or touched. Here’s a rundown at what to look for in a camera and how to make sure it’s working well.

Camera features: Look for such features as 4K resolution, night vision, and parked-car monitoring. An interior camera will document stored belongings and provide extra views if an accident occurs. While many dash cams are wireless—connecting to an app on your smartphone or transmitting video via Bluetooth on demand—you’ll need a cord to keep the battery charged.
Memory: Once you choose a camera, get the memory card made for it; not just any micro-SD card will do. Check your camera’s manual for precise card details needed so you have a write speed fast enough for continuous video capture. You may also want to upgrade to a card with more storage space so that more of your trips are recorded before the files are overwritten.
Attachment options: While your camera will come with some means to attach it, you may want to upgrade. Look for aftermarket attachment options to help you install your camera securely by suction, tape, or even as a screw mount around your rearview mirror. Find what works best for your truck and will keep the camera steady. You can also purchase longer power cords and small clips with sticky backing to help you hide the cords and plug-in in the truck’s backseat power supply—out of your way for everyday use.
— Heidi MeloccoMyth #1: Trailering is no big deal for your horse; it’s just like standing in a stall. Busted: Even under ideal conditions, trailering is mentally and physically stressful for your horse. Getting into and riding in a small, enclosed box on wheels goes against his natural instincts. And during the ride, his entire body is constantly adjusting to maintain balance.
Myth #2: Horses prefer slant-load trailers. Busted: Horses prefer to stand at a slight slant in a large open space. Their first choice would be an open stock trailer; their second choice would be a wide, tall, straight-load trailer with a partial partition (a divider between trailer stalls) or no partition at all.
Myth #3: A full partition (a divider that goes all the way to the ground) will keep horses separated and safe. Busted: A full partition makes it impossible for horses to spread their legs for balance. They’re better off with no partition at all.

Myth #4: Ramps are dangerous; step-ups are much safer. Busted: For loading, either is fine. For unloading, a good ramp is safer than a step-up; it lessens the chance that your horse will slip off and/or slide underneath the trailer.
Myth #5: Shavings on a trailer floor just create a mess. Busted: Trailer floors and some trailer mats can be slippery; shavings may give your horse much-needed traction. Also, most horses will drop manure in a trailer; nervous horses will drop wet “cow-plops” that make floorboards as slippery as sheet ice. Many horses are unwilling to urinate in trailers without bedding, but will urinate (and ride more comfortably) on shavings.
For unloading, a good ramp is safer than a step-up.
Myth #6: You have to tie your horse high and short in the trailer, so he can’t move around much. Busted: If you tie your horse, leave enough slack in the rope so that he can drop his head to the floor to clear his respiratory system. Otherwise, he’s at risk for lung ailments. However, don’t leave the rope so slack that he can catch a leg in it.
— Jessica Jahiel, PhDKeep your horse’s tail out of the snow and mud this winter—both inside and outside of your trailer—with a mud knot. Here, Andrea Scott Klug, who teaches, trains, and rides hunter-jumpers in Bradbury, California, shows you her step-by-step method for tying a secure mud knot.


Step 1. Holding the tail in your left hand, put your right arm underneath the tail.
Step 2. Loop your right hand back over the outside of the tail in a clockwise direction, and bring your hand underneath the tail so that the tail is looped around your lower arm.


Step 3. Hook the end of the tail between the first two fingers of your right hand, and pull the end through the opening you’ve created with your arm in slipknot fashion.
Step 4. Give a jerk on the end that’s still in your right hand to tighten the knot, which at this point should be about four inches below the end of the tailbone.
Step 5. Fold the knot that you’ve created up to the end of the tailbone, wrapping the end of the tail around the tailbone and tucking it in.
You enjoy all the benefits that come from a USRider Equestrian Motor Plan membership, including emergency roadside assistance, travel benefits, and Winner’s Circle Advantage discounts. Share the gift of peace of mind with your favorite horseperson with a USRider Gift Membership. Just go to the USRider website, log in, and click on Give a Gift Membership. Bonus: Your own USRider membership will be extended by one month for each gift membership you give.
Step 6. Finish the job by putting a rubber band or tape around the tailbone at the top of the knot.

“Ack! What was that?” Calliope asked nervously of her trailer companion.
“It’s a chain banging over your head,” replied Zeus, an experienced traveler, as the two balanced carefully in the trailer. “They haven’t fixed it in years. They don’t realize that it’s scary and hurts our ears.”
The horses rode in silence for a few minutes. Then Calliope cried, “Ow! I hit my head!”
Zeus, his legs braced, nodded. “They hit the brakes too hard. You’ll learn this route to the trainer’s barn pretty quickly, so you can balance and brace yourself for potholes and stop signs.”
If horses could speak, did you ever wonder whether their conversations on the road would sound something like this?
Would your horse rate you highly as a conscientious, careful driver who made an effort to minimize his traumas and terrors?
Here, I’ll tell you how to find out exactly what your horse goes through when you haul him. Then I’ll give you a checklist to follow to make your trailer more quiet and comfortable.
The best way to understand your horse’s perspective while riding in your trailer is to simulate his experience. Leaving your horse behind, hitch your trailer to your tow vehicle, and ask an experienced rig handler to drive it around your property.

Oh, and be sure to stand in the back of your trailer with your hands tied firmly behind your back and without anything to lean on or use as support. And put on a blindfold, so you can’t see the upcoming stop signs, potholes, and sharp curves.
Of course, riding in your trailer is technically illegal and for a good reason—it’s dangerous. But if you safely perform this exercise while driving on private property, it’s a huge eye opener. You’ll discover exactly what your horse sees, hears, feels, and smells when riding in your trailer.
This exercise will demonstrate very clearly to you why you must regularly evaluate your trailer for environmental, structural, and engineering consider-
ations. And you’ll improve your driving habits when you’re towing your most precious cargo.
It’s quite humbling to realize what your horse has to submit to as a wild prey animal entering a cave-like trailer.
Ask the driver to vary his or her driving—slow, fast, careful, reckless, easy brake, hard brake—over different types of surfaces, from smooth to bumpy.
With this learning experience, you’ll see why so many horses grow to balk at trailer-loading, and scramble and injure themselves inside of trailers while trying to balance.
Perform the following maintenance procedures to make your trailer a nicer travel environment for your horse. I call this my Sensory-Improvement Checklist.
■ Oil moving parts. Lubricate all jointed, hinged, or moving parts, such as springs, latches, hinges, and pins. This will help keep your trailer quiet.
■ Secure moving parts. With duct tape, secure all hanging chains or other moving parts that can squeak, bang, or clank. Many trailers are horrifically
squeaky and boast loud metal-on-metal sounds you’ll never hear unless you check for them in motion.
■ Eliminate shadows. Look for horse-eating shadows and dancing light in odd places, such as a crack in the floorboards. Noted animal behaviorist Temple Grandin, PhD, has proven that weird shadows and light patterns can scare prey animals and prevent them from loading or walking forward.
■ Take a buddy. As a herd animal, horses tend to be calmer when hauled with a buddy instead of alone, especially young and fractious horses. Allow your horse to see some part of his buddy, but limit his ability to bite, kick, or crush his traveling companion.
■ Check the tires. Make sure that all the tires have the manufacturer’s recommended air pressure for maximum support and minimal friction on the road. Buy an air-pressure gauge, or have a tire professional check the tires for you. Optimal tire pressure will help make the ride smooth and quiet.
■ Maximize ventilation. Very few hauling scenarios require prevention of air moving over the horses. Provide as much ventilation as you can. Horses generate a great deal of heat, and very few trailers have sufficient ventilation, especially when stalled in traffic. Consider installing lightweight plastic fans or even air conditioning behind trailer stalls. Note that heat is rarely necessary.
■ Minimize dust. Minimize lightweight shavings and fluffy hay in your trailer. Anything that increases the dust blowing around and into your horse’s respiratory system will potentially compromise his health. For trailer bedding, consider commercial, bagged shavings. Wet your horse’s hay, even in the hay net.
■ Monitor the temperature. Install a wireless constant digital thermometer transmitter in your trailer at wither height (about five feet up the trailer wall, where horses can’t destroy it). Put the receiver in your vehicle. This allows you to constantly monitor the temperature that your horse is exposed to.
■ Check the headroom. Make sure that a standard-sized horse has at least 30 inches of room above his withers so he can raise and lower his head and neck to balance, and so he can clear his respiratory passages. If you must tie your horse in your trailer (and there are good reasons for doing so in many trailers), make sure he can lower his head at least to withers level.
■ Improve the stalls. Make sure your trailer provides enough room for your horse to position his legs forward and sideways to balance if you’re forced to turn or brake suddenly. Add thick padding to the dividers, chest and butt bars, and trailer walls at body height to minimize scratches—and worse.


■ Check for danger zones. Check for and fix any rusty, dangerous rough spots. Remove any metal pieces that could catch a halter— or an eyeball. Run your fingers along every edge (dividers, walls, gates, bars, etc.) where your horse might rub or bump, to reduce risk of injury.
— Rebecca Gimenez Husted, PhDTop: Be aware what your horse has to submit to as a wild prey animal entering a cave-like trailer. Middle: As a herd animal, horses tend to be calmer when hauled with a buddy instead of alone, especially young and fractious horses. Bottom: Provide as much ventilation as you can. Horses generate a great deal of heat, and very few trailers have sufficient ventilation, especially when stalled in traffic.
Engager Trailer Breakaway Kit with Charger and Tester.

Aftermarket accessories are all those handy items you buy for your trailer after you drive it off the lot. They range from lights and locks to floor mats and hay nets. Here, I’ll give you a rundown of a few aftermarket accessories on the market today, including my tips and product recommendations.
Description: Your trailer’s breakaway system is designed
to stop your trailer via electric brakes in case your trailer and tow vehicle become disconnected. It’s powered by the breakaway battery.
Expert tip: One step forward in safety in the last few years is a breakaway battery with a reliable charger. As soon as your tow vehicle and trailer are connected, the breakaway battery starts charging. Older models just came with a battery, which quickly loses its charge.

Recommended: Hopkins Engager Breakaway Battery Kit; Pro Series Push to Test Breakaway Kit with Premium Integrated Charger; Tekonsha Push to Test Breakaway Kit with Premium Integrated Charger, all available from eTrailer.com.
Description: Coupler locks thwart trailer thieves by making it impossible for them to attach a vehicle to your trailer to drive it off. The lock fits into the hitch and is secured with the turn of a key.
ing. Look for a high-quality lock, and make sure it has two keys.
Recommended: Blaylock EZ Lock Trailer Coupler Lock; Blaylock EZ Lock Gooseneck Coupler Lock; Master Lock Trailer Coupler Lock, all from eTrailer.com; Gus Hill Industries; Heartland Lock, LLC.

Description: A drive-on jack is one that you can drive on tire onto while you change a damaged tire. This type of jack can be made from plastic, wood, aluminum, or steel.
It should be at least five inches high and have a ramp.
Expert tips: Use this simple tool if you’re replacing one tire at a time. When you shop for a drive-on jack, pay attention to its weight ratings—you’ll need something in the 10,000- to 15,000-pound weight range. The entire half of your trailer will be resting on the jack. Enlist a helper, so one person can place the jack while the other drives onto it.
Recommended: Blaylock EZ Jack and Wheel Chock, available from eTrailer.com; Trailer-Aid, available from Trail Pals Horse Trailer Accessory Store.

Recommended: Hay Chix; NAG Bags; The NibbleNet from Thin Air Canvas, Inc.; Professional’s Choice; SmartPak Equine, LLC; State Line Tack.
Top to bottom: Blaylock EZ Lock Gooseneck
Coupler Lock Combo. Master Lock Trailer Coupler Lock.

Expert tips: Coupler locks are available for tag-along (bumperpull), gooseneck, and fifth-wheel hitches. Choose a steel model that has the locking interface in an accessible position for locking and unlocking ease. Also find one you can easily lubricate with graphite or white grease to keep it from rust-
Description: Hay nets hold forage for your horse to eat inside and outside of your trailer while you’re traveling.

Expert tips: Veterinarians recommend that your horse has access to forage while traveling to reduce his stress and help keep his digestive system functioning smoothly. Keeping your horse’s gut moving can lessen his risk for colic. Look for a hay net with small to medium openings, which slows down his eating to mimic a natural grazing pace.
Description: There are numerous products that help you hitch up your trailer to your tow vehicle. Hitch cameras (which allow you to see the hitch as you align the ball with the coupler) fall in this category, as do products that ease the wiring connection from your tow vehicle to your trailer and those that offer other alignment help.
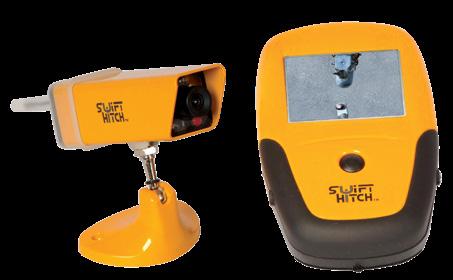
Expert tip: When shopping for a
Swift Hitch, a backup camera system designed to assist with hitching up your trailer or monitoring while you’re on the road.

hitch camera, look for one that’s battery-powered or that plugs into your tow vehicle’s 12-volt power supply, for ease of installation.
Recommended: EZ Connector; Quick Coupler by Trailer Gear, Inc.; Swift Hitch Wireless Portable Back Up System.
Description: Reflective strips, decals, and signs on your trailer increase your visibility to passing motorists and let them know you’re hauling live cargo.
Expert tips: Reflective decals enhance your trailer’s visibility day and night. You can’t use too many
reflective decals on your trailer. Think feet of decals. You want to be seen in all lighting conditions, even when your brakes and lights aren’t working due to electrical failure or pulled-out wires. The words “Caution Horses” lets others know you’re hauling live horses.
Recommended: 3M Diamond Reflective Conspicuity Tapes, available from Uline; CAUTION HORSES Safety Products.
Description: Trailer-stall floor mats and flooring are designed to provide your horse with traction and cushioning. Mats also dampen some trailer vibration and help make the ride quieter. Mats also protect your trailer floor from wear-and-tear, as well as corrosive urine.
Expert tips: Invest in high-quality, nonslip mats to absorb shock and encourage grip. If your floor mats become damaged, replace them. Holes allow urine to collect underneath, causing rust, rot, and other corrosion. Cut the mats to fit, or order them from the manufacturer of your specific brand and type of trailer. You can also upgrade the flooring itself.
Recommended: Flex Mats Inc.; Linear Rubber Products, Inc.; Oregon Rubber Mat; Polylast Systems, LLC; Stall Savers.
Made from engineer-grade reflective vinyl, the CAUTION HORSES Sign Series will make your trailer more visible to drivers at night and during the day, and tell other motorists you’re hauling live cargo.


Description: LED and analog lights that mount inside and outside of your trailer to enhance visibility.
Expert tips: I prefer LED lights over analog lights, because they last longer, use less energy (thus don’t drain your battery as quickly), and are much brighter. Why
eTrailer LED Interior/Exterior light.
stumble around in the dark? Before you buy lights, make sure you have the skills to run wiring for the specific lights you choose, or take them to a professional to install. Also consider your power source; you can only run so many lights without having a converter or relay for additional wattage, which is professionally set to handle the loading on your electrical system—and, of course, your alternator/battery—especially when your tow vehicle is turned off.
Recommended: LED Rectangular Interior/Exterior Light; Tow-Rax Recessed LED Light, both available from eTrailer.com.
Rebecca Gimenez Husted, PhD (animal physiology), is president and a primary instructor for Technical Large Animal Emergency Rescue. A Major in the United States Army Reserve, she’s a decorated Iraq War veteran and a past Logistics Officer for the American Veterinary Medical Association’s Veterinary Medical Assistance Team. She’s an invited lecturer on animal-rescue topics around the world and a noted equine journalist.

Training with the top equine professionals has never been easier. Equine Network’s subscription video platforms are home to top-quality videos on the topics that interest you. From horse care to colt starting, dressage to roping — our video platforms make it easy to learn from the best in the business anytime, anywhere.


Learn how to properly wrap your horse’s legs with these expert guidelines.
By Eleanor M. Kellon, VMDLeg wraps—such as polo wraps (shown)—can be useful, but improperly applied wraps can damage your horse’s legs. Learn leg-wrap basics with this expert guide.
One way to protect your horse’s legs in the trailer is by wrapping his legs. Leg wraps are also called for to protect and cover an injured area; provide warmth to stiff/ old tendons, ligaments, or fetlocks; and control acute-injury swelling and movement.
Leg wraps can be useful, but improperly applied wraps can damage your horse’s legs. The blood supply to the tendons in the back of his lower leg is compromised if the wrap is too tight, is applied with uneven pressure, or if it slips down and bunches up. How much tension to use when

Step 1. When you bandage a leg, use an inner layer of cotton or fleece.
applying a wrap depends on the leg-wrap materials you choose. A properly applied bandage will stay in place without slipping and will lie snug against your horse’s skin, but not snug enough to indent it. You should be able to slide a fingertip between the bandage and your horse’s leg.
Here, I’ll first go over wrap materials and leg-wrap lingo. Then I’ll give you an overview of three common types of leg wraps: Stall wraps; shipping wraps; and wound/injury wraps.
Here’s a rundown of common leg-wrap materials.
Step 2. Apply the inner layer so that it lies smoothly along the leg.
Cottons: Cottons are used for the inside layer of stable bandages, and sometimes work bandages. This term may refer to either disposable cotton sheets or reusable and washable wraps of cotton or synthetic materials.
Quilts: Quilts are cottons with a quilt pattern.
Pillow wraps: Pillow wraps are extra-thick cotton wraps.
Fleeces: Fleeces are lamb’s wool wraps used in place of cottons.
Here’s a rundown of useful leg-wrap lingo.
Step 3. Always start the wrap over bone, not the tendons.
Polo wraps: Polo wraps are typically made from fleece or nylon, and are 2 to 6 inches wide. These are used as the outer layer of a stall wrap or shipping wrap, or during exercise. Polo wraps are available in varying amounts of stretch.
Stall/stable/standing wrap: Wraps your horse wears when in the barn. A regular stall wrap (also called a stable wrap or standing wrap) has an inner layer of cotton, fleece, or nylon and an outer bandage to hold that layer in place. Note: Most horsepeople use standing wrap synonymously with stable wrap, while others mean a wrap that comes down to cover the pastern and coronary band, like a shipping wrap (below).
Step 4. Each layer should overlap the one before by half the width of the bandage.
Stall/stable/standing bandage: This is the wrap’s outer layer. It may be made from no-stretch cotton, fleece, or nylon.
Shipping wraps: Shipping wraps are those worn in the trailer. Shipping wraps should be long enough to cover the pastern, heel bulbs, and coronary band.
Step 5. Wrap down to cover the fetlock joint and then back up, ending on bone, not tendon.
A regular stall wrap (also called a stable wrap or standing wrap) has an inner layer of cotton or fleece and an outer bandage to hold that in place. For full-size horses, the inner cottons are available in 12- and 14-inch lengths. The 12-inch cottons are for your horse’s front legs; his front-leg cannon bones are likely shorter than those of his hind legs. Look for an outer bandage that’s between 9 and 12 feet in length and 4 to 6 inches wide.

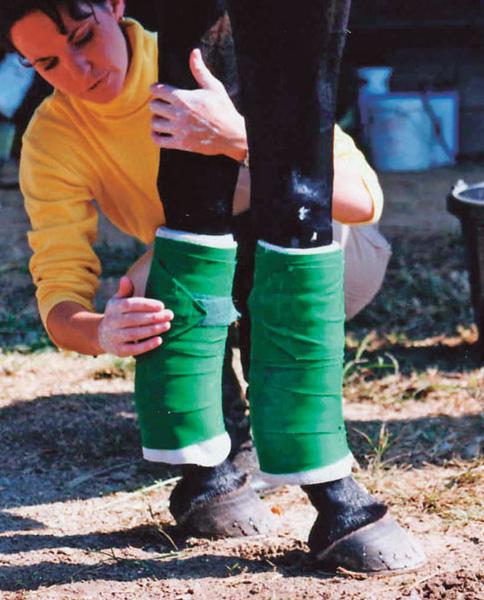

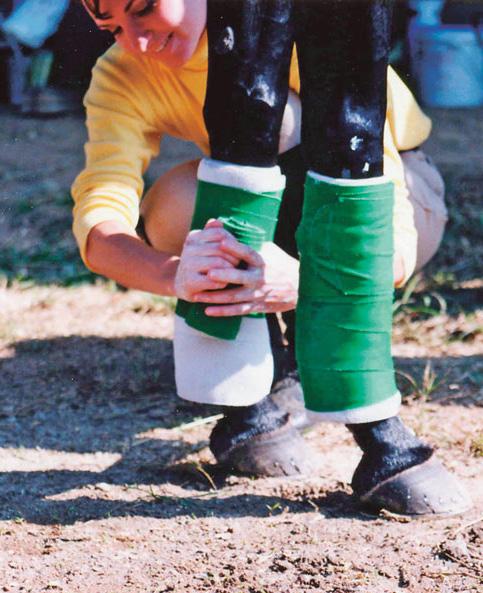
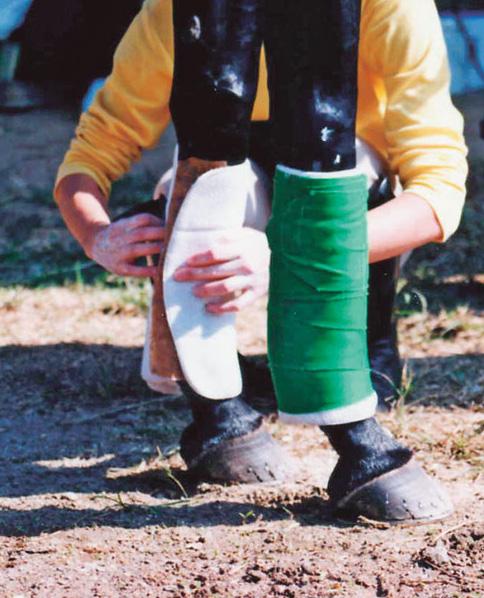
Here are three rules of thumb when bandaging:
• Always start the wrap over bone, not the tendons.
• Bring the wrap around the front of the cannon bone first.
• End the wrap along the cannon bone.
Stretchy materials are easier to work with than cotton-flannel bandages,
A shipping boot or wrap must cover your horse’s pastern, coronary band, and heel bulbs. The easiest route is to invest in one-piece shipping boots designed for trailering (shown).
but can also be pulled too tight. As a rule of thumb, never stretch to more than 1.5 times the resting length of the fabric, and never, ever stretch as tight as it can go. To get an idea of how much pull/force this requires, first unravel a 4- to 6-inch length of bandage, hold it in front of you and gradually stretch until it is 1.5 times the original length.
Before you begin, clean the leg where the bandage will lie. Brush the hair so that it is lying smoothly. Start at the cannon bone. If you’re right-handed, start the wrap on the left leg on the outside of the cannon bone, wrapping clockwise. On the right leg, start the wrap on the inside of the cannon bone, again going clockwise, to come across the front of the cannon bone first. If you’re left-handed, reverse this.
Apply the cotton so that it lies smoothly along the leg, with no wrinkles. While holding the cotton
in place lightly with one hand, begin the outer bandage by tucking it under the end of the cotton for a short distance, then wrapping in the same direction, first down to cover the fetlock joint, then back up again to end at the top of the leg. Each layer should overlap the one before by about half the width of the bandage.
One of the trickiest things to learn is where to start the outer bandage so that you finish wrapping at the top of the leg without too much bandage left over, or not enough left. This will depend on bandage length (9 or 12 feet), the width (between 4 and 6 inches), and how much stretch it has, as well as how long your horse’s cannon bone is.
Experiment with bandaging materials to find out what works best. In general, the outer bandage is started anywhere from halfway up the cannon bone to just above the fetlock joint, worked down to take in the fetlock, then brought back up again.
When your trailer your horse, sudden stops and sharp turns can throw him off balance. In the scramble to regain his balance, he could step on himself, usually along the lower leg or coronary band. This can result in serious injury. Shipping boots and wraps help protect his legs from such injuries.

A shipping boot or wrap must cover your horse’s pastern, coronary band, and heel bulb. The easiest route is to invest in one-piece shipping boots designed for trailering. These are easy to apply and are typically secured with a hook-andloop closure.
If you opt to wrap your horse’s legs for travel, 14-inch cottons and long polos are usually sufficient
for horses with fairly short cannon bones. For longer cannon bones, you might need to go with regular stall wraps and a pair of bell boots or use shipping boots—or simply use shipping boots.
Whether it’s a pulled tendon, a wrenched ankle or a nasty wound, wrapping can improve your horse’s comfort by controlling swelling and, in the case of wounds, keeping the injuries clean.
Wrapping over a wound, whether sutured or open, can be tricky. You don’t want the cotton in direct contact with the wound, because of lint. It’s less of a problem with the disposable sheet cottons, but these can end up sticking to wound drainage.
Your best bet is to cover the wound with regular gauze sponges that have been lathered with plain petroleum jelly, a skin rejuvenator (such as Veterinus Derma Gel), or an antibiotic cream. (Don’t use Telfa dressing, as it won’t adhere well.) Smooth out the gauze so that all edges are well stuck to the skin before you begin wrapping.
When wrapping injured legs, be careful with pressure. Too much pressure is painful and can cause additional damage when combined with swelling. Wrap just tightly enough to ensure that the bandage doesn’t slip down. Check the wrap every few hours to make sure no swelling appears above or below the bandage. USR
Eleanor M. Kellon, VMD, is a staff veterinarian for Uckele Health and Nutrition, Inc., and is the owner of Equine Nutritional Solutions, a nutritional consulting firm.


If your horse doesn’t walk into the trailer on cue, he hasn’t learned to lead on cue. Here, clinician John Lyons will break down the process and focus on teaching, or re-teaching, the individual pieces.
Teach your horse to calmly load into the trailer with this gentle, step-by-step method from John Lyons.
 By John Lyons with Maureen Gallatin Photos by Maureen Gallatin
Is your horse reluctant to step inside the trailer? Perhaps he’s afraid of a small space, or your trailer is dark inside, or perhaps he’s had a bad experience. Whatever the reason, if your horse doesn’t walk into the trailer on cue, he hasn’t learned to lead on cue. Here, we’ll break down the process and focus on teaching, or re-teaching, him the individual pieces.
Essentially, to load a horse into a trailer, you point his nose in the trailer and give him a signal to “go forward.” It works just like that when he’s been trained. But getting to that stage requires working on a few aspects. The most obvious is the go-forward signal, both teaching it and practicing enough so your horse obeys, even when he’d rather not. The second is closing off the other options, so he realizes that stepping forward into a trailer is what we want him to do.
Important: You don’t have to load your horse into the trailer in one lesson. He won’t have gotten away with anything if you stop the lesson at any time. Don’t declare war on him. He’s your partner. Work on the lesson until he loads and unloads calmly and on command.
doors, and open the roof vents to allow for air movement. Remove any feed, which would distract from your cues. Open the back doors, and stabilize the divider. If you have a slant-load trailer, clip the partition open so it doesn’t move around.
Horse prep: Outfit your horse in a bridle with a snaffle bit; you’ll have much better control with a bridle than a halter. Remove the reins, and clip a lead rope to the left side of the bit. Apply leg boots for protection. Lead him to a safe work area with good footing.
Even if your horse normally walks forward with your voice or body language cues, you should teach him a physical go-forward cue to reinforce the other cues. It’ll also give you a way to reward him instantly when he makes the slightest move in the correct direction.
forward. Stopping the taps at the right time is the most important part of what you’re doing.
After teaching the cue from both the left and the right, take your horse into various situations, and practice it. For instance, “load” him into his stall, a wash rack, and onto a tarp. With practice, your horse will respond when you merely point to his hip. If he doesn’t step forward within two seconds, begin tapping. The moment he steps forward, stop tapping. After a few steps, use the lead rope to ask him to stop, and pet him.

Before you begin the lesson, apply boots on your horse to protect his legs. When he steps off the trailer, his foot may actually go underneath the edge of the floor.

You’ll need: A snaffle bridle; a lead rope; leg boots; and a stiff, dressage-type whip about 36 inches long.
Trailer prep: Hitch your trailer to your truck, and drive to a level spot where you have plenty of area to work, such as inside an arena or pasture. Close the front and side
Practice the go-forward cue away from the trailer until both you and your horse have it down pat.
To teach the go-forward cue, stand facing your horse’s left shoulder. Hold the lead rope in your left hand, a few inches below his chin, to prevent him from turning to the left or right. Holding the dressage whip in your right hand, tap the top of your horse’s left hip, continuing the taps until he takes a step
When your horse gets to the trailer, and sometimes on the way to the trailer, he’ll likely do something other than stepping forward. Try to close off those options before you get to the trailer, where it’s more dangerous than out in the open. The most common options are: backing up; raising his head or perhaps rearing; pulling away to the right; swinging his hindquarters toward you; and pushing forward, crowding between you and the trailer. Here’s how to handle each one.
Escape Option #1: Backing up. Solution: Go with your horse, and continue using the go-forward cue as he backs up. Don’t try to pull him forward. Stop tapping the moment he stops backing and leans forward as though he’s thinking of taking a forward step.
Escape Option #2: Raising his head, or rearing. Solution: Teach your horse the “head down” cue. Though your goal is to have him drop his head, do the “hips over” first to teach him the connection between rein pressure and the
release of rein pressure.
Here’s the thumbnail version of the lesson. Put a snaffle bridle on your horse, and ask him to walk forward. Pull the left rein toward his left hip until he takes a big step to his right with his left hind foot (“hips over”). Immediately release the rein, and pet him.
Ask your horse to move forward, and again pick up the rein. When he turns his nose toward you, anticipating the “hips over” movement, he’ll also drop his head slightly. Release the rein.
With practice he’ll learn that he can relieve tension on the rein by “giving” or “yielding” to that pressure. From then on, when your horse raises his head and pulls against the lead, he’ll feel the tension and release himself from it by dropping his head. If your horse rears as you’re leading him toward the trailer, don’t try to load him into the trailer until you’ve gotten good control with the “head down” cue.
Escape Option #3: Pulling away to the right. Solution: Move quickly toward your horse’s left hip, and pull the rein to ask for a “hips over.” Immediately ask him to go forward. Practice teaching your horse to give to pressure, drop his head on cue, and go forward.
Escape Option #4: Swinging his hindquarters toward you. Solution: Pull the rein firmly toward his hip to get him to step to his right. Then tap his hip to tell him to go forward. Watch that you don’t get kicked. Your horse may also kick at the whip. Be sure you’re not tapping randomly or aggravating him with a million little taps. Tap firmly to signal him, and stop tapping the instant you sense that he’s about to step forward. If your horse kicks out once or twice in frustration,
just ignore it, and concentrate on what you want him to do. Don’t allow his kicking to become your focus. Simply move his hips away from you.
Escape Option #5: Crowding into you. Solution: Crowding is dangerous out in the open, but will be even more so when you’re at the trailer. Use the “hips over” to slow your horse’s forward movement. Control his nose, asking him to drop his head or to move his shoulder over. Be sure you have very good control before bringing your horse to the trailer. Practice asking him to go forward, then use the left rein to move his shoulders away from you. (Pull the rein toward his left shoulder. Release the rein when the shoulder seems to melt away from you and his step is slightly to the right rather than straight ahead or toward you.) When you ask your horse to stop, ask him to drop his head so he doesn’t throw his head up or charge into your space.
Begin some distance away from the trailer, then ask your horse to go forward toward the trailer. Pet him the moment that he steps forward.
As you approach the trailer, there will be a spot where he stops, perhaps 20 or 30 feet from the trailer. Allow him to stop, and pet him there. That’s the outside edge of his comfort zone right now. He’s done everything right, and by allowing him to stand, you’re telling him that he’s safe there. If things get too stressful up at the trailer, this is the place you’ll come to practice your cues.
When you feel that you have a 90 percent chance of success, ask your horse to walk forward. He’ll likely go a few steps and stop again.
That’s okay. His comfort zone has stretched, and that’s a good thing. Again, let him stand and relax.
When you feel that you have a 90 percent chance of having him walk forward, ask your horse to step forward again. Use that process all the way up to the trailer.
If your horse shows the beginning signs of any of the escape options discussed earlier, don’t get mad at him. Simply use the appropriate solution to show him that isn’t the option you want, and continue with the lesson.
If you’ve done your homework, allowing your horse to stop at the edge of his comfort zone then approaching the trailer usually isn’t a traumatic event.
Step 4. Ask for one step forward. Walk your horse up to the trailer or the ramp, and point his nose into the trailer. Use your left hand to guide his nose, but don’t use it to try to pull him into the trailer. His back end will tell his front end to step forward.

Allow your horse to stand with his nose facing into the trailer, and pet him. You want his head at a relaxed level, about withers height. If it’s higher than that, chances are, he’s thinking backward rather than forward. Ask him to drop his head, and pet him.
When you feel there’s a 90 per-
cent chance your horse will step forward when you ask him, use the go-forward cue. All you want is one step, and chances are that it’ll be a forward step with one hind foot.
After one step (or two steps if he volunteers the second one), ask your horse to stop. Pet him, and allow him to stand.
After a few moments, pick up the lead rope and pull it lightly toward your horse’s chest to ask him to step back. Release the rope the moment he leans back, and pet him when he makes the step.
When you think he’s ready, ask your horse to step forward. Again, you want just one step. Don’t allow him to walk into the trailer.
Your horse may not take a step toward the trailer. He may drop his head or perhaps paw the trailer. That’s fine. Give him time to check out the trailer. Some horses paw the ramp or floorboard several times before they even think of stepping on it. Those are good, forward thoughts, and you’ll want to reward them.
If your horse tries to back up, go with him. Continue tapping his hip. If necessary, ask him to do a “hips over” so he doesn’t back out of your control. Begin from where he stopped, asking him to approach the trailer again.
If your horse tries to push between you and the trailer and you can’t easily prevent that from happening, step back to let him pass. Don’t risk getting stepped on or having the horse hurt himself on the trailer.


Using the cues and timing you have taught him, you’ll eventually end up at the trailer door again, with the horse’s nose facing into the trailer. That’s good. Pet him there and begin again.
Step 5. Ask him to step onto the trailer. Now, have your horse step one foot onto the trailer, leave it there, and step it off on cue at least 25 times. When he can do that in a relaxed way, leaving his foot on the trailer until you ask him to step off, then you’re ready for the second front foot.
Ask your horse to step the first foot onto the trailer, and then ask him to go forward again. When he has two front feet on the trailer, pet him, allow him to stand, then ask him to back off the trailer. Do that at least 25 times. You may have to do it 200 times, varying the amount of time your horse stands in the trailer, until he’ll wait for your signal to back off. You’re teaching him to be patient in the trailer and to back off calmly, so don’t rush through this step.

Two feet is good progress. Here, John Lyons allows Seattle to stand for a minute before asking him to back off the trailer.
Step 6. Slowly progress to all feet on the trailer. When you feel your horse is ready, ask him to step his two front feet into the trailer, then ask him to go forward again. Stop tapping the moment that a hind foot moves forward. It may take lots of little steps before he’s ready to put a third foot in the trailer.
Here, John Lyons gently encourages Seattle to put one foot onto the trailer. He uses the whip as a preconditioned signal, not as a tool of intimidation.
Control each step; don’t allow your horse to step fully into the trailer. It’s important to go through this three-feet-on step so he’ll learn to step down as he’s backing off. Ask him to step forward until he raises one hind foot and rests it on the trailer floor. If he tries to back off, raise your whip, and ask him to step forward again. Allow him to stand for just a moment, then ask him to back. When he seems confident about this step, you can allow him to bring all four feet into the trailer. Don’t let him rush forward to the front.
Don’t worry if your horse gets slightly out of position. Keep his nose pointed into the trailer, and he’ll straighten his body.
Stepping down is the scariest part for the horse, because he doesn’t know where the ground is. Allow him to take his time. He may try to step down, then step up again. Just pet him and guide him. Ask him to back off your trailer a moment before he tries it on his own. That way, he’ll learn to wait for your signal.
Stepping up (and back down) with the third foot is worrisome for some horses.
dropping the butt bar against the wall, rock the trailer, etc. Make plenty of noise. If he comes rushing out, don’t make a big deal about it. Instead, immediately ask him to step into the trailer again. Then raise the lead rope to ask him to come out before he tries it on his own.

Step 8. Close him in. After your horse is comfortable getting into the trailer, staying there, and coming out on cue, then it’s time to think about closing him in. Once the doors are closed, you can tie your horse’s head, though only if he’s been taught to give to pressure. If there’s any chance he might pull back if he were tied outside of the trailer, don’t tie him inside the trailer. If you do tie him, untie him before you open the back doors.
•
When you ask your horse to back out, he may take lots of tiny steps until he finds the edge of the trailer floor.
Step 7. Practice. Now practice getting your horse comfortable loading and unloading, waiting patiently inside the trailer, and be-
Step 9. Go for a trailer ride. When your horse has been in and out of the trailer about 200 times and is standing quietly inside the trailer with the doors closed, you’re ready for his first ride.


Fire up the truck, and ease forward about 20 feet. Stop the truck, and turn it off. You’ve just finished your first haul. Assuming your horse is standing quietly, leave him alone for a minute or two. Then untie him, and open the back doors. Pet him, and tell him what a great future awaits down the road—and pat yourself on the back for a job well done. US R
•
•
•
•
•

coming familiar with all the trailer noises. As you practice loading and unloading, sometimes ask for one foot, sometimes for three or four. Mix it up, so your horse learns to be confident with your signals.
Don’t tie your horse in the trailer. Begin to move around, swinging the doors, opening the windows,
John Lyons’ ideas and concepts in horse training have influenced every performance level, riding style, and horse breed throughout the world. His son, Josh Lyons, is continuing his father’s legacy through Josh Lyons Horsemanship based in Parachute, Colorado.

















Ride and camp year-round among majestic elk herds near the historic village of Chama.

 Story and
Photos
by Kent & Charlene KroneChama, New Mexico, located eight miles south of the Colorado border, is a natural magnet for avid equestrian adventurers. Tucked between the southern foothills of the San Juan Mountains and western reaches of the Brazos Mountains, riding opportunities here are endless.
Chama, New Mexico, located eight miles south of the Colorado border, is a natural magnet for avid equestrian adventurers. Tucked between the southern foothills of the San Juan Mountains and western reaches of the Brazos Mountains, riding opportunities here are endless.
We began our riding adventures here in the 20,400-acre Edward Sargent Wildlife Management Area located about a mile from the historic village of Chama. Wildlife management areas are large tracts of land managed for conservation and recreation. They’re generally more rugged than parks and offer fewer amenities.
This large WMA extends all the way to the Colorado border. The focus is on wildlife protection— especially elk—and habitat conservation. Here, you’ll enjoy magnificent views of high meadows, grassy valleys, and towering hills blanketed with pine trees, cottonwoods, and golden aspen. Livening up the scene are coyote, wild turkey, mule

deer, black bear, and abundant birdlife, plus the majestic elk.
The WMA is open to equestrians year-round, but riding is restricted to designated areas from May 15 to June 30 and during established elk hunts; the area contains a favored corridor for the 3,000 to 5,000 elk that migrate from Colorado to Rio Chama each fall and return in the spring. Several hundred elk remain here year-round because their water, food, and shelter needs are met.
Primitive camping is free, with four large heavy-duty corrals, but no water. When we needed to refill our water tanks, we bought water from a nearby recreational-vehicle campground.
Our first ride, straight from camp, was along a ridge we admired while enjoying our morning coffee. We rode through the gate across from the corrals, then headed north. After crossing an expansive meadow, we found a well-used trail.
Scrub oak initially lined the gently climbing trail, but eventually, the oak surrendered to tangles of aspen and cottonwood trees. As we rode, we noticed watering holes for animals. Some resembled giant mud puddles, while others were deep, clear ponds. In the mud on the river’s edge, we spotted the tracks of birds, rodents, coyote, bear, deer, and elk.
With no destination in mind, we did a wandering, meandering ride. We rode about 5 miles and gained 1,200 feet in elevation. Since Chama is situated at 7,860 feet above sea level, the additional gain brought a reduction in temperature, as well as an influx of blue spruce and pine trees.
Hidden valleys came into view as we rode up and down the gently flowing ridgeline. Burnished foliage contrasted with golden bracket ferns as they swirled together on the forest floor. Tantalizing trails materialized and beckoned to us, only to fade away as we tried to uncover their secret destinations.
A stand of aspens escort Charlene Krone and her mount, Nate, on the Krones’ first ride out of camp.

Cowboy pauses for a drink from the Rio Chamita Stream on the way to Nabor Lake.

This ridge is ideal for you to design your own ride. Ride as far as you’d like. Take whatever trail appeals to your fancy. There’s an entire network of trails. It would be fairly difficult to get lost, because you have the ridge, valley, and river to guide you. Just remember to take a warm jacket; at these high elevations, the weather can be unpredictable.
On our second ride, we headed to Nabor Lake, a manmade reservoir located a little over 6 miles from our camp. After reading about the lake, we thought it would be a fun spot for a picnic and maybe a little fishing for Gila trout.

From the main road, go through the gate before the camp exit. This is a nonmotorized dirt road that crosses Rio Chamita, a small trout stream. Here, our Missouri Fox Trotter geldings, Nate and Cowboy, got a serious “turkey test.” The scrub oaks bordering the creek suddenly came alive with squawking, flapping wild turkeys, startling all of us!

The turnoff for Nabor Lake is 4 miles up this road. If you were to ride an additional 6 miles, you’d arrive in Colorado. We left the road but paralleled it while riding cross-country in the lush basin.
Having never been here before, we didn’t want to miss the faint tracks on the right that signaled our turnoff to Nabor Lake. We noticed aspens close to the road on the left and a T-post on the right alongside the tracks. Other than that, it would be easy to miss this turn; a GPS is helpful. From this trail junction, it’s 2.2 miles to Nabor Lake.
As we headed north, we could see Chama Peak in the distance. Three deer bounded effortlessly across the swelling hillside. An old corral appeared on our right, sprawled on the ground, like an old, homeless drunk.
Unexpectedly, our trail morphed into a wide grassy lane with straight rows of aspen on both sides, a forgotten entrance to an old mansion. When the lane turns right, continue straight on a faint path. This takes you to a picturesque meadow and Nabor Lake.

We rode across an earthen dam to an overlooking hillside and found some downed trees to use as picnic benches. Nate and Cowboy waited patiently to get hobbled so they could enjoy their lunch of green grass.
On our return trip, we did a cross-country adventure ride. We headed east, traveling through small
The Chama Depot, serving the Cumbres & Toltec Scenic Railroad, built in 1880. “From our idyllic campground, we could hear trains chugging and whistling, so we decided to check it out,” the Krones write.

basins, alongside hills, and in and out of grassy parks where we noticed lots of matted grass where elk or deer had bedded for the night. Rio Chamita Creek was our general guidepost for this exploratory return ride.
We highly recommend doing cross-country riding here. The terrain is open, and both the creek and ridgetop are helpful in directional navigation.
A couple of riding ideas: After crossing Rio Chamita Creek near the stone monument, go right. Go through two fences, and explore the valleys to the north. Past the monument, where the road turns to the right, take a left, and explore the two valleys on the left side of the road.
Keep your eyes open for wildlife. One highlight for us was watching a black bear dig for grubs. We had stopped for a break and noticed a “black rock” that appeared to be moving. Sure enough, the binoculars confirmed it was a black bear. We sat in the sunshine and enjoyed our own private wildlife show.
Hopewell Lake Campground, located at 9,700 feet above sea level 45 miles southeast of Chama in Carson National Forest, is a good riding area for those hot, humid summer days. You could make this horse camp
work for a short stay, but it isn’t well-designed for horses. The small single corral would be crowded with two horses, and the other corral belongs to another unit. In between the two corrals are a water spigot and a stock tank—nice amenities, but a long haul if you want your horse to have a water bucket hanging in his pen.
Aside from Hopewell Lake, another attraction here is the Continental Divide National Scenic Trail, which runs along the south edge of camp. This trail runs from Mexico to Canada, a grand total of 3,100 miles. It’s not tidy and maintained; a great deal of the CDT consists of dirt roads and cobbled-together trails.
No matter how gorgeous the riding or how awesome the horses, a little variety adds spice to life; the little town of Chama boasts the Cumbres & Toltec Scenic Railroad. From our idyllic campground, we could hear trains chugging and whistling, so we decided to check it out.
Designated a National Historic Landmark in 2012, the Cumbres & Toltec Scenic Railroad is the longest, highest, and most complete example of late 19th and early 20th century narrow gauge railroading in the nation. It was featured in the 1994 film Wyatt Earp, starring Kevin Costner.
The railroad operates daily, running old-time coal-operating locomotives up and over mountains 10,000 feet high. We signed up for an evening ride that would take us up to Cumbres Pass, where dinner was served inside a protective enclosure. We traded in our saddles for a seat on an antique train car and proceeded to watch nature unfold in all her finery. That evening, a small group of us stubbornly stayed in the exposed car, braving an icy wind sweeping down the mountainside and plummeting temperatures.
There was a method to our madness: Seeing the full moon rise while aboard the historic train. Finally, a glowing, luminescent orb began crawling up and over the mountain, growing larger and larger. We forgot the cold and just felt like we were the luckiest people in the world. A full moon, an antique train, being together on an adventure with our horses—life is good! USR
“We traded in our saddles for a seat on an antique train car and proceeded to watch nature unfold in all her finery.”
One Sunday, USRider Member Candice F. was on her way to go riding with a friend in the Sierra foothills aboard her palomino Quarter Horse, Sunny, when a trailer tire went flat. USRider quickly came to the rescue.

I’m a first-time horse owner of a palomino Quarter Horse gelding named Sunny. Although I dream of owning a big truck and a living-quarters gooseneck trailer, my current hauling setup comprises
a Chevy Tahoe and a gracefully aging Circle J bumper-pull.
Sunny and I compete on a drill team, and travel all around— from the Grand National Rodeo in San Francisco held at the Cow
Palace to the Reno Rodeo. (I’m based in Sacramento.) I’m also an avid trail rider, so I often meet my friend Marilyn for adventures on the route of the famous Western States Trail Ride (known as the Tevis Cup), and high-elevation outings to the Sierra Nevada mountains.


When Marilyn told me about an advertisement she saw for USRider, I wanted to join immediately, as I was inexperienced and a little apprehensive about hauling my horse. I was impressed with the friendly customer service I received. I hoped if I ever needed roadside assistance that I would be just as pleased.
Of course, no one wants to think about needing to be rescued while trailering, but I certainly felt more confident driving down the road knowing that USRider would send
the right people if I was ever in a bind.
On a recent Sunday, Sunny and I were on our way to the Sierra foothills to meet Marilyn for a ride when my trailer tire went flat. USRider immediately sent out a tow truck to put on my spare tire. This garden-variety rescue was outstanding on its own, since the time between dispatch and arrival was less than 30 minutes. And representatives called me at least four times to see how Sunny and I were doing and to make sure we made it back on the road.
But wait, there’s more.
I mentioned to USRider’s very friendly dispatch representative that I’d be happy to get all new trailer tires. So this nice person— who was based all the way in Oklahoma City—found a tire store
that was open on a Sunday less than five miles from where I was stranded. The tire store even let my horse hang out in the parking lot for an hour or two. This is just the kind of “above and beyond” service I get from USRider.
After my very patient horse and I got home safely, I contacted all the riders I know, encouraging them to join USRider. Having heard unpleasant stories of experienced horsemen with newer rigs getting stranded everywhere from the Sierra mountains to the Nevada desert—relying on friends to drive hours to their rescue or finding that other companies don’t offer adequate roadside assistance for a rider’s needs—I want to get the word out that USRider is all about taking care of people, our trailers, and our horses! USR

EquiMedic USA’s Small Trailering Kit is designed to meet most of your horse’s emergency needs while traveling. This handy kit, which contains 47different products (180 items), features two outside end pockets and two center flaps. The top flap opens upward and hangs the kit. The second flap folds downward. Both offer smaller pockets on the inside surface. The main compartment features elastic loops on three sides to hold bottles, jars, and equipment. A zippered mesh pocket completes the compartment.

The Professional’s Choice Trailer Door Caddy is designed to accommodate both you and your horse. This durable caddy features both open and zipper mesh pockets to keep things organized, and insulated cup holders to keep your beverages cold while grooming. Secure the caddy to your trailer’s door with the included mounting fasteners and adjustable hook-and-loop closures. Available in two sizes and four colors.

Your traveling horse is at risk for skin nicks and more. Dr. Rose’s Remedies Skin Treatment is an all-natural herbal formula that promotes rapid recovery from skin ailments. It nourishes and relieves the skin, while healing burns, lacerations, and surgical incisions. Both the spray and the salve help with scratches, hotspots, insect bites, and other conditions.

Travel stress can compromise your horse’s immune function. SmartPak Equine’s SmartImmune Pellets provides a comprehensive, innovative approach to supporting healthy immune function. The formula includes adaptogenic herbs—such as astragalus, ginseng, and golden root—and antioxidants to help protect cellular health and fight free radicals. SmartImmune also contains Echinacea, prebiotics, and AgariPlex™ (a proprietary mushroom blend that helps the body manage stress). The pelleted formula is easy to feed and picky-eater approved. Order SmartImmune in prepackaged daily-dose SmartPaks for traveling ease.



As a USRider Member, you can enjoy money-saving discounts through Winner’s Circle Advantage. You may access these benefits directly through the Members Area of the USRider website, as well as through the brochure you’ll find enclosed in membership kits and renewal mailings. The brochure features instructions and access codes for quick shopping access with all our Winner’s Circle Partners. With so many discounts, you can easily save the cost of your annual membership fee, and more! This issue, we spotlight Hotel/Motel Discounts. For more information on referrals and for more Member discounts, click here.
Save on hotel accommodations from coast to coast with USRider’s valuable discounts. As a new member of the world-renowned Wyndham Hotel Group, Microtel offers free wireless Internet and free phone calls, along with cozy bedding and free breakfasts. Microtel Inns & Suites has been ranked “Highest in Guest Satisfaction” seven years in a row by J.D. Power and Associates.
For an extended stay, meet Wyndham’s secondnewest member, Hawthorn Suites. Take advantage of its special offers with TripFinder Vacation Packages, Special Discounts, and Group Travel.


Encompassing more than 6,550 hotels and 551,000 rooms in 59 countries, Wyndham’s other brands



include AmeriHost Inn®, Baymont Inn & Suites®, Days Inn®, Howard Johnson®, Knights Inn®, Ramada®, Super 8®, Travelodge®, Wingate Inns®, and Wyndham Hotels and Resorts. USRider Members receive a 10% discount off the best available rate.


Choice Hotels International was the first hotel/ motel partner to join USRider’s Benefits Program. Choice Hotels has more than 4,700 Comfort Inn®, Comfort Suites®, Quality Inn®, Sleep Inn®, Clarion®, Cambria Suites®, MainStay Suites®, Suburban Extended Stay Hotel®, Econo Lodge®, and Rodeway Inn® brand hotels across the country. USRider Members receive a 15% discount.


USRider is proud to have Hyatt Hotels and Resorts as another hotel partner. Hyatt is one of the world’s premier hotel corporations offering executive amenities including meeting rooms, suites, restaurants, business centers, reception halls, and the finest hotel rooms. USRider Members receive 10% discount off the best available rate.

La Quinta Inns & Suites offers USRider members its special Bright Side program, extending a 10% discount off their best available rate at more than 700 locations.

Drury Hotels, Motel 6, Red Roof Inn, Shilo Inns, Studio 6, and Vagabond Inn offer special discounted rates to USRider Members. See your Winner’s Circle Advantage brochure for special pricing.


With winter’s short days and long nights, it’s especially important to make sure all your truck and trailer lights are in working order. Here’s a rig-light checklist; perform this check every time you load your horse.


Before you begin, hitch up your rig, and set the engine key in the auxiliary position. If you prefer to warm up your engine, put your gear shift in park and set the emergency brake to keep your rig in place.
■ Update your trailer lighting. Is the lighting system on your trailer adequate? Consider updating to brighter LED lights.
■ Ask someone to help you. For truck lights, it’s best to have a helper inside the vehicle working the controls while you check the lights.
■ Clean all light coverings. Clean all light coverings; dirt, dust, ice, and mud cut visibility. Use a soft cloth and soap designed for to wash vehicles. Then wipe each covering with a 2:1 distilled vinegar/baking soda mixture. Lastly, rinse with clean water.
■ Check the turn signals. Inspect both your tow vehicle and trailer turn signals to make sure they are blinking. Check both the left and right turn signals.
■ Check headlights. Turn on your tow vehicle’s headlights, then hop out and make sure they work. Or, ask a friend to help you. (Safety tip: Turn on your headlights and your trailer’s lights even during daylight hours, for visibility).
■ Check interior lights.
■ Check the brake lights. If you have a helper, ask them to depress the brake pedal a few times while you check the brake lights on your tow vehicle and trailer. If you’re alone, place a heavy brick or rock on the brake pedal to keep it depressed while you check the lights.
■ Check turn signals/brake lights simultaneously. Turn on your left turn signal and depress the brake at the same time to make sure all lights will work together. Do the same with the right turn signal.
■ Check running lights. Check the running lights on your trailer’s roof, fenders, and corners.
■ Turn on the lights. On the road, turn on your tow-vehicle lights (low-beam) and trailer lights for enhanced visibility. The better the other drivers see you, the safer you’ll be.
— Bonnie Davis
With winter’s short days, it’s especially important to make sure all your truck and trailer lights are in working order.
Check
and trailer.