
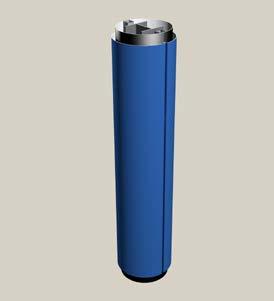
v1 Sept 22 Technical Support: +44 (0)1536 383 810 www.alumascwms.co.uk technical@alumascwms.co.uk Inner collar Infill strip Casing321 1 2 3 Up 3000mto Inner collar Inner collar
General
Screw fixings are not supplied. Only use high quality fixings and ensure fixings are suitable for the substrate. For advice, contact our Technical Service Team on 01536 383810
Fixings
Skyline Column Casings Installation Guide

Aluminium Column Casings are suitable for fixing to both sectional steel and wood framing. Ensure column support framework is securely fixed and suitable to withstand the weight of the aluminium column casing. The support framework and mullions must be installed plumb and to the correct measurement to accommodate the column casings. All support framework and mullions supplied by others.
ARCHITECTURAL ALUMINIUM
Components
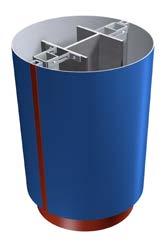
Skyline Column Casings Installation Guide ARCHITECTURAL ALUMINIUM Technical Support: +44 (0)1536 383 810 www.alumascwms.co.uk technical@alumascwms.co.uk 1. Securely install a supporting framework around the existing structure using timber or metal mullions running vertically up the joint line of the column Casing. It is important that the supporting mullions are installed at the correct width to correspond with the internal dimension of the column casing. These vary slightly for Column casings installed with or without top/bottom inner collar. Please refer to the above table. Mullion Dimension Code Diameter Inner collar Column CC30 300mm 238mm 247mm CC40 400mm 338mm 347mm CC50 500mm 438mm 447mm CC60 600mm 538mm 547mm CC70 700mm 638mm 647mm CC80 800mm 738mm 747mm CC90 900mm 838mm 847mm CC100 1000mm 938mm 947mm Mullion Dimension Code Square Inner collar Column CS25 250x250mm 188mm 197mm CS35 350x 350mm 288mm 297mm CS45 450x 450mm 388mm 397mm CS55 550x550mm 488mm 497mm CS65 650x650mm 588mm 597mm CS75 750x750mm 688mm 697mm CS85 850x850mm 788mm 797mm CS100 1000x1000mm 938mm 947mm Mullions set to the internal dimension of the column casing inner collar Set mullions to the correct diameter (internal) flange to flange Mullion bracketfixing Mullion


Skyline Column Casings Installation Guide ARCHITECTURAL ALUMINIUM 2. Mechanically fix inner collars to the aluminium (or timber) mullions, ensuring that fixings are positioned in such a way that they will be covered by the main column casing. Fixings should be countersunk flush to allow the main casing to fit over. Technical Support: +44 (0)1536 383 810 www.alumascwms.co.uk technical@alumascwms.co.uk


Position 2nd half of the internal inner collar to butt up to the 1st half and securely screw into mullion
Top inner collar

CasingMain

Bottom inner collar
Inner collar fixings positioned in area to be covered by main casing
If the Column is over 3m in height or if there is an additional shadow feature in the column design then additional inner collars can be added at the joint.

Skyline Column Casings Guide

Installation
ARCHITECTURAL ALUMINIUM

Technical Support: +44 (0)1536 383 810 www.alumascwms.co.uk technical@alumascwms.co.uk
Note:
Note that fixings should position so that they are hidden by the main casing.
Female
3. Before installing the main casing, it is important to note that the casing has a male and female connection and to ensure correct alignment these must be observed. It may be necessary to rotate one half top-to-bottom to achieve this as shown in the above illustration.
CasingMainCasingMain Male

Fixing to countersunkbe to allow over-fitting of male casing (see below).illustration

4. Using the mullion as a guide, starting with one half, locate the female edge and align vertically, ensuring the edge is plumb with the mullion. Place two countersunk fixings (top and bottom) to hold the half section temporarily in position. Use countersunk screws for this first section to accommodate the second section on top. Note: only fix one side for now (the female edge), do not fix the other side.

edge fixed to mullion.
Male
collarFemale
Technical Support: +44 (0)1536 383 810 www.alumascwms.co.uk technical@alumascwms.co.uk
Skyline Column Casings Installation Guide ARCHITECTURAL ALUMINIUM


FemaleFemale
Position female edge of casing over the top/bottom inner
Column
5. Take the other half section and marry up the male/female edges so that the column aligns correctly. Use a strap to hold sections together. Once in position, securely screw through female casing and mullion (avoid the same drilling position as the female section).


Female Male
Skyline Casings
6. Check alignment and position, then mechanically fix through both halves into the mullion. Fixing at maximum 500mm centres recommended. Round head or hex head screws can be used at this stage as any fixing will be covered by the infill strip.
Installation Guide ARCHITECTURAL ALUMINIUM Technical Support: +44 (0)1536 383 810 www.alumascwms.co.uk technical@alumascwms.co.uk

Skyline Casings Guide
Column

Installation
ARCHITECTURAL ALUMINIUM
Technical Support: +44 (0)1536 383 810 www.alumascwms.co.uk technical@alumascwms.co.uk

7. Insert the infill strip to complete the installation. Provided that the male/female end have aligned properly, then the infill strips should push in tight. We recommend that a bonded sealant is used to prevent tampering. For added security, use a small discreet self-tapping screw at the top and bottom.
