Edit results in an existing QC Batch
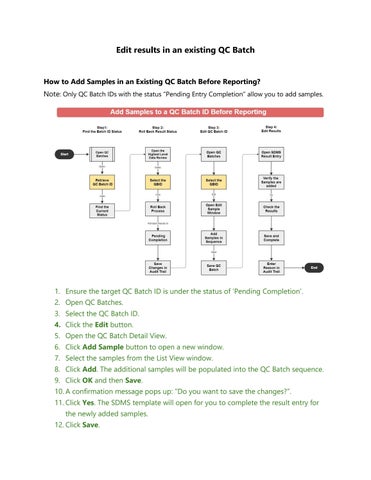
How to Add Samples in an Existing QC Batch Before Reporting?
Note: Only QC Batch IDswith the status “Pending Entry Completion” allow you to add samples.

1. Ensure the target QC Batch ID is under the status of ‘Pending Completion’.
2. Open QC Batches.
3. Select the QC Batch ID.
4. Click the Edit button.
5. Open the QC Batch Detail View.
6. Click Add Sample button to open a new window.
7. Select the samples from the List View window.
8. Click Add. The additionalsamples will be populated into the QC Batch sequence.
9. Click OK and then Save.
10.A confirmation messagepops up: “Do you want to save thechanges?”.
11.Click Yes. The SDMS template will open for you to complete the result entry for the newlyadded samples.
12.Click Save.
13.Enter the reason for the edits.
14.Click Complete.
How to Add Samples in an Existing QC Batch After Reporting?
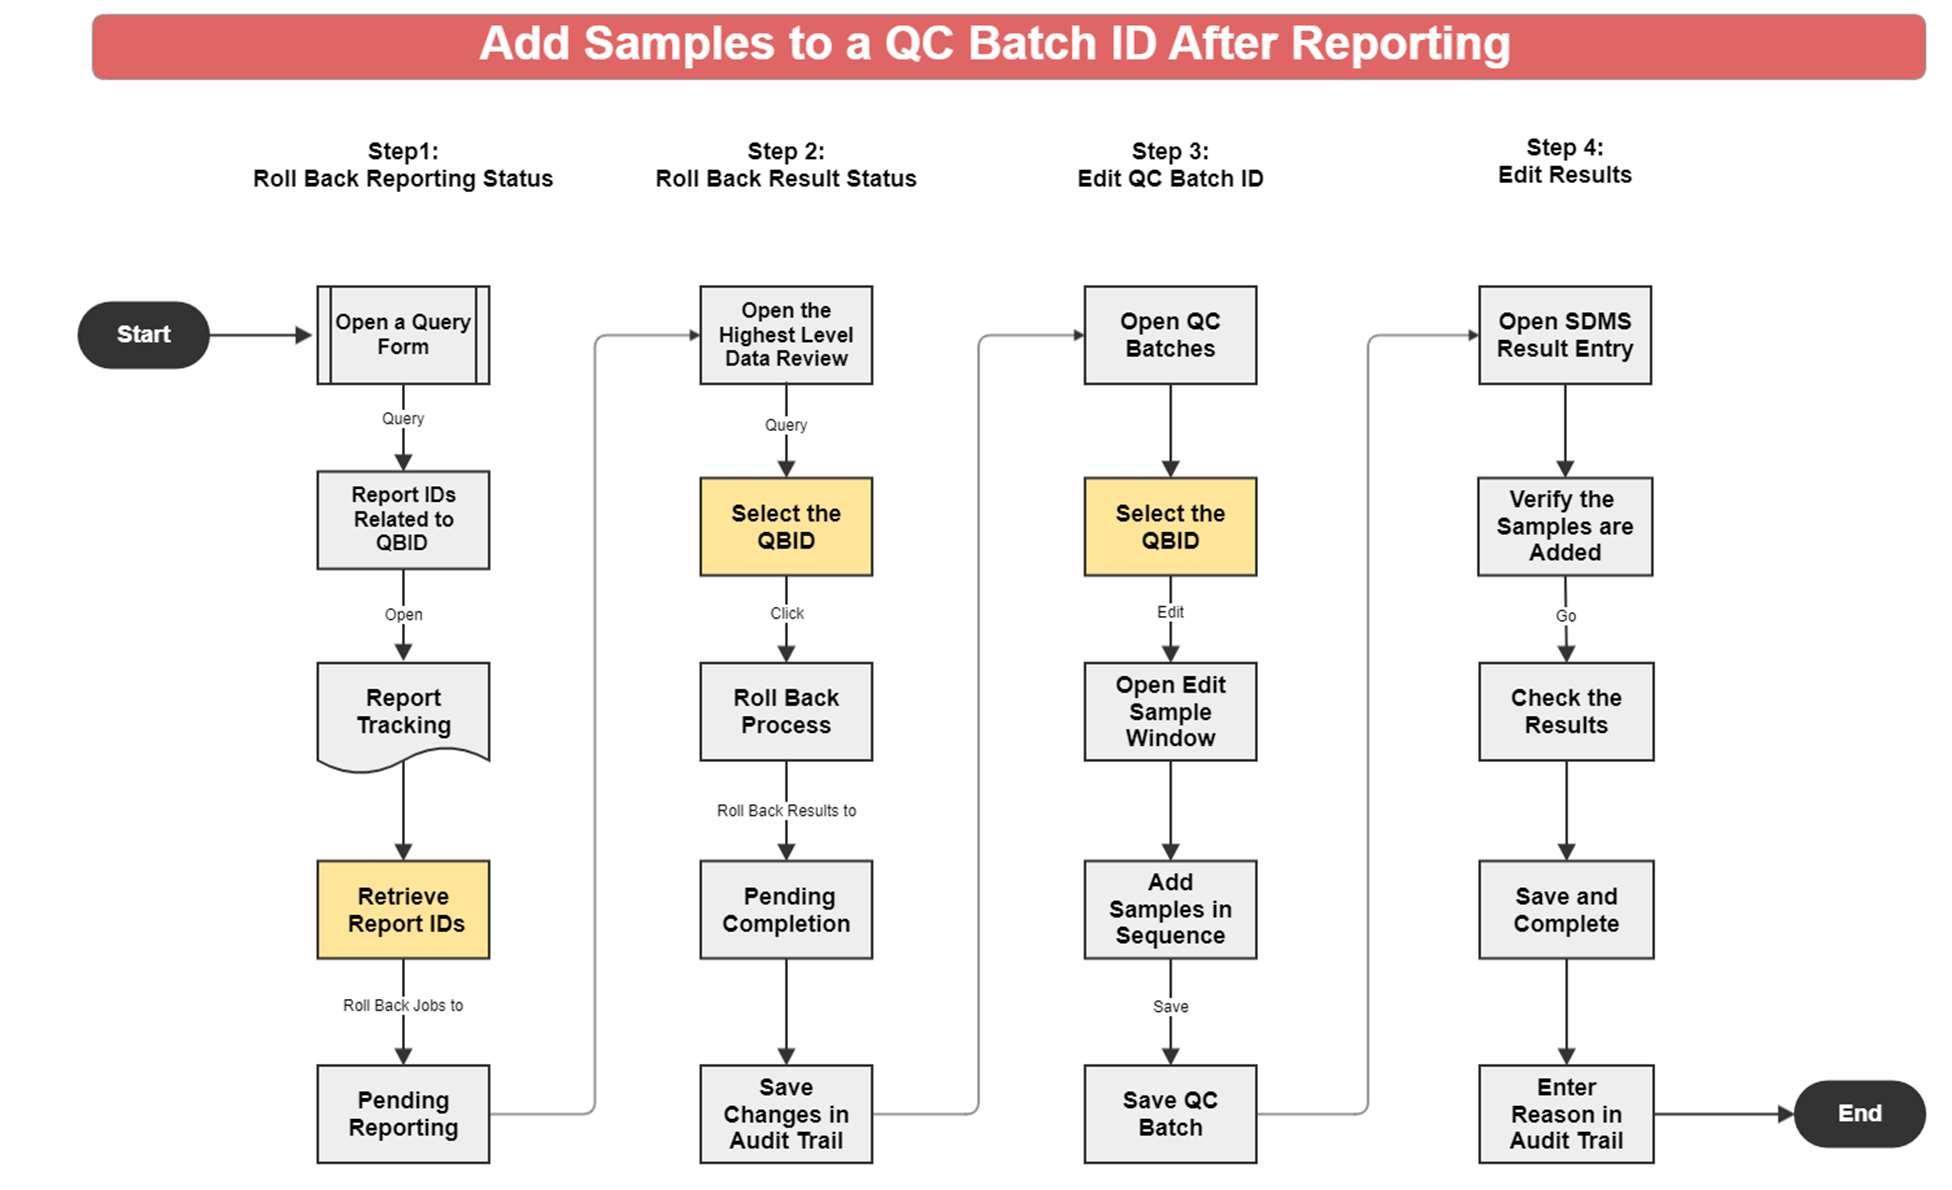
1. Find the Report ID related to the QC Batch ID.
2. Open the Report Tracking form, and retrieve the Report ID.
3. Click the Roll Back button, confirm the action and proceed.
4. The related Job ID status will change to ‘Pending Reporting’.
5. Retrieve the QC Batch ID in QC Batches.
6. Rollback thestatus to ‘Pending Completion’.
7. Click the Add Sample button to open a new window.
8. Select the samples from the List View window.
9. Click Add. The additionalsamples will be populated into the QC Batch sequence.
10.Click OK and then Save.
11.A confirmation messagepops up: “Do you want to save thechanges?”.
12.Click Yes. The SDMS template will open for you to complete the result entry for the newlyadded samples.
13.Click Save
14.Enter the reason for the edits.
15.Click Complete.
How to Edit Results in an Existing QC Batch Before Reporting?
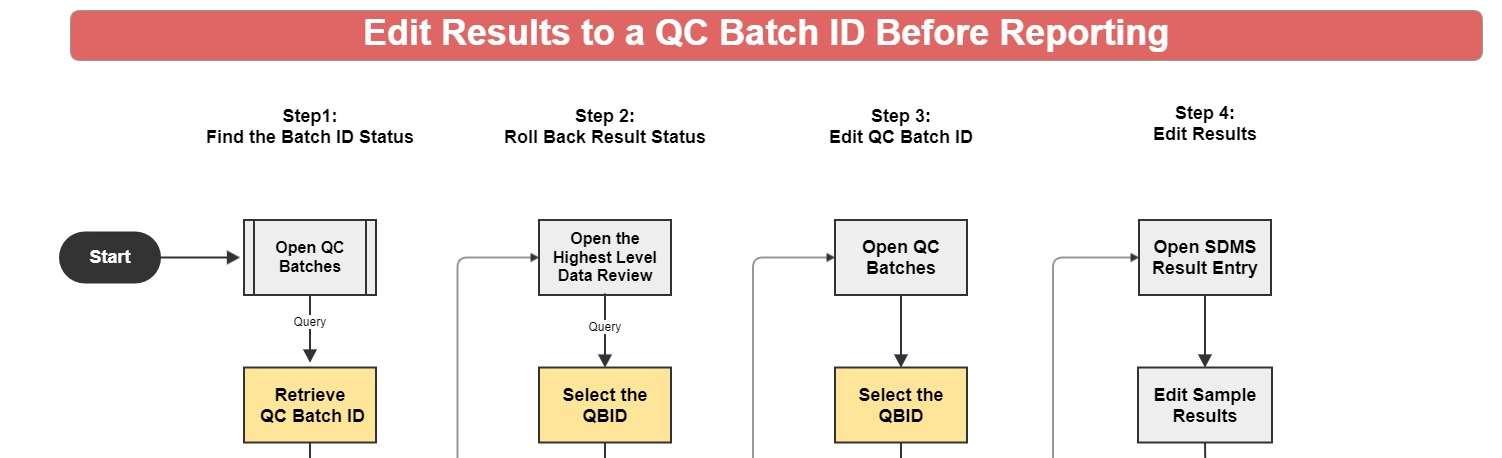
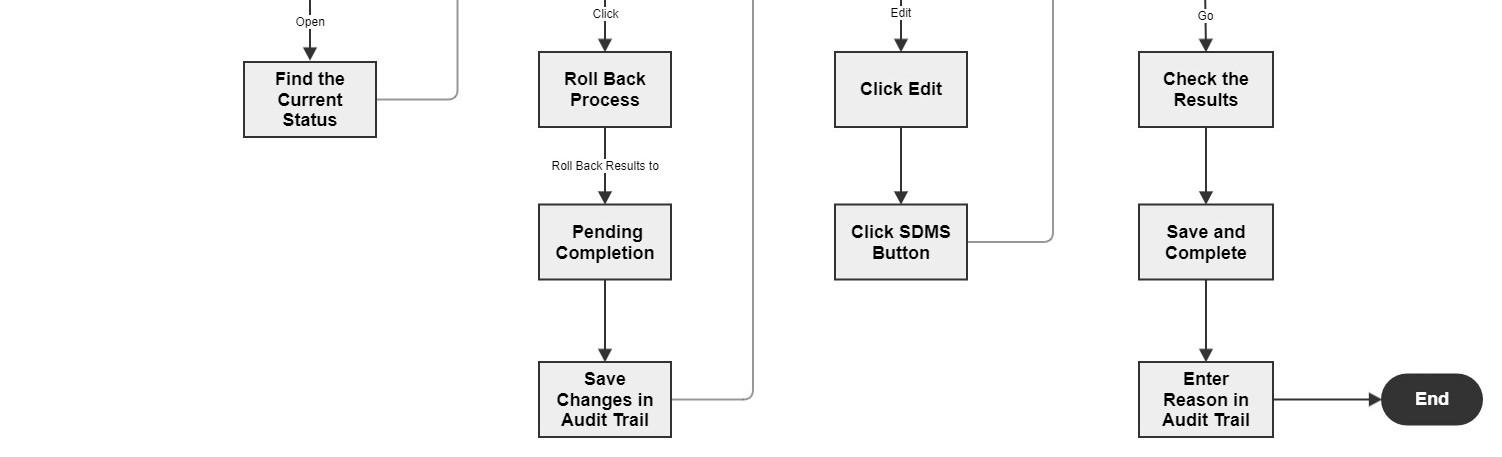
1. Open the QC Batch List View.
2. Find the status of the selected QC Batch ID.
3. Rollback thestatus of the QC Batch to ‘Pending Completion’ of result entryusing oneof theData Review forms.
4. Retrieve the QC Batch ID and open the SDMS result entrytemplate.
5. Edit the results and click Save
6. Enter reason for theedits.
7. Click Complete.
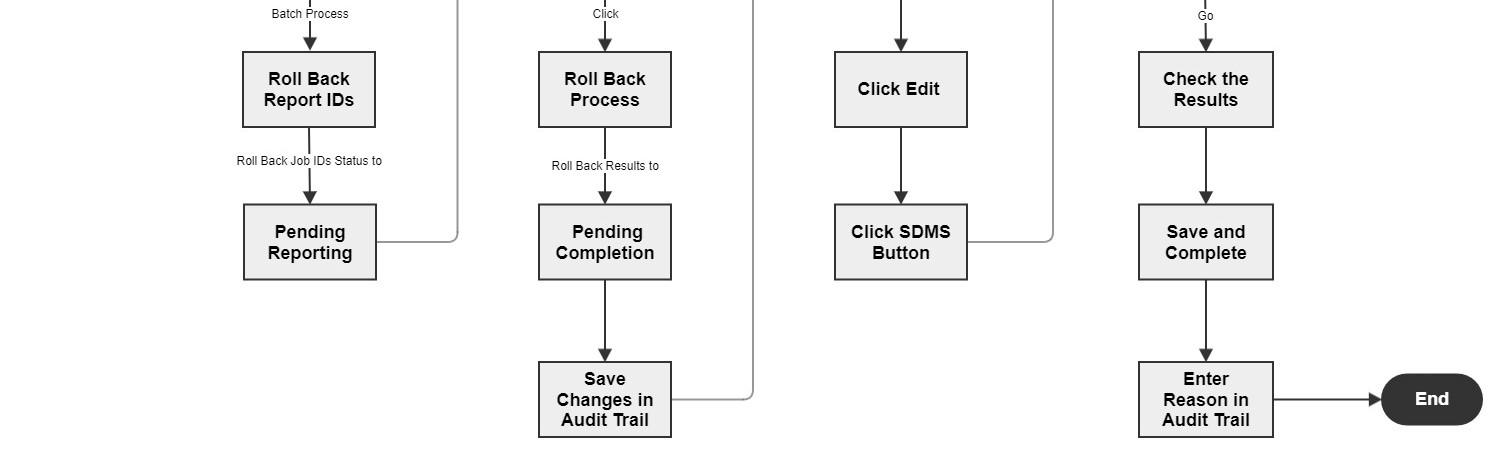
How to Edit Results in an Existing QC Batch After Reporting?
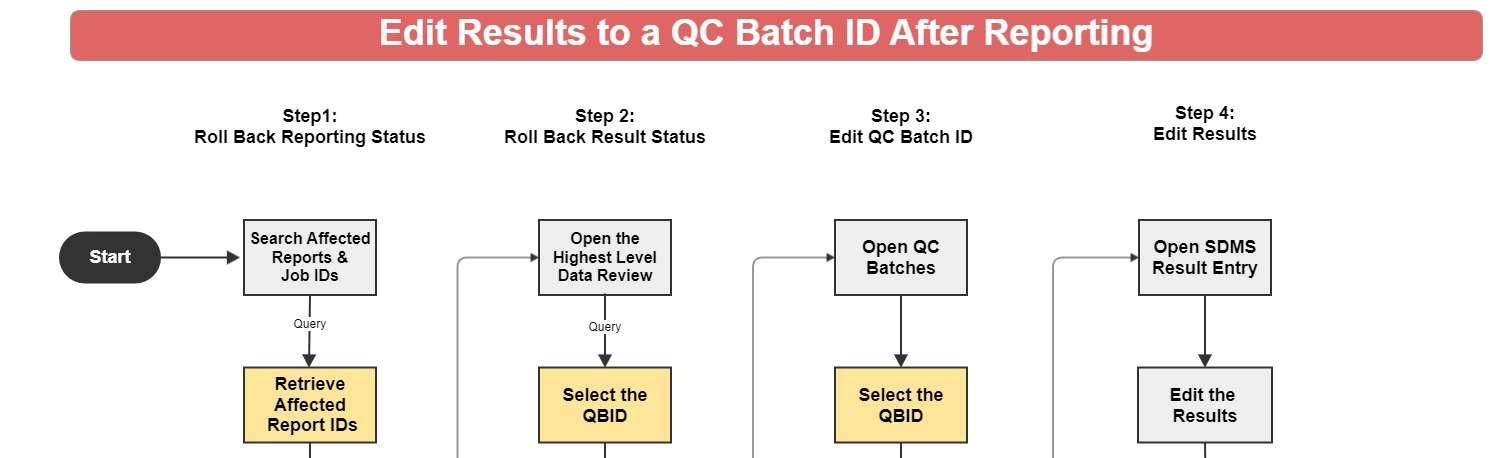
1. Identify the Impacted Items:
Report IDs: Determine which report IDs havebeen created with the results.
Job IDs: Identifywhich Job IDs are affected by the changes.
Process Chains: Determine which process chains are impacted by the modifications.
2. Batch Rollback:
Initiate the batch rollback process, providing a reason for the rollback. Ensure this step is documented in the Audit Trail.
3. Edit Results:
Navigate to QC Batch: Start with the specific QC Batch.
SDMS Edit: Open the SDMS, edit the results as needed.
Save Changes: Save the modifications.
Complete Edits: Finalize the edits and ensure all changes are recorded in the Audit Trail.
4. Batch Data Review:
Open Batch Data Reviewand review the changes, ensuring all modifications are tracked in the Audit Trail.
5. Result Validation (if necessary):
If required, open Result Validation and validate the results, documenting the process in the Audit Trail.
6. Result Approval (if necessary):
If needed, open Result Approval and approve the results, again ensuring that the Audit Trail records this step.
7. Custom Reporting:
Access CustomReporting by Job ID, save the updated report.
Confirm thereport revision ID with an "R1" extension and ensurethisis logged in the Audit Trail.
8. Report Re-delivery:
Automaticallydeliver the new report ID to the relevant parties, including a notification about the changes made.
How to Remove Samples in an Existing QCBatch Before Reporting?
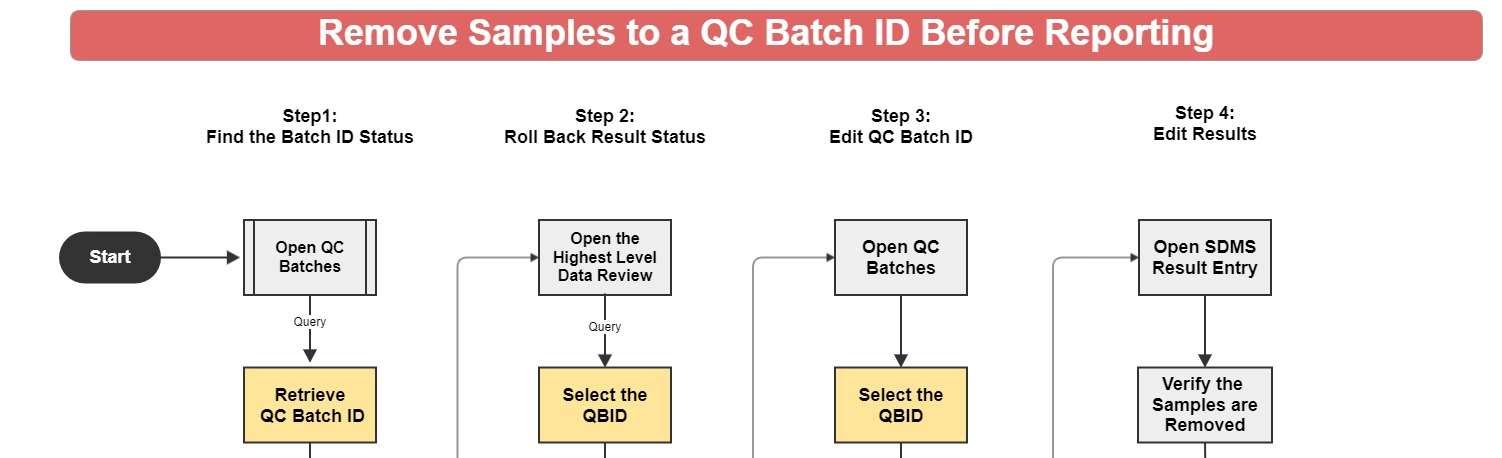
1. The target QC Batch ID must be under thestatus of ‘Pending Completion’. Therefore, rollback thebatch status to ‘Pending Completion’ from one of the Data Review processes, and record the changes in the Audit Trail.
2. Open QC Batches.
3. Select the QC Batch ID.
4. Click the Edit button to open the QC Batch Detail View.
5. Select the samples you want to remove from thegrid.
6. Click the Remove button “- “, and then click OK. A confirmation message will pop up:” Are you sure you want to remove the samples?”
7. Click Yes. The SDMS result entry form opens, and the same sample IDs will be removed from the spreadsheet.
8. Click Save. A confirmation message willpop up:” Do you want to save the changes?”
9. Click Yes.
10.Enter the reason for the edits. The changes will be saved in the Audit Trailin QC Batches.
11.Click Complete.
How to Remove Samples in an Existing QCBatch After Reporting?
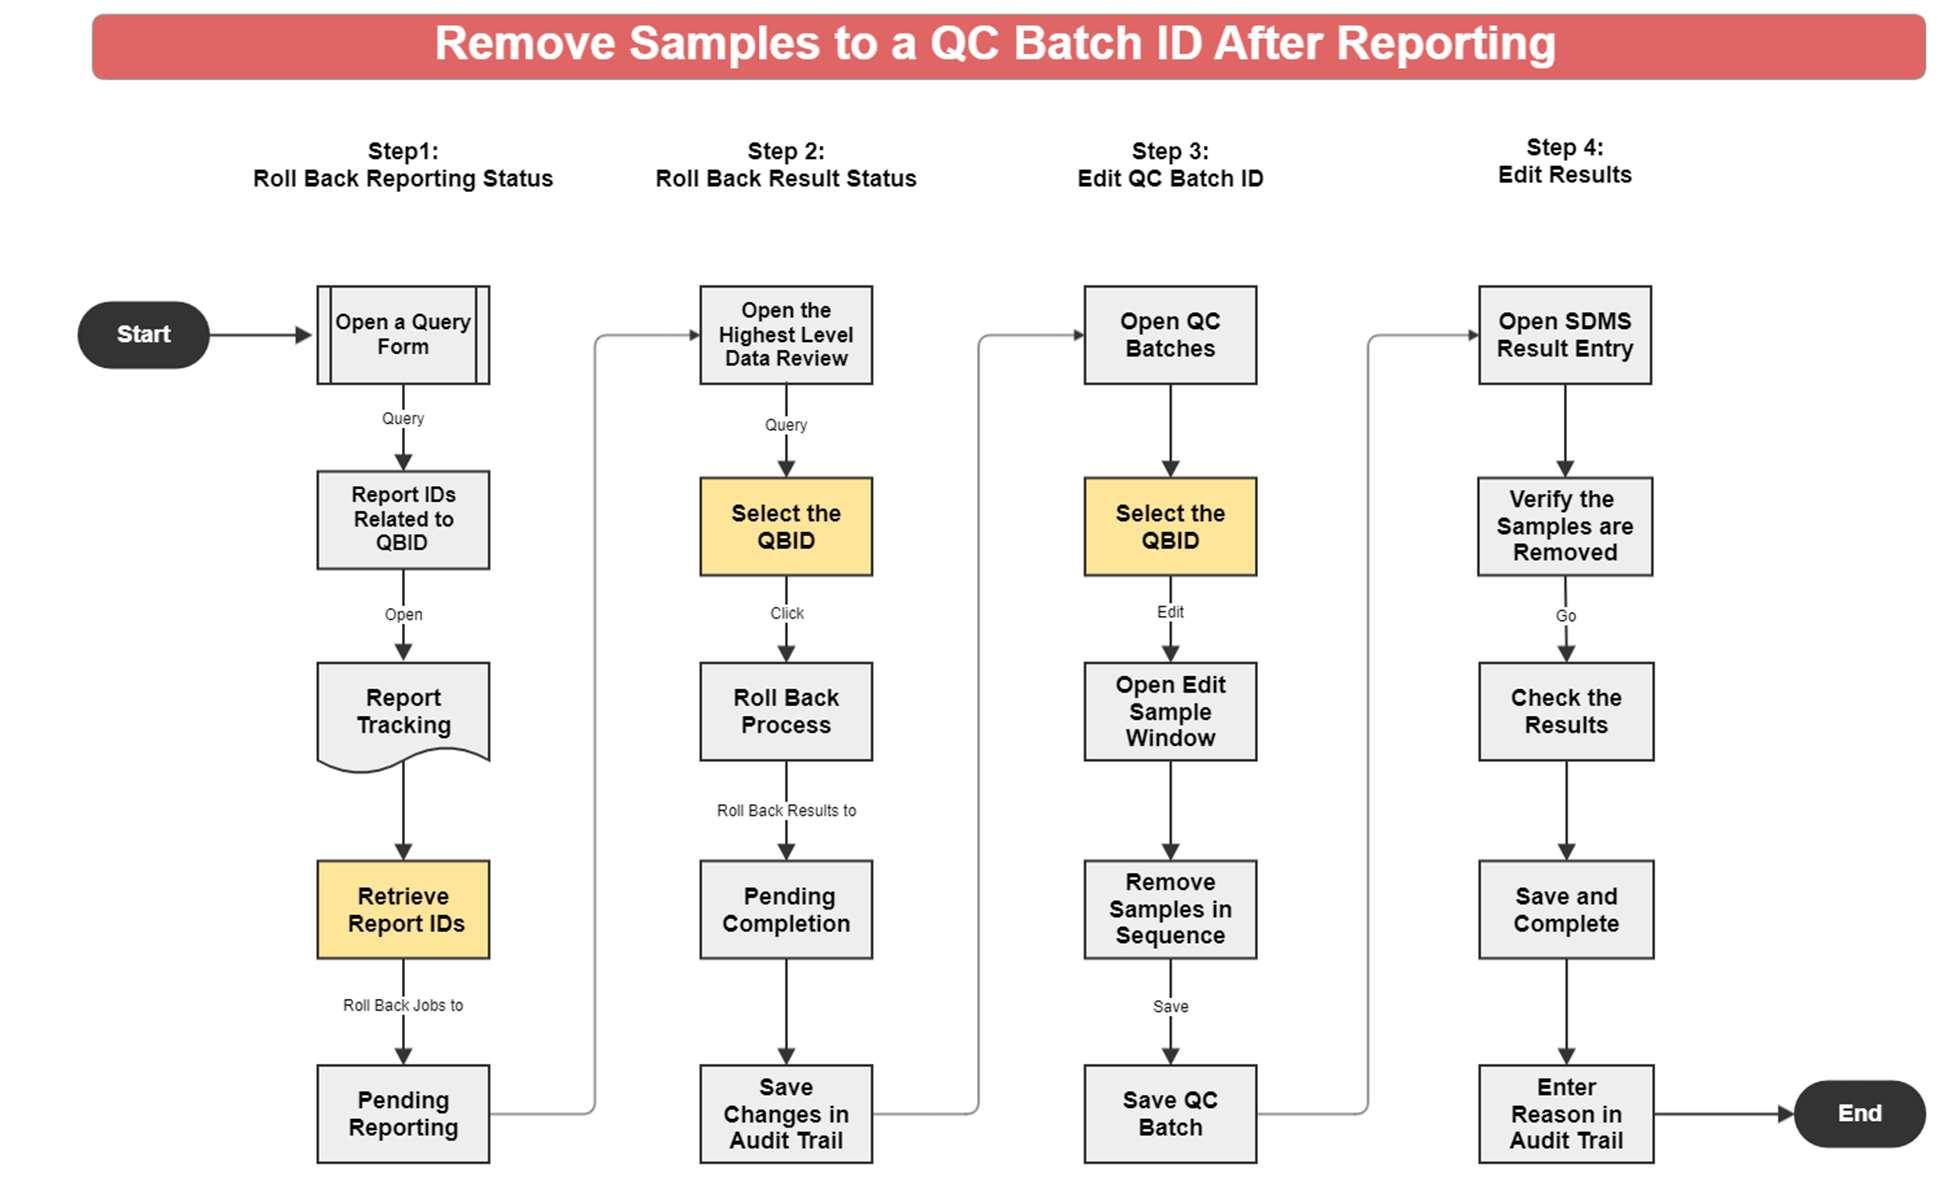
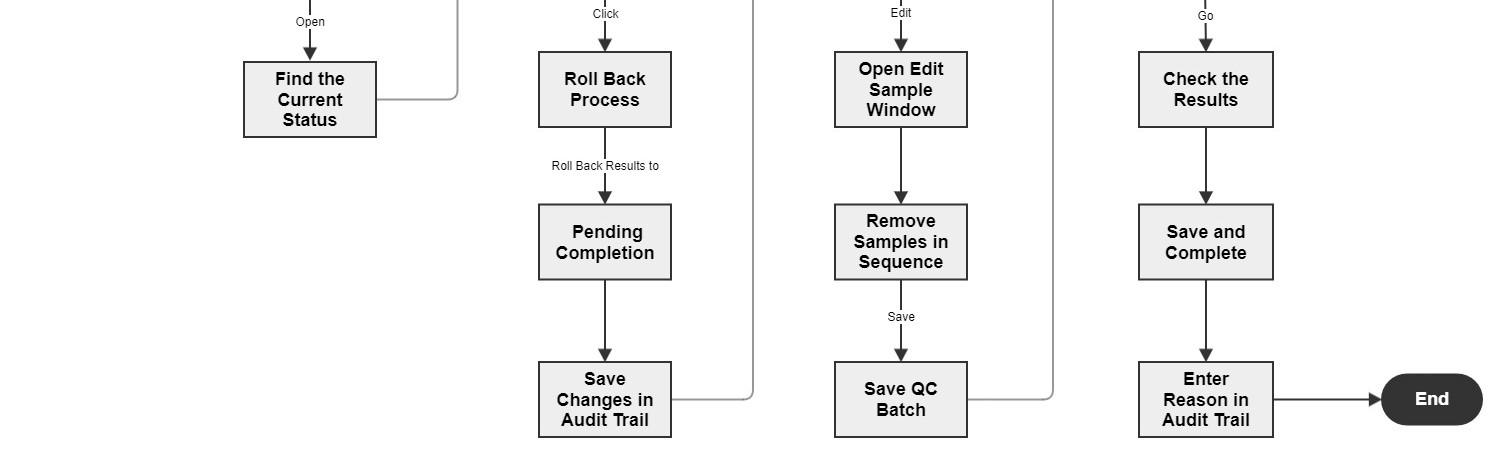
1. Find the Report ID related to the QC Batch ID.
2. Open the Report Tracking form, and retrieve the Report ID.
3. Click the Roll Back button, confirm the action, and proceed.
4. The related Job ID status will change to ‘Pending Reporting’.
5. Rollback thebatch status to ‘Pending Completion’ from oneof theData Review processes and record the changes in the Audit Trail.
6. Retrieve the QC Batch ID in QC Batches.
7. Click the Edit button to open the QC Batch Detail View.
8. Select the samples you want to remove from thegrid.
9. Click the Remove button “- “, and then click OK. A confirmation message will pop up:” Are you sure you want to remove the samples?”
10.Click Yes. The SDMS result entry form will open, and the samesample IDs will be removed from the spreadsheet.
11.Click Save. A confirmation message willpop up:” Do you want to save the changes?”
12.Click Yes.
13.Enter the reason for the edits. The changes will be saved in the Audit Trailin QC Batches. Click Complete