Position the vanity over the pipes in the correct position and fix with a single screw in centre of vanity to hold in place. Check the vanity is completely level.
Wall Hung vanities:
You may want use a level support/noggin to assist while leveling.
Floor Mount Vanities:
You may need to pack the vanity to ensure it is sitting level & square on the floor. See page 8 for instructions to attach kickboard.
LOCATION
You will need to install a filler, wide filler or infill panel.
After completing the Prior to Installation Checklist on page 2, mark the position of the top of the vanity. Don’t forget to factor in the top/ basin thickness to get the correct height.
Note: Vanity must attach to a minimum of two support beams, mark these positions.
Remove doors and drawers. Measure correct plumbing loctions and drill holes for plumbing in the back panel and/or base of the cabinet with an appropriate sized hole saw. Pre-drill screw locations for fastening to wall as per ‘Step 4’.
Securely fasten the vanity to the wall through back of vanity with appropriate screws/bolts at TOP and BOTTOM of cabinet. Fix the cabinet through the top left and right hand brackets and evenly space apart the horizontal fixings at a maximum of 300mm apart. For the bottom start the fixing points no further than 100mm from each end of the cabinet and no higher than 50mm from the base panel.
Note: Where a stud or support beam cannot be located, use an appropriately sized hollow wall anchor. Vanity must attach to a minimum of two support beams. Ensure fixings clear all water/electrical services in wall.
Once cabinet is secured to the wall carefully remove transportation blocks from the underside of the cabinet (we recommend using a chisel).
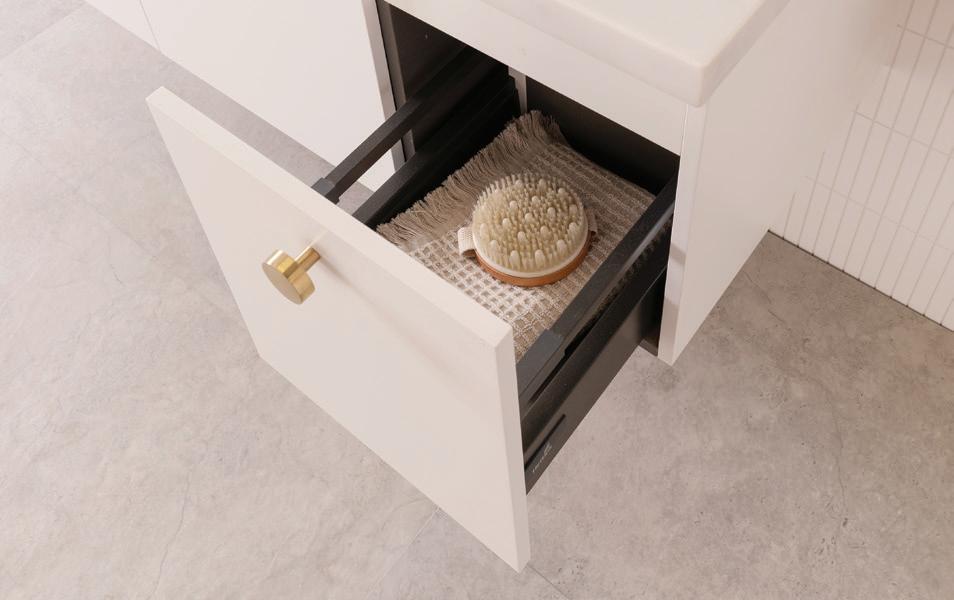
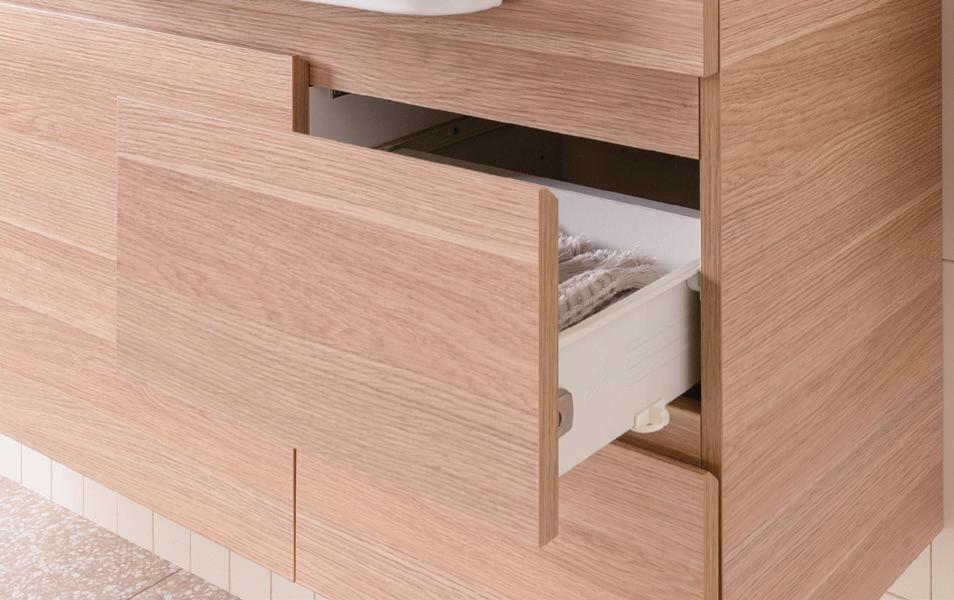
IMPORTANT: Before installing drawers, vacuum out drawer runners to ensure drawer runners are
Using a non-acidic silicone, apply a continuous bead of silicone to the top four edges of the vanity and at the back where the top meets the wall. Position the top so it has equal overhang on each side, ensuring the top surface is level.
If using a seperate basin, position in place and fully seal the basin to the top /cabinet using a continuous bead of silicone.
Note: Seal any visible gaps between the cabinet and the top and basin with continuous bead of silicone.
Apply non-acidic silicone to all edges where vanity top and cabinet meet the wall and floor.
Materials used in the construction of this unit are water resistant NOT water proof, so all areas need to be sealed to prevent water penetration.
Note: Gap sealant can be used in place of silicone where the unit meets tiled surfaces.
SECURING THE CABINET
REMOVE TRANSPORTATION BLOCKS
6. FIX TOP / BASIN
7. SEALING
2. PREPARING THE CABINET
MIRRORED SHAVING CABINET INSTALLATION
Note: If you are installing a light or powerpoint with your mirrored shaving cabinet make sure you consult with your electrician before installing. If the cabinet has easy link brackets please follow the instructions on page 7.
1. POSITION CABINET & LEVEL
2. SECURING THE CABINET
TALLBOY & ENSEMBLE INSTALLATION
Note: If the cabinet has easy link brackets please follow the Easy Link Bracket Installation Instructions at bottom of page.
1. Place cabinet on flat surface to remove mirrored doors. Remove doors and place flat on soft surface with mirrors facing up to avoid damages.
2. Locate support beams and position unit in desired location and check all sides are sitting level.
3. Mark the position of the cabinet on all four corners of cabinet
Note: Damage during installation is not covered under ADP warranty.
SEALING
Securely fasten cabinet to the wall through back with appropriate screws/bolts at TOP and BOTTOM of cabinet. Evenly space apart the horizontal fixings at a maximum of 300mm apart.
Note: Where a stud or support beam cannot be located, use an appropriately sized hollow wall anchor.
ADJUST DOORS
All edges where water
Apply non-acidic silicone to all edges where cabinet meets the wall. Note: Gap sealant can be used in place of silicone where the unit meets tiled surfaces.
Install doors back onto cabinet and make adjusments to align the doors correctly. See pages 13 for instructions.
NOTE: IT IS THE RESPONSIBILITY OF THE INSTALLER TO MAKE ANY ADJUSTMENTS TO DOORS AFTER INSTALLATION.
OPTION: WHEN RECESSING A MIRRORED SHAVING CABINET
1. Remove all doors and drawers.
2. Position unit in desired location and check all sides are sitting level.
3. Mark the position of the top of the cabinet.
Minimum 20mm allowance for opening the door & room to install a light if needed.
Complete Step 1, cut a hole 4mm bigger than the overall cabinet carcass in the wall. Position and secure cabinet in cut out, go to Step 2.
Note: Make sure the hole has sufficient nogging to fix top and bottom of carcass. Ensure the cabinet carcass protrudes by a minimum of 20mm from
(including
Apply non-acidic silicone to all edges where cabinet meets the wall and floor.
Note: Gap sealant can be used in place of silicone where the unit meets tiled surfaces.
Securely fasten cabinet to the wall through back with appropriate screws/bolts at TOP and BOTTOM of cabinet. Evenly space apart the horizontal fixings at a maximum of 300mm apart.
Note: Where a stud or support beam cannot be located, use an appropriately sized hollow wall anchor.
4. ADJUST DOORS & DRAWERS
Install drawers and doors back onto cabinet and make adjusments to align the doors and drawers correctly. See pages 8 -13 for instructions. For Detachable Kickboard Intsallation refer to page 5.
EASY LINK BRACKET INSTALLATION
If your cabinet or mirror is fitted with easy link brackets, please follow these instructions:
1. Measure location of easy link bracket on back of mirror or wall storage.
2. Mark location of bracket on wall, ensuring it is level.
3. Place wall bracket on the level line and mark screw locations (minimum of 4 screws, 1 going into stud). 1. POSITION CABINET & LEVEL 3. SEALING 2. SECURING THE CABINET
Pre-drill through hole locations into wall with appropriate drill bit. 5. Securely fasten wall bracket with appropriate screws through pre-drilled holes.
5. Once bracket is secure place mirror/wall storage onto bracket.
You may require different wall fixings depending your wall material (brick etc). Wall fixings not included.
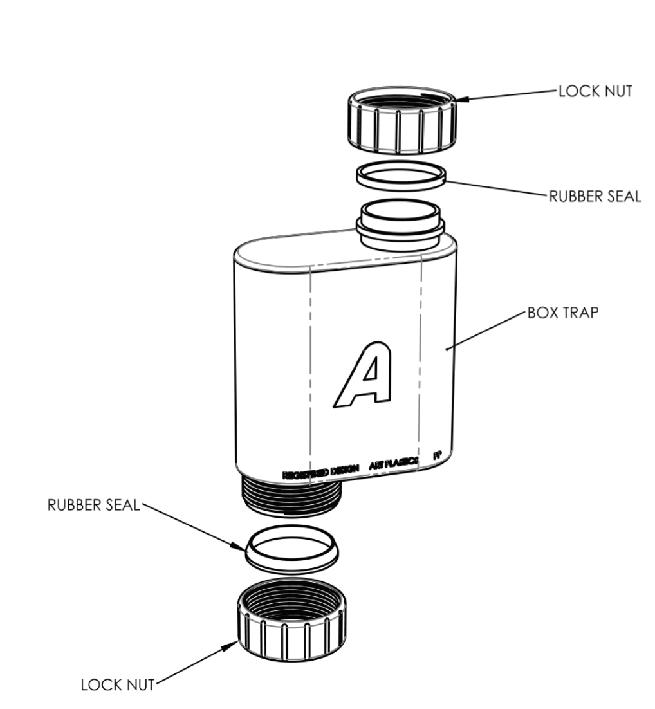
UNIVERSAL PLUG & WASTE INSTALLATION
Note: All plumbing components must be installed by a licensed plumber.
TO INSTALL
1) Remove washers and removable plug (A) & check waste fits in hole.
2) For ceramic basins - Place thin foam washer (C) in position under rim of Waste Neck (B) & seal in place with a non-acidic silicone. For all other basin material types, you do not need foam washer (C) before sealing in place.
3) Insert into centre of waste hole.
4) Insert Rubber Washer (D) on top of section (E) and screw on (hand tight only).
5) Insert Removable Plug (A) into the Waste Neck (B), ensuring you align the grooves until the waste is seated & locked into place.
Please Note: Ensure Rubber Seal (A.2) and O-Ring (A.3) are installed on Removable Plug (A) in order to provide a watertight seal.
IMPORTANT
Avoid overtightening waste to prevent stress & damage to the basin or top HAND TIGHTEN ONLY
Must be sealed with NON-ACIDIC silicone sealant
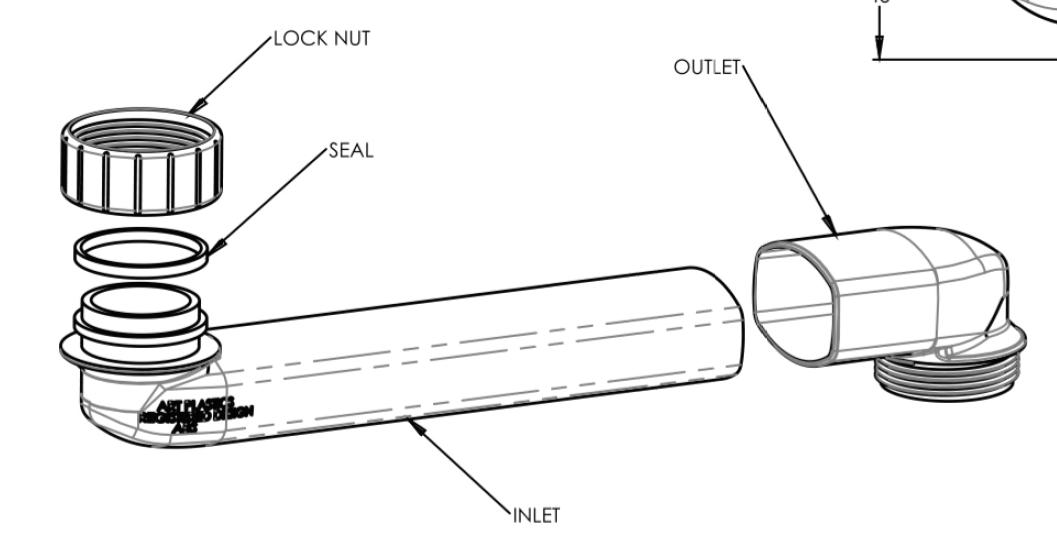
SPACE SAVER PLUMBING KIT
Note: All plumbing components must be installed by a licensed plumber. Inlet (Pipe) can be cut down to a minimum length of 90mm, to accomodate for smaller spaces.
DRAWER INSTALLATION & ALIGNMENT
IDENTIFY DRAWER TYPE
Identify what drawer system the cabinet has and then follow the corresponding instructions. If you need help identifying your drawer type or cannot find the drawer system in this booklet please go to www.adpaustralia.com.au or call us on (02) 4271 2444.
PRESSED METAL (PAGE 15 )
Note: The drawer sides could be white or grey metal.
DELUXE LED CLEAR GLASS SIDES (PAGE 17)
HETTICH INNOTECH (PAGE 19)
Note: The drawer sides are available in white or graphite finish.
PREMIUM SOLID OR LED FROSTED GLASS (PAGE 16)
Note: The drawer sides could be white, graphite or LED glass.
HETTICH MULTITECH (PAGE 18)
HETTICH AVANTECH (PAGE 20)
PRESSED METAL DRAWERS
DRAWER HEIGHT ADJUSTMENT
Loosen the front screw.
Turn the back screw to adjust the height of the drawer front. Turn anti-clockwise to go up and clockwise to go down.
DRAWER LATERAL ADJUSTMENT
When drawer height is aligned, tighten the front screw. Repeat on both sides of drawer if needed.
Loosen top and bottom screws on both sides of drawer.
Slide drawer front left or right.
REMOVING & INSERTING DRAWER
REMOVING INSERTING
Slide drawer out, lift up and out to remove. Insert drawer on an angle. Align top of metal sides onto runners in cabinet and push into place.
When drawer front is aligned, tighten all screws in place.
DRAWER FRONT REMOVAL AND INSTALLATION
To remove drawer front: Loosen front screw on both sides until drawer front comes off.
To install drawer front: Align drawer front with sides of drawer and tighten front screw to secure in place.
TROUBLESHOOTING - HOW TO RE-ENGAGE THE SOFT-CLOSE ADAPTER
Soft-close not working?
1. Remove drawer.
2. On inside of cabinet, re-set the trigger by pulling the tab towards the front of the cabinet.
3. Insert drawer and the soft-close should re-engage.
Note: If this does not solve the problem, your cabinet may not be level or plumb as there could be an alignment issue.
REMOVING DRAWER
HETTICH AVANTECH DRAWERS
DRAWER
DOOR HINGE ALIGNMENT
DOOR HINGE INSTALLATION
REMOVING & INSTALLING DOORS
TO REMOVE DOORS: Apply finger pressure to clip at back of hinge and pull forward to release.
TO INSTALL DOORS: Align door hinge with hinge mount on carcass, press back of hinge into place and listen for a ‘click’ to lock the hinge in place. You may need to apply a little force to lock the hinge in place.
Use the thumb wheel to adjust the depth of the drawer front. The system can give you 2.5 to 5mm of adjustment.
Once you have removed door from the cabinet, using a flat head screw driver, lift and release the top cover plate.
REMOVING HINGE FROM DOOR REPLACING HINGE ON DOOR
With top cover plate lifted, place hinge into position on door and insert into holes until flush.
Once secured in position, click cover plate down to lock into place. Pull hinge up and out from door. You may need to wiggle the hinge to loosen and use a little force.
Let’s talk bathroom ventilation
Signs of poor ventilation
Good bathroom ventilation will save you thousands of dollars and keep your family healthy - mould can be a huge problem in bathrooms if they’re not properly ventilated.
We’ve broken down everything you need to know about ventilation with a handy guide.
Scan to watch a quick 3 minute video with our top bathroom care and maintenance tips to ensure you get years longer out of your bathroom products!
Why ventilation is so important
The earliest sign to look out for is black spotting on mirrors.
When the steam or humidity rises to the top of the room and ventilation is not sufficient, the mirror (which is normally positioned high up in the room) is the first thing to steam up. Over time, this causes damage to the mirror that appears as black spots or corrosion which cannot be reversed.
Other signs might include paint starting to flake on the ceiling, bubbling of paint coatings on fixtures, and furniture swelling.
Evidence of mould or mildew is also a good indicator that your ventilation is not adequate.
How to achieve good ventilation
It’s crucial to have the best ventilation possible for your bathroom as moisture can be the root of all wet area products breaking down and failing, in particular your vanity and mirror. These products are usually water resistant not waterproof so it’s important moisture does not build up which will mean your products will last longer, saving you money!
Good ventilation is also key to achieve lower humidity in the room which will minimize bacteria growth and prevent mould and mildew. You’ll have less mildew on your grout, walls and ceilings, and fewer mould spores to threaten your respiratory health.
So why wouldn’t you keep your bathroom well ventilated!
The best sign that your ventilation is sufficient is that the mirror doesn’t steam up and the tiled walls aren’t wet.
The best way to achieve this is to have a good exhaust fan that is correctly sized for the space, to do this you need approximately 50 cfm per toilet and 50cfm per shower or bath. The fan should be installed to exhaust air into a duct that directs the air outdoors, not into your walls. Using the wall joists to guide exhaust air can result in moisture and mould problems in the walls.
Run the fan every time water is being used in the bathroom and run it for around 15 minutes after you shower.
If you have a bathroom window, opening that daily (even in the chilly winter months) in addition to using the exhaust fan will help to keep your bathroom fresh and mould-free.
We hope you enjoy your well ventilated, mould-free bathroom for many years to come!
A note about your vanity top or basin
Thank you for purchasing our product. We just wanted to let you know a few things about your new product.
Your vanity top or basin is a handcrafted product that has endured high temperatures during the manufacturing process, some size variation and visual distortion is to be expected. This is not a defect but can be seen to add to the aesthetics of the product.
Due to the nature of the manufacturing process, every item is unique. Please be assured that slight surface variances and size tolerances are normal. We have a thorough quality control process that ensures the finished product meets quality guidelines and is as close to the nominal specifictaions as possible.
Here at ADP, we take pride in delivering quality products and are committed to a sustainable future.
Please take care
So you can enjoy your vanity top/basin for many years to come, care must be taken.
Some materials are more heat and scratch/chip resistant than others, to preserve the surface and protect against heat damage do not place hot items directly on the surface. Avoid dropping heavy or sharp objects on surfaces as scratching and chipping may occur.
PROBLEM LIKELY CAUSE
I have noticed damage to my product, should I install it?
No - advise the store you purchased the product from before installation.
Where can find specifications or more information for the product have purchased?
My cabinet doors are out of alignment.
My cabinet drawers are out of alignment.
There may have been some movement in transportation and installation which causes doors to become unaligned.
There may have been some movement in transportation and installation which causes drawers to become unaligned.
Go to www.adpaustralia.com.au. If you still can’t find what you’re looking for, call us on (02) 4271 2444.
My drawer is not closing properly.
Incorrect installation, debris in the drawer runners or an obstruction preventing the drawer from closing.
Follow the hinge adjustment instructions on page 13 to align doors.
Wipe, Rinse, Dry
Keep it simple for everyday cleaning.
Wipe gently with a warm and soapy damp cloth or sponge, using a mild detergent. Rinse off with clean water.
Dry with a soft towel or microfiber cloth for an impeccable finish!
My metal-sided drawer with soft-close adapter is not working properly?
The soft-close adapter may not be engaged.
Identify drawer type (page 8) and follow the corresponding instructions to adjust and align drawer.
- Check the drawer box has been installed correctly (page 8).
- Check the cabinet has been installed correctly (eg. is it level & plumb?).
- Check there is no debris in the drawer runners and vacuum out if there is.
- Check there is nothing obstructing the drawer (eg. plumbing or tap hose).
Remove drawer. On inside of cabinet, re-set the trigger by pulling the tab towards the front of the cabinet. Insert drawer and the soft-close should re-engage.
I am missing something from my order (eg. vanity bin or basin).
Notify place of purchase of missing parts.
- Debris build up eg. soap scum, hair etc.
- Not installed correctly.
My plug & waste is not sealing / holding water.
- Silicone has not been applied under waste rim, allowing water to escape.
- Pull out the plug (part A) and clean thoroughly, removing any debris.
- Ensure the plug is locked in place - push down until you hear a ‘CLICK’ to provide a watertight seal. See page 8.
I have a stain or mark on vanity top or basin.
Identify benchtop or basin material and see care & maintenance guidelines on page 14 for appropriate cleaning method.
WARRANTY WARRANTY
NOTE: Unless otherwise stated warranties for ADP products are
Our products come with guarantees that cannot be excluded under the Australian Consumer Law. You are entitled to a replacement or refund for a major failure upon inspection by an authorised representative where a product is found to be defective in construction, material or assembly. You are also entitled to have the goods repaired or replaced if the goods fail to be of acceptable quality and the failure does not amount to a major failure, free of charge.
CONDITIONS
1. Items must be installed by a licensed tradesperson.
2. Failure is due to a fault in the manufacture of the product.
3. Proof of purchase is provided.
4. The installation of the product is in accordance with the instructions provided.
Please report any issues with your product within 48 hours of receiving your goods, no claims will be considered after this time. No claims for damages or wrong product will be recognised after installation.
EXCLUSIONS
To the fullest extent permitted by law, the manufacturer excludes all liability for damage or injury to any person, damage to any property and any indirect consequential or other loss or damage. Manufacturer will not be liable for the cost of installation or removal of any unit and the warranty will be VOIDED if damage occurred during or after INSTALLATION or a damaged or incorrect unit has been installed. Door and drawer adjustment; Unsuitable or improper use; Incorrect installation or installation not in accordance with the instructions provided; Installation or part installation by the purchaser or any person other than a LICENSED tradesperson; Normal wear and tear; Inadequate or complete lack of maintenance; chemical, electrochemical or electrical influences; excessive heat damage or Harsh detergents or abrasive cleaners used on product finishes, are NOT considered a warranty issue. Water damage is not covered under ADP Warranty. Acrylic, Ceramic, Solid Surface and Bamboo basins and tops have a maximum water temperature of 65°C, Cast Marble has a maximum water temperature of 70°C, water temperatures above this will void warranty.
CLAIM PROCEDURE
For all warranty queries customers are to contact the branch where the product was purchased (these details can be found on your purchase invoice) or go to www.adpaustralia.com.au/warranty-support to submit a claim.
SERVICE CALL OUT FEES & CHARGES
In the event of a call out for issues covered under the ADP manufacturer warranty, no call out fees will apply.
If ADP is called out and the cause of the issue falls within the warranty exclusions or the installation instructions have not been adhered to, the following charges will apply:
Call out fee: $198.00 initial cost, first 15 minutes included.
Service time onsite: $24.75 / billed in 15 minute increments.
Call out times: Business hours 9am - 5pm.
Note: Response time will depend on technician availability.
WARRANTY AGREEMENT - HOME OWNER TO KEEP
IMPORTANT: Warranty form to be completed by a licensed qualified tradesperson responsible for the intsallation of this unit. Any warranty will be VOIDED if unit is not installed by a licensed qualified tradesperson.