
Chapter 2
When applicable, please select all correct answers.
1. Theprocessofconvertingfromanalogtodigitalinformationisatwo-stepprocess—samplingand quantizing.Inconvertingananalogimagetoadigitalimage,thesamplingrateaffects_____.
A.thebitdepthoftheresultingdigitalimage
B.thepixeldimensionsoftheresultingdigitalimage
2. Theprocessofconvertingfromanalogtodigitalinformationisatwo-stepprocess—samplingand quantizing.Inthequantizationstep,toconvertananalogimagetoadigitalimage,_____.
A.atwo-dimensionalgridisappliedontheimageandeachtinycellonthegridisconvertedintoapixel
B.atwo-dimensionalgridisappliedontheimagetoapplyditheringtotheimage
C.aninfinitenumberofcolorshadesandtonesinananalogimageismappedtoafinitesetofdiscretecolor values
D.theresultingdigitalimagefileiscompressedtohaveasmallerfilesize
3. Whichofthefollowingfactorswillincreasethefilesizeofadigitalimage?
A.largerpixeldimensionsoftheimage
B.highercolordepth
4. Adigitalimagecapturedatahigherresolution_____thanitwouldhaveifithadbeencapturedatalower resolution.
A.capturesmoredetails
B.hasmoredifferentcolors
C.hasahigherbitdepth
D.hasalargerfilesize
E.haslargerpixeldimensions
F.usesahighersamplingrate
5. Adigitalimagecapturedatahigherbitdepth_____thanitwouldhaveifithadbeencapturedatalowerbit depth.
A.capturesmoredetails
B.hasmoredifferentcolors
C.hasalargerfilesize
D.haslargerpixeldimensions
E.usesahighersamplingrate
6. Theterm pixel iscontractedfromthewords_____and_____.
7. True/False :Apixelisapointsample,notalittlesquare.
8. True/False :An1-bitcolordepthallowsonlyblackandwhitecolors.
9. An1-bitcolordepthallows_____colors.
10. An8-bitcolordepthallows_____colors.
11. A24-bitcolordepthallows_____colors.
12. Bitmappedimagesarecomposedof_____.
A.individualpixels,whichrepresentspatialsamplesoftheimageorscene
B.mathematicaldescriptionsofimageelements,whichincludepoints,lines,curves,andshapes
13. Vectorgraphicsarecomposedof_____.
A.individualpixels,whichrepresentspatialsamplesoftheimageorscene
B.mathematicaldescriptionsofimageelements,whichincludepoints,lines,curves,andshapes
14. Themainadvantage(s)ofbitmappedimagesovervectorgraphicsis(are)_____.
A.scalabilityorresolutionindependenceofimages
B.easeofeditingtheimagecontentpixelbypixel
C.morecompactfilesizecomparedtovectorgraphics
15. Themainadvantage(s)ofvectorgraphicsoverbitmappedimagesis(are)_____.
A.scalabilityorresolutionindependenceofimages
B.easeofeditingtheimagecontentpixelbypixel
C.morecompactfilesizecomparedtobitmappedimages
16. Sometimeswhenyoumagnifyapictureonyourcomputerscreen,linesthatshouldbestraightlines appeartobejagged.Thiseffectiscalled_____.
A.anti-aliasing
B.aliasing
C.dithering
D.indexing
17. Generallyspeaking,howdoesthefilesizechangeifthetotalnumberofpixelsofanimageisdoubled?
18. Generallyspeaking,howdoesthefilesizechangeifthenumberofpixelsofboththewidthandheightof animagearedoubled?
19. Generallyspeaking,howdoesthefilesizechangeifthebitdepthofanimageisincreasedfrom8bitsto16 bits?
20. Generallyspeaking,howdoesthefilesizechangeifthebitdepthofanimageisincreasedfrom8bitsto24 bits?
21. Giveoneexampleoftheimagefiletypethatsupportslossycompressionandonethatsupportslossless compression.
22. Whichofthefollowingarefileextensionsofpixel-basedfiles?
BMPDOCJPEGTXTPNGGIFFLA
JPGPSDTIFFEPSWMFSWFAI
23. Whichofthefollowingarefileextensionsofvectorgraphicfiles?
BMPDOCJPEGTXTPNGGIFFLA
JPGPSDTIFFEPSWMFSWFAI
24. WhataretheprimarycolorsintheRGBcolormodel?
25. WhataretheprimarycolorsintheCMYcolormodel?
26. WhataretheprimariesintheHSBcolormodel?
27. Whichofthefollowingcolormodelstakestheformofacolorcube?
A.RGB
B.CMY
C.HSB
D.CIEXYZ
28. Whichofthefollowingcolormodelstakestheformofahexacone?
A.RGB
B.CMY
C.HSB
D.CIEXYZ
29. WhichoftheprimariesintheHSBcolormodeltakestheformofacolorwheel?
A.hue
B.saturation
C.brightness
30. WhatisthecolormixingmethodfortheRGBcolormodel?
A.additive
B.subtractive
31. WhatisthecolormixingmethodfortheCMYcolormodel?
A.additive
B.subtractive
32. Forthe24-bitcolordepth,whataretheRGBvaluesfor
(i)white
(ii)black
(iii)red
(iv)green
(v)blue
(vi)cyan
(vii)magenta
(viii)yellow
(Youcanusethecolorpickerinyourimageeditingprogramtoconfirmyouranswers.)
33. WhatarethetheoreticalCMYvaluesfor
(i)white
(ii)black
(iii)red
(iv)green
(v)blue
(vi)cyan
(vii)magenta
(viii)yellow
34. WhataretheHSBvaluesfor
(i)white
(ii)black
(iii)red
(iv)green
(v)blue
(vi)cyan
(vii)magenta
(viii)yellow
(Youcanusethecolorpickerinyourimageeditingprogramtoconfirmyouranswers.)
35. WhatistheprimaryuseoftheCMYKcolormodel?
36. Whydon’tthecolorsinaprintedimagelookexactlythesameasthoseyouseeonthe computerscreen?
© 2016 Pearson Education, Inc., Hoboken, NJ. All rights reserved.
Answers to the accompanying lab for the book: "Digital Media Primer" Yue‐Ling Wong, Copyright (c)2015 by Pearson Education, Inc. All rights reserved.
Lab: Digital Image Alteration
Required Application Program: Adobe Photoshop or Corel Paint Shop Pro.
Objectives:
1. Selectively alter an area of an image by making a selection.
2. Apply your knowledge of the various selection tools to choose the best tool for different tasks.
Pre-lab:
If you are not familiar with the following selection tools in Photoshop, review the Photoshop Selection Tools videos.
Lab:
Task #1:
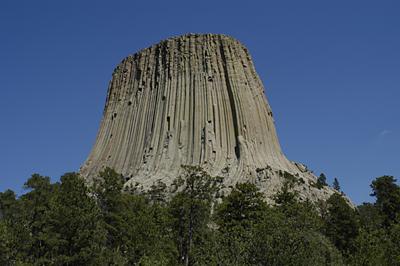
1. Open the files: sky.psd and devil-tower.psd (Figure 1a).
2. In the devil-tower.psd, make a selection of the whole clear blue sky area. Apply what you have learned about selection tools and techniques from the chapter and the videos to make the selection.

3. Copy the whole image of the sky.psd. Be careful not to accidentally deselect the sky selection.
4. Return to the devil‐tower.psd. While the blue sky is still being selected, choose Edit > Paste Into. (Note: NOT just Paste, but Paste Into.)
5. Save the file if you need to turn in your file.
The sky image you have copied should now be pasted into the selection. See Figure 1b for the resulted image.
(a) (b) magnetic lasso
marquee
polygonal lasso
quick mask
2. If you used more than one selection tool, what was the secondary selection tool you used?
3. Describe briefly how you made the selection, for example, the settings you used to set the tool's option.
4. Discuss any problems in the process.
Task #2:
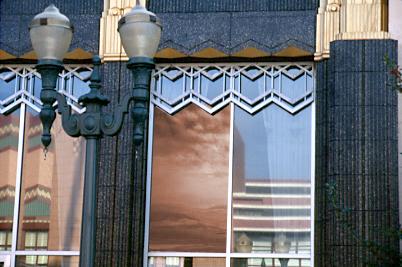
1. Open the files: sky.psd and window.psd (Figure 2a).
2. Make a selection of the middle pane of the window. It is where the change from Figure 2a to Figure 2b occurs.Apply what you have learned about selection tools and techniques from the chapter and the videos to make the selection.
3. Copy the whole image of the sky.psd. Be careful not to accidentally deselect the window selection.
4. Return to the window.psd While the window pane is still being selection, choose Edit > Paste Into (Again, NOT just Paste, but Paste Into.)
5. Save the file if you need to turn in your file.
The sky image you have copied should now be pasted into the selection. Figure 2b shows the resulted image.
Figure 2. (a) The original window.psd. (b) The altered image in which the reflection of the middle window pane is replaced with the sky image.

Write‐up:
1. Which of the followings is the primary selection tool you used to make the selection?
polygonal lasso
lasso
magic wand
magnetic lasso
marquee
polygonal lasso
quick mask
2. If you used more than one selection tool, what was the secondary selection tool you used?
3. Describe briefly how you made the selection, for example, the settings you used to set the tool's option.
4. Discuss any problems in the process.
Task #3:
1. Open the files: window.psd (Figure 3a).
2. Make a selection that includes everything except the middle window pane. Apply what you have learned about selection tools and techniques from the chapter and the videos to make the selection.
3. Choose Image > Adjustments > Hue/Saturation... in Photoshop, or Adjust > Hue and Saturation > Hue/Saturation/Lightness... in Paint Shop Pro. Lower the saturation all the way to the minimum so that the selected area is turned into grayscale. Figure 3b shows the resulted image.

4. Save the file if you need to turn in your file.
Write‐up:
5. Which of the followings is the primary selection tool you used to make the selection? polygonal lasso and then invert the selection
lasso
magic wand
magnetic lasso
marquee
polygonal lasso
quick mask
6. If you used more than one selection tool, what was the secondary selection tool you used?
7. Describe briefly how you made the selection, for example, the settings you used to set the tool's option.
8. Discuss any problems in the process.
Answers to an accompanying worksheet for the book: Digital Media Primer, Yue‐Ling Wong. Copyright (c)2015 by Pearson Education, Inc. All rights reserved.
Answers for Worksheet: Printing DPI vs. Image PPI
2. How does the printer DPI affect the output physical dimension of your printed image? no effect
3. How does the printer DPI affect the print quality (how noticeable the printer dots are) of your printed image?
higher DPI: the printer dots are less noticeable
4. How does the printer PPI affect the output physical dimension of your printed image? higher PPI: smaller printout
5. How does the printer PPI affect the print quality (how noticeable the printer dots are) of your printed image? no effect
Answers to an accompanying worksheet for the book: Digital Media Primer, Yue‐Ling Wong. Copyright (c)2015 by Pearson Education, Inc. All rights reserved.
Worksheet: JPEG Compression Artifact
Application Program Required
Adobe Photoshop 5.5 or later
Objectives
1. To take a closer look at the JPEG artifact.
2. To learn where JPEG artifact is most visible.
Introduction
JPEG is a common file format for Web images. Many digital cameras also save digital photographs directly in JPEG format, which, for some cameras, may be the only choice of the file format.
Have you noticed any ugly artifact in some JPEG images? If you are posting your portfolio of art work as JPEG images on the Web, you should understand how the JPEG compression affects your image quality and how to minimize the artifact.
The example image you will use in this exercise has many solid color areas and edges where sharp color changes occur. It is not the type of images that JPEG compression is best for because the JPEG compression artifact is more pronounce. However, this will make it easy for you to see the artifact in this exercise.
Instructions
A sample image, called solid-color-ex.tif, can be downloaded from the companion Web site of the book. Look under JPEG Compression Artifact. This example image is a TIF file with no image compression. The image is made up of large areas of solid colors and gradients.
I. Compression Quality and File Size
1. Open the image with Adobe Photoshop, and convert this image into JPEG files with different compression level.
2. If you have access to Photoshop 5.5 up to CS2, choose File > Save for Web… If you have Photoshop CS3 or later, choose File > Save for Web & Devices...
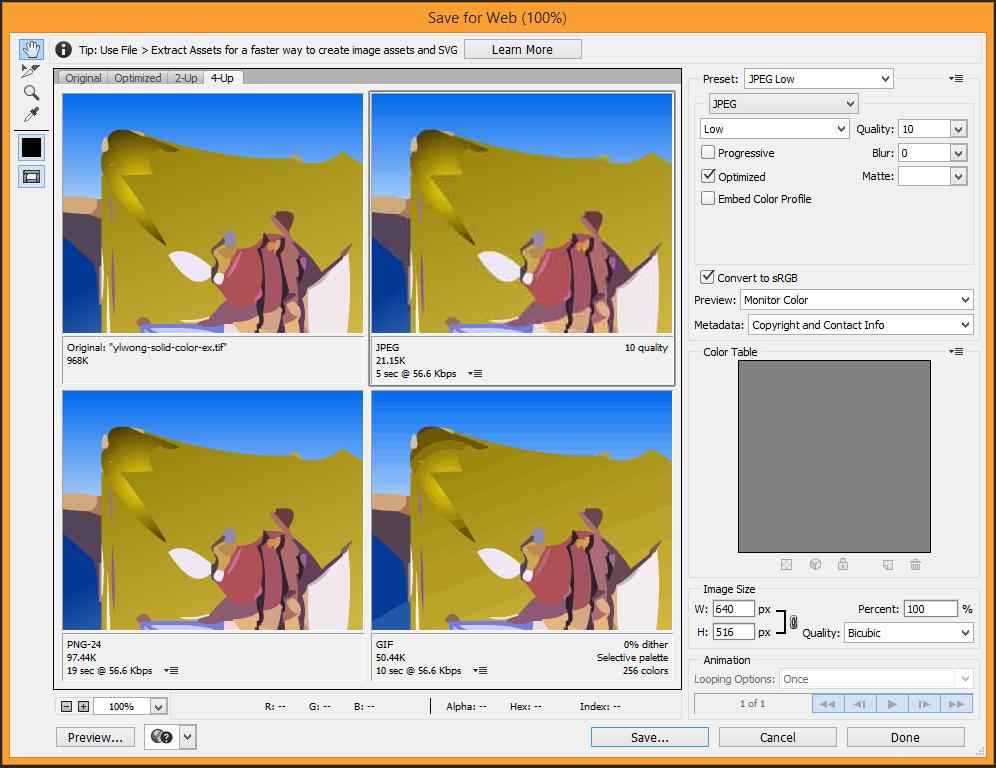
3. Click the 4‐Up tab (Figure 4 and Figure 5, on the last page of this worksheet), so you can see the original TIF image and three optimized images of different JPEG compression settings simultaneously.
4. Click on each of these three different optimized images, and select JPEG from the Optimized File Format dropdown menu. Then select from the Compression Quality dropdown Low, Medium, and Maximum.
1. Note down in the table the file sizes and the time to transfer the file over a specific network connection speed:
Time (sec.) at what Network Connection Speed
smallest should be the shortest
largest should be the longest
2. Which compression quality among the three in the table above gives the best image quality?
3. Which compression quality among the three in the table above gives the worst image quality?
5. Zoom in the images to look closely and compare the original TIF image with the three optimized images. Do you see the difference?
4. Where are the artifacts most visible? A
A. At the intersection of very different colors
B. Within a solid color away from the edge of the color
6. Select the optimized image that has the Compression Quality set to Maximum; you can also directly set the Quality to 100. Save the optimized image as max.jpg.
II. Take a Closer Look at the JPEG Image
Open this max.jpg file in Photoshop. It may look the same as the original TIF image to the naked eyes. However, some colors are altered, especially the pixels around the edges where sharp changes of colors occur. Try these:
1. Use the Magic Wand selection tool, with its Tolerance set to zero, click to select a solid color area in the original TIF image. The circumference of the selection should follow nicely around the outline of that solid color area (Figure 1a).
2. Now, try the same on the max.jpg. How is the shape of the selection? Most of the middle area is in the selection but the edge around the solid color is not. And, the selection outline is a little jagged (Figure 1b).
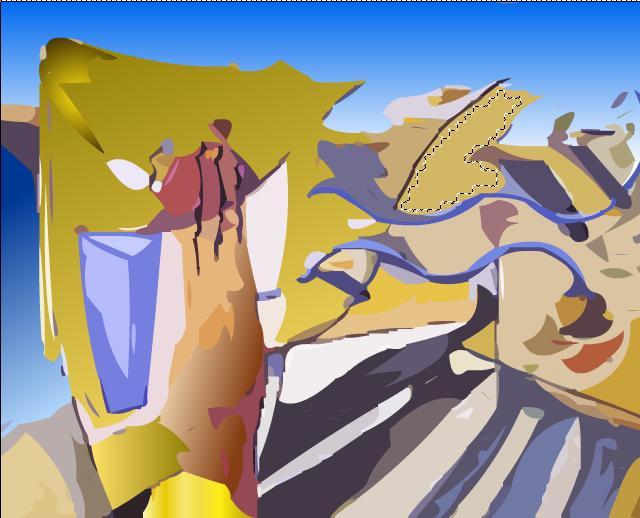

5. Why can you tell from the observation in the above steps that the max.jpg is not exactly the same as the original TIF? (First, what does setting the Tolerance of Magic Wand to zero means?)
The Tolerance of the Magic Wand tool being zero enforces that it only selects one single color.
The above steps demonstrate that the originally solid color area is not anymore a single solid color in the max.jpg. Otherwise the whole solid color area would have been selected with the Magic Wand tool at Tolerance set to zero.
Lower compression quality settings can impose very visible alternations on the image, but the Maximum setting causes only indiscernible alterations. The Maximum setting gives larger file size but it is still much smaller than the original TIF.
But how would this affect the way you create your digital images? This affects how you use the image. For example, any images that are intended for further editing should not be kept in JPEG format because every time you save a JPEG file, it gets altered even if you have not changed anything. (See the following sections)
III. Resaving a JPEG Even at 100% Will Alter the Image
1. Open max.jpg in Photoshop and save it as max2.jpg You can choose the Maximum compression quality.
2. Close the file and open the max2.jpg in Photoshop.
Since the compression quality is set to Maximum, the alternation caused by the JPEG artifact is indiscernible. To see if max2.jpg is really altered from max.jpg, try the following:
i. Use the Magic Wand selection tool, again with its Tolerance set to zero, click to select a solid color area in the max.jpg Fill the selection with a distinctive color, such as black. (Edit > Fill…)
ii. Now, try the same on the max2.jpg.
iii. Zoom in both max.jpg and max2.jpg Compare the newly filled color shapes. They are different!
IV.
Resaving a JPEG Will Lower the Quality
Open the original TIF file in Photoshop and save it as JPEG at the compression quality set to zero. Name the new file as max0.jpg.
Open this max0.jpg in Photoshop. Zoom in the image to 600%. You will see that the colors seem to be grouped in square blocks (Figure 2).
6. Do all the square blocks have the same pixel dimension? Yes
7. What is the pixel dimension of the square blocks?
(There are many ways to find out the pixel dimension of the square blocks. One way is to use a Rectangular Marquee Tool to make a selection around a square block. Then, look at the Info palette for the width and height of the selection.)

8 pixels 8 pixels
Why are the colors grouped in square blocks of such a pixel dimension? It is related to the JPEG compression algorithm—how it compresses the image file. For the sake of making the artifact more visible, we have you save a JPEG at zero compression quality. You may also see such artifact in other JPEG files, especially those are saved at low compression quality or have been saved as JPEG over and over. If you are interested in learning more about the JPEG compression algorithm, an in‐depth discussion can be found in the digital imaging chapter of the Computer Science Module.
V. Resaving a JPEG at 100% Will NOT Recover the Quality
With this max0.jpg still open in Photoshop, save it as max0max.jpg by setting the Compression Quality to Maximum Open max0max.jpg in Photoshop and note its image quality.
8. The image quality of max0max.jpg is: B
A. recovered, and is as good as, or almost as good as, the max.jpg – the JPEG saved directly from the original TIF at the maximum compression quality.
B. worse than max0.jpg, or at least there is not any observable improvement over max0.jpg
VI. Summary and Conclusions
9. True/False: Saving an image as JPEG at lower compression quality for Web images can reduce the image's network transfer time. T
10. True/False: One should keep the original image for further image editing. T
11. True/False: The quality of an image file that is saved as JPEG over and over at the maximum compression quality is as good as saving the file as PSD (Photoshop file). F
12. True/False: An image that is saved as JPEG at any compression quality can be recovered to the original quality any time by re‐saving it in another uncompressed file format such as Photoshop PSD. F
13. True/False: JPEG is a compressed file format. T
14. True/False: JPEG uses a lossless compression, i.e. no information is lost during compression. F
15. True/False: JPEG file format is best suited for high contrast images or those with sharp color changes throughout the image. F
16. Name one file format, in addition to PSD (Photoshop), that will not cause degradation in image quality. for examples, TIF, PNG, BMP
17. The most visible JPEG artifact occurs at the edges where sharp color changes occur


Answers to an accompanying worksheet for the book: Digital Media Primer, Yue‐Ling Wong. Copyright (c)2015 by Pearson Education, Inc. All rights reserved.
Worksheet: JPEG vs. GIF vs. PNG Application Program Required
Adobe Photoshop 5.5 or later
Objectives:
1. To learn to optimize files in JPEG, GIF and PNG format and adjust the compression settings to achieve the balance between the file size and overall image quality.
2. To learn the type of images that each of these file formats is most effective at compressing.
Introduction:
The three image file formats supported by the Web browsers are JPEG, GIF and PNG. Each employs different compression algorithms to make the file size smaller. Because of the different algorithms, they work best with different types of images.
The JPEG format works best with continuous‐tone images with a board color range and subtle color and brightness variations, such as photographs and images with gradients. It supports 24‐bit color (millions of colors). JPEG compression is a lossy compression which means that during compression, image data is lost to make the file size smaller. High JPEG compression tends to blur the image detail. (See the JPEG worksheet for more detailed hands‐on experimentation.)
The GIF format supports up to 8‐bit color (256 colors), but it also supports background transparency. It is most effective for images with solid colors such as illustrations, logos, and line art. It uses a palette of up to 256 colors to represent the image. If the original image has more than 256 colors, then you will need to reduce the colors. There are several color reduction options available, or you can also customize the colors to be included in the palette. A sequence of images can also be put together into an animated GIF.
The PNG‐8 format uses up to 256 colors to represent the image; similar to GIF. The PNG‐24 supports 24‐bit color, including transparency information. Unlike the JPEG format, PNG is a non‐lossy compression method. Depending on the image and the JPEG compression, PNG‐24 may yield a larger file size than JPEG compressed from the same image.
Instructions: Several sample images can be downloaded from the book's Web site. Look under Chapter 3's worksheet on JPEG vs. GIF vs. PNG.
1. Download the sample images from the book's Web site, or use images of your own. (Get instructions from your instructors about the number and type of images you need to use to complete this exercise.) Each image in this worksheet is provided with a brief description on the characteristics of the image. If you are using your own images, write a brief description about the unique characteristics of the image and how you obtained the image (e.g. captured directly from a digital camera as what file format, scanned from a slide, a negative, or a print, at what color depth and in what file format.)
2. Open the image in Adobe Photoshop. To optimize the image for the Web, choose File > Save for Web
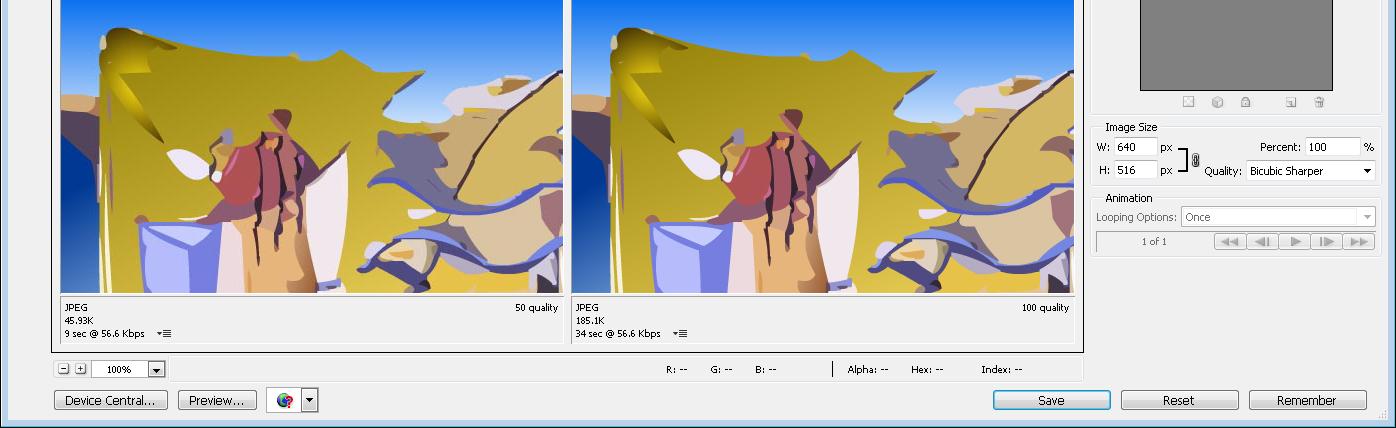
3. Click on the 4‐Up tab to see the original image and three possible optimized images. (See the figure of the screen capture of the Save for Web dialog box below. The screen capture shows the JPEG compression options on the right. Compression options vary with file format. Also read the Help to find out more about how to use the Save for Web dialog box.)
4. For each image, try each of the following file types: JPEG, GIF, PNG‐8, and PNG‐24. Determine the best compression settings for each of these file formats for the same image. Note down the settings and the file size on the following pages. Circle the one that you think it gives the best balance between file size and image quality. And, comment on the resulting optimized image and give the rationale for your decision.
Description and characteristics of the image
This is a slide of a pen‐and‐ink drawing, scanned at 24‐bit color. The background had a cast of non‐uniform gray when it was first scanned. This image has been cleaned up to show a uniform white background. Compare the GIF file with the one before the cleanup. See why it is worthwhile to spend a little more effort to clean up the scanned images, especially art drawings, before editing and optimizing.
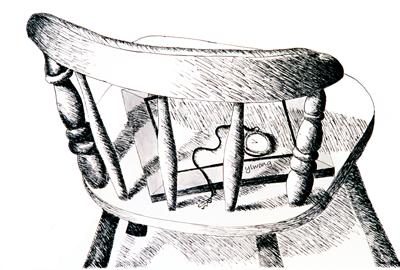
This is also a continuous tone image because it was scanned from a slide. But you can use a file compression method below to make it look crisp like the original art work. Which file format is the best choice for this image?
For each of the file formats below, fill in the optimized settings and file size, especially those highlighted in yellow. Then, circle the file format that you think is the best for this image for the Web.
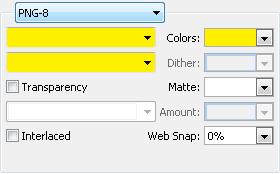

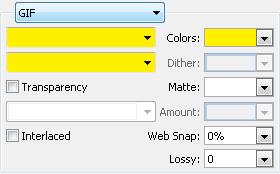
File Size: KB File Size: KB
File Size: KB File Size: KB
Comment on the resulting optimized image and give the rationale for your decision, for example:
overall fidelity to the original image quality and detail
which parts of the image suffer the most loss of detail and degradation of visual quality
which parts of the image has the least discernible degradation

whether the areas that suffer the most degradation in detail are the focal point of the image
file size
Description and characteristics of the image
This is a slide of a pen‐and‐ink drawing, scanned at 24‐bit color. The background has a cast of non‐uniform gray when it was first scanned. There is another image that has been cleaned up to show a uniform white background. Compare the GIF file with the one before the cleanup. See why it is worthwhile to spend a little more effort to clean up the scanned images, especially art drawings, before editing and optimizing.

This is also a continuous tone image because it was scanned from a slide. But you can use a file compression method below to make it look crisp like the original art work. Which file format is the best choice for this image?
For each of the file formats below, fill in the optimized settings and file size, especially those highlighted in yellow. Then, circle the file format that you think is the best for this image for the Web.
File Size: KB File Size: KB
File Size: KB File Size: KB
Comment on the resulting optimized image and give the rationale for your decision, for example:
overall fidelity to the original image quality and detail
which parts of the image suffer the most loss of detail and degradation of visual quality
which parts of the image has the least discernible degradation
whether the areas that suffer the most degradation in detail are the focal point of the image
file size
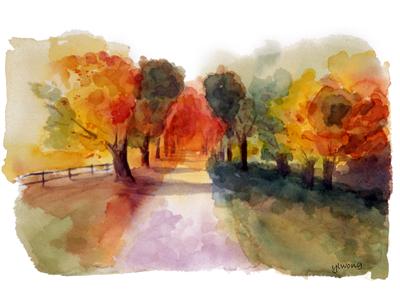
Description and characteristics of the image
This is a slide of a watercolor painting, scanned at 24‐bit color. The background had a cast of non‐uniform gray when it was first scanned. This image has been cleaned up to show a uniform white background.
For each of the file formats below, fill in the optimized settings and file size, especially those highlighted in yellow. Then, circle the file format that you think is the best for this image for the Web.
File Size: KB File Size: KB
File Size: KB File Size: KB
Comment on the resulting optimized image and give the rationale for your decision, for example:
overall fidelity to the original image quality and detail
which parts of the image suffer the most loss of detail and degradation of visual quality
which parts of the image has the least discernible degradation
whether the areas that suffer the most degradation in detail are the focal point of the image
file size
Description and characteristics of the image
This was painted in Adobe Photoshop with mostly soft‐edged brushes with no color variation in a stroke.
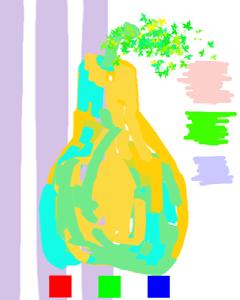
For each of the file formats below, fill in the optimized settings and file size, especially those highlighted in yellow. Then, circle the file format that you think is the best for this image for the Web.
File Size: KB
File Size: KB
File Size: KB
File Size: KB
Comment on the resulting optimized image and give the rationale for your decision, for example:
overall fidelity to the original image quality and detail
which parts of the image suffer the most loss of detail and degradation of visual quality
which parts of the image has the least discernible degradation
whether the areas that suffer the most degradation in detail are the focal point of the image
file size