6 minute read
TUTORIAL - AutoEntry

by XU Magazine

@OCRexSoftware Originally a software developer in the hedge fund space, he quit his job and started AutoEntry. AutoEntry supplies to over 2000 accounting firms and automates data entry of purchase and sales invoices, receipts, bank statements and more, providing significant time and cost savings.
AutoEntry: advanced, featurerich automation of data entry to Xero
This tutorial will quickly demonstrate why you might just fall in love with AutoEntry given its ability to not
only capture invoices and receipts to a basic level, but also capture invoice line items, match invoices to purchase orders, capture sales invoices and even bank and card statements.
Whether you’re an accountant, bookkeeper or business user of Xero, being able to simply snap a pic of all of those documents on your phone and to have them automatically publishing to Xero has got to be a no-brainer.
For this example we’ll assume the role of a bookkeeper processing purchase invoices or receipts, but the steps and benefits are similar for all Xero users and document types.
As an accountant or bookkeeper, by empowering your clients to submit documents directly as and when they receive them, AutoEntry can
1) Inviting your client(s) to AutoEntry
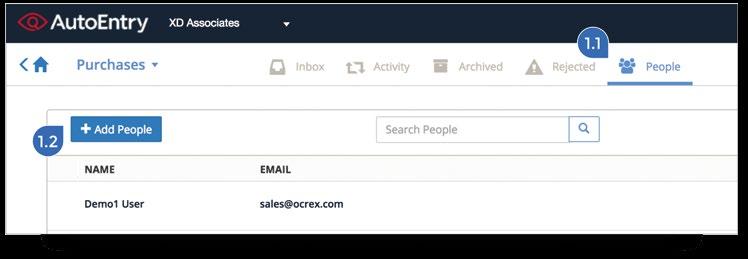
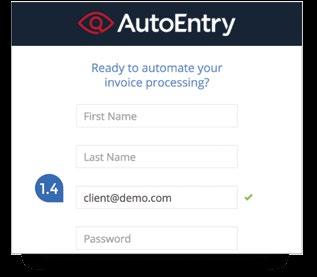
Once you have set up a company on AutoEntry, you will need to invite your client or colleagues to the company to allow them upload and process documents.
From the People tab (1.1) use the Add People button (1.2). Then enter their email address (1.3) and confirm the company you wish to invite them to.
Your client will soon receive an email invitation containing a link for them to follow to complete their registration on AutoEntry.com (1.4). help deliver your services more quickly while also creating a steady, manageable flow of work for you or your team. While reviewing the processed results on AutoEntry, you can choose to accept and remember any matches we detect between the Vendor/Supplier and your existing Xero contacts, or create a new contact, along with associated nominal and tax codes.

Setting up these rules as you go will bring real time savings to you and your team as subsequent uploads to this Company that meet the same criteria can be set to automatically publish to Xero as soon as we’ve completed data extraction and verification.
There are several methods for adding documents to a company in AutoEntry. While the most extensive upload options are available via the AutoEntry website, your clients may find Email or Mobile uploading more convenient.
Upload via Web:
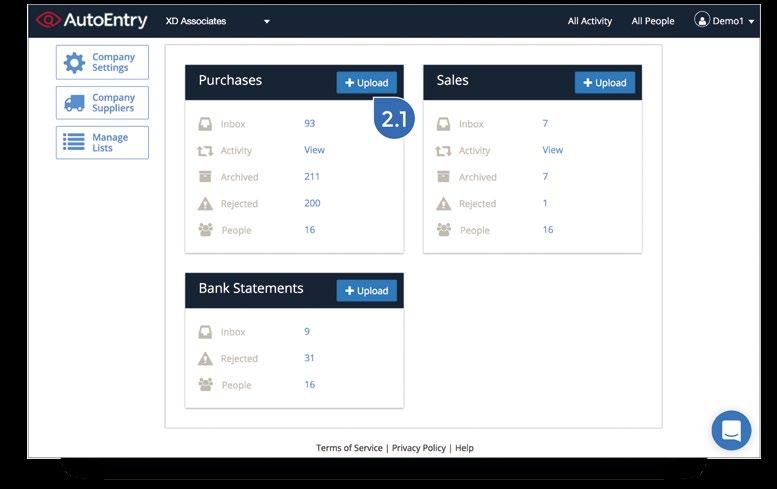
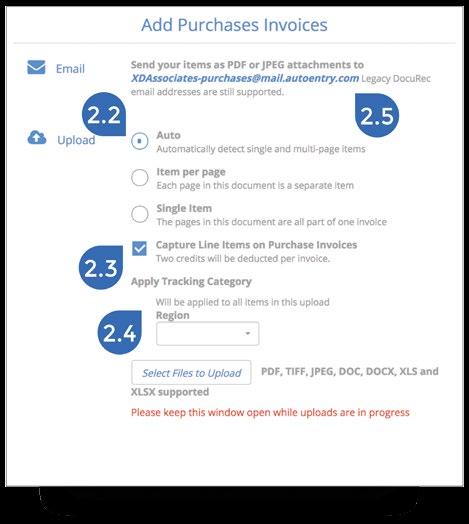
Tap the Upload button for the Purchases folder (2.1) to bring up its upload window If you wish to upload a batch of invoices, choose “Auto” (2.2) and AutoEntry will cleverly split the batch into individual invoices whether they be multi page, single page, or a mix. Select the check box on the Capture Line Items option to instruct AutoEntry to capture all line items from a given batch of invoices (2.3). To apply a given Xero tracking category to a given invoice or to all invoices within a batch upload, choose the tracking category here (2.4).
Submitting via Email:
Each company is also set up with a unique email address so that invoices can be submitted or forwarded to AutoEntry from you, the client, or their suppliers. Simply email the invoice as an attachment to the designated email address (2.5) and AutoEntry will do the rest.
Snap and upload on Mobile:
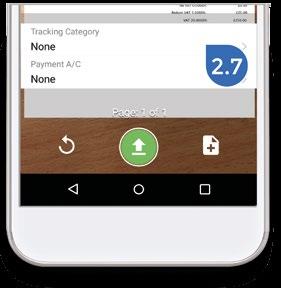
The AutoEntry iOS or Android mobile app couldn’t be easier. Simply snap an invoice or receipt (2.6) and quickly append pages. Apply Tracking Categories and Payment Account before upload. While your clients will only see their own company to upload to, you and your team can access your full list of Companies from within the app should you find it more convenient than using an office scanner.


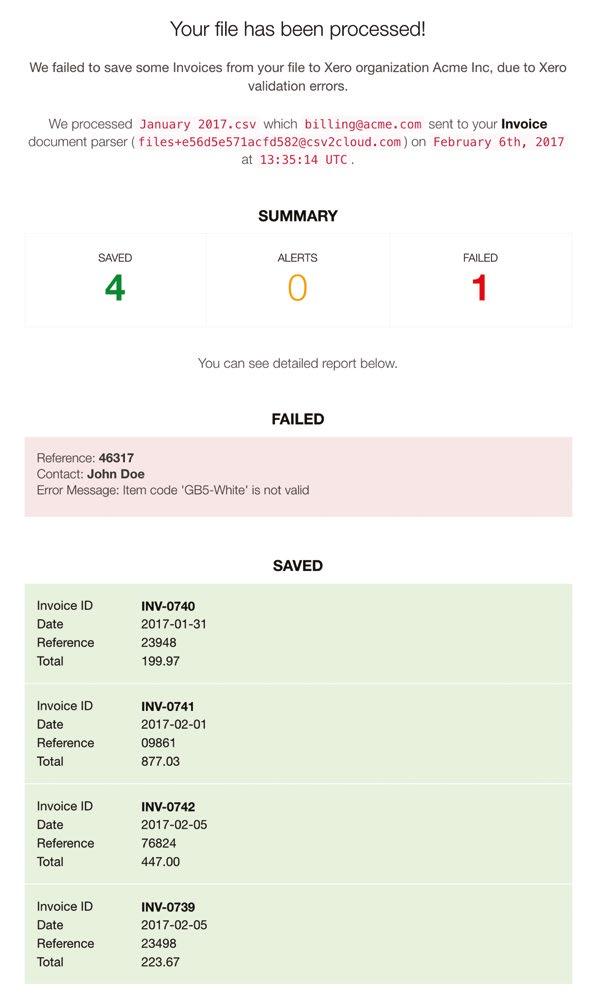
Your Purchase Inbox will show you a list of all of the invoices that AutoEntry has processed and which are ready to to publish into Xero. This will show you key fields from each invoice and let you choose/change the selected expense categories and tax codes (where relevant) (3.1).
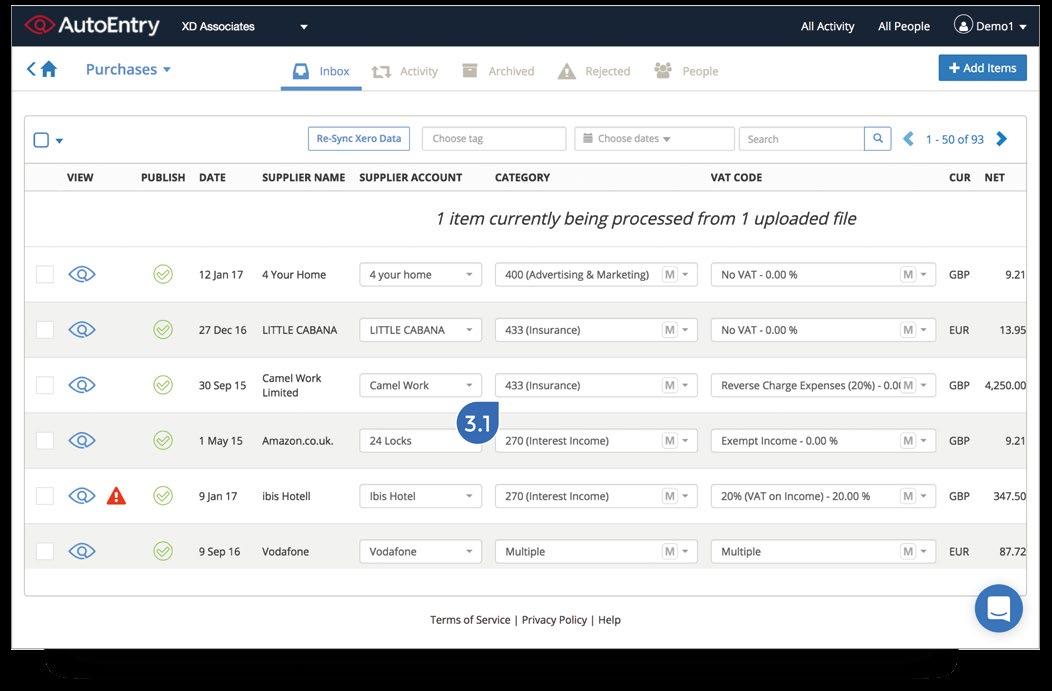
By this point AutoEntry has already performed:
1. Arithmetic validation to safeguard against incorrect figures being published to Xero. 2. Intelligent matching the supplier name captured from the invoice to your existing Xero contacts. It looks for acronyms of the full name and other common variants so as not to prevent duplicate supplier accounts being created. 3. Having learned from previous occasions and/or any defaults already set up in Xero itself, AutoEntry will apply the appropriate expense categories and tax codes automatically. Of course, you can overwrite and update the rule as you go if you need to. 4. Duplicates have been identified and marked as
Rejected to prevent publication to Xero.

Mobile List View:
Within the app, all of your items will be listed in order along with their current status.
Job + project + stock management
POWERFUL SOFTWARE


DELIGHTFULLY SIMPLE
Tidy helps streamline inventory:

“I can’t imagine life without TidyStock. Every day we use TidyStock - it’s the hub of everything that we do. We could do without some of the other packages and still be able to run the business quite e ciently. Without TidyStock we wouldn’t go ” anywhere. We wouldn’t be able to run the business. Steve Bennett, Managing Director and Founder, Woof & Brew, UK
Users of
JOB MANAGEMENT STOCK MANAGEMENT CONSTRUCTION MANAGEMENT MANUFACTURING
Selecting an item in the Inbox list will bring you to its Invoice View where you can review and edit all its fields in either the header (4.1) or line items (4.2) next to the invoice image.
You can even match the invoice to a Purchase Order, though AutoEntry will likely have this done for you automatically if the value or the PO is the same as the total on the invoice.

You can share a link to this invoice with colleagues or others perhaps to check if it is approved for payment (4.3).
Once you are satisfied with the invoice and line items details, simply hit Publish (4.4) to send it to Xero and move on to the next invoice in your Inbox. This also moves the invoice to the Archived tab so your Inbox stays focused on items that require your attention (4.5).

One really nice gismo we add to these published items is the ability to be able to click on the “View in Xero” badge (4.6). When viewing these invoices in Xero you will also see a useful link back (4.7) to the item here in AutoEntry.