3.1.2 CHANGING TO A NEW INDEX GEAR—ALIGNING TO THE KEY When you change the Index Gear it is always necessary to re-align the keying—that is, to align the Index Gear 0 position at a 90° relationship to the Dop Alignment Pin (thus making the Pin parallel to the Lap surface). When doing this, also set the Index Vernier at a 0 position. The tool for accomplishing the alignment is the Alignment Bar that is included with your machine (it looks like a little “hammer”). . Faceting instructions call for use of particular Index Gears. Although transposing from one gear to another often can be done, it is easier to use the specified gear. 1.
To change an Index Gear, first remove the Dop-retention screw from the Quill. Then, loosen the set screw in the hub of the Index Gear and slide the Index Gear forward, off the spindle. Also, remove the Detent (a gear segment)--it is held by a screw (there may be a washer behind it).
2.
Now, install the new Detent and tighten the screw. Slide the new Index Gear onto the Spindle, and snug the setscrew slightly (so that the Index Gear can still rotate on the Spindle). Re-assemble the Dop Retention Screw into the Quill.
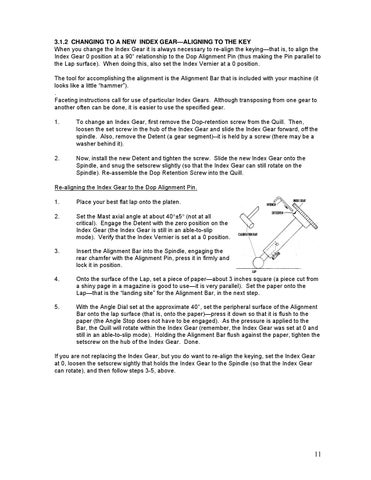
Re-aligning the Index Gear to the Dop Alignment Pin. 1.
Place your best flat lap onto the platen.
2.
Set the Mast axial angle at about 40°±5° (not at all critical). Engage the Detent with the zero position on the Index Gear (the Index Gear is still in an able-to-slip mode). Verify that the Index Vernier is set at a 0 position.
3.
Insert the Alignment Bar into the Spindle, engaging the rear chamfer with the Alignment Pin, press it in firmly and lock it in position.
4.
Onto the surface of the Lap, set a piece of paper—about 3 inches square (a piece cut from a shiny page in a magazine is good to use—it is very parallel). Set the paper onto the Lap—that is the “landing site” for the Alignment Bar, in the next step.
5.
With the Angle Dial set at the approximate 40°, set the peripheral surface of the Alignment Bar onto the lap surface (that is, onto the paper)—press it down so that it is flush to the paper (the Angle Stop does not have to be engaged). As the pressure is applied to the Bar, the Quill will rotate within the Index Gear (remember, the Index Gear was set at 0 and still in an able-to-slip mode). Holding the Alignment Bar flush against the paper, tighten the setscrew on the hub of the Index Gear. Done.
If you are not replacing the Index Gear, but you do want to re-align the keying, set the Index Gear at 0, loosen the setscrew sightly that holds the Index Gear to the Spindle (so that the Index Gear can rotate), and then follow steps 3-5, above.
11