8 minute read
Collimation

Any telescope system needs to be in collimation. This means that all of the optical components and their mechanical adjuncts are all properly aligned. Refractors generally don't need adjustment and with many it isn't possible . Any reflector will have the ability to be properly collimated.
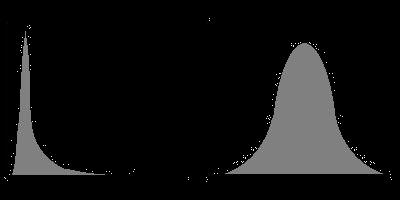
A well collimated telescope will display sharper, more contrasty images and will allow dimmer stars or objects to be photographed. An example of an out-of-focus star image both out of collimation and in collimation is shown in Figure 111.
Advertisement
Fig. 111 There are many different tools that are on the market to help properly collimate a telescope. These can be simple or quite complex. A précis of a few of them follow:
A collimating cap
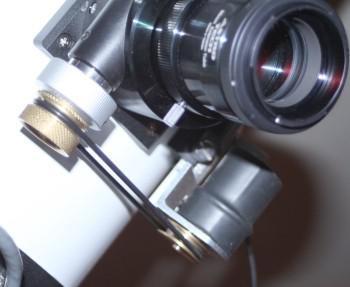
This cap can be as simple as a 35 mm film can with a small hole drilled in the centre of one end that is put in the focuser and looked through. Better is a 1.25” cap with a hole in it put onto a 1.25” eyepiece barrel such as in Figure 112. These are mostly used to properly orient the secondary mirror of a Newtonian reflector.
A sight tube with cross-hairs (Cheshire or not)
These are very versatile tools but shy away from the cheap, plastic ones. If the sight tube is short enough this can double as the above-mentioned collimating cap. A Cheshire tube can, on its own, collimate a Newtonian reflector to a very high degree of accuracy if one's eyes can accommodate focusing very near and middling far. A Cheshire sight tube is shown in Figure 113.
Fig. 112

89 Fig. 113
A barlow lens
Any old barlow will do: single-element, achromatic or multi-element. Stick with an actual barlow though, as I don't know how this procedure will work with a TeleVue PowerMate unit. They're technically not barlows.
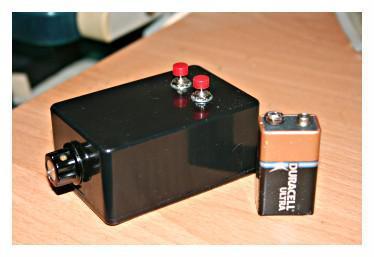
A laser collimator
A good one. I've gone through two inexpensive lasers that weren't themselves collimated and therefore, other than for use with a barlow (explained later) pretty much useless. The Hotech self-centring laser (Figure 114) is very nice as are any of the units from Howie Glatter.
Fig. 114
Auto-collimator
This is a small plug that fits in the focuser with a centre hole. Inside is a plane, polished reflector. It all works like those mirrors in old barber shops where you see multiple reflections stretching into the distance. Between the collimator and the primary mirror you get multiple reflections and if there is any mis-alignment this can be corrected by adjusting the primary mirror until all the reflections coincide.

The least expensive, yet very accurate Cat's Eye passive auto-collimator system has gottenrave reviews in Cloudy Nights and other venues.
Newtonian Reflector
There are several parts to the basic Newtonian that all have to be aligned both mechanically and optically in order for the telescope to deliver the best image. Collimation starts from the eyepiece and works its way out so the first thing that must be looked at is the placement of the focuser and the secondary spider. These are both beyond the scope of this document as we'll assume that the focuser and secondary spiders have been properly installed.
90
First in the sequence of collimation is the aligning of the the secondary mirror. This has to be properly positioned in the optical tube to be able to pass the maximum amount of light from the primary mirror up the focuser.
To check on the positioning of the secondary mirror use a collimation cap as shown in Figure 112 (or a Cheshire sight tube). Looking into the telescope with the cap in place the secondary mirror should appear round and perfectly centred in the focuser. Most secondary mirrors can be adjusted along the optical path to centre by loosening a large central screw in the secondary holder. Once it is centred then the collimation cap is swapped for either a Cheshire tube or laser. I'll discuss the laser first.

Place the laser in the focuser and turn it on and look down the telescope towards the primary mirror. A laser dot should appear on the mirror. Adjust the three collimating screws in the secondary holder (don't touch the large central screw) to move the laser dot into the 'doughnut' on the primary mirror (Figure 115). Fig. 115
All Newtonians these days have central spotted mirrors but if your's doesn't you'll need to put one on by removing the main mirror, finding the centre and sticking on one of those paper reinforcements from a stationery store.
Once the secondary mirror has been aligned then it is time to move to the primary mirror. The mirror cells of all Newtonians should have 'push/pull' screws to properly orient the mirror. If the telescope has a truss tube then a short collimator such as those from Howie Glatter that protrudes from the focuser inside the telescope and is visible from the rear can be used.
Fig. 116

91
If the telescope is a solid-tube type then a laser unit as shown with a cutout that can be seen from the rear can be used. Either way the idea is to adjust the primary to get the laser reflected back directly into the hole that it came out of (Figure 116 left).
The 'barlowed laser' method is also very effective. This method not only removes from the equation any mis-collimation of the laser device but also any 'slop' in the focuser. To do this, once you have aligned the secondary mirror take the laser out, insert it into a barlow lens then replace it in the focuser. Now the laser will illuminate the area around the central doughnut on the main mirror and reflect back the shadow of the doughnut as shown in Figure 116 (right). Adjust the push/pull screws to centre the doughnut's shadow.
Using a Cheshire sight tube such as the one shown in Figure 113 allows for a very accurate alignment of a Newtonian's optical path. The device is placed into the focuser and the alignment is checked by looking at the image seen of the various optical components.
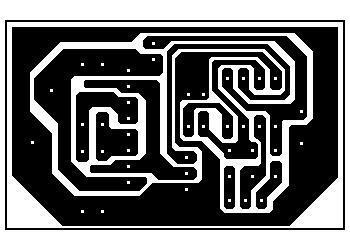
To start with nothing is aligned (Figure 117 top). Place the Cheshire tube in the focuser and look in through the peep hole. The secondary (lilac) is not properly positioned so loosen the large central screw on the secondary holder (check the telescope's documentation) and move the secondary so that it is perfectly centred in the Cheshire (Figure 117 second graphic).
Now adjust the collimating screws on the secondary so as to put the cross-hairs on the primary mirror's (red) centre spot (Figure 117 third graphic). The green circles are the shadow of the secondary and Cheshire. The grey circle is the primary mirror with its hold-down clips.
Now adjust the primary mirror's adjustment screws or knobs until the shadow of the secondary and Cheshire are under the cross-hair (bottom graphic). Don't worry if the shadow of the secondary appears off centre. It is supposed to be.
With the view through the Cheshire as in the bottom picture at the right a Newtonian telescope will be in very accurate alignment.
Today's fast Newtonians being used with coma correctors require a high degree of collimation accuracy. Either a laser or Cheshire will allow this level of accuracy to be achieved.
92 Fig. 117
Schmidt-Cassegrain
Schmidt-Cassegrain telescopes (SCT) generally don't have any method of aligning the primary mirror and therefore only the secondary needs adjusting.
To properly collimate an SCT really requires a star but there are devices on the market such as the Hotech Advanced CT Laser Collimator that can accurately align an SCT indoors during the day. There is a fine video on Hotech's website of how this device works but I'll stick to something a bit simpler.
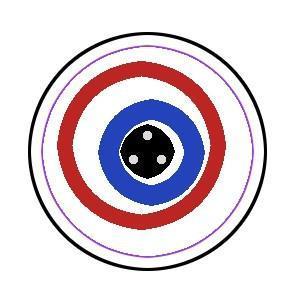
To start the collimation process on an SCT first set the telescope up so that you can comfortably sit and look down the tube from the front at a distance of about 2 focal lengths from the corrector plate. Centre yourself in front of the secondary holder and look at the 'circles'. These will be the edge of the front cell, the primary mirror, a Fig. 118 reflection of the secondary, etc. If properly collimated they will be concentric. In an uncollimated SCT the view will be something like Figure 118.
Adjust the three collimation screws in the secondary holder until all of the circles are centred and aligned. When this is done the rough collimation is complete and it is time to head out and find a nice 2nd magnitude star. Polaris is a good choice. Select an eyepiece which gives a good amount of magnification and put the star in the field, centred and slightly de-focused. The star must be in the centre of the field and it must be returned to the centre of the field after each adjustment.
In an un-collimated SCT the out-of focus star will show the shadow of the secondary mirror off-centre. Figure 119 shows the star both focused (centre) and either side of focus in an un-collimated telescope.
Fig. 119

With some SCTs collimation may be a two-man job with one person looking at the star and the other adjusting the collimation screws. Bob's Knobs, which are thumbscrews that replace the phillips or hex screws, make collimation simper and allow one person to collimate smaller SCTs.
93
The outcome is to have the shadow of the secondary centred to a high degree of accuracy. It takes practice, but once it has been done a few times it becomes second nature.
Maksutov Cassegrain
Maksutov Cassegrains (MCTs) are much like SCTs except that most have the secondary as only an aluminized spot on the front corrector plate. These will have push/pull collimation screws in the cell that holds the corrector and which allows the collimation of the telescope. Some MCTs do have adjustable secondaries and primaries but these are not the norm.
Image of the Pacman Nebula, NGC281. Captured with a Canon/Hutech 500D mounted on an AstroTech 8” imaging newtonian on a Celestron CGE. Ten 5-minute images at ISO800.

94