5 minute read
Focusing Masks

Focusing masks are opaque sheets that are placed over the front of a telescope to block most of the light from entering. The light that is allowed to enter does so only through strategically placed holes in the mask to either create multiple images or a diffraction pattern. These are used as focusing tools and are designed so that the pattern created at focus is different from that created out of focus.
The simplest focusing mask and possibly the oldest is the Hartmann mask. This may have two or several holes in it allowing light to enter. Technically a mask with two holes is a Scheiner disc but in common usage all of these are known as Hartmann masks. Some have round holes and others have triangular holes that add diffraction spikes to the images created but they all work the same way. Shown in Figure 61 are the two types of masks.
Advertisement
The way that a Hartmann mask works is that the light impinging on the optics will, if out of focus, create as many images as there are holes in the mask. With the mask above left two images will be created whether the optics are inside focus or outside focus. The mask below left Fig. 61 will create three images along with six diffraction spikes. Adjusting the focus will cause the images to either converge or diverge. When they converge to a single image then the optical system is in focus as seen in Figure 62. When the focus is long or short (top and bottom grphics) two star images are seen. When in focus these merge into the single star shown in the centre graphic.

The drawback with a Hartmann mask is that there is no inherent way of knowing whether one is inside or outside of focus, and therefore no indication which way the focuser has to be racked to get the images to converge. This may not sound like a great drawback, but some folks, especially those operating their telescopes remotely feel that having that indication is a good idea.
There is a Hartmann mask template generator on-line at
http://www.billyard-ink.com/Hartmann.shtml
Fig. 62
59
Another focusing mask that is a bit more complicated than a Hartmann mask is the Bahtinov mask. This was designed by a Russian amateur astronomer named Pavel Bahtinov. It consists of three grids of straight lines in the mask; two angled outward and one below those that bisect them.
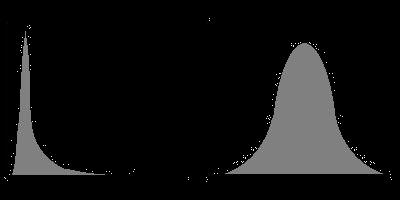
A Bahtinov mask is placed over the front of a telescope that is pointed at a brightish star. The image of the star will be a diffraction pattern shaped like an X with a long spike running through the X.

When in focus, the long spike perfectly bisects the X. At other positions the long spike will be on one side of the X or the other as shown in Figure 64. Fig. 63

Achieving critical focus is very simple if the image can be inspected at a high enough magnification. I have found that LiveView on my modified DSLR does magnify the image enough so that rough focus can be achieved but I have to take short exposures and inspect them changing focus between shots in order to get perfect focus.
Fig. 64 When taking images with the Bahtinov mask in place it is very easy to see whether the optics are in focus or not. With a DSLR I can zoom in a lot farther on an image being displayed on the LCD after shooting than I can using the LiveView therefore making my judgement of focus much better The image in Figure 65 of Sirius through a Bahtinov mask and then with the mask removed shows the diffraction pattern..
Fig. 65

60
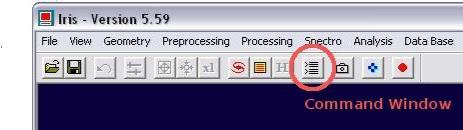
There is a new software tool on the market for use with a Bahtinov mask called Bahtinov Grabber. This freeware allows a section of a computer screen displaying a Bahtinov diffraction pattern to be analyzed. When perfect focus is achieved the software sounds a tone and shows a notification on screen.
Fig. 66
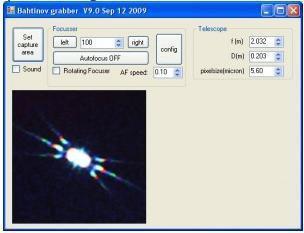
This software requires that ASCOM 5.5 be installed and, with that software, can use ASCOM compliant focusers to auto-focus a telescope to a very high degree of accuracy. The software window is shown in Figure 66 with the selected screen portion displaying a Bahtinov diffraction pattern and other controls above.
The auto-focus routines are in alpha as of this writing but with ASCOM providing the interface it shouldn't be too long before accurate and inexpensive auto-focus is available to all.
Figure 67 shows a Windows framegrabber displaying the Bahtinov diffraction pattern with the Bahtinov Grabber capture window showing it's 'in focus' display.

61 Fig. 67
The last focusing mask that I will discuss is a newer mask than the Bahtinov that works along the same lines in that the diffraction pattern is analyzed to test focus. This is the Carey mask and was invented by a British amateur.
This mask was invented to make exact determination of focus easier and yet still provide an indication of which way to move the focuser in order to achieve focus. To do this the mask must be placed on the telescope in the same orientation each time it is used.

The Carey mask has two sets of slots cut in with one set at 12 degrees and the other at 10 degrees. They create an X-shaped diffraction pattern with two X's overlaying each other. When inside of focus one side of the X will be splayed apart and when Fig. 68 outside of focus the other side will be. When the two are evenly overlapped then the optical system is in focus as can be seen in Figure 69 where the right hand panel is in focus and the other two are approaching.
Fig. 70

Fig. 69
When in perfect focus the two X's can be seen to be evenly splayed as Figure 70 shows.
62