
2 minute read
Write Block Surfaces and Objects


8. Place the block on the appropriate object layer. 9. Copy and replace as needed.
Placing Object Blocks on Layers
Advertisement
Once all the desired objects have been identified, sort and place each object block on a corresponding layer (Fig. 17-14).
Each individual object type, such as a tree or pedestrian light, has its own corresponding layer for that particular object. All pedestrian light blocks should be on the Pedestrian Light layer, all tree blocks should be on the tree layers, benches should be on a bench layer, etc. If organized correctly, the imported AutoCAD blocks will arrive in SketchUp organized and easy to manage.
Once the blocks are swapped with 3D components, those components will still remain on the same layer they were placed on in AutoCAD.
Fig. 17-14: Each site object type should be on its own layer. If any are not, place the site objects on the appropriate layer. For example, tree blocks should be on tree layers, pedestrian lights on a pedestrian light layer, etc.
Write Block Surfaces and Objects
Once the surface information has been compiled onto the 01 – Flatwork Base layer and objects have been identified and placed on the appropriate layers, the CAD_SU_BASE is complete.
The file information is now ready to be Write Blocked. Write Block (or WBlock) allows AutoCAD users to isolate specific information and export it out of AutoCAD, generating a new and separate AutoCAD file containing only the selected linework.
Two Write Block files will be exported from the CAD_SU_BASE: one file that represents the flatwork information and another file that contains object blocks.
Flatwork File
In AutoCAD, use the Express tool > Isolate layers to isolate the 01 –Flatwork Base linework. Alternatively, in the Layer menu, you can turn off all the layers except the 01 – Flatwork Base. The linework that represents the surfaces should be the only information that is visible.
Use the Write Block command to export the visible linework. 1. In the AutoCAD command window, type wblock. The Write Block menu will appear. 2. Select the surface linework and save the WBlock file into the 3D/CAD/Insert folder.
3. Name the exported information Flatwork (Fig. 17-15).
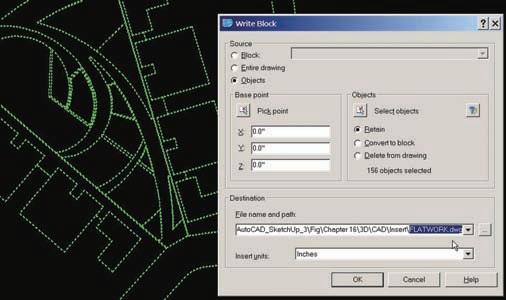
Fig. 17-15: The AutoCAD Write Block menu. Write Block (WBlock) the flatwork information to its own file called Flatwork. Save the file in the 3D CAD/Insert folder.
Object Blocks
Repeat the steps for all the object blocks. Isolate all of the object layers at once. Write Block the information and save it in the 3D/CAD/Insert folder. Call the exported information Objects (Fig. 17-16). The object blocks should all be saved out as a single file.
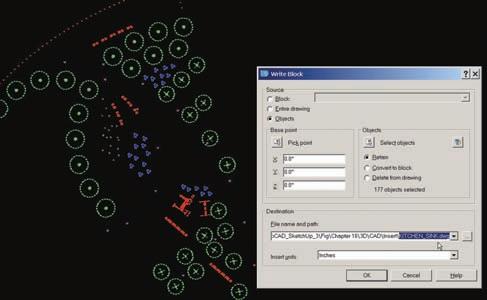
Fig. 17-16: Write Block the site object and site elements information.
Convert to Blocks
When both sets of information have been write blocked, close out of the CAD_SU_BASE. Navigate to and open both of the write blocked files: Flatwork.dwg and Objects.dwg.
Convert the information in each file into a single block (see “Creating AutoCAD Blocks”). Save the files and close. This step will help make the AutoCAD information easier to work with once it is imported into SketchUp. This is elaborated further in the next chapters. It should be


