11 minute read
Hephtig: Analog photography

Hephtig:
Analog Photography
Advertisement
The signs of a true hipster: man-bun, beard, a MacBook, a Starbucks cup with their misspelt name on it and an old-timey looking camera hanging around their neck. It’s this last part of the outfit that I want to discuss today because some interesting processes make it possible to transfer something you see in the world onto a piece of film.
WRITTEN BY CAS DIJKSTRA
The basics
To start off, let’s give a little bit of an introduction to the general workings of a camera for those of you who are less familiar with them. A camera takes an image by capturing the light reflecting from an object through a lens and projecting it onto a light-sensitive surface. In modern cameras, this surface consists of a digital sensor which is made up of many pixels. In an analog camera, this function is fulfilled by a roll of film which contains photo-sensitive crystals that react to the light falling on them.
When trying to understand photography, 3 technical terms are important to understand: Aperture is the size of the opening in the lens through which light enters the camera. A larger opening results in more light. Shutter speed is the time for which light is allowed to fall on the film or sensor. Finally, ISO is the sensitivity of the film or sensor. For a digital sensor, the ISO can be set for each individual picture. When working with an analog medium, the ISO is set by the film and cannot be altered halfway through.
In order to preview the image before you take it, many cameras use a prism/mirror system to reflect the image coming through the lens onto your eye. When taking a photo, the mirror flips up to allow the light to pass, the shutter opens for a short amount of time and the light is allowed to fall onto the film.
The film
This is really where the magic happens. There are many brands and variants of photographic film and they can produce wildly different looks. The film determines whether you shoot in black & white or colour. It also determines the contrast, colour profile, and quite importantly, the light sensitivity. Some films are more sensitive to light than others which means you can produce lighter images while keeping shutter speed or aperture low. There is also a difference between a film that produces negatives that can be printed or scanned and a film that produces slides (NL: dia’s). For this article, I will only discuss the photographic process and development of the negative film.
The photographic film consists of a coating of a gelatin emulsion that contains light-sensitive silver halide crystals. Silver halide is the common name given to silver salts that combine the element silver with a halogen element. For photographic film silver bromide is most commonly used. When a photon is absorbed by such a crystal, they cause a so-called free-carrier to be formed. An electron that can move through the crystal lattice structure. When one of these migrating electrons encounters a crystalline defect such as a dislocation or a small cluster of a trace element it can be trapped and combined with a silver ion to form metallic silver. Film manufacturers can add these trace elements or dislocations to the crystalline structure to increase the film’s sensitivity. They can also increase the size of the crystals on the film to the same effect. Important to note is that all the areas in the scene that are light will darken, whilst the dark areas will appear light. This is called a negative image. Through further processing or (in modern times) scanning, the image is converted to a (normal) positive.
The short exposure when taking the photo is not enough to produce a visible image. In the figure below, you can see a film that was exposed for 2 days, which produces a barely visible result. Here you can also see how the bright sky is black, while the shadowy scene is light.
In order to produce a visible image, the film must be developed. I will get to the development process later, but for now, it suffices to say that the more light a crystal has absorbed the stronger it will come through after development.


Colour film
Naturally, silver halide crystals are only susceptible to blue light. Colour photography became possible when certain dyes were discovered that could be adsorbed onto the crystals making them respond to other colours as well. In practice, this film is composed of at least three layers that capture the different primary colours. The blue-sensitive crystals usually make up the top layer of film, after that, a filter layer is applied to stop any blue light from interfering with the layers below.


The different layers of colour film can be seen in the figure above: (1) Film base; (2) Subbing layer, mostly an adhesive; (3) red-sensitive layer; (4) Green sensitive layer; (5) Filter; (6) Blue sensitive layer; (7) UV filter; (8) Protective layer. This is the minimum amount of layers, but different films can have as many as 12 emulsion layers containing all sorts of different chemicals to create a distinctive-looking image.
Developing film
As mentioned earlier, the exposure itself is not sufficient to produce a visible image. This is why the development process is necessary. During this process, the silver halide crystals that were exposed are fully converted to silver. To do this the film is soaked in a developer. This is a chemical solution that provides electrons to the crystals. The more light a crystal absorbed during the initial exposure, the faster this process will take place. This process has to be timed pretty precisely, if the film remains in the solution for too long all crystals will fully convert and the image will be blank. It is however possible to play around with the development time a little to purposely darken or lighten the image. This technique can also be used to compensate if the film was improperly exposed while taking the shot. After the development bath, the film is bathed in a stopper that halts the development process. The following fixer dissolves all remaining silver halide, making the film no longer sensitive to light. Up until this step, it is imperative that the film is not exposed to any light. Finally, clean water is used to rinse off any remaining fixer. The figure on the right shows all the stages of taking and developing the photo: First, the crystal is exposed, creating a small speck of metallic silver. During development, the exposed crystal is completely turned into metallic silver. The remaining silver halide is washed out by the fixer, leaving only the exposed crystals.
Colour processing
As explained earlier, the colour film uses certain dyes to retrieve colour information from the picture. During the development process, a few extra steps are necessary to produce the colours on the final negative. First of all, a different type of developer is used. When the electrons are donated to convert the crystals to metallic silver, this oxidizes the developer which in turn activates socalled “dye couplers” which produce colour dyes in each emulsion layer.
Next, the metallic silver is rehalogenized into silver halide, which can be removed by the fixer, leaving only the dyes.
The result
It really is quite a process to produce a single image and it is all much more complex compared to digital alternatives. Nonetheless, analog photography is on the rise. Photographers have different reasons for choosing film over digital. The fact is that film images have a different “look” to them. They are often a little more grainy and have not as much contrast as digital photos tend to have. This grain can be seen as a defect but for most this adds to the nostalgic feel of the picture.


JAMES BOND CARS
WRITTEN BY ROEL VAN DER VELDE
Bond. James Bond. You probably have heard that phrase a dozen of times before. It’s from MI6’s special agent 007. Associated with Bond are the beautiful Bond girls, high-tech gadgets, guns and of course, very fast cars. Let’s look at the cars of the most iconic British sports car manufacturer: Aston Martin!
The most iconic car of all must be the silver Aston Martin DB5 with all of its gadgets. The car had its first appearance in the third movie, Goldfinger (1964). Some of the gadgets this car has are the flipping license plate, machine guns behind the indicators, the pop-up bullet proof shield and, of course, the passenger ejection seat. The DB5 would return later in multiple movies and will return in No Time to Die, the upcoming 25th Bond movie. The car was powered by a 4.0-litre six-in-line engine providing for around 282 bhp and 390 Nm of torque. Its top speed is (only) 233 km/h and it takes 8(!) seconds to go from 0-100 km/h. For the time, these figures were amazing, but nowadays, a passenger car can do this.


Sean Connery with the famous DB5
The next Aston was the DBS, another beautiful Grand Tourer (GT). This car also had a 4.0 inline-six engine, generating 282 bhp and 543 Nm of torque. The car first appeared in the movie On Her Majesty’s Secret Service (1969). The DBS did not have the fancy gadgets the DB5 had, it only had a weapons compartment.
After the DB5 and the DBS, there were quite a few movies without Aston Martins. But in the movie The Living Daylights (1987), Aston returned with the Aston Martin V8. This is the successor to the DBS. Contrary to the cars before, this Aston had a V8 engine, as the name suggests. Specifically, a 5.3-litre V8 capable of 310 bhp and a torque of 490 Nm, enough to go from 0 to 100 km/h in 5.7 seconds!
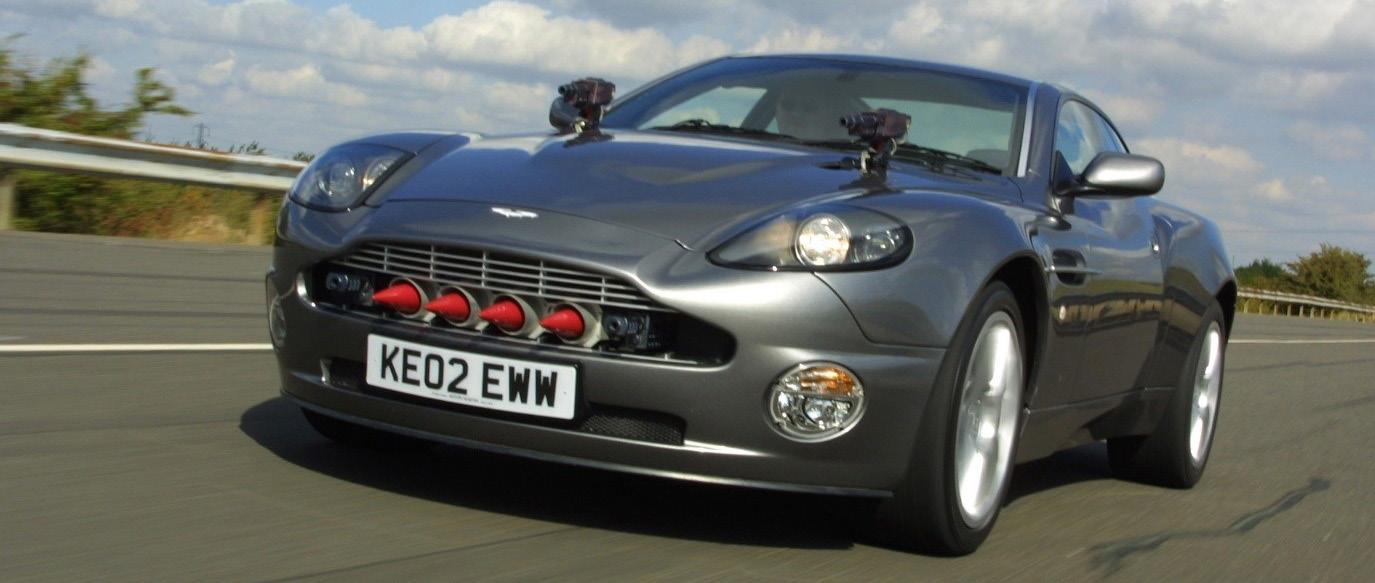
In the movies after The Living Daylight, the DB5 makes its appearance twice more before again a new Aston Martin can be seen in Die Another Day (2002). In this movie, you can see the V12 Vanquish (banner). Aston Martin is not really original with names, as this car has a 6.0 L V12 engine. This engine allows for 466 bhp and 542 Nm of torque and has an astonishing top speed of 306 km/h. A fun fact, the automatic gear box can shift in only 250 milliseconds! In the movie, the car has the nickname ‘Vanish’, as it had special adaptive camouflage. To make things even better, the car had a cloaking device making the car invisible with the push of a button. The car had even more gadgets, like guns and missiles in the grille, a device that can put the car back on its wheels when it has been flipped over, spikes, bullet proof windows and other high-tech gadgets. Aston was back with a high-tech car!
The next Aston we find in the movies is the DBS V12. It appeared in Casino Royale (2006) and Quantum of Solace (2008). It has the same name as the earlier car, but is the successor to the V12 Vanquish. This car also has the 6.0 V12, but this time it provides for 517 bhp and 570 Nm of torque. The 0-100 time has dropped even further to 4.3 seconds.
In Casino Royale, the car’s only gadgets are a defibrillator and a spare gun in the dashboard. The car also has a reinforced chassis to withstand the violent car chases in the movies.


The Aston Martin V8
In the most recent movie, Spectre (2015) the DB10 makes its appearance. This car was solely produced by Aston for the fifty-year partnership with the James Bond franchise. Only ten were manufactured, of which eight were used for the movie. As a result, the car is not street legal in any way and probably never will be. The DB10 has a 4.7-litre V8 engine producing 430 bhp and 490 Nm of torque.
The car takes much inspiration from the DB5 when it comes to 007-gadgets. Rear flame throwers, machine guns, ejector seats with parachutes and many more high-tech gadgets. Sadly for Bond, when being chased by Mr. Hinx (in an equally stunning Jaguar C-X75) through Rome, the machine guns were not loaded.
In the upcoming movie, No Time to Die, the Aston Martin Valhalla will make an appearance, next to the DB5, V8 and the newest DBS Superleggera. We only have to wait a while until the movie drops is released to know which gadgets these cars will have. Daniel Craig and the DB10


Prince Charles en Daniel Craig with the V8 and the DB5