7 minute read
More Physics Experiments


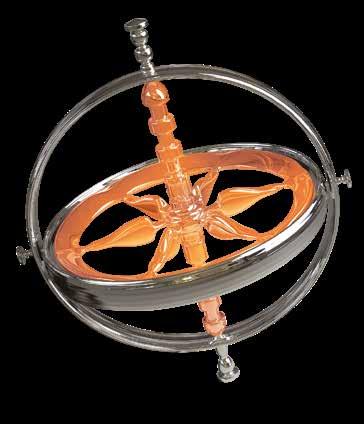
Sidewinder
Here’s how
Advertisement
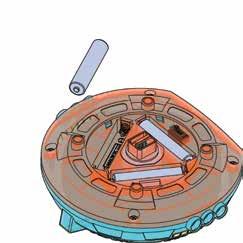
1. Assemble the model using the rods and anchor pins as shown.
2. This entire experiment should be conducted close to the surface of a table, so that if the model falls, it will not break. You can put a soft material underneath it as well, to protect it should it fall.
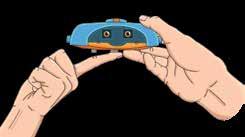
Hold both ends of the string in one hand to form a long loop. Hold the gyroscope assembly sideways, turn it on, and wait for it to get up to maximum speed. Now carefully rest the red anchor pin in the bottom of the loop and hold it there for a few seconds. Slowly let go of the gyroscope assembly. What happens?
WhAt’s happeniNg?
Amazingly, the gyroscope assembly appears to defy gravity as it dangles in the loop of string, supported only at the red anchor pin. But you know that it is not magic at work here; rather, it is the physics of the gyroscopic effect that keeps the gyroscope assembly balanced.
The spinning gyroscope resists moving out of the vertical plane in which it is spinning. The axis of rotation is horizontal, through the loop. This keeps the assembly from falling to the side out of the loop. This, combined with the fact that the upward force of the string is enough to balance the downward force of gravity on the model, keeps the model suspended in the loop.
1
The closer the string is to the gray rod, the better it will hang.
That’s using your head
Here’s how
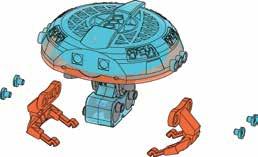
1. Starting with the assembled gyrobot model, attach the rods and anchor pins to the side of its head as shown.
Make a hypothesis about how these added pieces will affect the gyrobot.
2. If you disassembled the tightrope frame, reassemble it according to the instructions starting on page 9. Turn on the gyrobot and wait for it to reach its top speed. Balance the gyrobot on the tightrope. Observe its performance.
3. Remove one or both of the 9-hole rods and repeat the experiment. What happens?
1
WhAt’s happeniNg?
Despite the fact that the additional pieces add weight, they do not have much of an effect on the balancing or walking behavior of the gyrobot. This is because the gyroscopic forces are powerful enough to counteract the extra forces applied to the model by these additional pieces, and the additional pieces do not weigh very much relative to the entire gyrobot. Even when the assembly is asymmetrical, the gyrobot still remains balanced.
The shorter side of the pivot anchor pin makes a tight connection with the rod, while the longer side is relatively loose, which makes it easy to remove the rod during the experiment.
2
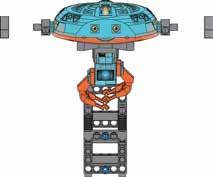
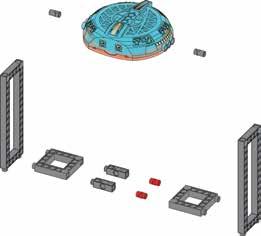
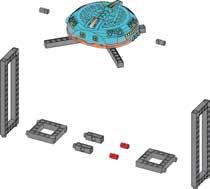
Heads or tails
Here’s how
1. Assemble the model using the frames, rods, and anchor pins as shown.
2. You will see that, because the gyrobot’s head is top-heavy, it will flip over and rest upside down. Before turning the gyroscope on, try flipping the head upright. What happens?
3. Flip the head upright again and turn the gyroscope on. Hold the head upright until the gyroscope has reached its full speed. Let go of the head. What happens?
1
2 3
WhAt’s happeniNg?
When the motorized gyroscope is off, the head always tips over and rests upside down. This is because the heavy weight of the wheel inside the head is above the pivot points. The head’s center of gravity is in an unstable position above the pivot points, so the model tips upside down. Once the center of gravity is below the pivot points, it is stable again.
When the gyroscope is turned on, the gyroscopic effect resists the forces acting on the head that are pulling it upside down. Therefore, it takes longer for the head to flip upside down. However, the stabilizing force of the gyroscope is not enough to keep the head balanced upright indefinitely.
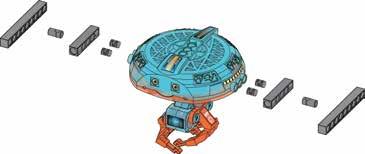
Arms wide open
Here’s how
1. Attach the four rods to the gyrobot’s head as shown.
2. Hang the head assembly in the frame similar to how it was hung in the previous experiment.
3. Turn the gyroscope on and wait for it to reach its top speed. What do you observe about the position of the head? Now rotate the two arms inward toward each other as shown.
How does this affect the position of the head?
WhAt’s happeniNg?
The arms affect the center of gravity of the head assembly. When the arms are extended away from the pivot point, the center of gravity of the head assembly also shifts, and this pulls the model downward on this side. The gyroscope is not quite strong enough to compensate.
1
2
Keep going!
Do you have your own ideas for experiments you can try with the gyrobot? Now that you know how to safely operate it, try out your own experiments.
©2020 Franckh-Kosmos Verlags-GmbH & Co. KG, Pfizerstrasse 5 – 7, 70184 Stuttgart, Germany
This work, including all its parts, is copyright protected. Any use outside the specific limits of the copyright law is prohibited and punishable by law without the consent of the publisher. This applies specifically to reproductions, translations, microfilming, and storage and processing in electronic systems and networks. We do not guarantee that all material in this work is free from other copyright or other protection.
Text: Tanja Sautter Project manager: Thomas Nolde Technical product development: Genius Toys Taiwan Co., Ltd; Dr. Petra Müller
Manual design concept: Atelier Bea Klenk, Berlin Manual layout: ideas, Michael Schlegel, Würzburg. Manual assembly illustrations: Genius Toys Taiwan Co., Ltd Manual illustrations and story comics: Bianca Meier; Daniel Alles; Murat Kaya Manual photos: Jaimie Duplass & beror (all stickers, ©fotolia); Nata Studio U1 ur; Stock Up U1 ul; sNorrisPhoto p. 1 mr, p 16 or; Tomas Nevesely p. 18 ul; Inked Pixels p. 20 or; Konstantin Savusia p. 20 m; Jag_cz p. 20 mr; High Mountain p. 1 ur, p. 20 um (all previous ©shutterstock.com); Genius Toys Taiwan Co., Ltd. p. 3 o, p. 13 or, p. 16 u, p. 17 o, p. 18 o
Packaging design concept: Peter Schmidt Group GmbH, Hamburg Packaging layout: Studio Gibler, Stuttgart Packaging photos: Nata Studio (Finger); Stock Up (Gyroscope)(both ©shutterstock.com); Genius Toys Taiwan Co., Ltd.
The publisher has made every effort to identify the owners of the rights to all photos used. If there is any instance in which the owners of the rights to any pictures have not been acknowledged, they are asked to inform the publisher about their copyright ownership so that they may receive the customary image fee.
1st English Edition © 2020 Thames & Kosmos, LLC, Providence, RI, USA Thames & Kosmos® is a registered trademark of Thames & Kosmos, LLC. Editing: Ted McGuire; Additional Graphics and Layout: Dan Freitas
Distributed in North America by Thames & Kosmos, LLC. Providence, RI 02903 Phone: 800-587-2872; Web: www.thamesandkosmos.com
Distributed in United Kingdom by Thames & Kosmos UK LP. Cranbrook, Kent TN17 3HE Phone: 01580 713000; Web: www.thamesandkosmos.co.uk
We reserve the right to make technical changes.
Printed in Taiwan


Do you have any questions? Our customer service team will be glad to help you!

Kosmos Quality and Safety
More than one hundred years of expertise in publishing science experiment kits stand behind every product that bears the Kosmos name. Kosmos experiment kits are designed by an experienced team of specialists and tested with the utmost care during development and production. With regard to product safety, these experiment kits follow European and US safety standards, as well as our own refined proprietary safety guidelines. By working closely with our manufacturing partners and safety testing labs, we are able to control all stages of production. While the majority of our products are made in Germany, all of our products, regardless of origin, follow the same rigid quality standards.
LET KNOWLEDGE GROW.
Thames & Kosmos US Email: support@thamesandkosmos.com Web: thamesandkosmos.com Phone: 1-800-587-2872
Thames & Kosmos UK Web: thamesandkosmos.co.uk Phone: 01580 713000