11 minute read
Operation

from Eddy manual
by returos
• The charger is designed to get hot when operating. If the charger gets too hot to touch, you notice a strange smell, or any other indicator of overheating, discontinue charging immediately and contact JOBO Bikes Product Support. Charge the battery only with the charger originally supplied with the bike, or a charger purchased directly from JOBOBIKE, designed for your specific bike serial number. Never use an aftermarket charger, which can result in damage, serious injury, or death. Please take special care in charging your bike in accordance with the procedures and safety information detailed in this manual. Failure to follow proper charging procedures can result in damage to your bike, the charger, or personal property, and/or cause serious injury or death.
Long-Term Battery Storage If you intend to store your bike for more than two weeks at a time, follow the instructions below to maintain the health and longevity of your battery. • Charge (or discharge) the battery to approximately 75% charged. • Power off the battery and leave it locked to the frame. Alternatively, you can unlock and remove the battery from the frame for storage. • Store the battery in a dry, climate-controlled, indoor location where the temperature is between 10 °C–25 °C (50 °F–77 °F). • Check on the battery every month, and if necessary, use the charger originally supplied with the bike to charge the battery to 75% charged.
Advertisement
NOTICE: Do not perform any of the steps in the Operation section of this manual until you have read this entire manual, since there are important details related to safety in the following sections.
27
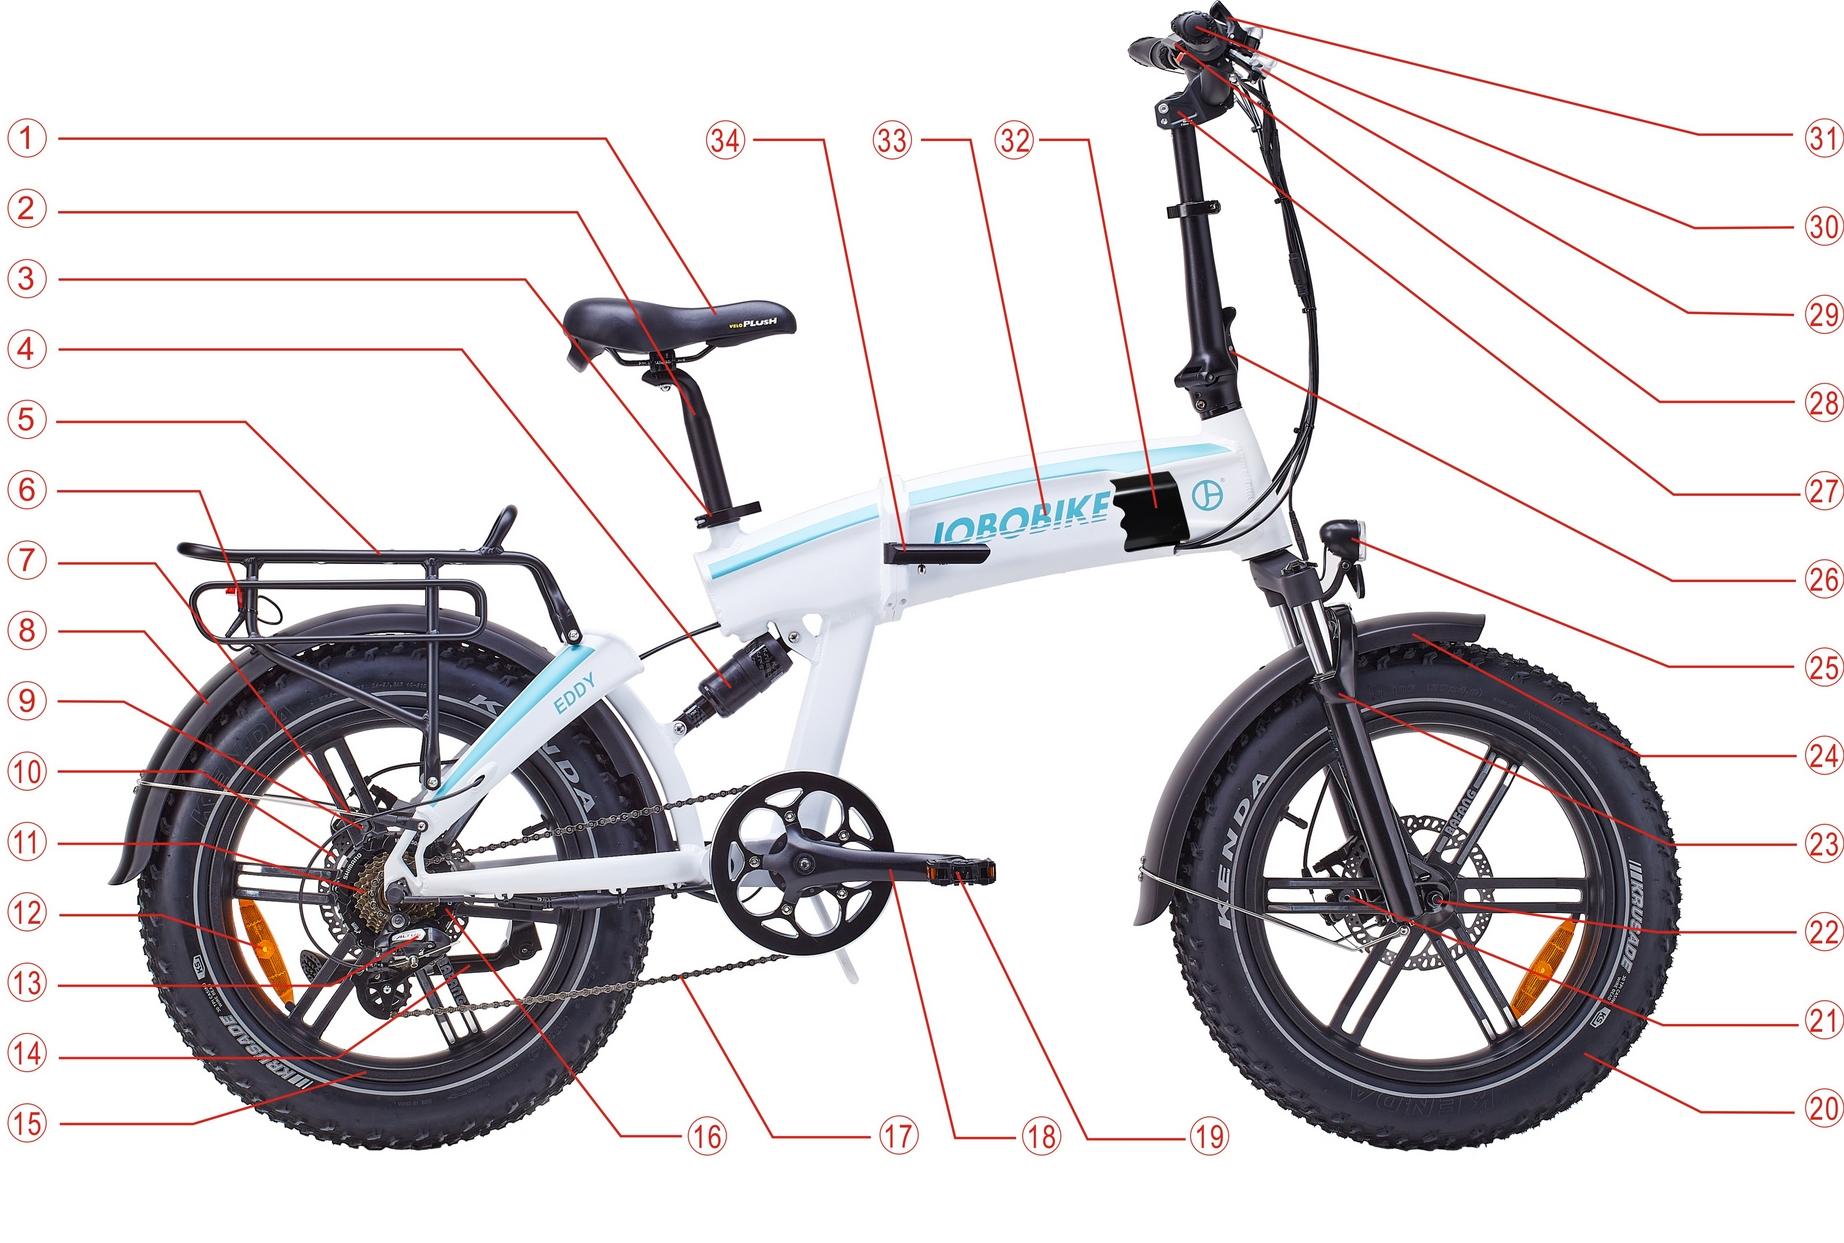
Read and understand all sections of this entire manual before operating the bike for the first time. There are important safety warnings throughout the whole manual that MUST be followed to prevent dangerous situations, accidents, damage to the bike, damage to property, injury, or death. Users must follow the instructions and warnings in this manual for safety reasons. Damage caused by failing to follow instructions is not covered with warranty and could result in dangerous situations, accidents, injury to you and others, damage to the bike, damage to your property, injury, or death. Contact JOBOBIKE’s if you have any questions about assembly or operation. Users must become accustomed to the bike’s power control system before operating. The twist power assist mechanism allows full power to be activated from a stop, and inexperienced users should take extra care when first applying the twist power assist. The pedal assistance feature is also a powerful option, and users should fully research and understand how to operate it before first use. Not familiarizing yourself or practicing the operation of the power system on your bike can lead to damage, serious injury, or death. Handlebar Features 1.Brake lever 2.Bell 3. LCD Display Remote 4. LCD Display 5. Shifter 6. Throttle (Walk Mode) LCD Display Controls The display can be controlled manually using the 5-button LCD display remote mounted on the left side of the handlebar (depicted at right). 1 .“+”button 2 .Headlight switch key 3.the power button 4. the information botton 5. -“-”button
28
Reference the LCD Display Operations table in this manual for instructions on how to perform various operations using these buttons. LCD Display Information The table below show the various features and information displayed on the LCD display.
• Battery and battery percentage indication • Watt indication • Assistance-level indication • Speed indication (incl. running speed, Max. speed and Ave. speed) • Odometer and trip distance • The push-assistance function • Trip time indication • Backlight On/Off • Error code indication • USB connection indicator Start-Up Procedure After the bike has been properly assembled following the assembly video, all components are secured correctly, and you have read this entire manual, you may turn on the bike and select a power level following the steps outlined below: Switching the E-bike System On/Off Press the power button to turn on the E-bike system. When holding the power button for 2s, the E-bike system would be switched off. When turned off, the E-bike system no longer use s battery power. When parking the E-bike for more than 10 minutes, the E-bike system switches off automatically. Display Interface After switching on the E-bike system, the display shows Speed and Trip Distance as default. Briefly press the “i” button to switch between following elements:
29
Trip(Km) →ODO (Km)→Max. Speed (Km/h)→ Avg. Speed (Km/h) →Time (Min.) .
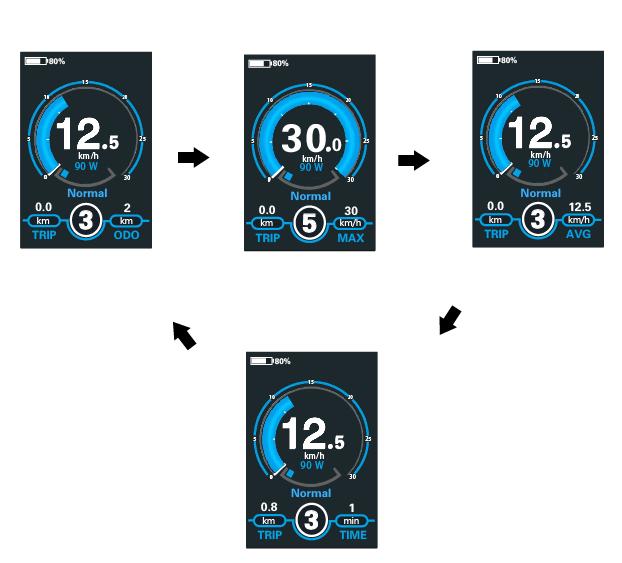
Display Indication Cycle Interface
30
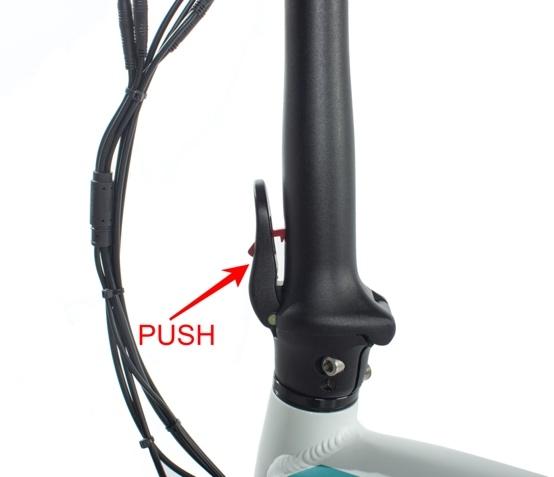
Switching Push-assistance Mode On/Off To activate the push-assistance function, hold the “-” button. After 2s, The E-bike is activated at a uniform speed of 6 Km/h while the screen displays “ ”. The push-assistance function is switched off as soon as you release the “-” button on the operating unit. The E-bike system stops the power output immediately.
Walk mode should be used only when the rider is off the seat with both hands on the handlebar. Always keep at least one hand on a brake lever to allow quick cutoff of the motor if necessary and to maintain control of the bike.
Switching the Lighting On/Off To switch on the headlight, press the “
” button. The backlight brightness is automatically reduced. Press the “ ” button again, the lighting can be switched off.Switching the Lighting Mode On/Off Interface Assist Level Selection Briefly press "+" or "-" button to switch between assistance levels so as to change the motor output power, The default assistance level ranges from level “0” to“5”, The output power is zero on Level “0”. Level 1 is the minimum power, and level 5 is the maximum power. When you press the "+" button again after reaching level 5, the interface would still show “5”, and blinks at“5”to indicate that the power is already at its highest. After the power downshift reaches “0”, if you press the "-" button again, the interface would still show “0” and blinks at “0”to indicate that it has reached the power minimum. The default value is level“1”.
31
Assist Level Interface
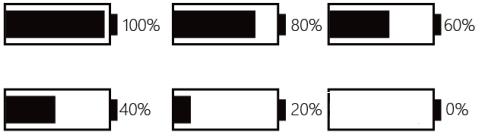
To avoid accidental application of the twist power assist, while dismounted, ensure that the bike is powered off. NOTICE: Even if you are an experienced bike user, please take time to read and implement the guidelines described in the owner’s manual that come with your E-bike, and any manuals included with subcomponents. Battery SOC IndicatorThe five battery bars represent the capacity of the battery. The five battery bars are bright when the battery is in high voltage. When the indicator shows 0%, the battery needs to be recharged im
Battery SOC Indication Interface
32
Watt Indicator The Watt can be read via the interface, the lower blue rim.

USB connection indication When a USB external device is inserted, the display interface would show up as the image below.

Error Code Indicator The components of the E-bike system are continuously and automatically monitored. When an error is detected, the respective error code would be indicated in text indication area. There is the detail message of the error code in Error code Detection section of this manual.

33
Make sure to repair the detected error when error code appears. Otherwise, you will not be able to ride the bike normally. Please always refer to an authorized dealer. Driving Range The range of your bike is the distance the bike is able to travel on a single ride with a completely charged battery. Some of the factors that affect range include changes in elevation, speed, payload, acceleration, number of starts and stops, ambient air temperatures, tyre pressure, and terrain. We suggest that you select a lower assistance level when you first get your bike from JOBOBIKE to get to know your bike and travel routes. Once you become familiar with the range requirements of your travel routes and the capabilities of your bike, you can then adjust your riding characteristics as you desire.
Carrying Loads Maximum payload capacity for the E-bike The total maximum weight limit, or payload capacity, (130 kg or 286 lb) includes the weight of the rider as well as clothing, riding gear, cargo, accessories, passengers, etcetera.
Total maximum payload: 130 kg (286 lb) Optional rear rack maximum payload: 18 kg (40 lb) Optional front rack maximum payload: 10 kg (22 lb)
You MUST hold onto the bike when loading passengers or cargos. The kickstand is not designed to be used for loading passengers or cargos. Do not assume the bike is stable and balanced when using the kickstand. Always hold onto the bike when passengers or cargo are being loaded, in place, or attached to the ebike. Never leave the bike unattended with a child on the bike. Ensure that the child is taken with you when you look away or walk away from the bike, otherwise the bike could tip over and cause serious injury or death to your most precious cargo.
34
Charging will be indicated by the LED charge status lights on the charger – Red indicates that the battery’s charging, and green indicates that the battery’s fully charged.
Carrying Cargo
Carrying a cargo load involves additional risks, which requires special attention and care. Braking, acceleration, and balancing are all significantly affected by the cargo loaded on the E-bike. To safely operate your E-bike while carrying cargos, you must get used to the differences in braking, steering, balance, etcetera that come with the extra weight. Users should practice riding on a flat and open area with light cargos before attempting to carry heavier loads.
NOTICE:
The following list provides important tips for safe operations of the E-bike when used for carrying cargo. • Cargo should be loaded at a position that is as low as possible to lower the centre of gravity, thus improving stability, but cargo should not interfere with any moving components of the bike or the ground. • Ensure that your loads are properly secured and check periodically that nothing loosens or at risks of interfering with any moving components, or touching or draging on the ground. • Become proficient at controlling the E-bike with cargo in a flat, open area before riding on roads or hills. Know your limits and plan routes accordingly.
Hills that are normally easy to climb and descend without cargo can become challenging and dangerous once cargo is loaded onto the bike, as the extra weight affects steering, braking, balancing as well as the amount of power it takes to go uphill. Do not use the front brake by itself. Apply the rear brake first, and then the front brake. Use both brakes for all braking operations. Braking with only the front brake can cause excessive stress on components, damage to the bike and parts, and/or loss of control.
35
It is always the user’s responsibility to ensure that cargos and passengers loaded on the E-bike do not interfere with the user’s ability to safely operate the E-bike. Serious injury or death can occur if the user’s abilitiy to safely operate the E-bike is compromised by the cargos or passengers onboard.
Parking, Storage, and Transport
Please follow these basic parking, storage, and transportation tips to ensure that your bike is well taken care of both on and off the road. • When pushing or carrying the bike manually, turn off the power to avoid accidental acceleration from the motor. • Turn the power and any lights off to conserve battery. • Ensure that the battery is locked to the frame when the power is off, or use the key to remove the battery and bring it with you for safety reasons. • Park indoors when possible. If you must park outdoors in rain or wet conditions, you should leave your E-bike outside for only a few hours and then park it in a dry location as soon as possible to allow the entire system to dry out. Compared to a regular bike, an E-bike used in wet conditions needs more frequent maintenance to prevent rust and corrosion to make sure that all systems are working safely. • Locking up your bike is recommended so that your bike is secure and the chance of theft is reduced. We do recommend you to take appropriate precautions to keep your bike safe from theft. • Do not park, store, or transport your bike on a rack not designed for the bike’s size and weight. • Use a rack compatible with the width of tyres of your bike. Some racks may not accommodate all tyre widths. • When storing your bike or carrying your bike on a rack for transport, unlock, remove the key, then remove the battery to reduce the weight of the bike, which makes lifting and loading easier and protects the battery by transporting it in the cab of a vehicle. • Avoid transporting E-bikes on a vehicle rack during rain, as this may cause water damage to the electrical components.
36