
8 minute read
To DIY or NOT to DIY


DIY REMODEL PAINTING VS. REPLACING
To "DIY" OR AD THAT IS THE NOT TO DIY THE QUESTION

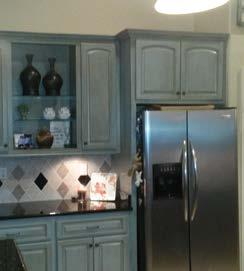
From the moment we purchased our home, I loved our kitchen –the layout, appliances, quality and functionality. What I didn’t like was the color of the dark cherry wood cabinets. It made the kitchen look small, dark and uninviting.
We enquired about the costs to replace the
existing cabinets. Quotes ranged from $9,500 to $13,500. Having just moved houses, our budget was drained, and we concluded this had to be a DIY job. It took weeks of research, reading blogs and watching YouTube tutorials until we gathered the courage to purchase paint, glaze and varnish.
After 12 weeks, we finally put back the last painted cabinet door. The result was what looked like a brand new kitchen. I have not once regretted our decision to paint the cabinets ourselves. Even now, two years later, with an active 7-year-old and two 70lb dogs, the cabinets look great without a paintchip in sight.
However, painting the cabinets has been a long project, greatly disrupting our family time together. We learned during the process that, depending on the paint used, it can be hard to achieve
a 100% perfect surface look. We decided to use an antique stain (I love the shabby-chic look), which depends on a number of aspects. We opted for chalk paint. Not because it’s the latest DIY craze, but because we could avoid sanding the cabinets. Our house features a large openplan layout, so we didn’t relish the idea of having
Our house features a large open-plan layout, so we didn’t relish the idea of having sawdust in every nook and cranny.
conveniently covered the odd, visible brush strokes. If you aim for a slick, glossy look, painting the cabinets can be a challenge and replacing may be the better option.
What paint is best for cabinets? That greatly sawdust in every nook and cranny. Other types of paint, such as latex and oil based paints, require sanding to achieve lasting coverage. One bit of advice: don’t skip painting the insides of doors and cabinets. At the time, it may seem like a time-saver, but imagine how much you’ll regret this decision every time you open a cabinet for
years to come.
Other considerations are the age or quality of your kitchen. If your cabinets are solid and well-working, there is no reason why painting wouldn’t spruce-up your kitchen. But, if you are already unhappy with the functionality or sturdiness of your cabinets, a coat of paint is unlikely to change that.
Considering the money we have saved, I can only recommend painting vs. replacing. But I loved our kitchen to start with, which had good quality cabinets. Thankfully, we had the patience to complete the task. I’m already planning my next project – painting my bathroom cabinets.
DIY POTPOURRI create your own signature potpourri

Ever notice that every house has its
own scent? Whether it’s pet ownership, cleaning products, furniture, flooring choices and, of course,
preferences in candles and potpourri. Candles and potpourri can work
wonders in creating a warm, inviting living space, but only the latter can work for you 24/7. Here, we show you how to create a signature batch of your very own!
INGREDIENTS: •Dried materials (petals, buds, leaves, cones, seeds, herbs, spices, etc.) • Scissors •Baking sheet • Parchment paper •Scented oils • Spritzer bottle •Water • Bowl
DIRECTIONS ▪Collect dried materials from your home, garden or supply store. If necessary, cut into small pieces. ▪Preheat oven to 200 degrees F. ▪ Line baking sheet with parchment paper. Arrange all dried materials in single layer on sheet. ▪ Combine 10-20 drops of favorite scented oil(s) with one tablespoon water in spritzer bottle and shake vigorously. Spray dried materials evenly until bottle is nearly empty. ▪Bake approximately two hours with door open, watching carefully as scorched materials can ignite. ▪Spray remaining scented oil mixture on dried materials, cool and display in decorative bowl.
Affordable Ways to Fence Your Backyard

BY QUENTIN ARTHUR
Fencing can boost your curb appeal as well as keep intruders out; however, some fence options, such as aluminum and vinyl can be pricey. If you have a big yard to fence in, but a small budget, consider these five affordable options:
Privet Hedges
Instead of metal and wood, consider a living fence. There are
dozens of privet hedge species that can grow between four and ten feet tall. The hedge will need to be pruned and maintained to ensure healthy plants. These hedges cost less than $2 per linear foot.

Yew
Yew is another living fence. It is a dark, evergreen plant that can take on just about any climate. The plant is very slow-growing, taking years to grow tall. You will not need to prune yew as often as other hedges. This plant costs about $6 per linear foot.
Picket Fence
A white picket fence is a common piece in the American Dream.
It is a very popular option for Cape Cod and Georgian homes. While this option has small spaces between the boards, which do not offer full privacy, it is still very appealing to homeowners. Picket fences cost between $5 and $10 per linear foot.
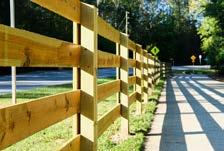
Treated Pine
Wooden fences must be resistant to water to avoid rotting. Some types of wood, such as cedar and redwood, are naturally rot-resistant and cost more to install as a fence; however, pine that has been treated with rot-resistant compounds is a more affordable option. You still get a sturdy wooden fence while paying far less. The cost for a treated pine fence is $20 per linear foot.
Dog Ear Fencing This type of fencing is similar
to a picket fence; however, what makes it unique is that each individual section is rounded at the top. The fence posts are longer than the panels as well. This style is popular with Colonial Revival homes. Dog ear fencing also costs about $20 per linear foot.
In Conclusion
Fencing is very useful for homes. It keeps pets and children in the safety of the backyard and prevents neighbors from being too nosy. If you are looking to get a fence on a budget, remember to measure the amount of fencing you need and calculate the costs with each option.
DIY SLIDING BARN DOOR __________
LIZ MCGHEE

After moving into a “3-bedroom” shotgun house with my cousin, I quickly became obsessed with the idea of installing a sliding barn door. The reality was that only one of the rooms came with an actual door. Not antici
pating noise and privacy, I offered the secluded room to my cousin, which left me vulnerable to unintentional noise made throughout the night. After a few months of this, I’d
finally had enough. My budget was small, but I couldn’t compromise my sleep any longer. I then took it upon myself to install a sliding door in the hopes that it would create some semblance of privacy and absorb sound. Luckily, my mother has worked at Home Depot for over 25 years, so I’m no stranger to DIY projects. You can end up spending a lot
on barn door kits, which is fine if you have the means. Home Depot, Lowes (forgive me, Mom) and Am
azon also sell easy-to-use, barn door installation kits that come with a pre-built door. I chose to make my own door since my place came with a lot of scrap wood in the backyard and the doorway is wider than a standard entry.
The most expensive item for this
project was the track, but Amazon had very reasonable options. You
want to make sure the track is twice the width of your opening so that you can move it out of the way when moving things from room to room. You will need to measure the opening where you wish to hang your door to determine the width of both the track and door.
Home Depot sells 4x8 pieces of plywood in various materials that work very well as the door for this project. Consider how heavy the material is when choosing, as well as how sound-absorbent and durable it is. If you don’t have a saw, Home Depot will cut your wood for free at the store, but you may need to purchase a sander. Before you choose your wood, think about the tools you have at home and whether or not the wood will need finishing.
To achieve the barn door look, you will need five to seven boards to nail around the edges and inside of your door. The two outside boards should go on first, and they should be the
same length as the door from top to bottom. Next measure the width between these two boards before cutting the next three boards: one for the top, one for the bottom and one to go across the center. Optional: two boards going diagonally across the each of the two areas you’ve created. You can be creative here and customize your door to fit your desired aesthetic.

Next, you’ll want to prime your door, sand once more
before painting with two coats of enamel paint. Then you’ll need to install your track, following the directions exactly. I measured the width of the entryway before buying a track so that I wouldn’t have to cut it myself. You will likely need a strong drill to mount the track to the wall and to attach the rollers to the door. Finally, feel free to add personal touches to your door like a false knob or a unique handle.
I am pleased to say the sliding barn door has solved all of the noise issues at home. It didn’t break the bank, AND it looks amazing! For more on installing a sliding barn door, speak with a hardware associate in person or visit blog.homedepot.com/easybarn-door-paint-and-install.
Home Depot, Lowes and Amazon also sell easy-touse, barn door installation kits that come with a door. I chose to make my own door.


