226
Black and white printing: facilities and equipment
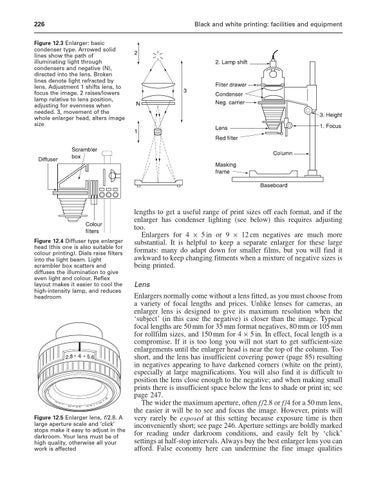
Figure 12.3 Enlarger: basic condenser type. Arrowed solid lines show the path of illuminating light through condensers and negative (N), directed into the lens. Broken lines denote light refracted by lens. Adjustment 1 shifts lens, to focus the image. 2 raises/lowers lamp relative to lens position, adjusting for evenness when needed. 3, movement of the whole enlarger head, alters image size
Figure 12.4 Diffuser type enlarger head (this one is also suitable for colour printing). Dials raise filters into the light beam. Light scrambler box scatters and diffuses the illumination to give even light and colour. Reflex layout makes it easier to cool the high-intensity lamp, and reduces headroom
Figure 12.5 Enlarger lens, f /2.8. A large aperture scale and ‘click’ stops make it easy to adjust in the darkroom. Your lens must be of high quality, otherwise all your work is affected
lengths to get a useful range of print sizes off each format, and if the enlarger has condenser lighting (see below) this requires adjusting too. Enlargers for 4 × 5 in or 9 × 12 cm negatives are much more substantial. It is helpful to keep a separate enlarger for these large formats: many do adapt down for smaller films, but you will find it awkward to keep changing fitments when a mixture of negative sizes is being printed. Lens
Enlargers normally come without a lens fitted, as you must choose from a variety of focal lengths and prices. Unlike lenses for cameras, an enlarger lens is designed to give its maximum resolution when the ‘subject’ (in this case the negative) is closer than the image. Typical focal lengths are 50 mm for 35 mm format negatives, 80 mm or 105 mm for rollfilm sizes, and 150 mm for 4 × 5 in. In effect, focal length is a compromise. If it is too long you will not start to get sufficient-size enlargements until the enlarger head is near the top of the column. Too short, and the lens has insufficient covering power (page 85) resulting in negatives appearing to have darkened corners (white on the print), especially at large magnifications. You will also find it is difficult to position the lens close enough to the negative; and when making small prints there is insufficient space below the lens to shade or print in; see page 247. The wider the maximum aperture, often f/2.8 or f/4 for a 50 mm lens, the easier it will be to see and focus the image. However, prints will very rarely be exposed at this setting because exposure time is then inconveniently short; see page 246. Aperture settings are boldly marked for reading under darkroom conditions, and easily felt by ‘click’ settings at half-stop intervals. Always buy the best enlarger lens you can afford. False economy here can undermine the fine image qualities