Commercial requirements
147
than lead them. However, the art editor will thank you if you can cover the same subject in both vertical and horizontal formats. Ideally too, avoid tight framing, and leave sufficient content around the edges to allow cropping to slightly different proportions according to layout. (Of course you are then in the hands of the editor, who can destroy your composition – some photographers purposely make uncroppable pictures to avoid this situation!) Size
The smaller your final picture the simpler its image should be. If it is to be reproduced little larger than a postage stamp (or on coarse paper) aim for a bold, uncluttered composition, perhaps with a plain and contrasting background. The larger the reproduction and the better the paper, the more detail and tone graduation will be preserved. If you know that your final result will be displayed as a big photo-enlargement, for example, it is probably worth changing to a larger-format camera, or at least finergrain film. Take special care over limitations of size if you work with a digital image – whether it is shot by digital camera or scanned from film; see pages 99 and 270. Managing the job
Having established the needs of the job – its ‘open’ aspects as well as specified layout, content and approach – you can get down to planning. If you are working in the studio, what are the most appropriate accessories to include? Will some form of set need building or hiring? If it will be a location job the right place has to be found, and hired if necessary. Models must be short-listed through an agency, interviewed and chosen. Lighting has to be thought out too. If you have to rely on natural light, consult weather forecasts for your location. Existing artificial light needs checking for its technical suitability. Tungsten or flash lighting units, and special equipment such as a wind machine, smoke machine or portable generator, may have to be hired. If you are shooting on film choose the
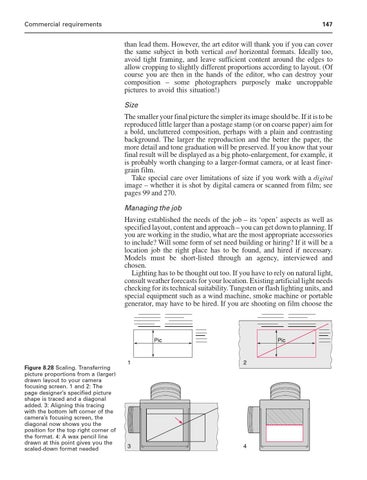
Figure 8.28 Scaling. Transferring picture proportions from a (larger) drawn layout to your camera focusing screen. 1 and 2: The page designer’s specified picture shape is traced and a diagonal added. 3: Aligning this tracing with the bottom left corner of the camera’s focusing screen, the diagonal now shows you the position for the top right corner of the format. 4: A wax pencil line drawn at this point gives you the scaled-down format needed