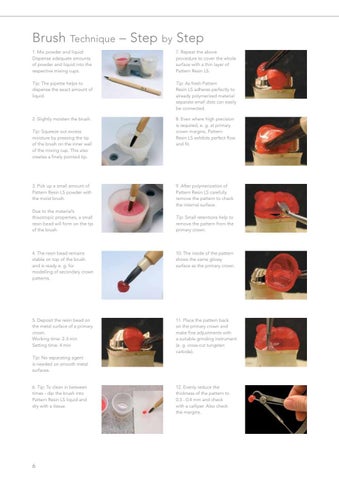
Brush
Technique
– Step
by
Step
1. Mix powder and liquid: Dispense adequate amounts of powder and liquid into the respective mixing cups.
7. Repeat the above procedure to cover the whole surface with a thin layer of Pattern Resin LS.
Tip: The pipette helps to dispense the exact amount of liquid.
Tip: As fresh Pattern Resin LS adheres perfectly to already polymerized material separate small dots can easily be connected.
2. Slightly moisten the brush.
8. Even where high precision is required, e. g. at primary crown margins, Pattern Resin LS exhibits perfect flow and fit.
Tip: Squeeze out excess moisture by pressing the tip of the brush on the inner wall of the mixing cup. This also creates a finely pointed tip.
3. Pick up a small amount of Pattern Resin LS powder with the moist brush. Due to the material’s thixotropic properties, a small resin bead will form on the tip of the brush.
9. After polymerization of Pattern Resin LS carefully remove the pattern to check the internal surface. Tip: Small retentions help to remove the pattern from the primary crown.
4. The resin bead remains stable on top of the brush and is ready e. g. for modelling of secondary crown patterns.
10. The inside of the pattern shows the same glossy surface as the primary crown.
5. Deposit the resin bead on the metal surface of a primary crown. Working time: 2-3 min Setting time: 4 min
11. Place the pattern back on the primary crown and make fine adjustments with a suitable grinding instrument (e. g. cross-cut tungsten carbide).
Tip: No separating agent is needed on smooth metal surfaces.
6. Tip: To clean in between times - dip the brush into Pattern Resin LS liquid and dry with a tissue.
6
12. Evenly reduce the thickness of the pattern to 0.3 - 0.4 mm and check with a calliper. Also check the margins.