Furniture Independent Study

Page 1

03 07 15 RESEARCH DESIGN MOCK UP 17 21 REFINE FINAL

In the art history class, Women in Architecture, taught by Professor Vickery, I was properly introduced to Eileen Gray, an architect born in 1878, in Enniscorthy, Ireland. Gray began her career in woodworking and furniture making, as many women striving to be architects often did. In Professor Vickery’s class, we discussed how sexism in education and the professional environment led to a huge setback for women architects, and often pushed them into other fields that were less male-dominated. I reflected on this lesson and I am grateful for the way I began my architecture education in college as a young woman, and I am treated equally to my male peers.

I also felt a sense of admiration for the passion many architects, like Eileen Gray, had for furniture design. I soon realized how similar architecture and furniture design were.

1. Designing a piece that combines function and form, not tied to any fads or trends, but using architecture theory to inform design decisions.

2. Understanding structure, mechanics, and assembly of all components.

3. Maximizing utility in a specific amount of volume/ area.

I believe to enhance an architectural space, you must also understand the architectural elements of the furniture and interior design. In this independent study I wanted to focus the three concepts listed, and create my own piece of furniture inspired by architecture.

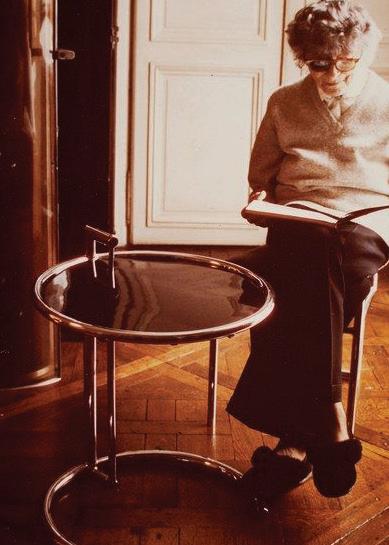
EILEEN GRAY, photographed with the E 1027 table The Architect of Desire, W Magazine
RESEARCH 3

Through a few email correspondences and a meeting, Professor Ray Mann signed on to be my independent study advisor. In our meetings discussing the scope of my semester, we set a limit to the size and complexity of my project. Professor Mann warned me about the difficulty of chairs, someone can spend their lifetime perfecting a chair design.

The first limit was to only work with wood. Limiting my materials also limits the complexity of the possible design, and UMass Amherst has a expansive wood-shop, available to anyone who needs it for academic purposes.

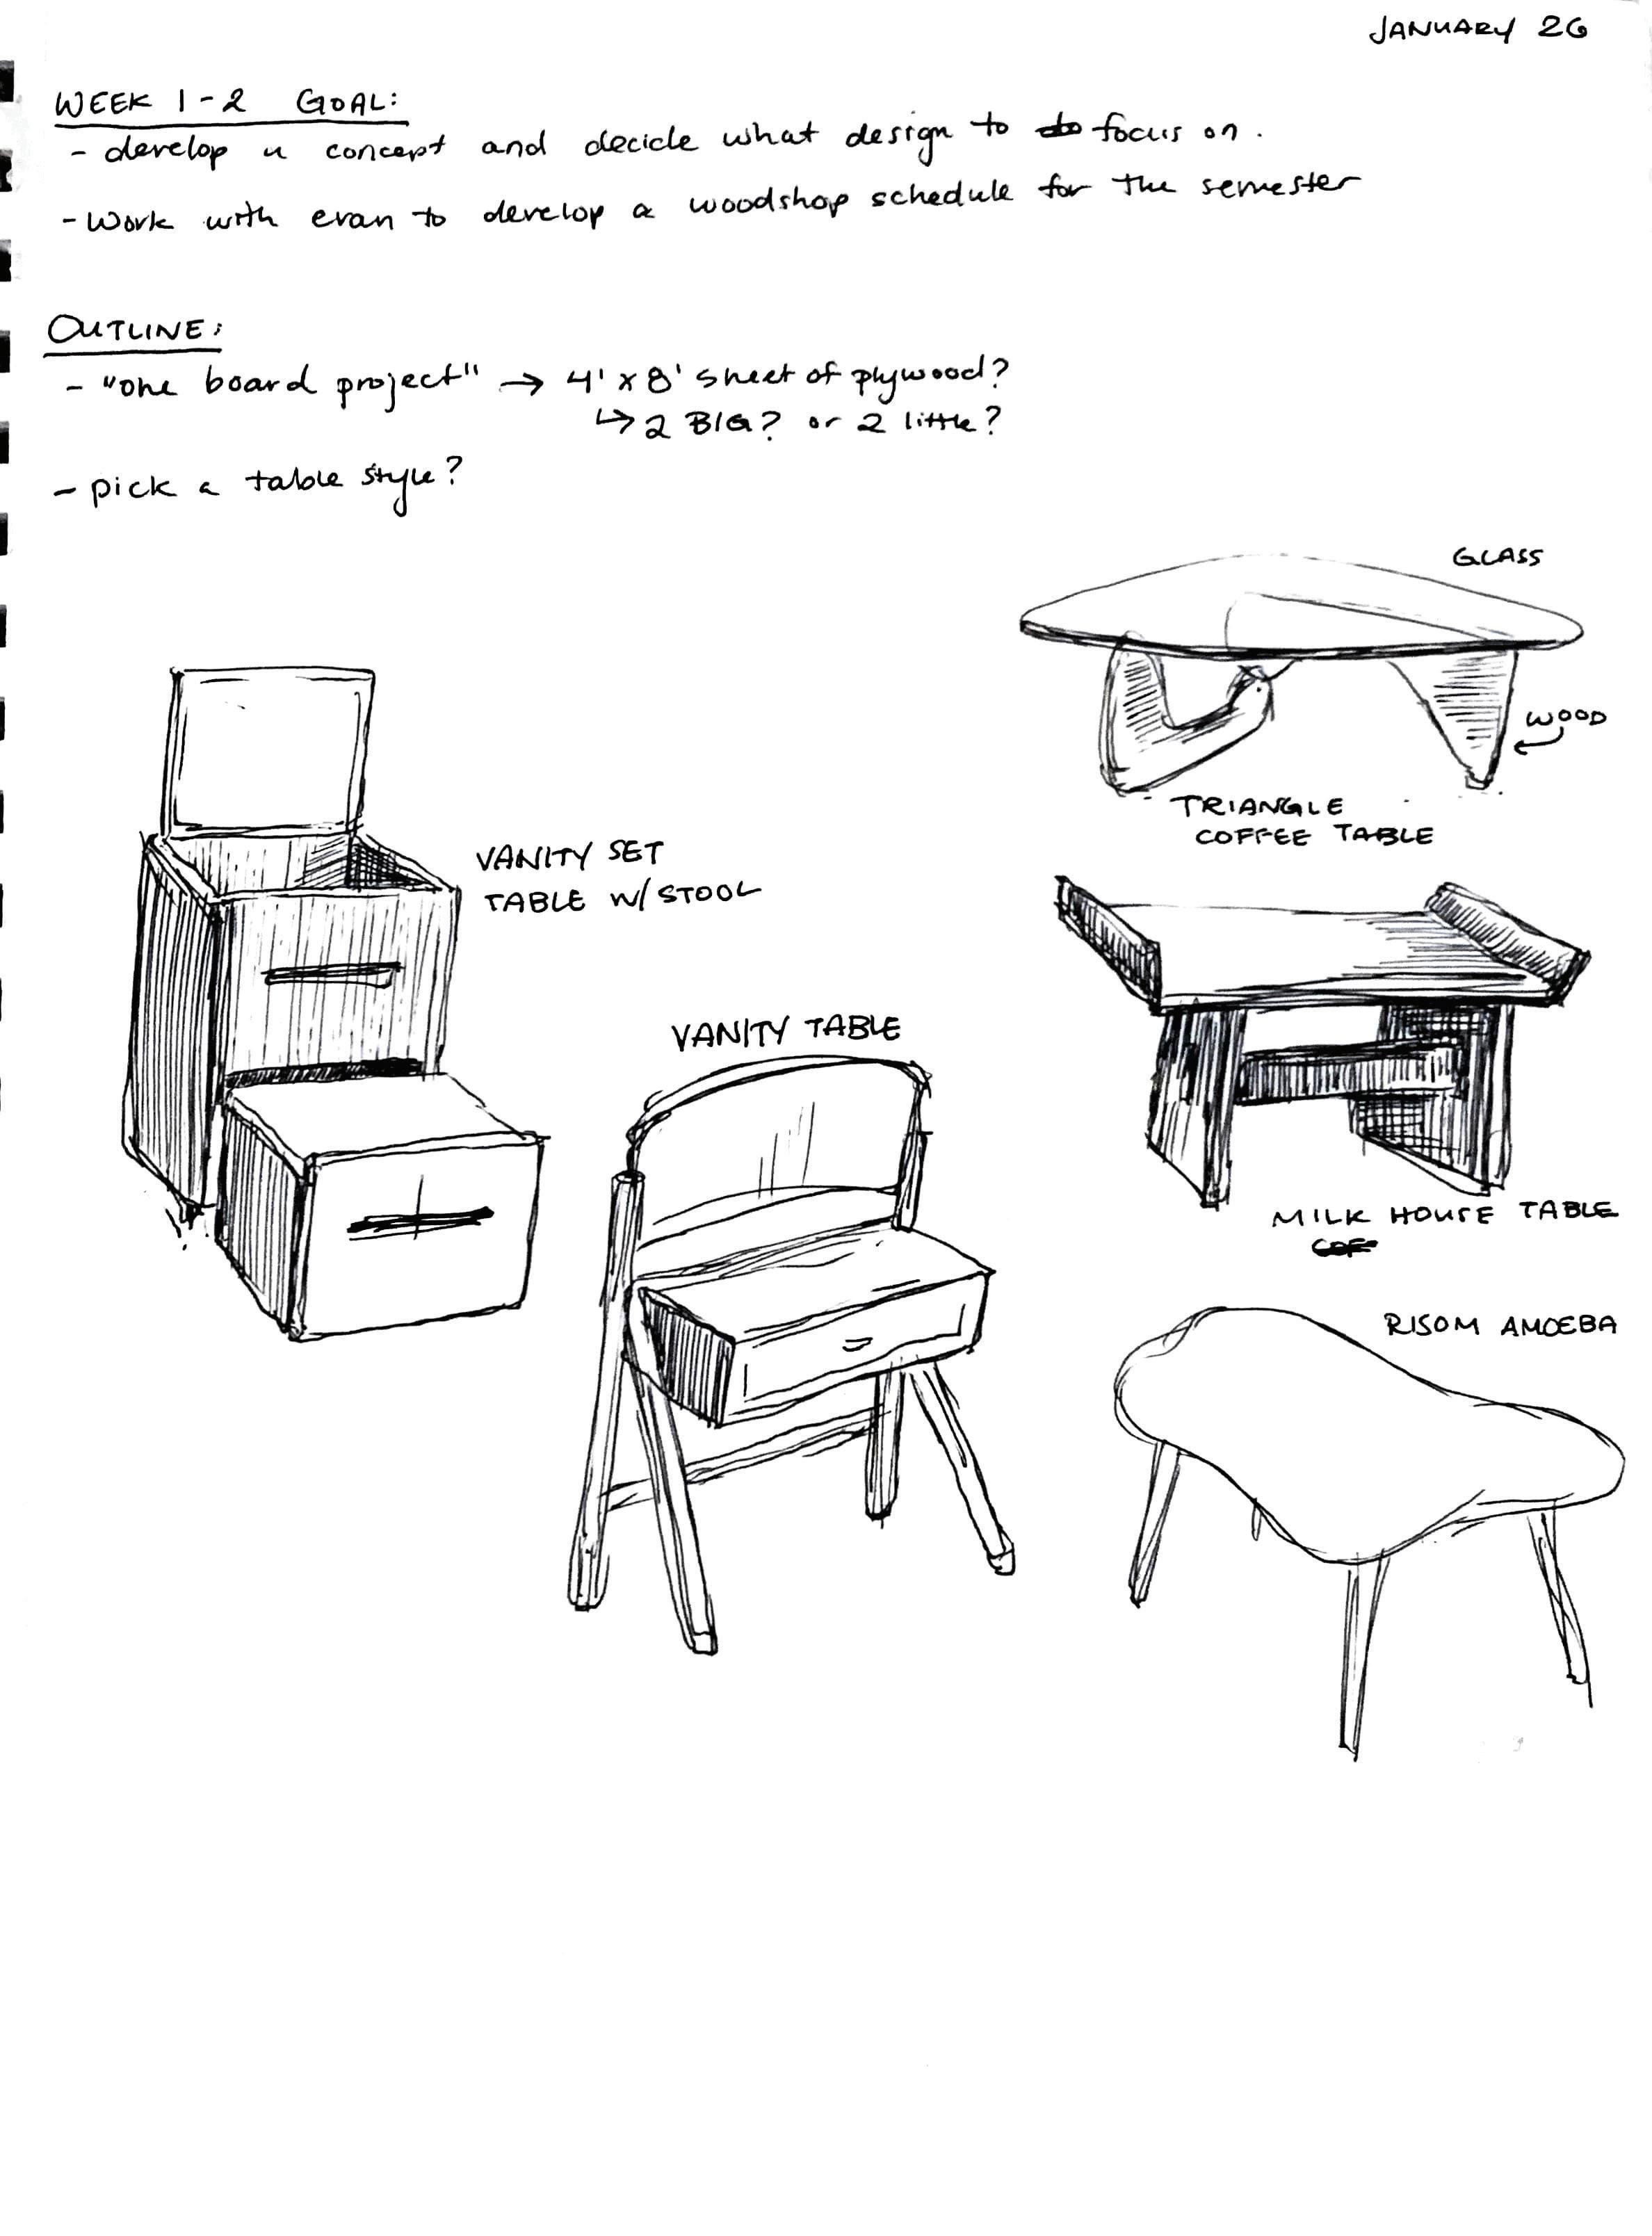
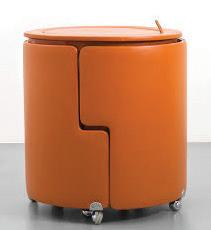
While I understood that I shouldn’t put all my energy into a chair design, I also wanted to challenge myself to do more than a table. During my furniture design research, I found myself constantly coming back to the idea of a nested furniture set, specifically a nesting vanity set. This means that the chair and table components can come together to create a compact unit. And under my project scope, I would design the chair to be a simpler stool design to allow me to focus on the entire design. The Dilly Dally Dressing Table Set by Luigi Massoni was a beautiful example. The design was a statement piece and had a gr way of maximizing it’s utility in a small volume.

RESEARCH
Sketchbook drawings, January 2022 4
of
form RESEARCH 5
Inspiration images
materiality and

In my research I purchased two books that were recommended by furniture design education websites.

Furniture Studio, Jeffrey Karl Ochsner, 2012

The first, Furniture Studio, discusses a 2009 semester of furniture studio at the University of Washington. I read pieces that discussed the curriculum, problems students ran into, and how to create good designs.

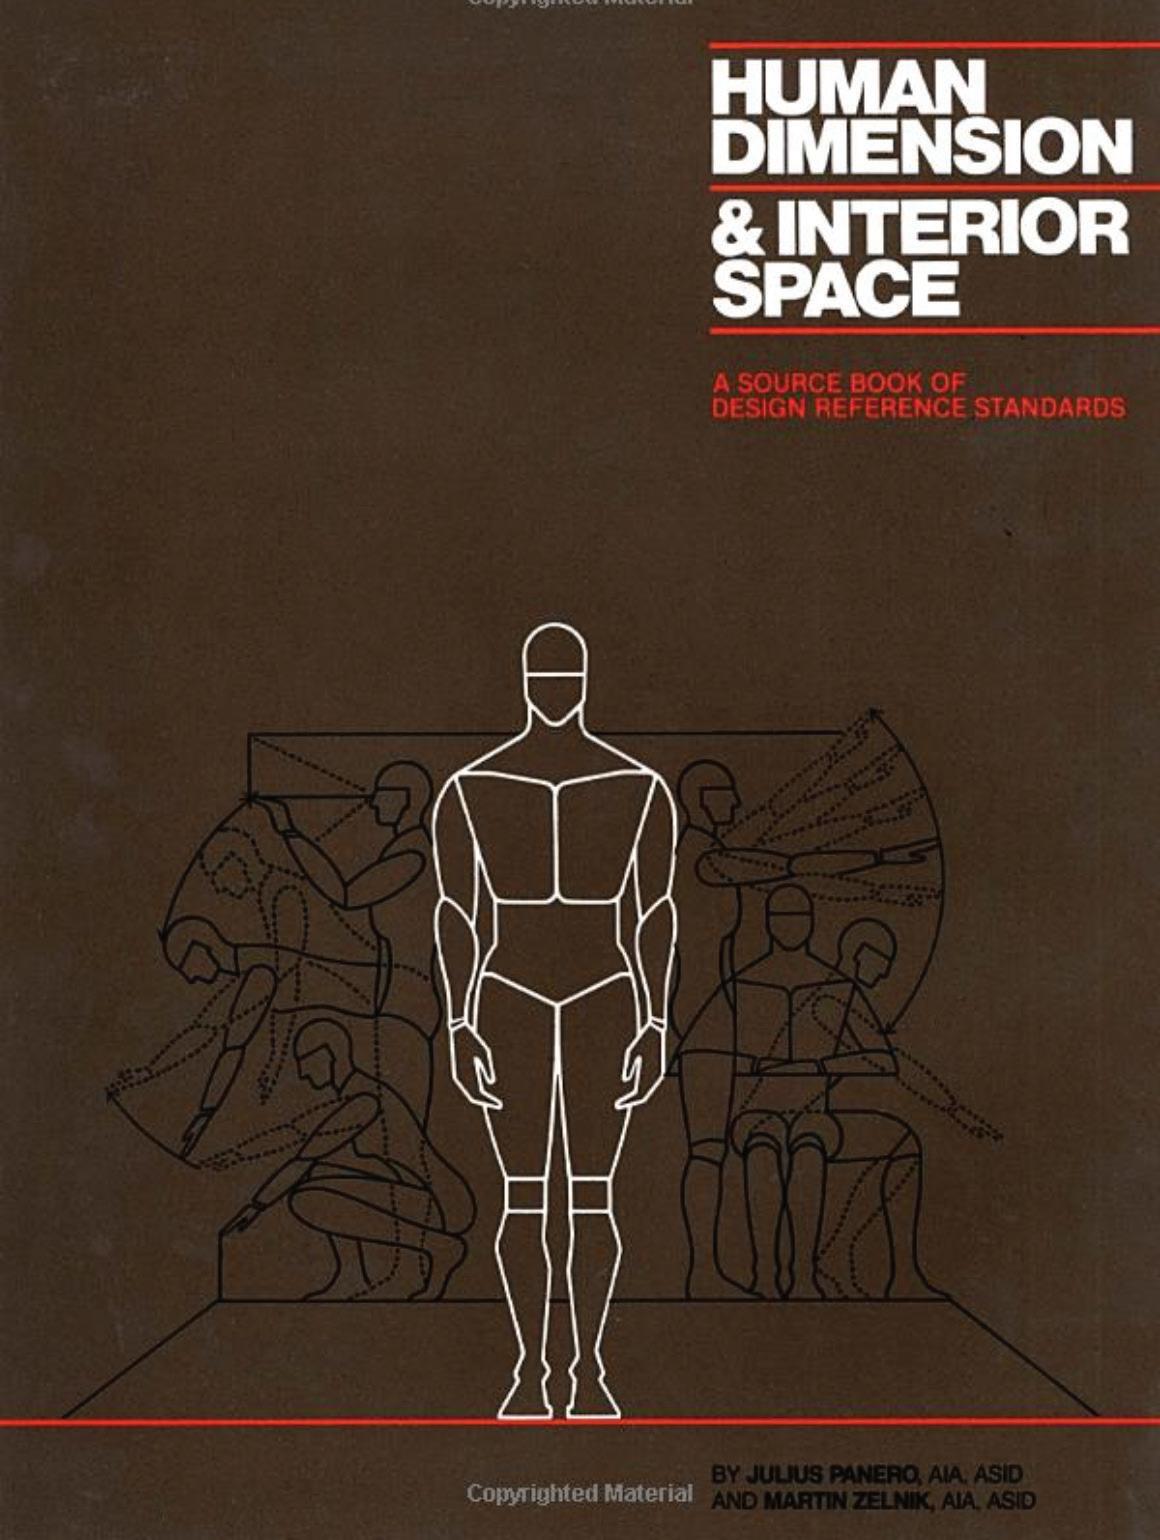
Human Dimension & Interior Space Julius Panero and Marin Zelnik, 1979

The second book, was highly rated as a great reference for the dimension of furniture. While it is a fascinating book, the human dimensions are incredibly outdated. This book also discusses the dimensions of furniture for dentists offices, restaurants, and other public spaces. It specifies differences in public space dimensions for males and females. Overall, this book is very interesting to flip through. But it is rather outdated and I would not recommend it to a prospective furniture student.

6
RESEARCH
Sketchbook drawings, January 2022 DESIGN 7
Sketchbook drawings, February 2022 DESIGN 8

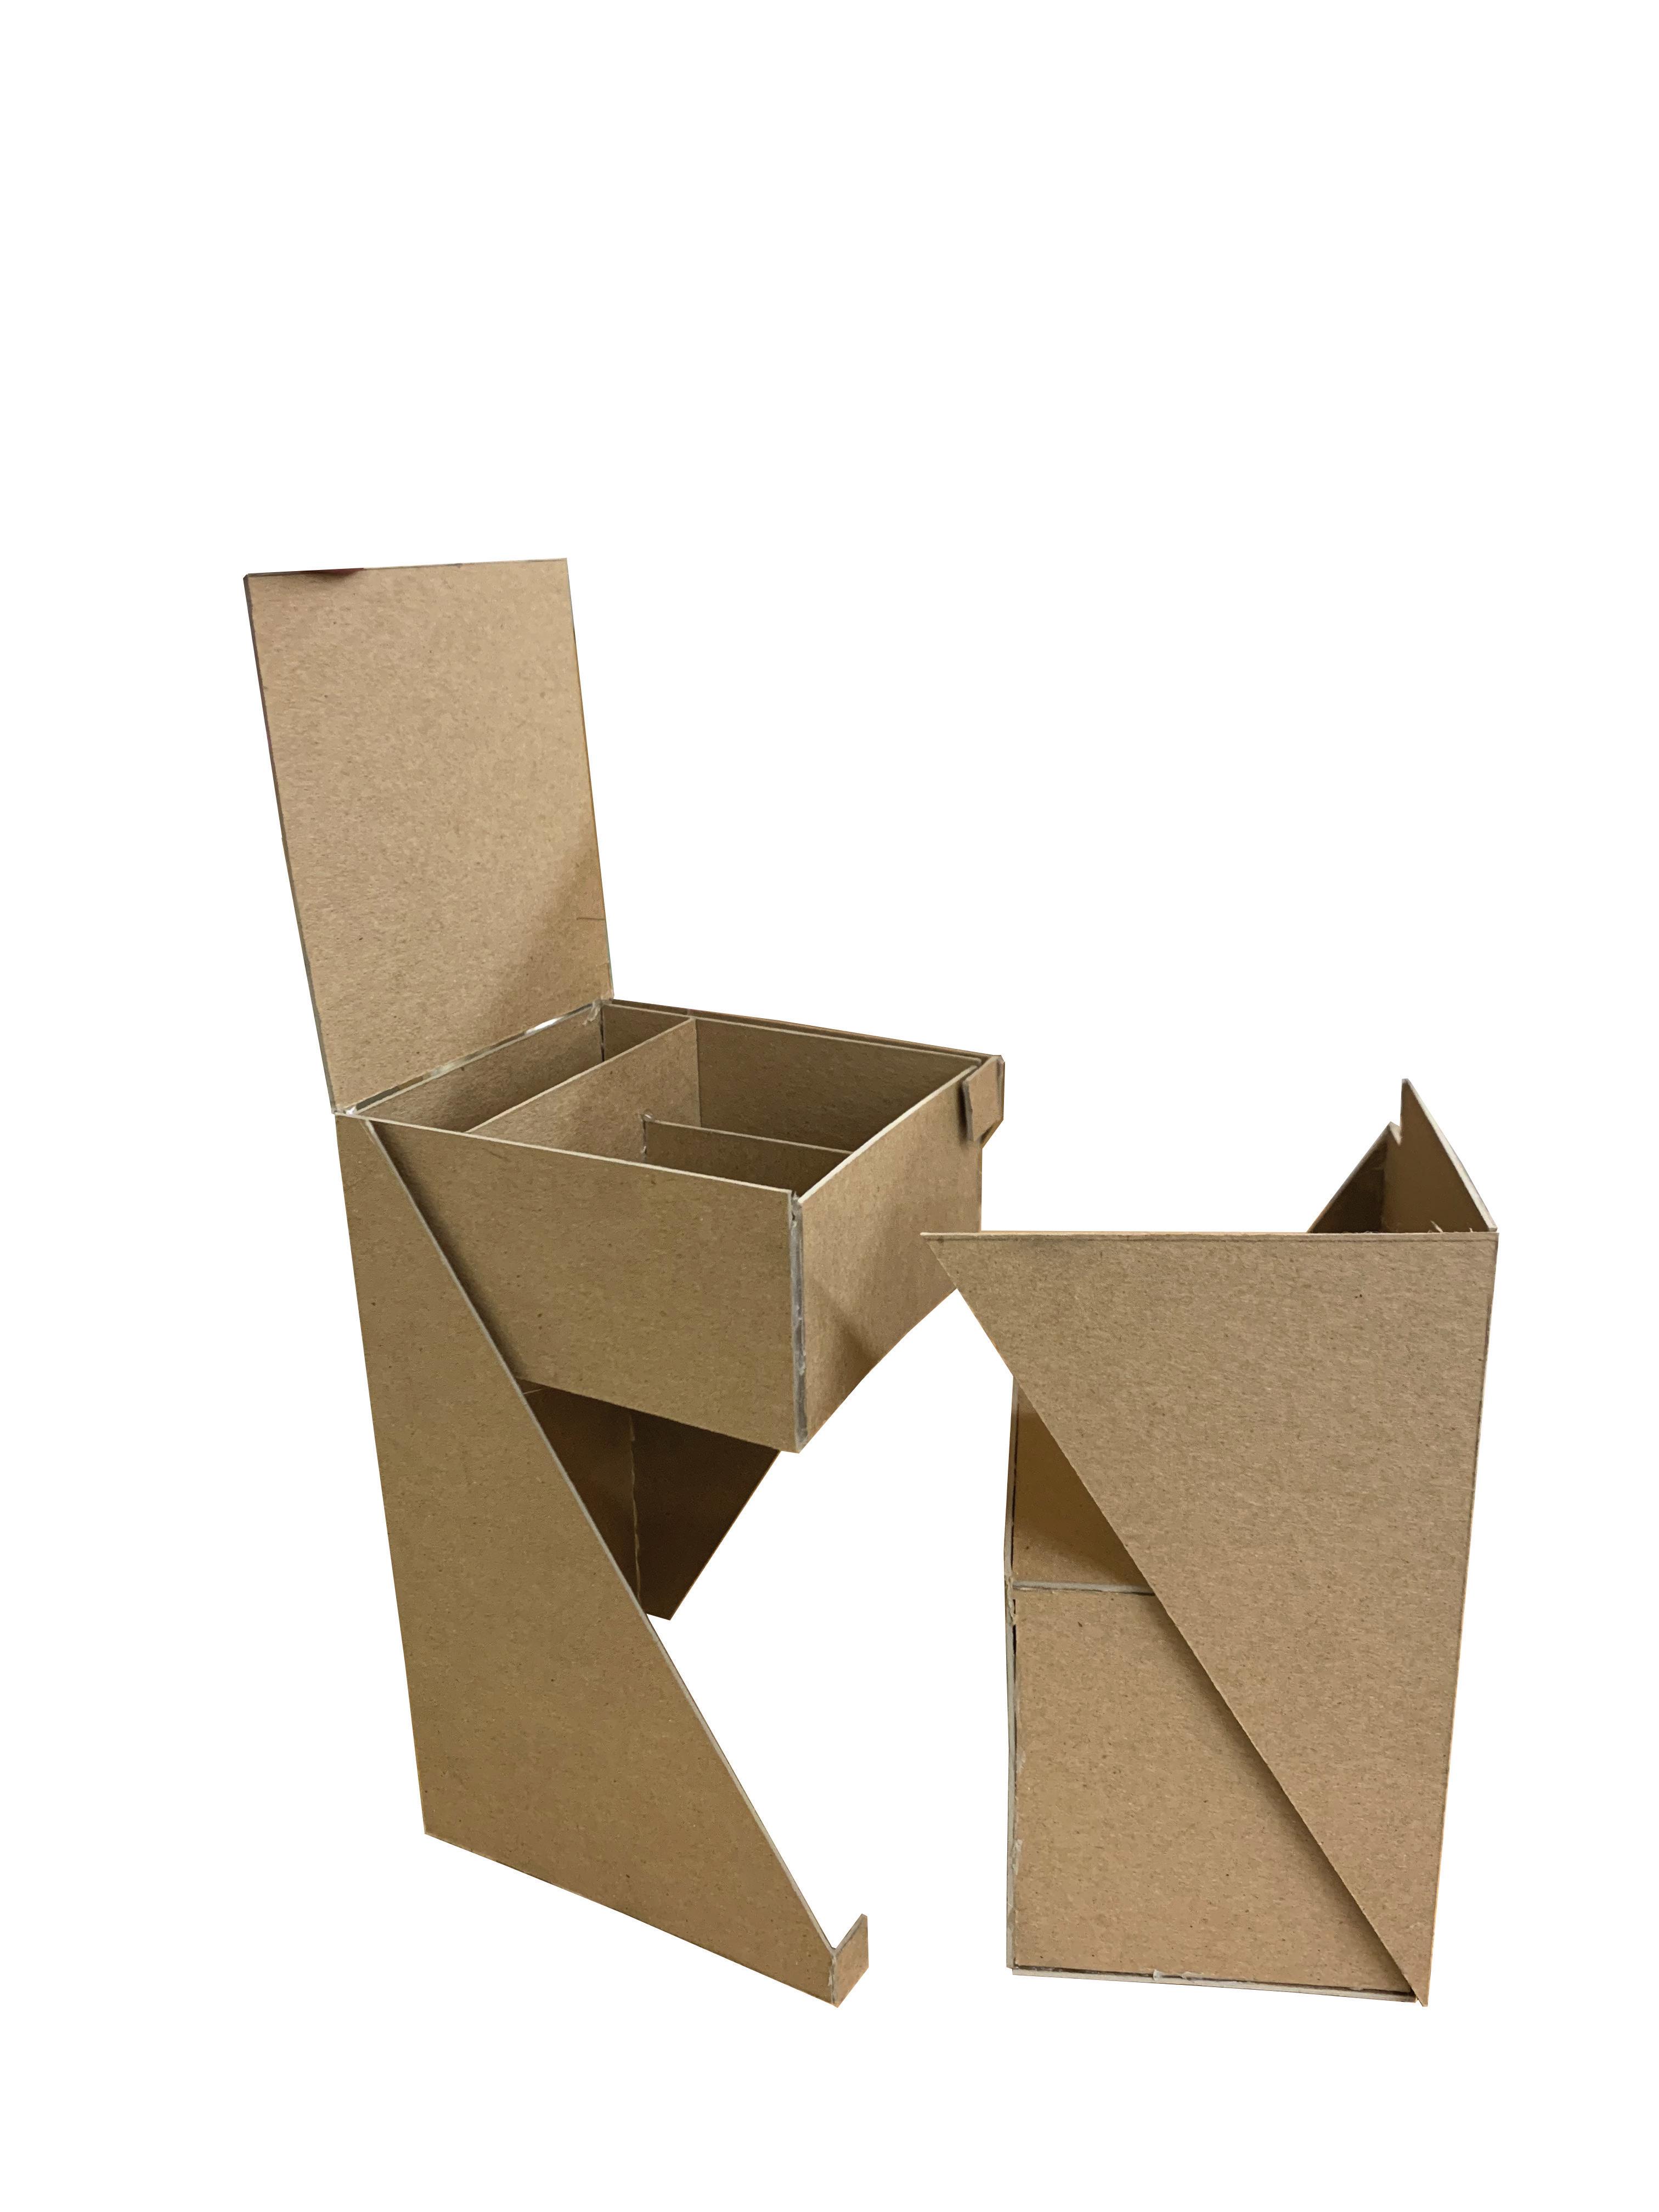
Scale Model, February 2022

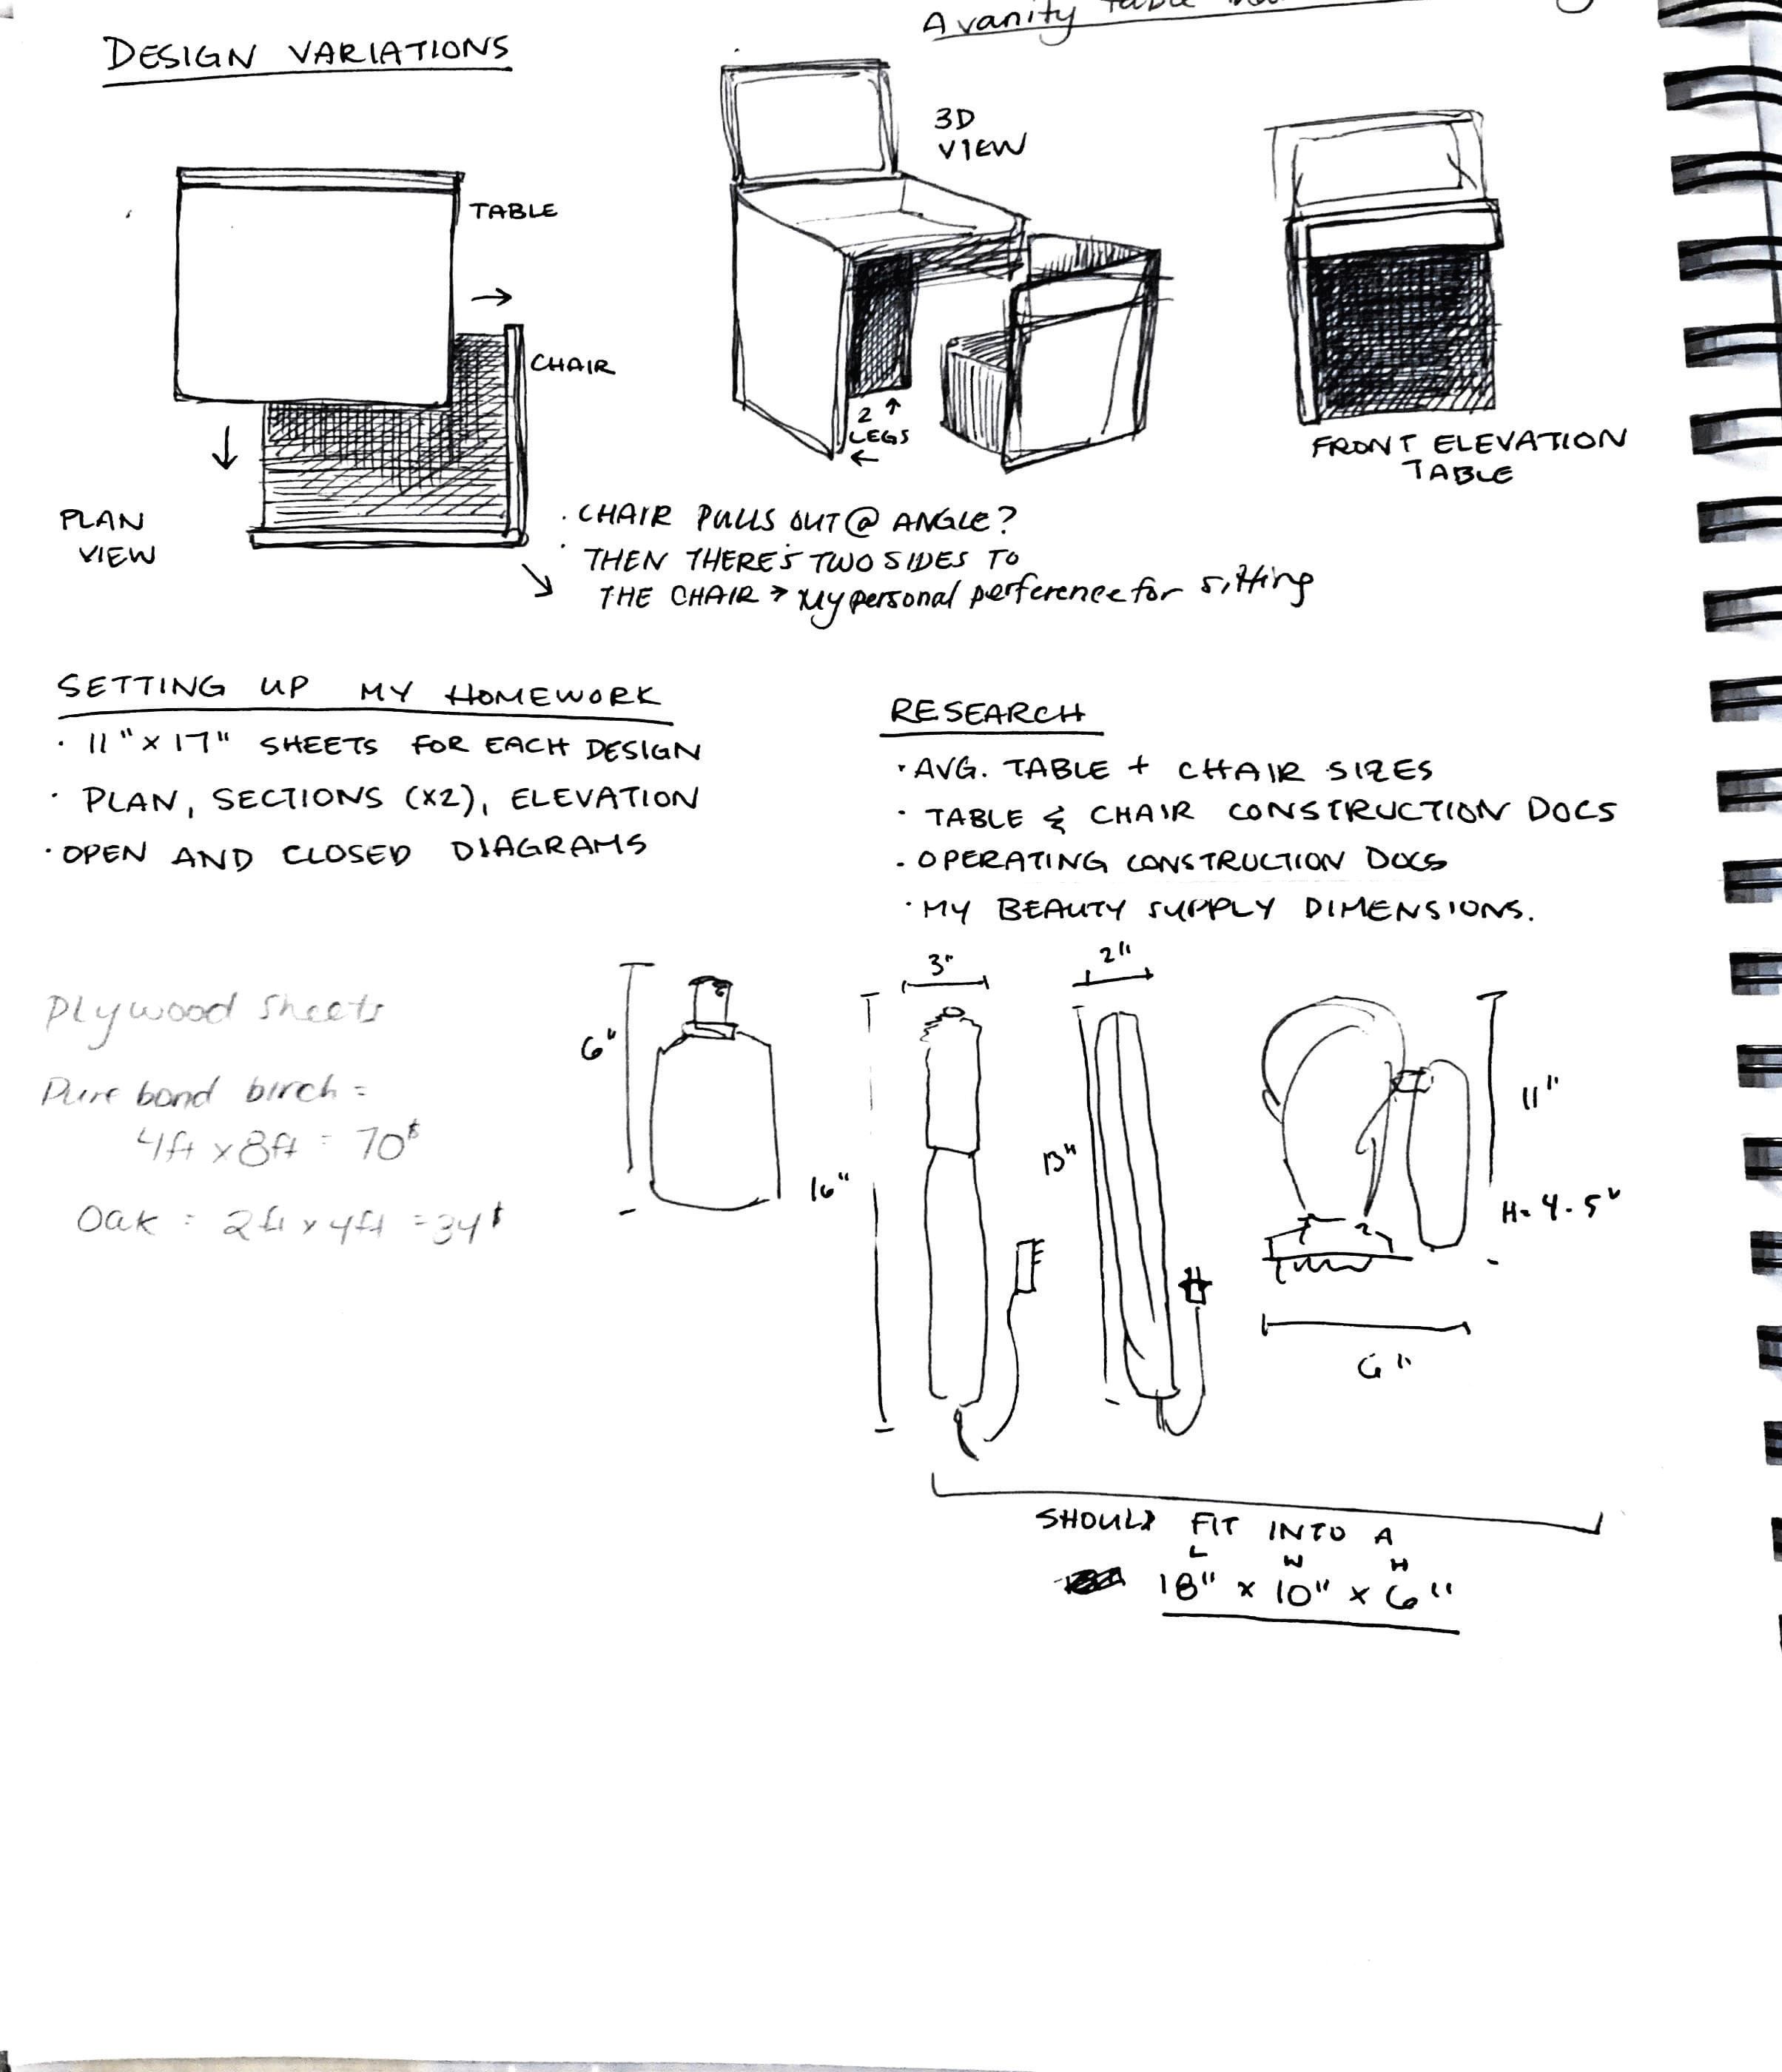
I tried to push the boundaries of my design by adding asymmetry. I created scaled drawings to find dynamic shapes, and then built scale models to test the physics of the design. I decided to keep a linear design in hopes it would mean an easier assembly process.

DESIGN
9
Sketchbook drawings, February 2022 DESIGN 10

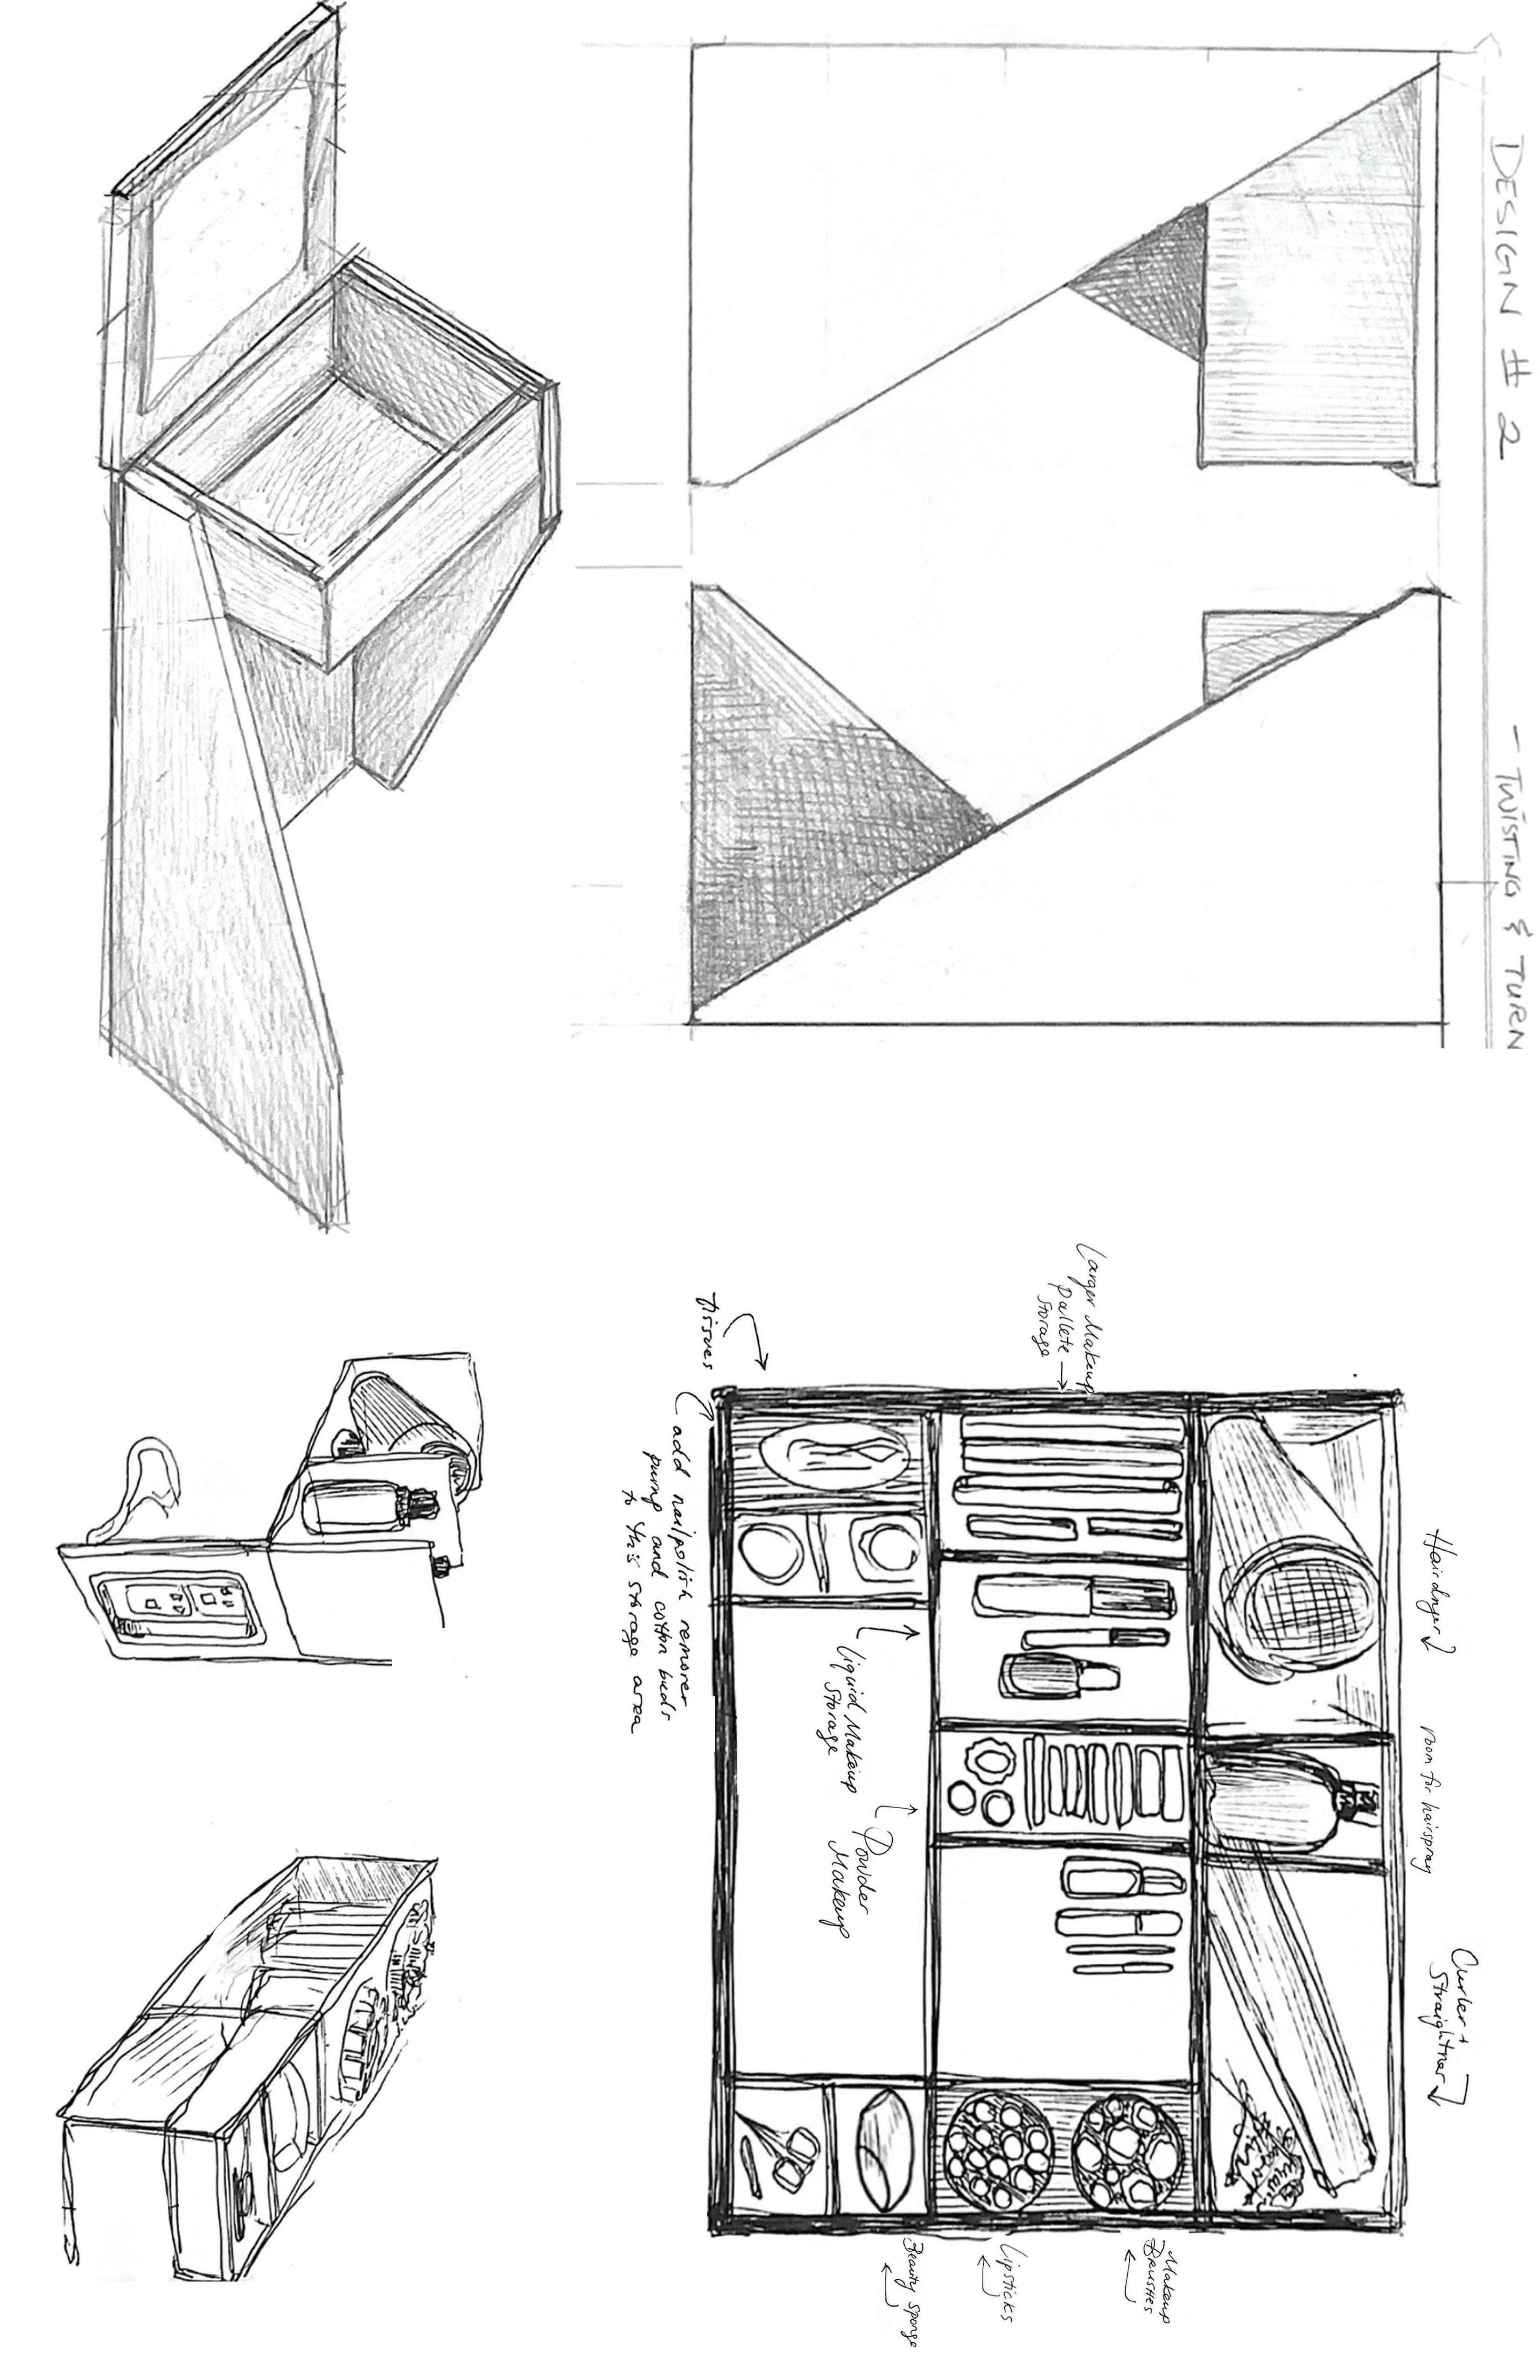
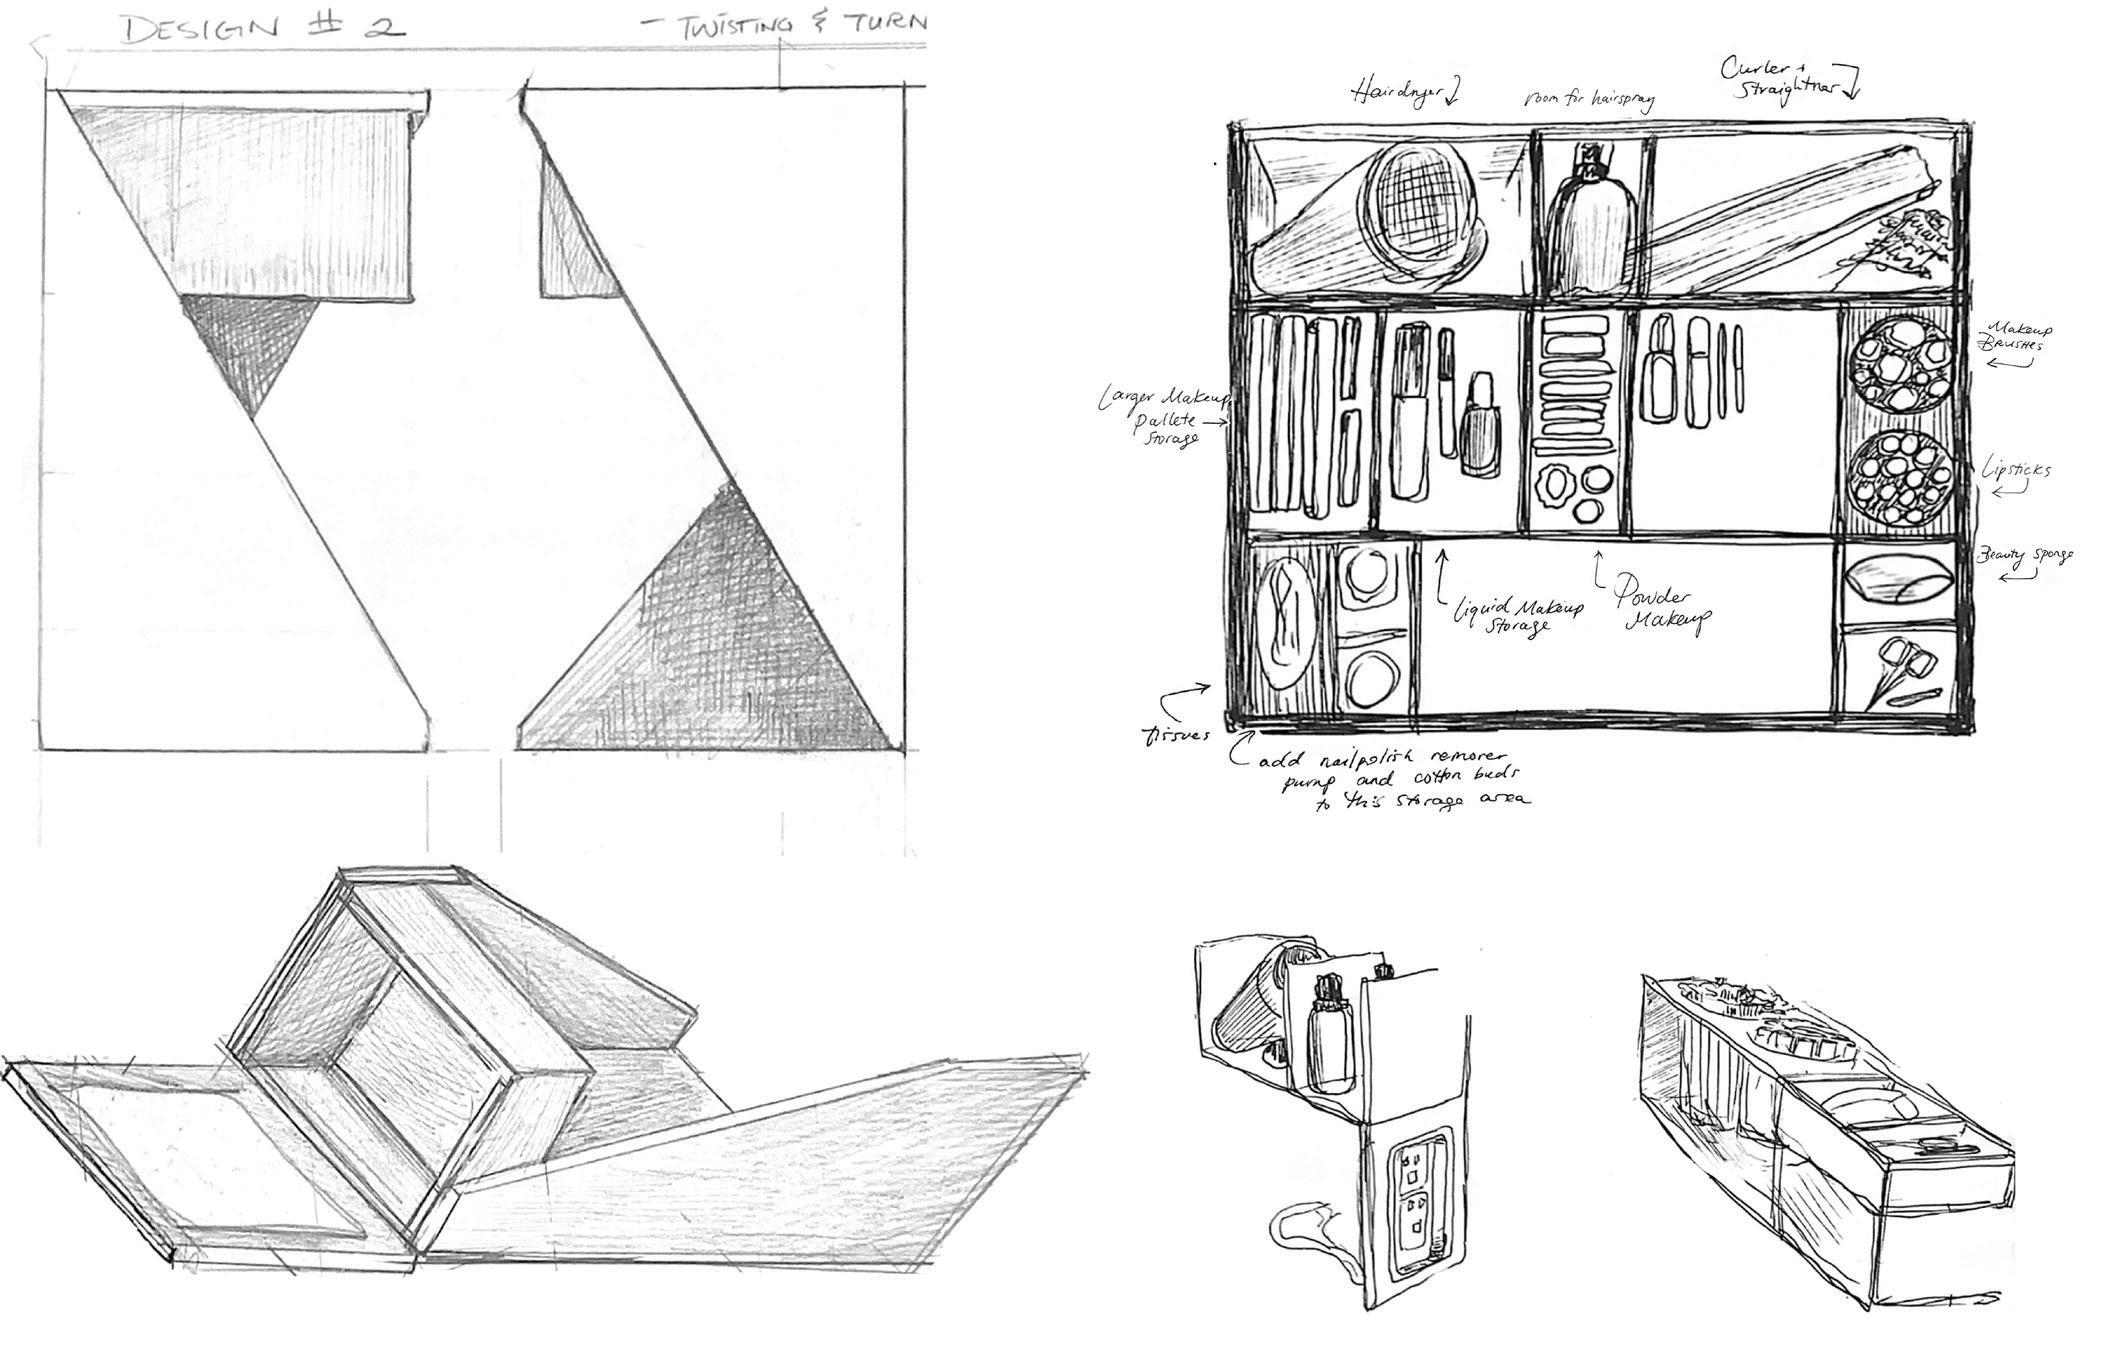
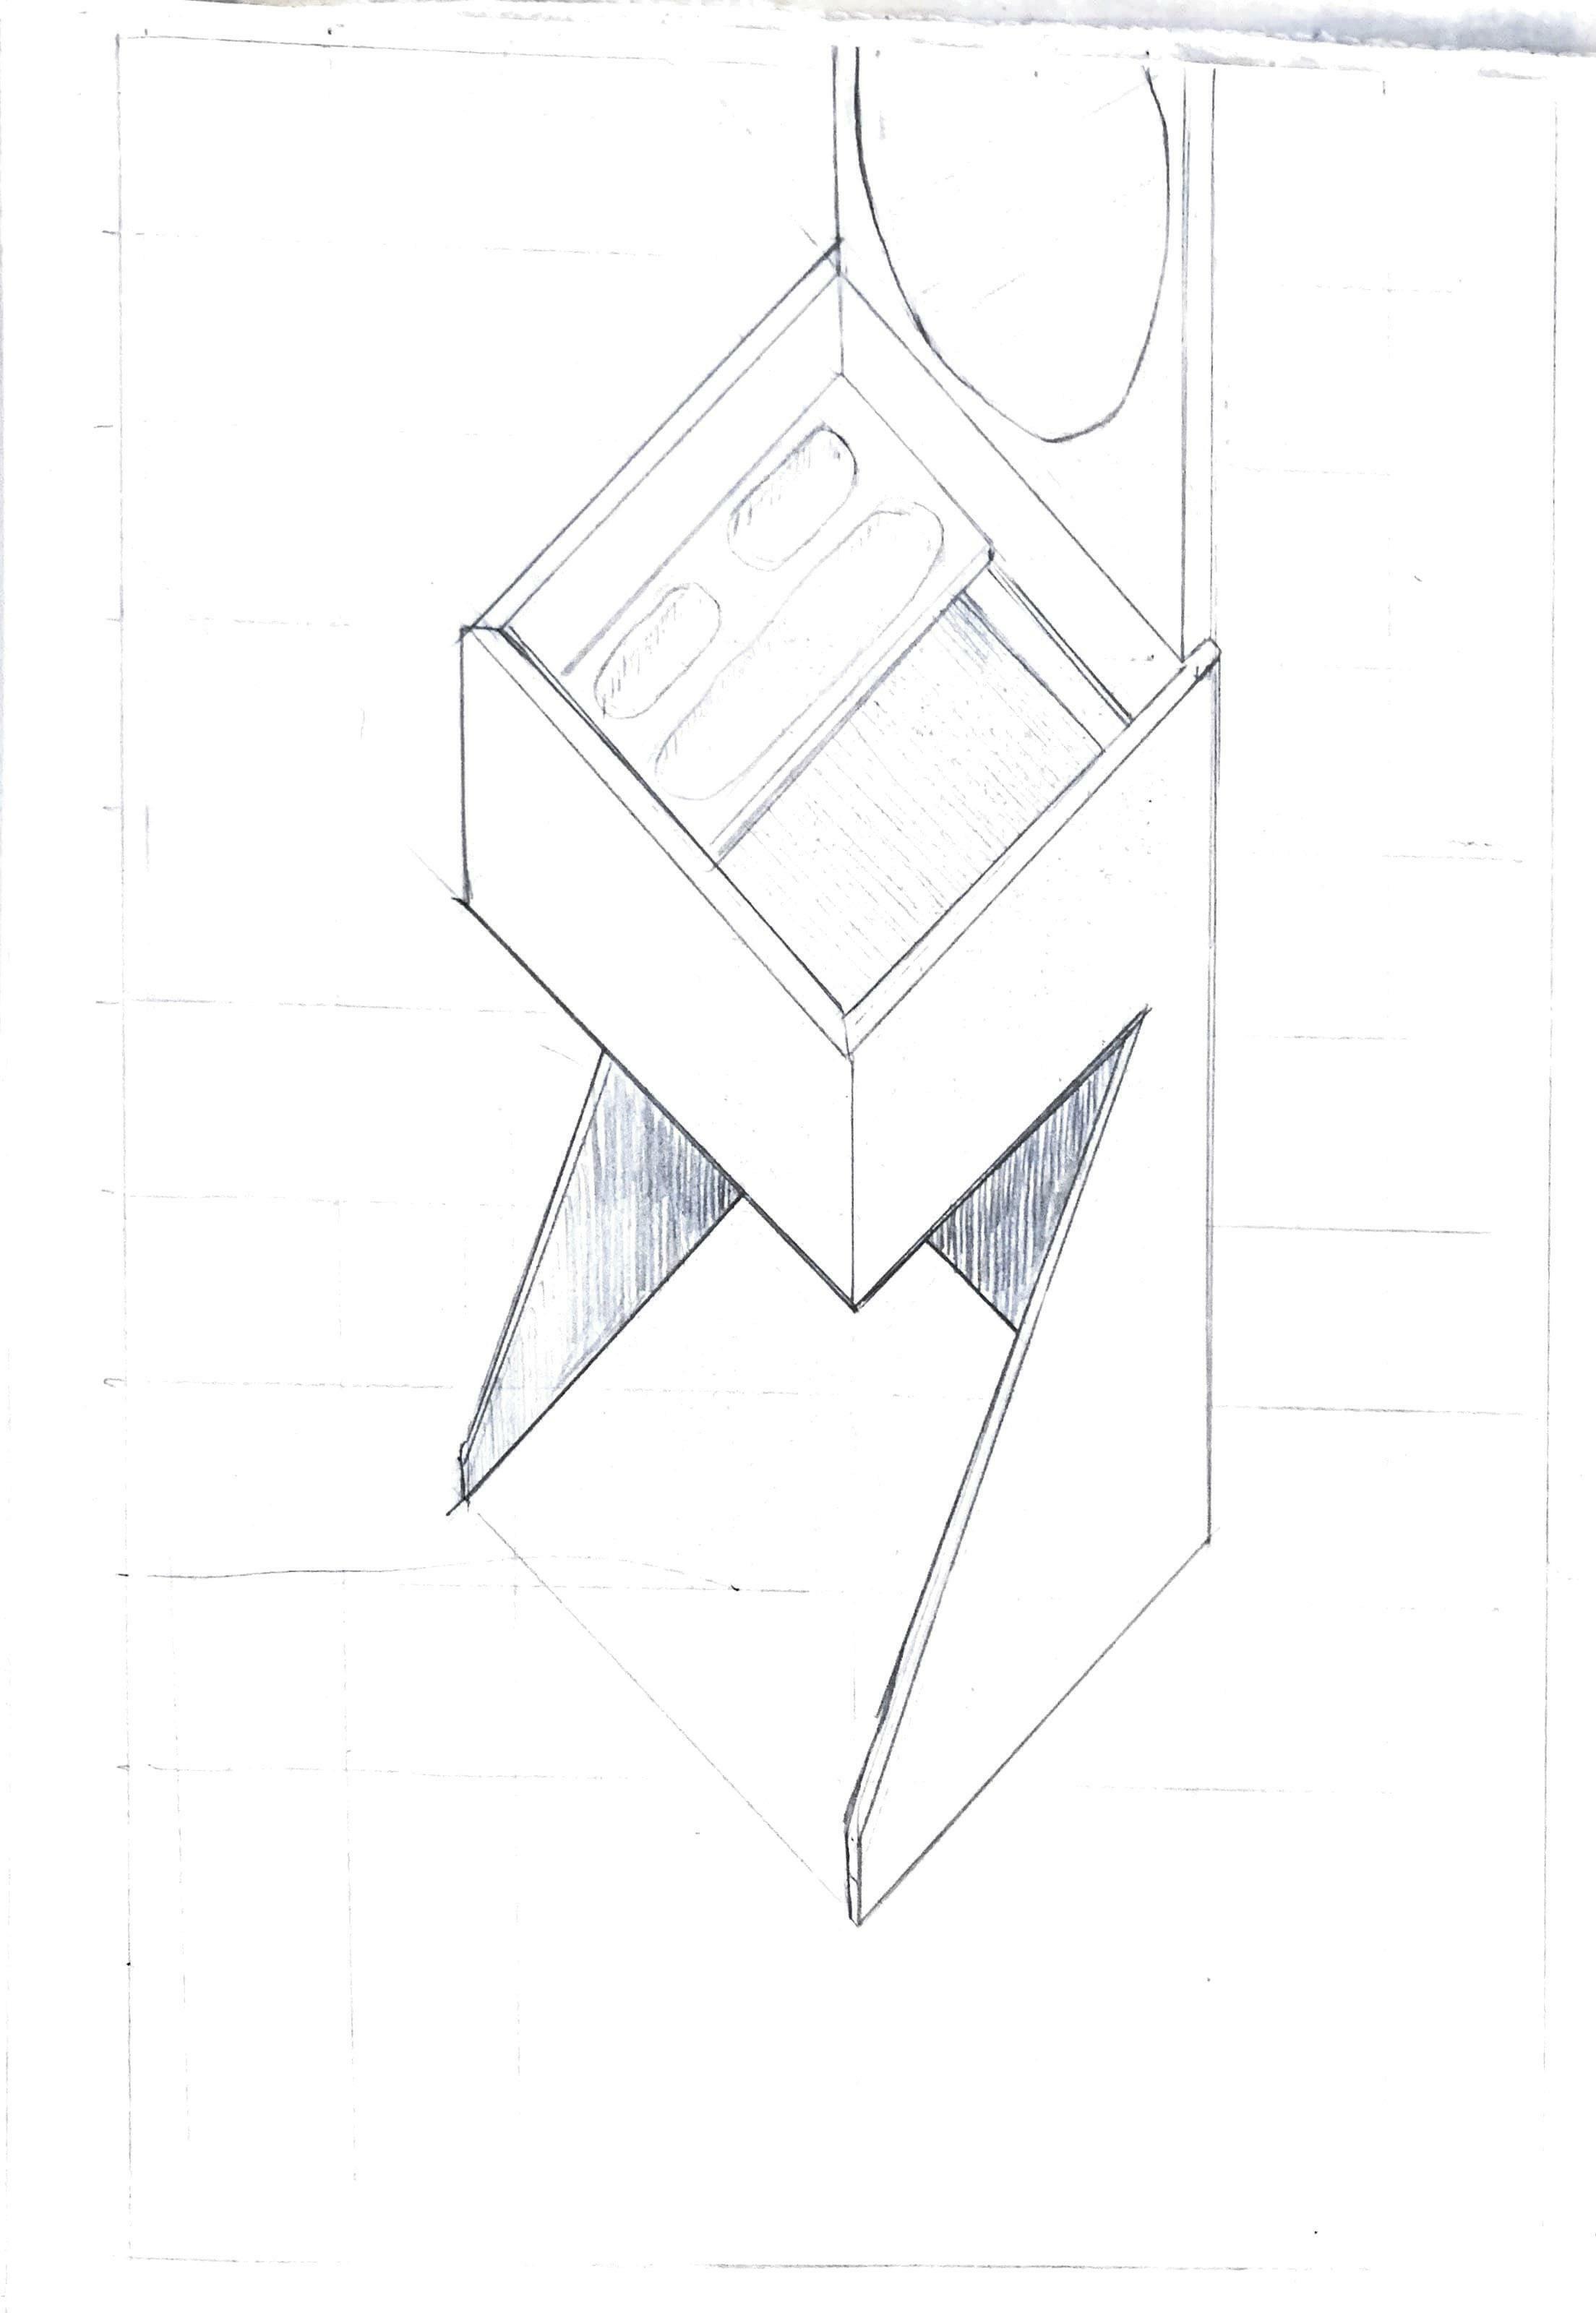
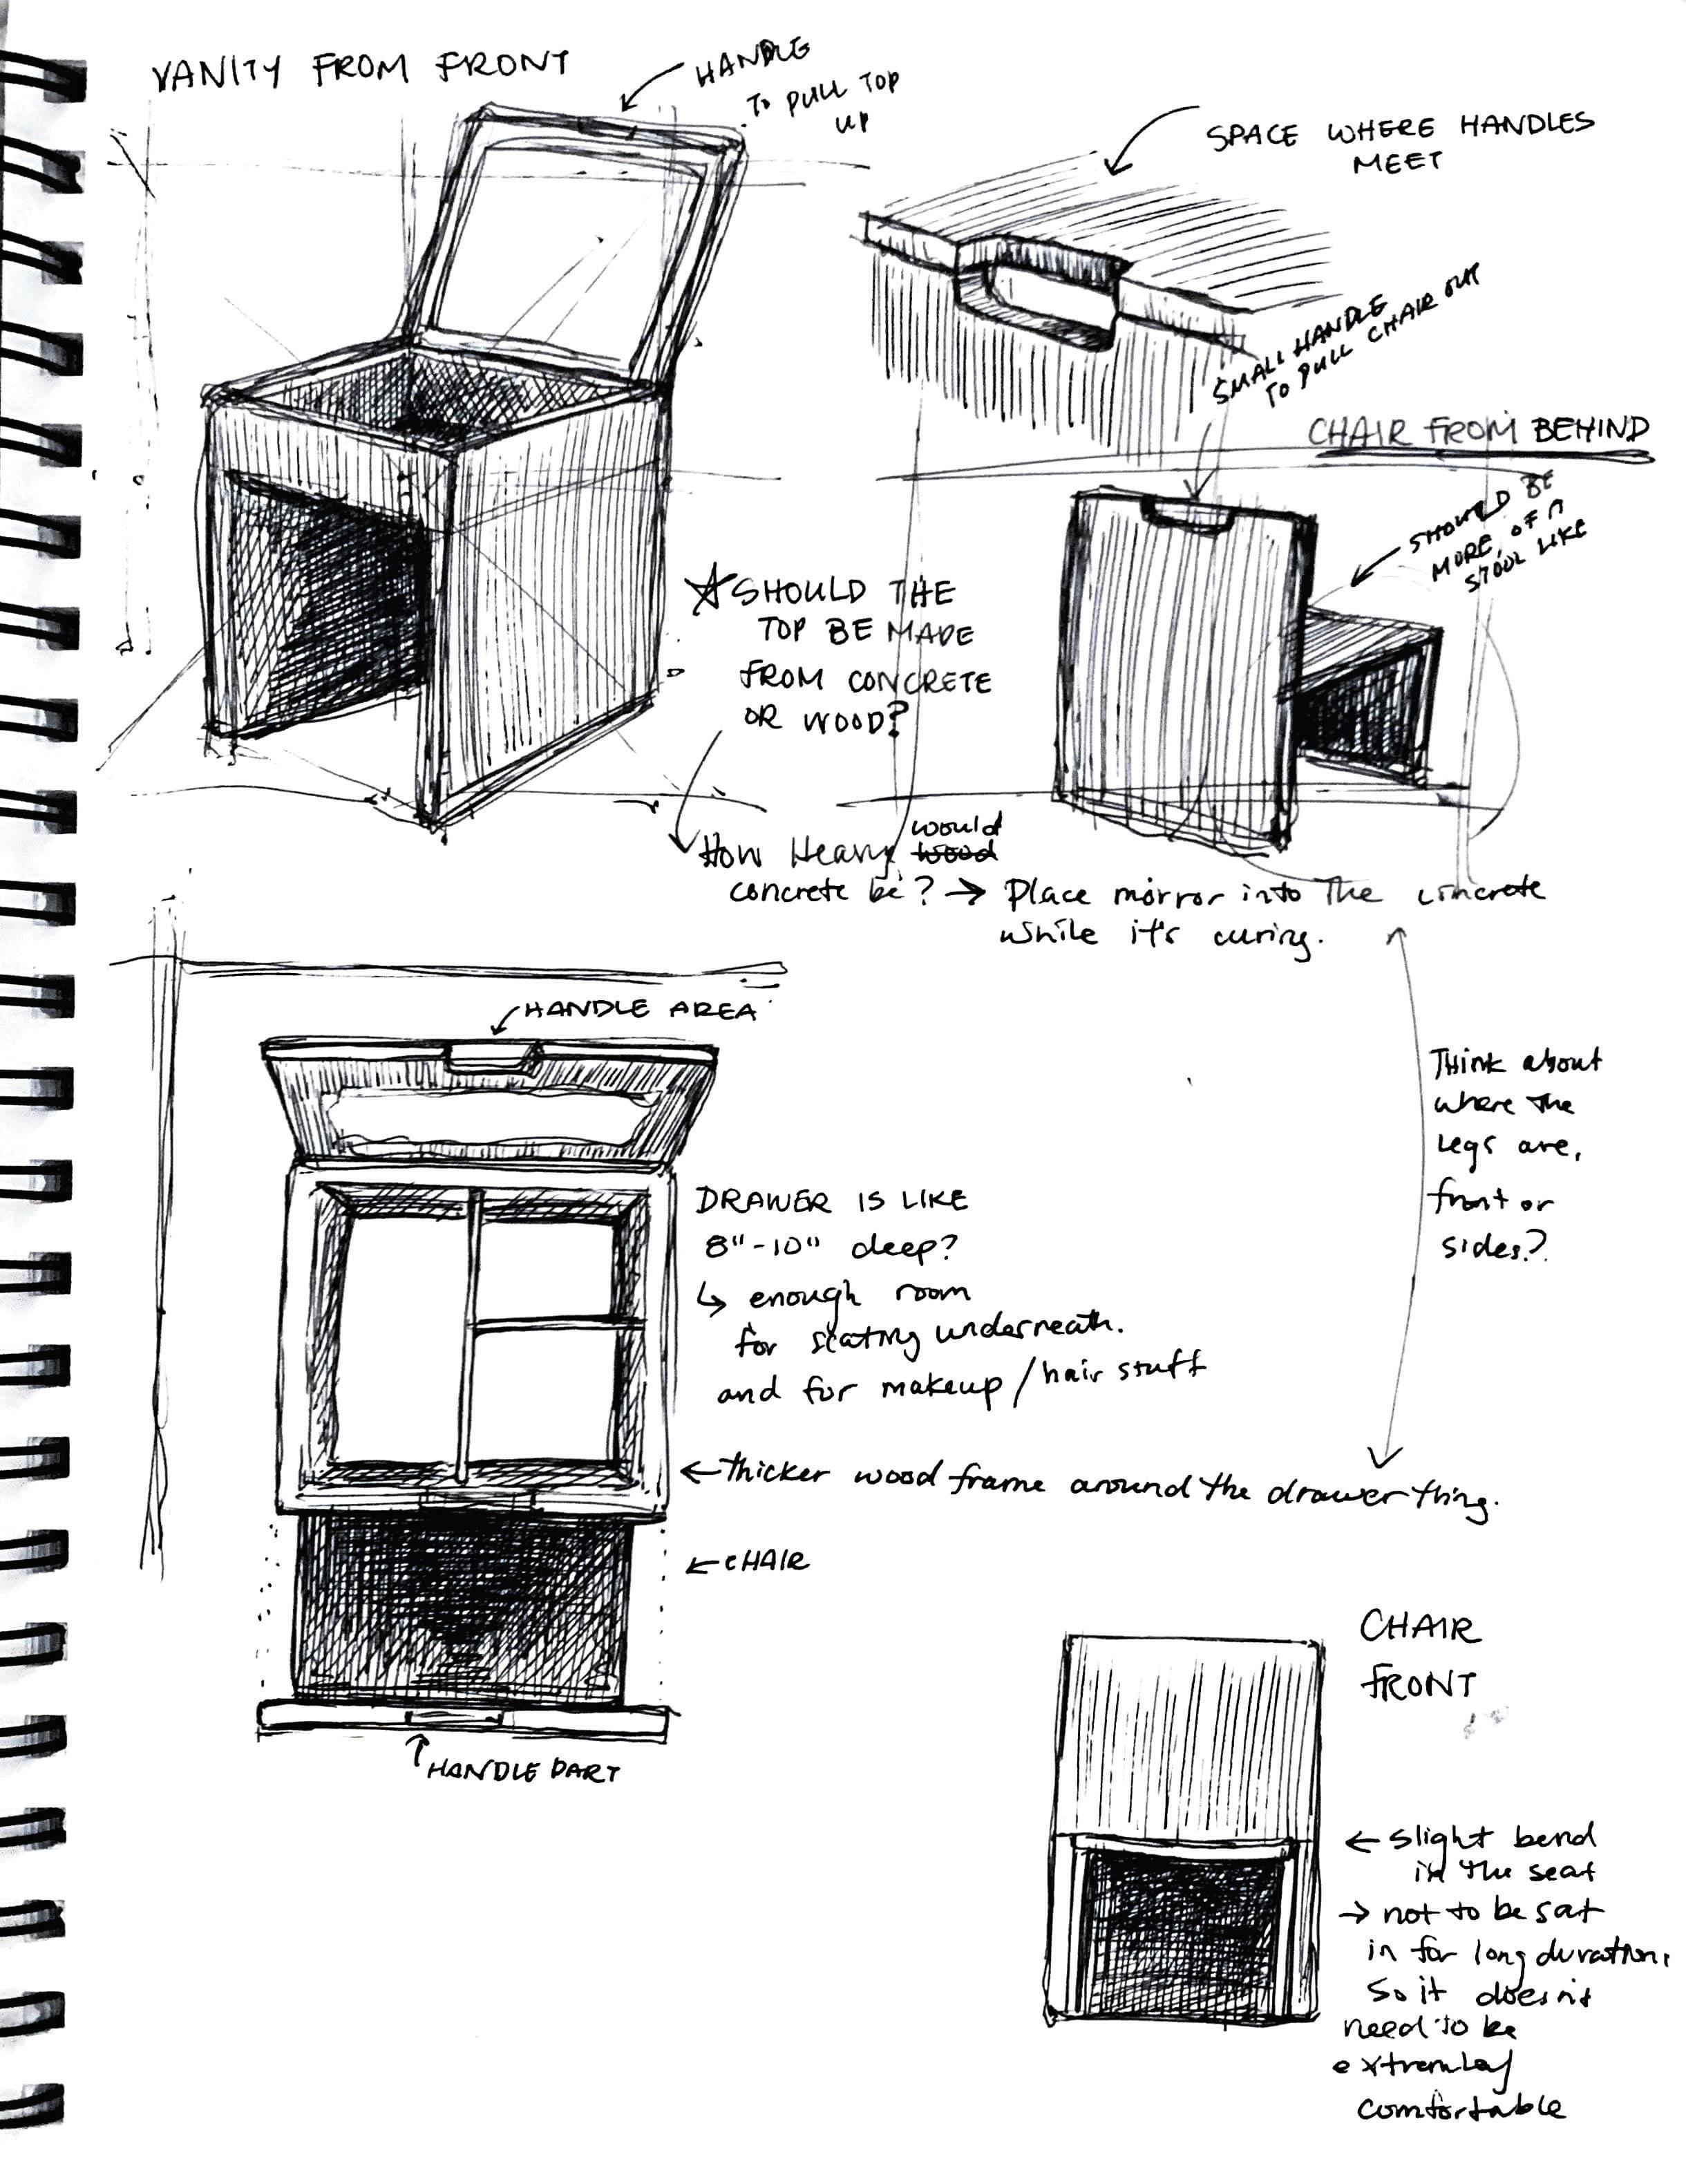
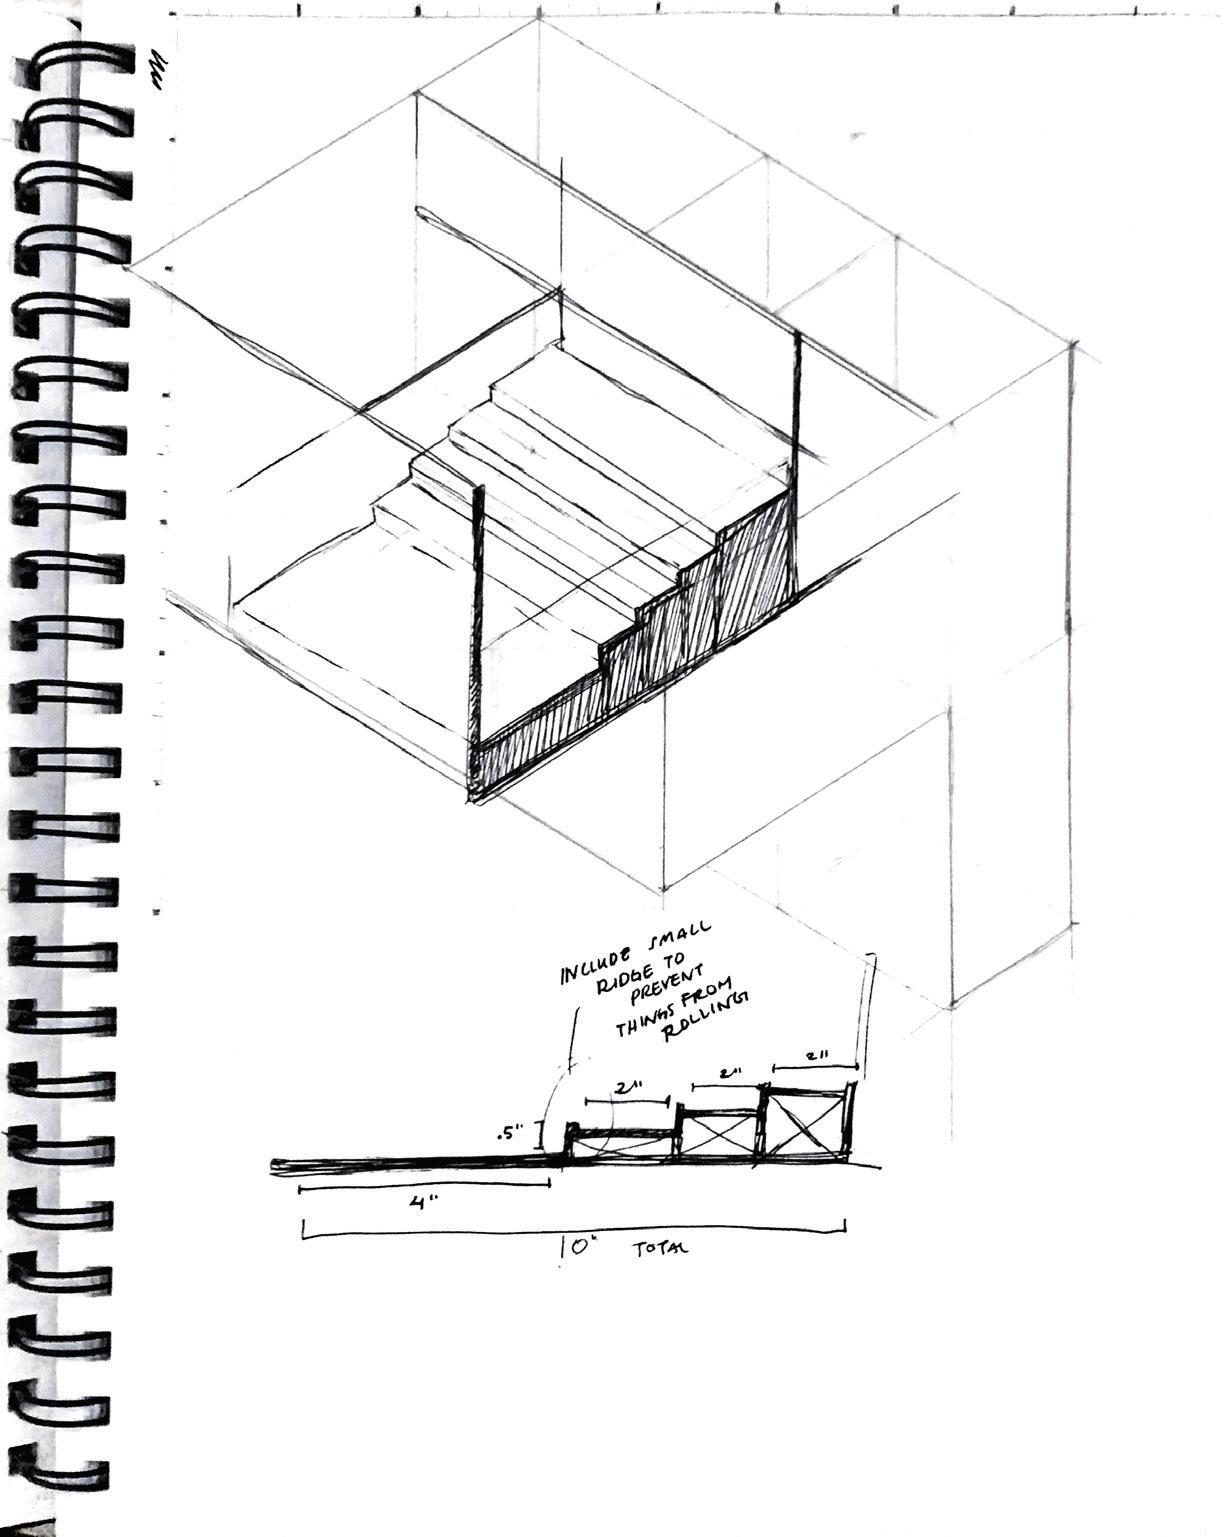
When I committed to the asymmetrical design, I began investigating how I would use the interior of the vanity. The deep dimensions were derived from makeup products I was planning on storing inside the table. I also added a large back piece to store hair tools, and add weight to the back of the table to balance the asymmetrical structure.

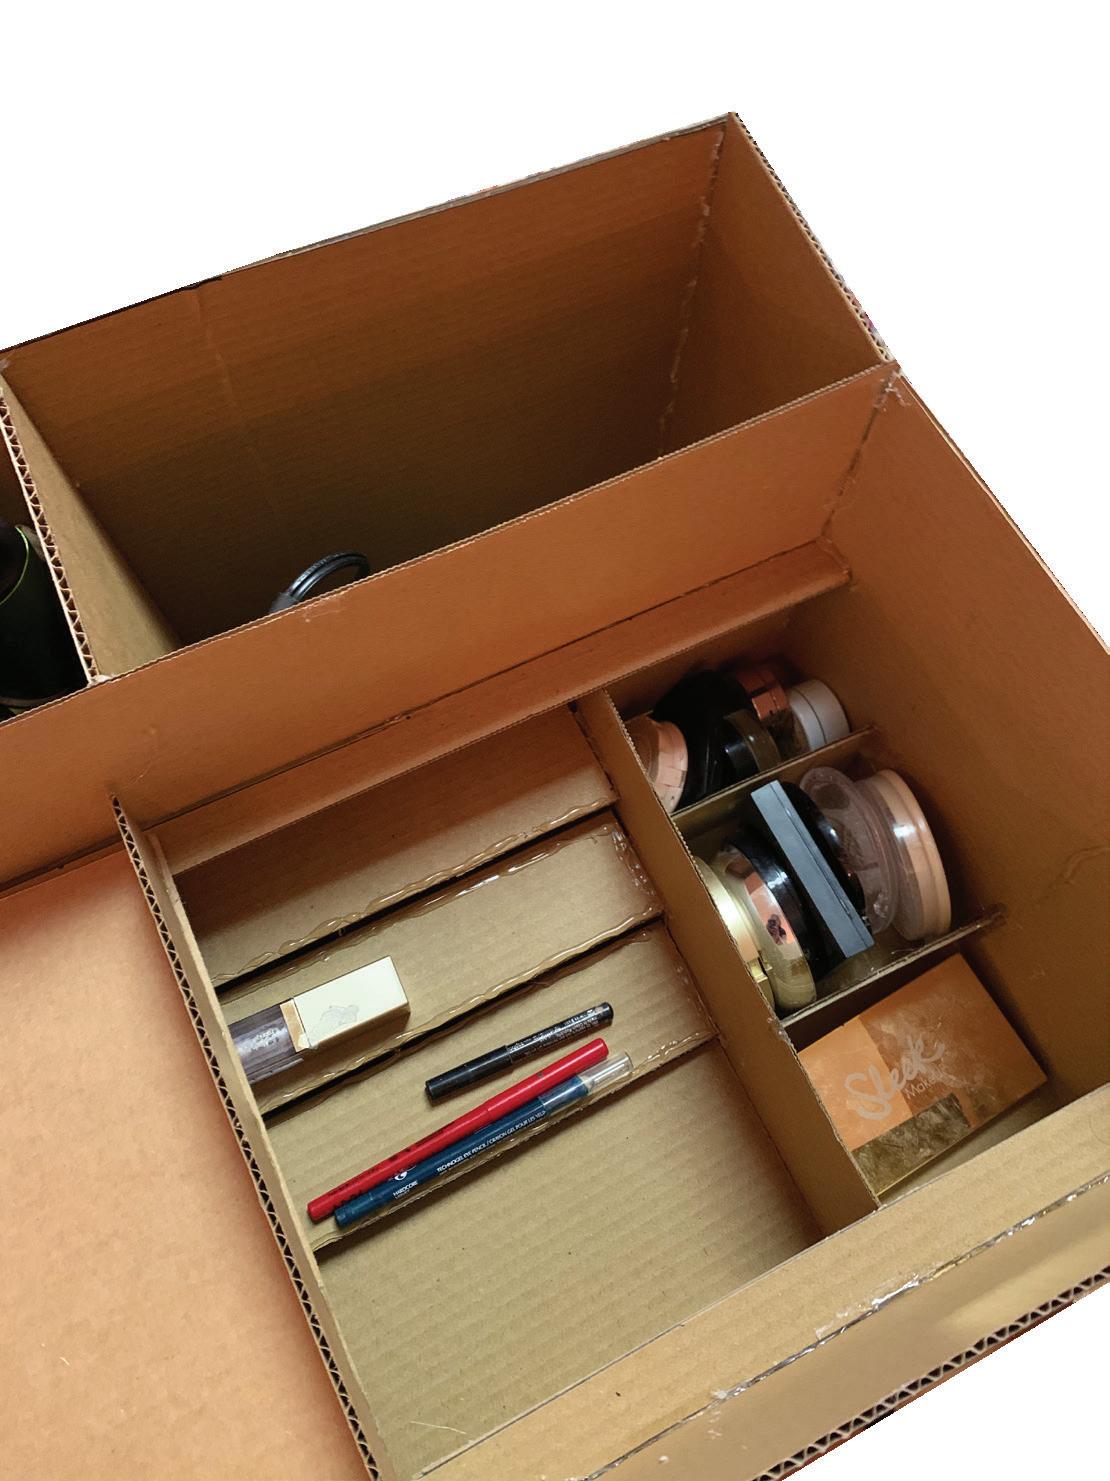
Interior of vanity sketches and model, February 2022

DESIGN
11

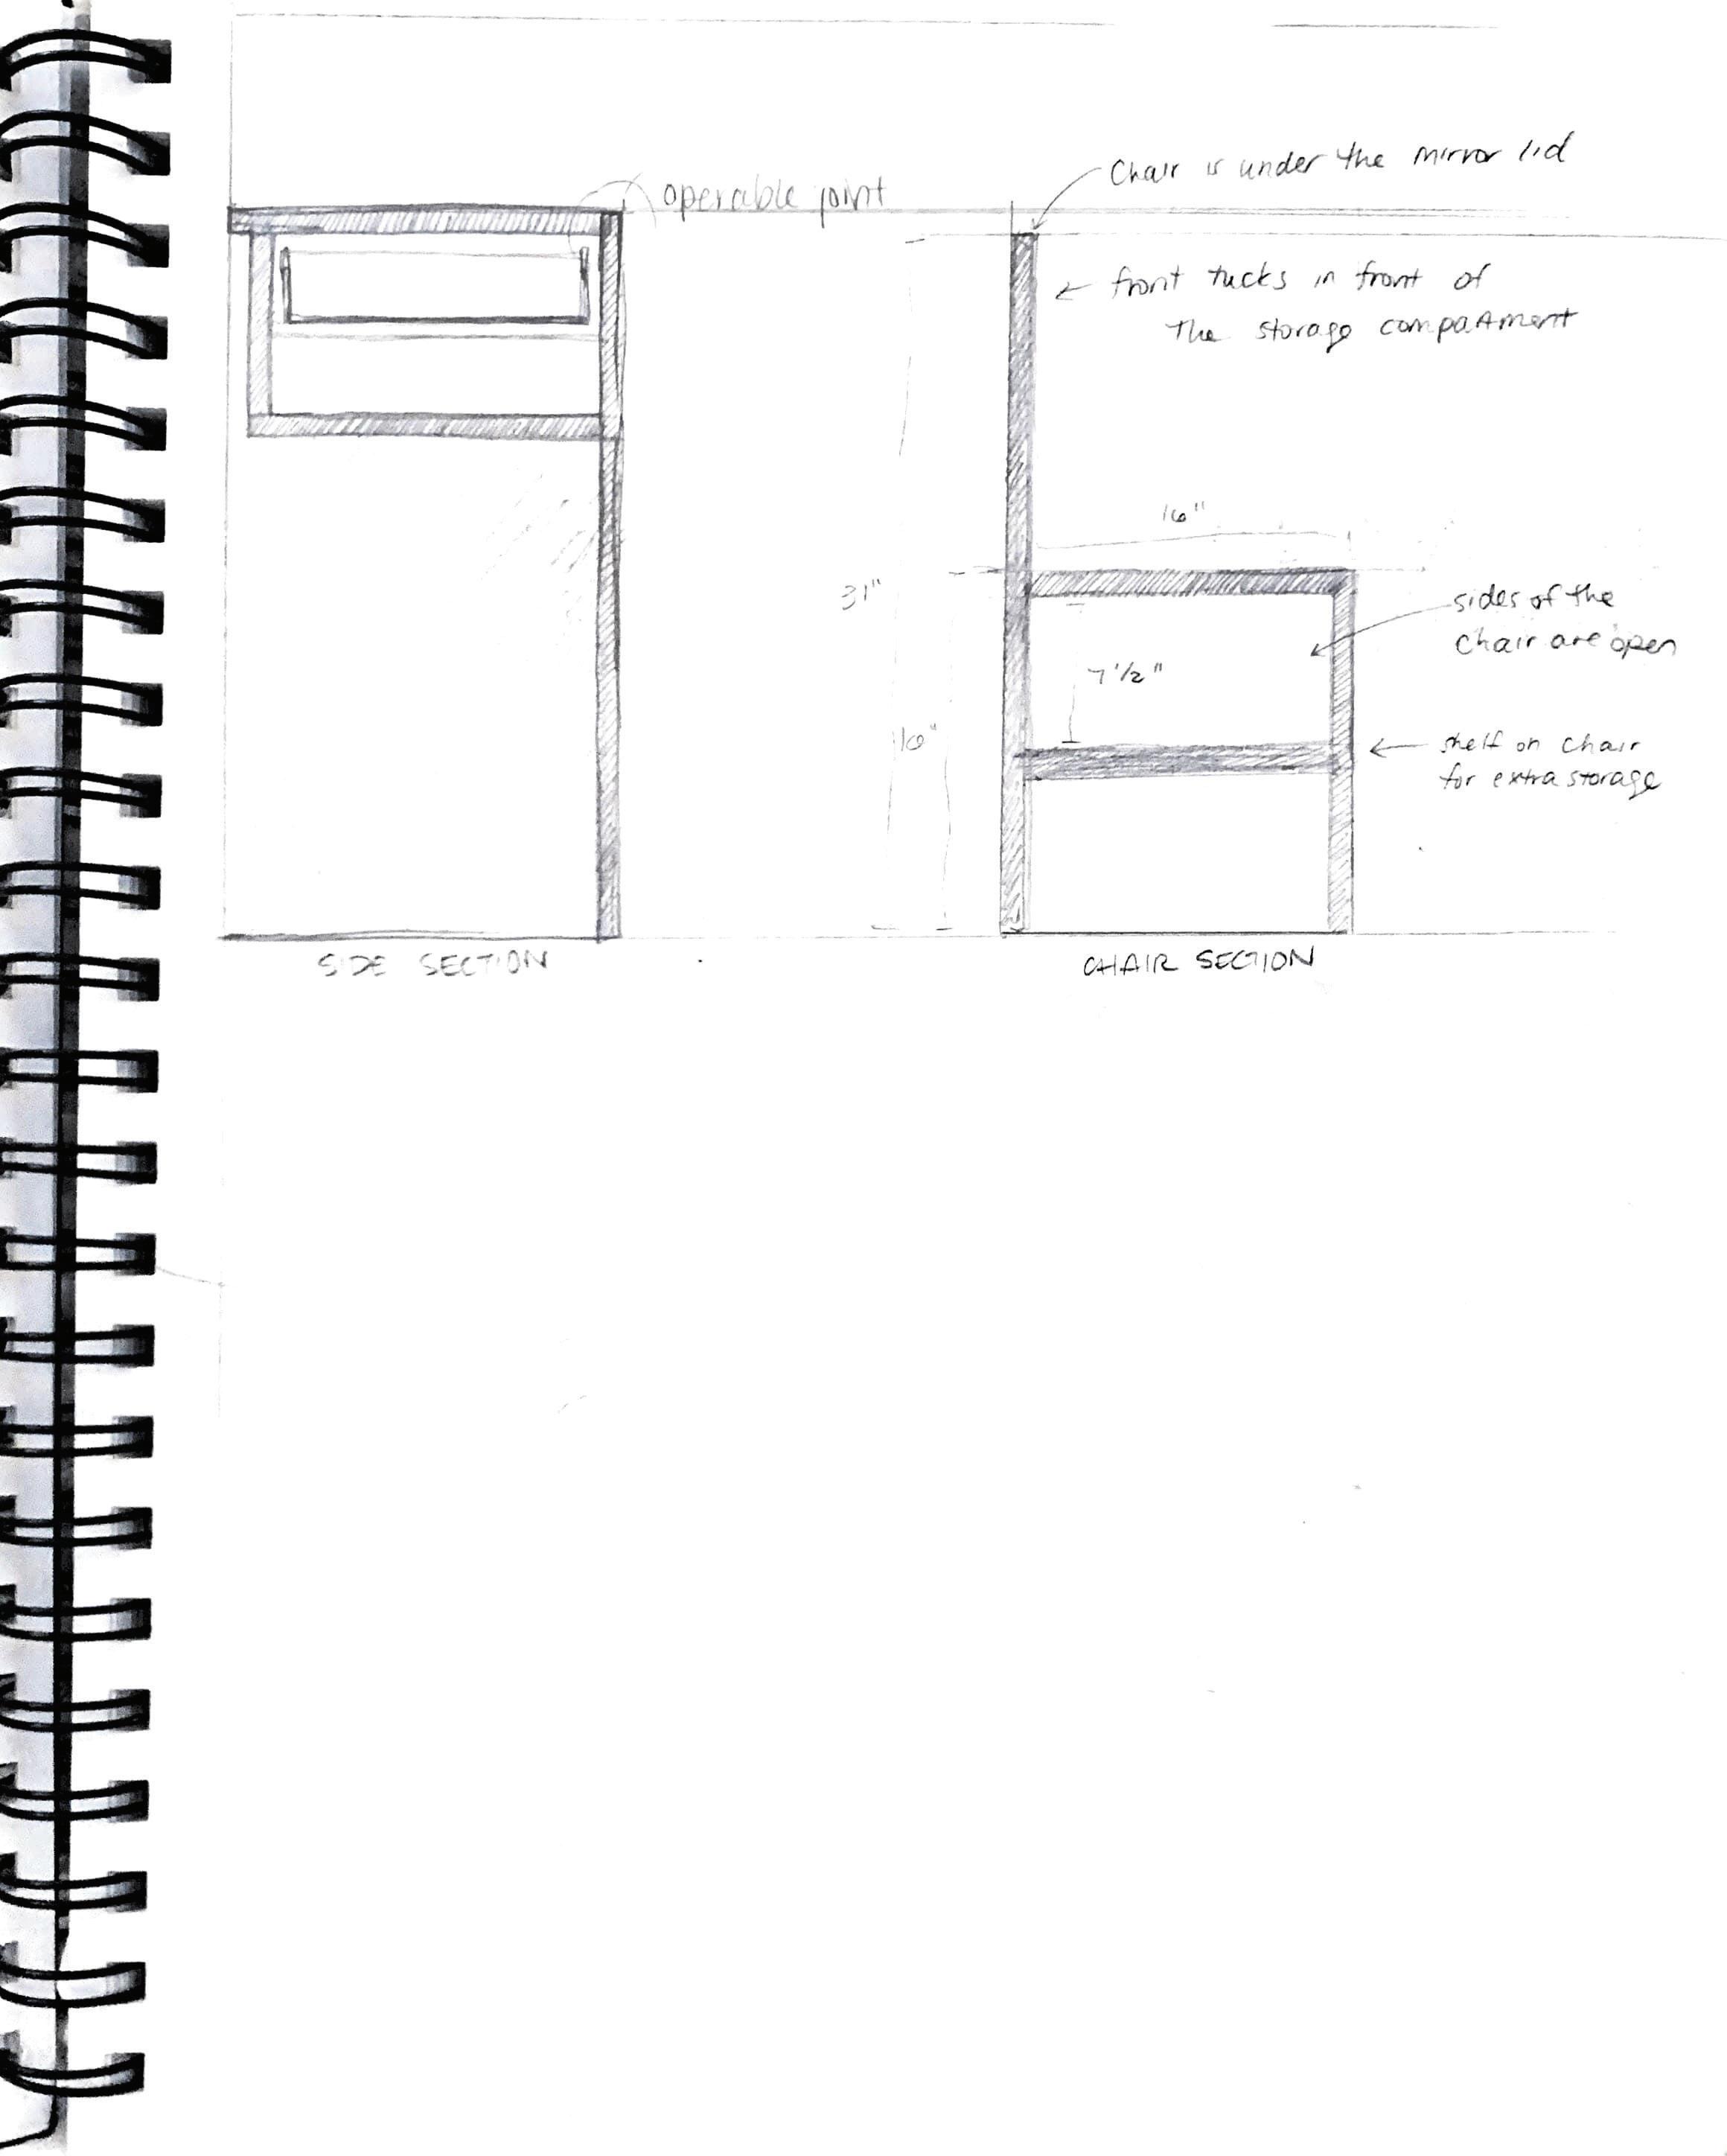
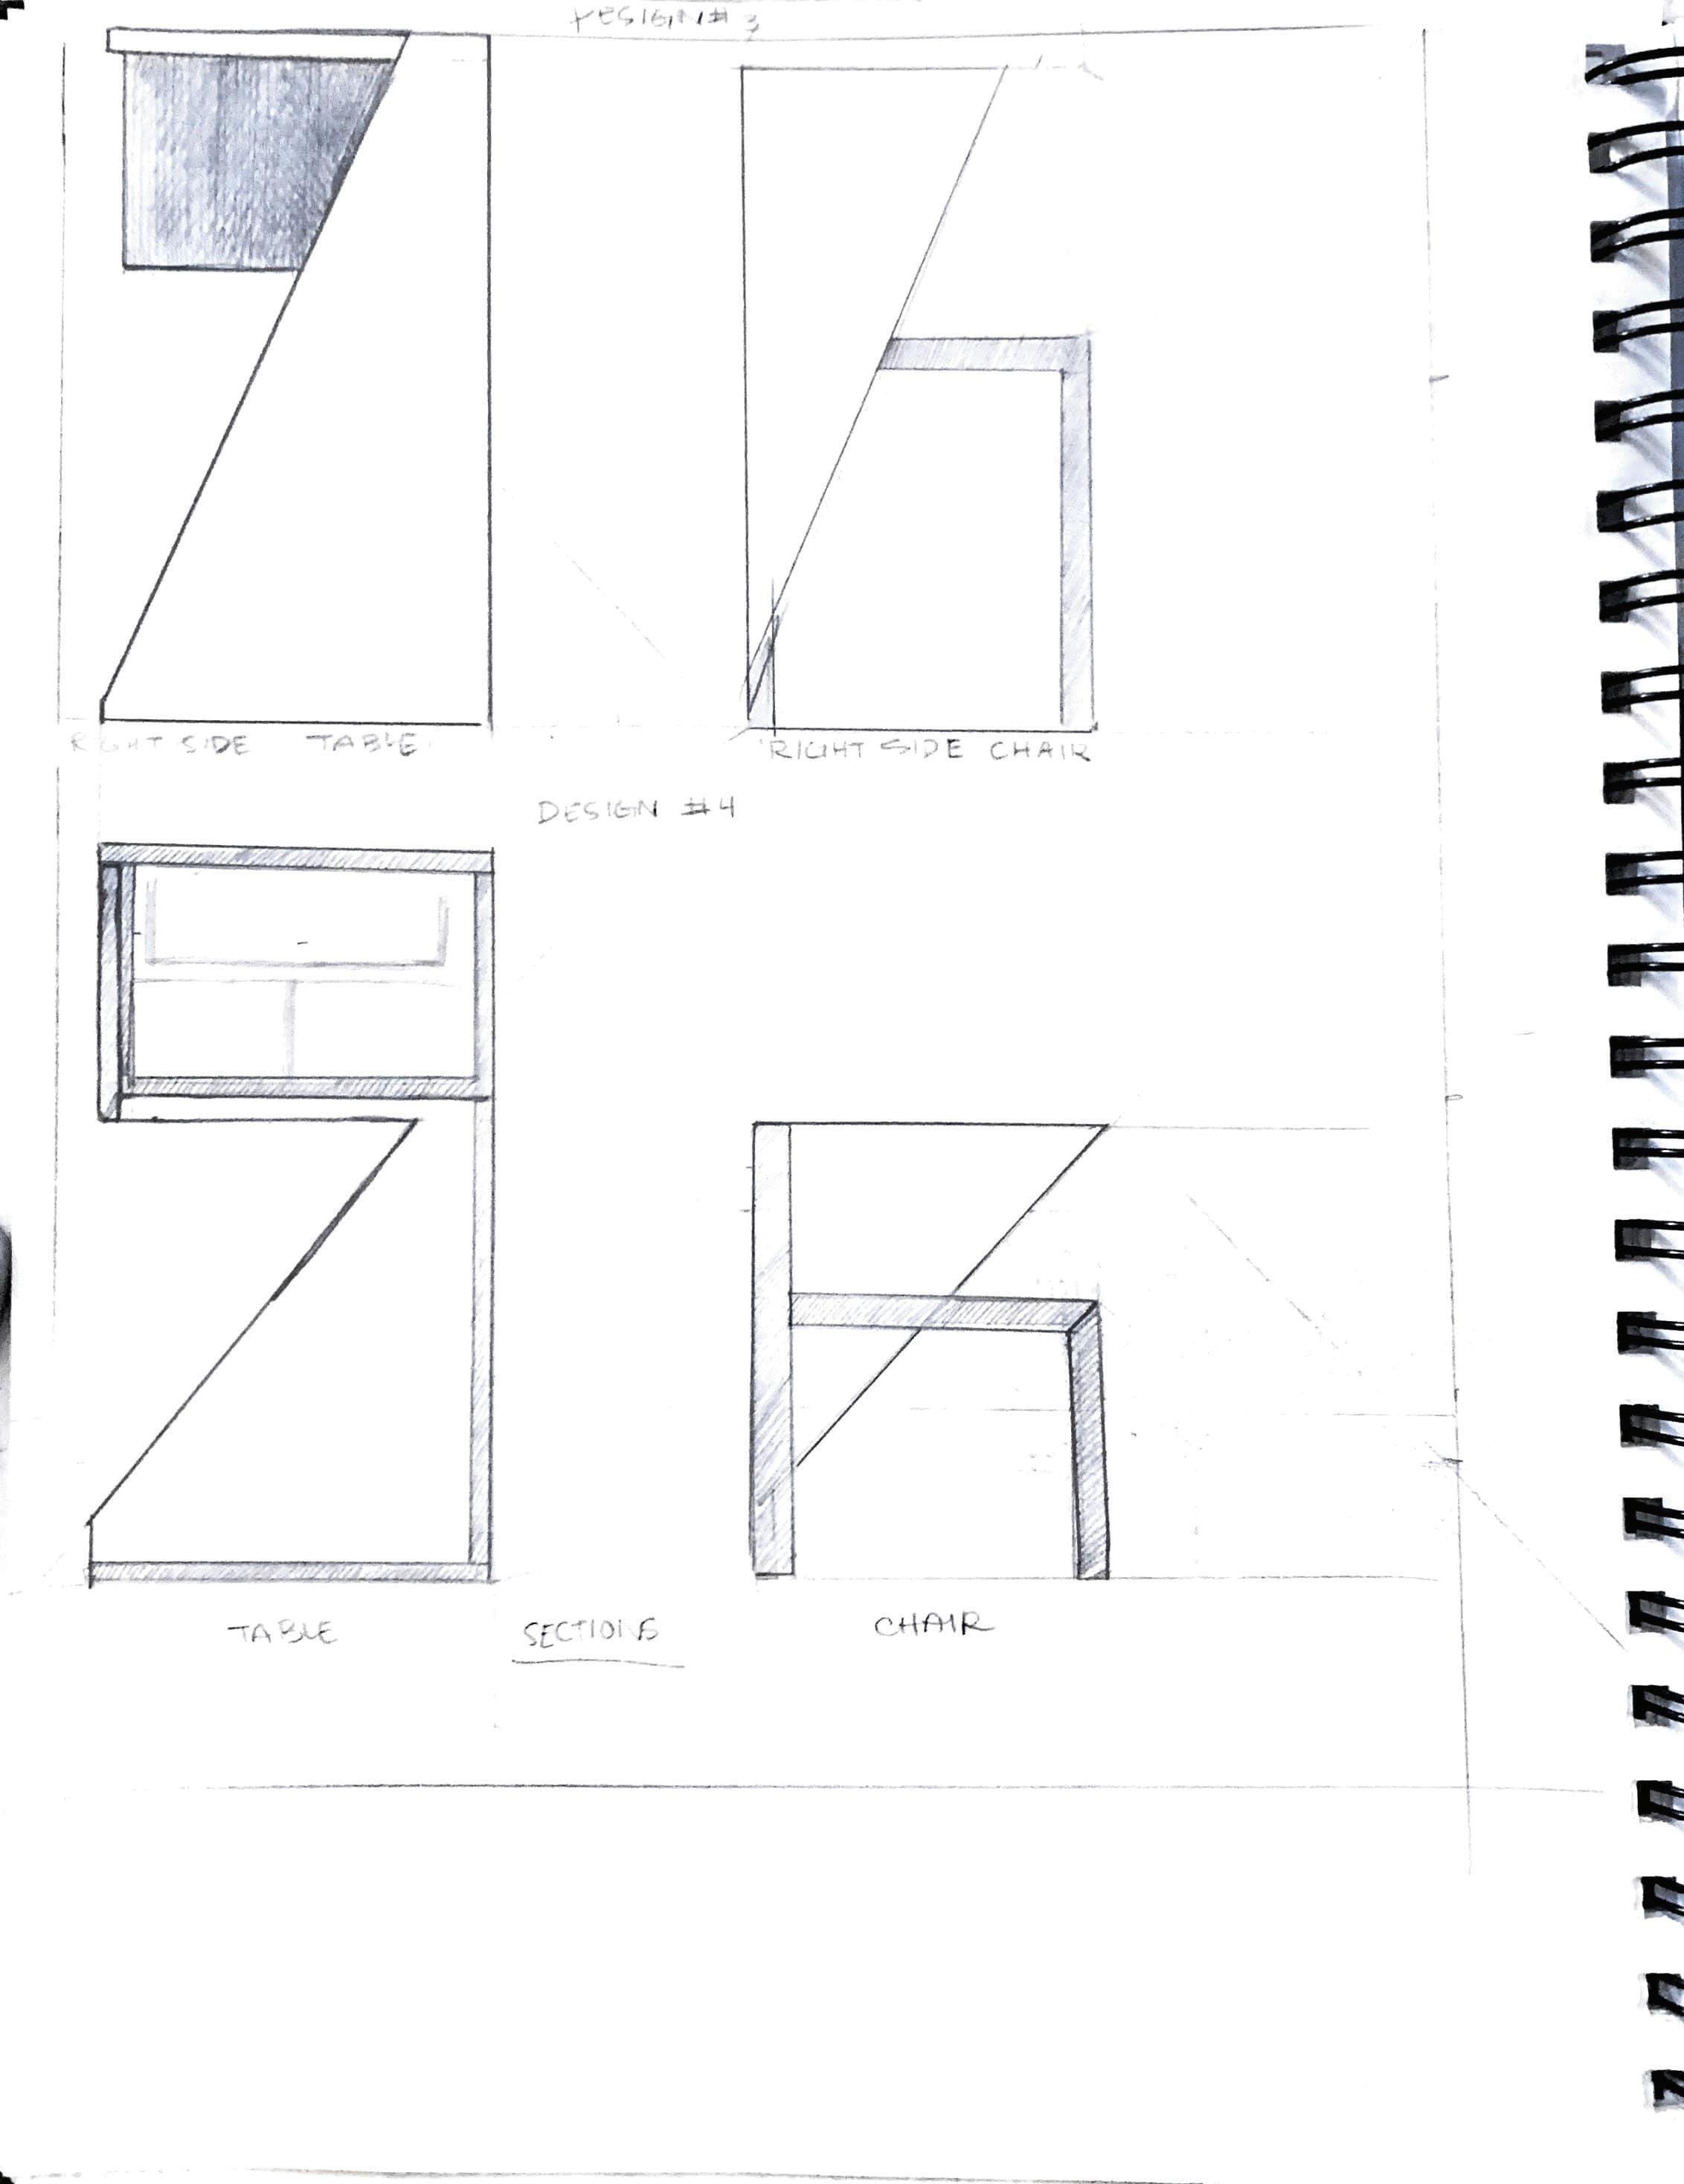
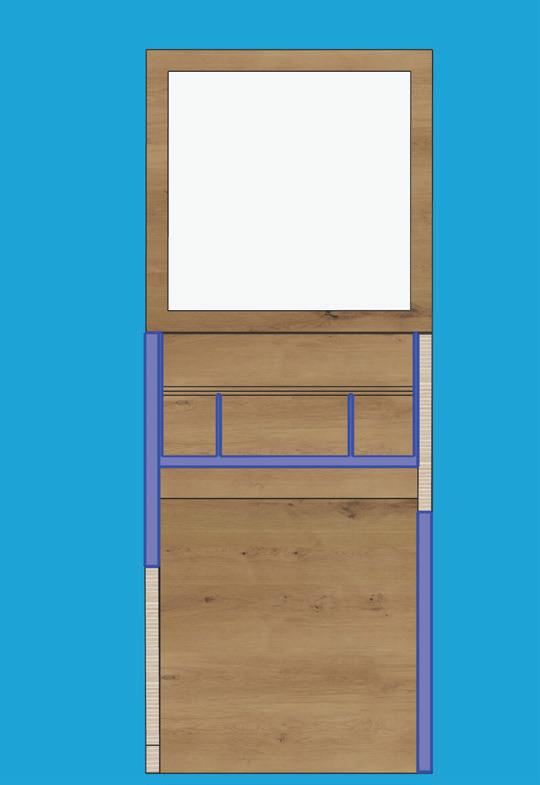
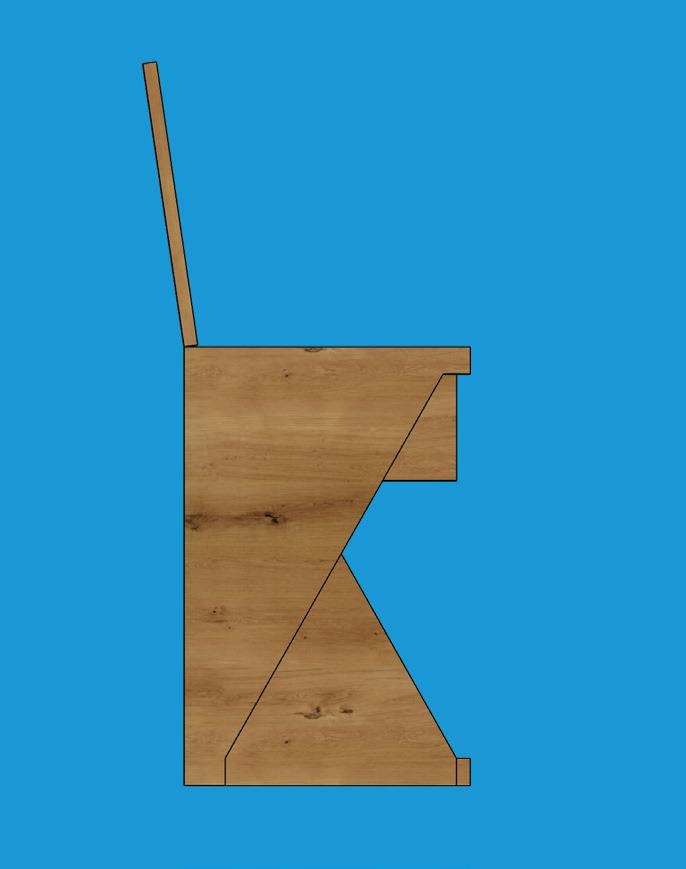
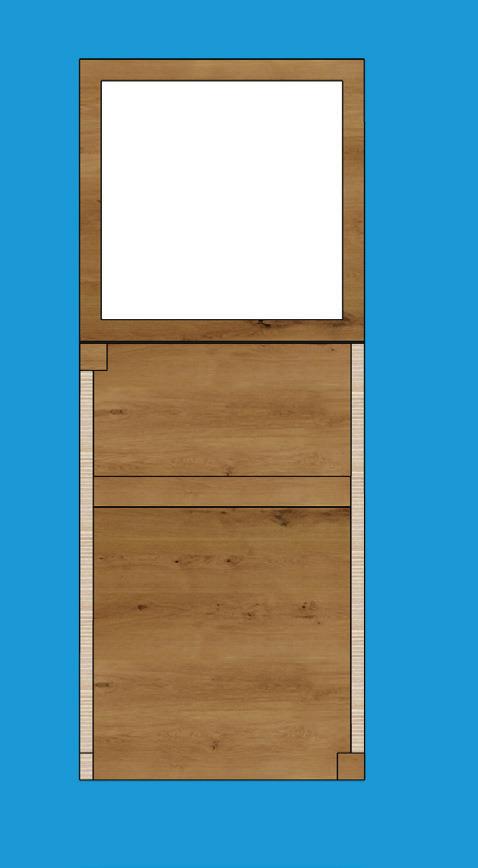
To refine my designs, I built sketchup models and printed out plans and sections. This is an example of my first design. Some important things to notice - I do not have any of my cuts planned, I do not have any joinery sketched out, I included a 2x4 as part of the cantilever support which was completely unnecessary. This was a fun attempt at a first pass but I still didn’t have a good idea of how to construct a piece of furniture.

VANITY DESIGN 1 FEB 03, 2022
SECTION FRONT ELEVATION RIGHT ELEVATION PERSPECTIVE TOP PLAN VIEW 2” 2” 3/4” 12” 23” 12 3/4 23” 3” centered 24” 35” 24” 20” 1” 2” 20” 3” on center 2” 24” 24” PLAN VIEW INSIDE VANITY 24” 12 3/4 ” 16” 7” 20” 1” 45° 4” 3” 20” TABLE TABLE RIGHT ELEVATION CHAIR FRONT ELEVATION CHAIR TOP PLAN VIEW CHAIR TABLE TABLE Flip up table top with mirror built into it. Storage spot underneath flip up table. Split in 1/2 vertically with a sliding tray piece. 2”x4” for cantilever support One piece of wood cut to create a clean elevation 2” 20” 2”
NIAMH CURRY
Vanity Draft 1 Construction Doc, February 2022 DESIGN 12

RIGHT

BACK

After getting feedback from Professor Mann, I chose to change my design to an asymmetrical table and chair. This construction document was used to make my first full scale mock up model. For my mock up model materials, I used a 4’x8’ sheet of 1/2” sheathing plywood, and a 4’x8’ sheet of 3/4” cabinet grade plywood. I chose these materials because first, I was recommended to not use 1/4” plywood for a structural element, and 1” plywood is very expensive. And second, the sheathing and cabinet grade plywood were the cheapest option from homedepot.

ASYMMETRICAL TABLE CUT LIST
= plywood end grain visible W L D TABLE - FRONT ELEVATION TABLE - SECTION 1 TABLE - RIGHT ELEVATION TABLE - LEFT ELEVATION TABLE - SECTION 2 TABLE - PLAN VIEW - OPEN SECTION 2 SECTION 1
PLYWOOD 1” PLYWOOD
W
H
NOTE:
1”
W - 20 7/8” L - 34“ H - 39 1/16”
L
45°
end grain show
L
TABLE SIDE
bevel edges, plywood
W - 20 7/8”
34” H - 33 13/16”
45°
plywood
grain show W L H
L
LEFT TABLE SIDE
bevel edges,
end
W - 20 7/8”
- 32”
45°
W
L
include
for hinges at the back insert mirror
TABLE SIDE
bevel edges
20 7/8”
- 20 7/8”
spot
TOP W - 2” L 2“ D 2”
BLOCK ENDS 45° bevel edge W - 18 5/8” L 8 3/4” VANITY BIN FRONT W 18 5/8” W2 - 13 9/16” L 12“ L2 - 8 3/4” VANITY BIN SIDE x2 W - 18 5/8” L - 12“ VANITY DIVIDER PIECE 1 W - 18 5/8” L - 5 1/16” BACK BOTTOM VANITY 1 W - 6 13/16” L - 5 1/16” BACK BOTTOM VANITY 2 W 5” L 13 5/16” VANITY DIVIDER PIECE 2 x2 W - 13 5/16” L - 18 7/16” VANITY BIN BOTTOM 1/4” PLYWOOD W 2” L - 2“ VANITY PULL 45° bevel edge W W2 L2 L Vanity Mock Up Construction Document, February 2022
MIRROR TABLE
TABLE
DESIGN 13

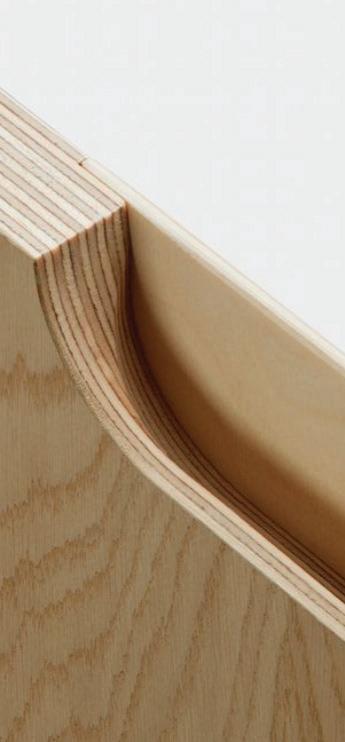
Reference image of wood joinery types.

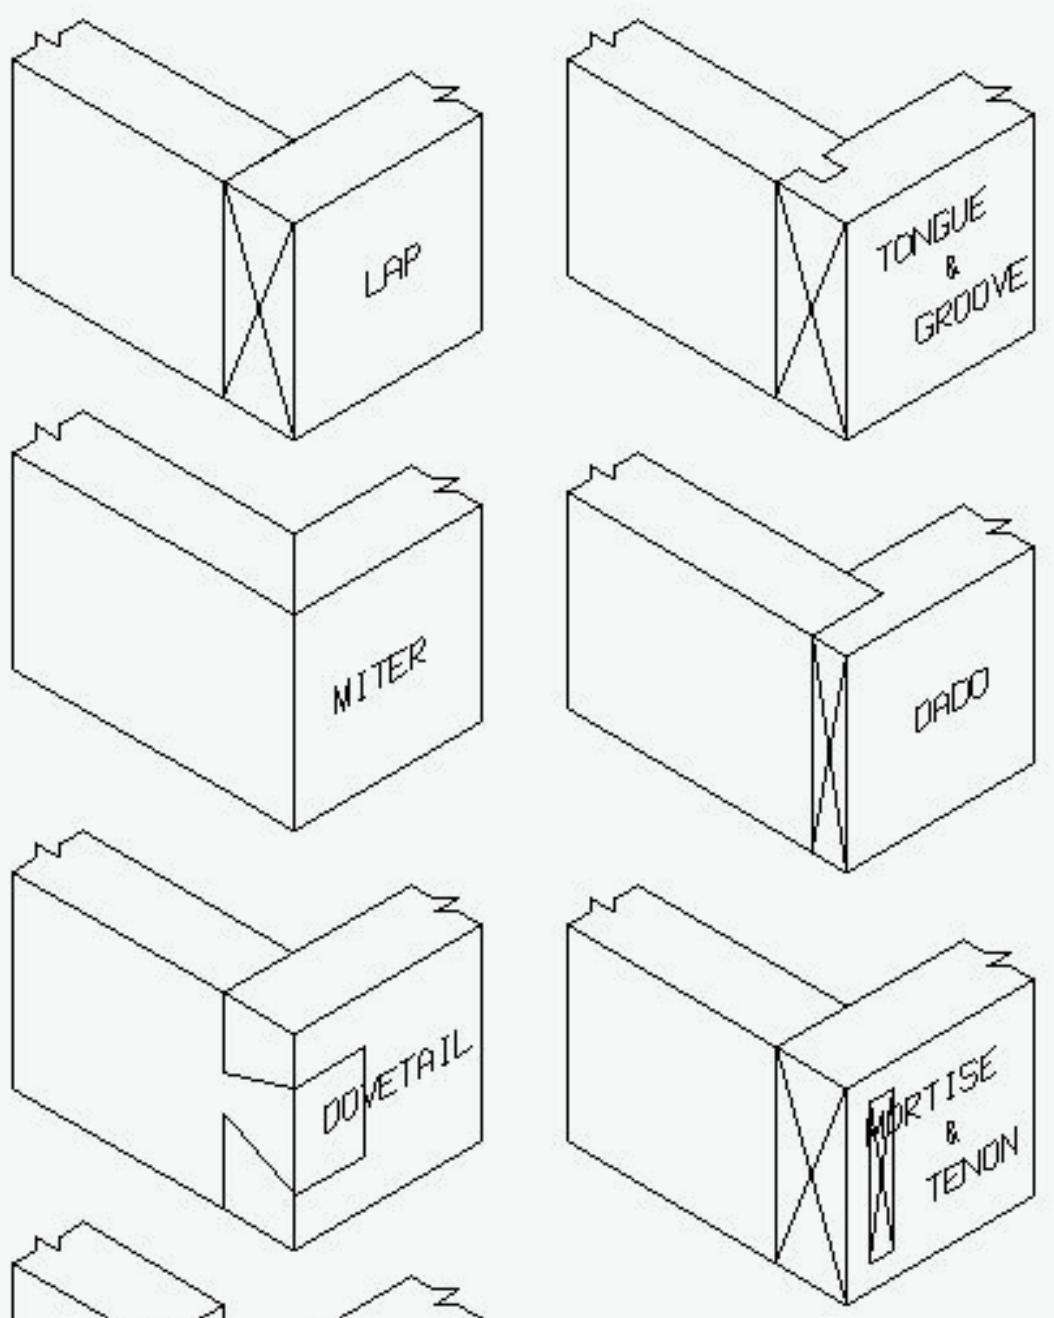
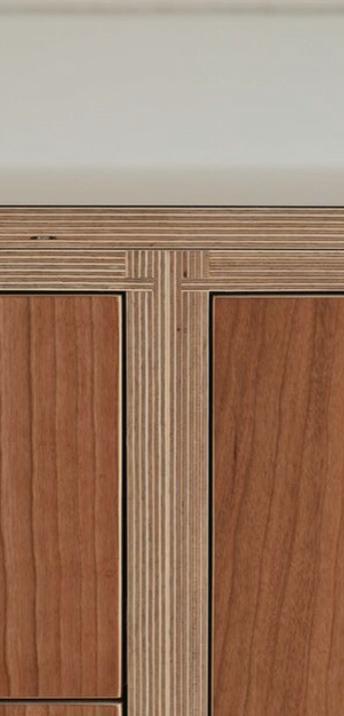
In any wood craft, joinery is a key element. Since I was using plywood, I needed to think about how I would implement the end grain into my design. I didn’t want to conceal my construction by using edge banding to cover the end grain. Using the material to my advantage, I decided to use miter and dado joints throughout my piece.

In my first mock-up, I tested these joints. I built the insert of the vanity with a series of dado joints, and I built the chair with a series of miter joints. I wanted to see the different difficulty level of assembly for each joint.

Both the miter and the dado were difficult to cut. The warp of my plywood only made it more difficult.

During a glue-up, the miter joints slip past each other. It was necessary to use a combination of standard clamps and DIY jigs to hold the corners together.

During a glue-up with a dado joint, the glue caused the wood to swell slightly and made it difficult to fit two pieces together. However, it was easier to keep the joint together because of the shape – there is less slippage.

DESIGN 14

The divider in the insert caused the sides of the insert to pinch. This therefore caused the table legs to pinch inward that the bottom. The squareness of the table failed.

I also didn’t build the vanity insert the same as a drawer. A drawer is dado’d into the sided to add more mechanical support. I had constructed the bottom of my insert with a rabbet joint which could lead to more stress on the glue and possibly breakage in the future.

Vanity Mock Up Model, February 2022

The construction process for the vanity insert consisted of many rabbet cuts holding the bottom, front and sides together.

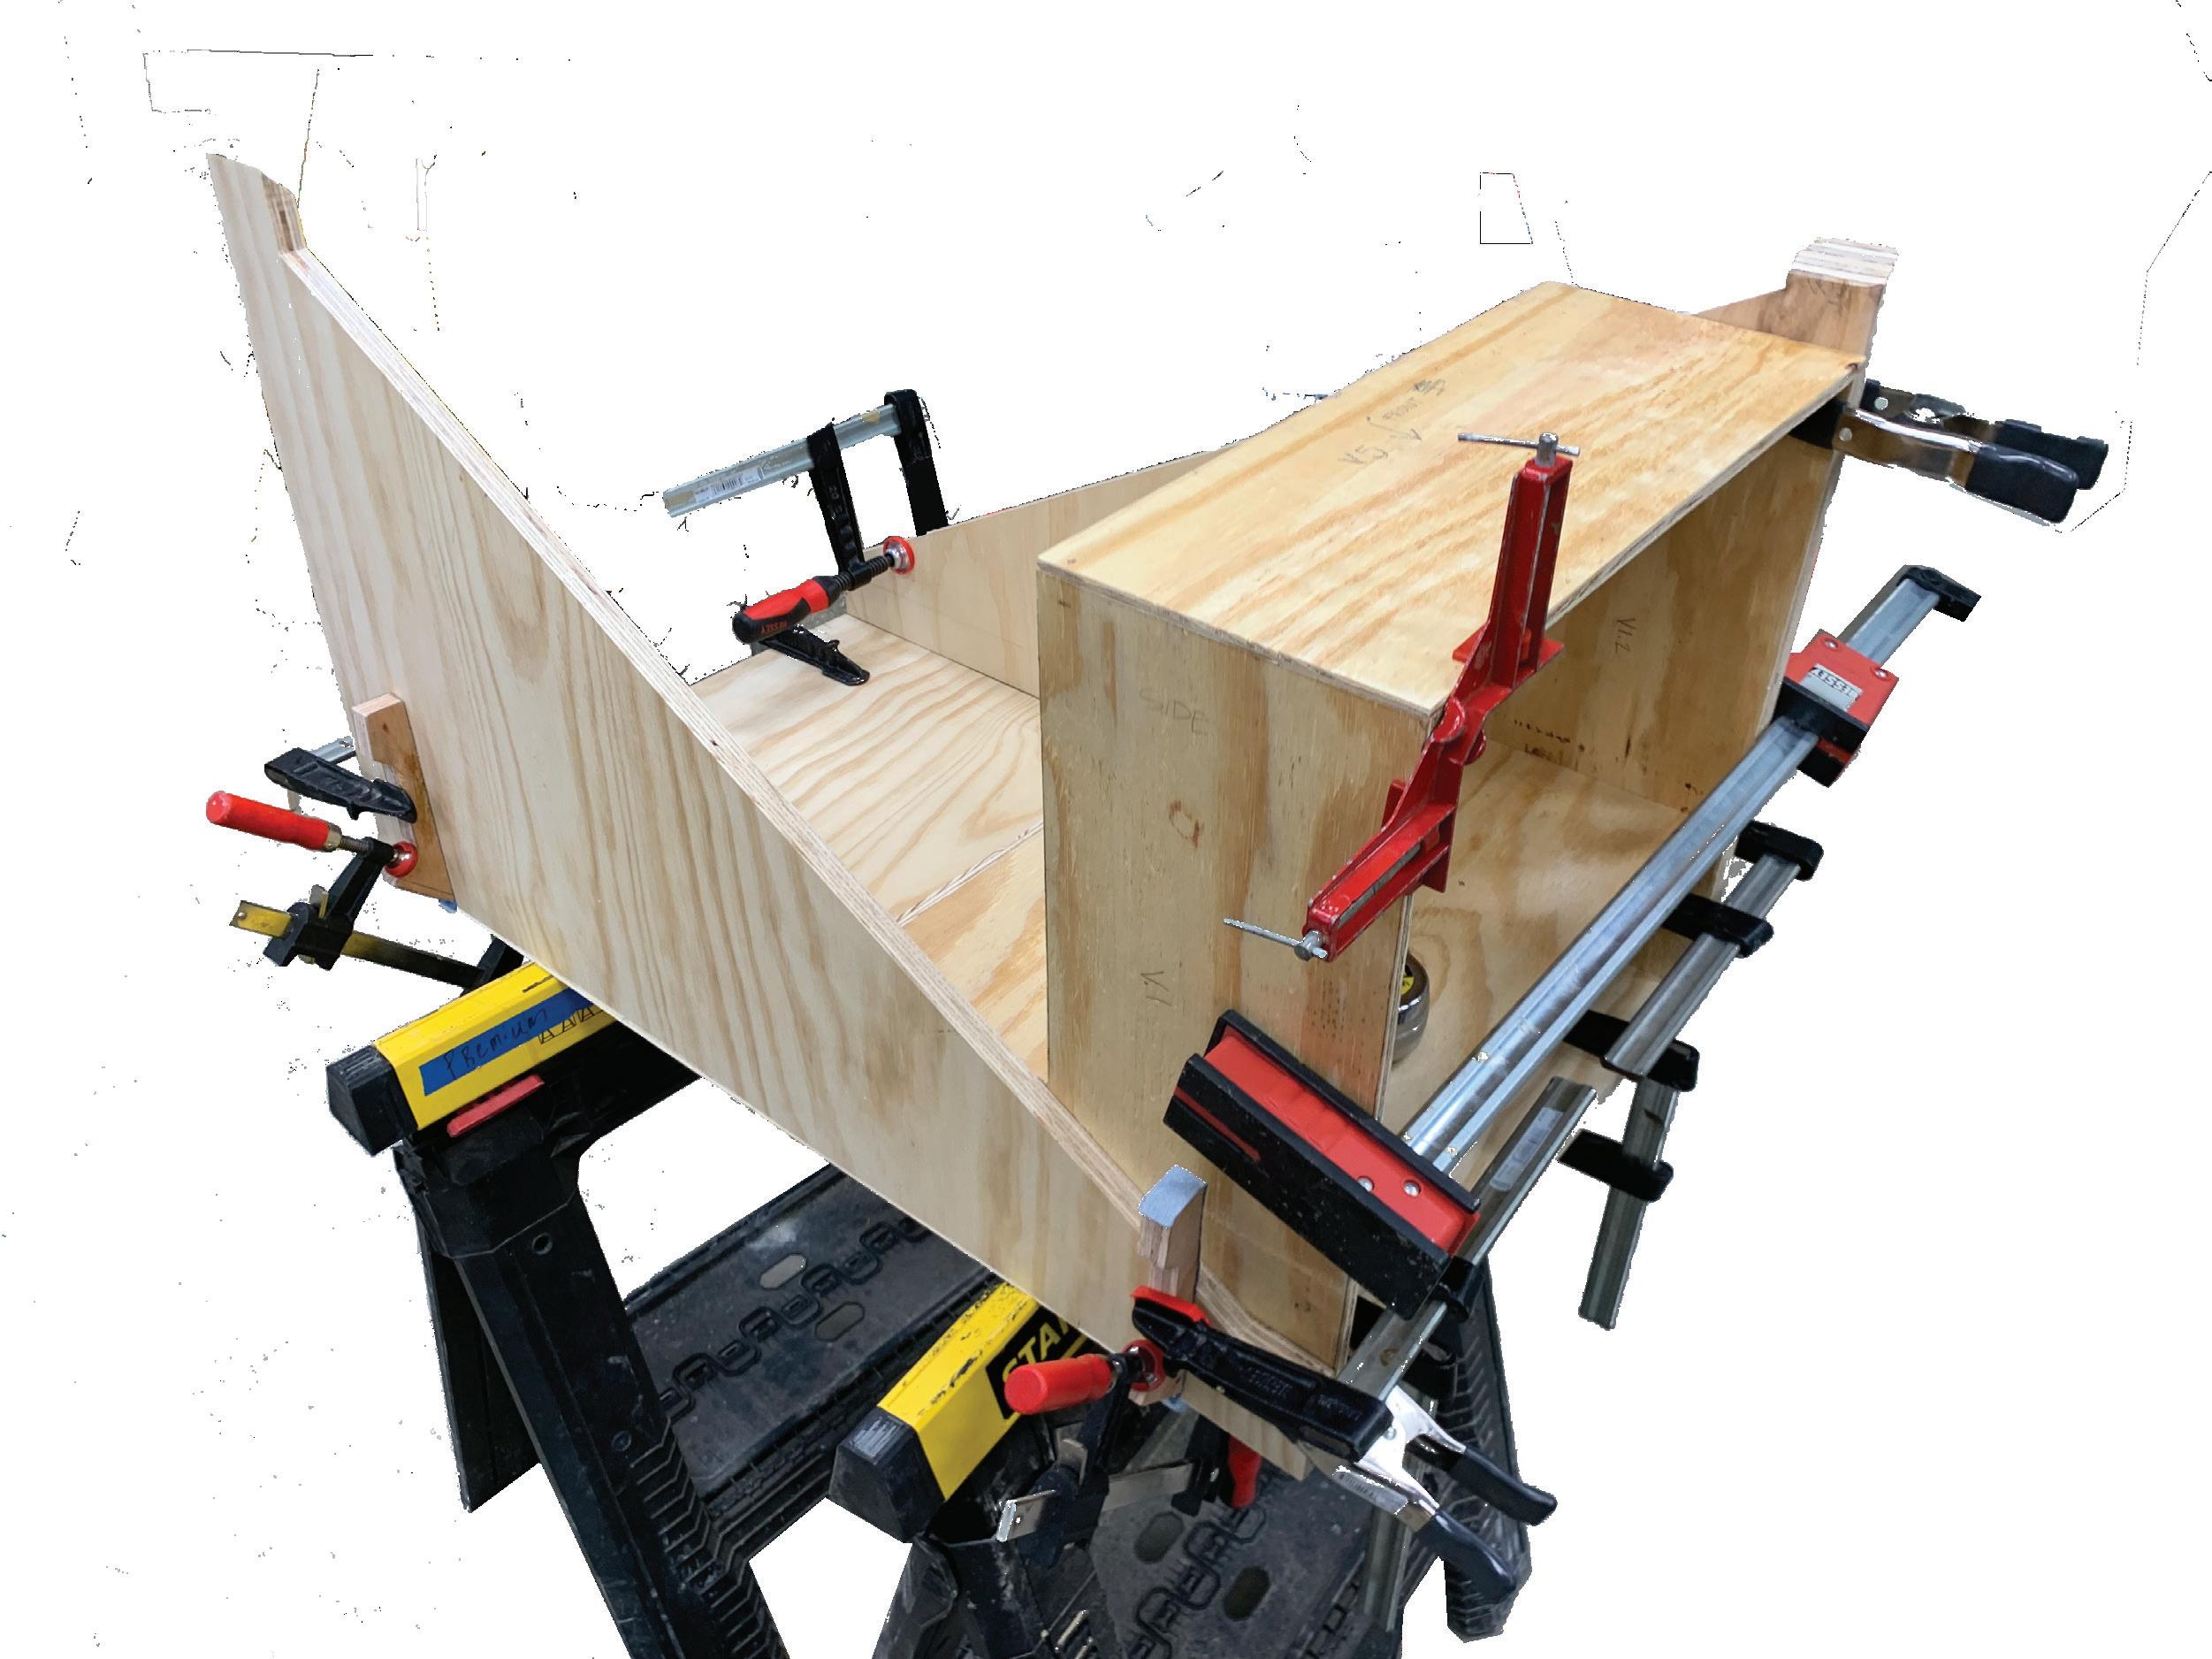
I dado’d the divider between the two side pieces. And I connected the insert to shell of the vanity with a series of dado’s.

I glued all the pieces of the insert together at once, and then used it to glue the shell of the vanity together.

The end result was rough. To start, the plywood sheets had been standing on their short side, vertically, for about 2 weeks. They had a huge warp, making them extremely difficult to work with.

Many of my measurements were off and caused some of the pieces to be resized on the fly.

MOCK UP

After the vanity squareness failed, Evan James, the wood-shop manager made 90° angle jigs to improve the quality of glue-ups.

The number of clamps shows just how difficult this wood was to work with. The warp in the plywood was extremely difficult to work with. And the bevel edges of this design also made the glue-up extremely difficult.

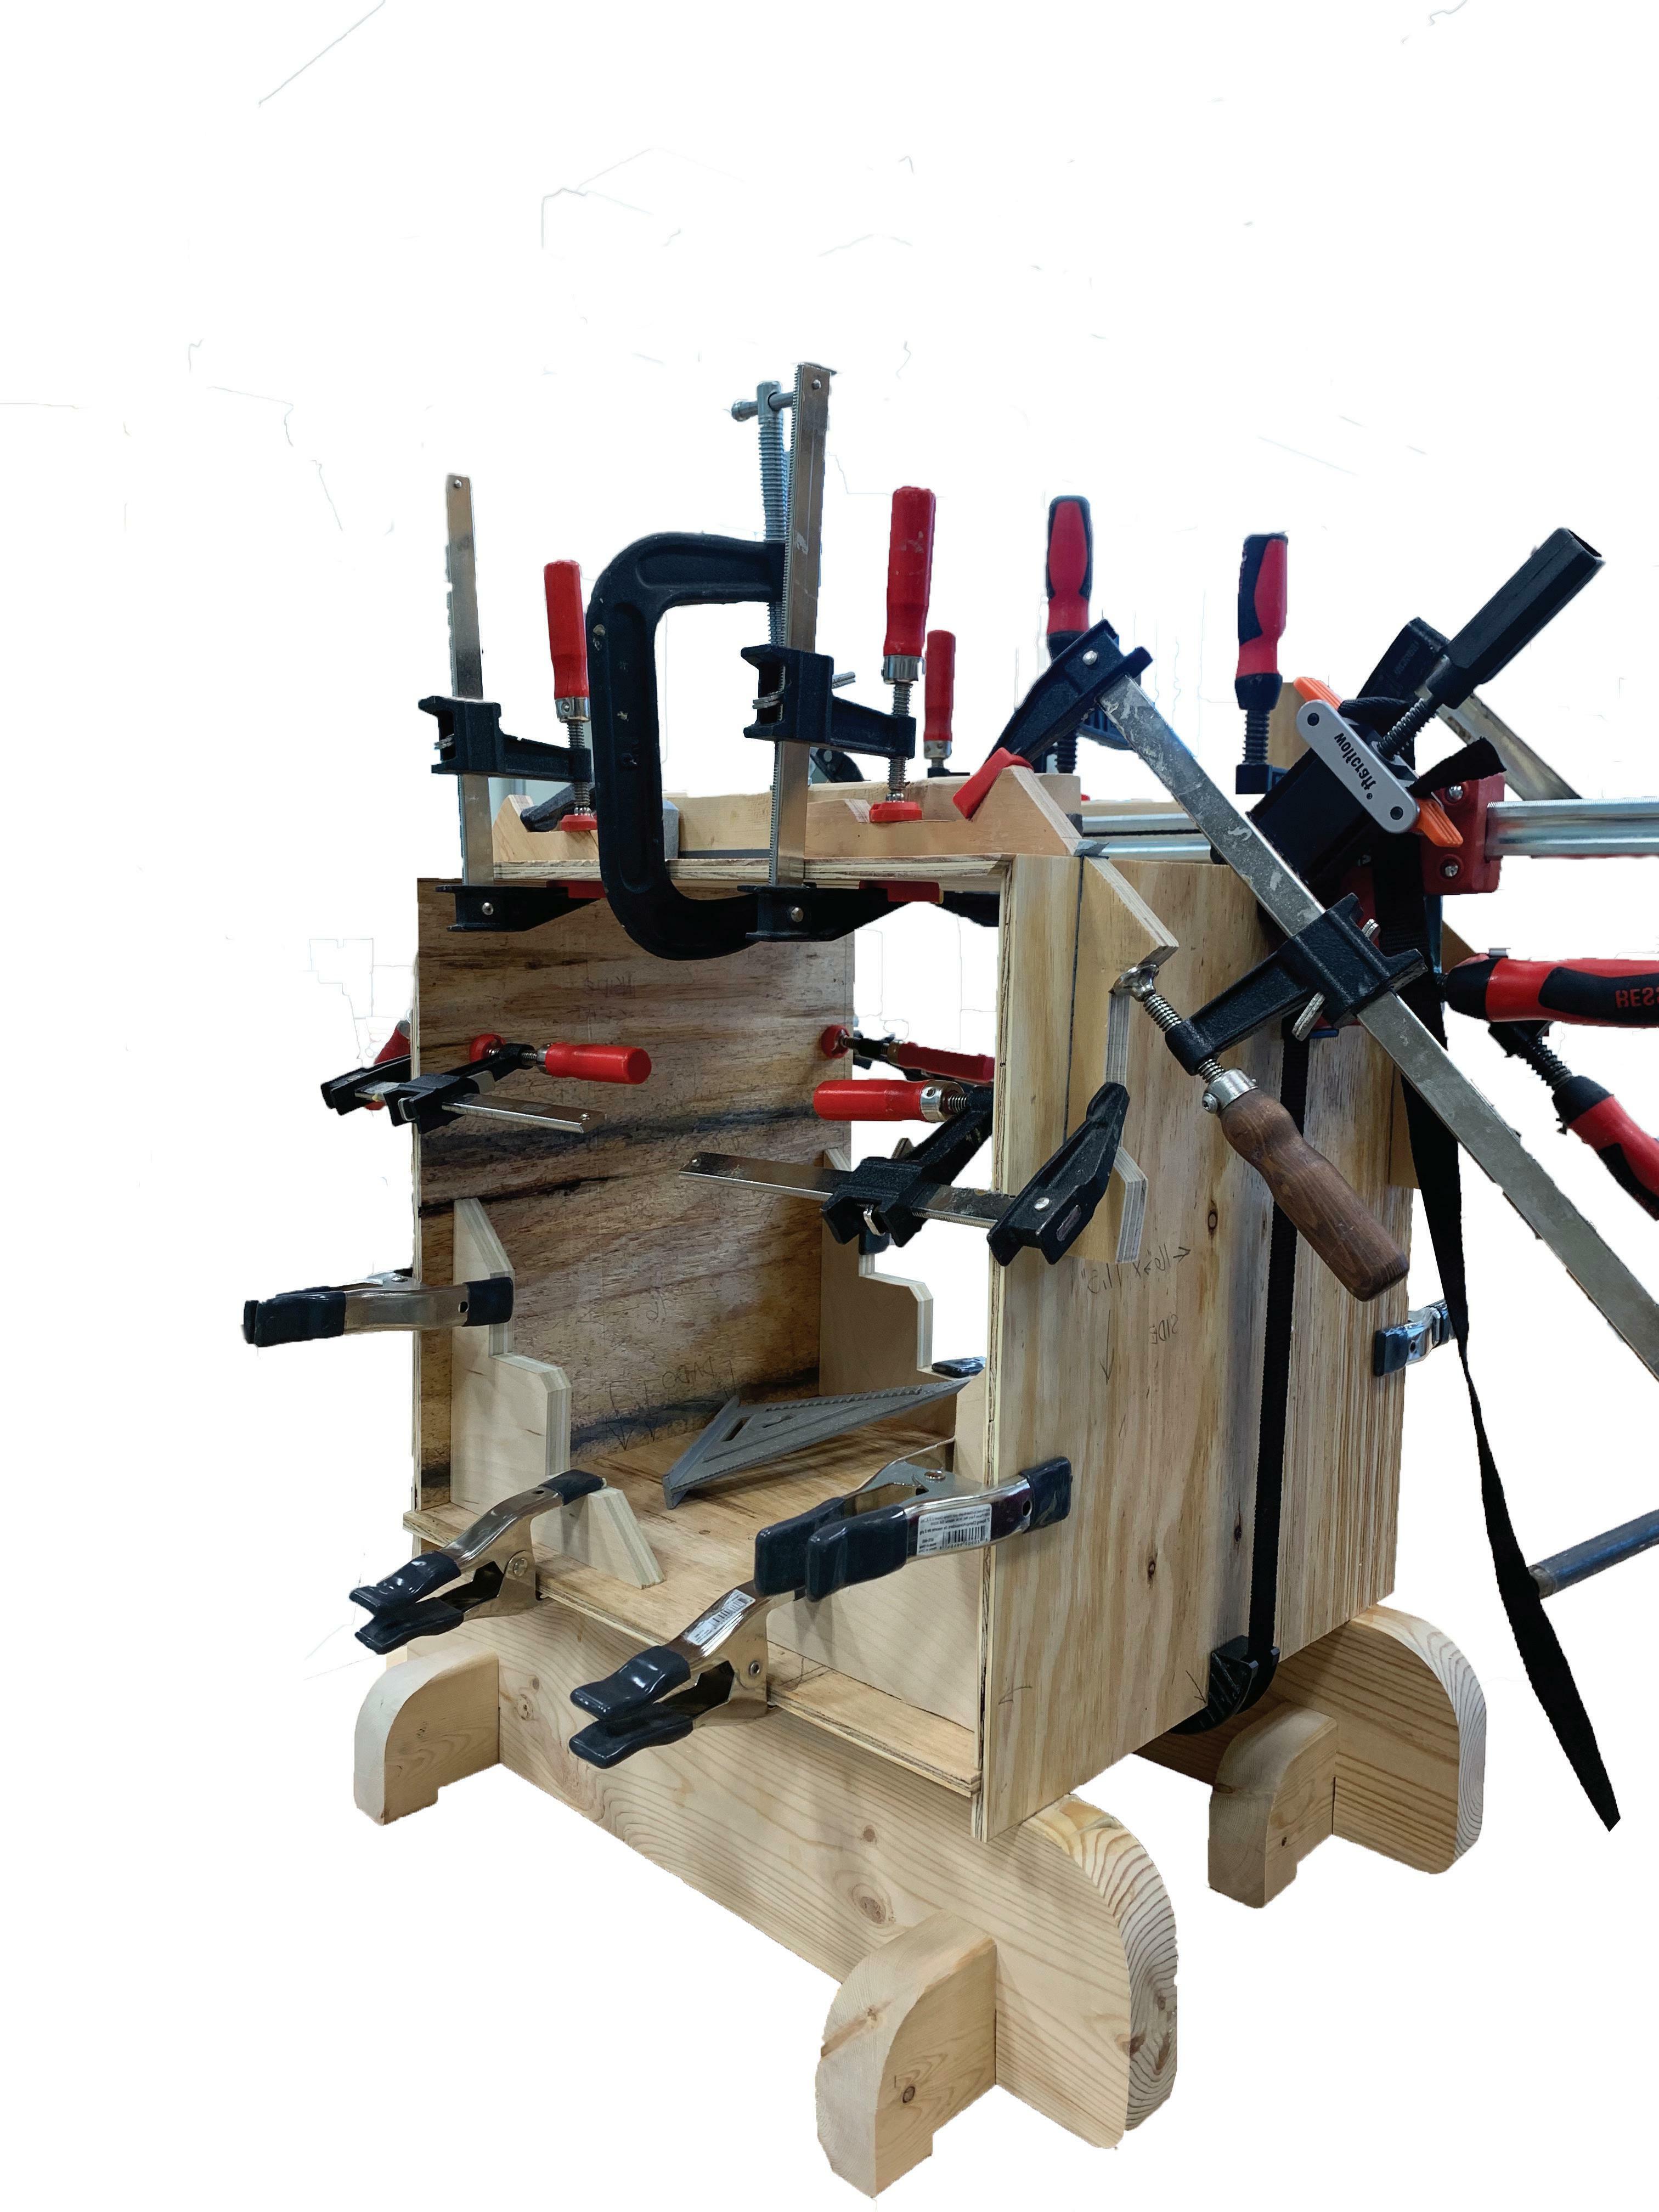
In this piece, I did change the construction of the bottom in order to reflect a typical drawer base. I dado’d it into the sides and back of the chair, prodiving more mechanical support.

Due to the quality of the table, as well as the warp with the 3/4” plywood, I decided not to fully construct the chair during the mock-up phase. I knew that it would not be worth the time, and I felt like I learned a lot from what I had constructed.

Chair Mock Up Model, February 2022

MOCK UP 16

MAIN TAKE-AWAYS AFTER THE MOCK MODEL

1. I need to keep a square ruler on hand at all times to ensure joinery and cuts are all orthogonal.

2. Have a precise layout/ cut sheet. Pay attention to wood grain direction when laying this out.

3. Eliminate unecessary difficult joints. Change some bevels to dados and rabbets.

4. Buy the plywood - then try to cut it to size the next day. Don’t leave it in the wood-shop standing up or else it will warp.

REFINE
17
My plywood laying flat on the CNC machine in the wood-shop

dado’d the vanity insert into the back of the vanity.

dado in the bottom of vanity insert to provide more mechanical support

changed the dimensions of the vanity insert and the table to make it slimmer

laying out cut sheet and the order of cuts/ type of cuts necessary

due to the overall design including a sliding element, I added spacers between the vanity insert and the table legs, as well as between the seat insert and the seat legs.

Including a toe-kick in my new design to add more structure to the bottom of the table.

Call out any changes in the construction document that happen during construction

cut the miters of the table at 45.5° as recommended by other carpenters Sketchbook drawings, April 2022

REFINE
18

green blocking is hair tools

Vanity insert isometric view

Vanity insert isometric section

REFINE
Sketchbook drawings, April 2022 Sketchup model, May 2022
19

During the refinement process I also redesigned the vanity inset and the chair inset. I returned back to my defining concepts from the beginning of the project, and approached the redesign by improving the utility.

I redesigned the vanity insert to include defined makeup brush holders, as well as holders for beauty tools. I also included details for a sliding tray to be added across the top of the insert. This would create a ‘second story’ for more storage or utility.

For the chair, I needed to add more mechanical strength, and improve the utility. I decided to add a vertical divider, centered inside the chair base. this provides compression support for the chair seat, and also organizes the space into two sections.

REFINE
20
Sketchbook drawing, April 2022

I started the final model by building the vanity insert. I constructed it with a series of dados and rabbets, and secured the joints with a 90° jig & clamps

FINAL
Vanity insert during glue-up
21
Vanity insert after glue-up, May 2022

Working with the new 1/2” cabinet grade plywood was much easier than the 1/2” sheathing plywood. The construction of the seat and vanity insert went well, with the only hiccup being how I would attach the hinges to allow a lid to swing open and close. This was not something I had practiced before on the mock model.

Seat insert after glue-up, May 2022

FINAL 22

The mechanical structure of the back of the table involved cutting the dado’s with a small spacer between the table legs will sit and the vanity insert. I left about 1/16” of plywood, and did a stop-dado cut for the vanity insert to sit in.

It was important to leave a spacer because the 3/4” plywood table legs were capable of pinching in. This would cause the table to fall out of square, and the chair wouldn’t fit in.

Leaving a spacer accounted for possible warping and also eliminated friction between the table and chair.

FINAL
23
Dado cuts in the table, May 2022

During the table shell glue up, I used spare hardwood to keep the squareness and prevent warping throughout the legs. Due to the angles of the legs, I couldn’t add any clamps anywhere but the base of the table.

Table during glue up, May 2022

24 FINAL

When I redesigned the shell pieces, I decided to make the triangle legs the same size and shape - the mock up triangle legs were slightly different and involved more concave corners. I also printed out a full scale sized template of each shell piece to ensure accurate measurements and angles.

Table during glue up, May 2022

FINAL
25

When designing the dividers, I wanted to customize the storage. I made this section taller with a removable hatch to access a lower storage unit.

The interior dividers are made of 1/4” birch plywood, and finished with water-based polyurethane. I constructed it by making small rabbets and dados, and using tacky glue to keep joints in place.

FINAL 26
Interior dividers, May 2022

This piece is the right arm of the chair. The chair legs warped more than the table legs, and that caused pinching when trying to close the piece. Due to the height of the seat, it wasn’t possible to put a wooden spacer to un-warp the board. The pinching prevented the chair and table from sliding into the full closed position.

This is the left leg of the chair, and towards the top, in between the leg and the vanity insert is a 3/16” wooden spacer which keeps the table leg un-warped.

This spot is to show where voids in the plywood were. I tried to avoid most of them when planning my cuts.

FINAL

I bought a box hinge with lid support to keep the mirror up straight. This proved to be more difficult to install than expected. If I could redo my mock-up model, I would include a hinge to practice how I would attach it to the lid.

In the final, I cut a 2” wide, 1/4” deep rabbet around the perimeter of a 3/4” piece of plywood. Then I cut 4 pieces of 1/2” plywood, with the short ends beveled, and a 1/2” wide, 1/4” deep rabbet. I glued 3 of the 1/2” plywood pieces into the dado on the 3/4” piece. This created a picture-frame effect, and the entire width of the board was 1” of layered plywood. To allow for any future maintenance to the mirror, I used screws to apply the last 1/2” piece of plywood instead of glue.

Finally, the shop manager, Evan James helped supply a mirror for my project, it was 14”x14” which left a 2” space on the side. I glued in a thick piece of cork to the side of the mirror to allow for any pictures or notes to be tacked up.

mirror

FINAL
28

Cut out at the top of the chair

Cut out at the bottom of the chair

Table after Boiled Linseed Oil
29 FINAL
1/2” Maple Plywood 3/4” Birch Plywood

Details on table

Spacer on vanity Table from below

FINAL 30

The Final The Mock-up

Special thanks to Professor Ray Mann and Wood-shop Manager, Evan James. I couldn’t have achieved this final result without their help. Professor Mann gave me great advice on my designs and guided me through the furniture design process. And Evan James taught me about craft and construction during the mock-up and the final models.

31 FINAL

Turn static files into dynamic content formats.

Create a flipbook
Issuu converts static files into: digital portfolios, online yearbooks, online catalogs, digital photo albums and more. Sign up and create your flipbook.