1 minute read
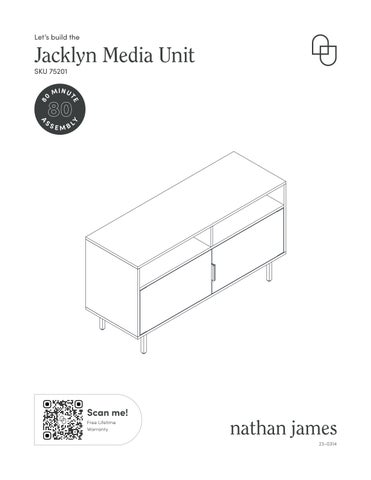
The goods


Let’s get this thing fired up! Lay down packaging carton or use carpet as a working surface.
Attach the Metal Side Frames (10) to the Metal Stretchers (11).
Step 2
Place the Cam Bolts (B) into the Top Panel (1) and Center Shelf (7), Left Side Panel (2), and Right Side Panel (3).
And don’t forget to use the M3*12mm Screws (O) to attach the Magnetic Door Catchers (D)!
Attach the Bottom Divider Panel (6) to the Center Shelf (7). You’re starting to get the hang of this!
After this step, you are OVER halfway there!! You got this!
Secure the Top Panel (1) to what you’ve built so far from Step 5.
Step 7
Carefully slide in the Back Panels (13). Now would be a good time to order that pizza you’ve been thinking about since Step 1.
Step 8
Secure the Metal Hinges (H) and (I) and Door Catch Plates (F) onto the doors.
Step 9
Don’t put those doors away quite yet! Finish securing the Metal Hinges (H) onto the doors.
Step 10
Take the doors and secure it to what you’ve built so far, being sure to line the Top Metal Hinge (I) with the corner hole on the unit. It’s all coming together!
Step 11
Now that the doors are secured, attach the Bottom Panel (4) to the unit.
Time to attach the legs! For this step, please tighten to 100%.
Is that pizza here yet?
Step 13
This may be our favorite step of all (and we have a feeling it’s going to be yours, too). Place the PVC Stickers (P) over the Cam Locks located on the inside of the cubbies. Ta-da!
Chip and Joanna Gaines would be so proud.
PWobbly or unlevel? Adjust feet until stable!