
With contributions from the artists: Philip Booth, Abigail Burt, Julian Cross, Sarah Davis, Roddy
Mathieson & Danuta SolowiejMAKING MODERN ART MEDALS
ARoughGuideforArtisticJourneys
MAKING MODERN ART MEDALS
Published by the British Art Medal Trust for the British Art Medal Society, London 2023. bams.org.uk

Design by Two twodesign.co.uk
Typeset in Bureau Grotesque
Condensed and Signifier
All images © the artists. Pages 76–82 © Roddy Mathieson except: Wax Tree, p76
© Lucy Smith; Ceramic Shell Moulds, p77; Dewaxing Shell Moulds, p78; Drossing Slag, p79; Pouring Vacuum Mould, p80
© Kenny Malcolm.
ISBN: 978-1-7390818-1-2
© the publisher and artists
This guide is for educational purposes only and not for reproduction commercially or for profit. All rights reserved. No part of this publication may be reproduced, stored in a retrieval system, or transmitted, in any form or by any means, electronic, mechanical, photocopying, recording, or otherwise, without prior permission of the publishers.
2
Cover photo by Julian Cross.
MAKING MODERN ART MEDALS
3 BRITISH ART MEDAL SOCIETY
ARoughGuideforArtisticJourneys
4 MAKING MODERN ART MEDALS
CONTENTS
INTRODUCTION 7
SOME MATERIALS FOR MAKING & MOULDS: ARTISTS’ TOOLS 10
MATERIALS 14
MOULDS 20
EVERY ARTIST HAS A METHOD & PROCESS 25 THE FOUNDRY
EXPERIENCE 75 ABOUT THE ARTISTS 84
BIBLIOGRAPHY 88
5
6 MAKING MODERN ART MEDALS
Marcy Leavitt Bourne
This brief introduction to the skills of making modern art medals is related to those ‘rough guides’ for travel in that it is about exploration, giving you suggestions for directions that you might take on artistic journeys, and practical ideas on how to make them. It is planned for you to discover and experiment with how art medals can be made. The artists who are included here – members of the British Art Medal Society – have shared their methods because they enjoy working with this medium and want to encourage others.
7 INTRODUCTION
INTRODUCTION

8
MAKING MODERN ART MEDALS
Some of the artists are sculptors, working on a larger scale; others have worked in jewellery. The skills that are learned by making medals apply whatever the size of the work, and whatever materials you choose to work with. As well as what the artists suggest, there are myriad other ways to approach the medal, and with this rough guide you will be able to find ones that work best for you. Whatever you use in the way of tools or materials (sharpness, chemicals, heat), wherever you are, studio or kitchen table, precautions (ventilation, gloves, mask) need to be taken for safety. And never, ever, rinse plaster down the sink.
Just what is the ‘modern art medal’? In the first place, the art medal has a long history, reaching back to Pisanello in the 15th century when he created his works of art in bas relief, cast in bronze, about the size that would easily be held in the hand.
These two-sided works of art often illustrated his patrons and their world, but they also conveyed his artistic ambitions and his artistic imagination. So, the medal isn’t something new; it is just brought up to date, to express contemporary views. Whereas Pisanello and other Renaissance artists were usually working to commission, today’s artist is also free to express thoughts and opinions that are personal, political or, indeed, poetical.
The artists in this guide have medals in public and private collections; they have been commissioned to make medals, but they also use this art form to express their views about the world around them. Here, they are sharing their thoughts on making medals that illustrate those views, as well as the skills that enabled them to create these small but powerful works of art that constitute the modern medal.
TRAVELLING MASTER-CLASS
9
←
INTRODUCTION
Danuta Solowiej’s teaching suitcase included tools, plaster blanks, modelling materials, moulds and finished medals.
ARTISTS’ TOOLS
Artists’ tools are very individual. Some are dental tools, some are hand made. They last a long time and become old friends. It is possible to use just about anything that makes the right mark.
10 MAKING MODERN ART MEDALS
MAKING
SOME MATERIALS FOR MAKING & MOULDS
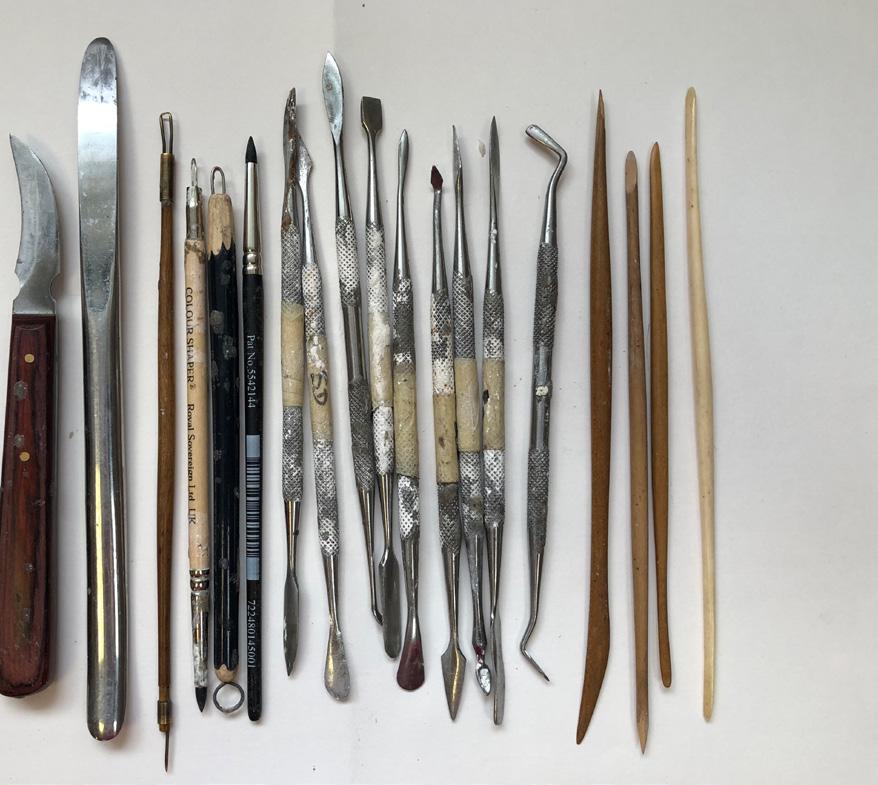
↑ ARTIST’S
TOOLS
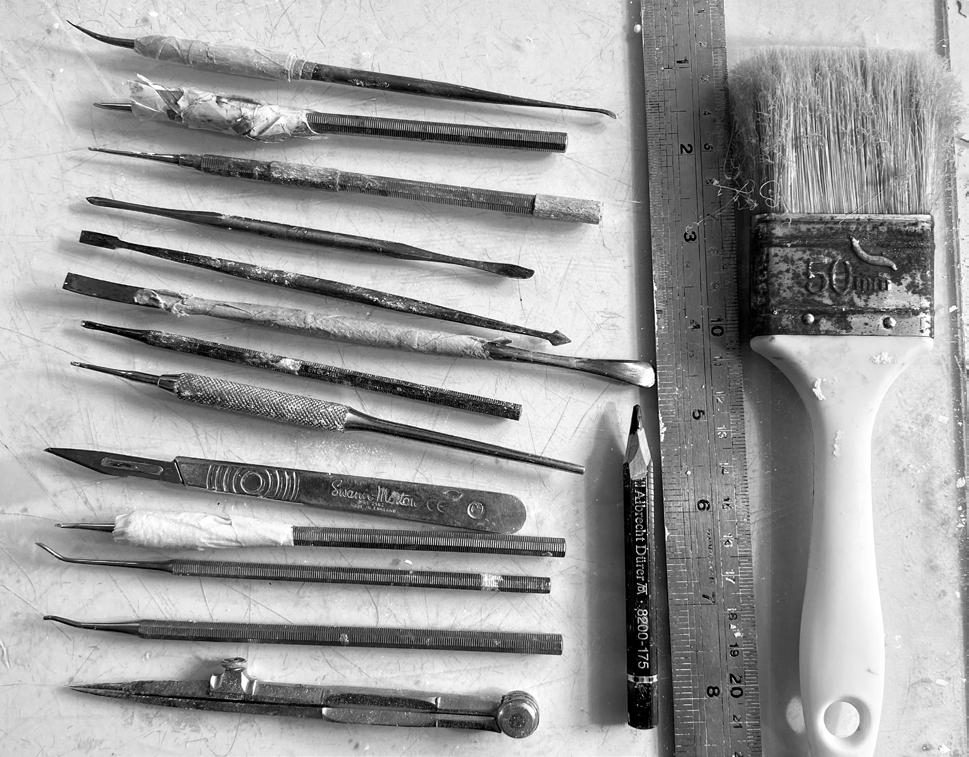
Danuta Solowiej took a radial shot of her medal making essentials, used and worn in places but in good working order. From the top, clockwise: curved tool; three plaster carving tools; two spatulas; three wax and clay modelling tools; three dental tools; three home-made tempered silver steel.
11
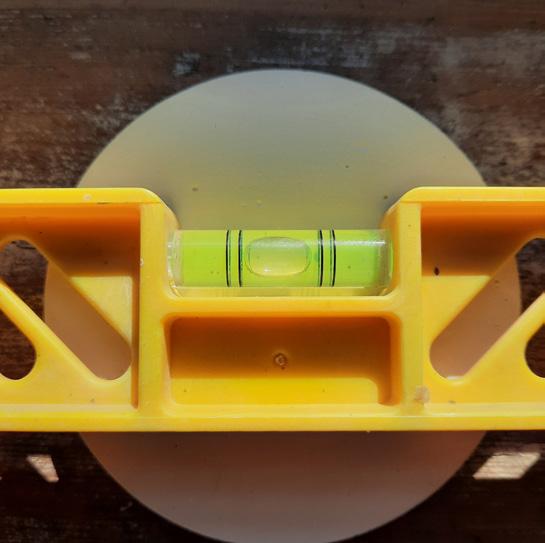
↓ SPIRIT LEVEL
A spirit level (most phones have an app) is important, as Danuta Solowiej says, especially when casting two sides separately, so that after joining the overall thickness is as even as intended and not dictated by the slope of the work table.
12 MAKING MODERN ART MEDALS
SOME MATERIALS FOR MAKING & MOULDS
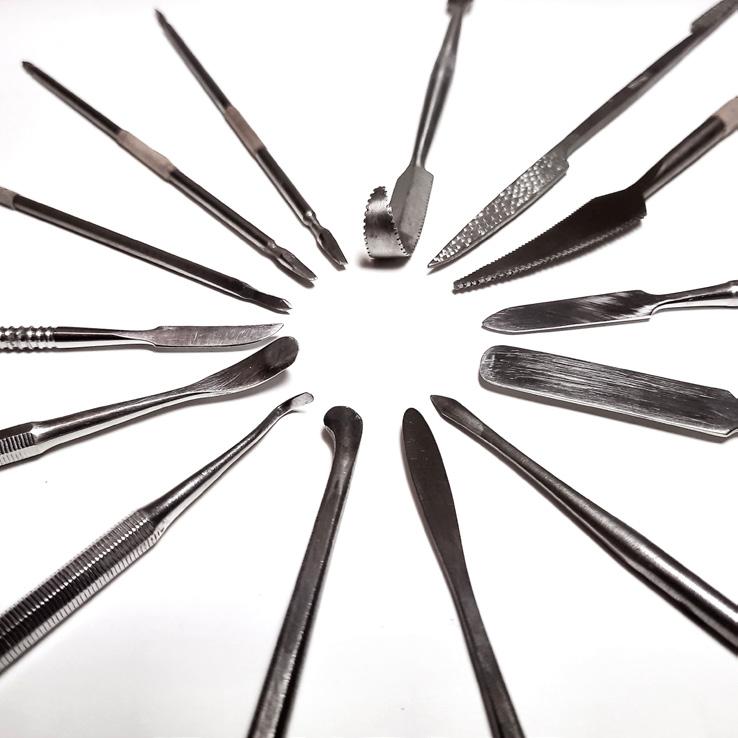
↑ ARTIST’S TOOLS
Sarah Davis’s tools include a little selection of wooden ones, which can be used for pressing wax into place, and tools that she has modified to suit her style of working. Dental tools come in sets of 10 with various shaped tips. Knives are for cutting the wax into thin slices from the main block. Basically, anything can be a useful tool.
13
MATERIALS
Here are a few of the modelling materials used by artists and suggested brands, but this is for guidance only, not an endorsement. They are easily found by searching online. As Abigail Burt puts it: ‘I consider material experiments to be an important part of medal making: spending some time seeing what textures and effects you can make with wax, plaster, imprints into plasticine, collaging material on to the model, mark making with different tools etc. The list is as endless as your imagination.’
14 MAKING MODERN ART MEDALS MAKING
SOME MATERIALS FOR MAKING & MOULDS
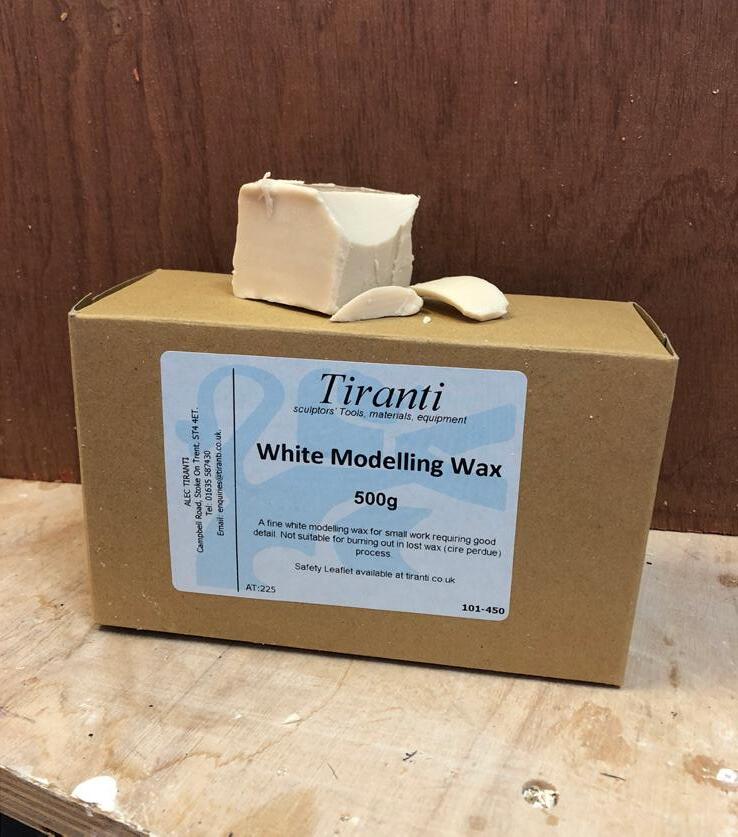
TIRANTI WHITE MODELLING WAX
Sarah Davis finds that soft white modelling wax works best for her, also known as Scopas white modelling wax. It has a very low melting point and softens with the heat of your hand. It sticks to itself nicely, allowing you to build up layers of detail.
15
↑
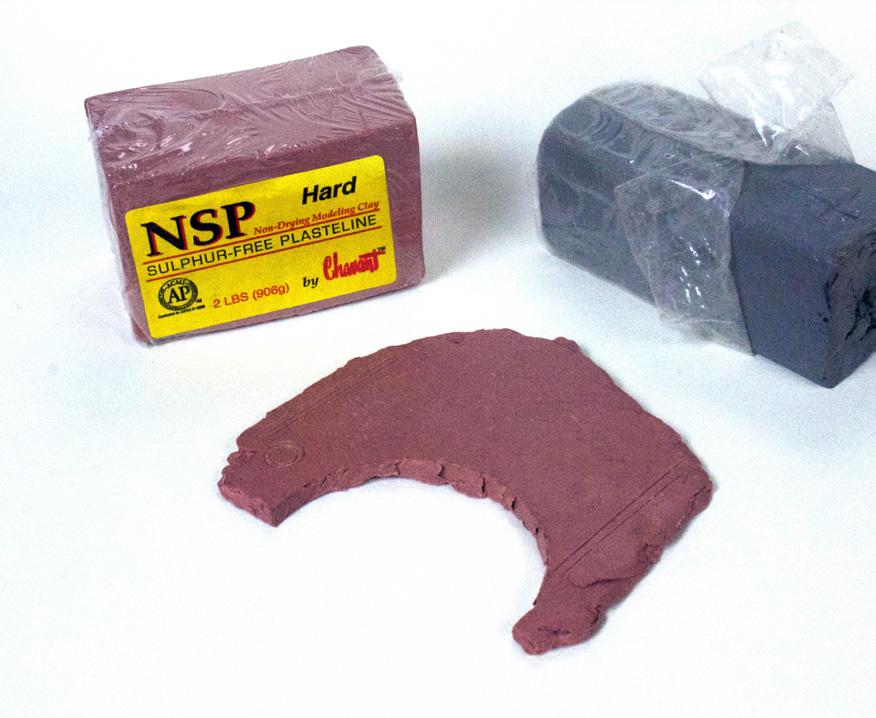
PLASTELINE (OIL CLAY)
Oil clay, sulphur-free plasteline is what Philip Booth has discovered really suits his working style. It is the material that industrial designers use to make prototype models, with all their demands for precision and controllable surface qualities. It is the ideal material for use in making the medal originals: harder than plasticine, holds its shape well, giving a robust model. You can use it to build up, to carve into and create fine details. It can be polished. Furthermore it is recyclable; all the bits that are left over can be formed into a lump by kneading it together like dough.
16 MAKING MODERN ART MEDALS ↑
SOME MATERIALS FOR MAKING & MOULDS

JULIAN CROSS SUGGESTS:
Plasticine, Chavent NSP Soft, is a material that works well for me when modelling, better than plasticine type materials. It offers good workability in the hand and firms up at room temperature. It is easily modelled with smooth wooden tools when soft and will take an almost mirror finish when smoothed with a little water. It’s also sulphur free, ensuring no cure inhibition.
↗ FILLED MODELLING WAX, SOFT 1704
Abigail Burt recommends what she says is a ‘brilliant, filled modelling wax’, from British Wax Refining Company Ltd. This is for modelling (though the company also supplies casting wax). This is a filled wax, meaning that an inert component is added to make it even more workable, but not suitable (hard enough) for direct casting. Mainly they deal with companies but have been very helpful. Other options are Monster clay and Chavant (again, not suitable for direct casting).

17
COMMENTS ON WAXES, JULIAN CROSS:

Many waxes are available, from soft through to hard machinable blocks and each has its pros and cons. Wax can be used as a direct modelling medium, and specialist waxes are available for direct modelling in a wide range of hardness. For lost wax or investment casting the ideal wax the foundry or caster expects is one that burns out easily and cleanly from the investment before the medal pour. I prefer the higher performance range of injection waxes. They can be hand poured into (warmed) silicone moulds with some care and produce very stable and handleable wax casts that can be patched, repaired and even carved a little. I tend to use GRS Premium injection wax in Green. Note: all waxes shrink a little on set, so allow for shrinkage in the modelling process if dimensions are critical.
USING JESMONITE
Jesmonite for casting is suggested by Sarah Davis, and used by others. It works in a similar way to plaster but is more durable. It also sticks well to itself, allowing two sides to be joined together seamlessly.
WHAT SIZE?
The sizes and weights of the finished medals vary, but as they are works of art held and turned in the hand, somewhere in the region of 200–400g is a reasonable weight when cast in bronze. But they can be small, too: 50–100g. Context is everything. Equally, the size might cover the palm of a hand, or be small enough to carry in a pocket.
18 MAKING MODERN ART MEDALS
JULIAN CROSS, ON PLASTER:
For plaster, I would suggest Prestia Classic, a Beta plaster. It is not quite as super fine, white and hard as most Alpha plasters. The ‘Classic’ offers the most reliable mix and pour, as well as having a firm but almost cheesy texture when freshly poured, enabling quick and smooth intaglio carving when setting out.
FINE CASTING PLASTER
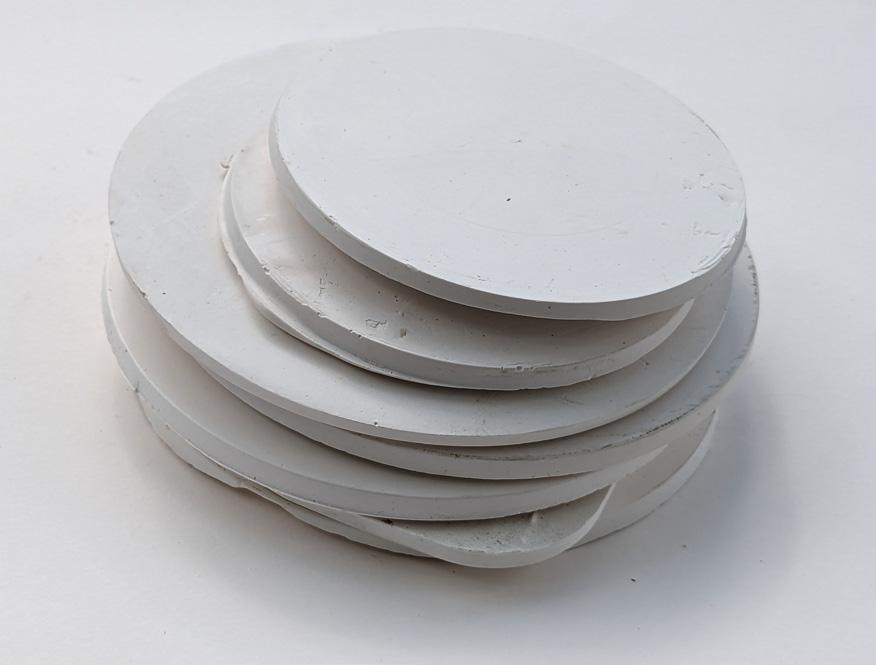
Fine casting plaster – very different from builders’ plaster –can be supplied by Special Plasters or Industrial Plasters. Plaster blanks can be used, as shown by these made by Abigail Burt, to carve precise detail or lettering. The ability of plaster to work from negative to positive can be very useful in refining detail on a medal.
19
↑
SOME MATERIALS FOR MAKING & MOULDS
MOULDS
The process of making a mould, while working directly on the model, or for sending to a foundry to have the casting wax made, is useful as it means that if a work somehow is damaged you will always have the ability to duplicate your work. Art medals are usually cast in editions, as are many bronze sculptures. How to do it is discussed specifically by several of the artists in this guide. Here are a few suggestions for materials.
20 MAKING MODERN ART MEDALS MAKING
SOME MATERIALS FOR MAKING & MOULDS
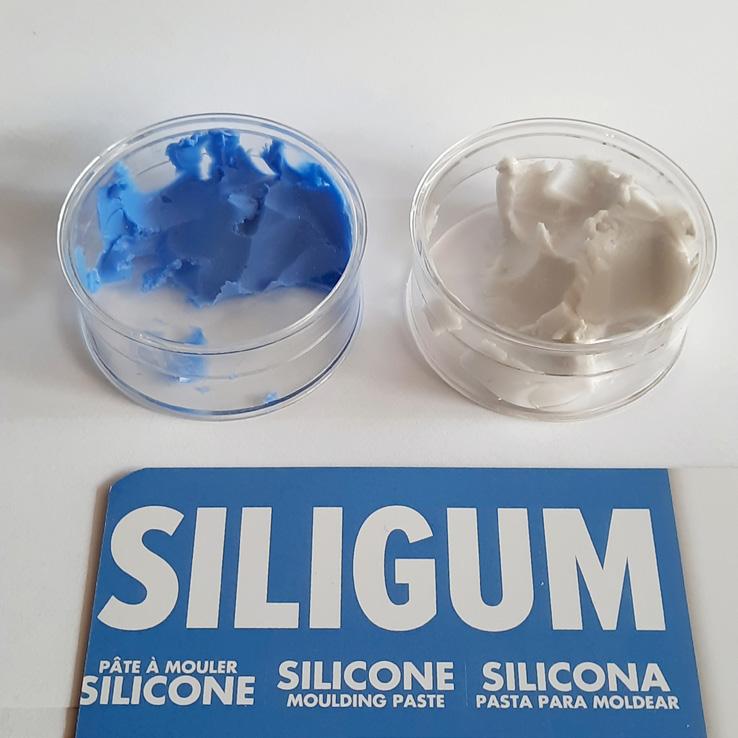
↑ SILIGUM
Siligum is an odourless silicone moulding paste which Danuta Solowiej finds easy to use, and the packets have clear instructions. The use of siligum is shown on page 69.
21
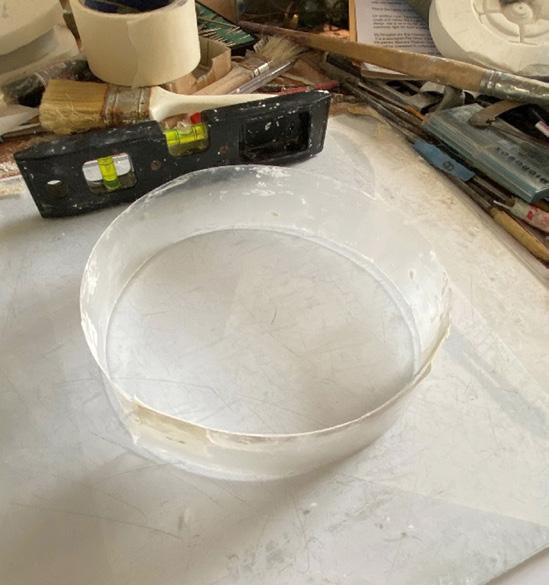
↓ THE MOULD
This is the final mould for Sarah Davis’s medal, made from RTV silicone supplied by WP Notcutt, who have other moulding materials, as well as Jesmonite for making models. You can see the model from the cast on page 66, one of several steps towards the final medal.
22
MODERN ART MEDALS
MAKING
SOME MATERIALS FOR MAKING & MOULDS
RTV SILICONE RUBBER
Philip Booth recommends using a medium to hard grade of silicone rubber for making the first set of moulds from the originals. It comes in 1kg tins with catalyst. He suggests you tell the store what you are using it for and they should make sure you are okay.
COMMENTS ON MOULDS, JULIAN CROSS:
I often use a basic tin-based RTV standard silicone commonly known as 3481, but sold by different suppliers under similar names. It is a room temperature curing reliable silicone with minimal shrinkage. (Catalysts are available in different curing speeds.) Different types of silicone material have very different chemistry and require separation in the workshop, so you need to check the compatibility of materials. They will all have clear instructions.

23
↑
24 MAKING MODERN ART MEDALS MAKING
EVERY ARTIST HAS A METHOD & PROCESS
The artists who have contributed their ideas and experiences concerning processes for this guide to making medals begin their work in different ways, some with sketches, some straight into modelling or carving. From model to mould, this will enable anyone on an artistic journey to see what might suit them and discover other options. Here, the artists share working methods, creating a sense of immediacy – being in the studio - a feeling that anything could be possible and that trial and error, mistakes and learning from them are all part of the wonderful exploration of making art, in particular making art medals.
25
EVERY ARTIST HAS A METHOD & PROCESS
PHILIP BOOTH
Especially Making Moulds
THOUGHTS ON MEDALS
The art medal for me is closely connected to making sculpture, in certain principles at least. There are notable differences and the particular physicality of them, for me, has, over a number of years, brought about a variation in the language I engage. There is one obvious difference: that of scale. These are small works that by definition fit into the hand. There is an intimacy of interaction since touch and handling play as much of a role in interpretation as the visual interaction.
The small scale presents its own challenges, but the use of the two sides – and the edge – creates fresh potential for linked or contrasting imagery, which may open up a story in unexpected ways. In terms of imagery, my approach to medals often employs a juxtaposition of figuration and abstraction, creating connections, surprises and tangential references within the tight limits of the form.
INSPIRATION AND DESIGN
The genesis for ideas for the medals is a very similar process to that which I engage to develop ideas for sculpture. Sometimes ideas grow out of encounters with the landscape, and are invariably based on considered drawing on site. At other times the work starts with an idea that is then substantiated through other sources. Whichever is the starting point, this is then worked out through drawing and, at times, collage to a point where I feel that I have something with appropriate impact and ‘rightness’. It isn’t necessarily a predictable event. The process goes through numerous stages as drawings, usually in books, as the ultimate small scale of the work means that I am able to work 1:1 at all times.
26 MAKING MODERN ART MEDALS
EVERY ARTIST HAS A METHOD & PROCESS PHILIP BOOTH
EXPLORING IDEAS THROUGH DRAWING
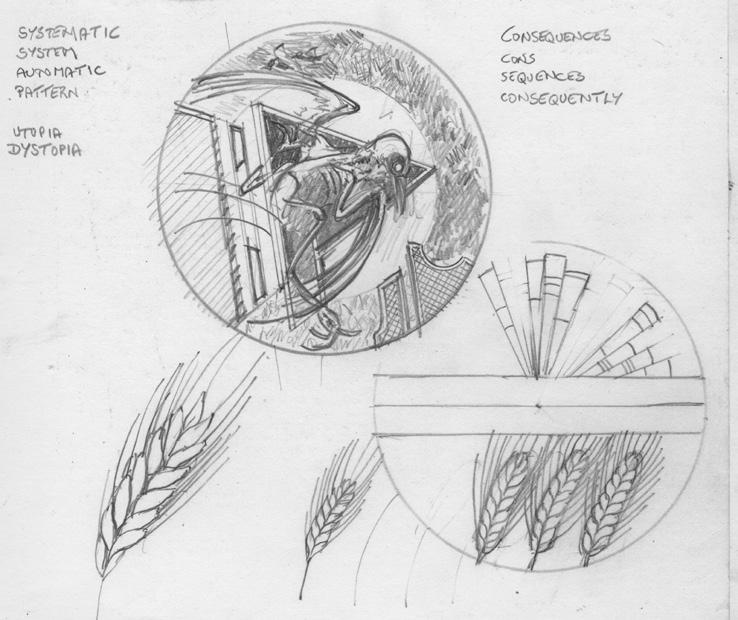
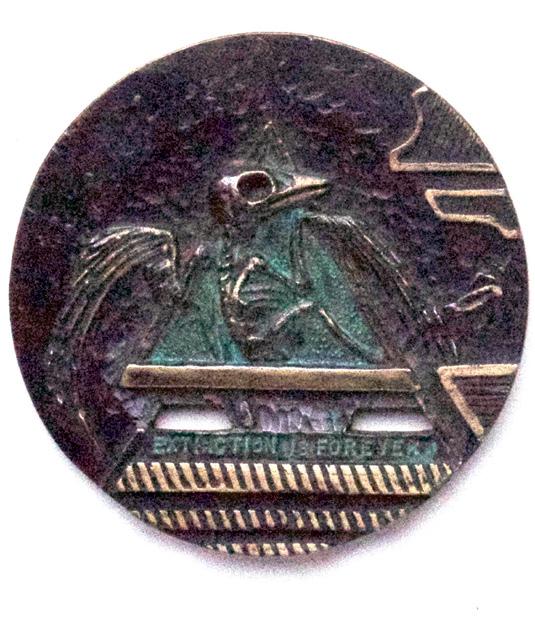
Extinction is Forever, a recent medal, is the equivalent of an upraised fist against the folly of how irresponsibly human beings have treated the planet Earth. Its message is a warning about environmental destruction. How did this medal come into being? It began as a drawing in one of Philip Booth’s notebooks, as the sketches show. Words, too, are important, and lettering is often part of Booth’s medals.
27 ↑
MATERIALS
To begin with making medals I first used a block of plaster, which was not such a sensitive material for the small scale of this kind of work. I next tried casting wax, but the wax being soft meant I was constantly repairing small blemishes inflicted by hands and tools in the wrong place, which is especially frustrating on the near finished work. Then I discovered oil clay (see Materials section). At times I construct into the surface of the clay or adhere other materials – metal or stone for example – into the surface, creating different qualities of surface and structure in the final piece.
ADDED MATERIAL
The medal Coincident shows how it is possible to position other shapes of different hard material into the model. When the medal is then cast into wax these surfaces will stand out against the texture created by the surface of the oil clay. It will not, however, take impressions from soft materials easily.

28
MAKING MODERN ART MEDALS
←
TEXTURE & DETAIL
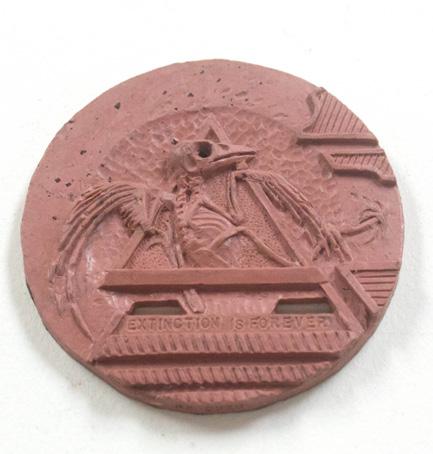
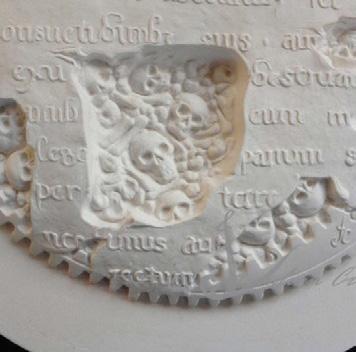
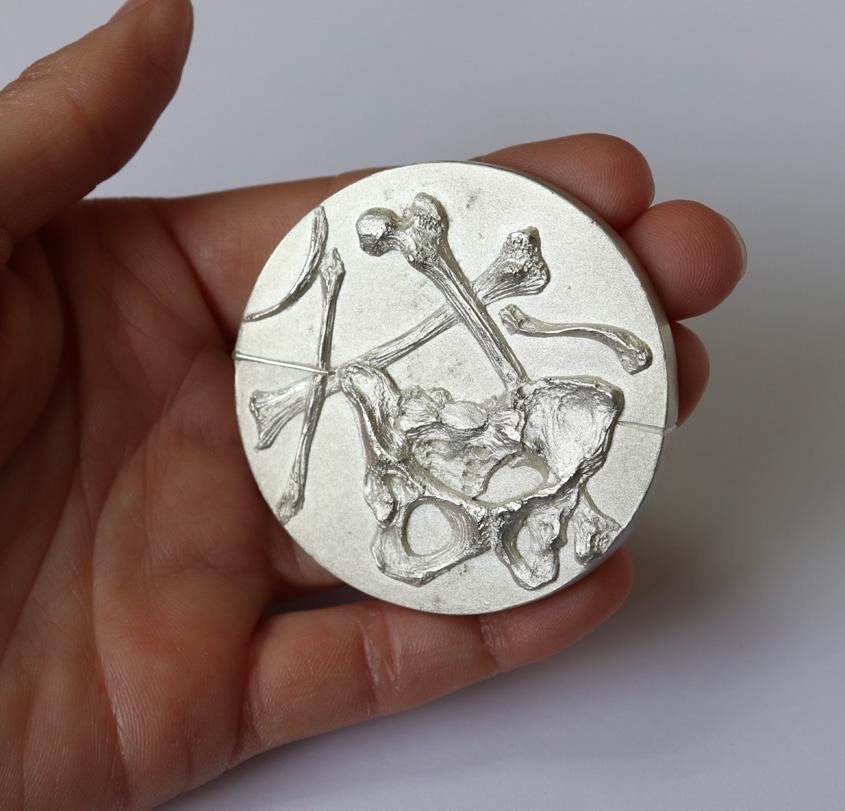
Extinction is Forever medal in its final oil clay stage before having a mould made. The fine details of the skeleton are firm in this material, and the lettering is clear. The texture of the background in a circular outline contrasts with the rigid lines below the skeleton. Where part of the imagery is fragile and transitory, the other suggests overwhelming force.
Oil clay comes in a block like a brick and feels just as hard. Be persistent but careful when removing a chunk. It is impossible to roll out when cold. After putting it in a warm oven for a few minutes (don’t overdo it) I start by rolling out a plane, as with ordinary clay, between two laths. When it is cool and hardened I use a template –card or board – to cut out the basic shape required. I prefer the hard grade of oil clay as detail is more robust once finished.
On the cool and hard surface you can draw lightly, transferring your final preparatory study as a starting point. After this it is a process of building on to the surface and modelling. You can make pieces separately, getting them close to a finished state and then attach them to the surface of the disc by cross hatching both surfaces that will come together. Do not use water (as with ceramics) to make them adhere, but instead work in a drop of two of turps to soften the clay a little, then it will adhere. (If you wait too long it becomes soft and mushy.) Leave for a while for the turps to absorb into the body or evaporate. It then hardens off a little for safe working and can be carved or finely modelled.
29
→
EVERY ARTIST HAS A METHOD & PROCESS PHILIP BOOTH
INSTRUCTIONS FOR CREATING A MOULD
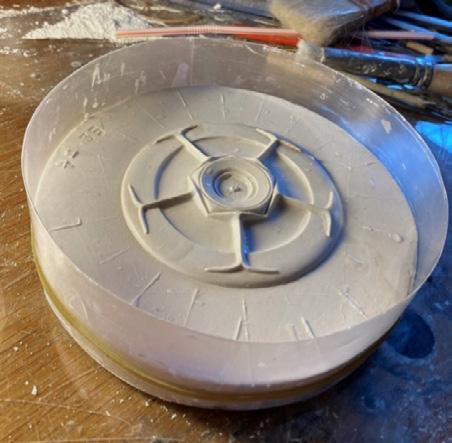
So, following the cross sectional diagrams, a to d:
Make a smooth bed of regular clay. Then I first cover one side of the work in damp tissue to keep the work clean (this saves both time and the risk of damaging your original getting clay off it). Very thin plastic sheet would be okay. Lay your model tissue side down on this bed and lightly draw around it. Lift away and scoop out a very shallow depression in the clay where your model will go up to about 5mm from your line.
Gently ease your model a little way into the bed of clay, to a depth of about 1mm, as in diagram a. Smooth off all around the edge, sealing any gap between model and clay bed.
Now build the ingate shape out of clay against the model. This will be the inlet for wax into the mould at the next stage and ultimately the inlet for the bronze at the final casting stage, so must be large enough, but not too big. I make mine according to the instruction given me by the foundry that used to cast my works. They are a wedge shape 30mm wide, slightly thinner than the model at the point of contact and expanding outward to about 10mm thick for the first half, to be added on to for the second half.
CREATING A MOULD
Cross sectional diagrams, stages a to d, of creating a mould.
30 MAKING MODERN ART MEDALS
→
b a
EVERY ARTIST HAS A METHOD & PROCESS PHILIP BOOTH

31
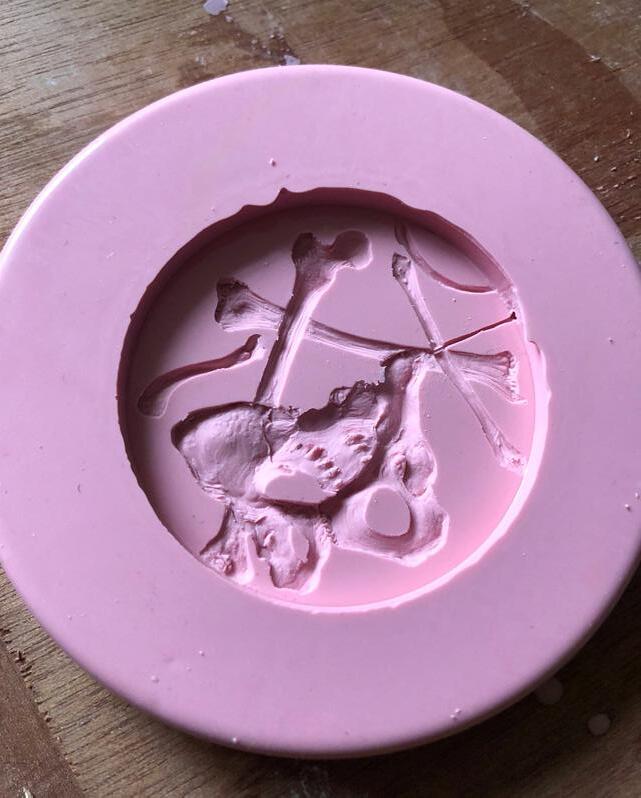
THE FINISHED MOULD
The finished mould illustrates the indents that will enable both halves to lock together in the right places. The bird skeleton is now in negative on the left, with its eye like a small ball, which in the final positive (as in the clay model) will actually be a round hollow socket. The other part on the right is the reverse of this part of the medal.
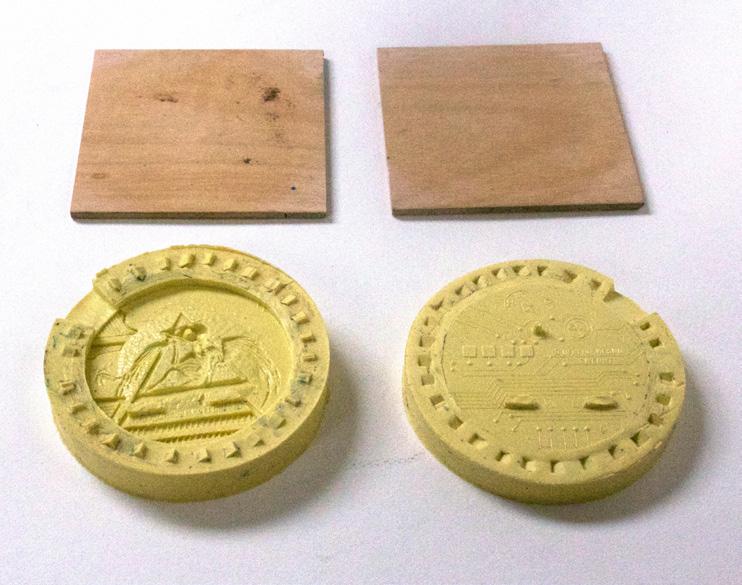
32 MAKING MODERN ART MEDALS ↑
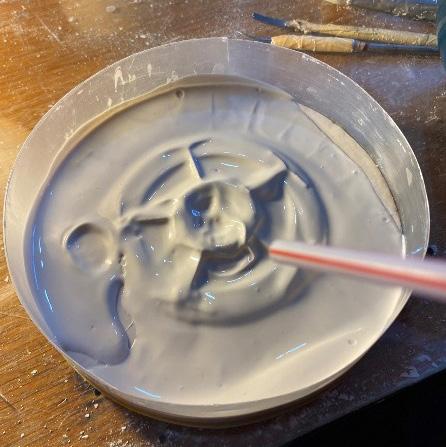
Also at this stage make the essential location indents to enable precise assembly of the mould for pouring wax. These are made with an appropriate tool pressed into the clay all the way around about 6–8mm from the edge of your model. My experience with this is that it is best to have quite a lot in order to ensure good location of both halves of the mould.
For the containment for the silicone I use a cut-down large circular yogurt pot (Lidls), pressed into the clay and all surfaces tidied off. Seal the contact of this container and the base with a clay fillet. This makes a very neat shape and, as I use a firm grade of silicone that holds its shape well there is no need for faffing with plaster jackets. Leave the silicone for 24 hours to fully cure.
In this diagram the poured silicone and model have been turned upside down from diagram c.
Casting the other side is an easy job as the already cast half of the mould fits snugly into the yogurt pot containment and all location indents are already made. Take care when removing the silicone half mould with the model from the clay bed and the containment. It should all come away easily. Try not to remove your model from the silicone at this stage, just remove the tissue, if used, and carefully clean any clay debris away. DO NOT remove the ingate plug you made earlier, instead build it up a little more to give a more symmetrical shape.
Set up for the next pour by firstly easing the already cast half to the bottom of the containment pot as in diagram. Tip: when preparing to pour the silicone for the second half of the mould spread a thin layer of Vaseline on to the silicon surface of the first half otherwise, despite what the manufacturers claim, the two halves can be difficult to separate risking damage.
33
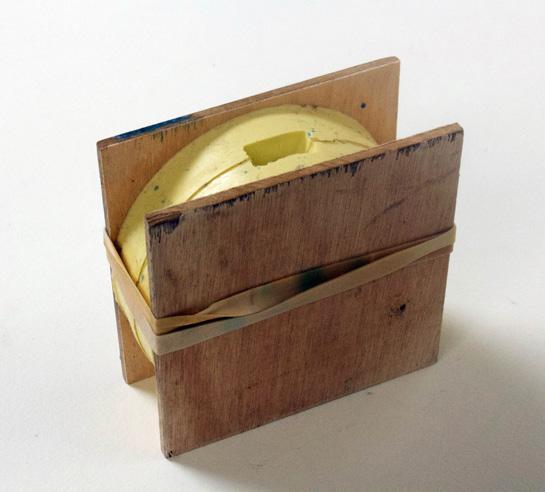
d c EVERY ARTIST HAS A METHOD & PROCESS PHILIP BOOTH
↑ THE FINAL STAGE
Once the two halves of the mould are made, Booth’s method is to secure the two halves together in readiness for the wax to be poured by sandwiching them between two pieces of ply and closing with strong rubber bands.
Using the hard oil clay means that at the point of removing the original from the silicon mould, the model will be robust enough to take out without risk of damage, so if there has been a problem, you still have an original model in excellent condition to work with. When pouring the wax I find it useful to warm the moulds in the oven first to about 80 degrees. This helps the wax to flow better, reducing the risk of freezing and leaving air spaces that will need repair. I also quickly apply a layer of wax to both surfaces of the mould before closing and then pouring the remainder of the wax.
34 MAKING MODERN ART MEDALS
EVERY ARTIST HAS A METHOD & PROCESS PHILIP BOOTH
For the final moulds for bronze casting I use ceramic shell, the making of which is probably best done under technical supervision in a workshop. (For patination, the last stage, see The Foundry Experience section.)
THE FINISHED CAST MEDAL
Extinction is Forever, cast in bronze with patination and polish, showing fine details. This is one face of a medal that is actually in two parts, as Booth enjoys the challenge of making medals that come apart, or precisely fit together. Therefore, these medals have four faces in total. Here, the obverse of the closed medal, is a wonderful example of the kind of detailed surfaces one can achieve with oil clay. (Real size of complete medal: 85 x 85 x 15mm when closed)
35
↑
ABIGAIL BURT Imprinting from Nature
INSPIRATION & DESIGN
My medal process is often inspired by nature; walking through nature; contemplating my relationship with the natural world; making sketches in my sketchbooks; researching other species; and printing out reference material to work in more detail from. I often do sketches of potential designs, many of which do not get realised. Making sketches allows me to work through ideas. I then often begin with a piece of plaster. I pour ‘blanks’ (see the section on Materials) into plastic lids, making myself circles or squares to start with. These can be used as a base on to which I model with modelling wax, or else I carve into the plaster. To begin, depending on the subject, I sometimes draw with pencil directly on to the hard plaster surface. I then carve into the plaster, engraving the surface with the lines of my design.
COMMISSIONS WORKED IN PLASTER
Making design drawings is a useful skill to develop if you are interested in undertaking medal commissions, because showing sketches of your potential designs to clients allows you to come to a design that they are happy with before you spend time physically making the model.
36 MAKING MODERN ART MEDALS
EVERY ARTIST HAS A METHOD & PROCESS ABIGAIL BURT
COMMUNICATING IDEAS THROUGH DRAWING
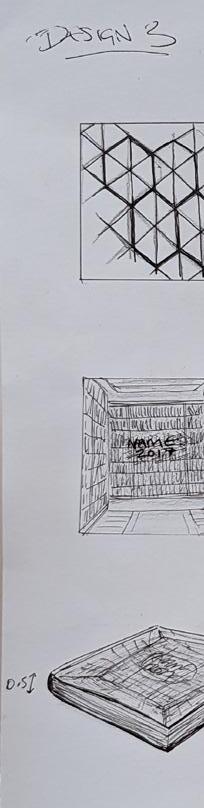
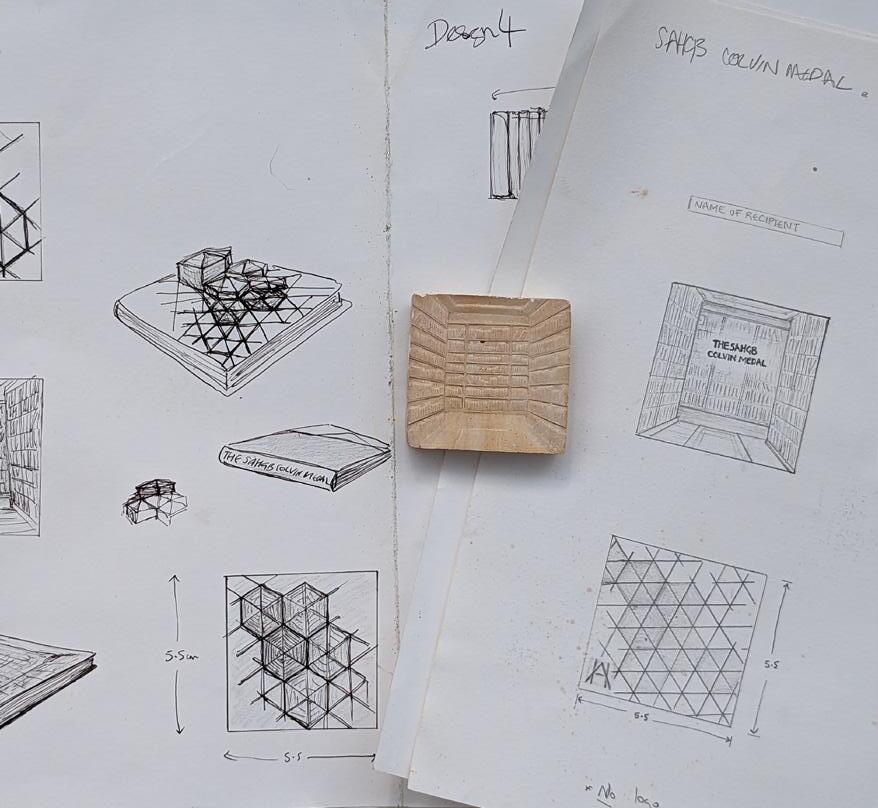
Designs and plaster for the commissioned medal for the Society of Architectural Historians of Great Britain. Drawings show the artist’s thoughts, about books, perspective and libraries, in a medal that creates spatial depth.
37 ↑
MAKING MODERN ART MEDALS
To make different shape moulds to pour plaster into, to create the starting form for your medal, you can make a neat border out of cardboard and tape, with a clay or modelling wax seal around the edge to stop the liquid plaster leaking out. You can set it on a small board, and tap it up and down to help the bubbles rise leaving a smooth surface.

38
↙ CASTING DETALS
Medals have a long tradition of commemoration and celebration, and the design here is for the start of a wedding medal. It shows both the positive, which has had shellac put on it, and the negative of the piece, which is still being worked on. There is a lot of detail, in the clothing and hair. Lettering can be done by hand, or letter punches can be used; there are many ways of putting words on to a medal and it depends on the effect that is wanted. Historically, lettering was an integral part of medal making.
The ability of plaster to work from negative to positive can be very useful for refining details on your medal. Shellac (either to be mixed or already in diluted form) can be used to create a barrier on a piece of dry plaster, which with the addition of a release agent, such as soap, enables you to pour an opposite version of your medal to work into. For instance delicate details are easier to carve into the surface as lines, which on taking the opposite imprint are then raised. For all processes involved in working from positive to negative and vice versa in plaster to plaster or plaster to wax, it is vital that you have no undercuts in your design. Making silicone moulds is more flexible and allows a certain amount of undercut in the design.
LETTERING
Lettering, for example, can be carved into plaster blanks precisely, and then a wax ‘sticker’ can be taken. Make sure the lettering is carved backwards so that the resulting raised lettering is the correct, positive version. Soak the plaster in water until no bubbles are rising, lightly dry off the surface. Then paint wax into the detail to create the wax ‘sticker’, which can be stuck into your medal designs.
39
EVERY ARTIST HAS A METHOD & PROCESS ABIGAIL BURT
WORKING FROM NATURE, USING WAX TO EXPERIMENT
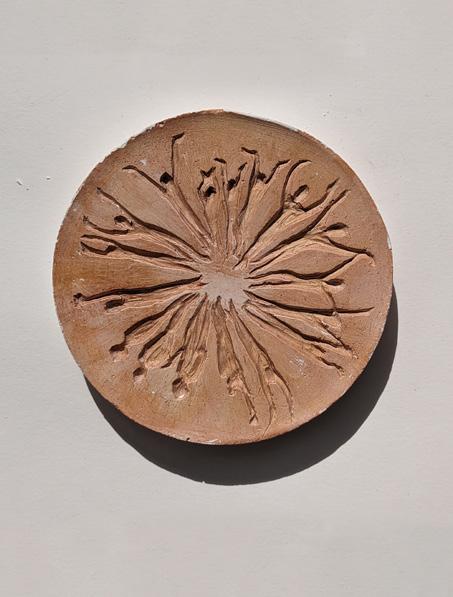
Sometimes I start with carving into a softer material such as modelling wax. When carving straight into wax a good approach is to roughly form the wax into the shape and thickness you are aiming for, and then start to work in more texture and surface detail. You can also experiment with texture by pressing natural objects, such as branches, into plasticine.
IMPRINTING FROM NATURE
Plaster and wax details created from a branch illustrate the method of imprinting from nature.

40 MAKING MODERN ART MEDALS ↓
EVERY ARTIST HAS A METHOD & PROCESS ABIGAIL BURT
A found piece of branch was first pressed into plasticine. Then a clay wall in the shape of a rectangle was built around the plasticine, and plaster was poured in on top of the branch. When the plaster is lifted from the plasticine ‘mould’ bits and pieces of debris can be peeled away leaving indented detail in the plaster. Wax can be poured into the wet plaster, and it is peeled off to create the opposite effect, as shown here.
If you place the plaster with the wax poured or painted on to it into a bucket of water, the wax will float off. Alternatively, the pressed branches can be removed from the plasticine and the pressed and indented shapes can be used to create a positive. Thinking ahead to the cast medal, remember that while wax feels light in the hand bronze weighs about ten times as much. Refining is important.
ALL IN THE WORLD
← FROM THE EARTH
A clay model, the first step in the process, of a medal inspired by Rabindranath Tagore, whose acceptance speech for his Nobel Prize for literature makes reference to the freedom and joy in living, as well as his deep love of nature. He spoke of hearing ‘the shouts and songs and glad voices, like those of trees which come out from the heart of the earth’. Burt’s medal captures that joyful spirit with its leaping figures.
41
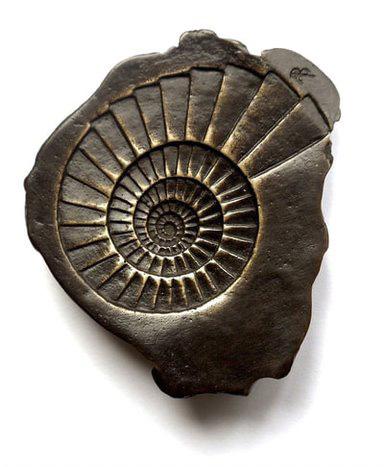
Also reflecting on the world around us Burt created a medal from a found object, an ammonite, a fossil of great antiquity. There is no rule that says a medal must be round, which opens up a lot of possibilities to have the shape of the medal contribute to its meaning as well as the imagery. By keeping to the shape of the ammonite itself, it reminds one of its origins, once a living creature.
INSPIRED BY NATURE
The original ammonite, just as it was found on the beach; the wax of the ammonite, made from a silicone mould.

42 MAKING MODERN ART MEDALS ↓
EVERY ARTIST HAS A METHOD & PROCESS ABIGAIL BURT
First of all, I made a silicone mould of the one side of the ammonite fossil that you see in the image. Then I poured plaster into the silicone to create a plaster version that I could then carve into on the reverse, forming a golden section spiral staircase. This is to reflect how we look to nature for inspiration.
↑ THE FINISHED CAST MEDAL
The reverse of the ammonite medal, now cast into bronze, showing the staircase, with Abigail Burt’s initials as signature on the edge. (Real size of medal: 75mm at widest point.)
43
JULIAN CROSS
Everything about Plaster
THIS IS JUST MY WAY
Each artist maker will have their own differing methods and materials they use in the creative process. What I want to show here is my own method of using plaster relief work in the production of a medal. This is a very brief insight into some of the methods I have successfully learnt to use over 40 years in modelling. Plaster relief work is a centuries-old technique and craft but the basic principles have not changed much over time.
PREPARE TO MAKE THE BLANK
To start with, you will need to create a plaster blank to work on. The plaster will be carefully poured on to a glass surface, which creates a flat smooth surface to the plaster when set. I use a piece of 30cm square 4mm float glass with softened edges. It is also possible to use any glass table top for this starting point of creating the blank. Make sure that the glass surface is completely level in all directions at this stage (see comments about a spirit level in Artists’ Tools section).
44 MAKING MODERN ART MEDALS
EVERY ARTIST HAS A METHOD & PROCESS JULIAN CROSS
Creating a Plaster Blank
An edge is needed for the plaster to be poured into. There are different techniques for this first pour, often using plastic pot lids and maybe cutting out the centre and fixing it to the glass with plasticine and pouring into it, removing the plasticine afterwards. I like the following method. It’s simple once you get the hang of it. I use a strip of cellophane (around 0.5 mm thick) and 3 or 4cm wide and about 60cm long with clean cut parallel sides. Curl it round to a circular shape on the glass and use a little masking tape at the overlap to just stop it unfurling. The cut edge of the cellophane must have a clean straight cut edge and it will then sit down well on the glass with almost no visible gaps. It doesn’t matter if the shape isn’t exactly circular. Tip: I have re-used this cellophane strip to make a ring dozens of times, so it saves hunting for another pot lid each time.
45 ↗
MIXING AND POURING THE PLASTER
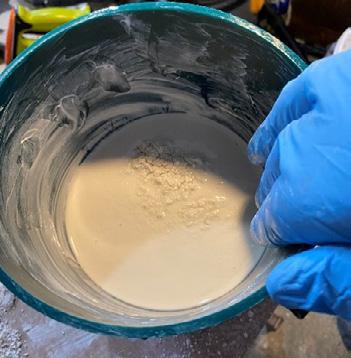
Equipment: a mixing bowl, preferably the flexible type, clean water and plaster. I always like to simplify things for ease and speed and avoid messy weighing and measuring of plaster and water. This simple method gives reliable results and gives you a feel for the material you are working with. Tip: It helps if you don’t mix up a lot too much plaster each time and so it is worth estimating the amount you will need. I use Prestia Classic plaster.
THE MIX RATIO
The approximate mix ratio is worth noting, about one part water to two parts plaster, therefore the amount of water you put in the mixing bowl will enlarge to about two and a half times the volume by the time you have added the plaster. A mug full of water would make a volume of around 2–3 mugs of plaster, and that poured into say a 15cm diameter ring would make a thickness of about 3–4cms. You will soon get the hang of how much water you might need, and it is best to slightly overestimate as you only get one chance at the pour stage to get the thickness of the blank about right, around 2–4cms thick approximately.

← The Plaster Mix
First in the bowl is the clean water without any old flakes or bits left over in the bowl. Next comes the plaster, gently sprinkled in by hand or using a small scoop.
46 MAKING MODERN ART MEDALS
THE METHOD
Tip: Wear a rubber glove, plaster is really alkaline and can damage or burn the skin in such close contact. Keep plaster dust to a minimum with good ventilation or wear a mask when handling loose plaster.
Keep sprinkling until you see that the plaster is becoming slower to be absorbed. At this point sprinkle slowly until there is a salt and pepper effect of dry plaster on the surface of the water that takes more than a few seconds to soak in. If after ten seconds it has all soaked in, add just a little more sprinkled plaster until it seems to stay for longer than about ten seconds. That’s it. Then make sure there are no clumps of dry plaster around the sides of the bowl by gently pushing them into the mix.
Plaster in the Bowl
While steadily sprinkling in the plaster wearing gloves, turn the bowl a little occasionally.
WAIT
Then, do absolutely nothing for at least a minute to let the plaster ‘slake’, which is allowing every grain of plaster in the mixing bowl to become completely saturated before you do any mixing by hand. This also helps to prevent air entrapment.
47
←
EVERY ARTIST HAS A METHOD & PROCESS JULIAN CROSS
← Smooth Away Lumps
Check for lumps by using a gloved hand to swirl the mixture around in the bowl, and smooth them away with some gentle mixing. Try for the consistency of double cream.

The mixture should be readily pourable, but not wet and runny. When you are sure the mixture is smooth, by gently squeezing it through your hand, it is ready to pour. The mixing process should have only taken 3 or 4 minutes including the slaking, so far. Tip: The reason for gently mixing is to avoid introducing air into the mix which will cause bubbles which can be problematical later. Always try to avoid creating bubbles in this and subsequent mixes.
POURING THE FIRST BLANK – THE SCARY BUT EFFICIENT WAY
Now take the mixing bowl to the cellophane ring on the glass. Very gently and steadily pour the plaster on to the glass into the very centre of the ring and allow the plaster to spread out to the sides. DO NOT touch or move the ring at this point. The weight of the wet plaster will push the ring out to being near enough circular; keep pouring until you have about the right thickness. The ring may move slightly as it is pushed by the plaster but let it find its position without helping it. DO NOT move the cellophane, or the wet plaster will escape from under and make a mess of your workspace.
48 MAKING MODERN ART MEDALS
EVERY ARTIST HAS A METHOD & PROCESS JULIAN CROSS
→ The Pour
The circular ring contains the mixture as you pour it out. If it’s a little lumpy you could swish it with a gloved finger, or gently bump the work table to settle the mound. It isn’t critical to have the top surface dead flat.

Leave it for 30 Mins+ The surface can be flattened off later when set. Meanwhile, walk away from this and make sure no one disturbs your pour for at least half an hour. Even if there is seepage, just leave it for later when it is set and you can break it away.

49
←
→ The Blank
What you really want for working on is the other side, the pristine surface, that the glass gives to the plaster face. There are other ways of doing this, such as pot lids etc, but with plaster poured on to glass the result can be marvellous.

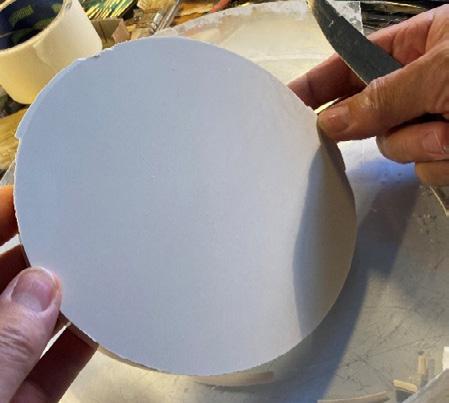
← Release the Plaster
Unpeel the cellophane, and, using the edge of a thin blunt knife, gently get between the glass and plaster just to release the suction seal that will have formed. You can break away any dried seepage. Little bumps on the top can be flattened or scraped away.
Tip: Remaining plaster and what to do: Leave the residue in the bowl to set and then crack it out into a waste container. If you must wash out the bowl with the unset plaster in it, then wash it into a bucket of clean water. Leave the bucket overnight and the plaster will settle to the bottom. The clear water above that can be flushed away or re-used; the slurry of set plaster will be collected at the bottom of the bucket and scraped out for disposal. DO NOT rinse unset plaster down your drains. The only way that plaster products should be disposed of is at a recycling centre with special facilities. They usually make a small charge, so save up a bag full.
50 MAKING MODERN ART MEDALS
SETTING OUT ON THE BLANK, WORKING IN NEGATIVE
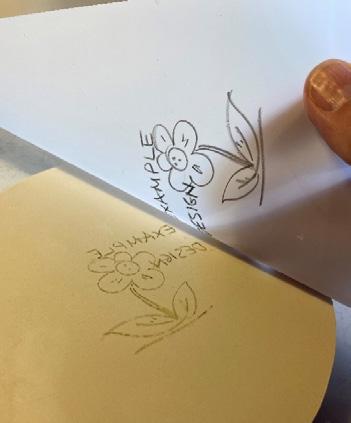
You can start on the pristine surface in several ways: one is to just start carving freehand, but it helps if you have a design outline that can be transferred to get started. I transfer a design using the following: drafting polyester film sheet, available as Polydraw. It can be wiped clean and re-used. Also, water-soluble art crayon (Faber Castell and other makes). Trace out the main details of your design boldly on to the film, the right way round, just outlined shapes as a guide to get carving into the plaster surface. Details come later when the ‘volume’ is carved in place.
Working in Negative
The drawn design is turned over on to the still damp plaster – important to have it fresh – reversing the image. This means that initially the work on the plaster will be done in reverse, working in intaglio. Working in intaglio enables an artist to achieve fine lines when the work is then made into its final positive.
Press down firmly on the back of the film with your thumb all over to transfer the design to the plaster, this will only work if the plaster is fresh and still very damp and the drawing on the film has been firmly drawn and then pressed down well. The design will appear in reverse on the plaster blank.
Tip: If you prefer to work in a more freehand manner, and you have a design, you can print it back to front, and use that image to work directly from on to the plaster.
51 →
EVERY ARTIST HAS A METHOD & PROCESS JULIAN CROSS
MAKING MODERN ART MEDALS
← Marking Out
A geometrically based design, on which the angles and intersections are marked out with lines scored directly into the plaster, outside the design, as reference points.

←
Carving into the Plaster
Carving has begun to an approximate depth in one area that had to be done first. This area will be a raised area when the plaster is reversed into a positive relief.
Further areas have been removed, always avoiding undercuts, and an impression has been taken using plasticine, Chavant NSP soft grey, to give an idea of how progress is going, checking the depth. The drawing shows a design that relates to the model.
52
→
PREPARING FOR A PLASTER CAST, MOVING TO POSITIVE
Having carved as much as I wanted, it then is time to create the plaster positive, correct some of the levels and the sections that I had roughly cut in the negative (reverse) first stage. I repeat this process many times in the next stages. To begin with it is important that the edge of the plaster is flat and as square as possible to the design face. This is so that wet plaster will be contained when placing a collar around it. You can use a surform with a flat blade to achieve this. It is also useful if the plaster is as circular as possible.
← Squaring the Edge
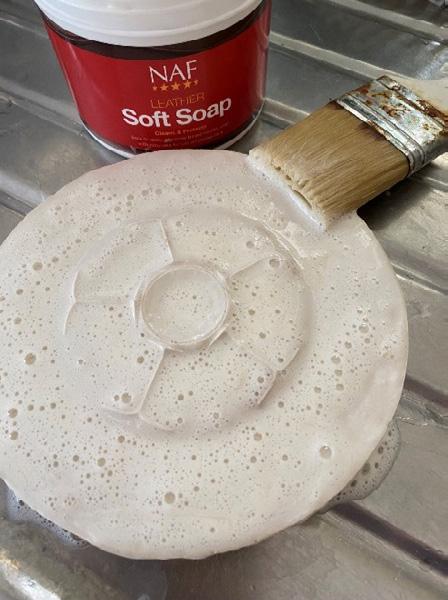
This particular work in progress has had a compass line scribed from the centre of the design to near the edge of the plaster. The surform – its blade held at 90 degrees to the plaster – is used to shape the edge of the plaster to this line. Here the work is being trimmed circular and square, placed on a smaller disc so that the edge is free to be trimmed.
The next stage, having brushed away any loose bits of plaster, is to check there are no undercuts, which would create trouble in a mould. Using Pure Soft Soap and a soft brush you work up a ‘barber’s’ lather over the design surface only. Some will run down the sides but avoid getting it on to the back.
Tip: you can loosen the soft soap with some warm water to make it easier to apply, as it is quite a thick gel in the pot. Once it is lathered, leave it to rest for at least 15 minutes.
53
EVERY
ARTIST HAS A METHOD & PROCESS JULIAN CROSS
← Soft Soap
Here the plaster has been lathered with Soft Soap. This is a fatty soap and very good for its task. It is the high soluble fat content that makes it work so well.
Now, rinse the plaster gently under running cold water using the soft brush. You should see the water running off the surface as if it had been waxed. Submerge the plaster FACE DOWN in CLEAN cold water for at least an hour.
Tip: The reason for face down is so that the air bubbles escape from the unworked back of the plaster, not through the design face. Such soaking is to completely saturate the plaster with water which removes the ‘suction’ that plaster has and enables the next stage.
After you have taken the plaster from the water, you will now need to wrap it in a collar to contain the next wet plaster pour. There are different ways of doing this.
54 MAKING MODERN ART MEDALS
EVERY ARTIST HAS A METHOD & PROCESS JULIAN CROSS
Using a Collar
Duct tape can be used to create a collar, but it does distort with its wavy edge, and means you would need to work it over with the surform before casting the next stage.

→ Instead, return to your useful piece of cellophane, held tightly in place with a long rubber band, placed firmly on a flat surface. In this later stage of modelling you can see how straight the edge is. A little water sitting on the surface shows it has become waterproofed.
With the fully soaped, rinsed and soaked plaster securely in its cellophane collar, it is ready for a plaster pour. The process is the same whether pouring into a negative or a positive plaster, at every stage. Each time you cast, you make improvements and take the design forward. Likewise, mix the plaster as before. When the plaster is ready you will have maybe five minutes to complete the pour. After you have poured a small amount on to the model, pick it up and lightly shake it while holding it flat, to move the plaster around.
55
→
← Blowing the Wet Plaster
Here the model has had the plaster shaken around the surface, and a straw is used to make sure it reaches all parts of the design.
Using the straw, blow the wet plaster about over the design ensuring the plaster gets into any detailed parts of the design. Any bubbles here will be dispersed by the agitation and straw blowing. Immediately continue to pour the remaining plaster swiftly and steadily into the collar, covering the model until you reach the desired thickness. The plaster should still be fluid at this point for another minute or two, so begin agitating the plaster by rocking it over the edge of the work table in a rhythm that causes the bubbles in the mix to rise to the surface away from the design face of the model.
If you have any access to a vibrating table that is ideal, something like a washing machine on full spin is the agitation required. Failing that, banging the whole piece up and down as firmly as you dare and for as long as the plaster is fluid, will all help to bring bubbles to the surface. Make sure the
56 MAKING MODERN ART MEDALS
collar is firmly attached. As soon as the plaster seems to be thickening, settle the whole thing with a couple of vigorous wobbles on the work table and leave to set undisturbed for at least 30 to 40 minutes.
SETTING PLASTER
To tell when plaster is set, you could of course leave it for a good deal of time. However, there is an optimum time to separate these plaster pours which is just after the plaster has cooled, after it has heated up. Plaster is exothermic when it is setting. A large bucket of plaster will get hand hot but a small medal cast size still gives off a little bit of heat when setting which you can feel with the back of your hand. Anything from 30 to 50 minutes might be required, you can also scratch the top surface to see if it feels firm set or still cheesy soft. This is simply a guide to the timing; you will get to judge from experience. It needs to be firm set.
Trimming Back
The double-thick plaster has been removed from its collar and is now ready to be separated. The knife is used to trim the surface back to flat, as needed.
57 →
EVERY ARTIST HAS A METHOD & PROCESS JULIAN CROSS
You should easily be able to find the line that separates the two halves. Gently tap with a blunt blade and a small weight around the line in several places, keeping the blade parallel to the surfaces. Do not force the blade in between but repeatedly tap around until a hairline crack appears.
←
Separating the Parts
A blunt blade is tapped with a small weight around the line in several places, with the blade parallel to the surfaces.
←
With two hands, the two pieces are gently prised apart, pulling equally on both sides to separate them.
←
The cast, on the right hand of the picture, is a faithful reproduction of the model in every detail.
If everything has gone right, you can then progress, though broken or stuck pieces are not uncommon and can be repaired at the next stage of carving, either in the positive or the negative. If there were undercuts, which would break sections of the model, you can ease that section at the next modelling stage.


58 MAKING MODERN ART MEDALS
EVERY ARTIST HAS A METHOD & PROCESS JULIAN CROSS
Work on the new cast, either positive or negative, developing the design, and repeat the soap, soak, cast process as many times as you wish to reach your desired outcome. I may go back and forth around 20 times. Any mistakes that are made in the positive, are easy to correct when in the negative, and vice versa. Once I have completed both sides of the plaster models to the design for the medal, I will then create a silicone mould from each side.
This commission by Cross is of great complexity, nevertheless, the outcome was achieved by following the same method as described.
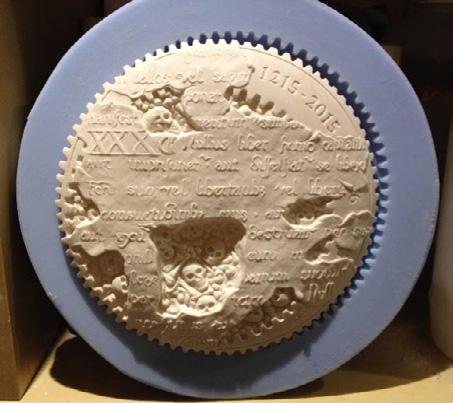
In plaster, the reverse (left) shows Britannia with a blindfold, one hand out holding the scales of justice, the other holds a sword; the weighing pan offers viewers the opportunity to weigh their own conscience regarding justice. The gears surrounding her represent the churning of time over 800 years. These are repeated on the obverse (right), which here shows a detail of buried bones, life and death, a cycle. In a conflict, each side believes justice is with them.

59
THE MAGNA CARTA MEDAL
↑
MAKING MODERN ART MEDALS
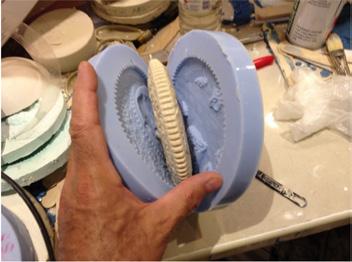
After each side was completed in plaster, a silicone rubber mould was then made, and from each silicone mould a thin cast was made of each side using Jesmonite. The two halves were aligned and joined together to make a single model, and this was then remoulded to create a single mould suitable for making the waxes to go forward to the foundry for casting.
→ Silicone Mould
The silicone rubber mould created a thin cast of Jesmonite.

One side of the medal, thinly cast in Jesmonite.
60
← Cast In Jesmonite
EVERY ARTIST HAS A METHOD & PROCESS JULIAN CROSS
← The Mould of the Whole
The whole medal, in Jesmonite, in the silicone mould that will now be used for making the final waxes for casting.
↓
The Magna Carta Medal (reverse), commissioned from Julian Cross in 2015 by the Worshipful Company of Goldsmiths for its renowned collection of contemporary medals. Only four silver copies are being cast of this large medal, which is 145mm in diameter.
61
SARAH DAVIS
A Story in Wax and Plaster
THOUGHTS ON MEDALS
I was first introduced to the art of medal making in 2019 whilst taking part in the British Art Medal Society Student Medal Project. Since then, I have continued to make medals, which has given me a new way of expressing myself. My practice is predominantly sculptural, with a focus on organic forms that explore our relationship with pain, healing and mortality, exploring the rawest of ideas. The medal is a quiet moment placed within the palm of a hand, but within that space is unbounded possibility.
When it comes to medal making, my ideas often start with a drawing. Sometimes the sketches are quite rough and give me a suggestion of the idea before I start modelling. On other occasions I will do a fully finished and to-scale drawing if I have a specific vision for the medal.
DEVELOPING IDEAS THROUGH DRAWING
To commemorate the fifth anniversary, in 2023, of Davis’s successful autologous stem cell transplant for lymphoma she designed a medal called Day Zero, referring to the day when the medical procedure goes ahead, virtually a new birthday. The drawn design of bones in a circle creates, as she has put it, ‘a kind of talisman that connects us all, to ourselves and to our past, a reminder of what we share’. Room is left in the drawing for the design to evolve through modelling.
62 MAKING MODERN ART MEDALS
→
EVERY ARTIST HAS A METHOD & PROCESS SARAH DAVIS

63
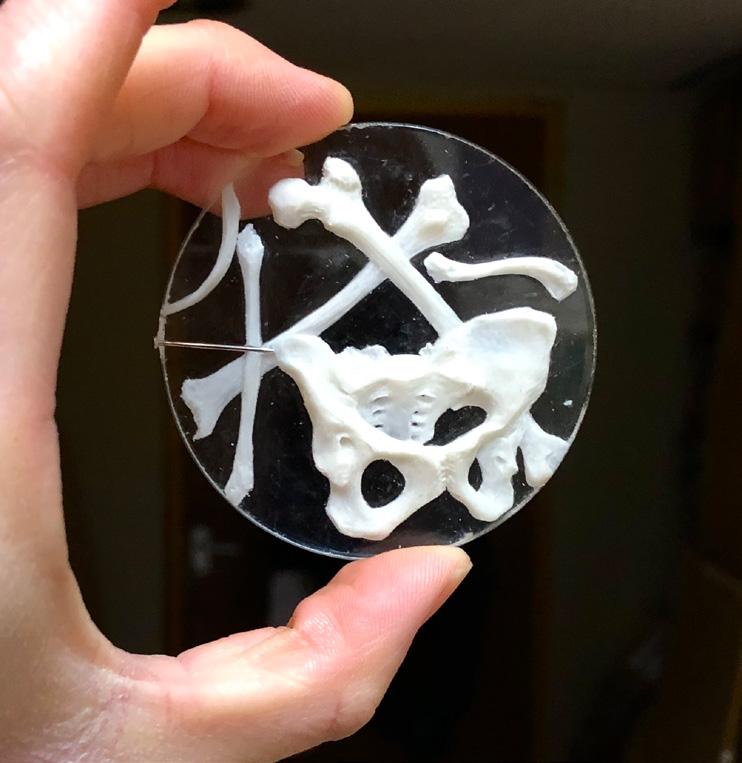
The medium I like to use is soft white modelling wax (see the section on Materials). For the medal I decided to model directly on to a Perspex disc to give myself an even flat surface to work on. In the illustration you can see the disk placed over the drawing to give me an outline to model within.

PERSPEX DISC & DRAWING
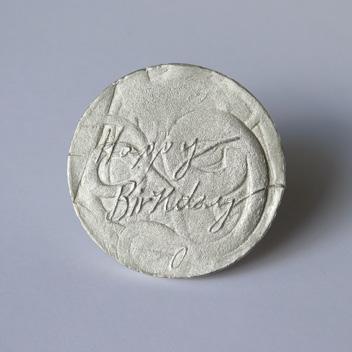
Perspex disc placed over the initial drawing for Day Zero. Alongside it is the reverse of the medal in plaster, with the words ‘Happy Birthday’. The lettering has been hand written, making it even more personal.
When making a medal I always work each side separately, and then make a silicone mould of both. The silicone mixes to a pourable consistency. To make the mould, a clay wall is built around the medal with a 2cm gap and the silicone is poured in on top, creating what is known as a block mould (see the section on Moulds).
64
MODERN ART MEDALS
MAKING
↑
↓ MODELLED ON THE DISC SURFACE
The Perspex disc, showing the modelled bones for the obverse of the medal. Using the Perspex creates the smooth, somewhat clinical, surface, to suggest a relationship to medical procedures.
65
EVERY ARTIST HAS A METHOD & PROCESS SARAH DAVIS
CAST IN JESMONITE
This is the finished modelling work for both sides of the medal in Jesmonite.
After each side has been cast into a solid material, I glue them together and carve detail into the edge. I used Jesmonite to cast the two sides, which works in a similar way to plaster but is more durable. It also sticks well to itself and you can create a smooth seamless join. Traditionally medals are cast in bronze, but for this medal I chose sterling silver. I sent it off to a jeweller’s foundry for the final mould making and casting. At the foundry a two-part mould is made of the medal, which is filled with casting wax. The wax is melted out – lost – leaving a hollow for the silver to enter. I finished the work in my studio by hand using a series of files and abrasives to create a subtle satin surface with polished highlights.

66 MAKING MODERN ART MEDALS
↑
EVERY ARTIST HAS A METHOD & PROCESS SARAH DAVIS
THE FINAL MEDAL Day Zero, cast in sterling silver by Sarah Davis. (Real size of medal: 58mm x 5mm)
→ ↓
DANUTA SOLOWIEJ The Medal as Witness
THINKING TO MAKING
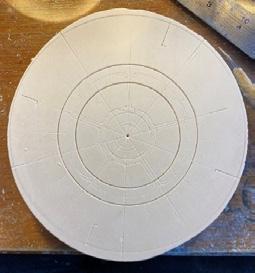
My relationship with medals is long but not well documented. I don’t write, I prefer to talk. I think with my fingertips. I am not ashamed of my childlike enthusiasm and curiosity about medals. I see my repertoire of skills as an advantage rather than a hindrance. I take my time. My medals fall into two categories, commissions and independent research. They inform each other and both require discipline and commitment. In commissioned work every step has to be accounted for, while independent work allows for wandering. These fluid, sometimes elusive journeys are difficult to retrace but the end results are revealing and reflected in the titles of the medals, often grouped within a theme. The anatomy of the medal – its two-sidedness and the edge – is helpful to think through ideas.
MODELLING TO FINISH
Siligum is extremely useful and reliable (see the section on Moulds). Details come out nicely.
68 MAKING MODERN ART MEDALS
EVERY ARTIST HAS A METHOD & PROCESS DANUTA SOLOWIEJ
↑
STEP BY STEP
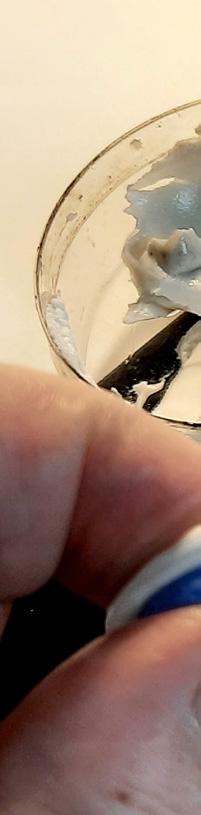
From the start, the image is of the artist working with siligum where the two components are being mixed together by hand to be applied directly to the object.
69
MAKING MODERN ART MEDALS
The working time is up to 3 minutes, the setting time is 5 minutes. Making a mould in this way means that it is ready to use straightaway, although for large or complex objects plaster backing is recommended. Siligum is suitable for casting multiples of plaster, wax, Jesmonite and resin. It is an easy to use product and the packets have clear instructions. It is fast-setting and non-toxic, an alternative to silicone.
←
CASTING MULTIPLES
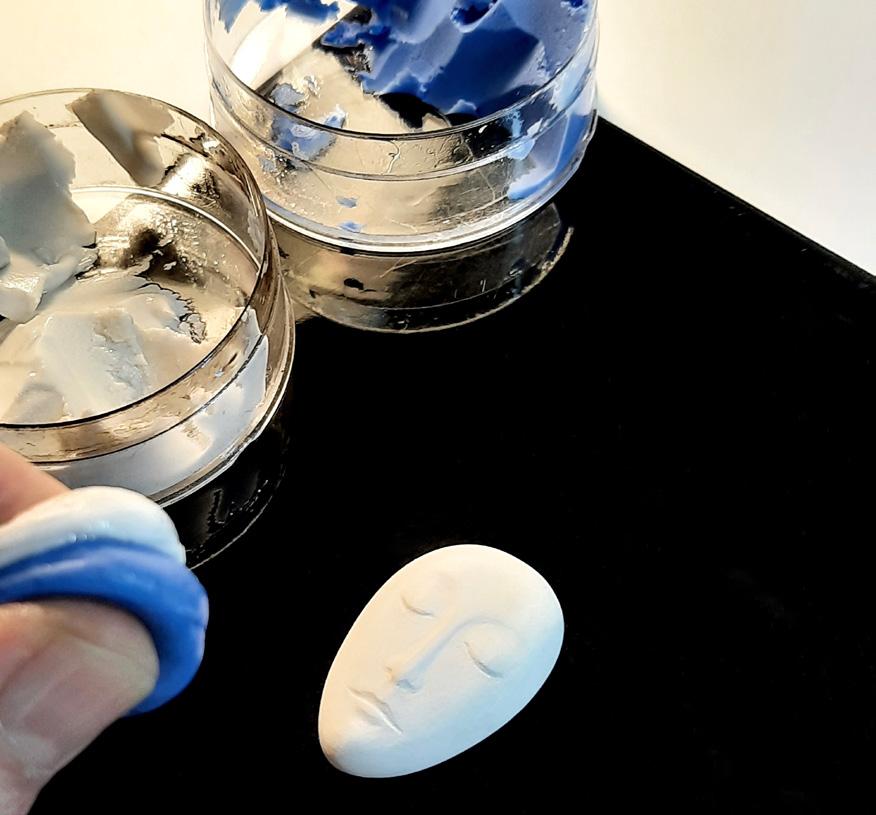
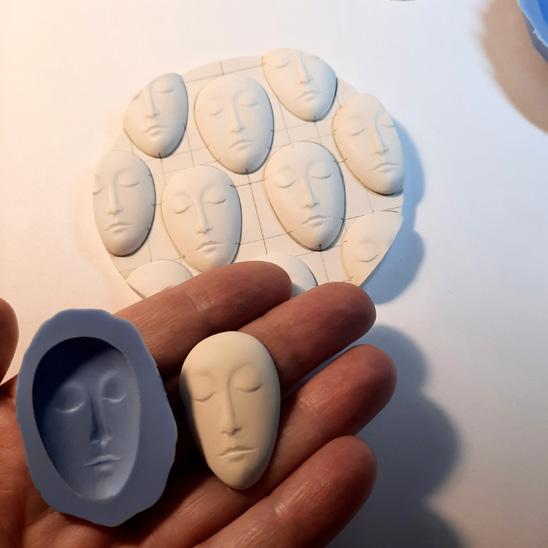
The small face is removed from the mould, and it can be placed on the plaster disc of the working model for the medal.
For this medal, the heads were made separately and glued to the surface with PVA; the joining gaps were filled with fine grade, ready mix Polyfilla, edges were smoothed and then I took a silicone mould of the whole. On the other side the heads are in negative, but the process is more or less the same.
70
EVERY ARTIST HAS A METHOD & PROCESS DANUTA SOLOWIEJ
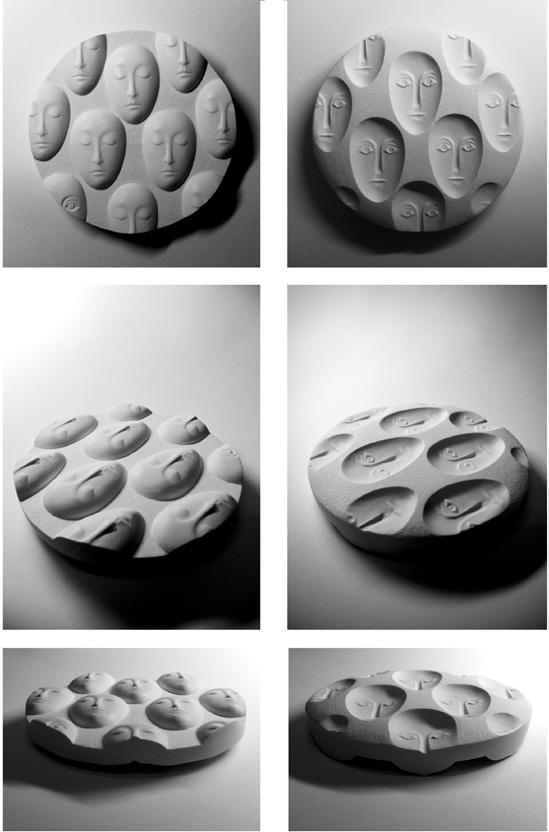
THE MODEL OF THE MEDAL
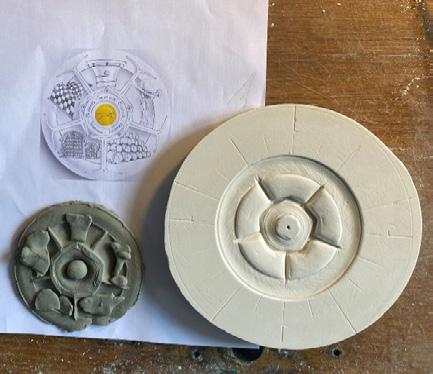
Both sides of the model of the medal Trust Your Instinct, a commission for the British Art Medal Society in 2019. Here it is in its finished form, ready to be sent to the foundry for casting. Solowiej always makes a duplicate before it goes, especially if it is for a commission, and for that uses either siligum or silicone.
71 ↘
MAKING MODERN ART MEDALS
At the foundry a silicone mould is taken from which the foundry will cast its waxes. The waxes are covered with either investment material or ceramic shell. That makes a mould ready for lost wax casting. The wax is melted out of these moulds – lost – and the void is filled with molten metal. Once the metal is solid, the mould is broken and the cast is revealed. And then the finishing begins.
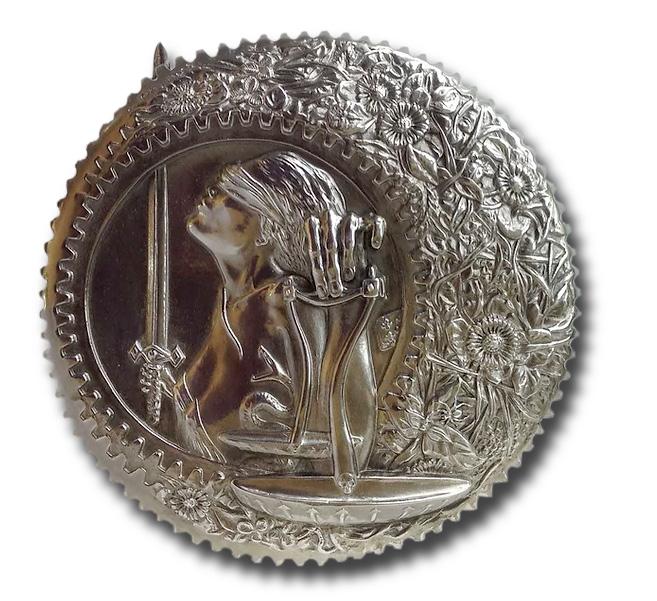
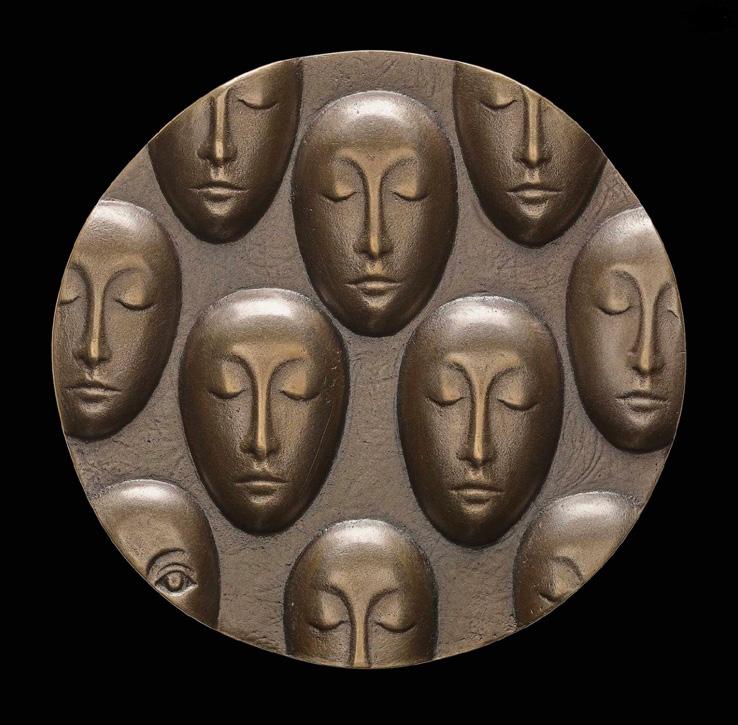
↓ THE FINAL CAST MEDAL
The bronze obverse of Trust Your Instinct, on which the eyes are closed. (Real size of medal: 80mm)
72
EVERY ARTIST HAS A METHOD & PROCESS DANUTA SOLOWIEJ
The small heads began with a series I called ‘Witnesses’. I have tweaked the heads occasionally since, but it was minimal. The only notable change was introducing the version with the closed eyes. These heads were always present while growing up in Poland, something to do with being amongst the Catholic and Orthodox churches, the way in which saints are depicted, the overflow of rituals and imagery, plus frequent visits to the puppet theatre throughout my childhood. Also, I have a curiosity regarding boundaries and behaviour of the crowd vs the individual, obedience vs rebellion, conformity vs eccentricity. Trust Your Instinct is a reflection on our reasoning as individuals vs herd behaviour.
PATINATION, THE FINAL STAGE
There are several chemicals that can alter the colour of metal but not all are easily available, and there are several ways of applying them. Safety is paramount, so the best way is to have it demonstrated by a person with experience in a suitable set up. For many years I used liver of sulphur solution which is applied by brush to metal heated with the torch, but recently I switched to platinol oxidising solution, which is a cold application but gives the same results, ranging from soft brown to near black.
Medals can be patinated at the foundry, but most artists prefer to do the patinating themselves. Danuta Solowiej describes patinating the finished bronze medal, or any work made in metal, as ‘controlled corrosion, because the chemicals are reacting with the surface of the medal in a controlled way (or so we would like to think)’. It can be done in many, many different ways. In fact, experimentation with patinating a medal can lead to a lot of surprises. When you begin on a work of art you may have an idea of how you would like the finish to appear – what would be darkened, what would be polished surfaces – or it may be a question of waiting to see. Liquids such as citrus juices and other organic materials will alter the appearance of metals. If you are experimenting, you can note the results and start a comprehensive list to refer to of what works best. There is also oil, acrylic and enamel paints, available from art shops.
73
74 MAKING MODERN ART MEDALS
THE FOUNDRY EXPERIENCE
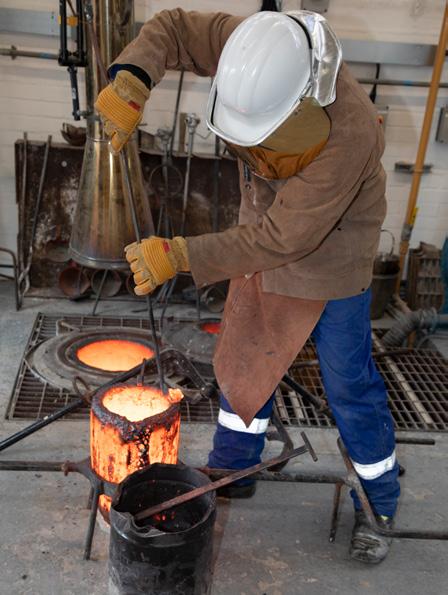
Once your medal has been prepared for casting, it may be that you send it to a local foundry, or a university foundry, or even your own small foundry. As well as teaching, Roddy Mathieson runs his own in Scotland, called The Mobile Foundry, and also has cast medals at the University of Dundee for many years. Casting isn’t something you can do at home without specialist equipment, experience and a good deal of caution. The photos, from Dundee, take you through the foundry process, from the time that a wax cast original model or cast of a medal comes into the foundry.
75
THE FOUNDRY EXPERIENCE,
RODDY MATHIESON
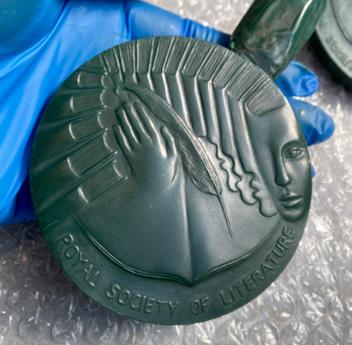
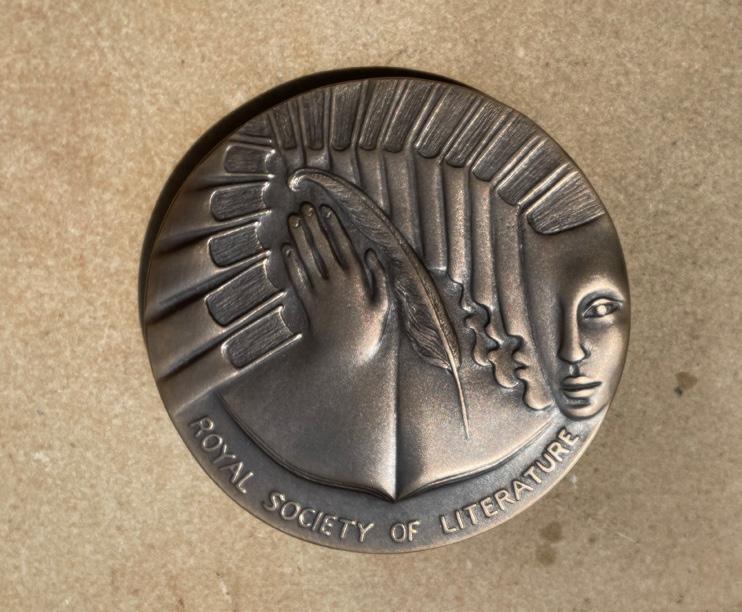
CAST
A wax cast of the Royal Society of Literature medal by the artist Linda Crook, produced from a silicone mould. It is being prepared for attachment on to the casting tree. A number of medals are attached so that they can all be cast at once. The original was made in plaster.
76 MAKING MODERN ART MEDALS →
WAX
RODDy MAThIESON TAkES yOu ThROuGh ThE FOuNDRy ExPERIENCE.
THE FOUNDRY EXPERIENCE, RODDY MATHIESON
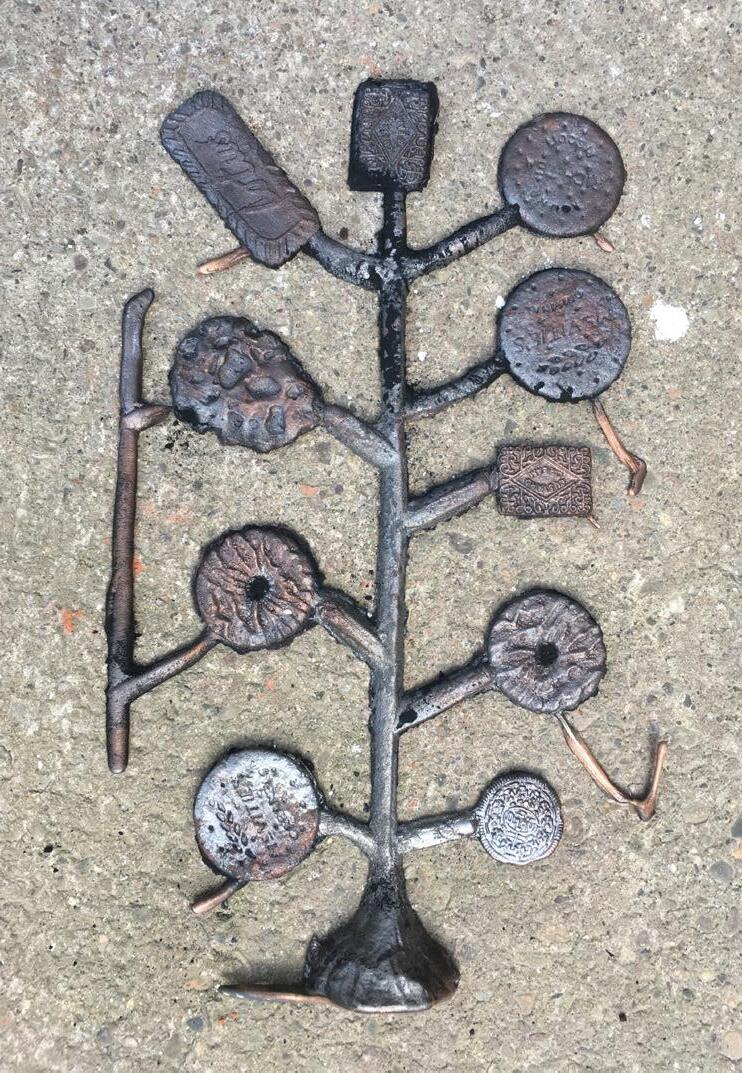
WAX TREE
The waxes are secured on to the casting tree: the funnel shaped base is the pouring cup; the wax rods are the runners that supply the metal from the pouring cup into the design; the other rods are attached, called risers, to help the air in the moulds escape via the top edge of the pouring cup.
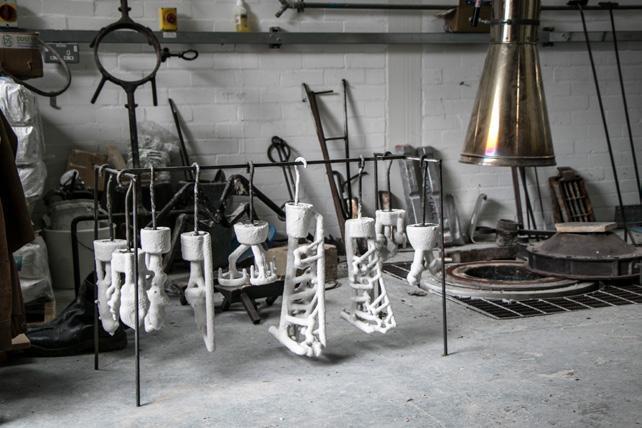
CERAMIC SHELL MOULDS
A number of works are shown here in ceramic shell moulds, which have been created by dipping the wax pieces into a ceramic slurry, and then coating the slurry layer with a crushed ceramic grit (molochite). Around 7 layers are applied.

77
←
↑
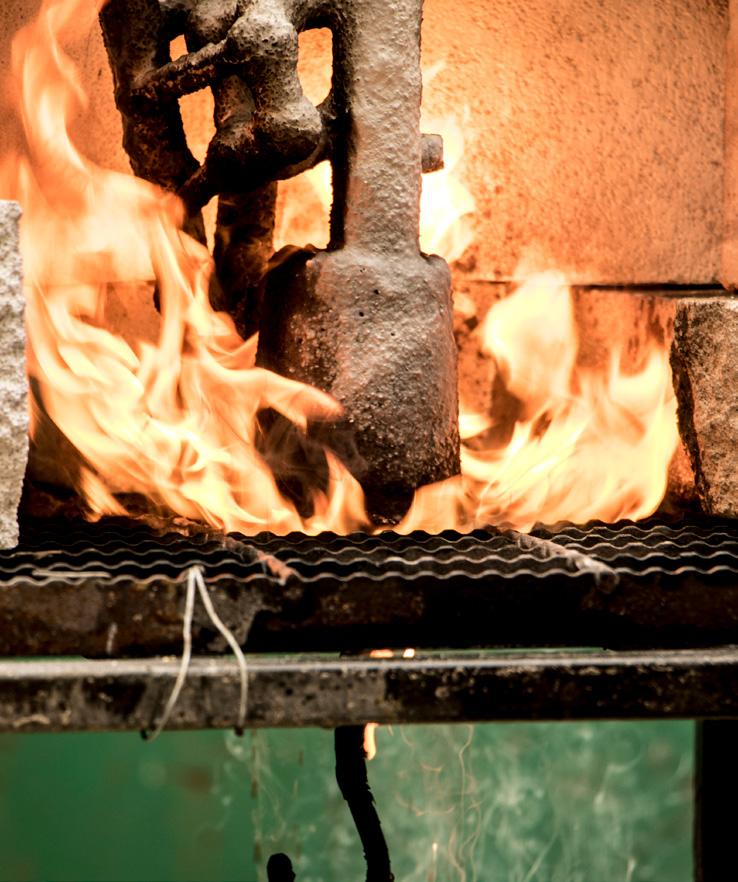
This is the ‘lost wax’ part of the procedure. It is a detail of the wax escaping from the hot ceramic shell moulds. It can be done in a kiln, or in this case using a propane torch. While some of the hot wax may ignite, most of it is caught below in a basin of water, for recycling.
78 MAKING MODERN ART MEDALS
↑
LOST WAX
THE FOUNDRY EXPERIENCE, RODDY MATHIESON
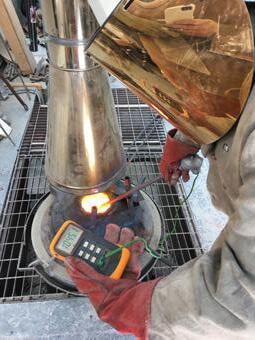
MAINTAINING TEMPERATURE
The temperature of the bronze is measured as it melts in the crucible: too cold and it will not flow through the mould, too hot and it creates porosity and shrinkage in the casts.
THE BRONZE IS ‘DROSSED’
Here, the crucible of hot bronze is lifted out of the furnace in order to add flux to the melt to help it degas and clean it; the surface of the bronze is ‘drossed’, that is scraped slightly, to remove any slag from on top.
79 →
←
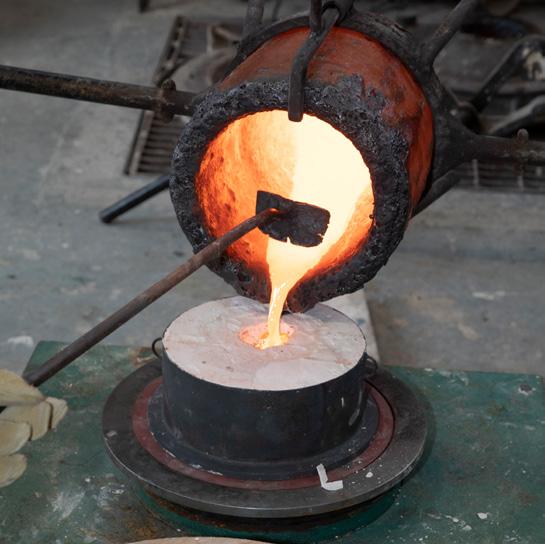
POURING THE MOULD
Pouring the vacuum mould. The bronze is cooled somewhat before pouring. Judging the right temperature to pour the moulds is crucial. Too much work has gone into the process to make a mistake at this point. The plaster investment mould is installed in a vacuum chamber, air is sucked through the porous plaster, and when the bronze is poured it is drawn in under pressure, helping to capture all the finest details, and at the same time avoid issues with air bubbles in the mould. As two technicians pour the metal, a third is drossing the crucible to ensure only the clean metal enters the mould.
THE CASTING TREE
Straight out of a sand mould, the casting tree will be cut off for recycling and the casts cleaned up. They will be cut off using an angle grinder. Once all the chasing (filing, sanding etc) has been done on the cast, it is then sandblasted to clean the surface prior to patination, and also any remnants of the mould are removed.
80 MAKING MODERN ART MEDALS ↑
→
THE FOUNDRY EXPERIENCE, RODDY MATHIESON
81
THE FINISHED PRODUCT
This medal has been patinated with liver of sulphur, applied with a paintbrush and gas torch. The sulphur reacts with the copper in the bronze and creates a brown patina. This is the most commonly used, as it also serves as a base coat for colours to be applied on top, and produces a classic brown and gold effect, where the surface has been rubbed back with steel wool to reveal the bronze and highlight the details.
Linda Crook’s finished and patinated medal for the Royal Society of Literature was cast, finished and patinated by Roddy Mathieson. (Real size of medal: 86mm)
82 MAKING MODERN ART MEDALS ↑
THE FOUNDRY EXPERIENCE, RODDY MATHIESON
83
ABOUT THE ARTISTS
84 MAKING MODERN ART MEDALS MAKING
PHILIP BOOTH
Philip Booth is a member of the Royal Society of Sculptors. He was senior lecturer at Falmouth School of Art from 19802002. From 1995-97 he was visiting professor of sculpture at Nagoya University of Arts, Japan; from 2002-2010 he was professor of design at Nagoya, where he is Emeritus Professor. He has exhibited widely in Japan and the uk, and continues with regular solo shows as well as contributing to major national open exhibitions. philbooth.co.uk
ABIGAIL BURT
Abigail Burt graduated from Falmouth University and received an MA from the Royal College of Art. She uses sculpture to engage with social and environmental agendas, curating public participatory projects around material process and storytelling. She activates her portable foundry for artist-led projects, and continues to develop sustainable practices. She was a Churchill Fellow and has taught in the foundry at Chelsea College of Art & Design. abigailburt.co.uk
@abigailburt
JULIAN CROSS
Julian Cross is an entirely self-taught artist working in many media including bronze and precious metals, using diverse techniques such as plaster-relief carving, sculpting and metalwork. Forty years of experience in the creative field to a high level of skill has led to his work being much in demand. He is a freeman of the Worshipful Company of Goldsmiths. He is President of the British Art Medal Society.
juliancross.com
info@juliancross.com
85
ABOUT THE ARTISTS
SARAH DAVIS
Sarah Davis is a multimedia artist using hands-on sculptural techniques to explore the cyclical nature of recovery and renewal. She uses traditional approaches with a deep historical resonance, such as wood carving, wax modelling and bronze casting. In 2012 she graduated from Chelsea College of Art & Design, and returned to education in 2015 to study at the City & Guilds of London Art School, where she now teaches woodcarving and conservation. She has twice received recognition for her work as a wax modeller at the Goldsmiths’ Craft & Design Council Awards.
sarahgdavis.co.uk
@sarahdavisartist
RODDY MATHIESON
Roddy Mathieson teaches at Duncan of Jordanstone College of Art and Design, University of Dundee, in the foundry, using his expertise for medals and for larger works. His Mobile Foundry is involved with public art projects, especially in Scotland, where he feels it is important that local people have a say in art that will have a visual impact on their lives. He also makes medals, and they often have a political content. In 2022 he received the Marsh Award for the Encouragement of Medallic Art.
@themobilefoundry
@djcadfoundry
86
MAKING MODERN ART MEDALS
DANUTA SOLOWIEJ
Danuta Solowiej completed her masters degree in sculpture at the Fine Arts Academy in Warsaw, specialising in medallic art. She came to London in 1987, and became a visiting lecturer at the Royal College of Art for over two decades. Exhibiting, teaching or making are important to her, but in no particular order of preference, as she finds that they influence and nurture each other. She has exhibited in the uk and internationally and received the Marsh Award for the Encouragement of Medallic Art in 2023. She is a freeman of the Worshipful Company of Goldsmiths.
@danutasolowiej
THE EDITOR
Marcy Leavitt Bourne, is an art historian and writer, specialising in modern art medals; she is a Secretary of the British Art Medal Society and Director of the BAMS Student Medal Project.
87
ABOUT THE ARTISTS
88 MAKING MODERN ART MEDALS
BIBLIOGRAPHY
BIBLIOGRAPHY
MAKING
Hughes, Richard and Michael Rowe (1991). The Colouring, Bronzing and Patination of Metals: A Manual for Fine Metalworkers, Sculptors and Designers. Thames and Hudson Ltd.
Hurst, Steve (1996). Metal Casting: Appropriate Technology in the Small Foundry. Intermediate Technology Publications.
Langland, Tuck (1999). From Clay to Bronze: A Studio Guide to Figurative Sculpture. Brand: Watson-Guptill.
HISTORY
Attwood, Philip (1992). Artistic Circles: The Medal in Britain
1880-1918. British Museum Press, 1992.
Attwood, Philip (2002). British Art Medals. British Art Medal Trust.
Jones, Mark (1979). Contemporary British Medals. British Museum Publications.
Jones, Mark (1979). The Art of the Medal. British Museum Publications Ltd.
Leavitt Bourne, Marcy and Melanie Vandenbrouk Przybylski (2012). The New Medallists. British Art Medal Trust.
89
ACKNOWLEDGEMENTS
Many thanks are due for the creation of Making Modern Art Medals:
In particular the Worshipful Company of Goldsmiths and the Goldsmiths’ Centre, where dedication to the teaching and continuation of creative skills is paramount; their grant has made this publication possible.
To all the artists who participated, not only writing each piece but being on hand to answer questions from an editor who is a writer not a maker.
The Worshipful Company of Founders, for years of support and focus on foundry skills.
Everyone at the British Art Medal Society, always encouraging and enthusiastic.
Teddy Bourne, without whose computer skills and patience this would just be blank pages.
90 MAKING MODERN ART MEDALS
91
MAkING MODERN ART MEDALS –
A Rough Guide for Artistic Journeys – is a brief introduction to the skills of making modern art medals. It is related to those ‘rough guides’ for travel in that it is about exploration, giving you suggestions for directions that you might take on artistic journeys, and practical ideas on how to make them. It is planned for you to discover and experiment with how art medals can be made.