37 minute read
6 Directory of Suppliers


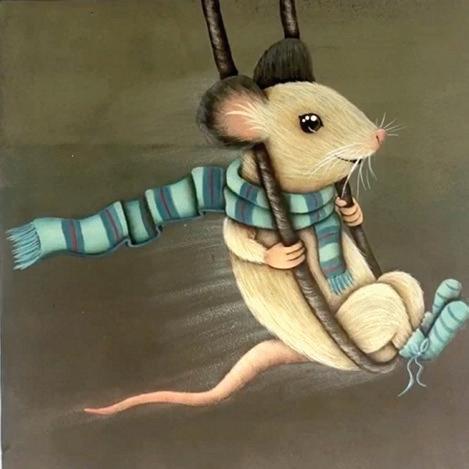
that way it will offer more similarity of a natural fur. It is a way to avoid a flat basecoat on the first layer of your animal painting. With a bristle Filbert brush, add 2 layers of Honey Brown following the fur direction. Then, with the same brush add 1 layer of Antique Gold then Antique White. (Image 1,2,3) Now with a Rake brush and Antique White add 2 layers of fur. (Following the same direction as the previous strokes). With a Liner brush and Antique White add 1 layer of fur. With an angle brush and Honey Brown, shade the leg, arm, scarf, and vine. Repeat this shading with Burnt Umber and Soft Black. (Image 4,5,6) We will need one more layer of fur but let us save that until the end as a final touch to the fur.
Image 1
EARS:
With a bristle brush add 2 layers of Grey Sky. Dry brush the ear center with Peaches ‘n Cream then Watermelon Slice. Dry brush the ears edge with Charcoal Grey. The last layer will be with a liner brush to add some dark fur leaving some loose hairs on the ear’s tips. Shade the ear that is behind the head with Soft Black. (Image 3,5,7)
Image 2
HANDS AND TAIL:
Basecoat the tail and hands with Peaches ‘n Cream. Shade one side of each finger with Charcoal Grey then Soft Black. Highlight the other side with Buttermilk. Then shade with Soft black the tips of the fingers. For the tail, using a crescent brush and dry brush technique, let us add some “C” strokes to get the round shape of the tail. On top use Buttermilk and the bottom use Charcoal Grey. After it is dry, shade the tail tip with Watermelon Slice and the beginning of the tail (close to the body) with Charcoal Grey then Soft Black. (Image 8,9,10)
Image 3
Image 4
SCARF:
Basecoat with Sea Glass. Shade all scarf and folds with Laguna. Add some large stripes using a shader brush with Teal Green and a center thin stripe with Watermelon Slice using a liner brush. Shade with Teal Green on the darker areas (on
Image 5 Image 6
Image 7
Image 8
Image 9
Image 10
Image 11

Image 15
Image 12

Image 13


Image 14 Image 16


Image 17


Image 18 each fold and the bottom of the scarf). For the overlay shadows, add some Soft Black. On the bottom line of the flying scarf with a liner brush, add a contour line with Teal Green + Soft Black following the movement of the scarf. Highlight all folds with Teal Green + Buttermilk. (Image 11,12,13,14,15)
SOCKS:
Basecoat with Sea Glass. Shade with Laguna. Add some stripes with Teal Green. Shade with Teal Green the bottom of the front sock and the overlay shadow of the back sock. Shade the ankle area with same color simulating some wrinkles of the fabric. Then add some Soft Black. Highlight the top of each sock with Buttermilk. The cord tie is Teal Green then add some highlights with Buttermilk. (Image 16,17, 18)
VINE:
Basecoat is Burnt Umber. Using a small crescent brush and the previous “C” strokes to get the round shape of the Vine. On the light side use Buttermilk on the left side use Soft Black. Then shade the all dark side with Soft Black. (Image 10)
FINAL FUR LAYER:
With a liner brush and Buttermilk, add a fur layer focusing on loose hairs. For the loose hair to pop-up let them reach a little of the shadowed areas. Inside of the front ear add some bigger hairs. If your mouse looks too white you can
add a glazing with Honey Brown. (Image 7,15,18)
FACE:
Dry brush the eye area with Honey Brown. Basecoat the eye with Soft Black. Highlight with Titanium White. Shade the tip of the nose with Peaches ‘n Cream and highlight with Titanium White. For the nostril add just a little line with Soft Black. The mouth line is Soft Black. The whiskers are Titanium White. (Image 7) With all elements done you can shade the outside edges of the vine with Soft Black except on the hands that are holding the vine. (Image 10) Final Touch is the “Flying Effect”. Dry brush with a Crescent brush and Buttermilk, add some irregular stripes following the movement of the swing. Then with a liner brush add some random lines. (flying effect1.jpg)
Image 19
Final image
FINISHING:
Just Add a layer of Varnish Spray.
A SUGGESTION:
You can add some DecoArt® Glamour Dust on the “Flying Effect” area.

Enlarge or decrease the pattern size to fit the surface of your choice.

Note to reproduction companies/stores: The bearer of the original color magazine has full rights to have this drawing reproduced and enlarged one time for personal use. This notice has been printed in red ink for verification of authenticity.
Free Kisses
by Leslie Smith
This affectionate gnome is not your typical panhandler. He is giving stuff away. His design is simple and can be painted quickly for Christmas, Valentines’ Day, or every day.
I love to paint. It does not matter if my hand is holding a brush, acrylics, oils or watercolors. I also love pen and ink, pastels, charcoal, and pencils. I live in a tropical paradise and I get to play at being an artist. How could life be better?
SUPPLIES:
SURFACE:
The gnome is approximately 5” wide and 9 1/2” tall. He is shown on two panels approximately 6”X10” and a wall pocket (to hold chocolate kisses). The wall pocket is a repurposed spoon rack (minus a few parts) found at a tag sale. The inside (painting surface) of the wall pocket is about 6” wide and 17” tall.
PAINTS: DecoArt® Americana:
• Antique Maroon DA160 • Avocado DA052 • Buttermilk DA03 • Burnt Sienna DA063 • Burnt Umber DA64 • Fawn DA242 • Lamp Black DA067 • Mocha DA060 • Neutral Grey DA095 • Purple Petal DA378 • Raw Sienna DA093 • True Red DA129
MEDIUMS/OTHER PRODUCTS:
DecoArt® Americana Multi-purpose Sealer DS-17 DecoArt® Americana Soft Touch Varnish DS-123
BRUSHES: Dynasty® Black Gold
• Round sizes 4-6 206R • Flat 3/4” 20FW • Flat size 10 206S • Long Liner size 0 206SL
MISCELLANEOUS SUPPLIES:
• Fine grit sandpaper • Transfer paper, stylus, etc. • General’s® White Charcoal Pencil • Clear ruler Palette Water container Any other standard painting supplies Chocolate
PREPARATION:
Sand gently in the direction of the wood grain. Seal all surfaces with DecoArt® Americana Multipurpose sealer. Once dry, apply a base coat of Lamp Black. Adjust the line drawing to fit your surface and planned variation of the design. A size conversion chart is provided.
PAINTING INSTRUCTIONS:
NOSE, MOUTH, HAND, AND FEET: Helpful Tip:
Our gnome is a fun characterization and not intended to be realistic. Use the size brush that is comfortable for you to paint the black background. Leave gaps in your painting to allow the black to provide shadows and outlines. His hand is a perfect example of both. His skin is painted very simply. Base coat his nose with Mocha, using a round brush. Use the size that is comfortable for you. It is important to keep his nose a perfectly shaped and centered oval. Shade with a crescent of Burnt Sienna along painters’ left side from about 12 o’clock to 5 o’clock. Highlight the upper right quarter with an oval Buttermilk. His mouth is base coated with Burnt Sienna; and highlighted with Mocha. It should be centered directly beneath his nose; the shape of the left and right sides should match.
The center (opening of his mouth) is Lamp Black. His hands and feet are also base coated with Burnt Sienna and highlighted with Mocha. Shade along the bottom of his hand and toes with a wash of Burnt Sienna. Add a few vertical lines of Burnt Sienna to hint at his knuckles and cuticles. His toenails are a hint: only a thin curved line across the top of his toes with Buttermilk. Wash the top of his feet with diluted Lamp Black to create the shadow from the hem of his robe.
Helpful Tip or Hint:
Antique Maroon is opaque; True Red is transparent. The maroon is opaque and will help the red show against the black background. If you choose to use other paints, be sure to check them for opacity and transparency. https://decoart. com/resources/Americana_Opacity_Chart.pdf.
HAT AND ROBE:
Base coat his hat and robe with Antique Maroon, using the size 10 flat. Add lighter areas to his robe with True Red. Use multiple or thicker coats of True Red to build brightness. Wash the edges of his robe and hat with diluted Lamp Black.
Helpful Tip or Hint:
An interim protective coat of Soft Touch varnish, applied before painting his beard, will make it easier to wash away mistakes (assuming the paint is still somewhat wet.). I would also suggest this before doing the lettering on the sign. You do not have to cover the entire painting - just the area that you want to be able to wash off easily.
BEARD:
Using the long liner and Neutral Grey, start the strokes that make up his beard. Lay the brush tip down outside the beard’s outline on the black background or sign and work inward towards his nose. Draw graceful curves, reducing the pressure on the brush as it moves. Do a stroke on the right and then a matching (but opposite) stroke on the left. Repeat until his beard is evenly covered about halfway and still about half of the background. His mustache is tiny strokes of Storm Grey. Repeat with Buttermilk, but a bit more sparsely. Each layer of his beard should follow the same angle and curves that were established by the first Storm Grey strands. There should still be considerable black background showing. His mustache is not painted with the Buttermilk nor Snow White, but while you have fresh Buttermilk on your palette, highlight his upper lip with some tiny, tiny strokes of Buttermilk. Repeat his beard one last time with Snow White, again not touching his mustache. Let dry. Clean up the edge of his beard, using the background paint Lamp Black. Keep the shape of his beard symmetric and centered on his nose. Fix (repaint) background in the area where the cardboard will sit. Compare your beard to the beard in the samples. Add more strands, if needed. You can also “unpaint,” adding strokes with Lamp Black. Wash about his mouth with diluted Lamp Black if your beard’s brightness is detracting from his smooching lips.
Helpful Tip or Hint:
The lettering is supposed to simulate a handwritten note on a piece of torn, discarded cardboard. It should be done freehand. Bad handwriting is an asset.
CARDBOARD SIGN:
Load the flat brush with Fawn. Starting at either side of the cardboard, dry brush streaks of paints towards the fold in the center. Let lots of background show, especially along the fold. Repeat with Buttermilk, but only covering a small portion of the sign. Wash the sign with diluted Raw Sienna. Let dry. If needed, retrace the torn edge and flip of the cardboard. Wash the flip and shadow beneath the flip with diluted Lamp Black. Highlight the torn edge with a thin line of Buttermilk. The flipped edge is highlighted with a triangle of Buttermilk. Let dry. Wash his beard along the top of the sign with a thin line of diluted black to create shadows. Sketch in the lettering. Paint with Lamp Black and round brush.
TINTS AND REFLECTED LIGHTS
Dry brush Avocado along the left side of his hat and robe. Dry brush Purple Petal along the right side of his hat and robe. There is a thin arc of the green mix along the very edge of the painters left of his nose.

MISTLETOE (OPTIONAL):
Be sure that the area beneath the tip of his hat is dark. Wash with diluted Lamp Black, if not. The mistletoe is three comma strokes, made with round brush and Avocado Green. Overstroke the leaf tips with a 1:1 mix of Avocado and Buttermilk. Attach the mistletoe to his hat with a tendril of the mix. The berries are Snow White “dippy dots,” made with a stylus.
CARDINAL (OPTIONAL):
Position cardinal where he sits well and transfer. As a second option, you can connect the gnome and cardinal with some hearts, falling along a graceful arched line. They decrease in size as they fall. This largely depends upon the size and shape of your painting surface. Base coat the hearts, cardinal’s head, and body with Antique Maroon and the round brush. Paint (or leave) the line in the center of his body (curved and off center) with Lamp Black. Highlight his body and head with True Red, his tail is also True Red, but not as bright. Paint (or leave) his mask with Lamp Black. His top beak is Raw Sienna, his lower beak is Burnt Sienna. His eye is Storm Grey with the tiniest dot of Lamp Black; use a stylus. There is a tiny Buttermilk highlight along the top of his beak, painted with the fine liner. His wings are also painted with the liner and in the same manner as his beard, with these differences: The brush is first loaded with Antique Maroon and then tipped in True Red. The brush has more paint and pressure, making the strokes wider. The strokes or feathers are side by side - not on top of one another. The edges of his wing and tail are not cleaned up; this means that each stroke has a rounded tip. The trim on the wall pocket was painted with DecoArt® Americana Decor in Silver. The area about the cardinal and hearts was spattered with a super fine dusting of silver.
FINISHING:
Sign your name when pleased. Protect with two coats of Duraclear® Sure Touch Varnish. Eat any remaining chocolate!
Enlarge or decrease the pattern size to fit the surface of your choice.

Note to reproduction companies/stores: The bearer of the original color magazine has full rights to have this drawing reproduced and enlarged one time for personal use. This notice has been printed in red ink for verification of authenticity.
Poinsettia Holiday
By Ursula Wollenberg

The poinsettia is the December birth flower, representing wishes of mirth and celebration. I chose fluid acrylics to give this painting a beautiful, soft watercolor appearance.
SUPPLIES
SURFACE:
• 8 x 10 Canvas Board
BRUSHES:
• 3/4 Faux Kolinsky -1114 by Dynasty® • 1/4 7000-WCF by Dynasty® • #2 Black Gold by Dynasty® 206R • 1/2 Finesse™ by Kingart™ • 8550A 1/2 Aqua Wash by Kingart™
PAINTS: Fluid Acrylics: DecoArt®
• Cerulean Blue • Paynes Grey • Quinacridone Burnt Orange • Quinacridone Magenta • Sap Green • Titanium White • DecoArt® Traditions: • Permanent Alizarin Crimson • Hansa Yellow
Golden® Artist Colors:
• Light Magenta
MISCELLANEOUS SUPPLIES:
• Derwent® Inktense Pencil Crimson 0530 (optional) • DecoArt ®Traditions Extender Blending
Medium • Water Basin • Paper Towels • Graphite Paper and Tracing Paper • Palette Knife • Gamblin® Gamvar Matte Varnish
LET US BEGIN:
Transfer pattern to surface of choice. I used a canvas board, but this would work on any surface. I drew my pattern in with a Derwent® Intense Pencil. Begin by adding a light coat of DecoArt® Traditions Extender Blending Medium to the background. Using Cerulean Blue and Prussian Blue, apply both colors to the background, lighter at the top, darker at the bottom. Do not worry about seeing brush strokes or if paint bleeds into another area of the design. Add a small amount of Quinacridone Magenta here and there. Dab the area with a clean paper towel. Splatter with the same and allow to dry.
BASECOAT:
Basecoat under petals with Burnt Orange. The top five smaller petals, with Light Magenta and leaves with Sap Green. Allow to dry.
PETALS:
Shade under larger petals with Permanent Alizarin Crimson. Shade smaller, upper petals with a brush mix of Light Magenta and Permanent Alizarin Crimson. Highlight under petals with Permanent Alizarin Crimson and smaller petals with a brush mix of Titanium White and Light Magenta.
HINT:
I like to moisten the brush with extender as I work and blend colors, using a moist (not wet) brush. Glaze Hansa Yellow on all upper petals, here and there on larger petals and into the background. (See photo) While moist, continue with shading the deepest areas with a mix (equal parts) Cerulean Blue and Quinacridone Magenta. Repeat until satisfied. Hint: Stay loose and do not worry about colors running together. This just adds to the overall watercolor affect.


Mix a small amount of Light Magenta and Titanium White on your palette. With a palette knife, scrape this mixture onto the lightest areas of petals for added texture. (See photo)
LEAVES:
Shade leaves with Sap Green. Add a few Sap Green leaves lightly into the background to almost see them. Highlight leaves with Hansa Yellow. Wash a small amount of Quinacridone Burnt Orange into the leaves. Let all dry.


FINISHING TOUCHES:
With a large brush, coat the entire canvas with Extender. Shade the very darkest areas with Paynes Grey. There may be some bleeding. Dab

off what you do not want with a paper towel. Mix equal parts of Hansa Yellow and Titanium White and add yellow centers with a liner brush. Add tints of this mixture to highlighted areas of the design, both petals and leaves. Add Cerulean Blue here and there on the design. No worries, just adding washes of color bring the painting together. Add a wash of Quinacridone Magenta to edges of canvas and dab with paper towel if necessary. Splatter background with colors left on the canvas. When all is dry, varnish with Gamblin® Gamvar Matte Varnish.
Enjoy!
Enlarge or decrease the pattern size to fit the surface of your choice.

Note to reproduction companies/stores: The bearer of the original color magazine has full rights to have this drawing reproduced and enlarged one time for personal use. This notice has been printed in red ink for verification of authenticity.

3-Time Santa by Marika Moretti
Dear Painting World Magazine’s readers, thank you for painting this design with me! Our imagination has no limit and we have endless ways to be creative! This is the main concept of this design: you have one drawing and three different ways to paint it, so you can practice with three different techniques… stencils, stamps, paper, textured paste and much more! If you like this idea, check out my website because there are more “3-Time” designs! Have fun!
Dear painting Friends, My name is Marika, I am 37 years old and I live in Bologna, Italy. My adventure with painting began more than 10 years ago… I had never taken a brush in my hands at that time, but when I started, it was love at first sight and I never stopped since then! During the years, I also had the chance to take many classes with American artists, amazing and talented teachers who helped me improving my painting skills and developing my own style and, in the end… becoming myself a designer! I started creating my own designs in 2016 and I really love it! I also have been teaching during the years, even if I continue to consider myself as a student, because you never stop learning, from others, but especially from yourself, from your mistakes… or better from your creative attempts! If you want to have a look to what I am up to, you can come and visit my new website, where you can find all my Decorative Painting designs and some extras, such as Home Décor ideas and Texture Painting. I also have a YouTube channel with many tutorials (in English too!) and I am working to add more! You can also find me on social media like Facebook and Instagram, where I also host LIVE demos or LIVE chats to talk about new products or new things you would like to see. Painting and creativity are a journey… and every journey begins with a single step! So, always paint with happiness, practice a lot, try to learn as much as you can from others, but remember... you are the best teacher of yourself!
SUPPLIES:
SURFACE:
• These are three square surfaces that I personally designed (approx. 6,7”x6,7”).
You can find them at Pinecraft Inc. (https:// pinecraftinc.com/collections/marika-moretti), but the design can also be easily adapted to any another surface.
PAINTS: DecoArt® Americana:
• Antique White DA058 • Antique Rose DA156 • Avocado Dip DA254 (or Olive Green DA56) • Black Plum DA172 • Burnt Sienna DA063 • Country Red DA018 • Dark Chocolate DA065 • Hauser Dark Green DA133 • Hauser Medium Green DA132 • Heritage Brick DA219 • Graphite DA161 • Khaki Tan DA173 • Lamp Black DA067 • Light Buttermilk DA164 • Mocha DA60 • Neons Fiery Red DHS4 • Snow (Titanium) White DA01 • Soft Black DA155 • Zinc DA304 • Mediums/Other Products by Company Name: • DecoArt® Americana Decoupage Glue DS106 • DecoArt® Americana Multi-Purpose Sealer
DS17 • DecoArt® Media Decorative Paste DMM21 • DecoArt® Metallics Festive Green DA261 • DecoAr®t Metallics Champagne Gold DA202
Windsor & Newton® oil paint
• Burnt Umber
BRUSHES BY COMPANY NAME:
• Dynasty® - Black Gold 206 FW Shader: ¾”, ½”, ¼” • Dynasty ®- Black Gold Round 206L: #1, 2 • Dynasty® - Black Gold Filbert 206FIL (for basecoating): #4, 6, 8 • Dynasty® - Black Gold Liner 10/0 and Mini
Liner 20/0 • Dynasty® - Mezzaluna: Medium • Dynasty® – Stencil Brush Pro ½” (or a make-up sponge) • Loew Cornelle® - Maxine Mop: ¾”, ½”, ¼” • Princeton® – Deerfoot Stippler 1/8” • Flat 1” (any brand) • An old flat brush (for the glue)
MISCELLANEOUS SUPPLIES:
• Paper towels • Paper palette • Transfer paper • Graphite paper (black and white) • Brush cleaning basin • Stylus • Sanding pad (medium and fine) • Super film • Palette knife • A couple of old fabric pieces (I cut an old
T-shirt and it works great!) • Stencil Tim Holtz® – Mini Stencil Set n.19 • Tim Holtz® Ideaology Paper - Tissue Wrap
Mélange • Stamp with old calligraphy (any brand) • Linseed oil • DecoArt® Americana Decoupage glue
HELPFUL TIP OR HINT:
I am sure that some of you have already used stamps and stencils, so there’s not too much to say here, the only suggestion I want to give you is “be gentle with stencils and be fast with stamps”! There are two tutorials on my YouTube channel if you want to have a look! About paper: Be sure you apply one or two coats of glue on the paper once it’s well fixed on the surface. This allows you to paint on the paper without damaging it, just make sure not to use too much water when painting on paper, otherwise it may lift a little.
PREPARATION:
Sand the entire surface and clean with a tack cloth. Seal the surface with DecoArt® MultiPurpose Sealer (optional) and let dry. Sand again and wipe away any remaining dust. Basecoat the surfaces with Lamp Black. After basecoating, I suggest you lightly sand the surface with Superfilm or an extremely fine sanding pad before shading/highlighting (do not sand on the paper though).
SANTA ON STENCIL:
Apply the stencil decoration with Metallics Festive Green and your stencil brush. (See tutorial on my YouTube Channel – Marika Moretti Designs – if you want to have a look).
SANTA ON STAMP:
Apply the decoration with the stamp using Khaki Tan + Champagne Gold. (See tutorial on my YouTube Channel – Marika Moretti Designs – if you want to have a look).
SANTA ON PAPER:
Cut the paper according to the measures of your surface and glue it on using the DecoArt® Americana Decoupage glue and old brush. When dry, apply one or two coats of glue on the paper. Transfer the main guidelines of all Santas.
PAINTING INSTRUCTIONS:
Santa’s face (stamped and stenciled background): basecoat with Mocha. Drybrush center of face with Light Buttermilk. Shade under fur and lightly coming down the sides with Burnt Sienna. Shade lightly, also, behind nose with the same color. Float the cheeks with Antique Rose (if you do not have it, just mix Antique White and Heritage Brick or Country Red).

SANTA ON STENCIL
Face details: Paint eyes with Lamp Black, highlight dots with Light Buttermilk. Add eyebrows with Light Buttermilk (press on your liner or round to make them thick). When dry, add woodgrains and outline with Lamp Black. Add the nose with a big dot of Country Red using the back of a brush handle. Shade the bottom with Black Plum and highlight the top with Neons Fiery Red. Hat: Basecoat with Heritage Brick. Shade with Soft Black: behind fur and coming up a little on the left corner, behind fur on right side and to make the hat folding and behind pom pom. Highlight by drybrushing with Neons Fiery Red. Wooden boards hair, beard, and mustache: Basecoat with Light Buttermilk. Lightly shade with Soft Black to separate the wooden boards. Shade with Zinc, then deepen with Graphite: on hair (under hat, lightly next to face – only first color here, behind beard and mustache); on beard (under mustache) and on mustache (to separate the two sections). Lightly highlight with Snow White if needed: sides of hair, tips of mustache and bottom of beard. Add woodgrain to separate wooden boards and some also on each board with Lamp Black. Wooden leaves and berries: Basecoat leaves with Hauser Medium Green. Shade bottom with Hauser Dark Green and highlight top with Avocado Dip. Outline and add woodgrains with Lamp Black. Add berries, with a mix of Country Red and Neons Fiery Red, using your stylus. Textured fur and pom pom: Mix some Antique White with the Decorative Paste until you get a creamy texture (more or less like pudding) and apply this mix on fur and pom pom using a #4 filbert and small strokes so that you can get a nice texture. When the paste is completely dry, shade sides of fur and bottom of pom pom with Dark Chocolate. Repeat if necessary. Highlight center of fur and top of pom pom with Snow White.
SANTA ON PAPER
When I paint on paper, I prefer not to basecoat in the traditional way, because I would lose the decoration that is on the paper. So, I prefer to basecoat with large floats or with a wash, because I still can see the paper decoration underneath. Face: Basecoat by floating all around the edges with Mocha. Doing so, you have a lighter tone in the center and that is your highlight area. Shade under fur and lightly coming down the sides with Burnt Sienna. Shade lightly also behind nose with the same color. Float the cheeks with Antique Rose (or the previous mix). Face details: Paint eyes with Lamp Black, highlight dots with Light Buttermilk. Add eyebrows with Light Buttermilk (use a liner for this). Paint the nose as before. Hat: Basecoat with a wash of Country Red. Mop to soften. Shade with Heritage Brick, then deepen with Black Plum: behind fur and coming up a little on the left corner, behind fur on right side and to make the hat folding and behind pom pom. Highlight by floating with Neons Fiery Red. Hair, beard, and mustache: Since the paper is white already, there is no need to basecoat! Lightly shade with Zinc, then, deepen with Graphite: on hair (under hat, lightly next to face – only first color here, behind beard and mustache); on beard (under mustache) and on mustache (to
separate the two sections). Lightly highlight with Snow White: sides of hair, tips of mustache and bottom of beard.
Leaves and
berries: Add thin twigs with Dark Chocolate. Add pine needles with your liner using Hauser Dark Green, Hauser Medium Green, and then with Avocado Dip. Add berries with a mix of Country Red and Neons Fiery Red, using your stylus. Fur and pom pom: Shade sides of fur and bottom of pom pom with Dark Chocolate. Repeat if necessary. Highlight top of pom pom and center of fur with Snow White (back to back float on center of fur). Add wavy stitches with Lamp Black.

SANTA ON STAMP
Face details: Paint eyes with Lamp Black, highlight dots with Light Buttermilk. Add eyebrows by dabbing with Light Buttermilk. Paint the nose as before. Hat: Basecoat with Country Red. Shade with Black Plum, then deepen with Soft Black: behind fur and coming up a little on the left corner, behind fur on right side and to make the hat folding and behind pom pom. Highlight by drybrushing with Neons Fiery Red. Hair, beard, and mustache: Basecoat with Lamp Black to cover the stamp decoration. Start adding thin lines using your liner and the colors in this order: Zinc, Light Buttermilk (twice). Shade with Zinc, then deepen with Graphite: on hair (under hat, lightly next to face – only first color here, behind beard and mustache); on beard (under mustache) and on mustache (to separate the two sections). Add some thinner lines with Snow White to highlight sides of hair, tips of mustache and bottom of beard.
Leaves and berries:
Basecoat leaves with Hauser Dark Green. Highlight center of each leaf with small touches of Hauser Medium Green and then with Avocado Dip. Outline and add central vein with Avocado Dip. Add berries with a mix of Country Red and Neons Fiery Red, using your stylus. Fur and pom pom: Basecoat by stippling with Dark Chocolate. When dry, stipple with Antique White, leaving some basecoat color showing. While still wet, stipple Light Buttermilk, covering a smaller area, and then Snow White only in the center of fur and top of pom pom to highlight. Shade sides of fur and bottom of pom pom with Dark Chocolate. Repeat if necessary. (I have another video on my YouTube channel for this – Marika Moretti Designs).

FINAL TOUCHES
Outline where needed with Lamp Black. I love antiquing my pieces!!! You do not have to if you don’t like it, but I think antiquing gives a warmer touch to the whole project and makes it more uniform. I take a piece of old fabric (a piece of an old T-Shirt is perfect), take some linseed oil and touch it in some Burnt Umber oil paint. Then I start rubbing on the surface until I get the effect that I like. I hope you liked painting this design and you will have a wonderful holiday season! Marika

Enlarge or decrease the pattern size to fit the surface of your choice.
Note to reproduction companies/stores: The bearer of the original color magazine has full rights to have this drawing reproduced and enlarged one time for personal use. This notice has been printed in red ink for verification of authenticity.
Season’s Greetings from The Cotton Tree Farm!

by Debbie Cotton
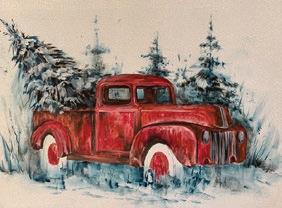
Enjoy painting my loose style design from start to finish. Learn to paint this rusty old pickup truck with ease, blending colors wet on wet. Distress the tin sign for the vintage appearance but also add sparkles of Glitter! Who would have thought how well they work together!
As an instructor of the arts, Debbie Cotton is a well-known artist within the decorative painting industry. She has developed her own unique and distinct style that is easily identified in her published works. She has a natural ability to paint and design and offers classes that lean towards a relaxed and informative learning environment. Debbie enjoys traveling to conventions, seminars, and local events where she shares her knowledge and love for painting, inspiring others to create and enjoy the wonderful world of art.
SUPPLIES:
SURFACE:
• 12 ½ x 9 ½ Simply-Cotton Tin Sign available from Debbie Cotton
PAINT: DecoArt ®Americana Acrylic Paint:
• Burnt Orange DA016 • Charcoal Grey DA088 • Coral Blush DA292 • Heritage Brick DA219 • Lamp Black DA067 • Prussian Blue DA138 • Snow (Titanium) White DA01 • Tuscan Red DA265
DecoArt® Galaxy Glitter:
• Clear Ice Comet DGG18 • Milky Way Blue DGG05 • Red Nebula DGG04
MEDIUMS:
• DecoArt® Americana Acrylic Sealer / Finisher
DAS13
DS17 • Winsor & Newton® Oil Color: • Burnt Umber #076 • Ivory Black #331 • Odorless thinner of choice
BRUSHES: Royal Langnickel®:
• 1” Zen Wash (Z73W-1”) XL Royal Bobbie’s Blender Mop (RBobbie-XLG) 5/0 Liner (R2595-5/0) 12 Short Shader (R4150S – 12) 4 & 8 Filbert R4170-4 & 8) 3/8” Moderna M77TC-3/8” ½” Deerfoot (660-1/2”)
MISCELLANEOUS SUPPLIES:
• Paper towel • Lint free rag for antiquing • Sponge roller • Water container
Helpful Tip: Painting wet on wet can be a simple and very effective technique. This refers to blending of one color into another while the colors are still wet. It helps to achieve instant results and works great to paint the rusty old truck. Load your brush into basecoat color and apply to your painting surface. While wet, pinch wipe your brush to • DecoArt® Americana Multi-Purpose Sealer
remove excess paint, pick up next color and blend. Work in sections at a time to ensure paint is wet to easily blend.
PREPARATION:
Wipe the tin sign with a mix of water and vinegar (1:1). Rinse with clear water and let dry. Basecoat the tin sign using the sponge roller with MultiPurpose Sealer + Titanium White (2:1). When dry, lightly sand and wipe to remove dust. Rebase with two coats of Titanium White with no sealer added, allowing adequate drying time between applications. Trace the pattern and transfer the main pattern lines and details as needed.
PAINT INSTRUCTIONS:
Ground: (see fig 1) Use the 1” Wash to set in the loose style ground with Prussian Blue. Wet the surface slightly with water, apply loose and choppy side-load floats, mop to soften here and there if needed. Switch to the 12 Short Shader as needed and pull up suggested grass using the chisel edge. Notice there is still Titanium White background showing through here and there creating the snow. As you work and build your colors, keep it a little darker under the truck and here and there near the tires. (fig 2) Deepen the ground here and there with a brush mix of Prussian Blue + Lamp Black. Use the 5/0 Liner to pull strands of grass. Use the 4 Filbert to tap in Titanium White Snow. Background: (fig 1) Use the 1” Wash to loosely shade Prussian Blue behind the truck. Wet the surface and mop to soften if needed. Make sure you tap some color in behind the windows. Allow to dry and deepen slightly here and there with a brush mix of Prussian Blue + Lamp Black. Use the chisel edge of the 3/8” Moderna to suggest the evergreens. Notice these are slightly lighter in color compared to the main evergreen in the truck so slightly thin the paint and tap the brush off on paper towel to remove the excess paint. Use the tip of the ½” Deerfoot to slightly fill in a little more color if needed. (fig 2) Deepen evergreens further using the same technique with a brush mix of Prussian Blue + Lamp Black. Switch to the 5/0 Liner and apply a few suggested needles here and there. Use the same brush to apply some suggested grass strands or foliage starting with Prussian Blue Hue and deepened here and there with the brush mix of Prussian Blue + Lamp Black. Truck: (fig 1) Use the 4 Filbert to paint the truck. Switch to the 8 Filbert as needed. This truck is painted to appear old and rusty so you can leave a small amount of the Titanium White background showing through here and there. Work each section at a time, blending colors wet on wet. Slightly thin the paint if needed. Notice that the paint is pulled in the direction of the section you are working on. (ie) the fenders are rounded so pull the paint into the shape. Start with Heritage Brick and while wet, using a dirty brush, pick up a small amount of Charcoal Grey to deepen and Tuscan Red to brighten. Use the 4 Filbert to paint the inside cab of the truck with Charcoal Grey. While wet, deepen here and there with Lamp Black, especially around the outside edges where it meets the red part of the truck. Allow to dry. Use the 5/0 Liner to apply the Lamp Black steering wheel. Windshield: Use the 10 Short Shader to loosely float and chisel with Titanium White. Allow to dry. Apply another application if needed. (fig 2) Use the 12 Short Shader to loosely float and chisel suggested rust with Charcoal Grey. Deepen here and there with a brush mix of Charcoal Grey + Lamp Black. Using the same technique brighten, areas with Tuscan Red. Allow to dry and brighten further using a brush mix of Coral + Titanium White. Use the 5/0 liner to apply suggested trim above the windows and along the


side of the truck with a brush mix of Coral + Titanium White (fig 2) Use the 4 Filbert to paint the running board with Charcoal Grey. While wet, blend through Lamp Black at both ends where it meets the truck and a small amount of Burnt Orange more thru the middle. Front Grill Hood molding & Headlights: (fig 2) Use the 4 Filbert to paint the headlights using a brush mix of Titanium White + Lamp Black to create a medium grey. While wet, blend a small amount of Lamp Black at the bottom and Titanium White at the top. Allow to dry. (fig 3) Use the 5/0 Liner to line Lamp Black to the outside left and Titanium White to the outside right of the lights. (fig 2) Use the 5/0 Liner to apply the front grill and hood molding. Start first with the brush mix of Titanium White + Lamp Black to create a medium grey. While wet, blend through Lamp Black to deepen here and there and Titanium White to brighten. Tires: (Fig 1) Use the 4 Filbert to paint the hubs, blending paint wet on wet. These are also painted to appear old and rusty. Start with Heritage Brick and blend into Tuscan Red to brighten slightly more with a brush mix of Coral plus Titanium White. Allow to dry. (fig 4) Use the 5/0 liner to apply suggested rust with a brush mix of Charcoal Grey + Lamp Black. Use the 4 Filbert to paint the tires, blending colors wet on wet. Start with Charcoal Grey and blend into a small amount of Lamp Black closer to the hubs to deepen. Pick up a small amount of Titanium White and blend into the Charcoal Grey to brighten more towards the outside edge. Line Lamp Black in between the tire and fenders, which is the inner fender. Evergreen in Box of Truck: Use the chisel edge of the 3/8” Moderna to tap in the shape of the
evergreen with Prussian Blue. Deepen here and there with a brush mix of Prussian Blue + Lamp Black. Use the tip of the ½” Deerfoot to loosely tap in further Prussian Blue Hue. Use the same brush mix if needed. Use the liner to pull some of pine needles poking out here and there. Allow to dry. Use the chisel edge of the 4 Filbert to loosely tap in Titanium White Snow. Once dry, brighten a little more here and there. Allow to dry. Letters: Use the 5/0 Liner to paint “Season’s Greetings” using Tuscan Red. Paint the “Cotton Tree Farm” on the door of the truck with Titanium White. Personalize this if desired. Line on the door handle with Lamp Black. While wet, skip Titanium White along the top.

FINISHING:
Apply some Galaxy Glitter! Use the 4 Filbert to apply Clear Ice Comet on the snow that is on the larger evergreen and a little on the snow on the ground. Apply the Milky Way Blue to the Prussian Blue areas of the large evergreen and a small amount to the other suggested evergreens. Use the 5/0 liner to apply the Red Nebula to the large areas of the “Season’s Greetings” letters. Antique: Antiquing is a finishing technique that is used to age a painted design. I like to antique around the outside edge. Use the lint free rag to pick up the odorless thinner and then pick up a small amount of the Burnt Umber and Ivory Black oil. Starting from the outside edge, apply the paint in a circular motion, allowing color to fade, working towards the design. Mop to soften edges if needed. Allow to dry. Top with the Sealer/Finisher to protect your painting.
Enlarge or decrease the pattern size to fit the surface of your choice.


Note to reproduction companies/stores: The bearer of the original color magazine has full rights to have this drawing reproduced and enlarged one time for personal use. This notice has been printed in red ink for verification of authenticity.