
26 minute read
A Look into the Historical Florals of Decorative Painting Part 5-6


PASSING THE PAINTBRUSH...
By Teri Walker
ARTISTS HELPING ARTISTS The Gift of Mentorship
Do you remember the first time you picked up a paintbrush? You probably experienced a myriad of emotions. Did you have doubts about your ability to paint or did you push that fear aside and challenge yourself? Were you afraid of rejection or did you paint only to please yourself? Artists experience many feelings every time they create. That is why it is important to find a mentor and a supporter. If you are lucky, they will be one and the same. All artists benefit from encouragement, acceptance, and praise from others whose personal opinion matter. Many years ago, I was lucky enough to find both a mentor and supporter. She believed in my ability when I did not. She is the one who made me realize just how much self-doubt will kill your talent. Not only did she teach me to paint, but she also taught me to believe in myself and have the courage to step out of my comfort zone to try new things. My mentor, and a lifelong friend, is Norma Dee Hickman. A self-taught artist who lives in north Louisiana. After a career as a professional singer, she picked up a paintbrush and for the rest of her adult life, has painted professionally. Norma created “Bayou Artists Ltd.,” and taught painting to students from many states. It was an honor to be admitted into her group. In the early years of her career, Norma was offered a membership in the prestigious “American Masters”, but family obligations kept her from accepting. Norma Hickman has an eerie ability to bring out hidden talents in others. Under her leadership, the members of B.A.L. formed a kinship that went beyond merely learning to paint. Norma guided us through all the ups and downs that life brings. And although, everyone painted different subjects, each stroke of the brush was made with emotion. Norma taught us that the canvas always reflects one’s innermost feelings, good or bad because art is the truest expression of the soul. Being a mentor is a divine legacy, because it gives one the power to influence another person’s life. Norma changed our lives with her patience, encouragement, and loving heart. She never gave up, so neither did we. I hope you have someone in your life that has helped you on your artistic journey. And if you have the opportunity, I encourage you to share your passion with the younger generation. Do not let the knowledge you have spent a lifetime acquiring fade into the forgotten pages of yesterday. Schools are mainly focused on technology, therefore pushing handson art even further in the background. Art is vitally important, for it defines a culture. Mentors are vitally important for they define the artist. Norma Dee Hickman’s works of art can be found in many private collections throughout the United States, but I believe her greatest legacy will always be her students, for through them, her influence will “Pass the Paintbrush,” to generations not yet born. And so, can yours. (Norma Hickman can be reached at: normahickman21@gmail.com for more information)


PAINTING WORLD MAGAZINE Winter House By Linda Coulter Linda Coulter has been teaching fine art and decorative art classes for 40 years, during which time she has presented her Coulter Grisaille with Pure Color Glazes Art style to over 10,000 adult painters from five continents. Linda taught Museum Art Courses for 20 years at a Smithsonian affiliate museum in Peoria, Illinois. Linda was featured on WEEK-TV 25 (NBC station) in central Illinois for five years where every Saturday morning she demonstrated her painting techniques to a live television audience. Linda has taught Coulter Grisaille Art Seminars and Weekend Art Getaways nationwide. Linda teaches private art seminars at Coulter Art Cottage in Farmington, Illinois, and she produces art instruction DVDs and written instructions. To see what’s available, visit Linda Coulter’s Online Store at https://www.grisaille.com/shop/
SUPPLIES
PAINTS Golden® Heavy Body Artist Acrylics (to paint the grisaille)
• Titanium White • Neutral Gray Values 8, 7, 6, 5, 3
SURFACE AND PRIMER:
• 10 x 10 artist stretched canvas or wood surface • Surface Primer: DecoArt® Americana Décor
Chalky Paint in Primitive (Hereafter called
“primer”)
BRUSHES: By Royal and Langnickel®:
• Soft Grip Shaders SG75T sizes 6, 10, 12 • Soft Grip Filbert SG75T-4 size 4 Soft Filbert • Soft Grip Round SG75R-1 size 1 Round Detail • Regis Bristle Filbert L404T-2 size 2 Bristle
Filbert
COLORS FOR OIL PAINTERS:
• Utrecht® Oil Colors are used for Color Glazing over the dried grisaille scene (I purchased from DickBlick.com) • Titanium White • Zinc White • Cadmium Yellow Light • Indian Yellow, Cadmium Red Light • Ultramarine Blue • Olive Green • Viridian • Raw Sienna • Burnt Umber • Ivory Black (You can use most any brand because these are basic colors)
Colors for Acrylic Painters: Golden® Heavy Body Artist Acrylic:
• Zinc White (used to lighten the glazing colors.
This white is semi-translucent and creates a wonderful “velatura” color,semi-translucent)
DecoArt® Americana:
• Bright Yellow DA227 • Saffron Yellow DA273 • Red Alert DA301 • Cranberry Wine DA112 • Ultramarine Blue DA225 • Black Forest Green DA083 • Neutral Gray DA095 • Raw Umber DA130 • Lamp Black DA067
Plaid® Folk Art:
• True Burgundy 456 • Olive Green 449 • Raw Sienna 452
OTHER SUPPLIES:
• 1 sheet of 350 or 400 grit Sandpaper • Saral® Graphite Paper
Masking tape/scotch tape (to anchor the pattern in place while tracing the lines) One 12-inch clear plastic T-square Soft paper towels (any brand) Palette Knife (for color mixing. I prefer a 1-inch long metal blade as it is easier to mix small amounts of paint) Water container Speed Ball® Pink Soap Grisaille Painting Medium Oil Painters Painting Medium Acrylic Painters Glazing Medium Golden® Satin Glazing Liquid 3721-5
ART TERMS:
Glaze is to add transparent color over the grisaille artwork. Because of the transparency, you will be able to see through the color, as if looking through a piece of stained glass. You will see all the brushwork of the grisaille, but now it appears in colors.
TIPS:
Grisaille Painting Medium: with water (use with tap water in a little bowl). Oil Painters Painting Medium: Safflower Oil Utrecht® brand Most oil paints have enough oil already in them that you will not need to add painting medium for color glazing. Use only a drop mixed with the paint, if desired. Acrylic Painters Glazing Medium: Be SURE this is added to bottled acrylic colors for glazing. They MUST be transparent or translucent and this will help achieve that.
NOTE:
We will refer to these as Base Gray (value 8), Bridge Gray (Value 7), Shadow Gray (Value 6), Dark Gray (Value 5), Darkest Gray (Value 3) These acrylic paints are always used for painting Coulter Grisaille.
Grisaille Palette:
Fold a sheet of paper towel into fourths. Dip this into water and then wring most of the water out. Lay the wet towel on the Styrofoam plate, and put the gray paints on that moist paper towel to keep them soft and creamy. Label the names on the plate so you can find them easily.
SURFACE PRIMING INSTRUCTIONS:
Apply two smooth even coats of the “primer” to the canvas or wood surface. Allow to dry between coats. When completely dry, anchor the pattern to the primed surface so it will not slip while you are tracing. Use graphite paper and stylus to transfer the pattern onto the primed surface.
GRISAILLE PAINTING INSTRUCTIONS:
Sky: Using the 12 Shader, paint the upper third of the sky with Dark Gray. Paint the middle third of the sky with Shadow Gray. Paint the lower third of the sky with Bridge Gray. While the paint is wet, blend where these values meet to create a smooth transition between values. With the back tip of the brush handle, dip into Base Gray to press dots of light into the darkest sky area to create stars. Repeat with White in a few areas for lighter stars. Background Trees: Gently create the trees with Shadow Gray using the side of the Bristle Filbert brush to create the overall tree shapes. Then use the tip of the Soft Filbert to gently tap foliage that will break up the dark tree. Remember to keep the top edges soft and fuzzy to keep the tree appear in the distance. Distant Ground (left of the house): Use Base Gray and the 6 Shader to apply paint and blend gently into the distant tree line, so there is no sharp line of demarcation. House walls are already painted with Primitive Chalky Paint which matches Base Gray on our grisaille palette. The right side of the house is Shadow. Use the Soft Filbert brush to paint the crisp edge where the two values meet. This value contrast creates the illusion of a corner, showing two sides of the house. The lighted window on the dark side of the house is painted with White using the Soft Filbert brush. Vertical muntins are added with Shadow Gray, using the Round Detail brush. (Muntins are the thin strip of wood that holds the glass panes together in the window.)
LINE WORK:
You will need to use the 12-inch T-square ruler for line work, to keep the lines straight. The two dark lines at the front edge of the roof are painted with Dark Shadow Gray using the tip of the Soft Filbert brush. These two lines will reveal 2 wider bands between them. The top band is painted with White, using same brush. The band below that is painted with Bridge Gray and the same brush. With the Round Detail brush, create the tiny line work around the windows and door by painting over the tracing lines to maintain accuracy. Use the T-square to accomplish this. House Roof: The shingled roof (not the front edge) is Dark Shadow Gray using the 6 Shader brush. Fine detail points are painted with the tip of the Round Detail brush. Use the T-square to keep lines straight. The Steps: The step risers are painted Shadow Gray, and the stair treads are painted with Base Gray using the chisel edge of the 6 Shader brush. The right side of the staircase is Dark Shadow Gray using the 6 Shader brush. Windows: Paint inside each window with White, using the 6 Shader brush. Add curtains with Bridge Gray, applied with the Soft Filbert brush. Then add muntins to all 3 windows (the thin lines will divide the panes of glass in each window). Use the Round Detail brush and Bridge Gray. Door: Using White and 6 Shader brush, paint the window with White, and the wood door with Shadow Gray. The tiny muntins are painted with Round Detail brush and Shadow Gray. The wreath is painted using the tip of the Soft Filbert brush and Dark Gray. Add a few dark accents with Darkest Gray using the Round Detail brush. Christmas lights are Base Gray and, in some areas, you can use White for brighter bulbs. Use the tip of the Round Detail brush. Pine Tree (left side of scene): Is painted with Dark Gray using the 6 Shader brush to create specific edges, and the Bristle Filbert brush to fill inside the tree shape. Now add clumps of snow on the boughs with the Soft Filbert brush and Bridge Gray. Draw a graceful, curved line to indicate the top of each clump of snow, then press the brush downward to create little fingers of snow laying on the pine needles. Highlight the top of each clump of snow with Base Gray, and in some areas add White to lighten the snow. Restate the dark areas between snow clumps using Darkest Gray applied with the tip of the Soft Filbert brush. Front Bushes: Use the Bristle Filbert brush with Shadow Gray to create each bush shape. Gently tap the top edges to achieve a soft fuzzy appearance. Then darken the bottom of each bush with Dark Shadow using the Bristle Filbert brush. This will anchor these bushes to the ground. Bush (left of the house): Use Dark Shadow applied with the 6 Shader brush to create the bush shape, then highlight the top of the bush with Bridge Gray gently tapped with the tip of the Soft Filbert brush. Bushes (right of the house): These are created with the Bristle Filbert brush and Dark Gray. The darkest accents along the ground between the bushes are Darkest Gray. Using the tip of this brush add lighter foliage with Shadow Gray. Lighten some areas of the bushes with Bridge Gray. Create the illusion of light streaming from the window by gently tapping White on the foliage nearest the top of the bush where it would catch light streaming from the window. Use the tip of the Soft Filbert brush. Bushes (lower right corner of scene): These are painted with Dark Shadow using the Bristle Filbert brush. Using the tip of the Soft Filbert brush, gently tap lacy foliage with Shadow Gray. For additional light, use Bridge Gray applied the same way. Keep this soft and gentle. Foreground Snow is painted with the 12 Shader Brush and Shadow Gray at the left and right sides of the canvas, and Base Gray in the center. Add Bridge Gray to create a smooth transition between the light and dark areas. Lamp Post: Using the Soft Filbert brush, paint the lantern cap with Shadow Gray. Then add highlights on the left side of the cap with Bridge Gray. Paint the lantern globe with Base Gray, then add White in the center to create glowing light. The lamp post is painted with Shadow Gray and highlighted with Base Gray. Small dark accents are added using the Round Detail brush and Darkest Gray. This dark will create a delicate
contrast against the white light, and that contrast creates the illusion of glowing light. Tree trunks and limbs: Behind the house are two trees without foliage. The trunks are painted with Darkest Gray and the tip of the Round Detail brush. Paint tiny twigs with the same brush but using lighter pressure. You may wish to paint the twigs with Dark Gray, so they appear softer. Snow is laid on the limbs and some branches with Base Gray, using the same brush. Add White in some areas to achieve more contrast if you desire. Allow the grisaille artwork to dry thoroughly before adding transparent colors on top of the grisaille. Pure Color Glazes: Add transparent colors over the finished grisaille (gray tones). You can choose either Oil Colors or Acrylic Colors, but do NOT mix the two kinds of paint together. Refer to the color chart.
COLOR MIXING INSTRUCTIONS FOR OIL PAINTERS:
NOTE: use Zinc White for semi-translucent effect, or Titanium White for opaque color accent. • Yellow (Cadmium Yellow Light) Sunshine (Yellow + White) • Sunflower (Indian Yellow). Custard (Sunflower + White) • Sedona (Cadmium Red Light + Ultramarine
Blue). Dusty Pink (Sedona + White) • Bar Harbor (Ultramarine Blue + Cadmium Red
Light). Fog (Bar Harbor + White). • Warm Shadow (Viridian + Alizarin Crimson).
Twilight (Warm Shadow + White). • Blackberry (Alizarin Crimson + Ivory Black)
Smoke (Blackberry + White). • Blueberry (Ultramarine Blue + Ivory Black)
Wedgwood (Blueberry + White). • Hunter Green (Olive Green + Ultramarine
Blue) Spruce (Hunter Green + White). • Tuscany (Raw Sienna) Tan (Tuscany + White). • Mahogany (Transparent Oxide Brown).
Chestnut (Mahogany + White) Gray (Ivory Black + White) Pale Gray (Gray + Whiter).
COLOR MIXING INSTRUCTIONS FOR ACRYLIC PAINTERS:
Note: Use Zinc White to create the “velatura” colors (pastel colors). • Yellow (Bright Yellow). Sunshine (Yellow + Zinc
White). • Sunflower: (Saffron Yellow). Custard (Sunflower + Zinc White). • Sedona (Red Alert + Ultramarine Blue). Dusty
Pink (Sedona + Zinc White) • Bar Harbor (Ultramarine Blue + Red Alert).
Fog (Bar Harbor + Zinc White) • Warm Shadow (True Burgundy + Black Forest
Green). Twilight (Warm Shadow + Zinc White). • Blackberry (Cranberry Wine + Black Forest
Green) Smoke (Blackberry + Zinc White). • Blueberry (Ultramarine Blue + Slate Gray)
Wedgwood (Blueberry + Zinc White). • Hunter Green (Olive Green + Ultramarine
Blue). Spruce (Hunter Green + Zinc White). • Tuscany (Traditional Raw Sienna) Tan (Tuscany + Zinc White). • Mahogany (Traditional Burnt Sienna + Lamp
Black). Chestnut (Mahogany + Zinc White). • Neutral Gray. Pale Gray (Neutral Gray + more
Zinc White)
Sky: With the 12 Shader brush, apply a delicate layer of Dusty Pink across the middle sky, as shown in the photograph. Apply Fog along the top of the sky. Blend where these colors meet to create a smooth transition. Accent the stars with Warm White, using the tip of the Round Detail brush where desired. Background Trees: Using the 10 Shader, apply Warm Shadow through the tree area. If you need a bridge between the pink and tree area, use a touch of Fog. Blend softly to avoid a harsh line. Distant Ground: Apply Twilight in that little area of distant ground using the 10 Shader

brush. Darken with Warm Shadow as you move downward. If this appears too bright, add a touch of Pale Gray. House: If you want a little color, add a tiny touch of Twilight to the house front using the 6 Shader brush. Keep the paint application thin and delicate. The house side is colored with Warm Shadow. The Roof is colored with a tiny touch of Warm Shadow. The house foundation is Fog in the front and Bar Harbor on the side. Use the 6 Shader brush for all of this. Windows: Using the 6 Shader brush, apply Sunflower in all the windows. Add Tuscany at the top and work downward into the Sunflower. Using the tip of the Round Detail brush, add Custard in the lower window, and highlight with Warm White. Curtains are Tan. Then paint the muntins with Chestnut. Door: Add Twilight to the door with the 6 Shader brush. The wreath is tiny bits of Olive Green, using the tip of the Round Detail brush. Then add colored lights on the wreath, with Cadmium Red Light and Cadmium Yellow Light (if using oil colors), or Red Alert and Bright Yellow (if using acrylic colors). Steps: With the Round Detail brush add Warm Shadow to the step risers and White to the top of the steps to indicate snow laying on the top of the steps. Pine Tree: Using the Soft Filbert brush, add Fog to the clumps of snow, and Olive to the tree between the snow clumps. You may darken the Olive by tucking in some Warm Shadow if you desire. Snow highlights are Fog + White. Then Warm White for the final highlights on the clumps of snow. If you want to show bits of pine needles, use Thyme applied with the tip of the Round Detail brush. Bushes: Using the 6 Shader and Warm Shadow to add color to the bushes. In the darkest areas mingle Warm Shadow with Olive. With the tip of the Soft Filbert brush, add tiny taps of Wedgwood, Twilight, Fog, and some Dusty Pink for accents of foliage on the
bushes. Use these colors gently and sparingly so they will not look bold. Apply tiny bits of Warm White for lightest snow. Refer to the photograph. Tree Trunk and Limbs: Using the tip of the Round Detail brush, apply Mahogany or Oak on the tree trunks and limbs. Each brown creates a different effect so try both and use the one you prefer. Add snow laying on the branches using the sky colors lightened with Whiter. Glowing Lantern: The light is the same colors as the windows (Sunflower, then Tuscany, then Warm White). The lantern cap and lantern post are Twilight, and the highlight is Warm White. Use the Round Detail brush. The glow of light at the right and left of the lantern is created by thinning Warm White and apply thinly with horizontal brush strokes. Softly blend. No harsh edges! Foreground Snow: Using the 10 Shader, apply Warm Shadow in the darkest areas, and Dusty Pink in the warm areas, and Warm White in the lightest areas. Use horizontal sweeping brush strokes. Refer to the photograph for color placement.

Enlarge or decrease the pattern size to fit the surface of your choice.

Note to reproduction companies/stores: The bearer of the original color magazine has full rights to have this drawing reproduced and enlarged one time for personal use. This notice has been printed in red ink for verification of authenticity.
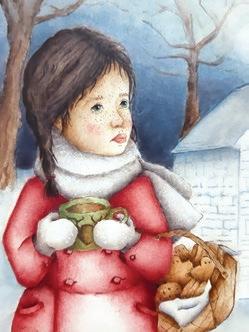
Anita and Hot Chocolate
by Anita Campanella

I live in a small village in Puglia, located in the south of Italy. I have been painting since I was a small child. I have attended many painting courses with famous international artists. I had the wonderful opportunity to collaborate with Painting World magazine and I’m really very excited. Welcome to my world, friends.
This drawing is inspired by the story that a dear friend, Laura Mori, dedicated to me on 12/24/2018. Anita tells about a girl who had a bad year. Anita lives in a small town at the foot of a hill. A tradition has been handed down among the inhabitants of this small town. The exchange of hot chocolate, with spiced biscuits, in the square next to the church, under the huge Christmas tree on the night of the eve. The hot chocolate prepared by Anita is very popular among the inhabitants, it is an old family recipe and it is said to be magical. When Anita was a little girl, her grandmother always told her, that on the night of Christmas Eve, as if by magic, whoever drank that chocolate before falling asleep, in dreams could have met all the loved ones. Anita believed strongly in the magic of her grandmother’s hot chocolate and although she found it difficult to find a good reason to celebrate, thanks to the love of her friend Laura, she cooks the recipe. The day ends quickly, Anita watches the clock, it is time and she goes with small steps towards the central square of the small town. In her heart she feels that all the inhabitants are waiting for her. “She is coming”, she feels in the silence of the snow, everyone is happy to see her, especially her friend Laura, who goes to meet her. The extraction begins and everyone is waiting anxiously. Fate wants that the magic chocolate prepared by Anita is assigned to her friend. Laura is very happy; she almost does not believe her eyes. After the exchange of chocolate, after eating the spiced biscuits, it is time to return. Always in small steps, Anita goes home and with great amazement, notices at the door a small gift pack. Anita opens it and with great surprise finds her chocolate, the magic one she had prepared. Next to it a note written by her friend Laura “May this night be your magic night”. Anita indulges in a smile, that night she fell asleep with peace in heart and with the belief that in the morning under the tree, she would find the strength to react. I dedicate this painting of mine to my dear friend. Thanks Laura Mori.
I thought of painting my Christmas recipe collector. I hope you all like it too. It can be a welcome gift if you also have a special friend.
SUPPLIES:
SURFACE:
• Wooden Binder dimensions: 7”x 10”
PAINTS: DecoArt® Americana:
• Dark Chocolate DA065 • Driftwood DA171 • Blue Mist DA178 • Wedgewood Blue DA038 • Uniform Blue DA086 • Leaf Green DA051 • Primary Red DA199 • Heritage Brick DA219 • Avocado DA052 • Soft Black DA155 • Light Buttermilk DA164 • Milk Chocolate DA174 • Antique Rose DA156 • Zinc DA304 Asphaltum DA180 Raw Sienna DA093
BRUSHES:
• Dynasty® Black Gold Flat Wash 206 FW, size 1 • Dynasty® Dry Brush series 200, size 6 • Dynasty® Black Gold Liner 206 MSC, size 20/0 • Dynasty® Black Gold Angle 206 A, size 1/2 “, 1/4“ • Dynasty® Black Gold Round 206 R, size 4 • Scharff Moon Mop 685, size 1/2 “ • Scharff Mop 670, size 1/2 “, 3/4 “ • Princeton Select Deerfoot 3750DF-012, size 1/8”
MISCELLANEOUS SUPPLIES:
• 400 grit sandpaper • Tracing paper • Black graphite paper • Paper palette • DecoArt® Americana Matte spray DAS-13 • DecoArt® Multi-Purpose sealer DS-17
PREPARATION:
Lightly sand the edges and surface. Seal all areas with DecoArt® sealer. Apply the Light Buttermilk color with a flat brush. Leave to dry well. Repeat the operation. Note: To obtain this very watercolor effect, I moistened the surface with water, using an old brush before proceeding with all the shadows. Always soften the shadows with a Mop Brush. These steps are essential to obtain an excellent result. In this painting, I always use the Angle Brush for shadows and a Round Brush for basecoat.
PAINTING INSTRUCTIONS:
Transfer the drawing with black graphite paper. Contour the guidelines of Anita, and of the trees with a Liner Brush and Asphaltum, stretched with a little 2:1 water. Surround the guidelines of the church with the Liner and Zinc, stretched with a little water always 2:1, except for the bell tower and the cross on the church that are with Asphaltum. The shadows on Anita’s coat are Heritage Brick: close to the scarf, the cup, on the sleeves close to the gloves, on the coat close to the sleeves, along the extreme sides of the right / left coat, along the extreme sides of the cuffs of the pockets , along the right / left sides of the folds, along the entire lower side of the coat and along the central seam. The shadow on the coat, behind the buttons, are Heritage Brick. Reinforce with the same color in the more shaded areas. Reinforce further with Soft Black. The buttonholes on the coat are with the Liner and Heritage Brick. Dampen the entire area of the church with water and outline all the bricks with the Liner Brush and Zinc. They are not solid lines. Jump with the brush here and there. Leave to dry. The roofs have a basecoat with Zinc stretched with plenty of water. The doors, windows and bell tower have a basecoat with Soft Black stretched with water. The shadows on the church, close to the roof, close to the windows and the door, at the base of the bell tower are Zinc. The shadows on the door and windows along the left sides are Soft Black. The shadows on the basket, close to the tea towel and the biscuits, are first with Asphaltum then Asphaltum with the addition of a tip of Soft Black. The handle of the basket and the biscuits have a basecoat with Asphaltum stretched with water. The details of the biscuits are with the Liner and Soft Black. The shadows on the canvas are Zinc. The shadows on the cup, along the right / left side, along the bottom side, along the handle and close to the gloves, are Avocado. The detail on the cup and the chocolate inside are a basecoat always with a round brush and Milk Chocolate stretched with water. The shadows, along the extreme sides of the chocolate and along the left side of the detail on the cup, are Soft Black. The shadows on the face, close to the hair, along the lower side of the nose, on the face along the right side of the nose and along the lower side of the eyebrows, are first with Raw Sienna, then reinforced with Asphaltum. In the same way are the shadows on the legs, close to the coat and along the right side of both legs. Freckles are with the Liner and Asphaltum. The Cheeks are a dry brush with Antique Rose. The pupils are Soft Black, the iris Avocado. Reinforce the line above the eye with Soft Black. The lips are with the round brush and Heritage Brick. They have a more intense color along the left side.
The trees have a Basecoat Milk Chocolate with the addition of water. Leave to dry. The lower part of the sky is with a round brush and a brush mix of Uniform Blue and Wedgewood Blue. Start from the bottom and blend going upwards. Help yourself with the Mop Brush to soften the shadows. Let it dry. The upper part is with the same technique and with a brush mix of Blue Mist and Zinc. Leave to dry well and repeat several times, until the result that gratifies you most. Leave the moon with the base color if it is necessary to moisten the area and with a Round Brush intensify with Light Buttermilk. Using the Mop Brush along, its perimeter, will help create some haze. The shadows on the left side of the trees is Soft Black. The grain of the wood is with liner and Milk Chocolate some, Soft Black others. Reinforce the shadows along the lower side of the sky, close to the snow cover, close to the scarf and the church, with Soft Black. The shadows on the gloves and the scarf are Driftwood. Reinforce in the more shaded areas with Soft Black. The light is with the Deerfoot Brush and Light Buttermilk.


Download the excess color onto a cloth and tap in the highlighted areas. The shadows on the hair are first Asphaltum, then reinforced with Soft Black. Pull strands with the liner and Soft Black. The elastic on the braid is with the Liner and Heritage Brick. The shadows on the snowpack, close to the church and Anita, are Zinc. The snow on the trees and on the door of the church door are with a round brush and Light Buttermilk. The flag on the church is Leaf Green, Light Buttermilk and Primary Red. The flagstick is Soft Black. The steam created by hot chocolate is a Dry Brush with Light Buttermilk. The writing on the snow is with the Liner Brush and Soft Black. The shadows along the entire perimeter of the wooden support are Asphaltum. If necessary, trim all the details with the Liner and Soft Black. Allow to dry well and paint with DecoArt® Americana Matte spray DAS-13. Happy Painting!

Enlarge or decrease the pattern size to fit the surface of your choice.
Note to reproduction companies/stores: The bearer of the original color magazine has full rights to have this drawing reproduced and enlarged one time for personal use. This notice has been printed in red ink for verification of authenticity.


