
27 minute read
MAMMA BEARS HAVE THE BEST HUGS


Your ad could be here!

Ads start at only $49.00 and reach about 4,000 print subscribers & thousands more on social media! Contact us at info@paintingworldmag.com to get started today!

MAMMA BEARS HAVE


THE BEST HUGS
By Alessio Meggiato and Sandy Kelsey
Hi! I’m Alessio Meggiato! I was born in a small town near Venice and I have this huge love for paintings. I was introduced to country painting about 14 years ago, and since then, I’ve started to work with several international artists, publishing projects in popular painting magazines. With the help of Terry French, to whom I will be forever grateful, I had the chance to be a part of the “Painting with Friends” book. I’ve attended many classes with the best international artists, both in Italy and in the United States. I’ve been sharing my passion and knowledge by teaching in several stores around Italy, and I am honored to be a part of the “Helping Artist” team by DecoArt®. About two years ago, I started to do some lessons online with some of the works I love most and doing that I had the chance to reach more people with my same passion. I’ve always loved Sandy Kelsey’s works, so I contacted her. I’m so grateful to have had the chance to collaborate with her for this project you can see on these pages. Often, my heart speaks through my hands. Creativity and fantasy may be my daily “addiction” ... or the best care I’ve ever experienced.
My name is Sandy Kelsey and I live just south of the Adirondack Mountains in Central New York, USA. From an early age I planned for an art related career and attended MVCC for Advertising & Design, then Munson Williams Proctor Institute for Fine Art. Somehow, I found myself working in the field of Human Recourses. Now I am semiretired and finally able to live my dream of pursuing art. I’m a member of SDP and the Leatherstocking Decorative Artists Chapter. I have always painted and drawn, only now I am able to attend classes from the many talented teachers I have admired for years. I plan on producing painting packets and hope I’ve developed my own style that painters would find fun. Recently, I was lucky enough to have my artwork on the cover of an online painting magazine. It is such a joy to work with so many talented and creative people ... and even collaborate with Alessio Meggiato from Italy!! At home, I live with three large goofy dogs. I have two adult daughters and four grandchildren between the ages of five and eight. I feel very, very lucky to finally have these opportunities.
SUPPLIES
DecoArt® Paint: • ANTIQUE WHITE DA058 • BURNT SIENNA DA063 • BURNT UMBER DA064 • CAMEL DA191 • DARK CHOCOLATE DA065 • FAWN DA242 • HONEY BROWN DA163 • KHAKI TAN DA173 • LAMP BLACK DA067 • LIGHT BUTTERMILK DA164 • MILK CHOCOLATE DA174 • SAND DA04 • SNOW TITANIUM WHITE DA01 • SOFT BLACK DA155
OTHER SUPPLIES: • Multi-Purpose Sealer • Sandpaper • Graphite Paper - both black and white • Paper Palette • Stylus • Tracing Paper with photocopied design • Painters Tape “For painting the background lines” • Sponge Roller • DecoArt® Matte Varnish
BRUSHES: • MAXINE’S MOP Loew-Cornell® series 270 ½ and ¾ • BLACK GOLD angular brush by DYNASTY® series 206A ½ e and ¾ • BLACK GOLD shader by DYNASTY® series 206S sizes 2, 10, 16, 20 • BLACK GOLD filbert by DYNASTY® series 206fil sizes 2, 3, 6, 10 • MEZZALUNA XLARGE and LARGE drybrush by DYNASTY® • BLACK GOLD script liner by DYNASTY® series 206SL sizes5/0,10/0 For painting the basecoat use the largest brush you feel comfortable with.

SURFACE PREPARATION: Sand the entire surface with thin sandpaper; remove dust with a damp cloth. Give a coat of MULTI PURPOSE SEALER (optional). When dry, lightly sand and remove the dust with a damp cloth.
PHOTO 1 – SURFACE BACKGROUND Paint the entire panel with ANTIQUE WHITE, two or three coats, with sponge roller. When it is dry, add the guidelines of the bears. Position the tape alternately so as to create lines. Paint the lines with KHAKI TAN avoiding the bear design.
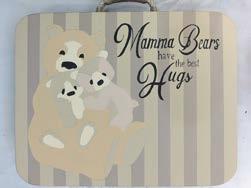
PHOTO 2 – BEAR BASECOATS (we will call Owen the bear on the left, Lorelei the bear on the right) MAMMA BEAR: make a wash of CAMEL on mother bear’s body and when still wet use the mop brush to tap and create the fur effect – giving face 2 coat of SAND - inside ears remains ANTIQUE WHITE. OWEN: the body remains ANTIQUE WHITE - give the face, belly ear and soles of feet 2 coats of SAND LORELEI: base the body with FAWN leaving the front and belly ANTIQUE WHITE. Use 2 coats of SAND on the face and inside ears ALL BEARS: SOFT BLACK noses - eyes LAMP BLACK - Paint the writing with LAMP BLACK using a flat brush No. 2 and in some places a round brush No. 1.
PHOTO 3 - FIRST SHADING MAMMA BEAR: shade with HONEY BROWN around the entire perimeter of the bear, right hand close to the bear, under the arm, on the arm behind the bear, under the neck, around the eyes, on the forehead, on the ears, do a shading “back to back or flip float” on the arm and on the leg behind the foot - shade the muzzle with HONEY BROWN under the nose, close to the heads of the bears and the fold on the nose - shade with DARK CHOCOLATE the inside of the ears and the soles of the feet. OWEN: shade the ears with BURNT SIENNA, the whole perimeter of the head, a back of the muzzle, rise of the hand, the nails, the feet behind the nails, behind the perimeter of the right foot, the upper part of the left foot, the shoulder and the belly, on the arm makes a shading “back to back” - shade with DARK CHOCOLATE inside the ear, the muzzle, under the nose, behind the eyes and on the fold of the nose, on the mouth, the belly and the pads of the feet. LORELEI: shade all the areas except the muzzle with DARK CHOCOLATE - use SOFT BLACK to shade the lower part of the nose, under the nose and the fold of the muzzle. ALL BEARS: Shade the noses with LAMP BLACK - the noses of the two bears at the bottom U - the mother’s nose inside the “C” nostrils. Shade the floor with DARK CHOCOLATE.

PHOTO 4 - SECOND SHADING MAMMA BEAR: to deepen the inside of the ears and the soles of the feet use SOFT BLACK - deepen with the MILK CHOCOLATE the upper part of the ears, the fold of the head, shadow behind the bears that pass in front of the muzzle, behind the muzzle and behind the eyes, to create a floating spot on the forehead to create the fur effect, the shoulder behind Owen’s head, to deepen the fold on the arm and the reflected shadow of Owen’s hand, the hand on the folds of the fingers, close to the foot and close to Lorelei upwards, deepening the angle between the foot, the bear’s hand and Owen’s foot, deepening the bottom making a nice wide shadow and creating the shadow of the foot, deepening along the whole leg , the heel and the back leg in the upper and left side near the foot - with MILK CHOCOLATE deepen the fold in the upper part of the left foot. OWEN: deepen with BURNT UMBER the shadow behind Lorelei, on the ear, on the angle of the muzzle against the shoulder, on the shoulder along the body, on the hand, on the nails, on the belly and under the mouth, the sole of the foot near the nails of both feet. Shade “back to back” to split the nails. LORELEI: deepen with BURNT UMBER the lower part of the cheeks, inside the ears, on the neck, behind the arm, on the belly near the hand of the mother bear, on the paw. Deepen the floor with SOFT BLACK.


PHOTO 5 - THIRD SHADING MAMMA BEAR: deepen with a mix of BURNT SIENNA and SOFT BLACK the two darker corners on the forehead by ears, close to the snout, behind Lorelei, behind the eyes, on the shoulder close to Owen, under the elbow, on the butt, on the fold of the heel, under the hand, between one foot and the other, the folds of the fingers, the hand close to the feet. OWEN: deepen with SOFT BLACK behind the ear, behind the arm, around the muzzle, behind the eyes, on the mouth, under the neck, along the arm and close to Lorelei. LORELEI: deepen with SOFT BLACK on the neck, on the body along the entire perimeter of the mamma bear, behind the tail, on the folds of the hands and elbow, on the cheeks close to the muzzle and on the right and left ears. PHOTO 6 - FOURTH SHADING MAMMA BEAR: deepen with SOFT BLACK on the neck close to Owen, under the elbow, the division between the two feet and the angle between the foot, the bear’s hand and Owen’s foot.

PHOTO 7 - BRIGHTEN WITH DRY BRUSHING Highlight using a MEZZALUNA DRYBRUSH and LIGHT BUTTERMILK inside ears, head, arm, leg, feet, hands, soles of the mother’s feet - head and body of the two little bears, Lorelei’s tail, noses and eyes of all three bears. Highlight again using the same brush and TITANIUM WHITE over the Light Buttermilk in a smaller area, all 3 bear’s faces.

PHOTO 8 – SMALL DETAILS and FINISHING With a 10/0 liner and SOFT BLACK, outline some points of the mother and the little ones to create the fur effect. Create Lorelei’s mouth and eyelashes and Mamma’s eyelashes with a 10/0 liner and LAMP BLACK. With a 10/0 liner and TITANIUM WHITE create lines on the mother’s nose and outline the nostrils, make a comma on Owen’s nose and the lines on Lorelei’s nose. With a 5/0 liner and LAMP
Use a liner brush and BLACK in an inky consistency to add the lines on the left side of the letters of the writing. Accent the main part of the letters using a liner brush and inky wash of TITANIUM WHITE in the areas shown. Reinforce highlight in a smaller area with a second coat in the centers of the larger highlights.+ Use tape to create the border on the edge of the panel and paint it with ROOKWOOD RED. When dry, shade all around the panel with the DARK CHOCOLATE. Erase any traces of graphite paper. Antique the entire design with a watery wash of DARK CHOCOLATE. Wait for the surface to appear perfectly dry and give two good coats of DecoArt® MATTE VARNISH We hope you enjoy this painting and love to all the Mammas!!

Enlarge or reduce the size to the surface of your choice.
Sandy kelsey & Alessio Meggiato 2019
Download all drawing patterns at http://bit.ly/FEB2020Drawings
Note to reproduction companies/stores: The bearer of the original color magazine has full rights to have this drawing reproduced and enlarged one time for personal use. This notice has been printed in red ink for verification of authenticity.
Passing the Paintbrush...
By Teri Walker

The Heart of Art
Many years ago, I had the opportunity to study art history with a professor who has extensively traveled the globe. His lifelong passion was to study and photograph the art of historical and modern cultures. The slides and stories he shared with us made an indelible mark on my appreciation of art. Never before did I realize just how very important art is to humanity. Therefore, I do not understand why art is the first thing to go when schools face cutbacks in funding. Art is the greatest historical record of every culture. In all of its many forms, art literally defines the people who created it as their way of expressing thoughts, feelings, passions, religious beliefs, dreams and goals. It is the earliest form of communication, for art was there before mankind had language. It continues to speak to us in the present and will be there for future generations. Art will never die, for mankind has an inborn need to create. Just like a living, breathing entity, art has evolved with changes in technology, techniques, and materials. We’ve come a long way since cave paintings. Art has endured many changes and served many purposes. Today, we use it for advertising, political statements, home decor, fashion, architecture, and self-expression. Art is so much a part of life, that it is often taken for granted and ignored. I hope you will take a few minutes to consider the importance of art in your life and share your thoughts with others. Each time you wet a brush, you carry on heritage as old as time itself. Be proud of the things you create, for they will live on long after you are gone from this earth. Your art is your vision, your passion, and your voice to the future. I urge you to share yourself with others by “Passing the Paintbrush” every time you get the chance, especially with children who have no art programs in their school. Your influence just might change a life and that will be your legacy, for YOU are the very heart of art.


PAINTING WORLD MAGAZINE HARLEY: The Traveler Dog By Elisabetta De Maria
Dearest painting friends, I present to you Harley: the traveling dog! Harley is a mongrel dog that has been abandoned and taken to a kennel with her brothers. Alessia and Letizia immediately fell in love with her when they saw her and decided to adopt her. Slowly they taught her to stay on the sidecar because they wanted to take the holidays with her. Since they adopted it, Harley has already traveled 18,000 km in a sidecar and has become the mascot of the campaign against abandonment. Harley toured Italy, went to Denmark and this year went on holiday in Estonia. She is the demonstration that you can travel together with your bosses .. not only in the car, but also on a motorcycle! The “I Viaggi di Harley (Harley’s Travels)” page was born against the abandonment of dogs in summer.… Happy Painting my dear friends! * Harleys’ goggles are by Doggles ® Inc. Doggles® is a registered trademark of Doggles Inc. - used by permission.
SUPPLIES Stabilo CarbOthello Pastel Pencils (DickBlick. com) • 100 Titanium White • 105 Ivory • 435 Ultramarine Blue Light • 575 Leaf Green • 610 Raw Umber • 615 Dark Ochre • 625 Burnt Umber • 635 Bister • 642 Caput Mortuum Violet Light • 655 English Red Deep • 680 Dark Flesh Tint • 681 Flesh Tint Light • 706 Gray 4 • 708 Gray 5 • 720 Cold Gray 1 • 726 Cold Gray 4 • 750 Neutral Black
Caran d’ache Pastel Pencils (DickBlick.com) • 009 Black • 036 Raw Sienna • 042 Flesh • 046 Cassel Earth • 047 Bistre • 066 Raw Russet • 408 Dark Sepia • 745 Dark Flesh 40 • 746 Dark Flesh 50 • 901 Chinese White Bruynzeel Design Colored Pencils (DickBlick. com) • 27 Yellow Ochre • 74 Dark Gray • 94 Silver
SURFACE • Sheet Pastelmat 25.5 x 22.5 Grey The photo of the dog was small and I thought to make a magnification. You can enlarge or reduce it to a size you choose.
ACCESSORIES • Photo, graphite paper, hb2 pencil, rubber, pencil sharpener for crayons, paper napkins, smudge. TIPS • For each job, always start on the left side and continue to the right: (left-handed people will work on the contrary) This is to avoid dirtying the work with the hand. • In any case, use paper towels in case you have to work on a part already painted to avoid removing the color or dirtying with your hand. • Always follow the direction of the hair. • Help yourself by blending colors with your fingers. • Always have sharp pencils.
LET’S PAINT After placing the photo on the Pastelmat, place the sheet of graphite paper in the middle, graphite side down. With a pencil or stylus, trace over all the guidelines, contours and details. Now arrange the colored photo next to your sheet so as to check, step by step, all the details.
EYE We work the eye inside the glasses. With the pastel Carbothello n 750 (Black) draw the shape of the pupil and fill the interior with the same color. Work the inside of the eye with the pastel Carbothello n 625 (Burnt Umber) without ever completely covering with the color. Lighten with Carbothello n 615 (Dark Ocher) and darken with Carbothello n 635 (Bister). Give light strokes with the pastel Carbothello n 680 (Dark Flesh Tint). Darken again with Carbothello n 610 (Raw Umber). Make small lines in the iris with Carbothello n 681 (Flesh Tint Light). I normally use many colors until I get the result I want. I overlap them. Sometimes even just a stretch of pastel can be used to give a different light. Learn to look at the photo and take a picture of the work. The eye of the camera can make you discover the mistakes. Let’s get back to the eye: Following the photo, darken the left corner, gradually using Caran D’ache n 046 (Cassel Earth) and reinforce with n 408 (Dark Sepia). Always with Caran D’Ache n 408 (Dark Sepia), outline the iris.
FEBRUARY 2020 ISSUE Outline the lighter edge, that we find immediately below, with Carbothello n 708 (Gray 5) and 726 (Cold Gray 4). Lighten with the pastel Carbothello n 681 (Flesh Tint Light). Work the outer corner of the eye (towards the nose) with Carbothello n 642 (Caput Mortuum Violet) and Cara D’Ache n 093 (Violet Gray). Darken with Carbothello n 635 (Bister) and lighten with Carbothello n 681 (Flesh Tint Light). Now we work the part above and below the eye with Carbothello n 625 (Burnt Umber). Lighten first with Carbothello n 615 (Dark Ocher) and then with n 105 (Ivory). The dark part near the corner of the eye is painted with Carbothello n 610 (Raw Umber) and n 625 (Burnt Umber). Give a touch of Carbothello n 642 (Caput Mortuum Violet) to resume the color of the corner of the eye and illuminate with Caran D’Ache n 036 (Raw Sienna). Give a slight touch of Carbothello n 585 (Olive Green). The light part of the upper and lower hair must be superimposed on the dark part. Work with Carbothello n 105 (Ivory). To have uniformity with the dark part, paint some hair with Carbothello n 642 (Caput Mortuum Violet), n 610 (Raw Umber), a touch of Caran D’Ache n 042 (Flesh) and n 036 (Raw Sienna). Resume again Caran D’Ache n 408 (Dark Sepia) and from the dark part of the eye make some hair that enters the clear part. In the light part of the hair near eyeglasses, work with Bruynzeel n 74 (Dark Gray). The part above the eye is worked with Caran D’Ache n 093 (Violet Gray) and Carbothello n 610 (Raw Umber). Paint the edge of the center right eyeglasses with Caran D’Ache n 408 (Dark Sepia) and the left side with 046 (Cassel Earth).
Paint the eyelashes with Caran D’Ache n 042 (Flesh) and 036 (Raw Sienna). Darken with Caran D’Ache n 046 (Cassel Earth) and illuminate with Carbothello n 105 (Ivory). Work the shaded part of the left side with Caran D’Ache n 408 (Dark Sepia) and 046 (Cassel Earth). Illuminate with Carbothello n 585 (Olive Green) and Caran D’Ache n 746 (Dark Flesh 50). Lighten with Carbothello n 681 (Flesh Tint Light). Smudge with your fingers and make the light coat uniform.
Fig 1

GLASSES Paint the white parts with Caran D’Ache Chinese White and blend in some places with Carbothello n 435 (Ultramarine Blue Light) and Caran D’Ache n 631 (Light Ultramarine Violet). Paint the lettering with Caran D’Ache Chinese White. Divide the eyeglass lens frame into three parts: left side, top side and center right and bottom side and center right (you recognize it from the step). Paint the left side with Caran D’Ache 003 (Light Gray) and shade the inside edge first with Caran D’Ache n 746 (Dark Flesh 50) and then with Carbothello n 635 (Bister). Illuminate with Carbothello n 435 (Ultramarine Blue Light). Continue with the lower part by blending the previous base color (Caran D’Ache 003) with Carbothello n 726 (Cold Gray 4). Darken with Carbothello n 708 (Gray 5) and with Caran D’Ache n 408 (Dark Sepia). Give some touches of Carbothello n 585 (Olive Green) in the center right part. Lighten with Carbothello n 706 (Gray 4) and darken with Caran D’Ache n 149 (Night Blue). Give some touches of Caran D’Ache n 093 (Violet Gray). Paint the piping underneath with Caran D’Ache 746 (Dark Flesh 50) and lighten with Carbothello n 105 (Ivory). We paint the upper part up to the right center, with Bruynzeel n 74 (Dark Gray). Darken with Carbothello n 635 (Bister) and illuminate with Caran D’Ache n 003 (Light Gray). Work on the outer edge with Caran D’Ache n 746 (Dark Flesh 50) and 047 (Bister). Blend with Carbothello n 726 (Cold Gray 4) inside and add some touches of Carbothello n 585 (Olive Green). Always looking at the photo, darken first with Carbothello n 708 (Gray 5) and then with Caran D’Ache n 408 (Dark Sepia). Lighten with Carbothello n 720 (Cold Gray 1). Now we paint the side part of the glasses with a base of Carbothello n 726 (Cold Gray 4). Illuminate with touches of Carbothello n 435 (Ultramarine Blue Light) and Caran D’Ache n 746 (Dark Flesh 50). Darken with Carbothello n 708 (Gray 5). Paint the first strip underneath with Bruynzeel n 94 (Silver). Shade with Carbothello n 708 (Gray 5) and illuminate with n 105 (Ivory).
Paint the second strip with Carbothello n 720 (Cold Gray 1) and illuminate with Carbothello n 435 (Ultramarine Blue Light).
Fig 2

EAR Paint the ear with Bruynzeel n 27 (Yellow Ocher). Now divide the ear into two parts: Lighten the right side with Carbothello n 105 (Ivory) and darken where needed with Caran D’Ache n 042 (Flesh). Review with Carbothello n 105 (Ivory) . Paint some hairs, where needed, with Caran D’Ache n 068 (Herculanum Red) and n 036 (Raw Sienna). Work where you need with Carbothello n 585 (Olive Green). The left side must be immediately darkened with Caran D’Ache n 036 (Raw Sienna) and n 064 (Medium Russet). Illuminate with Caran D’Ache n 068 (Herculanum Red) and revise again, where needed, Bruynzeel n 27 (Yellow Ocher). Continue to work with Caran D’Ache n 036 (Raw Sienna) and 064 (Medium Russet) until the color is established. Work the light parts with Carbothello n 100 (Titanium White) with nuanced n 105 (Ivory) and Caran D’Ache n 093 (Violet Gray).
The part of the hair of the head near the ear is painted with Caran D’Ache n 036 (Raw Sienna) and lightened with Bruynzeel n 27 (Yellow Ocher). Darken with Caran D’Ache n 069 (Burnt Sienna) and lighten with Carbothello n 105 (Ivory). Continue to work with the colors until you get the final result. The dark spot is painted with Caran D’Ache n 069 (Burnt Sienna), Carbothello n 610 (Raw Umber), Caran D’Ache n 408 (Dark Sepia). Continue descending on the fur with Caran D’Ache n 036 (Raw Sienna) and overlap n 047 (Bister), Carbothello n 625 (Burnt Umber) and n 585 (Olive Green).

Center of the Glasses Start from the white parts with Caran D’Ache Chinese White and continue with the other parts with Carbothello n 708 (Gray 5). Lighten with Carbothello n 720 (Cold Gray 1). Paint the underlying part with Carbothello n 750 (Black). Now let’s move to the right lens frame: paint the upper part with Carbothello n 706 (Gray 4) and darken with Carbothello n 726 (Cold Gray 4), n 635 (Bister) and a touch of 585 (Olive Green). Paint the inner lower part with Carbothello n 720 (Cold Gray 1) and darken with n 726 (Cold Gray 4). Paint the profile with Caran D’Ache Chinese White. Paint the front bottom with Bruynzeel n 94 (Silver). Lighten with Carbothello n 706 (Gray 4), Caran D’Ache n 746 (Dark Flesh 50). Darken with Carbothello n 635 (Bister), n 708 (Gray 5) and n 635 (Bister). Lighten again with Carbothello n 720 (Cold Gray 1) and give reflections with n 585 (Olive Green). Paint the darker outer part on the top right with Carbothello n 708 (Gray 5) and lighten first with n 726 (Cold Gray 4) and then with n 720 (Cold Gray 1). Darken the upper part more with Carbothello n 750 (Black).

Blend the white part with Carbothello n 585 (Olive Green) and touch with Caran D’Ache n 746 (Dark Flesh 50) and again with Carbothello n 585 (Olive Green). Paint the inside of the lens now. The dark part is painted half with Carbothello n 750 (Black) and half with n 726 (Cold Gray 4). Blend the gray part with Carbothello n 720 (Cold Gray 1) and make the border and the 5 spots with n 720 (fade with the fingers).
RIGHT LATERAL EAR Make a base with Caran D’Ache n 047 (Bistre) and lighten first with Carbothello n 615 (Dark Ocher) and then with n 105 (Ivory). Darken with Carbothello n 610 (Raw Umber) and then with n 635 (Bister).
HAIR HEAD To paint the hair on the head, I started from the center of the glasses in order to have a clear idea of the direction of the hair. Now I will give you the order of the pastels I used: you have to distribute them looking carefully at the photo. Start painting the white parts with Carbothello n 100 (Titanium White). Now work the rest of the hair with a base of Bruynzeel n 27 (Yellow Ocher). To obtain all the light and dark shades use the following colors in this order: Carbothello n 105 (Ivory), Caran D’Ache n 036 (Raw Sienna), Caran D’Ache n 047 (Bistre), Carbothello n 100 (Titanium White ), Caran D’Ache n 042 (Flesh), Carbothello n 635 (Bister), Bruynzeel n 27 (Yellow Ocher) and Carbothello n 615 (Dark Ocher).
Fig 4
Fig 5

With the same colors paint the part of the snout that goes towards the nose.

NOSE Outline the nostril with Carbothello n 750 (Black). The pink part is painted with Caran D’Ache n 044 (Terracotta), 068 (Herculanum Red) and Carbothello n 642 (Caput Mortuum Violet). The part under the nostrils is painted with Caran D’Ache n 746 (Dark Flesh 50) and shaded with Carbothello n 635 (Bister). Brighten your nose with Caran D’Ache n 036 (Raw Sienna). Continue to work with Carbothello n 635 (Bister) and touch with n 642 (Caput Mortuum Violet) and Caran D’Ache n 036 (Raw Sienna). Light up under the nostrils with Carbothello n 726 (Cold Gray 4). Now, very lightly and with little touches, work with Caran D’Ache n 408 (Dark Sepia). Brighten with Caran D’Ache Chinese White.
MUZZLE We continue to paint Harley’s face under the glasses starting with Caran D’Ache Chinese White. All the white parts will be painted first. We paint the rest of the face with the colors listed below (Always look at the picture): Bruynzeel n 27 (Yellow Ocher), Caran D’Ache n 036 (Raw Sienna), n 746 (Dark Flesh 50), Carbothello n 105 (Ivory), n 642 (Caput Mortuum Violet), n 635 (Bister), Caran D ‘ Ache n 093 (Violet Gray), Caran D’Ache Chinese White, Carbothello n 585 (Olive Green), n 681 (Flesh Tint Light) and n 635 (Bister). Work under the mouth with Caran D’ache Chinese White, n 036 (Raw Sienna), and n 746 (Dark Flesh 50). With Carbothello n 750 (Black) paint the spots from which the mustache starts. Reinforce all white parts with Caran D’Ache Chinese White.
EYEWEAR BAND The eyewear band under the head is painted with Carbothello n 750 (Black).

COLLAR The orange part of the collar is painted with Carbothello n 305 (Vermilion Red) and n 221 (Orange). Darken with Carbothello n 635 (Bister). The celestial part is painted with Bruynzeel n 94 (Silver). Lighten with Caran D’Ache n 003 (Light Gray) and darken with n 149 (Night Blue).
Brighten with Carbothello n 435 (Ultramarine Blue Light) and Caran D’Ache Chinese White. Shade with Carbothello n 610 (Raw Umber). Paint the rest of the collar with Carbothello n 750 (Black) I started painting some hair over the collar with Caran D’Ache Chinese White so as to be sure to have a bright white color.
NECK AND BODY Start immediately to paint the white parts with Caran D’Ache Chinese White. Work the rest of the body with Bruynzeel n 27 (Yellow Ocher) and Caran D’Ache n 746 (Dark Flesh 50). Lighten with Carbothello n 105 (Ivory) and darken with Caran D’Ache n 046 (Cassel Earth) and n 036 (Raw Sienna). Blend all the hair lightly with your fingers always following the direction of the hair. Paint the mustache with Caran D’Ache Chinese White.
BACKGROUND I worked the background with Carbothello n 720 (Cold Gray 1) and n 726 (Cold Gray 4). Smudge with your fingers. To protect your work, place it in a frame with glass. I hope you Enjoy Painting this as much as I did! Happy Painting
Elisabetta
Note to reproduction companies/stores: The bearer of the original color magazine has full rights to have this drawing reproduced and enlarged one time for personal use. This notice has been printed in red ink for verification of authenticity.


