
8 minute read
TUI BIRD FEATHER


Tui
Bird
Feather
www.Cindysbrushstrokes.com By Cindy Makowski
Cindy discovered painting in the late 90’s and continues to learn every day. She was finally able to take early retirement in 2017 to commit full time to her painting and teaching. Since then with the help of her husband of 40+ years, her mom Eleanor, and her side kick Diane, she has traveled to multiple art conventions, workshops and seminars around the states. In 2019 she was able to travel to Australia and New Zealand to teach at workshops there and looks forward to returning. Cindy lives in Florida with her husband and dog Chico and now has her mom living with her full time.
SUPPLIES: SURFACE: • Turkey Feather - 8” minimum
SUPPLIES: • Masking tape • Scissors • Felt
BRUSHES: • 1/4” angle • #2 round • #2 flat • Script liner or small detail
PAINTS: DecoArt® Americana Acrylics • Prussian Blue • Ultramarine Blue • Ocean Blue • Black • Citron Green • Titanium (Snow) White • Bittersweet Chocolate • Burnt Sienna • Honey Brown • Sunny Day • True Red
SPECIALTY PRODUCTS: • Acrylic gloss spray PREPARATION: Feathers should be washed in soap and water with a touch of bleach and dried on paper towels overnight. Tape the backs of the feathers. Use either white graphite paper and stylus to trace the pattern or the “Cindy’s Critters Tui Bird rubber stamp” available on my website. www.Cindysbrushstrokes.com. See Photo 1. HINT: Paint absorbs into the feather. We will jump around to allow absorption time and not lose fine details by painting too soon.
PAINTING INSTRUCTIONS:
TUI BIRD: Note: Each feather and feather type that you use will be different in coloration. Use judgement and modify as necessary, then go back and adjust. Example - We will start by putting in base details such as the eye so as not to lose it. Base in with Black. (If your eye is on a black stripe - use blue or lighter brown- when we go back to do final details, you can repaint black before adding finishing touches).
Base Layer Blues: See Photo 2. Using your small round detail brush, fill in the area around the eye, and down the beak using a dark mix of Prussian Blue and Black with a tiny touch of


Ultramarine Blue. It is darker around the eye and brighter out along the beak. Make the lower beak slightly darker and carry the dark color down the neck. Using your detail script, a dirty white line can be added now for the separation of the lower and upper beak. You can thin the paint slightly but do not try and make it inky thin as too much water will cause your paint to bleed out into the feather. Use either your detail round or 1/4” angle and lighten the mix with more Ultramarine Blue for the top of the head and behind the eye. Scrub in some blue color for the remaining back of the neck and upper back /shoulder area. Do not add the blue color to the brown feather area. Add more Prussian Blue and a touch of Black, if needed, to darken once again and lay in the base coat of the wing and tail feathers. Leave spaces between strokes, they do not need to completely touch or overlap, just be close. Let this dry and absorb for a moment before adding the next layer. You can use this same dark mix to base in the feathers on the “thigh” area of the bird.
2nd Layer Blues: With the small detail round, make a green blue mix on the greenish side, using Citron Green and Ocean Blue with a touch of Ultramarine Blue if needed. Scrub this into the area behind the eye going to the back of the neck and down the side of the neck. You can add a few strokes in the back and side neck area. See Photo 3. With the detail or script liner, mix a dirty white (cream) color and pull in lots of tiny almost hair like feathers that curl down from the base of the head, down to the brown area and over the blue of the wing shoulder area. See Photo 4. With your 1/4” angle brush, load a mix of Ultramarine Blue and a touch of Prussian Blue. Add a second layer of feathers for the tail and wing and chest area. Be sure to leave space and separation between feathers and do not cover all the dark. Let absorb for a moment and add Ocean Blue to the mix and add additional
highlights to the edges of the feathers and tips. Add the highlight to the top of the head. See Photo 5. Add minimal highlight to the thigh area, just enough to indicate feathers and break up the darker color. If your beak needs additional highlight, add a light touch of the Ultramarine Blue with a touch of Prussian. We do not want a bright blue beak, just a streak of highlight.
Brown Feather area Base: See Photo 6. Use a mix of Bittersweet Chocolate and Black to base in the brown feather area along the back and the belly. The belly will be darker than the back. While this absorbs you can start basing in the flower branch with a brown mix - Bittersweet Chocolate and Honey Brown added to your dirty brush is just fine. Rinse your brush if needed if you have too much black or dark color.
2nd Layer Brown: Add a second layer of feathers to the brown area using a combination of Burnt Sienna / Bittersweet Chocolate/ Honey Brown, varying the shades.
Final Highlights and Low Lights Blue: Add any additional highlights using Ocean Blue with a touch of Ultramarine to tone down just a bit. Add in any dark shadows and layer separation such as the layers in the wing with a touch of Prussian Blue. If you went overboard with the dirty white in the head, just add some darks back in with Prussian Blue and Ultramarine Blue. Head highlights with a few strokes of mostly straight white. Add a light wash of Citron Blue Green on the right side of the neck. On the wing to the right point of the shoulder there is a tiny white spot of feathers.
Final Highlights Brown: With Honey Brown and White, for a light cream color, add some final highlight strokes of light
Photo 2
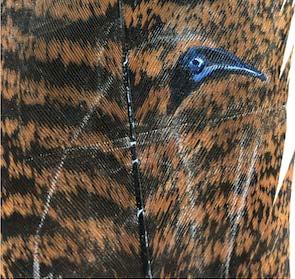
Photo 3

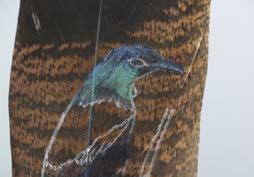
Photo 4 Photo 5
Photo 6

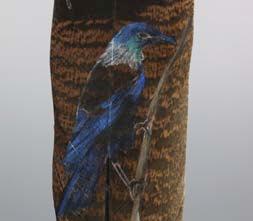

Photo 7
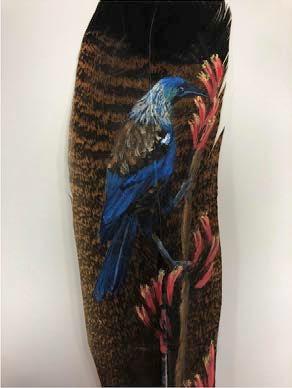
brown feathers. In the dark underbelly area, there are a few pinpoint edges of feathers that are light brown. See Photo 7.
Notice: We did not do the legs yet - waited until the branch was in as they go on top of the branch. Branch Highlight and Shade: Add a highlight on the left using Honey Brown and Sunny Day and a shadow color of Honey Brown and Burnt Sienna, with a touch of Bittersweet Chocolate. Legs of the Bird: The Legs are blue gray in color with a whitish highlight. Base in using your detail round with a dark grey mix of Ultramarine Blue/Black/White/ touch of Burnt Sienna. Add a highlight adding more white to the mix and a touch more blue if needed.
FLOWERS: First Layer: Place the stem and base of the flowers first, using your detail round. Mix a dark mix of Bittersweet Chocolate and a touch of Black. From the stalk or branch, pull upward at a curve and branch off similar to the fingers of your hand, as if you were holding a tiny ball. With the 1/4” angle, load a dark red mix of True Red and Bittersweet Chocolate. Touch and pull into the dark brown on a curve like that of your curved fingers, one or two strokes for each flower. Give this a second to absorb and dry.
Second Layer: Wipe off brush no need to wash. Add True Red and add a second layer onto of the first layer of color. Make your strokes slightly offset so that some of the dark still shows. While this is still wet, pick up the Sunny Day on the tip of your detail brush and add the Stamen dots on the ends of each flower, then streak the yellow down into the red for the highlight. Check your design over. Add touches of highlights, lowlights or color as needed. I added more dark under the brown feathers below the white spot, so they stood out more. Each case will be different, depending on paint absorption into the feather.
Photo 8
Don’t forget to sign your feather, just like any other painting! When your feather is dry, spray with a sealer to prevent the paint from chipping off the spine. See Photo 8. I hope you have enjoyed painting on feathers as much as I do. As always, send me photos of what you create. I love to see them.

Enlarge or reduce the size to the surface of your choice.
Note to reproduction companies/stores: The bearer of the original color magazine has full rights to have this drawing reproduced and enlarged one time for personal use. This notice has been printed in red ink for verification of authenticity.


