Inquries about membership, upcoming events, replacement Viewfinder issues, and special orders should be directed to:
Richard Rejino, LHSA Executive Director 14070 Proton Road, Dallas, TX 75244 info@lhsa.org, (972) 233-9107
Viewfinder is the official publication of the LHSA - The International Leica Society, a nonprofit organization incorporated in the state of Delaware. Copyright 2020. Reproduction or use of any material contained herein without permission of the Sociey if forbidden.
Leica is a registered trademark. It and other trademarks pertaining to the Leica System are the property of LEICA CAMERA, USA, INC or LEICA CAMERA AG.
ISSN 1543-8732
PRESIDENT Brad Husick Medina, WA
EXEC.VICE PRESIDENT
David Knoble Charlotte, NC
VP / TREASURER
William Fagan Dublin, Ireland
IMMEDIATE PAST PRESIDENT
Keith R. Sbiral Chicago, IL
PRESIDENT EMERITUS
James L. Lager
Rolf Fricke
Bill Rosauer
APPOINTED OFFICERS
Viewfinder Editor
Bill Rosauer
Buffalo Grove, IL lhsaeditor@yahoo.com
Associate Viewfinder Editor
Ed Schwartzreich Waterbury, VT
EXECUTIVE DIRECTOR
Richard Rejino Dallas, TX info@lhsa.org
ELECTED DIRECTORS
Class of 2022
Andrew Godlewski Middletown, RI
Bill Royce Kirkland , WA
Kirsten Vignes Minneapolis, MN
Philiip Blair Kenmore, WA
Class of 2023
Sandra Eisert Redmond, WA
Ashwin Rao Seattle,WA
Robert Levite Coral Gables, FL
Class of 2024
Wilbur Norman Sante Fe, NM
David Spielman New Orleans, LA
Amitava "Chats" Chatterjee Manassas, VA
SENIOR DIRECTORS
Gary Hough Woodinville, WA
Douglas Drumheller Pittsburgh, PA
Alan Weinschel Roslyn Heights, NY
CONTRIBUTING EDITORS
James L. Lager Closter, NJ
S.R. Gilcreast Jr. Peterborough, NH
S. Williis Wright Port Washington, NY
A LETTER FROM THE PRESIDENT
by BRAD HUSICK
dear members
We live in exciting times! With the introduction of the new M11, the world of M photography is better than it has ever been. LHSA had the support of Leica to offer a new M11 in our sweepstakes, and the winner was announced in March. There are several great articles in this issue on the M11 and the new Visoflex 2, which itself should soon be compatible with M10 cameras with a firmware update.
We also see the introduction of the Q2 Monochrom in “Reporter” form with tough paint and kevlar covering - a handsome combination we first saw on the M10-P Reporter.
In April we will see a preview of rare Leica items that will be auctioned later in the year and one item in particular may set a new price record! LHSA Sustaining Members (see the article in this issue) will be invited to preview these items in person and some will have dinner with Dr. Kaufmann himself. It’s part of the benefit of being a supporter of your International Leica Society.
I had the pleasure to chat with Mike Giannattasio, President of Leica North America, and he told me that by all measures Leica is doing great and may set new records. If only they could manufacture 35mm APO Summicron-M lenses and M11 cameras faster we would help them exceed their goals!
We’re looking forward to seeing many of you at the Spring Shoot in Colorado Springs, Colorado from May 12-15. It should be a gorgeous setting to try out your new Leica gear or techniques. We will put special emphasis on getting to know your fellow attendees and sharing experiences, learning from each other.
We have been hard at work planning our October Annual Meeting in Dublin, Ireland and we will soon announce the dates and agenda. Since nearly half our members hail from outside the US, we feel especially fortunate to make these meetings more accessible to all.
On a more serious note, we stand in solidarity with Ukraine and with those who are protesting, fighting, and advocating for peace during this fog of war. We support the respect of human rights and freedoms and hope for a non-violent resolution to the conflict. To the citizens of Ukraine, we admire your bravery and loyalty to your country. You inspire the world.
In your service,
Brad
A LETTER FROM THE EDITOR
by BILL ROSAUER as
As expected, the big news from Wetzlar is the new Leica M11 featured in this issue of Viewfinder. Of course, we have Jono Slack’s thorough take on it, plus one from Chats Chatterjee. I was fortunate to obtain a preview copy of the camera along with a briefing on it by Leica USA before the official intro. I wrote up a short piece on the M11 showing the differences between it and the M10. By now, many of you have received your own copy of the new camera, and I am sure you will agree with me that this is an impressive new chapter in the M story!
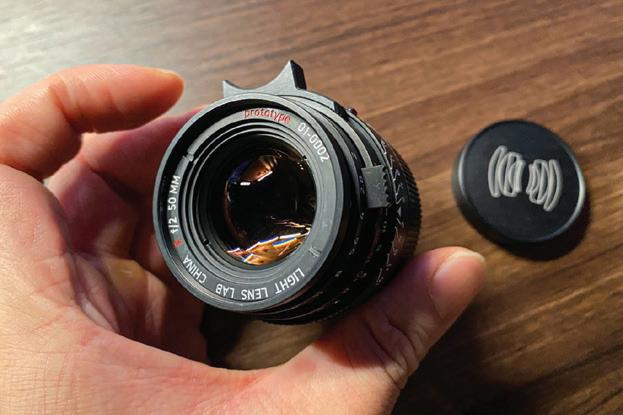
Ed Schwartzreich reports on the latest lens from Light Lens Labs, the 50/2 Elcan lens, following up on their successful recreation of the original 8 element 35 Summicron. If you recall, this was the lens that Leitz Canada (ELCAN) made for the US military during the Vietnam War period. This is one of those lenses I would call Unobtanium. Like the original Leica MP camera for professionals, the original 50/1.2 Noctilux and the Aspherical 35/1.4 Summilux, these are items every true Leica person would love to own, but being made in such small numbers and with the collector value of these items being so high, the average Leica user/collector has no hope of ever owning one. This was my thought process behind the LHSA MP3 special edition and Leica’s own re-issue of the original Noctilux. These are exciting times to be a Leica user when we have offerings like this from independents like Light Lens Labs and Leica themselves. Word has it that Leica has some exciting new re-issues coming, so stay tuned to Viewfinder and we will give you an exclusive look at these exciting new products! We also feature an exclusive new camera strap for the LHSA by my friend Evris of Rock-n-Roll Straps.
While in Wetzlar in November for the Leica Oscar Barnack Awards (LOBA), Dr. Kaufmann handed me a Leitz Phone 1 to evaluate. As their first foray into the world of mobile phones, Leica took a different approach, seeing the Leitz Phone 1 as a camera that happens to have a phone built in. Chats has been testing the phone and taking some very impressive images with it. We took a different approach to our reporting on the new phone as well. Rather than re-hash the technical reports done by others, we contacted Jane Cui, who was heavily involved in the project, to get her thoughts on the process Leica went through to make this project reality. I hope you will enjoy the interview Chats and I did with her.
David Knoble presents part 2 of his series, “Thoughts on Landscape Photography”. In this installment, David gives us some very useful tips on how to improve your landscape photography by discussing equipment used and useful post-processing techniques. I’m sure you will appreciate David’s thoughtful approach to the subject. Continuing his Tips and Techniques series, Dick Gilcreast shows us what a useful piece of equipment the old Leitz Table Top Tripod and Large Ball-Head can be when using longer focal lengths. Doug Richardson gives us his take on using the legendary BEOON for “Camera Scanning” old slides and negatives, including techniques on how to get the best results from old B&W and color negatives. Surprisingly, Doug found that his father’s 5cm f/3.5 Elmar gave the best results with his M9. As Doug says, how many scenes have been re-photographed using the same lens 75 years later? Amazing!
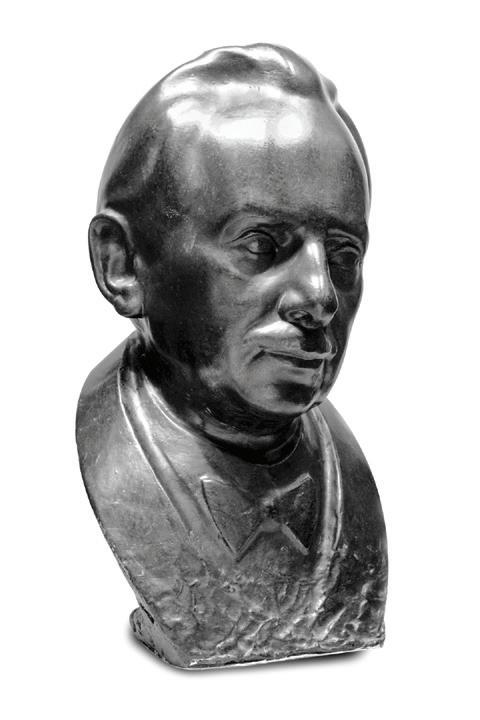
Of course, we have a Jim Lager contribution to this issue. Jim gives us the back story on the bust of Oscar Barnack many of us have seen at Leitz Park, along with those of the other patriarchs of the Leitz hierarchy.
I had the opportunity for an exclusive tour of the Leica plant in Portugal with my group last November. As you may know, tours of this facility are not often granted. I was allowed to take pictures while there, and I will have a full report in the next issue of Viewfinder to give you all an inside look at this facility. Stay tuned!
Peter and David Turnley are currently in Ukraine, documenting the plight of the refugees fleeing from the Russian aggression and war being waged on them by Putin the Barbarian. As Peter puts it, this is a “Two Turnley Story”. Peter is posting regularly on Facebook with some powerful images. He is also writing a moving account to accompany the images. I was going to include some quotes from Peter, but his wishes are this not be done and to respect his copyright on text and images. I would highly recommend that you friend Peter on Facebook and see what the Turnley brothers are doing to make the world aware of this unfolding tragedy.
Bis nächste zeit! - Bill
SUSTAINING MEMBERSHIP
It’s so rewarding to part of a global community, a family of like-minded people who are passionate about Leica photography. By investing in LHSA - The International Leica Society, you’re joining a group of leaders who believe that photography can improve our lives.
As technology and media continue to evolve, now more than ever we rely on you to embrace your community. We are constantly expanding our content and broadening our audience to all generations by making stories and conversations available on the web and social media, via all devices.
• A new special-edition deluxe Sustaining Member baseball cap or shirt (member’s choice) (first year only for 3-year members)
• 10% off registration for all events
• Guaranteed registration for events, even if “sold out”
• Recognition on website, Viewfinder, etc.
• Recognition at events
• Expedited US shipping for Viewfinder
Thank You to our first 100 Sustaining Members!
Toni Alexander - Newport Beach, CA
Markè Anderson - Rochester, NY
David W Darby - Claremont, CA
Ilie T Barb - Gainesville, FL
James Baxter - Washington DC
Mark Bennett - Plymouth Meeting, PA
Henry Berman - Washington DC
Roger Beuerman - Memphis, TN
Randy Buntyn - Gulfport, MS
H. Paris Burstyn - Boston, MA
Stephen Butzlaff - Lake Bluff, IL
Joey Carman - Agoura Hills, CA
Richard Chalfan - Bellevue, WA
Amitava Chatterjee - Manassas, VA
Robert Chesrow - Deerfield, IL
Michael Clements - Highland Village, TX
Kevin Connolly - Snoqualmie, WA
Linda L. Cook - McLean, VA
Sean Cranor - Rancho Mirage, CA
Cira Crowell - Santa Fe, NM
Michael Crutcher - Seattle, WA
Lisa Cutler - New York, NY
Kelly Dempster - Houston, TX
by BRAD HUSICK
Becoming a Sustaining Member helps LHSA strengthen its impact on online - and in the community. Your investment ensures access to fascinating and uplifting content and lively events that increase engagement. We aare grateful for your support and hope you will enjoy the benefits of being a major investor in our family. Visit us online to join us.
In addition to the benefits of a regular LHSA membership, the following additional benefits are provided for Sustaining Members:
• A copy of the book Oskar Barnack: From the Idea to the Leica (first year only)
• Priority-level support in “ask an expert” - 24-hour turnaround in most cases
• Invitation to occasional VIP-only gatherings at annual meetings, often with special guests
• A portion of the annual dues (10%) will be applied to the LHSA Philanthropy Fund and Photography Grant
Emanuel DeNoia - San Antonio, TX
Lena Di - New York, NY
Peter Dooling - Carrboro, NC
Don Dory - Austin, TX
Don Douglas - Springfield, VA
W. Douglas Drumheller - Pittsburgh, PA
Donald C English - Littleton, CO
David & Juliana Farkas - Hollywood, FL
Pat Fastook - Nutley, NJ
Thomas Fey - Oxford, OH
Jeffry Giangrande - Palm Beach, FL
Leslie Gleim - Honolulu, HI
Andrew Godlewski - Middletown, RI
Alan E Grate - Groton, CT
Ian Hamilton - Lake Oswego, OR
Jim Handsfield - Atlanta, GA
Nicolas Heyman - San Francisco, CA
Bruce Heyne - South Padre Island, TX
Gary Hough - Woodinville, WA
Brad Husick - Medina, WA
Mike James
James Kahan - Malvern, PA
Phil Kaplan - Smyrna, GA
Frank Keane - Scarsdale, NY
Michael Kerouac - Upton, MA
Larry Kerschberg - Reston, VA
Albert Knapp - New York, NY
David M. Knoble - Charlotte, NC
William Kyburz - Vienna, VA
Craig Leake - Claremont, CA
James Lehmann - San Antonio, TX
Bob Levite - Coral Gables, FL
Jesse Lucas - Louisville, KY
John Maddox - Palmyra, VA
Ulfried Maiborn - Pullach im Isartal
Steve Marrow - Sudbury, MA
Eugene Michael Maximilien - San Jose, CA
James Nabwangu - Scottsdale, AZ
Susan Napier - Pasadena, CA
Lars Netopil - Solms
Eric Nielsen - Pittsburgh, PA
Robert J. Orsino - St. Augustine, FL
Thorsten Overgaard - Clearwater, FL
Gary Phillips - Baton Rouge, LA
Richard C Pisano - Bel Air, MD
Stephen Podrasky - Aurora, CO
Ritu Raj - San Francisco, CA
James Rice - Carmel, IN
Ford Roosevelt - Los Angeles, CA
Anthony Rose - Thousand Oaks, CA
Subhash Roy - Lexington, MA
William Royce - Prescott, AZ
Karen Ruddy - New York, NY
Roberto Gutierrez Ruelas - Culiacán Rosales
Monique Rydel
Mark Sarkisian - San Carlos, CA
Keith Sbiral - Chicago, IL
Charles Schneider - Hopkinton, NH
Ed Scripps - Bellevue, WA
Jacqueline Scripps - Spicewood, TX
Evan B. Siegel - Newport Beach, CA
Richard Smith - Cashmere QLD
Michael J. Spilotro - Springfield, VA
Fred Stadler - Columbus, IN
Sean Sweeney - Lakeville, MA
Dan Tamarkin - IL
Aaron Tenenbaum - Fresh Meadows, NY
Charles Thornton - Santa Fe, NM
Roger Tooker - Charlotte, NC
John Tubbs - Green Valley, AZ
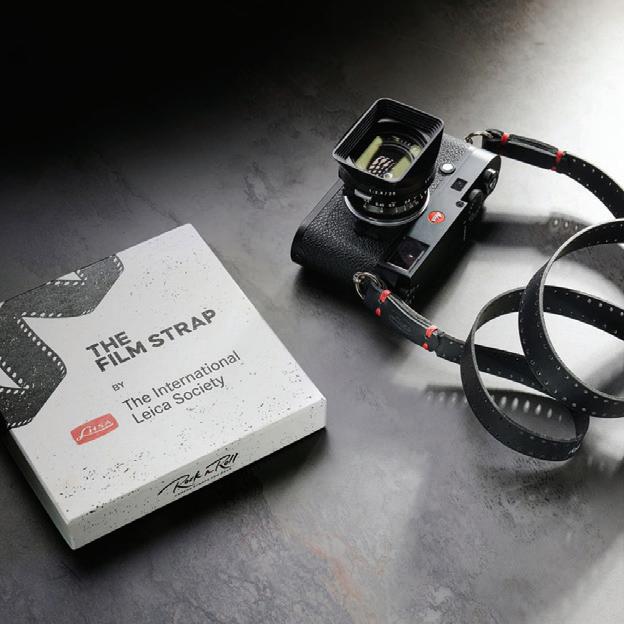
LEICA PHOTOGRAPHERS, THERE’S A NEW STRAP IN TOWN
by BRAD HUSICK
There’s a new camera strap that Leica photographers are going to love. It comes from long-time strap maker “Rock-n-Roll” (www.rocknrollstraps.com), and it’s a special edition designed cooperatively between maker/owner Evris Papanikolas and LHSA - The International Leica Society.
This beautiful, special edition strap is made for LHSA and is available in two styles – "M" for “lug” cameras such as the Leica M, Q2, and CL, and the other "SL" for “strap” cameras including the SL, SL2, SL2-S, and S. It’s made from soft leather and has a distinct pattern of sprocket holes along the outer edges that immediately brings to mind a roll of film. We’ll call this the Film Strap for short. The distinctive accent stitching is in contrasting red, and one end of the strap features the embossed logo of LHSA. The words “The International Leica Society” are featured in white lettering on the backside of the strap near the end. It comes with stainless steel split rings in the M/Q model and leather ends in the SL model. The strap is available in 100cm or 125cm lengths and is 2.2 cm wide.
The Film Strap’s leather is soft and supple right out of the box but strong enough to carry the heaviest of Leica camera and lenses. There is a small amount of stretch that makes the camera feel slightly lighter on the shoulder. It’s narrow enough
David Turner - Bellaire, TX
Robert Upton - Albuquerque, NM
Katy Van Horn - Omaha, NE
Charles Viers - Inverness, FL
Kirsten Vignes - Minneapolis, MN
Keith Walker - England
Alan Weinschel - Roslyn Heights, NY
George Weld - Charleston, SC
Brian Wicklund - Kansas City, MO
David Womelsdorf - Westfield, NJ
to wrap around your arm like a wrist strap, but not so narrow that it cuts into your neck or shoulder. It’s an ideal balance when shooting.
Rather than limiting the production, the straps will be available as Special Editions and produced according to demand for discerning Leica photographers. A portion of the proceeds will be donated to non-profit LHSA, a most generous gift from Evris, a long-time supporter of the organization. The Film straps are now available from rocknrollstraps.com
The LHSA Film Strap is an understated luxury that is perfectly matched to the Leica brand. It carries the International Leica Society brand (by permission) and the 50+ year history of the world’s largest Leica user community.
A CONVERSATION WITH JANE CUI
by BILL ROSAUER
Viewfinder editor Bill Rosauer sat down with Jane Cui, Managing Director, Ernst Leitz Labs, to gain some insights into the creation of Leitz Phone 1, Leica Camera’s first branded mobile phone. Many of you may know this was launched in Japan in July 2021. In this article, we examine Leica’s philosophy in creating this phone.
In October 2019, at the International Leica Society Annual Meeting held in Boston, Massachusetts, Dr. Andreas Kaufmann presented his vision for the future of Leica. In addition to discussing high level plans for camera families and expected progression (the Leica SL2 was previewed under NDA to the International Leica Society board and announced barely two months later), Dr. Kaufmann indicated that he was bullish about the explosion of mobile phone photography and his desire to capitalize on this growing trend. To that end, Ernst Leitz Labs (ELL) was formed on the west coast of USA, a veritable crucible of forward-looking technical talent that could help crystallize his vision of smartphone and computational photography.
This article is not going to delve into specs and other typical content found in review articles. Rather, it aims to expand on the Leica ethos, “Das Wesentliche”, an essentials-driven photography-first approach. Leica is known for its gorgeously designed cameras and elegant user interfaces, and Leitz Phone 1 delivers this in spades. Leica’s Munich-based industrial design team crafted a sleek metallic body with grippy edges and a wraparound rubberized protective sheath, along with a magnetic lens cap engraved with the Leica logo to protect the custom-designed 19mm lens. A red dot completes the look, and reminds every-
one this is a Leica Camera through and through. ELL's engineers were also tasked with creating the Leitz Engine which powers the photography aspects.
In fact, in our conversations, Jane was emphatic in stating that this newly designed product embraces a camera-first approach, designed around a one inch sensor which is also found in cameras. This is evident in the external design, extends into the Leitz Engine and Leica fonts present on Leica cameras, lenses and menus. In addition, the camera app provides users with Leitz Looks that initially offer very capable black and white images, along with a pro-level M.Photo option with various settings which can be further tuned to render glorious images rich in inky blacks.
Future updates will bring visual signatures of various Leica lenses to smartphone users, who will have the equivalent of a Leica camera and say, a Noctilux 1:1.2/50mm in their pocket. ELL and Leica are very clear in their mission - this is all about giving users the ability to capture the world around them with that unique Leica visual signature - what you see is beautifully rendered as a Leica camera would, by respecting the philosophy of photography without employing fancy effects or filters that are so prevalent in the smartphone photography world.
We couldn’t help but ask when the Leitz Phone 1 (or its successor) will be available to users outside of Japan. Jane did not indicate a specific time frame but did state that the Japanese market rollout gives them the opportunity to elicit feedback from a group of users which will be incorporated as appropriate and then made available in other markets at a to-be-determined time. This is a
logical approach because Leica and ELL get the opportunity to harness feedback from a society that embraces aesthetics and prides itself on elegance. Japan has very high standards and physical attributes as well as image quality are very important to users.
What does Leitz Phone 1 give a user? In our opinion, for the Leica newcomer, an opportunity to see what the storied brand stands for in the world of photography, and definitely, it whets their appetite till such time they decide to invest in a Leica camera system. For the experienced Leica photographer, the ability to shoot images at will, with that distinct Leica look merely by pulling a phone out of a back pocket, is incredibly rewarding, thanks to M. Photo.
We can’t wait for Leitz Phone 1 to be available to all of us. Till then, here are some images for your viewing pleasure. All were shot on the Leitz Phone 1, have not been edited in any external software e.g. Adobe Lightroom, and are presented “straight out of the camera”.
Viewfinder is grateful to Dr. Andreas Kaufmann and Jane Cui for their continued support of our mission to educate International Leica Society members about all things Leica!
First Look
by BILL ROSAUER
January 13th, 2022 finally saw the unveiling of the much anticipated M11 camera, the most recent iteration of the M line which began back in 1954 with the M3. I had hoped to be there in person while visiting Wetzlar in November for the intro, but alas, it was not to be! Thanks to Leica USA, I was able to test an advanced copy about two weeks before the official introduction. I will leave you to read Jonathan Slack’s and Amitave "Chats" Chatterjees articles in this issue for a more thorough review of the new flagship M camera.
I will limit myself to my first impressions and the obvious main differences between the M11 and the M10 series cameras, which are well known to many of us.
The first thing that strikes the user of the black version of the camera is how much lighter the M11 appears to be. I took out my own digital scale at home to compare the two cameras. Despite being virtually identical in all dimensions, the new M11 weighs in at 535.5 g, while the M10-P comes in at 646.5 g. That makes the M11 about 20% lighter than the M10. The Silver version of the M11 on the other hand, is virtually the same weight as the M10. Why is the black version of the M11 so much lighter than the M10? The answer lies in the fact that the M11 no longer uses a brass top cover for the black version. The new CNC’d aluminum alloy top is significantly lighter. I also learned that the black chrome finish used on the M10 and other M cameras is no longer environmentally friendly, so a new painted finish with a high ceramic content is being used instead. It is also not the glossy black paint finish which last appeared on the M10-R Black Paint. When we toured the Leica factory in Portugal back in November, we learned of this new finish and saw the paint booths where this finish is applied. The new finish is said to be much more durable than the old black chrome. I noticed that it is very matte black, has much more “tooth” to it than the old black chrome finish, and it is said to improve your grip on the camera. Time will tell how well the new finish holds up. Jono has admitted to dropping the black M11 he had and it did not show a mark from this abuse. As noted above, the chrome version of the M11 uses the traditional brass top plate, so it is the same weight as the M10.
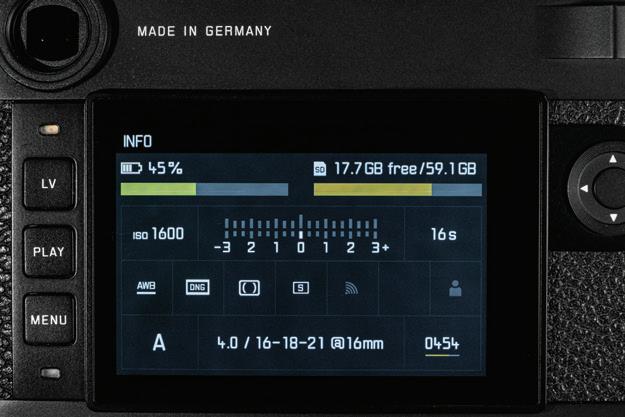
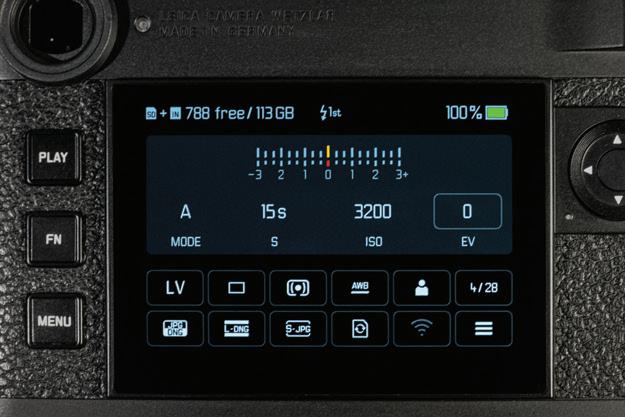
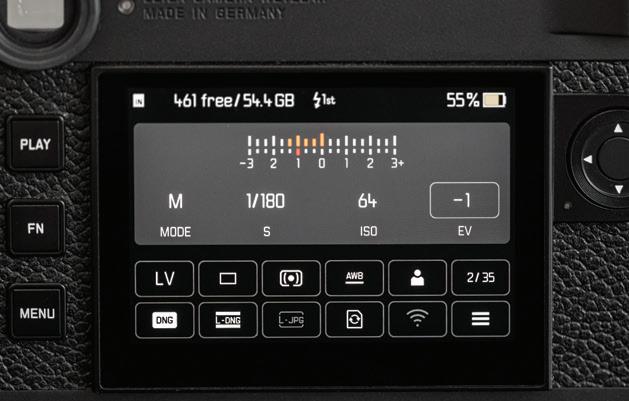
Another change is the rear display and the three buttons to the left of the display. I show a comparison of my M10-P rear display and that of the new M11. Leica has made the display and buttons of the M11 more consistent with the Q2 and SL-2 cameras. I really like
the new display, and it gives quick access to the functions you use on an everyday basis. Take a look at the photos of the two displays side by side. Nothing wrong with the M10 display, but the M11 display gives you more options and it is very easy to use. Of course, like the M10-P and later M10 models, it is a touch screen.
Another change with the M11 is that there are now three configurable function buttons on the camera. One of these is the relocated front button of the M10, now moved to a top mounted function button to the right of the shutter release similar to the M240 video button. On a side note, when leaked photos of the M11 top plate began to appear on the internet, many speculated that video had returned with the new camera. The previous LV (Live View) button is now labeled as FN (Function, which you can now configure as the Live View button), and the thumb wheel now has a click-button feature to access functions as well. These are all conveniently located and very intuitive in use. Bravo Leica for these useful changes!
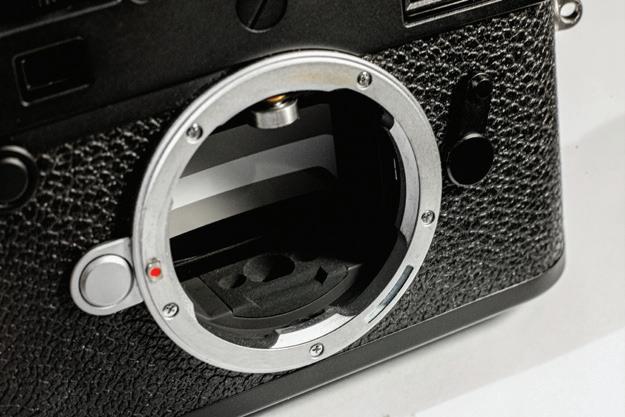
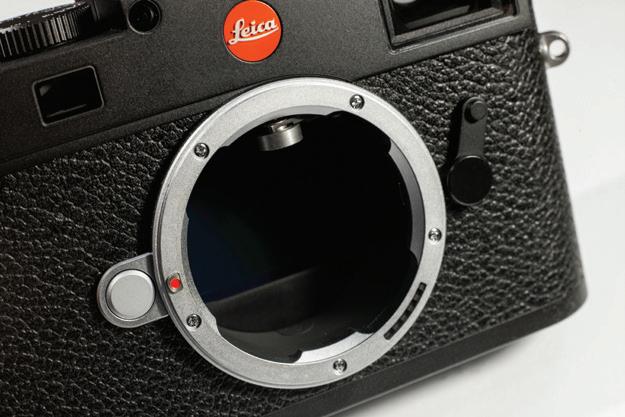
One major change associated with the new camera is the way the M11 meters the scene. Unlike all of the previous digital M cameras which metered off the metal shutter blinds with a rear facing metering cell, the M11 meters with the sensor itself. This now allows all three metering patterns (Spot, Center Weighted and Multi-Field), to be available without having to resort to Live View to use them. Now, when you remove the lens and look into camera body, it is a much less cluttered space. It really resembles the meterless M cameras (M3, M2 and M4) prior to the M6, which you will recall was the first M to have a rear facing meter reading off a spot on the first shutter curtain. In theory, this should allow “problem child” lenses such as the Dual Range Summicron and the 21/4 Super-Angulon to be used without restriction on the new camera. I would still proceed with caution at your own risk with the various legacy collapsible lenses on the M11! On a cautionary note, when you switch on the M11, the sensor is exposed unlike the previous digital M cameras. This accounts for the change in the sound the camera makes when switching it on, as the shutter then opens to meter the scene. This makes it very important to make sure you switch the camera off when changing lenses to avoid getting your sensor dirty.
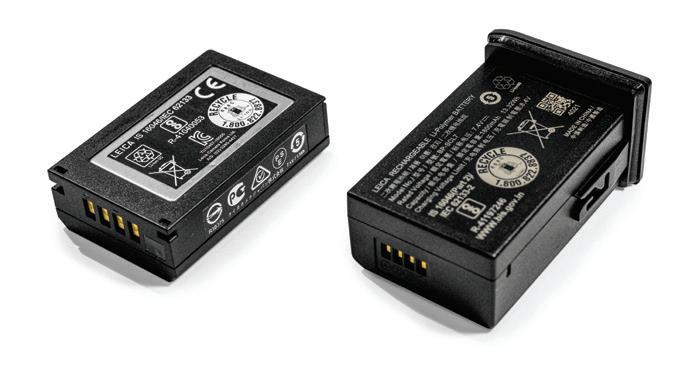
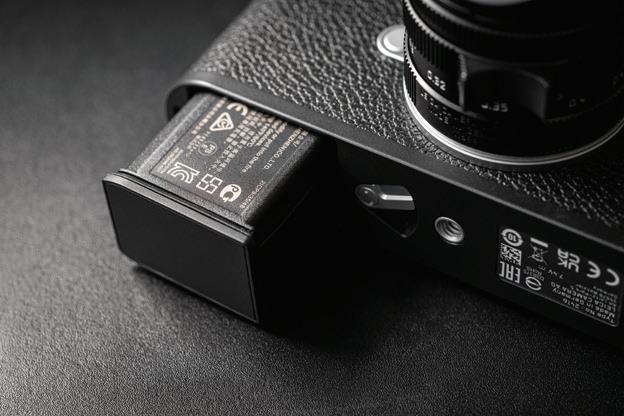
One very controversial change to the new camera is the elimination of the removable bottom plate, something we have had on all Leica rangefinder cameras since the Ur. In another change on the M11 to be more consistent to the Q and the SL2 cameras, you release the battery from the camera bottom with an adjacent lever. The integral battery and its cover also conceals the SD card slot in the camera. There has been much wailing and gnashing of teeth on the Leica forums about this change. In practice, this new configuration did not bother me as much as I thought it would. The good news is, it is now impossible to lose or misplace your bottom plate! The bad news is, the new battery is larger than the old one for the M10, and the integral cover plate makes it more
Comparison of the M10 battery (left) with the battery from the M11 (right) . The M11 battery is a bit bigger as it has more capacity and has an integral cover for the SD Card slot.
Comparison of rear display of the M10 (top) with the M11 (bottom)
The M11 offers more information options in an easy to access format.
awkward to slip into your pocket or camera bag. You can clearly see this in the pictures I took comparing the M11 battery with that of the M10. The good news again is that the new battery has 64% more capacity compared to the old one, so you may be able to get by with just the one battery in camera for a full day of shooting, instead of carrying 2 to 3 extras in your bag. There is also new USB-C port located next to the battery cover. This can be used to tether the camera, as well as for in camera charging or even running the camera off an auxiliary power source. The new charging base is much smaller than the previous M chargers. You could even leave the charger base at home, and use the supplied USB-C cable or a high capacity aftermarket cable to charge the camera through the port when away. Neat!
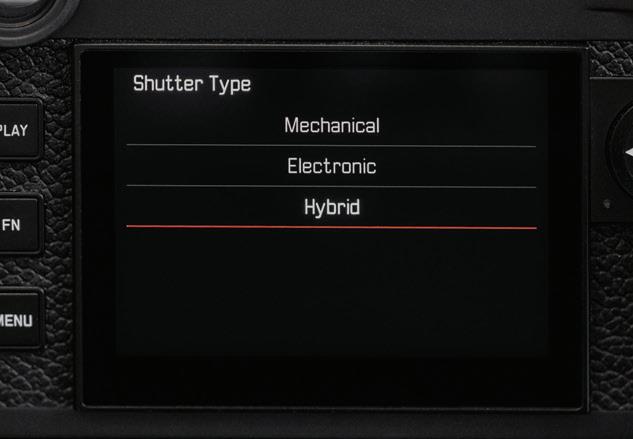
Another new feature of the M11 is that you have three different options for the shutter: Mechanical, Hybrid and Electronic. Each of these options has its advantages under certain circumstances. One of the options I was most interested in was the electronic shutter. At first, I didn’t realize I was actually taking pictures as there is no shutter sound. It was only after I had made 4-5 exposures in a row did I realize I was actually taking pictures. Of course, having an advanced sample of the camera with no instruction book to refer to, there was no way to know what was happening. In using the electronic shutter mode, you need to be careful not to use it indoors under certain types of artificial lighting, such as LED type lights. As you can see in the example shown, I had some very odd banding artifacts in the images which resemble venetian blinds. Looking a little closer, you can see that the banding effect is stronger with the undercabinet lights in my kitchen versus the ceiling lights. Another potential issue with using the electronic shutter is the rolling shutter effect. This is a well-known issue with electronic shutter digital cameras, and I have heard of others having this concern with the M11, but I did not see this with any of my images.
Overall, I really enjoyed the short time I had with the new M11, and look forward to getting to know it better in future when I can spend more time with it. Leica says they have made 40 improvements over the M10 with the new camera, and I have touched on a few of those here. I found the new rear display very useful, making your most frequently used options and information readily accessible. The three different resolution options available are very exciting and useful, as are the new crop modes. The non-removable base plate may upset the purists, but in use, the simplified new battery/card access is great. Yet the camera retains a very familiar feel in your hand while you are using it; it is quintessentially an M. The M11 makes some very useful improvements over the M10, without radically changing the M camera we all love and the M camera experience. This may disappoint some of you, but for the majority of M users, the M11 is a worthy continuation of the M line, truly a legend reinvented!
Comparison of the area behind the lens mount (throat) of the M10 (top) and the M11 (below) . The M10 features a back facing meter and meters off a pattern on the first shutter. The M11, which meters with the sensor, seems empty by comparison. The M11's lack of a meter in the camera throat recalls the days of the "classic" meterless M cameras. This should make it easier to use "Problem Child" lenses on the M11.
Example of the banding issue using the M11's electronic shutter under LED interior lighting. Notice the undercabinet LED light banding is worse than that of the overhead lights.
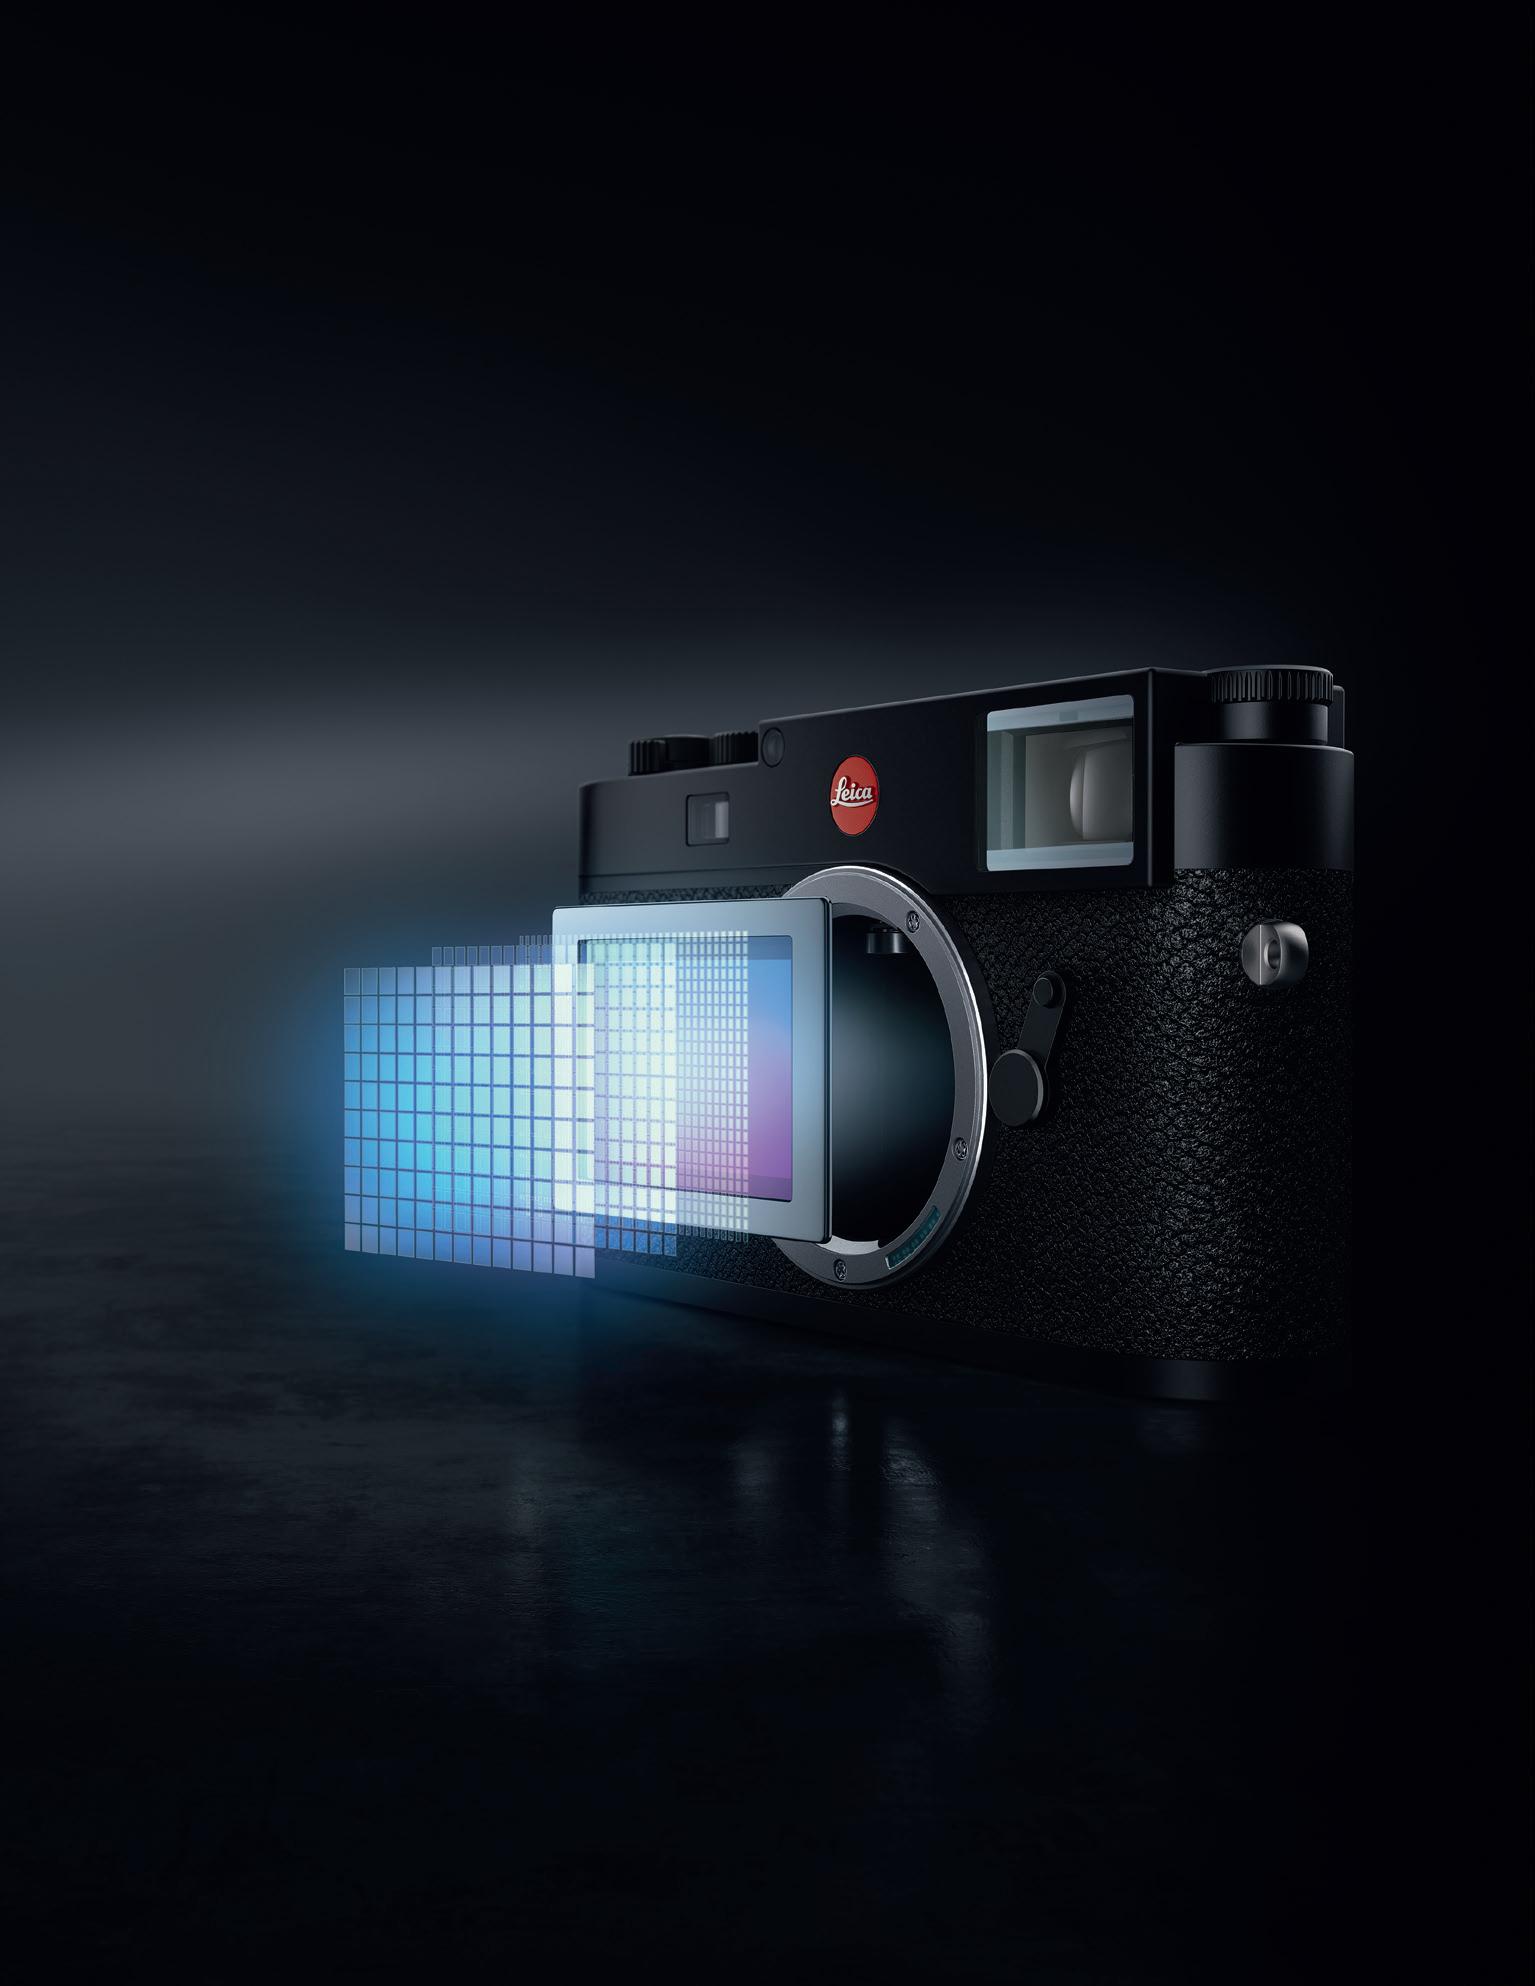
Leica Camera's M11 rangefinder, the newest member of the Leica M family, announced January 13, 2022 at 3pm CET / 9am EST / 6am PST, "a new benchmark in digital photography as the most flexible M-System camera in Leica’s history" (Leica Press Release) is a 35mm Messsucher with the trusted Leica M bayonet mount, a 60MP third-party backside illumination CMOS sensor, 14 stops of dynamic range (at 60MP, extends to 15 at 36MP and 18MP), the Leica Maestro III processor supporting 4.5fps, 64GB of onboard memory, and ISO 50,000 light sensitivity. It proudly joins and builds on the strengths of its M8, M9, M10, M10P, M10M, and M10-R digital siblings while forging new territory of its own. I love all my Ms, and each generation brings something new that convinces me the ultimate M has been born, so it was interesting to see how Leica has enhanced the Leica M11 with over forty (40) improvements, resulting in a classic icon reimagined for the 21st century.
LEICA M11
A CLASSIC ICON REIMAGINED FOR THE 21ST CENTURY
by AMITAVA “CHATS” CHATTERJEE
(this page)
Gorgeous, Iconic Design (courtesy: Leica Camera AG).
(opposite page, left)
Leica M11 mit Leica Summilux-M 1:1.5/90mm ASPH. 1/16000s at f/1.5, ISO64. Electronic Shutter.
(opposite page, right)
Leica M11 mit Leica Summilux-M 1:1.4/35mm ASPH. FLE. 1/12000s at f/1.4, ISO64. Electronic Shutter.
LONG VERSION I am pleased to share that Leica Camera privately briefed me under NDA on the just-announced Leica M11. I subsequently received one for review in the beginning of December 2021 and was able to take it through some of its paces over the span of two weeks. I did not attempt to conduct any scientific tests but just went shooting, spending time at home, Clifton, VA, Occoquan, VA and other areas in Northern Virginia and Washington, D.C.
Physically speaking, the Leica M11 is identical to its Leica M10-R and M10 Monochrom siblings, save for the relocation of the focus peaking button to the top and right of the shutter button along with some modifications to the physical rear button layout, button "seating", rear screen protrusion and of course, the fixed base that eliminates the base plate. There was no need to change the beautiful Leica M design save for a few enhancements to support the overall mission of being a classic icon reimagined for the 21st century. The Leica M11 physical rear button layout has been redesigned to be consistent with SL2, SL2s, Q2 and Q2M with an arrangement of PLAY/FN/MENU while Leica M10-R and M10 Monochrom have LV/PLAY/MENU. I am not sure why Leica M10-R did not adopt the same button layout because it was released after Leica SL2. The onscreen "summary" menu concept has also been migrated over to Leica M11, and the "cockpit commonality" with SL2 and Q2, to quote an attribute of Airbus, another European giant, is pleasing. Live View (LV) is now a menu option selectable through the touchscreen interface and can be mapped to the FN button as well. You know where everything is, and what it is meant for. This allows a user to dive right into the act of photography. In true Leica form, everything has been distilled down to Das Wesentliche - the essentials.
INTERNAL & EXTERNAL IMPROVEMENTS During my private briefing, I was told Leica M11 has received over forty (40) improvements, starting with the Leica Maestro III processor. All of them were not elaborated in our conversations, but here are the ones I spotted, and they are detailed below, grouped by internal or external improvements. Since I received a pre-production camera, images shot with Leica M11 shown herein may not fully represent final image quality.
>> INTERNAL IMPROVEMENTS
1. Larger 60MP sensor with variable resolution: Internally, the Leica M11 sports a newly-designed and custom-developed fullframe backside illumination CMOS sensor pushing out 9528x6328 pixels for ~60.3MP of resolution (L-DNG). Two smaller resolutions are available at 36MP (M-DNG) and 18MP (S-DNG), and dynamic range expands from 14 to 15 stops when moving from 60MP to 36MP. JPEG file formats are also available. According to briefing materials provided by Leica, the full sensor area is used for these smaller resolutions. Contrary to online rumors, there is no IBIS.
2. Electronic Shutter: What really caught me off-guard the first time I went out was when I pressed the shutter and didn't hear a sound. None whatsoever. I took another pic, and then it dawned on me. Leica M11 now possesses an electronic shutter which kicks in at speeds faster than 1/4000s in Hybrid mode, for a maximum of 1/16,000s, which means those of us that are lovers of fast lenses can leave our ND filters and filter cases at home, and boldly shoot wide open in bright light. This is most-welcome elimination of friction in the user experience. One can choose to engage one of three shutter types. Permanent engagement of the Electronic shutter mode renders this camera absolutely silent at all shutter speeds which is going to be absolutely lovely in situations that require absolute discretion (but be cautioned about "banding" on
images that is not the camera's fault but because modern lighting rapidly turns on and off, usually 60Hz, and sensor readout isn't that fast, yet). This is but one example of why I say that this is a classic icon reimagined for the 21st century. The rangefinder experience is still there in spades, but these little improvements are quite welcome.
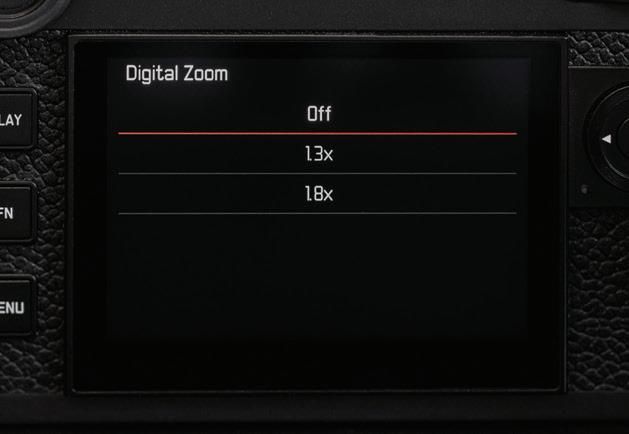
3. In-camera Digital Zoom (1x, 1.3x, 1.8x): this is a useful feature for when you leave your long lenses at home. Digital Zoom (1x, 1.3x, 1.8x) crops the image and present its digitally-magnified form in-camera, and when exported to Adobe Lightroom. Clicking on the Adobe Lightroom Crop button shows that the full image is available as well.
4. Base ISO64 (maximum ISO50,000, similar to M10-R and M10 Monochrom): I have not done any fancy studio ISO sensitivity measurements, but it is useful to have such a wide range of ISO sensitivities to choose from when the situation requires you to get a picture, grain and high frequency detail loss notwithstanding. A new base ISO64 offers wonderful image files that quite honestly look amazing right out of the camera. I did run some rudimentary tests at both ends of the ISO spectrum. While you get your shot, you sacrifice some detail. It is a tradeoff when you need your shot or the shutter speed. Pixel-peeping at 200% shows how ISO50000 causes high frequency detail to be lost, but this to be expected. However, it is better to have a decent image that is eminently usable rather than none at all!
5. 14/15 stops of Dynamic Range: This was mentioned in my briefing but I did not test this. I’m not a measurebator. I did however notice that there is sufficient latitude in the images and even those that are over- or under-exposed on purpose or by accident, can be recovered very nicely.
6. 64GB Internal Memory: 64GB of onboard camera memory is going to be a lifesaver for many. During my testing, I stepped out more than once, having forgotten to pop the SD card back in. I didn't miss a beat, and kept doing what I needed to do, thanks to in-camera storage. When I came back home, I connected the
Leica M11 to my iPad Pro and was able to download the images. This is really lovely, and I hope we will see larger storage capacities become available in subsequent Leica cameras. I also noticed that using FOTOS 3 as a remote trigger stores the image in internal memory instead of the SD card. I am not sure why this is the case because if one is used to popping the card out and physically transferring images, this is something to be aware of, especially when one has selected that images should be written to the SD card first before using onboard camera memory. I suspect this can be fixed in a subsequent firmware update.
7. Battery Capacity: Another improvement which many of you may appreciate is the larger battery capacity. According to Leica, the new battery has 64% greater capacity compared to its predecessor. The battery is bigger, but the charging apparatus is smaller. The supplied USB-A-to-USB-C cable is connected to a small power brick and various adapters are included. According to provided materials, a single charge can enable between 700 and 1700 images but my experience shows this to be less. A spare battery will provide comfort.
8. Menus: Leica M11 has a summary touchscreen-enabled menu ("cockpit commonality" with Leica SL2 and Leica Q2) which also supports interaction via the thumb wheel. However, within the menu pages themselves, users are limited to interaction via the Direction Pad. I think it would be good to provide the choice to a user for their preferred mode of engagement, i.e. via touch or Direction Pad. That being said, the various menu pages are shown below:
(above) Leica M11 mit Leica Summilux-M 1:1.4/35mm ASPH. FLE. 1/160s at f/1.4, ISO500. (left) Digital Zoom OFF (right) Digital Zoom 1.8x (below) - Leica M11 ISO64 (left) vs. ISO50000 (right) . Gitzo Tripod. FOTOS 3 Remote Trigger.
(above) Leica M11 mit Leica Summilux-M 1:1.4/35mm ASPH. FLE. 1/1000s at f/1.4, ISO64. (left) Overexposed (right) Recovered (below) Leica M11 mit Leica APO-Summicron-M 1:2/50mm Black Chrome LE. 1/250s at f/2, ISO320. (left) Underexposed (right) Recovered
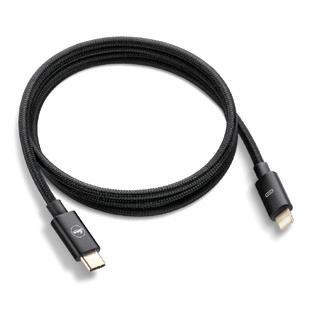
1. USB-C Port: Leica M11 gives us a USB-C port located on the camera bottom, alongside the battery enclosure. The USB-C port allows tethering to Leica FOTOS 3 for camera remote control and image review/download. It also allows a user to charge the battery by connecting a cable to an external charger or battery pack, as well as access images via tethered connection using the updated Leica FOTOS 3 app (camera file transfer settings need to be configured for Apple MFi in-camera) or Adobe Lightroom Mobile (camera file transfer settings need to be configured as USB PTP in-camera). I can already foresee situations where I could use an external battery pack to charge the BP-SCL7 battery while out and about. I bet I will Velcro the battery pack to a tripod leg when required!
2. Tethering Ability: The supplied USB-C/Lightning FOTOS cable is beautiful - I wish Apple would take a cue from Leica and provide such gorgeous accessories. The cable is braided and complements the Leica M11 very well. At first glance, it seems like Kumihimo Japanese silk braiding but I don't think it is. With it, one can connect to an iPhone and use the FOTOS 3 app Remote functionality to control the camera and capture images. I observed that such pictures are stored on the Leica M11 internal memory instead of the SD card. A USB-C/USB-C cable is not provided so I had to dig one up to connect the Leica M11 to my M1 iPad Pro and Samsung Galaxy. I did some non-scientific tests with image downloads - accessing the in-camera memory is very fast, comparable to the speeds I see when I pull the card out and plug it into a Thunderbolt card reader. For those who care, you will be pleased to note that an M1 iPad Pro and Adobe Lightroom do not bat an eyelid at the larger file sizes. Leica have done some optimization work with Apple, because the process involves MFI (Made for iOS)
3. Battery Access: Leica has done away with the removable baseplate that is common to decades of Leica M cameras from the Leica M3 through to and including the Leica M10 family, and aligned the battery experience with Leica SL2, Q2, and their respective siblings. This design choice is certainly an emotional one for many. However, from a purely design improvement point
of view, this friction elimination is good! A spring-loaded battery release latch allows a user to pop out the Leica M11 BP-SCL7 battery, tap on it to free and pull it out. The SD Card slot is revealed inside the battery housing, and a lip on the battery covers it. The BP-SCL7 battery has weather sealing which will minimize water and dust entry.
4. Rear LCD Screen: I have read a few rumors about Leica M11 eliminating rear physical buttons, housing a larger rear screen, etc. Based on my observations and measurements using a Maker's Cabinet Stria, the usable screen area is identical to Leica M10-R and Leica M10 Monochrom. One point of difference though: the buttons are not a part of the screen housing on the Leica M11 (as in Leica M10-R, Leica M10 Monochrom and Leica SL2), and as a result, the leatherette covering is slightly longer on the left side (looking at the screen)
5. Leica Visoflex 2: Leica did not provide a loaner Visoflex 2 for me to evaluate, so I have no experience here. I have been given to understand that it is now in a metal housing, and backwardcompatible with the Leica M10 family. On the other hand, the incumbent Visoflex is not forward-compatible. I tested it and did not see any evidence of operation, although some of the online rumors alluded to this.
6. Leica M11 Firmware and Leica FOTOS 3: Leica has been doing a lot of work on the camera firmware as well as FOTOS 3, and during my time with the new Leica M11, Leica introduced firmware version 1.1.3.0 and 1.2.0.0, both of which possess various improvements that make the camera so much more pleasurable to use. There have been some overall speed enhancements as well as snappier responses when connecting to FOTOS 3 wirelessly and this has to do with chip architecture and such. I also got to see work done to improve the auto white balance, but honestly, this is not a worry. Leica are wizards at tuning sensors to render the Leica colors we all love, and I suspect this will be no different. Frankly, Leica have a great track record of providing firmware updates full of meaningful features and enhancements so I am excited to see how they will push the capabilities of this classic icon reimagined for the 21st century. Geotagging is the one enhancement I am most
excited-about. Leica indicate this will be available in the second half of 2022. I have had a few conversations with Jono about this, and his idea of providing geotags for the user and the object in focus will be amazing. This is all mathematically possible. You can download the latest FOTOS from the Apple App Store.
BOTTOMLINE I am a very active user of all my Leica gear. I still pick up my Leica M9 and Leica M Monochrom "Henri" regularly, and love what they do, ker-plunk shutter sound notwithstanding. I continue to send film through my Leica M6 Millennium limited edition and develop at home. Leica M10-R and Leica M10 Monochrom also do a fantastic job. This begs the question: what do I like about Leica M11? First of all, Leica M11 is an immediately recognizable friend with a multitude of improvements such as Electronic Shutter, Visoflex 2.0, Onboard Memory, Faster Response, Dynamic Range, Improved Battery Capacity, USB-C Tethering, Faster Image Transfer, and better FOTOS 3 integration, all of which collectively elevate the end-user experience higher than ever before. Leica M11 is a modern, snappier, responsive avatar of our loved Leica M cameras. Leica have truly crafted a classic icon reimagined for the 21st century.
with. This was my first time engaging with them formally, and seeing how methodically we all work together to identify opportunities for improvement, describe the scenarios/circumstances where unexpected behavior occurred, attempt to replicate them, and then provide feedback to the Leica team. These efforts make Leica M11 a better camera for all end-users. If you have done any software development and are familiar with SDLC, the process will be immediately familiar. Thank you for the introductions to this awesome group of folks, Jono!
Where can I buy one? - You can order your own Leica M11 from Leica Stores and authorized Leica Dealers for $8,995 plus applicable taxes. I hope you get your camera soon, and look forward to seeing your images! In the interim, I have attached some for your viewing pleasure.
Where can I see additional sample images? - Images with associated EXIF info included at https://adobe.ly/3GmHzyz. Please check out https://www.instagram.com/chatsphotog as well.
One more thing - Before I forget, please check out Jonathan Slack's superb review of the Leica M11 here in this issue of Viewfinder. Jono is a personal friend, and he, along with Craig Semetko, Helen Todd, Bill Rosauer, Hari Subramanyam, Milan Swolfs, Evris Papanikolas, Luigi Vaccaro, Paulo Silveira and countless others are why I feel blessed to be in our global Leica Camera Family.
Acknowledgments - Gratitude to Leica Camera USA, especially Kiran Karnani (Leica Camera USA Vice President, Marketing. Congratulations on your promotion, Kiran! Very well-deserved. IG @kiran.karnani), Viktor Weigant (Leica Camera AG, Quality Assurance Manager, Wetzlar, Germany), Nico Koehler (Leica Camera AG, Product Manager, Connected Products, Wetzlar, Germany), Nathan Kellum (Leica Camera USA Product Specialist, IG @ kellumphoto). Kudos to Dr. Andreas Kaufmann (Leica Camera AG, Chairman of the Supervisory Board, IG @heavyleicauser) and the Leica Wetzlar team for yet another fantastic camera. In all honesty, I am amazed that Leica designed, built and delivered the Leica M11 during a global pandemic, now unfortunately in its third year with numerous lockdowns, restrictions and loss. I suspect many meetings and reviews were virtual, and would not be surprised if even fully-vaccinated team members caught COVID-19 during the development cycle, booster notwithstanding. Like many others, I am tired of virtual interactions and long for face-to-face meetings where it is easier to grab a marker, whiteboard ideas, and get things done. Despite all these challenges, Leica have delivered a classic icon reimagined for the 21st century. Seriously, KUDOS to the entire Leica team. Beers on me when I'm in Wetzlar next! I am deeply sorry for catching COVID-19 and missing A Celebration of Photography last November. I can't wait to be back.
I am also in awe of and grateful to the group of dedicated Leica User Forum beta testers whom I have had the pleasure of working
Amitava “Chats” Chatterjee ("Chatsphotog") is very active in the global Leica family. A board member of The International Leica Society (LHSA), he is published in LHSA’s The Viewfinder and its proofreader-at-large. He frequents various Facebook Leica Photography groups as well. You can find him at www.chatsphotog. com, Facebook (@Chatsphotogpilot), Instagram (@Chatsphotog) or Medium (@Chatsphotog).You can also buy him a coffee!
THE LEICA M11
by JONATHAN SLACK
Leica M10 was announced on January 17, 2017 - four days short of five years ago.
I was in Wetzlar for the launch, which was a wonderful affair. First of all, we were wined and dined, and then after the presentation the store was opened and you could go and buy your own camera. I know several people who were so excited that they bought both a chrome and a black camera!
The M10 has been a sparkling success with lots of variants over the last five years including the M10 Monochrom, the M10-D without a display screen, the M10-P with a touch screen and quieter shutter, and most recently, the M10-R with the improved 40 mp sensor.
I think that lots of people have been feeling that the M10-R is really the ultimate M with a wonderful sensor, quiet and subtle shutter noise, the size of the M3, and a refined and accurate rangefinder. I must say, having been using the M10-R since 2019, I was very much feeling that nothing else was needed.
So how can Leica convince us that anything else is needed? Indeed, is anything else needed? I'm going to try and answer these questions during the course of this article.
I've been watching all the speculation (and leaks) about the M11, and people's responses to this have been very helpful in deciding what to write about in the article. I realise that my personal concerns aren't the same as everybody else's, so it's been valuable to get a handle on what other people mind about.
I'm hoping that this will be a useful resource to anyone who is about to receive their new camera (or has just received it) .
LO OKING AROUND THE M11: HARDWARE
Let's start by looking at what Leica has changed with the M11 (and there is a lot!) .
The Body · Superficially the M11 looks very much like the M10, the dimensions are identical and everything appears to be in the same place. However, a closer examination shows a lot of differences.
First of all, there is no base plate. This is quite an emotional issue for lots of M users (myself included) . Removing the base plate to replace the battery or get at the SD card slot could be bit of a pain, but it was also different from any other modern camera and more often rather a pleasure.
Of course it also represented continuity with the very early days of Leica film cameras.
The base of the M11 holds a battery with a battery release switch, which is the same design as that on the SL2 and Q2 cameras. The battery, however, is different. (More about that later.)
New Button Layout · Just like the M10, the M11 has three buttons to the left of the LCD, but unlike the Live View / Play / Menu options on the M10, they have been changed to Play / FN / Menu options like the SL2. The FN key defaults to turning on and off Live View, but it can be configured to any other function as desired.
The rear plate has been tidied up a bit. The buttons are now separate from the LCD, and the LCD is flush with the top plate and base of the camera.
The front configureable button on the M10 is gone, but there is a new button on the top plate - in the same position of the Video button on the M (Typ 240). Like the FN (above) this button can be configured to default to any particular menu option (I have it set to magnification like the old front button on the M10) .
The third function button is accessed by a press of the rear thumbwheel. A short press of either of the FN buttons will bring up the last selected menu option. A long press brings
up the menu of available menu options. If you choose this, then it will be used as the default next time. The thumbwheel itself can be set either to Focus Assist or to Exposure Compensation.
The four-way rocker switch hasn't changed, but now it is only used for navigation and confirmation. Pressing the central button doesn't bring up the status screen as it did in the M10all the status information is now included on the Quick Menu screen.
To summarise, there are now three function buttons, each of which can be configured as desired and the thumbwheel can be used in the same way as the M10. I'll go into the Menu options in more detail later on.
The Finish · Apparently the Black Chrome process has become un-ecological to continue with. So, the new M11 comes with two finishes: first of all a traditional Silver Chrome with a
brass top plate as before, and secondly a Black Paint finish with an aluminium top plate. The new black paint is a modern solution and kinder to the environment.
The camera is also a a whole 20% lighter than the chrome version (532 gm vs. 660 gm). This is quite a significant difference and will be relevant to many buyers. It also has a seriously tough finish. Finally, Leica has managed to make a digital camera which weighs the same as the M6.
After seven months, trips to sandy beaches in Crete and rainstorms in the UK, the finish only shows signs of being slightly shiny on the corners .With the same treatment, the SL2 and Q2 Monochrom looked decidedly-used, with worn corners and lots of bright points. I've been using a shoulder strap which rubs against the camera all the time (with no protector) and there is little sign of wear on the paint above the strap lugs. What's more, the black finish is more 'grippy' than either the chrome or the old black finishes. As I understand it, the finish is the same as the 'Reporter' editions of the M10 and Q2, except that it's black rather than green.
New Battery · One of the obvious shortcomings of the M10 was the battery life, especially when using the EVF. The new battery for the M11 is properly weather-sealed and fits into the base of the camera in the same way as the Q2 and SL2 battery with a similar latch mechanism.
It would have been good if the new camera used the same battery as the Q/SL, but in that case they would have had to have a new compartment to hold the SD card, and as always with the M cameras, space is at a premium. So, the new battery leaves room for an SD card slot on one side of it. The only downside is that the release lever is obscured when the camera is mounted on a tripod. It would have been nicer if you could change the battery/ SD card without having to take the camera off the tripod. On the other hand, with the greatly improved battery life and the internal memory, perhaps that isn't quite so relevant.
The battery life is a really much better (CIPA suggests 700 images per charge) . On occasions, I've used three batteries in a day with the M10, but on the M11 I've not ever exhausted a battery in a day's shooting - even with the power saving switched off and using the EVF full time.
64 gb High Speed Internal Memory · The internal memory is an alternative to two SD card slots (and presumably takes up less space)
If, like me, you are prone to grab a dog and a camera and head out into the world only to find that you left your SD card in your computer, then the internal memory is a real bonus. The only downside is that you have to connect to the camera via the USB cable to get files from it. Either that or else copy files from the internal memory to an SD card (which is simple and works well)
You can choose various ways to handle the internal storage together with an SD card. The current options are:
• SD First (uses SD until full then INT)
• Backup (writes files to both together)
• Split (DNG on INT, JPG on SD)
• SD Only
• INT First (uses INT until full, then SD)
Several people requested a sixth option and this will be on the next firmware release: Split (JPG on INT, DNG on SD) .
It will be very useful for event shooting: using FOTOS for quick access to social media with the JPG files, which would also serve as a backup to the DNG files which would be put on the computer later via the SD card.
The internal memory is extremely fast. In my tests it is slightly faster than a SanDisk 128 gb Extreme Pro 300mb/s UHS-II SDXC for short bursts and about 20% faster for extended shooting.
High Speed Shooting & the Buffer · The camera also has a 3 gb buffer, which is enough for fifteen DNG images and as many as 100 JPG images. There are two high speed shooting modes, one at 3 frames per second and the other at 4.5 fps
New Maestro Processor · The M11 has the Maestro III processor which is used in the SL2 and the Q2 to allow much faster processing and better power consumption.
New 60 mp Sensor & Image Quality · The M11 has a new 60 mp BSI CMOS sensor. The base ISO is 64, so that's an improvement as well. The DNG files from the M11 are a joy to work with in Lightroom.
High ISO is about 1.5 stops better than the M10-R (which is still very good) , but there is generally more detail available as the resolution is higher. I'm happy to shoot at ISO 5000, and 6400 is very usable, and 12500, whilst losing some detail, still has good colour.
The M11 also shows noticeably less vignetting than the M10-R whilst the excellent colour feels more 'realistic' (although perhaps not so charming) . Skin tones are excellent - in my opinion better than any previous M camera. I'm not a fan of Auto White Balance in daylight, but as a result of literally
thousands of image samples being sent in to Leica during the testing period, this works very well (in artificial light too)
The dynamic range seems to be very good (but I don't really have a way of measuring it) . It is at least as good as the M10-R and probably a little better - although I found it very slightly easier to blow highlights than with the M10-R (the M11 is still much better than the 24 mp M1o)
The amount of detail at 60 mp is quite startling and suitable for very big prints.
Full-Time Off-Sensor Metering · All previous M cameras with built-in metering (with the exception of the M5) have metered off the shutter curtain. The M240 and M10 also metered off the sensor in Live View.
The M11 has dispensed with this, and now metering is only via the sensor. This has the advantage that the metering is much more accurate (with Multi-Point, Center-Weighted and Spot metering options)
Live View metering is inherently slower as it means that the shutter must be open to take the reading and then shut and re-open to make the exposure. With the M240 and the M10,
this page: "Ulysses" - 35mm Summilux-M f/1.4 ASPH, 1/640th sec, ISO 64 opposite page: "Sardines" - 35mm APO-Summicron-M f/2 ASPH, 1/1000th sec, ISO 64
shooting was much slower than with Live View switched off (and metering off the shutter curtain) . This isn't the case with the M11, but I'll deal with responsiveness later on.
Electronic Shutter · With the M11, like the SL2, you can choose:
• Mechanical
• Hybrid
• Electronic shutter
With the mechanical shutter you have the same limit of 1/4000 th as the M10. Hybrid uses the electronic shutter when the speed required is over 1/4000th. Electronic uses electronic shutter at all speeds. The Electronic shutter goes up to 1/16000 th
The electronic shutter is fantastic for using fast lenses in bright light, but not for capturing sports or fast moving action. The readout on the electronic shutter takes about 1/10 th second (CMOS sensors read line by line) . This means that if objects are moving fast through the frame, you get tilted verticals and you may also get banding in artificial light (depending on the shutter speed and the light source) . But, for static or slow movement when you want to shoot wide open in bright light, it's a real asset. These issues are found in many cameras which have progressive electronic shutters.
Worth noting that if you have set the camera to electronic shutter and you want to select shutter speeds above 1/4000 th , then you need to set the shutter speed dial to "B" and you can then select the desired shutter speed in the menu.
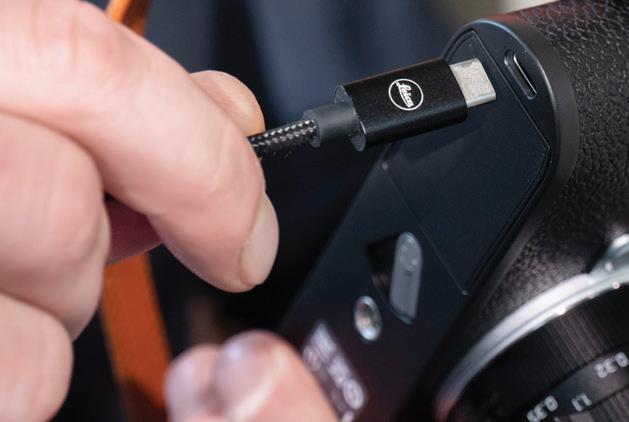
USB-C · The Camera has a USB-C connector on the base at the extreme right (looking from the back) . Not such a big deal you might think, but actually this is a real game changer. I'm going to discuss this at length later on in the article (in Cables & Compatibility and also in the FOTOS section)
Enough now to say that it works really well for charging the camera (and quickly) , and also for connectivity to computer / tablet / phone. There is no cover for it (just as there isn't in most modern phones) , but it is weather sealed and dust doesn't seem to be a problem.
To connect to an iOS device with a lightning port, you'll need Leica's special MFI-compliant cable. To connect to most other devices, a USB-C to USB-C cable works fine, although I found difficulty connecting with an Apple USB-C Thunderbolt 3 cable - all USB-C cables are not made the same! My feeling is that the M11 is less fussy than some of the other devices I've tried to attach.
The New External EVF · The new EVF is a 3.7 mp OLED display,
which sounds very much like that in the Q2 and certainly it feels that good.
It's very nicely made out of metal, tilt-able, with magnets to stop it tilting when you don't want it to. It has clear and useful detents at 45 and 90 degrees.
It suits the camera really well, flush with the body at the front, and although it's bulky, it's not as tall as the previous EVF, which means it fits better in your bag. The hot shoe connection is much more positive as well, making it less likely to fall off - mind you, a lock would have been nice!
There is still some 'black out' after shooting, and so it isn't quite so good for continuous shooting as the Q2.
Comparing it to the previous EVF on my M10-R, the image is much larger and brighter and more detailed. In this case the proof is in the use. With my M10 I almost never used the EVF, but with the M11 I've used it extensively. I think those who are lucky enough to have Noctiluxes will be very happy with it as well!
The new EVF will also work with all M10 variants. There will be a firmware update to enable this function which is due in March 2022.
LO OKING AROUND THE M11: HARDWARE
Variable-Sized DNG Files · This is an interesting idea, and I'm not aware of any other company doing the same thing. This is not a crop. It's a full-frame image, but with a lower megapixel count - with either 60, 36 or 18 mp. They use Pixel Binning to achieve this. Three different sizes:
• 60 mp 9504 x 6320
• 36 mp 7416 x 4928
• 18 mp 5272 x 3498
I've done some pretty careful test comparisons of the different image sizes, and although there is an improvement in noise levels with the lower pixel counts (as you might hope for) , reducing a 60 mp image in post-processing software has a similar effect.
On the other hand, I'm always reading about people who don't want the increased storage space of higher MP files, and this gives you the best of both worlds in that you have the opportunity of more pixels, but you can shoot at lower pixel rates for less important shoots or when storage is at a premium.
If you shoot DNG+ lower resolution JPG files, then the JPG files also have the lower resolution.
Digital Zoom (Crop Mode) · This works the same way as on the Q and Q2, and you need to use it in conjunction with the rear screen or the EVF.
• Off 9504 x 6320 (60 mp )
• 1.3x crop 7680 x 5104 (39 mp )
• 1.8x crop 5248 x 3472 (18 mp )
This can either be chosen through the menu, or it can be allocated to one of the function buttons. You choose 1.3x or 1.8x crop and Live View framelines are brought up separately for each crop whilst the EVF / LCD still shows the entire sensor. If you are shooting with a 28mm lens that equates to approximately 36mm and 50mm, with a 35mm lens it will be approximately 45mm and 64mm etc. The EVF only shows the frameline for the chosen crop (1.3 or 1.8x).
The DNG file shows as cropped in Lightroom. Using the crop tool will show the whole image with the crop lines - again, just as it does in the Q2.
If you have selected a lower resolution DNG or JPG file and then you choose Digital Zoom, the camera will revert to full sized DNG/JPG (quite right as well) .
Apple MFI Compatibility & FOTOS · MFI compatibility means that the M11 is the first Leica camera to be accredited by Apple to be compatible with iOS for both the iPhone and the iPad. This means that there will be much better GPS tagging using low power Bluetooth later on in the year.
The M11 already has the fastest WiFi file transfer to FOTOS of any of the Leica cameras, and this will be improved further later on in 2022. In the meantime, FOTOS 3.0 has been released together with the M11 - this allows connecting both by cable and by WiFi, and you can now filter selections by Favorites, File Type, and Downloaded / Not Downloaded. Downloaded images can be transferred directly to Lightroom. Remote control and 'Tethering' both work reasonably well with the M11, both with cable and with WiFi.
However, this is all rather a work in progress, and an expected firmware update and some FOTOS updates will improve things incrementally over the next year. Specifically coming later in 2022 are:
• 5 GHz dual band IEEE802.11 Wifi
• Bluetooth connectivity (low power)
• GPS geottaging from your phone to the camera
Cables & Compatibility · If you want to connect to your iPhone, then the camera comes with a braided and branded Leica
bottom: "Another Sunrise or Redgrave Fen" 35mmAPO-Summicron-M f/2 ASPH, 1/80th sec, ISO 64
cable which is Apple MFI compatible. If you want to connect to an iPad or Android device, then you will need a USB-C to USB-C cable. I've tried various cables and most seem to work okay (with the possible exception of Thunderbolt 3 USB-C cables) . It's worth mentioning that lots of devices are fussy about USB-C cables (which are not all the same)
Connectivity via the USB-C cable to Lightroom and Photos will also be improved later in the year. You can select PTP or MFI for the USB mode in the camera settings. Later on if you select PTP, you will be able to see the thumbnails for the DNG files (currently just a symbol) .
PTP stands for Picture Transfer Protocol. This was developed by the International Imaging Industry Association to allow the transfer of images from digital cameras to computers and peripherals without the need for additional drivers. It shows the device within the application, but not in the Explorer/ Finder screen.
MFI stands for Made for iPhone/iPad and is a licensing program for developers of hardware and software peripherals that work with iOS devices. Leica has passed the certification for this (it's displayed in the Camera Information / License information section of the menu)
If you are planning to use the USB to connect directly to Lightroom or Photos on your computer, then it's probably worth shooting DNG+JPG for the time being (until you can see the thumbnails in the DNG files) .
Changed Menu System · The menu system has been changed a lot to reflect the menus in the SL2 and Q2 - this might not be to everyone's taste, but it has to make sense. I'm certainly grateful as it makes event shooting with the M11 and the SL2 much simpler.
Pressing the Menu button once brings up a touch screen Quick Menu just like that on the SL2 and Q2. Pressing it twice takes you to a Favorites Menu with items, which can be switched off and on in Customize Control / Edit Favorites . If nothing is chosen, then the Favorites Menu is omitted and the second press of the menu button takes you to the menus themselves.
With the M10, I found the Favorites very useful, but with the M11 the Quick Menu really has everything you are likely to need quickly, and the main menus are better organised than they are in the M10 (at least, this is pretty subjective stuff, but I like them better) .
The Quick Menu screen replaces the old status screen, which was raised by pressing the center button of the four-way controller on the M10 (this only acts as an OK button for menu selections)
The Lens Detection menu is much improved with an option to 'Edit List of M Lenses' and also 'Edit List of R lenses'. When you choose this, the list presents all the lenses just as it did with the M10, but now you can switch lenses off and on. This means that if you just have a couple of uncoded lenses, when you choose "Manual M" you are presented with those lenses (with Edit List at the bottom) . For example my list looks like:
• 35 f1.4 11869/11870/11860
• 90 f2.8 11807/11808
• 50 f1.4 11868/11856/11114
• Edit List of M lenses
As before, it remembers the last used uncoded lens and uses that as the default.
THINGS WORTH TALKING ABOUT
Startup Time & Power Settings · I've compared the startup / wakeup times to that of the M10 as best as I can. If you are using Live View, then the image comes up on the LCD / EVF on the M10 about 1/2 second more quickly than on the M11. On the other hand, with Live View switched off on both cameras, if you hold down the shutter and switch on the camera, then the M11 takes an image about 1/2 second before the M10.
However, the greatly improved battery life on the M11 proves to be a real life saver here. Under Menu / Camera Settings / Power Saver Mode , I have Camera Standby set to Off, and Display Standby set to 30 seconds.
This works very well - wake up is almost instant, and the battery doesn't drain fast if you aren't shooting, even with the EVF attached (unlike the M10 where the EVF seemed to drain the battery incredibly fast)
"The House on the Hill" 35mm Summilux-M f/1.4 ASPH 1/1250th sec, ISO 64
During the testing period (7 months), I've only had one battery, and (as long as I remembered to charge it) I've never managed to exhaust it during a day shooting - even with the EVF attached and power saving turned off.
Full Time Exposure Metering & Shutter Lag · The shutter lag using the M10 with Live View was noticeable, and significantly longer than with Live View turned off (because of the need to close the shutter before opening it for the exposure) .
The M11 is effectively in Live View all the time (even if the EVF/LCD are turned off) . This means that the shutter must first close before opening it for the exposure just like the M10 in Live View.
I wanted to find out whether the M11 suffered from shutter lag the same way as the M10 with Live view, but it's hard to measure shutter lag! In the end, I devised an experiment which would measure the difference in shutter lag between the two cameras (rather than measuring the actual shutter lag which needs specialised equipment)
What I found was that the shutter lag on the M11 was effectively the same as that on the M10 with Live View switched off, and much less than the M10 with Live View switched on, which is good news.
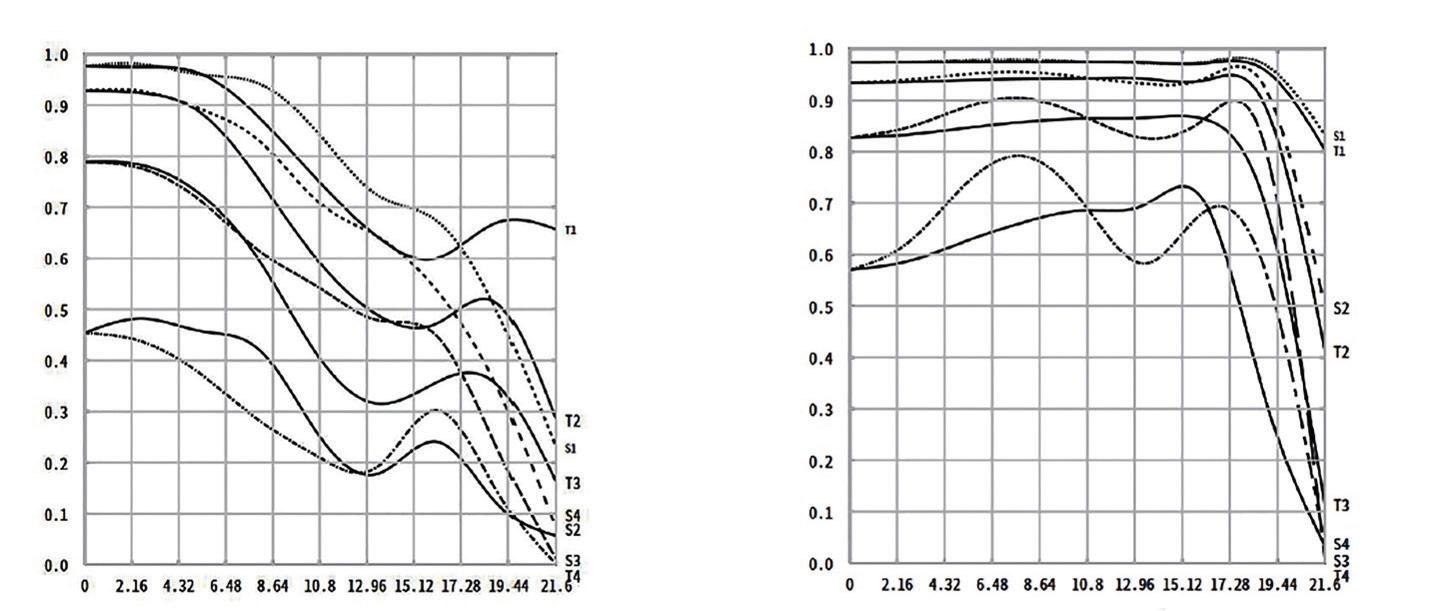
Can Leica Lenses 'Resolve 60 mp ' ? · I wonder how many times this question will be asked? I've resorted to help from the wonderful Roger Cicala at Lens Rentals for this (not because I couldn't say it myself, but because he says it so beautifully and so convincingly)
Roger's article "More Ultra High Resolution MTF Experiments" can be found at https://www.lensrentals.com/blog/2019/10/ more-ultra-high-resolution-mtf-experiments/
But in this context the real point is his appendix "Why Megapixels Are Stupid" where he points out that: Camera MTF * Lens MTF = System MTF
What that means is that however bad the lens might be, its performance will still be improved by using a better camera (and vice versa) . Using the M11 will improve your results from vintage glass as well as from the most modern APO lenses.
Tough (Oh yes) (Don't do this at home!) · When I test cameras, that is just what I do. They don't get babied because that isn't the point. On the other hand, generally speaking, I don't test them by dropping them from more than a meter (say 4 feet) from the back of our van onto a tarmac road - it doesn't seem fair. More than this, I don't do it when my own personal 35mm APO-Summicron-M is attached!
Except that's exactly what I did. My backpack tipped over, the top opened, and the camera dropped out…it rolled off down the road. I don't think I need to explain the pain that this caused me. I can feel hundreds of readers cringing as they read this.
There is a small chip on the corner of the top plate and a scuff on the ISO dial (which still works perfectly) . This was from where it actually hit the road, there are no marks on the paintwork from where it rolled (just a bright mark and a ding on the lens cap for the 35 APO) . Of course I was lucky, but still it shows that the camera is tough indeed. I feel that the removal of the base plate has probably made the camera more rigid and resilient.
This was a couple of months ago. Before that, the camera had been on numerous dusty, sweaty treks around Crete, and chilly wet ones in the UK.
For Christmas I was given a splendid modern waterproof jacket, and we went off to the Suffolk Coast to test it out it on a particularly nasty winter morning. It wasn't raining much to start with, but after 2 1/2 hours when we got back to the van, I found that the jacket had actually become pretty waterlogged. I simply hadn't realised how bad the weather was. The M11 had either been over my shoulder or in my hands (I took a lot
of photos, it's an atmospheric place!) . It had been switched on for the entire time.
When we got home I dried off the outside of the camera (which was very wet). I then checked in the battery/SD compartment and the lens mount and everything was completely dry. My coat weighed almost a kilo more than it did when we started!
Of course, you shouldn't try this (and I didn't mean to), but I think this shows that the M11 is really tough - really, really tough.
35mm Summilux-M f/1.4 ASPH 1/125th sec, ISO 64
(left) "Aldeburgh Evening" - 35mm Summilux-M f/1.4 ASPH, 1/125th sec, ISO 5000 (right) "Lighting the Way" - 90mm Elmarit-M f/2.8, 1/1000th sec, ISO 64
(below left) "Isn't It Wonderful" - 35mm APO-Summicron-M f/2 ASPH, 1/80th sec, ISO 320 (below middle) "Miaou" - 50mm Summilux-M f/1.4, 1/320th sec, ISO 64 (below right) 90mm Elmarit-M f/2.8, 1/250th sec, ISO 250
Shooting 60 mp With a Rangefinder · I've seen a lot of people saying that the antiquated rangefinder is not good enough to focus with such a high resolution sensor. If you're planning to focus on the third eyelash from the left in low light with your 0.95 Noctilux wide open, then I might agree, but that's pretty tough with an EVF as well!
I still find focusing with a rangefinder a thing of beauty and wonder, and extremely efficient - and I haven't changed my mind after thousands of shots with the M11. There are times when I like the EVF, but if I want to shoot quickly with the M11, then the rangefinder does a great job, just as it always has. Added to which it's such a pleasure focusing with a rangefinder!
Of course, if you are planning to print your 60 mp shots 6-feet by 4-feet, then you need to be a bit more careful with the focus, but that was always the case whatever the resolution of the sensor.
PULLING IT ALL TOGETHER
Superficially the M11 looks like an M10 with higher resolution, but actually it's quite a revolution in terms of image quality, connectivity and functionality. To sum up:
• The new base improves weather sealing and strength
• New black paint option is very resilient with grippy finish
• Aluminium top plate on black version makes it the weight of an M6
• Button layout is now the same as the SL2 and Q2
• Three new programmable function buttons (FN, Top-plate, Thumbwheel)
• New battery with 700-shot CIPA standard (this has proved modest)
• 64 gb of very fast internal memory
• Brand new and faster Maestro III processor
• New 60 mp BSI sensor with excellent dynamic range
• Full time off-sensor metering (much more accurate, no extra shutter lag)
• Electronic Shutter (up to 1/16,000 th sec)
• USB-C Charging
• PTP and Apple MFI connectivity using USB-C port
• Improved FOTOS App allowing filtering selections and tethering
• New well-constructed EVF with bigger and brighter image (like Q2)
• LCD Display with double the pixel count of the M10
• Image-stabilised monitor on the EVF & LCD (not the sensor!)
• Combined Quick Menu and status screen
• Menus changed to be even more comparable with Q2 and SL2
• Improved menu system for uncoded M lenses
• Digital Zoom mode with framelines for 1.3 and 1.8x crops
Yes, I should (me, personally), more relevantly, should you buy one? I think that if you've got an M10-R, and you are happy with the image quality, resolution and operation, then the only really good reasons for upgrading are the internal memory, the electronic shutter, the better battery and the USB-C functions. If you are shooting with an earlier M10 or a previous digital Leica, then the improvements to image quality and resolution are really very compelling.
CONCLUSION
Leica has worked hard during the five years since the launch of the M10, and they have managed to produce a camera that is improved in so many ways whilst still retaining the fundamental essence of the M camera (Messsucher) . I'm sure that lots of people will be sad to see the demise of the baseplate, but you quickly get to like the idea that you no longer have to worry about it dropping on the floor!
The M11 is a camera which is suitable for any photographic assignment where autofocus is not required, but it's much more than that. The image quality is now up to medium format standards and the much improved EVF allows for critical focusing where it's absolutely necessary. The electronic shutter gives extra scope for shooting fast lenses wide open in bright light. The internal memory gives the extra security that photographers usually get with dual SD card slots.
Although the M11 is not quite the smallest full-frame camera with interchangeable lenses, it certainly is if you factor in the size of the lenses.
You might say that the M11 is the EVF-based L-Mount camera that so many Leica aficionados have been asking for. They might complain that it's external, but it works so well, and you still have the advantage of having a proper rangefinder camera.
But for me the real purpose of any M camera is the ability to work with a rangefinder, and with the fantastic Leica lenses, both old and new. The M11 adds proper multi-point metering without any speed sacrifice, improved image quality and less vignetting.
At first glance, one might be tempted to think that the M11 is a small step up from the M10, but a longer look shows that it is improved in almost every respect. The changes may be evolutionary rather than revolutionary, but of course, that's what every existing M user really wants. On the other hand, the much improved EVF and the added connectivity is likely to please existing users and to attract new ones.
Acknowledgements
First of all to Emma, who has to put up with me spending hours testing, and telling her important things (which she is always polite about!). Also to Oscar, Scarlett and Roo for being such patient models.
Secondly, to the guys at Leica: Stefan Daniel, Jesko von Oeynhausen, Viktor Weigant and Nico Koehler who have patiently answered questions and been generally great to work with (and to have dinner with!).
Thanks are also due to Kirsten Vignes who always does such a fantastic job bringing life to these articles and to Bill Rosauer for his continued enthusiasm and help.
Then to the other guys on the LUF Beta Forum (you know who you are). What a great bunch of people - it's been really fun working with you all and let's hope we can meet up for that beer later on in the year!
Finally, to all the denizens of the Leica User Forum who have informed this article by speculating on what the camera would be (and what it would not), and thus helping me to decide what to talk about.
(top)
75mm APO-Summicron-M f/2 ASPH 1/6000th sec, ISO 64
(bottom)
35mm APO-Summicron-M f/2 ASPH 1/750th sec, ISO 64
photography thoughts on landscape
It’s All About the Light®
by DAVID KNOBLE
Part Two: Equipment, Dynamic Range & Post Processing in
Part I, I talked about picking locations and the effects of the time of day and weather, along with the importance of repetition because of changing conditions, and ended by describing ways to use light to compose a photograph. Here I delve into some discussions on equipment necessary to use with whatever camera you have to obtain the best image, and ways to deal with dynamic light. I will end with some post processing ideas that I use when editing my digital image to match what I envisioned while I was on location. First, I’ll repeat the list that this two-part series covered.
1. Location, time & weather
2. Repetition, repetition, repetition
3. Light - direction & subject
4. Equipment - setup & grab bag
5. Post-processingt
camera sensor, you can use additional equipment to tame the dynamic range problem. The focus on equipment and post processing becomes the second part of working with the light and my Thoughts on Landscape Photography
EQUIPMENT No matter which Leica camera you may be using, there are some methods of carrying gear that help when taking landscape photographs. I typically carry my equipment on site with a Billingham photographer’s vest as I love the plethora of large zippered pockets. When traveling to multiple locations each day, I have traveled with a photographer’s backpack that had additional storage for clothing and other personal items. There are so many choices here, I will leave that to YouTube reviews and blog articles.
Other than carrying gear, there is also some generic equipment that will help you achieve better landscape photographs. Clearly, weather resistance is good thing when it comes to outdoor photographic work. A tripod is a must in my opinion, and filters are one of the best ways to extend useful light and dynamic range. Post-processing using computer software helps further deal with dynamic ranges and produces images that take full advantage of the detail captured with Leica glass.
WEATHER RESISTANCE Sometimes the weather is foggy or cold and damp, but sometimes the weather is much worse. I’m not just talking about rain, but also dust, sand and wind. The most weather sealed Leica body is the Leica X-U. That particular camera can be soaked in mud and washed off with a hose. However, some additional Leica bodies are very weather resistant even though they cannot be placed under water. I have used the Leica SL, SL2 and S007 which all have spectacular weather sealing. I have used each of these in the rain and temperatures approaching freezing. The Q2 has similar weather protection as the SL2. I have lightly washed off my Leica SL2 and S007 after getting winded sand on them and once spilling coffee on my SL2. The Leica M10 has some weather resistance, but not as much as the S, SL and Q and I would NOT advise getting it soaked.
Taking photographs at the coast where the dynamic range of the light often exceeds the range of the camera sensor is a challenge. Different cameras have different sensors with different dynamic range capabilities. Regardless of your
The SL and S lenses are also well put together for use in bad weather with rubber seals at the lens mount. There are a few lenses that are not internal focusing with slightly less protection from the elements, but many are internal-focusing and effectively keep out the weather. While my experience with the weather sealing has been fantastic, I am only providing my results and not a warranty!
As such, I would suggest that you follow the instructions with your specific camera. They key is to know the limits of your gear and use it to take great photographs.
David Farkas, a good friend and owner of the Leica Store Miami, has told me multiple times he does not put UV filters over the front of his Leica S lenses because they are well coated and can handle the weather. In truth, the glass on his Leica S lenses is in great shape and I have watched him use them in crazy weather! I spend a considerable time at the coast, so I use the UV filters to avoid scratches from the mix of wind and sand, but I do not use filters in forest locations. It is a matter of preference, but he and I both use our gear out in the elements.
Recently, I put my Leica S007 to another weather test. Hurricane Elsa came up from the Caribbean and as it went through Florida downgraded to a tropical storm. As it went further inland, the winds died down to 40-55 miles per hour, but the rain on the east side of the storm was still pretty strong.
The morning after Elsa passed by the South Carolina coast, I went out to take some photographs. The wind was still strong at 25 miles per hour and sand was whipping up past my ankles. The sea was still quite rough and churning sea foam everywhere. Foam and sand were flying in the wind as I set up my tripod. I actually left the strap around my neck even though it was mounted to a series 3 Gitzo tripod. Very carefully, I mounted some filters on the front of the S series lens and one hand pulling down on the tripod leg, I set my exposure to 1 second and pressed the shutter.
I named my favorite image of this series “Elsa the Snow Queen” as the weather was still trying to prevent me from working. I very lightly ran water over the camera and lens system and set everything on the table to dry. It took using an old toothbrush on the lens grips to get everything off and after drying I brushed any loose sand out of the button and knob cracks and crevices, but everything is back to normal. The best part about these Leica systems is that they can be used hard, as long as they are cared for afterwards. As much as I love my M system, I would not have tested it on the beach that morning!
ISO. In fact, when I use black and white film on vacation, I frequently use Kodak Tri-X or Ilford Delta 400 both of which are higher speed films. However, landscape photography will often times have very high dynamic ranges and the lower the ISO the more range of light can be captured. This has been true in the film world and the digital world alike since the beginning of time. With lower ISO’s also come slower shutter speeds for any given aperture. Since landscape photography typically deals with large depths of field, the shutter speed is even slower. Hand holding a camera at shutter speeds less than two times a focal length is very difficult and even with optical imaging stabilizer systems (OIS) the sharpest image will most likely be obtained with the use of a tripod.
Let’s talk a little about final print size to show the importance of using a sturdy tripod and then we’ll look at ways to create the ultimate stability for long exposure times. Why talk about a print size? Because showing images in social media or simple digital means can easily hide poor techniques or flaws in focusing and stability. Consider an Instagram post that uses 2,080 dots on the long edge of a landscape oriented digital image. The first full-frame digital Leica camera was the Leica M9 with 5,212 pixels on the long side of the sensor. This means an Instagram post loses more than 1/2 of the pixels in the original DNG file. If an image is slightly blurred because of movement during a slow shutter speed, then taking away every
TRIPODS While weather resistant is helpful, a tripod is a must for landscape photography. When I am taking street photographs or documenting people or an event, I am using low to mid-apertures and frequently an ISO higher than base
other pixel and sharpening the image file can hide those flaws. What happens if instead we print the image from the M9 on paper?
If we decide that 300 dots per inch (dpi) provides a crisp looking print on paper, then the size of the image would be 5,212 pixels divided by 300 dpi, or about 17.4 inches. The Leica M9 sensor is 3,472 pixels on the short side, which translates to 11.6 inches at 300 dpi. Thus, using the entire sensor for a print would by 11.6 inches x 17.4 inches, or about 12” x 18” which fits well on 13” x 19” paper leaving a 1/2 inch border all around the edges. Remember that this is for the first full-frame Leica digital camera. Consider the Leica SL2 which is more recent and has a sensor size of 8,243 x 5,615. The short size of the Leica SL2 sensor contains more pixels than the long side of the Leica M9 sensor! This 47 megapixel sensor can produce a print at 300 dpi of 27.5 inches by 18.7 inches or almost 19” x 28”. Imagine how a print that large would look if the image was not perfectly in focus. Not only do flaws in focus and stability show up, but so do sensor dust spots or dust spots poorly removed in post processing.
This brings us back to tripods. While there are many types of tripods available and they come in different sizes and weights, the goal is to get the most sturdy tripod you can carry and that your budget can afford. There is nothing worse than spending a few hours photographing something that cannot be repeated only to find every image is blurry. You get what you pay for with tripods, and it is just not worth skimping.
Tripods list the weight that they can hold and in my experience, using near that maximum weight can be problematic. Think about climbing a 30 foot extension ladder. If the maximum weight the ladder can hold is your weight, how do you think the ladder will hold up if its not perfectly level and the wind is blowing just a little bit? It will probably flex side to side and twist, moving around as you climb or try to work at the top. My safety is worth more than that! Tripods are similar and can flex when the maximum weight is used on them.
My Leica S007 and a Leica S 35mm weigh about 5 lbs (2.3kg) with batteries, filters and a bracket to attach to my tripod head. I use a Series 3 Gitzo carbon fiber Systematic tripod that weighs 4.5 lbs (2kg) and is rated to hold 55 lbs (25kg). Because I am frequently in the sand, I use 3 inch metal spikes on the bottom rather than rubber feet, but the tripod is sturdy and does not move, even if I lean on it a little bit. I use the Gitzo series three center ball head which adds another 1.7 lbs (0.7kg) and is only rated for 39.7 lbs (18kg). The lower limit of the ball head reduces the maximum weight to be used on the entire tripod setup. A frequent question I get is why not use a traveler tripod? I also have a Series 1 Gitzo traveler tripod with 5 sections because it is light-weight (2.3 lbs) and is short enough to fit in a suitcase (14 inches folded). However, the maximum weight it can hold is 22 pounds (10kg) and fully extended it will flex with 5 pounds of photography gear and a ball head mounted on top. I use this tripod with a digital Leica M or my Leica M3 with black and white film.
I frequently use my tripod with the wind blowing or the ocean swirling at my feet, but using a really sturdy tripod, almost all my images come out crisp and sharp. I proved that again after Hurricane Elsa using 1.5 second exposures. With the higher resolution camera sensors, the images are a joy to look at on the screen and especially in large sized prints. My advice here is to get a tripod that has a max weight of at least 10 times the weight you might mount on it. Also, be sure that any tripod head you use has a max weight limit of at least 7-8 times your gear weight. This is one place that what might seem like overkill can only help you get better images.
If you still don’t believe me try this test. Take several photographs of a landscape at high f/stops with shutter speeds equal to 1/focal length and one stop slower without using OIS. If you use OIS, then use ½ second and 1 second exposures by hand. Then, take the same photograph but with the camera mounted on a sturdy tripod. Compare those at 100% in lightroom and I’ll bet you can see the difference. The tripod photograph will be crisper.
FILTERS Filters will extend the useful light in your landscape photography, regardless of the camera you are using. Sunrise and sunset light is very bright in the sky, and your foreground may be much darker. This is especially true with broken cloudy days. Furthermore, including the sun in your photograph will drastically increase the dynamic range of the scene. Reflections off of waterfalls, lakes or snow and rocks have the same effect. If that light in the sky or water can be reduced without reducing the light in the rest of the image, the dynamic range can be reduced as well. This helps you capture the full range of the light in the camera at the time you take the image. We’ll talk about a few different kinds of filters and how they affect an image.
POLARIZERS A polarizer is used to take scattered daylight and remove all light that doesn’t go in the same direction towards you. This is a fancy way of saying polarizers typically remove reflections on glass or water surfaces and darken some areas of the sky. This isn’t a scientific explanation, but sums up the results. Personally, when photographing the ocean, I prefer the reflections and do not use a polarizer, or use it to lower the overall light content, but not to polarize the light. Polarizers can have very odd effects in very wide angle lenses, so I would not recommend them in 21mm and wider applications. In addition, wide filter edges can sometime cause unnatural vignetting with some lenses. However, using them on 35mm lenses and higher focal lengths can typically work well. These filters are frequently screw-on filters that must be sized to your lens. Furthermore, they come in a standard and high-transmission format. The high-transmission polarizer lets in much more light, and does not affect the exposure very much while still providing the polarizing effect. Another side effect of polarizers is a potential increase in color saturation.
NEUTRAL DENSITY FILTERS
Neutral density filters are filters that block incoming light evenly across the lens. For example, a 3-stop neutral density filter would produce exactly the same photograph as one taken without the filter, but with a shutter speed that is 3-stops slower. Clearly, if there is motion in the photograph, the slower shutter speed causes more blur in the movement. Neutral density filters come in ranges from 1-stop to more than 10-stops and all variants in between. They also come in screw-on filter sizes as well as in square glass formats for filter systems, like the Breakthrough filter system or the Lee filter system. We’ll take a look at those in a moment. The key to neutral density filters is that the entire image is the same, but with a longer exposure. The dynamic range of the image has not changed. The highlights are reduced in the same amount as the shadows. Note that very high neutral density filters can sometimes let infrared light pass through which can cause a magenta cast in your images. If this is happening to you, take a look at neutral density filters that also filter IR light.
GRADUATED FILTERS
My favorite and most used filters are graduated filters. These filters have neutral density properties on the top and the fade out to clear towards the bottom. This means part of the photograph has light blocked and part of the photograph has no light blocked. These filters most commonly come in a rectangular shape so that they can be moved up and down to place the line where the graduation changes anywhere in the photograph. Graduated filters come with a sharp line between neutral density and clear, and with a gradual fade from neutral density to clear. They can be used right side up, upside down or at any angle, depending on where the light needs reduced in the image. For example, I use them on the coast to reduce the light of the sky making it
more similar to the light in the water and sand. Without this filter, the sky may have blown out highlights to expose the sand properly, or the shadow areas in the sand may lose all detail if the sky is properly exposed. While you can perform some tasks in post-processing, you are relying on the quality of the sensor and a perfect exposure in-camera helps prevent losing details or creating unnecessary noise in the image.
These are the basic filters and there is considerable literature available about all the different kinds and the way that they work. I use the Breakthrough Photography filters and the Schneider filters, both square filter systems. I screw on a sized ring to the end of my lens which allows a frame to be connected in front of my lens. This frame has two slots which let me put up to 2 filters in front of the lens. I might use a neutral density filter and a graduated filter to slow down the exposure (blurring the water) and reduce the light from the sky. The process of using more than one filter is called stacking. If you attach a filter to your lens first, you might be able to stack three filters. Sometimes I use a neutral density filter on my lens, and two graduated filers set at different points in front of the lens. The images you see here were all taken with some combination of filter stacking.
POST PROCESSING Post-processing encompasses the editing of a digital image using computer software after the image \ was taken. Many people use Lightroom and Leica long offered Adobe upon purchasing a digital camera. I use Lightroom Classic on my computer to process most of my images.
If your landscape images resulted from using a tripod and filters to obtain a crisp image and one with a usable dynamic range, then your post processing time will be significantly reduced. If not, then you may spend significant time fixing
light problems and other issues in your images. I have a saved starting point in Lightroom with basic edits linked to each of my camera bodies. When I import my images, this is automatically applied to every image based on the EXIF data of the camera type. Using this setup, I can start with some level of consistent processing and include several specific adjustments. For example, I reduce highlights, increase shadows and whites and reduce the blacks. This lowers the contrast a little further in the highlights providing additional details, and enhances the shadows to see more detail. I also add some texture, clarity and haze removal along with a very little vibrance and saturation.
These edits are just starting points and I almost always adjust them further. I look to provide a bright area of the image to draw someone’s eye through white and shadow adjustments. I also use the detail sliders to enhance the edge details. Another important edit is sharpening. I use the masking process to only sharpen areas and edges that need to be sharpened. I also sometimes add a horizontal graduated mask and lower the sharpening 20-40 points. For example, if I use the masking to sharpen the waves and rocks in the foreground, I may want to be sure no sharpening is applied to the clouds in the sky. To do this, I reduce the sharpening through the use of a horizontal filter over the sky to the horizon.
Post processing is very creative, and each applies edits differently at this stage. Learning how to mask and edit certain parts of an image can be helpful to see what impact you can have on your image. You can answer questions like, how do I draw the viewer to this part of my image? Or, how can I remove some of the vignetting in this image? Answer: adding a white vignette from Lightroom might do the trick!
CONCLUSION I started this article by suggesting the importance of location repetition to fully explore the possibilities in landscape photography. I suggest here again that repetition in the use of filters and post-processing will enhance your work as you begin to fully understand how these tools can help you produce better photographs. Nothing replaces how you see things, but these tools can enhance what you do. Learn how much you can safely capture, and work on stabilizing your system. All of this will take time and cause you to slow down, but one great image can be reward enough!
Note: All the images here were taken at Folly Beach in South Carolina, USA using a Series 3 Gitzo Tripod and Ball Head and the Schneider or Breakthrough square filter system, processed in Adobe Lightroom Classic and On1 Photo RAW.
"Elsa the Snow Queen"
"Camera Scanning" with the Leitz BEOON
by DOUGLAS RICHARDSON
by JONATHAN SLACK
(top) My mother and I watch as the coal-burning paddle steamer Jeanie Deans leaves the pier at Craigendoran on Scotland's River Clyde during the early 1950s. Day-long pleasure cruises "doon the watter" were a popular outing between 1900 and 1960, and one of the platforms of Craigendoran railway station directly served the pier where the steamers docked. (Photo by David Richardson.)
(bottom) Around four years old, I wait with eager anticipation as my cousin Jean Watkins (a 'Nitten' girl) is presented with a cake to mark her 10th birthday. A treat like this would have been a memorable event during the late-1940s era of British post-war austerity. One of the earliest photographs from my father's then recently-acquired Leica IIIb (which had probably been smuggled into the UK by a member of the postwar British occupation forces in Germany), its tonal range suggests that it may have been taken with a 5cm Sonnar that he had once owned, and that had probably come with t he camera. (Photo by David Richardson.)
seems unlikely that many Leica lenses have been used to rephotograph the scenes, events, and people that they had recorded almost three-quarters of a century earlier. But as a result of the article 'Leica BEOON vs. High Resolution Scanners' by Andrew Godlewski and Bill Royce in Viewfinder Vol. 52 Issue 4, that was the role recently demanded of my 5cm f/3.5 Elmar.
Recent years have seen a growing interest in 'camera scanning' - the digitisation of negatives or colour transparencies by directly photographing them rather than using a film scanner. Godlewski and Royce had described how the Leitz BEOON copying stand could be used in this role. Since I had a collection of B&W negatives from the late 1940s and early 1950s that I'd inherited from my father David Richardson along with his Leica and several lenses, this alternative to using a slow scanner seemed worth investigating.
But first I needed to decide what lens to use. Godlewski and Royce had used a Rodenstock APO-Rodagon enlarging lens, but two long threads begun in 2017 on the Leica Forum 'BEOON advice please - functional checks prior to purchase' and 'Useful to shoot some slide film - BEOON+M10' showed that while some users had no problems when using enlarging lenses on the BEOON, other users with the same model of lens could not obtain an acceptable focus.
Being semi-retired, I was unwilling to risk money on an enlarging lens that might or might not prove satisfactory, so I wondered if one of my Leitz-era 50mm lenses could be pressed into service – the solution that the designers of the BEOON had intended. My f/2.8 Elmar, f/2 collapsible Summicron, f/2 Summicron DR, and a late-1930s f/3.5 Elmar (serial number 434493) originally used by my father seemed the most obvious candidates, but I decided to try most of my 50mm lenses except the f/2 Summar and f/1.5 Summarit.
These tests identified the f/3.5 Elmar and the 50mm f/1.4 Nikkor as the best-performing lenses when stopped down to f/12.5 and f/11 respectively ( although I was pleasantly surprised by the results from an old Russian f/2.8 Industar-22 Tessar derivative). In the central area of the image, the Nikkor was sharper than the Elmar, and showed equally-good contrast, but there was a marked deterioration towards the corners. The Elmar stayed acceptably sharp over the entire area of the image.
In October 2021, I used the Elmar-equipped BEOON, my Leica M9-P, and an A5-sized light panel (8 inch x 5 inch for the benefit of US readers) to make digital copies of many of my
father's B&W negatives. When his Elmar had last 'seen' those scenes and subjects, it had focussed them onto frames of film. Now it was focussing the same images onto a sensor array based on a technology that would have seemed like science fiction when the original images were taken.
Importing the resulting files into Adobe Photoshop via Adobe Camera Raw, then inverting them by using 'Select Image => Adjustments => Invert', then using 'Image => Mode => Greyscale' followed by 'Select Image => Auto Contrast' produced satisfactory results.
Inevitably, some of these ageing negatives displayed minor faults such as scratches, but in the few cases these may have been due to problems with the home-processing techniques of yesteryear. During the late 1940s, our family had briefly lived with one of my aunts and her family in the Scottish mining village of Newtongrange (known in the local dialect as 'Nitten') . In those days most of the working-age men from the village were coal miners, so one harsh reality of life there was the presence of coal dust - on a few occasions particles may have got into my father's developing and fixing solutions and thus into the emulsion of some of his negatives, accounting for tiny patches of local deterioration over the ensuing 70+ years. But like dust and scratches, these flaws could be fixed using Photoshop's Spot Healing Brush Tool.
In photos which included a significant amount of sky, the upper part of the frame showed significantly-degraded contrast. At first I assumed that this was simply the result of flare in an uncoated lens, but a search through my father's papers showed that lack of coating had been the least of the problems that this elderly lens had once displayed. When examined by a British optical company in 1956, Elmar 434493 was found to have what a technician described as "heavy weathering sleeks and light cuts on front lens. Heavy fungus sleeks and light rippling on rear lens. Dust, grease and heavy condensation on internal surfaces."
To cure these problems, the lens was dismantled, its front and rear surfaces were repolished, the other surfaces were cleaned, then all surfaces were coated – a degree of lens 'surgery' that was not uncommon at a time when severe post-war British import controls made it impossible for amateurs to buy new Leitz equipment. Total cost of this work was six pounds sterling (around $18 at 1956 exchange rates) - the equivalent of around 160 pounds ($220) at today's prices.
Having established the basic technique of digitising with a BEOON-mounted camera, I was ready to try a small
(page 37) As local people look on from what would today be considered a dangerously-close distance, Edinburgh's fire brigade tackles the blaze that destroyed a cinema in the Scottish city's Clyde Street on 12 November 1952. We lived in a tenement in nearby Elder Street, so my father grabbed his Leica, and rushed to the scene in time to capture this photograph. The difference in contrast between the foreground and the rest of the image is due to smoke from the burning building. (Photo by David Richardson.)
number of colour negatives taken during my holidays in Greece during the mid-1980s. Like most colour negatives, these contain an orange layer intended to overcome imperfections in the cyan, magenta, and yellow dyes. The software used to drive film scanners is designed to cope with colour negatives, and will apply a correction intended to remove the effects of the orange layer, so an equivalent to this process must be done to images taken with colour negatives using the BEOON or a similar copying stand. Several companies offer software custom-designed for this task, but acceptable results can be obtained using Camera Raw and Photoshop.
After my first attempt at using the BEOON-mounted M9-P to photograph a colour negative, I was surprised to find that the captured image showed no significant colour cast. Part of the space between individual frames was visible, and this clear space showed only a faint grey colour, with no hint of orange. The camera's white balance had been set to 'Auto', so its firmware had presumably interpreted the orange layer as the result of some form of ghastly lighting condition and had attempted a suitable correction.
Since the Camera Raw plug-in needed to import DNG files into Photoshop offers 'Auto' and 'As shot' options for white balance, I use its 'Auto' setting to make a similar correction rather than relying on the camera's white balance options. As a result, the task of rebalancing the image is given to software running under the full processing power of a desktop computer, rather than leaving it to the firmware and limited processing capabilities of the camera. Subsequent experiments have confirmed that imports made using Camera Raw's 'Auto' setting produce a better final image that samples made with the camera's 'Auto' selection followed by an 'As shot' import via Camera Raw.
To obtain the most accurate image of colour negatives, the camera has to be adjusted to the optimum white balance. This can be done by setting its white balance to 'Manual', then photographing the illuminated screen of the light panel. The camera should be set to produce DNG files – you can use JPEG, but there may be a minor loss of quality in the final result.
(top) Taken with a Leica IIIg fitted with a Russian Jupiter-9 copy of the Zeiss 85mm f/2 Sonnar, this photograph shows the Great Gate of Trinity College, Cambridge, which was founded in 1546 by King Henry VIII. (The reference to 'Edwardius Tertius Fundator' and date of 1387 refers to King's Hall, an earlier college for which the gate was originally built.) The conversion process from the colour negative has preserved the neutral colours of the stonework.
(bottom) The combination of full sunlight and deep shadow seen in this narrow alley in the old city of Jaffa (Yaffo) in Israel was a challenge to the film I used at the time, and made this colour negative difficult to convert.
Once colour negatives had been photographed using this white balance setting, then passed to Camera RAW with the latter is set to 'Auto', the image will be rebalanced, a process that greatly reduces the orange tint. Cropping can be used to remove any non-image parts of the frame, so that the automatic processes which follow are based entirely on the image.
Directly underneath the photo, Camera RAW will indicate the bit size of the planned export to Photoshop. If it indicates 8-bit, clicking on the blue text will allow 16-bit to be selected. In order to convert the colour negative into a colour positive, the individual pixels are going to be remapped, so working at the 16-bit level will allow this process to be done with greater precision.
Clicking on Camera Raw's 'Open image' button will transfer the rebalanced image to Photoshop. The procedures that follow are for Photoshop CS6, so users of other software will have to 'translate' these it in order to match the interface and commands of their program.
'Select Image => Adjustments => Invert' will convert the image to a positive, but this is likely to be of low contrast and limited colour saturation. The simplest method of creating a balanced full-colour image is to use 'Select Image => Auto Color'. If the
result is not satisfactory, 'Edit => Undo' can used to cancel the operation, followed by 'Select Image => Auto Tone'.
If neither of these automated processes gives a good result, the final option is to revert to the inverted image, then select Photoshop's 'Images => Adjustments => Levels', and adjust the white and black points for the red, blue, and green channels in turn.
Whichever of these methods proves best for an individual photograph, 'Select Image => Adjustments => Hue/Saturation' will then allow you to explore the effects of slight changes in the master settings of Hue and Saturation should these prove necessary. Small changes in hue might be useful in photos that include neutral tones or flesh tones. Once the end result is satisfactory, selecting 'Image => Mode => 8bit' allows the photograph to be stored in whatever format seems best.
Digitising with the camera is faster than scanning but as in the days of the traditional darkroom, dust is the enemy. My approach is to use the Photoshop healing brush to edit out the most obvious flaws, and only tackle the minor ones at leisure or when the photo is needed for use.
Application of Photoshop's 'Auto Color' has created a good positive image. Having just enjoyed a charcoal-grilled fish during lunch at a waterfront taverna in the harbour of Rethymnon in Crete, my wife Linda is about to offer the last of her bread roll from that lunch to the small fish swimming in water.
Importing the DNG image of this mid-1980s colour negative into Photoshop by using Camera RAW in its 'Auto' mode has eliminated most effects of the orange filter layer.
Applying Photoshop's 'Invert' adjustment to the imported image produces a positive of low contrast and weak colours.
Handholding a Long Digital Telephoto Zoom
by DICK GILCREAST
Some of the small digital Leica V-LUX 1, 2, or 3, and their related Panasonic Lumix cameras, some with Leica zoom lenses, are very handy for general coverage of family and such, but their lenses can reach out to the equivalent of 400mm and more! This amount of length can make a very impressive wildlife picture, for instance, but can be difficult to aim and handhold steadily enough, even with some amount of shake reduction built in.
Say you're out looking for birds or wildlife, looking for distant shots using that longest telephoto lens capability. The sensor size is quite small, so steadiness is important. Although wide to normal focal length photos come out quite sharp, handholding a long telephoto subject steadily enough in the frame can be a problem.
One solution could be a shoulder brace, such as those that came with the 400 and 560mm f/6.8 Telyt lenses, although a rather large unit to carry around. Another possibility might be a tripod or monopod which will work well enough but has difficulty following moving subjects. However a third more practical method might be to use the small Leitz table tripod with ball head held against the chest, as used to be recommended in some older Leica guide books for holding longer lenses steadily in poor light. This technique was helpful in the past using film, but now with digital the very much higher ISOs usually help with steadiness - except perhaps when using the very longest zoom ranges at the necessarily small apertures.
So why not try out the old table-tripod idea? Relatively small, the two separated parts easily stowed in the camera bag, it will
The two parts of the chest pod shown joined together. The Leitz ball head is one of the larger versions with firm tightening capability. Once the camera is attached to the ball head, rotate the legs in three directions, hold them against the chest to provide steady support, and then adjust the ball head to provide easy vision through the eye level finder.
be there whenever needed. It may take a couple of moments to put it together and set it tight against the chest, but it then supports the camera in any direction, horizontal or vertical, and helps with following a moving subject such as a bird or animal while sighting through the eye level finder. Just turn the upper body to follow the subject, which remains steady in the finder, while waiting for the right moment.
One additional tip is to orient the tightening handle of the ball head down toward your right side where the right hand can tighten it in the correct position for the eye to look through the eyepiece comfortably. It can then be left tight for the duration of the shoot while the right hand's index finger operates the close-together zooming lever and shutter release, and the left hand helps to support the camera against the chest. With
autofocus and auto exposure, aiming and holding the subject in the frame is all that is needed as long as the frame remains steady.
Yes, the sensor is a bit small for maximum size prints, but it is entirely adequate for a normal size print, and the camera and "chest-pod" can be carried and used all day without fatigue. You can imagine the size of a bag required for all this capability using a full-frame camera and a complete set of lenses to 400mm!
These pictures of a young white-tail deer were quickly made while using the chest pod on a Panasonic Lumix DMC-FZ70 camera, with the lens extended out to about 360mm. It was in a forest area where a large tree had been recently cut, opening the scene to light from the sky.
by ED SCHWARTZREICH
the AN ELCAN 50 / 2 REPLICA
author has just received an early prototype of Light Lens Lab’s possible newest offering: a 50/2 ELCAN replica. Before delving into this lens’s particulars and performance, let us return now, for a moment, to those thrilling days of yesteryear: those days before the original ELCAN was released. Let us talk about 50mm RF lens properties and use in the 1950’s and 1960’s.
Back in Those Days (A Search for Lens Speed) Leitz, Nikon, Canon and a few others were known for producing 50mm rangefinder lenses with maximum apertures of f/2.0, f/1.4, f/1.2, f/1.1. f/0.95. The original intent of the lens’ designers of vintage fast camera lenses was almost always reportage and brand “one-upmanship” (save for some specialized products like the Leitz 125 f/2.5 Hektor and the much earlier Leitz 90 f/2.2 Thambar). Fast lenses were tools. An eminently usable f/2 or faster aperture simply made the Leica photographer more likely to get an image. Having a fast lens perform well wide open was a main design goal, and there was
a race of sorts here to out-perform the competition. And for the ELCAN 50/2, from what we know, the goal was meeting whatever the military contract specified, and cost savings via the use of a novel 4-element lens formula. And little else.
An Example from the Semi-Old Days LHSA member Dick Gilcreast used to specialize in using his f/1.0 Noctilux to get images at LHSA Annual Meetings that others could not make, and even chose an M body focus-tuned to his specific Nocti to do this. This author took over from Dick in later film years, with the same model lens and the same primary goal of available light reportage. His quest continued into digital imaging era. Here is a digital image that the author made at the 2014 LHSA Annual Meeting in Dearborn, MI, likely at f/1.4, of Magnum photographer and musician Larry Towell (figure 1) . The intent: get a nice, sharp to the edges, interesting image for use in Viewfinder, even though the bokeh in the background might not be that pleasing.
A Necessary Segue Now to "Bokeh" and lens “drawing” characteristics in general: today there are many very fast lenses, and quite often photographers seem more concerned with the artistic appearance of their wide-aperture imaging rather than merely with their lens’ speed; at the least, that is what they often talk about on line. Editor Bill Rosauer hosted a 50mm shootout in previous Viewfinders with just that goal, if one recalls. Such interest remains keen for certain 1950’s to 1970’s lenses and informs the rationale for why many photographers might still use them today. The different lenses and the way they “draw” wide open are now akin to the various types of brushes that a painter might use. There is nothing at all wrong with such a viewpoint, but it likely belies the designer’s raison d’être for the older fast lenses, which was instead something like, if one pardons the alteration of a classic line: “f/2.0 and be there”.
The LLL ELCAN Replica So now, in keeping with this dichotomy between a lens’ original intended use, and the contemporary “take” on that lens’s signature, this article will examine the upcoming LLL replica of the ELCAN 50/2. The original ELCAN was, in part, a very sharp lens which gave brilliant 3-dimentional-appearing imaging in its center, but had deficiencies in the outer zones of the lens field. Such performance nonetheless met contract specifications for its use as a basic military lens, and was, as a bonus, cheaper for Leitz to produce than the contemporaneous 50/2 Summicron because it only had 4 optical elements. Very likely, the possibility of the ELCAN’s use as a general Leitz lens was curtailed specifically because of its deficiencies; its general optical design was however used in the concurrent 90/2.5 Colorplan and first 90/2.8 Elmarit-R, so it was not an “one-off” in the most general sense. Thoughts of the ELCAN as a portrait or streetshooting lens likely never crossed the minds of its designers. It was only later that the ELCAN became a prized collectible because of the rarity factor, and later still becoming coveted as a users’ lens.
The author does not possess an actual original ELCAN 50/2. The goal here will not be a comparison with the original, but rather to find the sorts of pictorial material at which the ELCAN replica has one or more “sweet spots” where it “draws” well (if indeed it does). We already know that the original ELCAN was a sort of Curate’s Egg -- parts of it were truly excellent, but other parts ... well. Might the ELCAN, by virtue of its quirks, be preferable for specific uses, at least as defined by some users?
Initial Impressions It should be said, right off, that the replica is a light and small lens. It reminds the author of his older Leitz 35/2’s in dimensions. The metal used in the prototype is not brass like will be potentially in production lenses, so reporting a weight would not be accurate at this point. Of note: like the original, the f/-stop ring turns backwards relative to the usual Leica lens.
According to information the author has received, the flint glass used in the ELCAN 50 2 replica is very close to the original but not precisely the same. It is sourced from old stock manufactured by the Chengdu GuangMing factory. The single coating used is also
very close to the original. The replica’s coating has a mixed amber and purple color. The original coating also was mixed amber and purple but more on the amber side.
The lens has reportedly been made slightly taller than the original, to deter counterfeiting. (The same thinking was used in LLL’s prior 35/2 Summicron 8-element copy). LLL names its replica “LIGHT LENS LAB M E 50mm f/2”. The draft brochure which LLL intends to use with this lens calls it “a classic Ultrastigmat design”. This references the ca. 1919 Grundlach Ultrastigmat 50/f1.9, which itself served as a precursor to Bertele’s ground-breaking Ernostar f/2.0 lens. Both of these are modified triplets and bear comparison in their optical layouts to the ELCAN 50/2. Images on line from the Ultrastigmat look quite similar to those from the 50/2 ELCAN in their center sharpness and resolution fade-off towards the periphery. Interestingly, Dr. Mandler’s original ELCAN patent information makes no specific mention of these earlier lenses.
The MTF curves that LLL has released are seen on the previous page (figure 3) . Nit-pickers like the author will note that the plot at f/2.0 is a bit less good than the theoretical graph made of the original lens by Peter Karbe from its patent (in a previous issue of Viewfinder). The f/5.6 plots are similar.
Ok, Let's Look at Images Out of rather intense curiosity after waiting months for this lens to appear at the author’s door, he took various shots with it right off, both at f/2.0 and more closed down. It was immediately apparent what the overall characteristics of the lens were: very sharp and luminous in the center of the field, and a fall-off in resolution laterally in the field away from the center. This latter effect is often not unpleasing, but is definitely there.
First, on the opposite page (figures 4-5) is a grab-shot portrait at f/2.0. One can see from the close-up of the subject’s eye that the lens is very sharp in its center. The rendering of the remainder of the portrait is quite pleasing. One cannot really judge if the lack of sharpness towards the edges is merely due to the shallow DOF, or to something inherent in the ELCAN’s performance.
That particular becomes quite clear in the next series of images, taken of a hill with goldenrod, with focus on the stalk of a milkweed plant about 15 feet away. Here the ELCAN’s imaging wide open (figures 6-8) was compared directly to that of Leica’s 50/2 APO Aspheric (figures 9-11) . For these images (not taken at the same hour, but from roughly the same position), the center focus for both lenses appears approximately equally sharp. However, when one goes towards the frame edges, the loss of definition from the ELCAN is significant. Yet again, when one views the entire image that the ELCAN produces here, it is quite pleasant. The ELCAN showed better edge sharpness here when closed down to f/5.6 (images not shown), but still not so good as the 50 AA -- this might have been expected from their respective MTF curves. Elcan first, then 50AA.
The same effect of rather ragged blurring -- shall we dare to call it Bokeh? -- of the areas in the lens field away from the center seems to occur with the ELCAN at its closest focus, and all the way to infinity focus. It is a characteristic of the lens’s optics.
The author did a standard “quick and dirty” test of lens lens’s acuity, center and edges, by photographing at f/2 a frame-filling double sheet of newsprint, tacked to the wall. The result (not shown here) made it clear that this prototype’s inherent blurring was of significant proportions; it was, interestingly, slightly more prominent on the left side of the outer zones than the right. This is probably an artefact of inadequate QC in assembly, as from other evidence a small forward focus shift wide open is seen occurring only in that area of the field; the fingerprint should be symmetrical. However, it was clear from the overall patterning that such blurring was intrinsic to the lens -- just look again at the those MTF curves.
The upshot of all this is to grasp that this is a military lens. Its projected users were not photographing brick walls or landscapes, but likely objects of intense interest near the center of the frame. Reportage or documentation were the goals, and for this, the ELCAN performs admirably, albeit with the above-mentioned caveats. An M10 Monochrom shot of the author’s neighbor Steve in his tractor and brush-hogging equipment shows what the ELCAN (again at f/2) can do for reportage. (following page, figures 12-13)
However, this sharp, luminous, dramatic shot is a crop of the full frame, to perhaps a 90mm lens FOV. Here is the full frame image, which again, if one can zoom in on it, shows the expected fall-off in definition in the field. The full frame does not look that bad overall, as one almost instinctively senses the reduced resolution at the edges as due to DOF instead, and that effect serves to highlight the central portion of the image.
On the following page are two more full frame shots with focus in the center. (figures 17-18) One finds that it is only the central portion of the image which is truly sharp, even though figure 18 is shot at f/5.6, not at f/2 like figure 17 . Again, however the eye tends to normalize such an image because our eye is strongly directed to a human subject within the lens’s central sharpness. Both are taken with the M10 Monochrom, no post processing done.
And figure 16 is another full frame shot, this time at infinity at f/5.6, showing that stopping down yields a slightly old-fashionedlooking image which the author finds quite pleasing. The only post processing done was levels. Portraits done at medium f/ stops are also very nice.
A Take-Away from Using This Lens Dr. Mandler was of course correct. The lens formula is “overstrained as far as field overage goes” for a 50mm lens, while it is superb for a 90mm lens field. Nonetheless, the skilled Leica photographer can utilize what is essentially the “sweet spot” of this lens to get outstanding images.
figure 4 figure 5
figure 6 figure 7
figure 8
figure 9
figure 10
figure 11
Using, or intuiting, the 90mm frame line for important composing, if one has time, will help.
Let Us Say Something About the Elcan's Center Performance This is the ELCAN’s main strength. But how good is that relative to the 50/2 APO Aspheric? While something like crystalware would be a great target, the author’s cupboard here was bare. He does however own a large, rather striking, quartz crystal. So, here are two images, both at f/2, of a quartz crystal about 8 inches long, sitting on a woven placemat. (figures 14-15) Only the center portion of the image was used -- about a 66% crop. The M10 was tripod mounted, and both the ELCAN and the 50AA were focused at the same point on the crystal, using Live View. One can see that there is little difference between how brilliantly the crystal is portrayed (the ELCAN may have very slightly more contrast or “pop”), but at the back of the placemat one can readily see the ragged look of the out-of-focus imaging of the ELCAN, versus the smoother roll-off in definition of the 50AA. There is no post-processing. ELCAN first, then 50AA.
The Verdict The ELCAN replica has the same ergonomic feel as a small 35. A small lens makes the M-Leica less conspicuous, less obvious. While it may be subjective, the M simply seems to handle and feel different here than with a larger / heavier lens hanging off the front. In street shooting, this author has used the older smaller Leitz 35’s for just this reason. But many times he has wished for a 50 when his 35 has meant getting closer to the action than felt comfortable, and / or having to crop the resulting image. Many fast 50s are bulky and weighty. Because the ELCAN replica lens is so small, light, and unobtrusive, it can take the place of a 35mm lens in one’s kit for just this purpose.
It would appear that LLL’s ELCAN 50/2 replica has a high level of performance, but essentially only in the context of its interesting design particularity of having a definite sweet spot in the center third-to-half of its lens field. With this lens, to attempt a picture like the author presented at the beginning of this article -- of Larry Towell -- would have led to a quite different image, with a definite fading off of resolution towards the edges. That might have looked just fine and convincing, but simply different. But perhaps it was not exactly what the photographer wanted or needed. Horses for courses.
However it needs definitely to be mentioned that portraits or action shots taken at f/4 or f/5.6 are almost uniformly quite nice, with the retention of the high degree of center sharpness, and a slower and less ragged fade off into the field than at f/2. The author could well see frequent use for this lens at these apertures.
One definitely has to know beforehand the strengths and weaknesses of this lens in order to obtain the best results; the ELCAN replica “draws” uniquely, but perhaps usefully. If one is street shooting or making informal portraits, it seems an interesting, and for some, an almost ideal lens. It excels when what is of visual or
figure 12
figure 13
figure 14
figure 15
emotional interest is either center-frame, or comes close to filling the frame. Its center performance is sharp, snappy, and luminous, and this center rendering becomes highlighted / isolated / visually emphasized by the rapid but subtle loss of definition towards the edges. It is not a “general” 50 mm lens, as performance in the field is sub-par. Perhaps then this ELCAN replica, just like for the rare and now-costly original, is not for everyone’s shooting needs, but having a fast small normal lens with this fingerprint is an ideal working situation for many of us who shoot people pictures. Just beware the backwards-turning diaphragm ring.
Addendum After writing most of this article, but before it went to press, the author lent the ELCAN replica prototype to Raid Amin, a long-standing cocontributor to Rangefinder Forum, for his use and opinion. Raid made several fine portraits of his wife with the lens, confirming its use in that particular. Then, unlike the author, who shot everything here “straight” with little manipulation, Raid tried adding contrast and some degree of increased saturation in PS and got what appears to be almost a “painting with color” effect. The central image, already sharp, is enhanced, and the out-of-focus background greatly benefits from having its “activation level” increased. The effect seems visually reminiscent of what LHSA member Costa Manos had done in his past color work with Kodachrome. Raid has opened up yet another use for this lens. The first shot has been made through a shop window. (figure 21 ) The image of the port-a-potties is cropped in all dimensions, but a bit of the loss of definition that is inherent to this lens appears near the left edge. (figure 19)
Morbid Curiosity Note The author tested the front and rear elements of this lens for radioactivity with his old Eberline Geiger counter. They did not register above background activity levels.
figure
figure
BARNACK SCULPTURE
by JIM LAGER
After the death of Oskar Barnack in 1936, sculptor Hermann Lickfeld created a bust of the Leica’s inventor. At least two were cast in bronze. One is presently on display in the main building at Leitz Park. Another was owned by Leica enthusiast Jim Forsyth (promoter of the Barnack Leica League circa early 1960's) . Forsyth obtained it from Oskar Barnack’s son Conrad. The bust was among various Oskar Barnack memorabilia in Forsyth’s possession.
In the late 1960's the Forsyth items were purchased by American collectors. The bronze bust was “copied ” and plaster reproductions prepared (probably less than five) . During my research efforts I inspected a Leitz Wetzlar letter dated 1956 commemorating Barnack’s death 20 years earlier. A photograph of the Barnack bust was included. The 1956 image may be of the specimen currently displayed at Leitz Park.