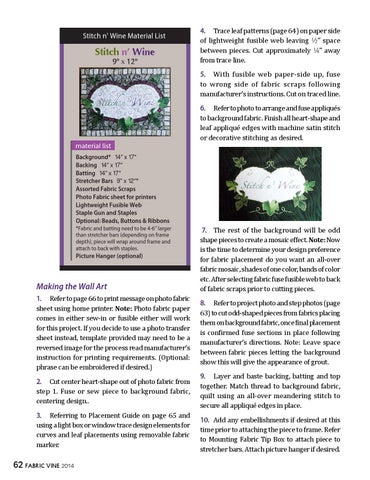
Stitch n’ Wine Material List
Stitch n’ Wine 9" x 12"
4. Trace leaf patterns (page 64) on paper side of lightweight fusible web leaving 2” space between pieces. Cut approximately 4” away from trace line.
5. With fusible web paper-side up, fuse to wrong side of fabric scraps following manufacturer’s instructions. Cut on traced line.
material list Background* !$” x !&“ Backing !$” x !&“ Batting !$” x !&“ Stretcher Bars (” x !@“* Assorted Fabric Scraps Photo Fabric sheet for printers Lightweight Fusible Web Staple Gun and Staples Optional: Beads, Buttons & Ribbons *Fabric and batting need to be 4-6” larger than stretcher bars (depending on frame depth), piece will wrap around frame and attach to back with staples.
Picture Hanger (optional)
Making the Wall Art 1. Refer to page 66 to print message on photo fabric sheet using home printer. Note: Photo fabric paper comes in either sew-in or fusible either will work for this project. If you decide to use a photo transfer sheet instead, template provided may need to be a reversed image for the process read manufacturer’s instruction for printing requirements. (Optional: phrase can be embroidered if desired.) 2. Cut center heart-shape out of photo fabric from step 1. Fuse or sew piece to background fabric, centering design..
3. Referring to Placement Guide on page 65 and using a light box or window trace design elements for curves and leaf placements using removable fabric marker.
62 fabric vine 2014
6. Refer to photo to arrange and fuse appliqués to background fabric. Finish all heart-shape and leaf appliqué edges with machine satin stitch or decorative stitching as desired.
7. The rest of the background will be odd shape pieces to create a mosaic effect. Note: Now is the time to determine your design preference for fabric placement do you want an all-over fabric mosaic, shades of one color, bands of color etc. After selecting fabric fuse fusible web to back of fabric scraps prior to cutting pieces.
8. Refer to project photo and step photos (page 63) to cut odd-shaped pieces from fabrics placing them on background fabric, once final placement is confirmed fuse sections in place following manufacturer’s directions. Note: Leave space between fabric pieces letting the background show this will give the appearance of grout.
9. Layer and baste backing, batting and top together. Match thread to background fabric, quilt using an all-over meandering stitch to secure all appliqué edges in place. 10. Add any embellishments if desired at this time prior to attaching the piece to frame. Refer to Mounting Fabric Tip Box to attach piece to stretcher bars. Attach picture hanger if desired.