2 minute read
Blower Housing, Cylinder Head, and Breather/Valve Assembly

from John Deere TRS26 Walk-Behind Snowthrowers & Snowblowers Service Repair Manual Instant Download (TM14
by kmd9iso9dkk

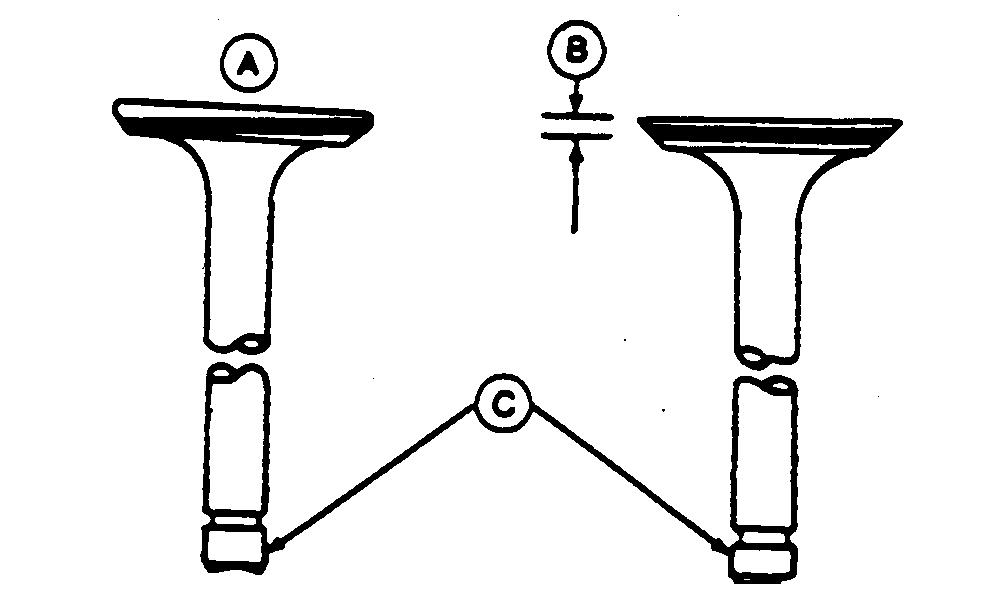
Inspect Breather
1. Clean element (A) and bowl with solvent. Blow dry.
Advertisement
2. Check that drain hole (B) is open.
3. Check that reed valve (C) moves freely and closes when released.
Remove And Install Valve Assembly
1. Remove cylinder head. (See this group.)
2. Remove intake manifold. (See this group.)
3. Remove breather assembly. (See this group.)
4. Compress valve spring and remove retainer (A).
5. Remove and inspect valve and spring. (See this group.)
6. Install spring and retainer (A).
7. Install valves.
8. Compress valve spring. Seat retainer in groove in valve stem.
Blower Housing, Cylinder Head, and Breather/Valve Assembly
Inspect Valve Springs
1. Clean and inspect valve springs. Replace if cracked or broken.
2. Inspect valve spring (A) for squareness on a surface plate (C). Turn spring and measure space between top spring coil and square (B).
3. Measure free length of valve spring.
4. Compress valve spring. Measure compressed tension and length.
Replace valve spring if not within specifications. VALVE
Inspect Valves
1. Remove carbon from valve head, face and stem with a power-operated wire brush. Be sure carbon is removed, not merely burnished.
2. Check valve for damage. Replace warped valves (A) or valves with less than 0.0312 in. (0.792 mm) margin (B).
3. Grind valve stem ends (C) square before valve-to-tappet clearance is checked.
Blower Housing, Cylinder Head, and Breather/Valve Assembly
4. Inspect valve stem for bend using V-blocks and dial indicator. Turn valve slowly and read variation on indicator. Replace valve if variation is greater than 0.001 in. (0.03 mm).

Analyze Valves
Lead deposits on the intake valve are caused by exhaust gas leakage past the valve, when using leaded gasoline.
Grind intake valve and reface seat to correct this condition.
Use unleaded fuel to prevent lead deposits.
Valve stem corrosion is caused by moisture in the engine which occurs during hot engine cool-down periods or during storage.
Fogging combustion chamber with oil before storage helps prevent corrosion.
Replace badly corroded valves.
Blower Housing, Cylinder Head, and Breather/Valve Assembly
Operating at high temperatures for long periods of time can cause exhaust valve burning. Burned valve will show dark discoloration into the area protected by the valve guide. Another indication is distortion of the margin (A) and face (B). The valve seat may also show erosion.
An overheated engine can cause valve burning. Check for clogged engine cooling fins. Do not run engine with blower housing removed. Also check for worn valve guides, springs or tappets, lean fuel-air mixture or incorrect spark plug.
Use of old or stale gasoline can cause valves to stick.
Gummy deposits (A) build up on valve and can also gum carburetor, requiring cleaning.
Always use fresh gasoline and drain fuel tank, lines and carburetor before storage.
Blower Housing, Cylinder Head, and Breather/Valve Assembly
Measure Valves And Valve Guides
1. Clean inside of valve guide (A).
2. Measure inside diameter of guide with telescoping gauge. Ream guide if not within specifications.
3. Measure outside diameter of valve stem (B). Replace valve if not within specifications.
IMPORTANT: If guide is reamed oversize, an oversize valve must be installed.
4. Replace cylinder head if guide cannot be reamed to specifications.
Recondition Valve Seats
1. Hold the valve seating surface (A) as close to 0.0469 in. (1.191 mm) as possible.